HOLIDAY DONATION DRIVE - SUPPORT MSW - DO YOUR PART TO KEEP THIS GREAT FORUM GOING! (Only 13 donations so far - C'mon guys!)
×


dvm27
-
Posts
2,457 -
Joined
-
Last visited
Content Type
Profiles
Forums
Gallery
Events
Everything posted by dvm27
-
 Sweet work, Mark. So, for those inner flat cuts are you simply drawing lines parallel to the cut line and aligning these with the mill vice jaws? I'll follow with interest as you proceed with your expanded illustrations at the bow!
 -
A model to be very proud of Mike! I'm sure your heirs are already plotting who gets it.
- 452 replies
-
- 5
-

-
- cheerful
- Syren Ship Model Company
- (and 1 more)
-
And you're off, Chris! Pear is a fantastic wood to work with. It's not the worst idea to leave these crucial pieces slightly wider than spec while forming those difficult scarph joints. If the angle of your joint is off by a degree or two it will kick up or down the mating piece by a small amount. Leaving a little extra while mating the joints will give you a bit of leeway if this happens. Curious as to which spindle sander you've chosen. How about the scroll saw blade? The right blade makes all the difference.
-
Beautiful work , Patrick. You must have spent hours turning those studded bolts. If you ever get tired of doing that you can purchase them from the following source. https://model-motorcars.myshopify.com/collections/small-parts-hardware/products/simulated-hex-nut-brass-nickel-plated-05-mm-k099n. They carry lots of different sizes.
-
Sweet work, Mike. A major advantage of scoring the rising wood for the floor timbers is apparent in your model at this stage. Each frame is positively indexed on the keel and there is no chance of cumulative error while assembling the frames. Wish I had done that on my Swan class model. It would have actually made the framing process a lot easier.
-
Not sure what you're asking, Ian. The fitting out instructions are fully illustrated with scale patterns for the items required.
-
You're off to a great start, Cliff. I think one of the great advantages of Ed's system is the ability to exert downward pressure within the hull (using an overhead gantry).
-
Echo by davec - FINISHED - cross-section
dvm27 replied to davec's topic in - Build logs for subjects built 1751 - 1800
Looks excellent, Dave! -
Thanks, Chuck. All clear!
-
I just found three of our 18' cutter plugs which we stopped selling years ago. They are resin cast and faint planking scores are indicated on one side. The most difficult part of building a plank on frame ships boat is making an accurate plug. This solves the problem for you. This 18' ships boat is clinker planked and full instructions are posted on our website http://www.admiraltymodels.com. Cost of the plugs are $50 plus $7 postage, US only please. If interested please send me an e-mail at dvm27@comcast.net. Only one per customer!
-
Tough job, but I know you're up to it Mark. Look at Pandora model by Nareem, a Russian ship model builder http://www.shipmodels.com.ua/eng/models/elite/pandora/index.htm On some of the bottom photos you can see his hook and but planking details (although only partially planked).
-
Like David, I do my dye work off the model whenever possible. However, my wales have been a bit beaten up and need refinishing on the model. I will use both scores and tape when reapplying and mask off everything else. I treat Fiebigs dye like it was toxic. One errant drop could destroy months of work.
-
Swan class 3D model in progress
dvm27 replied to dvm27's topic in CAD and 3D Modelling/Drafting Plans with Software
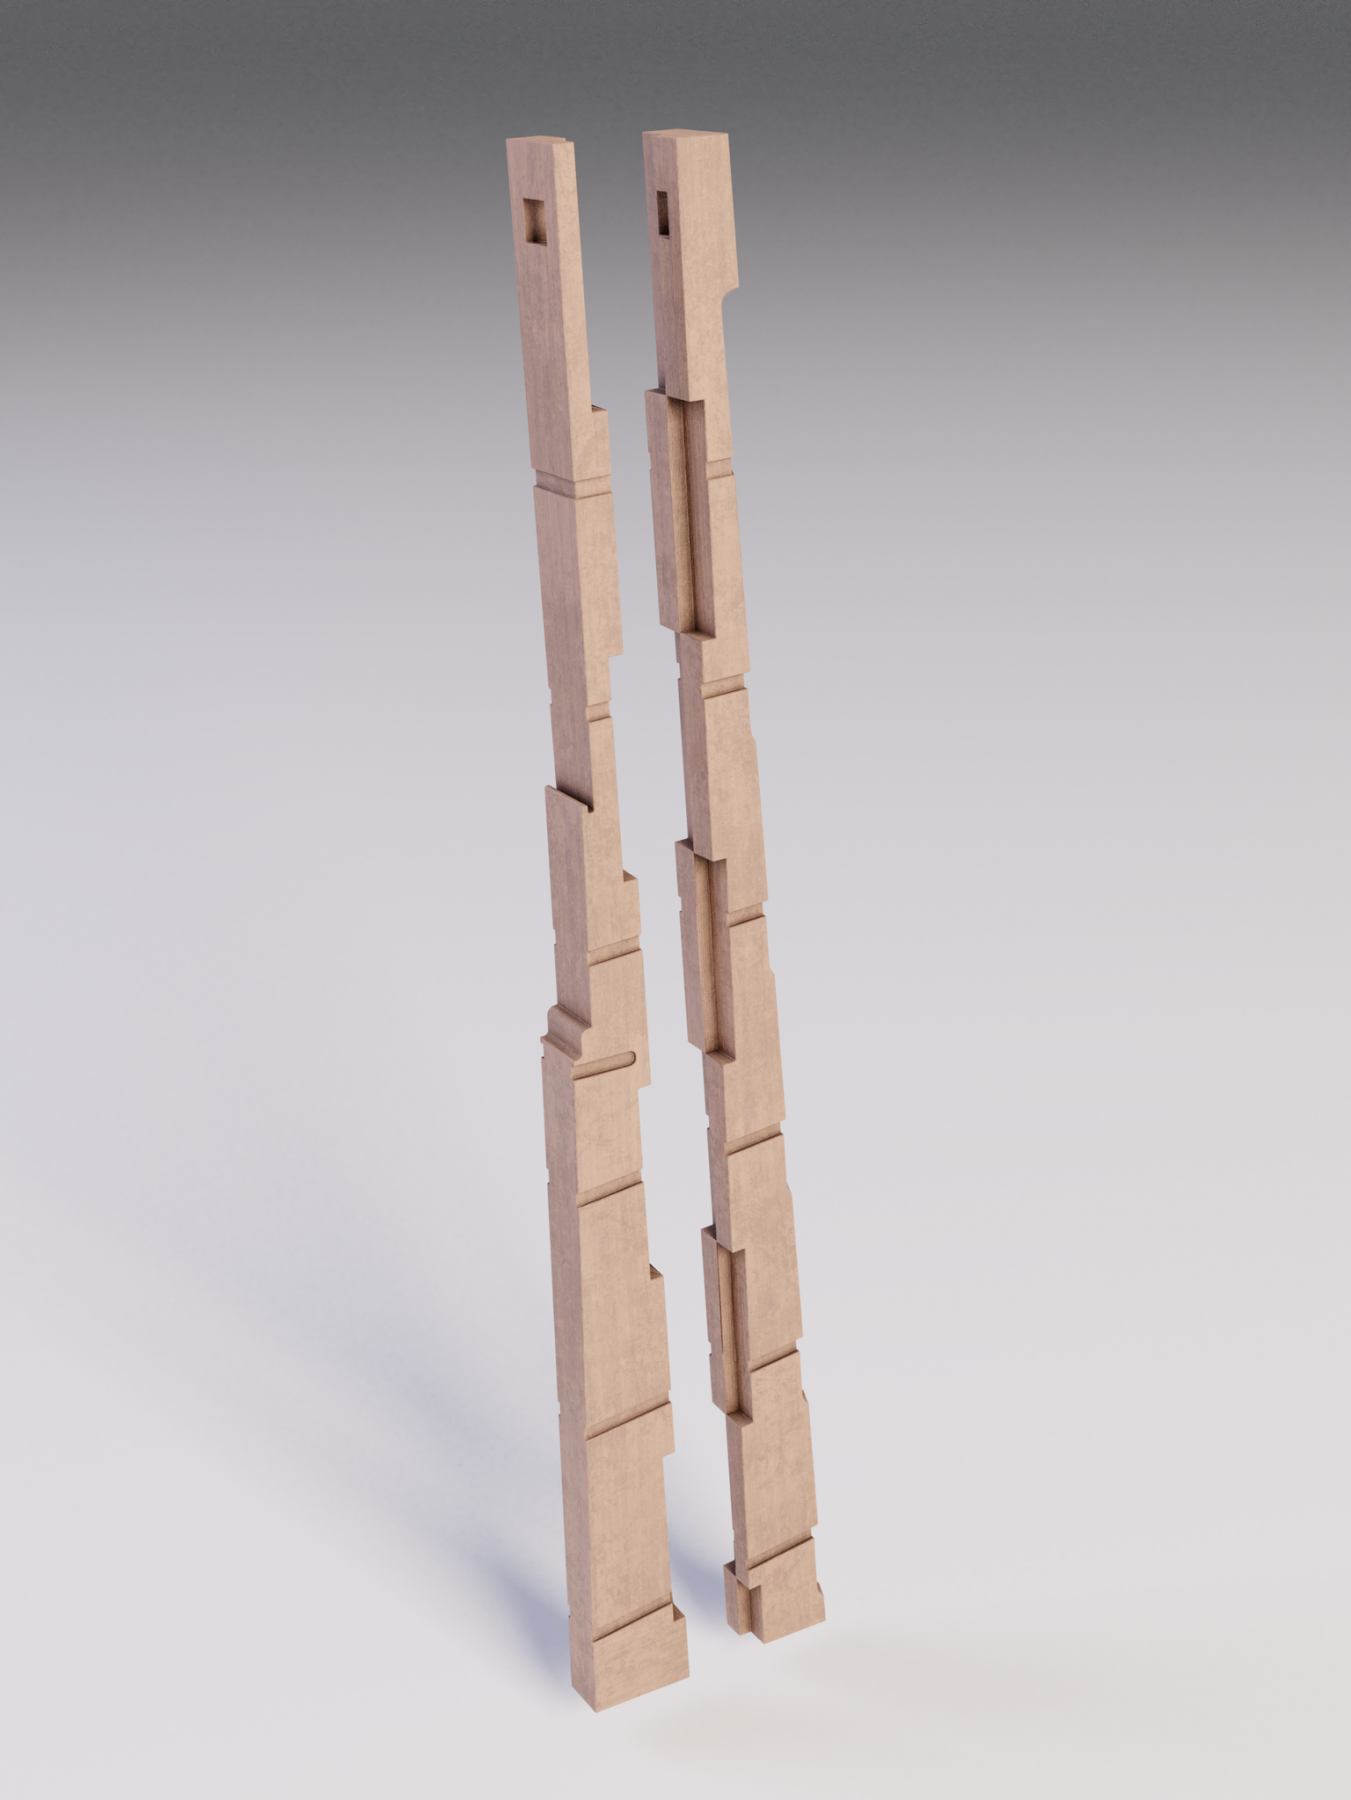
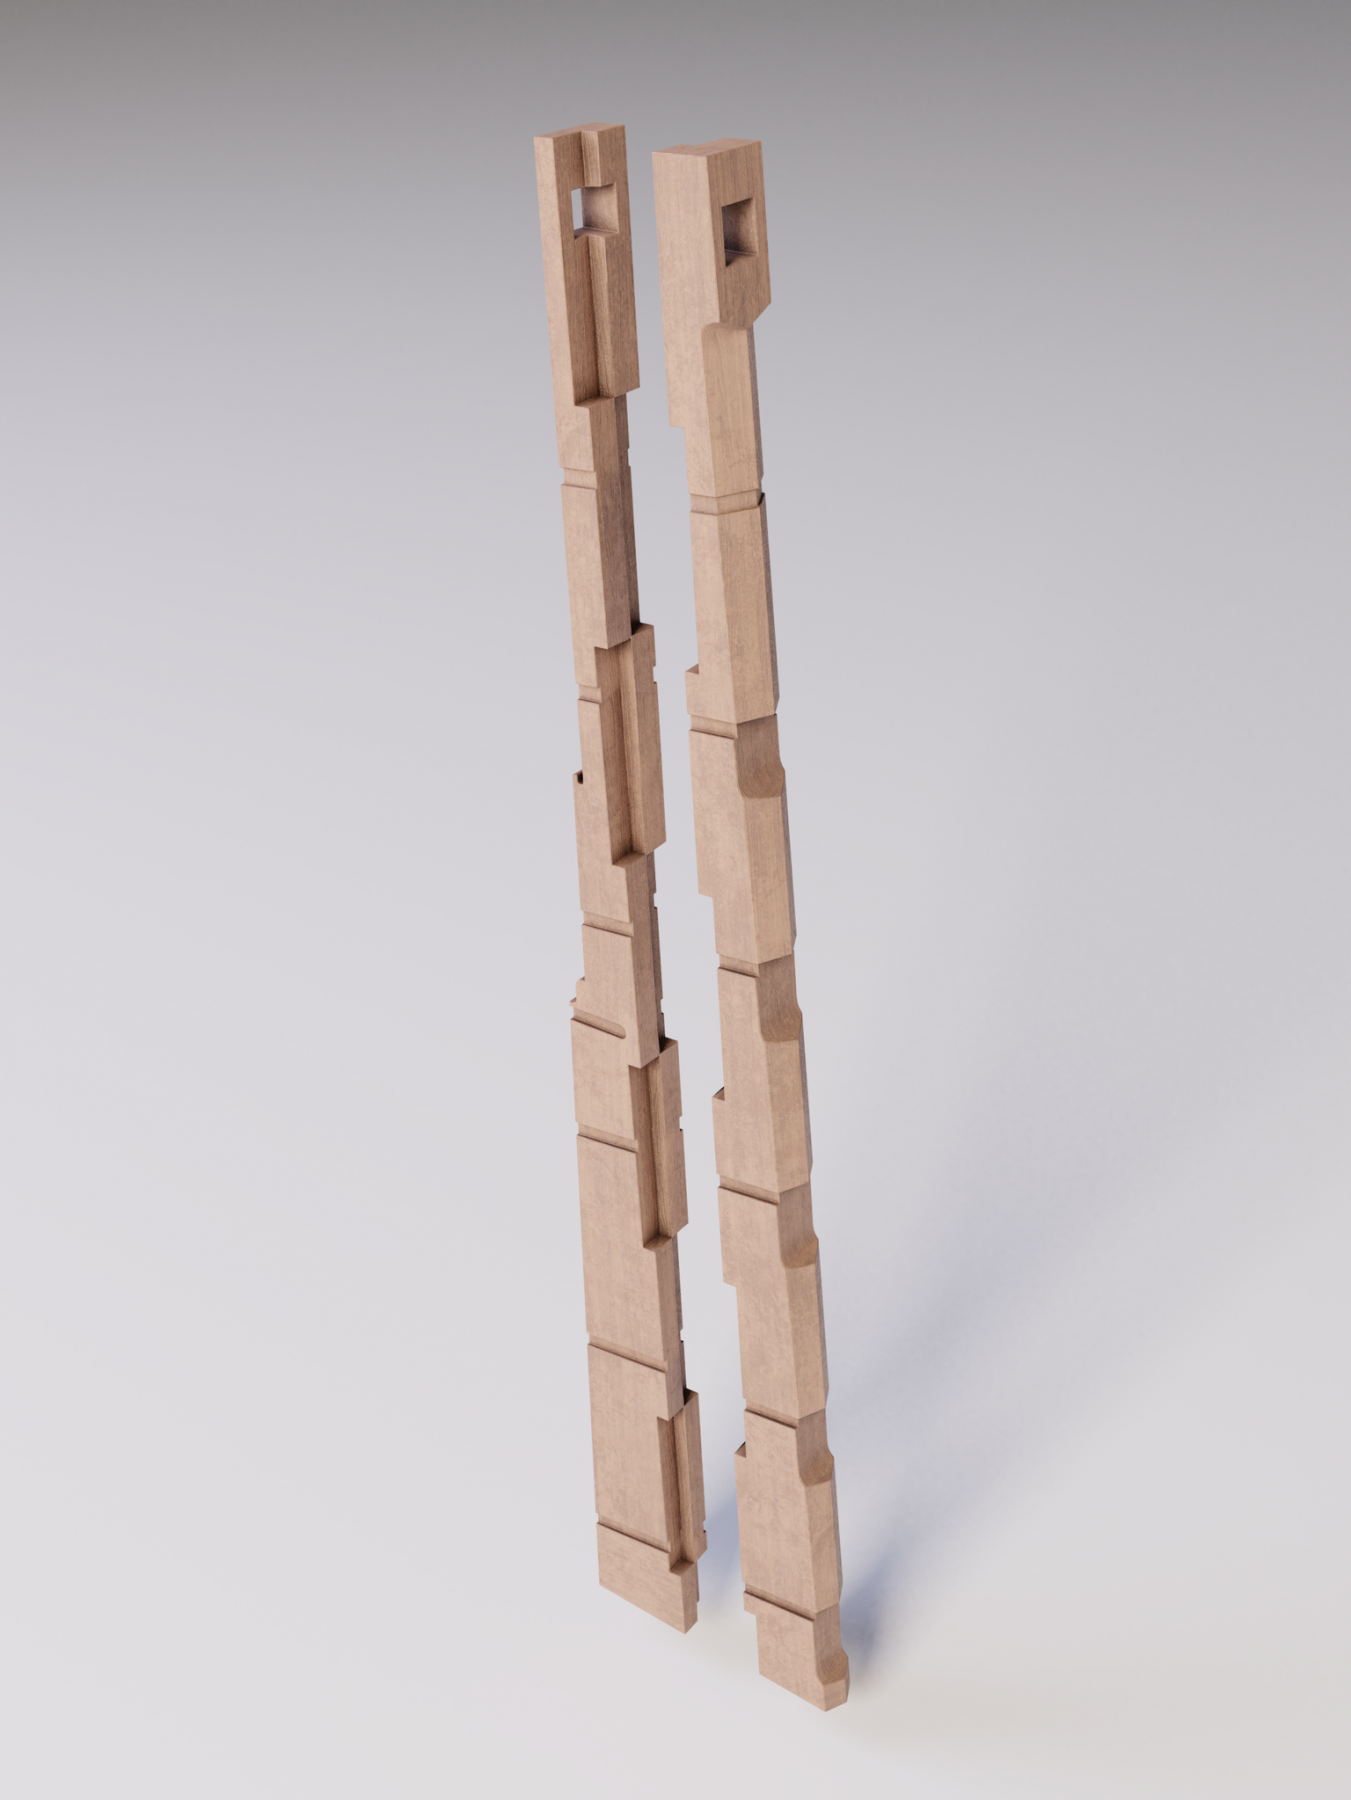
For those of you curious about how an actual rudder was constructed, our resident 3D guru, Denis, has prepared these renderings for our Swan class model. These tabled joints would be very difficult to emulate on model (please give it a go Mark!) and virtually impossible to see unless you could actually visualize both sides of the rudder at the same time. When completed our 3D Swan class ship will offer a more complete (and historically accurate) treatise on contemporary ship building than the AOS series.

- 141 replies
-
- 25
-
-
- pof swan series
- swan
- (and 1 more)
-
Hi Alan. The Master Admiralty Models workshop list mysteriously disappeared from my computer a couple of months ago. But we will post any new workshop information here and on our website.
-
Echo by davec - FINISHED - cross-section
dvm27 replied to davec's topic in - Build logs for subjects built 1751 - 1800
The joints were held together with copper bolts. Size and number were dictated by the size of the scarph joint. Remember that in real practice these joints were hooked, tabled and/or coaked which afforded a tremendous amount of interlocking power when the copper bolts were driven through. -
As we are no longer providing Echo cross-section and fitting out packages or the Swan framing wood package we have decided to make these available for anyone wishing to pursue one of these projects. The information is provided free of charge and available on our website www.admiraltymodels.com. I would be happy to provide a copy of the Echo cross-section plans, including shear and frames, Power Point build presentation and numerous photos of my model in progress. These are very large files and I will provide them on a USB thumb drive for $25, plus postage. Thanks to all for the great response and helping me close out inventory. Now, back to Speedwell for me!
-
Pandora by marsalv - FINISHED - 1:52
dvm27 replied to marsalv's topic in - Build logs for subjects built 1751 - 1800
Could you share your method of making the woodling hoops? They look very good! -
I’ll post the wood list for the Swan framing and a Echo cross-section to our website over the weekend. Thanks to all who ordered plans during our close out sale. I’m a bit overwhelmed by the response but will fill all your orders shortly.
-
Michael Mott mentions brazing vs soft soldering in a recent post. This begs the question how important is silver soldering at this scale? Do rigging stresses often cause soft soldered joints to fail? What other applications would favor brazing over soft soldering on our models? In my experience, I have found that soft soldering is easier and has a higher rate of success than brazing but perhaps because I do it so infrequently.
-
Admiralty Models Closing and Sale David Antscherl and I formed Admiralty Models over fifteen years ago to provide plans, support and products for those wishing to try their hand at scratch building. Along the way we have lofted several plans, published many books, hosted over a dozen workshops and offered timbering packages to that group of ship model makers whose dream it has been to build a fully framed model. We have truly enjoyed this experience and are very grateful for the level of support shown to us by the ship model community. All good things, however, must come to end and thus David and I have decided to close Admiralty Models. Ironically, our hobby business has been seriously reducing our personal hobby time. To facilitate closing we will be reducing prices on our plans by 25%. This will deplete our inventory (hopefully). We will still keep our website www.admiraltymodels.com open as there is ship model making reference material and photographs there. But we won’t be selling any products. So, if you have been thinking of building a Swan or Echo fully framed or cross-sectional model, you may wish to purchase your plans while they are still available. Prices are as follows: Swan plans (Mylar and USB drive) - $131.25 (regular $175) Echo plans (Mylar and USB drive) - $93.75 (regular $125) Masting and sparring plan (Mylar) for above - $37.50 (regular $50) Postage: US $5, Canada $10, Overseas $22.50. No extra charge to combine items for shipping. Ordering: PayPal payment to dvm27@comcast.net or check to Greg Herbert, 3739 Spring Lake Lane, Owings Mills, MD 21117 Admiralty Models will still conduct workshops if there is sufficient interest. If you have not attended one before please send me an e-mail and I’ll update our Master List. David and I wish to thank Model Ship World and all of those who have supported Admiralty Models over the years. In addition we wish to thank Byrnes Model Machines, The HobbyMill and Syren Ship Models for their collaboration and support over the years. Our little niche business has succeeded beyond our wildest expectations! Greg Herbert and David Antscherl www.admiraltymodels.com
- 28 replies
-
- 16
-
-
Welcome back, Mark! Your ingenious problem-solving solutions are always instructional for the rest of us.
-
Look a bit closer and it's even more impressive Pat. The starboard gudgeons (on the planked side) are much thinner than on the unplanked port side. An elegant solution to a half planked hull!
-
Brilliant, Ben! So, are you going to carve those beautiful toptimber profiles in place or fake them by adding them later (as most of us have done). If you are doing the latter I'd recommend removing them now as its much easier to get a fair toptimber line without them.
-
Even on close examination it's hard to see. Quit while you're ahead Mike!