HOLIDAY DONATION DRIVE - SUPPORT MSW - DO YOUR PART TO KEEP THIS GREAT FORUM GOING! (Only 44 donations so far out of 49,000 members - C'mon guys!)
×


dvm27
-
Posts
2,459 -
Joined
-
Last visited
Content Type
Profiles
Forums
Gallery
Events
Everything posted by dvm27
-
 Beautiful, Rusty!
 -
Well done, Ben. I see you decided to ignore Druxey's advice and execute the hawse holes afterwards (as I have). Please mark them out carefully and triple. check their positions. There's a bit of an optical illusion from the side but the outer one is slightly lower from the bow view. Start with a very small hole and gradually expand them with Swiss files. I purchased one that was the exact diameter of the hawse holes to avoid ellipsing them.
-
Alan, During the process of building a fully framed model I occasionally arrived at a place where the stress overwhelmed the fun of doing a hobby. At those times I took a break to work on other projects. Sometimes for a week, sometimes longer but when I came back to it the stress was gone and the work improved.
-
I also love this book Michael. It packs a lot of information into the smaller format and referencing the SLR numbers is a great bonus. This is supposed to be the first of a series on the collection. Let's hope so!
-
The symmetry looks very good, Toni. Your should have a nice run of lights when you've completed this extremely challenging area.
-
Love the scarph jig and everything else, Mark! I don't think you can prevent all spring-back. I've always followed Harold Hahn's advice of boiling and clamping over a shaped mold that has too much curve. This allows for natural spring-back after the piece has dried.
-
Looks like a piece of furniture, Michael!
-
Looking very good, Ben. As long as you're using those as practice pieces I'd recommend a test go at the hawse holes too. They can be very challenging and you only get one shot at them!
-
ancre LE BONHOMME RICHARD by Jeronimo - FINISHED
dvm27 replied to Jeronimo's topic in - Build logs for subjects built 1751 - 1800
Wow, Kurt, that last photo demonstrates the finest possible example of the model makers art.- 662 replies
-
- 2
-

-
- bonhomme richard
- frigate
- (and 1 more)
-
Excellent planking work, Toni! Just curious - were those holly striations visible befor the application of the finish? I've learned to look at my holly with a strong light before using it for just the same reason. Good luck with the stern. It's like a 3-d puzzle with no reference points.
-
Beautiful, Remco. Same sanding stick, just a helluva lot smaller, for the sweeps. For those who haven't done this before make sure the sandpaper (rubber cemented on) does not extend to the opposite port.
- 1,215 replies
-
- 8
-
-
- sloop
- kingfisher
- (and 1 more)
-
Congratulations on the completion of yet another beautiful model. Your friend is very lucky to receive it.
-
Darn, Pete, I'm getting tendinitis of my finger from hitting the like button. Ship's boat and sails are as perfect as the rest of the model. Do you keep your models or sell them?
-
Harriet McGregor by Boccherini
dvm27 replied to Boccherini's topic in - Build logs for subjects built 1851 - 1900
Beautiful capstan and also execution of those joggled planks! Greg -
As a very small hobby business owner (Admiralty Models) I can understand why the Hobby Mill takes only checks. PayPal fees, as well as credit card fees, are rather exorbanent. If you're already working on a small profit margin it becomes that much less desirable. If you incorporate these services into your business you have to raise prices to cover them. But I certainly agree that foreign payments become rather awkward to say the least.
-
THE BLACKEN-IT TRIALS
dvm27 replied to Erebus and Terror's topic in Metal Work, Soldering and Metal Fittings
Brilliant, this one's a keeper. -
You have a surgical light in your basement? I am also speechless...and jealous! Greg
-
Nice job on the top and butt planking, Toni!
-
Thanks for your interest Ben. As you'll find out, building a fully framed model is very intense and I found myself needing a bit of a break after finishing her framing. Workshops, Echo cross-section and mentoring have kept me pretty busy though and I'll surely get back to her in the near future.
-
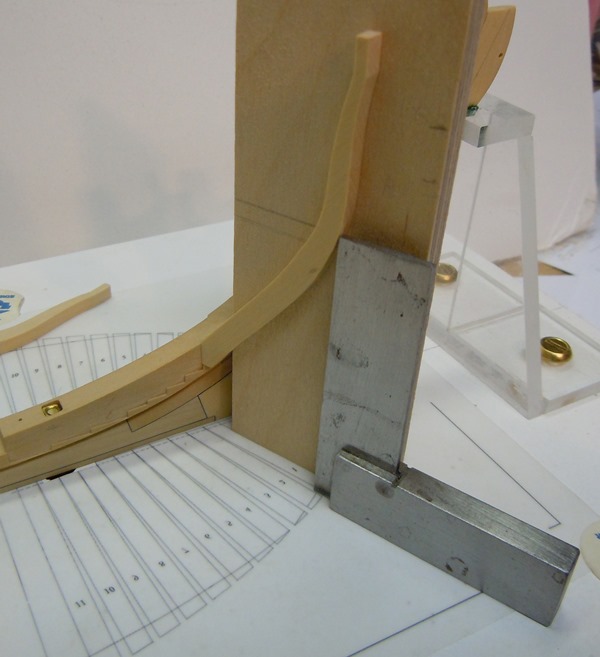
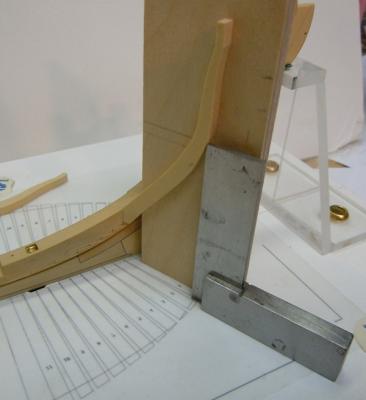
As the ever-knowledgeable Druxey suggests, something like this setup works. I use thin ply set up at 90 degrees to the building board (wood triangles glued on back) and a steel square. Place the bottom edge of the wooden angle jig (or card) on the face of the line delineating the fore face of the cant and use the steel square to set the height of breadth. This gives you two points of contact to hold the cant while spot gluing in place. Once it's set you might even drill for the treenails. This way you can easily re-position it later on.
- 889 replies
-
- 11
-
-
Finish the rigging on Cutty Sark
dvm27 replied to Toshimoriguchi's topic in Masting, rigging and sails
It might help if you were to furnish photos of the ship as she in her current state as well as the scale so we could better understand how to meet your expectations. Is it plastic or wood? Scratch or kit? -
No worries, Alan. Just be sure to offset the keel from the center line by a smidge so it sit's dead center. Scribe a line down the middle of your building board, set the keel on it so that the fore and aft ends are dead center then place marks in the holes. Ed T's jig is fabulous but overkill for a small section such as this.
-
HMS Druid by Krug - FINISHED - 1:48 - Hahn
dvm27 replied to kruginmi's topic in - Build logs for subjects built 1751 - 1800
She's looking beautiful, Mark. I wonder how she sailed? She's a bit of a tub with that bluff bow. Not surprising since she was a converted mercantile ship. -
Donald McKay by rwiederrich - clipper
dvm27 replied to rwiederrich's topic in - Build logs for subjects built 1851 - 1900
Great start. Did you finish the other two clippers you were working on? The only one I see in the completed gallery is Cutty Sark -
By George I think you've got it!