HOLIDAY DONATION DRIVE - SUPPORT MSW - DO YOUR PART TO KEEP THIS GREAT FORUM GOING! (Only 53 donations so far out of 49,000 members - C'mon guys!)
×


augie
-
Posts
4,669 -
Joined
-
Last visited
Content Type
Profiles
Forums
Gallery
Events
Everything posted by augie
-
 Just realizing from that last photo that she really has a bluff bow. Looking forward to seeing the placement of the head rails and rigging!
 -
Good to see you back at it Patrick.
-
OK, stop gloating and get to the starboard side NICE!
- 1,756 replies
-
- 2
-

-
- constitution
- constructo
- (and 1 more)
-
That walnut is really going to make her look first rate. GREAT start. Nice collection of gifts there!
-
Great stuff, Sjors. I can almost smell the roasted potatoes in the oven.
- 1,616 replies
-
- 1
-
-
- caldercraft
- agamemnon
- (and 1 more)
-
As we've mentioned, the fillers should handle it. But why not order a replacement anyway? That will give you time to think about it. Don't upset yourself about 'do-overs'. We all have them. That's how we generate the often mentioned 'scrap box'. And if you decide to start over, you can always fill the time that you're waiting for the parts by jumping ahead to something completely unrelated to what your doing. Work on the cannons or ship's boat!
-
No, sorry to disappoint but 91% is 91%. It's regulated so they don't mess with that. Keep in mind that the 91% may not have enough water in it for glue removal. You might actually try cutting it down to about 70% +/-. But hey, if acetone is working.....go for it!
-
Nice going......you're not pulling the shrouds together and the rats have just enough slack. PATIENCE!
- 1,756 replies
-
- 2
-
-
- constitution
- constructo
- (and 1 more)
-
The isopropyl should work Wes, although I've never found it to do a quick or neat job. One thing you might check. It commonly comes in 3 different concentrations designated by the alcohol concentration (the rest is water). Most common is 70%.......but you'll also find 50 and 90%. I use the 90 as you can always add water to cut it. WalMart sells all three. If I had your debonding and computer problems at the same time I'd wind up in the hospital. Hang in there!
-
How about something like this: http://www.micromark.com/wild-honey-static-grass-1-quart,7995.html
-
This warped BF keeps coming up. Check out this latest thread: http://modelshipworld.com/index.php/topic/8964-straightening-ply-keels/?hl=%2Bflat+%2Bkeel It's a matter of degree. With Syren, you are going to be putting in tight fillers between the bulkheads. If done correctly (and it's not hard) this will straighten minor bows in the BF. But it's important to make the decision now. The described technique of wetting one side and clamping allows for the piece to dry evenly. If you wet the whole piece and dry it between glass or wax paper it has a tough time releasing the moisture. Keep in mind you will be making or rigging up some sort of a clamp that will firmly hold the keel straight as you move along in construction. This, along with the fillers between the bulkheads, will usually keep things straight.
-
First off, I'm very glad you started a build log ..... particularly on Syren. Workshop looks good. Glad to see a roll of wax paper! Adhesives ----- I use Tite-bond for most wood glue applications. Almost never apply it directly from the bottle but rather put some on some wax paper and transfer it with a small brush or toothpick. Yes, it can harden fairly quickly. But I also use CA which comes in different viscosities and setting times ..... all fast. But sometimes, that's what's needed. Remember, you can sand PVA ( Titebond and other 'wood' glues) but CA does not like to be sanded. It's so tough you'll sand away your wood before you sand the glue. So always be cautious if you use it. What glue to use where is part of the art. You'll come up with your own preferences. If you ever need to unglue anything (how could that possibly happen ), good old rubbing alcohol from WalMart will work on PVA. It will at least soften it enough to separate the parts. For CA glued parts, acetone will work. If you want something that sets controllably slow, lay in some 15 or 30 minute 2 part epoxy. You won't use it much. It can be removed with rubbing alcohol but only before it sets. Enough about glue. The gaps on the rabbet. Without seeing them it's hard to say. But keep in mind you need a strong joint here as the keel will attach there and the rabbet holds the keel to the bulkhead former. If you do add any glue to fill the gaps, work neatly as you need that groove formed by the rabbet clean to lay in your lower garboard plank. Lastly, make sure your bulkhead former assembly is dead flat before you start adding bulkheads. You don't want to build a banana. And ....... welcome aboard !
-
Looking good. Love the anchors. Now be careful around that stern.
-
Dan makes an interesting point. The door seems to be at the kind of angle we're used to seeing on quarter gallery lights. At this point I'm not sure what would be considered correct. The plans seem pretty clear.
-
She is absolutely coming alive. Congrats to the Admiral on her fiber work!!!! Loving the stove. Smiling over here
-
Chuck's hooks are great strapped to blocks. I'm sure his rope and blocks are excellent from what I've heard. You might want to make a mock up of your complete gun mounting to be sure you order the hooks/blocks in the sizes small enough to give you room to rig the gun tackles.
-
3D Printing - Not Just Yet!
augie replied to dvm27's topic in CAD and 3D Modelling/Drafting Plans with Software
Whether you like the technique or not, it has impressive capabilities. -
Don't count them.......until you're finished. It'll drive you nuts! As David mentioned, leave them just a hair slack. You don't want them pulling your shrouds together as you move up.
- 1,756 replies
-
- 2
-
-
- constitution
- constructo
- (and 1 more)
-
There's no time limit. Just enjoy what you're doing.
-
You may be right Dave. But I'm satisfied with the way they fall at this point. I'm thinking they would look different if the guns were shipped inboard.
- 2,191 replies
-
- 2
-
-
- confederacy
- Model Shipways
- (and 1 more)
-
Thanks all for the domestic advice. Larry - I just use beige cotton sewing thread for the seizing.
- 2,191 replies
-
- 3
-
-
- confederacy
- Model Shipways
- (and 1 more)
-
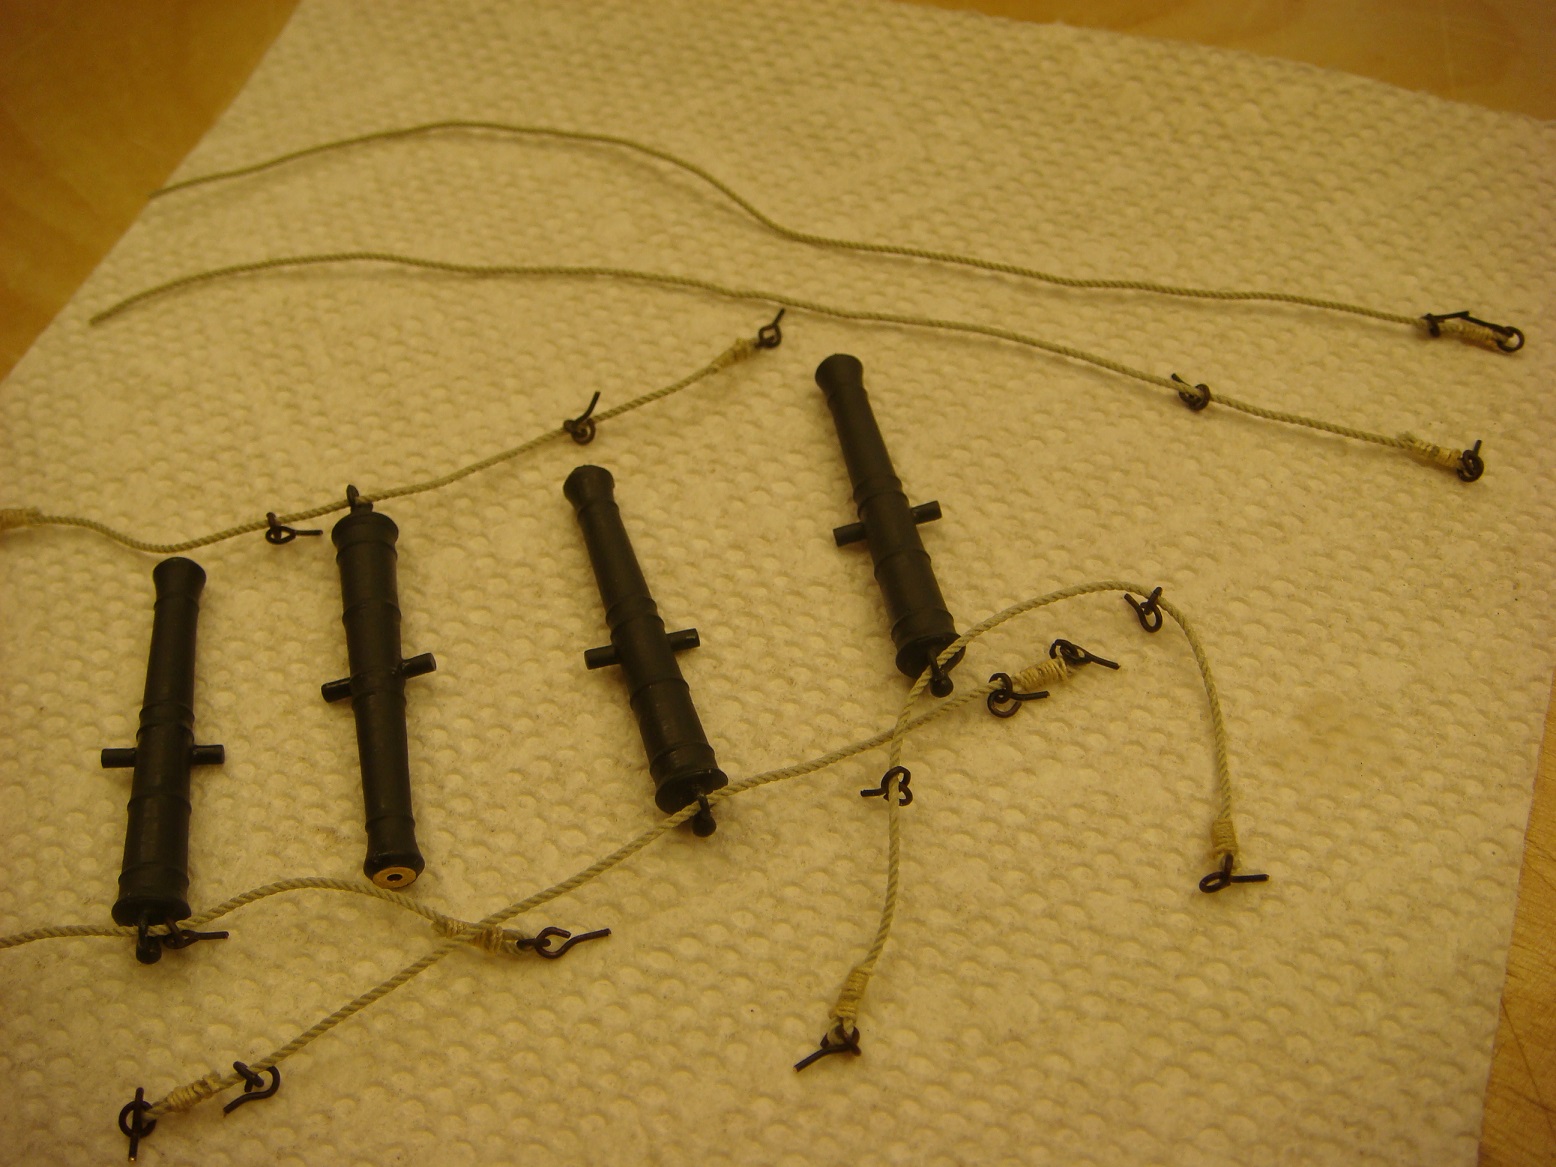
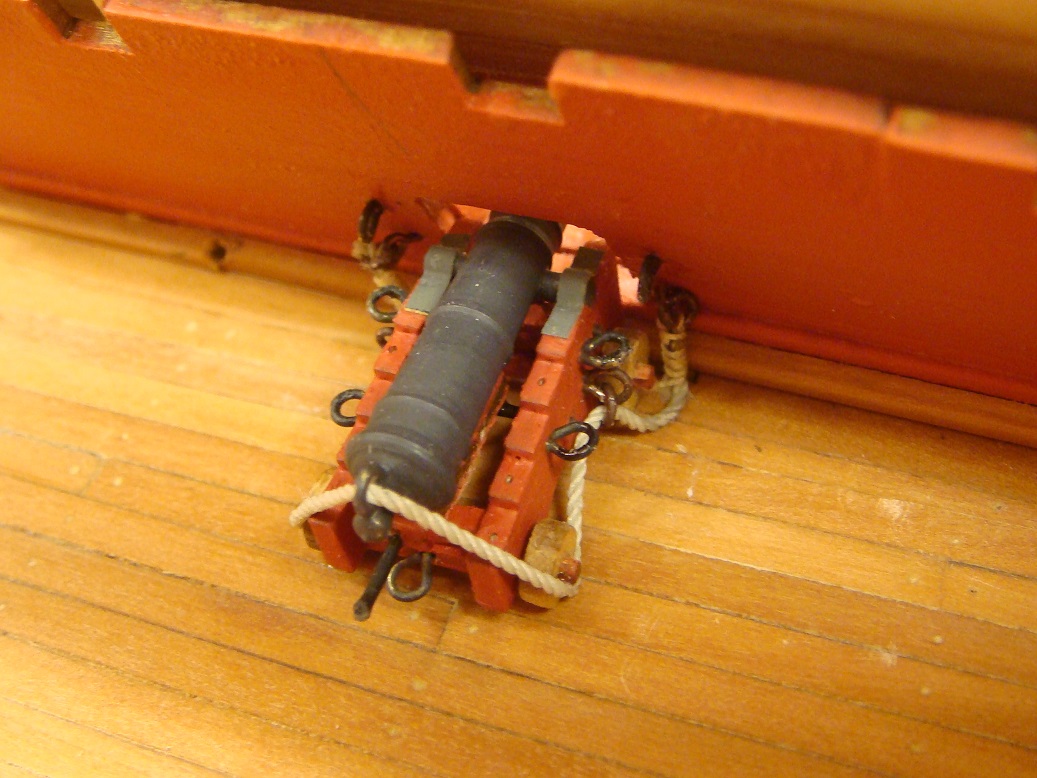
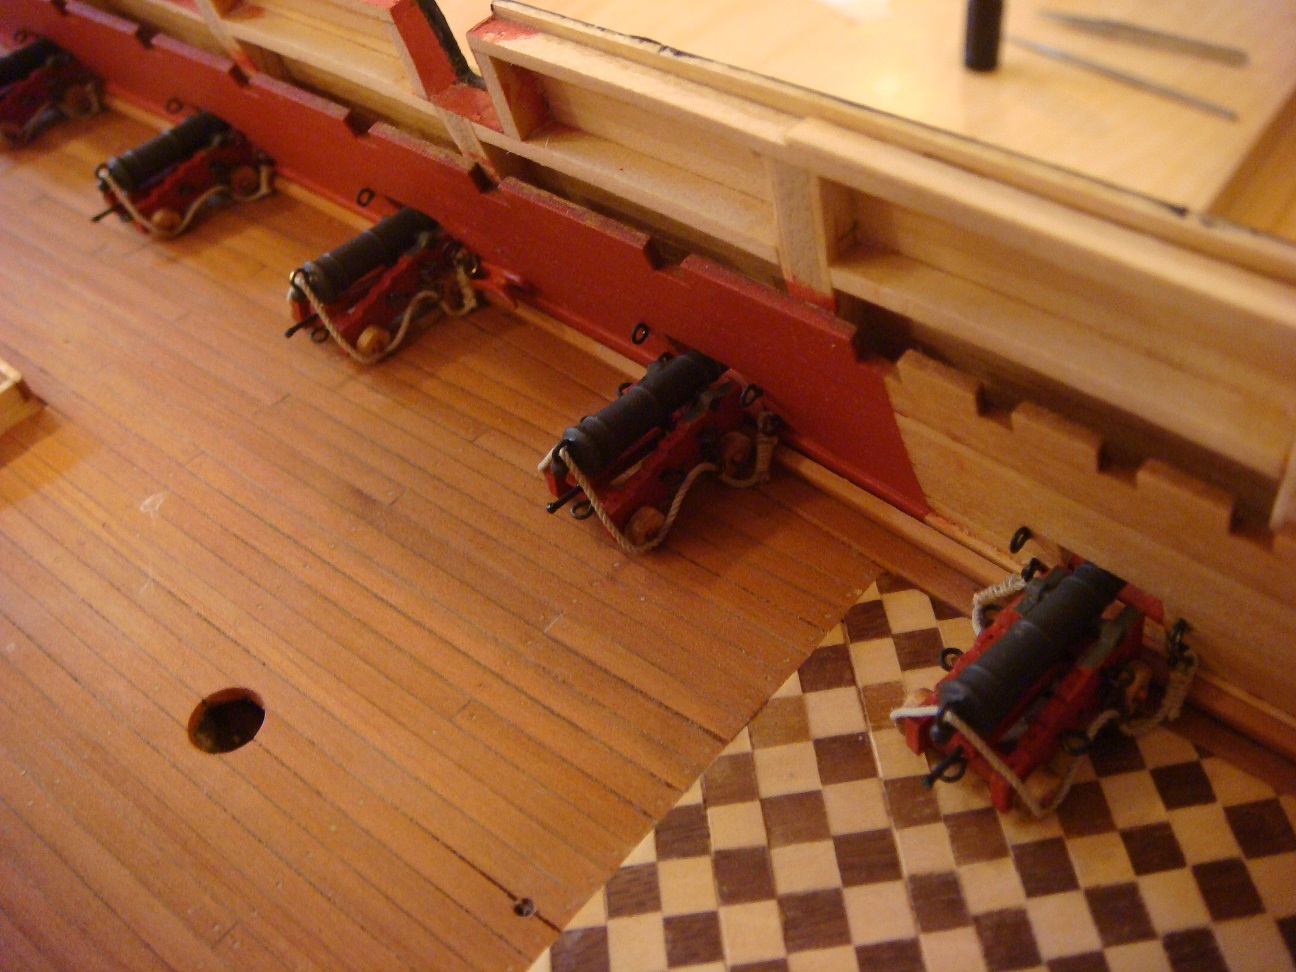
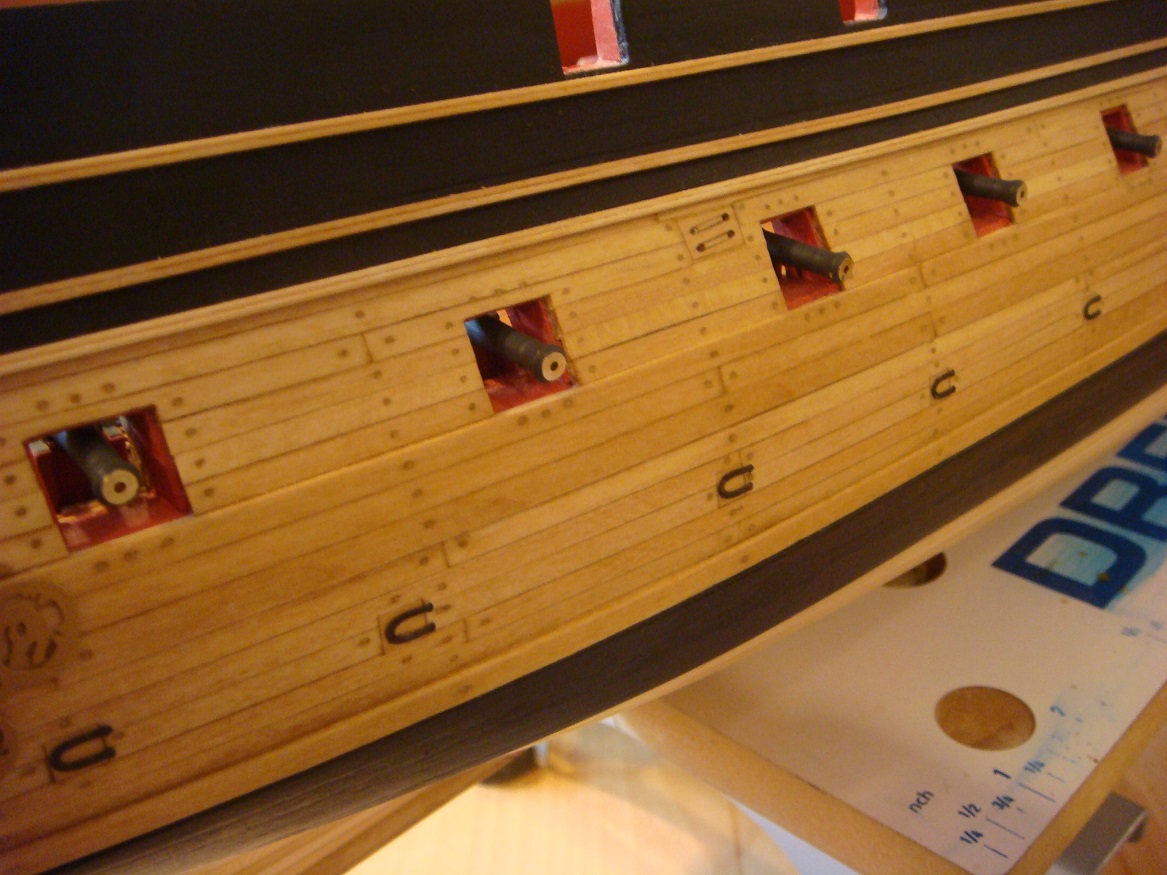
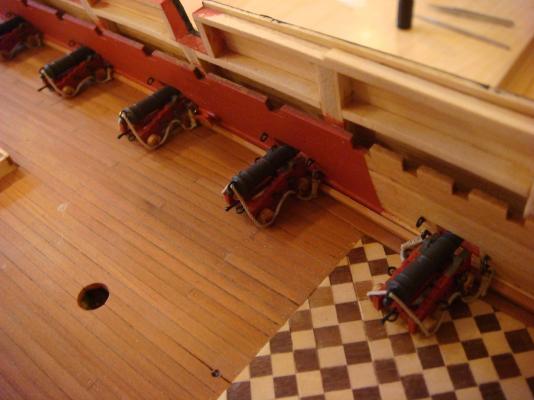
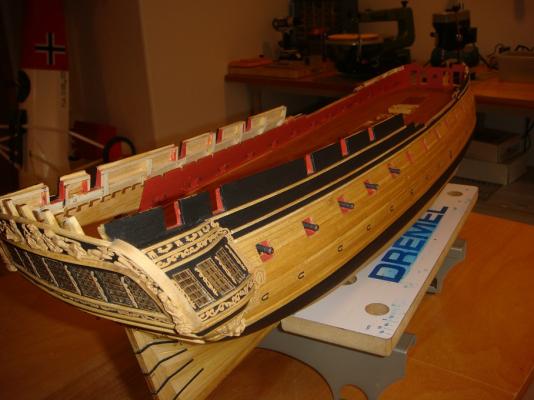
Although the assembly line is still going full throttle, thought it was time for an update. I set up a mock cannon station (thanks, MOBBSIE) to verify the required length of the breech lines. Turns out, Chuck was dead on with 3 1/4", eye to eye. One eyebolt/ring is seized to one end of the line, a second eye/ring slipped on then the cannon (and one more eye/ring). Then the other end is seized to an eye/ring at the exact length. That's 0.018 Morope by the way: The cannon was then glued to the carraige and the loose eyebolts attached to pre-drilled holes. The cap squares over the trunnions were simulated with short strips of 1500 grit sandpaper. I have used painted artists tape in the past but this was much easier. The assembled gun was then glued to the deck and the breech line rings attached to pre-drilled holes in the bulwark: Here are the sternmost 5 guns in position. Keep in mind that these guns will be totally obscured by the quarterdeck overhead: I experimented with the tackles but they just look too crowded to my eye. I'll re-evaluate when all guns are positioned. Here's what it looks like from outside: Finally, Ron from NZ asked for an overall shot: Being a 'few' guns short of a 21 gun salute, I'll get back to work and hope to have then all in by Christmas. No rush ---- I'm having too much fun. Heck, the Admiral (who last wandered over to my side of the shop when I was cutting out the bulkheads) proclaimed 'This looks pretty nice ----- but where do you THINK you're going to put it'? I have about another year to negotiate . Everyone stay well. And keep making my day with your updates.


- 2,191 replies
-
- 30
-
-
- confederacy
- Model Shipways
- (and 1 more)