HOLIDAY DONATION DRIVE - SUPPORT MSW - DO YOUR PART TO KEEP THIS GREAT FORUM GOING! (Only 24 donations so far out of 49,000 members - C'mon guys!)
×


augie
-
Posts
4,669 -
Joined
-
Last visited
Content Type
Profiles
Forums
Gallery
Events
Everything posted by augie
-
 Join the Club!
 -
He's getting faster then Mobbsie, Wayne. I'm figuring with Aggie almost done his next project will be the rest of Nelson's fleet @ Trafalgar !
- 1,873 replies
-
- 4
-

-
- occre
- san ildefonso
- (and 1 more)
-
Yup, John has it right. The sander will take them down then it's just the finer and finer game until they're smooth. You might want to give them a coat of lacquer once you're done to keep them brite.
-
Interesting thread mates. Thanks for all the input.
-
Alistair's method should work for you. I use the MS paints, diluted, and am generally done after 6-7 coats. Dullcoat and a good rub finishes it off.
-
Darn it Popeye......that was the old MSW. New one started in Feb. 2013. I didn't think she went back that far. Glad she's in the gallery.
-
Popeye--- your build log is gone???? Wasn't it on MSW 2.0???
-
The wheels are just stained, Sjors. That's what the master (Chuck) calls for.
- 2,191 replies
-
- 1
-
-
- confederacy
- Model Shipways
- (and 1 more)
-
I have to say that even though I left mine 'bright', I prefer Dirk's method. Mine has been cased now for almost 1 1/2 years and it is darkening nicely but Dirk got there faster!
-
I know it's fiddly work but it all adds up to bring her to life.
-
Sorry about the glitch, Popeye. But knowing you, it'll work out fine. Besides, you do NOT want to disobey your Admiral !!
-
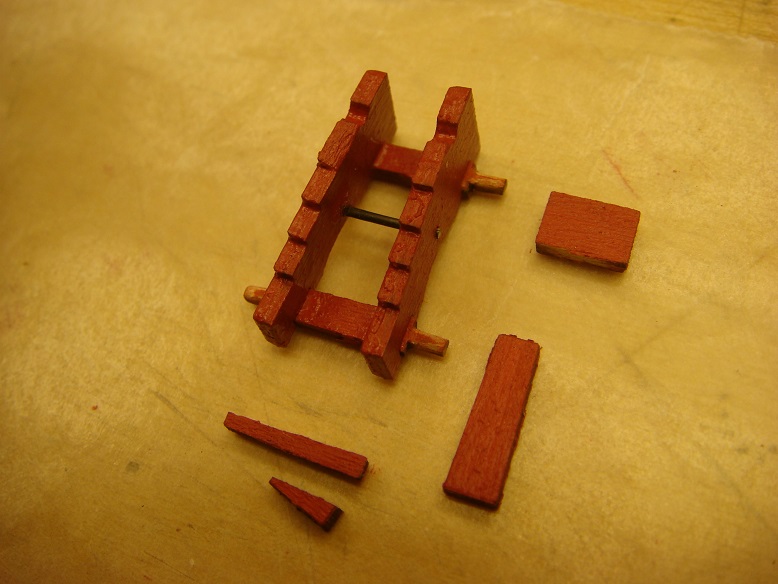
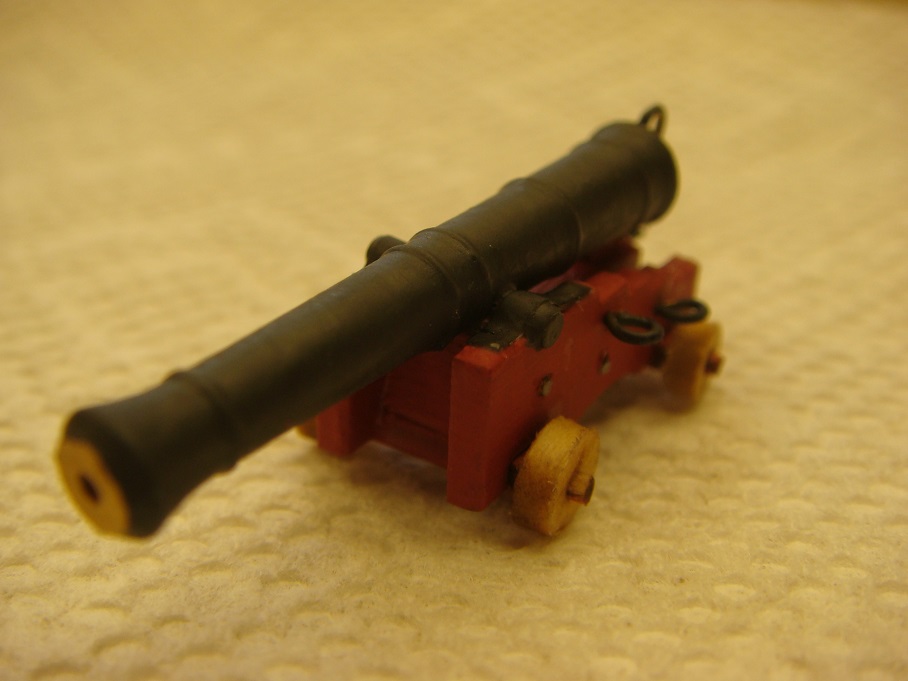
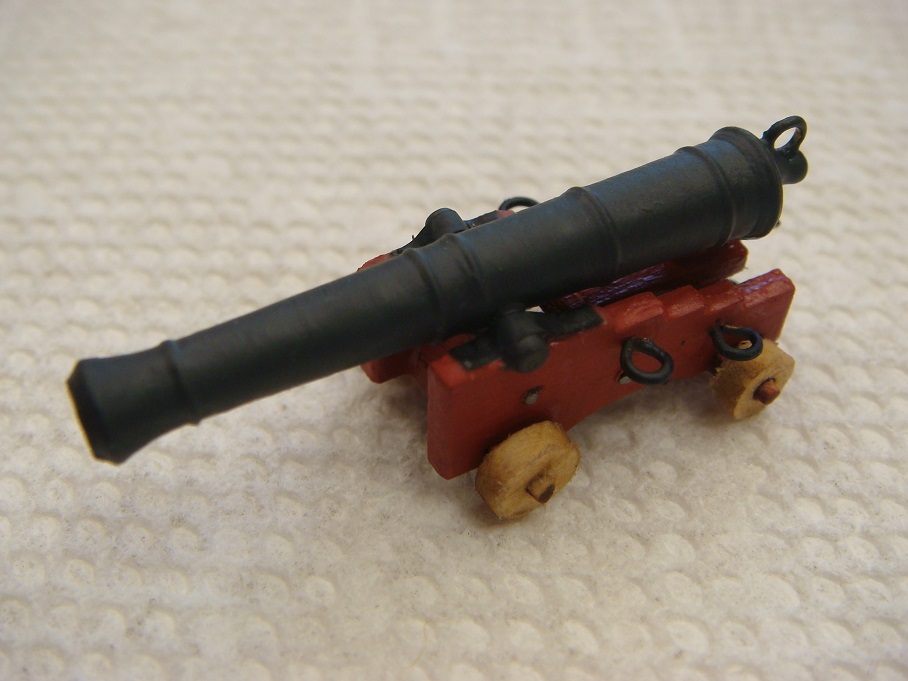
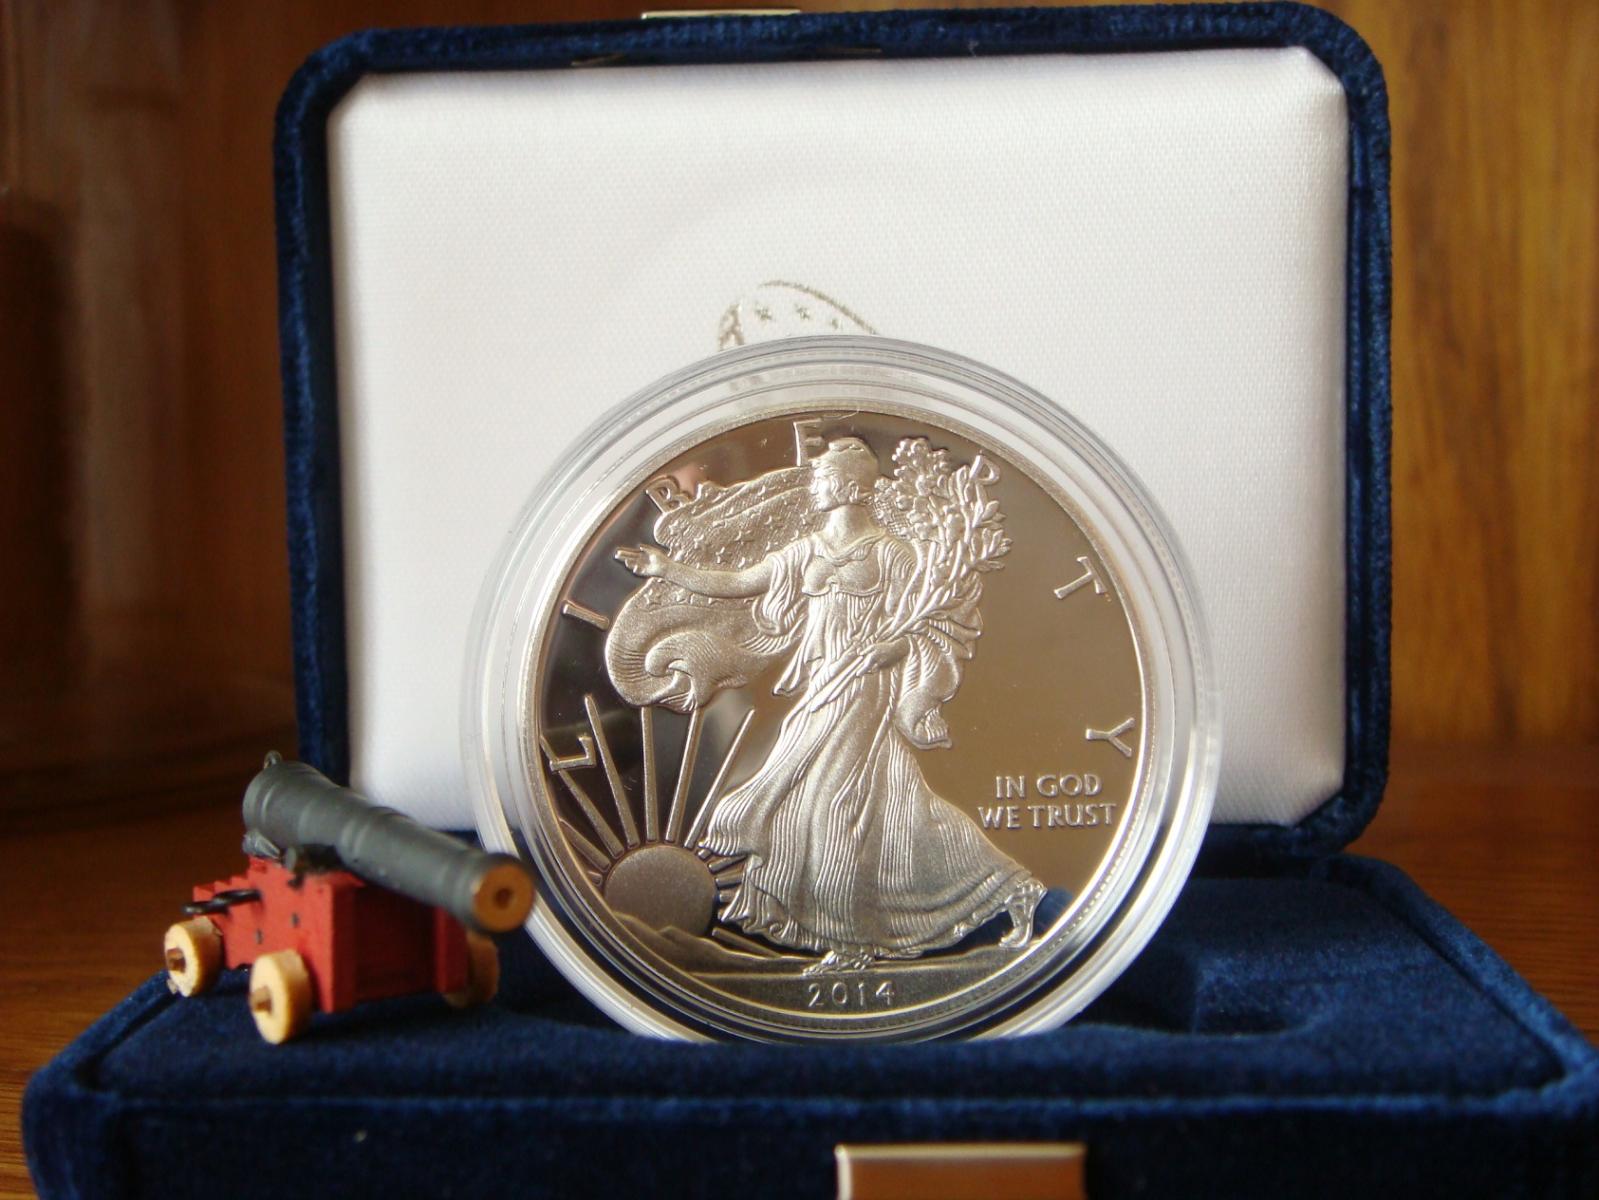
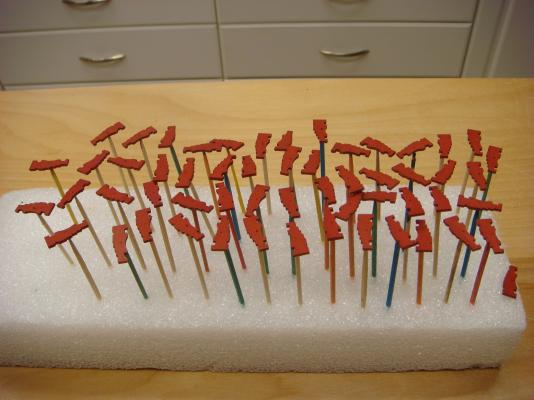
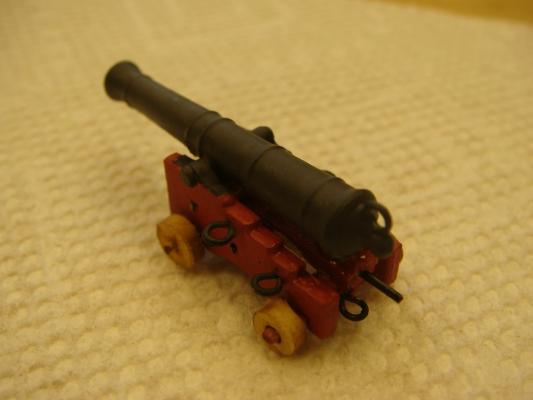
OK, time to have some fun. Mass production of the gun carraiges has begun. Like the guns themselves, the carraige sides also grow on trees: Chuck's carraiges embody quite a few parts. Here are a few ready to go: Before things get too far down the road (I don't like surprises), I decided to more or less complete one 12 pounder to check that everything was going to fall into place. Besides, I have some extra cannon so gun #1 was done to serve as the prototype. It will not be appearing on the model. Here are a few angles: I'm happy to report that she fits nicely into the gun ports from a height and elevation standpoint so now I'm free to proceed with the next 28 !! Take solace in the fact that this mini-model will not go to waste. It's been deployed as a security measure to guard my vast collection of proof silver coins (one, at last count): The assembly line is now in full production mode. Everyone stay well ---- and WARM!


- 2,191 replies
-
- 32
-
-
- confederacy
- Model Shipways
- (and 1 more)
-
I lean toward Alistair's opinion with the far left and that things seem to settle down with time. Just to confuse things further, I don't know what kind of filler you're using but I usually start with a lightly colored product and then modify the color to suit the situation. If it's a water-based filler an acrylic paint will do the job. Naturally it's best to mix up enough for the whole ship and store it until you're done. If it stiffens up you can bring it back to proper consistency with water.
- 831 replies
-
- 1
-
-
- Armed Virginia Sloop
- Model Shipways
- (and 1 more)
-
Looking forward to your 'review' of the airbrush. It's something I've often thought of but never pulled the trigger. Good luck!!!
-
Popeye never ceases to amaze. We should see quite a number of additions to our 'Completed Ship Gallery' next year
-
I dunno Sam...I just point and shoot. Actually, I have a combo of fluorescent and incandescent in the shop. I believe I was on the macro setting without flash. No big deal.
- 2,191 replies
-
- 2
-
-
- confederacy
- Model Shipways
- (and 1 more)
-
Thanks all for the comments and ideas. Lawrence- you can't go wrong having that clear flat acrylic around. I know others use Testor's Dullcoat in either spray or brush-on but I've never found it. This Testor's product is in the Model Master line and I use only the brush on. Dries very quickly and will take that wee bit of 'shine' off of anything. By the way, I just noticed something on that photo. I'm usually pretty lazy and take photos with a paper towel background. For this shot I 'borrowed' a piece of material from the Admiral's stash. That material is actually a light sky blue! It appears my camera and/or shop lighting 'eats' blue. I do have a window in the shop and always carry my parts 'over there' for color matching in natural light. Just something to keep in mind for those of us who work in artificial light.
- 2,191 replies
-
- 2
-
-
- confederacy
- Model Shipways
- (and 1 more)
-
Just catching up on your great log Brian. Looks like you're enjoying this. Great idea working with that 'sample' deck. Avoids a lot of surprises down the road. And heed Alistair's advice on painting planks. It is , indeed, a balancing act and in the end we want to know it's wood under there.
- 831 replies
-
- 1
-
-
- Armed Virginia Sloop
- Model Shipways
- (and 1 more)
-
Crow's nests look pretty darned good to me! That micro chuck looks like a good idea for centering those small bits. I think you'll like that drill press.
-
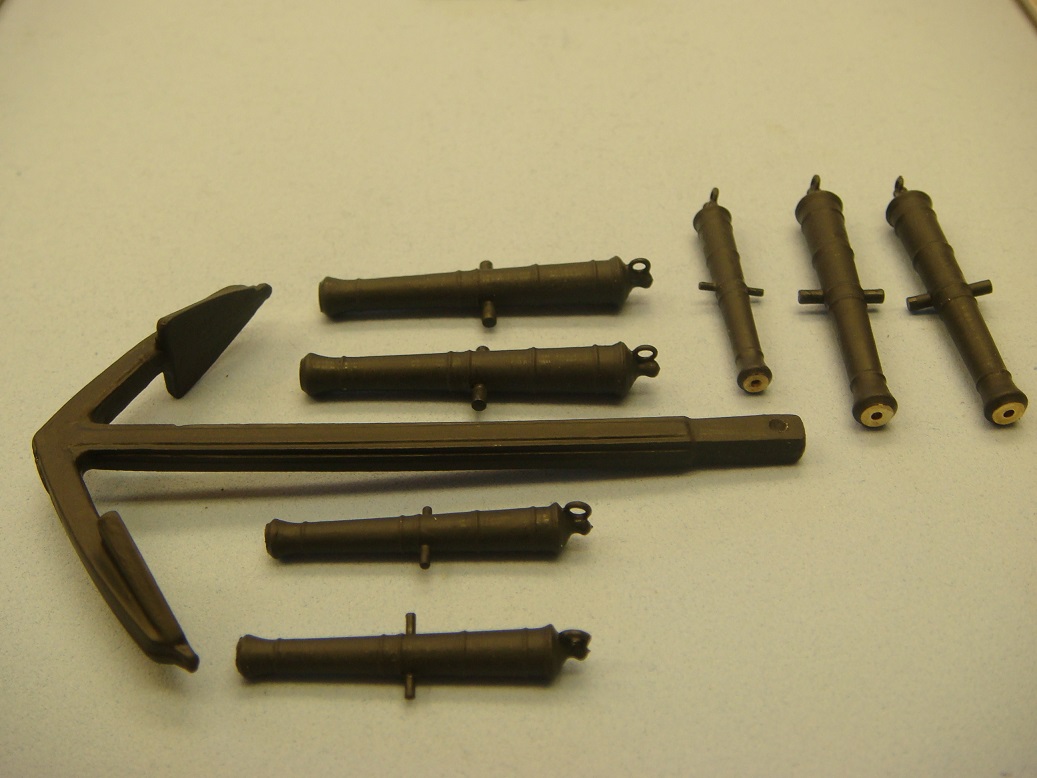
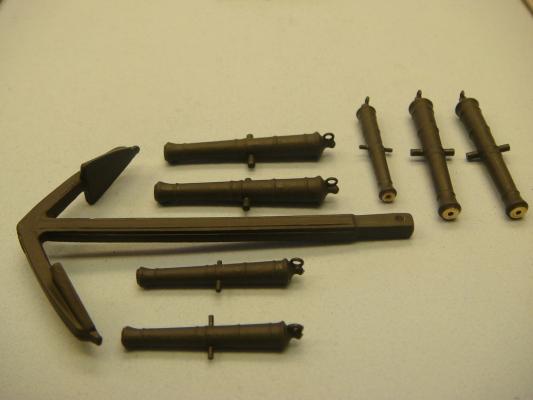
Just a quick update. The cannons have been painted .... and I included the anchors for good measure. Wound up using 8 coats of my black/blue acrylic followed with a coat of Testor's Clear Flat acrylic. Now, before anyone goes ballistic on the brass muzzle faces........ ..... About 1 1/2 years ago, I was very impressed with Mobbsie's treatment of the guns for his Agamemnon. He leaves the entire muzzle section in natural brass as his trademark. It was my thought that a scaled-back reveal of the brass on just the muzzle face might be attractive, if not true to actual practice. As it turns out, I find this approach very appealing but the jury is still out until the guns are mounted in the gun ports. Naturally, I requested Mobbsie's approval on this blatant pilfering of his idea. He was kind enough to offer his tacit approval. Yes, there was some discussion about renumeration for certain taxes on tea that apparently were overlooked a while back....but all has been resolved. Work has already begun on assembly of the gun carraiges. Hopefully, progress by Thanksgiving!!!
- 2,191 replies
-
- 30
-
-
- confederacy
- Model Shipways
- (and 1 more)
-
That turned out to be one fine planking job, Frank. And your weathering makes her look like she spent 200 years in Buzzard's Bay ---- on the bottom!
-
Headrails look great. And the catheads are really nice.