HOLIDAY DONATION DRIVE - SUPPORT MSW - DO YOUR PART TO KEEP THIS GREAT FORUM GOING! (Only 53 donations so far out of 49,000 members - C'mon guys!)
×


augie
-
Posts
4,669 -
Joined
-
Last visited
Content Type
Profiles
Forums
Gallery
Events
Everything posted by augie
-
 Best of the New Year to you and yours as well, Bob. Hope to see this beautiful lady outward bound in 2015.
 -
You don't waste any time! I know there are a few Pride's on MSW but I'll be looking forward to your log. You could certainly tackle Syren now but getting a hull under your belt will give you confidence. When I look back at my Syren now there are a lot of 'woulda, coulda, shoulda's' but it's all part of the learning curve.
-
Gotta love the Admirals ! Mine has been heard to say 'It needs more ropes'
- 1,756 replies
-
- 2
-

-
- constitution
- constructo
- (and 1 more)
-
Looking very good. What size are those in full scale.......12 lb.?
-
After all you've done you're worried about portholes? Start with a small hole and make it ever bigger !
- 956 replies
-
- 2
-
-
- andrea gail
- trawler
- (and 1 more)
-
How about the Model Shipways Pride of Baltimore? She's got pretty straightforward rigging and is at the same scale as Syren so you would get used to working at 1:64. And she's pretty!
- 188 replies
-
- 1
-
-
- constitution
- mamoli
- (and 2 more)
-
Where are you planning to steam to with 13 fuel drums ....... Portugal?
- 956 replies
-
- 2
-
-
- andrea gail
- trawler
- (and 1 more)
-
Looking good John. I usually 'sign' my builds, inconspicuously, with DNA.
-
Very, very nice. And well worth the effort. Now, when can we expect the details regarding the calibration of the compass?
- 515 replies
-
- 3
-
-
- artesania latina
- whaleboat
- (and 1 more)
-
A Happy and Healthy New Year to you and yours, Mobbsie. I'm sure she will stand proudly in her new home. Be sure include a proper plaque to identify both Aggy and her shipwright.
- 1,279 replies
-
- 3
-
-
- agamemnon
- caldercraft
- (and 1 more)
-
Let me take the opportunity to welcome you back on your log. It's great to have you 'home'. Hope that you are improving and that things are returning to normal. Sorry about the gunport dilemma and your solution is right up my alley . Hard to believe you're going to add a second layer over that wonderful planking job....but I AM looking forward to seeing the Cherry. I'm smiling at your return.
-
Welcome home, Aldo. I trust you're feeling better and that things are returning to normal there.
- 2,191 replies
-
- 2
-
-
- confederacy
- Model Shipways
- (and 1 more)
-
Thanks for posting that photo. I'm still in awe.
-
Really first rate, Andy. You nailed the rigging --- I love the footropes. CONGRATULATIONS!
-
So you would slip in both halves and then somehow glue them together? That's either heresy or ...... brilliant!!!!
-
Oh, no question that WOP gives a 'harder', more durable finish. Actually, I use flat acrylic over WOP in many instances....best of both worlds.
-
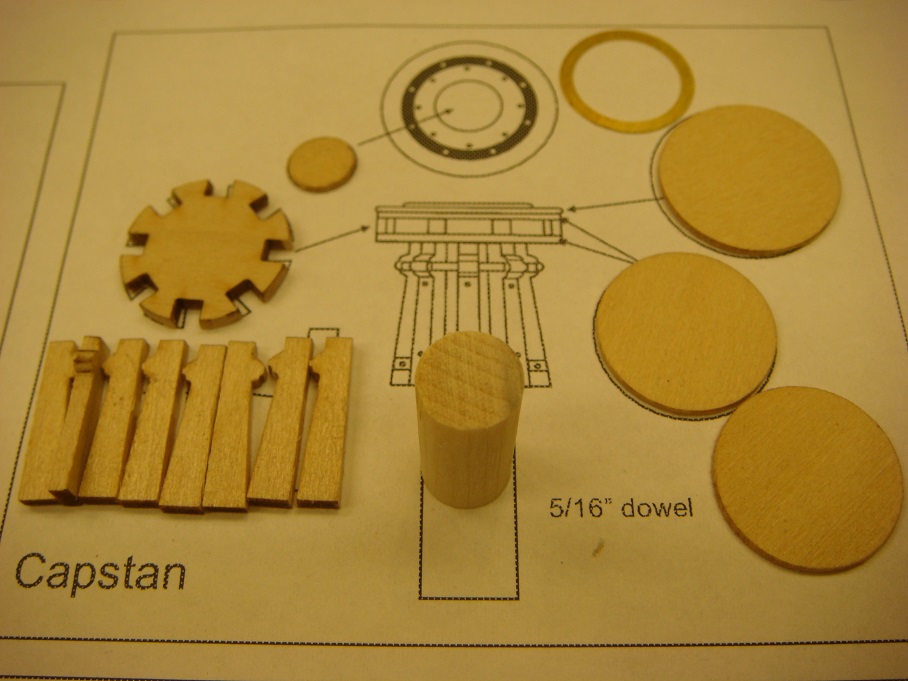
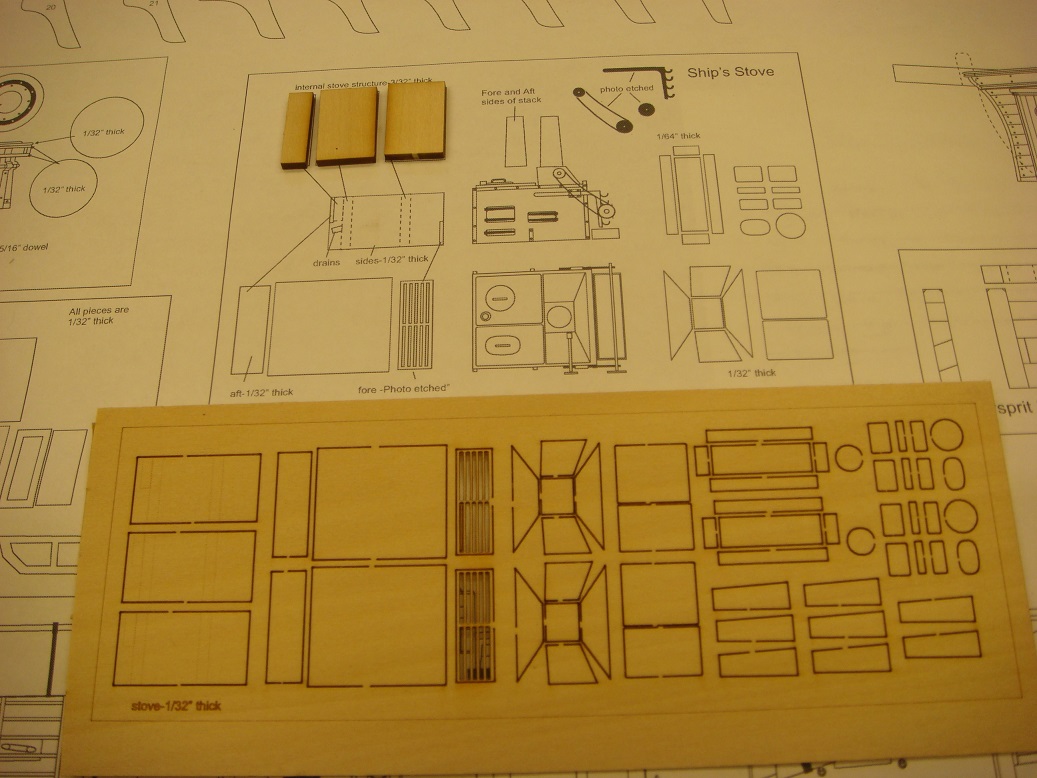
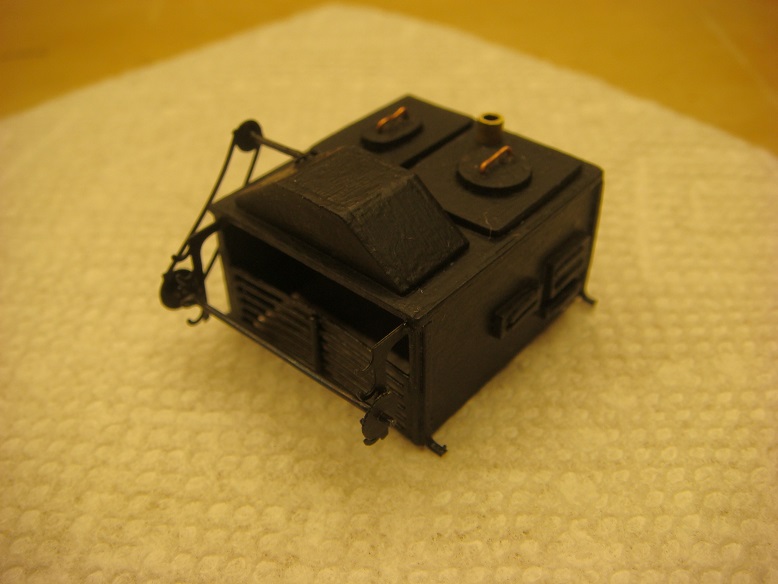
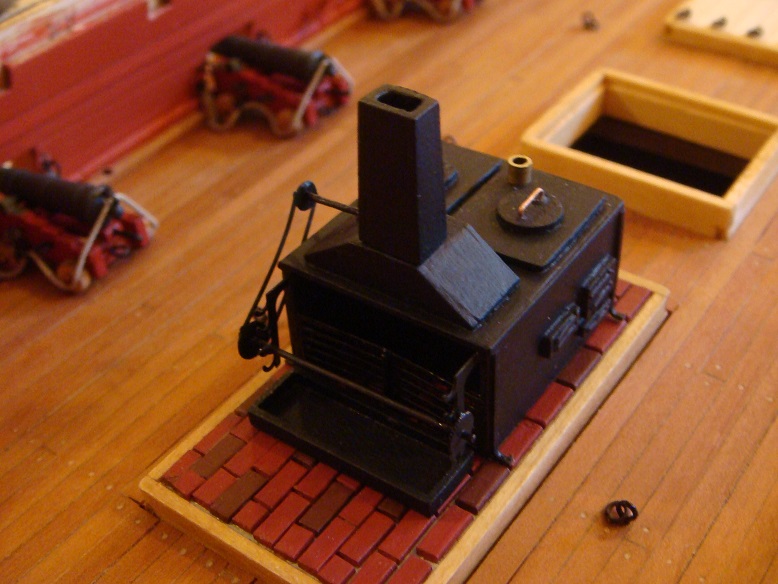
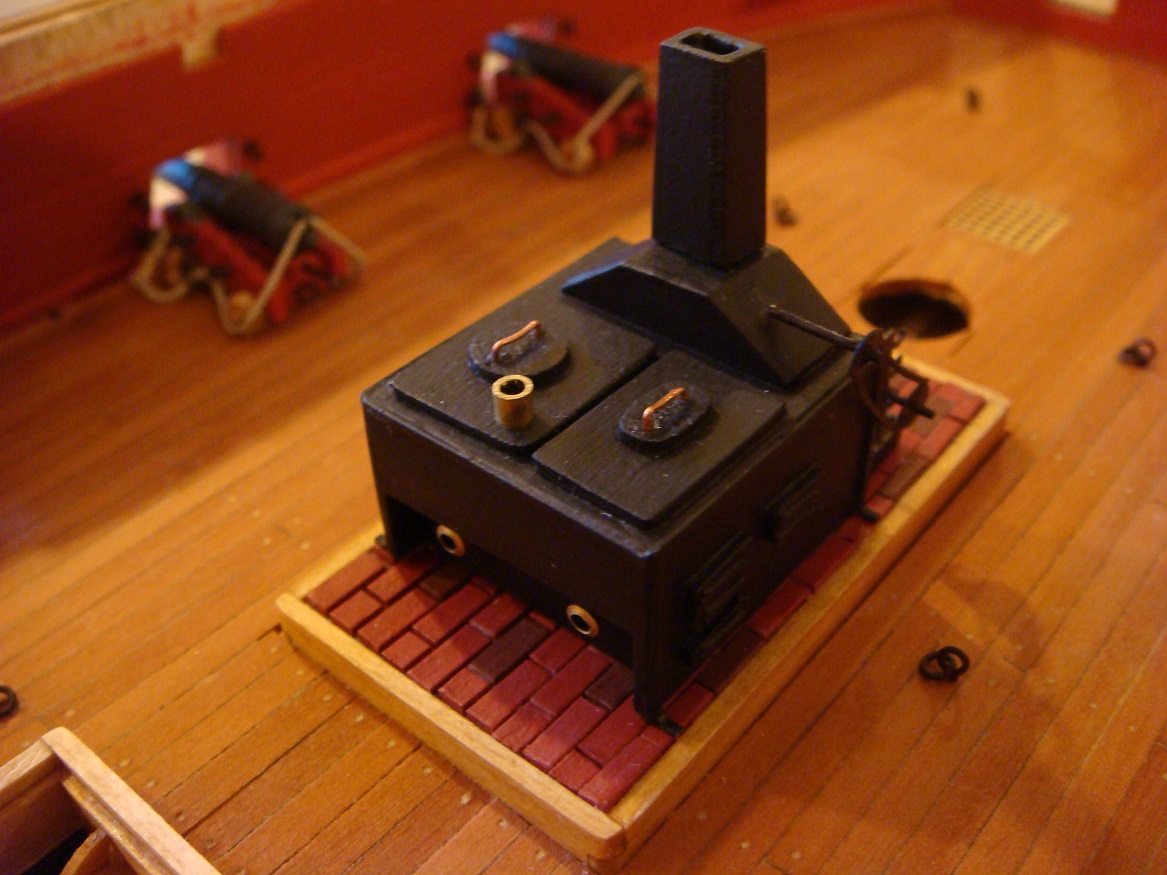
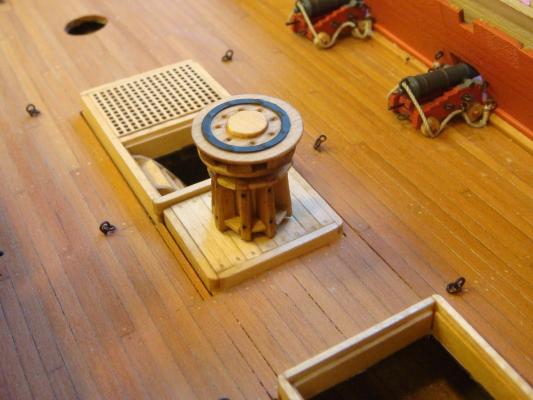
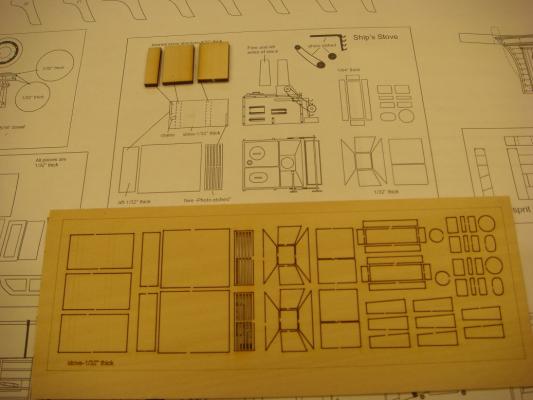
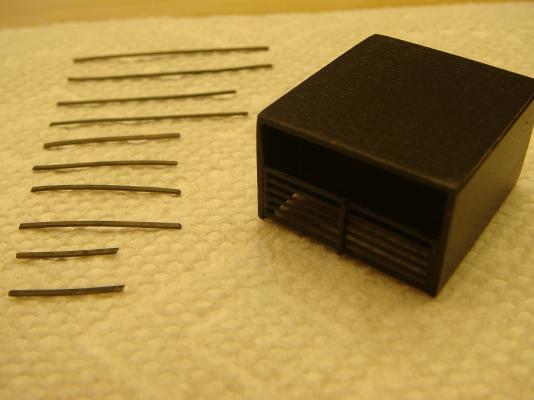
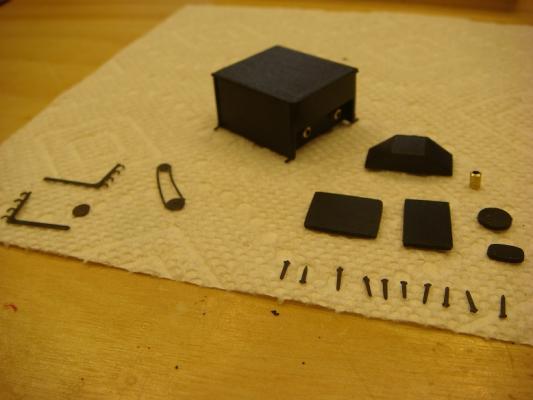
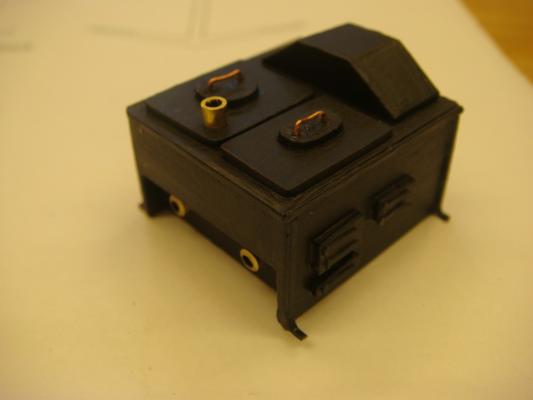
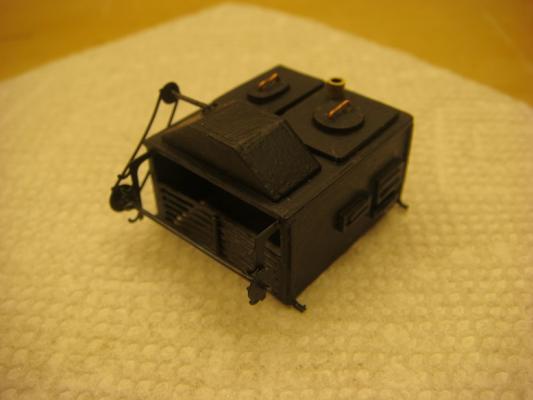
Thanks to all for stopping by and for the kind comments. Alistair - everything for the stove comes in the kit. Buck - on the capstan bolts, they are actually 22 gauge wire. Typo on my part. J Pett - the soliloquy on bricklaying is back on page 81. They are just painted wood strips cut and laid individually. Ken- probably not on the gun deck. I have cannon to rig on the forecastle and quarterdeck later. Jury is still out. Rich - luck has nothing to do with it. Checked Chuck's Practicum before I bought the kit. Popeye - Thanks, I am smiling. But, unlike you, I'm unable to conjure up anything and make it from paper clips, old universal joints and piano wire. Wish I had your creativity. And to all the guys looking for a free meal, no......the stove was too late for the Christmas goose. But I am throwing a 4-July bash and all are invited
- 2,191 replies
-
- 7
-
-
- confederacy
- Model Shipways
- (and 1 more)
-
I've used WOP over water base and haven't seen any problems. That said, I prefer the clear acrylic. Bet that helps a lot
-
Nice gesture on the part of your co-worker. I'd venture a guess that your colleagues are going to be more than surprised when they see what you come up with! Make it a great voyage ---- and HAPPY NEW YEAR!
-
Your techniques just keep getting better and better, Frank. As for realism, when I had my fist look at your sample planks it took me right back over 55 years to a fishing boat I used to frequent back in the 50's. I can almost smell the chum bucket. WELL DONE, mate!
-
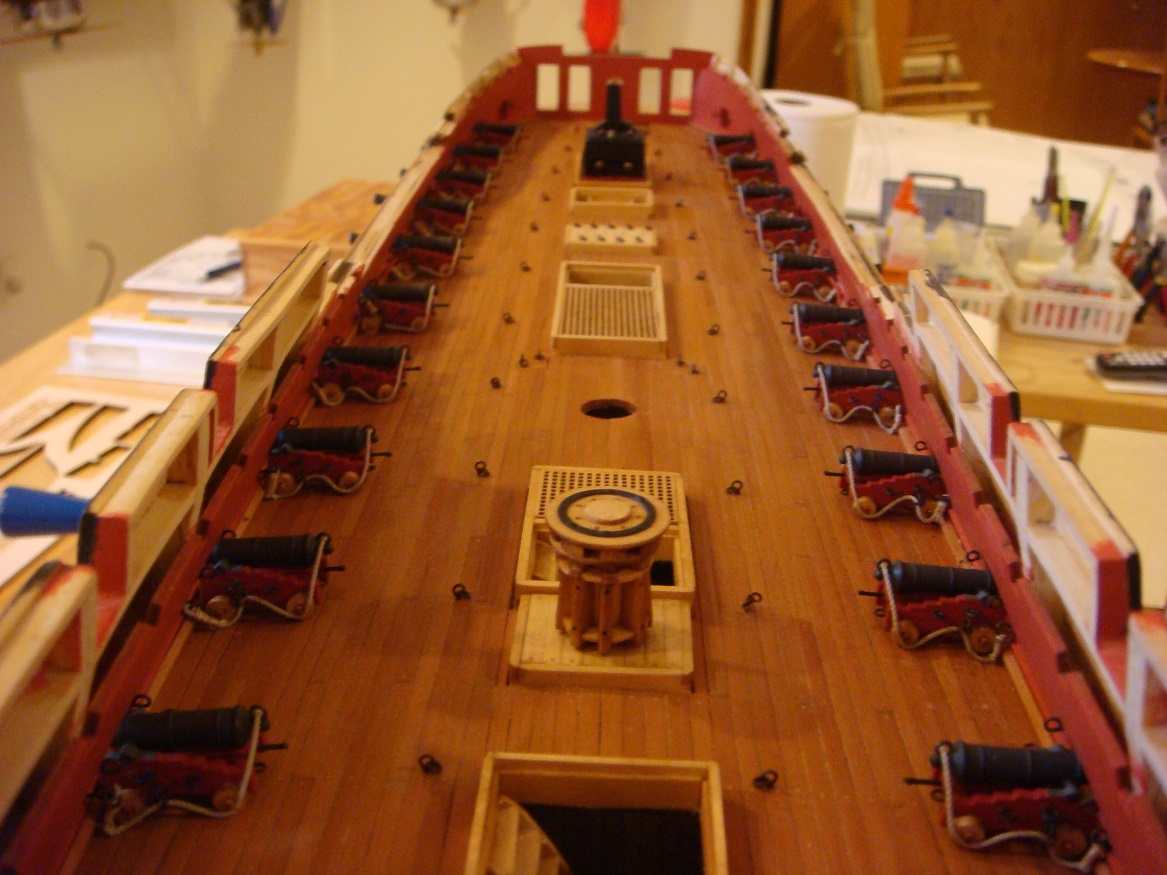
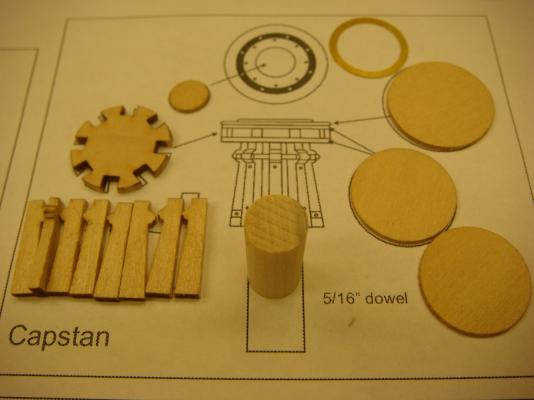
As luck would have it, did manage to find some time to work on deck fittings over Christmas. So, at about 800 hours into the build here's where we are: THE CAPSTAN Supplied as a laser cut sheet, this reminds me why I don't scratchbuild: I'm leaving it with the natural finish to show off the pins made of 28 gauge wire. The ring on top was photoetched. She's just pinned on deck for now. Still need to make some pawls. And that brings us to THE STOVE. Also supplied as (many) laser cut and photoetched parts: The basic structure was assembled and brass strip cut for the corners and feet: Lids with copper wire handles and more venting added (along with access doors) Photoetched parts painted and brass tubes added to simulate stove vents: Finally, the rotisserie was added! Here it is just placed on my fine Italian brick hearth from fore/aft. The vent stack will be permanently added once we fit the upper deck beams: Lastly, just an overall look: Sorry to be so long-winded but I thought a walk through the stove construction might interest some. It was all given a coat of flat acrylic as a final touch. Much of this will be obscured as the upper deck beams and partial deck go in. But I know it's there. And, I have to fess up ---- this was a LOT of fun. Hope to have some deck bulkheads and deck beams in place by New Years. If I'm not back before then, Best of the New Year to all here on MSW!


- 2,191 replies
-
- 41
-
-
- confederacy
- Model Shipways
- (and 1 more)
-
It will probably also be illuminated Ferit. With Spermaceti candles. That joint is spectacular Buck.
- 515 replies
-
- 2
-
-
- artesania latina
- whaleboat
- (and 1 more)
-
Really nice railings. That Titanic should be spectacular!
- 956 replies
-
- 1
-
-
- andrea gail
- trawler
- (and 1 more)