


augie
-
Posts
4,669 -
Joined
-
Last visited
Content Type
Profiles
Forums
Gallery
Events
Everything posted by augie
-
 I suspected that might be happening . But John was right.... 12 pounder is 4.4", 18 pounder just over 5".
 -
Lots of good advice coming in so far. If you haven't tried it, get yourself a quality pair of tweezers or two.. They make handling the ropes and getting the knots started much easier. Once comfortable working with them, they almost become part of your hand. Keep us posted and yes, start a build log on your next journey.
-
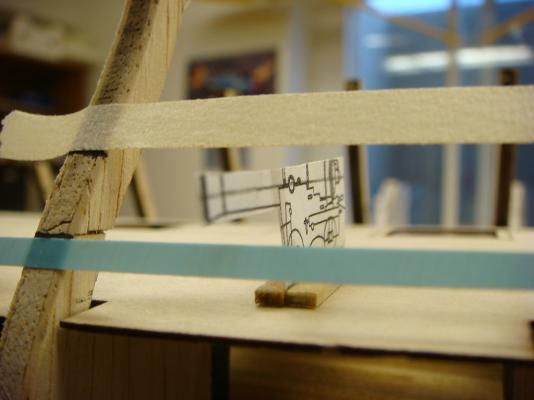
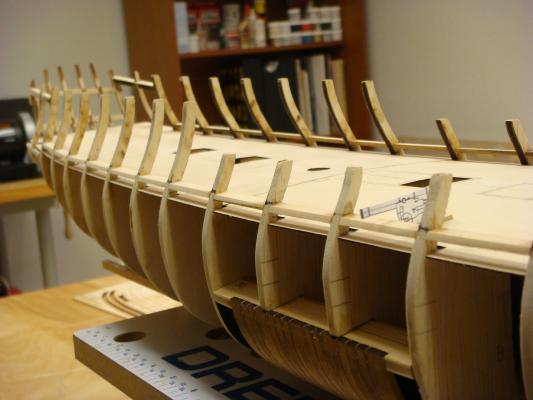
Work on framing the gun ports on the main gun deck has begun. A temporary batten was used to check the position of the laser drawn lines on the bulkheads. Only minor adjustment was needed to yield a nice sheer line. Lines were scribed on the bulkheads and the battens removed. A paper cannon was made using a copy of the 12 lb. cannon from the plans mounted on a 1/16" thick strip to simulate the actual deck. This was used to check the height of the cannon above the sills. This photo, using tape to demark the port lines, shows where we are: Satisfied with this positioning, I proceeded to install the laser cut sills, port and starboard: The sills were roughly faired with the bulkheads. Now that the sills are in, the lintels should go fairly quickly. I will simply be using a 3/8" spacer to set them in position. Then come the uprights. SJORS - in anticipation of your comment, yes.......the paper cannon fires 12 lb. cotton balls. The final versions will handle good old American iron.
- 2,191 replies
-
- 23
-

-
- confederacy
- Model Shipways
- (and 1 more)
-
Feels like I'm standing right there on her deck Popeye
-
OK Wes.......stop showing off. That is one beautiful coaming
-
Please tell me you are not going to use the 1/2" power drill with the masonry bit for the tops
- 1,873 replies
-
- 2
-
-
- occre
- san ildefonso
- (and 1 more)
-
Ah, certain of our Northern European friends. Still wielding fire and force after all these years. Give the tool a fair chance!
-
Nice to see her going vertical!!!!!
-
Nice looking wood ..... and great work to boot. WELL DONE!!!!
-
Really sorry to hear that David. Probably either CA fumes or sanding dust. Hope you two can work it out.
-
Haven't gotten to Jeff's wood yet John. There will still be a lot of ME basswood on board. Yes, the Hobbylite comes in either white or a wood color. Available around here in most hobby stores. One nice feature is that you can just add water and get any consistency you want. And if you let it dry out in the jar you can always reconstitute it with water. You can also add a few drops of an acrylic paint and get any color you want. Best thing since sliced bread ......oh, wait, that was the pencil sander
- 2,191 replies
-
- 3
-
-
- confederacy
- Model Shipways
- (and 1 more)
-
I did paint my tops black after planking but I left the masts and spars natural. I like the effect. I'm not sure what the 'official' method is. As we say, 'You're the Captain' (in this case Rear Admiral).
- 1,873 replies
-
- 1
-
-
- occre
- san ildefonso
- (and 1 more)
-
Pretty good? Must be heavy weather on the Great Lakes. They look terrific from the Rockies
-
Nice work on the tops Sjors. Are they to be painted or left natural with stain?
-
You are making remarkable progress in spite of the obstacles. Your planking, without sanding, looks better then what I can produce as a final finish. Will be interested to hear your call on the treenails.
-
That's exactly it Lou. Just to make that forward edge solid. The stern edge rests pretty solidly on the existing structure.
-
Case looks terrific Andy. A beautiful home for a fine piece of work!
-
Mercury by DSiemens - FINISHED - BOTTLE
augie replied to DSiemens's topic in - Build logs for subjects built 1801 - 1850
Nice work Daniel. Always something new in your micro world -
Get this week under your belt. We'll keep a candle burning in the stern gallery.
-
Your effort here has been ....... outrageous. They would be too nice to use on anything I'd ever build. I believe the plural term for blocks is 'bevy'. FANTASTIC, Grant.
-
Planking looks just great....and the color makes her POP!
-
Really sweet all around, Wes.
-
:D .......ya got me, JP! Just trying to make my photos multitask. I wasn't aware MSW had a court reporter on staff writing all this stuff down.
-
Looks familiar. Having fun yet?

