
HOLIDAY DONATION DRIVE - SUPPORT MSW - DO YOUR PART TO KEEP THIS GREAT FORUM GOING! (Only 44 donations so far out of 49,000 members - C'mon guys!)
×


popeye the sailor
-
Posts
16,007 -
Joined
-
Last visited
Content Type
Profiles
Forums
Gallery
Events
Everything posted by popeye the sailor
-
 there always the after market.......you can get seats and likely other parts as well if your going to go down the rabbit hole.........you may as well go feet first. you won't hit your head upon landing
 -
Airfix 1/72 Mitsubishi A6M Zero
popeye the sailor replied to SigEp Ziggy's topic in Non-ship/categorised builds
.......don't think I've ever built a Zero. this should be interesting -
we do what we can........sigh........neither one of my two got into modeling. electronics are their things hope it works out.
-
B-25 Mitchell "Meet Miss Runyon" by Javlin-HK-1/32
popeye the sailor replied to Javlin's topic in Non-ship/categorised builds
impressive size........makes me jealous { I have a 1:48} awesome job thus far -
oh....I showed the admiral the picture you posted for me.........then I showed her how you were using the masking......justify buying it. she noticed your paint rack........she likes that
-
not a huge fan of moving parts either........if they fit good and snug....great. the ailerons on the Nine o Nine keep falling....gotta adjust 'em every now and again. besides, I don't play with them on a daily basis great start on the wings!
-
how I did the Wulfe Hound was to put some paint on an old face cloth {admiral wouldn't let me take one out of the drawer} folded up somewhat. dabbed it on the first thing I saw { a cardboard box}, and did long light strokes over the wings and such, front to back. some I even did with a semi dry Q tip. good to see her together Mark!
-
hope the CA doesn't 'frost' the glass.......it also has a habit of doing that {as I've found out}. if you can find it in your neck o the woods, you should try it. it has plenty of uses. most of the kits I've worked with have multiple canopys......the M.B. has two........the B 25 I have, has two options as well. now I have a Heinkel He 111 that has the nose glass in two halves. I use the window maker on it, but it still looks like a dog's breakfast.....the whole kit does, actually........poor fit and all the problems you could ask for {if you wanted to torment yourself}. I have a good mind to.........seeing as I did the Wulfe Hound, paint it up and put American insignias on it....like we'd capture that!!!!!!
-
look'in gansta Jack........sorry.....my kids are affecting my mind love the combo!
-
so your going to need to cut a square hole in the diorama floor to set the crypt in place...is that the plan for it? your new add ons look really good...did you make the well from scratch?
-
really nice progress OC........did you use window maker to assemble the canopy? I've done canopys before by hand and really stunk at it......most of the time I don't do them. we'll see what happens with my next project. did you have to add the bubbles on the sides? those will be tough to mask.
-
really nice progress Mike I've never done gun ports before....you make it look easy
-
really great find Nils Billings had some nice looking models in their early days. I know what you mean about the figures........it can be a daunting task to find them in the scale your working on. your doing a superb job bringing her back up to speed
-
it looks wonderful Michael........the lighting really does the job great idea on her display too........I'm sure your admiral will agree
-
if you run into that situation, you can always fit in the difference below the waterline. this way it is either painted or coppered. put it as close to the garboard as possible .
- 211 replies
-
- 1
-

-
- agilis
- steingraeber
- (and 1 more)
-
looking really good George.....looked great on the water!
- 90 replies
-
- 1
-
-
- fairmount alpine
- billing boats
- (and 1 more)
-
I'm hoping they fall that way. I'm using 5 mm plank strips. I may need to do further cleaning up in this area........I'm sure I will find out how much as I get closer to it. since you've adjusted all of the bulkheads, some extra faring will be needed. I had a couple on mine too that required extra so they would be flush with the deck platform...even had to shim one side of bulkhead #9.
- 211 replies
-
- 1
-
-
- agilis
- steingraeber
- (and 1 more)
-
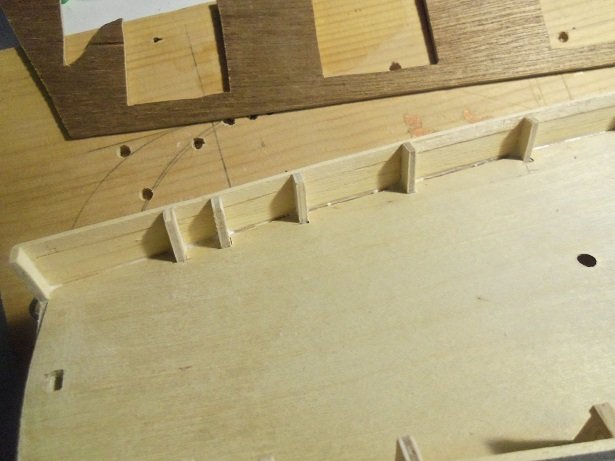
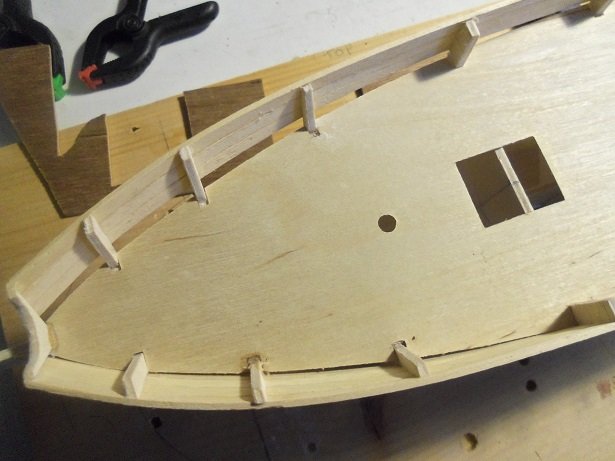
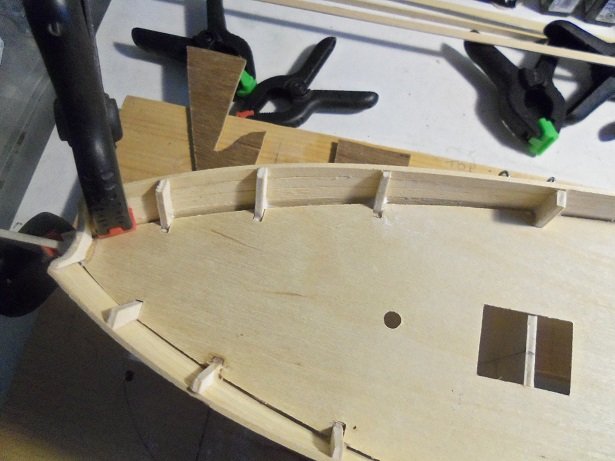
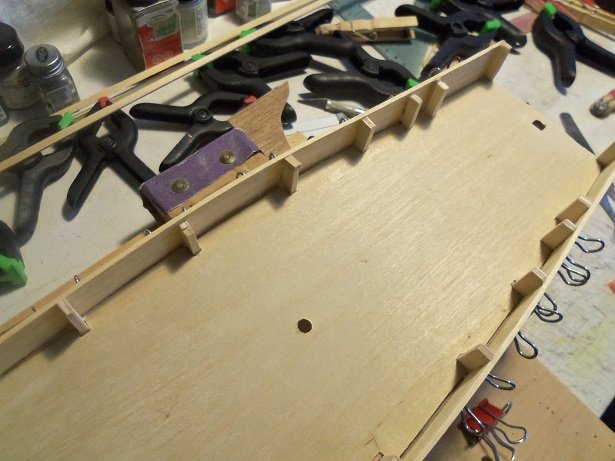
I'm sure we'll notice other things that are different. I thought that about the anchor anyway.......figured that this small a vessel wouldn't likely have the need for two anchors. I've used this as a rule of thumb......so seeing this model with two got me thinking. logically........a ship is at port.......it would be logical for the anchor to be located on the starboard side, much like the diagram dictates. but thumbing through the Petersson book, it shows an American schooner with two catheads, which suggests that two anchors are used......or can be. for some of these smaller vessels, the cathead is also an anchor point for one of the bob stay lines. once I get the book you have, more will come to light. I haven't seen anything in the way of plywood billets on E-Bay OC..........I'll have to check it out though I know that Mark gets something for his laser cutting.......I'll ask him what he uses and go from there. even MDF would work better than some of these plywoods I buy. as J and I proceed, we've taken on our own directions on the model. this is how others view their projects.......without logs, the first time modeler, would have a tough time figuring out the right way for them to go. the different styles shown on this site is exciting......when I built my first wood ship, I was so clueless........the processes in building one of these models is much different than plastic. but the one thing that is much easier, is that if a part breaks or doesn't fit correctly, another part can be made faster and {hopefully} better suited for the task. my take is to plank the hull first....get the overall shape of the hull and deck area, and go from there. the book I received adds another vessel to the fold....the cutter. it's a single masted vessel, so a little more modification must be made.......mostly to the deck area. I won't be going there though; I'm going to stick with the schooner concept. so now, both bulwarks are planked and I can see how the deck line meets the bulwarks. there are some gaps....I expected that, but I am happy that it looks as good as it does. the port side had very little gap towards the stern....most of it is at the bow. the starboard side needs one more strake to complete the bulwark closure. the port side is not bad at all at the stern........it's at the bow....... it's not overly bad.......deck planking will cover that easily. I did run into a small problem at the port stern........I went to trim off the excess planking and I took a chunk out of the plank above it. I had to remove that small section and replace it........but with doing that, I chipped the one above that one.....GRRRRRR! so I have a two strake repair at the stern....I hope it becomes unnoticeable when the hull is sanded. I want to stain the hull, but if I have to paint the upper part black, so be it......that will definitely cover the sin I also decided to stagger in some butts......awwww hell, make it interesting.....right? I still want to make a second hull......the brigg angle is too cool not to do....I've never done one. I think everyone should know me by now.....replicating hull is something I love to do, and if I can squeeze another model out of this kit, then I got more than my money's worth. planking the bulwarks can be a bit messy on the deck side....glue blobs and such. I take an odd piece of wood and remove the blobs, cleaning the inner bulwark up. if the inner bulwark is to be planked over, than this will not be an issue. I will sometimes do it, but all of the posts need to be the exact size and shape, so bulges won't be a deal breaker. the starboard side strake, closing up the deck / bulwark relationship, has been cemented in place now. at the bow, it's a bit worse, but not bad enough that the deck planking can't cover it. there is good mating.......I am glad to see that. now I'm able to us outer forms of clamping and I won't have to worry about glue blobs and stuff. once dry and a little sanding, I should have a neat appearance for the bulwarks. I've taken the day off today......with any luck, I can get most of the hull planking done. one thing I forgot to do, is draw the center line down the middle, to mark the start of the deck planking.

-
yess.........plank that hull! quickly now...........before something else happens! it looked like you might need to take a bit more off the #4 starboard side.......check your faring. this is why I'm planking the hull before doing the deck........if there are any gaps, I can get rid of them with the deck planking. do like in 'cool hand Luke'.....get mad at dem damn eggs!
- 211 replies
-
- 1
-
-
- agilis
- steingraeber
- (and 1 more)
-
Chase is going to be 12 too..........13 in November he's a huge lego nut
-
I saw in your sub log that you were finished with this project. it looks great!.........it's the coolest way to display her too great job....congratz!
-
thanks to all who hit the like button.....and your kind comments I got lucky with the fading......I don't do it enough. it sits a bit better on the stand too, since I added more cement to the pin. this is why the guide button I put in the fuselage is so important. being off center, without the guide button, the plane would be in a nose dive. ....and that just wouldn't be very appealing I will admit, this was an odd subject to model, but it shed light on an aspect of the war that wasn't really talked about. just a couple more touch ups, and the Wulfe Hound will be finished
-
really nice progress Jack.........the color scheme is gonna look neat
-
wait till you rig the gallows.......now there's a trip hazard
- 337 replies
-
- 3
-
-
- finished
- mountfleet models
- (and 1 more)