


popeye the sailor
-
Posts
16,007 -
Joined
-
Last visited
Content Type
Profiles
Forums
Gallery
Events
Everything posted by popeye the sailor
-
 you were doing such a fine job on her......don't count yourself short. sure you had to make changes........but once you got it dialed in, you produced some really fine work! sad as this is.......don't be too long to unveil your new endeavor......I'll follow you anywhere
 -
I guess my lament was slightly over rated........the paint didn't come out as bad as I thought. it was a little rough, but I think some sand paper and a light coat of the thinned paint will fix it. more on this later
-
thanks gents it's where I am so far. more to come.....thanks for the likes as well!
-
your building the old Revell kit, as I am. I wouldn't lean to heavily on the blue aspect, since water reflection and fading may have played a part in the hue. take a look at the Arizona thread I have in the nautical forum, and you will get a few more ideas as far as the paint choice. I hope you show your progress
-
margins are hereby cut! I had a sheet of 1/32nd and the tracing paper did the trick!
-
Billing's paint is kind of an auto grade paint......smells the high heavens. it does give a very nice finish though....and hard. it easily resists the minor dings and stuff associated with building a model. I got quite a few bottles when Billing USA was closed down. some of them are no good....all gelled or dried up, so I've been using up as much of it as I can. it's been a while since I got'em......unknown how they sat on the shelf. I'm hesitant to try them through the airbrush anymore......they tend to clog it up fairly quick. I added some thinner to the mix, to see if I can thin it down some. I haven't tried to clean the paint off that turret yet.......serves me right for not testing it beforehand. PSS: I read the label........says it's leg free.....I wonder why?!?!
-
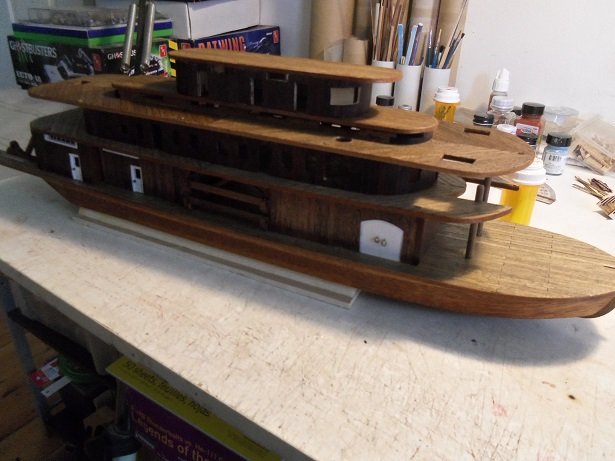
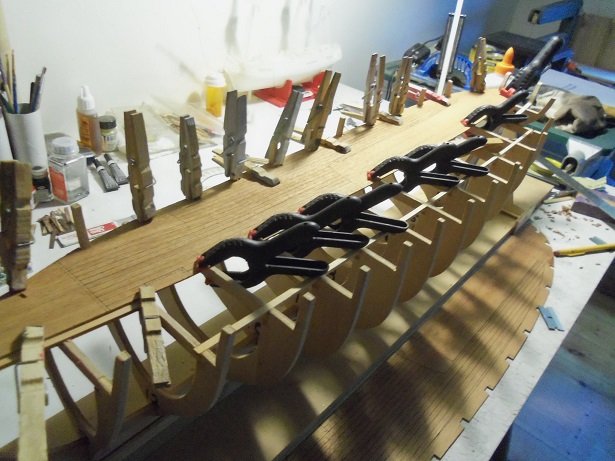
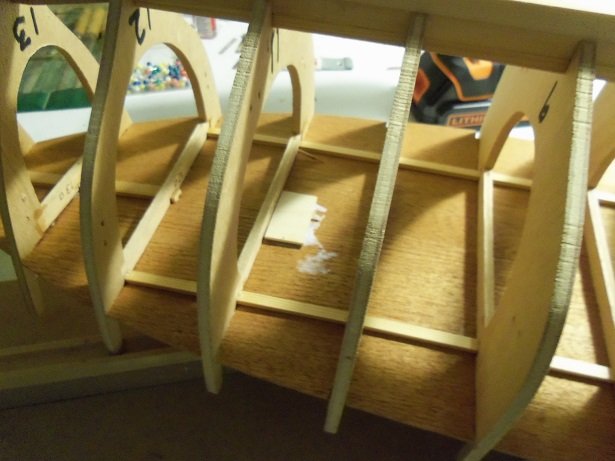
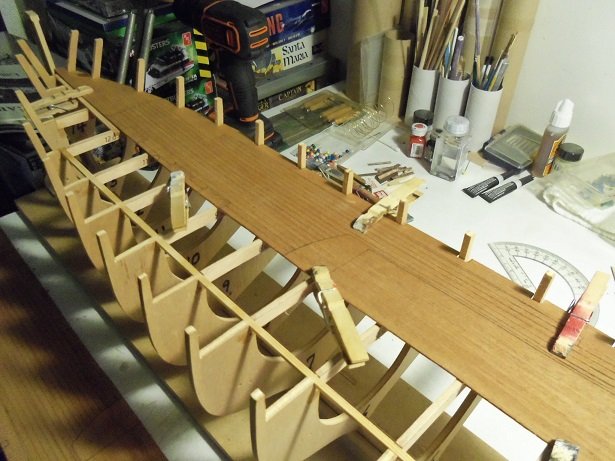
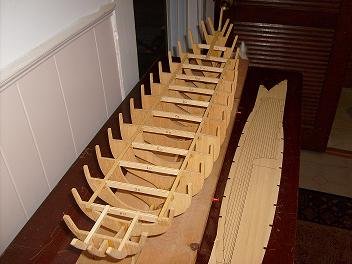
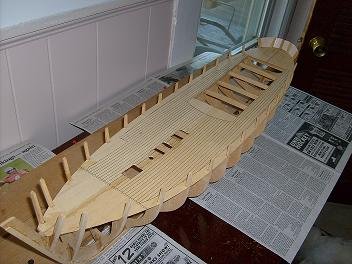
I guess this is soon enough I just had a rather funny experience with the Progress........I took it off the table so what I did can dry {or else I'll just keep pick'in at it } here is the dry fit I promised. not cutting the outer banding on the two upper decks was a good thing to do......the tabs for the structure can't be seen. I'm gonna try using the tulle for those vent holes.

-
thanks John time......that's easy.......I rent if I owned a home, things would be very different thanks Brian.......I'll try and show you soon thanks to all for the likes!
-
hi there......hey...........hello! there is a small update, basically, just to let you know that I haven't thrown this one in the circular file. it took me making three more of those blinds, but I managed to get them all drilled.....breaking two bits in the process. the camera was still being recharged at the time, so no pictures were taken. even when it came off the charger, it couldn't........the hull was masked up. the hull bottom is painted. then I added more gray into that paint I had mixed up for the upper hull and structure. I have a bad feeling that Billing's paint is not going to work well on plastic.........instead of using a piece of sprue to test it out on, I painted one of the turrets. it came out terrible.............I think to the point that it distorted the finish on the part I'll know better once I strip it off. I'll give and update soon.

-
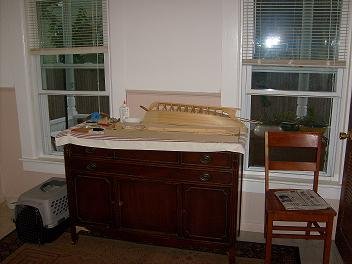
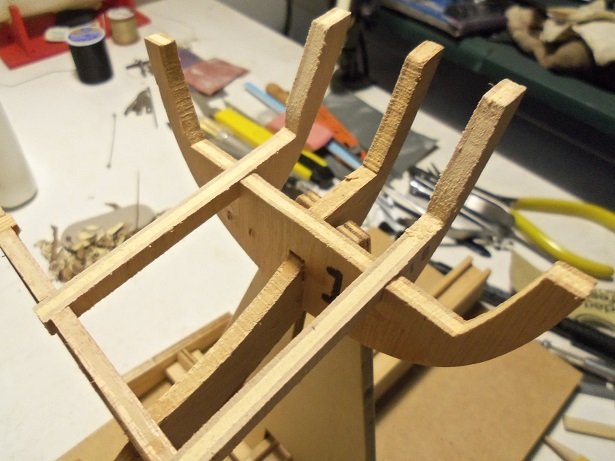
amendment to that final picture.............I went in to check and see how the piece I put over the mast hole was drying. I was angered that the piece decided to curl up on one side and pull away from the surface. thinking to myself that using 1/8th basswood, probably wasn't the best choice......as well as the direction that the wood grain was going in, made the curling possible, I went into the bag of spare parts to find a replacement. I found a pair of 1/4 thick plywood.........likely came from the Boulogne Etaples model {I remember where all these parts came from}.......pieces large enough for the job. after removing the ill fated piece, I took one of them and cemented it in it's place..........clamping it down with two of the biggest clamps I have! at first I thought that wood this thick was overkill.........but then I got to thinking about it. once this is drilled to size, it can be capped off at the bottom, creating a suitable mast root. when I built the Nordkap, all I did was cement a rectangular piece of wood spanning across the deck beams below the hole. the last picture is where I built it..........in the dinning room of our Spruce St apartment. I still recall how bewildered the admiral was when she saw it for the first time. I was building the Revell Cutty Sark in the computer room. "now, where are you going to put that?", she asked, knowing that I probably had no idea of where to store it for the time being. "Well.........we can put it right here.", I said, as I took the boarded carcass from the table, to the bureau you see before you. there was rebuttal, but I assured her that it would only be there till I found a place to put it. it never left that bureau..........I worked on the Cutty, till I couldn't stand it any more...........a new toy.....something I had never attempted before, was just too much to take. of course, it didn't help that I was also thumbing through the instructions, building the frenzy even more. the bureau wasn't anything special.......it housed pots and pans, silverware and a junk drawer. Gibbs was still a baby.....I recall taking small bells, sealing them inside coffee cans and whatever they would fit into, for his amusement....it didn't take much. another thing keen to notice, about this, my very first attempt in wood, is that I took care not to have a space along the bulwarks.........I wasn't worried about the bow past the cabin line, but it had to be snug along the bulwarks.......I knew that much. likely from building the plastic ships, where the parts fitted so tight together. the worse thing I experienced, was the white glue and the drying time.......I didn't like it slowing me down. but look at me........all I wanted to convey here, was the change in plugging up the mast hole........I didn't expect to get carried away the first time for anything is probably the most memorable........I'm sure other folks have fond memories of the first time they glued two sticks together the next update will be making the margins, and faring the hull. until then
-
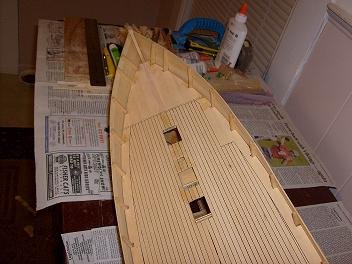
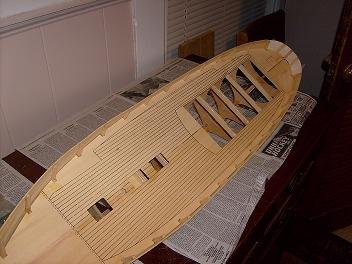
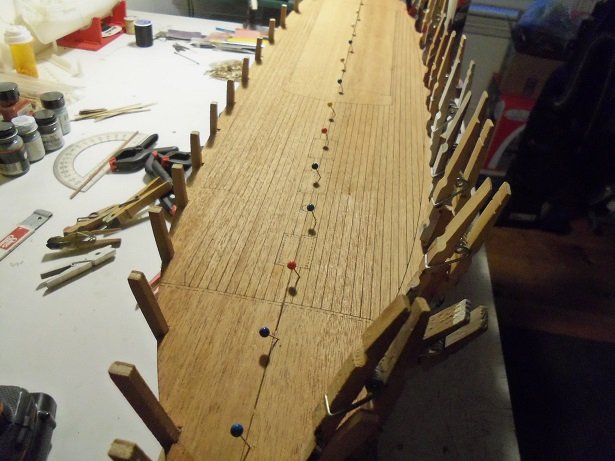
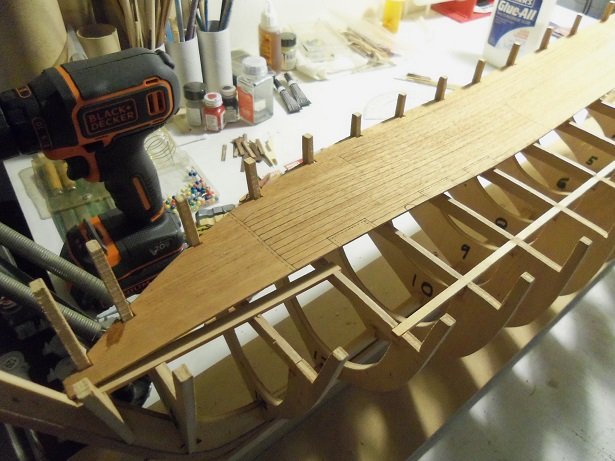
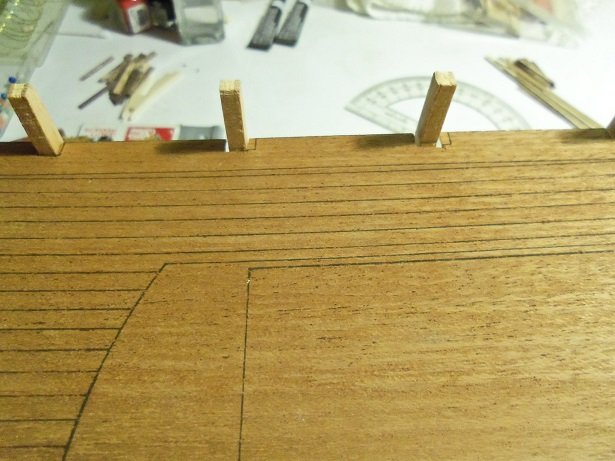
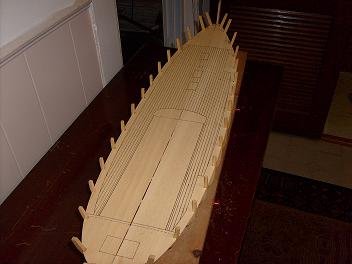
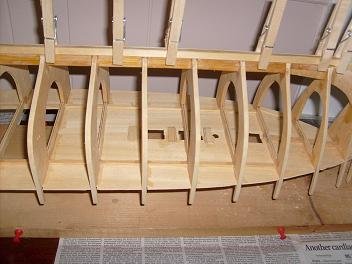
satisfied all that I was going to be.......the starboard half was cemented into place. this half is warped......one of the few parts that are......the rest of the part on this sheet are small, so it doesn't affect them as much. this was left to dry for the time being.....I turned my attention to another project to bide my time. when I felt that it was dry enough, the port side was fitted and cemented into place. I could have made more of an effort to get the printed panels more in sync with each other, but for what little there is, I can easily make the adjustments for it. this side was allowed to dry also. it was left till this morning for all the pins and clampings to be removed. I realized some time later, that I hadn't gone over it again with sanding the deck platform surface. I was relieved in seeing how level the deck surface turned out. I drilled the preliminary hole for the mast.......a starting hole that I can make to size without splintering, but being on the split as it is, some splintering did occur. I didn't use too much pressure, so it didn't occur as serious, as it could have been. going through my junk wood bag, I found a suitable piece of wood to reinforce the hole I already made. checking the platforms, I see there was good contact down the length of the frame. I'm thinking that I should reinforce the deck tabs along the bulwarks, to thwart the threat of breaking them off. doing the margins will help those tabs....but they are the most important of them all. the stern will also be of importance, since the stern structure will be removed and modified. something to think about

-
Cutty Sark by NenadM
popeye the sailor replied to NenadM's topic in - Build logs for subjects built 1851 - 1900
the boats look super Nenad........her Majesty will be very glad to see YOU!!!- 4,152 replies
-
- 5
-

-
- cutty sark
- tehnodidakta
- (and 1 more)
-
my....you have been busy I was under the impression that this was a wood project.........but it's plastic. so far though, you managed to integrate wood into the model...and it looks great revell did {not known if they are still producing it} produce a galleon in 1:96 scale at one time. super job thus far..........very interesting th direction your going with this
-
poking my head into the scratch build forum, I was glad to see you've made some progress on this one. fine progress it is too glad to see your feeling better.
- 1,208 replies
-
- 1
-
-
- great republic
- clipper
- (and 1 more)
-
I've gotten the same pep talk Michael glad to see your back in the workshop! look'in real sweet!
-
I know......we buy all these tools and toys, and then we have to leave them sitting there because we just don't have the time. I'm getting there........finger's crossed for the day I can take up residence at my table! viva la playtime!
-
I wasn't aware of this either.....I've only seen the white Plastruct products. I'll keep this in mind as well nice picture..........but that's how I've pictured you already .........I mean, avatars don't lie............do they?!?!?!?! {if yas gimmie a pipe 'an a saila hat, I kin look like mine too } Ak - k-k-k-k--k!
-
You know I put a note in the Hull before buttoning it up. I forgot what the heck I said! Doh!! "you broke it, you bought it " I used to work at a cabinet shop in Florida.....I bought a 'second' that looked something like that. open on both sides, I filled it up with car models.
-
thanks CDW..... I hope I'm not confusing folks with pictures of the Nordkap. since I opted not to build it again, I thought it would be neat to post relevant photos during the building of the hull. I chatted with the admiral to later purchase a newer kit of the Nordkap.......it would be interesting to see what a laser cut kit would be like. I even have yet another ship in mind for the project........longer than the Nordkap the ship in mind had all the stern features of the Nordkap, but is longer and sports a fore castle deck. glad your enjoying the build so far,,,,more on the platform fitting will be ready soon.
-
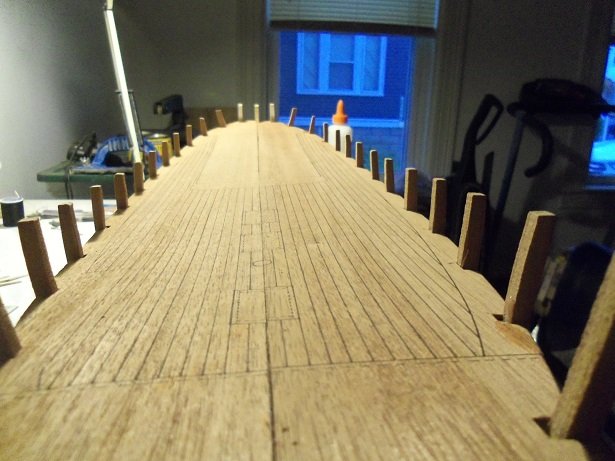
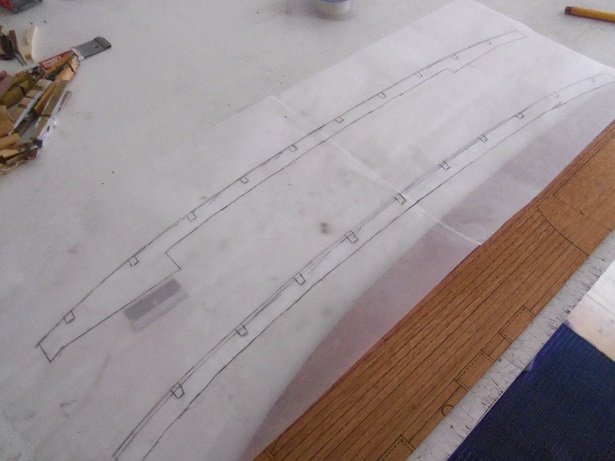
yesterday, I had just enough time to trace out the margins. one thing I'm going to do differently on this build, is that I won't cut out for the holds and structure...it's not really that much of a biggie. if I were to do an R/C version, it would be a must. now I'll need to check my inventory and see what I have for flat stock.......I'm hoping that I have some 1/32nd. I remember how I planked the Nordkap. I know now that I took the long way to do it......and I used 1.5 mm planking to boot. fitting in the starboard half of the platform, I did experience some shrinkage, but not as much as I expected. the wood is brittle........breaking a few of the smaller corners off as the platform was being fitted. I glued them back on. as mentioned, I was a little off with the bulkhead spacing, but I can clean it up when the planking takes place. I did have to alter the two transom posts, removing some of the curvature at the base, so I wouldn't have to cut the slots too deep into the deck platform. the starboard side is finally in place. I'll wait till the port side is fitted, before I make adjustments to them both more on this step later.

-
the Mississippi i"m working on is only 660 mm...smaller by far, but still a decent size. she's a good looking monster nice work Chris!
-
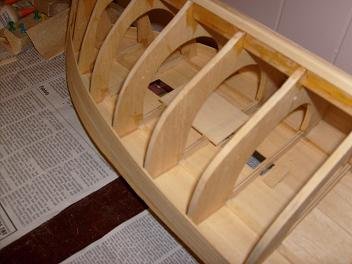
the tracing paper did the trick....the only down fall was that I had already cut the deck parts out. hard to trace the outer edge. presently, I'm fitting the deck platforms.......I will have an update soon. there will be quite a contrast between the woods used on this older kit.......it was a lot easier when I built the Nordkap. here are a couple of pictures of when the platforms were installed during that project. I can tell you that Harold did a great job with aligning the bulkheads......I could cut the slots for the bulwark posts exactly where they were printed on the platforms. I was off a bit here and there......can't totally blame it on the age or condition of the wood. there is a silver lining though, since I will be making the margins and planking the deck...none of the tell tale gaps will be seen I should have some update pictures soon.

-
thanks Pat.. I got a bit more done.......the structure has been trimmed and touched up with stain. perhaps later, I will cobble it together and do a dry fit to see how all this looks now. I really need to get busy on the windows and doors.......I have an idea on how to make them. thanks for the good word! thanks to all for the likes