
HOLIDAY DONATION DRIVE - SUPPORT MSW - DO YOUR PART TO KEEP THIS GREAT FORUM GOING! (83 donations so far out of 49,000 members - C'mon guys!)
×


popeye the sailor
-
Posts
16,007 -
Joined
-
Last visited
Content Type
Profiles
Forums
Gallery
Events
Everything posted by popeye the sailor
-
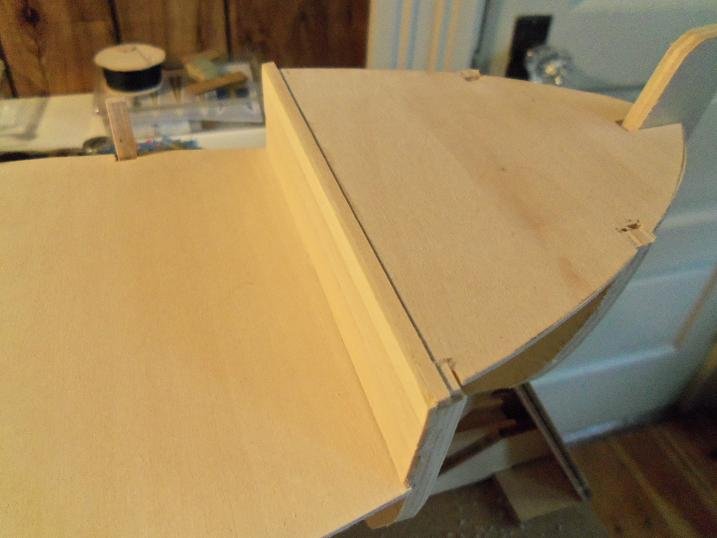
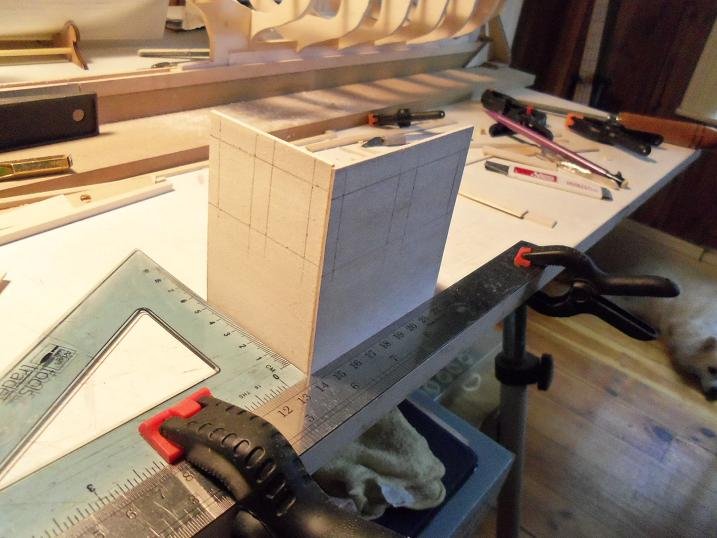
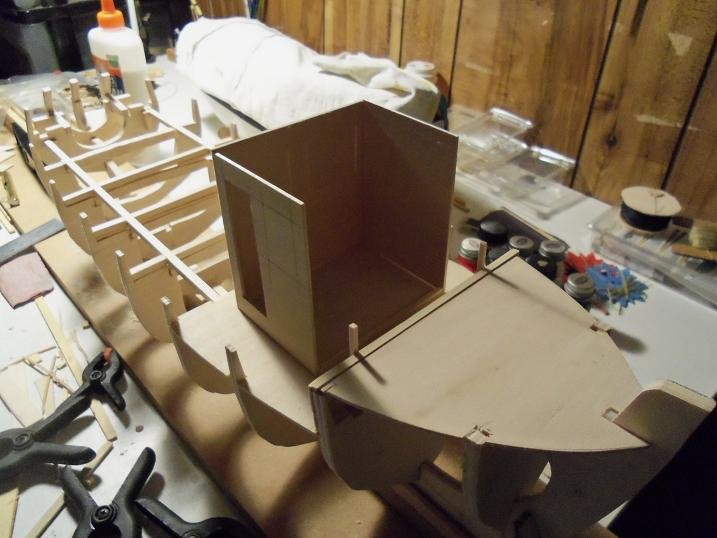
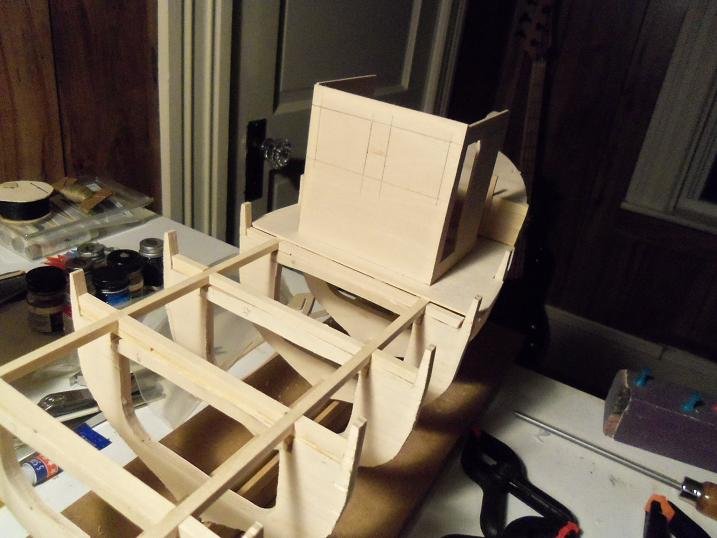
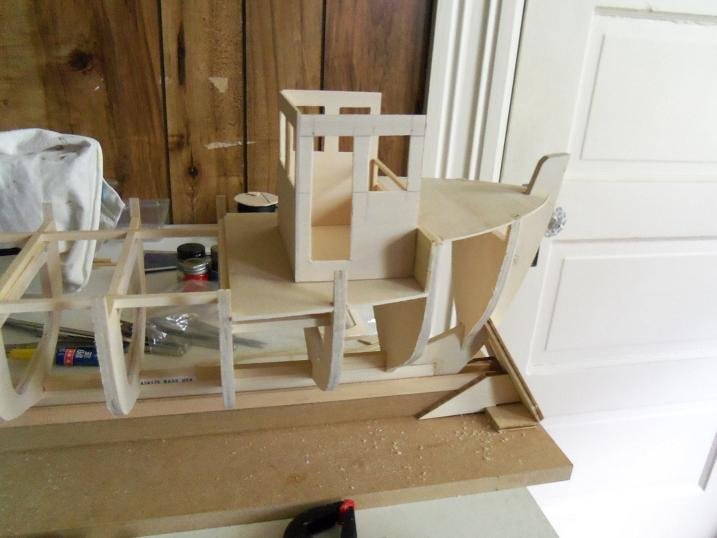
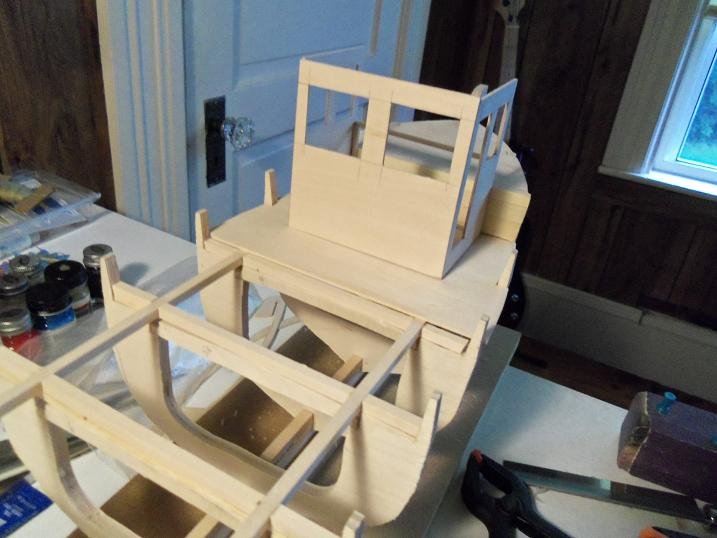
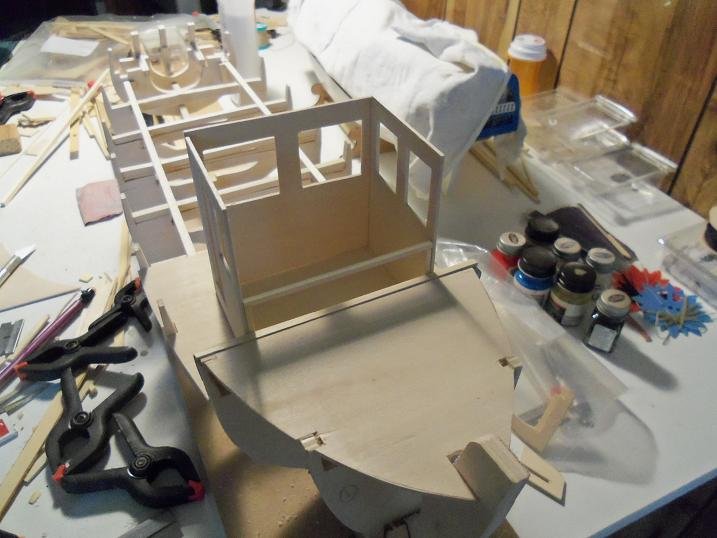
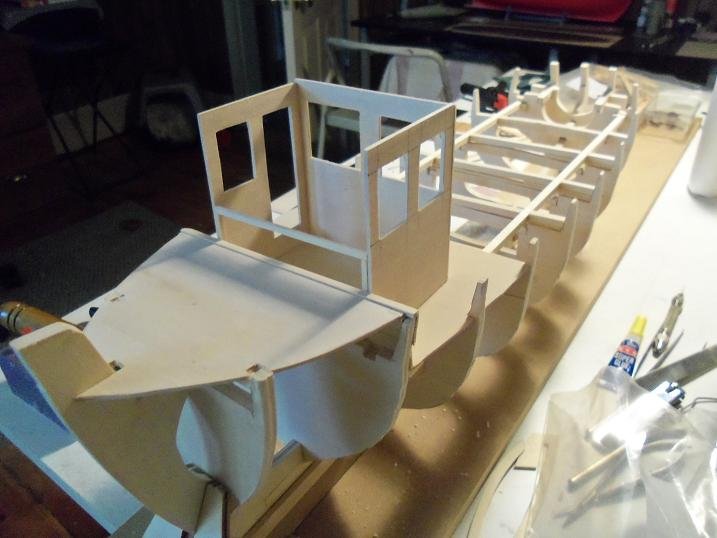
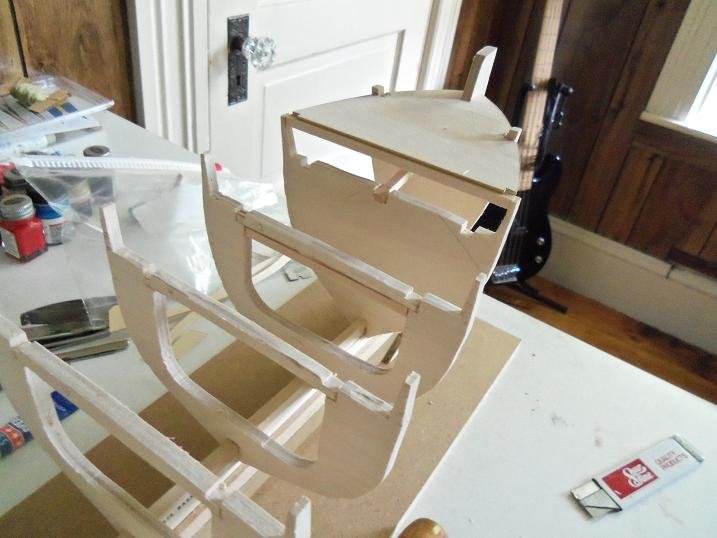
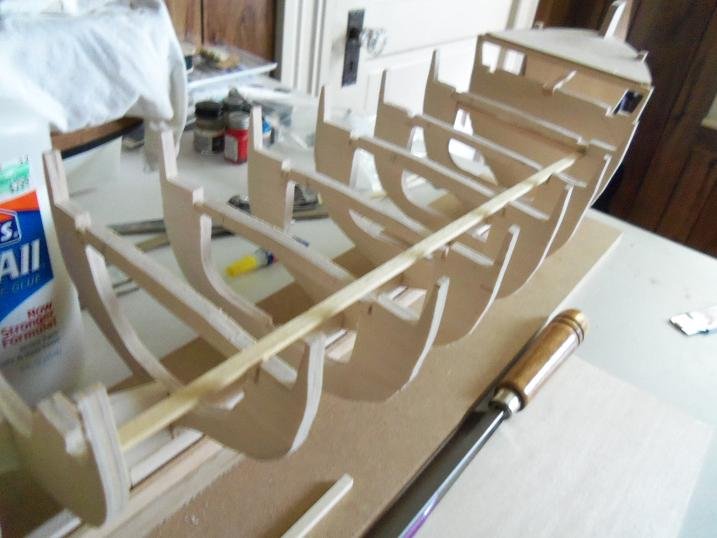
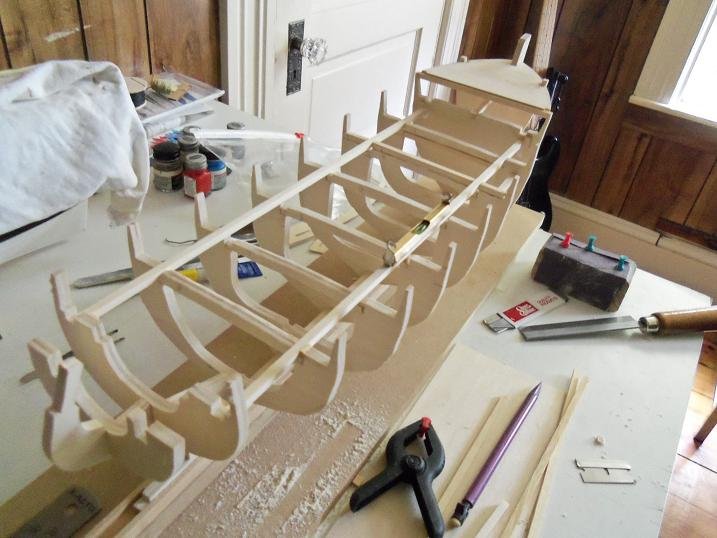
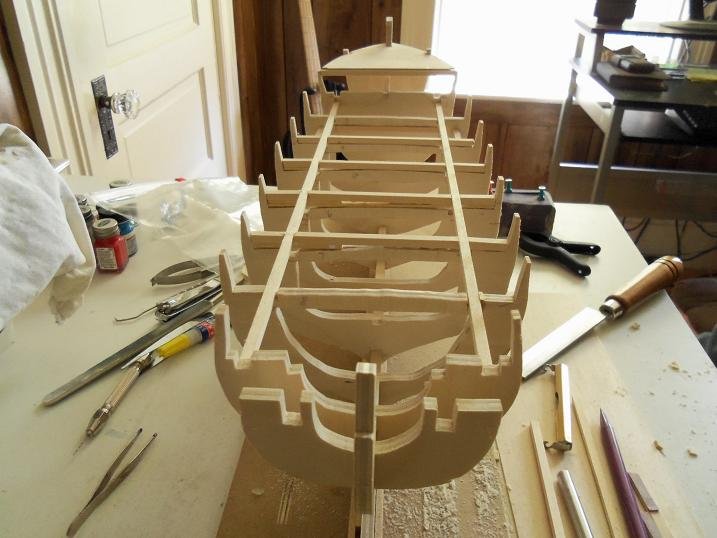
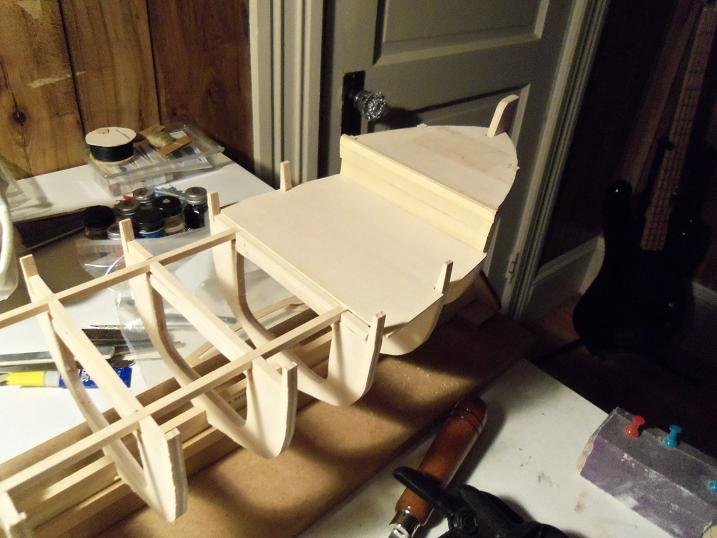
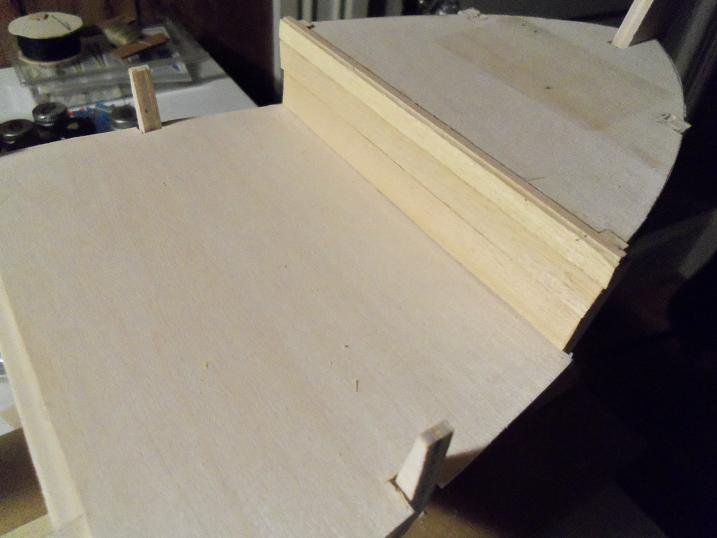
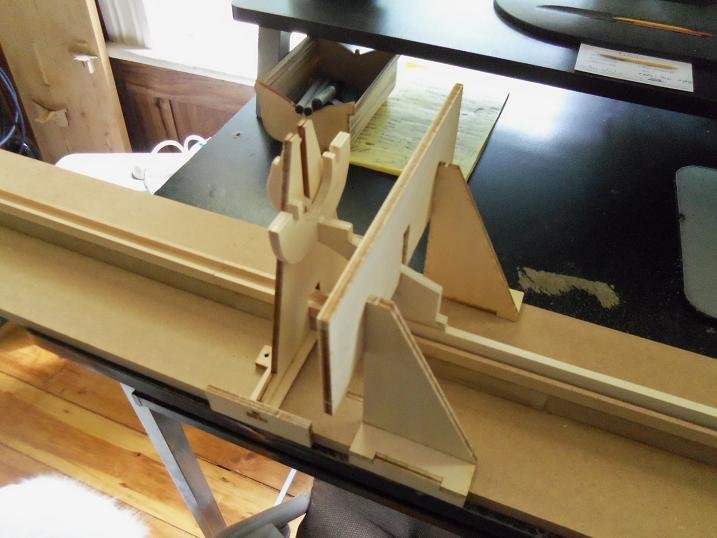
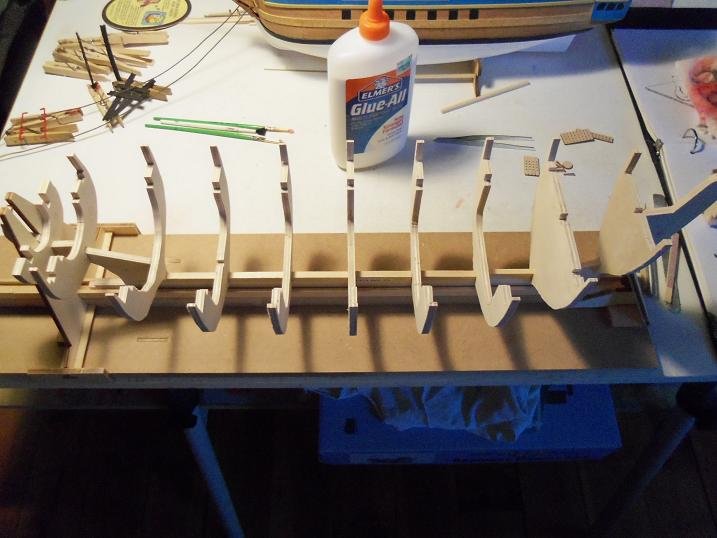
 fleshing out the pilot house.....three sides were cut with the windows and door marked out. the bow platform was prepped and sanded. the sides were cemented together {here's where the door came in} I decided where the door is to be......only one. making the frame to cement the shell in place......it will also double as a dash frame too. with the shell fitted {not cemented in place yet}, I moved to the aft end, because a cabin is to be located there. the two transom parts are in place now
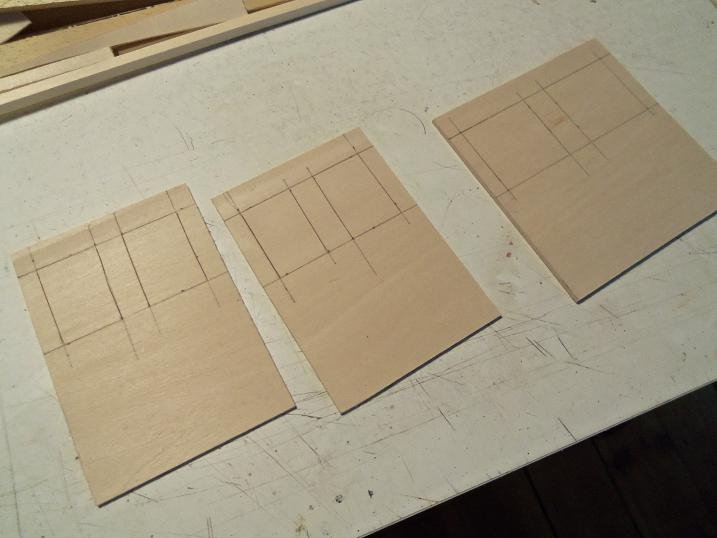

-
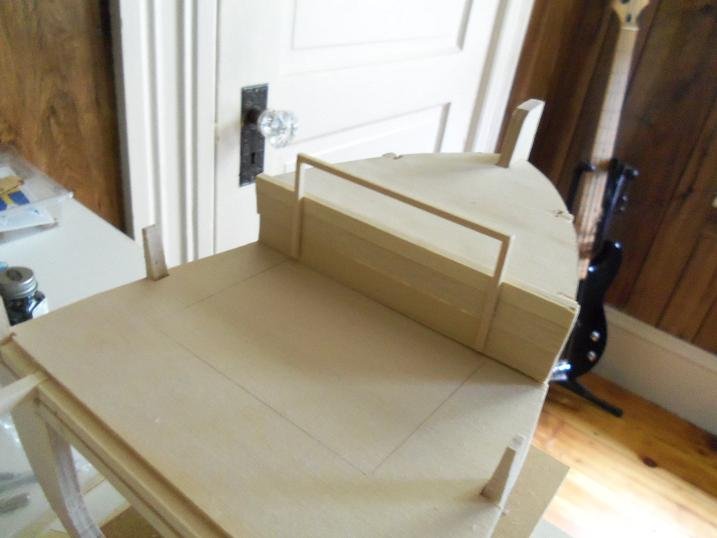
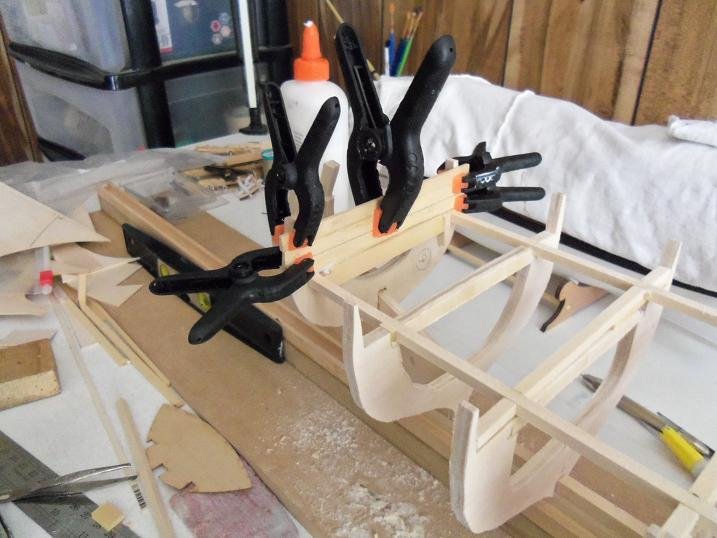
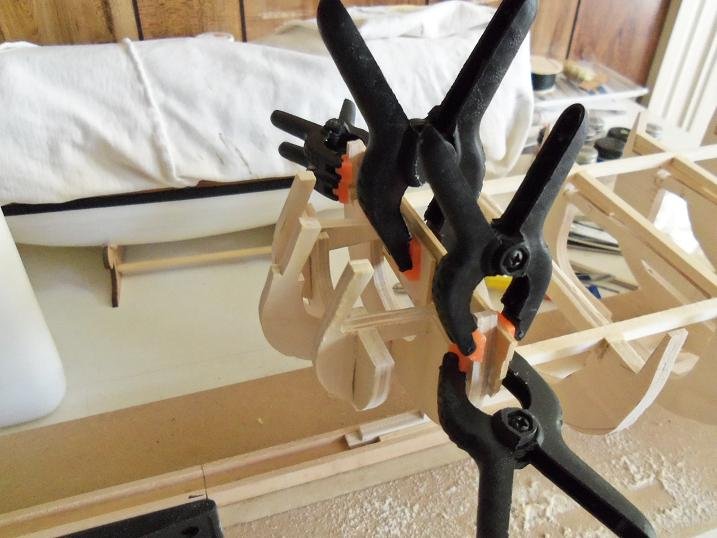
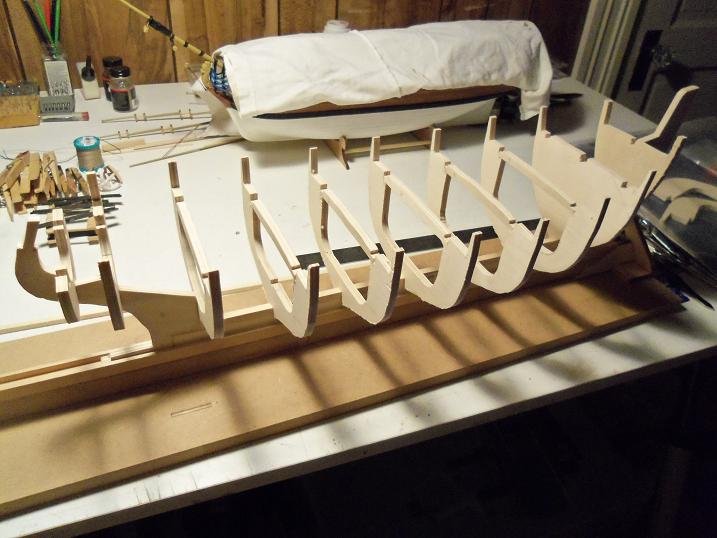
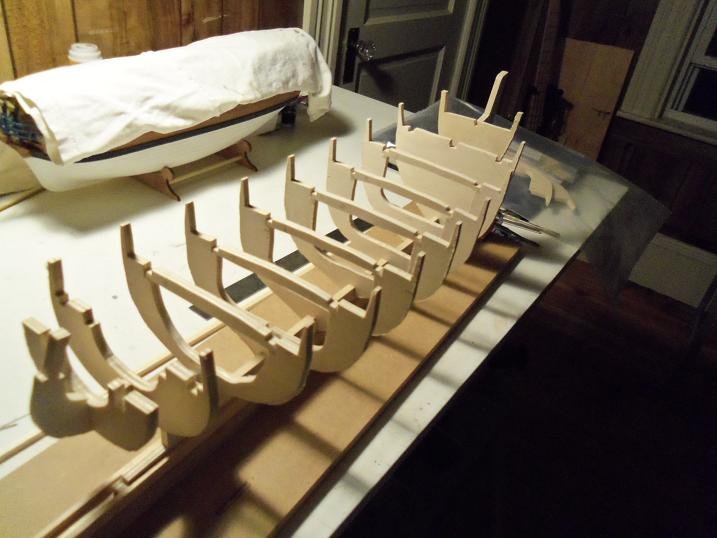
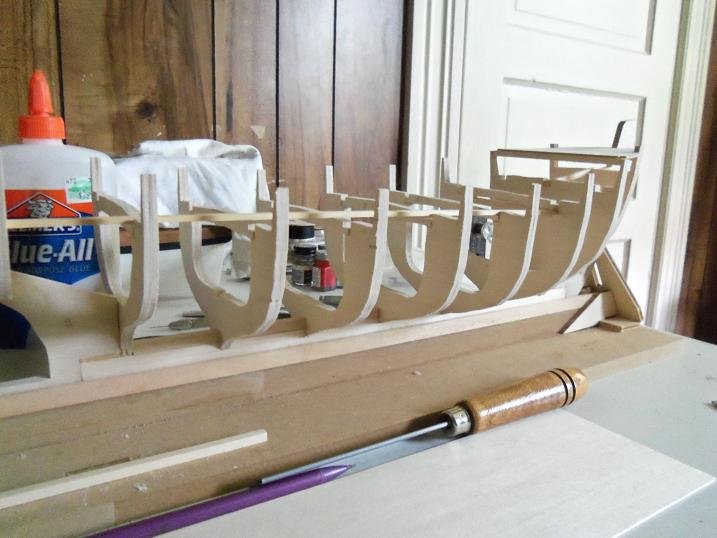
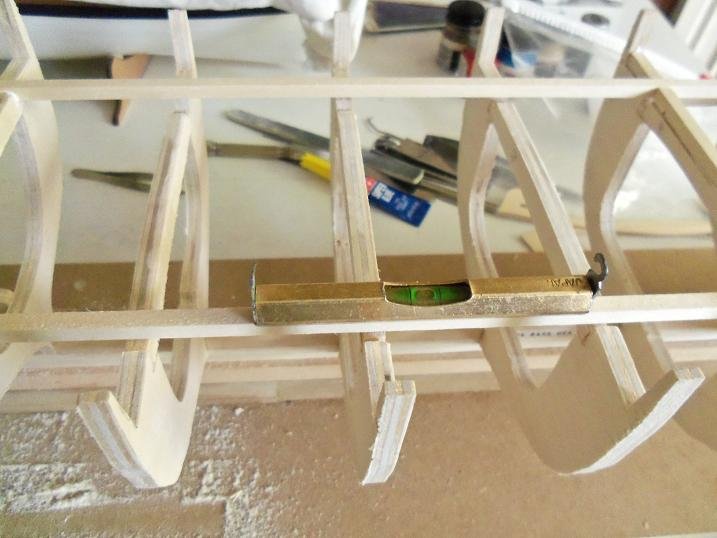
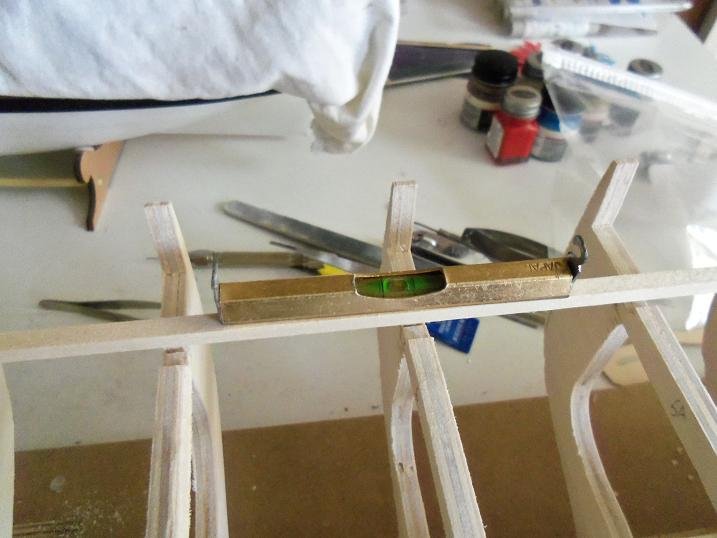
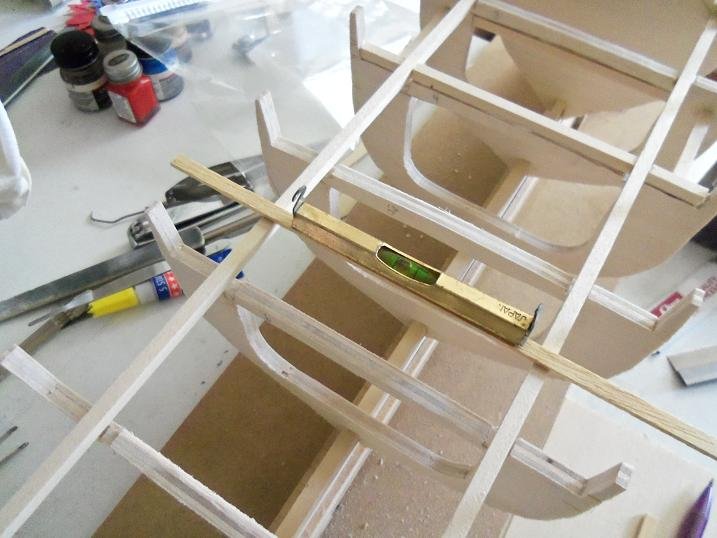
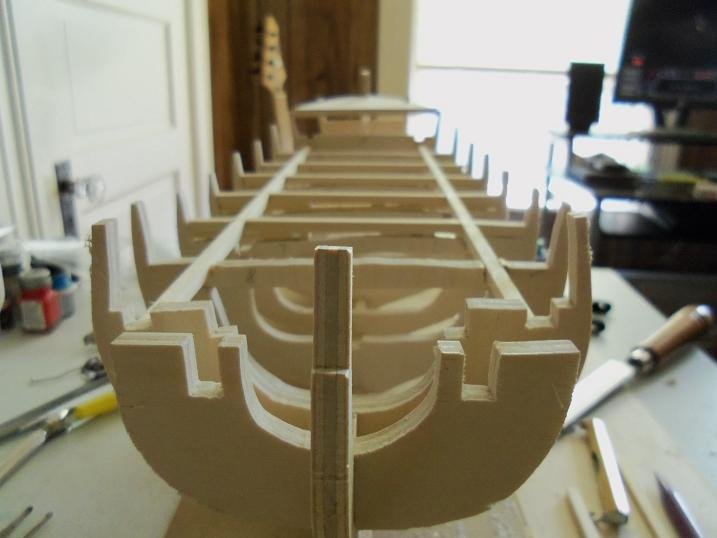
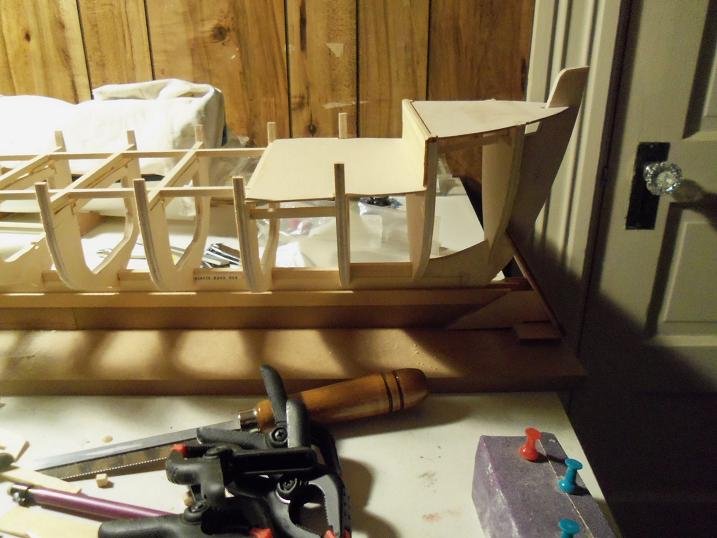
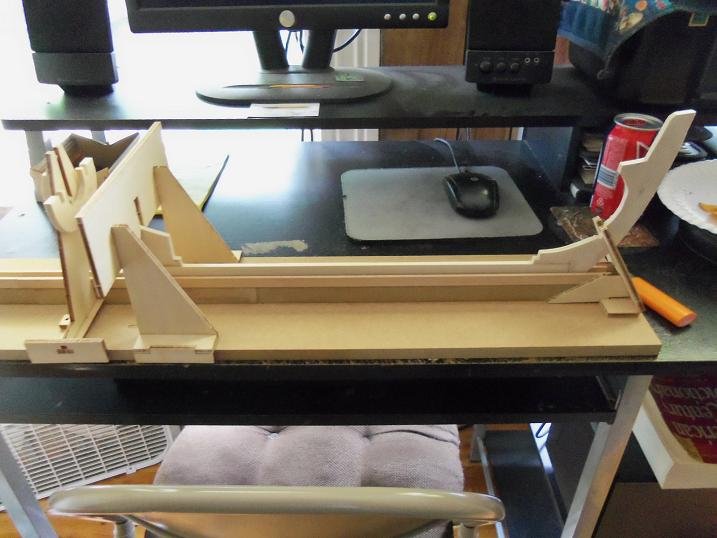
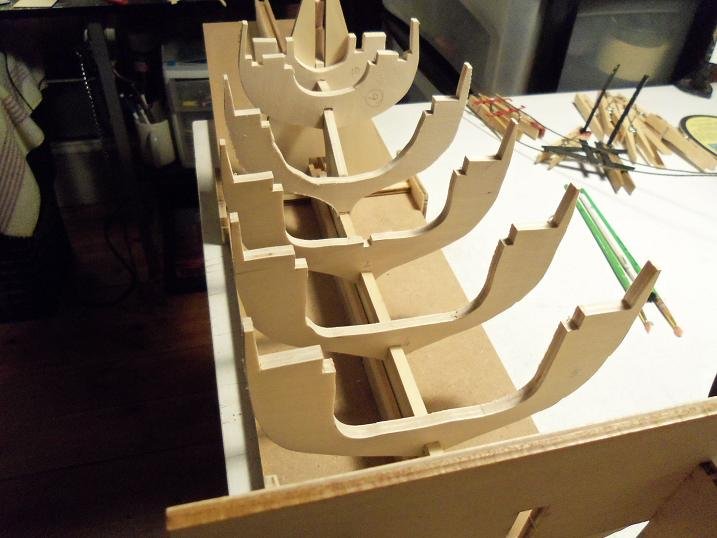
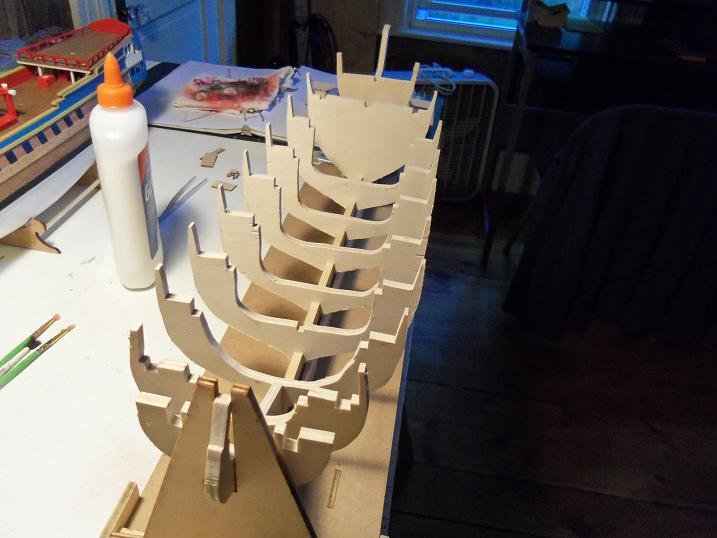
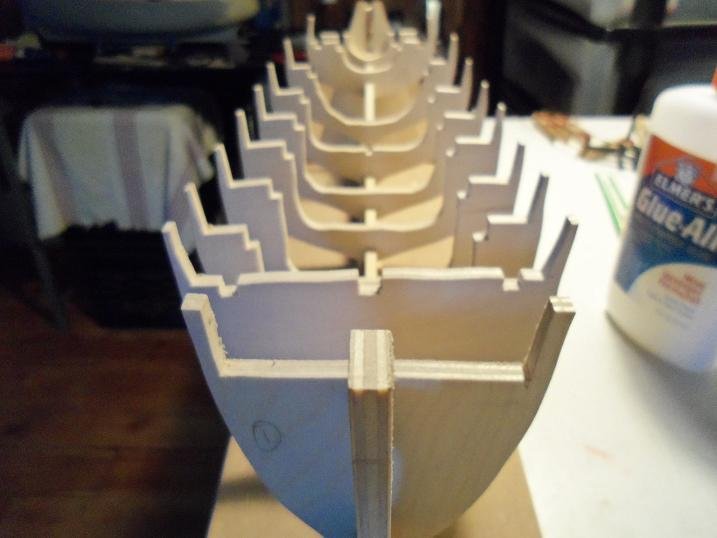
6-7-2012 at this point, the beam that span the bulkheads were cut out and fitted. the two transom parts were left off until a bit later. planning the layout began here. once they were all in place, the tops were all sanded. 6-13-2012 two beams will be installed lengthwise, in the slots of the bulkheads. the short one was cemented in place at the bow. I want to place the pilot house at the bow, so it needed a short fore deck. I got to thinking......putting the beams in the slots would create quite a bit of camber for the deck. I decided to take most of it out. the beams were set in place, using a level. extra framing was needed to give the deck platform a good anchor point. at both ends of these beams, they were boxed in and cemented to the bulkheads. the deck platform is cemented in place at this time.
-
thank you Anthony the admiral will never part with it,,,,it is on the shelf along with my other models. in picture #3, you can see my home made slip leaning against the wall.......it has three different set ups on it. more is on the way. thank also for the likes
-
the figures look great Nils.........I think the shipping cost would kill me though. I have the Preiser site bookmarked...I wrote down the number and I'll look them up there. thanks for giving me the head's up.......I looked at quite a few sets and didn't see these
-
I knew you were joking John.....no problem I knew he was joking Mike the way I look at it, if one hesitant new comer posts a log after reading it, then it's good I'll check out those links Nils......thanks a lot
-
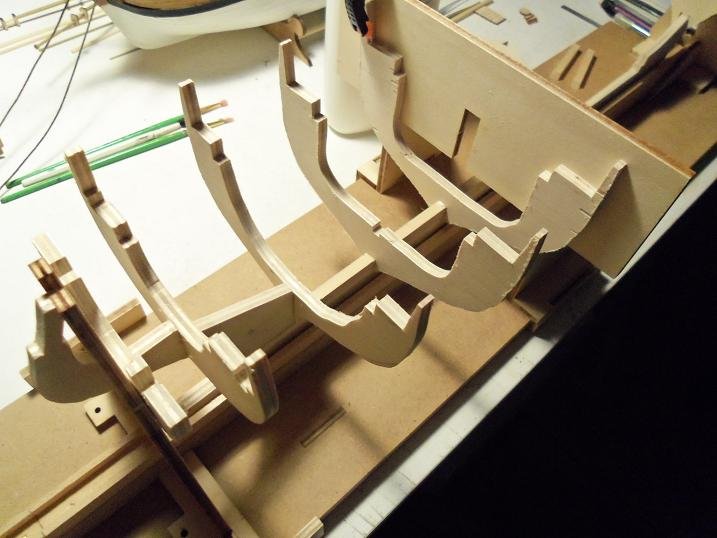
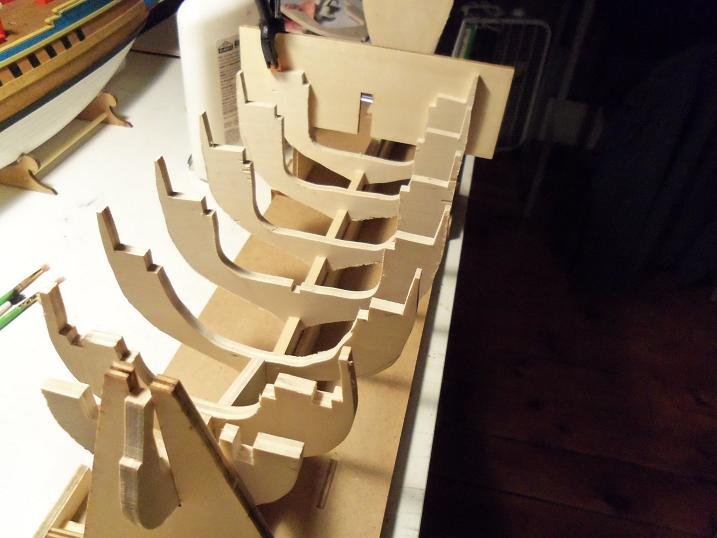
the big crash.......a very sad time for the older members of MSW. the tremors we had in the recent past, were but stark reminders of how we all had to pitch in together to rebuild what we once had. some logs never came back......those who past on, and those whose logs were so extensive, that rebuilding them was impossible. one thing that shone through all the turmoil, was how committed the Admins and moderators were in repairing a crippled site, and how committed the members were in helping. those who came after the big crash.........you may have heard about it in passing......but probably not much concerning the impact that it had on the site. a lot of logs were lost...along with a good bit of information...tutorials and such. some logs were partially lost, suggesting the presence of a rim, to the crater that had formed the epicenter, of the void. While some repaired their logs, others were having to replace their entire logs. sadly, some found it to surmountable to accomplish. I was in a similar predicament.......the Gothenborg, the Gundalow, the Nordkap....some of the ones I had to repair......the Nordkap didn't make it, along with this build log of the M&M Fun Ship. I've mentioned this build many times now........I've had my doubts that I could recreate it. when I build my first model, the Nordkap, I started in right away scratch building and bashing aspects of the model, so I learned this very early. I was also entertaining an idea of how to clone hulls from the parts panels.....a much easier path, that having to learn CAD from the ground up. I had missed the boat with the cux 87 build......I had already destroyed the panels. it wasn't until I started the Mary Ann, that I took towards trying to save them. only interested with the hull parts, I traced out the parts for two hulls. one I had traced a couple extra center bulkheads, in n effort to stretch the hull, making it longer. that hull went on to become the Trawler Syborn. the other one sat in a box, waiting to be assembled. during this time, the admiral became enamored with the models, liking them better than my plastic models. she asked me about what I was doing.......and I told her about the 'experiment' {as it were}. her next question was, "so you make the hull......you can make it into anything you want?" I told her .."sure". being an avid M&M collector, it was she, who gave me the idea.....it took no time at all to come up with the concept for it. some of the dispensers she had collected, had these small packs of M&M's inside.........fun size bags. that's how the name came about. even the paint scheme was a no brainer....it should be colorful, like a handful of M&M's I hope I can recall everything it took to build this model. it might not have all the bells and whistles, but I think the pictures will fill in the gaps. in a way, it makes sense to recreate this log, over trying to do the Nordkap. I have another kit of the Nordkap.......a much older one, so it will make a new log all the more interesting. with the first model, in spite of the wood being some 30 - 40 years old, I was able to use over 90% of it. the wood in the kit I have now is much older....it quite possibly might even be close to a first production kit. there is no kit of the M&M Fun Ship..........a one of a kind scratch build. I hope you enjoy the log.......it took roughly four and a half months to build. 5-15-2012 first the keel....... that's the Trawler Syborn in the background, all planked and well on it's way. 5-16-2012 at the time, I had just received the new build slip from Tom. this was the first keel to sit in it. one by one, the bulkheads were cemented in place. even the main table {my only table at the time} was fairly new.......odd to see it without all the scars of time. soon, all of the bulkheads were in place......all except the two transom parts for the stern. the hull frame came out rather straight......it looked pretty good. as with every model, sanding is the dominant part at this point. more will be added before I'd need to get into the really tough sanding. I will add more a bit later......I just got reminded that we have to go out. so, when I get back............
-
thanks John for the thought........I know that your likely joking, but I don't think of it like that. I value everyone's suggestions and comments......after all, we've all come together within these hallowed halls for one reason....our love for the medium. we all share the same desire.......to create models as accurately as possible, whether it be scratch or kit. this is the only site I've belong to so far, where criticism really hasn't flourished....everyone conveys more of a constructive criticism, than anything else. for all you new comers out there......don't be daunted from doing logs on your projects here......your denying yourselves of an excellent learning opportunity. the beauty of this site, is that we all want you to succeed.......we all want to perpetuate the medium...we all want you to grow along with us I was here a short time before I came out with the M&M project...it was a 'what if'....a fantasy build. in the beginning, the ribbing and jokes I got from it was pretty intense......I almost shut down the log. but one voice suggested I continue, so I did. I'm sure he knows who I'm talking about {if he remembers}..before long, as I got into it more, it all stopped when folks saw how neat it looked. I learned something too...no one was being rude or cruel.....it was merely a lighthearted approach to something they've never seen before. it's too bad that the log was lost in the big crash......if I could remember everything, I'd put it back up. for my first attempt at some real scratch building, it was some pretty nifty stuff if I do say so myself. so.....no, no firing squad........just my friends who care and want to see my full potential. I'm glad your a friend as well.....no one can have too many thanks to all of you who won't let me take the easy way out! when I first started here.......I could count those I considered mentors on one hand. now......forget it.....i've lost count
-
sorry to hear that.......hate it when that happens hope it's not an extensive repair job. good to hear about the dead eyes....I'm aware you've dealt with them before. I should look at your Half Moon log...but since I'm here......did you order the triangular dead eyes for that project? I'm thinking I should.
- 258 replies
-
- 1
-

-
- harriet lane
- model shipways
- (and 1 more)
-
thanks Mark.......happy to report that the Norden is in the living room!.....off the table!!! I still gotta expand the existing shelving I have up......or put up a new one, but it can wait till it gets warmer. I'm finally straightening up the inventory bin,,,,throwing out junk from past projects {that I'll never use again}, and relabeling the bottles {bins} so they will be less confusing. I was getting very tired of searching for what I'm looking for. I also need to come up with an organizer for all those eyelets I had found a while ago......I really need to do something along the lines of a passenger liner, to use them up! I have soooooo many!! the main table is still cluttered with the two ships. I will take care of them after I do what I want to do next.....nothing too crazy, I assure you thanks again for all the kind comments and to those whop hit the like button
- 378 replies
-
- 6
-
-
- t78 norden
- billing boats
- (and 1 more)
-
I thought of that Mark........earlier, that's what I meant about going 'Dr Who' all over it it would be an interesting mod! I just have to trim them so they butt up against the post...the way they are at the moment, it might be a very tight squeeze. this is why I started to think of joining them together, and compensating for the forward camber of the second level. I hope to have some kind of update soon....thanks for your vote of confidence.......and to you as well Piet!
-
some very nice structure work.......are you using another of the archive pens to touch it up after? how much of this will you / we actually see? detail goes very deep into the model
-
thanks Robert and Piet yes, it was a fun project. at the moment, I have the trawler Syborn and the Half Moon sitting on the main table...the Norden is still on the table in the spare room. I was think'in about these two....the half Moon......I'm debating whether or not to order the triangular dead eyes for her...she might look terrible with the round ones. the Trawler Syborn.....I decided not to use the life boats, and have her sporting the life raft bins. I ordered a package of four from Billing USA, but they are too small....I need to order the larger ones. so the probability meter went into the red for these two. I'll think further about what to do next.......I'll have something on the table soon
- 378 replies
-
- 7
-
-
- t78 norden
- billing boats
- (and 1 more)
-
thanks Piet........yea, I'm making some headway.....now to get back to the build. I got side tracked yesterday......it was a nice day. not that I had yard work to do, but the fact that I had to replace the entire exhaust system in the car. I could have gotten away with just replacing the resonator pipe and muffler, had someone not cut off the flanges and welded the pipe to the front pipe {a repair before we bought the car}. just as well, because I had already replaced the flex part of the front pipe about a year ago, and it had developed a leak...it too was beginning to break again. the weather was forecasted to be rainy all week....but yesterday was dry and in the 50's. so, being a good day, I ran the car up on the ramps, jacked up the rear to get it off the ground, and did the whole job. I had the nose of the car in the garage, and the rest of it outside, cuz I don't have a lot of room. I had called my brother about it, since he has a lift, but he had a tough job going on at the moment and he was in a foul mood. AWWWW, what the heck......I'm used to doing things like this. I do my own work. I shake my head sometimes.......all through my younger days, I used to get stopped, because I was runn'in a cherry bomb, or some other enhanced exhaust system....and today, you hear these kids scream'in by the house with exhaust systems that make you think they're runn'in off the manifolds! enough rant this morning, I took a review through all the build logs I've written on Word Press.......I am so astounded with how many there are! I have Wenzel's Wharf and 11 different drydocks........and then add the ones I have on Blogger. glad I like to write, all I gotta say
-
when I build mine ....that's what I meant. I saw your new project......a very original project indeed.
-
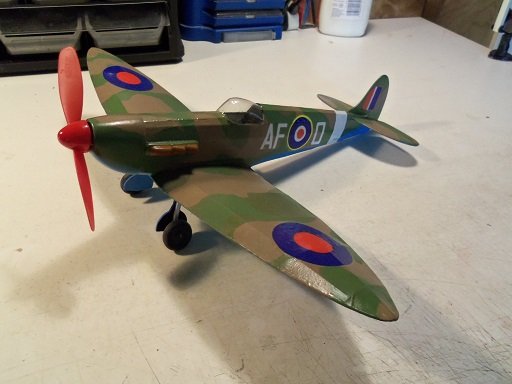
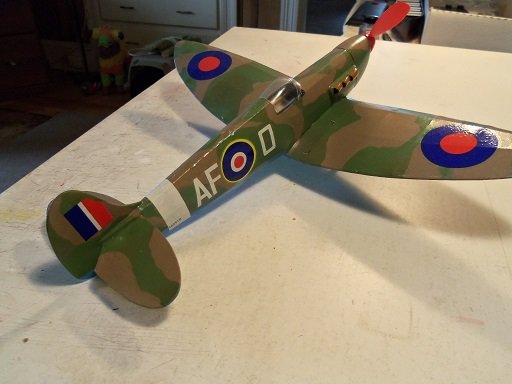
splendid job Mike! I would have voted for the half covered too.......sorry I lost track of the log I did something different in regards to the covering too. I built the Guillow's Spitfire MK1 a while back. I knew that the smell of dope would send the admiral into a tizzie, so I used a less oderfull approach. a must is a good atomizer bottle. after tussuing the model {I do it apart} I spray it with a watery mix of white glue.....a couple of times, allowing it to dry each time. it will shrink up just as well, as good as dope does. with a real soft wide brush, paint on another coat of thicker diluted white glue. when that's dry......airbrush the paint.....I use flat enamels. for the prep work on the frames and wings, I use lacquer.....doesn't matter what sheen, it's gonna soak into the wood anyway. the finish comes out just as good. I haven't flown it yet.......my track record for rounded fuselages is not that good. the best flight I ever got was from a Fokker D VIII seriously nice work on your Fokker though.....really like the markings don't think I'd have the patience for one like yours. congratz on a beautiful model
-
pinnacle looks like a model in itself! awesome progress Nils.....looking super
- 692 replies
-
- 5
-
-
- eagle of algier
- chebec
- (and 2 more)
-
that bit of rigging is just way too cool Frank! neat way to make metal cleats too. very nice progress
-
good.......so I have a log to follow he's not answering Jack....guess he ran out to get the kit
-
glad you like the pen......Danny and John {moderators} get the kudos though. the best tip I ever got perhaps you might benefit looking at some of the admiralty builds {like Danny's}......you can see the way they framed in the lower decks. then you can plank them over, leaving some areas unplanked, so it can be seen. outer planking looks great
-
feel free browsing through pictures is a good way to get ideas. you did a great job on your Norden....can't think of any other boat I'd want to be docked next to in the gallery I have no doubt that your next fishing vessel will be even better!
- 378 replies
-
- 6
-
-
- t78 norden
- billing boats
- (and 1 more)
-
thanks for the good word on the stairs......trying not to let ya'll down I need to build a shelf for the Norden........darn thing is sitting on the table at the moment.........needed better light for it's photo shoot. I'll figure something out I have to find some of those figures Nils......I'm still looking thanks! I thought about that Mike......I have some fine mesh.....or I can even use the tinted cello I'm using for the windows. it would have been good if the Model Shipways grating worked out.....smaller mesh...I wouldn't have to worry about being able to look into it. I'm sure I can block it out with something....thanks for the offer jee Sam.........hmmmmmmmm, could be a way to get a leg up in that line of work if my current job does a nose dive, I'll let ya know
-
I've heard of folks doing this........likely this is the reason why. good save
- 89 replies
-
- 1
-
-
- constitution
- revell
- (and 1 more)
-
thanks John....we'll be side by side in the gallery thanks for the inspiration
- 378 replies
-
- 4
-
-
- t78 norden
- billing boats
- (and 1 more)