popeye the sailor
-
Posts
16,007 -
Joined
-
Last visited
Content Type
Profiles
Forums
Gallery
Events
Everything posted by popeye the sailor
-
 a big hello to everyone........thanks for the kind word and the likes I know I've been rather spotty lately.......it was a good feeling having the time to try out a few ideas, and be at the table. Michael.....believe it or not, those are lion's heads Corel was very kind to send me some for my Half Moon {review that log and you will see them}.....I saw them when Jct did his Corel build of the same ship. I only needed six, but Corel sent me ten of them. so cool the idea came to used them......kinda fits the season, don'cha know John.....yea, time is a bit tighter. I took on a part time job recently......it varies how often I work, so it does affect my table time to some degree. but no, I won't let it get in the way of my desire to put ideas to wood are you kidding Nenad? the detail you put to those cabin structures really made me envious.......definitely an idea I want to try one of these days. no.........no Mark! I don't want to get the look again.......... it's been known to turn victims to stone!!! Greg........this is a concept I came up with a year or two ago. it was to be three boats, but one of them ran off to Hollywood to become the Andrea Gail. I guess it figured that I couldn't make a star out of it >har-umph< this particular one will be called the 'Jingle Belle' ......it is to be the caroler's boat. the structure on the aft is a warming house.........you know.......get warm, hot coco, study your lines {uhhhhhh, you were a little flat......ALVIN!} there are a few other goodies I want to add to her. we'll see what come out be welcome to review the log........way too much for me to remember
 -
oh, I knew that Nils........but the problem can also exist in airbrushing as well. angling the spray downward from the tape line can negate some of it, but if you put too thick a coat on, it can happen. not sure if you have it in your country, but I use what they call 'Frog tape'.......it's a green color tape. works so well, I've dared to use it twice.......not too often though, I don't like to tempt fate
- 2,625 replies
-
- 6
-

-
- kaiser wilhelm der grosse
- passenger steamer
- (and 1 more)
-
sorry to hear that........I could suggest something, but it seems so wrong , on so many fronts. the shelf is a good place..........
-
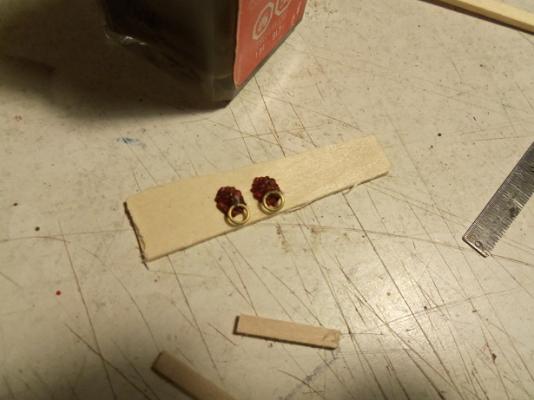
thanks Patrick ........baited breath........hmmmmmm, I wonder how that saying came to be?! did someone get drunk and eat some worms? EWWWW! sorry.......couldn't resist we have that same phrase here in the states.......I believe George Carlin came up with the punch line I think it was right before he came up with the seven words you can't say on television you are very welcome to follow along ! as I was writing this update, another idea came to me. I have a few of the tack line decorations that I didn't use for the Half Moon. all I needed to do, was add the rings, and came up with a pair of door knockers........courtesy of Scrooge and Marley ! well........the wax paper did work.......but the window maker took the finish off the paper, making it kinda cloudy. you know, I really don't know why this is so important. if I came up with crystal clear windows, I would have to finish out the interior. it would mean........interior wall coverings, floor coverings, furniture, Tiffany lamps, staffing and customers. with cloudy windows, I can skimp with just a couple simple oil lamps. I ran it by the admiral. she just gave me the look.. right..........stick with the K.I.S.S. method.........I understand ..............
-
awesome job Nils.........sweet looking decorations yea.......I'm one of those 'angle painters'.......airbrush over tape. sounds like a great tip to me
- 2,625 replies
-
- 4
-
-
- kaiser wilhelm der grosse
- passenger steamer
- (and 1 more)
-
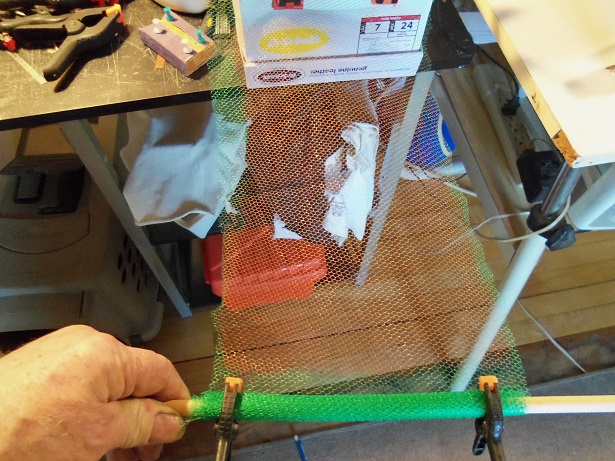
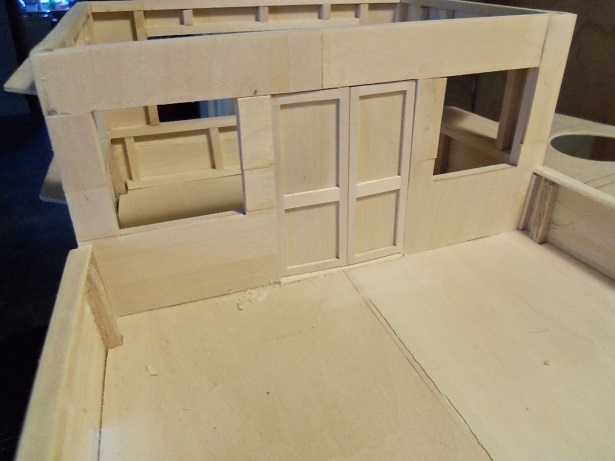
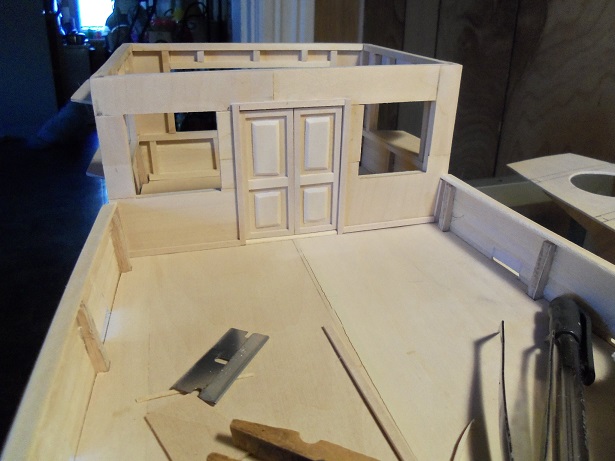
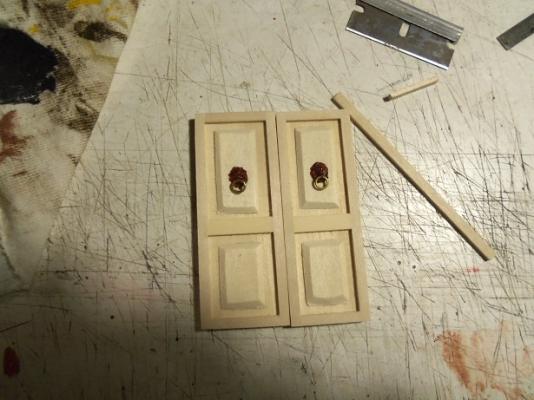
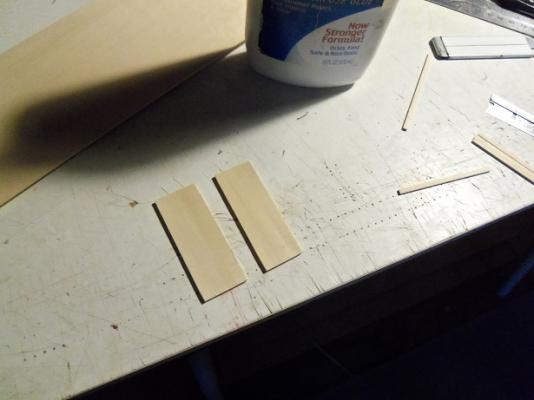
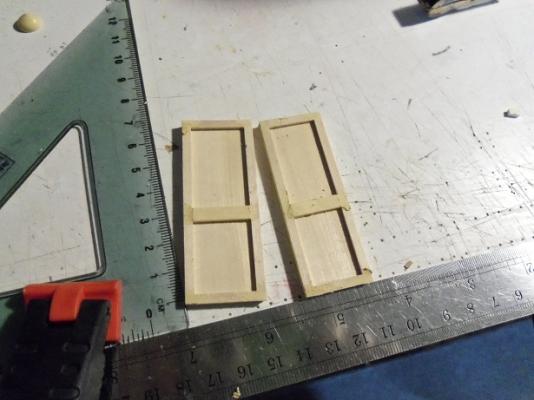
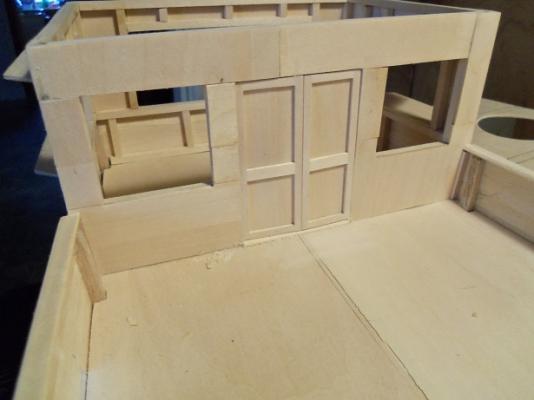
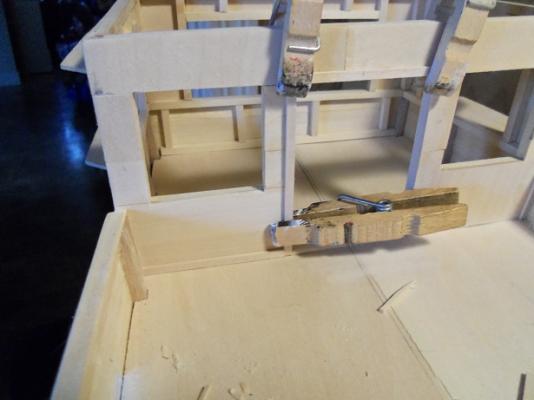
well.........this is interesting........guess I blew the deadline Michael it's OK.......I'll just blame it on Andrea I've been having this nagging thought in the back of my mind........I've had this urge to play with windows and doors. I've even had thoughts about siding. I have quite a bit of that large mesh netting......my thoughts took me along the lines of how stained glass is made. I took a strip of the netting and rolled it up on a dowel, hanging the other end off of the box that holds the Titanic parts. I painted it with copper paint. I might experiment with silver and gold........but copper seems a good start. now, I have two choices here for the glass part....I can use white glue {thick or thinned}, or I can try using the rest of the Testor's window maker {the stuff is old....it would be good to be able to use it up} to create it. I have some smeared on plastic wrap at the moment to see if it will stick to it, or I'll be able to peel it off with no problem. while I was waiting for the copper paint to dry, I started to make the doors for the front entrance. I was going to make them operational, but I think it would be best not to....they will look just as good. I started with two equal pieces of 3/16 basswood. I gave them an outer border, filling in the seams with wood putty. they were then sanded.......all the while, being fitted to the opening. I am going to accent the siding with molding along all the edges........windows, doors, and corners. two pieces were fitted along the edge of the bulwarks, more will be fitted along the deck and around the door opening. the windows still need to be trimmed out and sanded flush with the exterior shell, so they can be fitted. ..........darn crane light...........I bumped it with my head and it blew the bulb! I got another and fixed it to dress up the doors a bit more, filler blanks were made for the upper and lower voids. they were put back in place, so I could show the admiral. she was a little disappointed that she won't have them this year........she has been very good she understands though how my mind wanders.........she extended my deadline. but, if I don't deliver..........I get coal! I did mention that there are some parts that I desperately needed......could I add them to this years Christmas list. I got.........the look checking in on my experiment, I find that the plastic wrap won't do........the window maker sticks to it quite well. I've got wax paper as the next test. while this is drying, I can make the window frames.


-
awwwww......the ants look like they've had a bit too much rum...they'll perk up in a min or two see.......there goes one now ! great progress Piet........very nice rigging on the cannons!
-
again, your metal work astounds me.......hinges look really neat! skylight is looking great! didn't know Judy was in the Hospital........so sorry to hear. I hope she is doing better and on the road to recovery. snow.........oh, the word be deaf to thy ears.........we haven't seen it yet.
-
catching up Nils........the norm lately. she looking great in her new colors......the hull detail is fantastic. you've truly come a long way since I last saw her
- 2,625 replies
-
- 4
-
-
- kaiser wilhelm der grosse
- passenger steamer
- (and 1 more)
-
Mobbsie coined it pretty good.........there's a lot of very nice planking there. you've done a super job. finger's are crossed for the admiral.......I hope there's a solution
-
very nice work Jesse.......you made it just in time for the Holiday! wish mine was
- 56 replies
-
- 5
-
-
- rouse simmons
- bottle
- (and 1 more)
-
I've heard of it, but never tried it.........I use Testor's window maker. it dries crystal clear.......sometimes too clear for my taste what is perspex? is it what we {here in the states} call plexiglass? super job on the windows........they really look great!
-
gee John..........now it is I who have been absent for a while hull and deck looks great with the seal coat.......the grain pops out nicely. really like the structures, as others have mentioned, I like the way you assembled them. awesome progress!
- 745 replies
-
- 3
-
-
- francis pritt
- mission ship
- (and 1 more)
-
Cutty Sark by NenadM
popeye the sailor replied to NenadM's topic in - Build logs for subjects built 1851 - 1900
hello Nenad! trying to catch up with my build watching.........MAN.........have you been busy! the cabin structures came out fantastic! no matter about that tiny pho-pah that happened........they still came out the way you envisioned them you know.......I've been following your build from the beginning.....you've kicked yourself and pointed out some of the errors. but I can tell you.......whose gonna notice them, with all the fine detail you've put into her? I love that shot of her with the structures on her decks beautiful work Nenad........the time you've spent shows......the effort gleams! I can't wait to see her masted! very nice work my friend! BTW.........what's with the 1/100? whose gonna notice a split hair- 4,152 replies
-
- 7
-
-
- cutty sark
- tehnodidakta
- (and 1 more)
-
finally I got to catch up on your progress Patrick........all I can say is wow! you've really made some fine progress on her! can't wait to see all the interior work! keep it up.....your doing a splendid job my friend!
-
Thanks Gents........those boats look really sweet Mobbsie yea.......I'm sure I have some 2 mm blocks around here somewhere. with this era of ship, I'm sure it's nothing too fancy working this morn........I'll see what spare time I have this afternoon.
-
thank you my friend hope to have an update on her soon it's never too late to finish your build
-
I like your sense of humor J............takes so much of the guess work out of it thanks everyone for the good word and the likes.........I didn't get to go much further so far......errands, don'tcha know back to work at Wally {Wal-Mart} for the weekend. I'm working on a few ideas.......and the 'other' project is keeping me busy as well. I think I nee to let the cat out of the bag soon........before it gets too big!
-
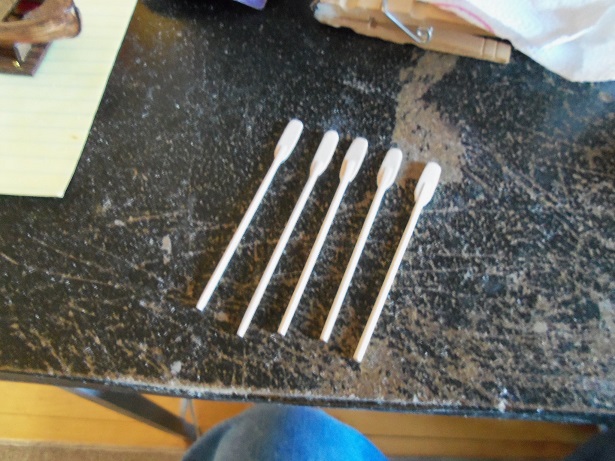
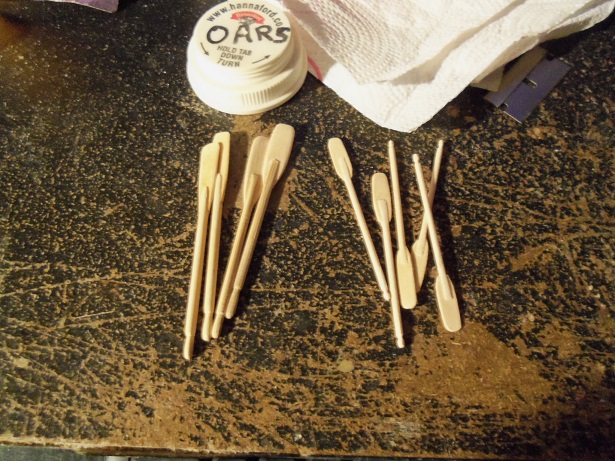
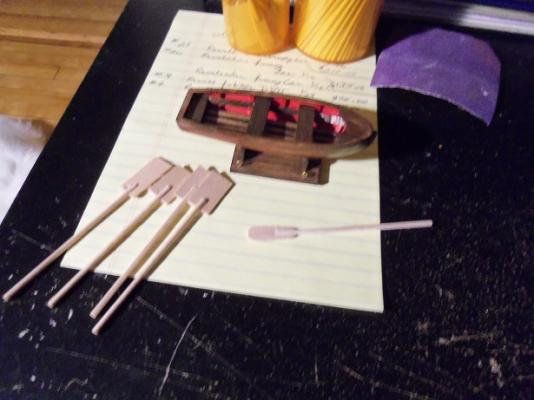
thanks to you all for the kind comments....>fighting with a very slow computer right now< Billing's has no reference to the making of oars, nor the rigging to lash it down with.....I'll try to wing it I had assembled five oars, the same way I did the larger ones. the smaller dowels worked well. I may have shown this earlier......one of them has started to be sanded to shape. now that they are all sanded to some kind of shape.....they need to lose that 'paddle' look. I did the first one. ....perhaps a bit more.....but the other soon had the same shape. very hard to get them to look all the same compared to the other set, they look much smaller. they probably should be scaled down a bit more, but they are good enough for me. they were stained after a little more sanding.........and four of them were cemented on the ship's boat. the next thing to do, is come up with a good way to lash her down.


-
thanks to everyone for the kind comments.....it's been a bit of a set back. knocked a few parts off in the process so far, but once I can get the decks in place, I can easily put it all back in shape again I'll show how I have the light plugs set up Lawrence, when I can get back to her. for the time being.....I need to do something about my computer.
-
good to see your back Robbyn! yea.....it's hard to get back into the hobby at first.......it's like going through a door { whole different world}. I should know.....I go there regularly once you get a routine going.........it will all come back. your work area is really nice.......the place {my} dreams are made of.....I'm really freak'in jealous over here look forward towards seeing some flying sawdust!
-
How Do You Drive Those Tiny Nails?
popeye the sailor replied to Julie Mo's topic in Wood ship model kits
personally, I've had good luck with the pin pushers. I can only work with the 7 mm brads though........not sure if they have one for the 10 mm brads. I used to use a solid rod with a handle on it...but it was too much trouble. had to push the brad in part way.