popeye the sailor
-
Posts
16,007 -
Joined
-
Last visited
Content Type
Profiles
Forums
Gallery
Events
Everything posted by popeye the sailor
-
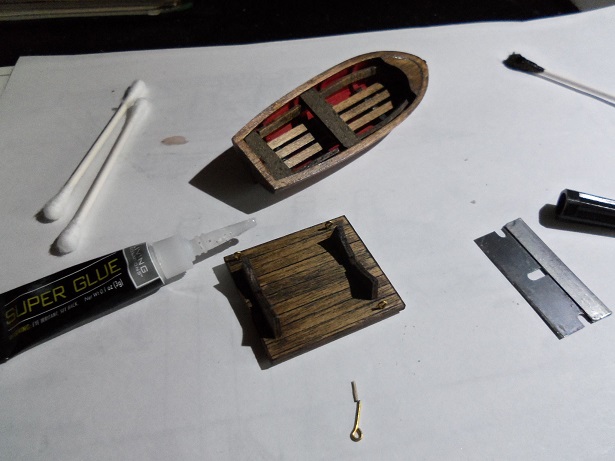
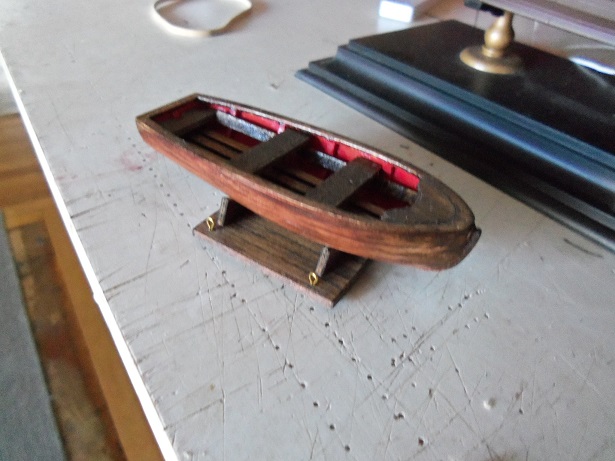
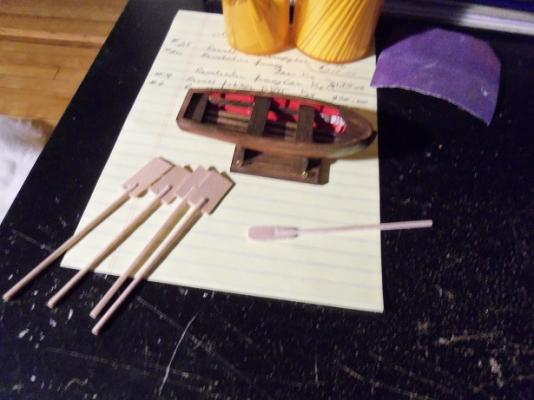
 I was hoping to get these up before now....... stuck with a moment to spare, I did a little bit to the ship's boat. some eye bolts need to be added to the hold, as well as the remaining seats for the boat itself. when this part of the assembly was done, this is how it looked. I want to add a little more to it, so I went into the oars I made for the Susan A build.......I had made quite a few in order to come up with a couple of matching pairs. sadly, they look a bit too big........it's looking like I'll need to make them. I'm glad I bought that package of small dowels.........they are smaller than the ones I used to make the other ones. I have one that is close to where it needs to be.......more when I have the time
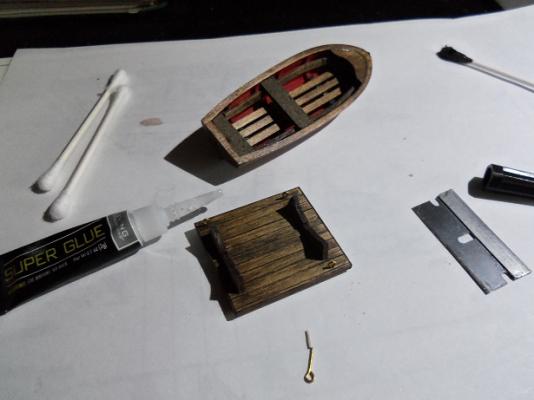


-
I've built the Cutty twice........the second I still need to repair and finish. 1959.......yea, that's old.......pretty sure that it's from the first production. I have always believed that the Cutty and the Thermopylae came from the same molds......I've read articles where folks complained about getting Cutty decals in their Thermopylae kits. there were several kits in this series.....four other models in the series shared the same similarity of production: the Constitution and the UnitedStates the Alabama and the Kearsarge I was just looking at old models.com they have this model for $210.00. I put it on my Christmas list
- 87 replies
-
- 4
-

-
- thermopylae
- revell
- (and 1 more)
-
I had to do some major catching up Michael.....I've been a bit busy of late. good to see your back at the table...I must say, you haven't missed a beat! it great to see her again....and under a warmer roof the skylight looks super! very nice work indeed!
-
your doing a pretty good job here.........I've had thoughts about something like this, but no place to apply it this in itself, is a really complex model! looks super! how are you with a big block?
-
very interesting I should see this.......I have been doing the same thing with a Billing's Bluenose kit. a friend sent me his build....too ill to continue....he had botched the scuppers badly in shipment, there was damage........in trying to repair it, I got an idea. I took it apart and traced out two more sets of keels and bulkheads........I intend to have three.....the two bluenoses and the AmericA. it's supposed to be secret, in case it don't work out......but I see something that I may need to change......the transom plate. yours is shaped so much better they look really good.......I wouldn't worry too much about the warpage. I think by starting the hull planking on the port side {your warpage seems to go starboard}.......as it dries, it should pull it straight again. mind if I pull up a chair?
-
if it gets any more colder 'round here John.......I won't have to winter's coming......but the almanac says that we won't see snow until late december / early January.thank you my friend thanks for the likes everyone!
-
is there a mold date on the model.....it can be found on the center section of the deck, near the main mast hole. that's where I found it on my Cutty Sark...I did think it odd that they'd put it topside, rather than on the under side. the sails get brittle on older kits....I have a few spots on my United States kit sails is there a decal sheet? if there is, they may be micro cracked......you won't find that out until you use them to prevent this, there is a product you can purchase......Testor's decal bonder. sprayed on the decals before hand will prevent this from happening. the only drawback is that you'll need to cut them out close to the image. long story on how I came to know this
- 87 replies
-
- 3
-
-
- thermopylae
- revell
- (and 1 more)
-
I can see why that engine appealed to you.......looks really neat! nicely done J
-
OMG!!! I haven't seen one of those kits for ages! you are so lucky to have snagged one of 'em which way are you going to go.........Barque or square rigger? how do the sails look? definitely will keep an eye here
- 87 replies
-
- 3
-
-
- thermopylae
- revell
- (and 1 more)
-
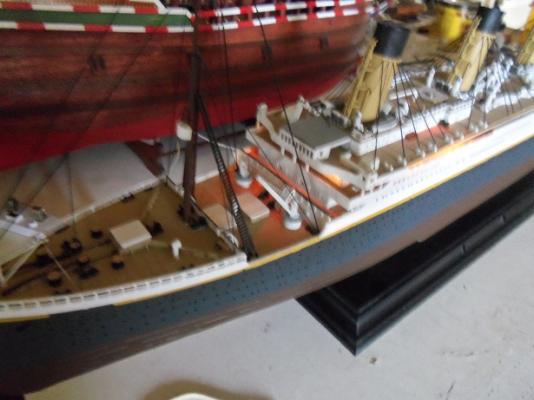
I did get to fiddle with her a bit........... the deck assembly was removed........really stubborn bugger.......the aft railings paid the price. they just popped off.....I can put them back on later. anyways........the sides were sanded some more, so the fit might be better. it was a combination of the fit and the wires that is causing the problems.......I made the adjustments, but still have to move the wires around for the fore section to drop into place. since I said the heck with the extra lighting, I was curious to see how she would look with what I had ......... I have to get the light in the fore section to line up with the forward galley dome. here is the problem area I still need to fix..........I shouldn't have left the assembly in place for so long. it caused the side to bulge out here is the fore section........ ...and here she is shown aft. I probably should have waited til it got a bit darker.........but the admiral liked it, and I guess that's all that mattered. I'm hoping to get more done on her this week

- 573 replies
-
- 25
-
-
it would've been a great birthday present, to see this log hit 100.......if you weren't feeling so poorly fingers are crossed for you my friend.......good luck at the doctor's tomorrow!
- 2,191 replies
-
- 5
-
-
- confederacy
- Model Shipways
- (and 1 more)
-
good to see she made the move with just minor damage.........glad to have you back among us!
- 1,616 replies
-
- 5
-
-
- caldercraft
- agamemnon
- (and 1 more)
-
very nice looking ship........has such a nice vintage look to her you've made a lot of progress since I last looked in
- 274 replies
-
- 2
-
-
- Santa Maria
- Artesania Latina
- (and 2 more)
-
here's hoping that this post find you in better spirits and feeling better we miss you
-
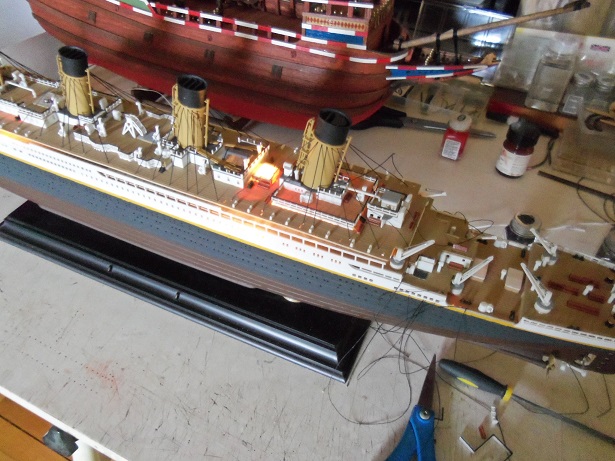
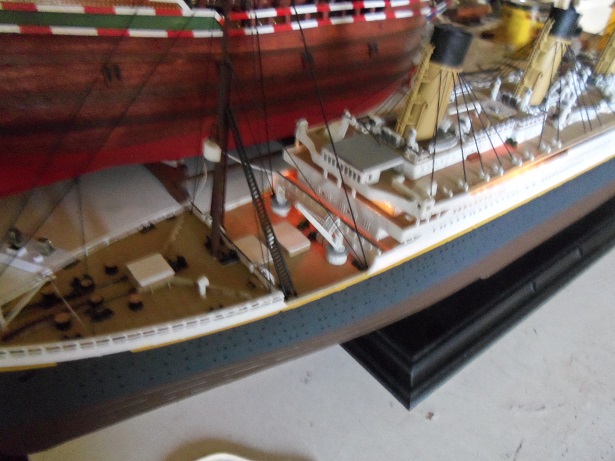
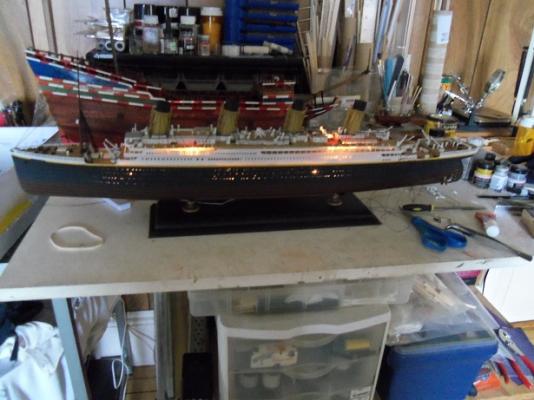
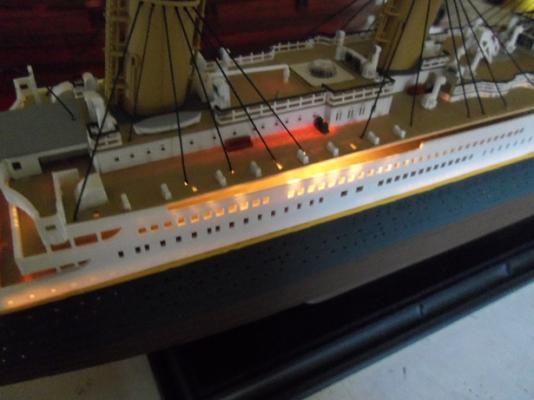
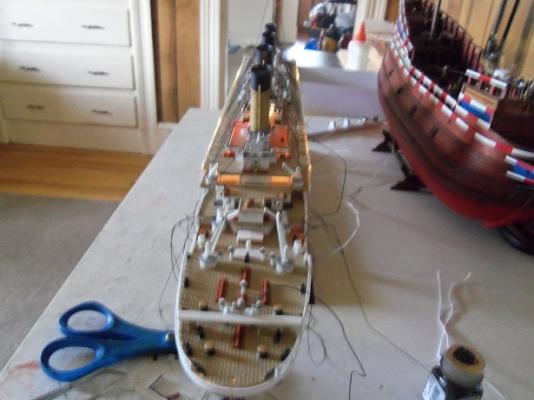
I finally made it through an eight day stretch {work}. the boss of my part time job went on vacation and I covered for him. I have today off......should be doing the outside things I've neglected.......but it's more fun peeking in to see you fine folks! I haven't had time to do much today....but I did manage to put a finger or two on the 'other project' I've been play'in with. yes....a wooden deck would really snaz it up a notch Nenad.......but this is the basic kit. if I had one of the other versions, I would have gotten the wooden decks and likely some of the P.E. that goes along with it. I guess I can be content for the small enhancements I was able to do thanks for your thoughts and the good word your eyes do not deceive Patrick and Greg..........the Half Moon is in the background I had to get the Titanic up higher where I could work on her better. until I get the deck fit issue resolved, she will share the spotlight with the H.M. thanks for the good word.........perhaps I can get something done on the Half Moon as well thanks Pat...with all the detail that this kit possesses, I'd still like to see what the Minicraft kit looks like. thanks for your kind word
-
shrouds and ratlines look really sweet Ron. you've gone quite a ways since I last looked in
-
looking sweet Peter..........nice job with the rigging!
-
holy cow.........you done some really great progress since I last looked in! sails and rigging looks really sweet!
-
the ultimate 'group build' my admiral is my color coordinator too {olive drag on what!?!?!.............get outa here! } it's a good thing to join forces.........plenty of time for that solo build. your progress looks great!
-
Hi John..........unfortunately.....I've been busy doing other things. but this build is a nice break from the Titanic {plastic}. I hope to get some time in on her soon thanks for the good word
-
thanks for the good word Lawrence. the kit doesn't include the innards........too many tiny parts, and I'll go cross-eyed! there are at least three versions of the Academy kit........this is the basic kit. the others have the photo etch and wooden decks glad to see you back Greg! I know how it can be......I'm caught in a work rut at the moment. I did take one picture though.......it not seating too good, probably the wires in the way. but here it is the lower portion isn't cemented in place yet. it will help me in sorting out the wires. I will try to get one with it lit thanks for the good word!.........and yes, there is a lot of neat detail. there's more to go still

- 573 replies
-
- 25
-
-
well happy anniversary Lawrence........I hope you two enjoy thanks for the good word as well! thanks Greg......work is getting in the way at the moment, but I hope to have something done on her very soon. only a few more things to add on deck....and then masting can happen
-
hi Frank......I have to do something with wood to keep my sanity thanks for the good word the Goth is still alive
-
believe me gents.........there are plenty of mistakes paint hides very well your all too kind! I haven't got much done of late on her.....I did manage to set the assembly on the hull. for some reason, it's not fitting well......the ill fit is also causing the guy lines to go limp. I'll have to play with it to see what's going on. time is going to be tight this week........I'll see if I can add to the build thanks for the kind word......glad your all enjoying the build. I can't wait to see how the Billing's Titanic comes out Gary........but you have your hands full with the Cutty Sark welcome to the log Adam........I was big on plastic as well. wood has spoiled me bad!
-
thanks Brian.......your welcome to any ideas I have here I'm going from memory here........the kit came with frames, keel, and every thing to make it. for planking, I ripped some 2 mm {I think}, to get the thin strips I needed. I need to set the ship's boat on the hold that it's cradled on, and add it to the build before I get to the masting. I will post some pictures soon. in the meantime, look back in the log......I'm sure there's something on it look on page #38....... you'll see the tack line sheave decorations I got from Corel too......there's more on page #41 there are some major differences between the two kits. I altered mine from pictures I found on the net. I need to catch up to where you are on your build.....your doing a great job so far