popeye the sailor
-
Posts
16,007 -
Joined
-
Last visited
Content Type
Profiles
Forums
Gallery
Events
Everything posted by popeye the sailor
-
 this is a fine looking build you've got going here. did you get to finish her?
 -
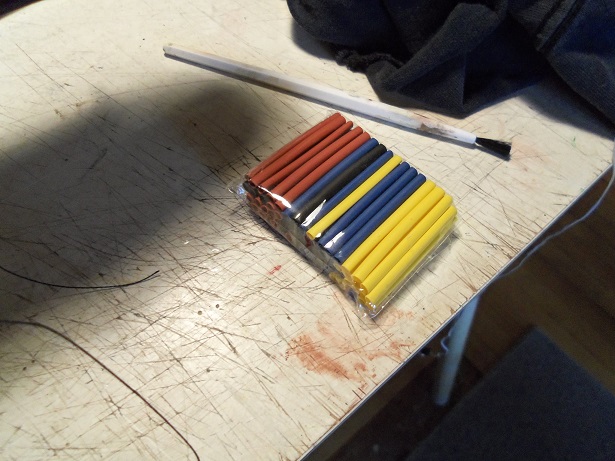
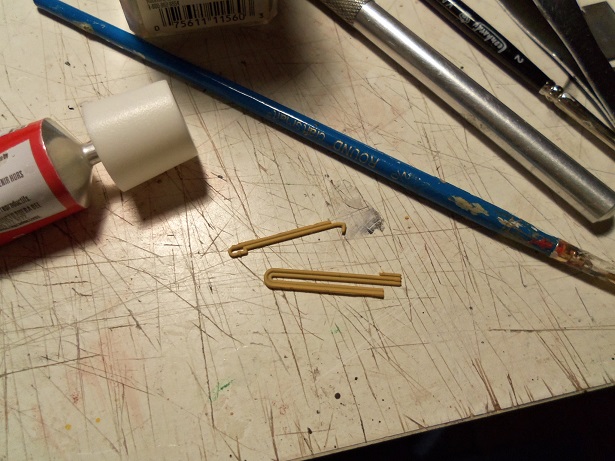
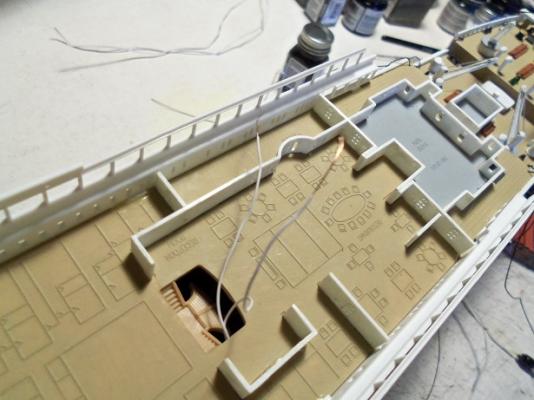
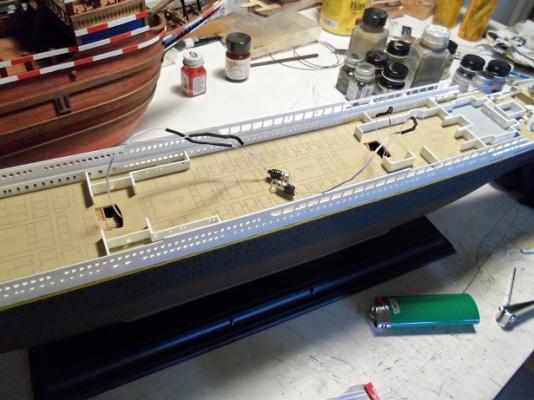
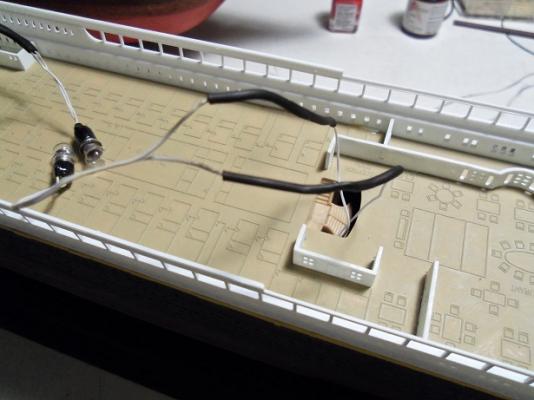
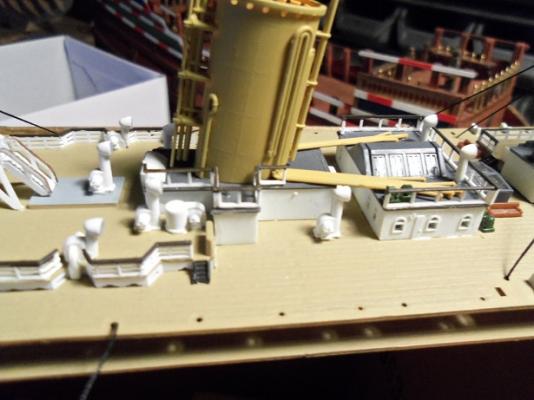
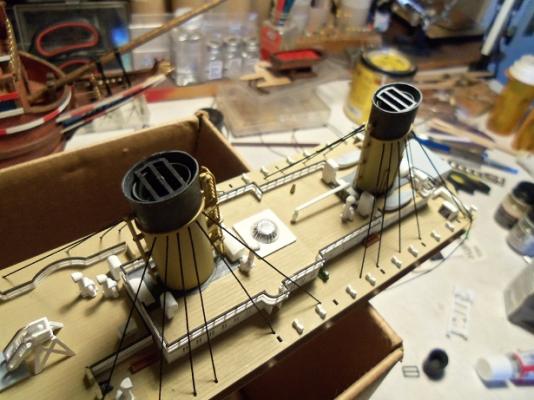
....but wait........there's more! out came the hull...... my son supplied with a whole pack of small shrink tube.. I was going to add a couple more lights to the mix, but the heck with it, I'll do with what I have. so, I stripped the wires...it was very easy........did it between my finger nails the lights were soldered in place and shrink tubed.... now.......if I don't have any more interruptions.......perhaps I can put all this together

- 573 replies
-
- 22
-

-
thank you Pat.........would have answered you sooner, but I got done posting the rest of the update.......and the admiral announced that the light in the range hood wasn't working {they had to remove it so they could access the pipes in the wall}. she told me they dropped it on the floor. so, I replaced the bulb and it still wouldn't work! I opened the access panel for the wiring and I found that one of the connectors came off the switch. I couldn't get the connector back on, without the threat of getting zapped, so I went to the breaker panel to shut off the one that it belongs to. I was running the fan........told the admiral to let me know when it stopped working. I had shut off five of the breakers.......the rest were doubles {I ran into the same problem when I did the security lights for the garage }. I thought the hell with it and hit the main breaker!...........shut off the whole apartment! all this just for one stupid connector....this place is totally screwed! can't wait til we can get our own place again! that would be a wonderful pipe dream....but I gotta help feed the coffers that keeps Uncle Sam in packet change
-
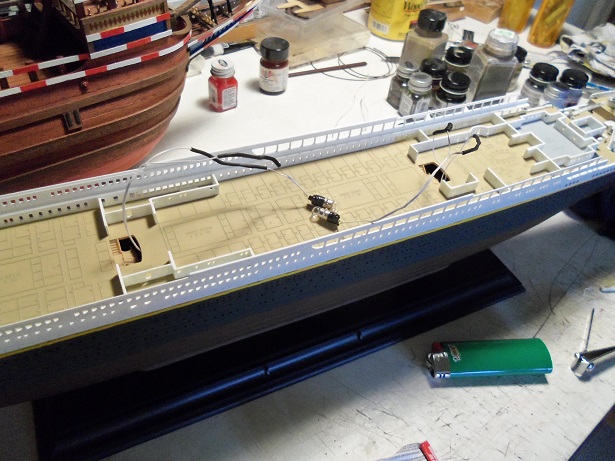
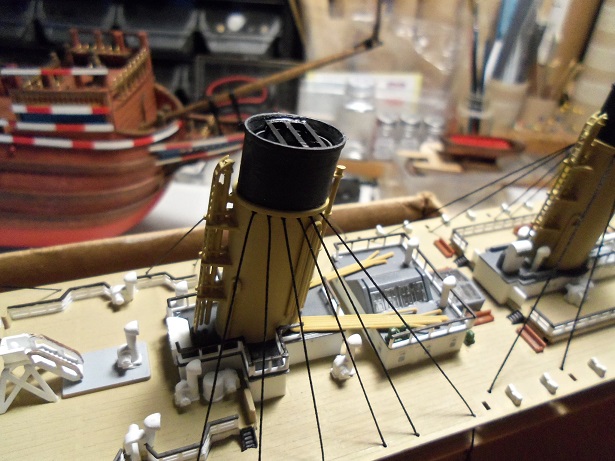
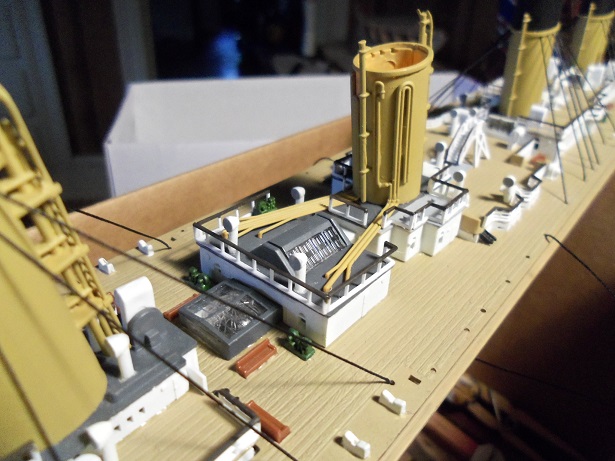
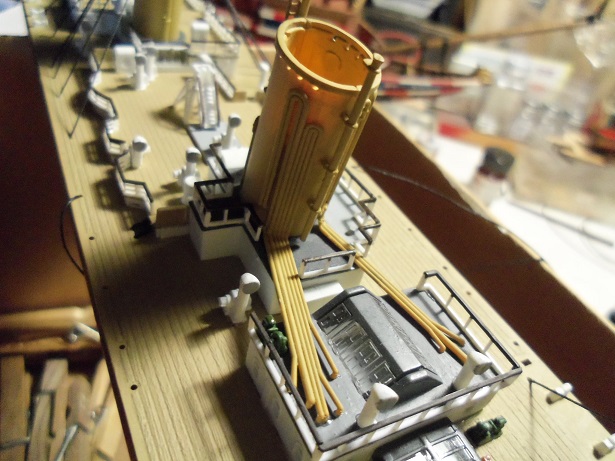
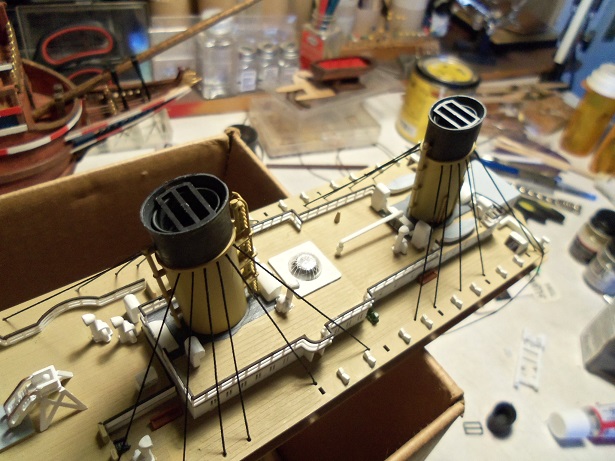
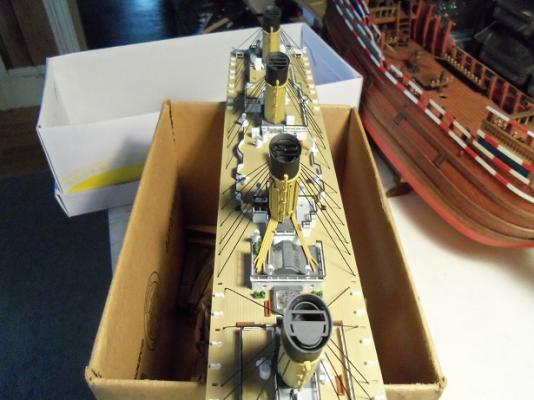
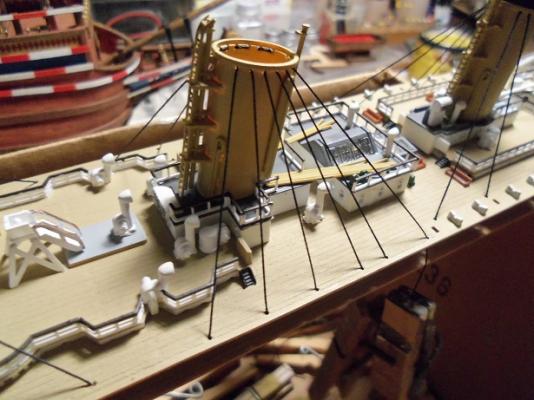
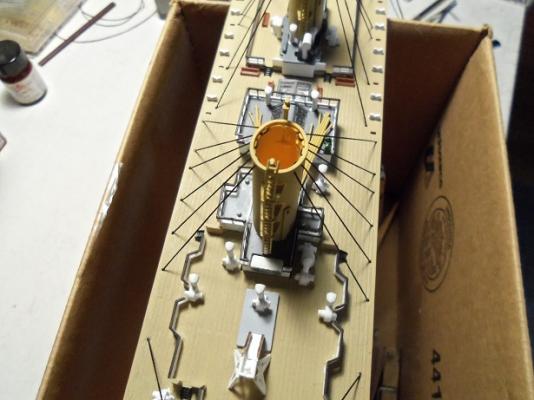
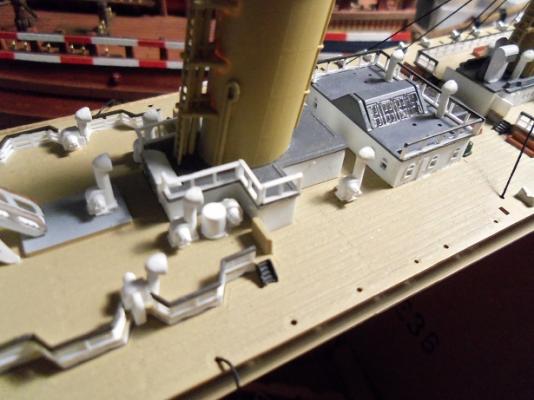
got back home around 1:30 PM..........the plummer left about 1/2 hour ago. spent a bit of time setting the kitchen back up and washing the floor. what a mess! anyway.........back to the Titanic...... I used CA on the rigging of the funnel.......trimmed off nicely ....found that I had a couple more pictures of the guy lines. I guess the next thing to do, would be to get the top on the funnel. I'm not sure if the grate is painted in these pictures.......they are in these pictures though.


- 573 replies
-
- 25
-
-
I would imagine that they are part of the coolant system. to try and better answer your question, I did a little surfing....... found a couple sites that had blueprints, but the pictures wouldn't come up for me for some reason. looking art the diagrams on the bridge deck......this funnel would be closest to boiler #1&2.......definitely for water circulation. if I find more, I'll post it thanks for the good word thanks Bob.......it's been a fun trip so far, getting back to where I began. but I can tell ya.......every time I mess around with wood......I feel at home again
-
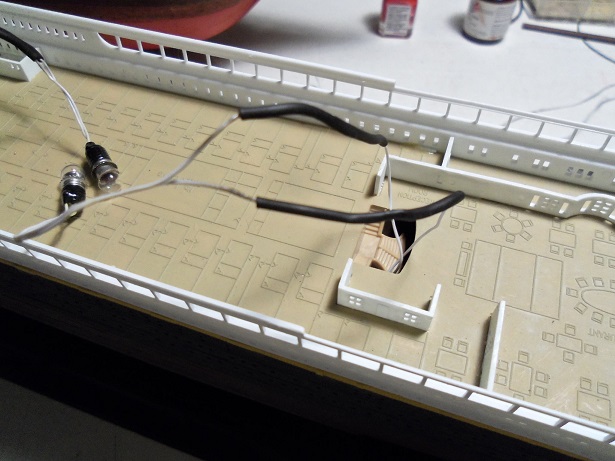
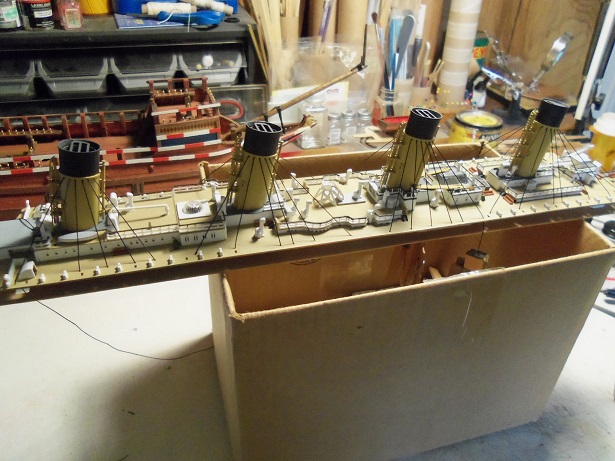
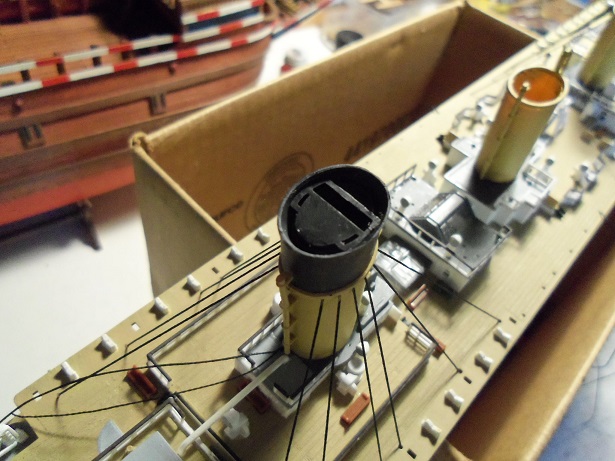
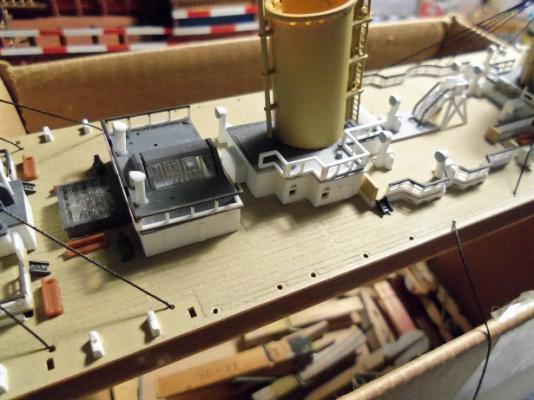
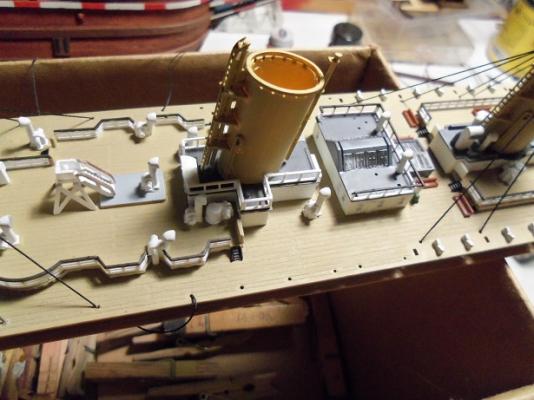
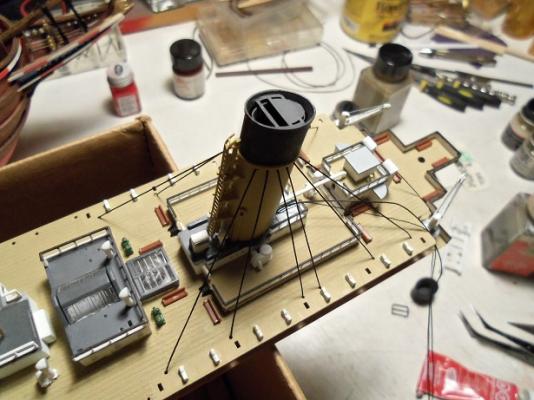
well........things have taken another turn. I was kinda on vacation from the part time job until I got my badge.......I have it now. I worked last night and I need to go in this morning. I have one humongous update.......here is the beginning of it...... the port side pipes were cemented in place while removing the sprue stubble from the starboard side pipes, the darn thing broke! but I managed to get them on anyway then the railings were added, along with the section for the back edge, between the two pipes now I can rig the guy lines the rest will have to wait till the afternoon. I got to get ready for work. there's more crazy stuff going on behind the scenes here......got a plummer coming......the power company is running all over our neighborhood replacing transformers {I hope they don't block our drive way again}........to name what is to be today. tomorrow might be worse.......power might be out for a while.........I'm going back to work again for the evening. the fun is beginning


- 573 replies
-
- 18
-
-
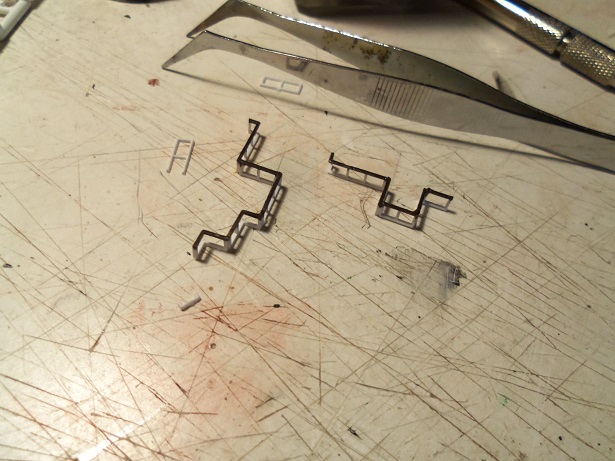
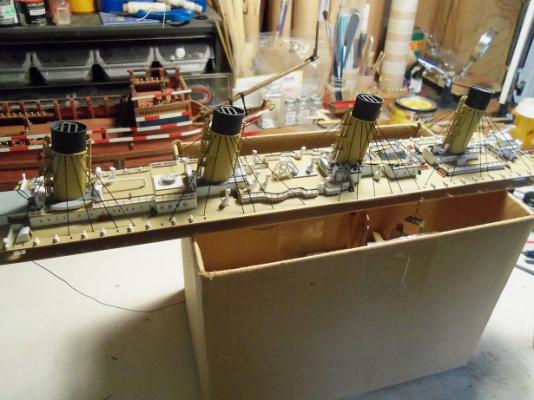
they are Sam.......and very fragile. I'm still not done with them yet........more after the top section is on the hull thanks for the good word !
-
thanks Lawrence........I've been doing a few other projects at the moment.......but I'm trying to squeeze in the ship's boat. it'll be a mini project by itself
-
thanks George........and all you who hit the like button! I will add more later..........got to get my nose out of the site long enough what can I say...I was deprived.........I didn't turn on my computer once this week end! thanks again all!
-
glue it on which ever way it looks right..........this is war......damn it! I just browsed through this log.......I must say, you did a splendid job........it looks great! I can't believe I missed this one....I enjoyed every minute of it. the concept of it is very good and some of your techniques are simply genius! I have a friend on another site, that started a 'battle of Britain" doirama last year.........it isn't even close to getting off the ground yet. you did this in a fairly short amount of time! .....very glad you didn't bin this build..........super job my friend!
-
my.......what a cool looking boat your building! catching up on the logs I view.........I hardly get to meander anymore {I have so many that I look at}. the veneer and the gray is a nice combo.......did you score all of the bunker doors {like the idea of the coal} very nice progress J..........so glad to have you on my watch list again!
- 105 replies
-
- 4
-
-
- picket boat
- model shipways
- (and 1 more)
-
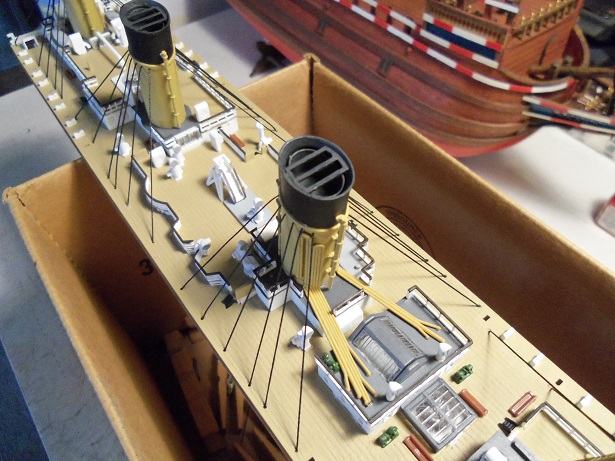
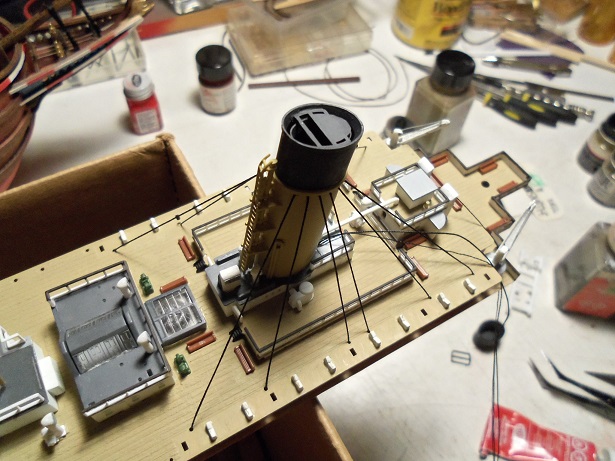
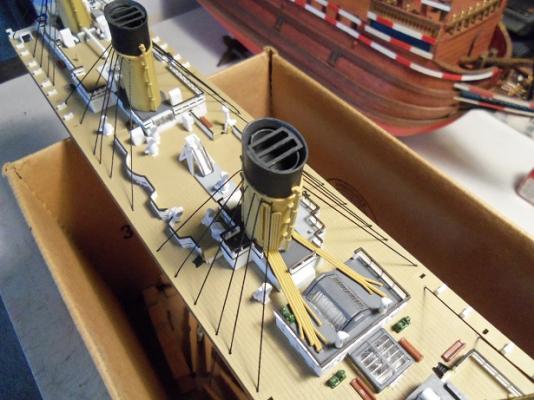
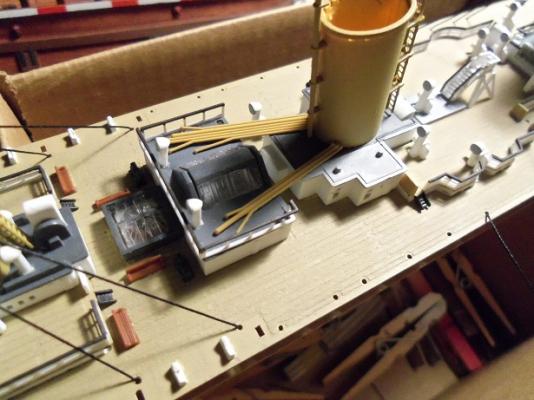
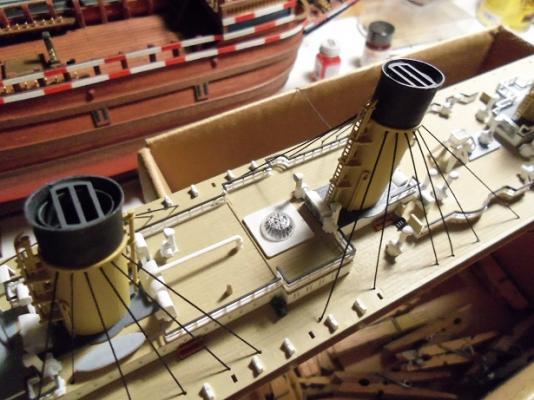
this morning.......some touch ups were made. instead of doing a dry fit, I just cemented the bottom part of the pipes in place. I then found that the port side railings was wrong......I shouldn't have over guessed them. but it looks like the railings would have been too long anyways.. I painted the hand rails of the railings the port side has already been trimmed down to fit.
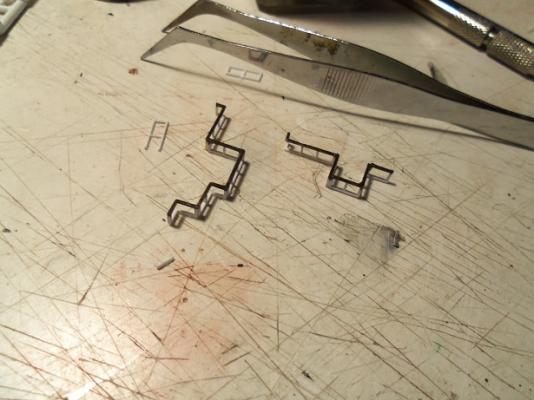
- 573 replies
-
- 20
-
-
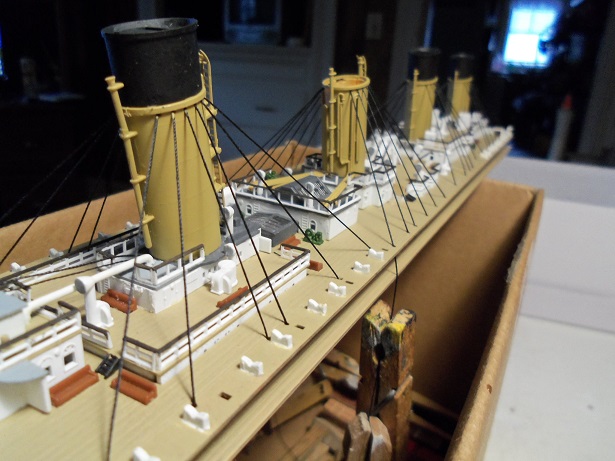
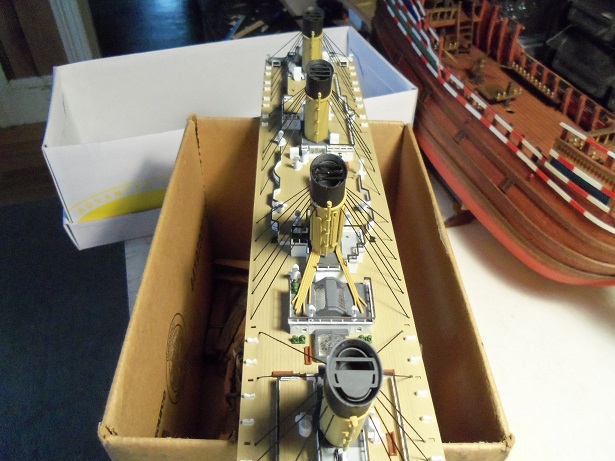
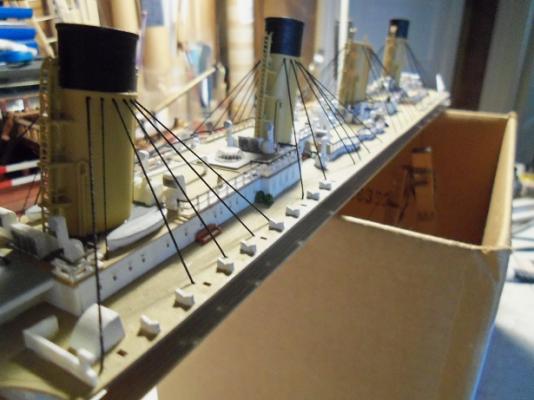
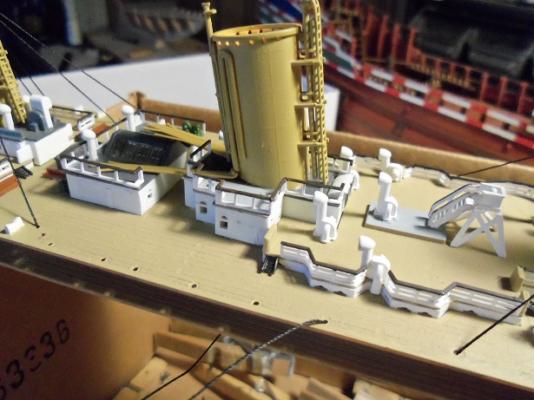
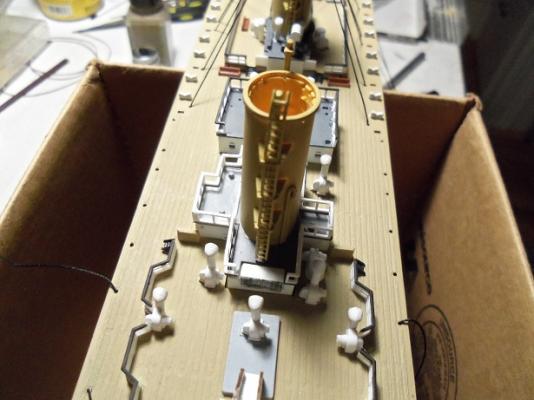
I know I promised this to you fine folks last week..........but with the way this work week went......well..#%$^*@! the shop is too small a place, to have that much drama! too long a story to get into the policies and politics of it all. last week, I got to do more on the Titanic. I did manage to add the fourth funnel top {if I didn't mention it already}. the grates were added in the openings of the tops. the fourth funnel is the only different one........it has a damper molded to it. the starboard railing is assembled. as it dries, I will make the port side railing. I wasn't sure how the pipe work ran in this area.........I initially though the port side railing was wrong. so, I fitted it so it would go the entire length along the edging. here's a view from the fore end....... we had taken off at this point to run errands........I managed to do a little scavenger hunting. I found some flat white, since what I had dried up on me. the inner part of the tops is painted in that hull black that I had mixed up. the grates were painted with it after they had dried.

- 573 replies
-
- 17
-
-
get better Patrick.........no need to apologize about anything. I'm keeping my fingers crossed I can finish at least 1 more built before the year ends I look forward in seeing you resume your work on Majellan {if you haven't already......I'm still getting caught up}. thanks Mobbsie.........the second job is on hold at the moment.......I need to have a clearance badge just to be on the premises. I've been working over there for three weeks already..........now somebody has finally realized that this is out of policy woe be unto the airline passenger...... they are still not 100% safe yet so........I can't be there until I get the badge {good thing I'm not depending on the extra cash} but.........I can't use the second job thing as an excuse......I wouldn't be totally truthful if I did. while it does slow me down a little......another idea is brewing {if the admiral saw the complete scope of it, she'd kill me}. this has consumed some time as well {small amounts over a long period of time}. I said it once......I'll say it again......it's just too delicious to pass up. thanks Lawrence...makes me blush to see how much I was missed it is nice to get to the point where I can now spend some quality time........here and at the table. have you begun work on the African Queen yet?............no matter.........I'll find you great to see your up and about Greg 'at's how I alwayz goes through life mate.........wit' one eye closed! AK-k-k-k-k-k-k--k-k!
-
nice repair job..........looking in and reading all that was a shock to my system glad you were able to bring her to her former glory
- 119 replies
-
- 1
-
-
- la reale de france
- heller
- (and 1 more)
-
it looks like you printed these on paper........also another idea you could try. what I've done in the past is size the image I wanted to use, printed it out, and then sprayed it with the decal bonder to lock in the printer ink. I have also used the decal bonder on kit decals.......especially if they are old ones. this will insure that when used, they will not micro crack. the Billing's kit of the AmericA is another example........to used these decals is sad.....they are so thin, they break up into thousands of shards {micro cracking}. I got another set of decals from my friend Tom, and sprayed them with the decal bonder. this cured the problem perfectly......the only thing I had to do was trim close to the decal when cutting it out. here is what prompted me to buy into the decal maker program. I sent in a request to Revell for the decal sheet for the Cutty Sark 1:96 scale. I got a pristine decal sheet........you'd think no problem, right?!?! well, I guess it depends on how old they were.......because to slide them off the paper.......they micro cracked into oblivion! if I had known about the decal bonder, this could have been prevented. anyway........looking for an outside company to print me a decal sheet was futile {there is a guy named 'parker' floating around forum sites.......if you see him, boycott him!} that's when I stumbled upon the decal maker system......managed to make my own decals ever since. examples of what can be done with the program, can be seen on my build of the Susan A and the Andrea Gail.....both are in the gallery
-
I have the 'decal it' decal maker.........one issue I've been stumped with is the transparency issue. I found it best to apply the decals to a white background, since darker colors tend to render the decal invisible. I'm sure it has to do with the pixel value.......I've done a few experiments using white decal paper. the one problem here, is the white areas that are trapped within the decal itself. it's very hard to trim out all of the white if the background is a darker color. I have been in contact with the Sure Thing people and I was told that there is an update for the standard edition of the program. don't get the basic, because it will not allow you to import images into the program......only the standard edition will do that. I have even scanned stencils and imported them......very nice if your looking for scroll designs. roman numeral.......number and letter stencils can also be scanned and imported as well......it also has a limited number of fonts you can use too.....really dresses them up I'm sure you know this, but decals as a rule, will only stick to a gloss background......a background using flat paints will not do as well. I like your idea......it coincides with my ideas of utilizing crests, crosses and embossing sails.
-
I'm surprised that those holes weren't predrilled and already there. but I guess if this is an older kit, they might not have been. very nice job you've done there
-
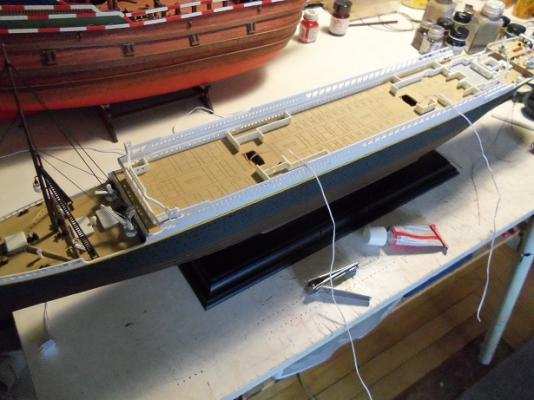
thanks Patrick............heck no.....still got a ways to go yet. there is a lot more railing work to be done after the deck assembly is cemented on the hull. glad to see your recovering well
-
gee Frank.........your going like a house a fire! splendid rigging so far. apparently........you figured out how to do it great job!
-
good to see you back to the table..........done some wonderful progress nice looking work shop too!
- 274 replies
-
- 1
-
-
- Santa Maria
- Artesania Latina
- (and 2 more)
-
well......thank you so much for the kind comments taking on this part time job, I was told I'd be a fill in.......20 hrs a week. I thought....cool, I'd use it to buy supplies and stuff. I never thought that it would slow me down. I'd worked at night a couple of times......tried to do a little, but I couldn't concentrate. I'm getting used to it slowly......and now getting to the point where I can play with the free time. winter's coming too.......there will be more indoor time....unless Gibbs has anything to say about it I did some more today.......fixed the damage I did the other day. I had the A and boat deck assembly on my desk and I hit it with my arm as I was passing by from the living room. more was added to the assembly as well. I'll try and post the pictures a bit later. I almost forgot how tedious it was assembling these railings........ugh! thanks David....this revisit into plastic has been fun.......but the best Titanic I've seen has been Doris's. Reklein did one as well.....he posted a picture on Nil's build log. thanks for the kudos though thanks Pat.......pleased your peeking in sure......pull up a chair and grab a mug......still got a ways to go yet had a look at your Endeavour build......sweet looking vessel life is just fine Wayne......just learning to juggle four balls, instead of three. hope you've adjusted well from the B.S. you had to go through earlier this year. always good to see you Frank. too bad you missed it......wore my best lampshade just for you :D no matter........I'm catching up {slowly}......noticed you have an update {I hope} I'll see you there
-
very nice job on the ship's wheel...........sweet looking deck layout!
-
Cutty Sark by NenadM
popeye the sailor replied to NenadM's topic in - Build logs for subjects built 1851 - 1900
looking really good Nenad........exterior decoration must be your calling- 4,152 replies
-
- 4
-
-
- cutty sark
- tehnodidakta
- (and 1 more)