


popeye the sailor
-
Posts
16,007 -
Joined
-
Last visited
Content Type
Profiles
Forums
Gallery
Events
Everything posted by popeye the sailor
-
 I have pictures of the Lady grace Lextin......her name was change for the movie, and then changed back. I did find a bit of history on the lady grace. she was sold after the movie was made.......and then later bought as sort of a museum piece. she needed some work though, and ten days into it {August 2011}, workers started a fire that gutted the helm and the cabins below. anyway, to look at her hull.....it left a large paint blotch. I may do a little blending......but I doubt it thanks Mobbsie! it works......I hope the numbers do as well thanks for the good word!
- 956 replies
-
- 4
-

-
- andrea gail
- trawler
- (and 1 more)
-
Cutty Sark by NenadM
popeye the sailor replied to NenadM's topic in - Build logs for subjects built 1851 - 1900
there's nothing wrong with them......if you mount them.........move on! fantastic work!- 4,152 replies
-
- 5
-
-
- cutty sark
- tehnodidakta
- (and 1 more)
-
thank you very much gentlemen! they're not perfect, but standing not too close, you don't really see the difference. I will try and do the numbers tonight. I hope the transparency issue doesn't ghost them out.......I may have to set up the E-machine, to find out if it's simply a compatibility issue....not being black. gotta go to work now.....see you all tonight. thanks again for the good word and to all who hit the like button let me know what you do George.......especially if you find something different. as mentioned, don't get the basic.....you can't import anything with it......just make the decals supplied in the program. this was Larry Patrick.....Moe is going to be the Tree boat.......I think......?!?! oh crap.....now you got me thinking
- 956 replies
-
- 5
-
-
- andrea gail
- trawler
- (and 1 more)
-
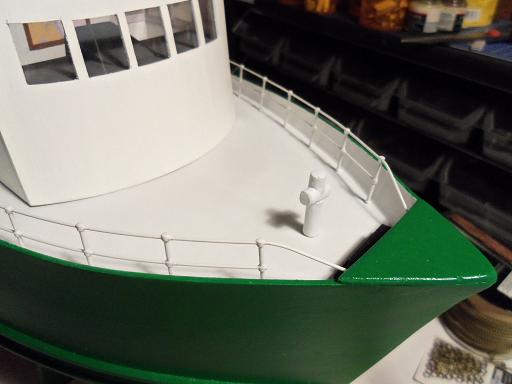
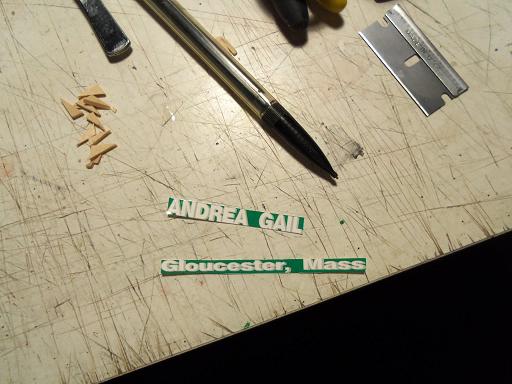
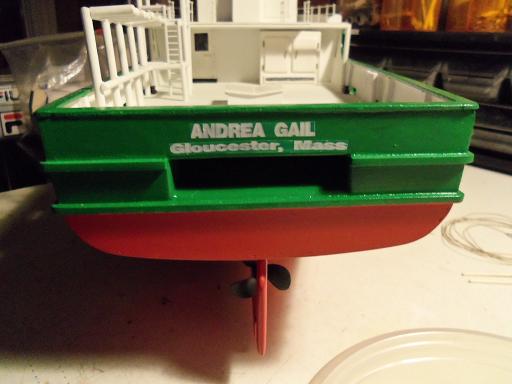
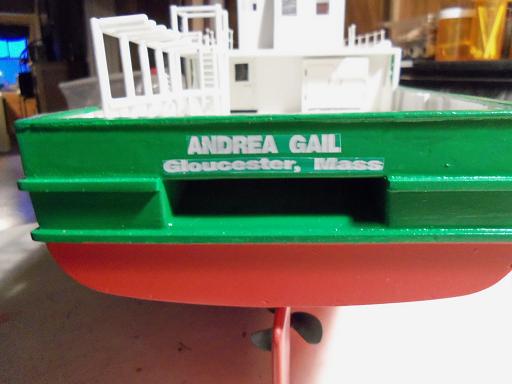
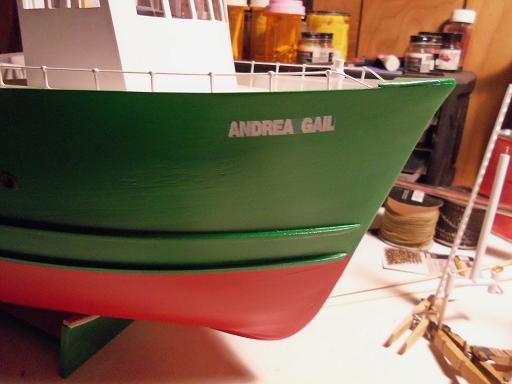
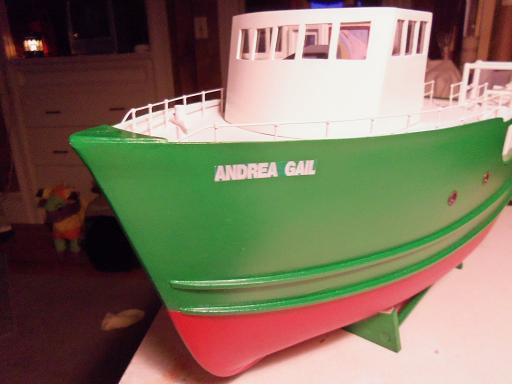
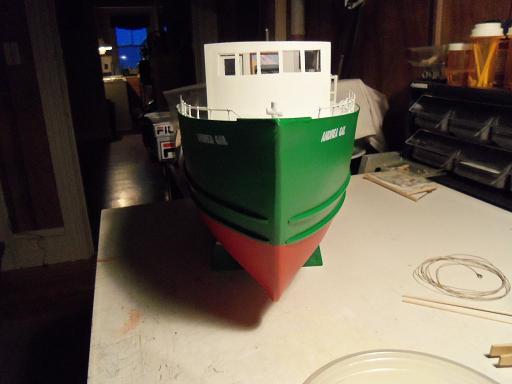
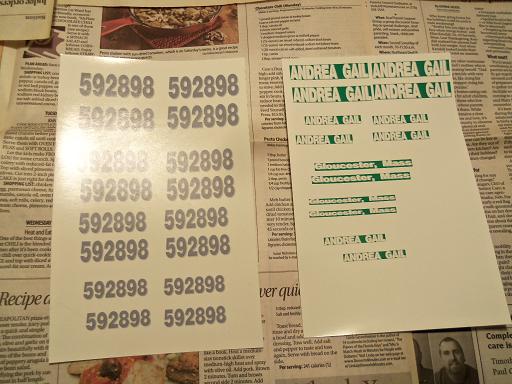
I didn't want to let you folks down......even though it's walking dead night the samson post is in place I cut out the decals that was best to fit on the stern. since these are done on white paper, I made sure that I stayed in the green, and not give them a white border. I was very happy to see that they came out as well as they did. the green is a little off.....I may try to do some blending. I'll weigh it out though......I don't want them to get blotchy, or built up with paint. I did the names on the bow too....they came out the same. I am so pleased that they look as good as the do.
- 956 replies
-
- 20
-
-
- andrea gail
- trawler
- (and 1 more)
-
thanks again for all the kind comments! once I make the other pulleys and brackets, I can try and give them a little extra detail. thanks Augie, Mark, John, I really appreciate the good word! I'm past the halfway mark for sure.......now to make the parts to fit her out! thanks Patrick......you may reconsider, when you see the next update all I have are the towers Carl.......no laptops here I will be very careful. thanks for the good word! thanks George.....you can try to get it here: Testors be sure to get the standard edition, and not the basic. I will be ordering the update for it....probably this week. then I can set up the E-machine. if you do get it, let me know, and I can tell you how to get the update as well. I don't know about the hardener, but the bonder is very important it can even be used on old decals, to freshen them up {they won't micro crack}.
- 956 replies
-
- 1
-
-
- andrea gail
- trawler
- (and 1 more)
-
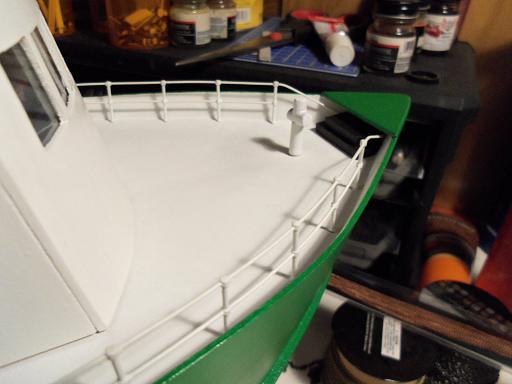
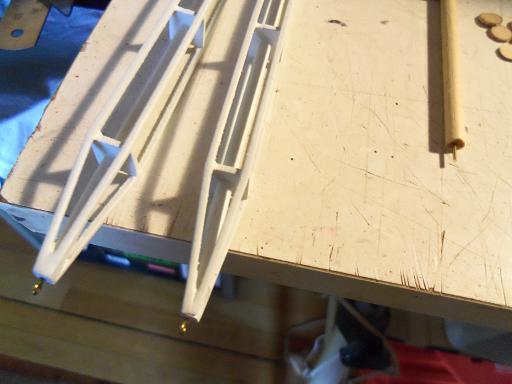
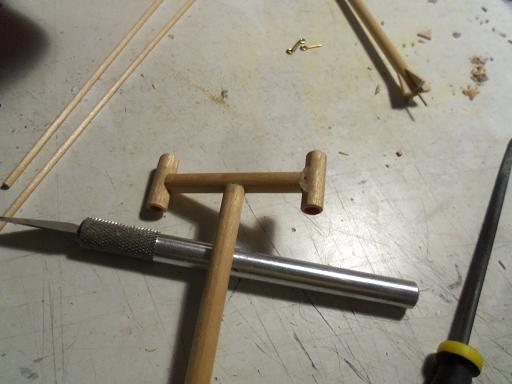
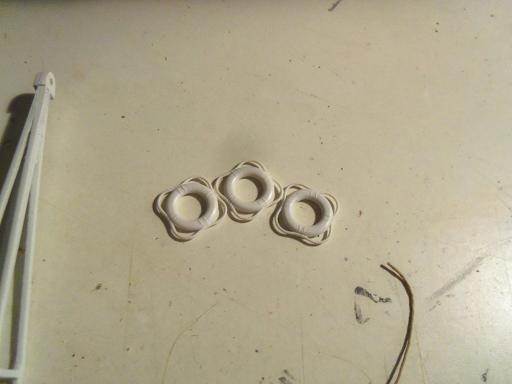
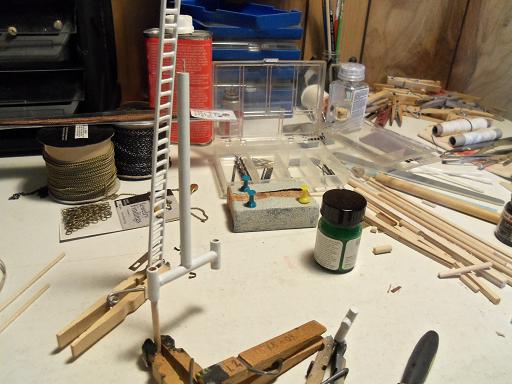
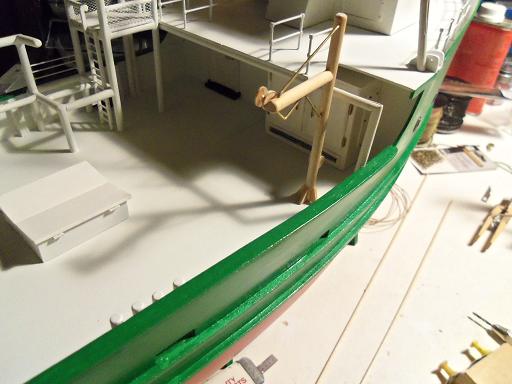
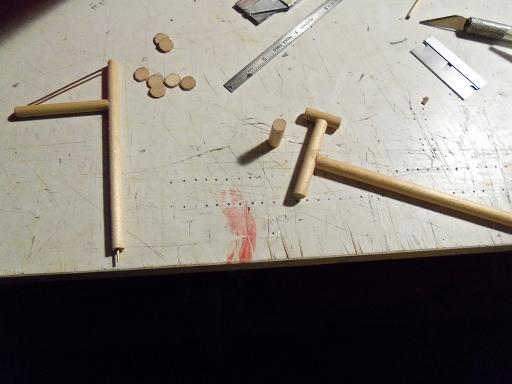
I began to do a little bit with the booms.....in thoughts of how these would be rigged..I'd love to do something with double......or even triple blocks. I think the mechanics of the pulley assemblies would be really cool. I need to look into this a bit more, but for now, eye bolts were fitted in the tips. assembling the 'T' vent...I used white glue to fill in the gaps of the assembly. before it had dries, I sanded it to add to the glue. it's done to make it as seamless as possible. going into the trawler box, I filched some preservers. they need to be painted still...not sure if I will replace the rope. some parts got the second coat of primer..the Samson post was included. .....even the aft section. the stanchion was remade.......unpainted, and no pulley block it looks better scaled down.......the pulley spools are made from very short railing posts and those 5/16 circles I cut out.......I had to make more because some split in the making of them. fitted in place, it looks a little naked, but it will all become clear when finished. I didn't get to apply the decals yet, as you can see. I wanted to try them tonight, but it's a bit late for that..........perhaps I can try tomorrow evening.


- 956 replies
-
- 20
-
-
- andrea gail
- trawler
- (and 1 more)
-
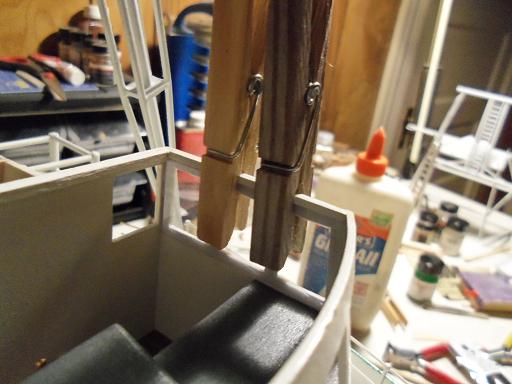
holy cow!......boy! do I have a lot to catch up on! whether folks comment on my builds or not.......this is the MOST awesome place to be I am so honored to be a part of this wonderful site!!! Mark.....thanks for the good word! the admiral refuses to see my build table go in another room......I tried to shut off the banter box.....but she say it will continue until the pilot house is finished! she rubbed it by saying ".......that what you told me to do!" Tom.......the decal maker. I have never tried to use paint shop to make them.....I have made something with it, and imported it into the decal program though {the Half Moon is a good example of this}. the good points about the decal maker, is that it is formatted to accept and use decal paper {5.5" X8.5"}, where paint shop is formatted to regular paper {8.5" X11"}. I'm sure it can be done.....but the decal maker takes out a lot of the guess work. I'm still experimenting with it, since I don't use it a lot...but it has served me well. just about any image can be imported and manipulated using it......and what I've done so far has been fun. the one thing I need to get, is the update to it, so the transparency function can be enabled. the only thing I can say, is if you have an interest in it, it's the #14202 Testor's "sure thing" decal maker - standard edition. I have a phone number where you can get the update for it......download only {I'm going to see if I can get a physical copy} Sjors and Nenad.......thanks for the good word! clutter is my version of keeping ideas under wraps! Carl......yes, I will be doing that. I will feed it info via memory stick......I had to get rid of XP because the attacks were getting pretty serious~! thanks for the good word......sorry I had to leave abruptly this morn...many things to do before I left for work Patrick and George....... no.....that's not blood.....just the Remanence of red paint. you should have seen what happened when I shook a bottle of flat black with the cap loose! you'd have thought everything around me had the measles! you are like way too kind Patrick.....I thank the both of you for looking in and the good word! Augie........no not chello......cello! I play bass....there's a difference Piet.......the plans don't show one.......if it's there.....you bet! thanks for the good word! I think I covered everyone........if I missed you, let me know...so I can redeem myself for being such a heel for forgetting you .......I didn't forget you Sal.....hello and welcome to the mayhem! the clothes pin thing is something I used to do in my plastic days...it has served me well so far, in my wooden future if you see something......use it......I love to share thank you for the good word! in your honor, I'll post Friday's update ...........wait a moment! a big thanks to all who hit the like button!
- 956 replies
-
- 6
-
-
- andrea gail
- trawler
- (and 1 more)
-
OMG!!!! too much to comment on at the moment! {getting ready for work} I'll be here tonight.......good question Tom
- 956 replies
-
- 1
-
-
- andrea gail
- trawler
- (and 1 more)
-
thanks Frank......as said.....who am I to deny I love to hear any ideas....you never know what I might try! I'm more than willing to share anything I come across thanks for the good words! no Nils.......what your seeing is a mess! it's a wonder the admiral don't put the vac to it......it's wide open for all to see when they come over! sometimes I have to move things around.....just to find my ideas! thanks for the good word! thanks Bob! I'm trying......but it isn't hard at all! this has turned out to be a very fun project. after the B.S. of the last couple of weeks, it's great to be back at the table. thanks for your kind word.....I'm glad you like it! oh......and thanks to everyone who hit the like button! I really appreciate it
- 956 replies
-
- 2
-
-
- andrea gail
- trawler
- (and 1 more)
-
I can see that.......the quality of your work shows no warning really.......never had a thought it was warranted just throwing it out there as reference for others. yours and J's logs will serve me well for when my Half Moon comes out of the closet
-
I wish I had some form of translator for that.......I did catch the word sprinkler.......was there a sprinkler system put in place on board?.....or am I mistaken..... .....a very sad sight to see.
-
looking really good Jerry.......there is no hard rule for this. usually the fore stays are done first.......the shrouds and back stays. the shrouds actually have two purposes.....side to side support for the masts, and as back stays to counter the pull of the fore stays. in doing the fore stays first though, one must be careful not to have too much tension on the lines, or it will distort the mast rake. with the way you've done it, you'll have the shrouds to help you from having that happen it's a win / win for you......nice work!
-
thanks Augie and Michael.........you folks wanted it........who am I to deny the M&M build was the best cabin detail I've done so far. I wish I had more bling I could add {I'll look in my inventory again}.........but between Patrick {omega} and Kees........I do feel compelled to do more as far as the vista problem goes.......I'm kinda glad. I've got two other towers that have XP, and it good to give at least one of them a purpose. I'll probably use the E-machine......it has the fastest processor speed of either of them, so it should work quite well. I'll just have to break it down when I'm not using it. thanks for the good word! thanks George........I'm VERY pleased myself!
- 956 replies
-
- 4
-
-
- andrea gail
- trawler
- (and 1 more)
-
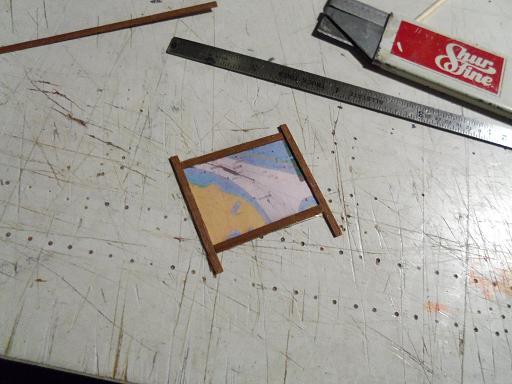
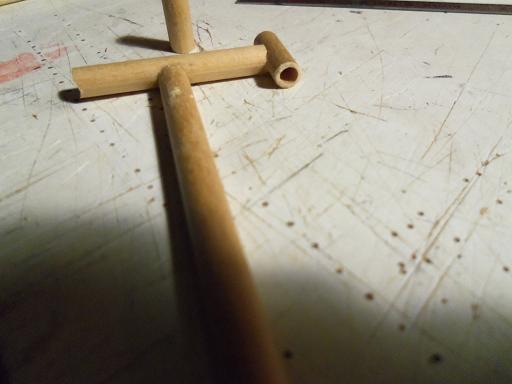
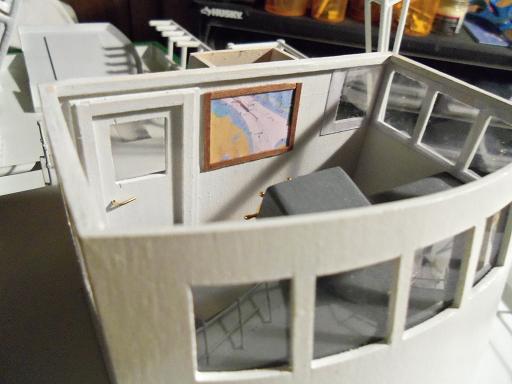
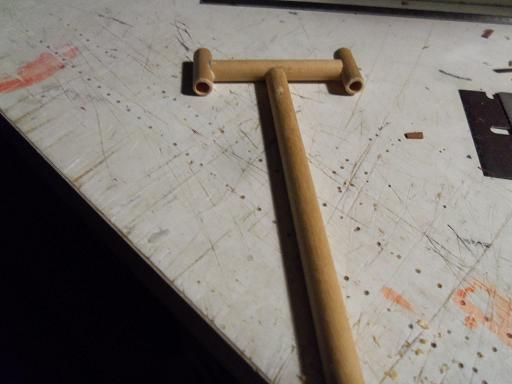
I ran into a huge problem.......and the realization why I was getting these little quirks with it. I found that this program is not supported for Vista. one of the big problems I found, was that it would not print Black, of all things.......all I would get is a Dark Gray. I've decided to take one of the other towers that we have {that still has XP} and turn it into a decal maker. I have an extra monitor, keyboard and mouse, so I'm all set for this. I still need to get the update for it, and when I get it, I'll install it as a whole when I do it. I will use whatever I get at this time......I'm pretty sure the numbers will look OK.......but it's the name one the bow and stern that's worrying me.......I need to be creative, and I'm not sure how it's going to react. the numbers are simple......I can use the clear decal paper for them. using the text selection, they were made up and resized four times, to be sure I would get ones that will fit the field they are to go on. for the names though, I need to change the color of the foreground......not the background, as you might think. for this, I used white decal paper, since the letters are in White.....the foreground will be changed to a Dark Green, which is the closest to Emerald Green, the color palette would come to it. one of the initial drawbacks to this program {the update should give me this feature}, is the transparency issue I've been dealing with. I've had to pick and choose what decal I can make. I'm hoping I can use this in my favor with these decals......when they are applied, I'm hoping the green blends in and disappears in the Emerald background. they were sprayed with decal bonder, and allowed to dry overnight. as you can see, the program would not allow me to change the foreground over the entire paper......I'll just have to be exact in cutting them out. I'm hoping the numbers work out as well. I heard the voices for the idea I had......a map on the back wall would look super so, I made one up. printed on regular paper, it was sprayed with decal bonder to lock the ink on the paper. I was going to use 1/8 X 3 mm strip, but I thought of the thin strip mahogany, and the rest is history. there is another vent that I need to make. it will be located in back of the pilot house. it has a strange design.....a 'T' with two smaller pieces on the ends. to ad a bit of detail to it, I hollowed out the end pieces using three different drills and finished them off with a round file. as you can see, I also began to remake the stanchion. the round circles are to be some pulleys that are yet to be made. here you can see how I hollowed the end piece out. Once the map was trimmed.......I did get a little too close to one corner, but I don't think it will show. I didn't clear coat it or anything........it was then cemented in place. the bonder deters the white glue from seeping through. without the roof on, it can be seen through the window {s} lastly.........the other side of the vent was hollowed out and cemented in place on the assembly all 'n all.......not too bad, considering we were out running errands for most of the day. but with every update.......brings me closer to another 'cement fest' thanks for looking in
- 956 replies
-
- 15
-
-
- andrea gail
- trawler
- (and 1 more)
-
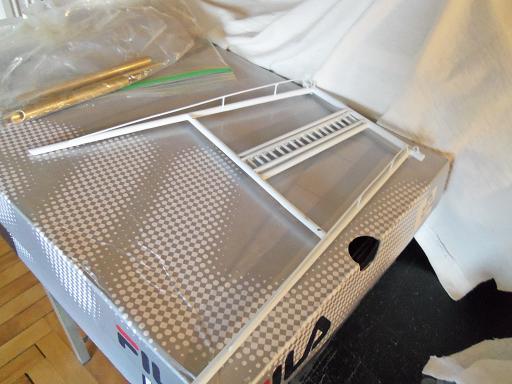
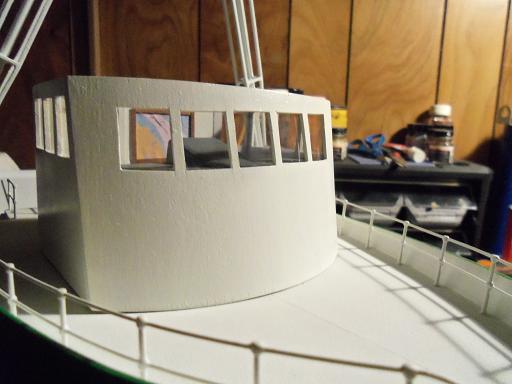
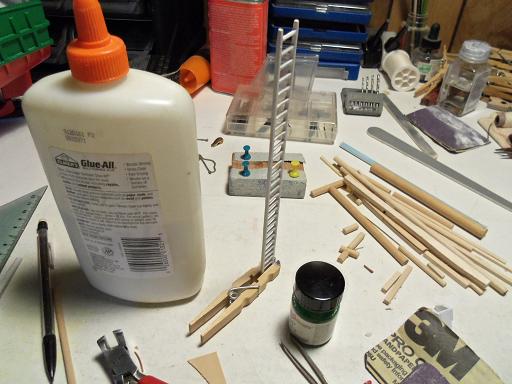
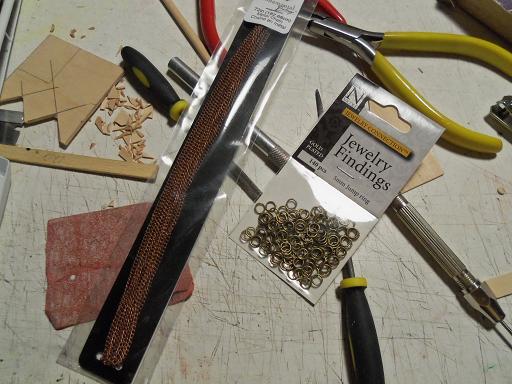
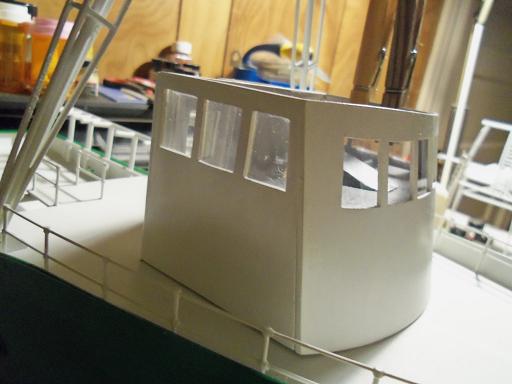
I started this session by looking over the paint work. there are some areas that didn't get any paint....... the can I've been using is almost gone. for the white.....it's just primer from spray can....it's the best dead pan color there is. absolutely no sheen......but I have accented here and there with gloss white, especially areas that are going to see decals {which I really need to get off my duff and make}. I tied the 'wings' back on Andrea for the time being, until I get to do something with them. that will be coming up soon the can of primer white I've been using is almost gone.....when we went to register the Camry and run our errands, I will make it a point to get another can. I had decanted some and started to do the touch ups, beginning with the ladder. I wanted to show you this.........we had gone on a past errand.....I, of course, try to use every one as a scavenger hunt......and we ended up at the Mall. A.C. Moore's is there and we stopped in. I found these 5mm rings....but the admiral found the chain. there is no size listed....but there is 72 inches of it, kind of an antique copper. a funny thing........at the beginning of this session.....I instructed the admiral to nag me about the pilot house, knowing full well my track record for straying off course. I am happy to say that she outdone herself!......and I laughed the whole time she was doing it, which probably made it worse! yes, it was time to get the rest of the windows installed. I collect the clear cello from packaged products we buy in the stores. it comes in different thicknesses, so it meets all of my application needs. while this was going on, I decided to get going on the decals. I am about to deal with the same problem that Piet did with the 019......this should be interesting


- 956 replies
-
- 14
-
-
- andrea gail
- trawler
- (and 1 more)
-
thanks Lawrence......I really appreciate the well wish and good word feeling better has given me the urge to get a couple of the other builds on the table......the one you've seen draped in cloth is the Boulogne......the other is the trawler Syborn. Andrea had taken residence though, and will remain on the main table until it is finished......it's become a vendetta for me I appreciate your following along.....your positive comments.....and those of others, keep me going thank you very much

- 956 replies
-
- 2
-
-
- andrea gail
- trawler
- (and 1 more)
-
very nice work Augie....paint looks real good
- 2,191 replies
-
- 2
-
-
- confederacy
- Model Shipways
- (and 1 more)
-
all the better! squinting at half speed..........AYE sir!
-
that's a very nice stand your making.......if you can get the rest of the concaves to mimic the left one shown in the picture above, you'll be in good shape. you've done a superb job Piet.....and it surely deserves to be shown in all her splendor! believe me......there isn't anything that could distract from your build. it's simply too awesome!
-
thanks again for your kind comments and likes I yam feel'in better.....I appreciate all your concerns not that it matters, but I did make a mistake about the part I cemented up along the gangway.......there is NO visible use for it in the plans. as mentioned, I will make some use for it. the paint is dry.......we'll see what I can get done today thanks again for looking in!
- 956 replies
-
- 5
-
-
- andrea gail
- trawler
- (and 1 more)
-
I use the clear stuff to make windows and such........there are different thicknesses and that's a good thing
-
I have 3.5's..........I just make the holes a bit bigger.........it's a good thing there are different sized thread!