
HOLIDAY DONATION DRIVE - SUPPORT MSW - DO YOUR PART TO KEEP THIS GREAT FORUM GOING! (Only 36 donations so far out of 49,000 members - C'mon guys!)
×


popeye the sailor
-
Posts
16,007 -
Joined
-
Last visited
Content Type
Profiles
Forums
Gallery
Events
Everything posted by popeye the sailor
-
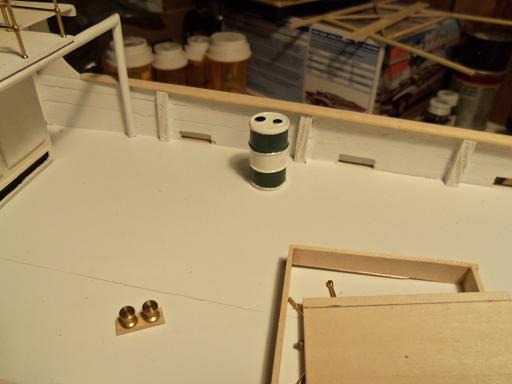
 thanks Omega for your kind comment. once I can get some paint and the rest of the trawl rig on her, then she'll look much better. beside the first drum, I have four more ready for paint............seven more to detail thanks for the good word
- 956 replies
-
- 1
-

-
- andrea gail
- trawler
- (and 1 more)
-
awe-some work Doris! there is such beauty with all you do. thank you.......and I hope that 2015 holds great things for you as well! good health and peace!
- 883 replies
-
- 1
-
-
- royal caroline
- ship of the line
- (and 1 more)
-
I'm humbled with your comment Doris I'm trying......but it's so hard to attain the level that you instill in your modeling....your work is art! thanks Aldo....more on the trawl rig soon.......I'll try to be ecologically friendly thanks Piet........Exactly! there will be different color combinations......as mentioned, the deck and structures are dominantly white, so I'm doing my best to give her a little color got side tracked yesterday...and today {my last day of vacation} I need to run a few more. I hope to get something done..........perhaps another vacation is in order thanks also to everyone who hit the like button!
- 956 replies
-
- 1
-
-
- andrea gail
- trawler
- (and 1 more)
-
cannon assembly line looks to be going along nicely! Happy New Year to you!
-
very realistic Matti........your not missing a thing sweet! a good New Year day to you good sir!
-
NICE!!!! H.N.Y.!!!!!!!!
-
interesting color texture in those two pictures........refraction of light perhaps? the Vic parts would work quite well I see.......I think I would drill the holes over the existing detail though. not only would it hide them, not having a need to clean or sand, but the hole marks are already marked up for you {just need to flatten them slightly} think if all those hulls were masted........there would be quite a forest to be seen! Happy New Years Daniel
-
really looking super Piet!.........maple stain......I'll go squeeze a few trees for ya, if ya like
- 176 replies
-
- 2
-
-
- muscongus bay lobster smack
- Midwest Products
- (and 1 more)
-
looks very sweet! nice job on the shrouds and dead eyes
-
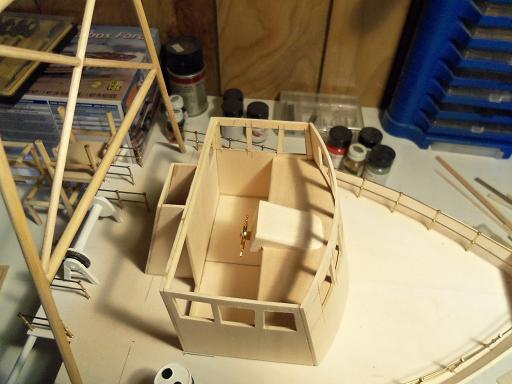
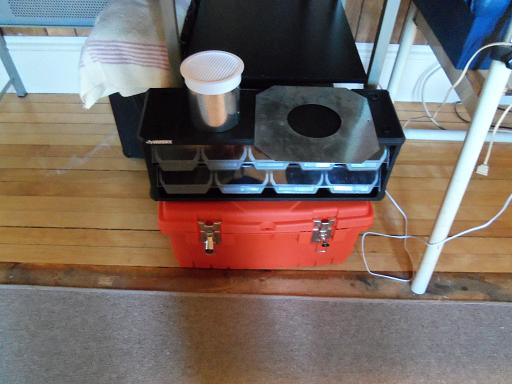
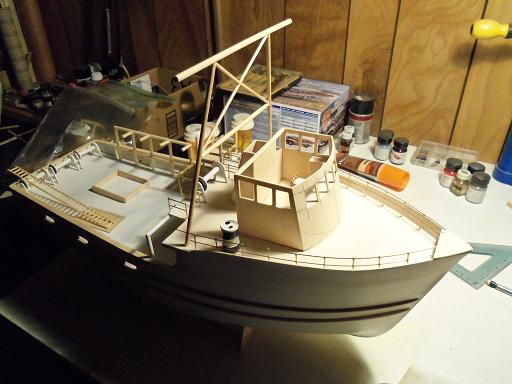
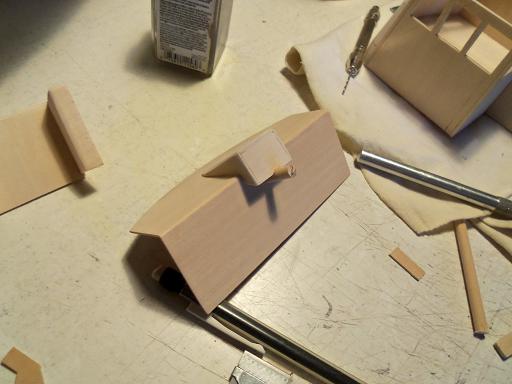
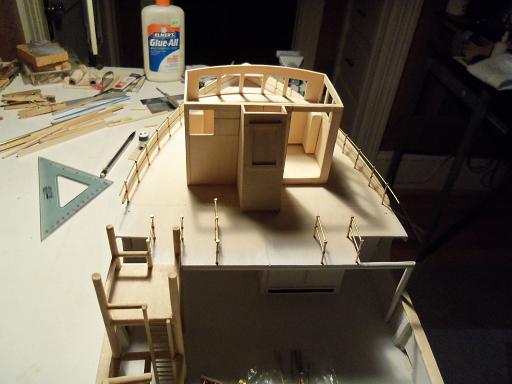
thank you Lawrence.......and a Happy New Year to you.. I really see this build......going upwards now! so........I finally got the dash done enough to give you a good idea of what the Billing's kit would supply. I still have to add the gauges, which I will use some of those cast off pieces I showed earlier. there is a seat that also goes in there....I still have to make it I can use either one.......I'll have to weigh out which one is better {after I make an instrument panel for the other one}. I may not put much more detail into it though......small windows {learned my lesson with the Cux 87} the scaffolding is about 3/4 done now.......I need to come up with a few more parts for it. the drums are all finished with the sanding......now for the next step here is another package of those cast off pieces.......they come from the Half Moon. there is a question I ask myself.......when all the parts are punched out and on the table, with these cast off pieces heaped in a pile nearby.........."when is a part, not a part?" simple.........the ones you don't use I had taken off yesterday afternoon........we went to HobbyTown and Home depot. I spent half of the gift card that I got from HobbyTown. bought some plastic cement {to be ready}, some decal paper {the one with clear and white}, and I found the super thin dowels I will need for the buoys.....I will go to Hobby Lobby and get the oval beads to complete their assembly At home depot......I felt like I was in a time lapse. I distinctly remember seeing a simple version of dryer ducting.......a four inch tube with an aluminum collar attached to it. now, I'll admit...when I last bought one of these, it was back in the 90's.........but I couldn't find anything that even closely resembled it! what I did find though, that will work...was a soffet vent, a round plastic collar with a four inch tube coming out of it. near it was a tin square with a four inch hole in the middle. sliding the vent through the hole, I saw that it will work......the collar traps it well enough. we have plenty of box fans.....I'll be sure to show you how this will look. I also wanted a tool box......to combine the two trays that hold all my modeling tools. the organizer, I will use for my paints.....they're all in a box in the closet. the tool box works well......all of my small tools will go in the tray inside, and the larger tools will go in the large belly under the tray. not exactly what I was thinking of.......I was thinking of a metal one......3 - 4 drawers, and perhaps a compartment at the bottom......guess the admiral figured that it didn't fit the decor
- 956 replies
-
- 13
-
-
- andrea gail
- trawler
- (and 1 more)
-
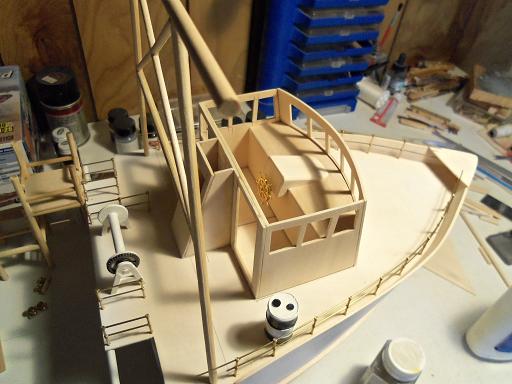
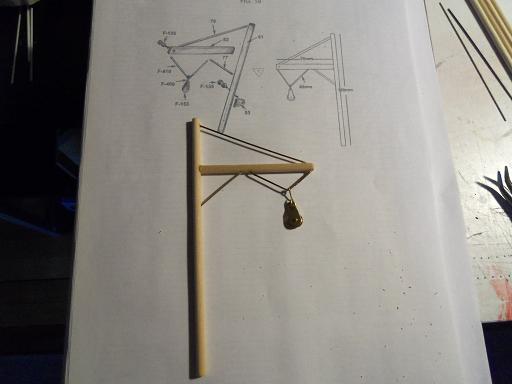
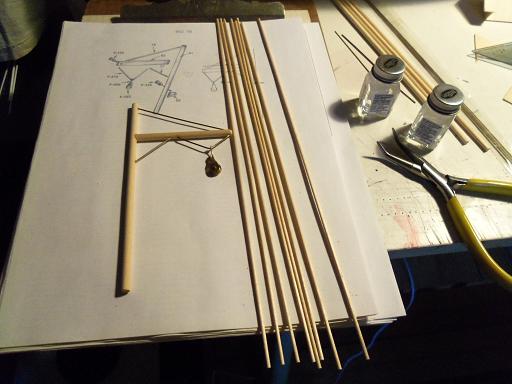
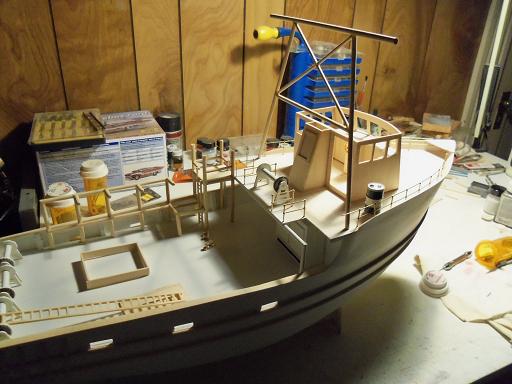
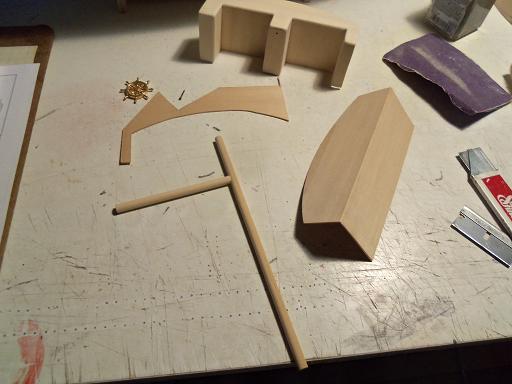
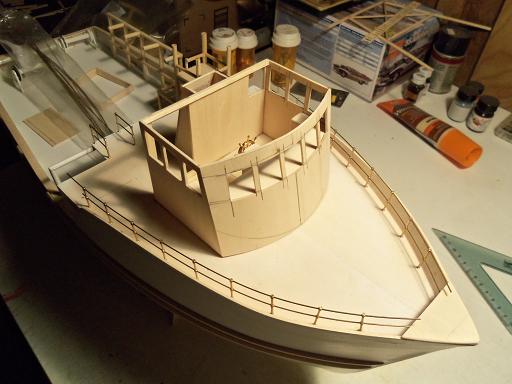
HAPPY NEW YEAR EVERYBODY!!!!!!! the drums are all sanded........and intermittently, I went to the table to break the monotony. naturally, this update will cove a couple of days, so there is quite a bit to cover first.....the A.G. with the brain storm I had after the railings were done. this is how the trawl rig will sit behind the pilot house. there is a platform that is to be located along the top bar.......I was scratching my head trying to get a better idea of how to vision it.......well....here it is from the gangway up there, two uprights are to come down and locate on the pilot house roof. looking around for how this should look, I stumbled on the diagram of the helm and instrument panel. I figured I'd do it and show you what the Billing's offering would look like. also pictured, is a scaffold, to be located on the starboard side, near the overhang stanchion. hard to believe, but I have most of the parts to make it, in my inventory. back to the drums.......I have some in various stages of assembly. yea.....there's a couple that lean......still a bit more adjustment.......I'll hid them somehow there is an instrument panel that will go on that dash......after a lot of sanding it was cemented in place. the first bracket was assembled to the scaffold the uprights were cut for the aft section of the trawl rig, as well as the center shafts of the booms.
- 956 replies
-
- 13
-
-
- andrea gail
- trawler
- (and 1 more)
-
gee.......I don't see a warped sense of humor there John I went online looking at drums, to see what colors different companies paint theirs. it's the reason why I painted the first one in those colors.....no logo on it though.......no matter I then thought it would be neat to get pictures of logos as well to dress up the drums a bit more........wicked.....wicked cool idea! I need to install my decal program.....not sure if it will work on Vista. if it doesn't, I have another tower kicking around that still has XP..........I'll just get the images and put them on a flash drive. one way or another, I will have decals to dress them up. I have to make the A.G. decals anyway, as well as the decals for the vessel. HA......HA John.........looks like your getting sucked into my delusion too!!!!!! na-nu........na-nu!

- 956 replies
-
- 7
-
-
- andrea gail
- trawler
- (and 1 more)
-
thanks Aldo for the advice....still haven't done it yet.....but I will. thanks Piet........I hope to see a better alternative to making these fuel drums when you get 'round to it........this method is killing my fingers! I have a couple of different sizes of railings in my inventory. at 1:50, I figured I'd take a look in the instructions for the Nordkap......it's the same scale. of course, the instructions I have are very old......the numbers have surely been changed. so I went on the Billings site and looked at the more recent ones. they are 23 mm.......BF0-299....they come ten to the pack. they do have other sizes and types.....you may want to look at the BB USA website.......it's still up, and is run By Ages of Sails {Roger}
- 956 replies
-
- 1
-
-
- andrea gail
- trawler
- (and 1 more)
-
count me in Bob.........it looks like fun!
-
the plans I saw doesn't show that sheet........I came away quite puzzled with how they expected a person to build it with so little info
-
thanks Michael I'll try anything......just as long as I don't hit a bulkhead, or splinter around the hole. I brought out the Tree Boat.....I'm going to map out the bulkheads and make up a template. thanks for the advice ....and thanks to everyone again for your kind words and support! thanks Patrick.......more to come my friend!
- 956 replies
-
- 1
-
-
- andrea gail
- trawler
- (and 1 more)
-
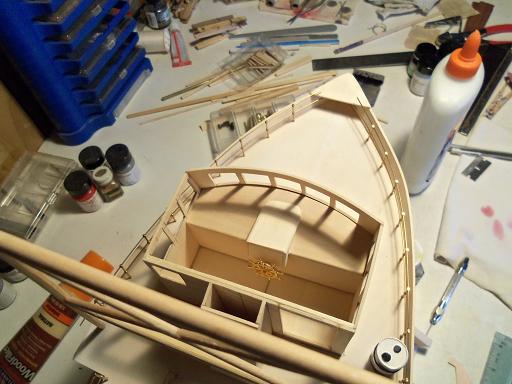
a big thanks to every one of you.......and all who hit the like button! never in my wildest dreams, could I have imagined it coming out as well as it has. I had a duh moment too. after the railings were done...I had thought about getting some primer on the fore deck. in thinking of this earlier, I had drilled two holes where the trawl rig was to be, so I wouldn't lose the location marks. looking at it during the dry fit, I picked up the section and set it in place.......it hit me. drilling two holes in the base of the uprights, I cemented in a couple of the stubby pieces of brass from the railings. trimming them into tabs, and stuck them in the holes I had drilled.......now why didn't I think of that in the first place?!?! I know Augie......I just worry. I just don't want to hit the bulkheads in there....I don't know where they are I'll do it........I'll make a 'map gauge.....the tree boat isn't totally planked yet yes Frank.......you know, my other work table used to be the admiral's desk.......it looks better than mine! maybe I'll switch! thanks Mark.......perhaps I should do some pilot house dioramas.....that would be an interesting change of pace I relayed the message Sjors.........still on deaf ears I did get a ..."why don't you scratch build one!" good idea if I had the parts panels.........CAD ain't my thing
- 956 replies
-
- 2
-
-
- andrea gail
- trawler
- (and 1 more)
-
drat! George stole my thunder! looks great with the sheer deck on........looks sweet all around!
- 176 replies
-
- 2
-
-
- muscongus bay lobster smack
- Midwest Products
- (and 1 more)
-
you have the idea for the run of the sides...adding thickness to the outers. for the diagonal slant you have near the counter, are you going to use narrower planks? for my Half Moon, I used three different widths, to get the profile of the transom and counter. you have a beautiful shape there....looks real good! gonna look very sweet when she's all planked!
-
they look super Sjors! I can just make out the eye bolts very nicely done!
- 1,616 replies
-
- 1
-
-
- caldercraft
- agamemnon
- (and 1 more)
-
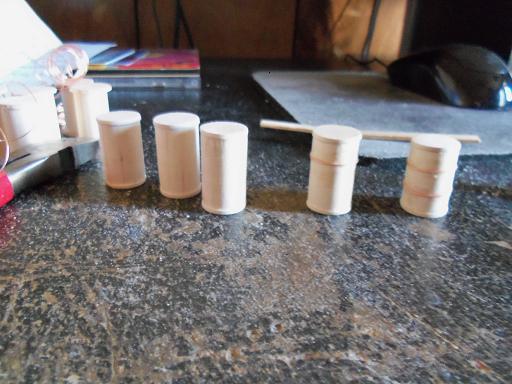
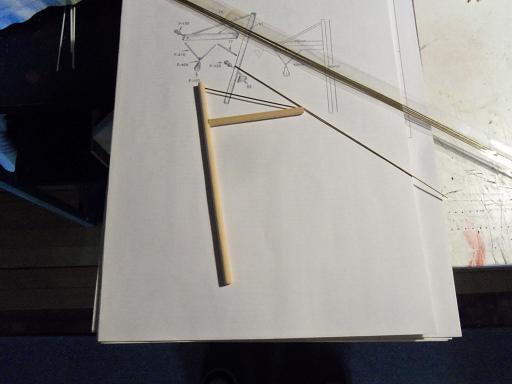
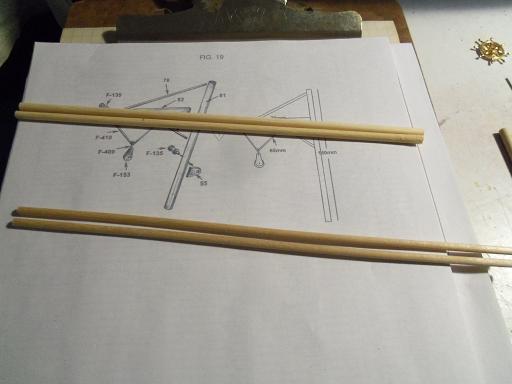
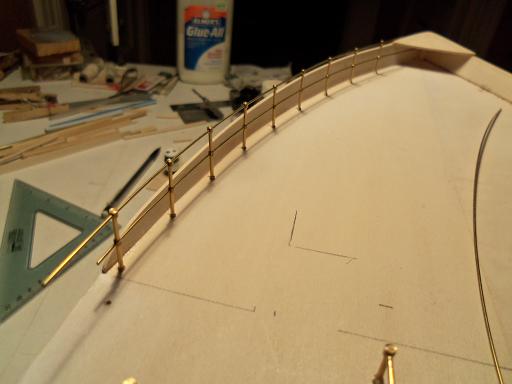
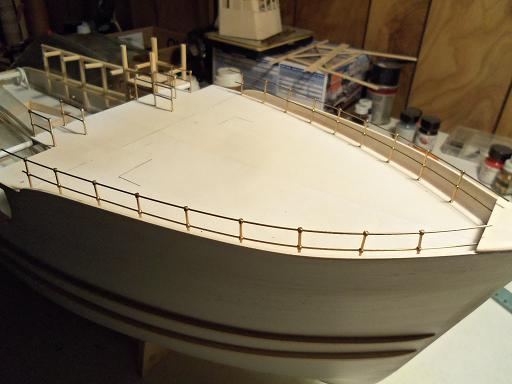
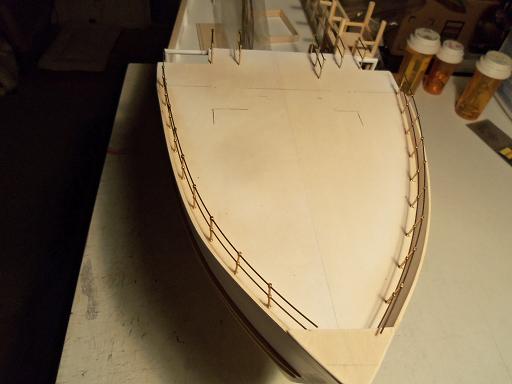
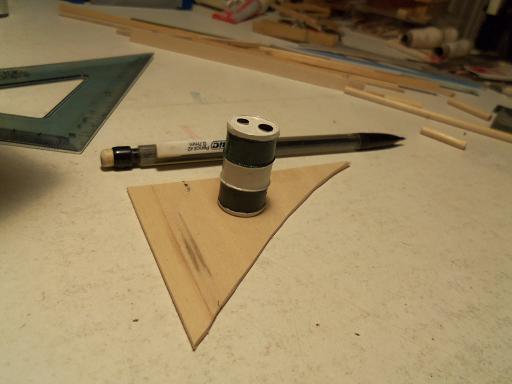
on one of my breaks.....I jumped back on railing detail. I figured out a neat way to space the stanchions, although it caused me to use 9 per side instead of 8, like I originally figured. I marked where the holes were to be drilled.....and it was done the port side was done first then the starboard side.... these are not fastened together yet.....I usually use CA to do it. the top rail at the bow is to be bent down and will disappear under the cap. I did a dry fit with the pilot house. oh.......I also trimmed all the other railings and filed the ends flat. they are done, but not cemented in place yet. here is the fuel drum.......per the illustration now if I can just drill those darn port holes.......I'm hesitant......I don't want to screw up now!!!

- 956 replies
-
- 16
-
-
- andrea gail
- trawler
- (and 1 more)
-
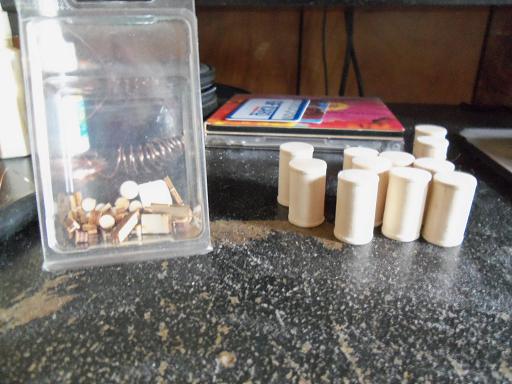
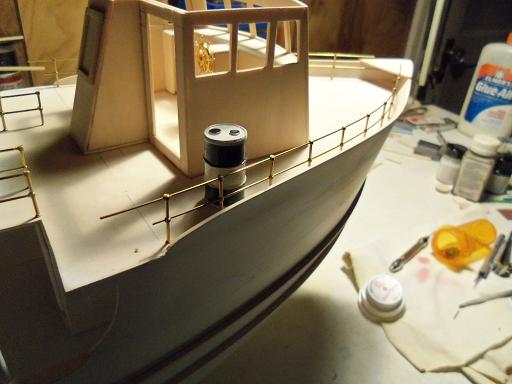
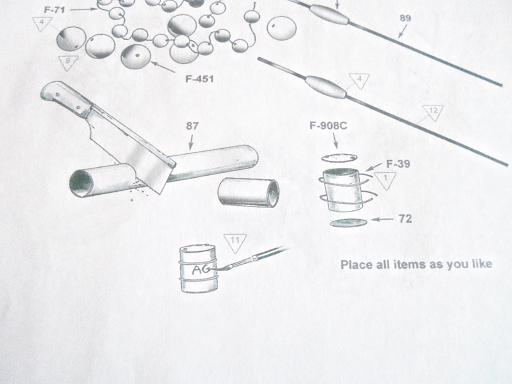
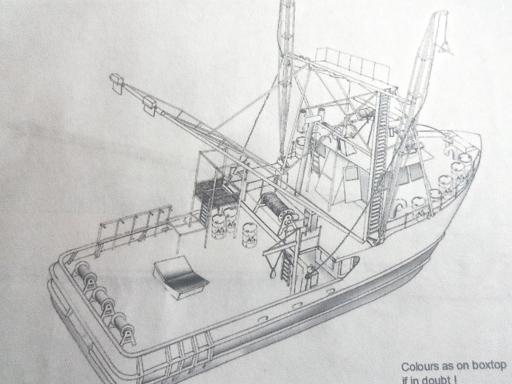
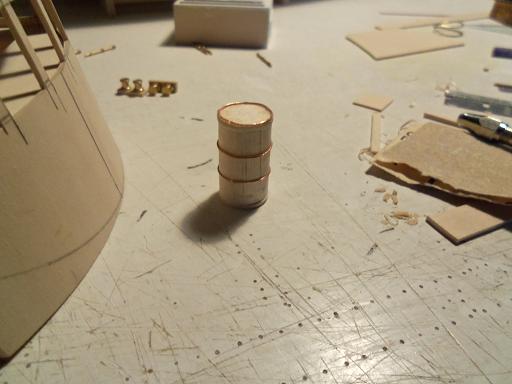
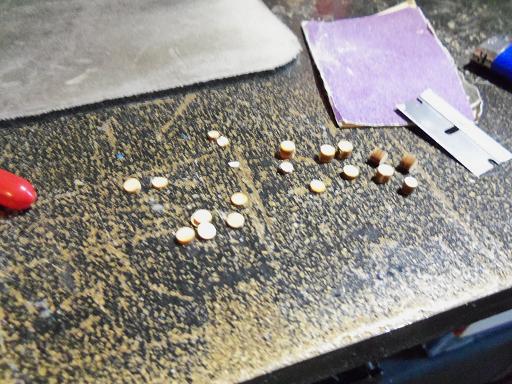
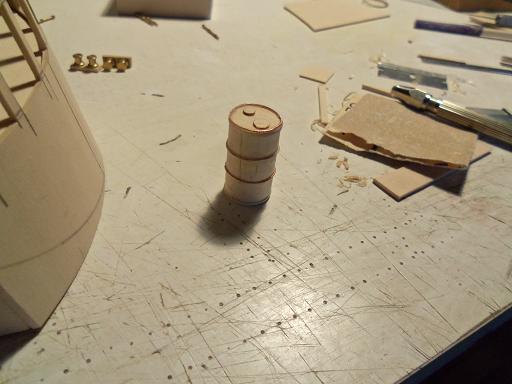
spent the morning here.......great way to enjoy a cup of coffee then I figured I had better get busy with these fuel drums.......I have enough of them to do. the Billing's kit supplies the parts for about 13 of these little buggers........I hope to make that many. this is how they are assembled and the location on the model......actually, you can put them wherever you want. I do have a couple that are a bit uneven, but I made some adjustment to them at the bottom and I'll simply blend them in somewhere where they can't be seen. I'm doing hand sanding.......after a few I really can feel it.......so I took a break here and there. I show you one of my break, later on......... anyway, I won't bore you with the sanding part......nor the wrapping of the copper wire {I forget what gauge it is}, to form the two rib bumps on the body, and the raised ring at the top. I searched around......I knew I had them.......the package of punch outs from the AmericA build. these are all the little cast off pieces from the laser cut holes and stuff.......I never throw them away. these little baubles are just the thing to simulate instrument panels, gauges, knobs......you name it {yup......that's my desk........got years of modeling miles on it .......I need a new one} sliced down to thin wafers.......they make the perfect bung holes. the lettering on these drums is just.... A.G. {looking at the plans} I looked up some 55 gal drums online, and since I plan to make decals for them, I might even try getting some logos, which is a good indication that some will be done in different colors. barring touch ups, this is what one of them looks like. 11 or so more to go..........
- 956 replies
-
- 14
-
-
- andrea gail
- trawler
- (and 1 more)
-
thanks Aldo.......my big problem is I think of them faster than I can build them. to make matters worse........I act on them thanks John........not so much as flattened wire....but I want to simulate the ribbings. these are in essence 55 gal drums. thanks Piet......I'm gonna try as a matter of fact, the first one is pretty much done.....except for a little touch up and the lettering on them. I'll show you what they will look like
- 956 replies
-
- 2
-
-
- andrea gail
- trawler
- (and 1 more)
-
that appears to be how many drums of fuel she was carrying when she was lost, Augie. the Billings kit includes the parts for that many, but it probably wouldn't matter if there are a few less sorry for the frenzy Michael........this is a couple of days worth with using the vise, I am able to straighten the drum body between the top and bottom. any gaps that appear can be filled with filler. the center rib line is going to be the tricky part......I was going to use wire and filler, but I might also try to use 1/32 square stock {soaked and pliable} I'll have to see what will work.
- 956 replies
-
- 1
-
-
- andrea gail
- trawler
- (and 1 more)
-
hi there Wayne! usually as a rule, I don't refrigerate my beer. I do chill some for when company comes over, but I keep mine in a cool part of the house. I hope to put the finish on the ice maker soon thanks for the good word!