


glbarlow
-
Posts
3,855 -
Joined
-
Last visited
Content Type
Profiles
Forums
Gallery
Events
Posts posted by glbarlow
-
-
Great work as usual on the no rush planking. I like how you demonstrated the bending and taper points.
Enjoy your holiday. Ours was supposed to have been a trip to Spain and Portugal, we would have left next week. 😕
- Martin W, Blue Ensign and BobG
-
 3
3
-
The same but different hull planking. Looks like a lot of fun. Thanks for the detailed explanations.
-
-
Great work! Nice to see a little heads up on what I have coming next, just being half done with bulwarks planking. Those scarf joints are scaring me a bit. Glad to see you got through that step. I'm sure I'll make a half dozen before getting one I like.
-
21 hours ago, drumgerry said:
I know you're just pulling my leg a wee bit but I hope you don't think that I think I'm all that because of the guitar building thing.
Not at all, I'm envious of having the skills it must take to build a musical instrument. We build boats, but don't rely on the quality of our builds to create music...
Chris' designs are such you should not need a drop plank, provided you begin tapering early at the bow. I've not started my Flirt yet, a long way to go with Cheerful, I'd be surprised if stealers are needed, but they are relatively common and not a big deal - especially as the hull will be painted to the waterline so they won't be visible anyway. I do think perhaps your taper at the stern may be a bit too much. The tick marks there should go all the way to the keel, not just around the bulkhead. You end up sanding that down for the sternpost to fit, but the measurement should include the length of the stern. The number of planks at the stern should equal the length from the gunport pattern to the keel including curves - which makes paper tick strips essential to do the measuring.
I do all my plank bending with a board, clamps, and a travel iron. You'll see in my Cheerful log I bend any direction including some severe twists at the stern. Cheerful is single planked so I had to be precise with the measuring, cutting, tapering, and bending. It had no tapers at the stern, so there's that. Just to be contrarian, I don't think either bottom plank is too high, especially for the first planking and especially if you already think you need stealers.
A KEY point is this is your first planking - all you really need is for it to look like a ship when its done. Fill it however it takes as long as you can sand it smooth to the shape it needs to be, including the abundant use of wood filler as needed. The tick marks and the use of a planking fan might better guide the second planking to reduce the number of stealers, but as the hull will be painted using stealers on the second planking is fine.
I hope this helps and doesn't just confuse you more - I do explain a bit how I do it in my Cheerful build, linked in my signature line below.
-
23 hours ago, drumgerry said:
although I'm going to make new ones for the garboard
The tick strips and planking fan method works great to build a tight hull. It's a good practice to recheck those tick strips every few planks just to make sure you're still on track. Beveling the top inside edge of the plank is also good practice for ensuring a tight fit, something even us non-guitar makers know to do. Your knowledge of musical instruments is of great benefit, you're starting way ahead of most first-timers. As you'll see from the Chuck videos for the planks to curve up and in at the bow they need to be bent "the wrong way" bent down. Your monster plank bender might make the edge (vs. flat side) bending a bit of a challenge but I assume its a tool for your instrument making you're comfortable with, I'm sure you'll sort it all out.
Nice work, the first planking looks tight and well tapered.
- BobG, drumgerry and Edwardkenway
-
3
-
6 hours ago, Sjors said:
Inner bulwarks are planked and painted.
It's coming along great!
- mtaylor, Sjors and popeye the sailor
-
3
-
2 hours ago, James H said:
put a little offcut of timber on the inside bulwark
That's a great suggestion.
-
16 hours ago, DelF said:
Love the framed print
14 hours ago, Blue Ensign said:facsimile of the original plans of the models we make
Thanks for the kind comments guys, they are appreciated!
I really like the print. It's quite amazing to see how detailed they are for something done over 200 years ago and more amazing that from it a ship was built.
6 hours ago, MEDDO said:someone to build the Surly
At any given moment my Cheerful might become Surly - I'm trying hard to prevent that from happening 🙂
- Edwardkenway, mtaylor, Blue Ensign and 2 others
-
5
-
All those work for me. Surely they are in the dictionary.
I hesitate to note I just ordered that book🤪
-
All those work for me. Surely they are in the dictionary.
I hesitate to note I just ordered that book🤪
- DelF and Edwardkenway
-
2
-
22 hours ago, Sjors said:
A block or long slat of wood
8 hours ago, DelF said:uphroe comes from the Dutch juffrouw,
20 hours ago, Edwardkenway said:I'd been looking it up too
You guys have a lot of time on your hands 😄 I have very limited nautical knowledge as Derek will attest. I've always know this as that long skinny thingy with holes in it that the rope loops through back to the holes in the mast top thingy. No dictionary used 😄
I may have to get the one Derek listed, I admit am frustrated sometimes not knowing what stuff is called - though thingy covers a lot of ground.
- Edwardkenway and Sjors
-
2
-
6 hours ago, DelF said:
visit Glenn's Lady Nelson log
In my defense autocorrect doesn’t know what a rabbet is and apparently doesn’t care if a rabbit’s bottom is sanded😳
- Sjors and Edwardkenway
-
2
-
33 minutes ago, Thistle17 said:
elected not to post my trials and tribulations
It seems you have good information to share, you should start a log. I enjoy passing on my trials and tribulations in the hope of helping others.
I’ve actually worked out a process for the moulding and have a few practice runs that I’ll share in a future post.
Thanks for sharing.
-
-
7 minutes ago, MEDDO said:
looks like you avoided them.
I don't think I avoided all of them, but you're right. That's the fun on this semi-scratch build, not bailed out by laser cut kit parts. But then again, not limited by them either. Fun stuff...
- MEDDO, Ryland Craze, mtaylor and 1 other
-
4
-
Guys, I think this point has been asked and answered.
- hollowneck, mtaylor, ccoyle and 1 other
-
4
-
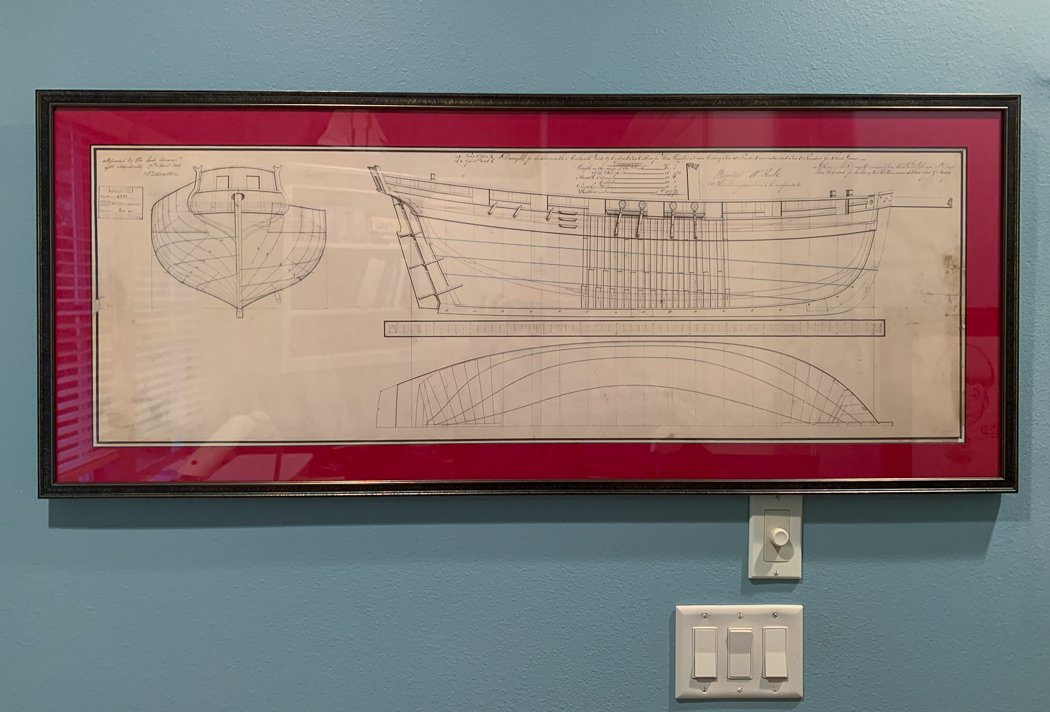
Before I get into starting the deck work I wanted to share the latest addition to my workshop, my framed print of HM Cheerful, a true copy from the UK NMM of the original plans. Note the matte color was selected to match my paint choice on the model. Cheerful joins a NMM print of the Pegasus on a different wall. It’s a bit high to get above the ceiling speaker volume control, but I’m out of other wall space. It looks really cool hanging there.
Thinning the stern frames was the first frightful task, that one I avoided the Dremel sanding drum with the use of a jewelers saw (described earlier in the log). No such luck with the second frightful thing, thinning the bulkhead extensions and the port sills to a very thin 1/16th. So after convincing myself 1/8th wasn’t good enough I let the Dremel do its thing.
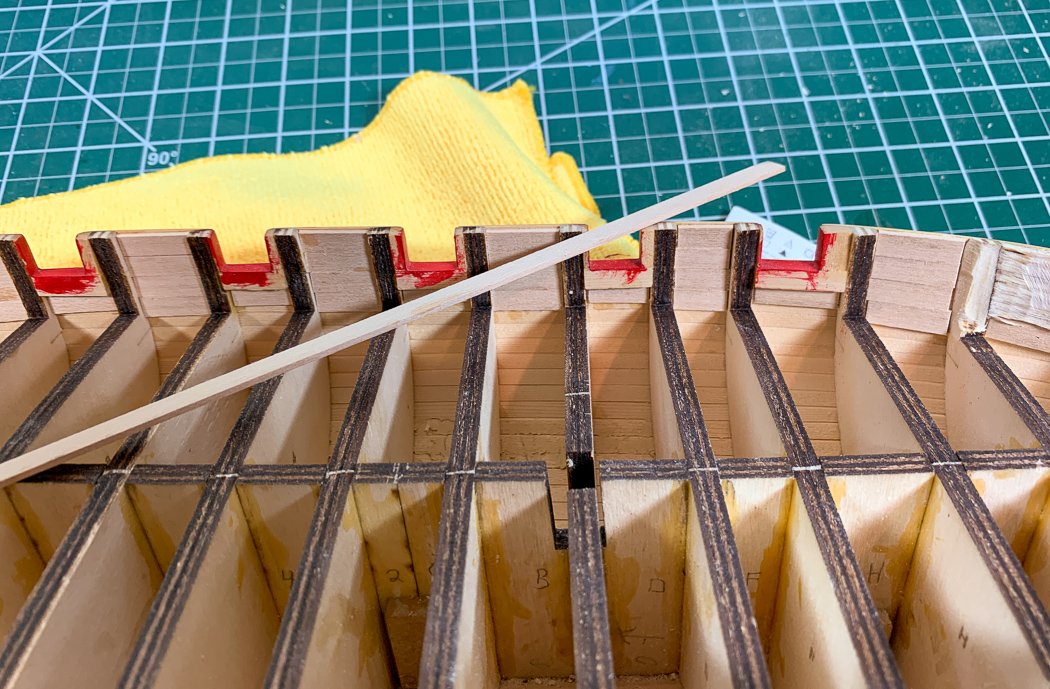
However, the near magical step I did first was to line the bulwarks with 1/16th basswood strip between and below the ports. Aside from providing some needed strength these strips marked exactly how far and and how much to take out from the neighboring bulkheads and port sills with the Dremel. This worked great in keeping me and the sanding drum where it was supposed to be and not go where it wasn’t. I’m not sure how I’d have gotten an even 1/16 without a whole lot more trouble, not to mention not gouging my way through the hull planks.

After getting the majority done with the Dremel I finished off with my chisels at the base where the Dremel couldn’t reach and then sanded it all out even with my various sanding tools. I used 180 grit to get the last little bit of the 1/16th thickness and 220 to finish it out. Did I mention 1/16th is very thin. My 1/16th thickness gauge came in handy to constantly cross check what was left of the once thick port sills.
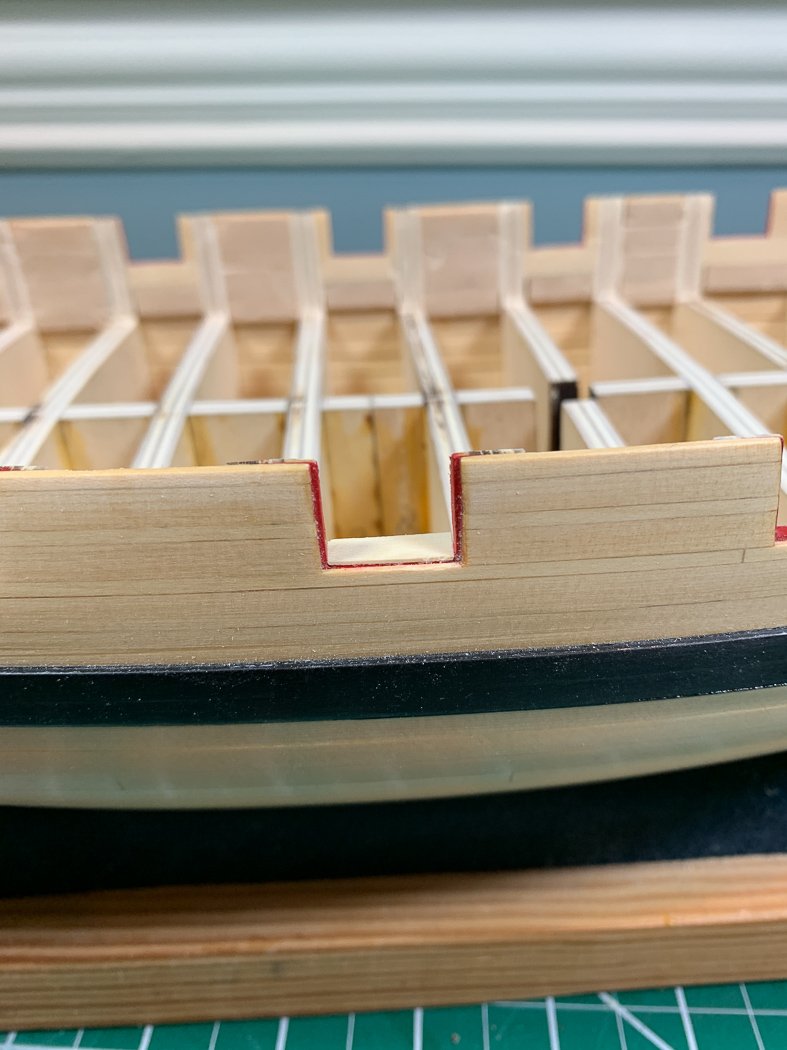
A lot has to happen right along the way for this build come together. The port sills were installed very early using reference lines on the bulkheads, later an outer plank was run beneath them following the sheer of the deck. That had to be done with a 1/64th clearance for the rabbet (and I thought 1/16 was thin). I actually did ok with that. I erred on the high side with the original port sills (no more than 1/32) because I knew, and did on a couple, I could file them down to the 1/64th rabbet height. Despite that I knew I had one port to address when I got to this stage. I filed this too low port sill completely flat to the hull, added a 1/64th strip, cut that flush, and painted it. You’d never know it was too low now. Improvise, adapt, overcome.
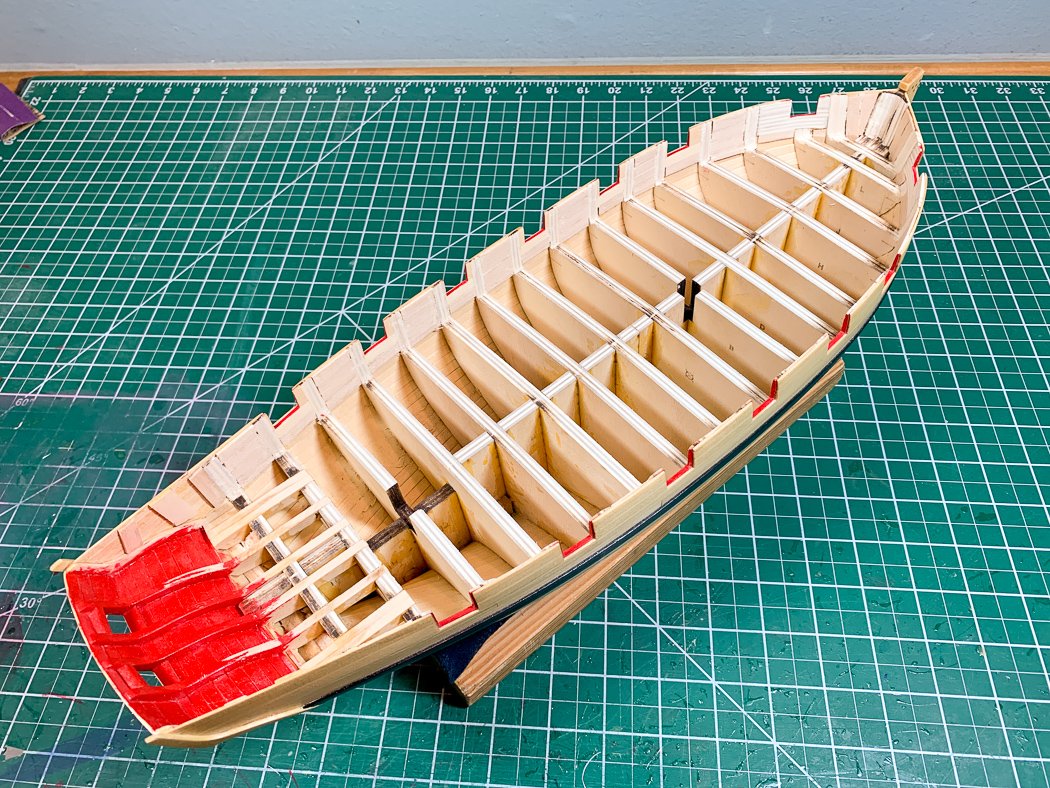
I faired the top of the bulkheads and frame to provide a smooth surface for the false deck. Skipping this step would have resulted in a bump near the stern frames and a rough spot here and there along the frame former. It looks kinda pretty maybe I should just stop here. PS: I probably shouldn't have gotten carried away when I painted the counter and not painted the interior of the stern yet, kind of wasted work now.
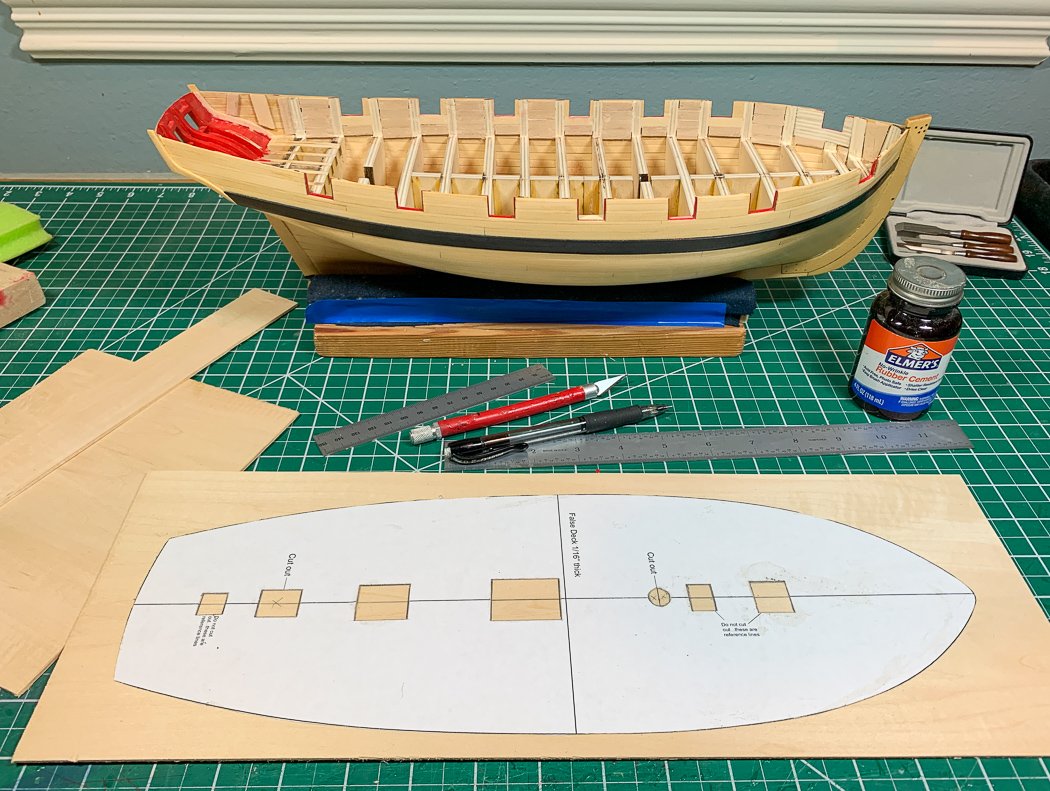
My process for cutting the false deck was to cut out the deck drawing from the plans, cut out the locations of the deck furniture and rubber cement it firmly to 1/16 basswood, and extended the center line through the openings. I cut it out with a #11 blade, the basswood was easy to cut, including the stern frame slots, skylight, and mast openings. It’s a tad confusing, you do cut out the paper to show the hatches and opening, but just on the paper (so I obviously did that before gluing it onto the basswood). Only the skylight and mast hole are cut through the false deck, the rest are place markers for other deck furniture.
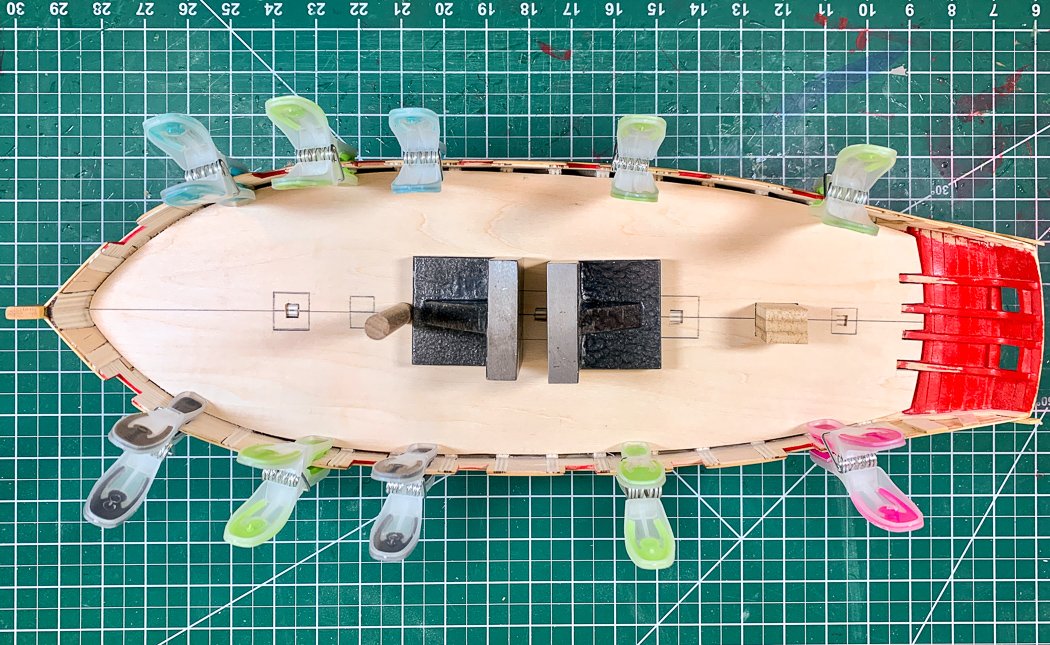
It was easy to peal off the paper, rub off the rubber cement residue with my finger and my false deck was ready to mount. I did have to do a little work to ensure it was centered, in addition to the dowel for the mast hole I jigged up a plug to fit into the skylight opening. Still not satisfied I cut little squares in the hatch openings (which I will cover or fill later). With the top faired there is a clear line down the center of the frame from the plywood lamination - the dark middle layer was perfectly centered, so I had only to match it up with the line I’d marked down the basswood. Now I won’t later be looking at off-centered deck furniture, at least not due to the false deck.
So on went the Tite Bond III, a coulple of weights to hold down the center, and plastic clothes pins to push the edges down onto the bulkheads, and not mark the outside of the hull in the doing.
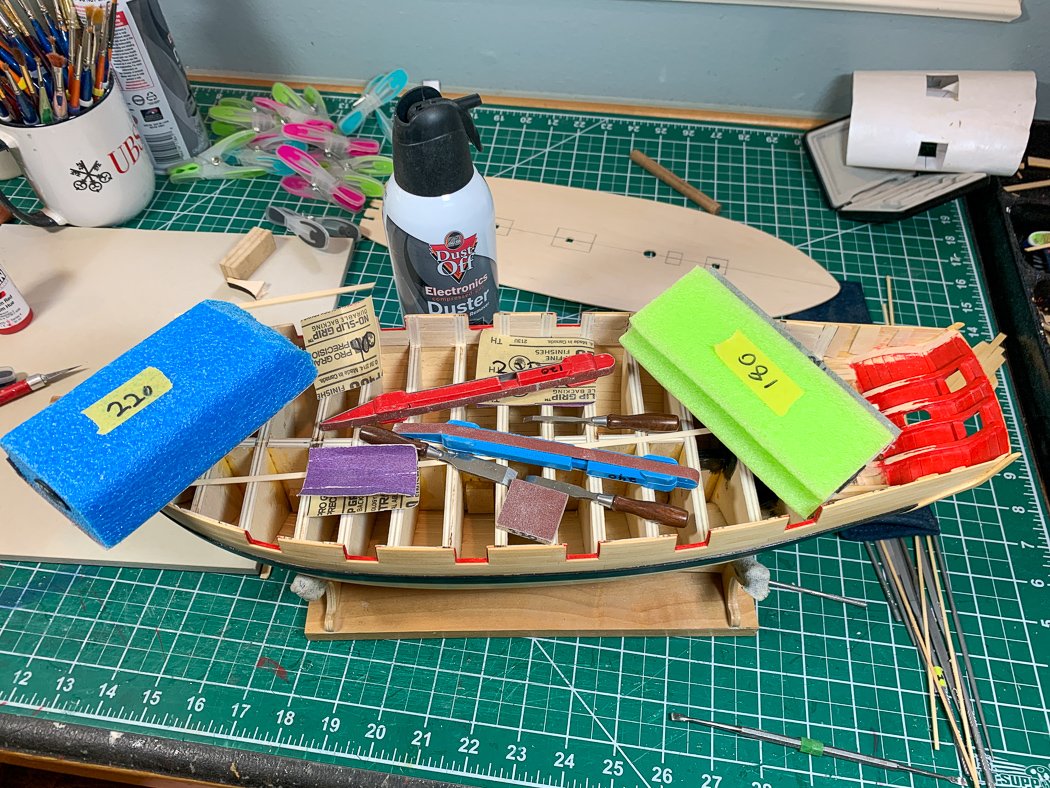
A lot of tools got me to this point. Here are just a few of them. I’m on to planking the bulkheads followed by the moulding strips, I’ll save those for the next post.
Thanks for stopping by.
- Blue Ensign, bruce d, MEDDO and 12 others
-
15
-
I'm building Cheerful, a 1806 cutter, just as Chuck describes. It's fun to get all caught up in how it was done on a real ship, but there is the practicality of building a model that achieves the look, "faked" or not. I think your most recent drawing is consistent with what Chuck describes, and recognizing it is a block drawing, properly shows how it is done on a model.
I built the Lady Nelson before knowing this and unfortunately without some of these features. I'd encourage you to look at https://syrenshipmodelcompany.com and Chuck's monograph on Cheerful. The middle chapters address how to represent the deck of a cutter from a modeler's perspective.
- mtaylor and Ryland Craze
-
2
-
8 hours ago, DelF said:
I looked up 'euphroe' in Sailor's Word Book - A Dictionary of Nautical Terms by Admiral Smyth, published in 1867.
I’m trying to think what it means that you have or even know about a book with this title🤣😂
-
-
1 hour ago, Edwardkenway said:
made the decision to remove the few planks
A decision I’m familiar with having removed so many on Cheerful. It’s the right step and one you won’t regret in the long run.
- FrankWouts, Edwardkenway and MEDDO
-
3
-
Thank you for these comments and likes. I’d do a few things different now (especially that winch), but I enjoyed this little kit. A quick and fun build.
-
4 hours ago, DelF said:
Glenn, this is aimed at you, so I hope you were only joking
The second half of that post was because I was going to have to read the entire log page by page since otherwise every other post would be bookmarked. I fully intend to steal every ideal and technique of yours. Between you and James I see no reason for a Flirt build log when I get to it. I'd just be embarrassingly repeating the phrase, "as I learned from Derek..." and showing photos that didn't match James'.
You've probably mentioned it already, but what airbrush did you get? I have a really cheap version, but all I've ever been comfortable in painting is sheets of PE (which I've used a lot of, numerous sheets on Vanguard alone. I have no problem or issue with it in general, I don't know how we'd build large parts of a model without it) and cannon barrels.
Pen Duick by BobG - Artesania Latina - 1:28
in - Kit build logs for subjects built from 1851 - 1900
Posted
Now that I see the real thing your paint work is even more impressive. I think you should take up Spyglasse’s comment and make a working version of the deck and just throw stuff everywhere 😂🤣😂