


glbarlow
-
Posts
3,855 -
Joined
-
Last visited
Content Type
Profiles
Forums
Gallery
Events
Posts posted by glbarlow
-
-
50 minutes ago, Chuck Seiler said:
length of plank stock
Only that I think the longer it is the harder it is to cut consistently. 24 inch, like Jeff sold, is the max for me. I'm using 15" length stock from Syren for Cheerful and don't have a problem.
- mtaylor, Ryland Craze and Chuck Seiler
-
 3
3
-
49 minutes ago, Chuck Seiler said:
I don't see a photo.
Thanks for pointing that out. - they didn't load the first time, I've added them.
- mtaylor, Ryland Craze, Canute and 1 other
-
4
-
Ripping planks
I’ve been asked to do this a couple of times, I’ve been hesitant because there are undoubtedly many ways to do it and many people better at it than I am. If you prefer a different way, then you should do it that way. I can only say this way works for me. For example, Jim Byrnes tutorial is pinned to the top of this section.
So, here is what I’ve learned about ripping planks from milled sheets. To be very clear, it’s what I’ve learned from asking questions, seeking help, and learning from others. I’ve adopted and amalgamated all that input into my own technique. That I can successfully turn milled sheets into planks comes from the gift of knowledge from many sources but especially @Chuck Passaro, @Rustyj, Jeff of HobbyMill fame, and from the guy that provides the perfect tool, Jim Byrnes of https://www.byrnesmodelmachines.com

I’m not going to insult anyone’s intelligence discussing shop safety. If you build models and own sharp tools, machine or otherwise you know how to use them and what to wear to keep your fingers and eyes. So, do those things if you do anything I describe here. This is my disclaimer.
First the equipment. In my opinion there is no more essential and no better tool for ship modeling than the Byrnes saw. Far more than ripping planks, it is a precision instrument. There are plenty of posts on MSW about this saw, so go read those and then buy one. This saw is without peer, in my opinion. Please hold your replies on why another model saw is right for you. I respect your choice.
Next is the blade - I’m sure there is more than one that will do the job, but all the people I have asked, including Jim Byrnes, say the same thing. The Thurston I-292, .030 kerf slitter blade. I understand Thurston is out of business, I’m sure there are equivalents if you can’t find one.
Here’s what I use and how I do it.
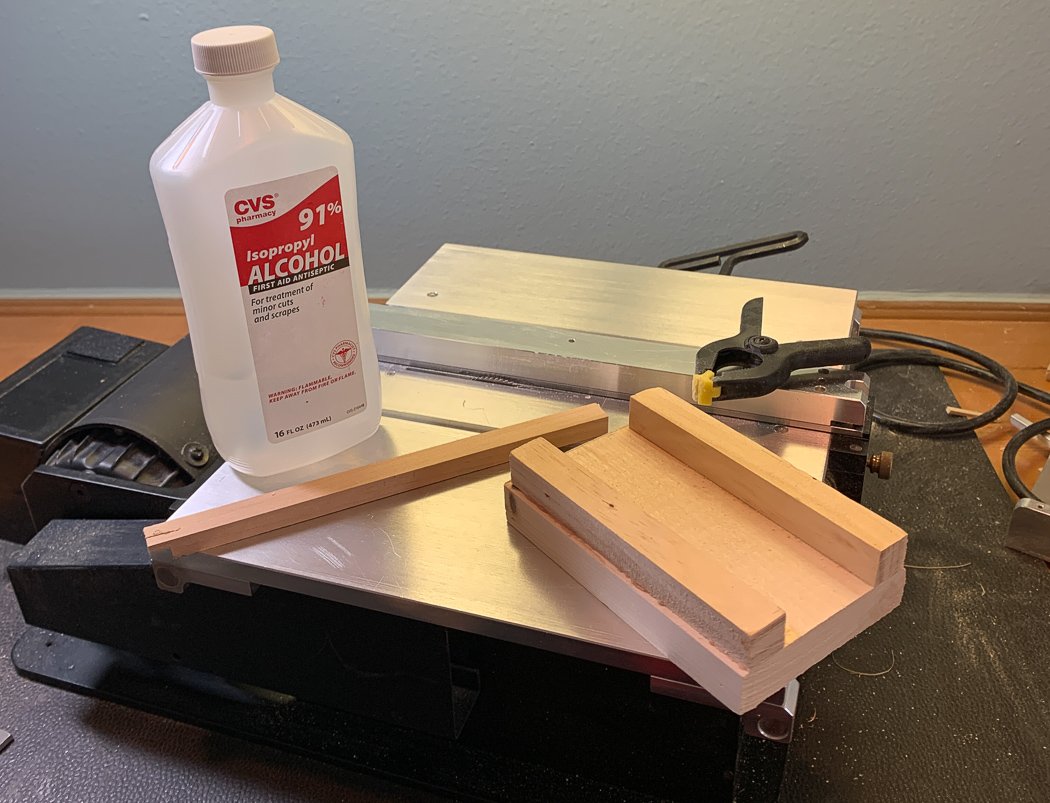
I start by cleaning the table and the blade with denatured or isopropyl alcohol. There are other methods, but keep the blade clean however you do it. I also on occasion wax the table with common car wax. I cut planks between the blade and the fence using the tall fence accessory from Byrnes.
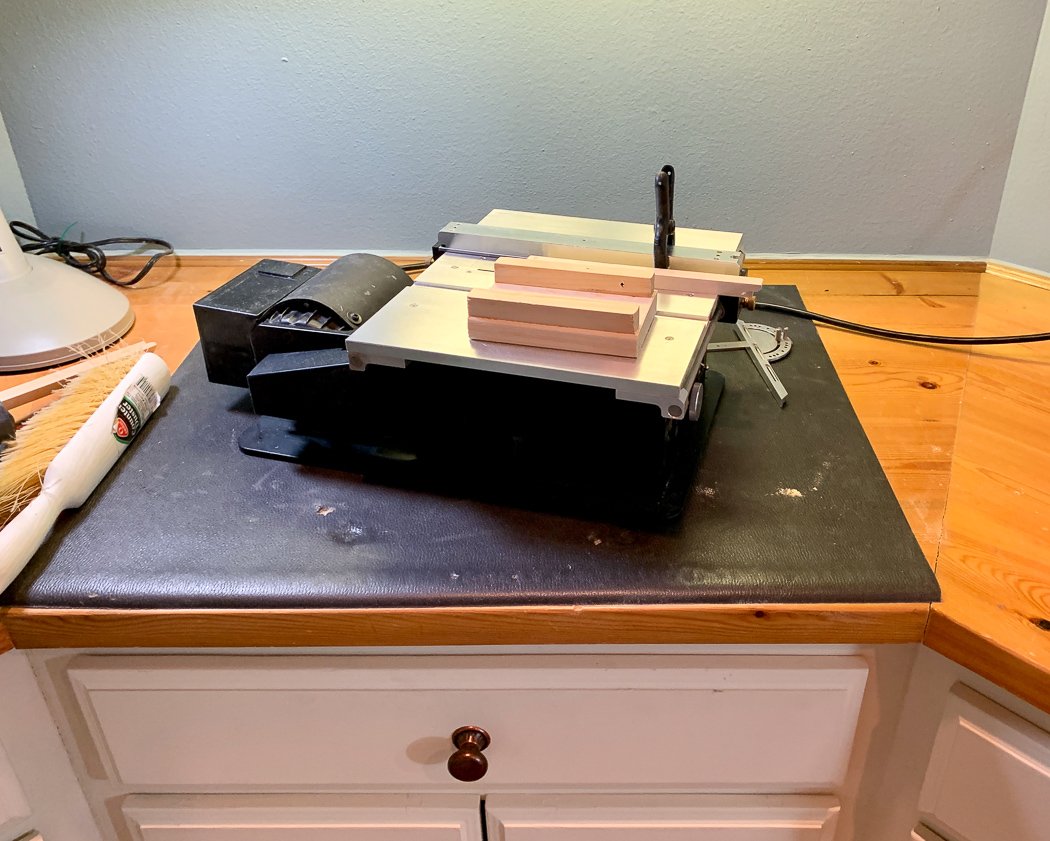
Probably the biggest breakthrough was Chuck’s coaching to stand to the side of the saw, not behind it. This photo shows my orientation to the saw when I cut. It’s amazing how much more natural it is and more control I obtained from this simple change.
I use sacrificial push sticks. Just a square length of wood with a notch cut in it that I can push right through the blade. When it crumbles, I cut a new one.
The side block is just a piece of wood. I glued the two pieces on top for a little more of a grip, it also serves as a finger guard. I sanded the side facing the milled stock square and as smooth as I could get it. The optimal length is 5 inches, Jeff describes why in a tutorial he wrote, I’ll just say it is the right length.
The last bit of “equipment” is an ordinary clamp, and another reason for the tall Byrnes fence.
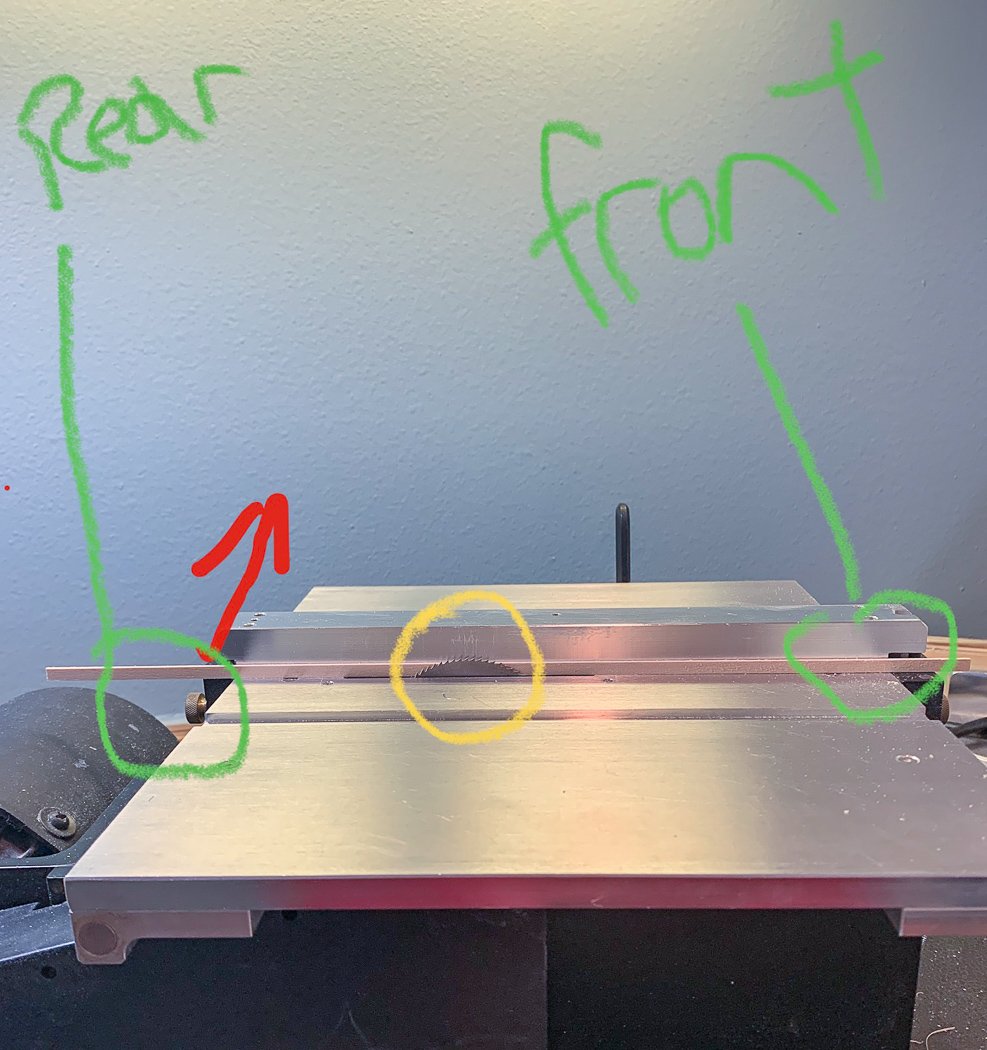
With all this in hand I can start cutting. I start by setting the blade height so that the teeth at the high point are fully exposed above the wood being cut at the high point, but just barely. I can see the full depth of the top teeth above the wood, but just. With my blade, that equates to about 1/16th above the sheet. The point is to have the blade teeth at the peak just clear of the wood. There are technical reasons for this, mine is that this is where it cuts best. Don’t set it too high and adjust the blade every time to whatever thickness of wood you’re cutting. This is true of cross cuts as well.
I set the fence distance to the blade to the thickness of the plank I want using an existing plank, digital calipers, ruler, or rip gauge. Sometimes this ends up being trial and error, I cut the first one and adjust accordingly. I set the fence at my desired width then fully tighten the front fence knob on the fence. Then, ever so slightly, push the rear of the fence away and tighten the rear fence screw to provide back taper. Push too much and the plank thickness won’t be consistent, too little and you get the ever-feared kickback. How much? I use the highly accurate measurement of ‘just a tad.’ It really takes just the lightest amount. Jim Byrnes suggests .005 inch, that’s not much.
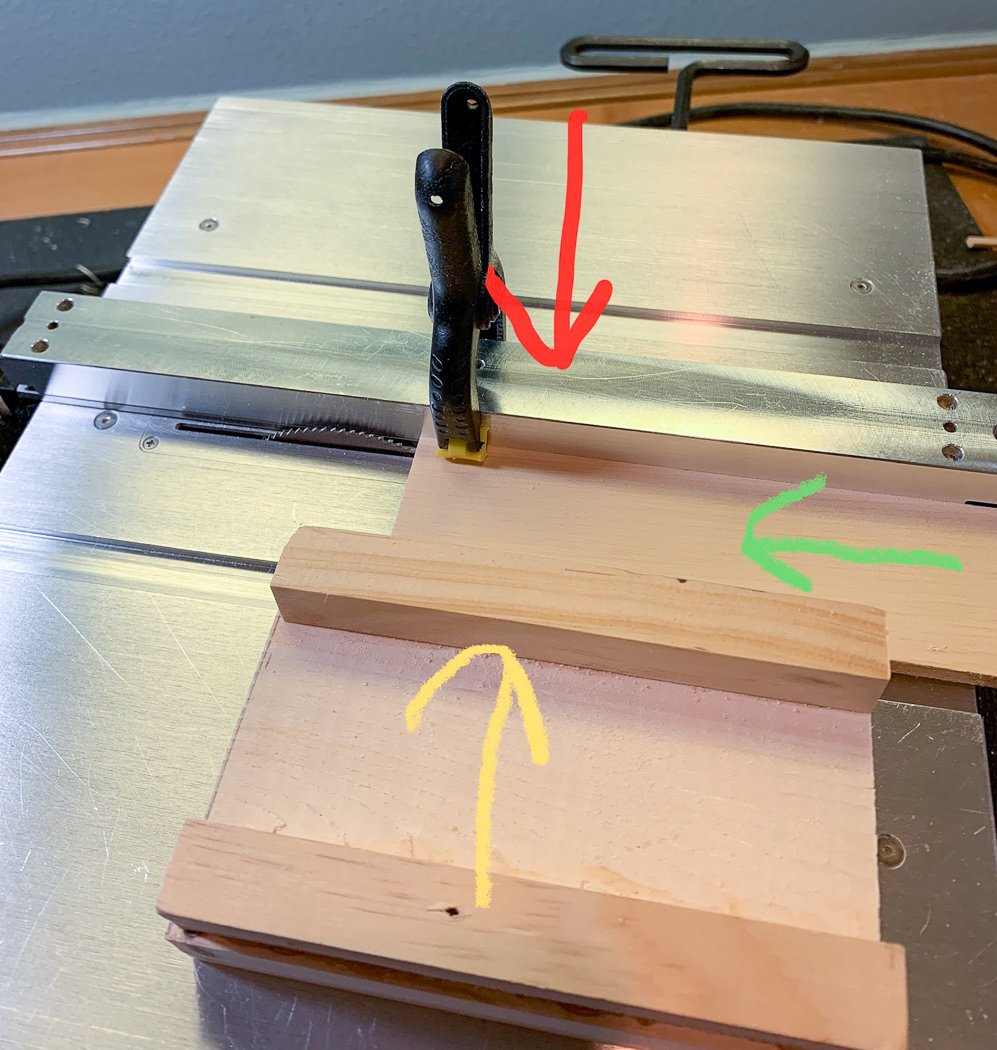
The side block, push stick, and top clamp in combination allow me to: Hold the sheet against the fence with side pressure (and not be tempted to use that hand to help push the wood, don’t do that, push only with the push stick), hold the sheet down on the table close to the blade, and push the sheet all the way through. I set the wood just behind the blade, use the clamp to press the wood down using the fence. I position the side block so that it covers the back of half of the blade and the rest holding the wood against the fence. As the sheet nears the end, I slide the block forward along with it as the last of it goes through the blade.
This all comes with practice. The side block is a good example, I want just enough side pressure to keep the wood tight to the fence, too little and too much create problems - firm, but not forced, is the best I can describe it. You know if it’s too firm because you can’t push the wood, you know it was too light when your wood is not the thickness you measured. You know you weren’t consistent throughout the cut when you have one thickness at one side of the plank and something more or less than that at the other. It’s a feel thing you only get by doing it.
I start the saw and push with the push stick oriented so, regardless of the width of stock I’m cutting, it remains more or less centered on the blade. I think of it as pushing both the plank being cut and the stock through together even as they separate.
When this all works in concert the plank goes right through the blade and is pushed out the far side. I then reset everything, especially the clamp, for the next plank.
I always keep checking to make I’m getting a consistent cut. Any number of things can create a variance. Too much or too little side pressure, Not keeping it clamped to the table with the top clamp (it will rise up on occasion), too much relief on the rear side of the fence. However, once I get going, I can rip off any number of consistent planks that are model worthy with little to no waste.
I couldn’t do any of this six months ago, I would desperately try to find already cut planks if I wanted to do something other than the kit provided wood. Once I made the effort to ask for help, so plentiful and so freely given here on MSW, and started cutting I found out it’s not that hard. I was pretty proud of myself when Chuck’s directions for Cheerful called for wood cut to a thickness of 1/32nd of an inch, and I made that cut. Once I did that, I knew I was indeed a plank ripper.
One last time. I know there are many ways, many other practices, and many expert wood workers on this site. This way works for me and I hope it helps some of you.
Oh, and practice shop safety.
- rcweir, Chuck Seiler, Canute and 17 others
-
20
-
I too want to applaud Chris (and Chuck) for sharing and soliciting the input of others. I'm sure we all respect it is his nickel on the line when it comes time to make decisions. My input is its great to have a diverse line, and I agree not to have too many models that are essentially the same - the reverse side is an eclectic line up may have the reverse impact with buyers not seeking him out because they don't know what he does. I think Chris' philosophy of making models everyone can build with clear instructions, expert design, and quality laser cut material will set him apart, but that it should be a reasonably bracketed range of products. I think Chris is doing this by a time period of sailing ships, so that makes sense to me.
- chris watton, Canute, DelF and 6 others
-
9
-
I want to re-register my vote for a small frigate like Sphinx. The big 40’s are gun platforms and while they may have history, they are readily available and don’t have much character. The perhaps lessor know and smaller frigates aren’t targets of the big manufacturers and are more unique to build, because they were unique when they existed. I mean how many gun carriages do we need to make. At some point British ships became a bit cookie cutter.
Admittedly I say this with Pegasus and Vanguard already displayed on my shelves, but I think a model that doesn’t take two-three years to build has an audience, at least this audience member. I don’t want to sort out many more 4 pounders like Speedy and Flirt, and I get it about carronades even if they aren’t as sexy as 12 pounders. So a 20 gun range frigate is my recommendation. I liked building Granado, the bomb ship deck mortars have character and were interesting to build as another example.
- Edwardkenway, DelF, Nirvana and 4 others
-
7
-
-
-
Splinting a bulkhead is an opportunity many of us have had, with your fix it will be stronger than before.
Adapt, improvise, and overcome. With homage to Clint Eastwood that’s my modelers creed.
btw, thanks for the link on boxwood. Unfortunately I need it in a more finished state, buying it
like Derek in 1-6mm thicknesses. I can rip planks, but not reduce thickness.
-
I’ll once again enjoy watching you taking one of Chris Watten’s already excellent designs to the next level. I like the idea of these smaller simpler models we can finish in a few months. I say that as I just now get close to planking the final 9 planks on my Cheerful’s hull knowing how far I have to go yet. Speaking of which is that a plan of Cheerful on the right wall? I have the NMM print, just need a frame shop to reopen.
-
I have my master Shipwright version of Flirt to build after Cheerful, but that’s a long time from now. By then there will be lots of build logs for me to consult. Looking forward to seeing your progress.
I sent an email to Timberline asking them if they’d ship to the US, didn’t even get a reply so I guess that’s a no
-
7 hours ago, Sjors said:
also have one in stock.
I do, the first copy of the Master Shipwright version. It will be waiting for me after I complete Cheerful, still have a long way to go.
- Sjors, popeye the sailor, BobG and 1 other
-
4
-
Glad to see Flirt underway!
- mtaylor, popeye the sailor, BobG and 1 other
-
4
-
-
On 8/2/2020 at 7:18 AM, MEDDO said:
Still eyeing the Cheerful as the frames and keel are already cut.
A decision you won't regret - its a challenge, and a joy.
- MEDDO and Ryland Craze
-
2
-
Your great work is tempting me to get myself one....
- MEDDO and Ryland Craze
-
2
-
On 8/8/2020 at 4:12 PM, Boatsinc2000 said:
Jeff Hayes aka HobbyMill
Jeff! Where have you been, we all miss you and your wood! Come back! 😀🤣😂
- Ryland Craze, Maury S, mtaylor and 3 others
-
6
-
-
2 hours ago, Keith Page said:
so fed up with fragile mdf parts
Interesting this is your first post and that’s your comment. Bases on many other Speedy logs and those of us who have the kit your experience is an odd exception. Is it that you don’t like MDF, there are discussions on this forum on that topic. What particular part was “fragile,” I’m sure we’d all like to understand.
As noted, Chris would and will help out anyone encountering a problem, all you have to do is ask.
-
55 minutes ago, Brewerpaul said:
My Process For Planking".
Wow, I didn’t know that was there. For the record whatever I was doing for planking then is not how I’m doing it now as would be evidenced by my most recent logs, so I should update or delete that post.
There seems to be a lot of definitions of what ‘spiling’ is in these forums, but having built the POB I am quite certain there is a good deal of tapering of planks required. There is no way the same number of planks will fit at the bow as does at the waist otherwise.
-
A 1/16th thickness of dry wood should be easy to cut with a #11 blade and metal straight edge. This is the only way I’ve ever done it. I buy blades by the 100 and change them frequently, they have to be sharp. I also use a 300mm heavy metal ruler, a short thin one would tend to slide.
-
-
-
Another excellent build BE, congratulations.
I’m sure everyone appreciates the level of detail you provide in your logs.
- BobG, Martin W, chris watton and 1 other
-
4
-
Ripping Planks - what I've learned from others
in Modeling tools and Workshop Equipment
Posted
I doubt many models need anything longer than 24.” For me the big objective is getting every plank neatly the thickness I want it to be, that’s where the technique helps me most.