


glbarlow
-
Posts
4,035 -
Joined
-
Last visited
Content Type
Profiles
Forums
Gallery
Events
Posts posted by glbarlow
-
-
I was scheduled to be in Southhampton for a cruise to Portugal and Spain this September. We arranged our trip to be there a day early, I pre-purchased tickets to see HMS Victory (and still have the non-refundable tickets). Thanks to Covid, no trip - cruise canceled. I really want to walk aboard HMS Victory, maybe someday.
As to the model, I'm sure its amazing but I barely found a place to display Vanguard, so I'll just have to enjoy it through other's build logs.
-
I’m still here both enjoying and being frustrated by this build.
I just ripped off both fashion pieces after staring at them several days and have ripped off planks below the wales more than once, my first drop plank and my desire to do the best possible work hasn’t proven to be a good combination thus far. I’m hoping there is plenty of 3/16ths wood, based on the number of pieces I’ve cut and rejected I'm going to need a lot. To be clear it’s the builder not the model that’s the challenge. Seems everything I do is something I never did for a kit, so I get to learn on the job....good stuff.
Here is one recommendation I’ll pass on. My first layer of wales must be a tad low because the fashion pieces, cut exactly to the plans, turned out about 1mm short - which is why I ripped them off to make them longer at the bottom. My counter also needed the fashion piece bent out a little, no two models will be exactly the same.
Three months ago I couldn’t rip planks worth a darn, now I’ve ripped 5/32nds at 1/32nd thick, .79mm, which is thin...so yay.
So no pictures worth sharing. Patience and perseverance...
- Ryland Craze, Chuck, VTHokiEE and 10 others
-
 13
13
-
Nice work on adding the nets. The location of the chimneys seems peculiar, seems like all the smoke would blow right in the helmsman’s face.
-
It would be hilarious to put a 1:64 chair on the kitchen counter with a note that says “how many more chairs do we need”
- Edwardkenway, clearway, ErnieL and 1 other
-
4
-
You’re doing a great job. We all make those mistakes. I took off the same plank three times yesterday on Cheerful, just couldn’t get it right. I always try to remember dry-fitting is our friend.
-
-
-
On 2/1/2020 at 2:25 AM, ASAT said:
going to do a build log?
Lou,
My most current logs are Cheerful and Nelson, both linked in my signature line below. Next up for me on Cheerful is below the wales planking, with a single planked hull and scale length planks I’m in for an all new adventure.
-
15 hours ago, Jim CT said:
finding the PDF
My post included the link for Lady Nelson,, just click on the ‘here’ hyperlink. It and my other build logs are also linked in my signature line below. However the.pdf I’m referring to is the one created by Chuck on lining the hull which is linked at the beginning of this thread. Clicking Here should also get you there.
Welcome to MSW. One suggestion is to select, by click, hold, and drag, text and then on the quote selection block that appears to generate a reply for things you want to comment on as I’ve done with your reply. It keeps from repeating to much text but also generates a notice to the person you’re asking something of and helps them to follow the question. I use it all the time, easy and quick way to get your questions and comments before the forum.
There are lots of great people here ready to help you out. If you haven’t selected your first model I highly recommend Vanguard Models which you can find Here @chris watton is an active member of this site he maintains a thread on MSW with his latest product news Here Chuck Passaro also has great models, they are a bit more advanced, but great to visit and follow Here Find some build logs you like and follow them. I’ve learned a lot of what I know from those logs the rest I learned by doing, screwing it up, re-doing, and doing it again.
Hope all this helps, again welcome.
- Jim CT and thibaultron
-
2
-
2 hours ago, Jim CT said:
planking at some event
With the .pdf in hand I think this video was especially helpful for me too.
-
On 2/6/2020 at 9:31 PM, ASAT said:
Glenn, can you do a quick outline of what finally “clicked” or worked for you?
Lou,
I’m sorry, just seeing this now. I ported over my Lady Nelson log Here I explained in a little detail about how Chuck’s method worked for me there. I’m about to start below the Wales planking on Cheerful Here (which I started instead of Speedy) so I’ll be using it again soon. Hope you’ve found what you were looking for
-
If it doesn’t go well that plane can do a few strafing runs.
-
-
-
-
3 hours ago, BobG said:
Have you compared the water based matte poly to the Satin WOP?
Hi Bob, I have and use both, my Lady Nelson has satin on the exterior and matte on the interior, for no real reason than that’s what I did. I prefer the matte as a painting base, but I doubt there is any significant difference between the two, I’ve also painted over the satin in the past. My little experiment did prove, at least to me, that water based poly is my preferred base.
3 hours ago, BobG said:Do you ever apply steam at the same time
Yes I do also apply steam but have the iron on the lowest heat level for steam. Here again I’d do it without steam but the little travel iron produces it and I figure it can’t hurt. I let the board sit in the clamps for about a minute after heating and sometimes it takes two heating runs to get the curve I want.
I only started this method with my last build, but it makes such a huge difference in my planking I’m only sorry I didn’t find Chuck’s tutorials sooner.
- Ryland Craze, Saburo, mtaylor and 1 other
-
4
-
11 minutes ago, VTHokiEE said:
Maybe I could skip the primer if I used an air brush?
The water based poly effectively is my primer, I don’t think it would cover any char though. I’ve only painted cannon and etched parts with my air brush. I wouldn’t be confident using it on the model or wood in general. Not that you can’t...
I think it varies by types and color of paint.
-
Every stern on every model I’ve ever done has been an adventure, they rarely come out the way the plans show, I have to improvise and adapt to make them work, and have fun doing it. I expected the challenge of the scratch built Cheerful to be no different - but I was wrong. This is probably the first stern that came together just the way it’s supposed to. Not that it was easy and I still had a few challenges, but Chuck’s design, for lack of a more elaborate description, - works as planned.
But to be fair I haven’t figured out the square tuck yet, 😂
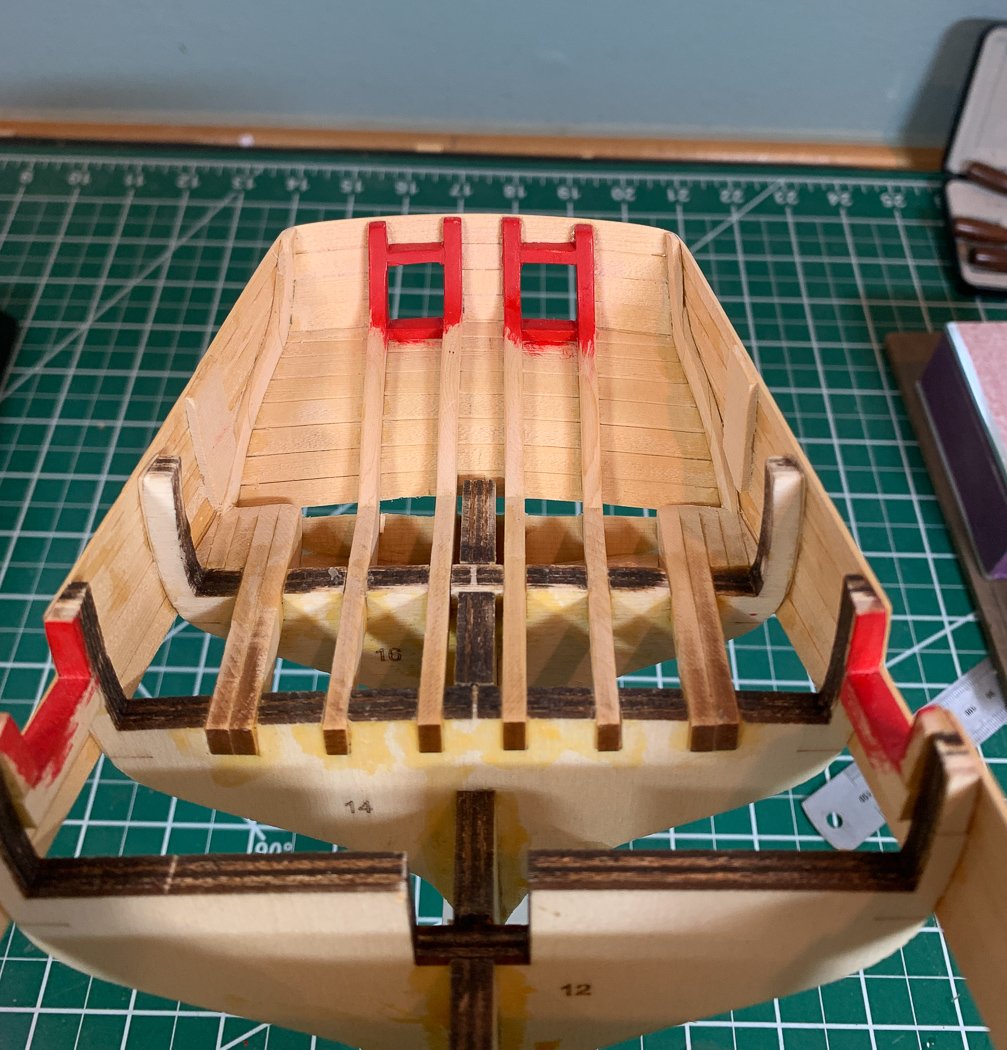
Reducing the frames in the last post was hold my breath time but wasn’t that hard with the process I described. Then it’s just a matter of planking up the counter.
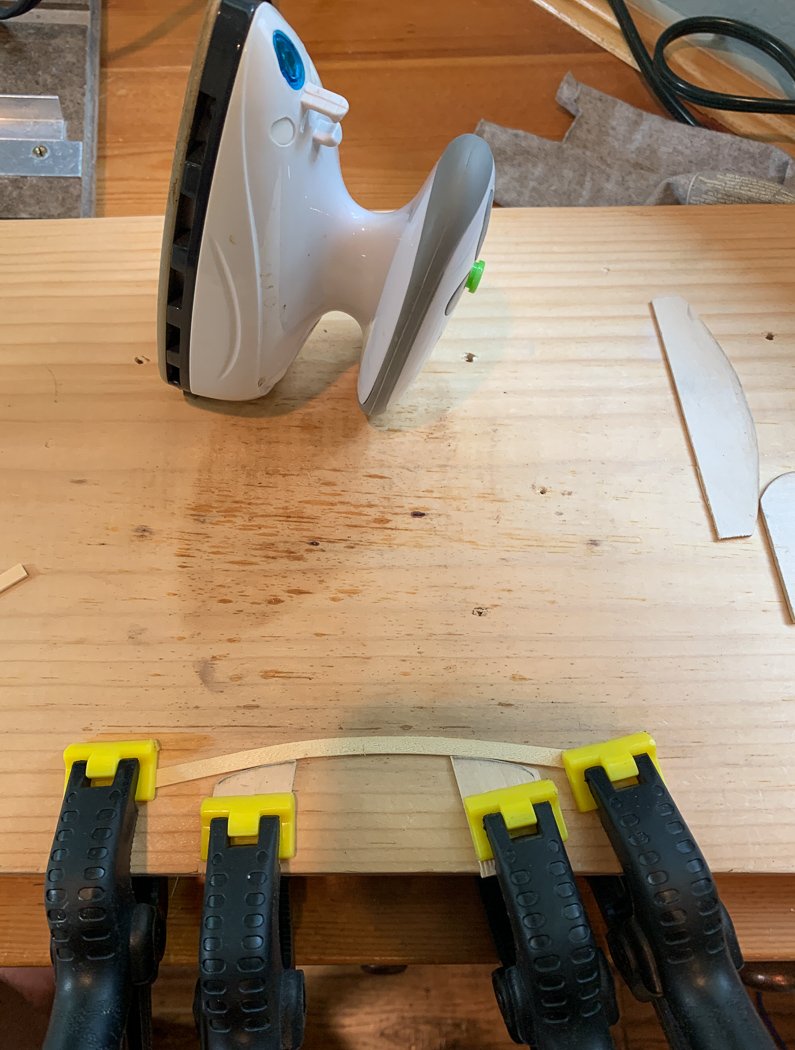
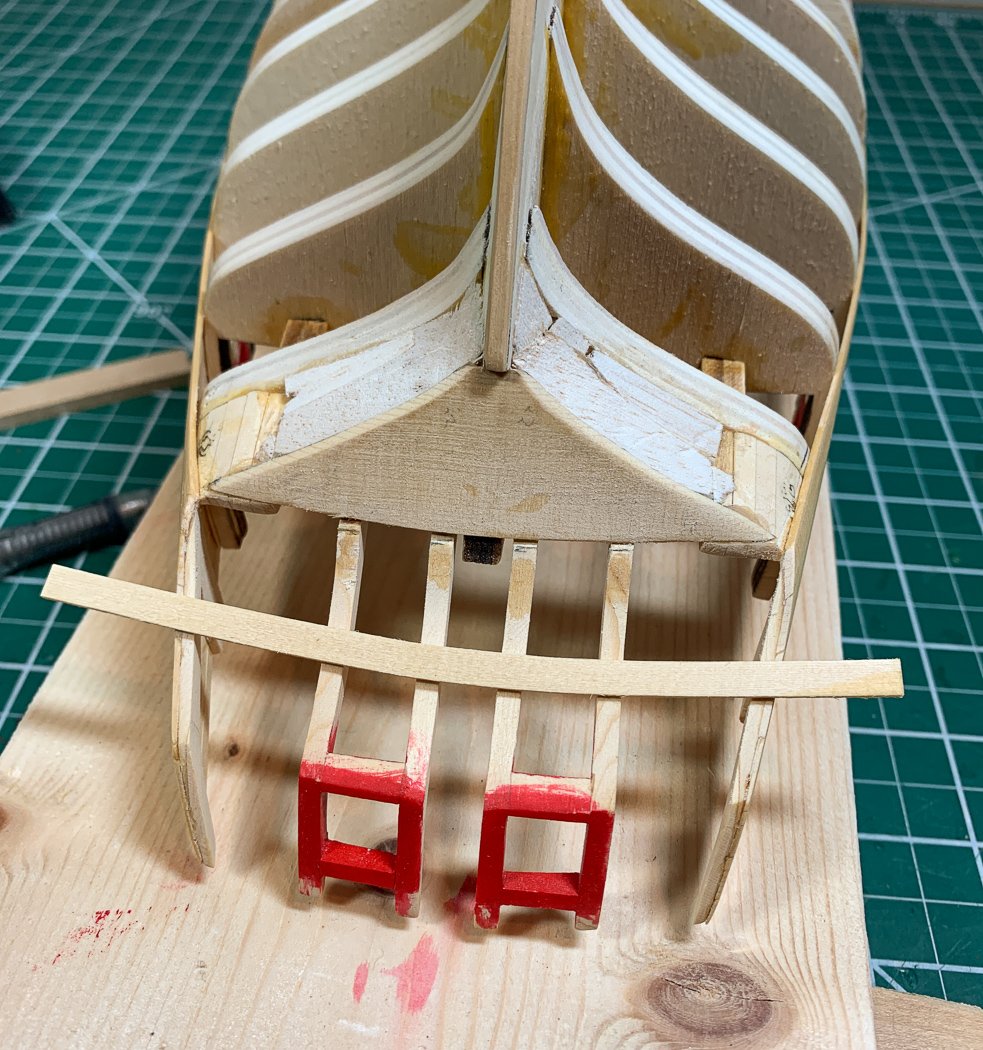
The first plank is a challenge because the counter is curved both in and down. But thanks to my Chuck Passaro plank bending station it’s a problem quickly solved. No way that plank was bending with out some help. The benefit of Chuck’s method is there is no soaking or its potential for warping. Rub a wet finger along the board and the steam travel iron and clamps do the work heating the bent board into shape. If you haven’t tried this method I highly recommend you search out the instructional videos here on MSW and give it a try.
I gave a little more information and detail on using this technique in my Lady Nelson log if you’re interested.
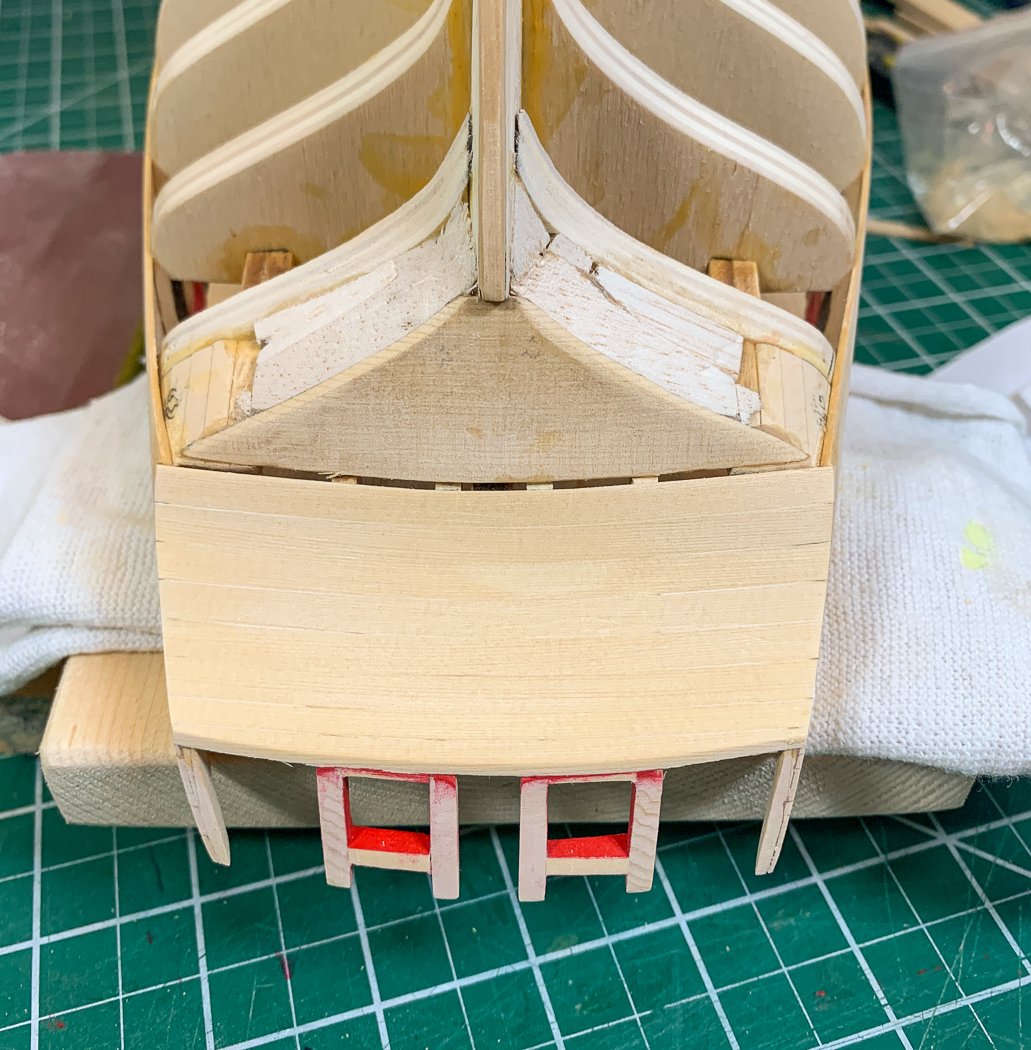
I’m a CA planking guy, no clamps to hold PVA for me. With the bent plank (and the lower side of each beveled for a tighter fit), a little CA, and 30 seconds of finger pressure… plank complete, on to the next. In no time I was up to the transom and doing some sanding.
Here’s a thing to remember - the inward side of the counter is also a final product, it won't be covered, so be neat with the glue. The reverse side result of the beveling looks like Shiplap and adds a little character. It’s a good time to use some sanding sticks on the counter, much easier to get at it than after transom is on.
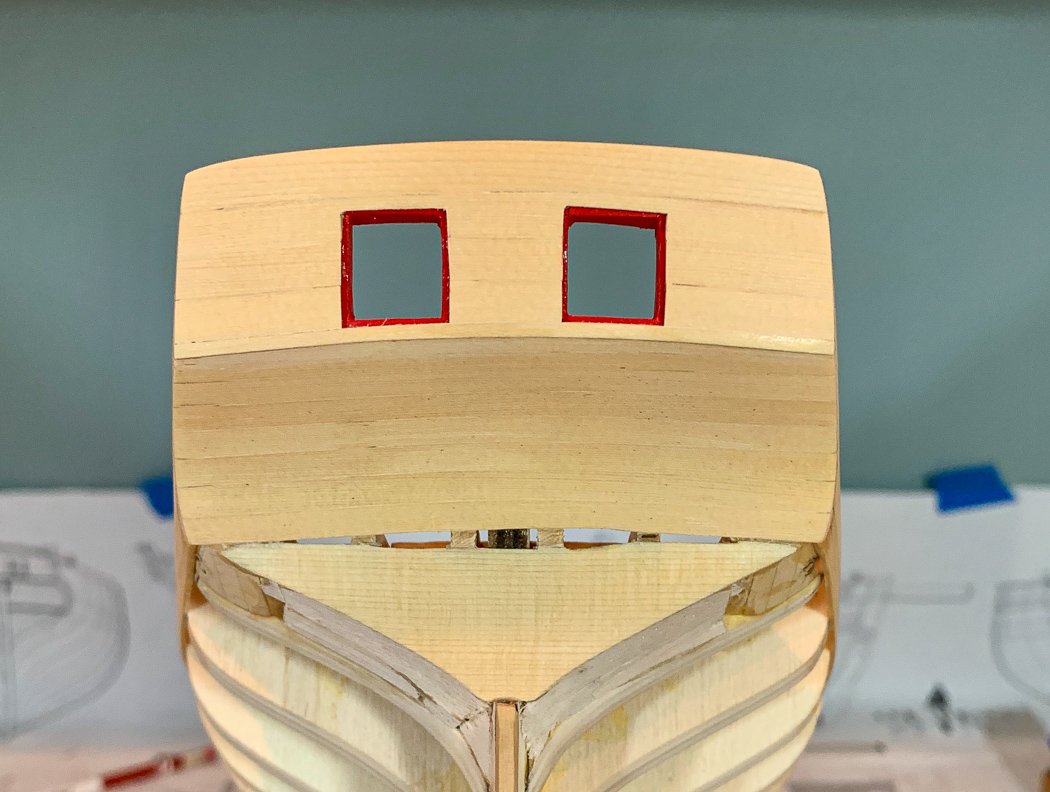
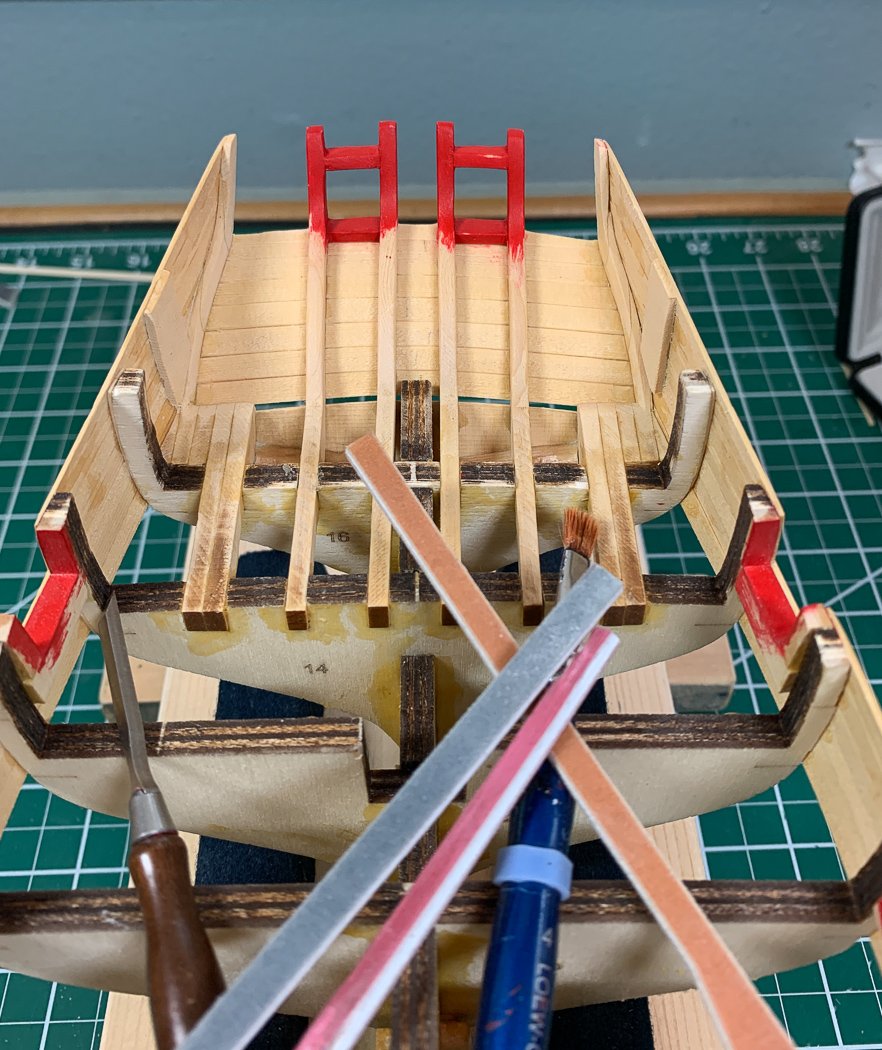
The transom is a little more fun than the counter, having to fit the planks around the stern ports. Since I plan to have these closed I left a little larger rabbit for the port lids to grab onto, I may leave them, or one of them, open - I still have the option later to decide. The third row is fun since it has to be cut to fit over the top fourth of the ports. I elected to use a 7/32nds plank on the top instead of a fourth 3/16ths one. I liked the look better and it gave a little more clearance above the top fo the frames inside.
Back to the inside of the transom to sand a little to remove any excess glue. Unlike the natural transom outboard, the inside will be painted red eventually so it doesn’t require extensive effort. I’m glad I sanded and shaped up the stern frames before they were installed, I’d hate to be removing laser char at this stage. I have already learned from building the winch my Cadium Red won’t hide laser char. Eventually I’ll be cutting a hole in here for the rudder, which should provide another hold my breath moment.
Now to cut some fashion pieces having only a #11 blade, maybe the jewelers saw to do it. Anyone want to hazard a guess how many I’ll do before I get two I can use?
On another note, I ordered a Proxxon MF70 micro mill today - I think Cheerful will provide me some opportunities to learn how to use it since I haven’t the slightest clue, though thanks to Delf for giving me some pointers. MSW is certainly a worldwide resource of talented people.
-
The comments about the use of sanding sealer encouraged me to do a little experiment. So I used the same paint and applied it to a stick of my Alaskan Yellow Cedar. The counter and bulwarks will be painted red and I wanted to see what worked best.
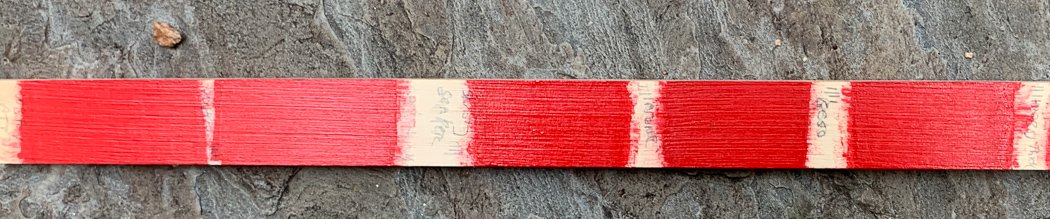
I know it doesn't show well on the photo but there are very definite color differences and texture when applied to the different bases. Here’s what I tried from left to right using four coats of very thin Golden Cadium Red paint.
- Matte Water Based Poly
- Golden Open
- Sanding Sealer
- Nothing
- Gesso
So based solely on my subjective view in order worst to best: 5. I quickly ruled out sanding sealer, it closes the grain of the wood and the resulting look is glassy. It also didn’t take the multiple coats very well. 4. No base is fine, but it absorbs so much into the wood the finished look was only ok, It works better if I use thicker paint. 3. The Golden Open product took forever to dry as a base (its more for acrylics on canvas as I read about it). It also had the most negative affect on color making the red almost orange. 2. The gesso was good, but as a base it has to be sanded, way too much work around gun ports for me. It also darken the color more than I liked.
- My favorite is using what I’ve always used, the water based matte poly (which is not to be confused with wipe on poly, totally different stuff). It dries quickly, seals the wood in a good way and provided the base for the best version of the Cadium Red color.
Again, totally my subjective opinion, but at least I have my answer of what works for me. On a related note, I've always used Admiralty Paints, by far my favorite. However, it doesn't come in a RED enough Red for Cheerful (Go Red or go home) so I'm using the Golden Cadium Red. I can tell from the photo the colors appear different IRL so not sure it helps much.
- Saburo, MEDDO, Ryland Craze and 5 others
-
8
-
On 6/16/2020 at 10:15 AM, VTHokiEE said:
is the planking pattern laid out in the plans?
Sorry I missed your question earlier.
Yes the planking pattern is laid out on the plans. I didn’t worry about them for the lower level of the Wales (bottom two rows in photos.
As a related point, I bevel the bottom edge of each plank to help keep them tight. I’m hoping not to be able to see through my ship once it’s done 😕
-
7 hours ago, Bill Brown said:
importance of this step in the build process
That is so true for any model, but especially in this case where it’s single planked. I can tell already on mine the time fairing was well spent.
-
-
25 minutes ago, DelF said:
assumed it was boxwood.
Thanks!
The Alaskan Yellow Cedar is much more yellow gold than Boxwood. That may not show in the photos. The poly transforms it nicely.
You should definitely put it on your list. It’s beautifully designed and is a real challenge to get each step right. I’m really enjoying it.
-
There is likely a bearding line on the plans. Draw that line on your first planking as a guide, you only need to reduce it there, shouldn’t be too much.
Lady Eleanor by Blue Ensign - FINISHED - Vanguard Models - Scale 1:64
in - Kit build logs for subjects built from 1851 - 1900
Posted
Thanks BE, that makes sense. I wasn’t thinking like a fisherman 😊