-
Posts
4,130 -
Joined
-
Last visited
Content Type
Profiles
Forums
Gallery
Events
Posts posted by glbarlow
-
-
30 minutes ago, Chuck Seiler said:
One problem I see is that you appear to be using walnut as your outer planking.
Are you replying to me or to Sheerline? I'm using Alaskan Yellow Cedar on Cheerful. I was also successful using this technique on Lady Nelson using the kit supplied walnut though I agree a kit with brittle wood of any type might find it difficult.
- Chuck Seiler and mtaylor
-
 2
2
-
Thanks for the compliments, I appreciate your taking the time.
33 minutes ago, VTHokiEE said:my skills aren't quite ready to be stretched
I follow your Alert, I’m sure you can pull off Cheerful. Maybe like me you’ll just have to do the same plank 3 times. 😂
15 minutes ago, Edwardkenway said:I cut the profile into a 2mm thick old brass hinge and practiced on a piece of AYC. I found a thinner scraper tended to dig in!
That’s exactly what I’m finding. I just bought some thicker brass, I need to get the right profile cut in it.
- Louie da fly, VTHokiEE, mtaylor and 3 others
-
 6
6
-
I’m a ardent fan of Chuck’s plank bending approach, I try to describe it in some detail in my Finished Lady Nelson And underway Cheerful logs, linked in my signature below.
I see you have tick marks already so I’m sure you know the planks likely need to be tapered for the same number to fit at the bow as fit at the waist.It being a kit it’s hard to understand why there is such a big gap at the stern for the same number of of planks as at the waist, but the bottom line is you have to fill the space. Here again the tick marks should show you the width needed. If it takes 5 it takes 5, just don’t put them all together. Did you have the same issue with the first planking?
-
On 8/20/2020 at 2:45 AM, James H said:
The one I use is this:
Geez, James has production quality photos of glue🤣😂😅🤣😂
- chris watton, BobG, Ryland Craze and 3 others
-
 6
6
-
Thank you Lou, Derek, Edward, and Bruce.
I really appreciate the comments, I just try to pay it forward having learned so much from others as well. I really didn’t know when I started if I could pull it off, I’m glad now I did start it. I mainly hope my log will help encourage others to take their own shot at stretching their skills just as I’ve been encouraged.
Regarding tree nails I think at most I’d put them at the butt joints. They are all in the right place, but not in a perfect line. As Lou notes being lined up is a big part of them looking right so I don’t know... I agree with Derek as well, in fact measles was my same thought. I’m going to have to think about it some. To nail, to partially nail, ......
My other challenge is the moulding, so far my practice with the scrapers I’ve made has not produced a single good result. I’ll keep working at it until I can produce some worthy of the model. Another of those things I’ve not done before.
So between these two things, I guess I’ll be slowing down for a while. Maybe I’ll build a cannon or two as a side project and a diversion.
Thanks again for the input, I appreciate the counsel.
- Louie da fly, Ryland Craze, mtaylor and 3 others
-
 6
6
-
Thank you Ryland.
- mtaylor and Ryland Craze
-
 2
2
-
-
49 minutes ago, BobG said:
you're making me want to build this ship!
Time to get started, you’ll enjoy the journey, just don’t drop it. 😜
- Ryland Craze, BobG, mtaylor and 1 other
-
 4
4
-
46 minutes ago, bartley said:
cutting reproducible lengths.
Yes, you’re correct, the post was limited to ripping planks, there are many other things the Byrnes saw does well. I have done plenty of cross-cutting, I’m a big fan of the sliding table accessory for those reproducible cuts. I’m sure I’ll be at it again now that my Cheerful planking is complete and I move to the next phase.
-
Thanks Michael and Rusty!
- Louie da fly and mtaylor
-
 2
2
-
-
After 3 months I have completed building and planking the hull. It isn’t perfect but I’m happy with the results of my first single planked model. Here’s a few things I learned in my failed quest for perfection as I planked the lower belt:
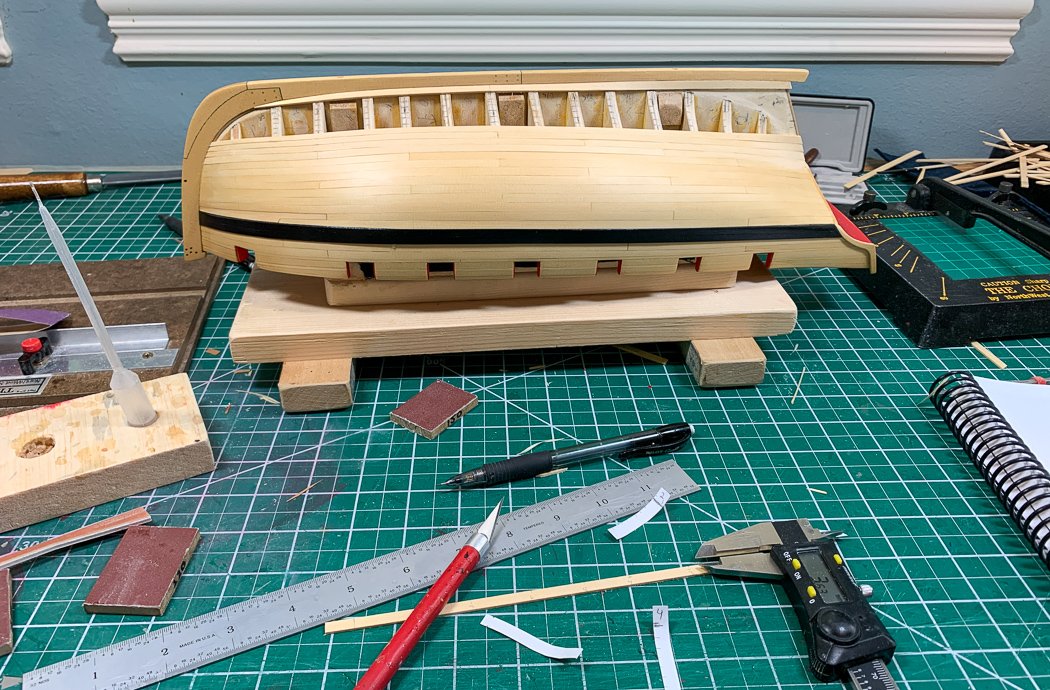
The taper point, determined by the tick marks, for the upper planking belt was consistent at bulkhead B and only required forward to the bow. Although for the most part the lower belt taper began at bulkhead 2, this belt was a bit more complicated. I don’t know why exactly but I had to make adjustments different from the original tick marks as I progressed through the lower planks. However, validating the process, I did this by “updating” the tick marks after the first couple of planks, measuring the distances with tick strips to determine the widths required at each bulkhead for the suceeding planks. It sounds more complicated than it was. The real point is the process worked and kept the guesswork at bay. It does mean planning the whole way, so progress can be slow.
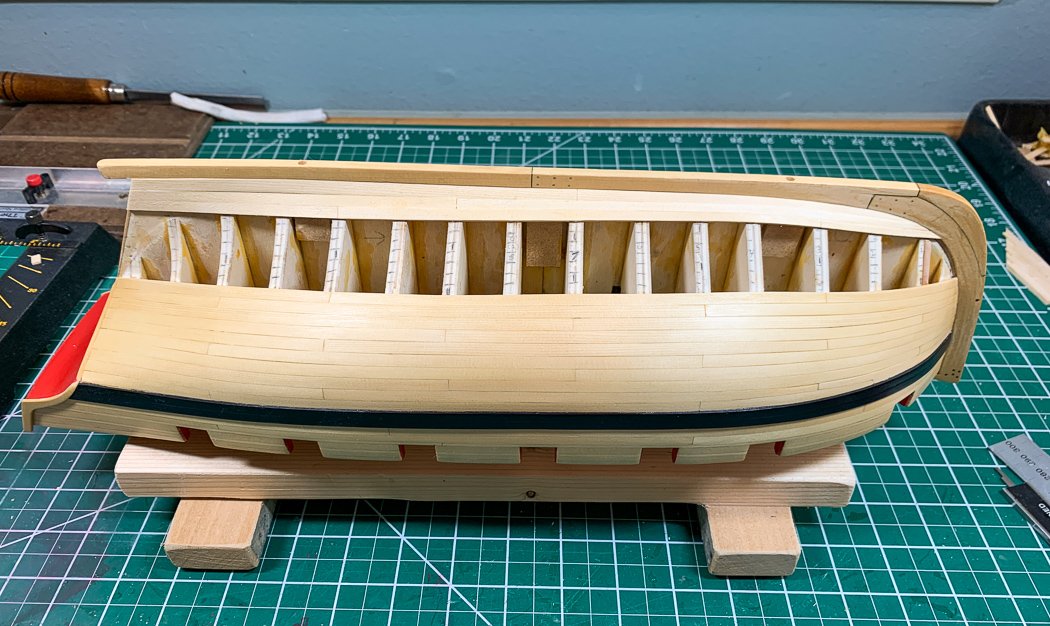
I installed the first three of the final ten from the top, then switched to cutting the garboard and two planks above it before going back to the middle four. This is a sound process I’d recommend for everyone. I really didn't want my last plank to be the garboard. This plank (actually two pieces following the pattern) took me a long time to shape. As normal I did better on the 2nd side, but this time no third attempts. Aside from the more complicated fit of the garboard, there is another reason for finishing with the lower middle of the belt for us mere mortals. Any adjustments that might be needed (I acknowledge nothing:-) are done on planks visible only on the bottom and won’t be seen once mounted.
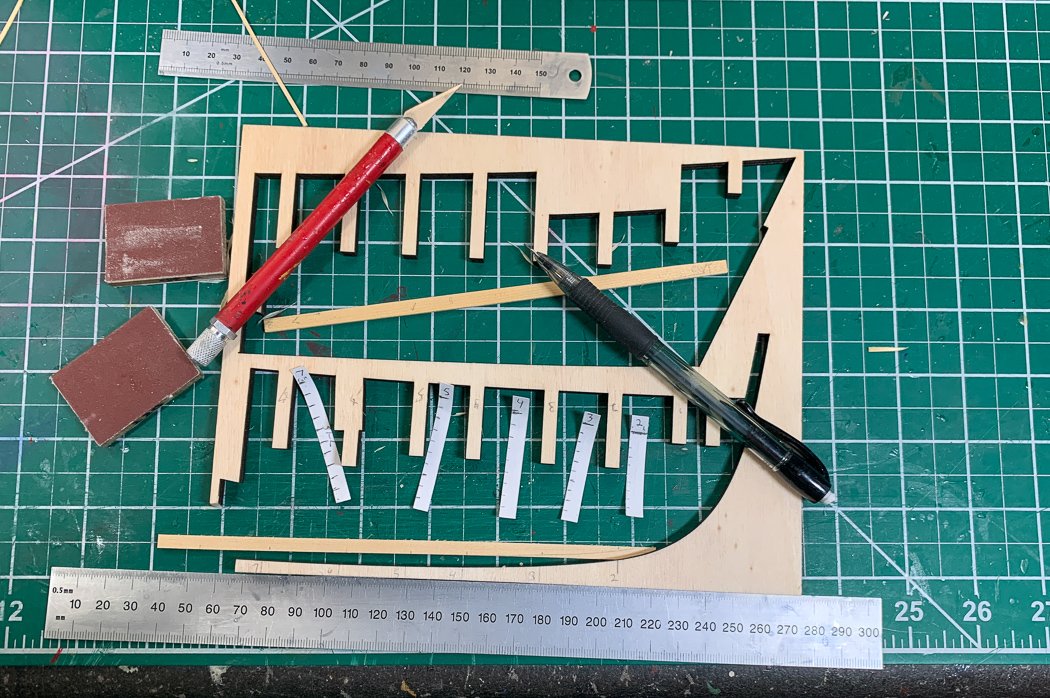
There is a small curve at the stern along the keel and of course the upturn of the keel to stem at the bow. I thought about how to get those curves just right and wondered if only there was someplace to copy them for an exact fit….Using the original laser cut waste worked pretty well, especially for the small curve in the keel at the stern. I probably had some reason for including the tick strips in this photo, but I don't remember what it was. Oh yeah, use tick strips. 😄 I love this old knife, I have fancier handles but always reach for this one. I probably went through 15-20 #11 blades for this phase of the model.
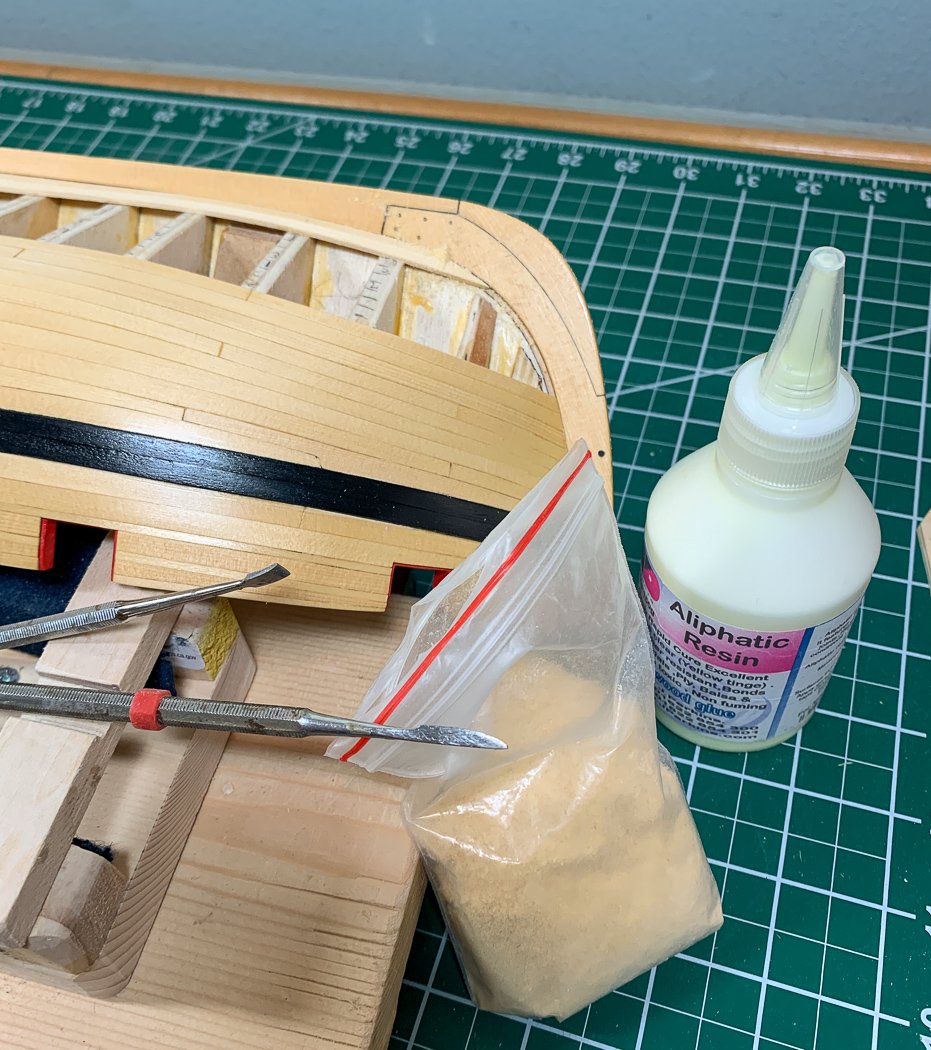
Many already know this, the best wood filler is the sawdust gathered beneath my saw from the planks cut for the model. I’ve not had to use a lot having been very careful (and having ripped off and replaced so many planks), on occasion it comes in handy. Here for example I thought I did a great job on the shaping the port garboard until I placed the next plank up and found the garboard to be about .05mm short, leaving a very small hole between it and the stem. I used a toothpick to put a little glue (either Aliphatic or PVA, but not CA) in the hole then placed a pinch of sawdust on top. I used the backside of my favorite dental tool to pack the sawdust into the hole with the glue and blow off the excess. I let it dry and then sand it, the hole essentially disappeared. For the best result I let the glue fully dry before sanding, I also try to use the least amount of glue needed to fill the gap and wipe it off the excess before it dries to make final sanding easier.
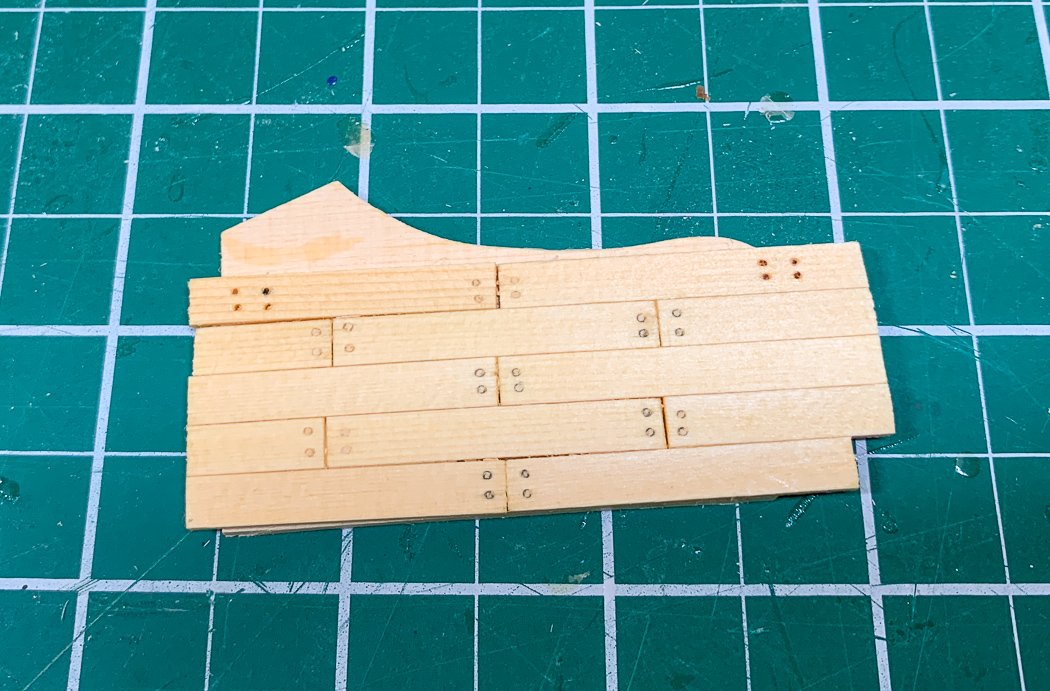
I did a little side experiment with tree nailing. I’m not sure how I feel about doing this or which method to use. I tried the black (and brown) fishing line approach, but wasn’t sure I could pull it off consistently or neatly. So I then tried two different neutral colored wood fillers and using both the sharp pointed pencil in the hole before filling (Chuck’s instructions explain this process) as I did for the keel and stem, but also did the hole fill without the pencil mark. I’m not decided yet on which to use or even how much I want to do it. I spent a lot of time on the hull, I’m not that excited about poking holes in it: 😕
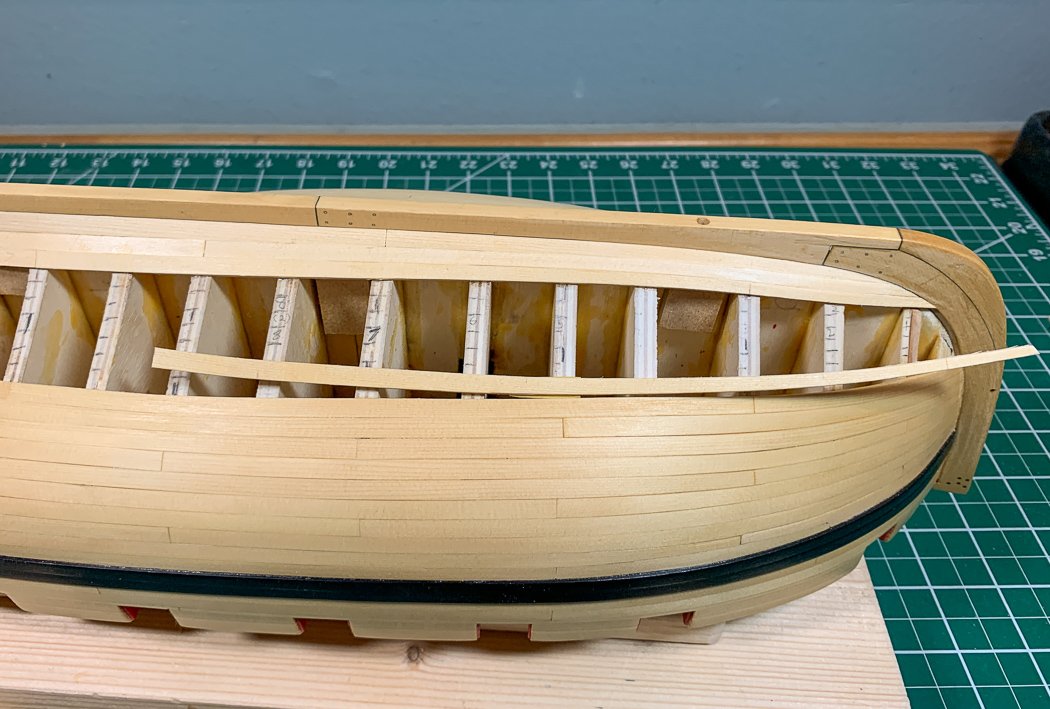
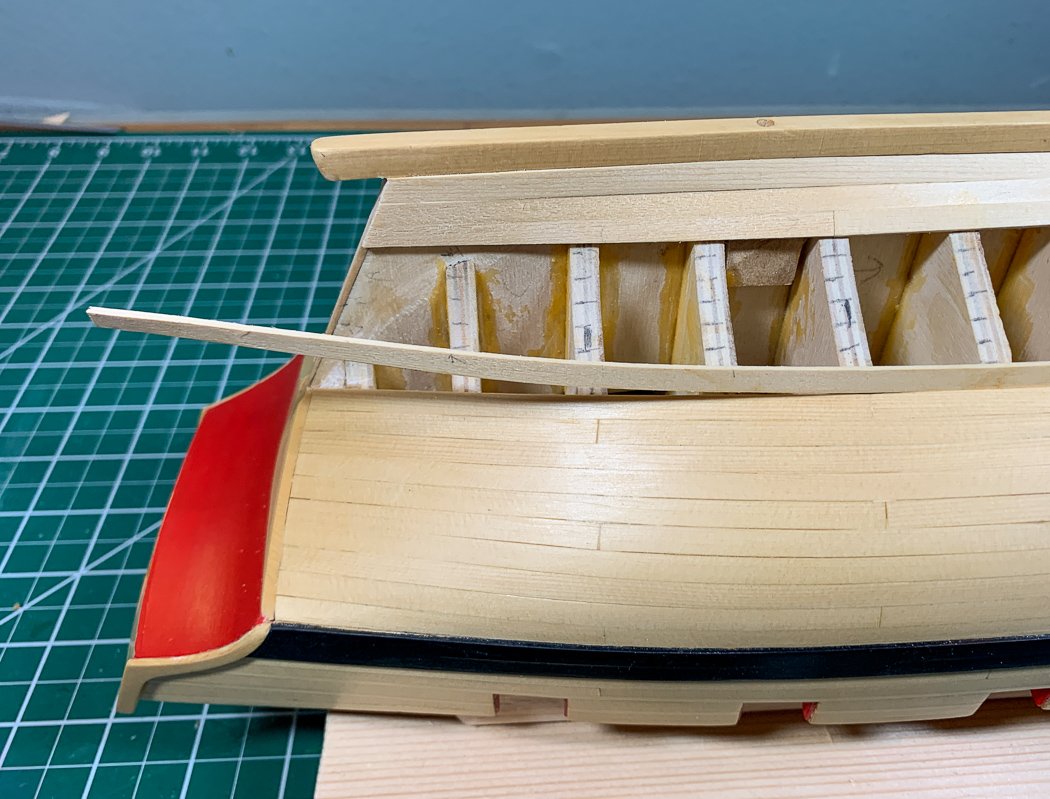
I’ve mentioned plank bending using @Chuck method several times in this log, my Lady Nelson log, and multiple times as comments on other logs. I can’t say enough about the difference it makes for me. The real value is the dry heat bending. Neither of the planks show above were touched by water (I normally rub a wet finger across before I apply heat, but wanted to make a point so on these two I didn’t). They are clamped to a board, bent to shape, and heat applied with a travel iron (much quieter than hair dryers or heat guns). I then happily use CA to apply my planks. I can select, taper, shape to fit, and glue on a plank with no soaking, no warping, no clamps, and relatively quickly move to the next plank. It's a process, it takes time to shape them properly. But the more I did it the better I got in determining where to apply the bend. It's seems odd, as shown in the top photo I bend a plank in a downward curve in order for it to lay properly bent up and in onto the bulkheads.
I don’t know how I could have single planked Cheerful’s hull by any other method. I have a tight fit between planks, there is no edge glue, the butt joints are tight. Once properly shaped, it sometimes takes 2-3 times under the iron, I can almost lay it into position, including the heavy twists required at the stern.
I’m not perfect with the lining, as I noted above I had to make adjustments, but doing so told me where I needed to adjust rather than finding out too late. It also showed me, which is a really big deal, where to start any required tapering, and if I didn't need to taper at all. It’s a process that works, it doesn’t take long to learn, though it does take time to do. The reward is a much nicer planked model - in my opinion and my experience. It most certainly a nicer one than I would have been able to do with my old ways.
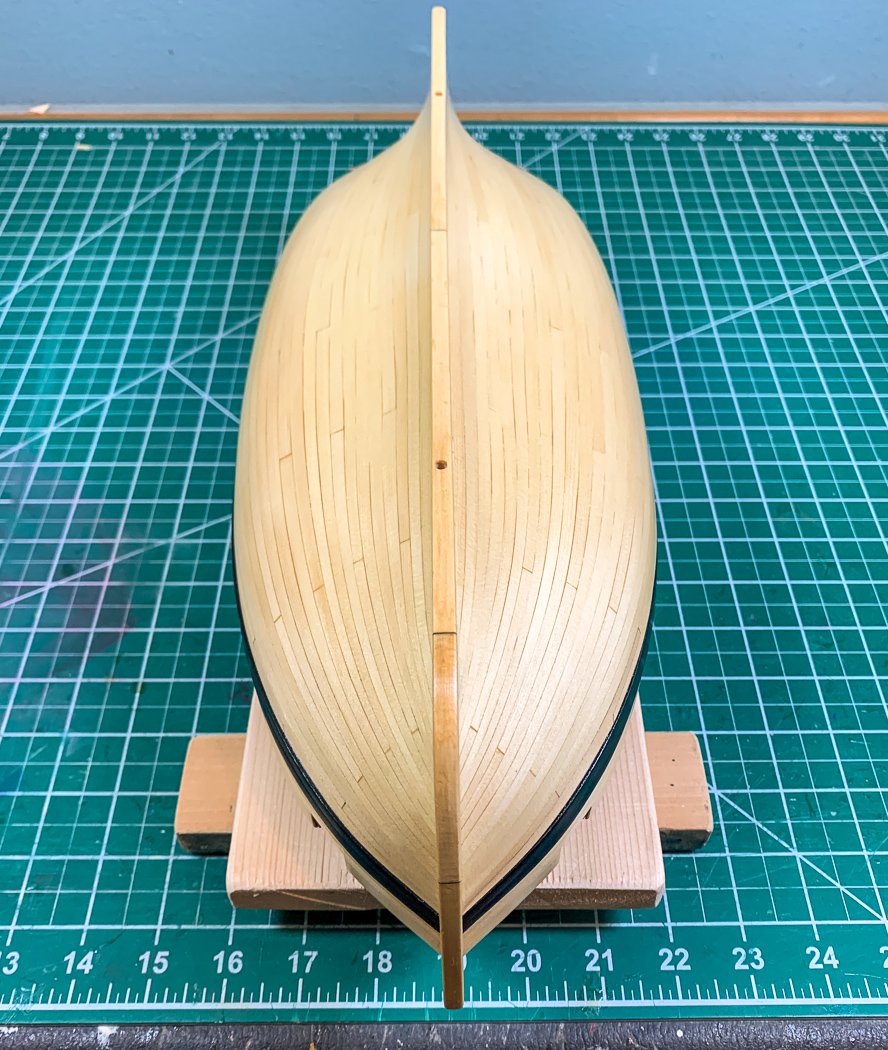
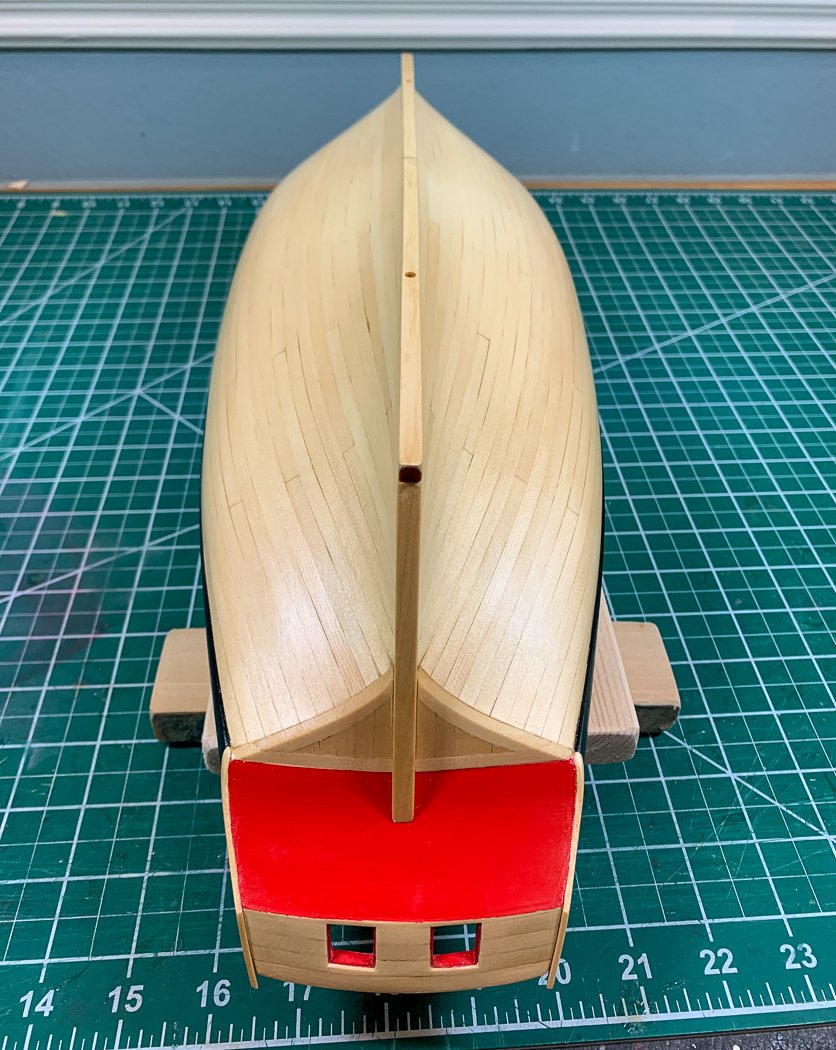
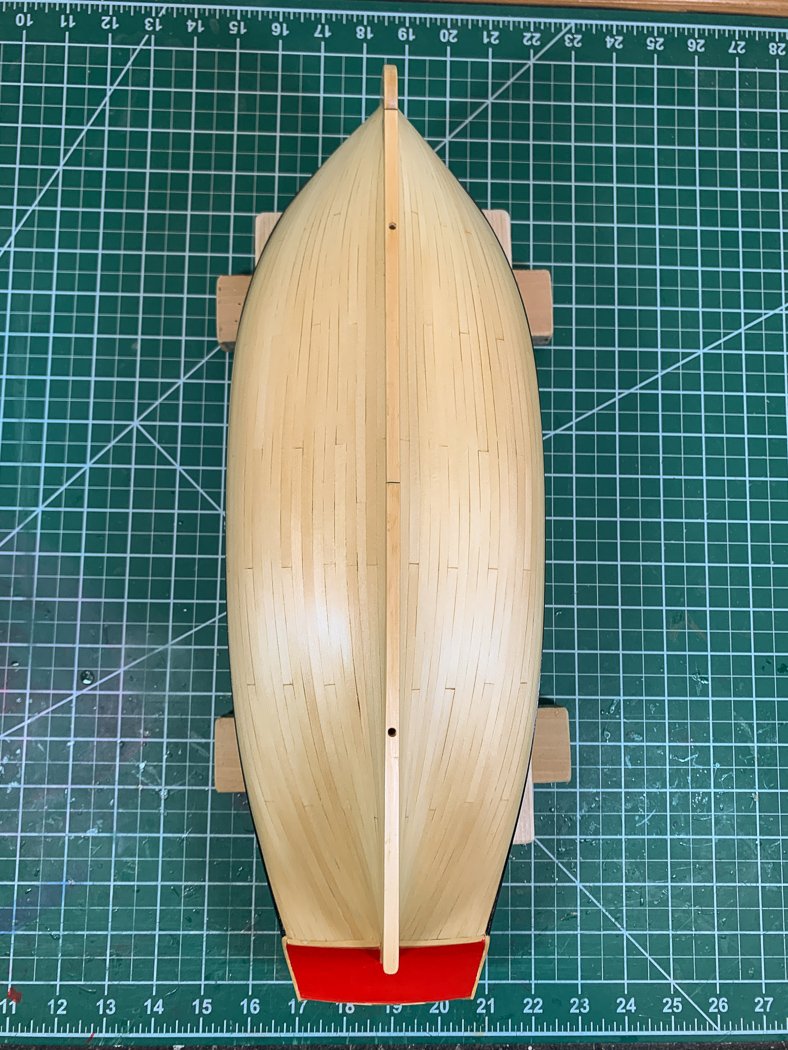
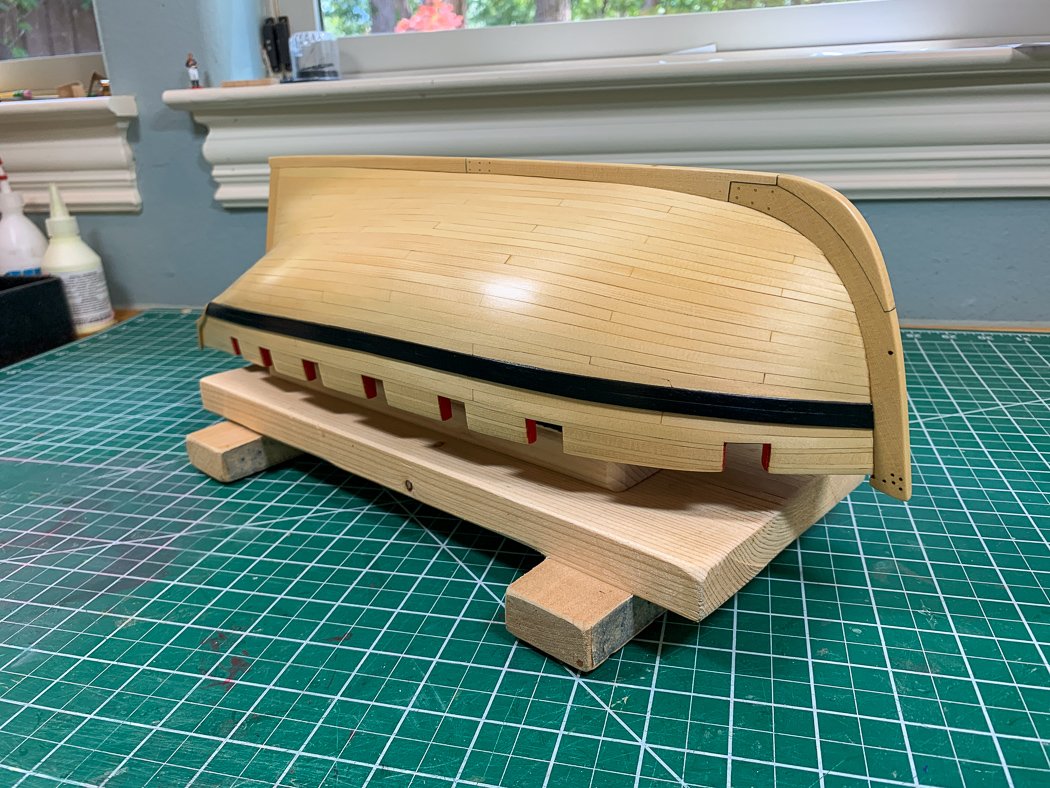
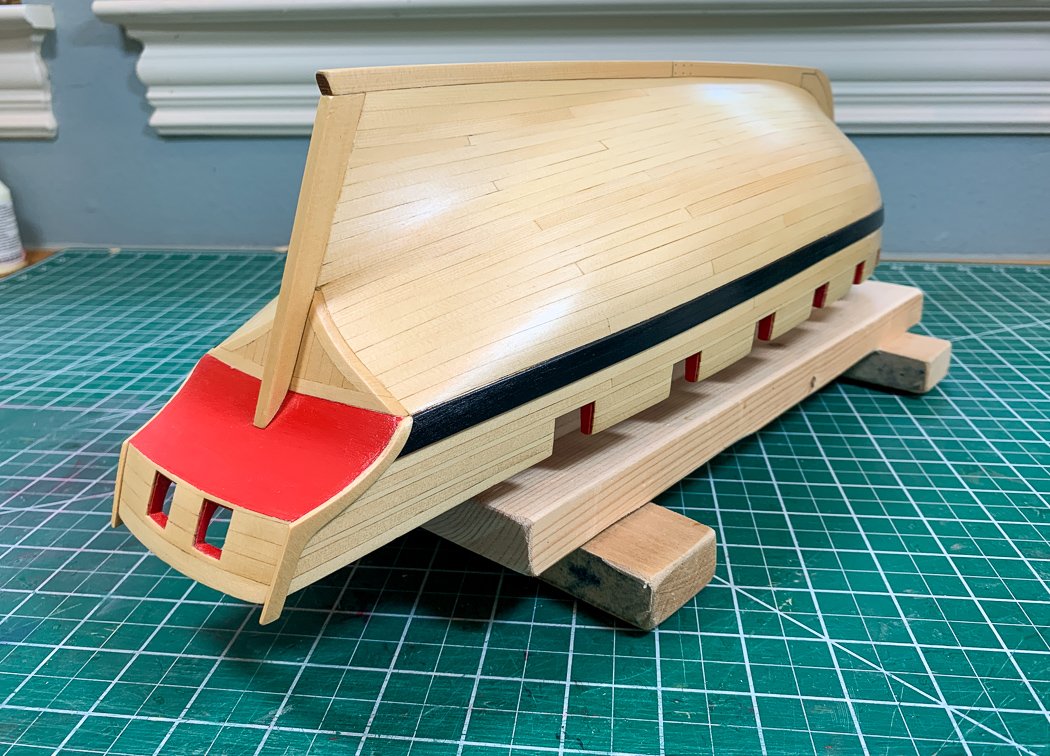
So with all that said, here is my finished hull.
The stern post took some work to fit. Don’t wait until this point to start that fitting process. I’ve been checking it as part of completing the square tuck. In my case I had to cut off about 1/8th inch from the bottom, this will vary per model. Chuck told me it’s cut over-sized to allow for adjustment, given every model is a little different. It is a chore to get a good fit.
One final comment on planking. I elected at the beginning not to “caulk” each plank by adding a pencil mark on one side. I wasn’t confident how it was going to come out (based on my skill and it being my first). As it turns out the Alaskan Cedar in combination with Wipe On Poly brings out the planks in a subtle way that I like. The butt joints are easily seen and the slight variations in the wood highlight the overall character enough without pencil marks - in my opinion.
As I've noted I’ve never single planked a hull before, I was really concerned about even attempting it. My advice to those thinking the same thing: This is the model, Alaskan Cedar is the wood, and Chuck's instructions provide the right opportunity to give it a try.
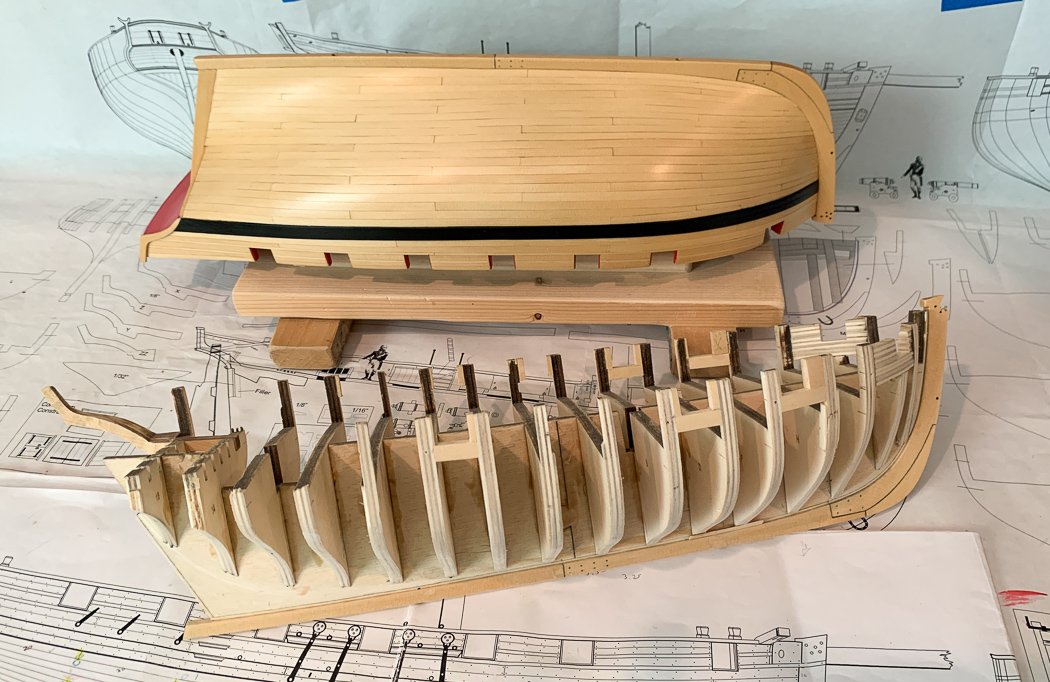
I’ve come a long way from that day when my first frame shattered as it fell to the floor. I’m hoping I can continue to make progress without that happening again. For now I’ll just sit back and think about how I want to attack tree nailing and moulding strips. Thanks for taking a look.
-
1 hour ago, Retired guy said:
Block looks good to hold wood from not moving,
Actually the side block is to keep the wood up against the fence and not allow any down or forward pressure from that direction, tight enough to hold it in but not so tight the wood can't move. As I mentioned, use of this side block was a break-through for me getting consistent width planks, before I was inadvertently trying to "steer" the wood with the side hand. It gives me a great feel for the wood, I've had zero kick backs since I adapted the technique as I described it.
There are definitely different ways to do the same thing. I appreciate you sharing your alternative method and glad it works for you.
1 hour ago, bartley said:Thanks for putting this together. It is reassuring to know that what I am doing is more or less the same as what you are doing.
I really glad for that. In fact I'm as glad about that as offering others confidence to try it themselves for the first time. One problem of such a diverse group of people on a forum this large is that invariably there are a few that think only theirs is the right way, and who sometimes go so far as to say your way is wrong. I just wish people would simply say as I have "in my opinion" "for me this does this" "another way is" "here is another alternative" ....
I wanted to present what I've learned to help people by simply providing a choice, though one I know works and is supported by its use by others far more skilled than I am. Which is why the title of the post includes "what I learned from others."
-
-
-
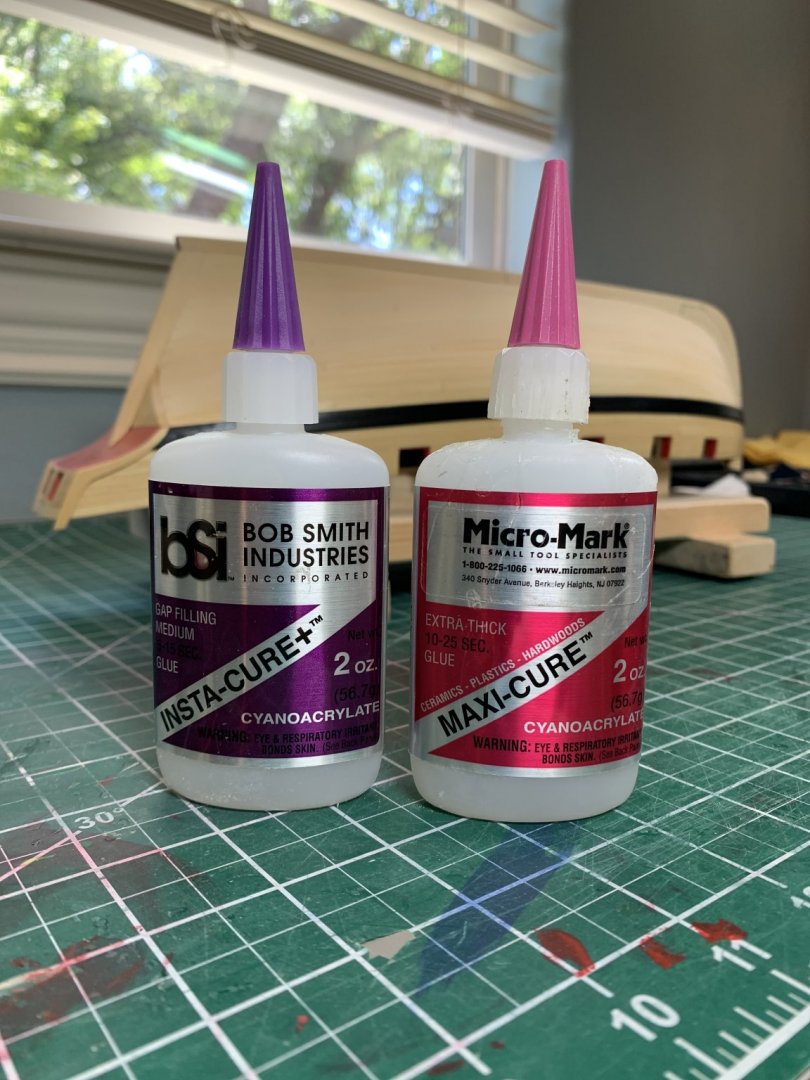
11 hours ago, Sjors said:
What is CA gel?
Is that a kind of super glue?
There are Bob Smith Industry CA glues with different viscosity that I’ve used exclusively for 20 years. I use the medium one on the left 95% of the time, the one on the right is a thick gel. The main difference is set up time. With the gel you get a little more time (10-15 seconds) to position something. I used it today to attach the rudder post to Cheerful.
There is also a thin version that I never used with near instant adhesion.
- JpR62, popeye the sailor, mtaylor and 3 others
-
 6
6
-
-
On 8/2/2020 at 7:18 AM, MEDDO said:
Still eyeing the Cheerful
Hope to see you started on this soon. I’m eying the barge as a future project and will have your log marked as reference. I’m looking for another active log😀
-
Excellent details, very fine work! I need to practice the 7-10-7 method before I commit the yellow cedar mast material. Another thing I’ve never done. Your mast and spars look great.
-
25 minutes ago, gjdale said:
Please don’t regret your original post
Thank you for your appreciated comment.
- gjdale, mtaylor, Ryland Craze and 1 other
-
 4
4
-
Thank you also for saying so. I’m glad to have been of help. I wrote this because I came across a confidence barrier myself and hoped to help others get past where I was just a short time ago.
- Canute, JohnLea, Ryland Craze and 2 others
-
 5
5
-
-
On 8/18/2020 at 2:22 PM, kurtvd19 said:
- between the blade and the fence is the rotation of the blade will send it back at the operator with the slightest amount of pinch or a twist of the cut piece.
The point of standing to the side and the slight release to the rear of the fence prevents this from being an issue. I know or care nothing about full size table saws or even other hobby saws. I know the method I described works for me with my Byrnes saw. I use push sticks made from basswood, they are not super thin and they go right through the blade without problem and without splintering. I can make a new one in about 30 seconds.
There will always be other opinions and practices, those are not any more right or wrong than any other. I do wish others would respect there are multiple ways that work and not assume only they are right.
If it works for you do it your way, this way works for me. Since it’s based on others with more skill than me, including the maker of the saw itself, I’m comfortable with it being my way.
-
2 hours ago, DelF said:
However I thought the 0.005" relief was built into the fence
Thanks Derek, I'm glad you found it helpful.
Opinions vary on whether it's built in or not - or on some models and not others. I can tell you on mine (which I've had a number of years now) I'd get kick back if I don't. And for what it's worth it was Jim himself that made this suggestion to me. I can't stress enough that it's just the smallest of amount before tightening the back screw.
- Canute, mtaylor, Ryland Craze and 1 other
-
 4
4


HM Cutter Cheerful 1806 by glbarlow - FINISHED - 1:48
in - Build logs for subjects built 1801 - 1850
Posted
Thanks Lou.
That's the right idea. Chuck sent me some boxwood strips, I haven't tried them yet - the cedar was definitely shredding when cut down to 1/16 x 1/32. The challenge is the knee, I need to get a triangular piece of boxwood (actually multiple ones since I'll mess up the first three) for the knee at the bow.