


glbarlow
-
Posts
3,909 -
Joined
-
Last visited
Content Type
Profiles
Forums
Gallery
Events
Posts posted by glbarlow
-
-
-
This is supposed to be fun, seems like you’re enjoying it. Congrats on the cradle, excellent work!
- ErnieL and Ryland Craze
-
 2
2
-
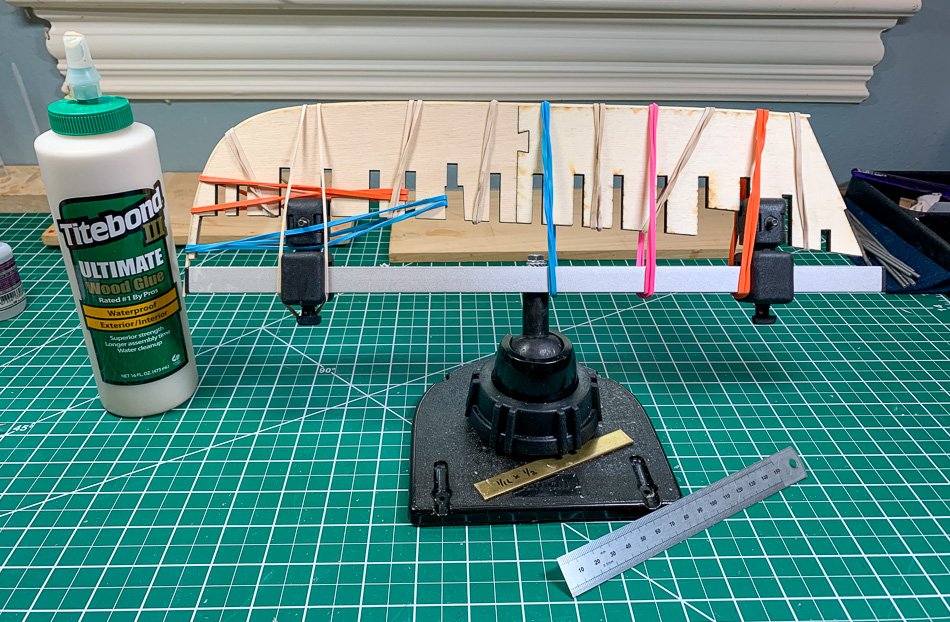
It’s fun to glue the stem and keel onto a bearing strip that is half its width while keep it it all centered well bound. I used my Admiralty White PVA glue here just to be sure I had enough time to make the alignments. I'm going to the yellow TiteBond glue for the frames so they can take the beating of fairing.
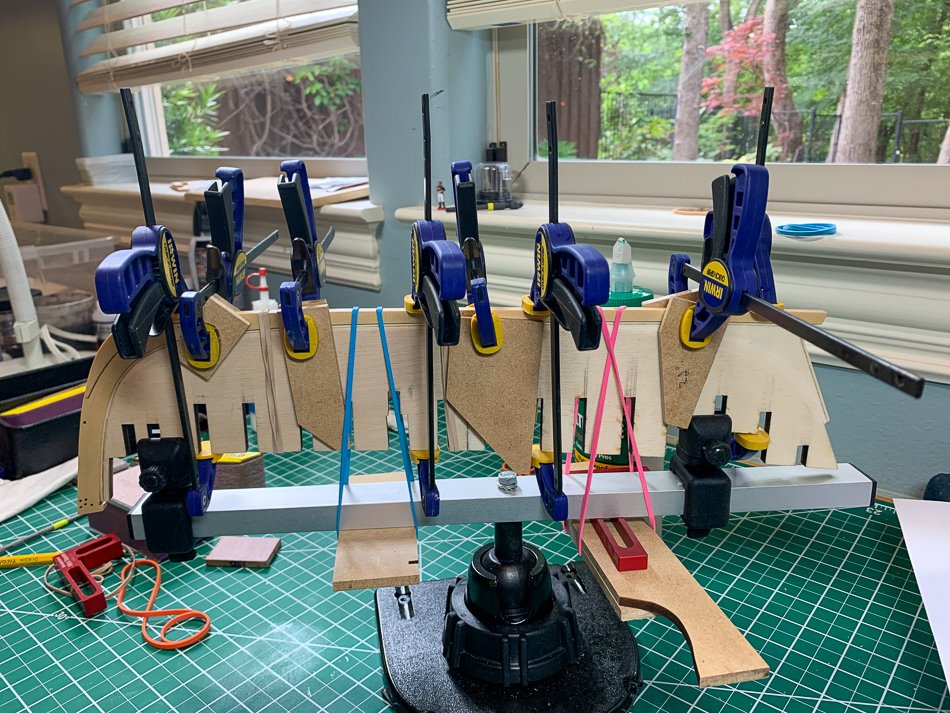
First rule of modeling, when you think you have enough clamps, go buy more clamps. I’ve had these, and more of them, for a long time. The rubber bands though are new, the idea borrowed from another MSW builder. They are much more handy than I would have guessed in adding support.
I have all the MDF waste from prior models, the Vanguard was a good source of quality waste. I have and use all sorts of sizes I cut for various jigs. In this case they came in handy by ensuring the keel was glued exactly center down the frame by placing then clamping them along the sides - the various MDF sizes are just what I had laying around. The rubber bands give me more room to use clamps both for the centering and the holding down.
Was it too early to glue on the stern post and rudder, seems like it’s too soon 😄 Just kidding, both the sternpost and rudder are already put away for much later. It was nice to see how well designed the ship is, and a little positive affirmation that I got it on right - such a nice fit and look. I lightly sanded the keel and stem and made sure the bearding line was clear of glue.
I now have the mounting holes 1 inch into the frame past the keel. An important step to make sure some future day the model doesn’t snap off at the keel when pushed or pulled by a small grandchild. Now I can put the screws away forget about this for about a year…

The 2nd coat of WOP (the color is more even than it appears in this photo) and the frame is now ready to install bulkheads. I’m sure there is a very good reason for the out of sequence numbers aft and letters forward of those bulkheads. Doesn’t matter I just follow the plan and the clear direction to ensure the reference lines face the correct way.
It’s my understanding it doesn’t matter which way the + bulkhead faces?
I hope that’s true because I started with it and right now the glue is drying… I will install bulkheads 1 to 2 at a time triple checking each is square…and facing the right direction. So I’ll be back later with more excessive detail.
Thanks for the comments, likes, and follows. It’s always nice to know someone is watching. I did my last build log (and it will be my last build log there) on that other site, it was like writing a letter to myself, in an empty room, where even the crickets were quiet.
-
-
-
-
1 hour ago, BobG said:
purchased all the Cheerful materials
Hi Bob,
Yes I've purchased everything available from Chuck's site, keeping in mind as Chuck says, it's not a kit. There are a few more things that are commonly available items (like the 1/16th x 1/8th bearding strip I mentioned) you need separately but for the most part all the big stuff I have from his site. Under the Cheerful tab on the Syren Ship Model webpage is a wood list and blocks/rope list showing everything you need. When the shop is open displayed below that (still on the Cheerful tab) are all the sub-assemblies (you can get all or none, your choice), the plans, starter kit (keel, bulkheads, and stem), and the wood package. Even with all that there are still things I'll have to build from scratch - I'm looking forward to that challenge.
While you can get your own wood based on the list, I highly recommend the Alaskan Yellow Cedar. It's a new wood to me but I really like it. While you could also cut your own bulkheads the ones in the starter kit also have reference lines that help in placing gun port sills and other things - plus its in great wood as well. Remember you'll have to cut and rip everything, it's a scratch build.
Hope that helps, everything from Syren Ship Model Company is great quality and well-made.
I'm thinking of getting the longboat to store away a future build, my hands are plenty full for now.
-
-
Two quick posts to get started, they may come a bit slower from here.
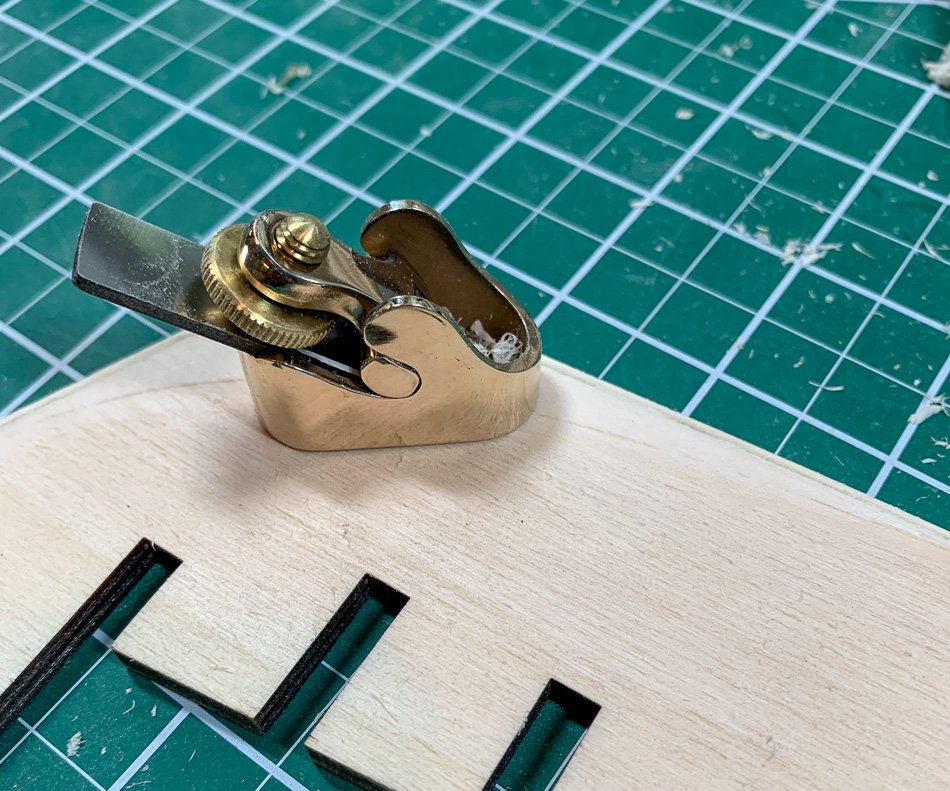
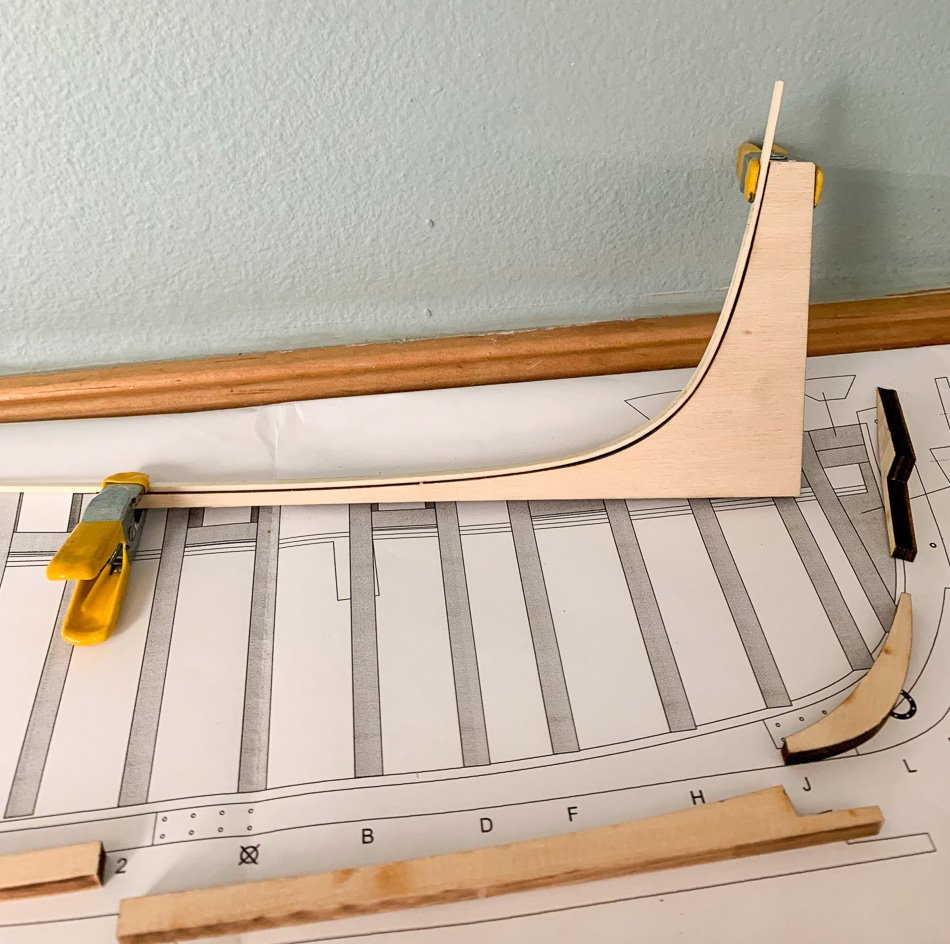
I’ve cut a lot of bearding lines but never so easily as I did this time. On the recommendation of another MSWer as part of a discussion about using square stock for masts I ordered this IBEX flat finger plane. It is pricy but well worth it. I’ve tried planes in the past with no luck other than gouging up wood, but this small little tool made short work of creating the bearding line.
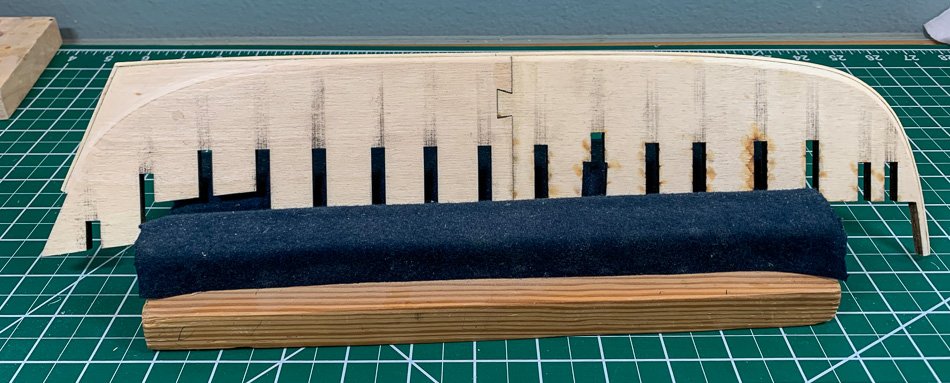
I never toss stands from past models, this one I made for Vanguard is a perfect fit, so yay. A block of wood, some curved shoe molding backed by 1x1 strip covered with felt. Build board done.
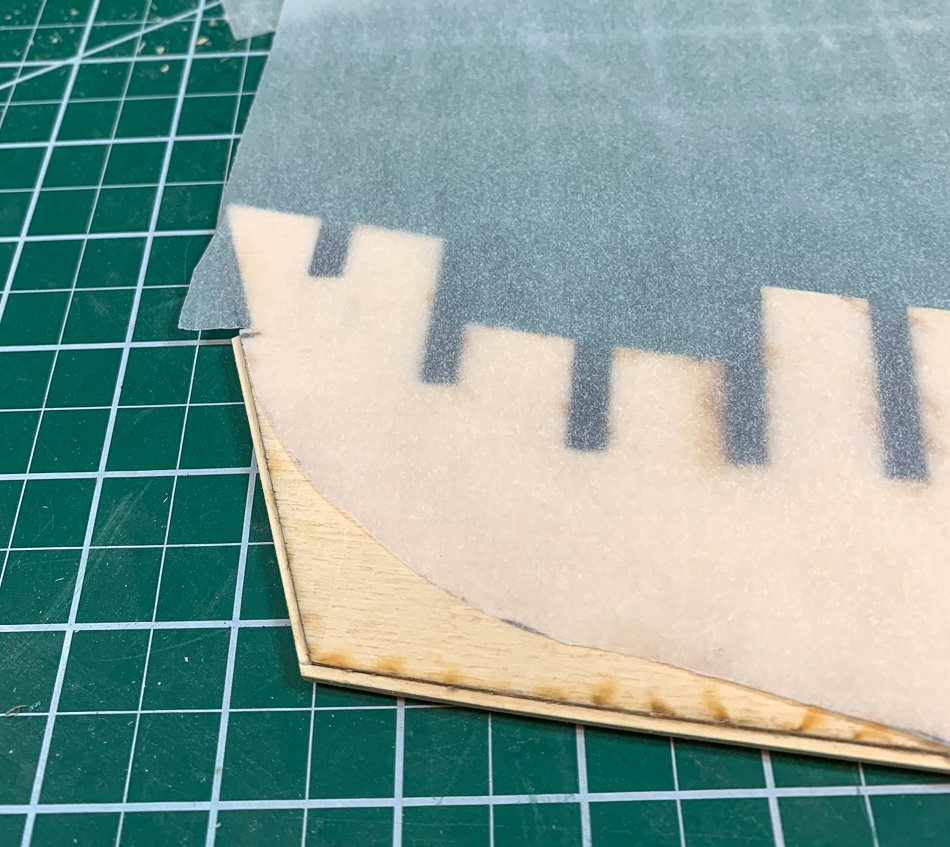
I followed the stern reference mark on one side of the hull and with tracing paper transferred it to the other side. The plane slides easily to make the taper down to the rabbit strip. Maybe too easy. I may have gotten a little too much angle. I’m thinking that will be ok…won’t it…I can’t put it back on….
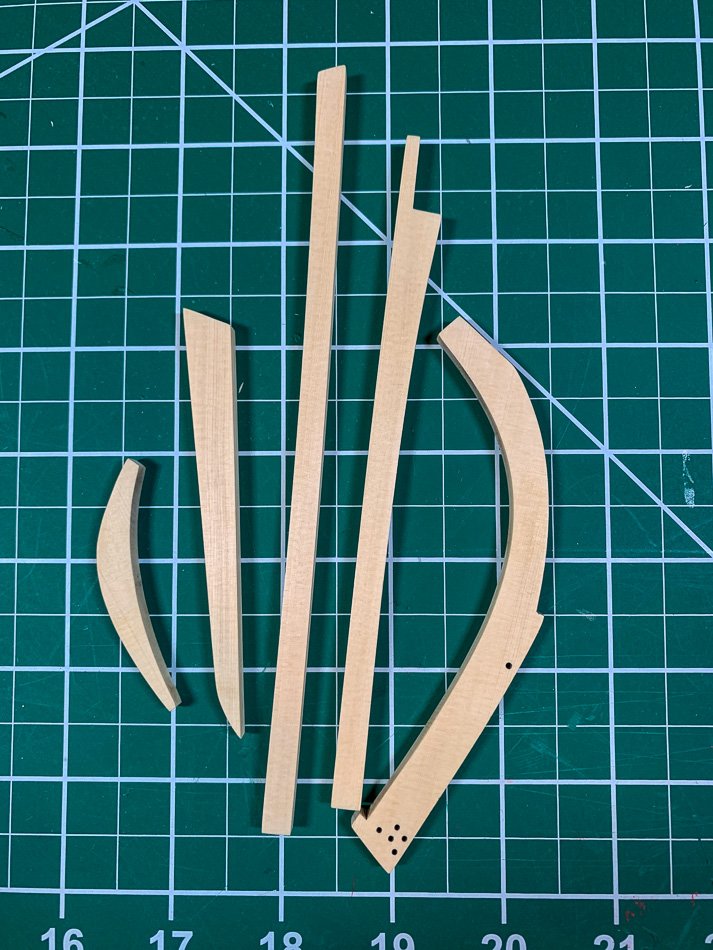
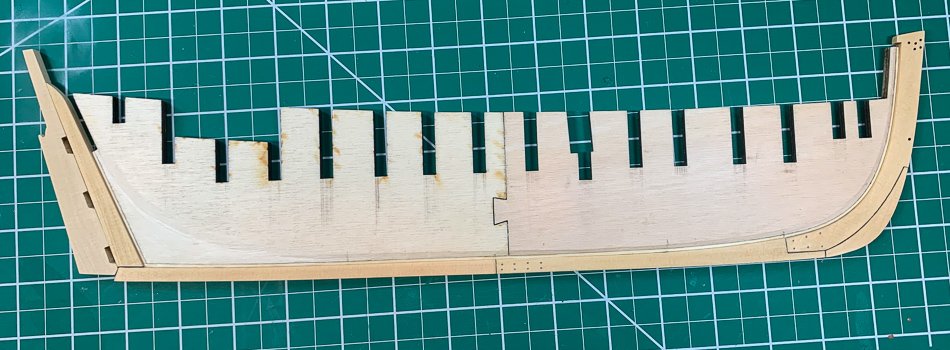
I removed the stem pieces from the billet and initially was a little disappointed. I have no experience with Alaska Yellow Cedar. I did some test some WOP on billet scrap and wasn’t seeing it. But I knew there was beautiful wood there somewhere - and there was. There is a Lot of char to remove and sanding to do, a lot of work with 220 and 320 grade sandpaper since I didn’t want to risk taking too much or alter the shape of the stem pieces.
After a considerable amount of work (not complaining, I’m not on a schedule) there it was - the Alaskan Cedar is better than anything I’ve seen, it is very nice. A bit lighter color than boxwood, it feels almost like a piece of ivory when sanded smooth. I’m looking forward to working more with it as the ship progresses.
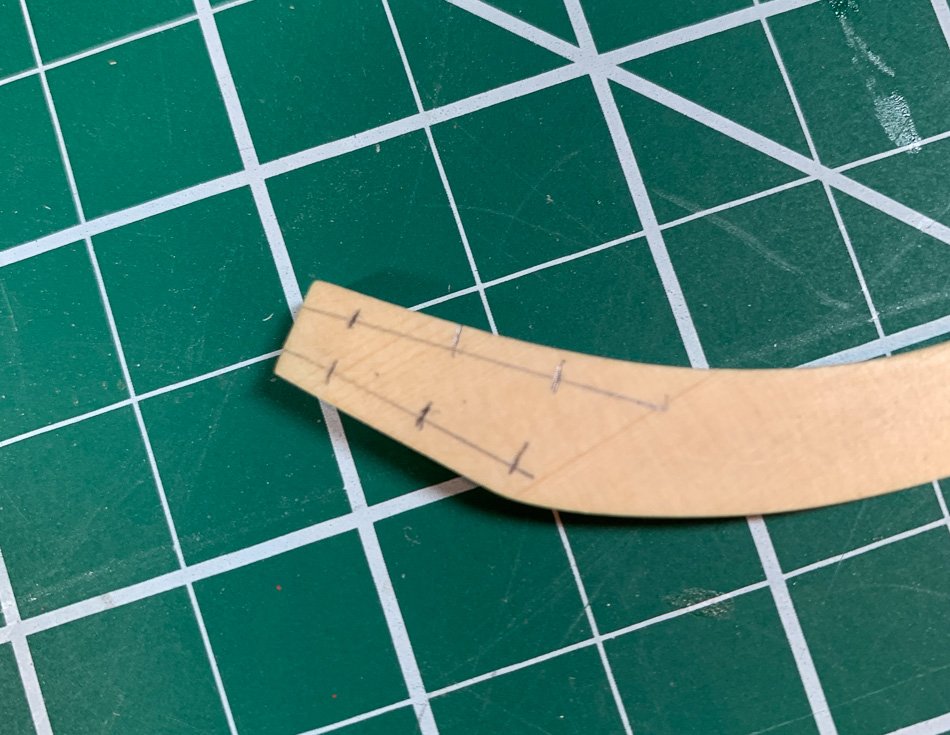
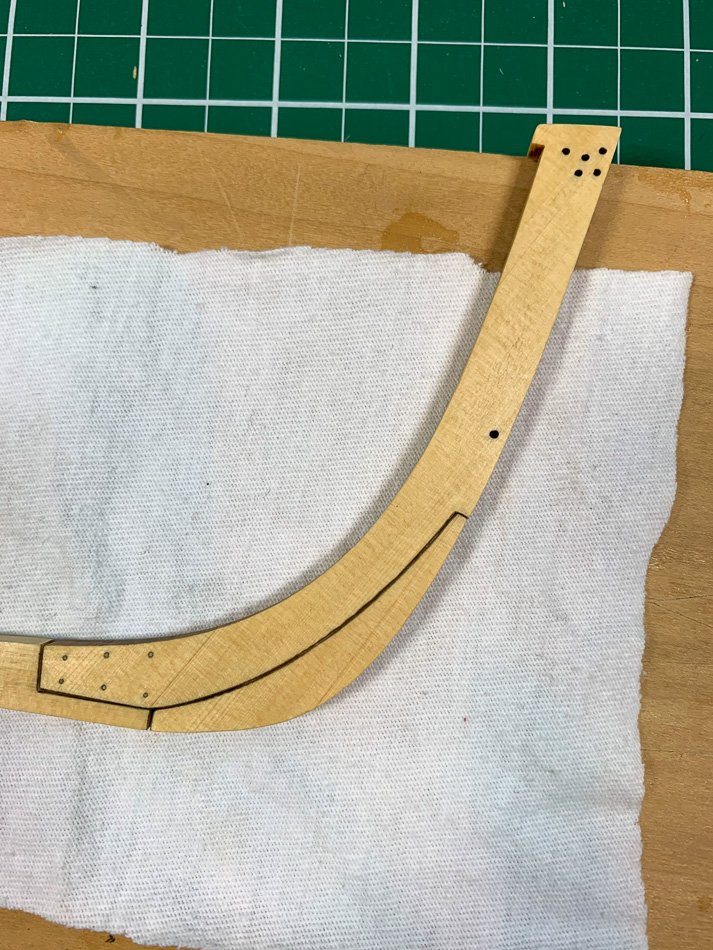
I followed Chuck’s practicum by adding the simulated tree nails using a #76 bit, #2 pencil and natural wood filler, I simulated caulking between the joints of the stem also with the pencil. I have some charcoal pencils I’ve used in the past but I think subtlety here is the name of the game, a little pencil goes a long way. I finished the night putting the first coat of poly on the stem and keel, big impact on color and grain showing up.
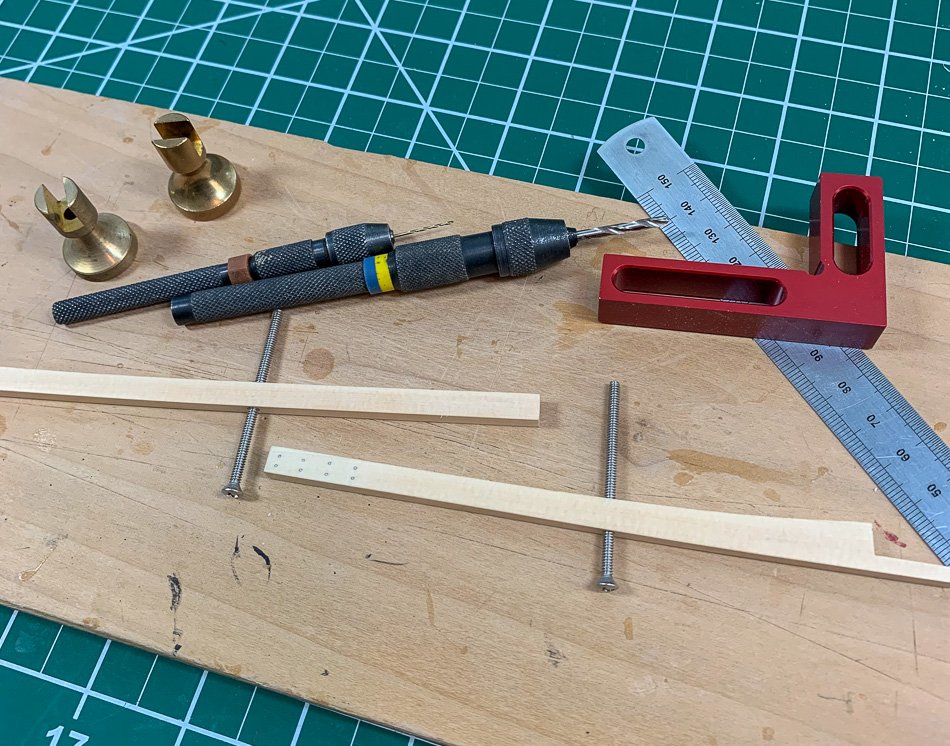
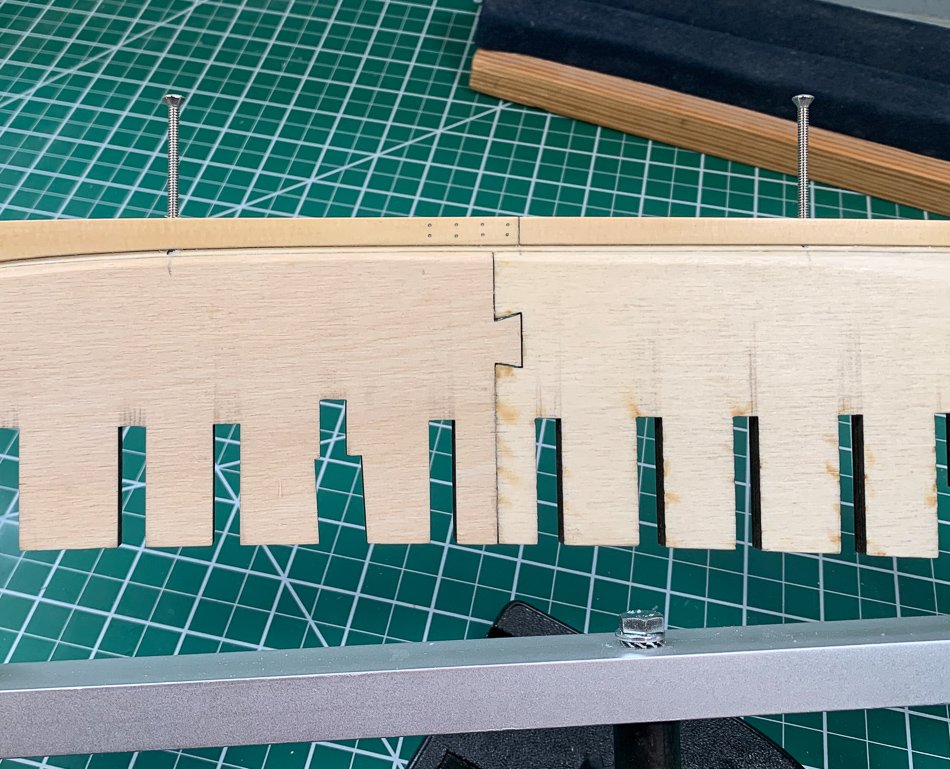
One practice I’ve followed for every model I’ve built is addressing the display mounting very early, no different for Cheerful. I already have the display board, 12" walnut. I’ll figure out the pedestals later, the ones shown are my stock that may not work. However this was a great time to drill the holes through the keel. I use these machine screws, long enough for the board, pedestals, and to go past the keel into the frame, I epoxy them in eventually, no nut needed (other than the builder).
All I needed to do now is drill the holes in the keel, once its securely mounted to the frame I’ll extend the depth of the holes an inch or more into the frame. Then years from now when I finally finish this epic build it will be simple to complete the display mount. A lot easier than trying to turn over a completed ship. I like my models firmly secured to a display board verses a cradle and if I change my mind the holes aren’t going to show…
Now on to mounting the stem and installing the bulkheads.
-
After much research I am ready to build Chuck Passaro’s @Chuck Revenue Cutter Cheerful 1806. And so it begins...
After completing nine kits over the years I am making my first attempt at scratch building. Well, I say scratch building but Chuck’s Cheerful plans, starter kit, wood package, and sub-assemblies along with his instructions and always gracious guidance make it a much easier transition.
While I’m a decent kit modeler I’m hesitant to post a build log for Cheerful. There are several outstanding logs already on MSW, some from builders I’ve admired, some I’ve just discovered in searching Cheerful, and of course the master himself, Chuck. I don’t know how I can add anything to what they’ve already done. They do say however every model is unique, I’m pretty sure I’ll prove that...
One thing is for sure, I’m going to learn a lot along the way. A good reason for a build log is having the council and support of the MSW community. I’m going to build it to the best of my ability, and I’m certain at the end of the build my ability will be a bit better than when I started. I’ll ask questions and share how I do things, hoping there is something useful for the next builder. I’d like to think my log will be a Cheerful read and not a Surly one (see what I did there…).
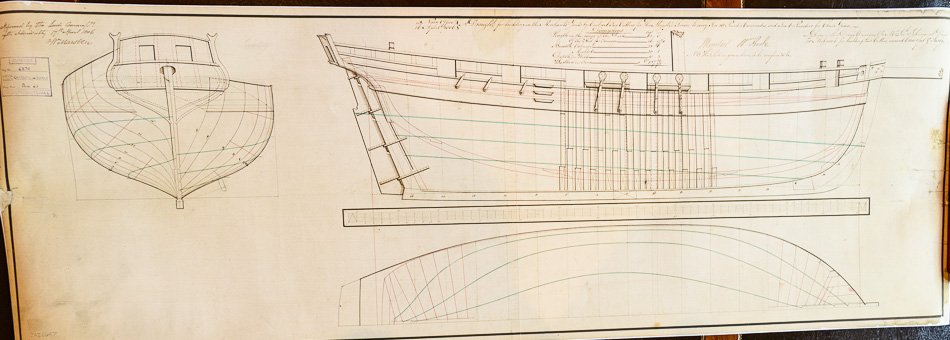
For proper motivation I ordered a copy of the British NMM plan for Cheerful. I plan to hang it in my shop (next to the NMM plan of Pegasus) once frame shops are open again, whenever that is (Covid shut down for future readers). These plans are wonderful to look at - the fact these drawings turned into a ship and stood the test of time to become today’s model … very cool.
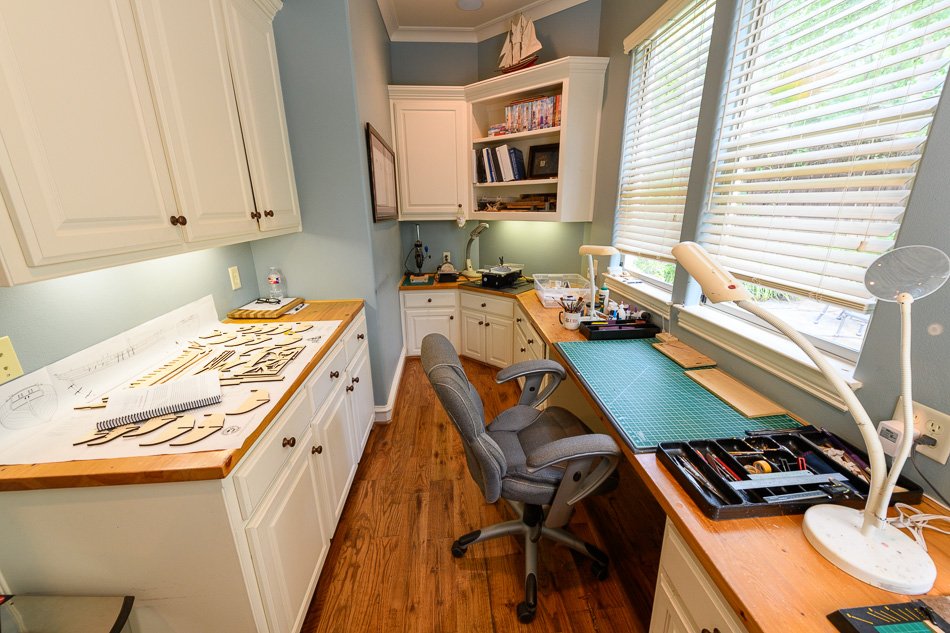
We custom built our house, from the very first drawing I had the intent to include room for my model building. The architect didn’t quite get it initially, but the final blueprint has the notation “Ship Room.” We don’t have basements here in Texas due to the soil condition, so it’s fitted into the architecture tucked away on the lower of the three levels. The upside is it’s a nice sized well lit room for building, the down side is that there isn’t a lot of room for machinery, which I don’t have anyway other than the Byrnes saw and sander, so Cheerful, hand tools it is. The tub on the back right is loaded with my Cheerful collection of wood, sub-assemblies, blocks, and rope - ready to become a ship.
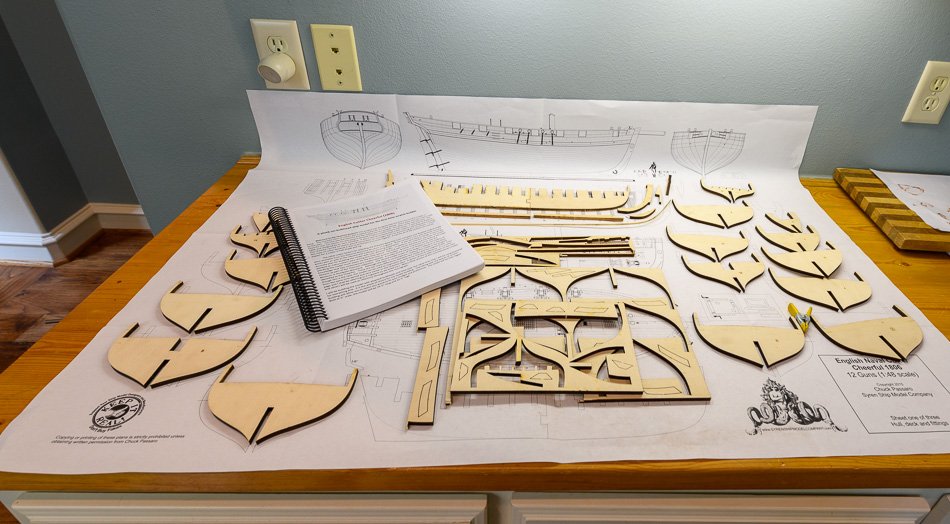
The first thing was to print off Chuck’s instructions from the website and have them bound in a spiral notebook, something that will always be by my side along with my iPad to cross check what I’m doing with other build logs, So thanks in advance for the good ideas and experiences I’ll find and happily steal, I mean learn from. Next I laid out the frame and keel parts from the starter package and thought wow, there are a lot of bulkheads, and felt just a touch better about my first attempt at single planking. Then I remembered fairing and thought, wow, there are a lot of bulkheads…
The starter package didn’t include the rabbet strip (as Chuck says, welcome to scratch building). For some reason I had the perfect 1/8 x 1/16 boxwood strip in my stock, one of the few remaining bits I had from our retired friend Jeff of HobbyMill fame. Then I wasted no time in stealing a good idea, so from BE’s log I used the waste from the hull billet to shape the rabbet strip at the bow, making it easier to install.
With the two hull parts joined I glued on the rabbet strip using Tite Bond yellow wood glue, it sets up fast! I pre-positioned my rubber bands but I had to move quickly to center the strip. I have some brass gauges, the 1/16th size allowed me to quickly run the edges to get it centered.
Next up, the bearding line, the keel and stem...
Looking forward to comments and feedback. My log has begun.
- JeffT, Moab, Edwardkenway and 17 others
-
20
-
On 12/28/2019 at 2:04 AM, Vane said:
see the shots of Granado
I built Granado and Pegasus as well. There are gallery photos of both linked in my signature. Have a look.
-
I don’t copper ships anymore, historical or not. I don’t like the look or the work.
Don’t quit, remove all the copper, sand it smooth (there’s plenty of wood to do so, wood isn’t plastic. You can get the glue off), and paint it Matt White below the waterline. Check out the photos in my signature for Nelson or Pegasus. I only do white stuff hulls.
The thing with modeling is rarely does everything go according to plan. Adapt and overcome is what makes it fun.
Hang in there. We’ve all done our first model ...
-
-
Though I’ve rigged 9 models now, I confess I’ve never served a line, at 1/64th scale I just couldn’t get excited about it. Now I’m about to build Chuck’s amazing Cheerful at 1:48 and I want to do it right. I’ll get his Servo-metic to do the serving but I have a couple of dumb, servo-novice questions:
-What keeps the thread wrapped around the line in neatly in place so that it doesn’t turn into a unraveled mess as I work to install it?
-is it terminated And run in a different way due to its added thickness and again so it doesn’t turn into a ball of thread.
-Any suggestions tips or tricks?
Thanks in advance for any advice offered.
-
A better version than what I’ve done. Your method of creating the loop is excellent and one I’ll adopt. Thanks!
- mtaylor, hollowneck and Peta_V
-
3
-
Tie a loop with one semi-loose clove hitch, slide it to get close to the right distance, put the deadeye in the loop, use your jig to set the distance tighten then put on second clove hitch above the first one about 8mm. Definitely use same color. You tie off the deadeye lanyard with its natural color between the two clove hitches using two half hitches. Make whatever adjustments are needed then watered down white glue when everything is set.
I set the tension about equal to a loose guitar string, tight enough to bounce the string but not so tight I could get a twang. It’s a fine line between too tight and too lose.
I’m sure others have better ways, but this is mine. Hope it helps.
-
Piece of old cotton t-shirt
-
I agree about wiping it down to remove fingerprints (carefully so the rag doesn't catch an edge of a plate...) and some acetone to remove excess glue, but I didn't seal either of my coppered boats. One is over 10 years old at this point. I don't really touch them once they are on the shelf except the occasional dusting.
So it's a choice.
-
Your method produce great results so go with what works for you. I use the drill only for the corners and slice my way there with a #11 blade, finishing with the files. I also do it with each layer of planking both inside and out so the final bulwarks layeyer is just following the previous two. But again, it’s whatever works and yours did.
I’m with you on the paint. Some acrylics come in a tube and have to be thinned. I use Admiralty paints exclusively, one coat generally does it Except for my white hull, to get that look takes about 10 coats). I may try the thinned method on Cheerful, but for now... Your paint work looks great as well.
Maybe paint the gun ports before removing your tape.
-
Congratulations on your next best seller. Well done!
And...amazing instructions. I agree with the best way to bring on new modelers is kits with sufficient instructions to guide them to success. Chris does just that.
- BobG, DelF, BLACK VIKING and 5 others
-
8
-
On 4/28/2020 at 12:00 PM, glennard2523 said:
As noted by the "Other Glenn"
Nice work pre-rigging the masts.
Funny, I thought you were the “Other Glenn.” 🙂
-
-
Copper patinas over time and it evens out. Both my coppered ships look much better with “aged” copper. In my opinion, bright and shiny becomes the main focal point and detracts from the rest of the ship. I wiped off excess CA with acetone and left it alone other than that.
Another point is overlapped copper plates may look off up close but are lost viewing on the shelf, gaps stand out. I mentioned this because I see a gap in your photo. Just a thought...
-
7 hours ago, ASAT said:
24x3x3/8” billets on sale
Thanks Lou, I'll give them a look. Google did not lead me to them so I appreciate the link. I think I'm going to make my first attempts with some Alaskan Cedar once Chuck re-opens his store. I'm not going to go nuts, aside from Cheerful I'll try the mast and bowsprit for Speedy/Flirt. But I do need the boxwood (ok Want the boxwood). I'll do some measuring to see if 3/8th works. 2" is way bigger than I'd ever need, though I may be able to rip it down some.
I'm going to watch Derek in wonder as he makes his 🙂

HMS Speedy by ErnieL - Vanguard Models - 1/64
in - Kit build logs for subjects built from 1751 - 1800
Posted
I’m thinking of taking mine to a carpentry shop to do the fairing, May not work out though😂🤣