


glbarlow
-
Posts
4,035 -
Joined
-
Last visited
Content Type
Profiles
Forums
Gallery
Events
Posts posted by glbarlow
-
-
9 minutes ago, chris watton said:
made a spectacular entrance
It’s all about the entrance 😁
- chris watton, mtaylor and Ronald-V
-
 3
3
-
I appreciate all the comments for my mis-labeled post. But let’s assume I’m a grown-up and understand the basics of machine shop safety. Also, I have no intention or need for any metal work. The two vices I have are specifically designed for my Proxxon mill and are highly rated by it’s users so I’m ok on that front too.
I now have good examples of two ways, and can use both for more than just a trim ring - very cool stuff
I agree I just need to get in there and cut something. Or maybe fly across the pond and buy a few beers at the pub for Derek -after- he shows me a few things (see, shop safety right there;-) But for now my focus is on finishing planking on Cheerful, I ripped 40-50 more yellow cedar planks last night and will likely need most of them to finish the hull.
I’ve bookmarked this thread and will keep it handy. If anyone want to follow Derek and No Idea’s tutorials (Maybe an actual mast cap:-D) with their own please do. We’ll all benefit.
-
4 hours ago, allanyed said:
a canvas cover.
I haven’t seen any of the Cheerful builds this way, I think I’ll go with the “trim ring” however accurate it may or not be.
-
-
Very nice. What is the history of a ship like this. Very different (and interesting) from warships (and most common models) as gun platforms with 6 cannon and more space dedicated to what I guess are cabins?
- mtaylor and chris watton
-
2
-
4 minutes ago, ouizel said:
What about at the false keel / bulkhead junctions
I'm sure there are lots of opinions. Personally I've never cleaned the char from those. The glue will hold with the char there, it's somewhat a myth that it won't. I'd be more concerned about altering the fit if I sanded the bulkheads where they fit to the frame. You really want a tight fit. Sometimes you might have to sand a little to get that fit, but not to remove the char.
-
43 minutes ago, Justin P. said:
char removal
He hasn’t faired the hull yet, I imagine most of it will disappear then.
-
9 minutes ago, DelF said:
hope this helps
This is great Derek and exactly what I was looking for. Just something to learn a bit about the mill and I will eventually need this ring for Cheerful. Thank you for taking the time to detail it out.
I understand about the dust, I ripped three sheets of planking strips, about 40-50 last, night. Lots of dust.
- Some Idea, Duanelaker and mtaylor
-
3
-
5 hours ago, allanyed said:
some misunderstanding
Yes, my lack of knowledge of nautical terms is a problem. I guess the proper term is trim ring at the base of the mast.
I was just looking for a simple project for my mill, seems I chose the wrong thing. I don’t have and don’t plan to get a lathe, especially not until I’m less exposed for my ignorance of mills, and obviously nautical terms.
Thanks everyone for your replies. I’ll figure something out for the trim ring.
-
-
-
The dividing attachment for the Proxxon FF 70
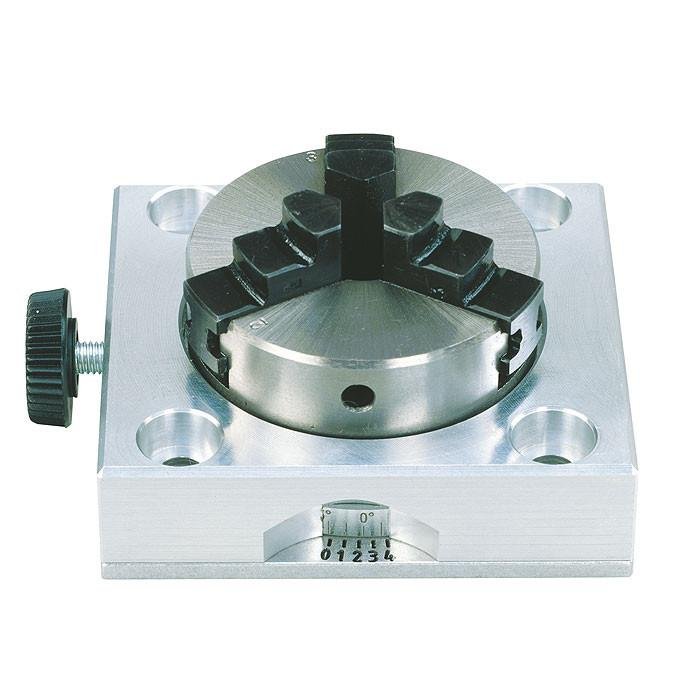
The Proxxon cutters and a selection of smaller ones. Using Yellow Cedar.
Im sure your right, I’ll find a simpler way.
-
-
Had to decide between a mill and a lathe...now I want both😬
- Ronald-V and chris watton
-
2
-
-
I have a new Proxxon mill I don’t know how to use yet. One thing I want to learn to do is to use the rotating clamp to mill a nice mast cap. Anyone have an example or a source/reference I can look to?
-
On 3/1/2019 at 7:04 AM, Chuck said:
Elmers wood filler. It is the perfect color match for yellow cedar.
Just checked Amazon, there are lots of versions of Elmers, is one in particular a best match for our yellow cedar?
-
4 hours ago, DelF said:
I've bookmarked it for future reference under 'Planking Tutorials'.
Well thanks Derek, I’ve bookmarked several sections of your Speedy build for future reference as well. Part of my writing it is hoping others find it helpful. I’ve been helped here by lots of people, including you.
1 hour ago, Chuck said:it is well worth the effort.
Thank you very much Chuck. I certainly agree, I hope by sharing my work using your process even more will be encouraged to put in the effort.
And yes, the cedar really is nice looking wood.
10 hours ago, RichardG said:finding that my 3rd attempt on everything I do on my model seems to be the best
Thanks Richard. But just think, the third time on this model also could be the first time on the next one.
-
2 minutes ago, Edwardkenway said:
I'll borrow that if I may.
Thank you!
I borrowed it from someone else, it's all yours now 🙂
- Jonny 007, Edwardkenway, BobG and 2 others
-
5
-
15 hours ago, BobG said:
Have you found a method that gives you consistently good results
Thanks Bob! I'm not sure its that good, but I hope it helps future builders applying Chuck's methods.
Not sure about the good results part given I had to add a strip to the last bulkhead. Laying the batten along the length is the way to go. I think using a very thin one helps suss out problem areas. I also left the trailing edge with the laser char (forward aft of mid-ships, back of fore of midships). I sanded that off too at the end, but until then it made sure I didn't loose the shape of the hull. Even though I had a small problem I was able to fix, overall the planks run true. Honestly I don't know how to catch the last frame. It didn't become apparent until I installed the stern frames. Experience is the constant process of learning I guess.
- Saburo, BobG, Ryland Craze and 2 others
-
5
-
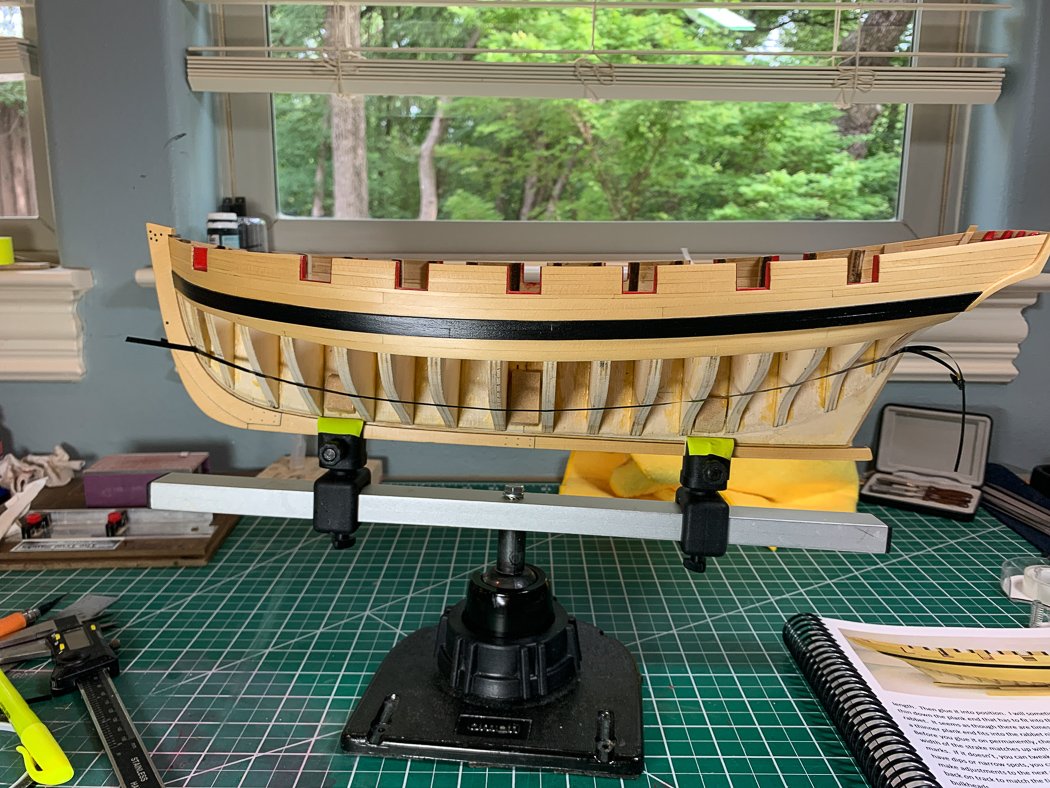
I’ve built a number of models but taking on Cheerful is a new challenge. Before I started there were a number of tasks that were concerning for me. From port sills, thinning stern and bulkhead frames, square tucks to scarph joints, there are lots of things I’ve never attempted despite having built eight kits. On top of that list was single planking a hull that will be left natural (other than poly). No place to hide major mistakes and not much way to hide small ones. I’ve now finished the upper belt of the port side and thought I’d share what I did and what I learned.
@Chuck, as I’ve noted throughout this log, provides great instruction in his monograph. However, reading and doing are two different things. The first critical planking step happened months ago, fairing the hull. Taking the time to do that right back in the beginning now pays off.
Now its time to divide the hull into two belts. This keeps the measurements accurate and planking consistency more manageable. It starts by measuring from bulkhead zero (midships) the distance of 8 full planks (using the planking fan), since the known is full width planks at the center - that’s the first attachment point for the tape, then it’s connecting that to the stern and bow.
I struggled with this simple step of adding the artist tape (perfect for this job) to create the belts. I applied and re-applied tape until it wouldn’t stick and then did it again with more tape. I was being too analytical in how I was approaching positioning the tape. It wasn’t until I got some (more) sage advice from @Chuck I understood to step back and look at it straight on from the side and find the graceful curve (it’s there, let it come to me…be the hull…) and flow from bow to stern. And I mean from the side straight on. When you tilt the hull up to apply the tape it presents a false look of the tape flow, at least to my eyeballs - the curve doesn’t present itself until you lean back and look directly from the side at the balanced hull. Having found the curve, I marked lines on each bulkhead and threw away the tape I’d spent so much time moving around. The marks define how those 8 planks will fit the length of the ship and where and how much tapering I’ll do to make it fit, obviously thinner at the bow.
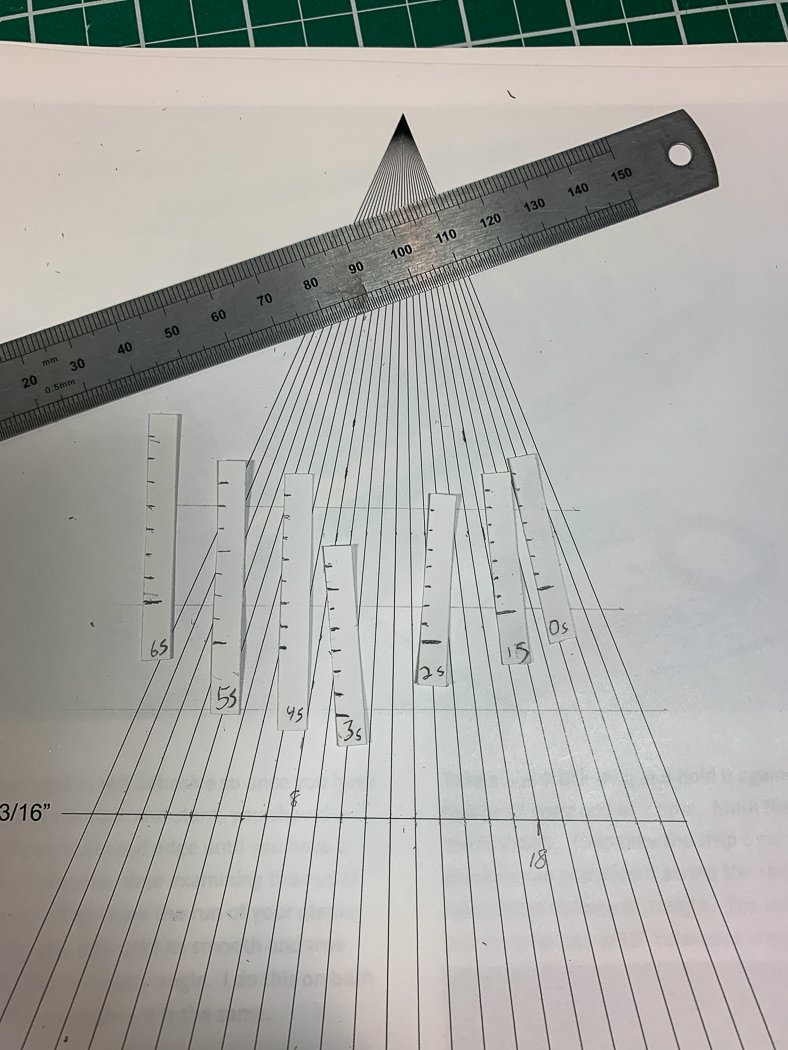
Then it’s time to line the hull. Chuck has .pdfs and videos here on the forum so I won’t go in to detail, I can’t begin to explain it as well as he can. I will say making tick strips and using the planking fan is precise and tedious work, but it’s time well spent and essential to success. It takes the guesswork out of planking.
Another key to these tick marks is not only the width at the bow but as important where to start the taper. In the case of Cheerful that was bulkhead 6. I kept the same starting point for all eight planks which turned the curve I created with the tape into a wooden reality.
-2552
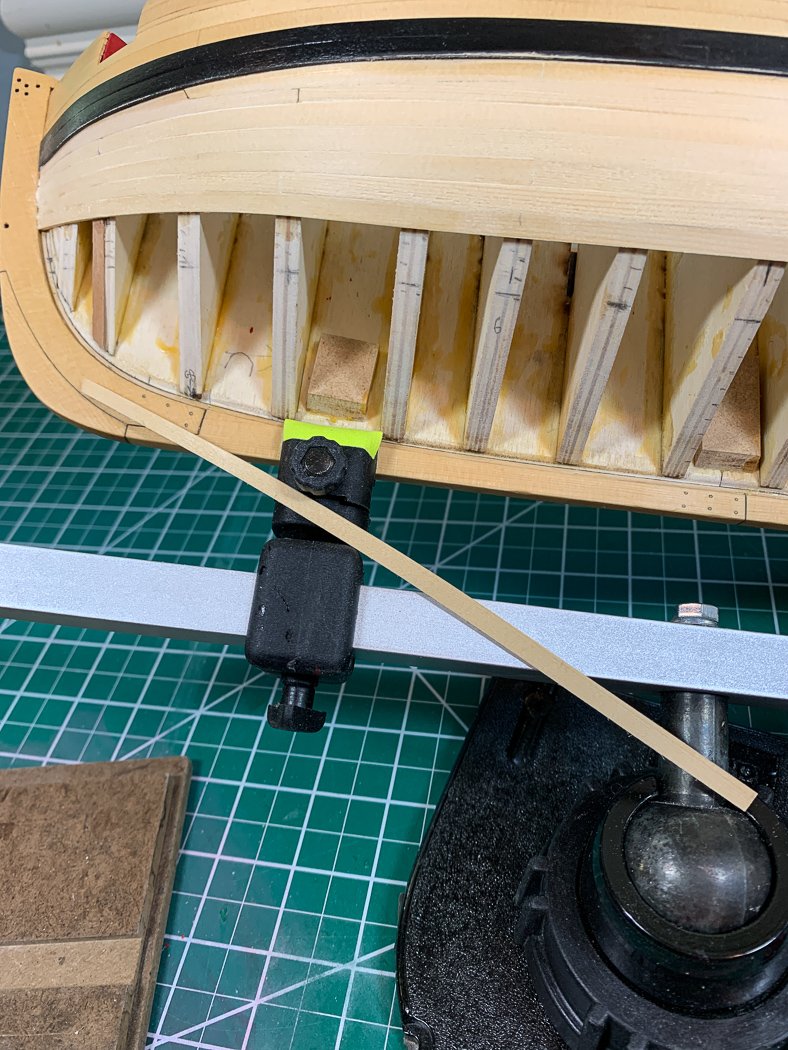
Here I have a plank tapered and angled properly to fit the rabbit. Transferring those tick strips to each bulkhead and then to planks is how you get to consistent. The most critical of course is the bow - determining how wide strips need to be for 8 to fit within the tape mark. Often its also true of the stern, but the lining process (and Chuck’s monograph) noted for Cheerful this first belt from mid-ship to the square tuck it is full width planks. The other nice thing about these tick marks is the reassurance as I planked I was still on plan, still I double checked the measurement at the bow every other plank. I did have to make a few minor adjustments due to less than perfect tapering.
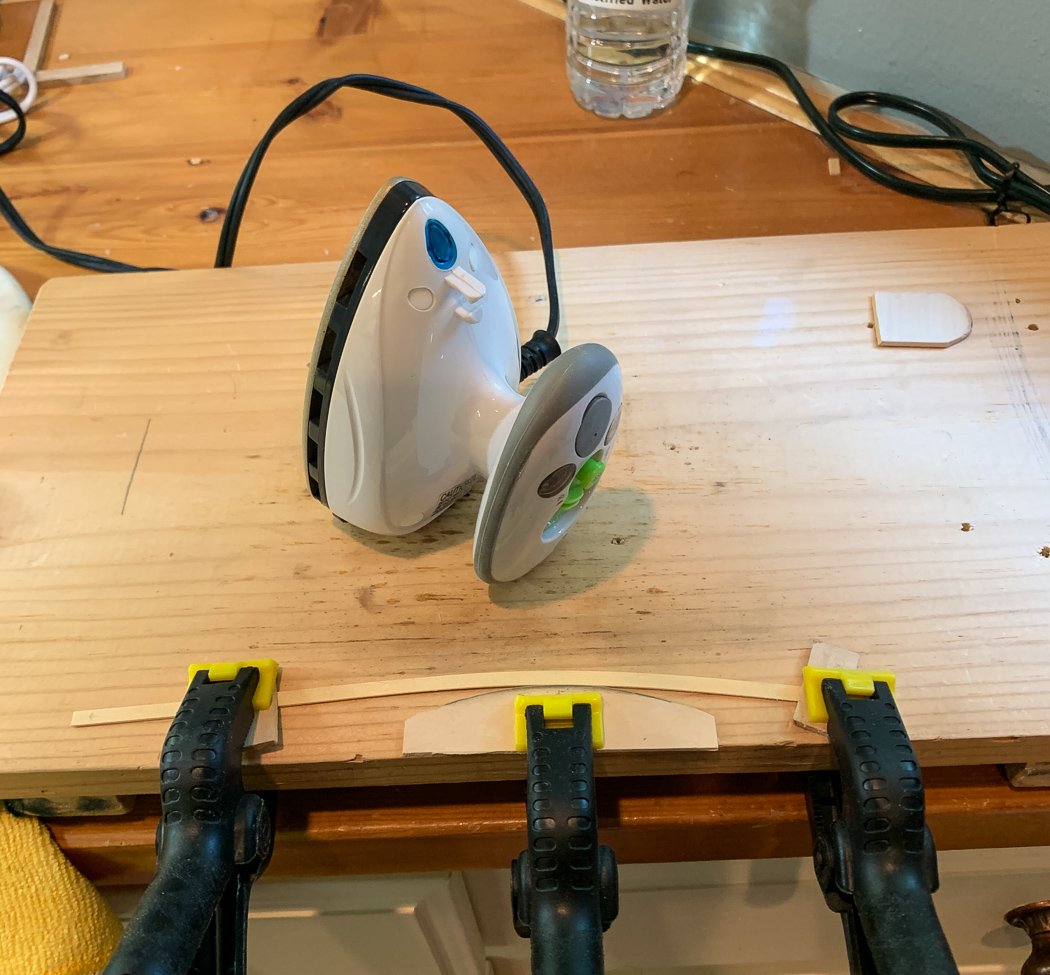
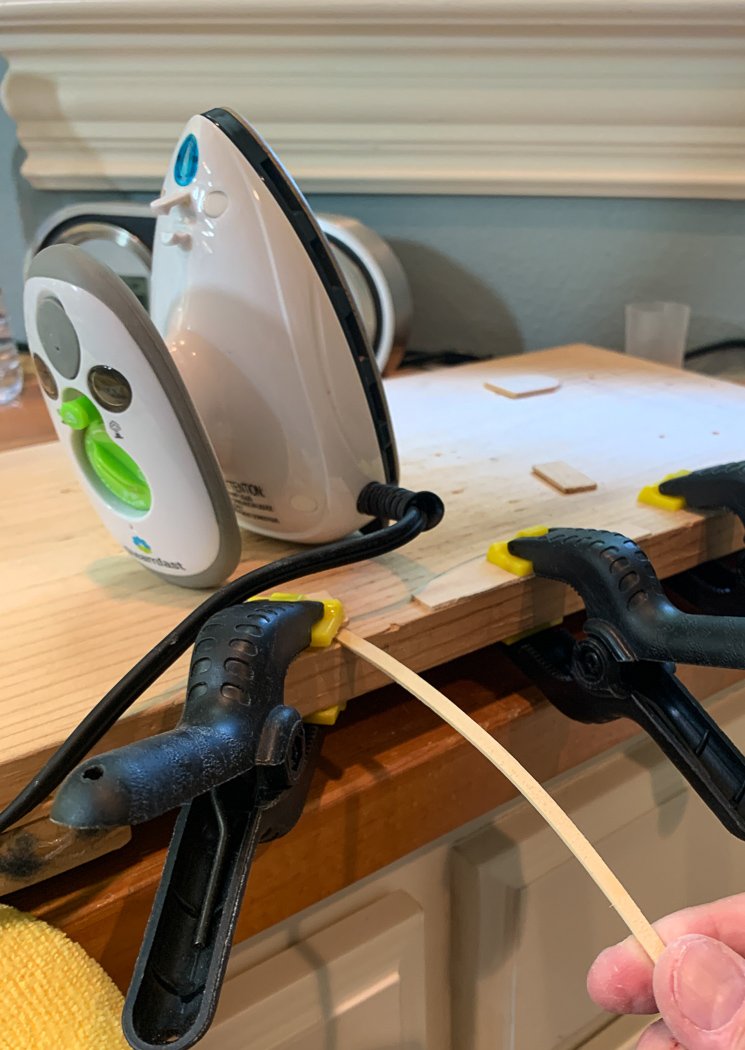
Then it’s on to my bending station. Again @Chuck monograph, .pdfs, and videos explain this. I can only add that in my view there is no better way to achieve a tight fit. No soaking, just a wipe of water across the plank with my wet finger and then a hot iron. It’s surprising just how much the wood can bend. It’s counter-intuitive but I bent the plank down in order for it to curve up on the bow. Then when that’s done bend it again to follow the inward curve. The wood can take it, just go slow and careful. Multiple times I bent the wood more than once (I only snapped one) to get a fit. It should almost lay into the bulkheads on its own.
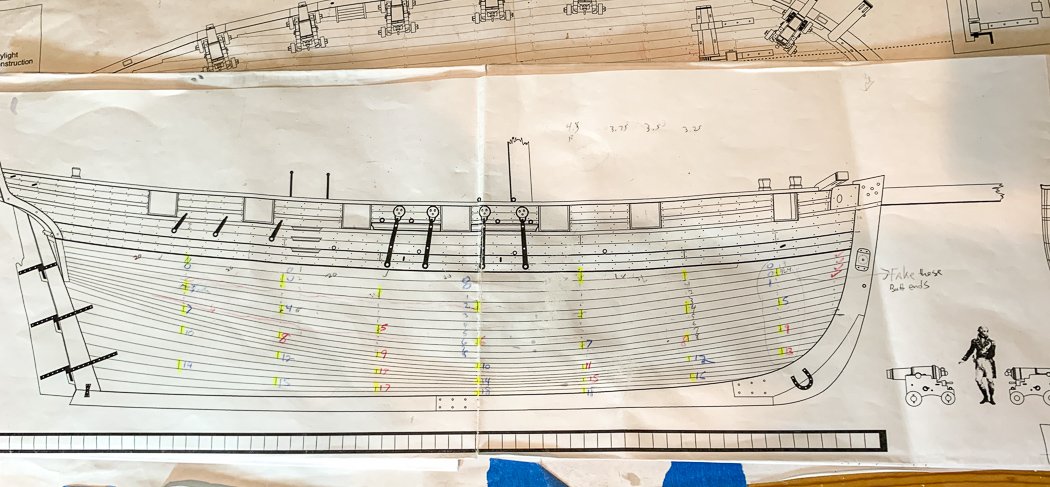
I am also following the planking plan for proper lengths and pattern (rather than running one plank for the full length of the hull). I first added some edit marks to the plan (hard to see with those skinny lines) then transferred that to hash marks on the hull to maintain (well, actually not forget) the pattern. Another note: The plan is a two dimensional view of a three dimensional hull, don’t be deceived by the plank widths shown on the plan, that’s obvious when you think about it. Visually I was initially thinking I can take the width shown on the plan, nope. It works above the wales but not below.
I will own up to one cheat. For the short joints near the bow I scored a joint line on a longer plank that reached the second joint end nearer mid-ships. Tapering, bending, and fitting a single plank at the bow is hard enough, getting a match with a short plank was more than I wanted to do. Hence my joints at a the bow are perfect…because its the same plank.
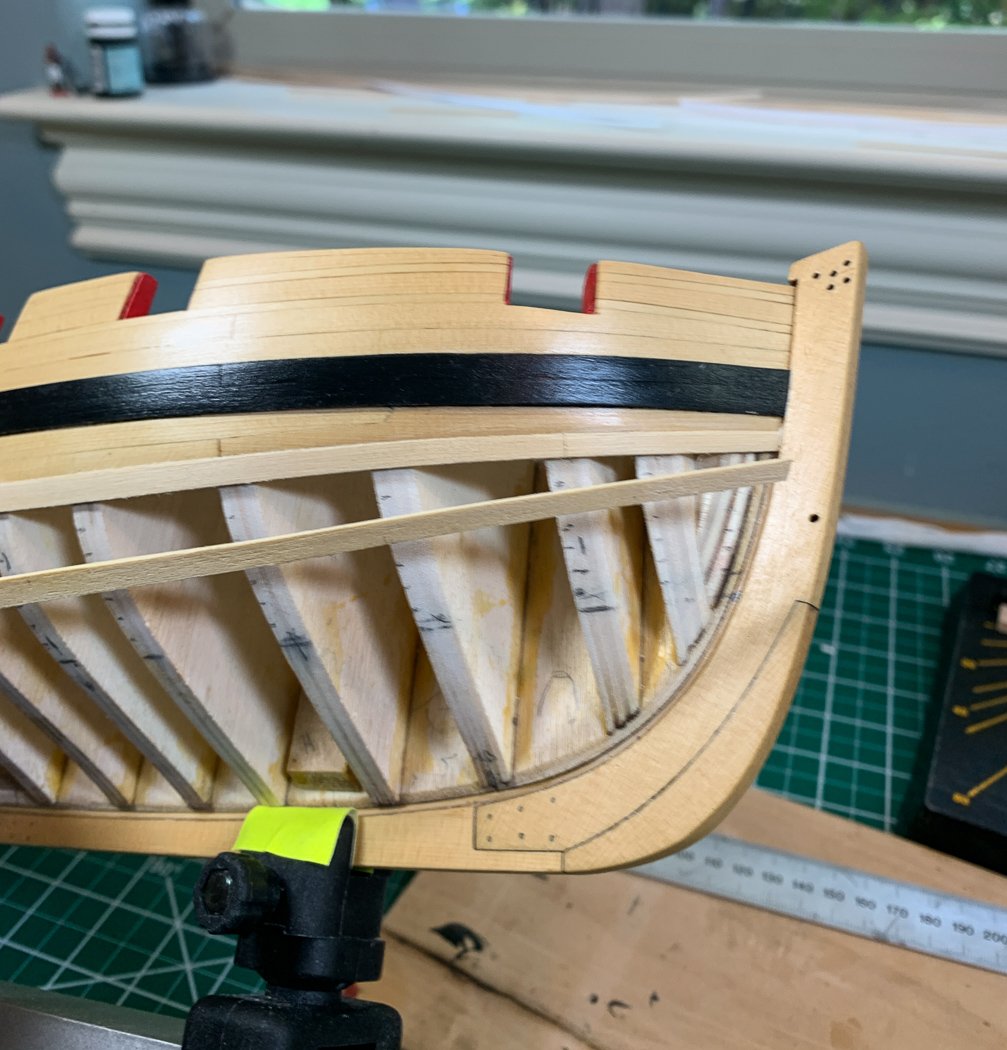
Here's an example of how tilting the hull up may throw off my look at the curve. It may seem wobbly, it isn't. It's sort of an optical illusion because of the multiple curves at play, I had to ignore this and trust the tick marks.
I spent a long time on each individual plank, way more than any plank on any ship I’ve built before. I can’t make it up with paint or on a second planking. Here’s a little fun fact; different planks that measures 3/64ths on my digital caliper can measure between 1.18mm and 1.31mm. That’s not much, but it makes a difference on getting a smooth fit between planks. So now I measure the thickness on every plank in millimeters even though I cut them in imperial, its that or sand it out later. And I’m learning to do a better job with ripping planks.
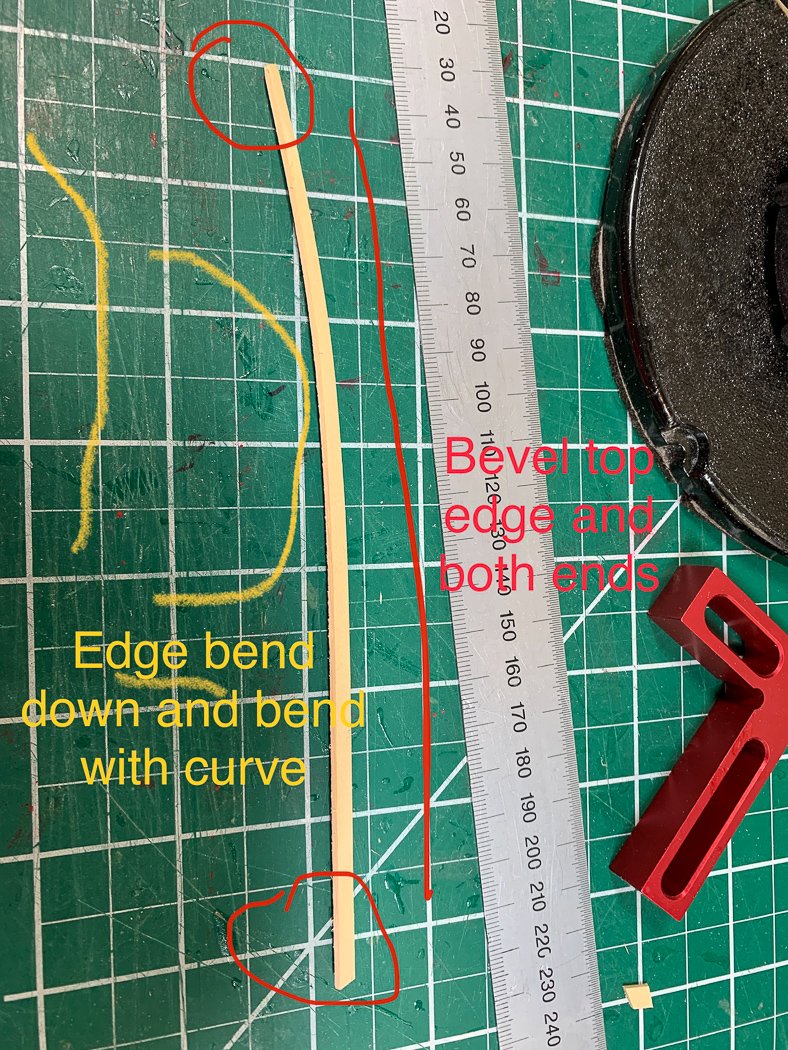
After tapering, each plank is first beveled along the top edge and also slightly at each end, especially at the rabbet. This is a time consuming but important step for me to get a tight fit. The stern, due to the big curve from side to bottom (great use of nautical terms) is particularly challenging to get the right bevel and the right bends (more of a twist than a bend actually). It’s tempting to force it, it’s better to take the time.
I should be clear here. There are eight rows of planks in this belt. I probably made at least 14, tossing away almost as many as I fit. It’s another example that if my ship had three sides my third side would look great, I learn as I go.
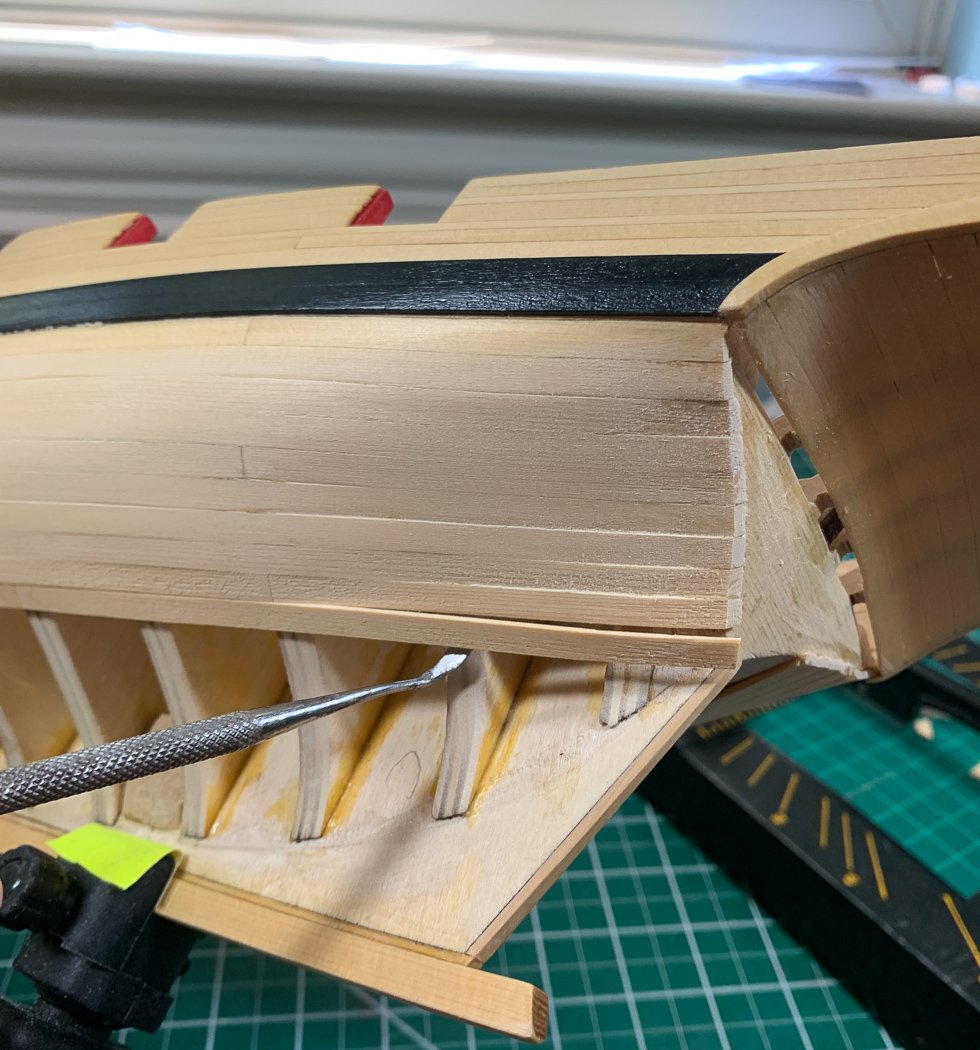
Then it’s gluing them on. I placed CA with my thin applicator on no more than 2-3 bulkheads at a time and finger clamp the plank down and up for 20-40 seconds. That of course means as I moved along the plank would be too close to the bulkhead to use the applicator. I’m big fan of dental tools - here’s one I use to slip CA under the plank. I don’t glue the top edge. The bevel is how I get the fit, not edge glue.

While the tick marks confirmed I was on the right track, it was nonetheless nice to see the 8th and final plank fit at the stern right where it’s supposed to be as part of the eventual square tuck. I left them all a little long at the stern to give me some latitude when I get to the square tuck. I’d already had to make adjustments to the square tuck by sanding the triangle base down (again with advice from Chuck) to provide the 1/8th inch depth between it and the counter for the square tuck. After all that I repainted the wales, they got a bit banged up.
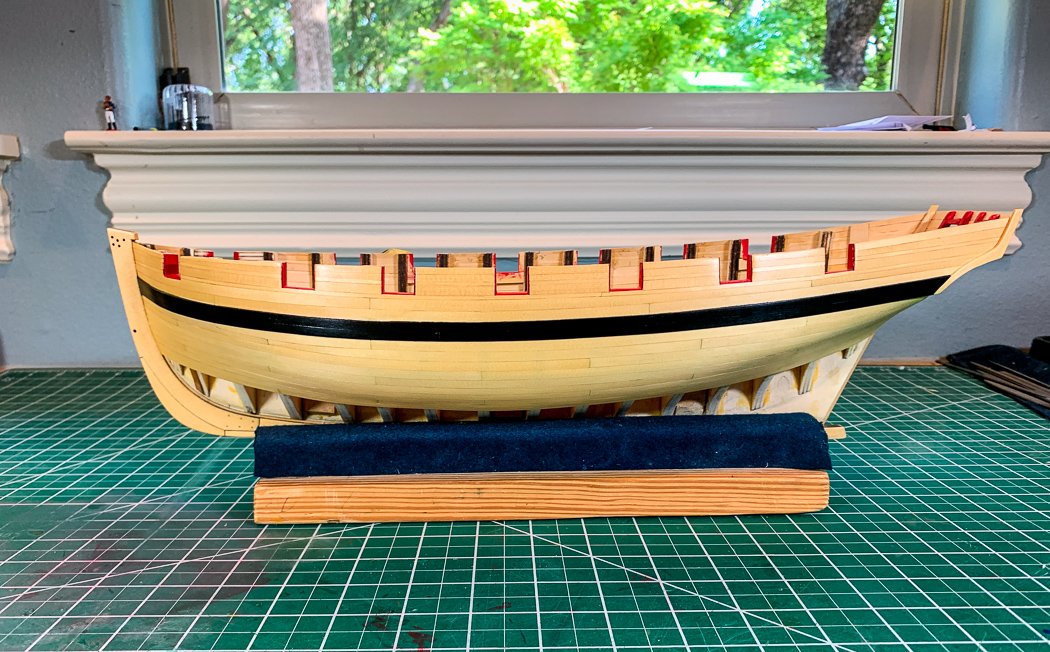
And I got to here following a light coat of poly (which isn’t fully dried and buffed yet in these photos) In addition to other things the poly brings out the seams and joints between the boards in a nice way.
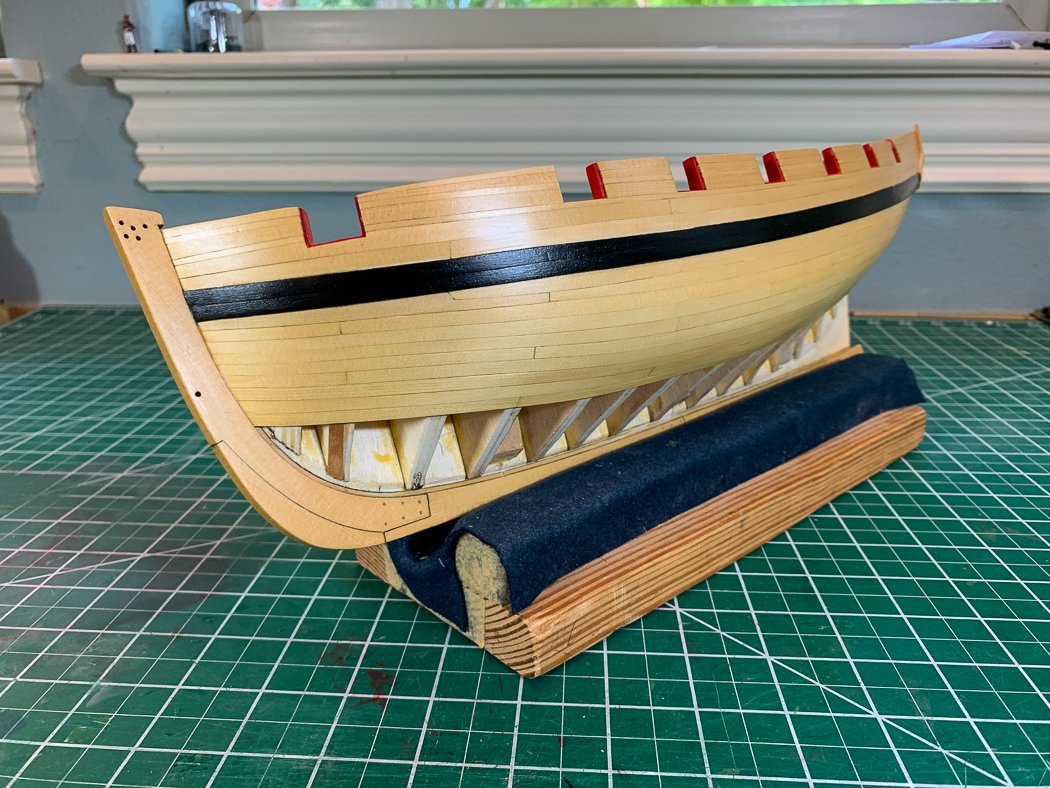
I didn’t get a perfectly tight fit in the rabbit, so I helped myself by putting the slightest amount of super phatic glue with a toothpick (it dries clear) then added some sawdust taken from beneath my saw and packed it in at the rabbet. After light scraping (another dental tool) and sanding to remove the excess glue, with the poly added it now looks fine.
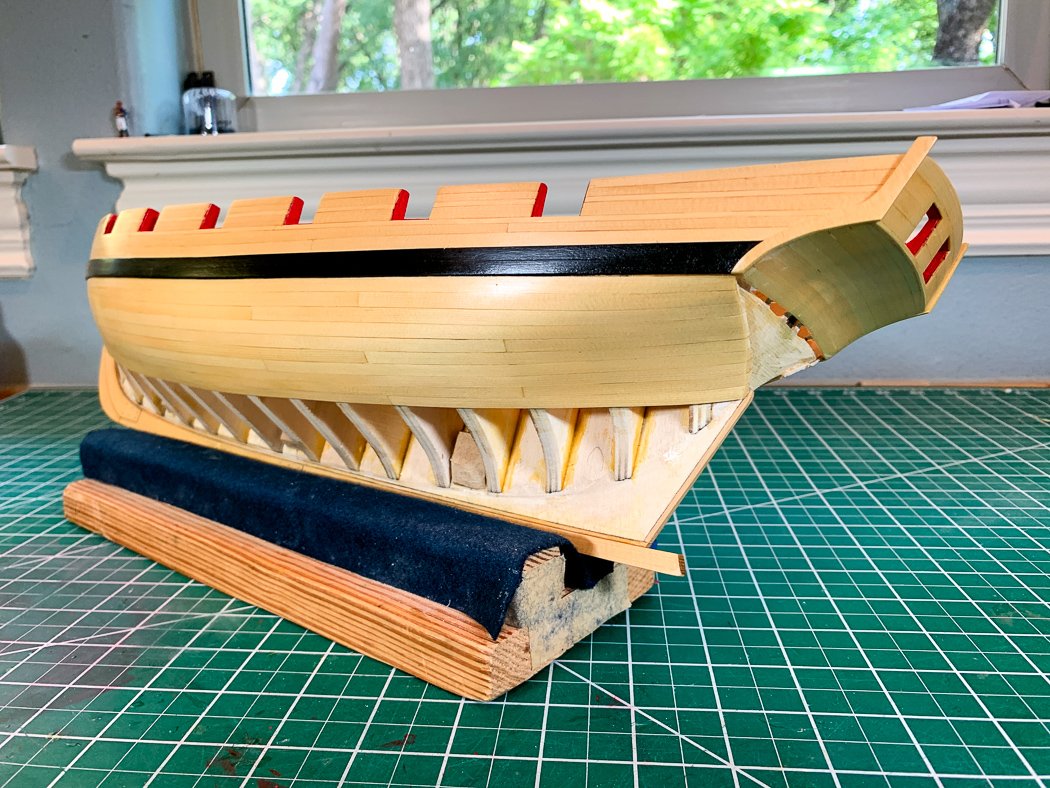
I’m happy with the curve of the stern, though maybe it’s a little flat. As I’ve noted earlier the initial fairing is critical, but I did over-sand the final bulk head. Layering a 1/64th strip (that’s all it took) on between bulkhead and planks created a smoother run. It took work, especially on beveling, to get a tight fit together with a tight twist that would have been very difficult without my handy travel iron.
It’s not perfect - it has flaws, I mean character, but I can’t see through it so there’s that. I like the slightly different colors of wood that comes from following the planking pattern, just more character.
I have 24 more planks to go to finish the hull so everything can still fall apart. But at least I’ve proven to myself that I can more or less single plank a ship - with the help of Chuck’s monograph, the process of lining the hull and bending planks, and a lot of time and patience (and possibly a supplemental wood order).
So as it turns out, I can get there from here.
-
On 7/12/2020 at 3:29 PM, DelF said:
Quadhands
How’s the footprint working out? I saw they have a smaller 4 hands model as well. My big question is do the magnets hold when you’re tensioning lines?
-
-
I’ll definitely be watching this and enjoy building it vicariously. No way am I interested in building something so large, but it will be fun watching you do it.
Chris Watton and Vanguard Models news and updates
in Traders, Dealers, Buying or Selling anything? - Discuss New Products and Ship Model Goodies here as well!!
Posted
I don’t think lime wood is much of a differentiator, but that’s just me. I’d pay (and have;-) for something better than what other kit manufacturers offer.