


Charter33
-
Posts
418 -
Joined
-
Last visited
Content Type
Profiles
Forums
Gallery
Events
Posts posted by Charter33
-
-
Excellent work there Ron.... looking good...👏
- kiwiron and The Gimps Chimp
-
 1
1
-
 1
1
-
Well.... what a day!
This could just as well been posted in the 'What have you received today' thread 🙂
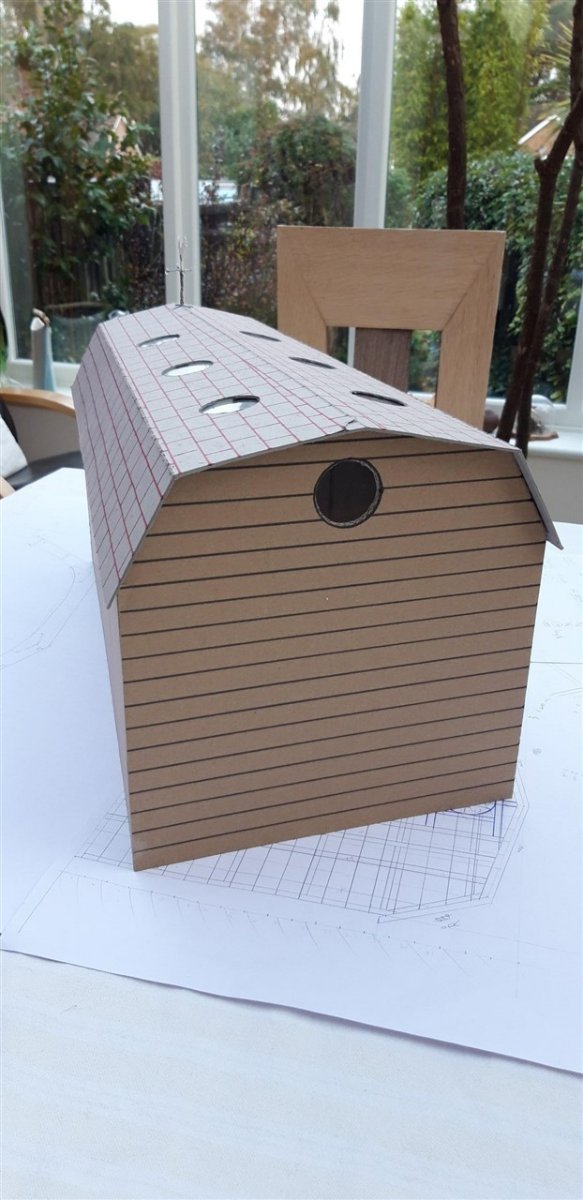
I wanted a window in the far gable end that would increase the amount of natural light to the 'clean/dust free' model making section of the workshop (the Captain's day cabin?). I thought it would be appropriate to have some sort of nautical theme as a nod to the workshop's primary use and have a few ideas about how to do this. Then the Admiral asked for ideas for a Christmas present. "A porthole would be nice...."
Today we drove over to Trinity Marine near Exeter. Remember when you were a child and were taken to the most amazing toy shop and you felt like all your Christmases had come at once? This marine reclamation/salvage company has some jaw dropping stuff. Their website is impressive, but really does not do justice to the stunning stock they have - for example the very detailed model paddle steamer that currently has pride of place in one of the two display showrooms -it must be at least 8' long, or the model of a French frigate, or the gear reclaimed from HMS Hermes....... To call the place an Aladdin's cave is an understatement and I recommend a visit if you are ever in the area.
trinitymarine.co.uk if you want to browse their website.
So, I am now the proud owner of a 19" diameter, aluminium opening porthole reclaimed from the MV Orient Well.
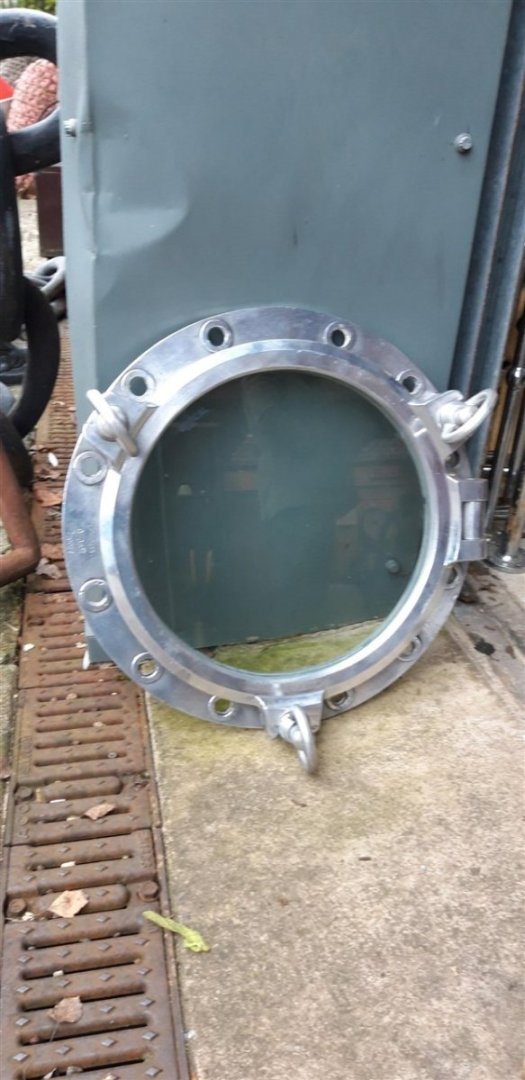
and one of my next tasks is to adapt the timber framework to accept it.
Christmas has come a bit early this year 😁

Ho ho ho
Cheers,
Graham.
- Roger Pellett, ccoyle, Ras Ambrioso and 15 others
-
13
-
 5
5
-
Thanks for the 'likes'!
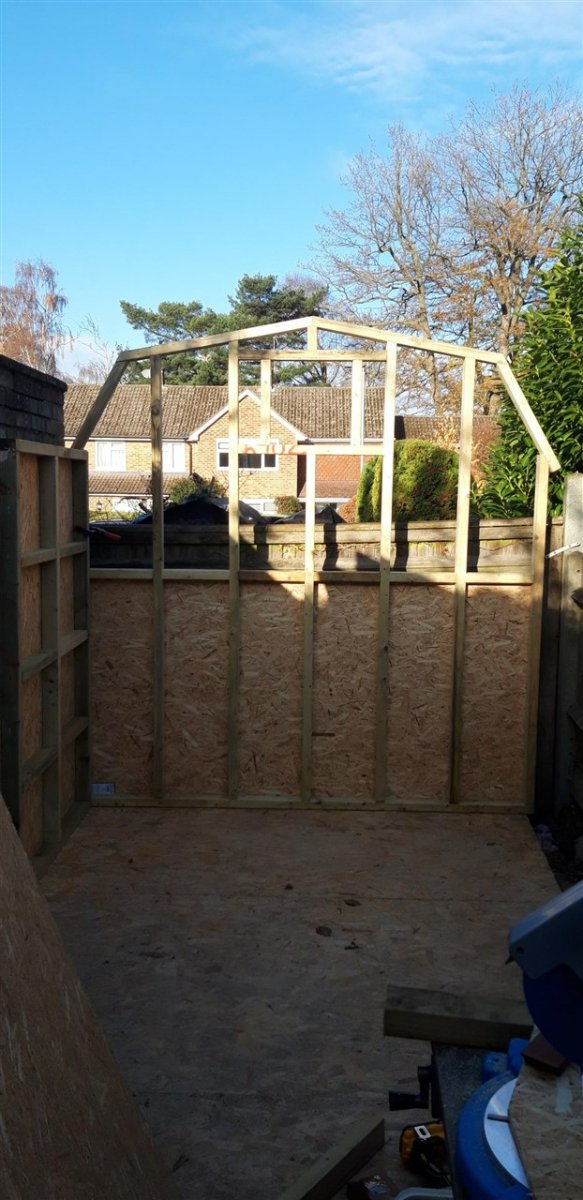
Moving on to the walls......
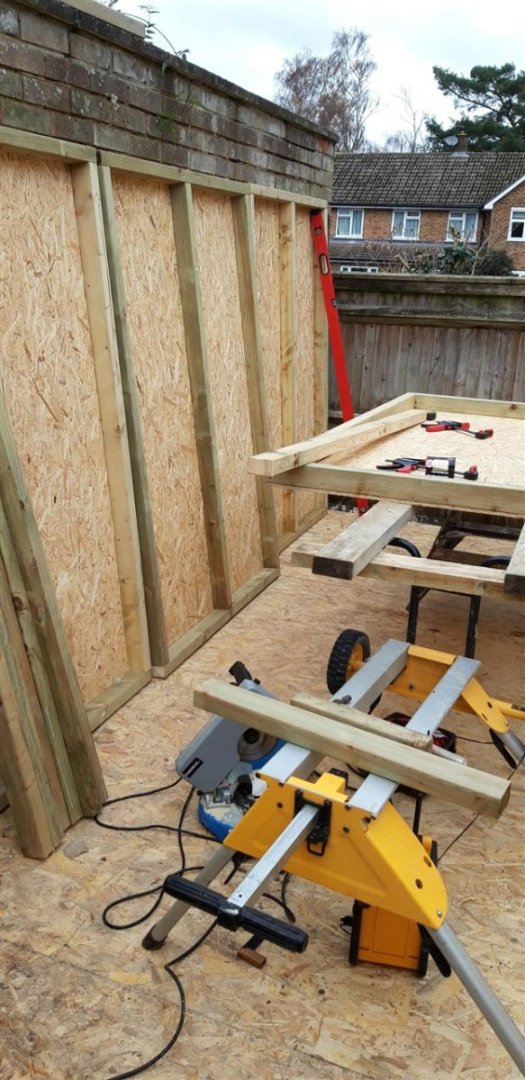
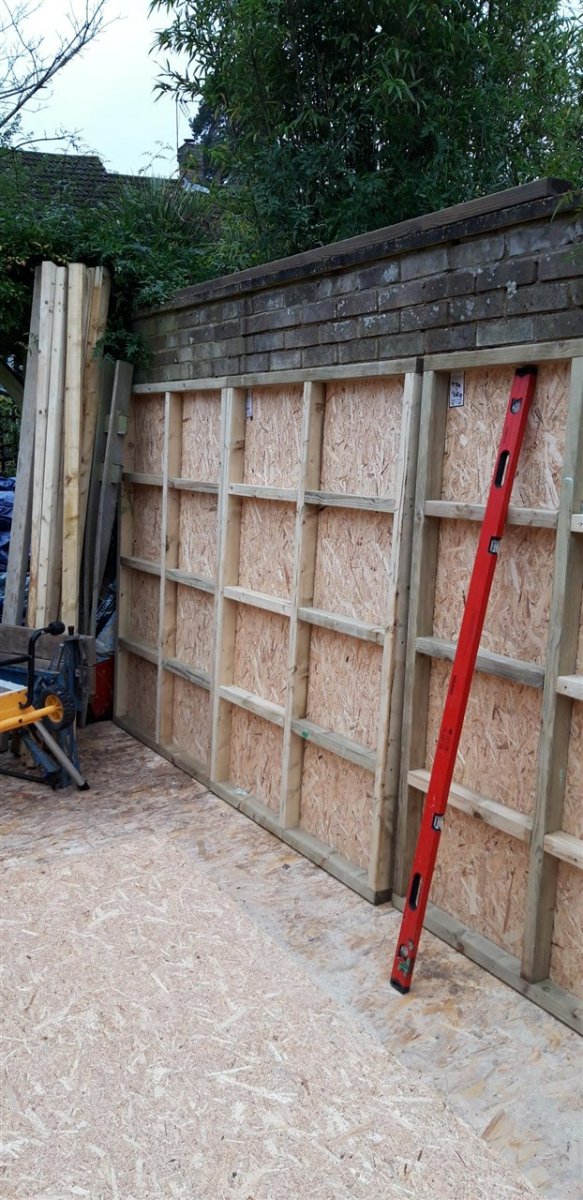
Side walls comprise of four 4' wide x 6' high treated softwood frames faced with OSB board each. A modular design with each section to be covered in breathable membrane and composite cladding. Completed sections will then be bolted together and secured to the floor.........
_1280.thumb.jpg.467af2dff173071e2c52a641fbfb9122.jpg)

Far gable end next. Framed and faced the same way but it will be covered in membrane and clad once all the elements are finally assembled - I can just about manage to lift this panel on my own..... no chance if it's clad! The bottom fence panel will be temporarily removed to do this.
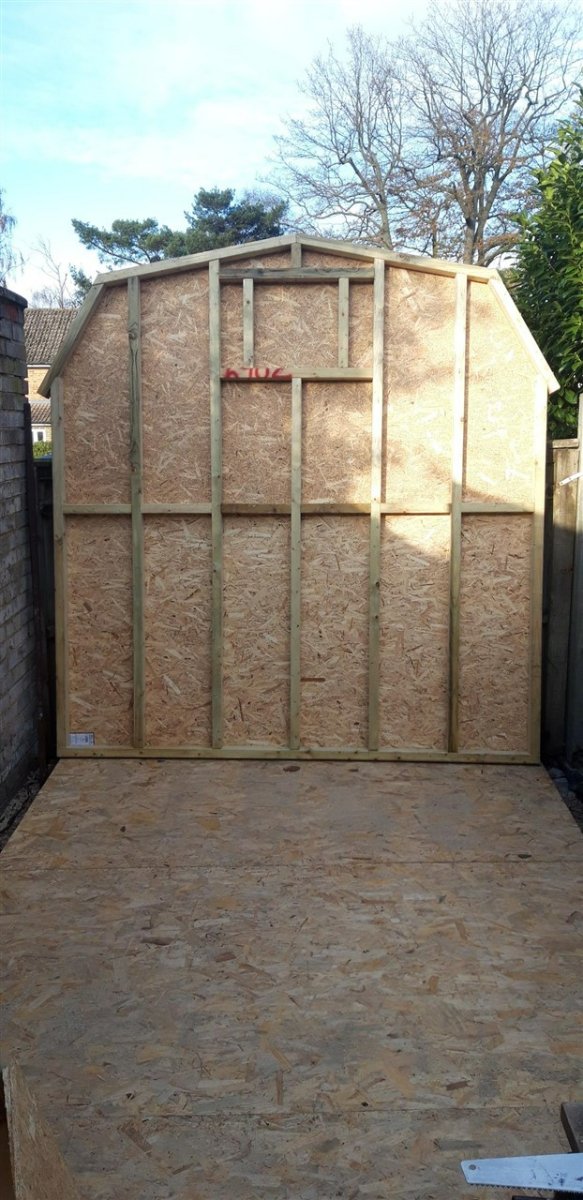
First test assembly........

....... all good and now fully faced.
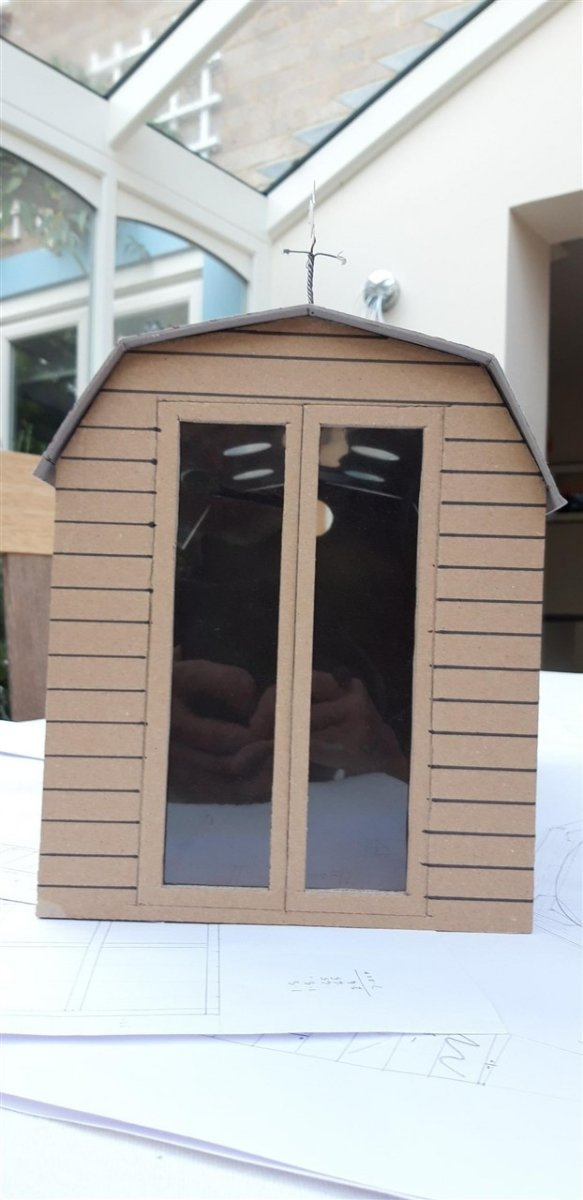
A meeting with the surveyor from the company who are making the French doors ironed out the finer details of the nearer gable end, and this will be the next stage.
Making progress!
Cheers,
Graham.

- Prowler901, Baker, king derelict and 14 others
-
17
-
Green over brown or brown over green? The answer is 'Yes, either way.' Which ever the way, you're displaying it brilliantly... keep up the excellent work! Really enjoying this build!
-
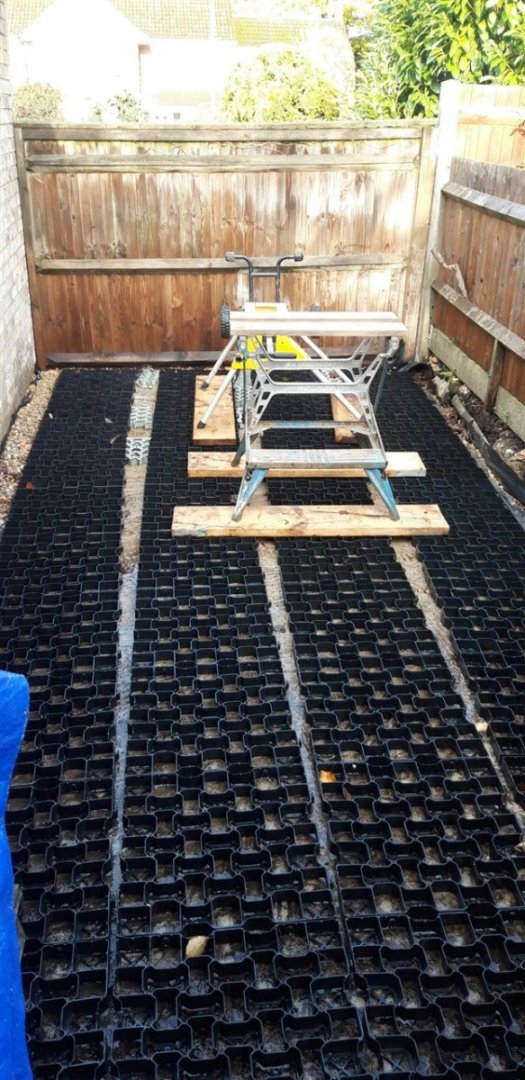
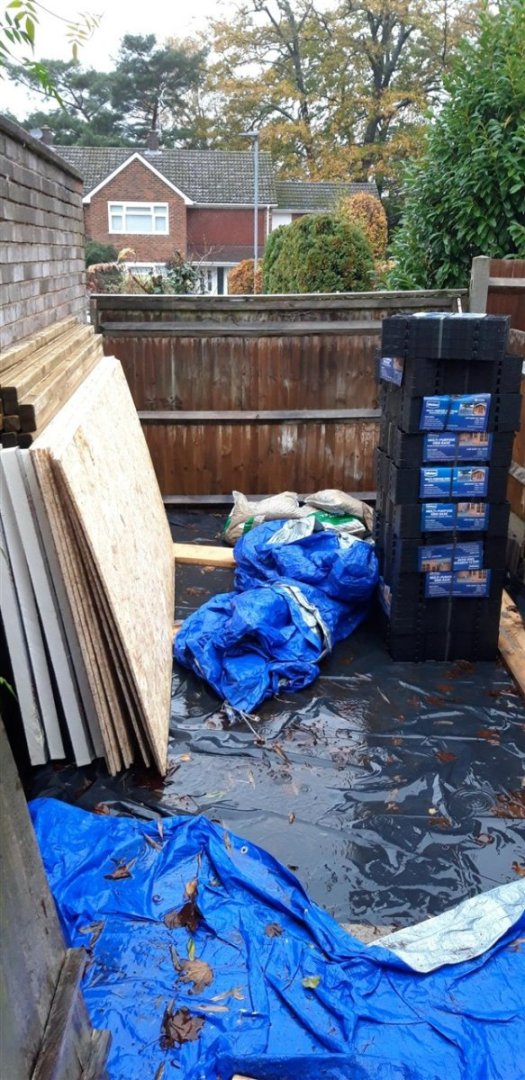
Air gap forming base roughly in place and showing the issue of the tapering plot. The gravel/weed control matting drainage channel around the slab works well as proved by a morning of torrential rain.
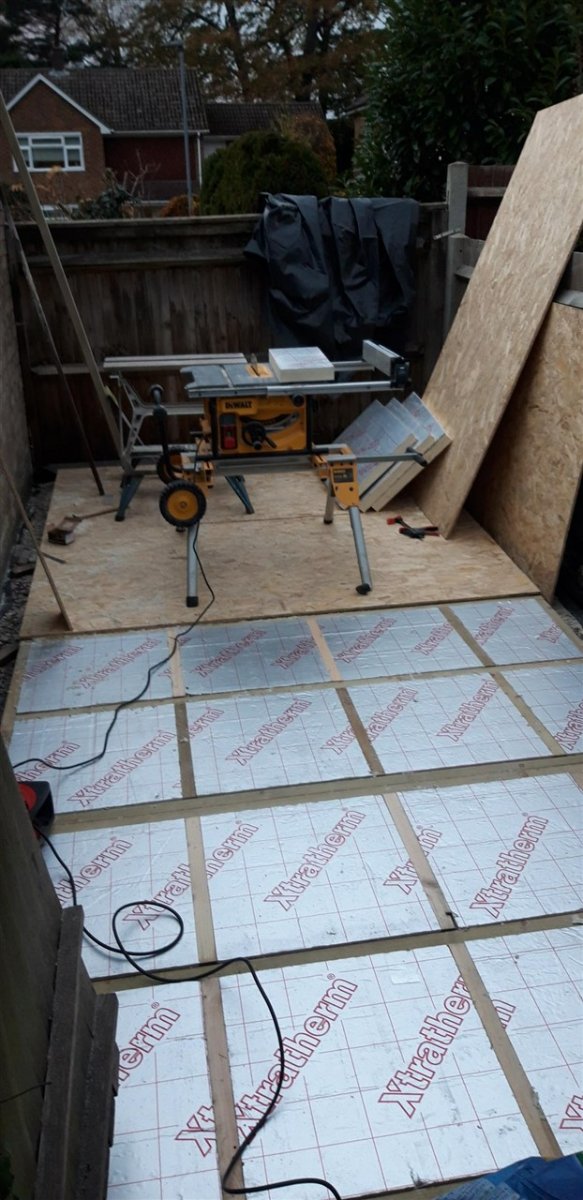
Construction of the wooden floor went as planned. First two panels completed, the other two internally braced and with the insulation panels in place. Twilight coming on.......

..... but all finished by the end of the day - thanks to the built in LED lights on the cordless screwdriver. Had to clear up and cover things with tarpaulins by the light of the streetlamp behind the fence, but all is now weather protected, and this week target has been met.
Walls next......
Cheers,
Graham.
-
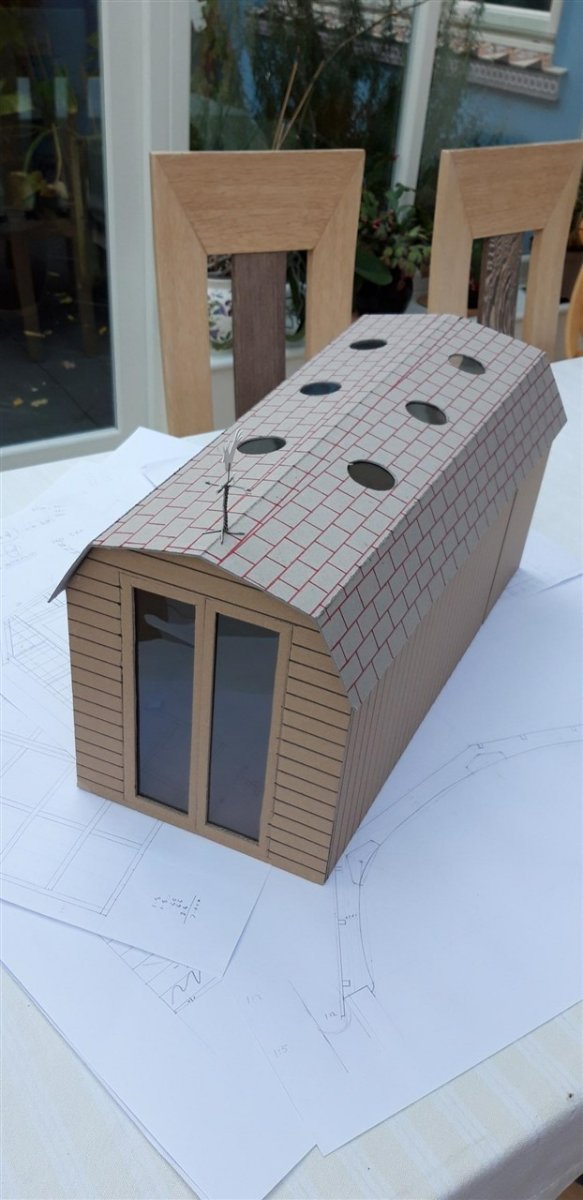
The appropriate dimensions are:
5 M (16') long, 2.5 M (8') to the top roof ridge, the far end, with the round window, is 2.4 M wide, and the width tapers to 2 M (6' 6") wide at the end with the doors. These sizes will maximize the area available while still conforming to planning regs.
The rain that had been forcast held off long enough for me to sort out gravel drainage channels around the concrete slab and to lay the plastic air gap forming base. It was dark by the time I'd finished for the day, so no pictures today.
- thibaultron, AJohnson, Edwardkenway and 2 others
-
5
-
With the groundwork and the concrete slab base now done, as described in the 'What have you done in the garden' thread, it seems about time to branch out into a build log of its own.
Initial design thoughts have evolved, and evenings have been spent researching materials, techniques and costs and these were used to draught out some plans. A quick 1/10th card model helped with visualizing the concept. I no longer have access to the CAD packages I used to work with, so it was back to earlier tech ie. Tee square, drawing board, set squares and sharp pencils - happy days!

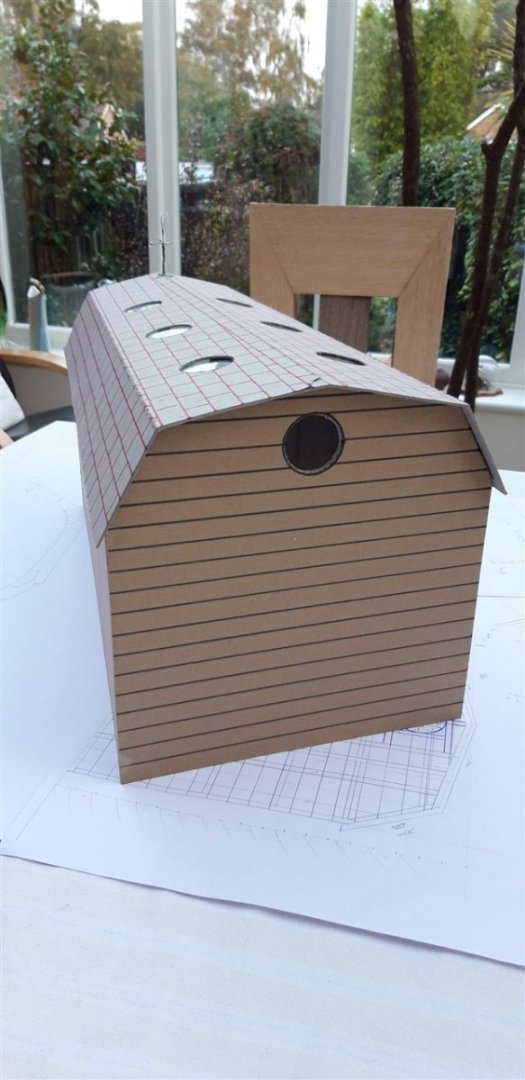

A few finer details still need to be resolved. These include things like the position and types of roof lights. With the structure enclosed on three sides the roof is the only practical source of natural light. At the moment I'm leaning towards using sun tunnels, but this may change. Another modification to the outline 'aspirations' explained before is the move from a half glazed stable door to a pair of fully glazed French doors to also improve the amount of usable daylight and to provide wider access. Limitations in terms of access to the site, limited storage and construction space will need to be carefully managed but my plan seems viable and I'm now in a position to start building.
So today the first batch of materials arrived - enough to construct the floor. This insulated OSB box, complete with an air gap between it and the concrete, will eventually be clad with T&G floorboards once the shell is complete and weather tight.
Now...... if the rain would only stop falling, I could get started......
Cheers,
Graham.
-
Another vote of thanks for posting the link to the scalpel/saw modification, I will be giving this a try for certain. I also watched the rest of this episode - love watching a craftsman who clearly enjoys his work and takes the trouble to share his skills.
I too was intrigued by the heat treatment alluded to for the jewellers graver tools using beeswax. This was the first time I've come across 'hardening and tempering' being carried out together at the same time. I was always under the impression that high carbon steel had to be heated and then quenched to harden it ( the carbon going into solution and being trapped within the structure resulting in an extremely hard but very brittle material) followed by a separate re-heating (tempering) to a lower temperature that enabled some of the carbon to come out of solution - a lower temperature for tempering giving a harder material suitable for a tool such as a scriber, a slightly higher temperature for tools that are subjected to impact and therefore needed a degree of flexibility such as a cold chisel. Annealing is heat treating a metal to make it as soft as possible so that it can be more easily worked. Metallurgy is one heck of a science with so many variables. The specific carbon content, and the presence of other alloying metals in some cases, results in a vast range of possible physical properties that can be fine tuned to meet a requirement. All this is achieved using different temperatures, holding at this temperature for different periods, and the rate of cooling. I can only assume that the process described in the video
has been found to produce the properties needed for a graver tool, ie. the ability to retain a hard and sharp edge to enable it to remove metal skilfully and accurately in the hands of a talented artisan.
I'll be giving this method a go too!
Cheers,
Graham.
-
Really enjoying following this excellent project, including all the additional information that has been posted recently on pulleys. Bandsaws also use the principle of a slightly radiused crown to the pulleys to ensure the blade tracks to the centre.
Looking forward to seeing the lathe hooked up to the engine and running!
Cheers,
Graham.
- Ryland Craze, thibaultron, Egilman and 4 others
-
7
-
Can't speak specifically about the 1.5 mm sq. walnut as I bought extra from a local model shop to do that particular additional feature, but so far I have found that Jotika/Caldercraft have been generous in the quality of various materials, both wood and metal, that they provide. Even having had to re-do some of my build due to inexperience/incompetence there hasn't (yet!) been the problem of running out of stock.
Cheers,
Graham
- mort stoll and kiwiron
-
2
-
I had a quick look and there are plenty of really good video tutorials out there on the cuttlefish bone casting technique. Its a very old traditional method but one word of caution - the pouring of the molten metal is best done outside or in a very well ventilated area - the smell of the charred bone is quite strong!
Graham.
-
On 9/15/2022 at 11:26 PM, Ras Ambrioso said:
Another catastrophe. I could not remove the lead from the mold. If I make the mold out of metal, what can be used as a mold release?
Impressive work there Ras. Another material that you could use for a mould when casting is cuttlefish bone. Inexpensive and available from pet shops jewellers often use it for a 'one off' item. You can get a smoother finish to the casting if you shape the cavity by pressing into it rather than carving. I'm sure that there will be tutorials on-line out there to help you.
Good luck!
Graham
-
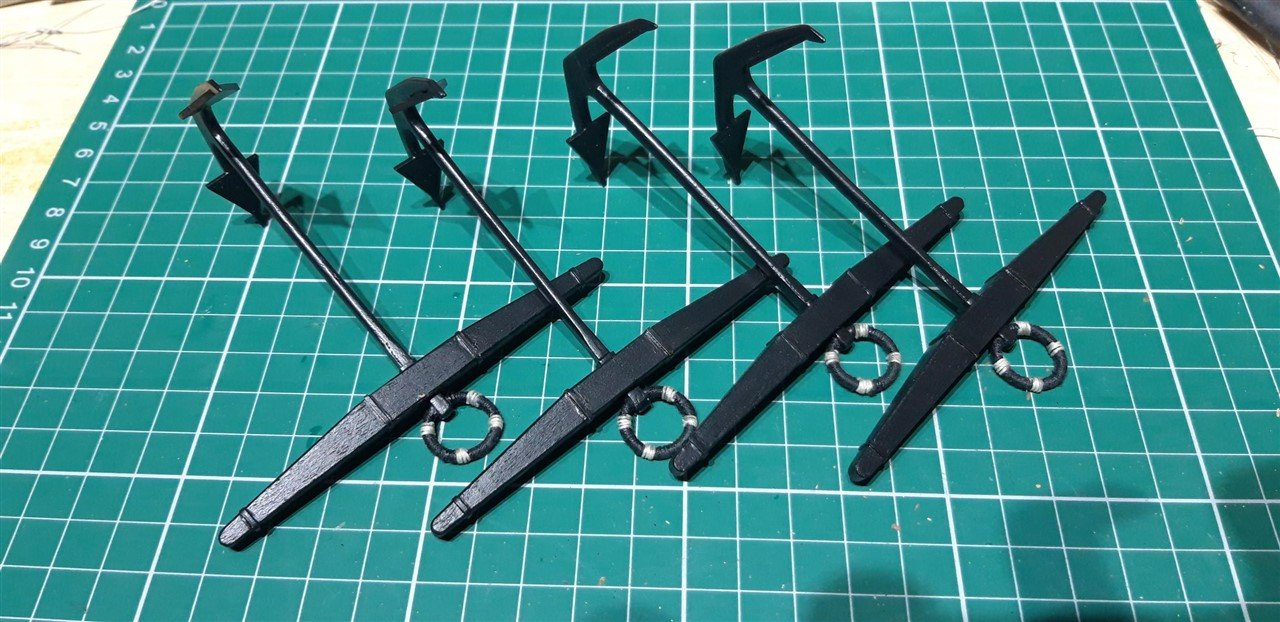
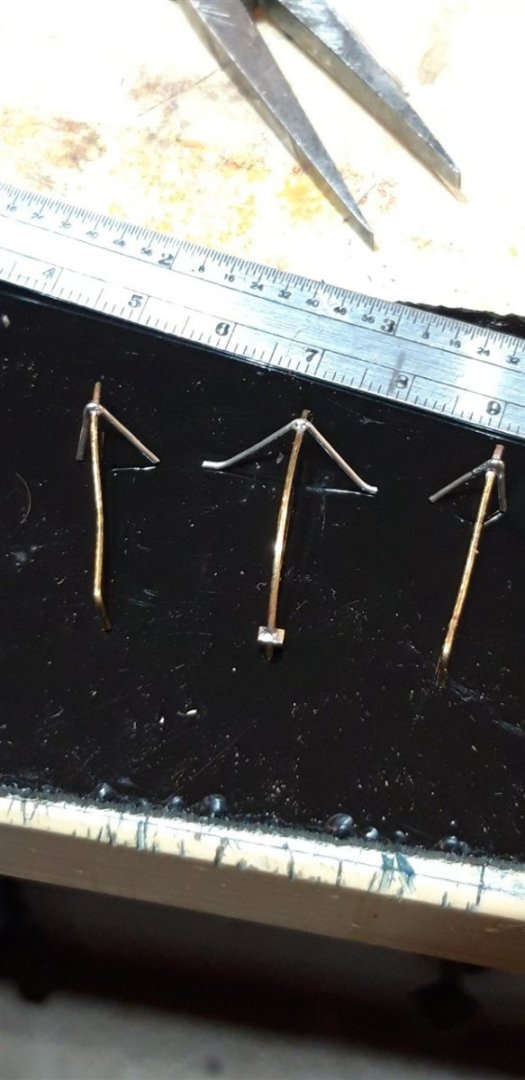
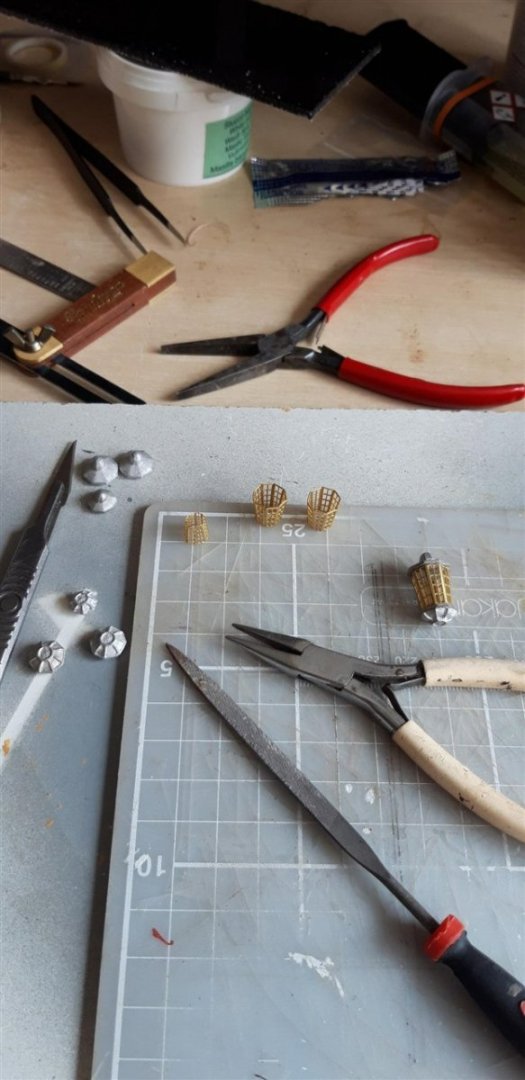
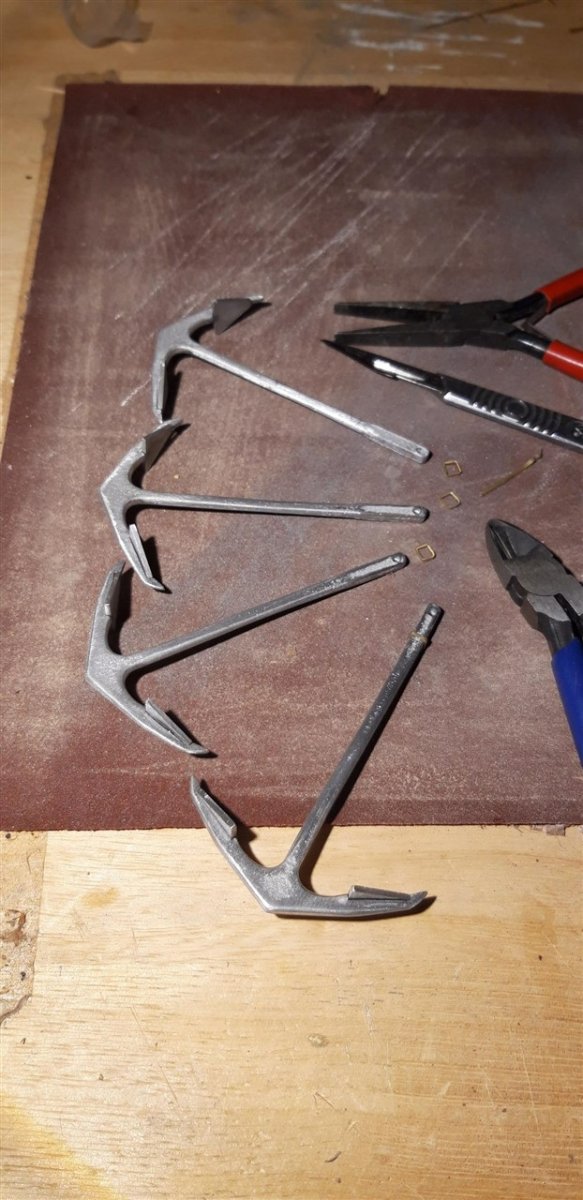
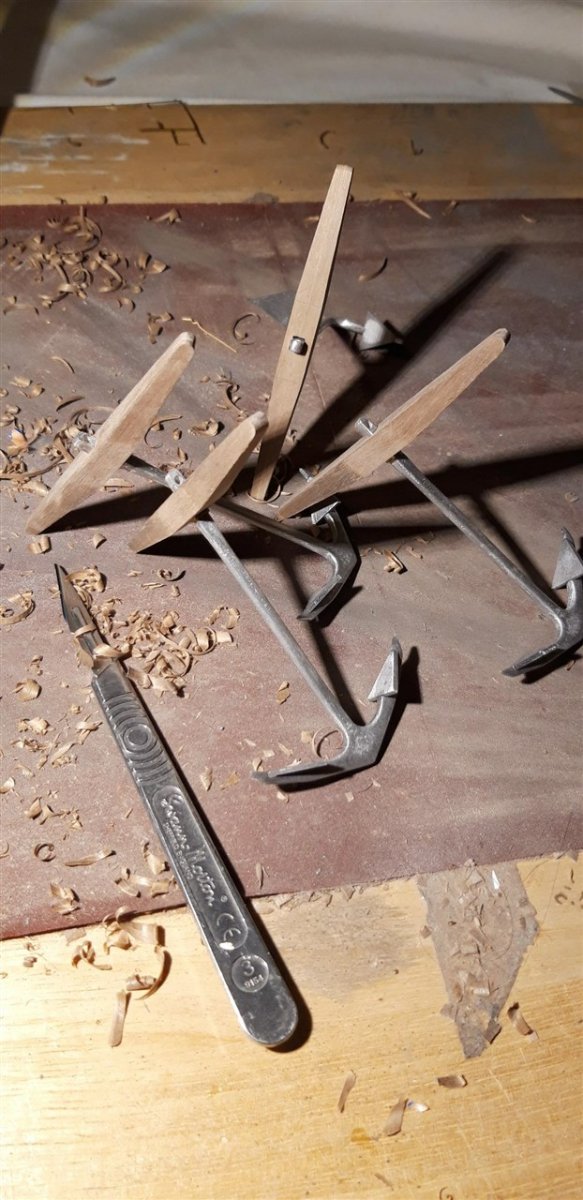
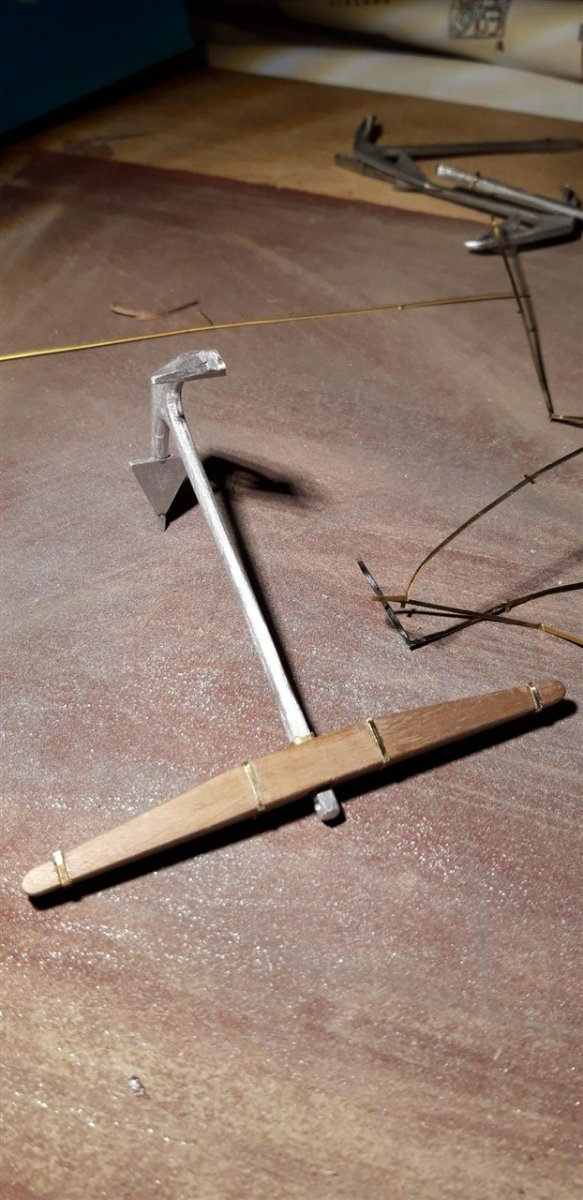
Construction of the anchors was well within the scope of the reduced 'building facilities' with my usual 'shipyard' temporarily little more than an A3 wooden drawing board on the dining room table illuminated by a clip-on flexible LED lamp.
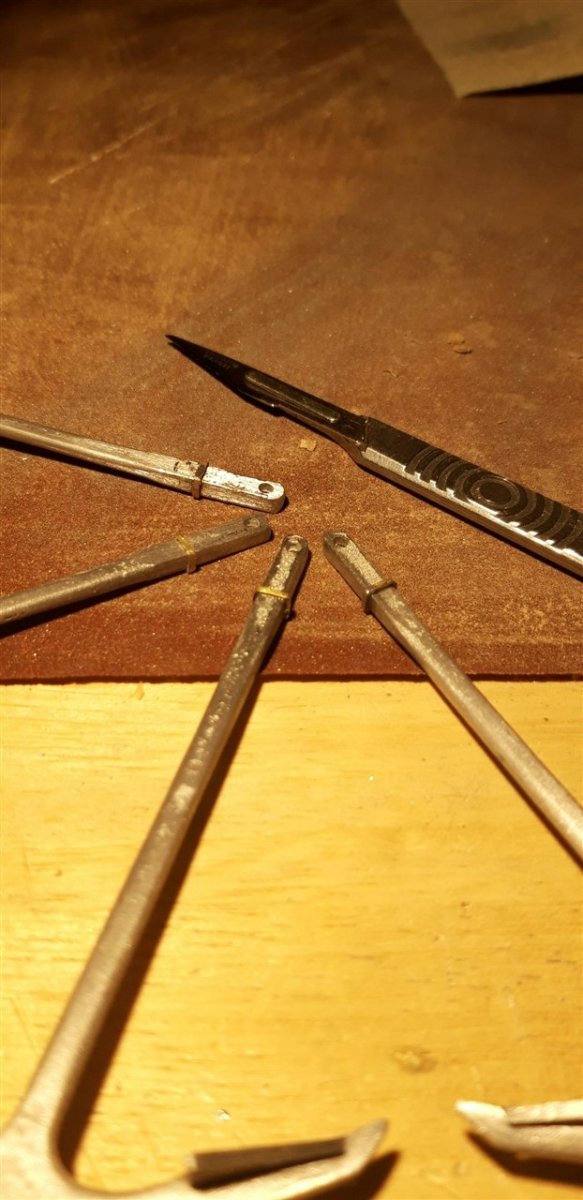
After cleaning up the castings and adding the anchor palms I made stops from some of the left-over photo-etched frame from the stern decorations, in this case from one of the thicker sheets. Once bent to shape they were soft soldered, cleaned up with a needle file and glued in place.
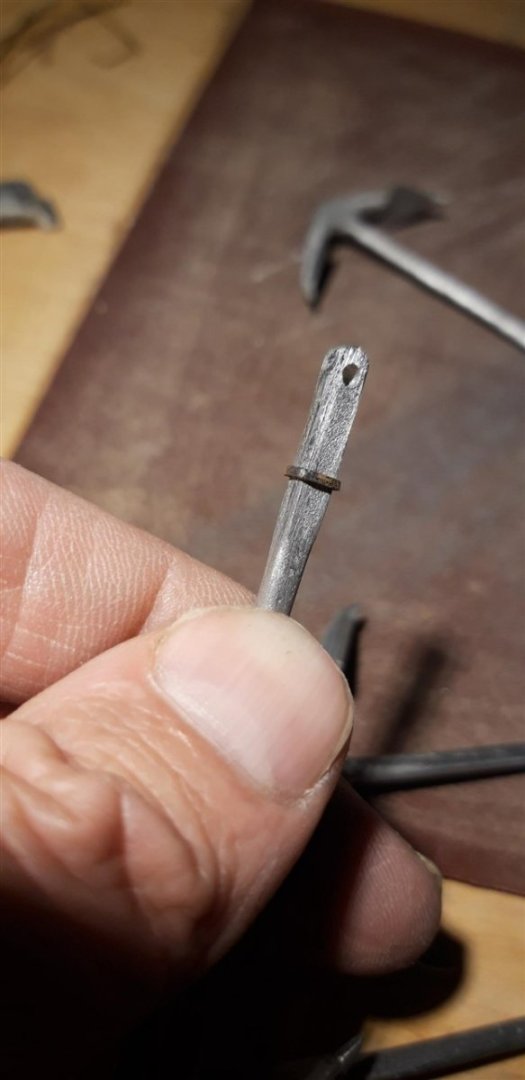


Anchor stocks glued together and carved/sanded to achieve the tapers ......

...... and after a light chamfer to the edges the iron bands were fitted, this time utilizing the fine brass strips recycled from the thinnest PE sheet frames.
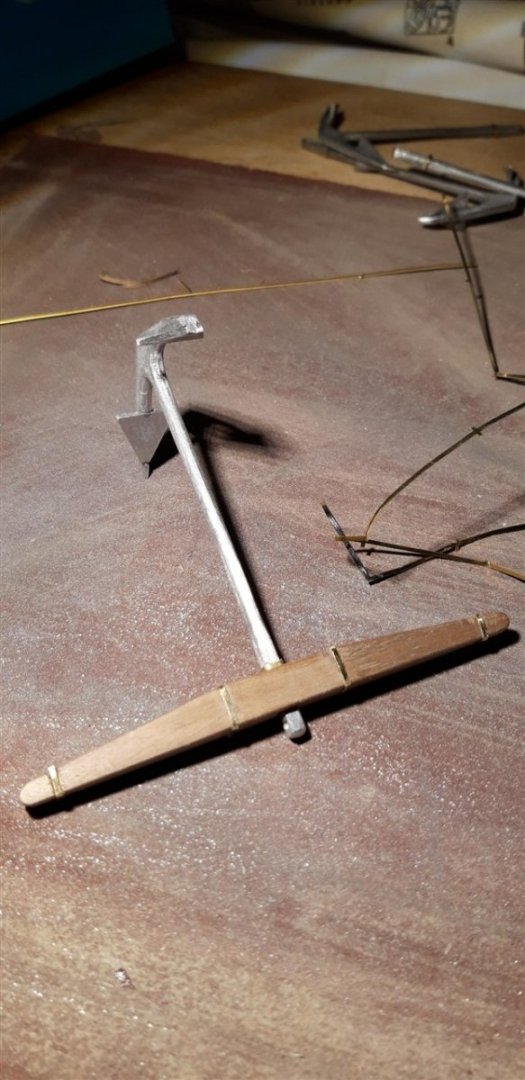
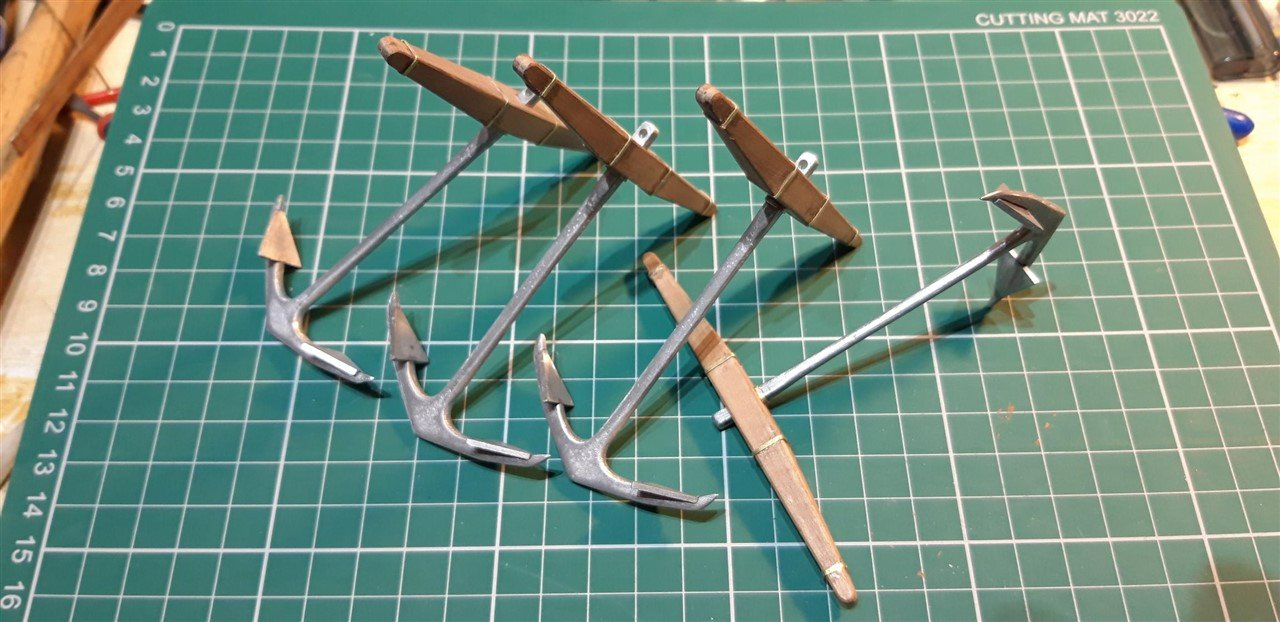
The rings were fabricated .....
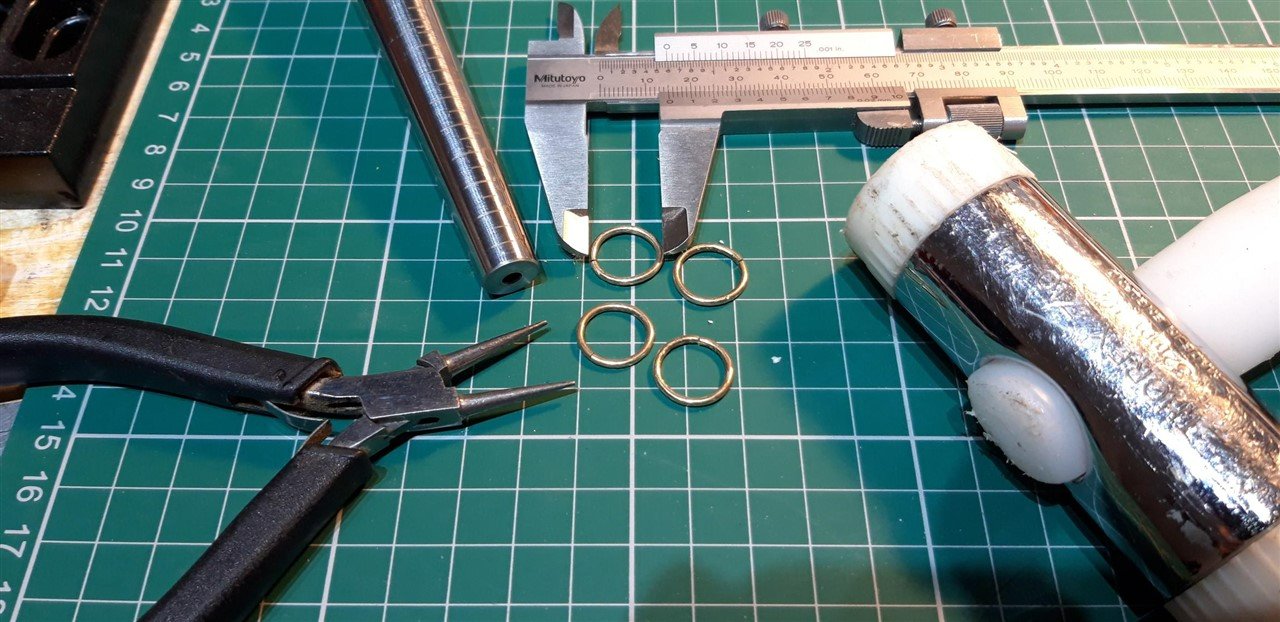
and the anchors painted.

After fitting the rings, darkened using 'brass black' solution, I looked on-line for advice on how to do the puddening. The search engine brought me straight back to MSW. Lesson learned - forget Google and just use this site's search tool!
Cheers,
Graham
- Robert29, mort stoll, bruce d and 2 others
-
5
-
Oh those Halcyon days - that picture takes me back ..... couldn't eat the contents quick enough....😅
Will be following your 'Pup' build with avid attention, Edward...
- Edwardkenway, Canute, thibaultron and 5 others
-
8
-
Hi Mike, and thank you.
I just anneal profiles that need a significant degree of bending. A lot of the brass strips required are straight so are fine as supplied, just needing to be cut and finished to length. I put off doing the bow pieces that run from the Catsheads to the top bow rail until I'd had a bit of practise on the stern. These two need to curve through 90 degrees and also flow around the hull's curve. Should be fun!
Cheers,
Graham
-
Well.... the brass profile decorations turned out to be more of a challenge than expected. It took a several evenings to achieve pieces that were of an acceptable standard and a couple of attempts that had to discarded, not just the compound curves but the bevelling of the ends to match the hull etc. Thankfully the manufacturer is generous in the amount of profile provided. Got there in the end and this stage of the stern is now just about completed. I'll attempt the two pieces to finish the the bow next. These look a little more tricky, but the brass profile is annealed and ready to go.

Off to the West country for a break today so away from the shipyard for a little while - so 'anchors aweigh' ..... literally - the components for the bower and sheet anchors, plus basic range of tools, paints and brushes, oh, and the side entry port casting as well it seems, appear to have fallen into the bottom of the suitcase......... well, sometimes you need a mini project to keep you going ...... 😉
- AJohnson, Bill Morrison, kiwiron and 2 others
-
5
-
With over 40 years of teaching Design Tech at Secondary level, plus running two Adult ed. courses a week for much of that time, I'd offer to drop by and show you ...... the distance is a bit of a problem unfortunately 😆
- Canute, John Murray, mtaylor and 1 other
-
 4
4
-
-
Hi Ron,
When I had a parts problem I found that phoning Jotika directly was the best method of contact. That broken part you have looks like the lower curved rail for the bow. Once fixed in place it's not under any load and is supported all along the back. It also will need trimming in length to fit properly. You might find that it is still usable...
Great progress with that second planking and squaring up the corners of those ports - keep up the great work!
- Bill Morrison and kiwiron
-
2
-
Coming along very nicely!👍
- kiwiron and The Gimps Chimp
-
2
-
Well ....... turns out it's one of those instances where half a dozen lines of instructions in the manual proves to be deceptively vague and a bit more thought is needed ........
I managed to bend the brass profile to the correct shape to match the curve on the top part of the Quarter gallery but then found out that it was a compound bend and needed to also curve slightly upwards.
Got a bit creative with some bits and pieces that were to hand and came up with this solution

.... successful, but not very elegant.....

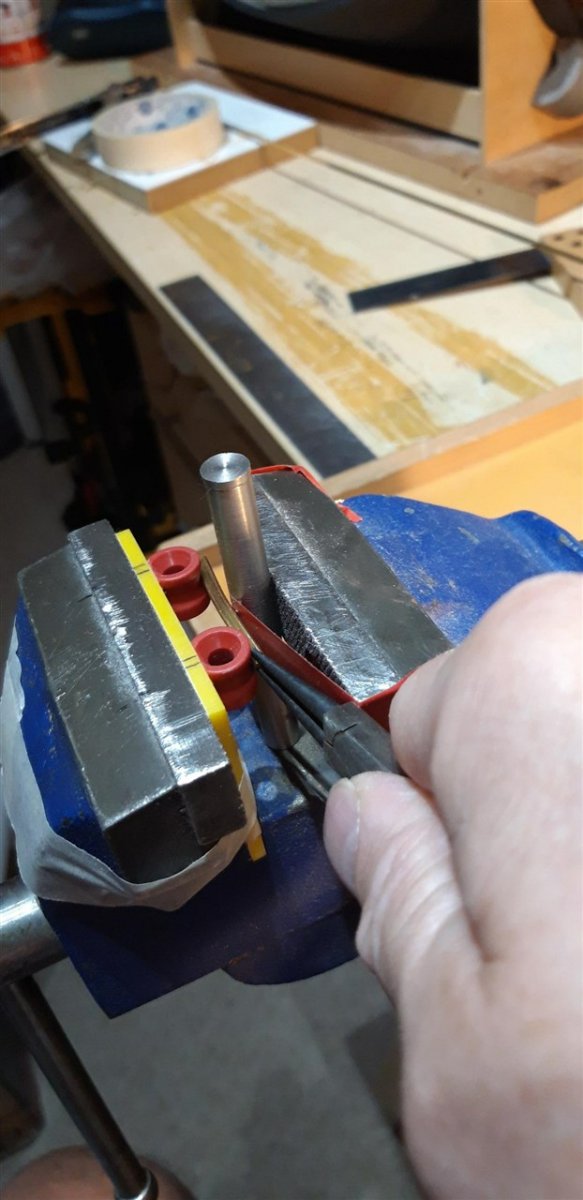
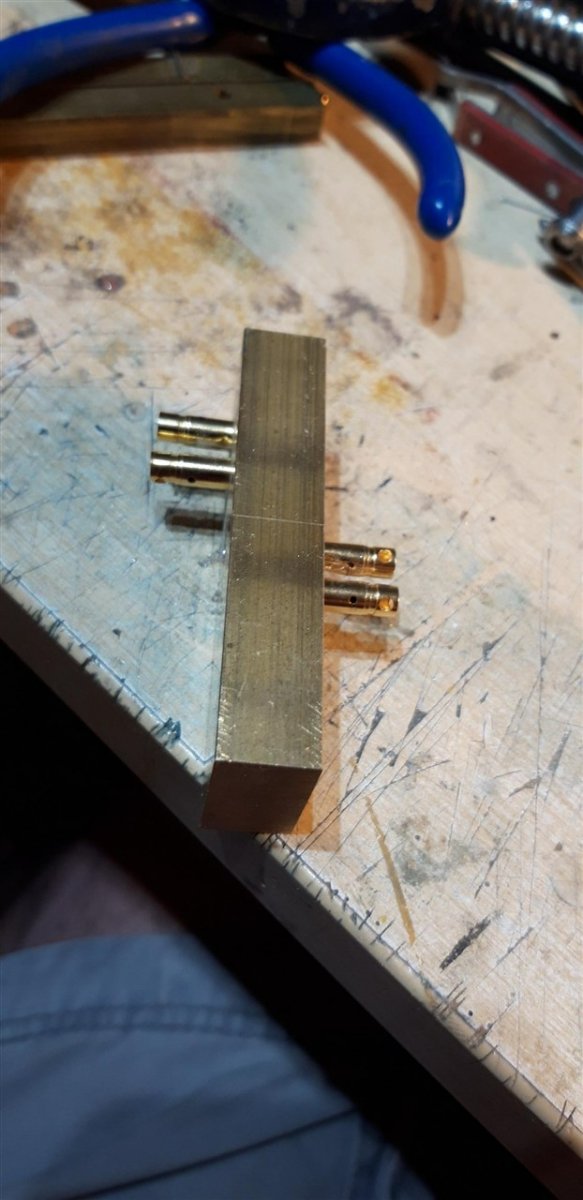
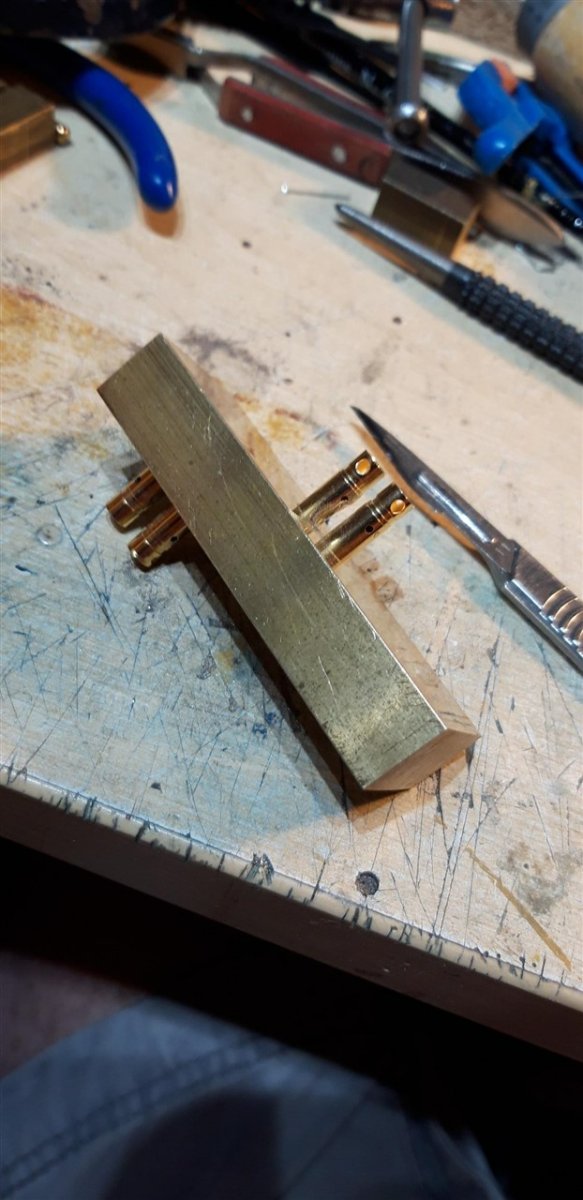
There had to be a simpler way ...... time to go back to the drawing board. Rummaging through the 'odds and s*ds' box I came up with a random block of 'bound to be useful one day' brass and four 5 mm dia. brass connector pins.
Four drilled holes and the light application of a hammer later I now have a double sided jig to to form the brass in both axis'. 2 mm gap between pins on one side, and 3mm on t'other.
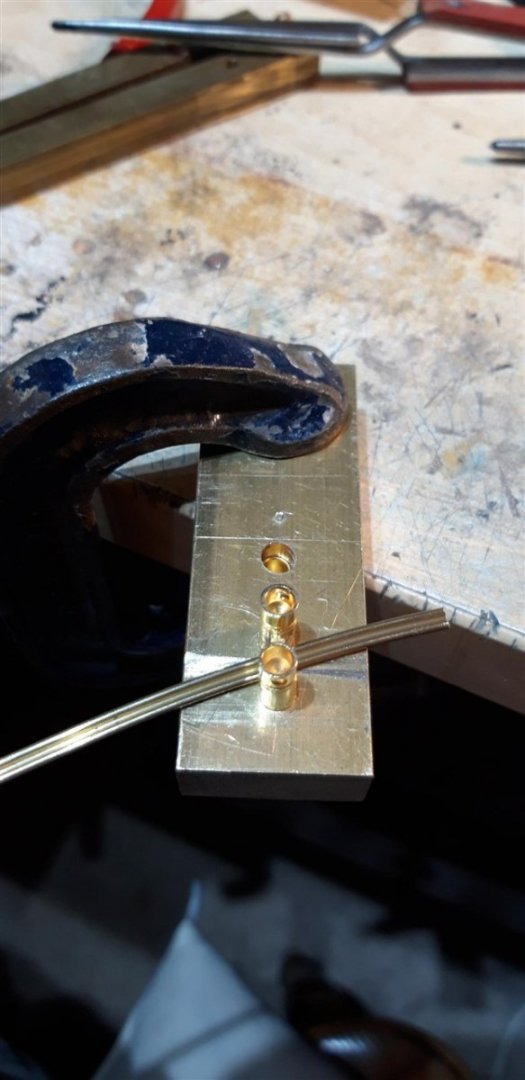
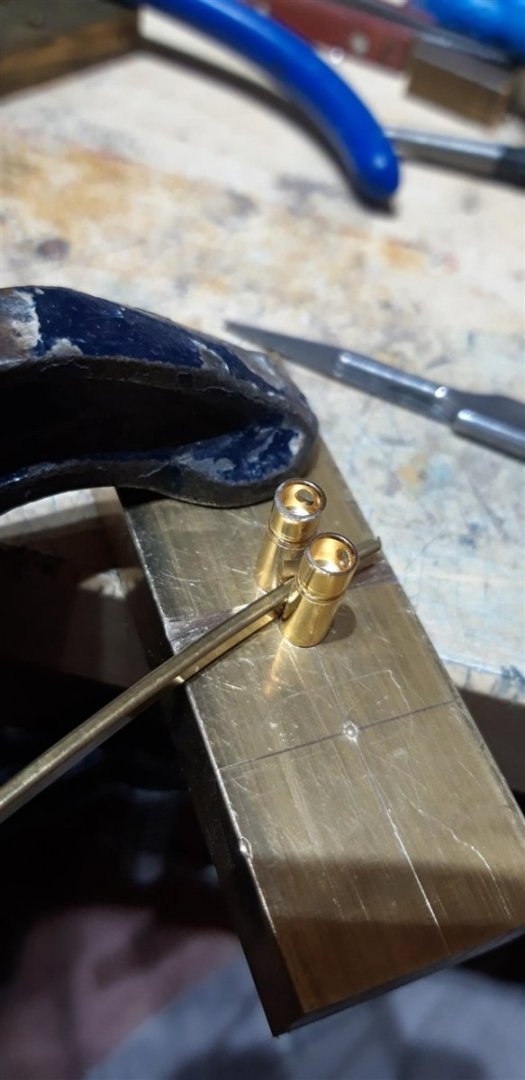


A long way still to go, but I'm a bit more confident that it's do-able......
Cheers,
Graham
- kiwiron, AJohnson, mort stoll and 1 other
-
4
-
I'll join you down there, Andrew, for a pint of 'heavy' - it's been a stressful day....
- Edwardkenway, mtaylor, Keith Black and 4 others
-
7
-
Thank you for all the positive responses, always a great motivator!
Totally agree with you about the windows, Robert. I'm really pleased with how they came out. I also followed your example and added those two extra wooden mouldings under the false baluster pieces on the Quarter galleries using 1.5 mm pre-rounded strips cut from some unused first planking material. Another great suggestion - thanks again.
Andrew - you're so right about the effect of adding extra detail. It not only improves the appearance, it also adds to the enjoyment of the build. Time well invested, as you showed with your superb 'Nisha' 👏
Working on the stern lamps I was tempted to add a new tag to this thread - 'misadventures in modelling' or 'a comedy of errors'........
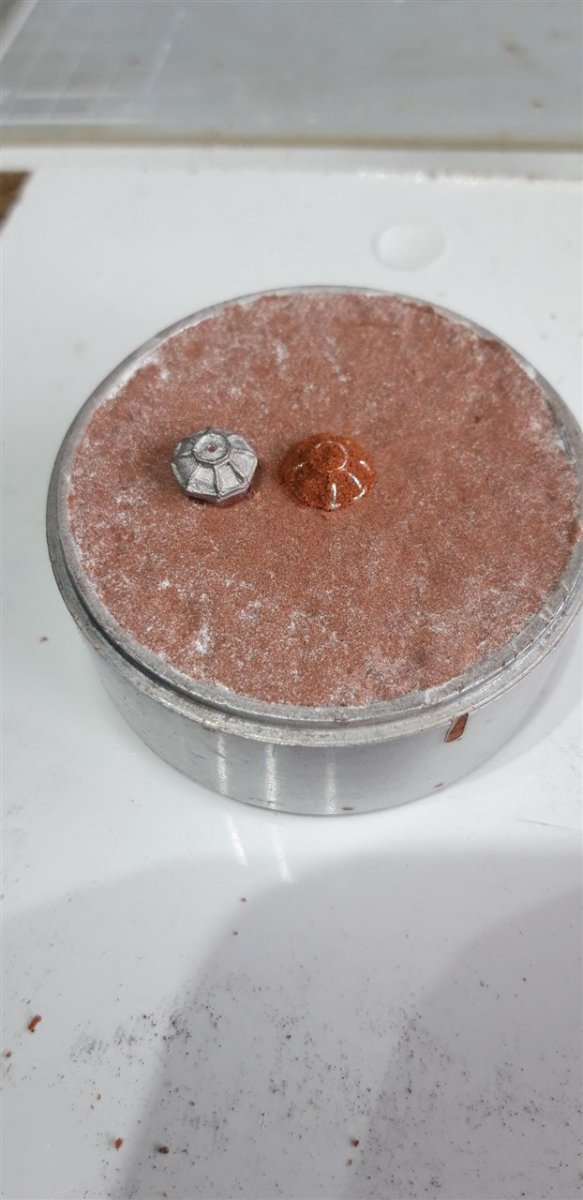
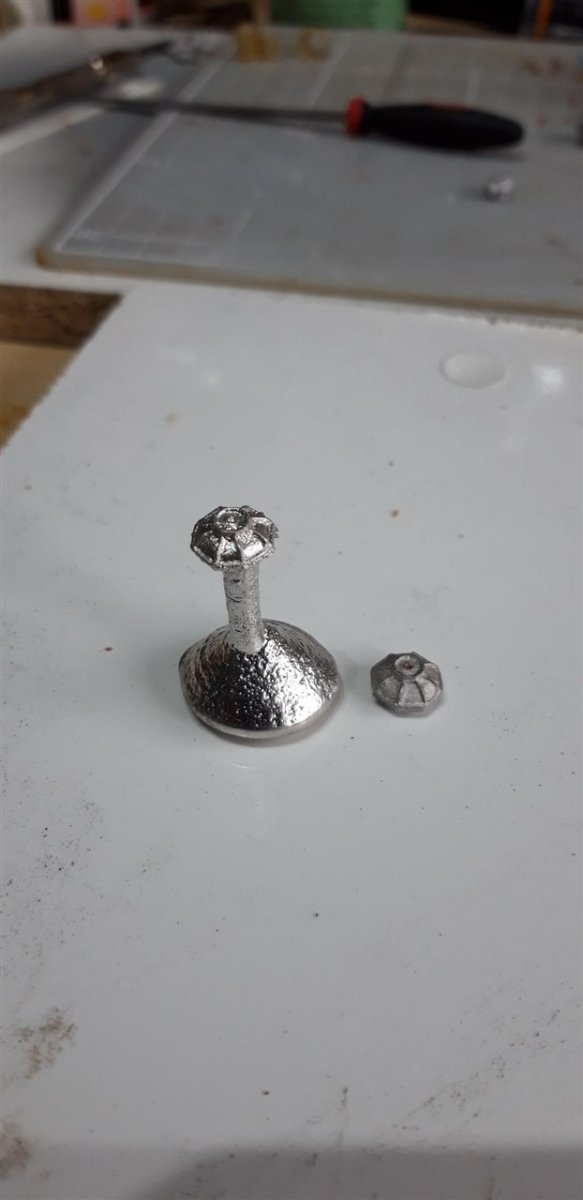
Having successfully drilled three of the lamp base castings for their supporting frames, the 0.7 mm drill bit started to bind on the final one and before I could turn the Dremel off the casting had twisted out of the vice, bending the drill bit, and was projected across the room. I did see a couple of the rebounds it made off walls etc. before it finally disappeared into a parallel universe. Time spent looking for it proved unproductive. The only saving grace was that the lost base was from one of the two middle sized lamps and its twin could be used as a pattern. Having dug out the Delft clay and associated equipment the mould was created and some metal (pewter) melted and poured.
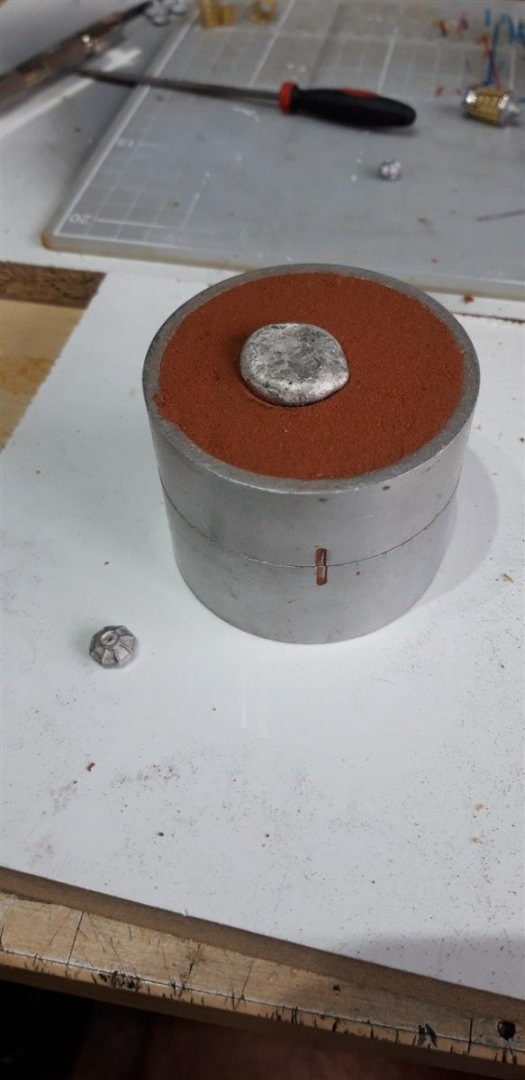
Did it work? oh yes......

Not as crisp as the original, but serviceable after a little fettling......

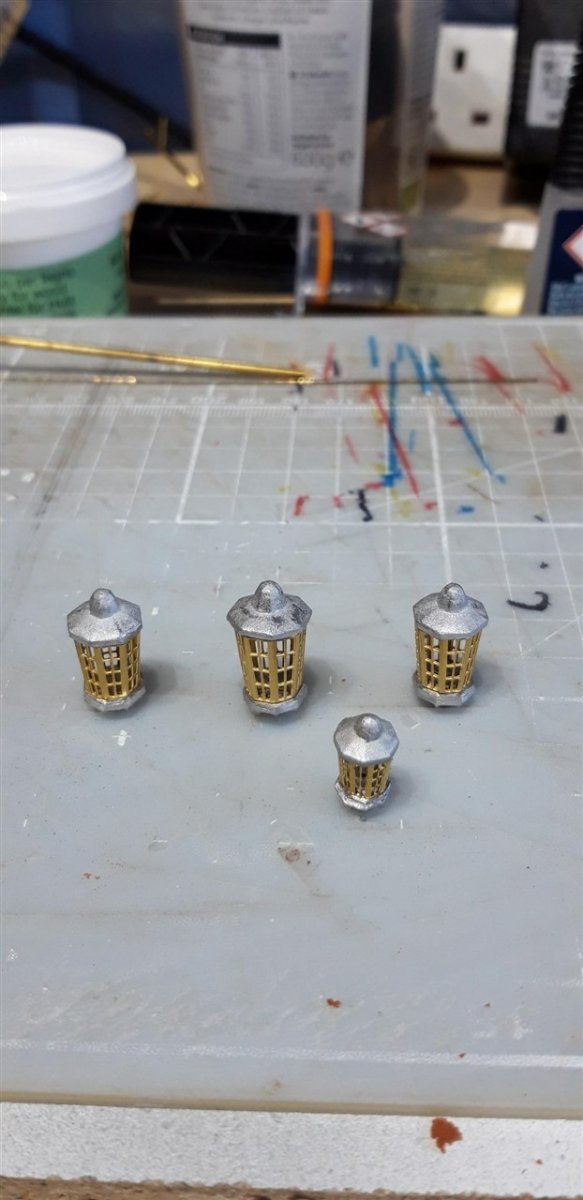
Lamps assembled prior to gluing and painting,
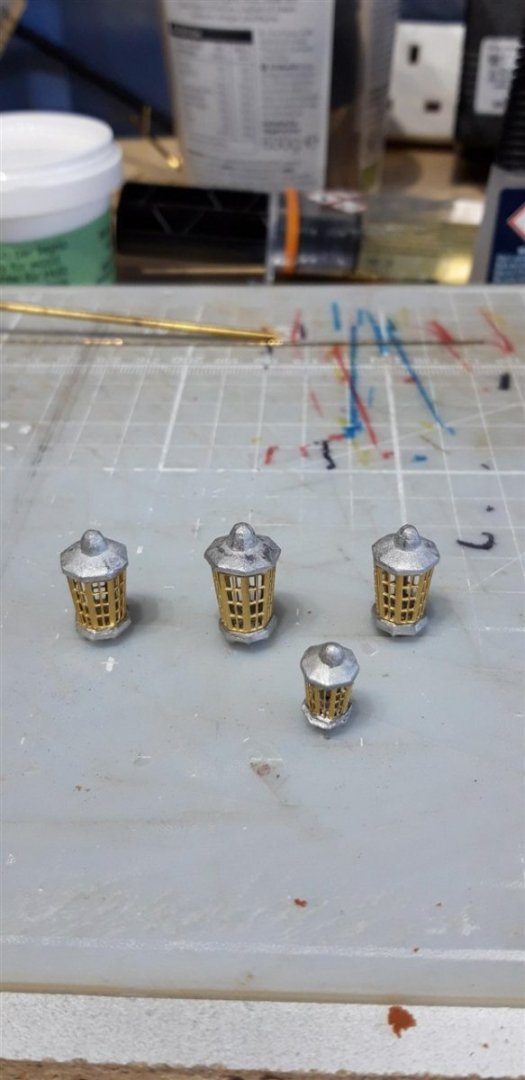
but first I fabricated the fames to support them based on images found on-line.
Once painted it was time for a dry fit before removing them and adding them to the growing collection of parts being stored until closer to the end of the build for their own protection.

Time to start work on shaping the brass profiles to finish the stern facia and Quarter galleries.
Cheers,
Graham
- mort stoll, AJohnson, Wacom and 2 others
-
5
-
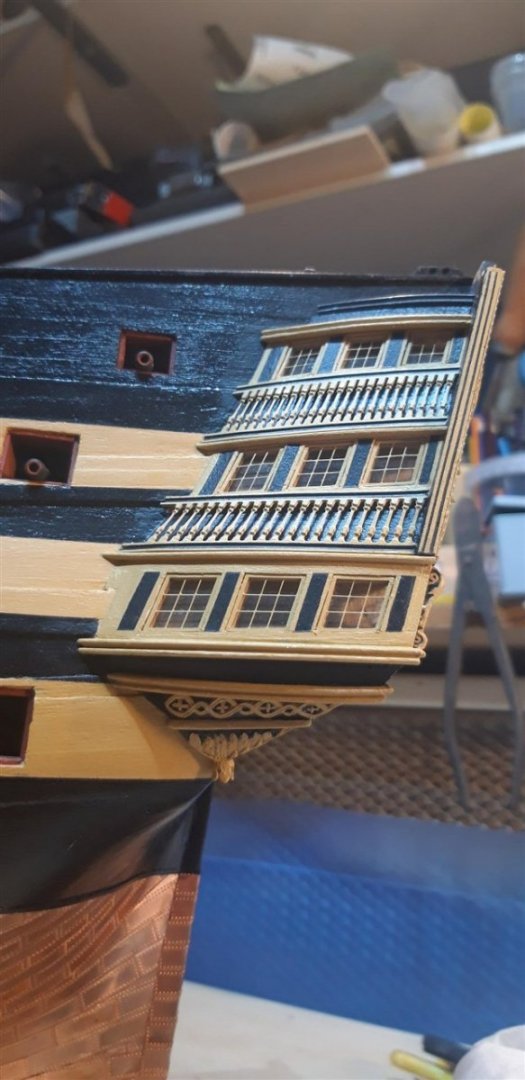
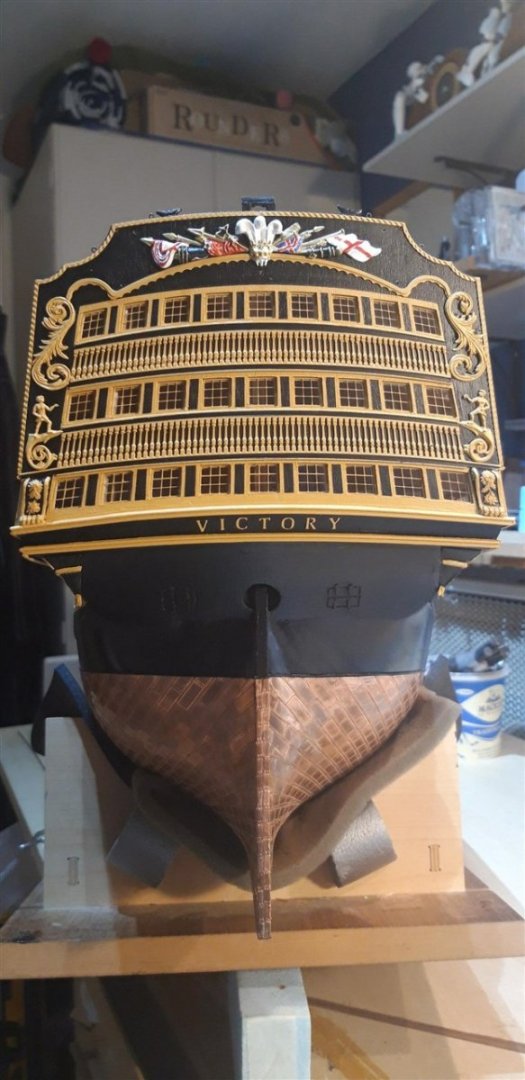
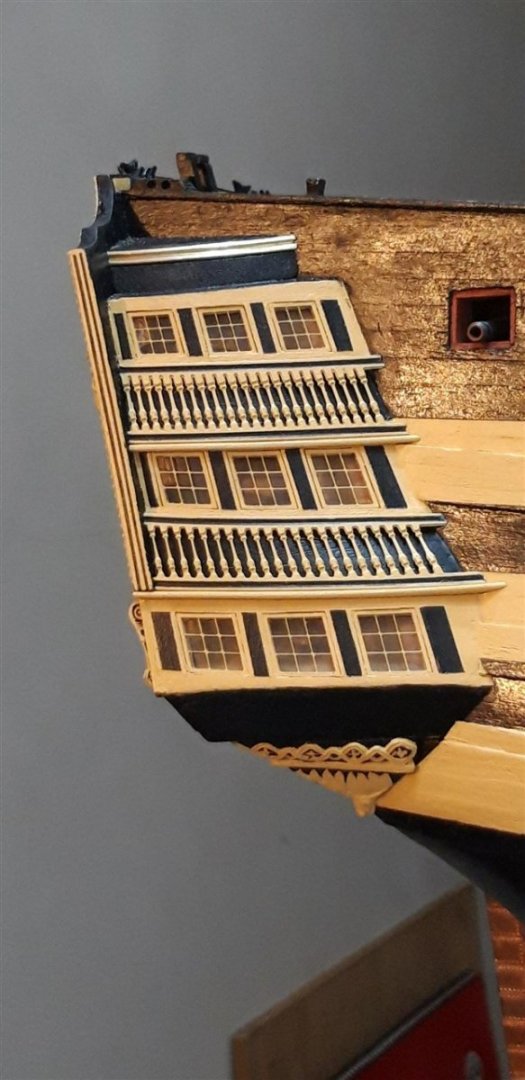
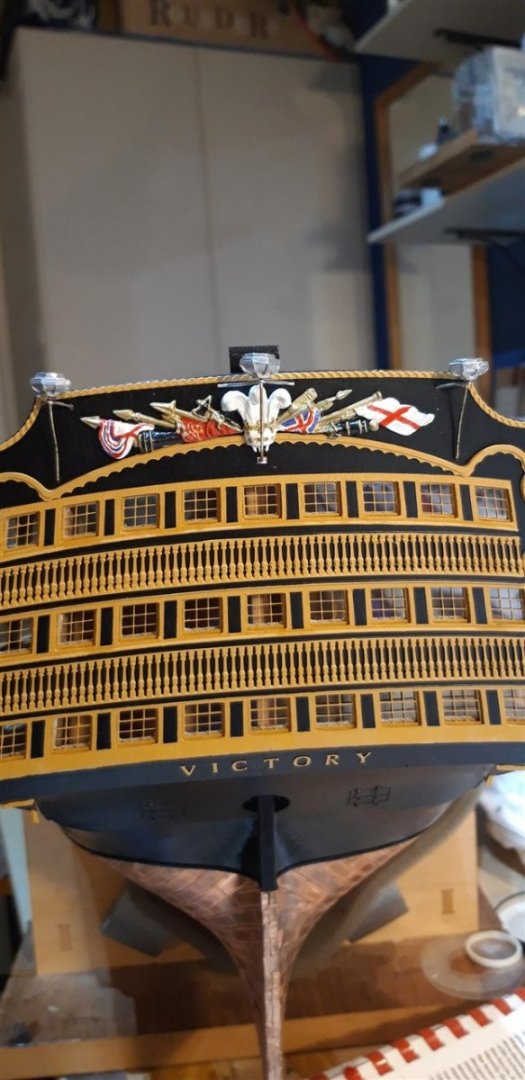
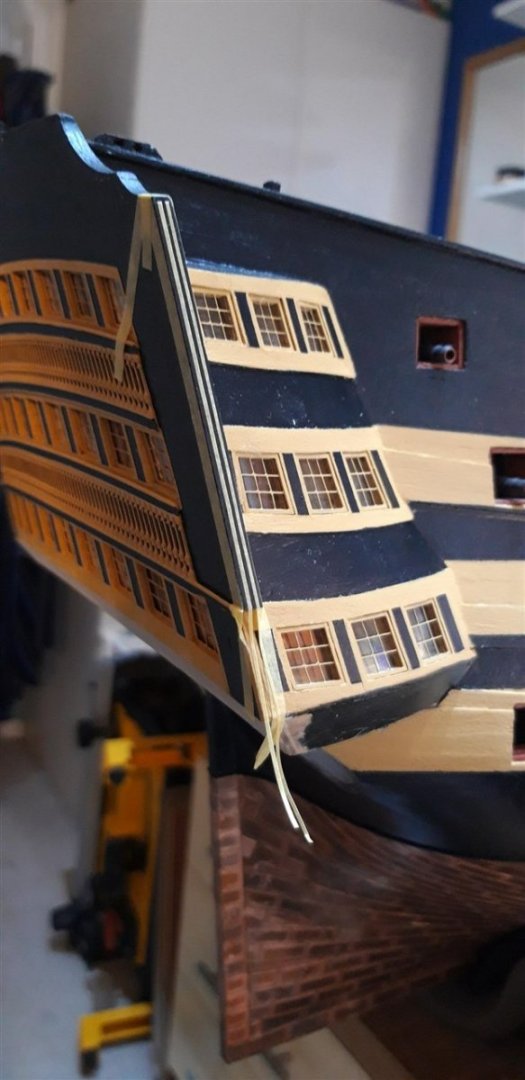
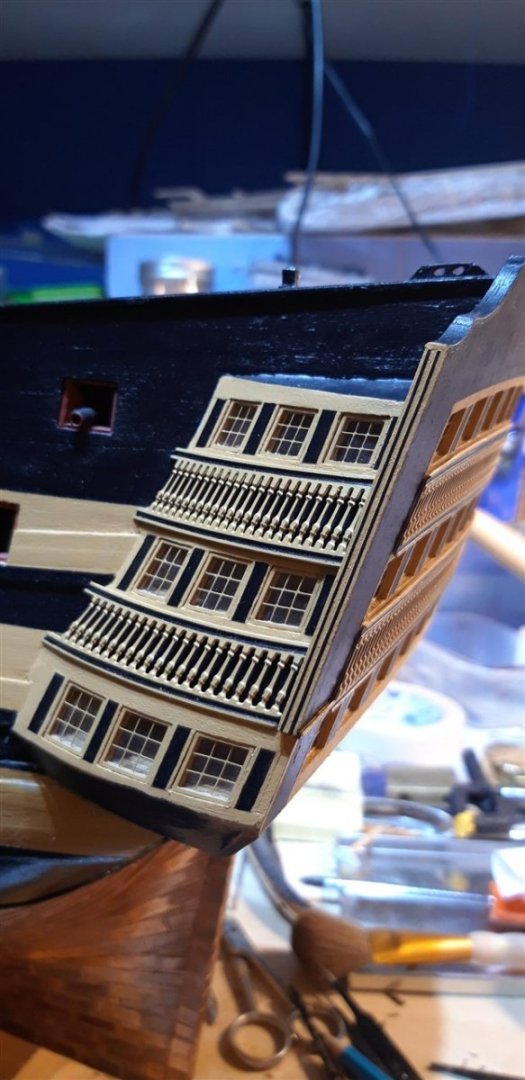
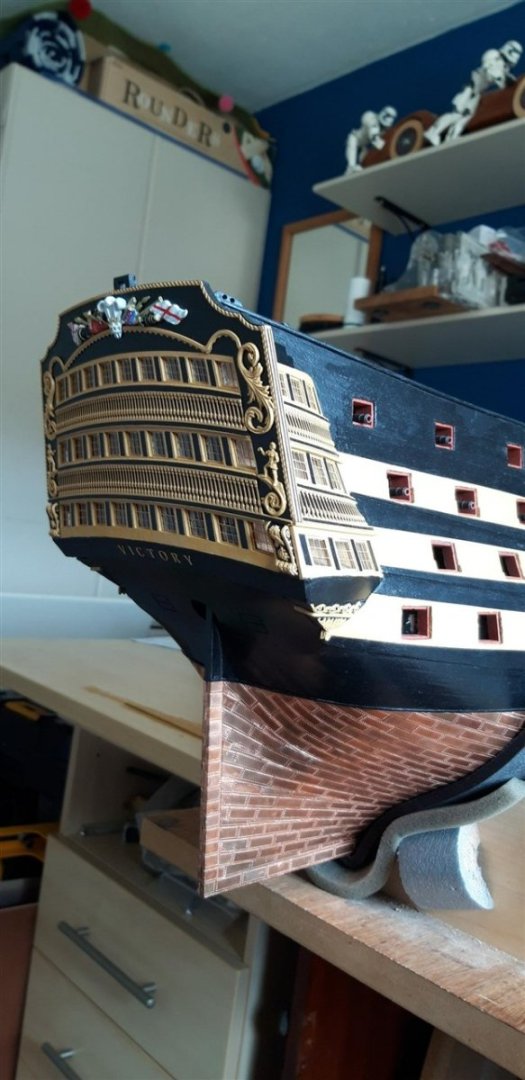
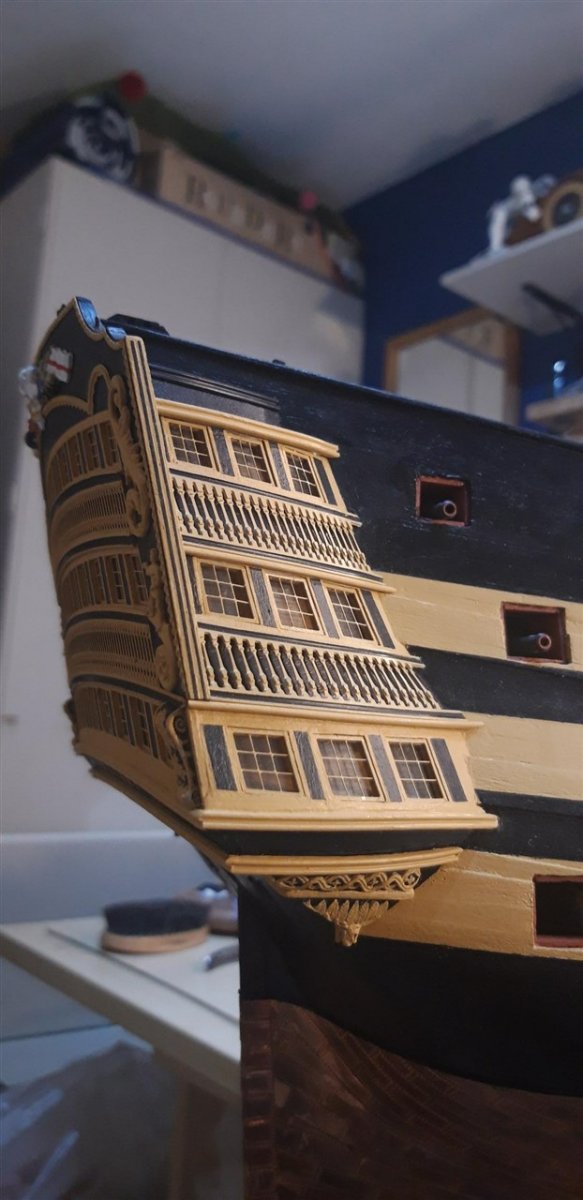
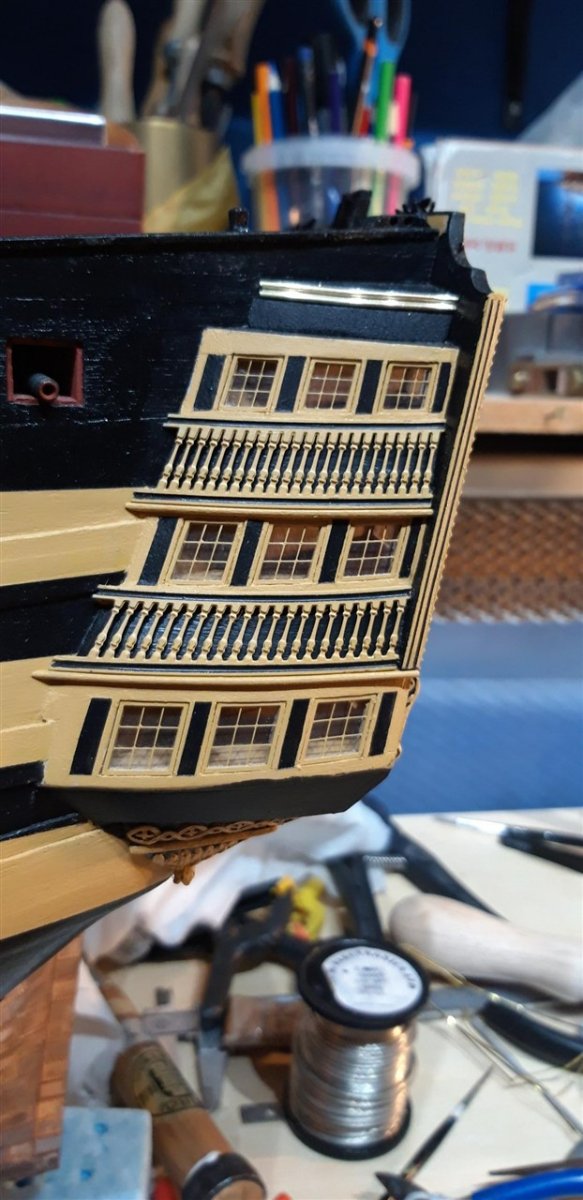
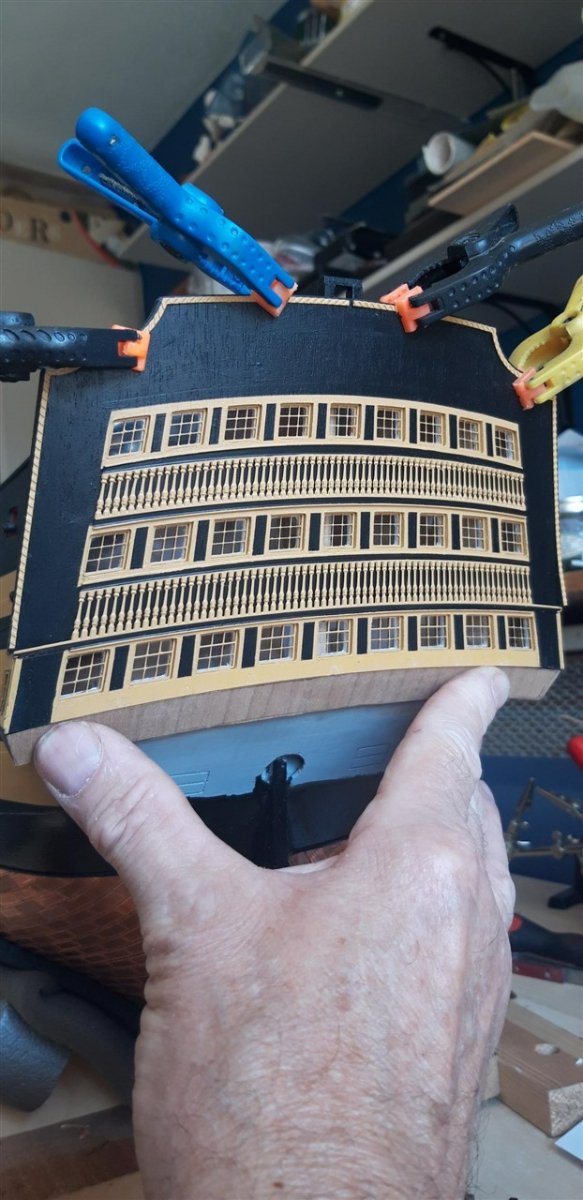
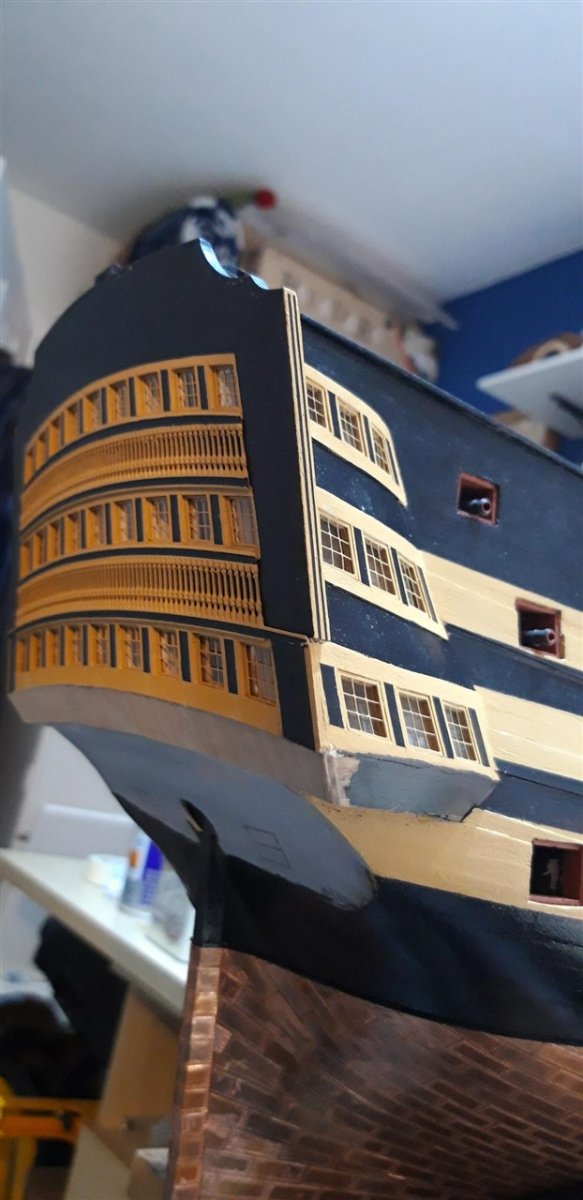
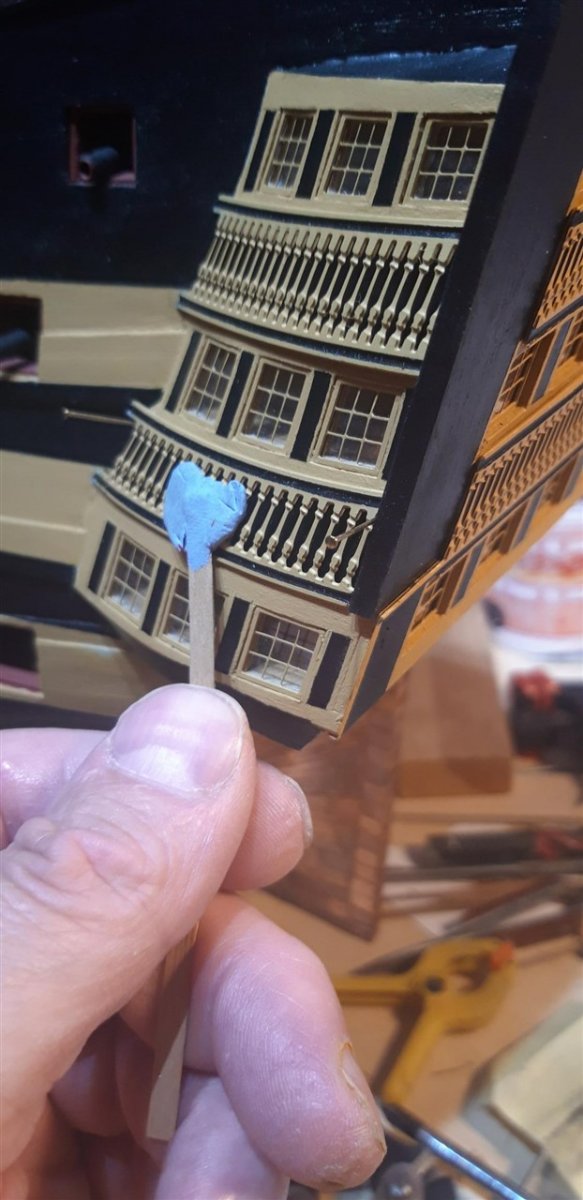
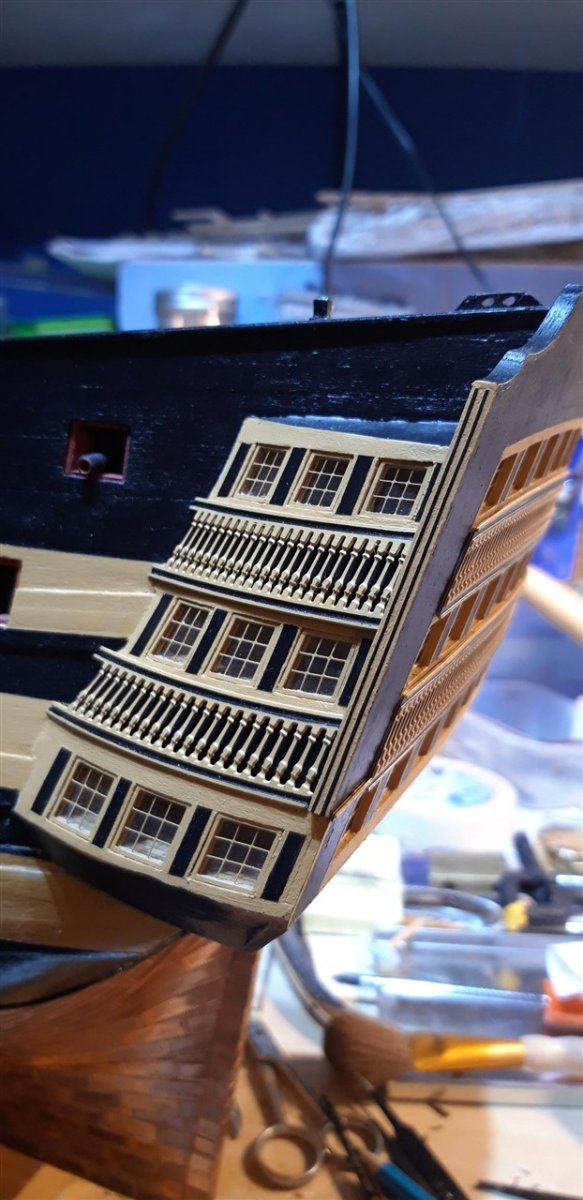
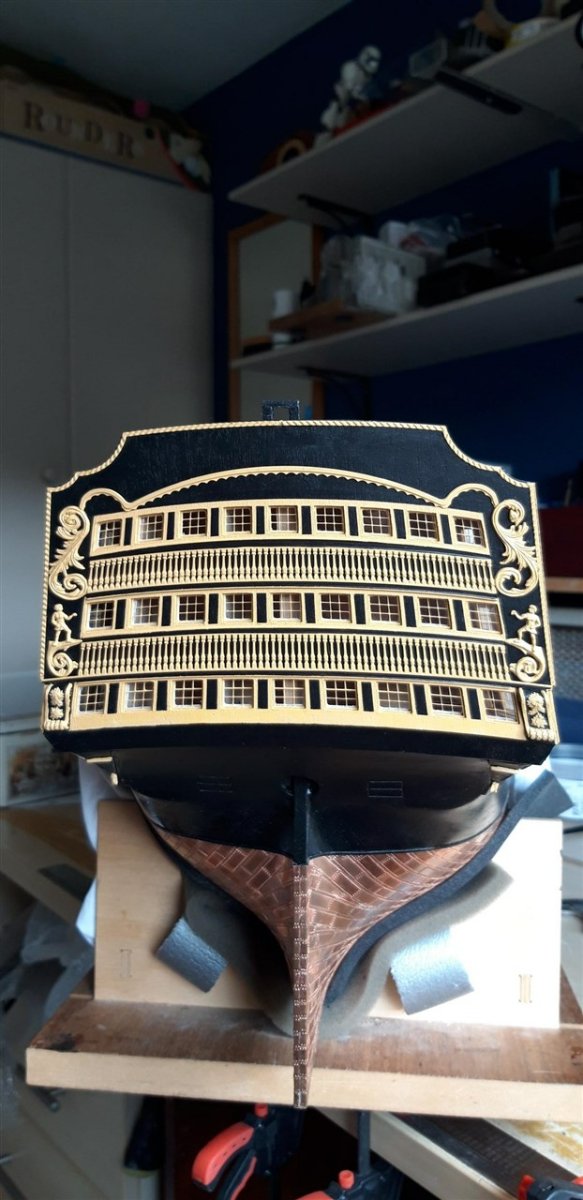
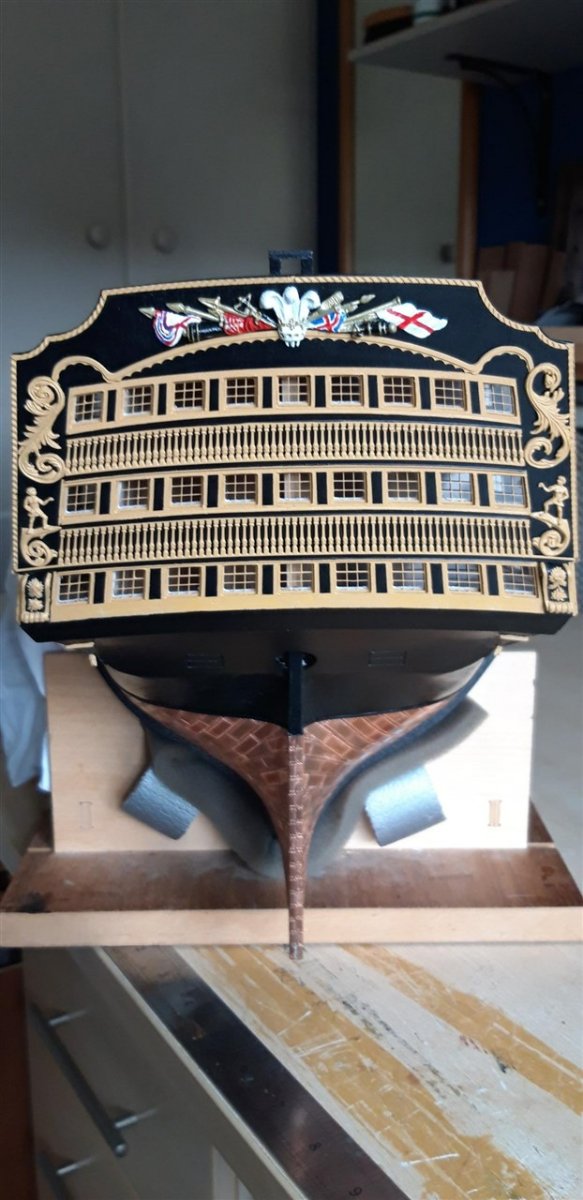
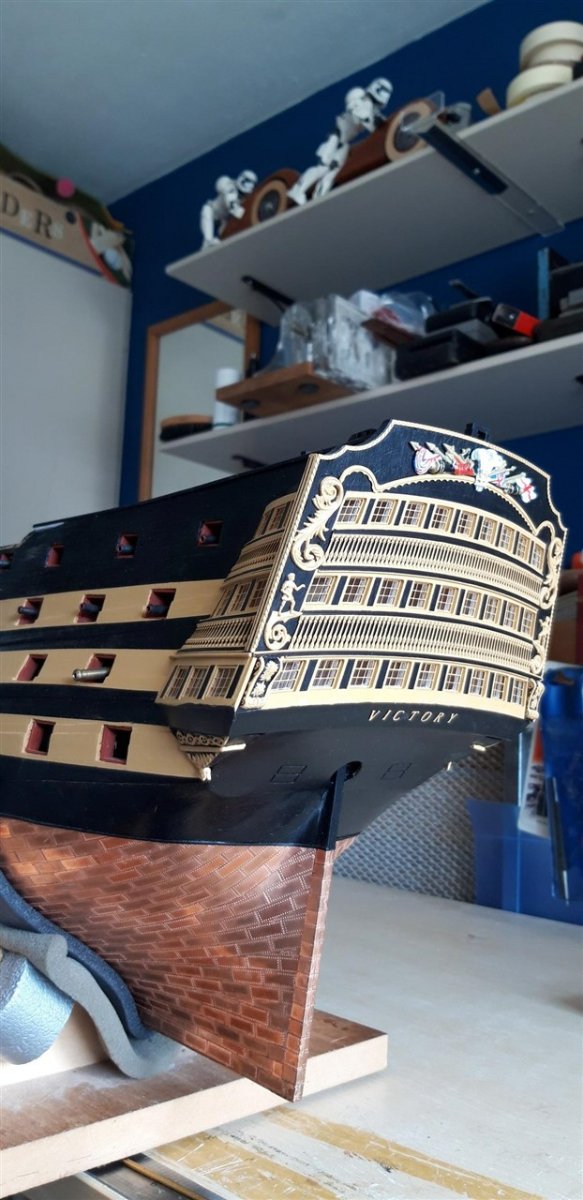
I've been focusing on the stern facia and quarter gallery decoration details. With the facia windows I have followed advice to mount the frames from the back of the outer stern facia to give the windows more depth. To achieve a similar effect on the Quarter Galleries I used Robert's innovation of adding an additional 0.5 mm layer to the three window skins.
The two false baluster patterns were fixed with C.A. adhesive. With very limited time to align them I opted to temporarily pin a scrap strip across the facia to help. The simple 'tacky stick' gripped the pattern as it was placed in position.

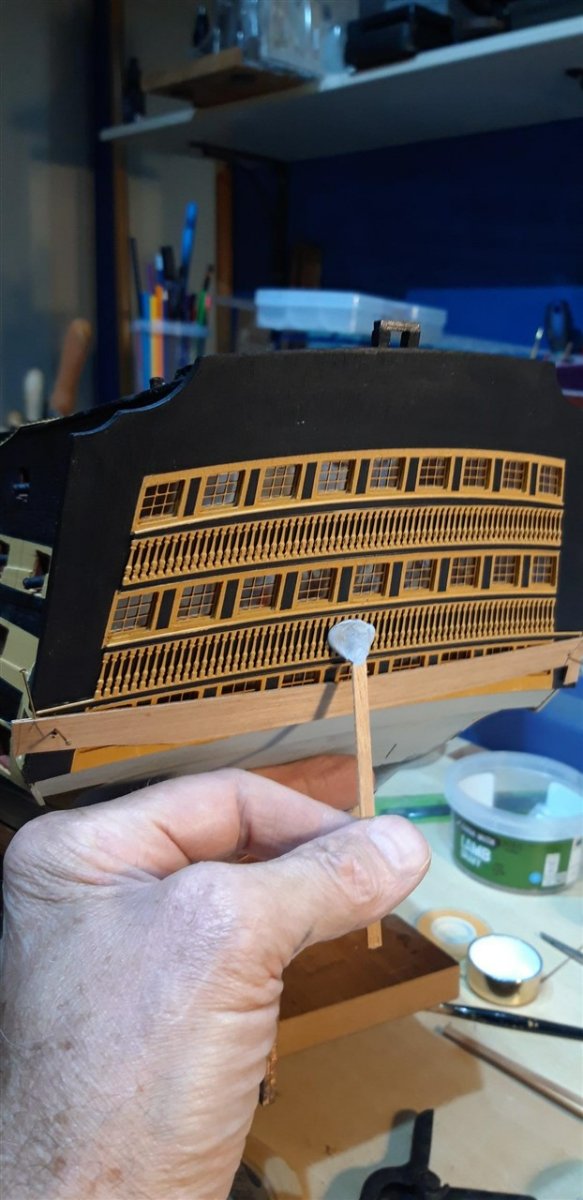
The gap between the facia's surface and the transom seemed a bit excessive, putting it mildly....

.... so I made an additional piece to improve things. I never throw away any off-cuts and found a piece of the 2 mm walnut ply big enough for the job. The hole in the remnant of the original transom ply made a perfect template. Edges bevelled as required .......
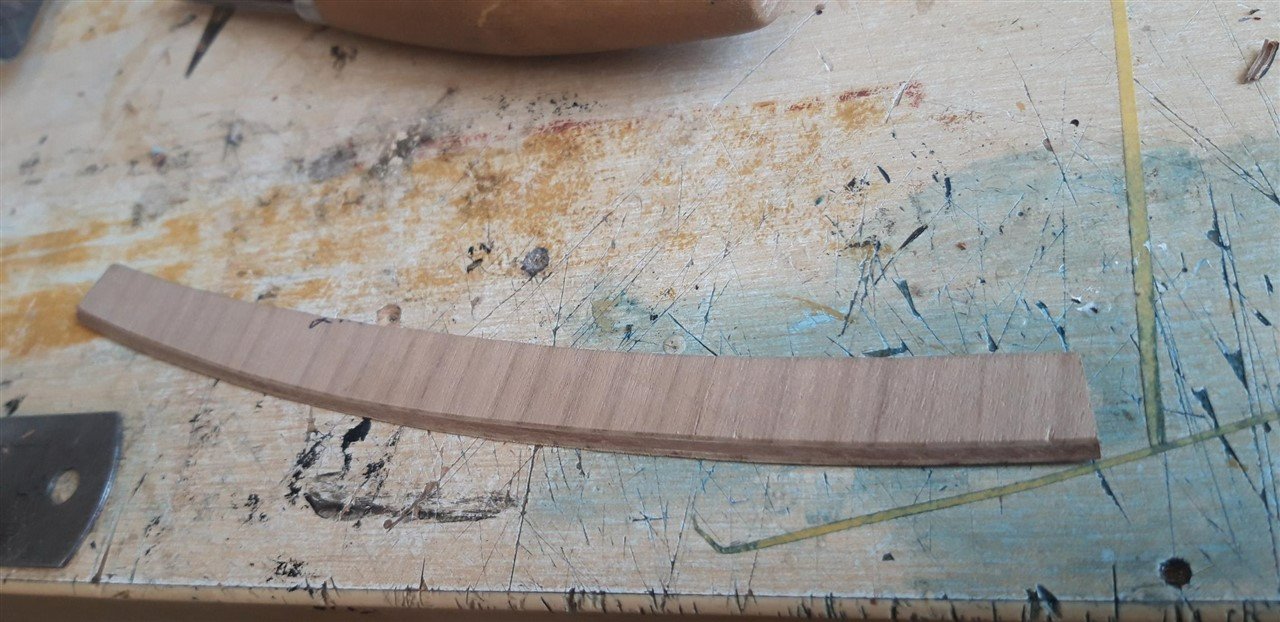
...... and the new piece glued in place. The lower edge was then blended in with carving knife, file and sandpaper.

To create the black panels between the Quarter gallery windows it was back to careful masking
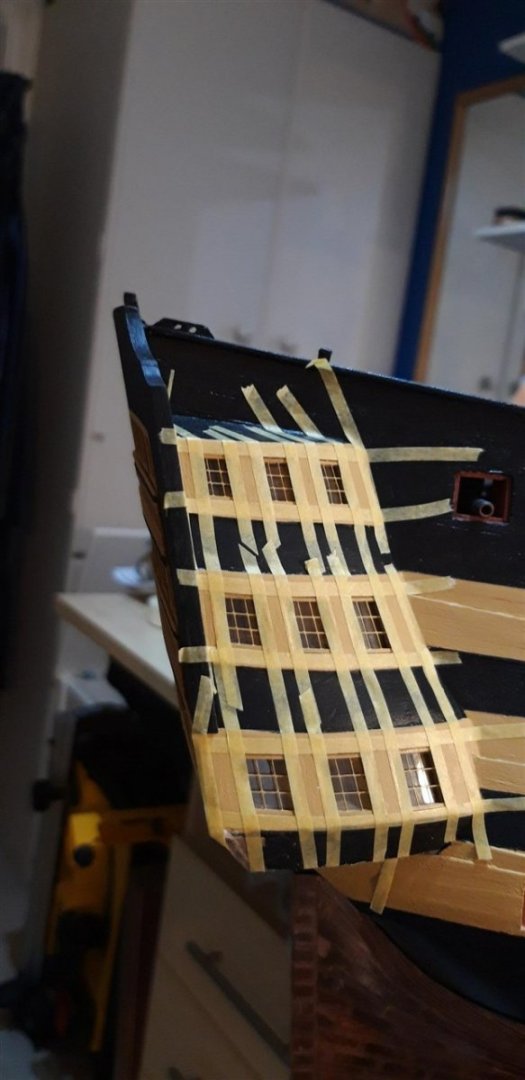
I wanted to add additional detail to the vertical edges of the facia so, after cutting strips of tape down to about 0.7 mm wide, these were put in place together with masking on the front and back surfaces, and the unmasked areas over painted yellow.

To get the Quarter gallery false baluster patterns in place I used rapid epoxy to provide more adjustment time. Brass pins were pushed into the skins as an alignment aid.

At this point I began work on the Trophy of Arms, carving the groove where it intersects the top stern facia moulding
This was then primed together with the other white metal components - and all the associated tales of woe explained earlier in the 'What have you done in the garden today' thread 😖. Once painted yellow these castings were glued in place, once again using epoxy adhesive.

...the errant scroll was the one bottom left!
The Trophy of Arms was painted up using images found on line. The left hand draped flag was re-worked a couple of times, and I'm still not completely happy with it. I'll probably go back to it in the future
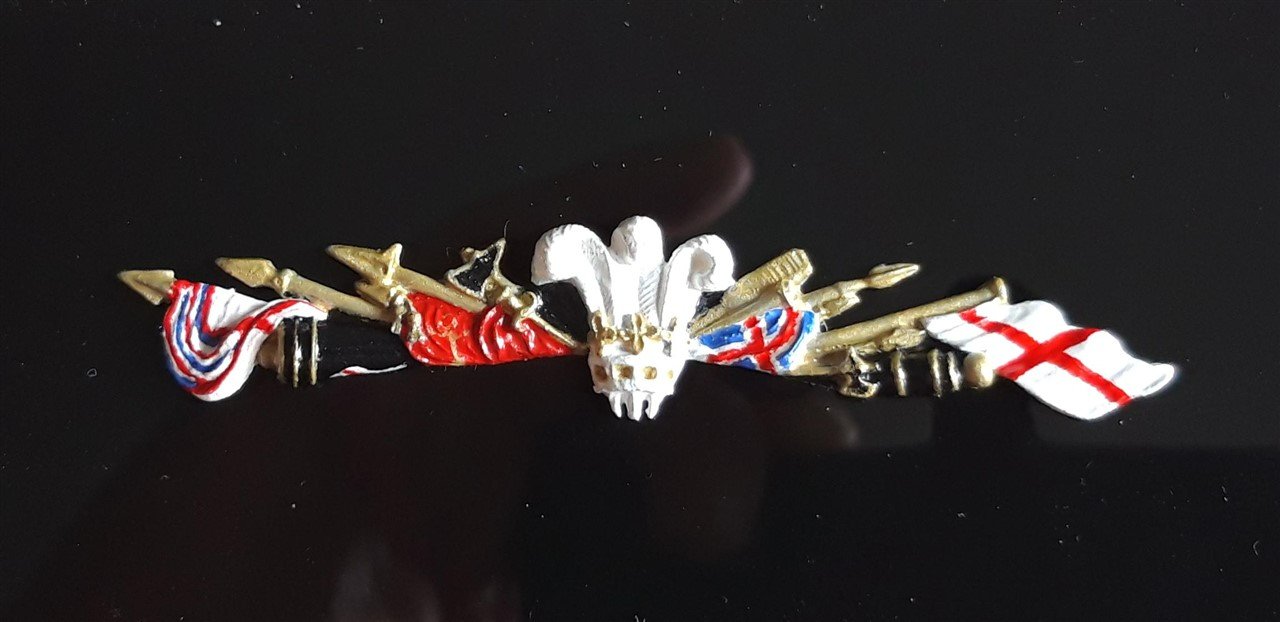

Ship's name added,

A couple of daylight pictures with the drop decorations in place.

and finally I made a start on the lanterns.....
Cheers,
Graham.
- Kelp, willbor-237, Bill Morrison and 6 others
-
8
-
1


_1280.jpg.431085d67309829d7baedfeef9fc1b61.jpg)


Fish glue alternatives?
in Wood discussion...Where to use it? Where to get it? What types are best? How to Finish it?
Posted
Hi Bruce,
Not to sure if this technique would be appropriate as I don't know if it would work for your particular application, but one trick I use when wood turning is to glue wood together with standard PVA, but with a piece of paper in the joint. It holds things together well enough for quite aggressive shaping but can be split apart once the job is done. A sharp chisel usually does the trick. The paper/glue left on the joint surface can then be sanded or scraped off.....
Another possibility might be to use a hot melt glue and then heat the wood after shaping. Seen this done but to be honest I haven't tried it myself.
Good luck!
Cheers,
Graham.