


DelF
-
Posts
1,398 -
Joined
-
Last visited
Content Type
Profiles
Forums
Gallery
Events
Posts posted by DelF
-
-
3 hours ago, David Lester said:
as soon as there's a bit of a curve, I couldn't figure out how best to handle it smoothly.
2 hours ago, whitejamest said:no idea how I will handle the challenges of making the rows of plates fit the curves
My only technique was to lay each plate individually, trying to overlap each plate with the preceding one at an angle sufficient to follow the curve. As the plates are small the angle should only need to be tiny. It's better to overlap the plates rather than leave gaps. As for the transition to the stem and stern, I used paper templates to get the necessary shapes as described in my Speedy log. If it's any consolation, I found it a very challenging job as well.
-
Hi David
I'm sorry to read about your problems with copper plating. I wonder if you were being a bit hard on yourself though - I thought the stern section you showed in the first photo looked fine. Anyway, you are where you are and you've retrieved the situation. My only concern would be that the copper tape looks a bit bright. I'm assuming it'll either dull down with age, or if you coat it with matt lacquer or similar?
Derek
-
57 minutes ago, Blue Ensign said:
A seat of ease is constructed
That's a relief!
Seriously though, that's another great modification that I'll shamelessly copy when I eventually get round to Sphinx.
- mtaylor, bruce d, hollowneck and 2 others
-
 5
5
-
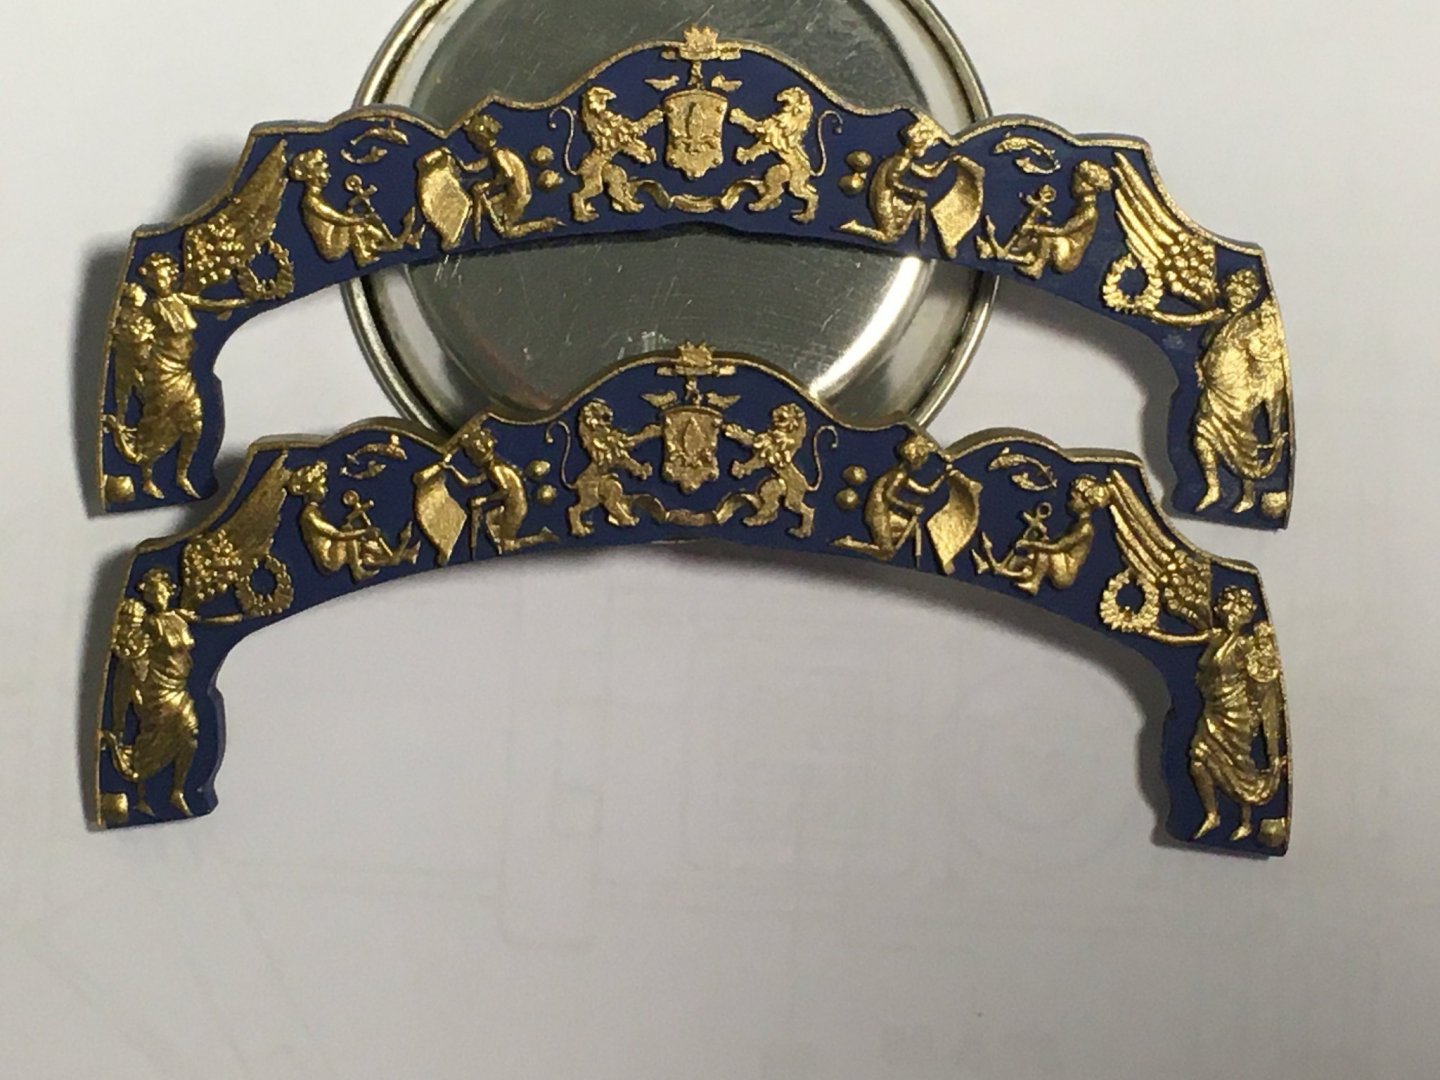
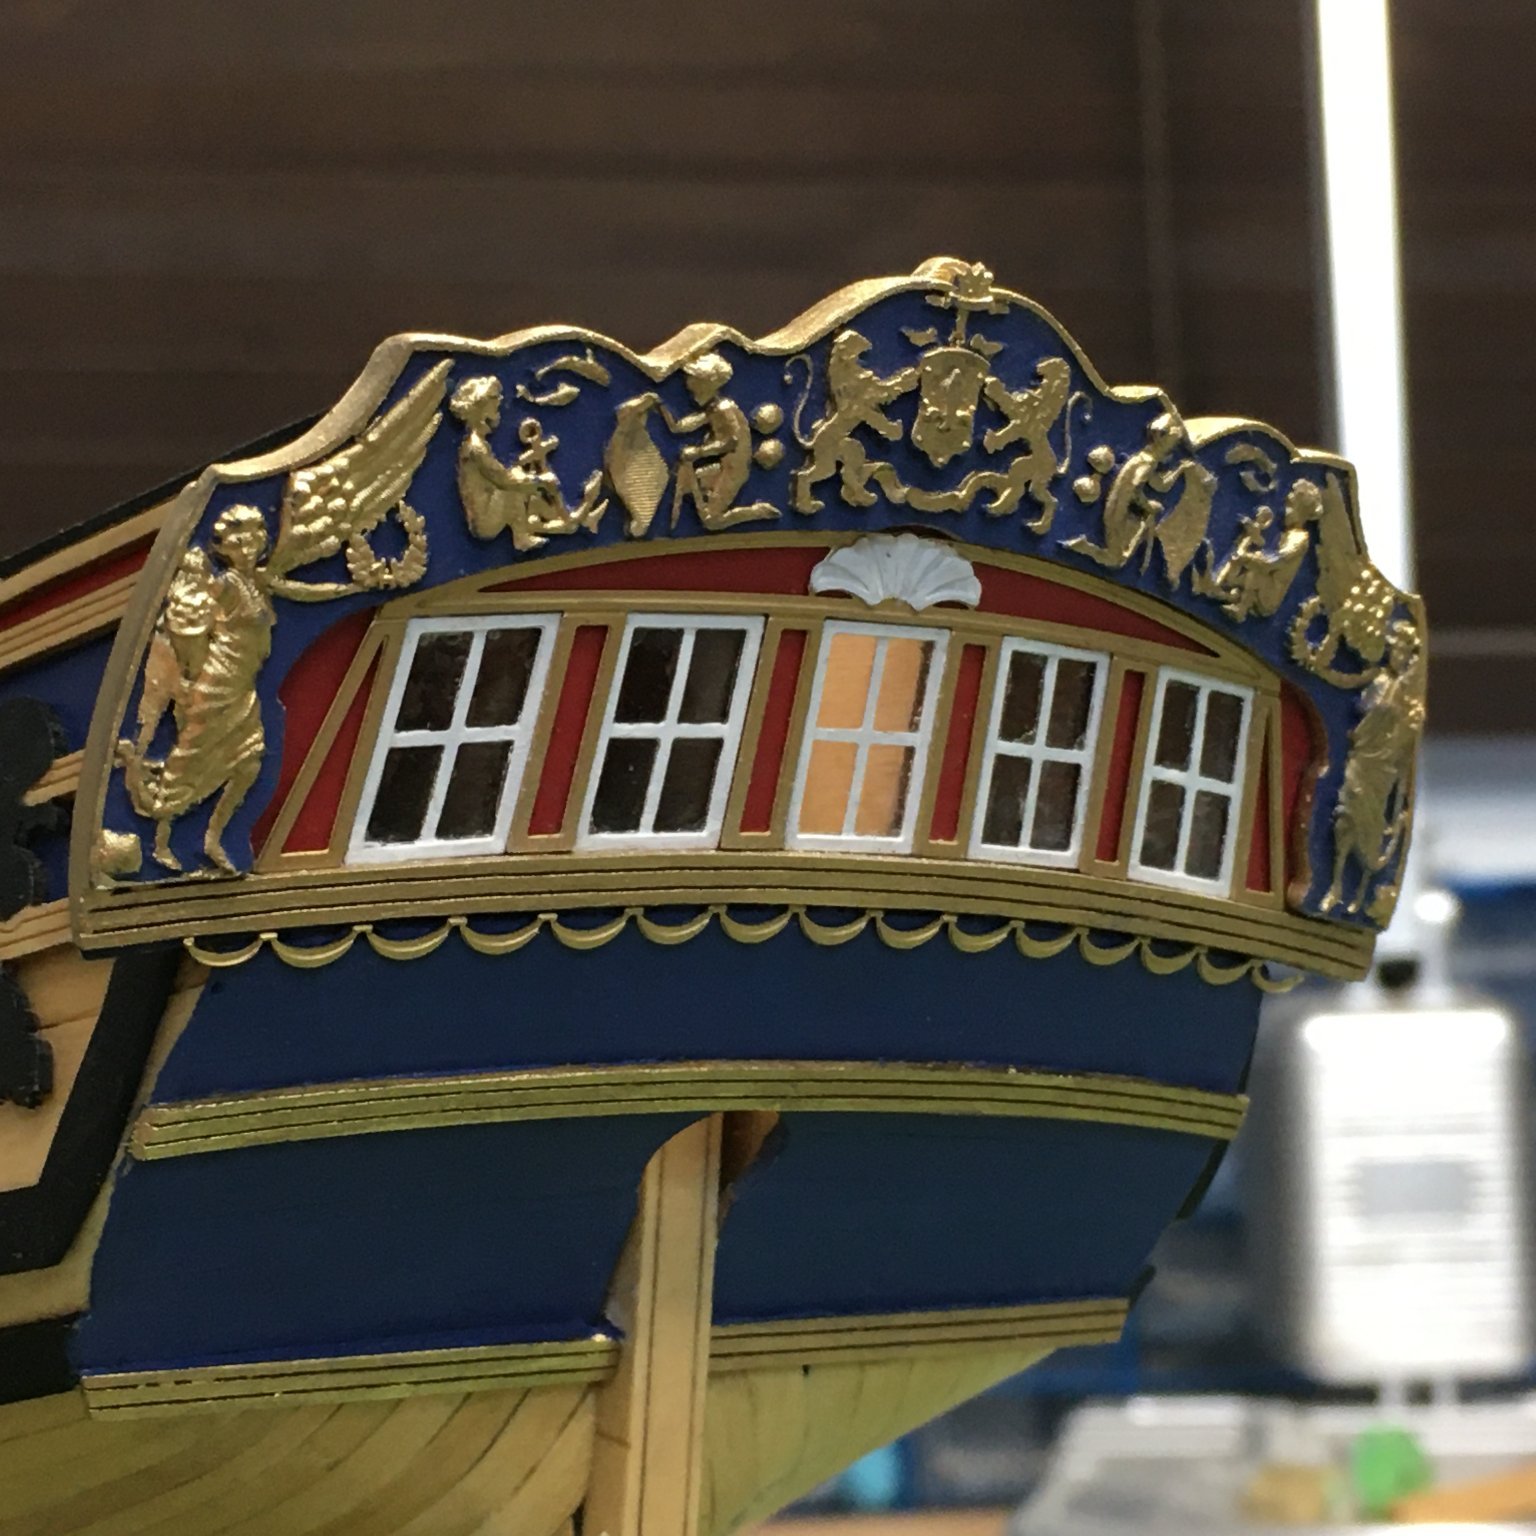
Stern decoration completed
Once I'd sorted out the self-inflicted problem with the fascia the rest of the stern decoration went smoothly. There were only two points of particular interest. The first involved gluing the swags beneath the window. This was a very fine and delicate piece of photoetch, and I was worried that it would be hard to apply any sort of glue without spoiling the paintwork. In the end I remember that matte medium can be used as an adhesive.
I originally bought this product to try as an alternative to dilute pva or shellac for use in rigging, but as an adhesive it dries quickly and invisibly. It worked well - here's the swag in place, along with the rest of the stern decoration. I had considered floor polish for sticking PE as discussed in other Duchess logs, but I may stick with matte medium if it continues to work as well as this.
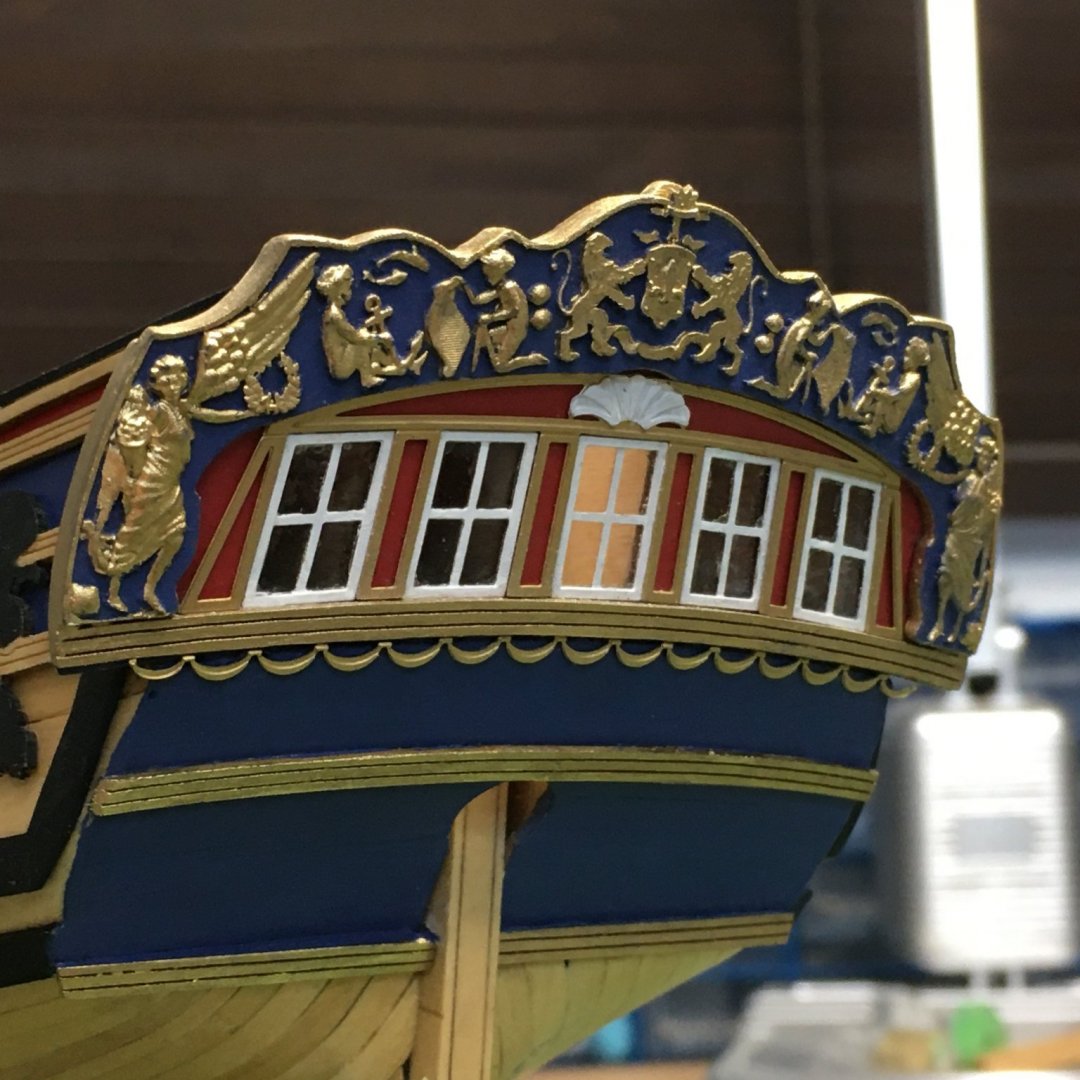
As always, close-ups show the need for some touching up, but nothing major.
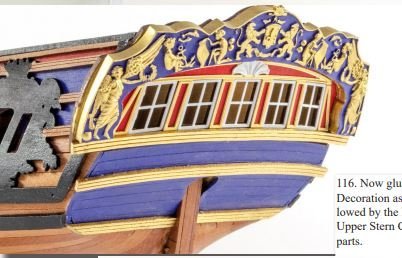
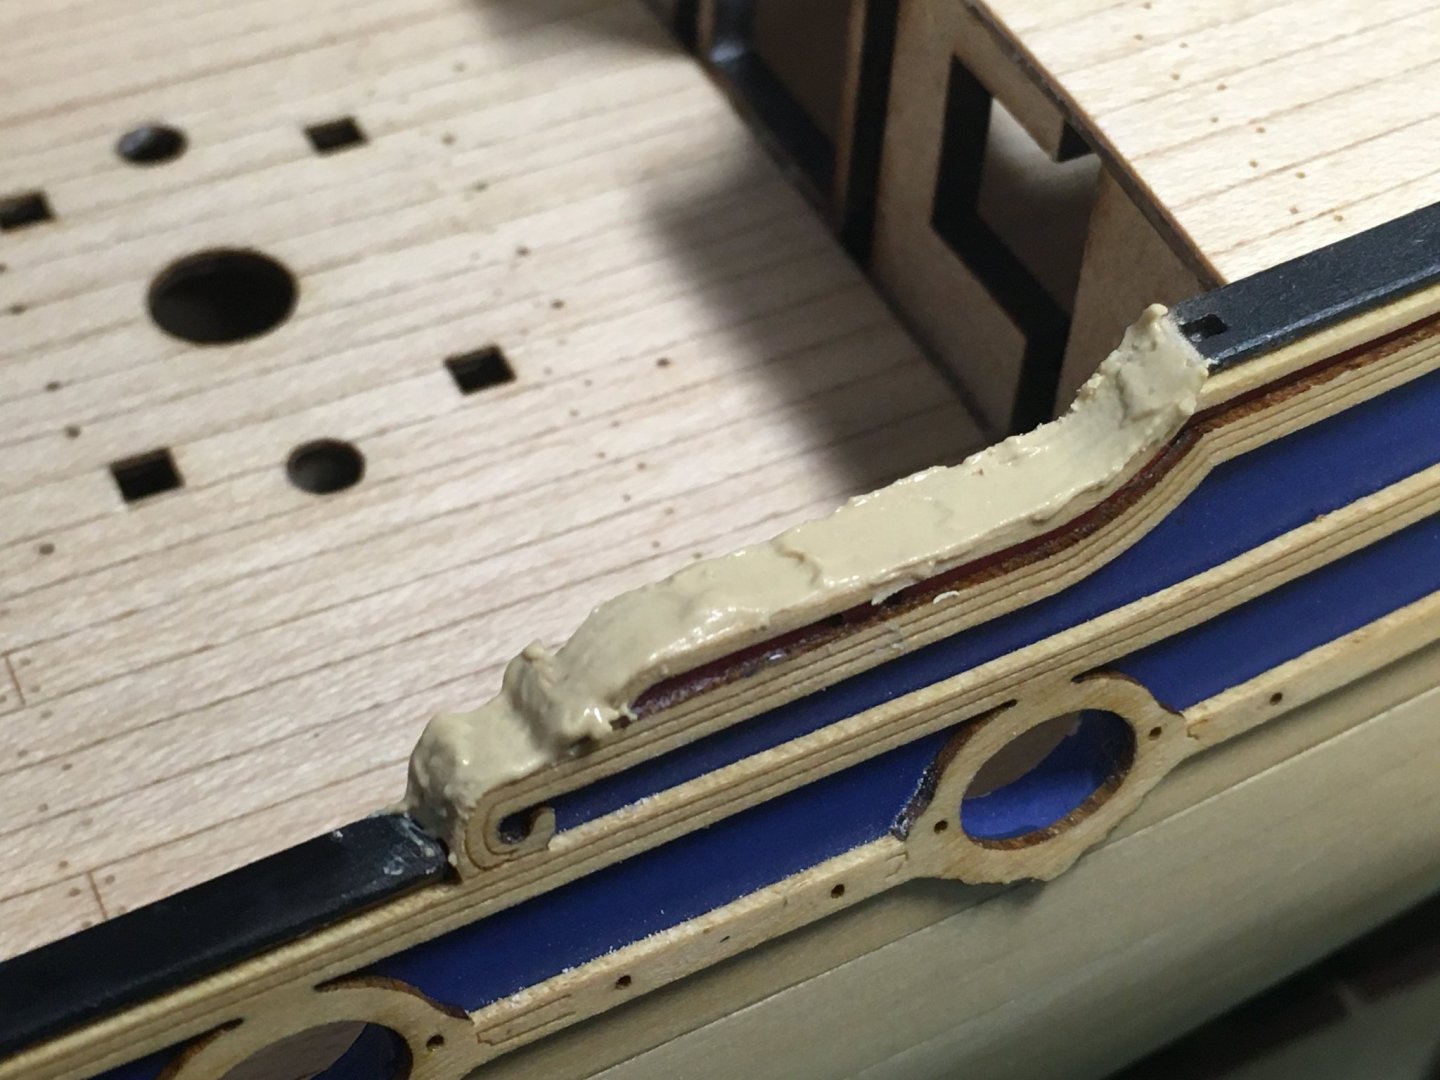
The other point of note was trying to disguise the join between the stern fascia and the cast resin decoration. In the manual the resin is painted gold and the wood left:
This looks neat but I wanted to see if I could make the capping slightly more realistic by eliminating the step between the tops of the two components and painting the whole cap gold. I considered but dismissed the idea of moulding a strip to cap the two pieces, and in the end went for filler. Here's the result of the first attempt:

Perhaps another go at smooth the cap and repainting, but I'm pleased with the result so far.
Derek
- GrandpaPhil, BobG, usedtosail and 11 others
-
14
-
I'm just catching up with your log Glenn and I'm jealous already! That hull looks awesome.
I'm also jealous of your workshop - how do you keep it so clean and tidy? Even when I've just tidied mine it looks 10 times worse than yours. One day I'll post pictures to prove it.
Anyway, I'll follow your log with great interest from now on - it may spur me on to re-start my Winchelsea.
Derek
- AlleyCat, glbarlow, hollowneck and 2 others
-
5
-
Sterns always seem to be tricky to get right. Yours is looking fine so far - just make sure you don't make the same mistake as me when you come to fit the stern fascia. I soaked the fascia in hot water to bend it to shape and let it dry, after which it seemed to fit fine. It was only when I tried to fit the photo-etch decoration to it that I found it had expanded and was 3mm too wide - more than enough to make it unrecoverable at this scale. See here for how I got out of it, and how I used hot air bending to avoid the same mistake.
Sorry if this is teaching Granny to suck eggs!
Derek
-
Glazing experiments and (almost) a disaster
As always, many thanks for the kind comments and likes.
I decided to glaze the windows but wanted something a bit more realistic than clear acetate. First I tried Glue 'n Glaze...
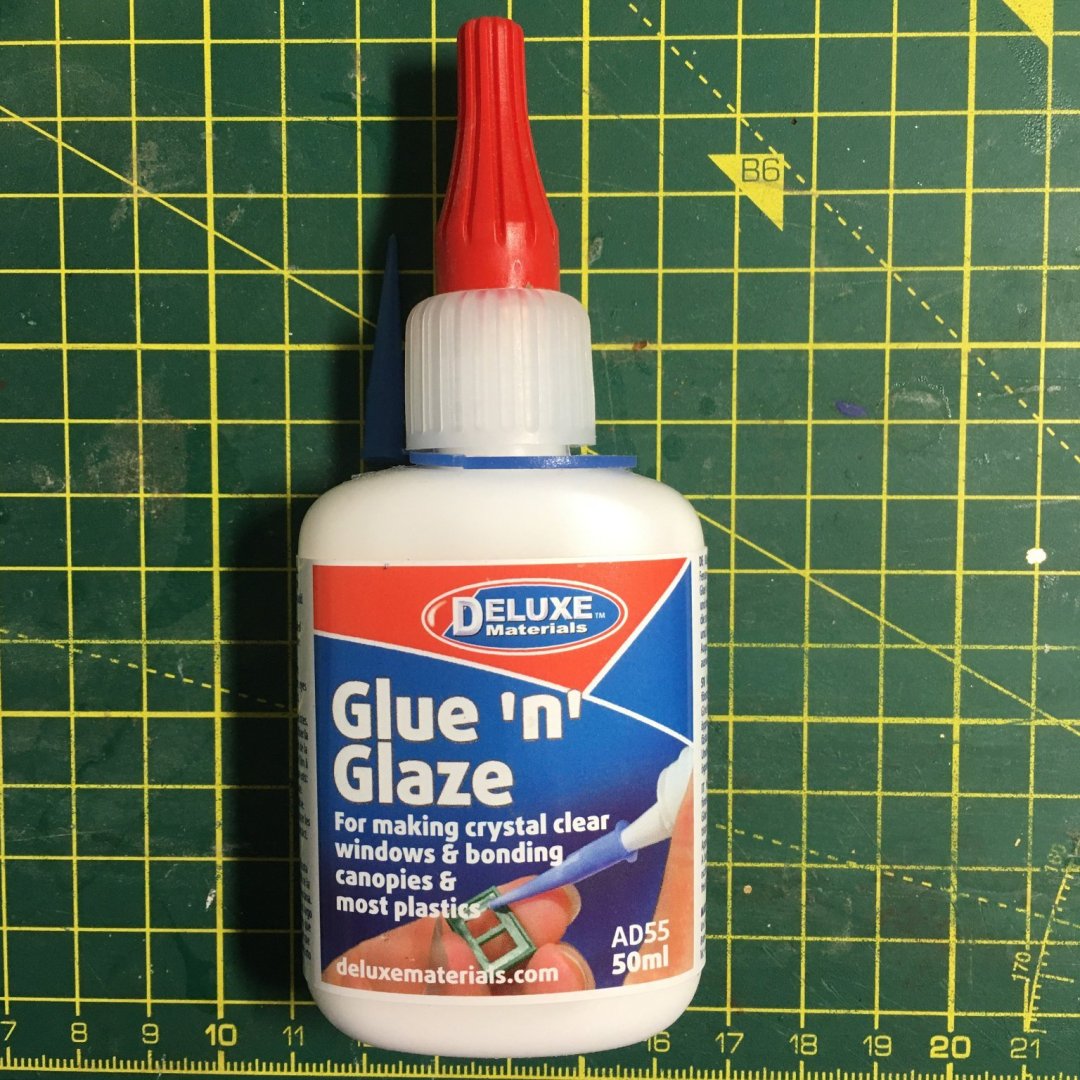
...a product used by railway modelers and others to simulate glazing. This looks like PVA but dries clear, and is applied using a cocktail stick or similar to spread the liquid across the window opening.
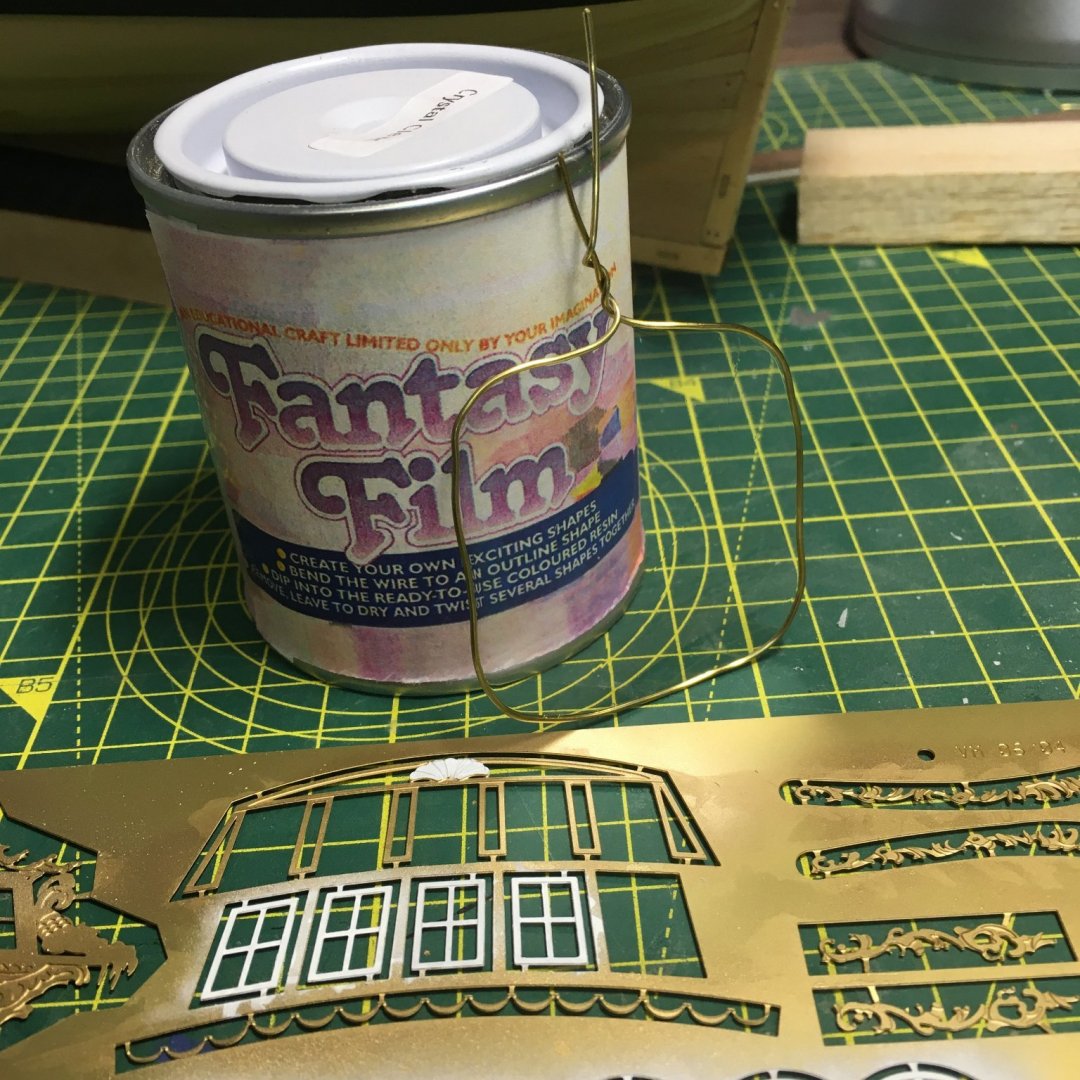
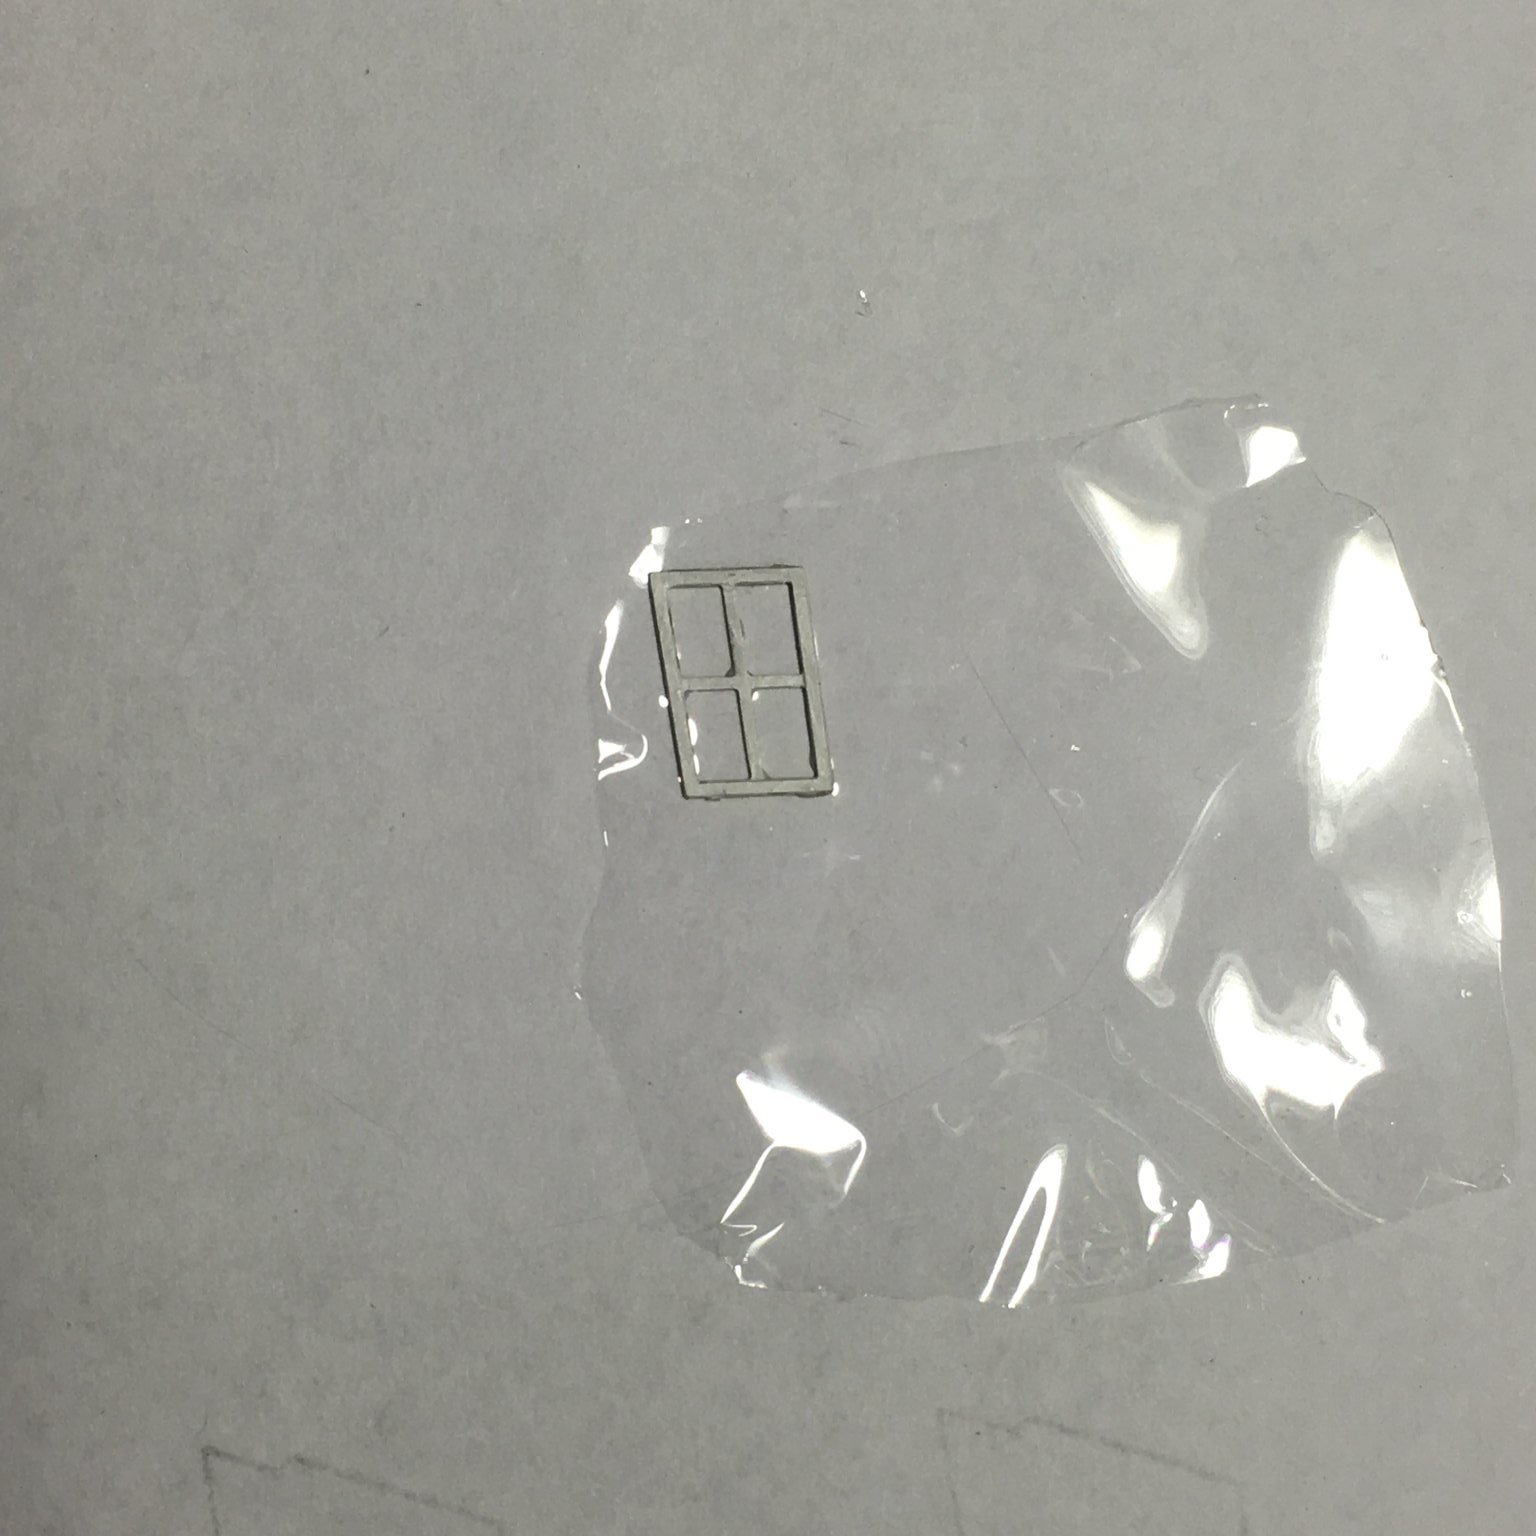
I found it very difficult to photograph the result, so you'll just have to take my word that it didn't look right - too thick and uneven, even for 18th century glass. Next, my wife told me about a product called Fantasy Film, used by crafters to produce decorative effects. The idea is to twist a copper wire into a shape such as a leaf, dip it in the liquid, pull it out and it dries to a very thin translucent film. Obviously for a leaf or petal you would use coloured film, but I managed to get hold of the clear version to try it out as a glazing material. When I dipped a window the result was almost OK. The problem is the liquid is quite thick and dries very fast. No matter how quickly I pulled it out of the liquid it didn't finish flowing off the bottom edge before it solidified, leaving an unsightly blob in the bottom two lights. The liquid also solidified around the glazing bars making them too thick.
Long story short, I came up with two methods that seem to work well. The first involves using a loop of brass wire to make a large sheet of film, laying a window on the film with a tiny smear of Glue 'n Glaze (which also acts as a clear glue) and trimming once dry:
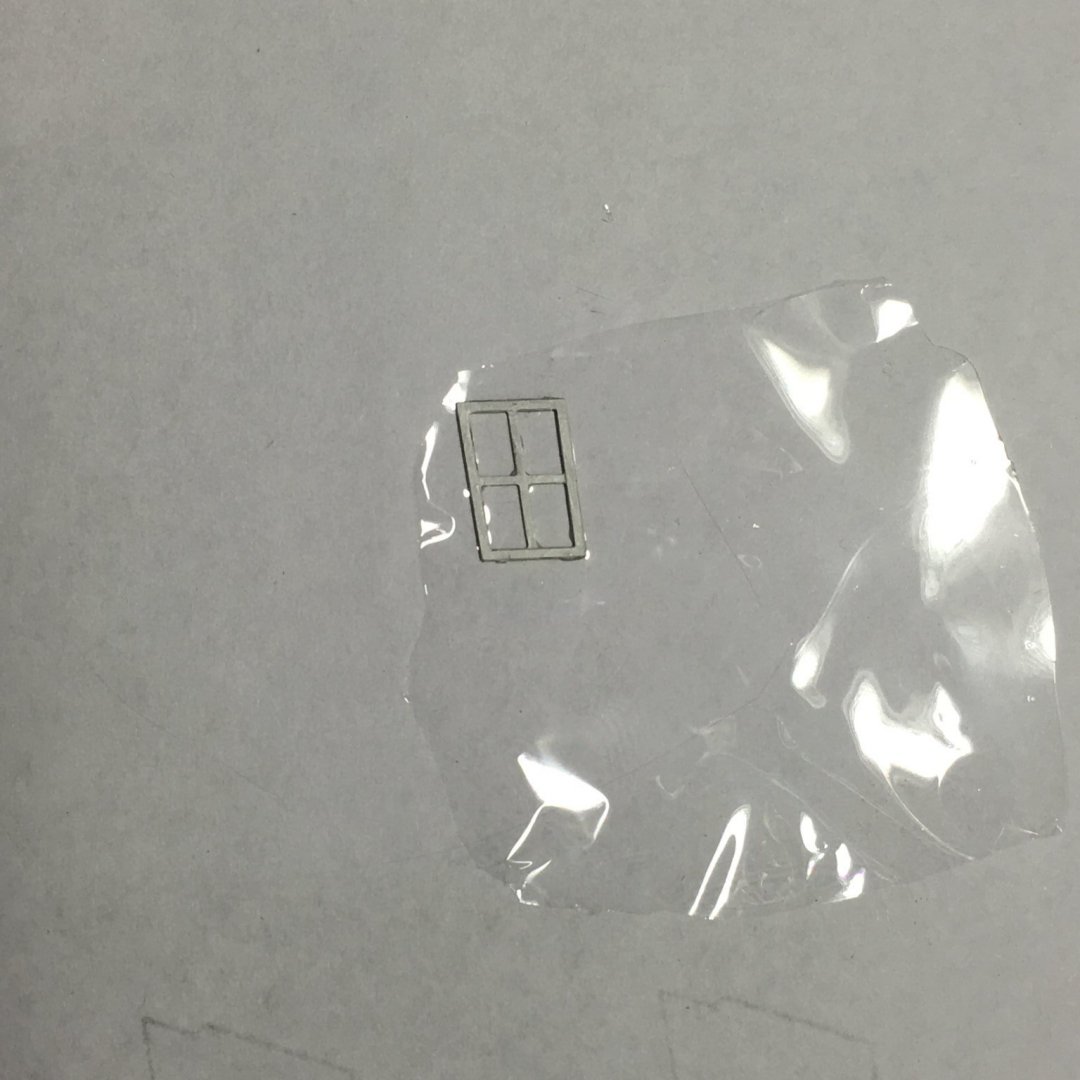
Difficult to see the final result in the photo, but I felt this looked more realistic. The film is crystal clear but not dead flat, so it gives the impression of old glass.
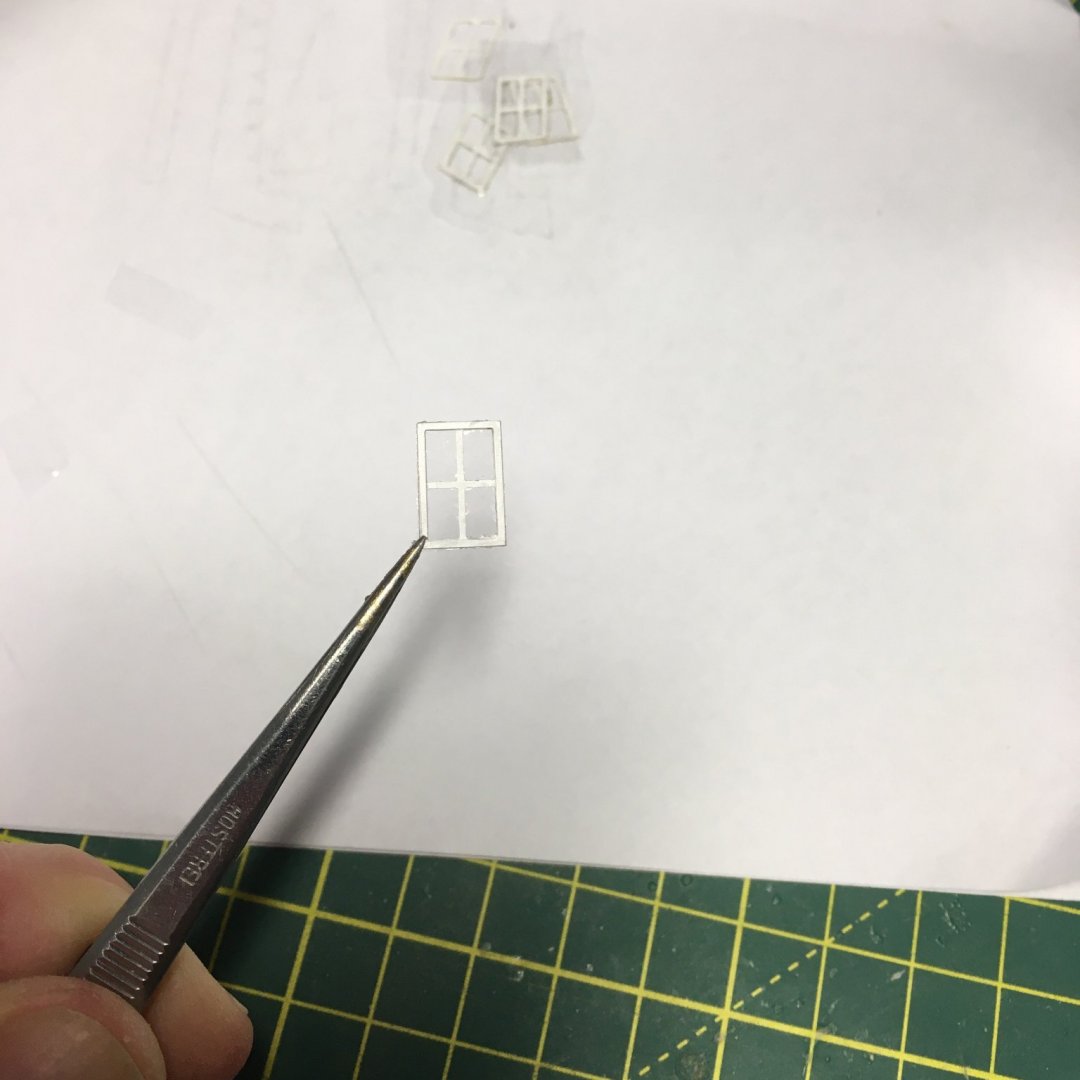
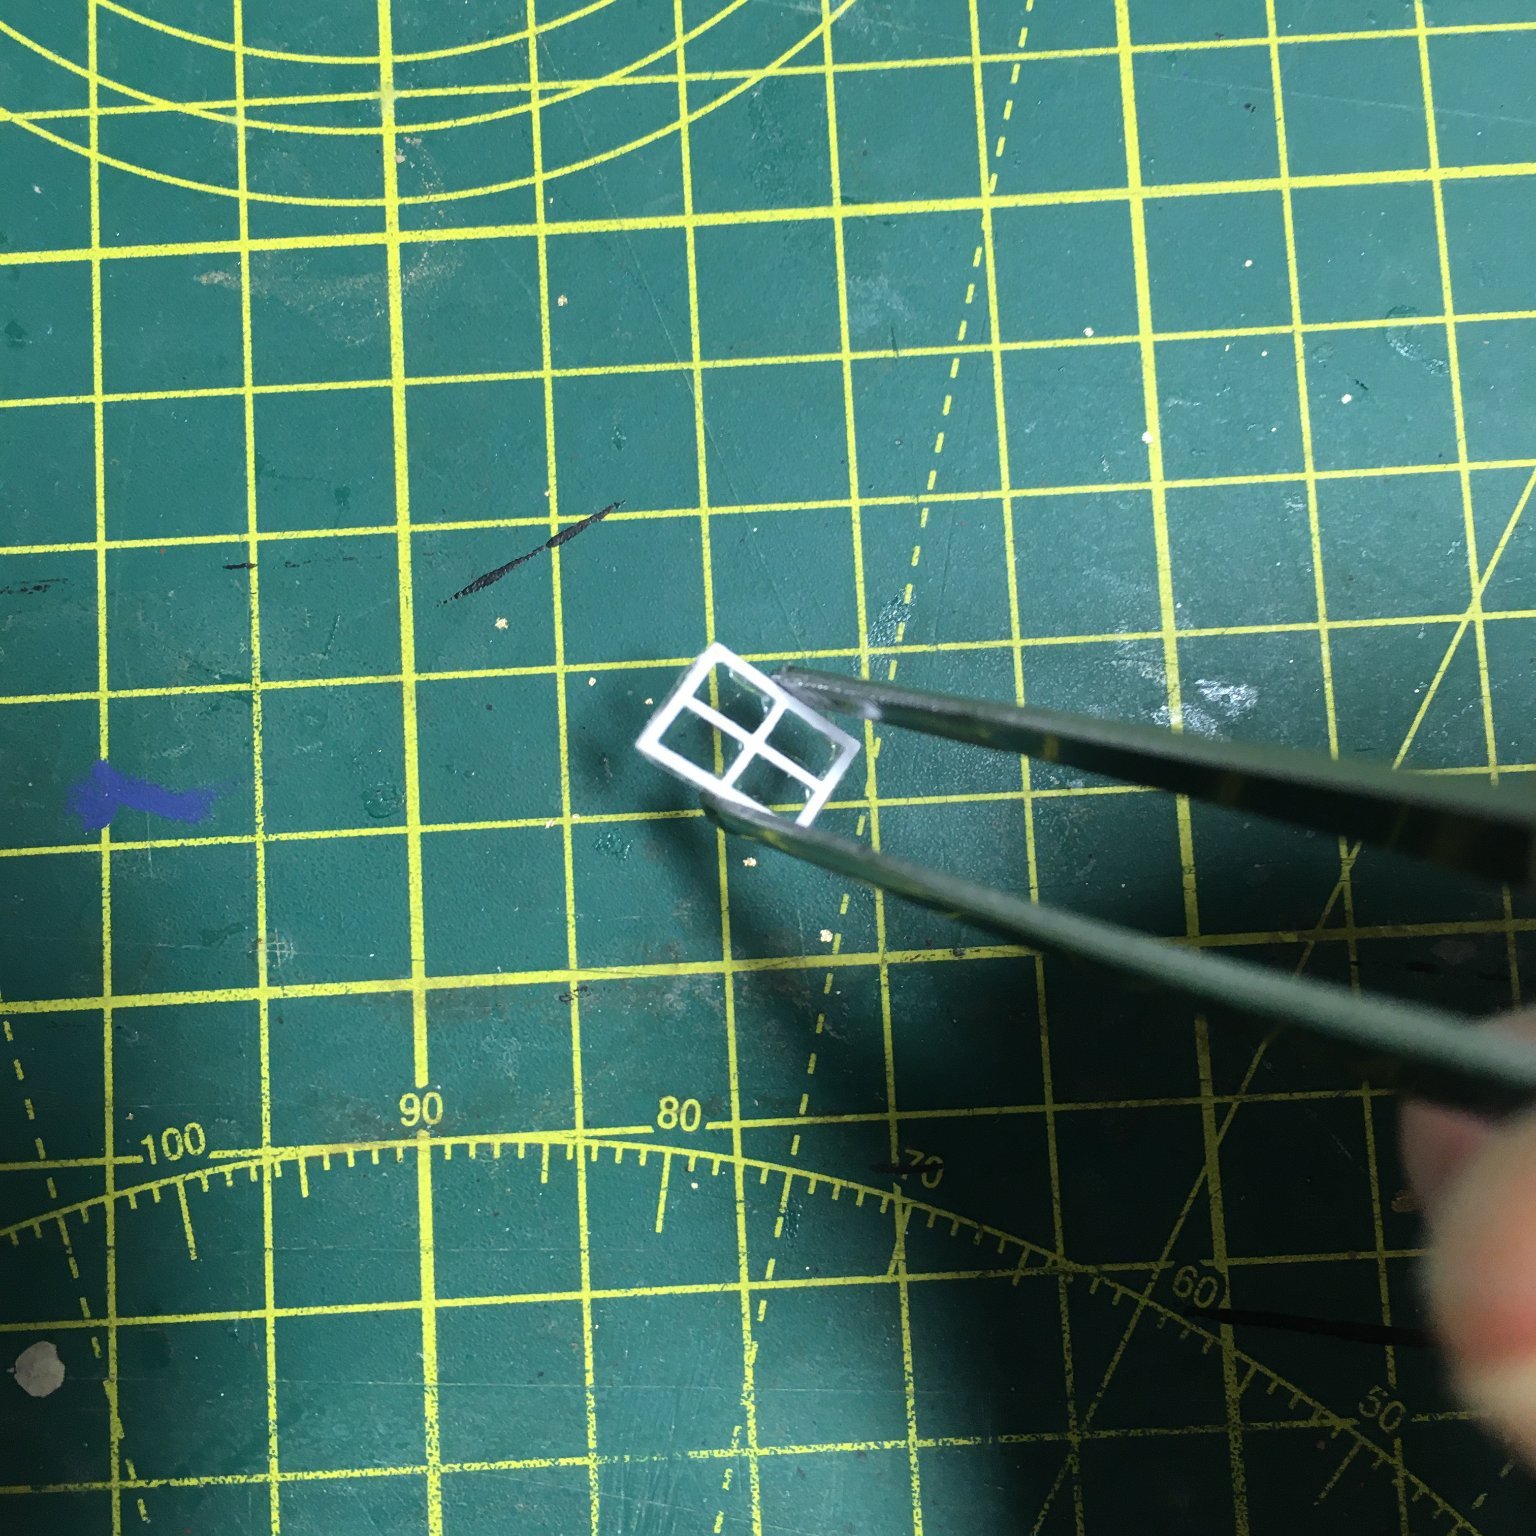
The second method involved holding a window in a pair of large tweezers in such a way that I could hold it flat against the surface of the liquid, just touching the back edge and pulling it away again. I couldn't photograph this process but here's how I held the windows:

Held vertically to dry, this left a film in each of the four lights of the window without coating the front of the glazing bars and without the unsightly blobs I got when dipping the whole window into the liquid. On balance I prefer this method as it doesn't need as many steps.
The Disaster (almost!)
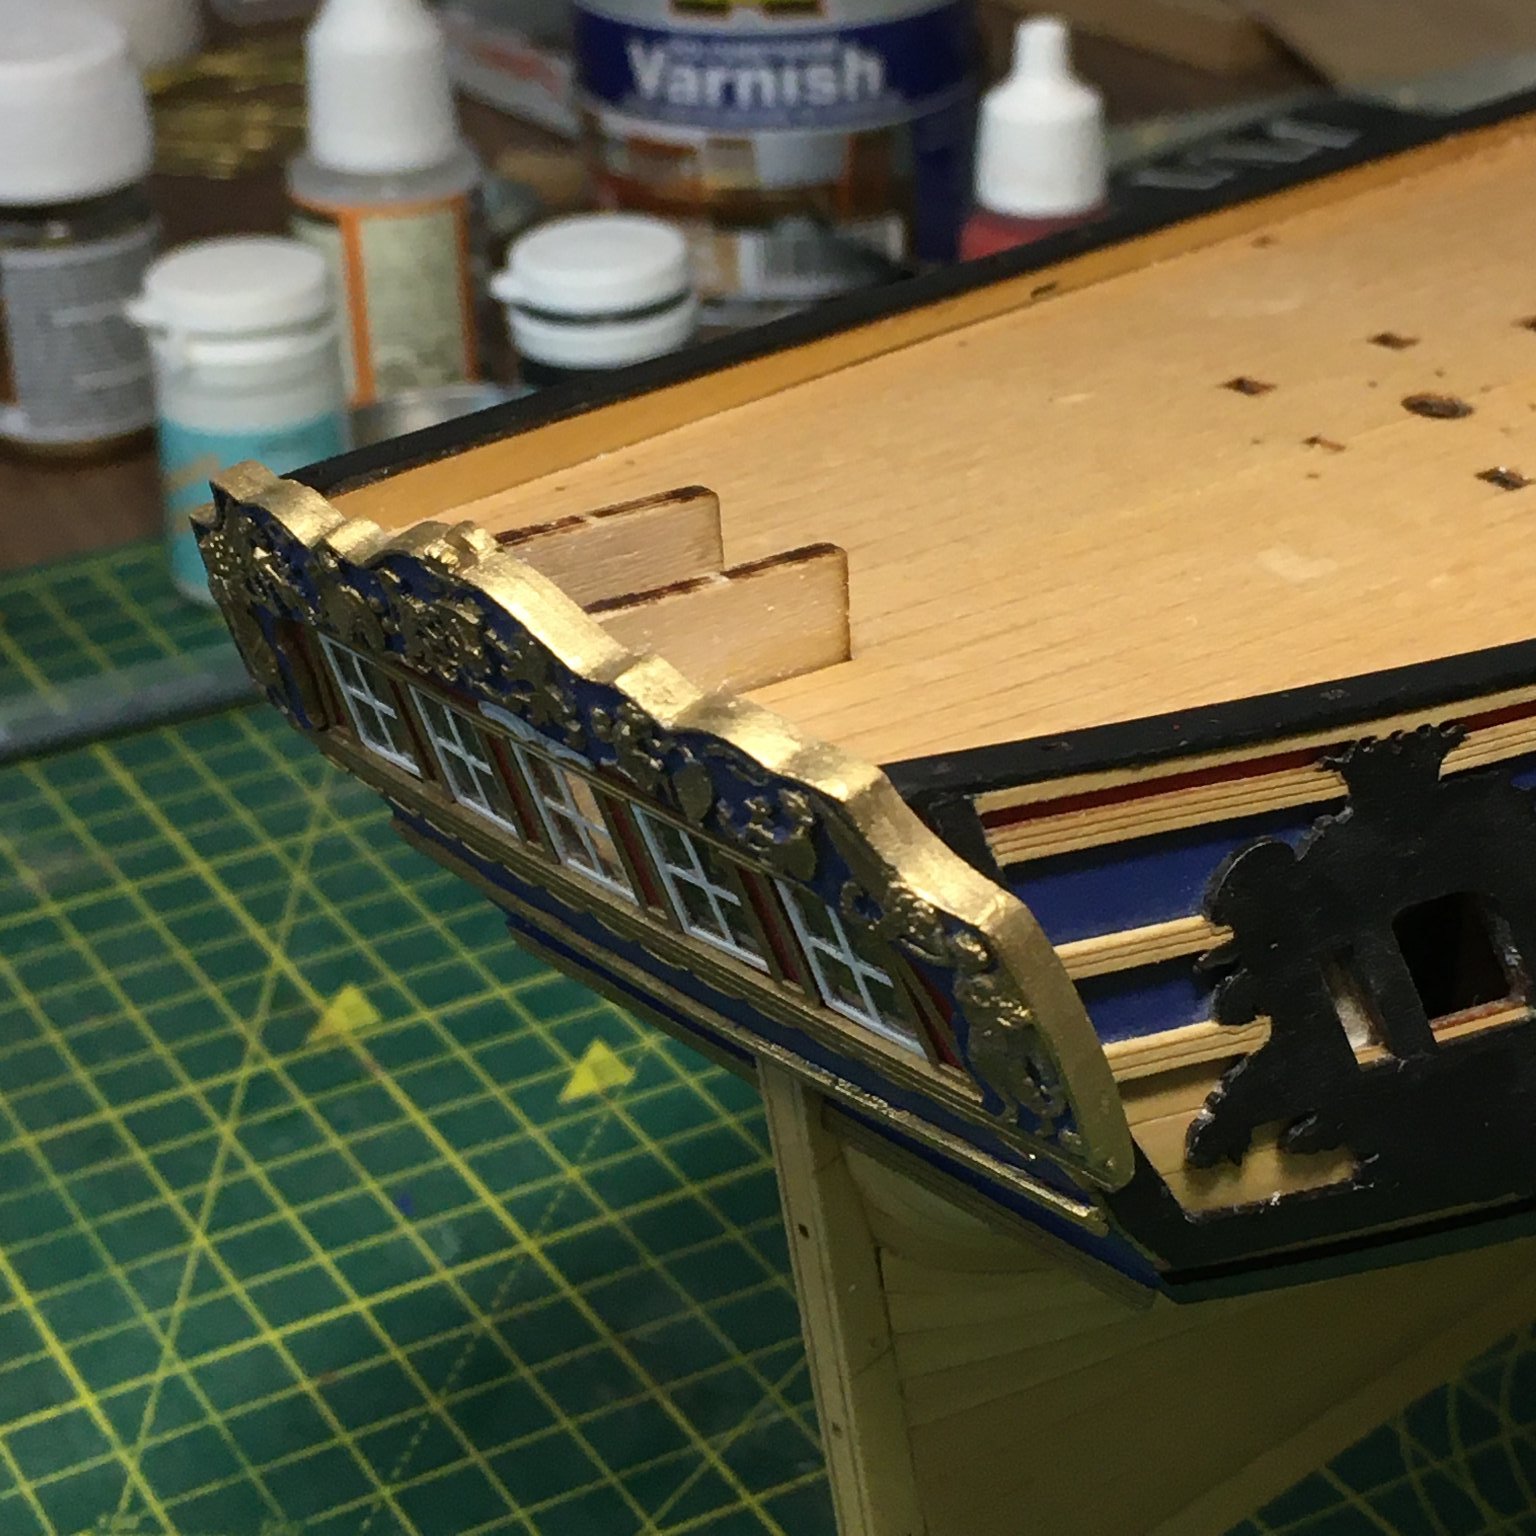
The five windows fitted in the stern fascia without a hitch. It was when I came to attach the photo etch window surround that I came unstuck - it didn't fit:
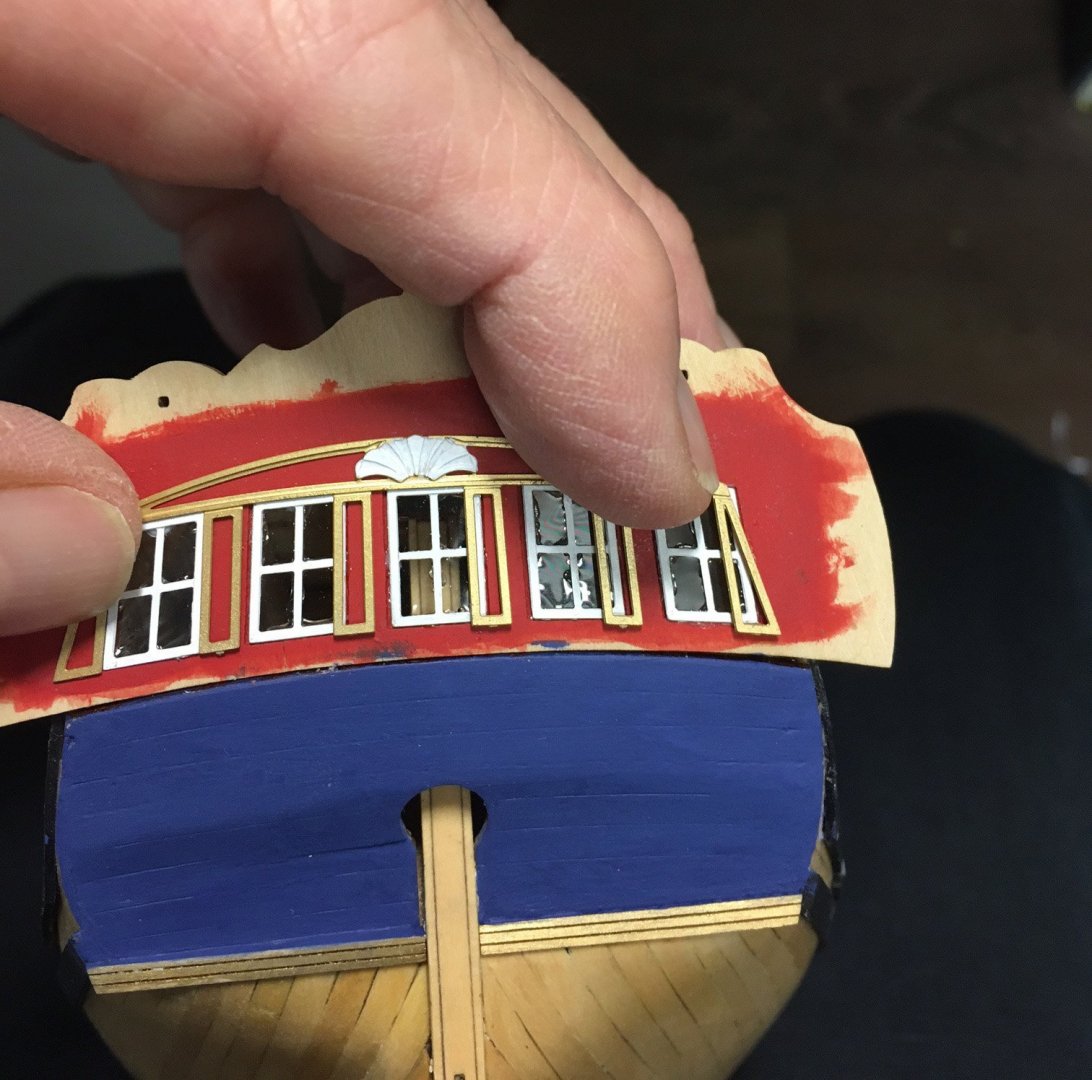
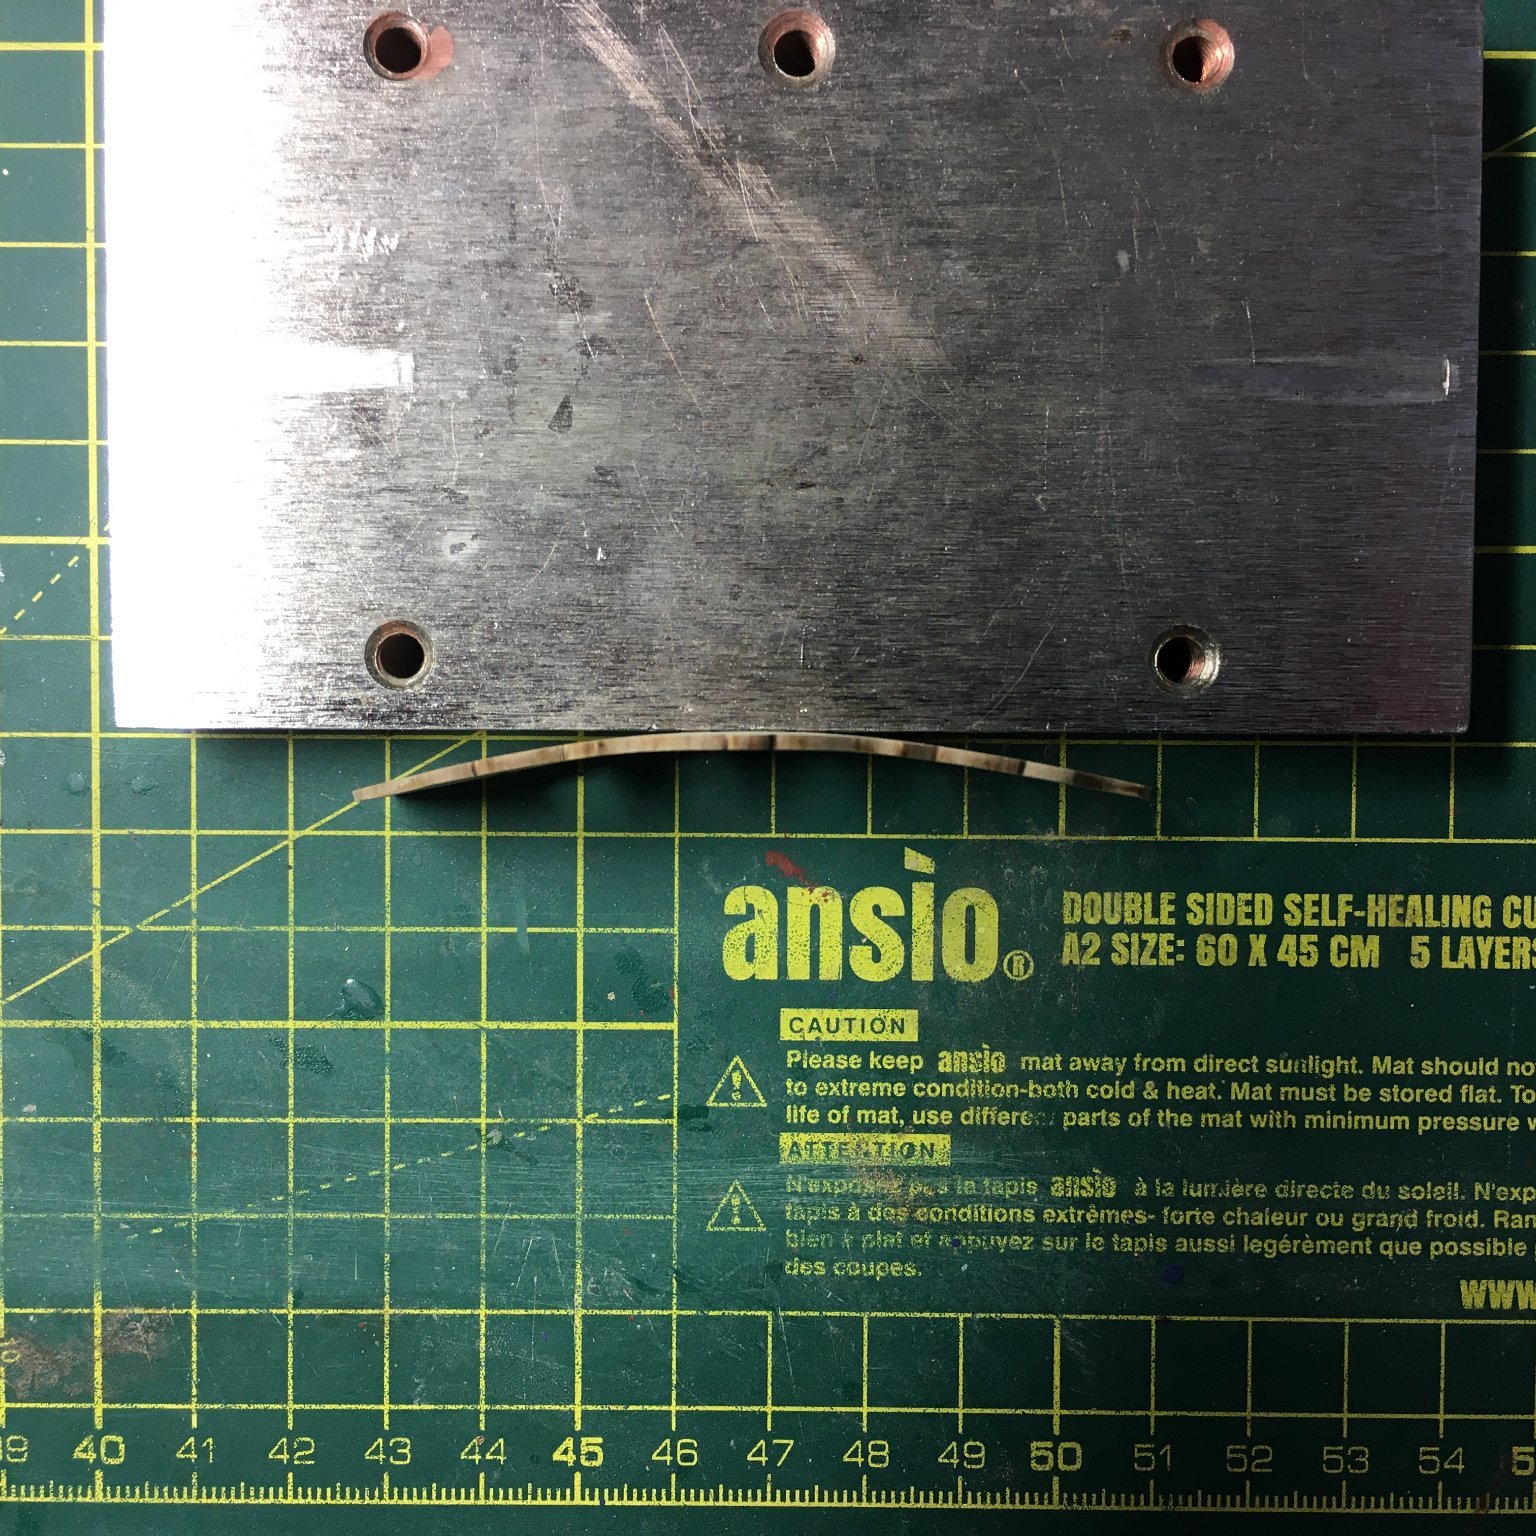
With the left hand edge lined up, the rest of the surround was way off. I checked the PE against the plans and it was spot on, whereas the stern fascia was 3mm wider than it should have been. I realised belatedly that I had soaked the fascia in hot water too long and, although I'd waited until it was dry it never shrank back to the original width.
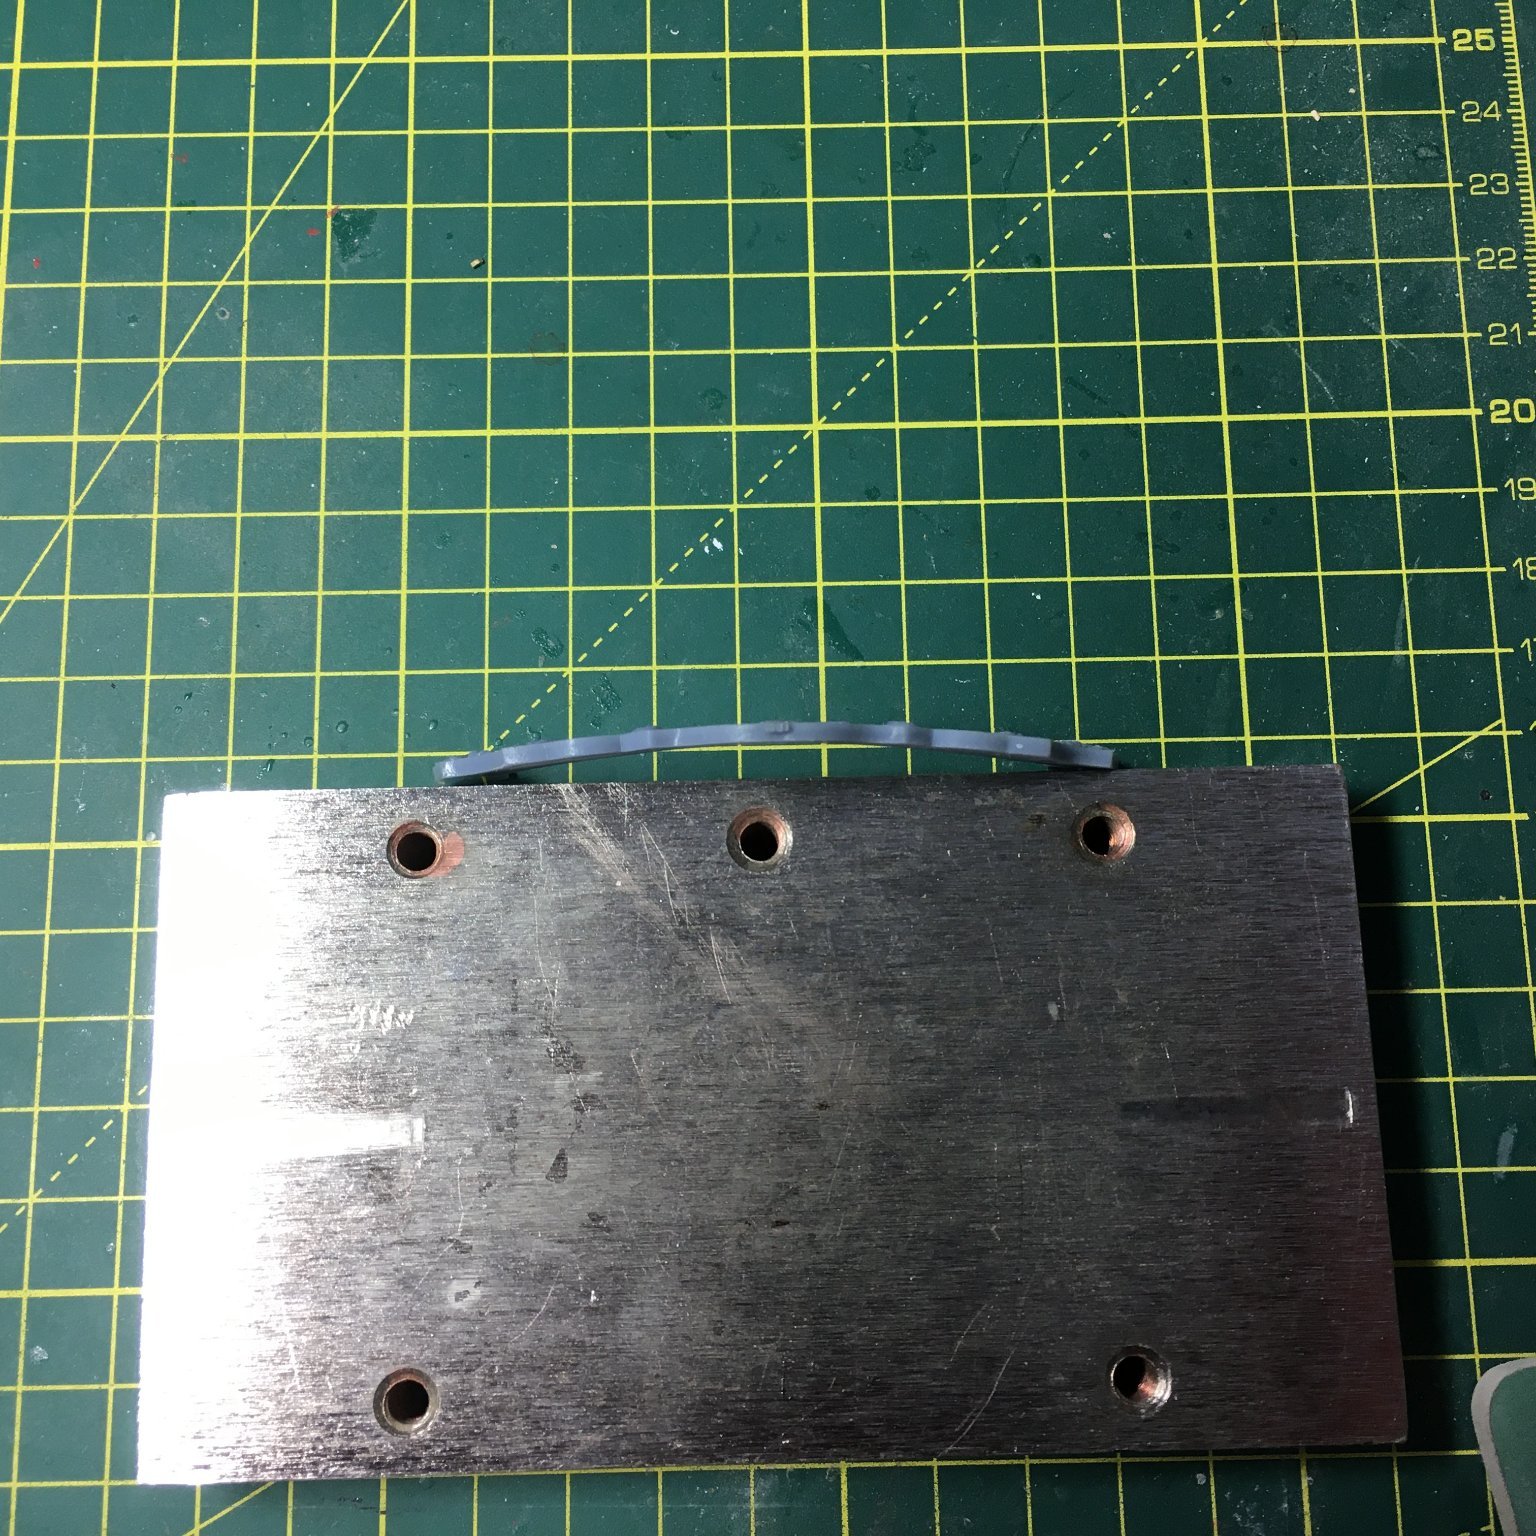
With most kit makers I'd have had no option but to make my own replacement, but now that Chris has his own laser machine he was able to supply me with a replacement in the next post and at minimal cost. Chris was also kind enough to send me a sample of the stern decoration from his new 3D printer. More of that anon. First, I wanted to bend the new stern fascia without expanding it so this time I tried dry heat, using an arrangement of blocks and a weight to hold it in place. The blocks were 5mm thick which I reckoned would give the right degree of curvature, with the fascia held down by a rod with a weight on the end. The second picture shows the hot air gun:
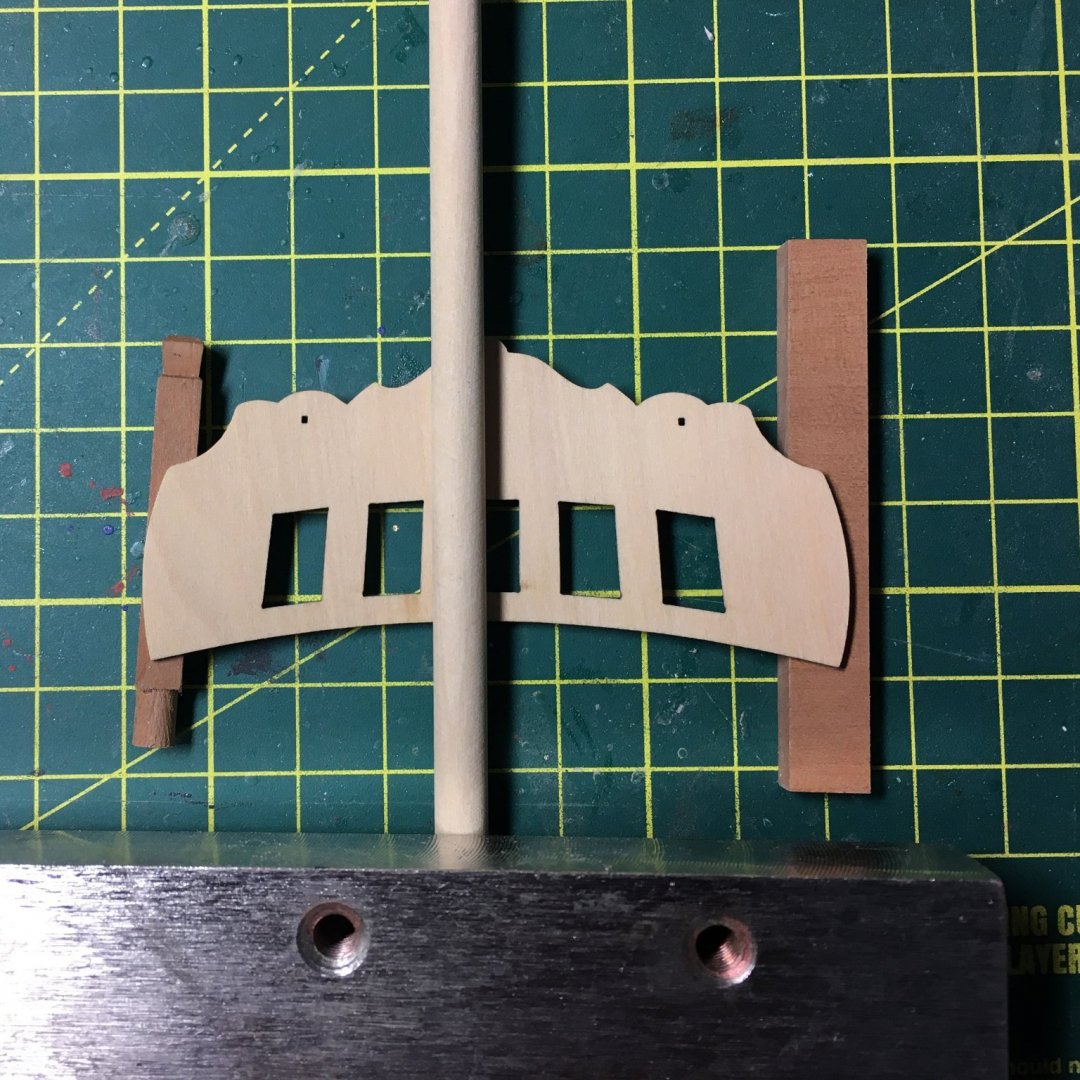
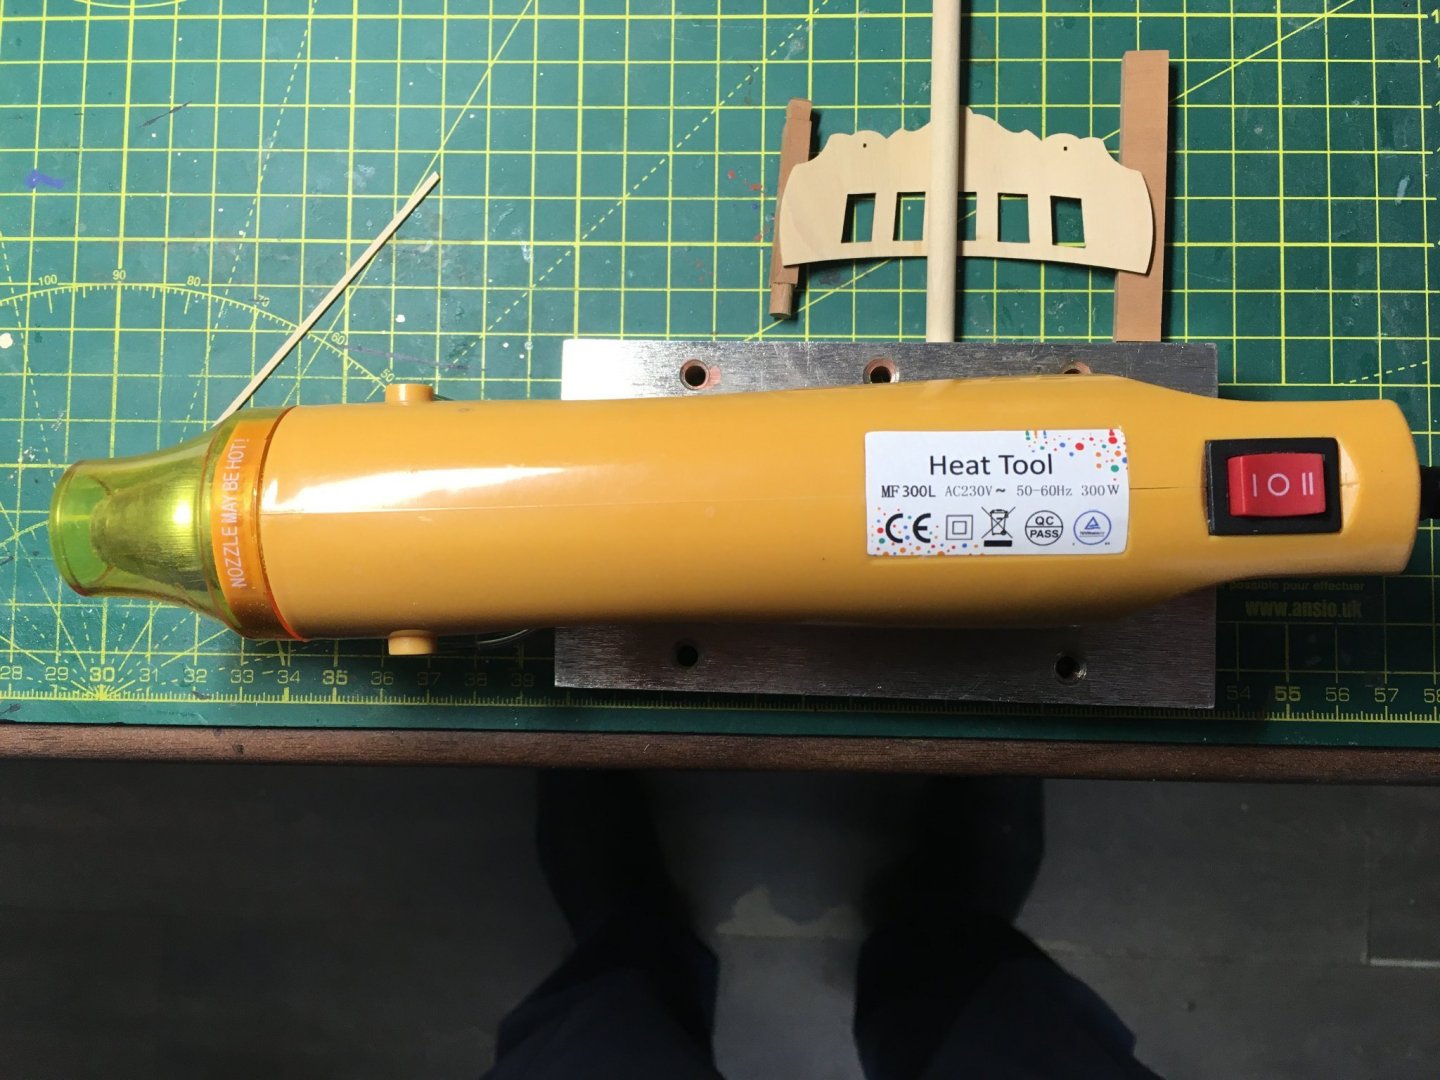
I put the gun on the hottest setting and aimed it at the fascia for about 30 seconds then left it to cool. The method worked well, leaving a permanent curve. I tried the same method on the stern decoration and found it worked equally well on resin:
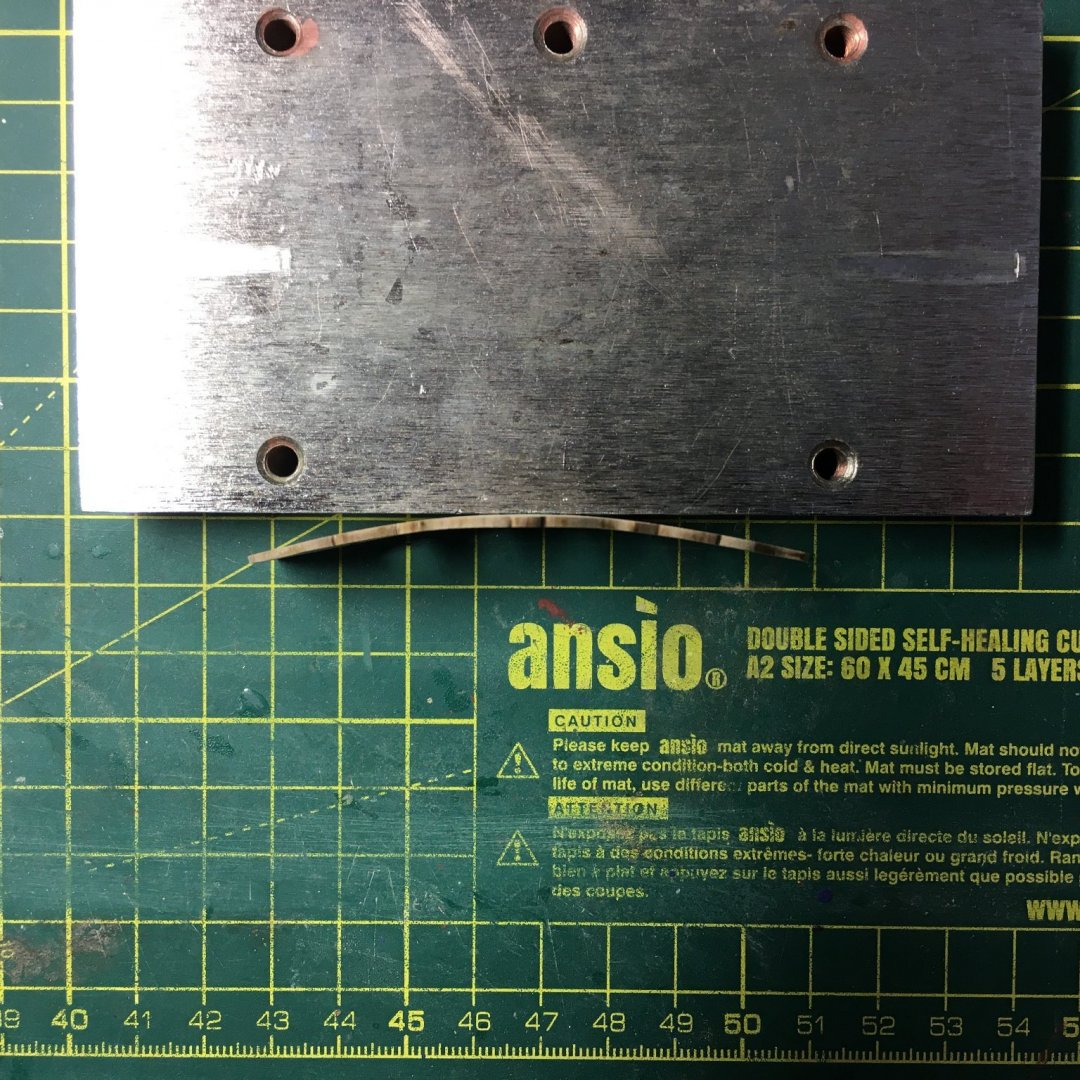
I'll use dry heat as much as possible from now on.
Finally, I painted the new stern decoration Chris had supplied to compare it with the original:
The new one is at the top. Those with a microscope might detect a difference, but I think Chris is on to another winner here.
Next, I'm looking forward to finishing off the stern.
Derek
- VTHokiEE, archjofo, jpalmer1970 and 9 others
-
12
-
Well done. It’s worth taking care to get everything right at this stage.
I managed to break off all but one of those tiny pieces. I’m saving them until I fit the decoration as the PE surrounding the windows will cover them.
One tip if you have to make tiny parts is to shape them in to the end of a longer piece of wood. This gives you something to hold until you’re happy with the shape, then just cut it off.
Derek
-
18 minutes ago, glbarlow said:
I guess I misunderstood.
Sorry Glenn, my mistake. I got confused because we'd been discussing turning tools and I had my mind on the lathe. I hadn't realised you were thinking of drilling the holes.
I used the micro drilling attachment and the V block in a mini mill. Although the mini is only one class up from a micro mill it's a much bigger beast, weighing in at over 200 lbs and with interchangeable chuck and collets. The same mill will be available in the States - they're all made in the same factory in China and rebranded in the West. Here it is fitted with a chuck:

If Santa's in a good mood it might be worth considering. However you can use the micro drill attachment in other things with a chuck - for example a benchtop pillar drill like this:

If you've not got one they're much more reasonably priced and good for other jobs around the house.
- glbarlow, BobG and GrandpaPhil
-
3
-
Not sure why you'd want a chuck on the mill? You should be able to hold all the tools you need using collets. Or have I misunderstood? I did the balustrades on the lathe.
I've put a CNC machine on my Christmas list 'cos I'm greedy. Doubt I'll get it though 😒
-
Thanks James, Rusty & Glenn.
41 minutes ago, Rustyj said:I wish I'd thought to do that!
Yours still looks fine Rusty. I just enjoy playing around and problem solving - and every time I look at your log I half regret not planking my own deck like you did.
41 minutes ago, glbarlow said:What carving tools did you use other than files
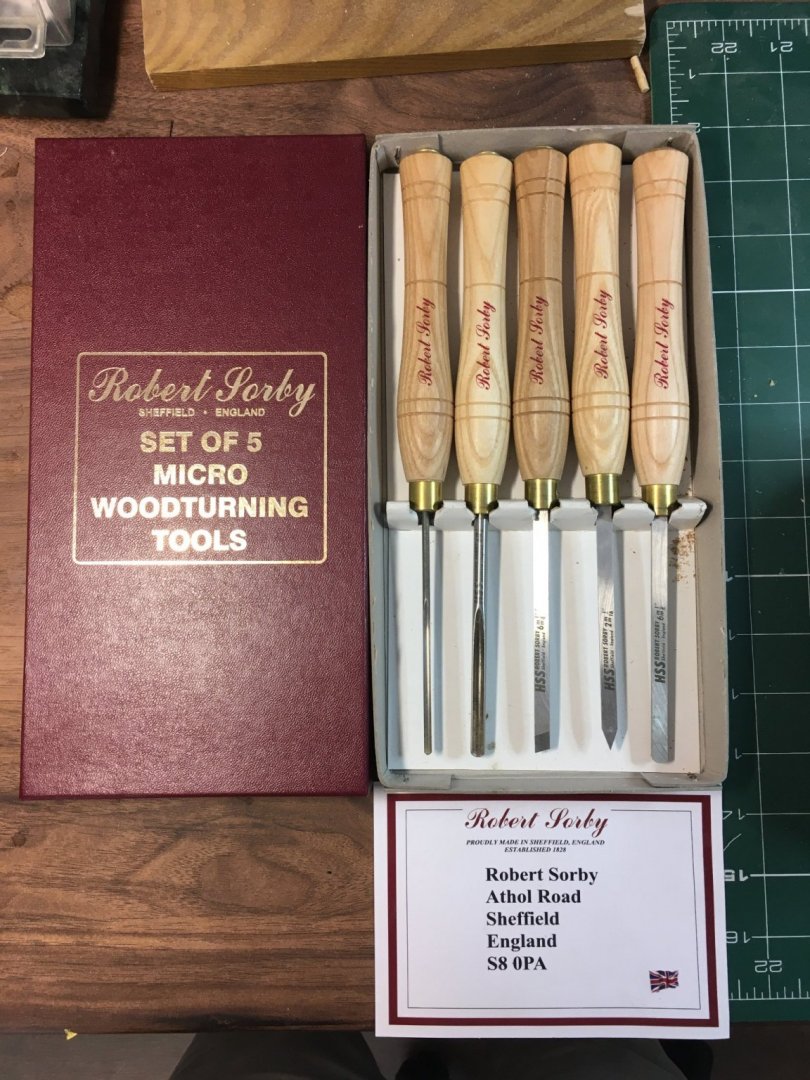
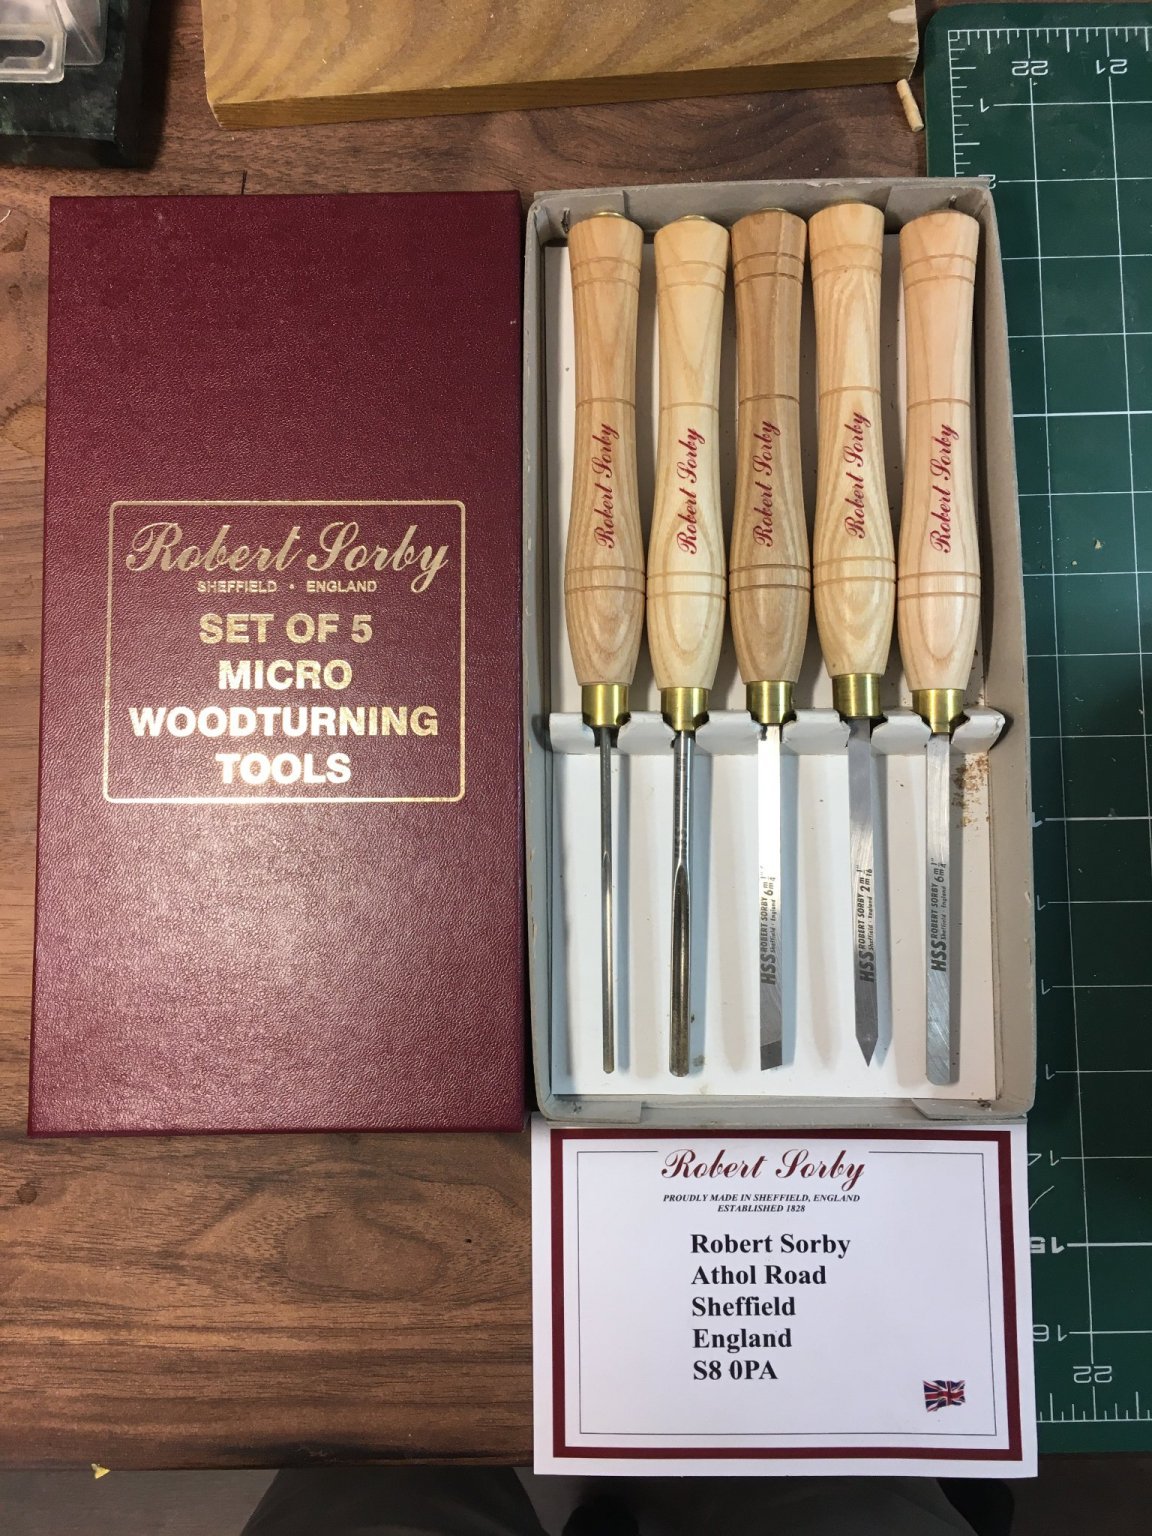
I use these woodturning tools - the gouge to get the right diameter and the rough shape, the knife edge to mark out the main sections of the piece then files for the final shaping:
The next picture shows a balustrade with the sections marked out and roughed to shape, and prior to filing:
Ordinary wood turning tools are easy to come by, but for tiny pieces (2.8mm diameter in this case) these smaller tools are essential. I'm not sure this brand is available in the US, but I'm sure there will be alternatives if you search for micro woodturning tools. Here's a link to my Speedy log where I first started using them to make anchor buoys.
Hope this helps. And by the way, I've already got a shelf in my workshop labelled 'things Glenn made me buy' 😁
Derek
-
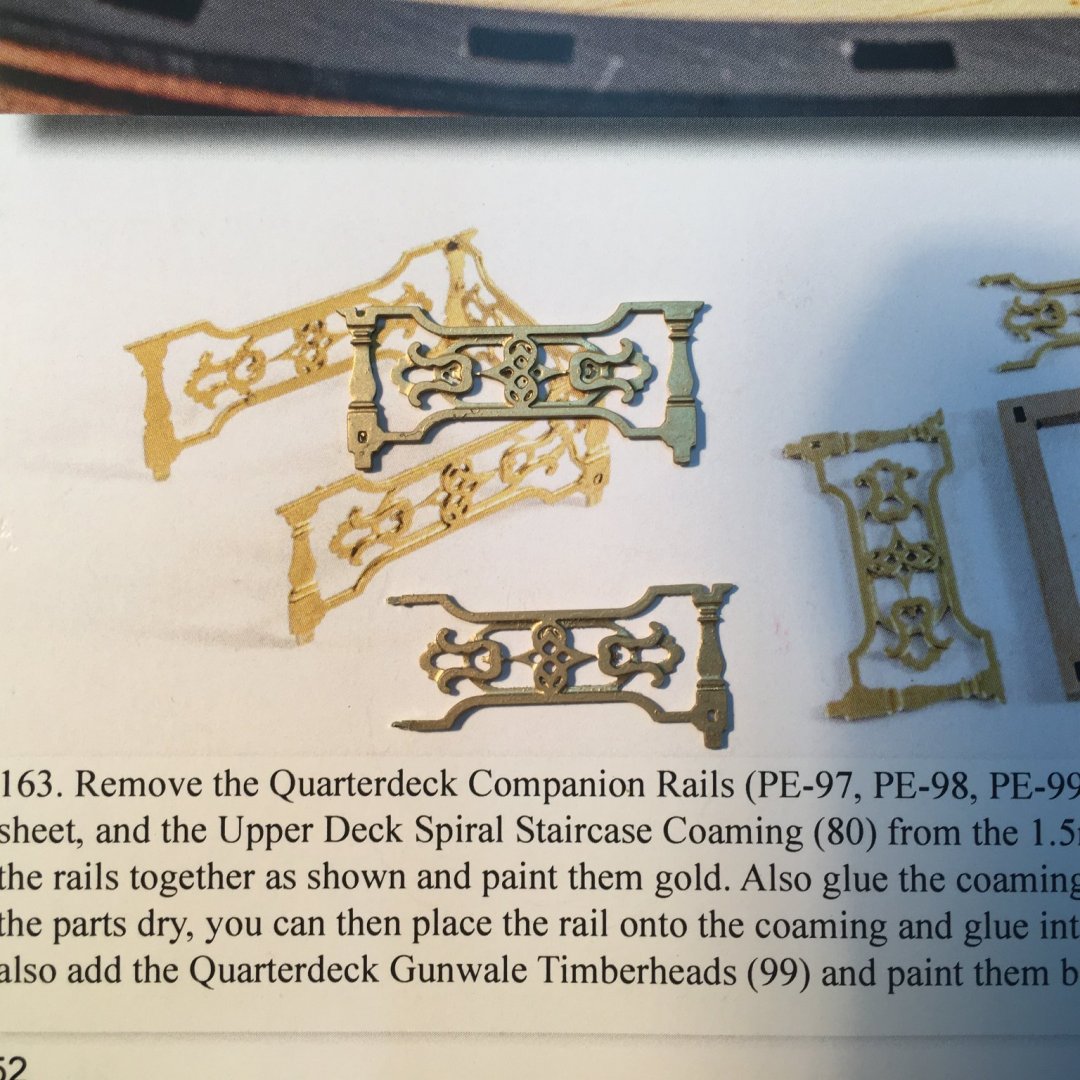
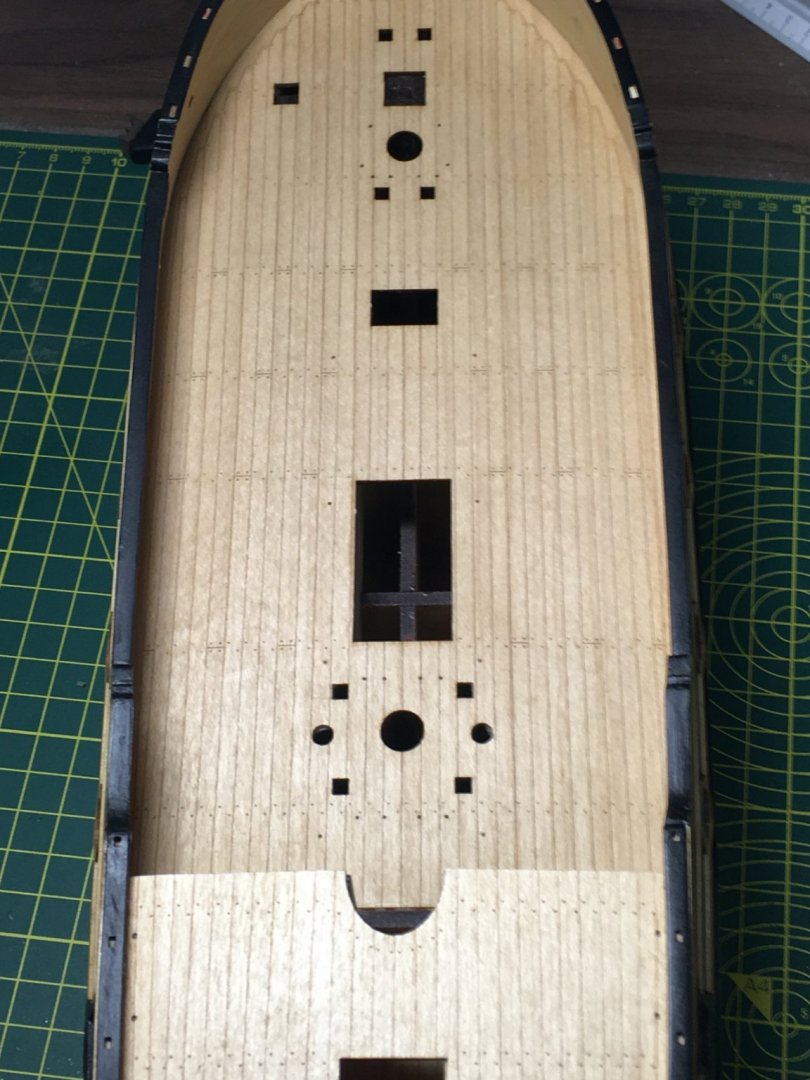
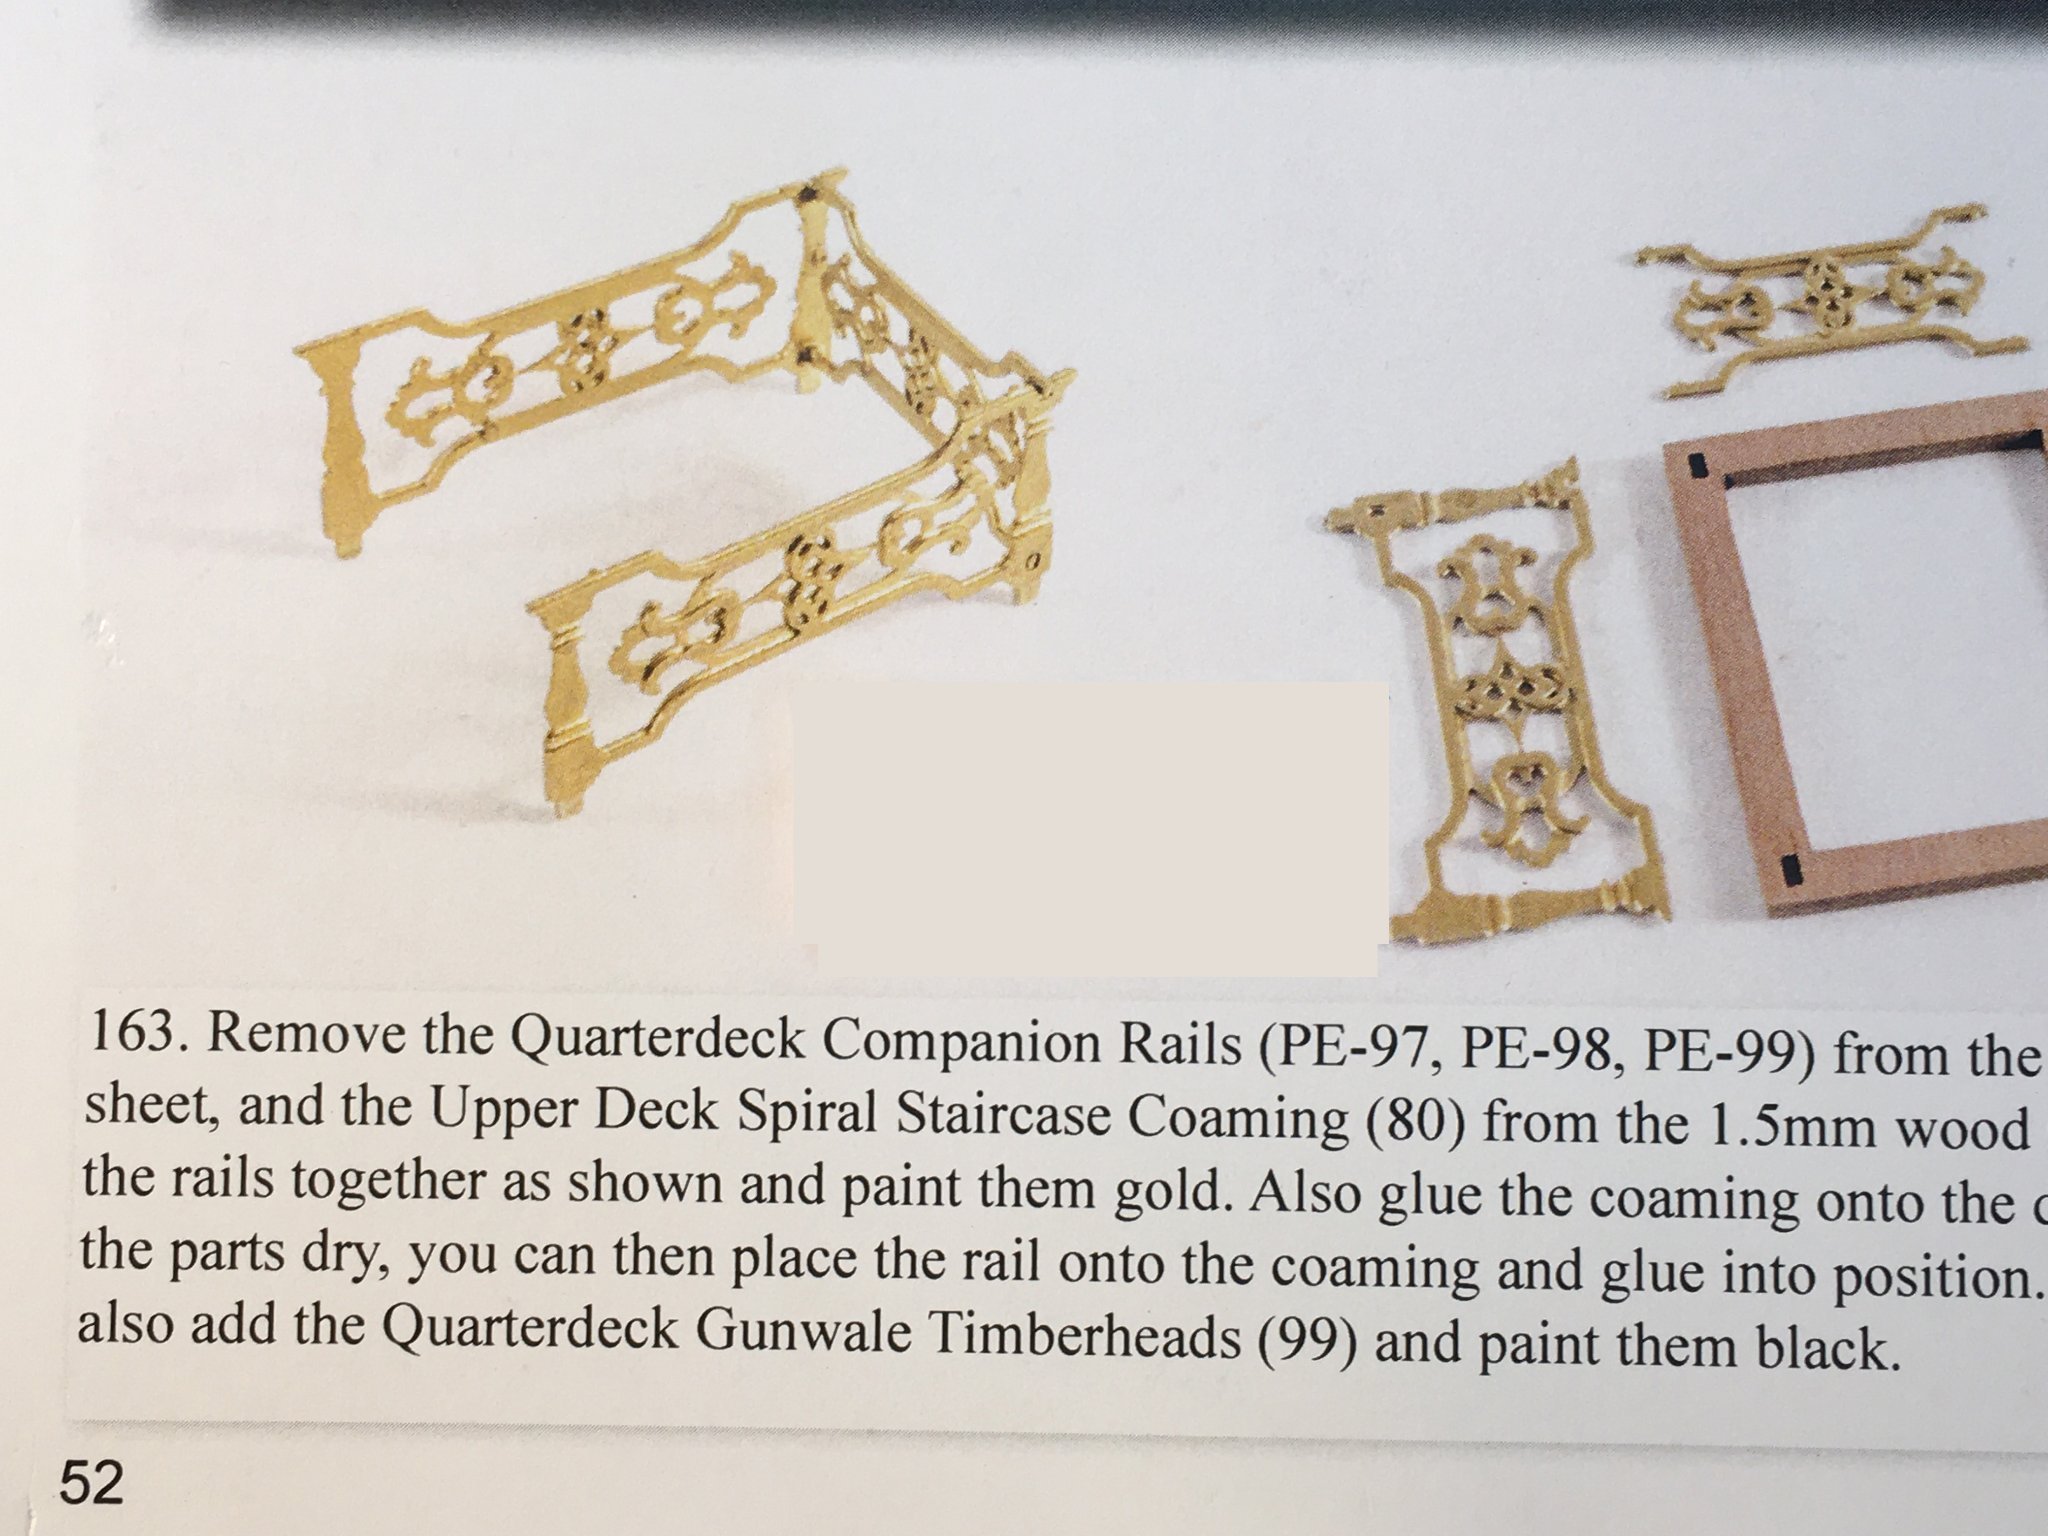
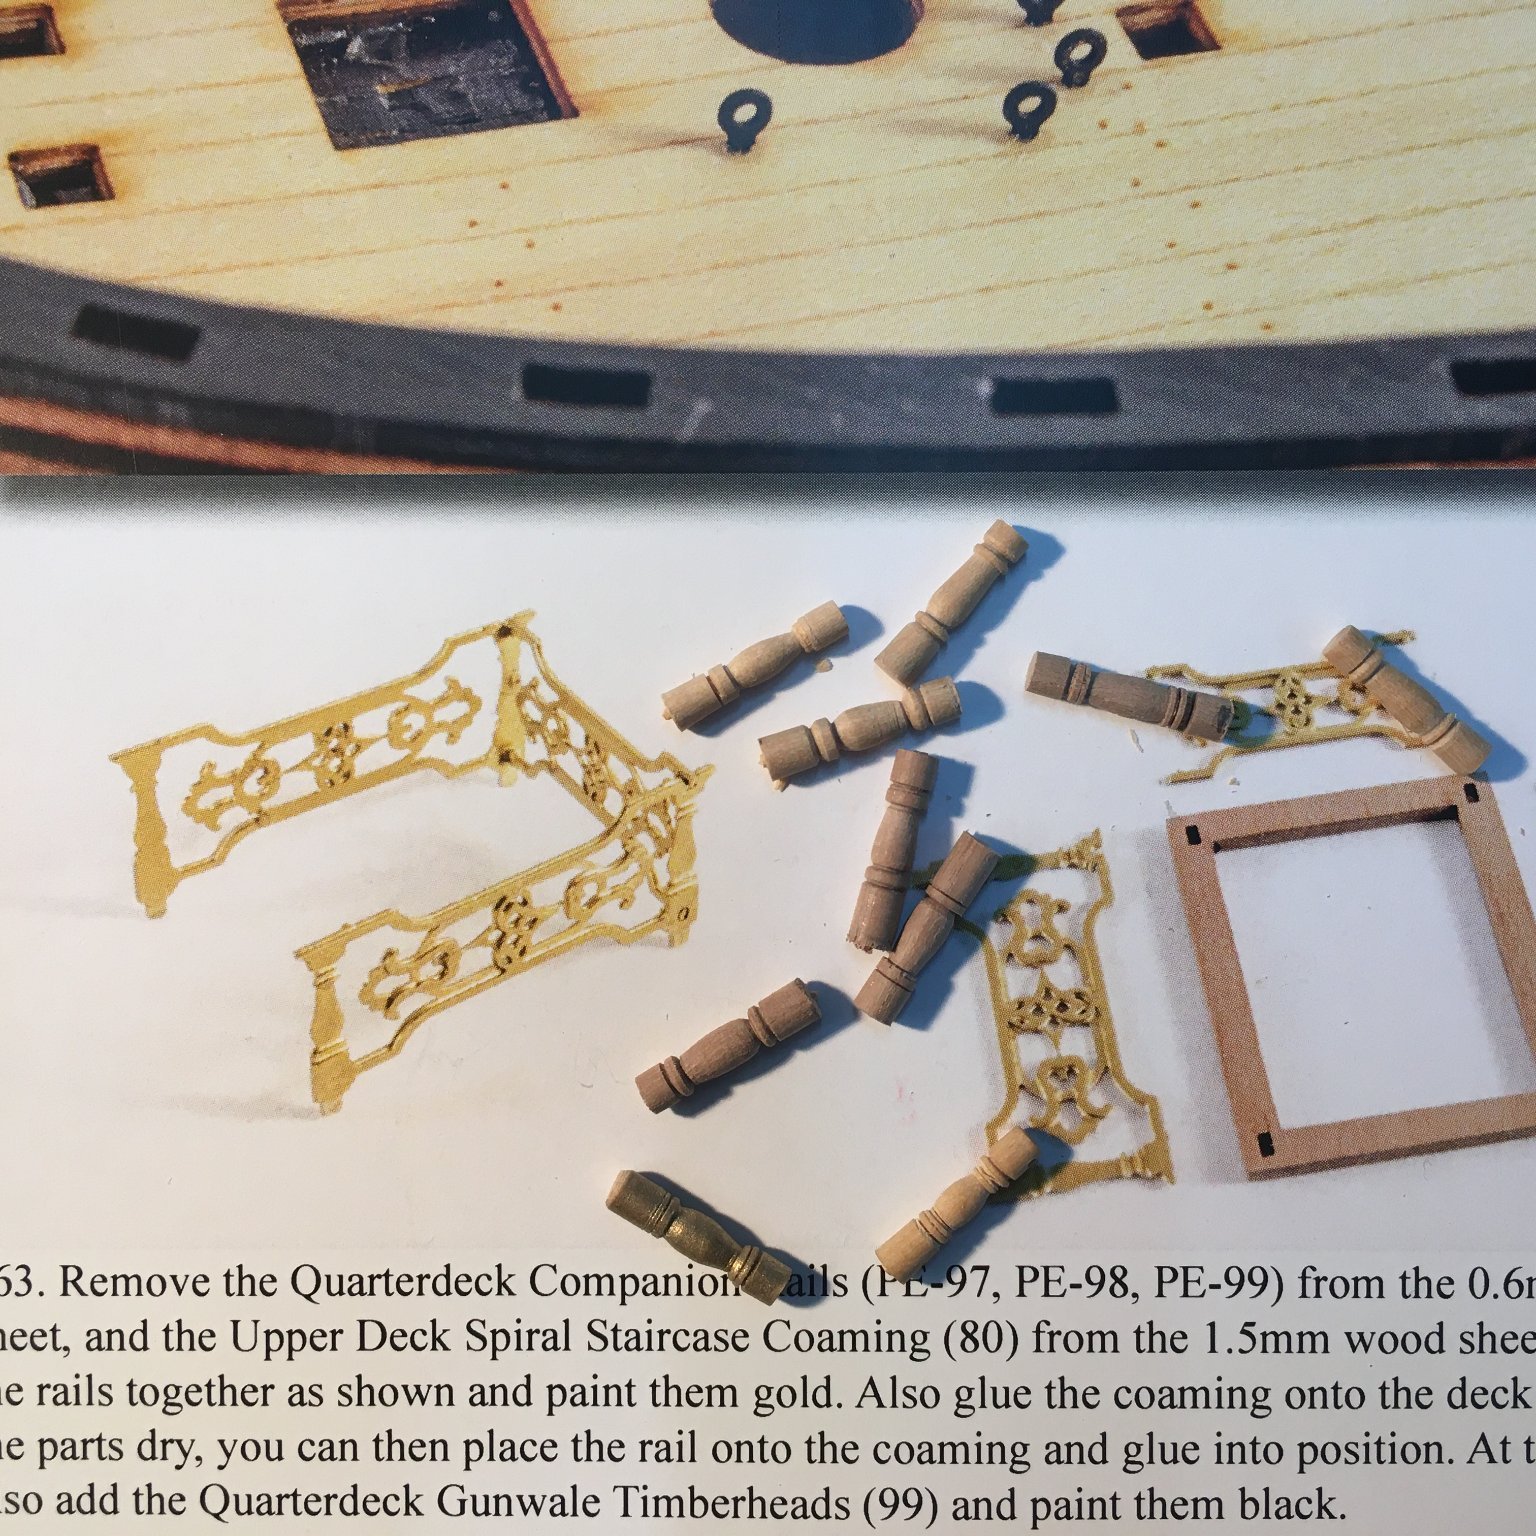
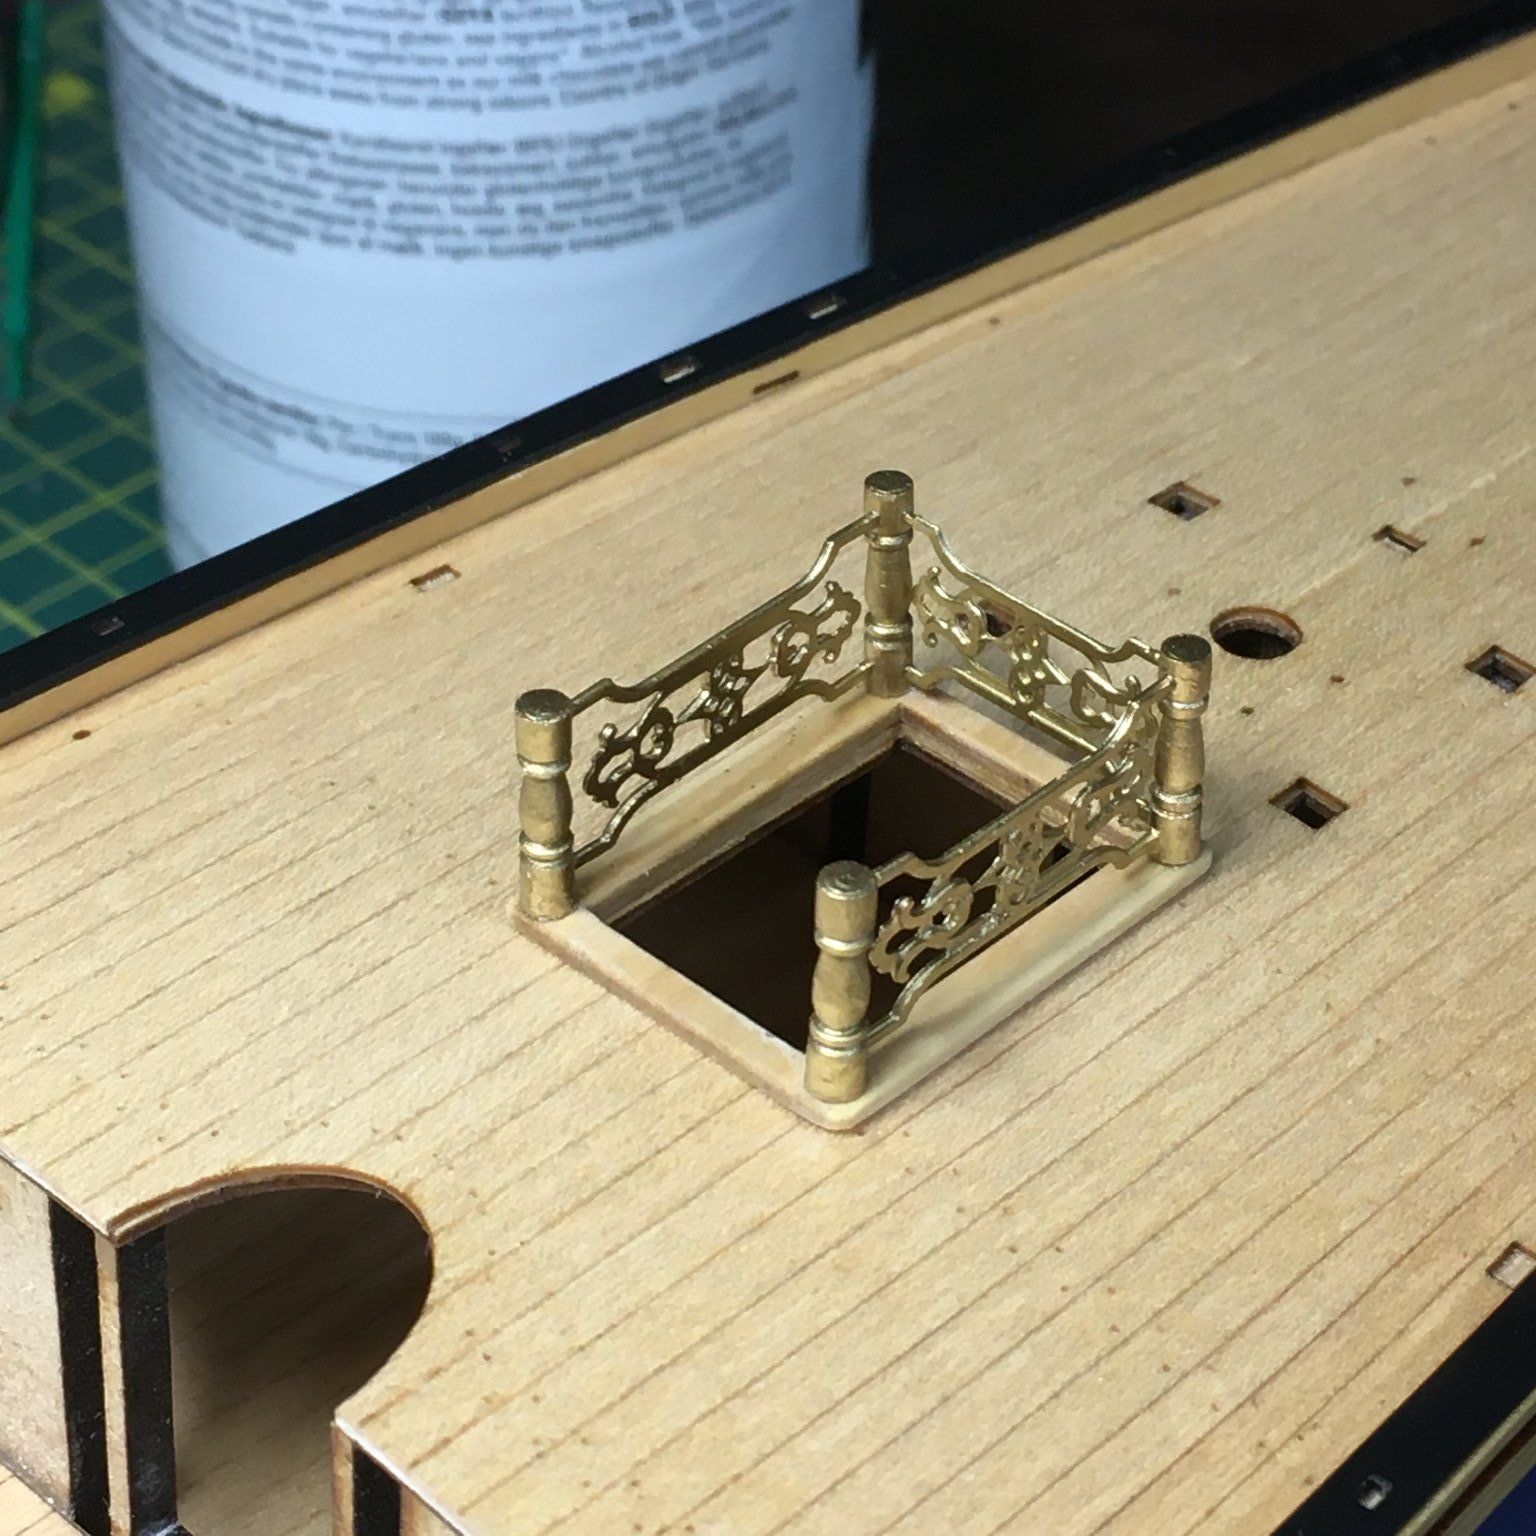
Quarterdeck Companion Rails
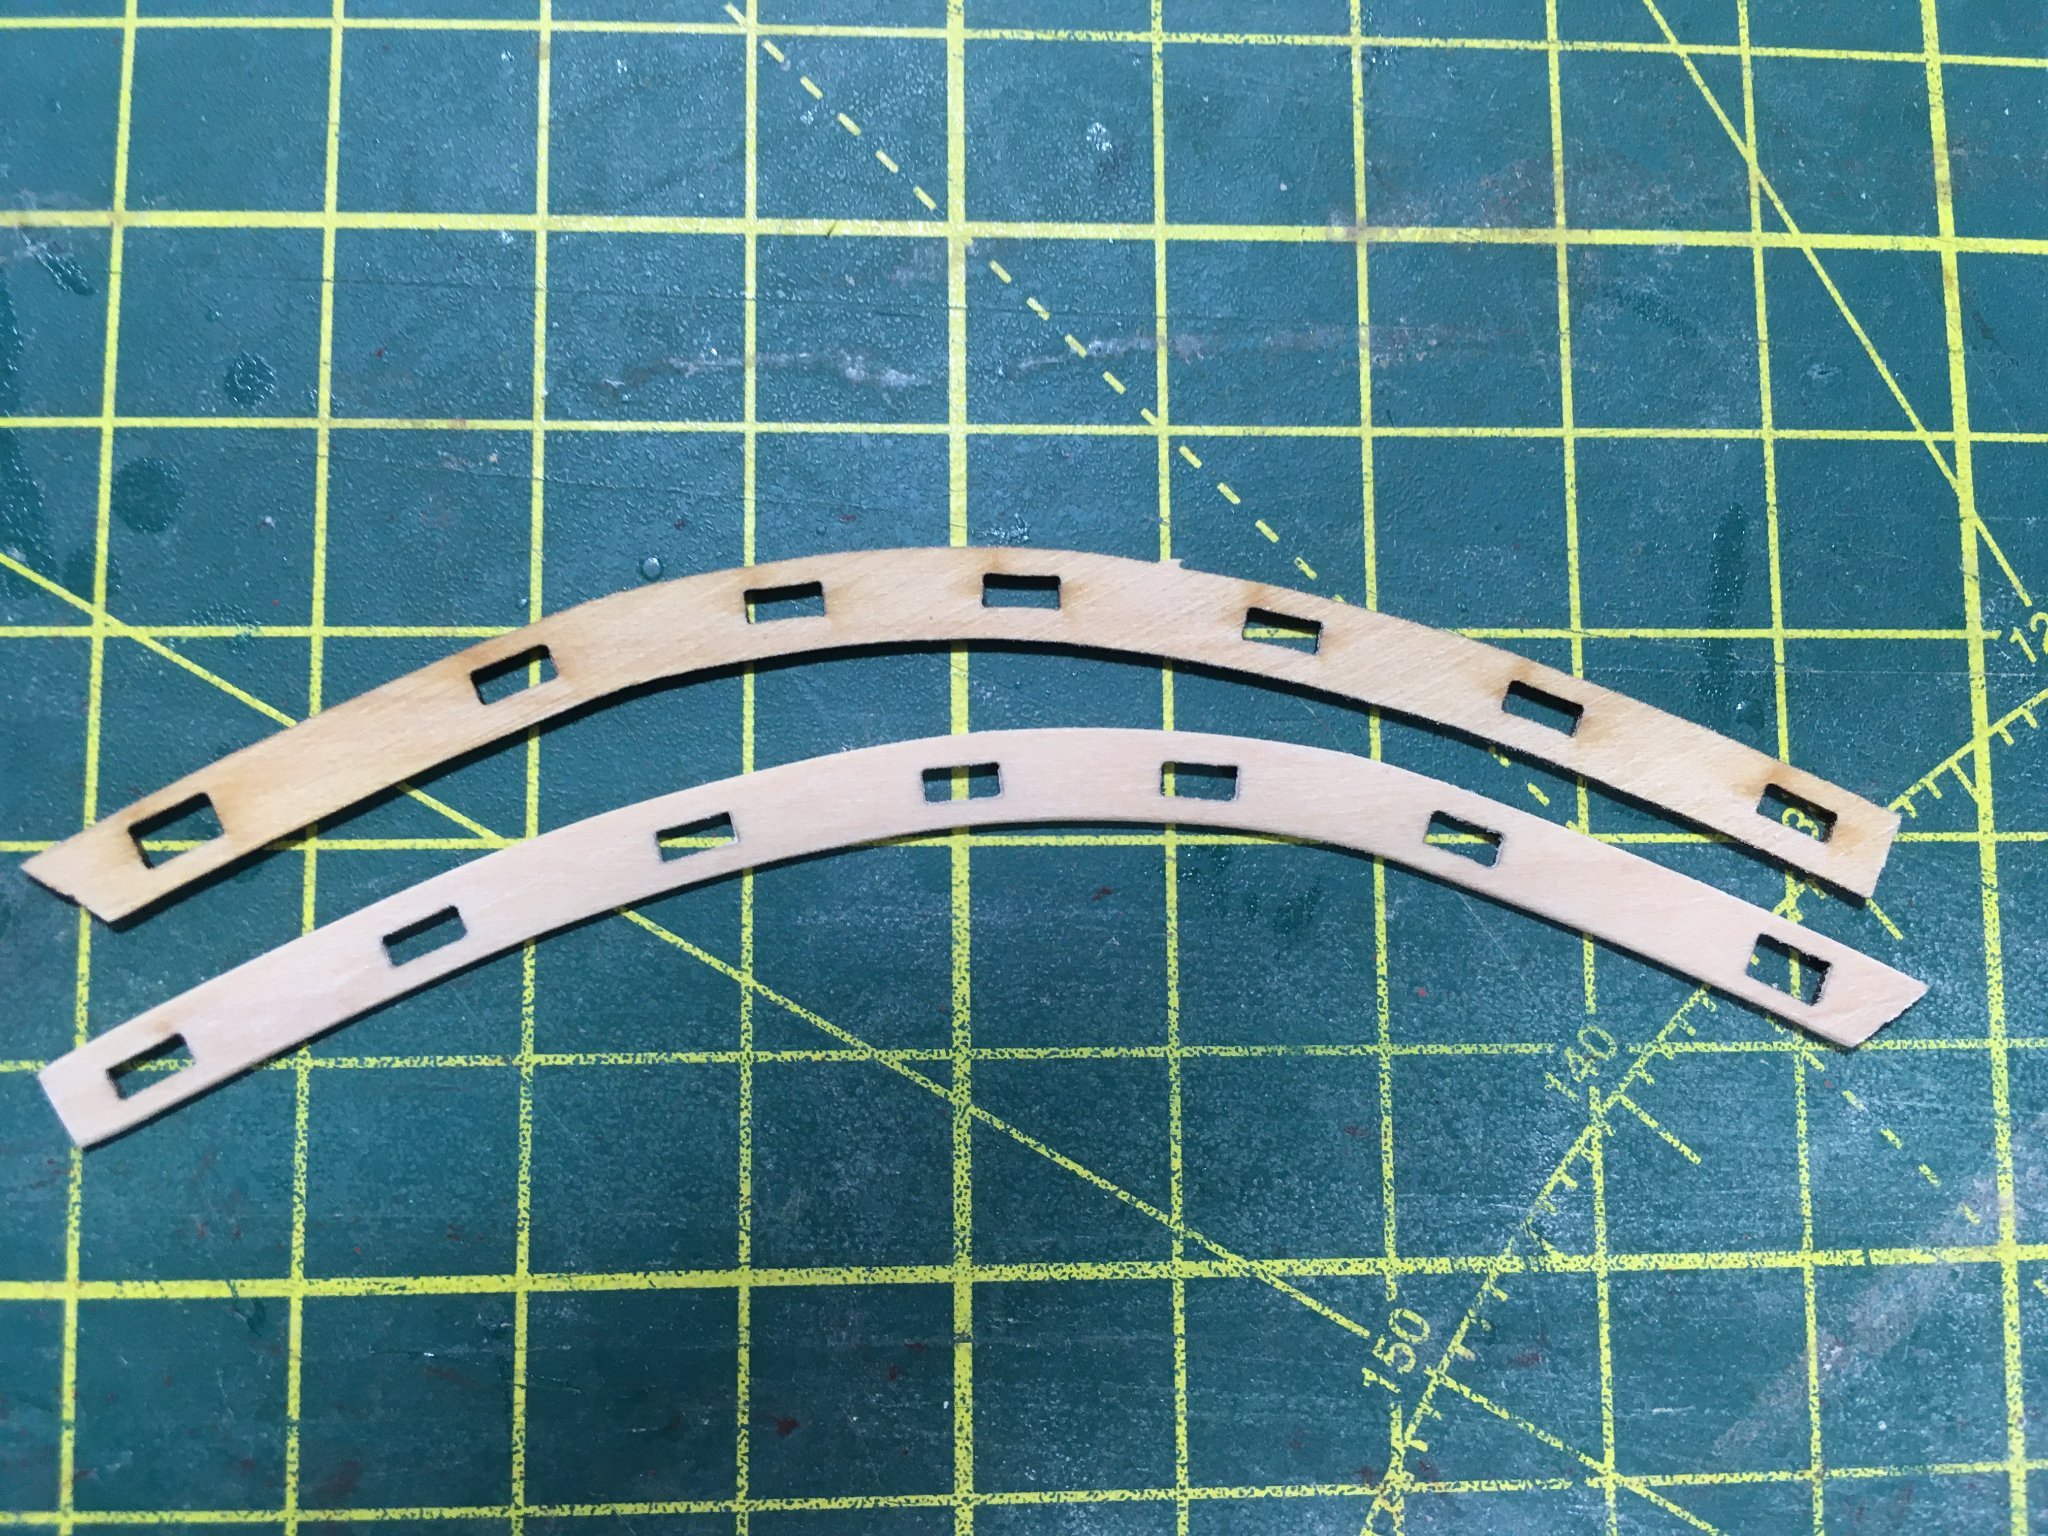
Having taken a break from the stern decoration by working on some odd jobs such as the curved stairs, I was tempted to tackle the quarterdeck companion rails. These sit at the top of the stairs and have always niggled me since I first saw that they were made entirely from photo-etch. The PE makes beautifully decorative railings, but I felt the four balustrades looked flat and unnatural, albeit well detailed:

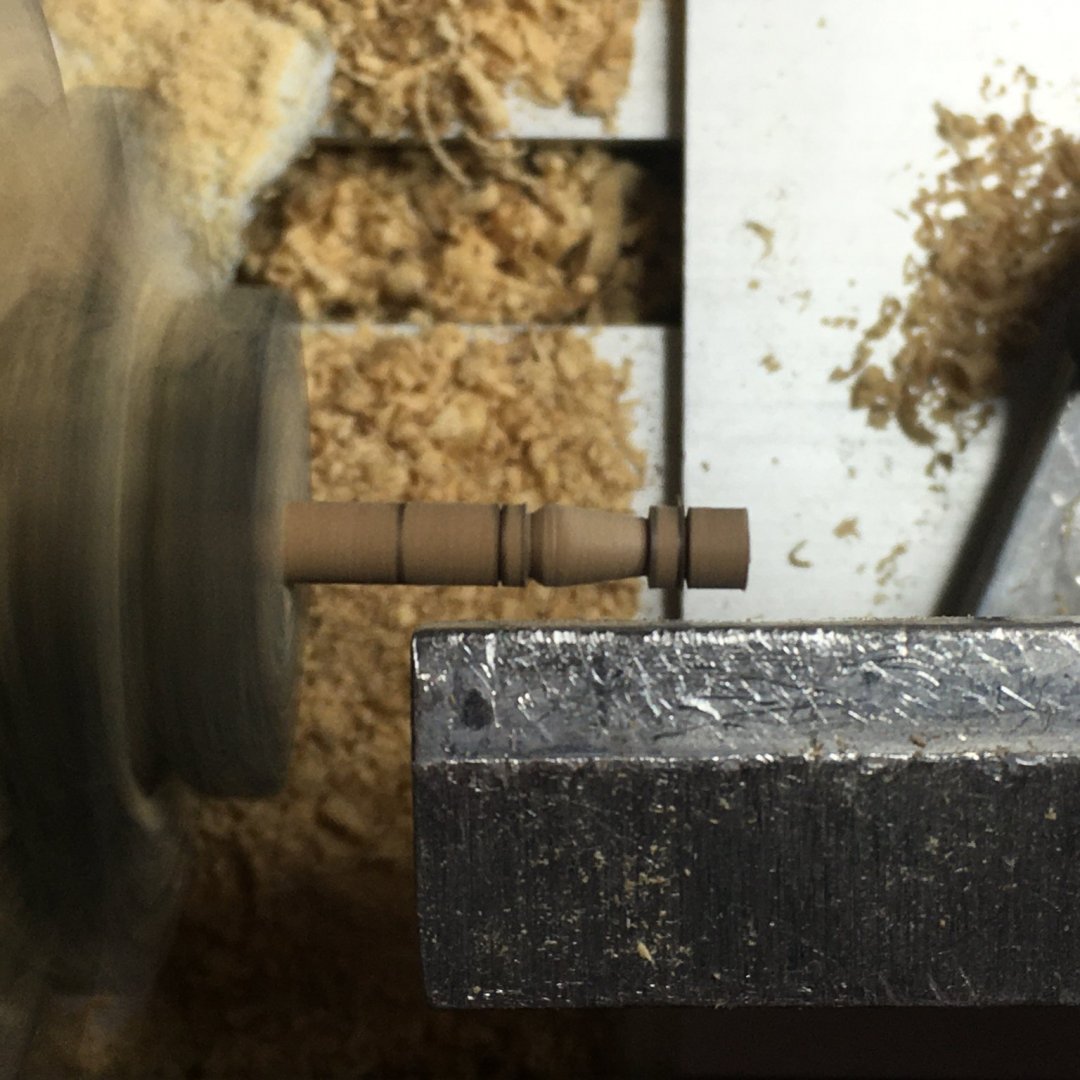
I decided to have a go at turning my own balustrades on the Proxxon wood lathe. I had a spare castello boxwood mast left over from Speedy which I turned down to just under 3mm. Then, using the PE as a template I started practicing with various turning tools and files:
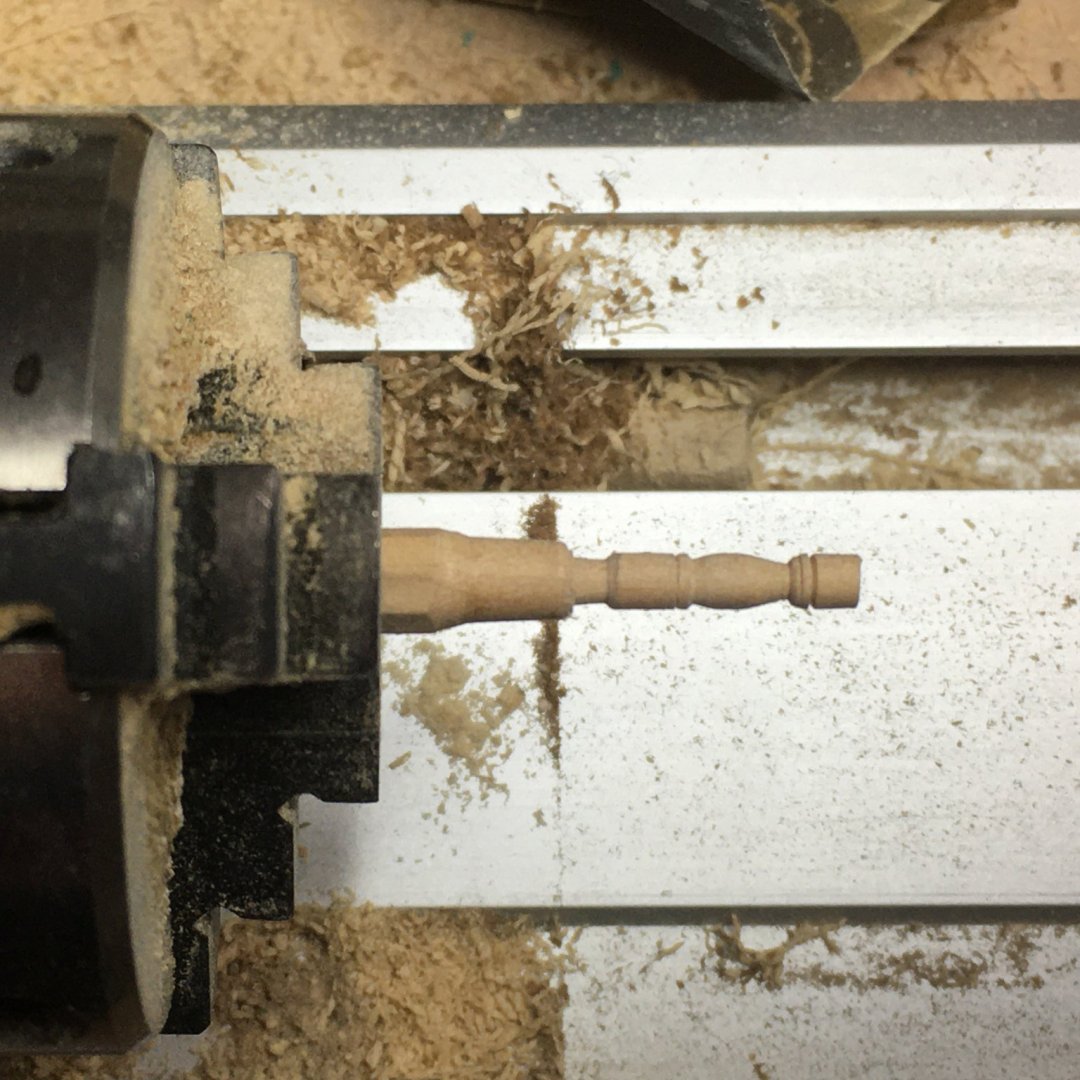
I made quite a few before I had four that passed muster. Here are the rejects!

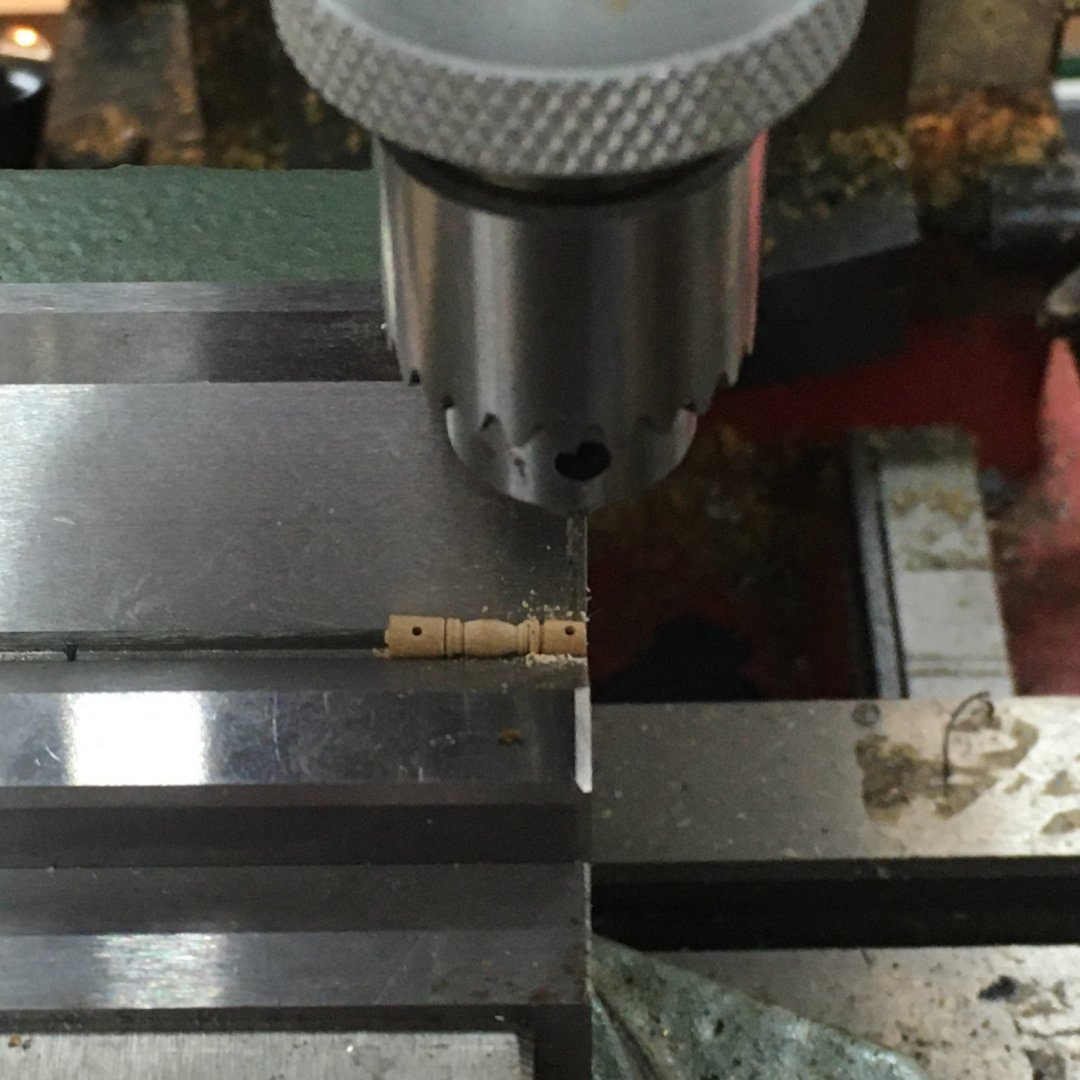
The next job was to cut the balustrades off the PE using a jeweler's piercing saw, leaving enough of a peg on the railings to fasten into the new balustrades:
To drill 0.6mm holes in the balustrades accurately I used a technique I described here in my Speedy log, employing a vee block and a micro drill attachment in my mini mill:
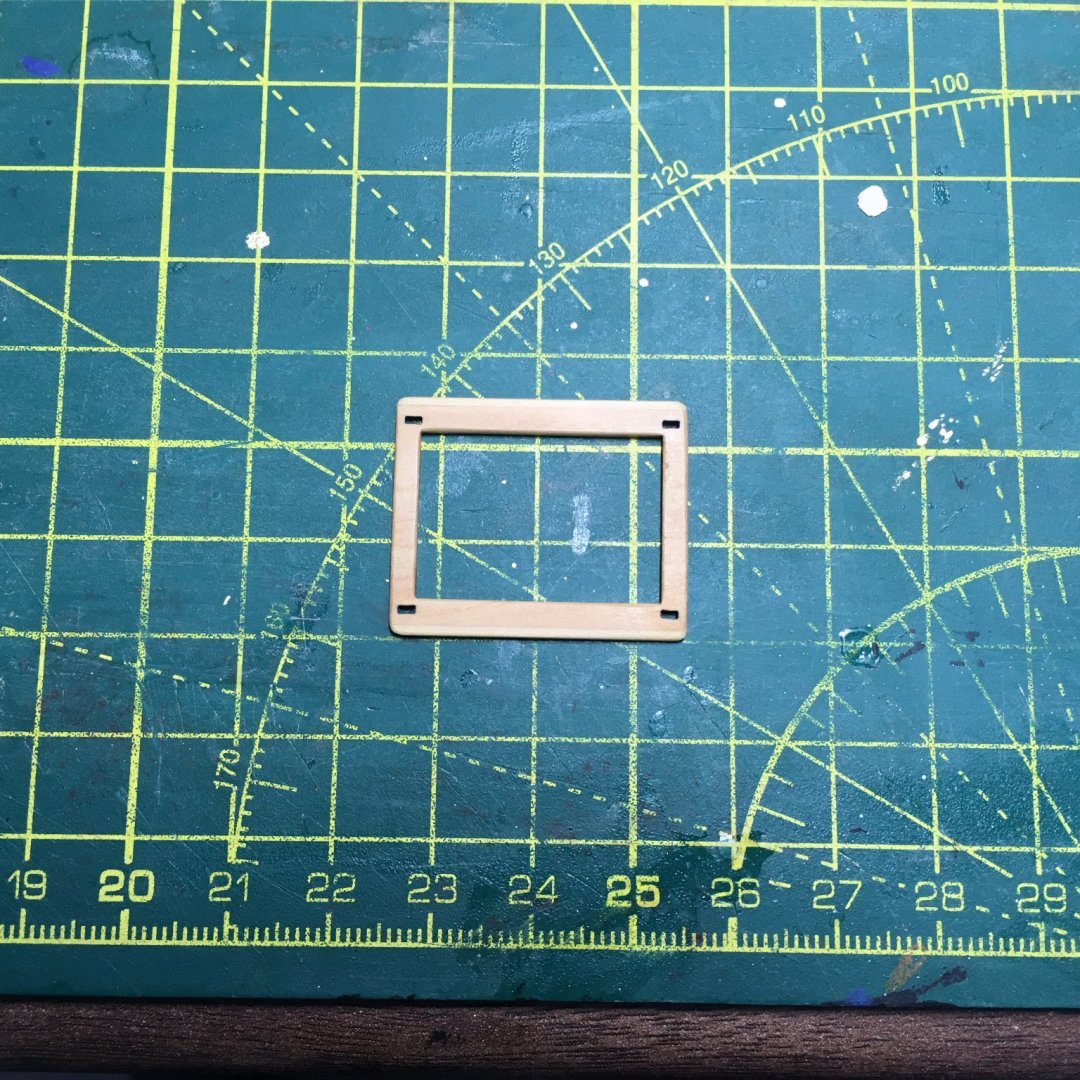
Next I prepared the coaming, sanding off the char and rounding off the sharp edges. The only slight change here was to the width. Because the new balustrades are thicker than the photoetch I had to glue strips of 0.5 mm boxwood to the long edges:
With the balustrades and PE glued up, painted and stuck to the coaming here's the end result:

This little side project has recharged my batteries and I'm ready to start on the hull decoration again.
Derek
-
-
Glad to see you gave into temptation Tim! You won't regret your choice.
I second Glenn's comments about jigs. Half the art of milling is about finding the best ways to hold work down securely and in the best position to work on it. If you enjoy problem solving that's half the battle, but you'll also find lots of examples of jigs on the forum. As a starter, have a look at Marsalv's Royal Caroline build. In his current model he uses CNC machinery, but on Caroline you'll see what he was able to achieve with the standard MF70.
I also agree with Glenn on the Proxxon vice (PM40) and dividing head (#24 264).
Enjoy!
Derek
-
-
Looks fine to me Steve, although I hope those reddish patches aren't blood!
Derek
-
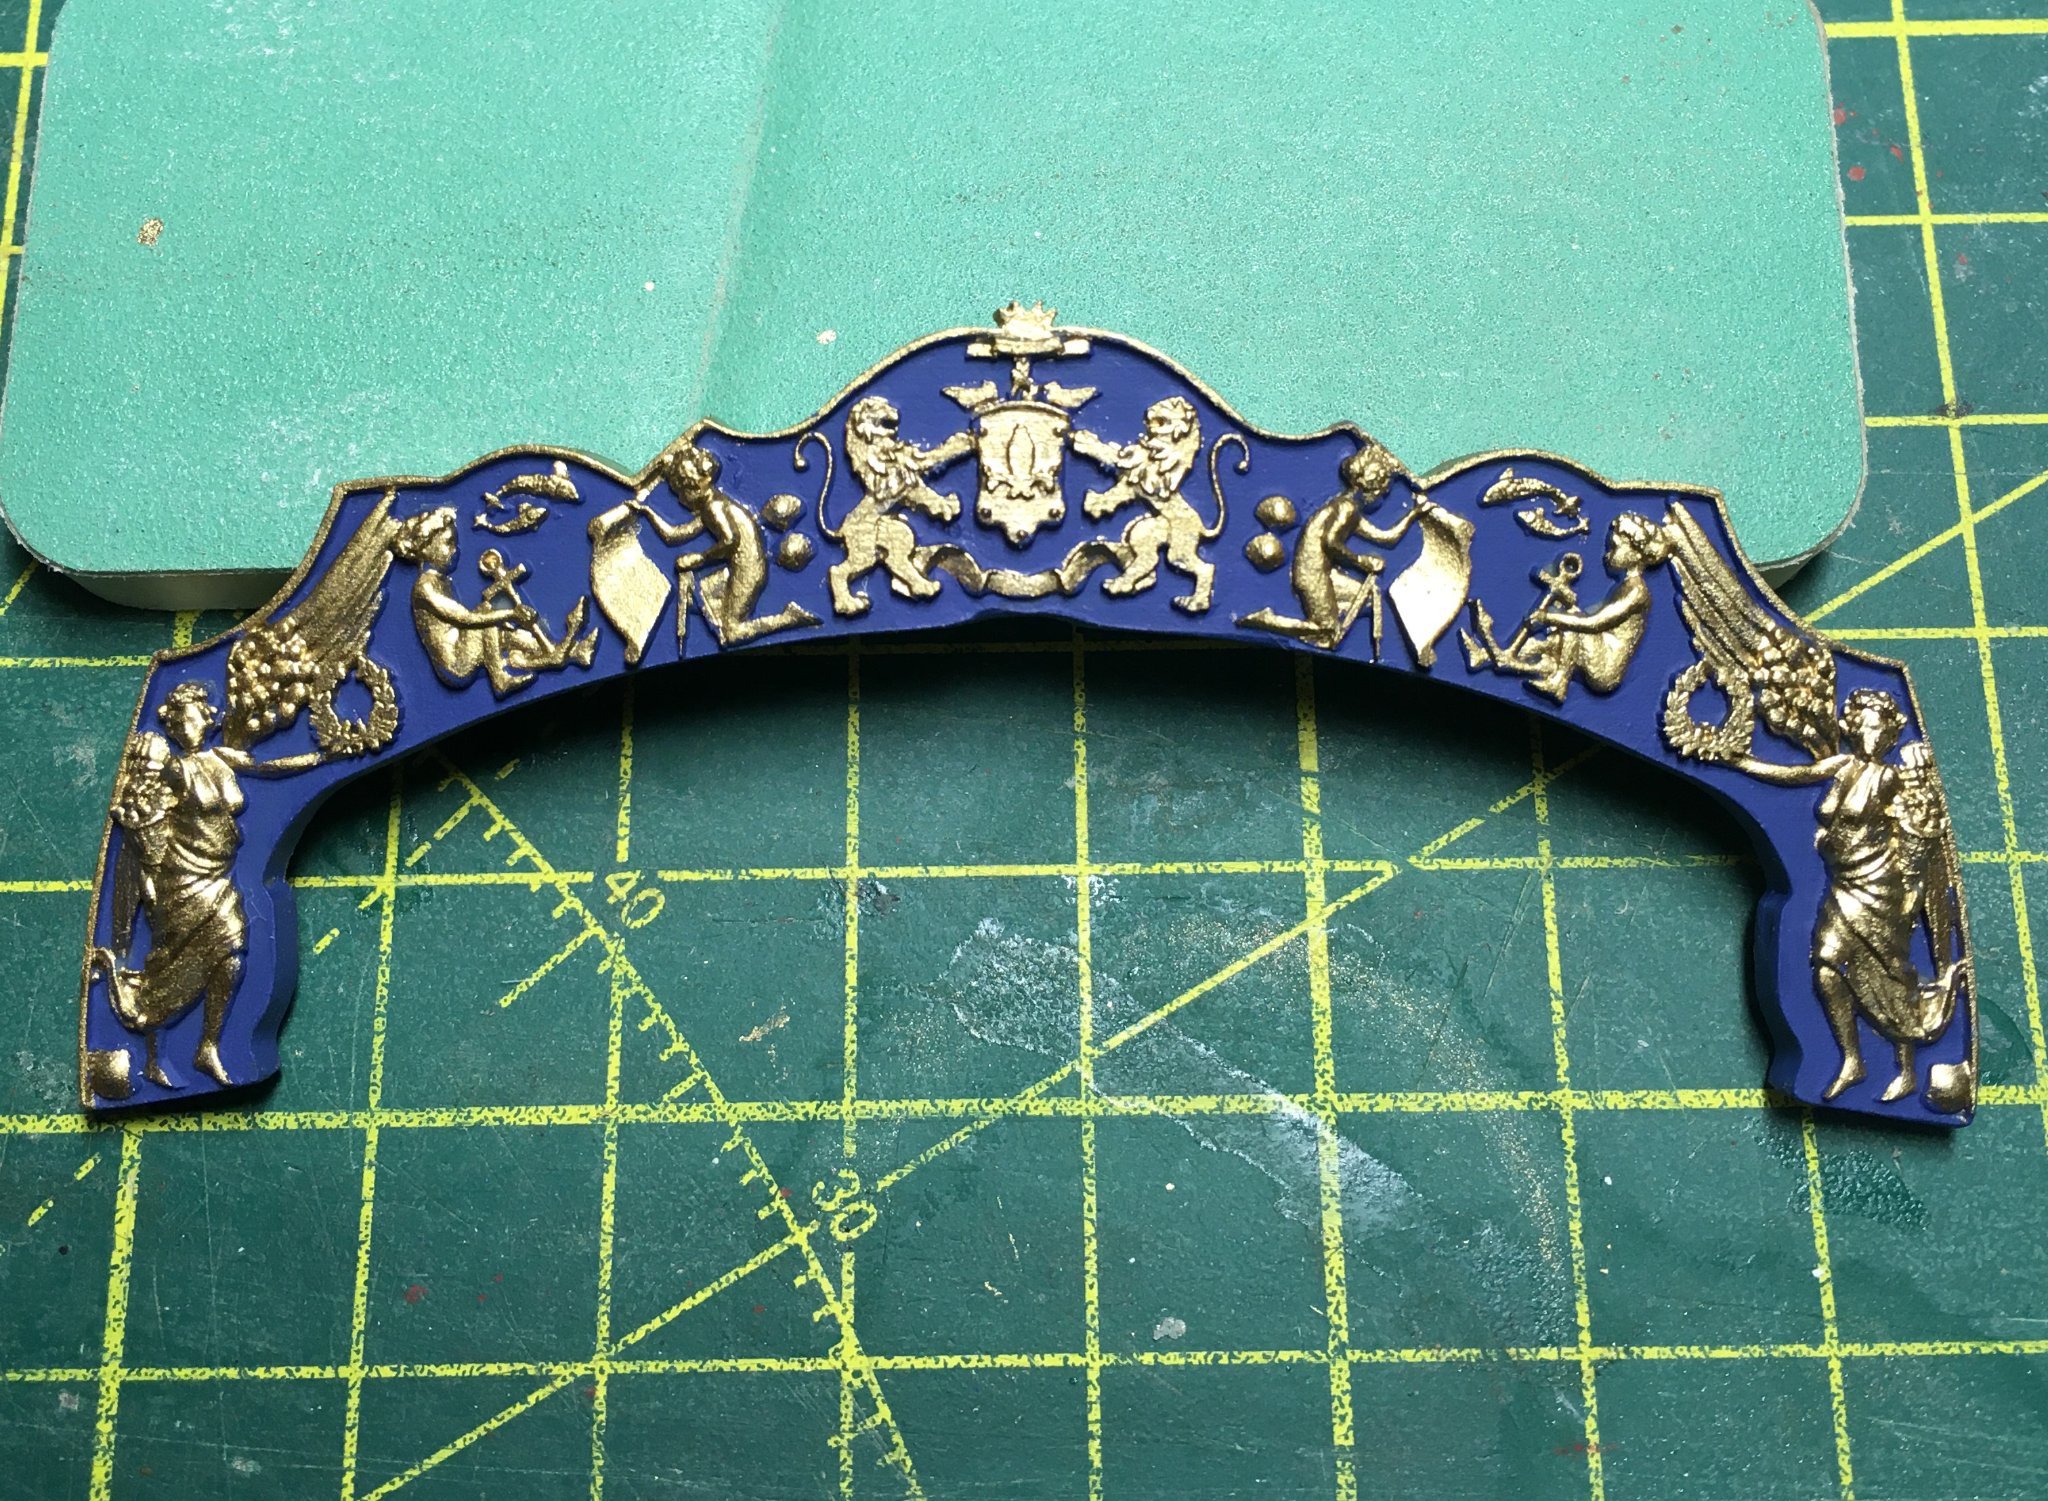
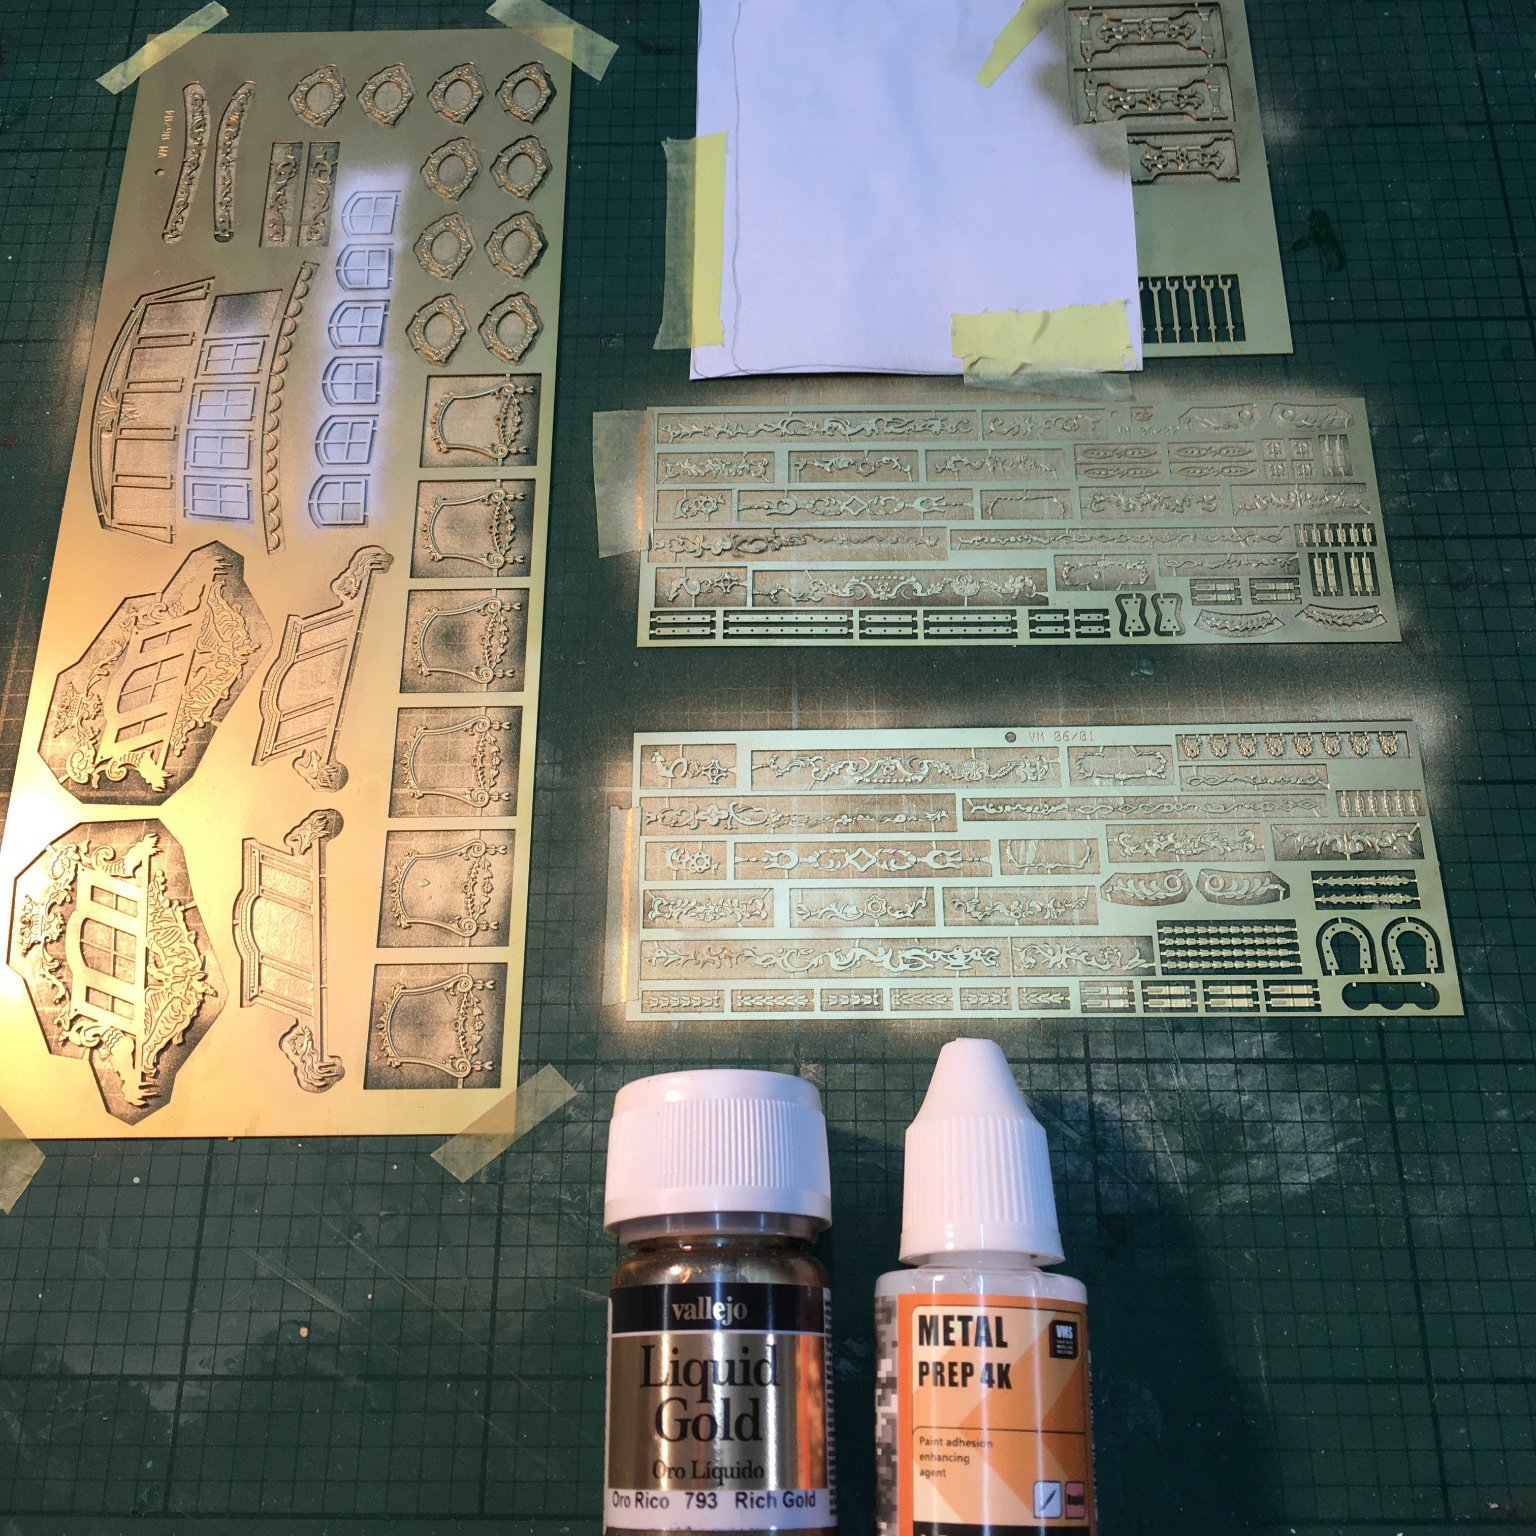
Bits & pieces
Thanks for the likes and supportive comments. I've finally made my mind up not to paint the hull white, so instead of struggling to get the waterline right I decided to amuse myself with a couple of odd jobs.
First, I had a go at the stern decoration. I'd seen and admired this in other people's logs and the prototype, and when I came to examine the resin casting closely I was struck again by how finely detailed and well produced it is. I dug out my smallest brush and held my breath for about two hours whilst I produced the following:

I followed the kit instructions on dipping the casting in hot water to soften it before moulding it to the curve of the stern, and on the painting technique. Humbrol #25 acrylic blue went on first, followed by Vallejo #793 Rich Gold thinned with a drop of isopropyl alcohol then sealed with Vallejo matt acrylic varnish.
Then it was on to the photo-etch decorations. The instructions suggest priming these in white then applying gold where appropriate. However I'd found a product called Metal Prep 4k by Vantage Modelling Solutions (VMS) that claims to prepare PE for painting more effectively than traditional primers and etchers, and to be more resistant to damage after painting. I gave it a go on four sheets of photoetch (degreasing first with acetone) and it seemed to provide a good base for the white and gold top coats. After applying the latter I was fed up with cleaning my airbrush so I painted on the matt varnish sealing coat with a brush. It remains to be seen how well this finish stands up to handling and fitting to the hull.
Again, I was struck by the incredible quality and detail in the photo-etch.

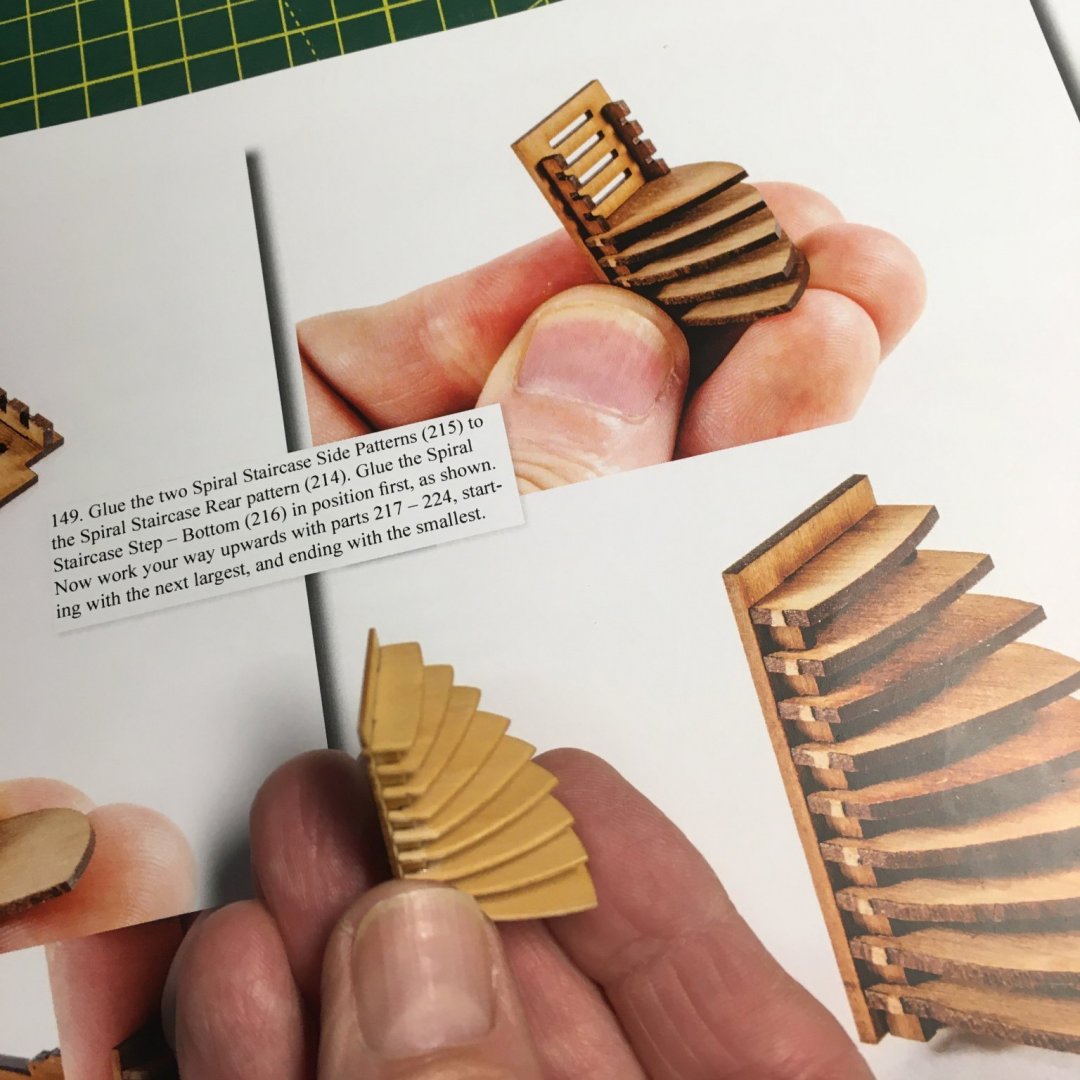
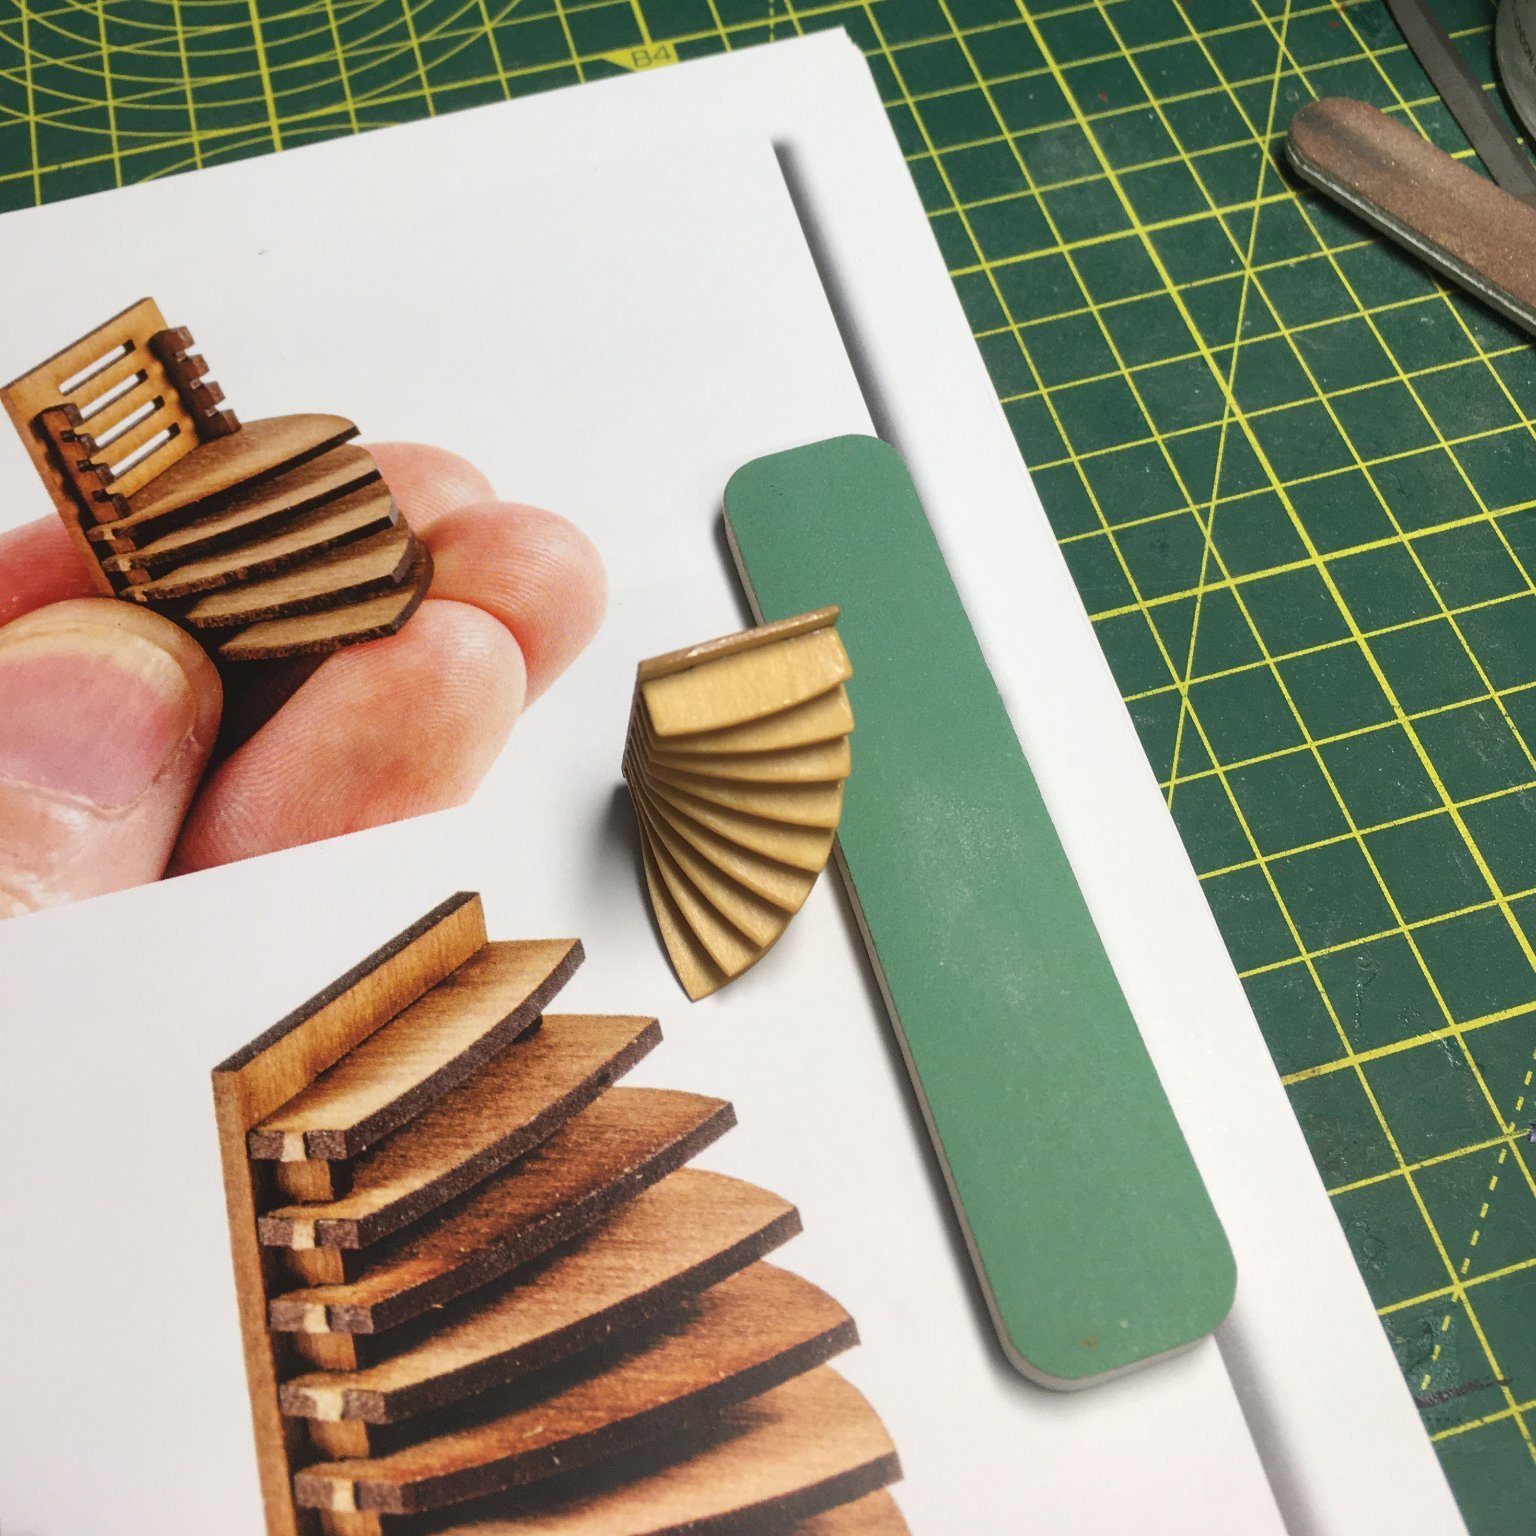
Finally I had an enjoyable 30 minutes assembling the curved staircase. In previous models I've made my own stairs and ladders as kit offerings were invariably the wrong scale and too chunky. However with Speedy and now with Duchess Chris Watton has ensured that all the fittings are to scale.
Although the staircase will be largely hidden in the final model, I wanted to clean it up properly for my own satisfaction, sanding off the char, smoothing the upper surfaces and gently rounding the noses of the treads. Obviously James didn't need to go to these lengths for the prototype, but it's worth showing the difference this preparation makes:

Next I'm planning to experiment with different glazing options before I fit the window frames and continue with the decoration.
Derek
-
I agree - she's looking great. I'm glad to see someone else using shellac - one of my favourite finishes. One thing I'm sure you're aware of though - rubbing down with steel wool can cause problems unless you manage to get rid of every last tiny piece, otherwise they'll rust and spoil the finish later on. In future you might be safer just buffing - I use a piece of soft, lint-free cloth once the shellac has dried.
Derek
-
Beautiful planking work Maurice, really showing off the fine lines of this ship. I particularly like the round tuck in the 5th shot down.
Derek
- Blue Ensign and mtaylor
-
2
-
-
15 hours ago, WalrusGuy said:
Hi Greg, do you have any suggestions of which brands are good for these kinds of files? And do you know where we can purchase these? To be honest, I had no idea these existed until you pointed it out.
4 hours ago, dvm27 said:The pillar files by Grobet
I would also suggest barrette files, such as those from Vallorbe, one of the top makers. See here for a series of posts discussing these and other files in my Speedy log. The discussion starts off on filing out gunports, but these files are very useful for any jobs where you need to file just one face whilst protecting others.
Derek
-
Neat work David - you're making good progress. Have you treated the deck? Sorry if I've missed the explanation, but it looks different in the last few pics.
-
Hi Tim
I don't know how I missed your log before now, but I'll follow with interest from now on. It's great to see you back in your workshop, and with what looks like a fun project. I love cross-sections, they're full of interesting detail and take up a lot less space than conventional models - I have one framed as a picture on the wall.
Derek
-
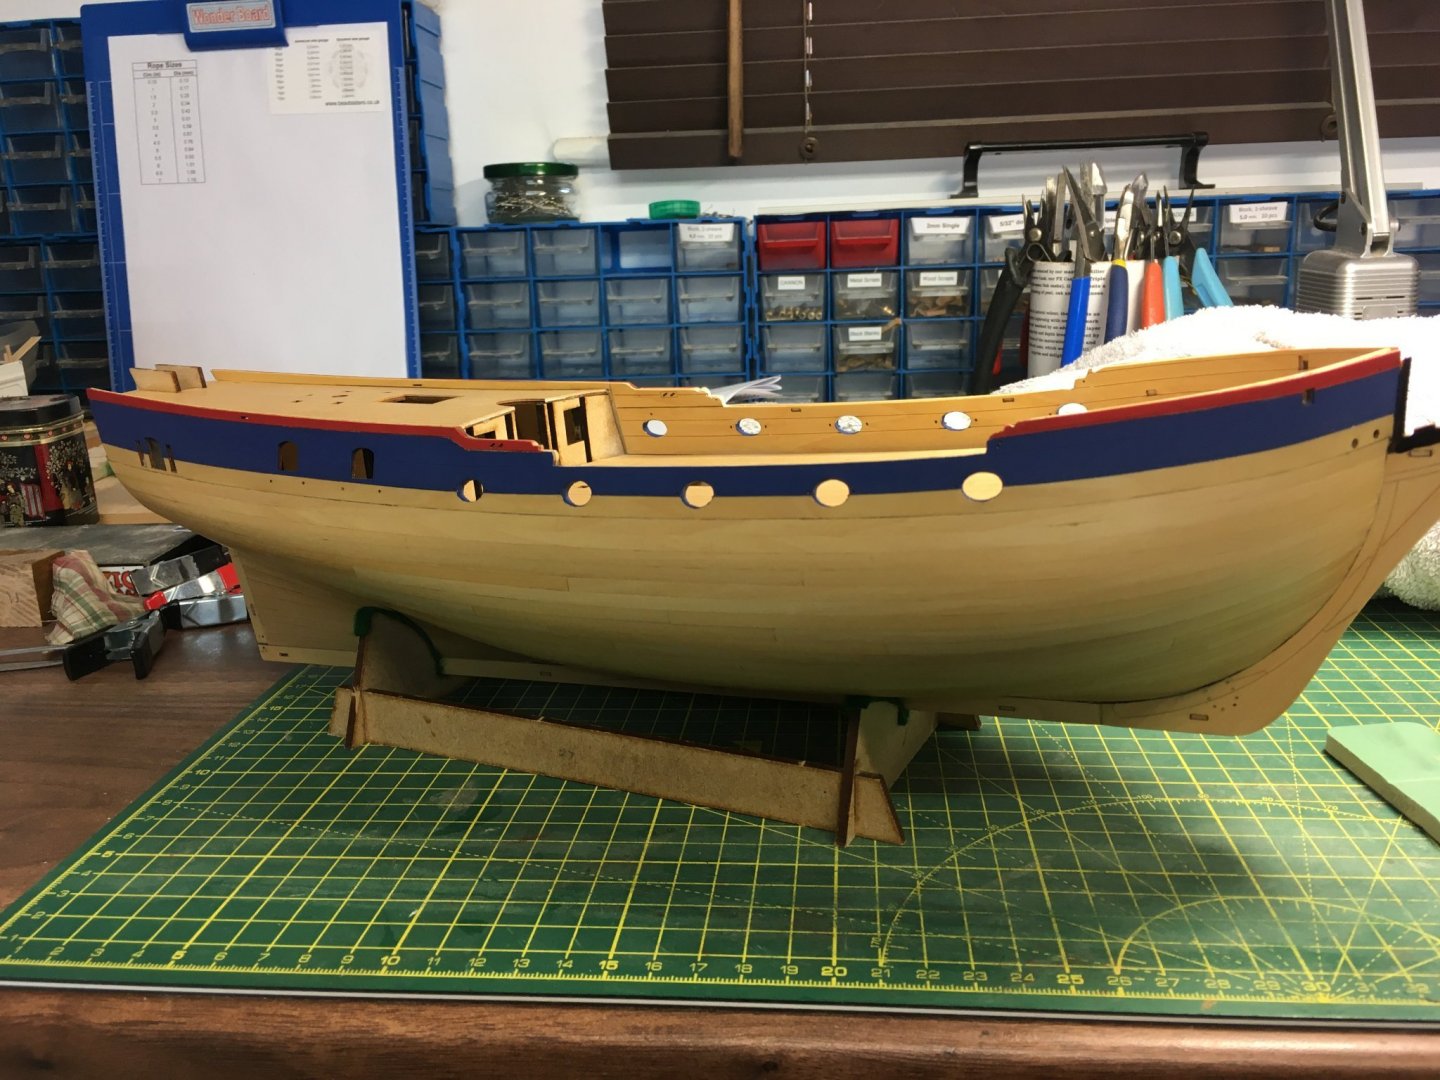
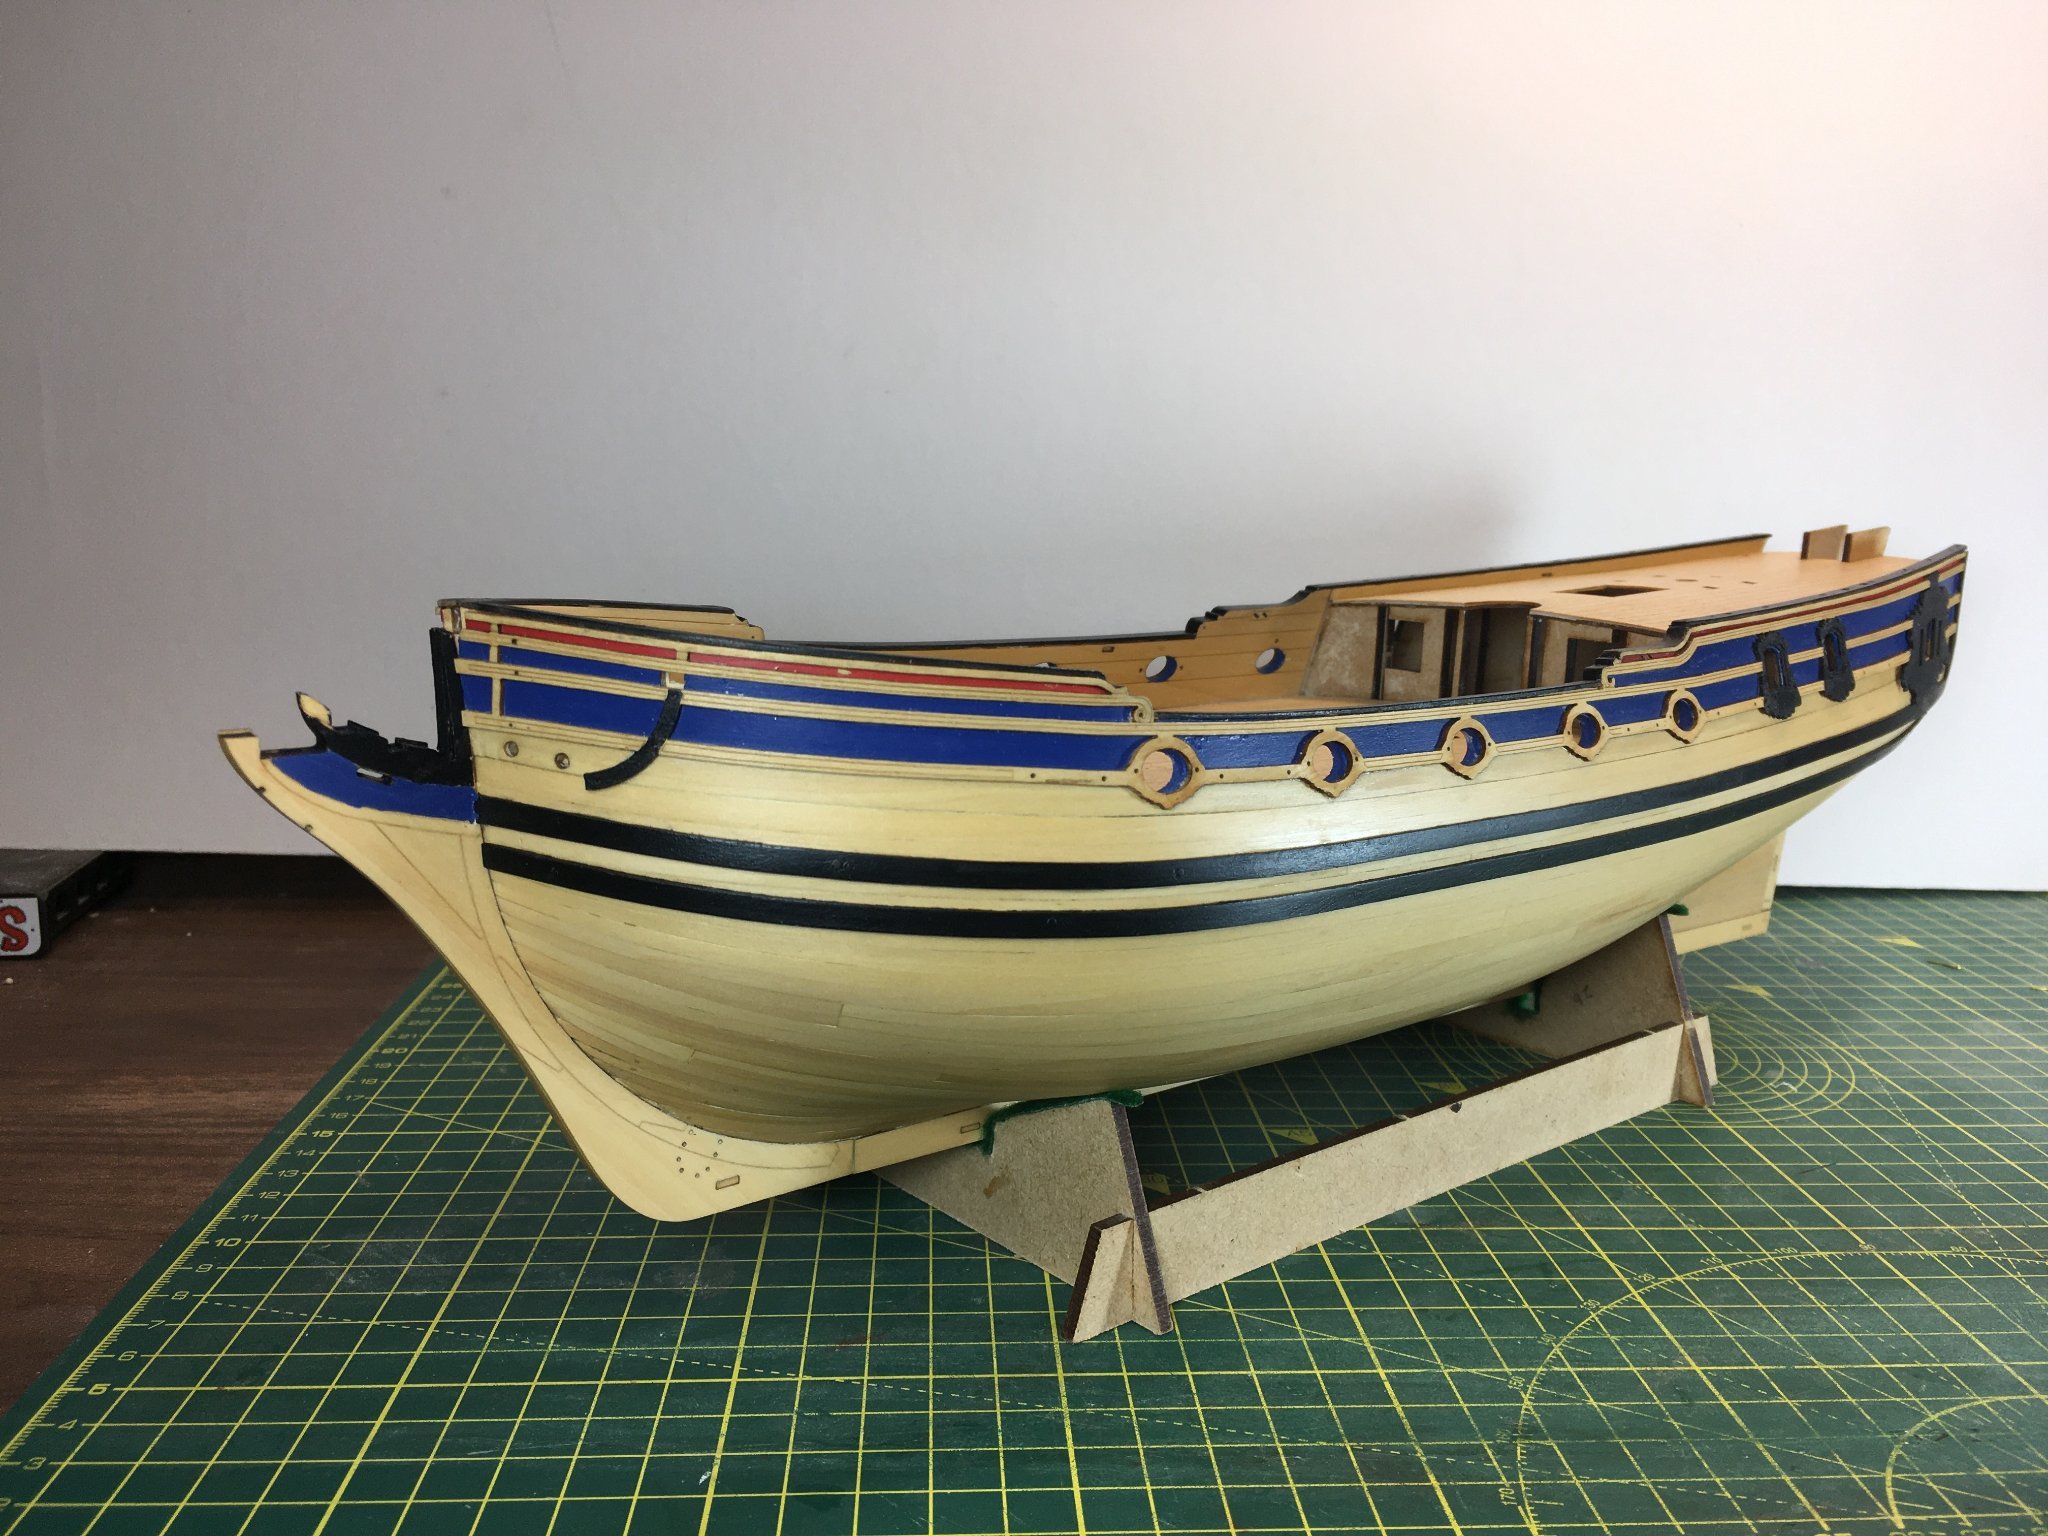
Gunwales, Rail Patterns & Wales
Thanks as always for the likes and kind comments.
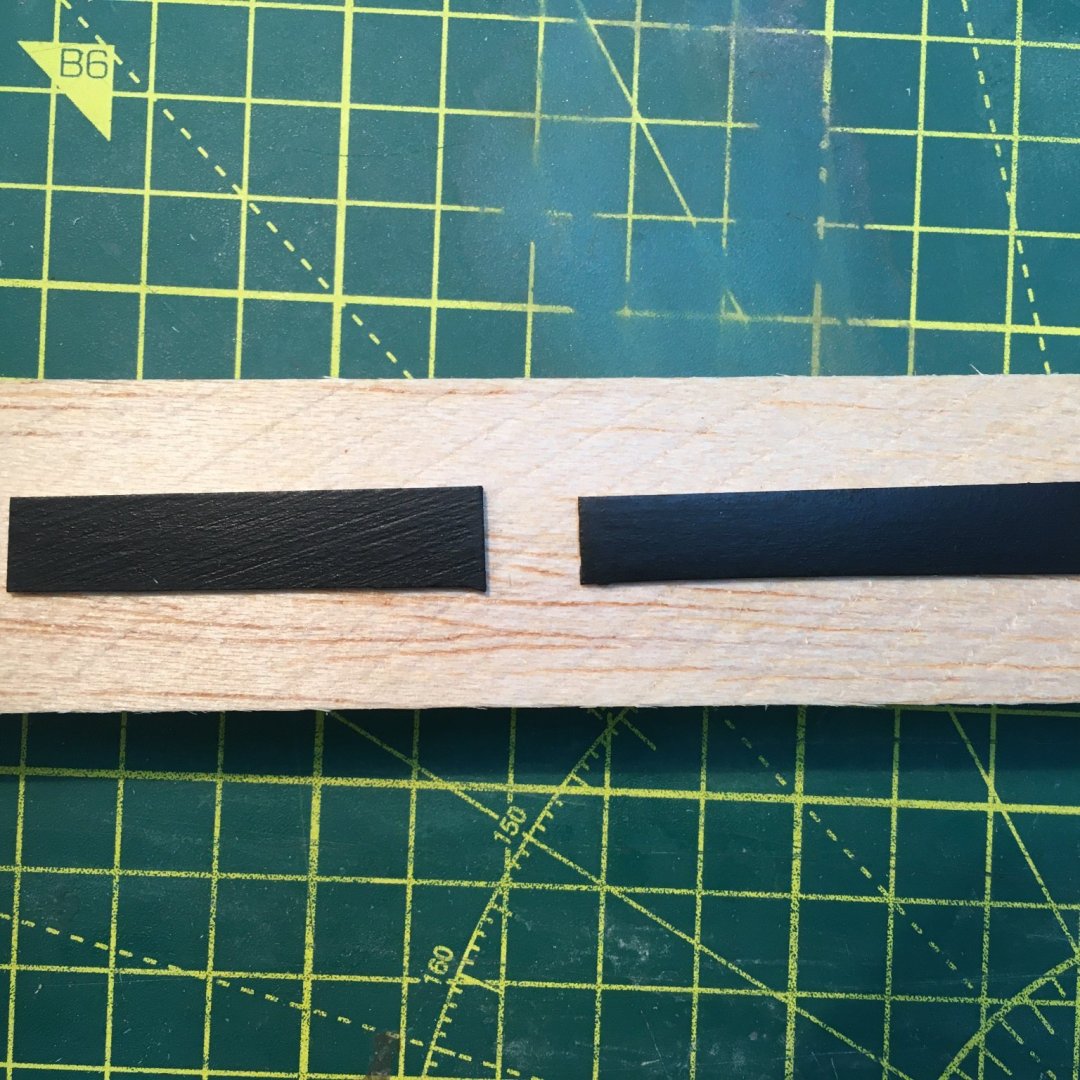
Before starting on painting the upper works, I wanted to do something about the laminations visible in the gunports. Their oval shape made lining them in the normal way with thin strips of timber a challenge, so I decided to disguise them with woodfiller. I used masking tape on the inner bulwarks to prevent filler and paint getting on to them, as unlike warships they will not be painted. Here's the filler I used, and the result:


For paint I used Humbrol Blue #25 and Vallejo Red 70.957. In the manual James used Humbrol enamel but I prefer acrylic for wood. I wanted to try to up my game on this job, using multiple coats of thinned paints rather than slapping on a couple of thicker coats and hoping for the best. Not easy to tell in the first picture, but hopefully the close-up of the starboard bow shows the result was smooth with no visible brushmarks:
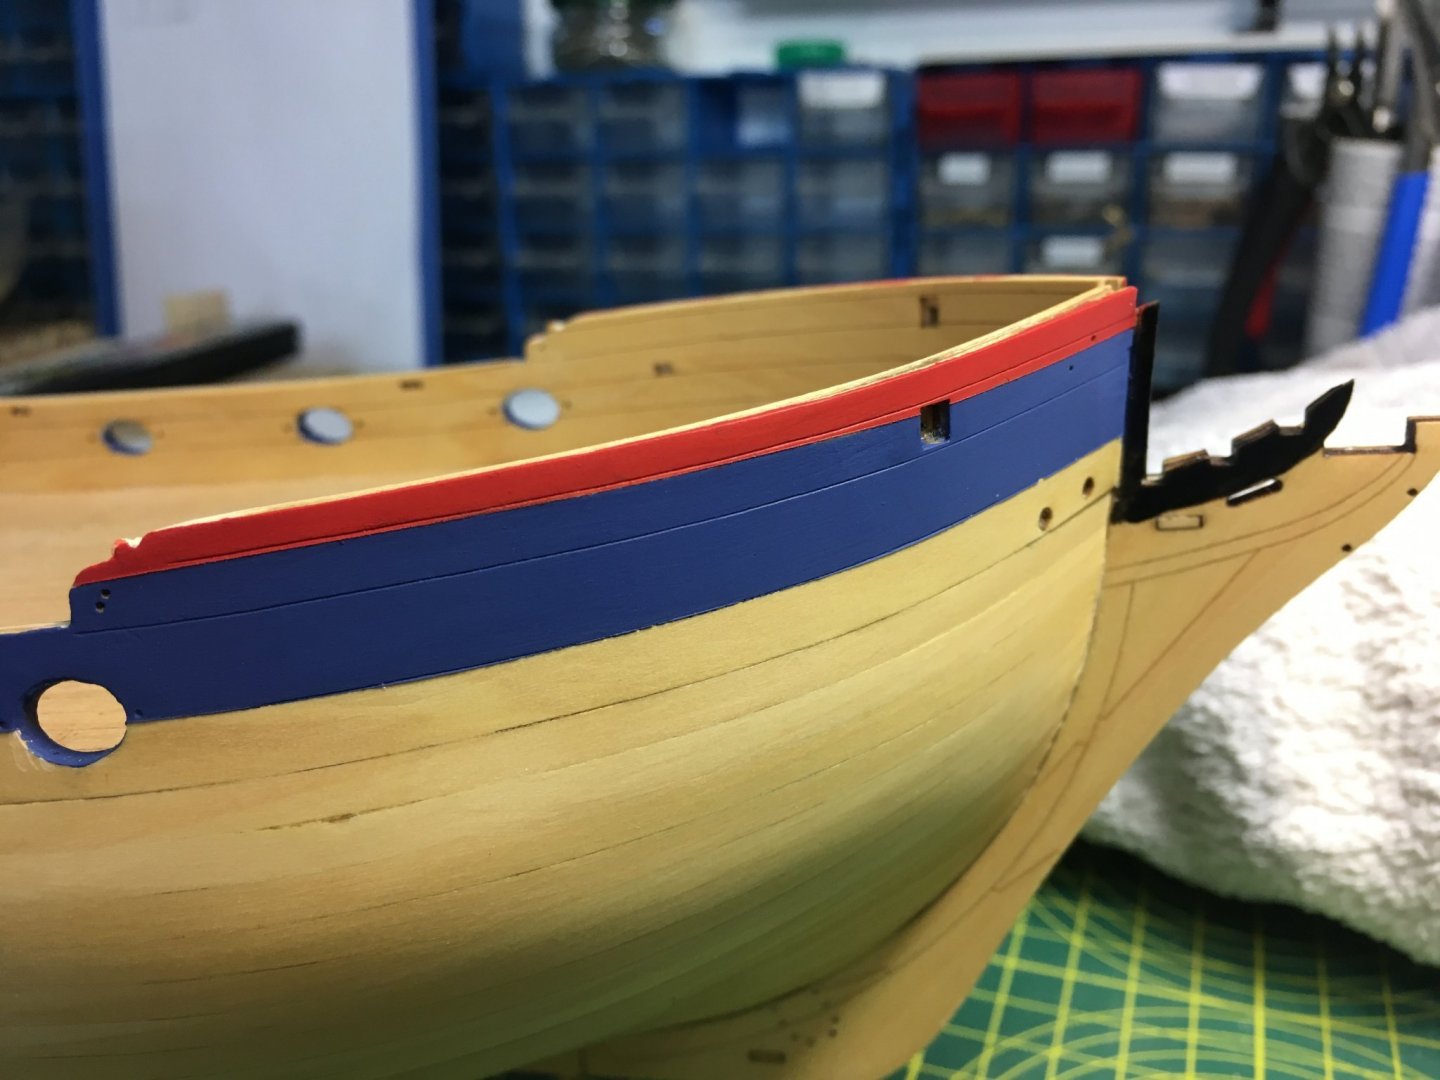
I used Tesa tape for the straight and gently curved bits, and this Modelcraft flexible tape from Vanguard Models elsewhere. @James H recommends Tesa tape and after trying it so do I - a fraction of the price of other brands and it works just as well.
The next job was fixing the gunwales to the hull, three lengths each side. Although each piece is precut to shape, they take a bit of preparation before they can be fitted. There has been some discussion on other logs about the importance of removing laser char, even on parts that will be painted. However I've found that it is equally important to sand laser cut parts everywhere that will show because, although the wood is good quality, the finish isn't smooth enough for painting. Here's two gunwales to illustrate the point, one sanded with 240 grit, the other not. I also like to lightly sand edges and corners to make them less sharp:

As a further test, I cut two pieces from the sheet the gunwales came from, sanded one and painted both:
Hopefully the difference is obvious.
The next job was applying the rail patterns, two each side. The technique as set out in the manual was fairly straightforward - soak the bow ends in hot water, clamp to the hull and leave to dry (I did this part before painting the hull) then paint and glue in place. The manual recommends allowing the patterns to dry overnight, but I got impatient and used a hot air gun to speed the process. Seemed to work OK. Here's the port patterns clamped up:

The sharp eyed among you will have noticed that I'd already managed to break off all but one of the little dangly bits (nautical term 😁) under the windows. These patterns are incredibly well cut and detailed, but also incredibly fragile. Fortunately I was able to find all the missing parts, but I won't re-attach them until I come to fit the PE over them otherwise I'd be sure to snap them off again.
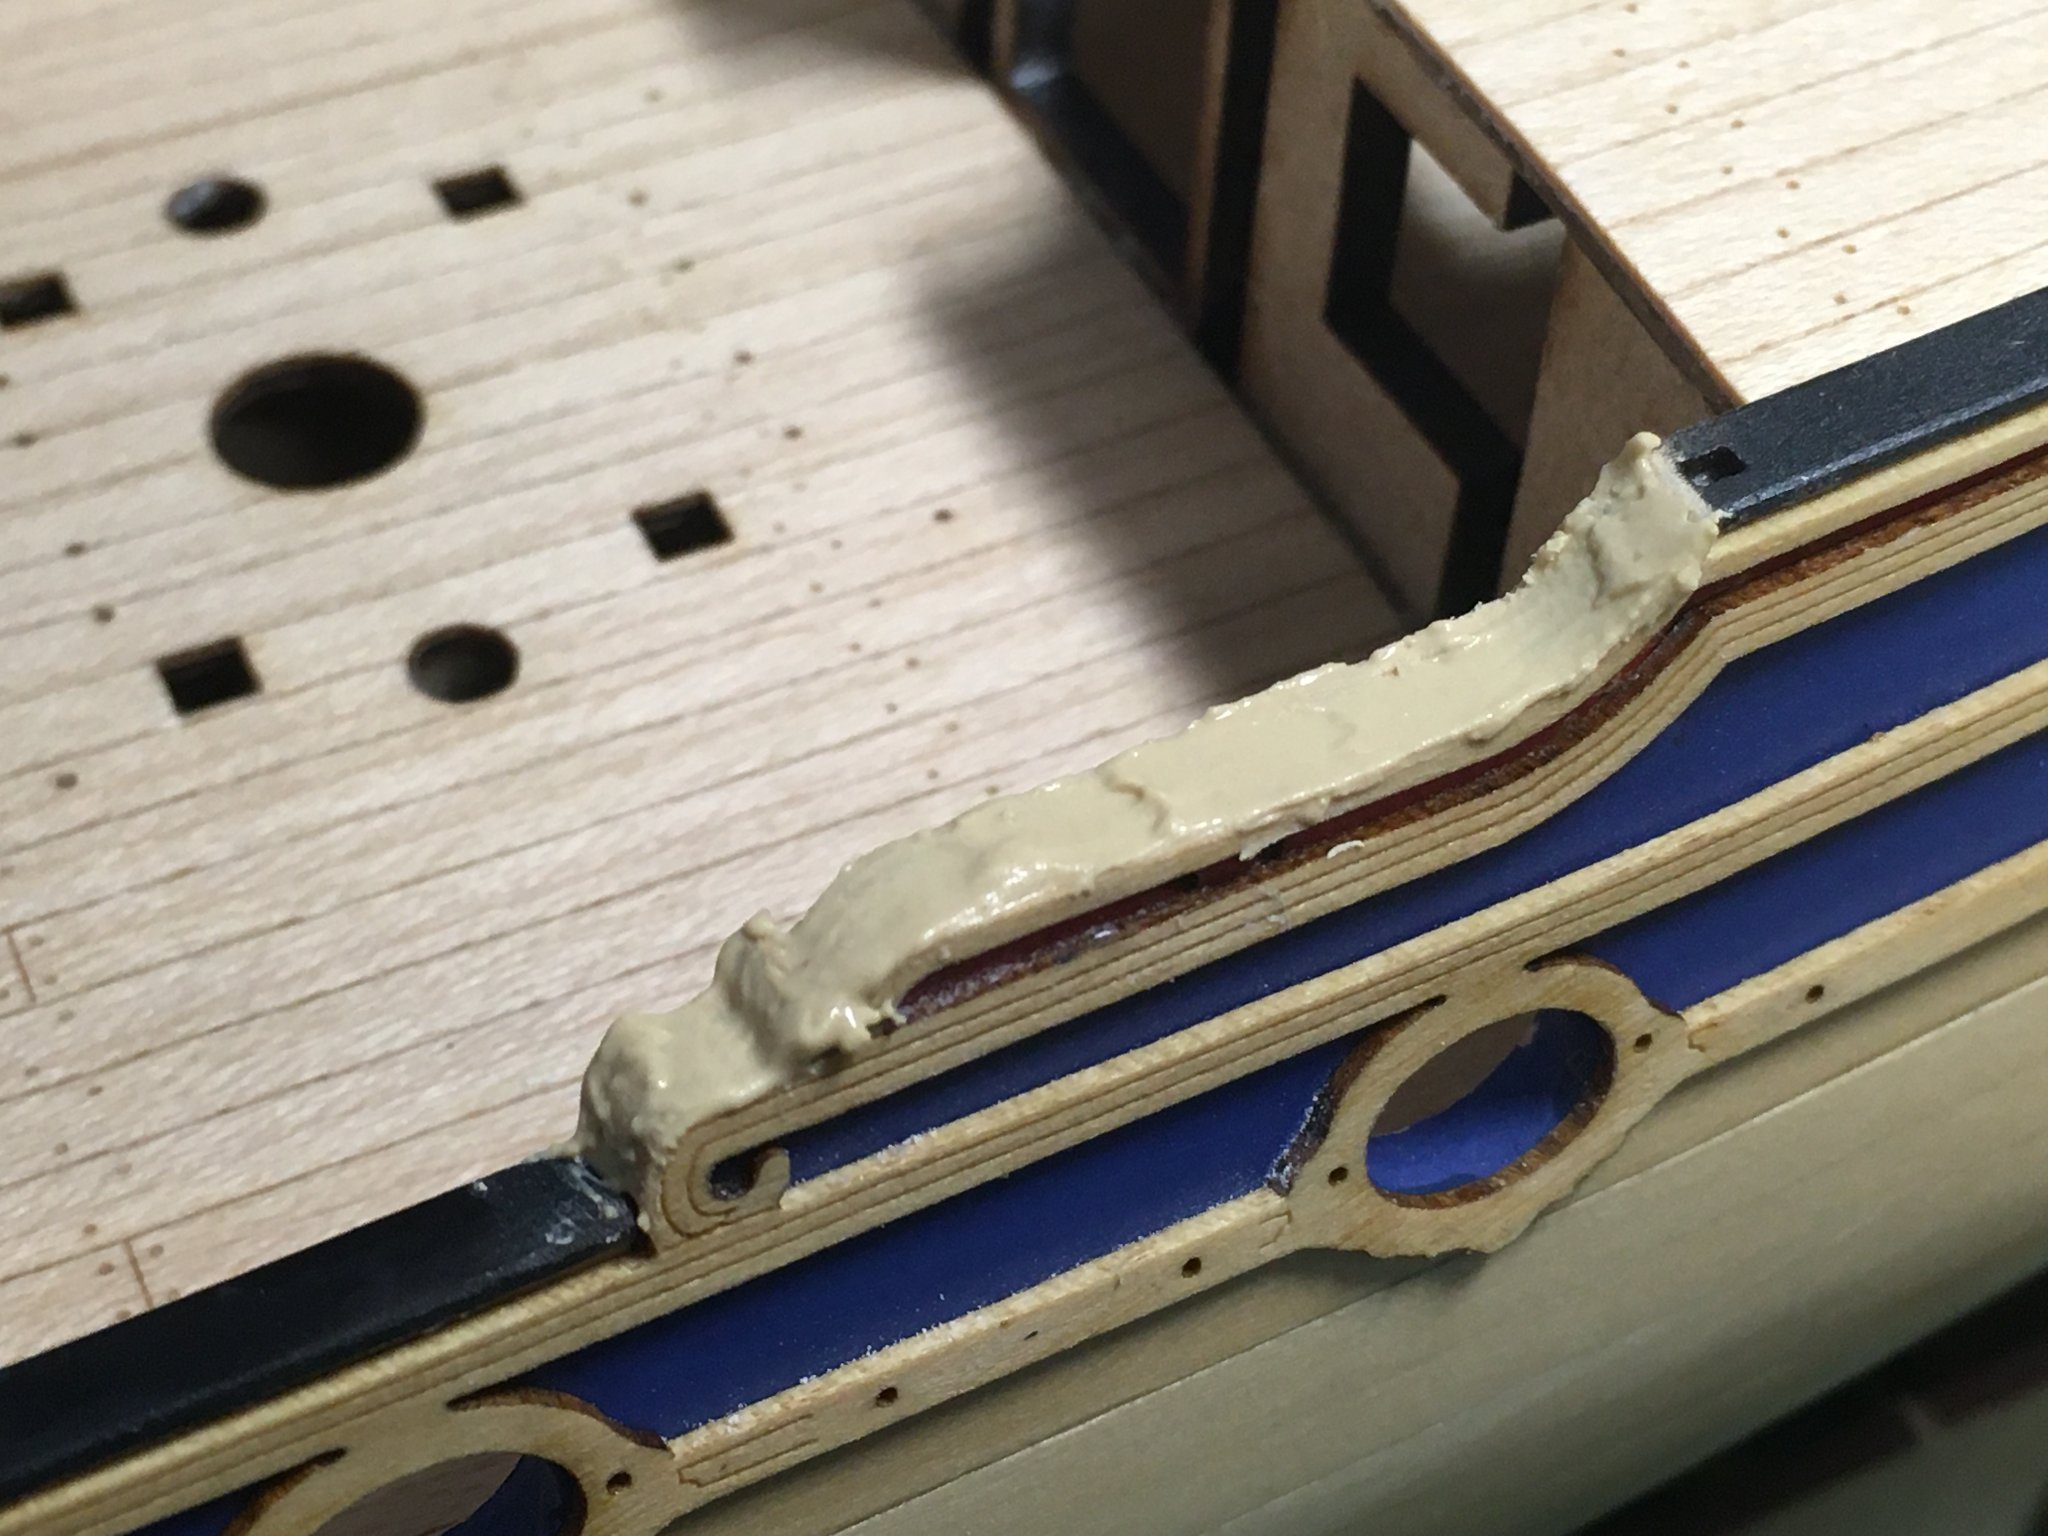
Before fitting the wales I wanted to finish sorting the gunwales. There are two places on each side where the for and aft gunwales dip down to the midships area, and in these places the laminations are exposed. Although I'd got them sanded fairly smooth I was still concerned that they would show through the paint, so I applied applied woodfiller, sanded it and painted to match the rest of the gunwales:
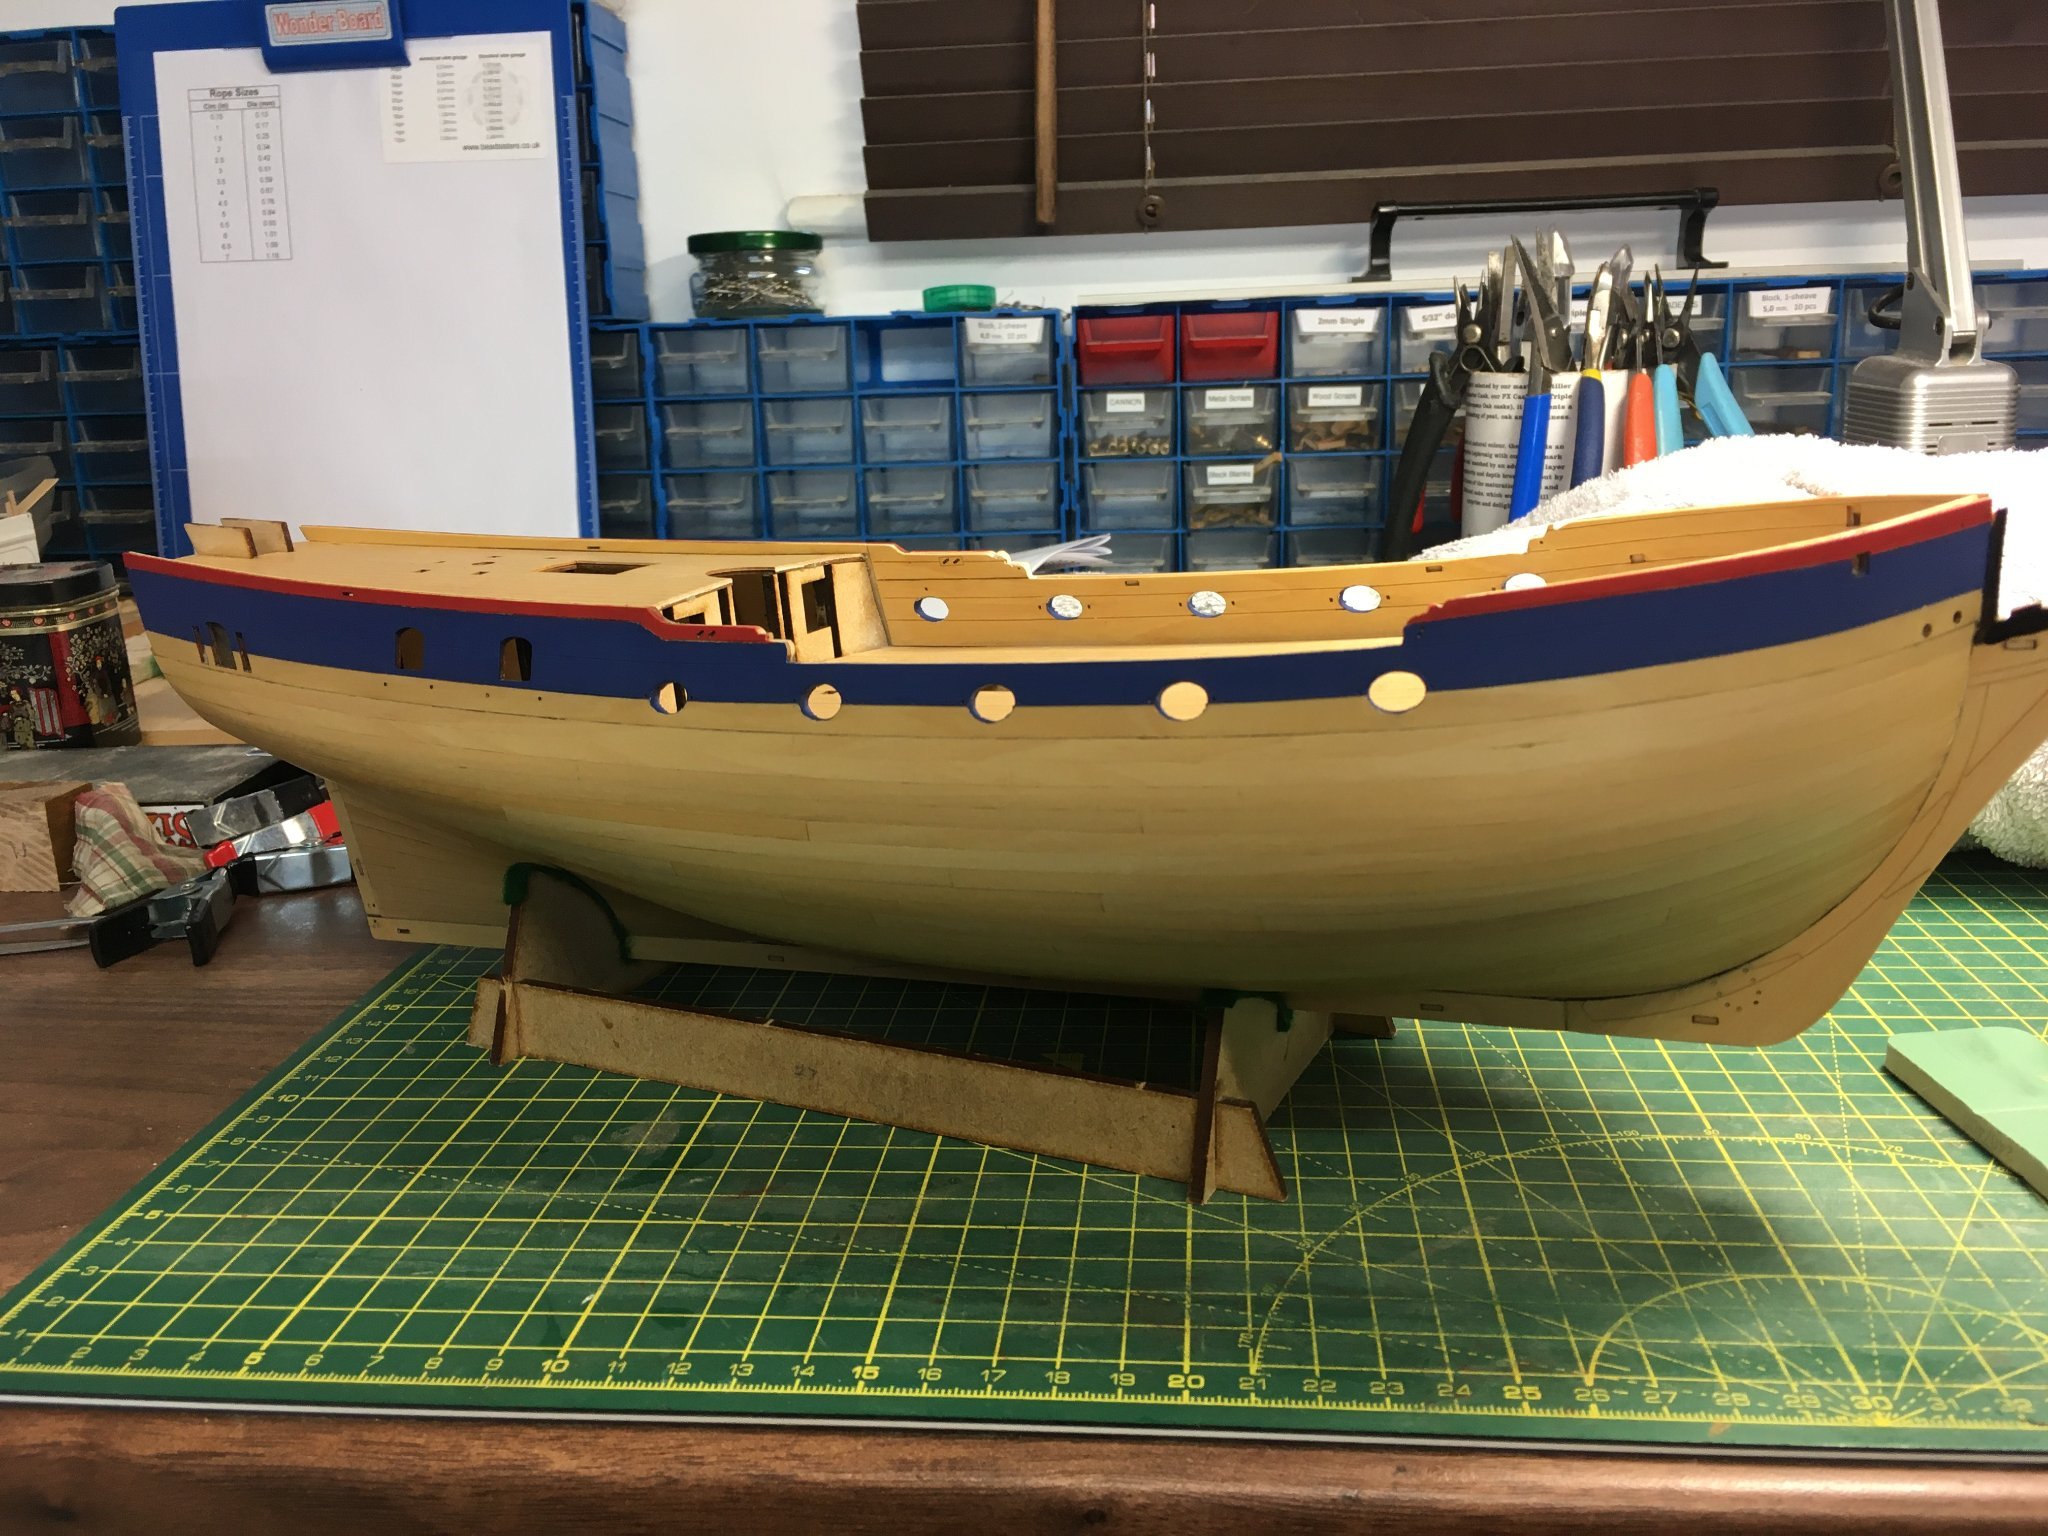
Lastly, it was onto the wales. These come precut to the shape of the hull, so after sanding, soaking in hot water, shaping on the hull and painting, I was left pondering how best to fit them. I knew from the plans and manual where the upper wales needed to go, but I was worried about getting glue on my nice WOP-ed hull. In the end I decided to use pins to fix the wale in position initially, tweaking the pin positions as necessary before committing to PVA. I used the 0.5mm pins supplied in the kit, and drilled 0.45mm holes. I drilled a series of holes in each wale first and inserted pins so they just poked through, then held one end in position against the stem. When it looked right I pressed on the first pin with a spare finger to mark the hull for drilling. With the first pin in position, but not driven fully in, it became easier to repeat the process along the length of the wale. If necessary I took pins out, re-drilled their holes and repositioned them. Once happy with the upper wales I took them off the hull and applied PVA before pinning them back in place, this time driving the pins fully in.
Next, I followed the manual's suggestion and cut a 3mm wide piece of spare limewood from the kit to act as a spacer for lower wales. This made positioning the latter easy. Once all four wales were in place I filed the pin heads flush and painted them. Here's the current state of play:
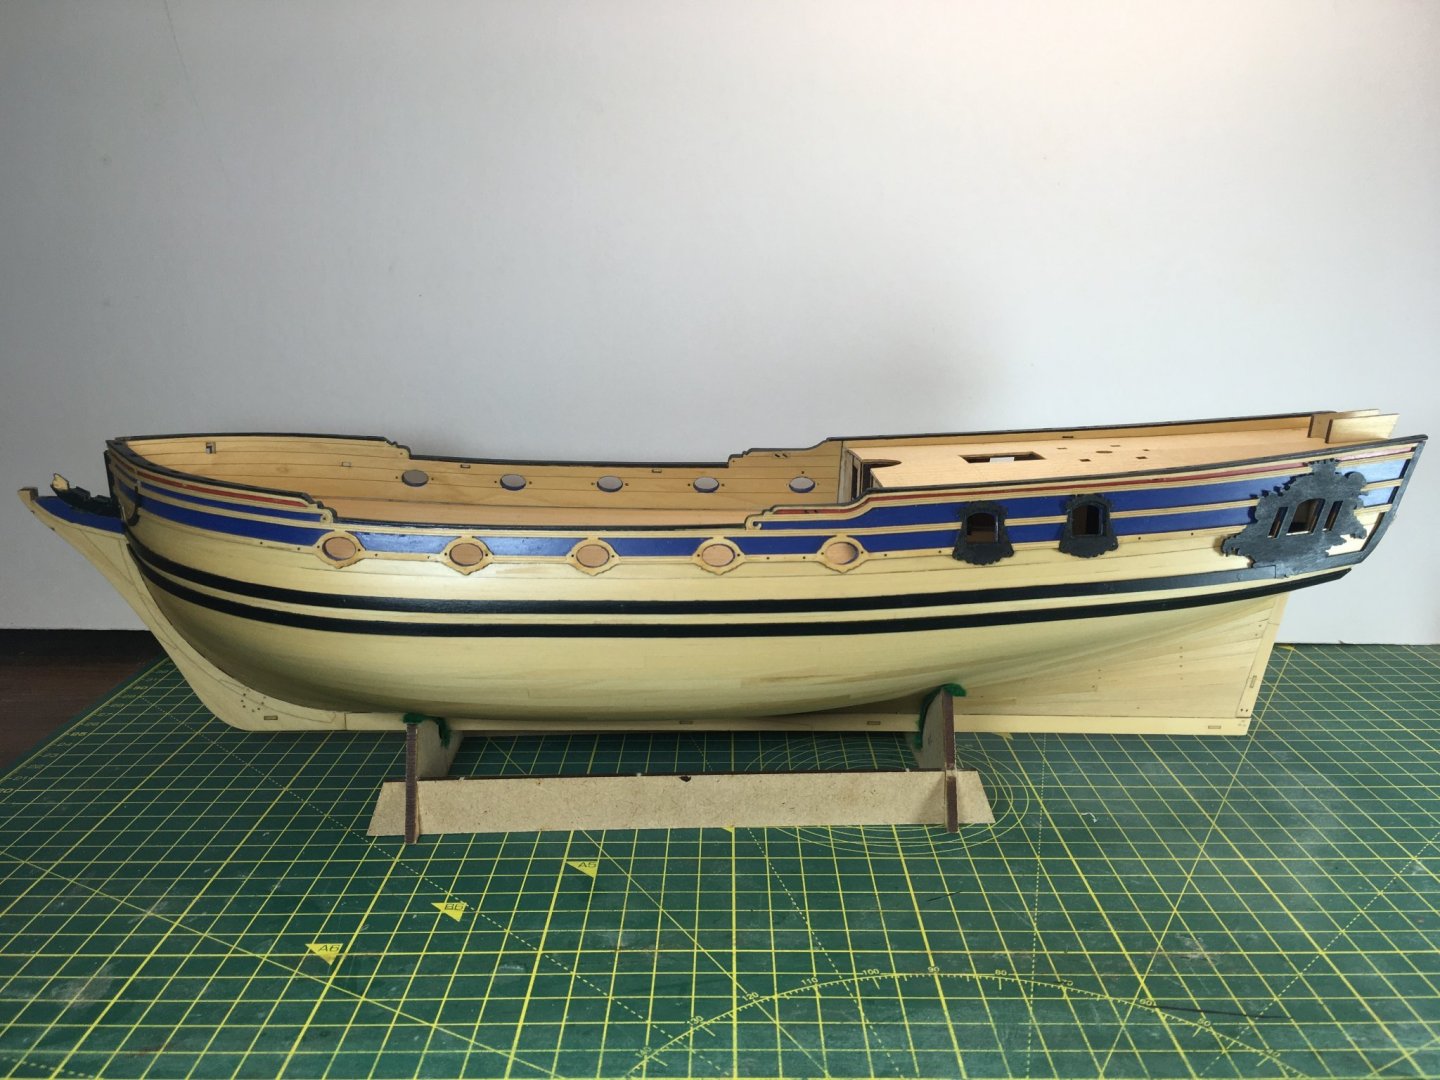
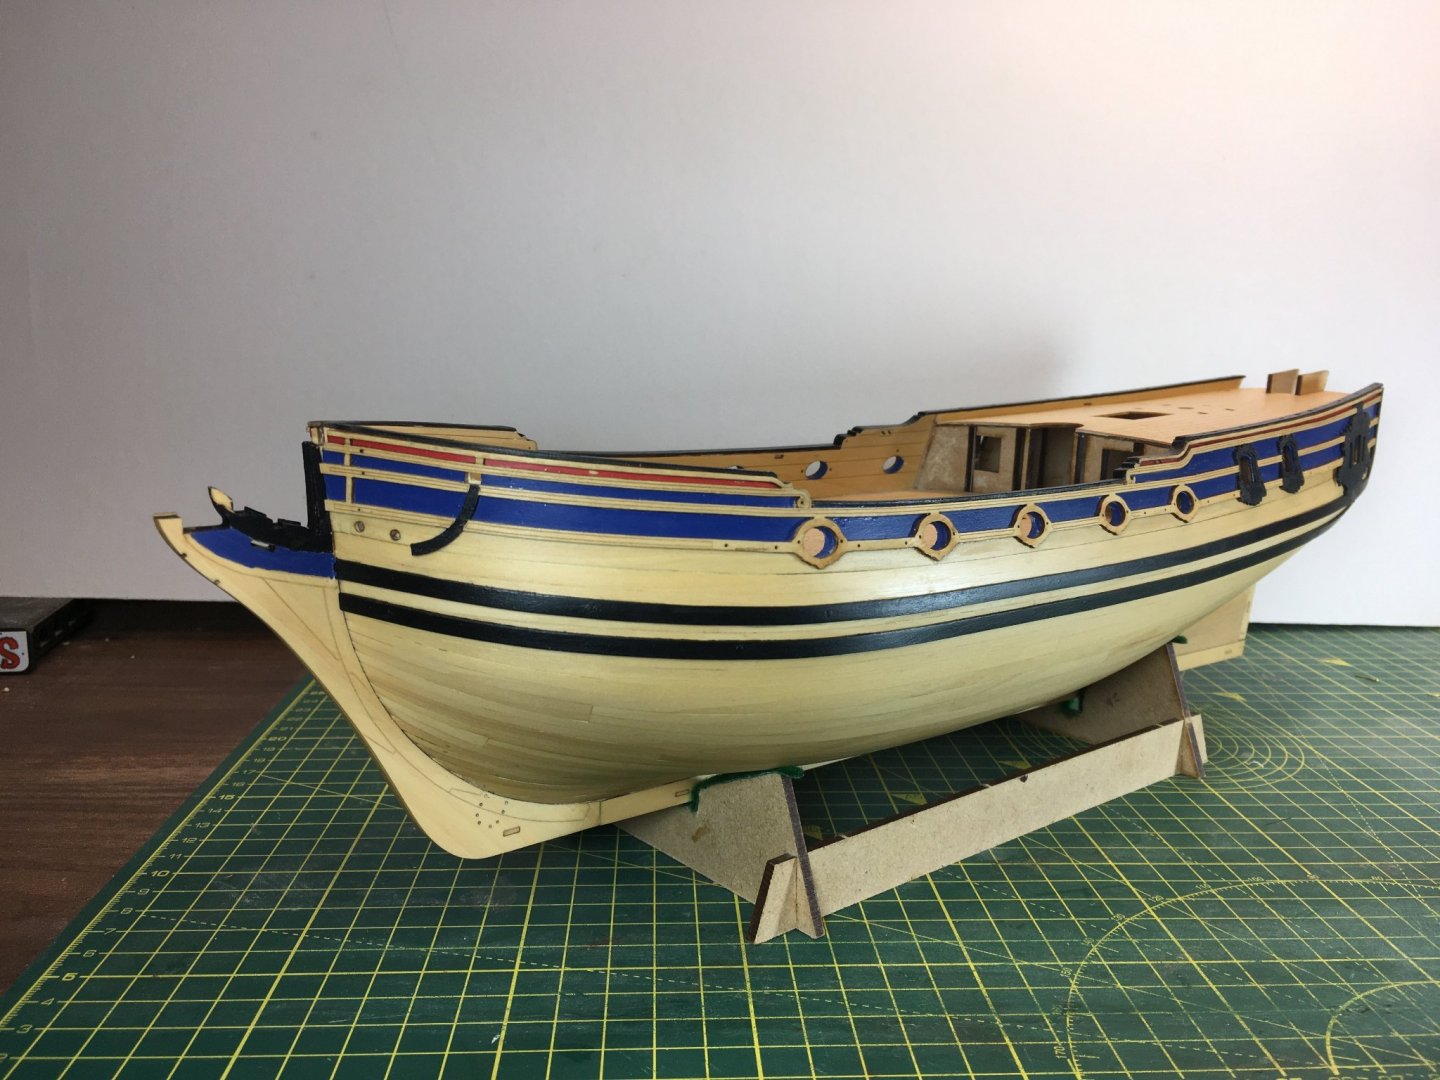
I'm enjoying this part of the build, and looking forward to all the fancy decoration.
Derek
PS I'm increasingly tempted not to paint the hull below the waterline. Anyone disagree?


Duchess of Kingston 1778 by desalgu - Vanguard Models - 1:64 - Royal Yacht
in - Kit build logs for subjects built from 1751 - 1800
Posted
Looking great - well done!