druxey
-
Posts
13,383 -
Joined
-
Last visited
Content Type
Profiles
Forums
Gallery
Events
Everything posted by druxey
-
 Congratulations! The fact that you completed the project, flaws and all, is an achievement in itself. You'll find that what you've learned building your dory will be very helpful for the next model. I also echo Paul's comments on identity: we are all in this endeavour together.
- 85 replies
-
- 5
-

-

-
- Lowell Grand Banks Dory
- First Build
- (and 2 more)
-
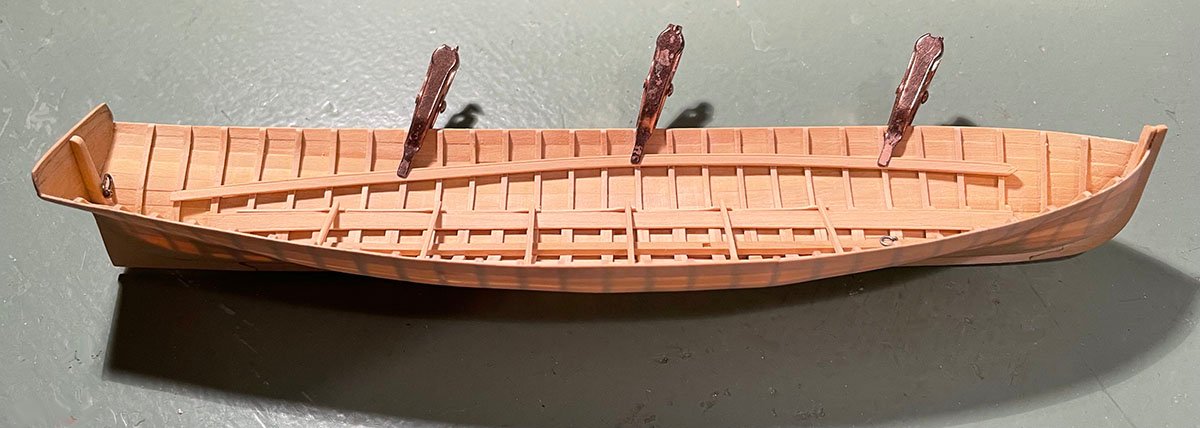
Shipman: Whoops; a typographical error! I mistyped 28 for 26 in the title. It's a 26 foot cutter. Funny that no-one else noticed this. Vaddoc: Thank you. There is another strake, the wash strake, to be added, and the stem top will be trimmed slightly after. It was made over high for convenience when the embryo model was held on the plug. Thanks for looking in, everyone.
- 433 replies
-
- 5
-
-
- open boat
- small boat
- (and 1 more)
-
Yes, Alan, this cutter is from the 1860's, not the 1960's! You aren't that old. Thanks for reposting the link, Eberhard. The chisel in the photo is one of a beautiful set from Russia made by Mihail Kirsanov. They are fine tool steel. He is mentioned elsewhere on MSW:
- 433 replies
-
- 5
-
-
- open boat
- small boat
- (and 1 more)
-
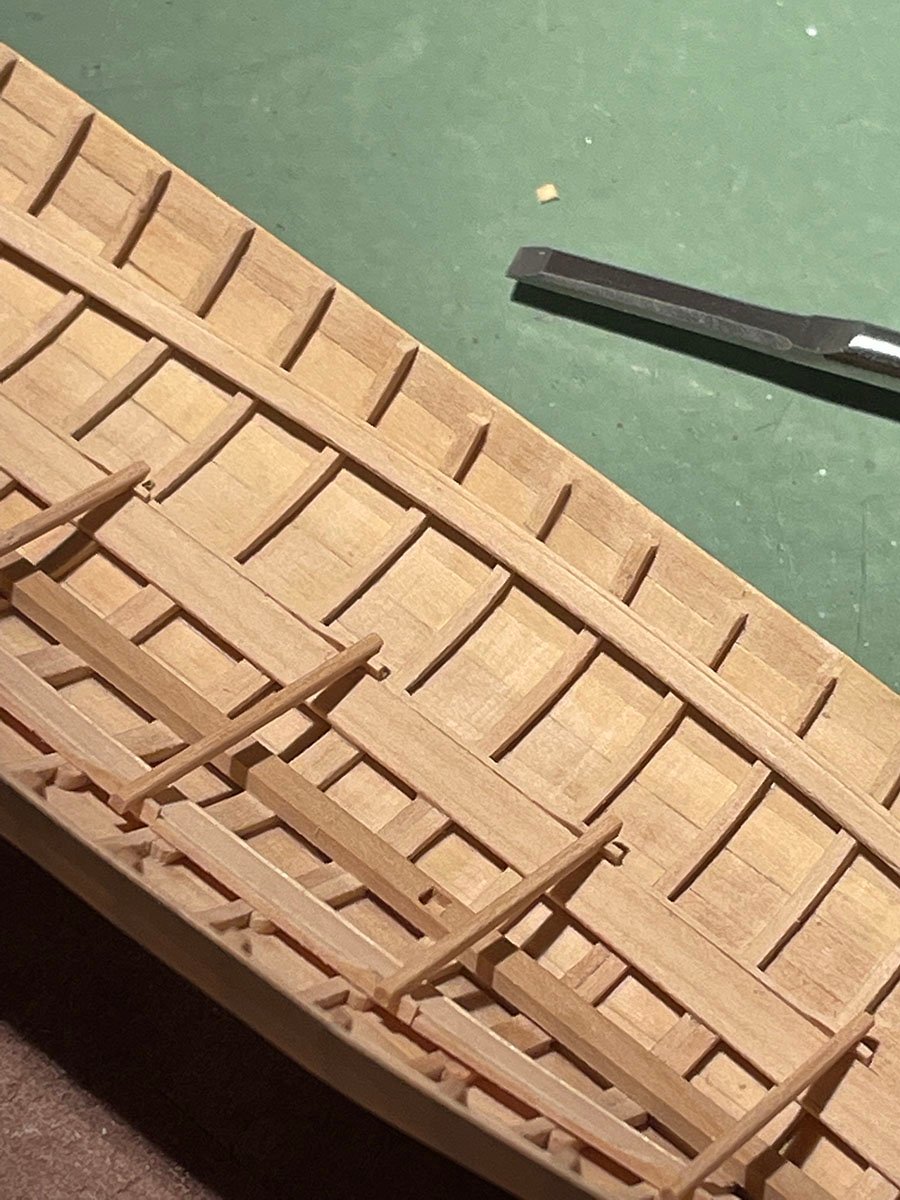
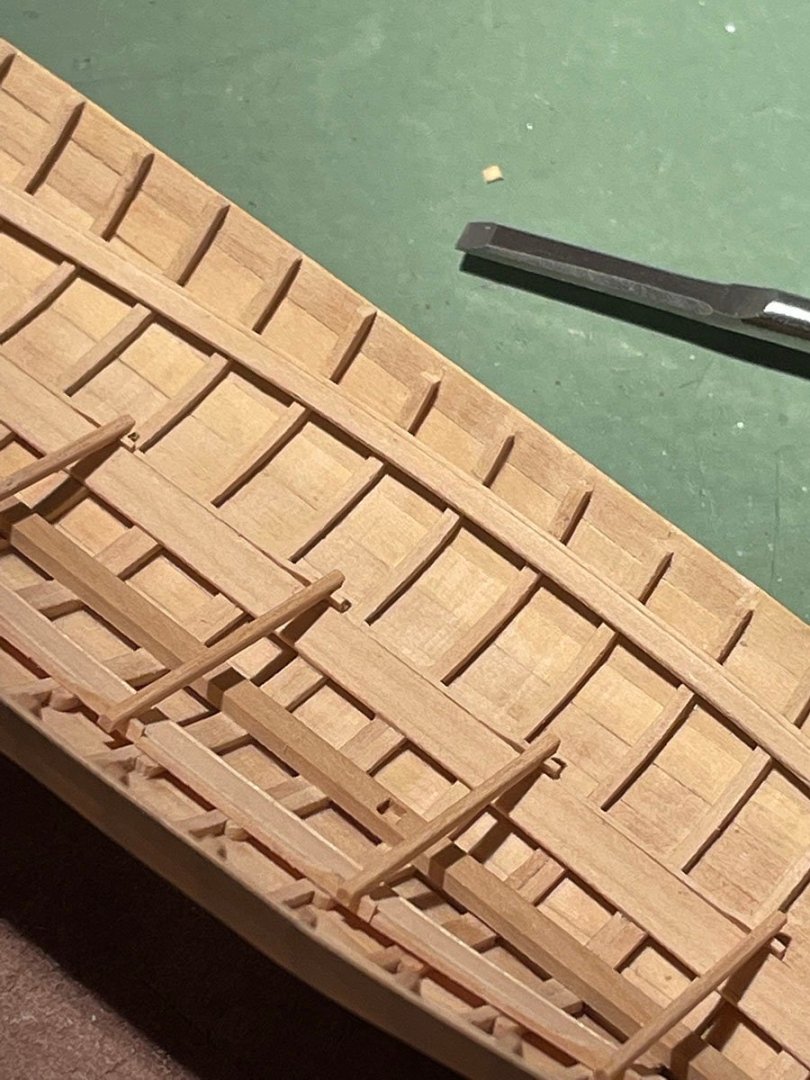
Having successfully trimmed back the futtock tops, the blanks for the inwales were cut. These posed several challenges. They are 2½" thick and wide, but their cross-section is a parallelogram, the angles changing constantly along the boat's side. I cut each out wider than the final width, bevelled the outer edge first, then fitted it to the boat. The next challenge was to locate stub toptimbers that support the tholes and wash strake. These pass through the inwale and have to be spaced correctly to 'miss' the futtocks. They are now marked and ready for cutting. Once the slots are cut, the inwale will be glued in and the inner edge shaped correctly.

- 433 replies
-
- 24
-
-
- open boat
- small boat
- (and 1 more)
-
Your paintwork is very nice and subtly done. The highlights and shadows look very natural and not painted. Well done!
-
Good things take time. However, I would have thought that you could find another project to work on while glue sets up. More crew members, perhaps?
- 740 replies
-
- 2
-
-
- Tudor
- restoration
- (and 4 more)
-
The next step after adding the risers is to prepare for the inwales. For this, the tops of all the futtocks have to be cut down by 2". To do this without splitting the plank is tricky. A very sharp small chisel is used and the waste wood removed incrementally. It's a slow process!
- 433 replies
-
- 19
-
-
- open boat
- small boat
- (and 1 more)
-
Well, finally new progress to report! It took three tries before I was satisfied with the risers. I rubber cemented two layers of 1" thick (scale!) stock, cut and sanded the convex curve, ran the beading on both sides of the assembly and then milled the concave side so that the pieces were of uniform width. They are now being glued in.

- 433 replies
-
- 18
-
-
- open boat
- small boat
- (and 1 more)
-
Symmetry
druxey replied to Don Case's topic in Building, Framing, Planking and plating a ships hull and deck
Butt blocks are used where frames are widely spaced. With narrow spaces the butts were always on the frames themselves. -
Swan-Class Sloop by Stuglo - FINISHED - 1:48
druxey replied to stuglo's topic in - Build logs for subjects built 1751 - 1800
Might I suggest using heat to bend your planks? I use a temperature-controlled iron and wet the wood first. The iron must be hot, but not so hot as to scorch the wood. It's quick , too! -
Well, the switch arrived today. I spent some time not only installing it, but thoroughly cleaning out the fine dust adhering to the inner works of the saw. One hurdle was the electrical connectors to the switch. I've not come across the particular crimped type used here in Canada, so had to do a small workaround. All is well; the saw fired up again! The next posting will be a real progress one again.
- 433 replies
-
- 8
-
-
- open boat
- small boat
- (and 1 more)
-
Depending on the glue you used, it can be removed. With white or yellow glue some rubbing alcohol on a brush with soften it and you can remove the softened blob carefully using a pointed tool. Be aware that the paint will be removed as well, so you'll need to repaint after.
- 85 replies
-
- 3
-
-
- Lowell Grand Banks Dory
- First Build
- (and 2 more)
-
I thought it time to post a small update for you. The package containing the new switch for my saw is somewhere in the Province of Ontario now, according to USPS tracking. So, this is really a non-update. I debated the hot-wiring solution suggested. However, the idea of reaching over a running saw to pull the plug held very little appeal. So we wait....
- 433 replies
-
- 6
-
-
-
- open boat
- small boat
- (and 1 more)
-
There must surely be other suppliers of brass tube online, brunelrussell. I checked my own stash and the largest I have is only ⅝". On the other hand, does this have to be brass? Rolling a long strip of paper around a mandrel of suitable diameter (spray glued) and painted does the job nicely.

-
Well completed, Jorge! Congratulations on seeing the project through.
-
NRG Capstan Project
druxey replied to tlevine's topic in - Build logs for subjects built 1751 - 1800
Read the instructions? Surely you jest! Seriously, I'm always amazed at folk who blaze full steam ahead, torpedoes be damned. Hopefully builders of this very nice piece will heed you. It looks like a very nice project to do. Well done, Toni! -
Hey, that is a very respectable result for first time. Don'r be too critical of yourself. The skills you've now picked up will really help with your next model. Well done!
- 10 replies
-
- 1
-
-
- First Build
- Model Shipways
- (and 2 more)
-
Thanks, Bob. However, I think I can wait as I've other paying work to re-rig on the bench as well right now!
- 433 replies
-
- 5
-
-
- open boat
- small boat
- (and 1 more)
-
Swan-Class Sloop by Stuglo - FINISHED - 1:48
druxey replied to stuglo's topic in - Build logs for subjects built 1751 - 1800
Isn't it a relief to move on from framing? Your lower ceiling planks look very good. -
Update: There will be a hiatus in the workshop, hopefully only for a few days. The switch on my Byrnes' saw failed - after only 14 years of hard work! Jim and Donna have sent out a replacement very promptly so it's in the USPS service - somewhere.... Until it arrives I can't cut more 1/64" leaves of wood for the boat's risers. Dommage.
- 433 replies
-
- 8
-

-
-

-
- open boat
- small boat
- (and 1 more)
-
The stretchers on this boat appear to be fixed, Bob, and not adjustable. Other boats had a double notch or other arrangement (see my Greenwich Hospital barge) to allow for short or tall rowers.
- 433 replies
-
- 6
-
-
- open boat
- small boat
- (and 1 more)
-
Thanks, Pat. The model will be unpainted with a natural wood look to show off construction. I used to put a dilute coat of sanding sealer on my models but no longer do. The 'finish' is simply fine sanded and scraped.
- 433 replies
-
- 7
-
-
- open boat
- small boat
- (and 1 more)
-
Next are the risers; the plank that the thwarts rest on. It was difficult to determine their shape as it is hard to measure vertical heights inside the boat. I 'proved' the spiled shape in card first. The risers will be cut from ¾" thick stock. Keen-eyed folk will have noticed that some metalwork has been made and fitted while there is still easy access to the ends and bottom of the model.
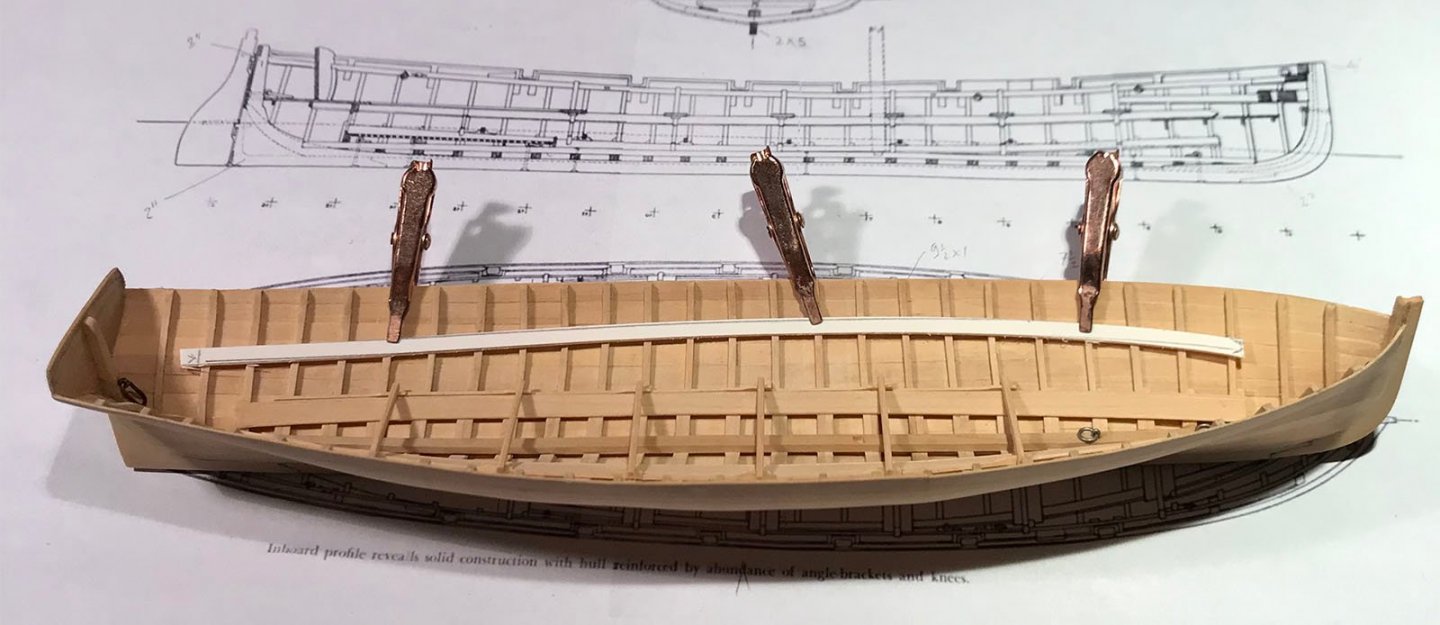
- 433 replies
-
- 22
-
-
- open boat
- small boat
- (and 1 more)