HOLIDAY DONATION DRIVE - SUPPORT MSW - DO YOUR PART TO KEEP THIS GREAT FORUM GOING! (Only 20 donations so far - C'mon guys!)
×


druxey
-
Posts
13,301 -
Joined
-
Last visited
Content Type
Profiles
Forums
Gallery
Events
Everything posted by druxey
-
 Mark P: I'm interested as to why you think that the stop was not a separate piece when Steel spec's it as such. (He does not call for a rebate to be cut into the frame.) My reasoning for the frames being 1" greater sided on the sides of the ports is for extra strength when driving and fixing the ringbolts for the breeching and gun tackle.
 -
Interesting. I believe that access to the magazine was by a passage with two separate doors that opened outward. This was a precaution against accidental sparks or detonation from outside blowing in. The doors would blow shut in such an event. Direct access from above via a companion ladder would be very dangerous!
-
Longridge's Midget Universal Woodworking Machine
druxey replied to SJSoane's topic in Modeling tools and Workshop Equipment
Thank you, Mark. Since I first read Longridge back in 1955, I'd always wondered what the 'Midget Universal' was like! Your post and link made me smile this morning. Thank you! -
Impressive at all scales! I imagine the car runs beautifully as well.
- 1,035 replies
-
- 7
-

-
- royal katherine
- ship of the line
- (and 1 more)
-
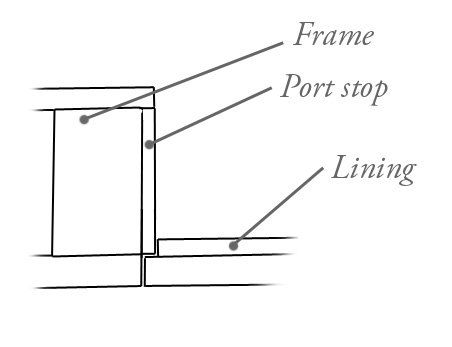
Siggi: in the tables, Folio XXV and XXVI, it states: Port lids. - Every gun deck port to be fitted with a substantial lid made of English oak - Stops of the ports not less than (measurement in table 3 1/2" or 3". Well seasoned linings fitted into the stops (measurement in table thickness 1 1/4" to 1") Fitted into the stops implies that the linings overlap, not abut, the stops. I've certainly shown this - rightly or wrongly - in my own models.
-
HMS VICTORY 1765 by albert - 1/48
druxey replied to albert's topic in - Build logs for subjects built 1751 - 1800
'Cant frames' in English. Those look very nicely made. Only a few more needed! -
Aiee! That is a very daunting task to complete successfully. Good on you, Dan.
-
A bridle port would certainly need a lid: the ship would be very wet otherwise!
-
A very interesting form of construction, nicely executed as usual, Dick.
- 263 replies
-
- 3
-
-
- nave tonda
- round ship
- (and 2 more)
-
There are still examples of end-grain 'pavers' seen in Europe.
-
Those look very challenging! I hope one can see them when the model is completed. Merry Christmas down under, Dan!
-
Your present non-unravelling line is fine. If I wanted unravelling line, I'd buy Morope! In terms of commercial business, would it keep your costs down by packaging line in longer lengths, therefore lessen time spent handling many small quantities?
-
HMCSS Victoria 1855 by BANYAN - 1:72
druxey replied to BANYAN's topic in - Build logs for subjects built 1851 - 1900
And a happy festive season to you also, Pat!- 1,005 replies
-
- 4
-
-
- gun dispatch vessel
- victoria
- (and 2 more)
-
Well, obviously the limit is because of the tools available, not the skill of the model-maker! Perhaps Santa will be kind....
-
Gunshot proof, no; but weather/waterproof, yes! Certainly Steel (British, 1805) describes the rabbeted style of port lid clearly. Either way, you are building a very lovely model.
-
I like to draft on frosted Mylar sheet: it doesn't expand and contract like paper.
-
I suppose a museum expert in fabric conservation might be the right person to ask, Johann. Frohe Weihnachten!
-
The thing is, in different countries and at different time periods the way things were done were not always the same. Also, secondary sources (modern books and models) can be misleading. Check contemporary models on sites such as: http://collections.rmg.co.uk/
-
Thank you for bringing this book to our attention, Toni. Season's greetings!
-
The inner layer of lid planking (the lining) is vertical and the outer layer follows the line of the outer hull planks in thickness. The inner layer is stepped back or rebated by the thickness of the port stops. The stops are the lining pieces attached to the lower port sill and frames on the sides of the port opening. They are set back by the thickness of the outer planking. Your photo shows these rebates clearly. There is no taper as shown in your sketch.