


druxey
-
Posts
13,363 -
Joined
-
Last visited
Content Type
Profiles
Forums
Gallery
Events
Everything posted by druxey
-
 Chris: it's very similar to Endeavour. However, I'm sure every shipyard had slightly different methods of planking. I'm also sure that no more stealers or drop planks were arranged than were absolutely necessary, saving much work.
- 15 replies
-
- 4
-

-
- Steelers
- drop planks
- (and 2 more)
-
You see this technique on 18th century museum models such as seen in Annapolis or (formerly) Greenwich, Mark.
- 15 replies
-
- 3
-
-
- Steelers
- drop planks
- (and 2 more)
-
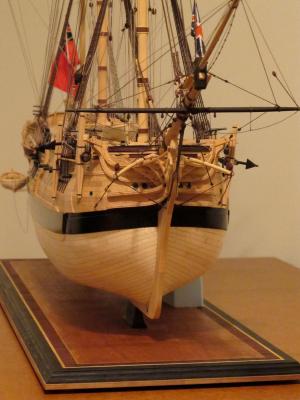
Here is a photo of that bluff bow completely planked. Two hooked strakes under the main wale was all that was needed!
- 15 replies
-
- 12
-
-
- Steelers
- drop planks
- (and 2 more)
-
The example you cite, Captain Jerry, is a rather excessive one. It is the result of allowing the garboard strake run too high up the stem, forcing the other strakes to be too crowded into the stem. This could easily have been avoided by an experienced shipwright. Take a look at the example in 'A primer on planking' by David Antscherl pinned on this site. The bow is just as bluff as the one in your photo, but compare the run of planking in both examples.
- 15 replies
-
- 4
-
-
- Steelers
- drop planks
- (and 2 more)
-
THE 74-GUN SHIP by Jeronimo
druxey replied to Jeronimo's topic in - Build logs for subjects built 1751 - 1800
Very, very nice so far, Karl! -
I agree: Taking time to plan and draw the planking layout and shift of butts is never a waste of time! It will save grief later on.
- 1,051 replies
-
- 10
-
-
- cheerful
- Syren Ship Model Company
- (and 1 more)
-
If that is where those timberheads are located, the way you have done it is very convincing. Well done!
-
An additional hint: once I have a strake of planking laid, I run a sanding stick along the edge of it to ensure it is even and lines up with my mark-out before proceeding with the next strake.
-
You forgot, Dan? Forgot???? And after all your work to make the lantern.... That's funny. Glad it all worked out for you, though.
-
Had you considered making master patterns and casting all those units?
- 2,625 replies
-
- 3
-
-
- kaiser wilhelm der grosse
- passenger steamer
- (and 1 more)
-
Echo by Maury S - FINISHED - Cross-Section
druxey replied to Maury S's topic in - Build logs for subjects built 1751 - 1800
And take a lot less time, Dan! -
3D printer at Home Depot
druxey replied to twintrow's topic in CAD and 3D Modelling/Drafting Plans with Software
Think Commodore 64.... -
Coming along nicely, Mark. Try to resist doing too much sanding until planking is complete. What do you mean by '3" off'? Do you mean creep or cumulative error compared to your lining off of the planking runs? You can easily correct this by either making remaining strakes fractionally wider or narrower to compensate. Just don't let this become a big issue when it comes down to the last strake!
-
Just catching up with your log, John. She's looking lovely.
- 745 replies
-
- 4
-
-
- francis pritt
- mission ship
- (and 1 more)
-
I think elevating screws were coming in around that time, but one supposes older models of carronade were probably still in use. An exception was a 68lb carronade from New York of 1782 which is illustrated with a screw elevating device (Caruana)
-
TFFM refers to trunnions on long guns, not carronades.
-
Tiny fake nails/nail heads
druxey replied to Landlocked123's topic in Metal Work, Soldering and Metal Fittings
Technique is great, Popeye, but I'd be wary of using ferrous metal in a model. It can rust under certain conditions. Brass or copper are better choices. -
Christian: The old-timers used both methods to get the timberheads in the positions that they needed them. As master shipwright, you need to make those decisions based on what makes the most practical sense.
-
Tiny fake nails/nail heads
druxey replied to Landlocked123's topic in Metal Work, Soldering and Metal Fittings
Check out Scale Hardware as Mark suggests. -
Nice looking metalwork, Hartmut. Well done.
-
Only early carronades (1780-c.1795) had trunnions. Later models had 'joints' or lugs underneath. There were many changes in their design over the first 20 or so years. The elevating screw was a later development. You should be safe using a quoin.
-
Very nicely done, Nils. However, I find the rivet heads 'read' a bit too prominently. Perhaps it's the fact that they are reflective at the moment?
- 2,625 replies
-
- 2
-
-
- kaiser wilhelm der grosse
- passenger steamer
- (and 1 more)
