

.jpg.f26acc9a74319261612561bfa7da1303.jpg)
vaddoc
-
Posts
1,528 -
Joined
-
Last visited
Content Type
Profiles
Forums
Gallery
Events
Posts posted by vaddoc
-
-
I like large scale models so my planks are also large, 2 mm thick and up to 70+cm long. I tried lots of methods but really just very hot water from the tap is enough.
After I cut the plank to proper shape, I take the model to the kitchen. I hold the plank with a clamp for 30 secs under the hot water and then immediately put on the model. The plank will take even very acute angles but must be bent immediately.
For steam bent frames, I through them in a pot of boiling water, fish them out one by one and immediately secure on model.
Steam is not really needed for the dimensions we work with, although a steam box will work very well.
I do not like dry heat for planks. I do use the curly hair women machine sometimes to bend strips prior to laminating
- thibaultron, mtaylor and Canute
-
 3
3
-
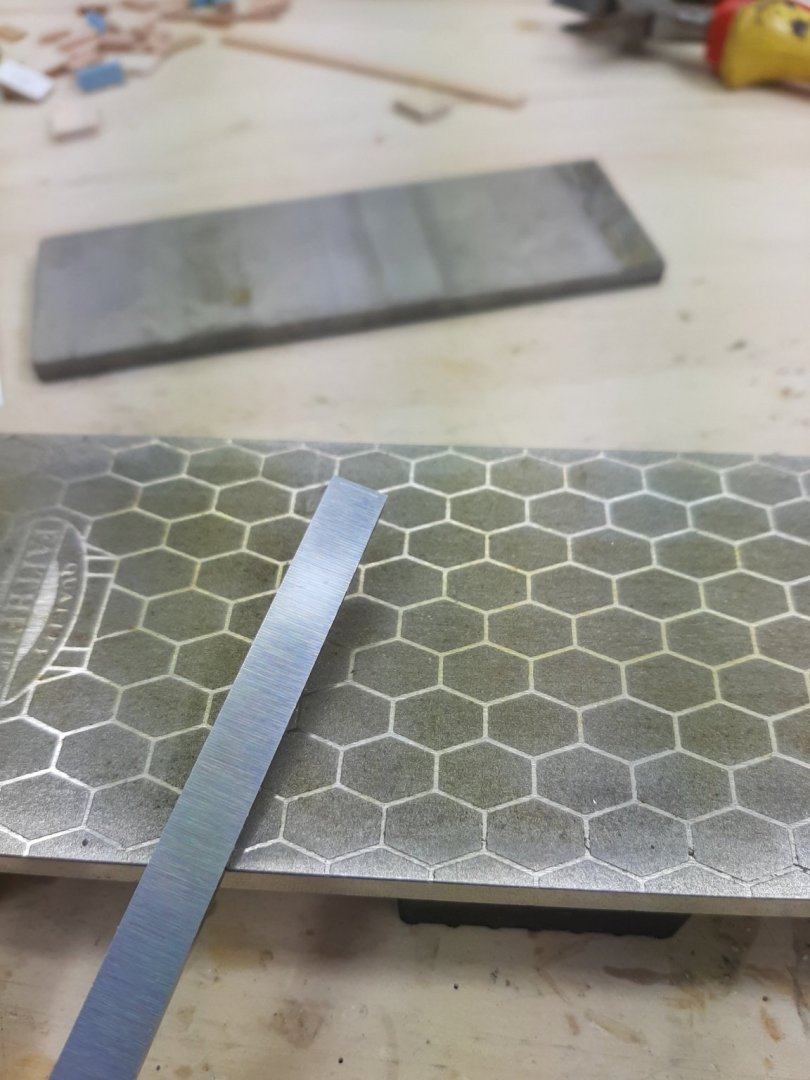
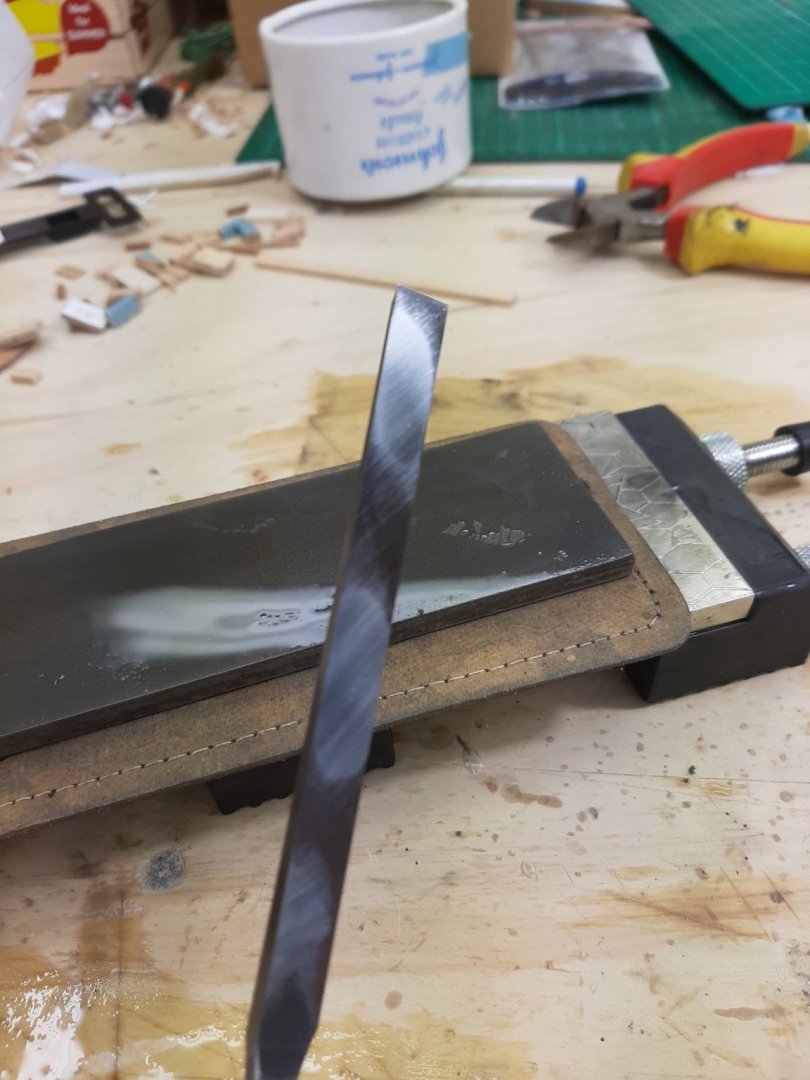
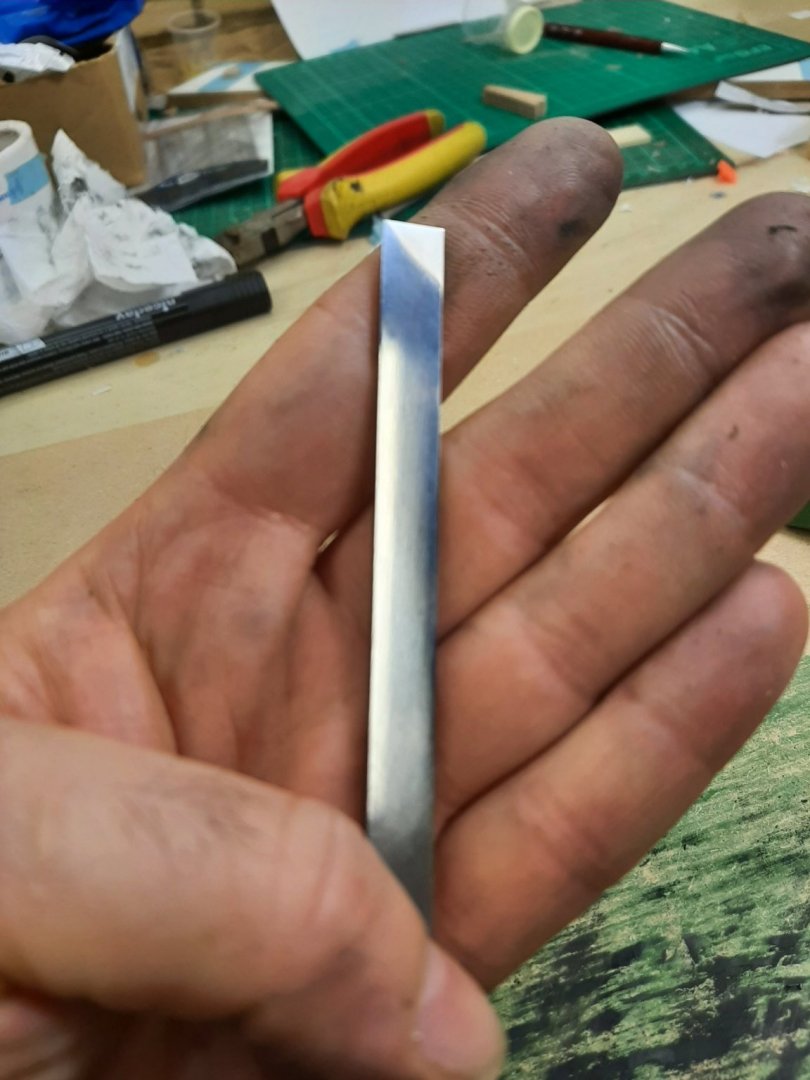
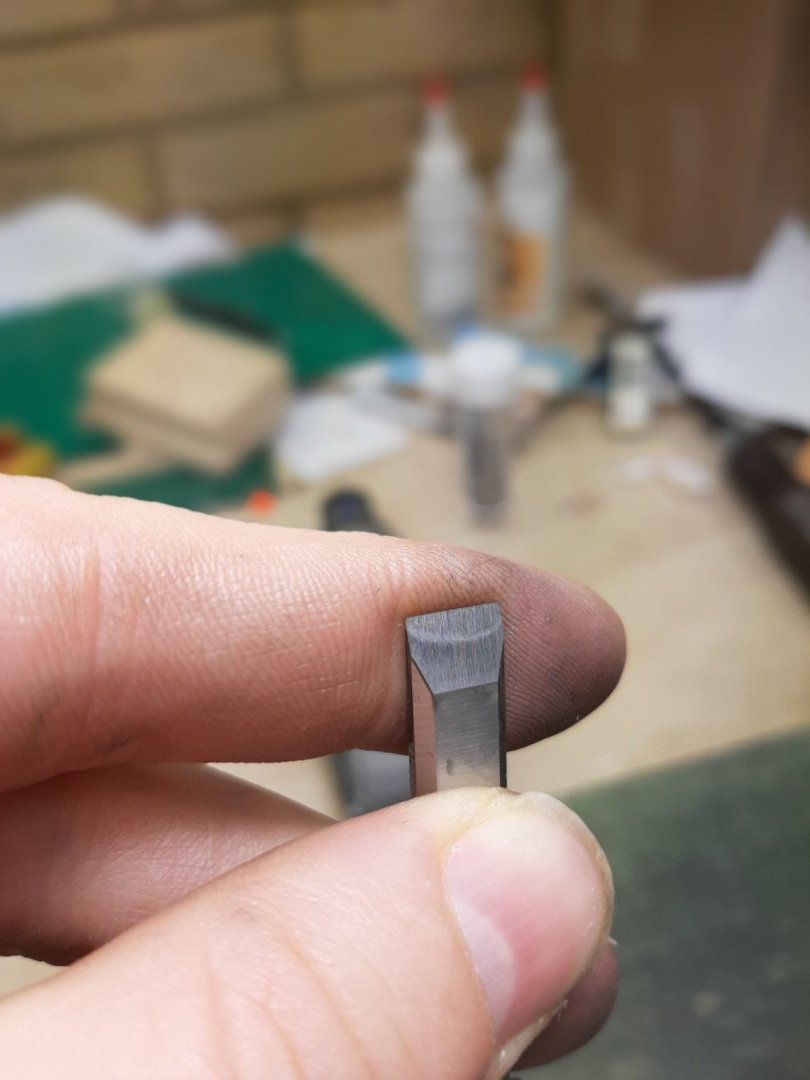
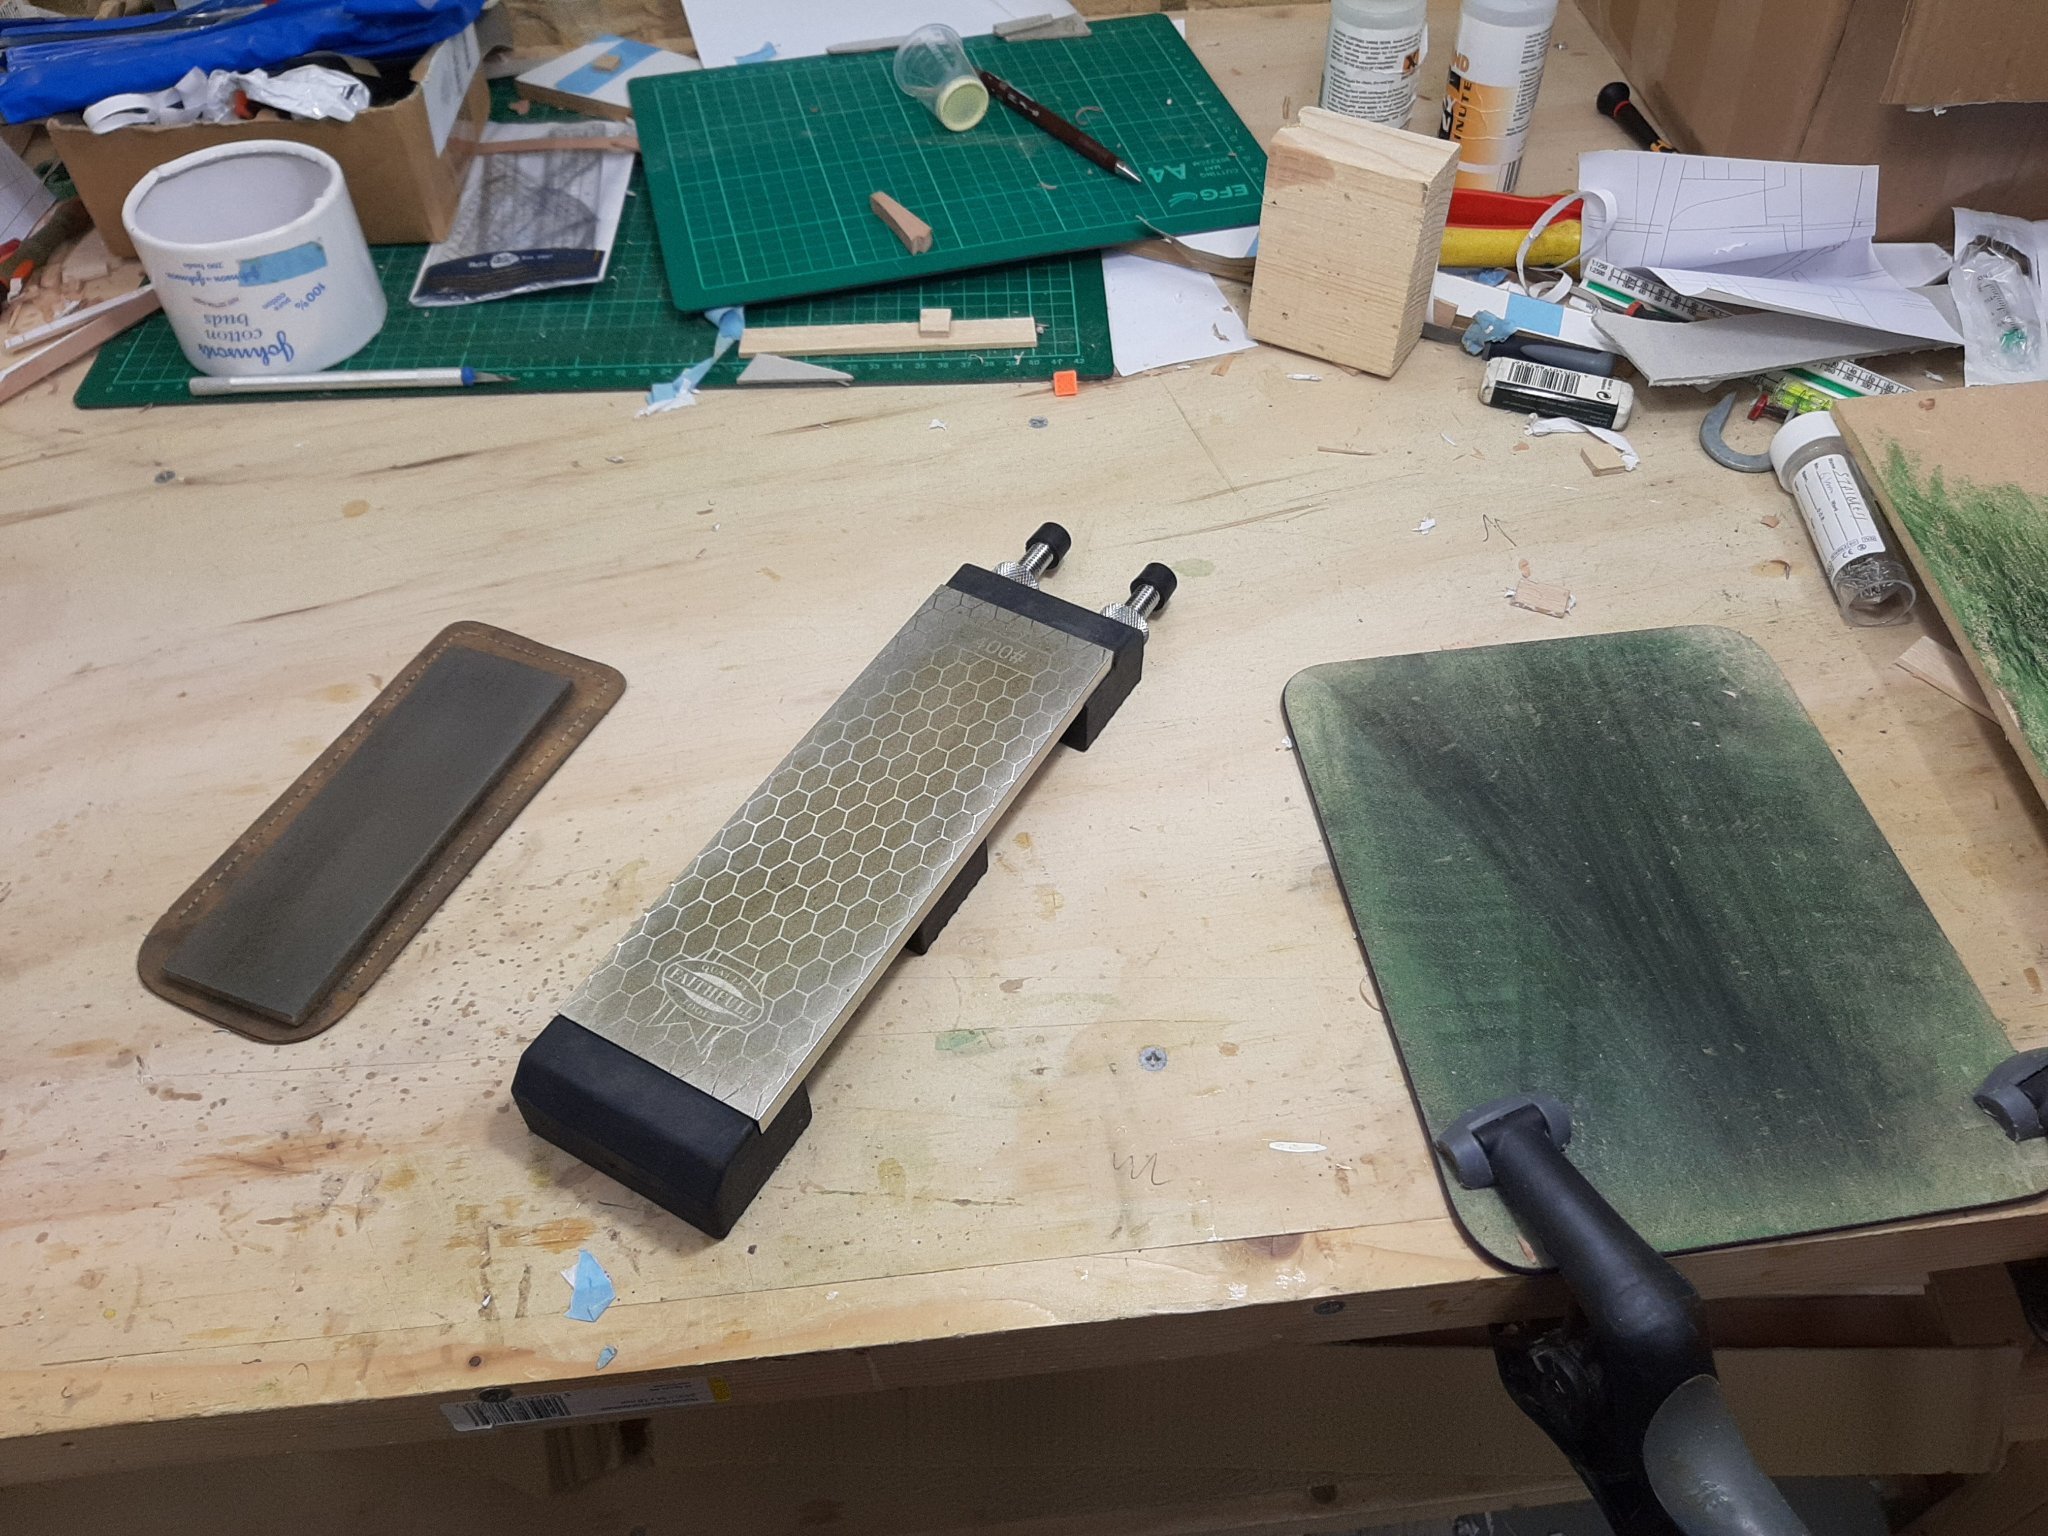
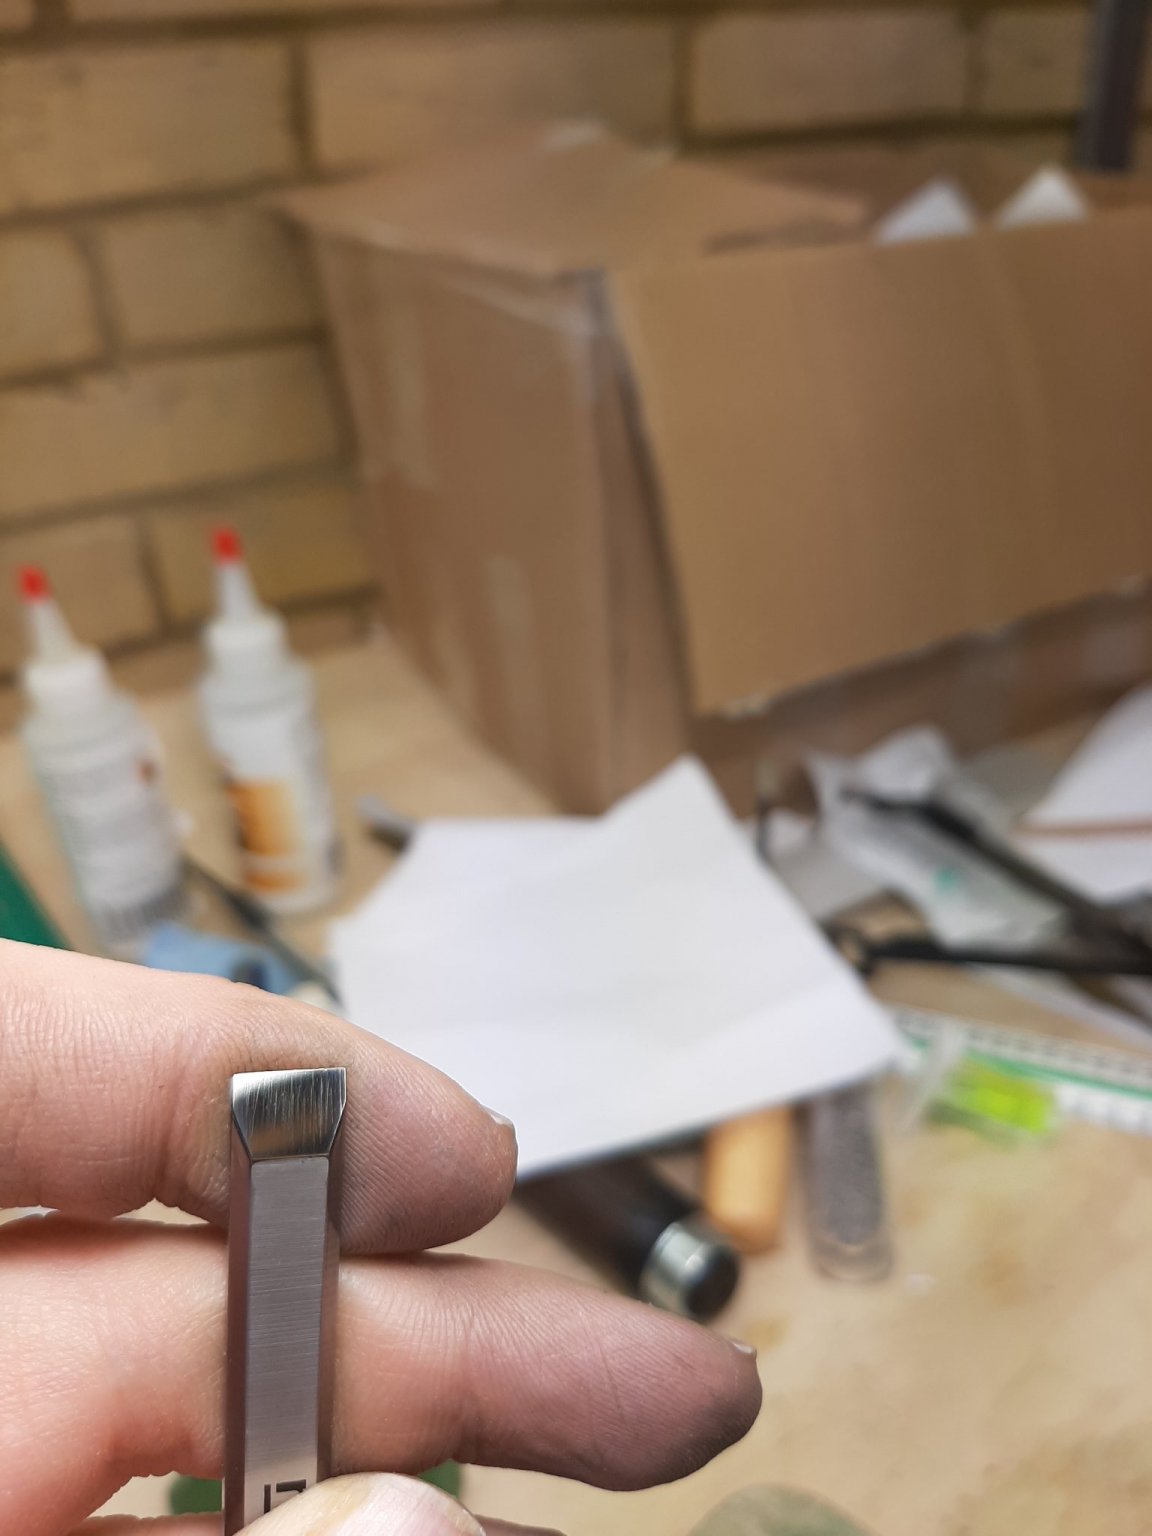
This morning I spent a bit of time honing my new chisel and I thought it would be useful to record and post the process, essentially my way of doing it. I am no expert but the chisels do get sharp. Maybe it will be of help to others.
-
Dear all
I am no wood worker but I have come to appreciate what a wonderful tool a very sharp chisel can be. However, no matter how expensive or cheap a chisel is, it will need to be honed continuously and will only work as intended if it is really scary sharp.
There are many ways to hone a chisel and various types of stones and jig are available, some very expensive. Please allow me to share how I sharpen my chisels. Now, there are a few tools that are needed but are not too expensive and will last for a very long time.
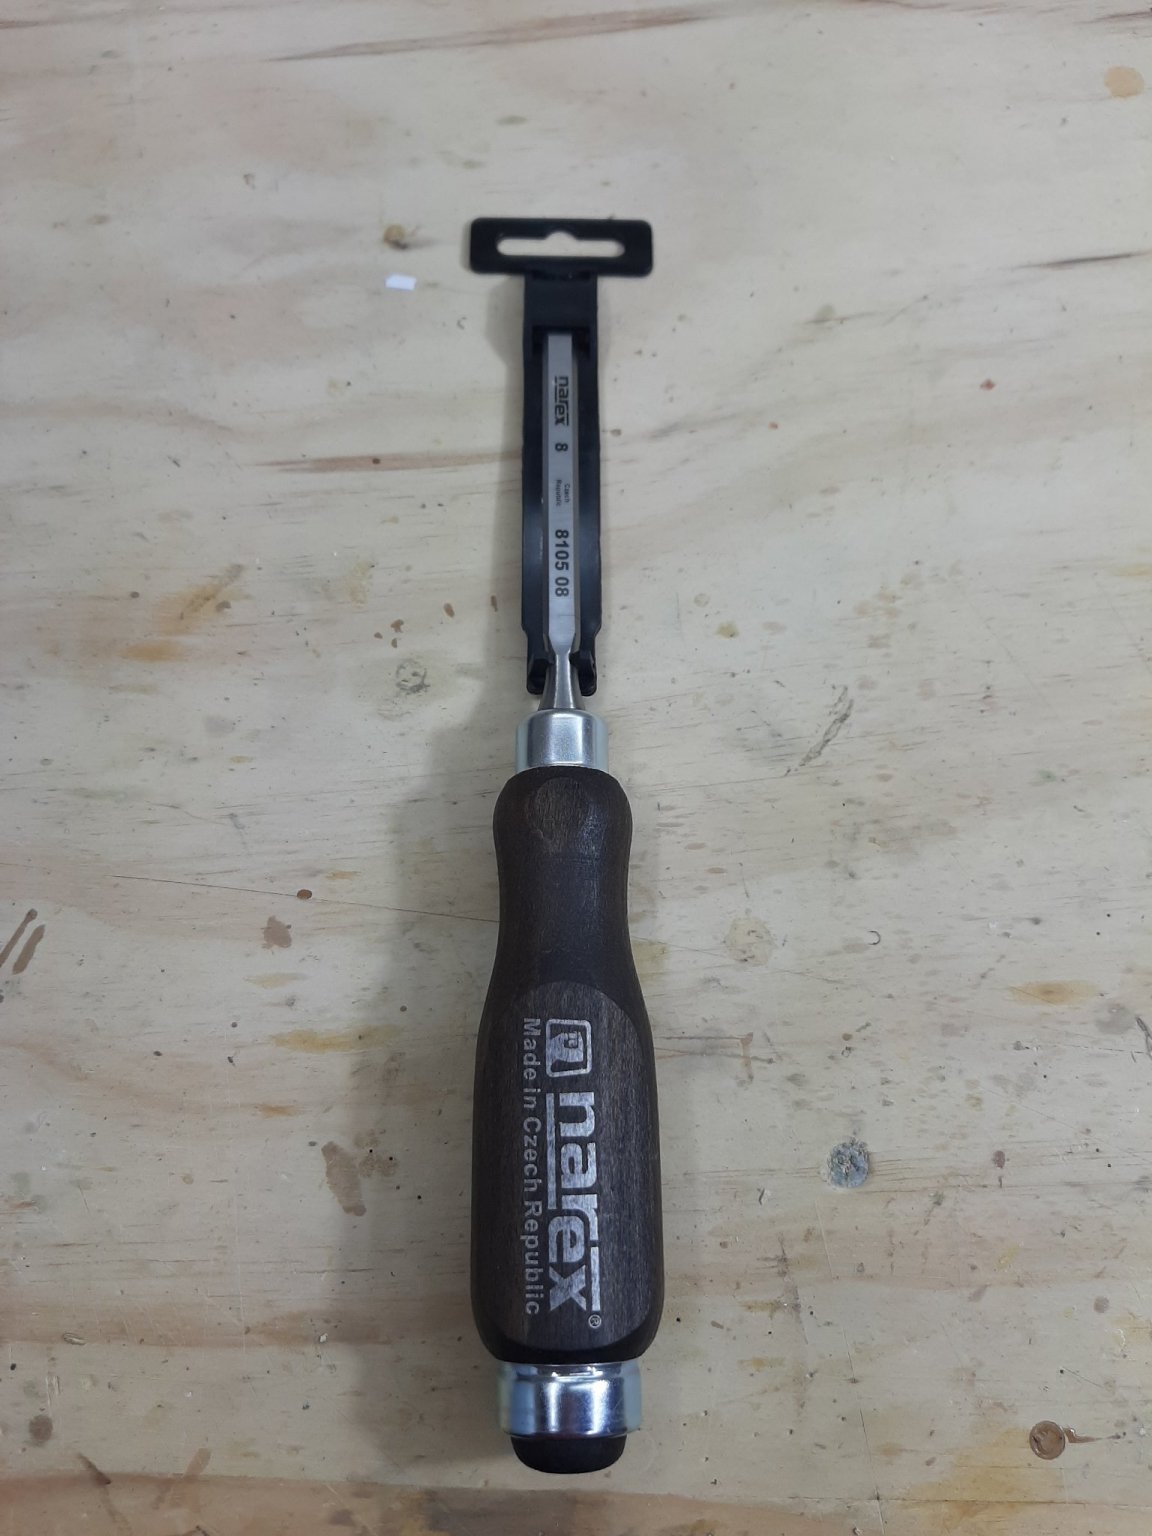
I recently bought a new chisel, an 8 mm Narex so I thought it was a good opportunity to show how it can be turned into a useful tool. I hope that this will be of help to others.
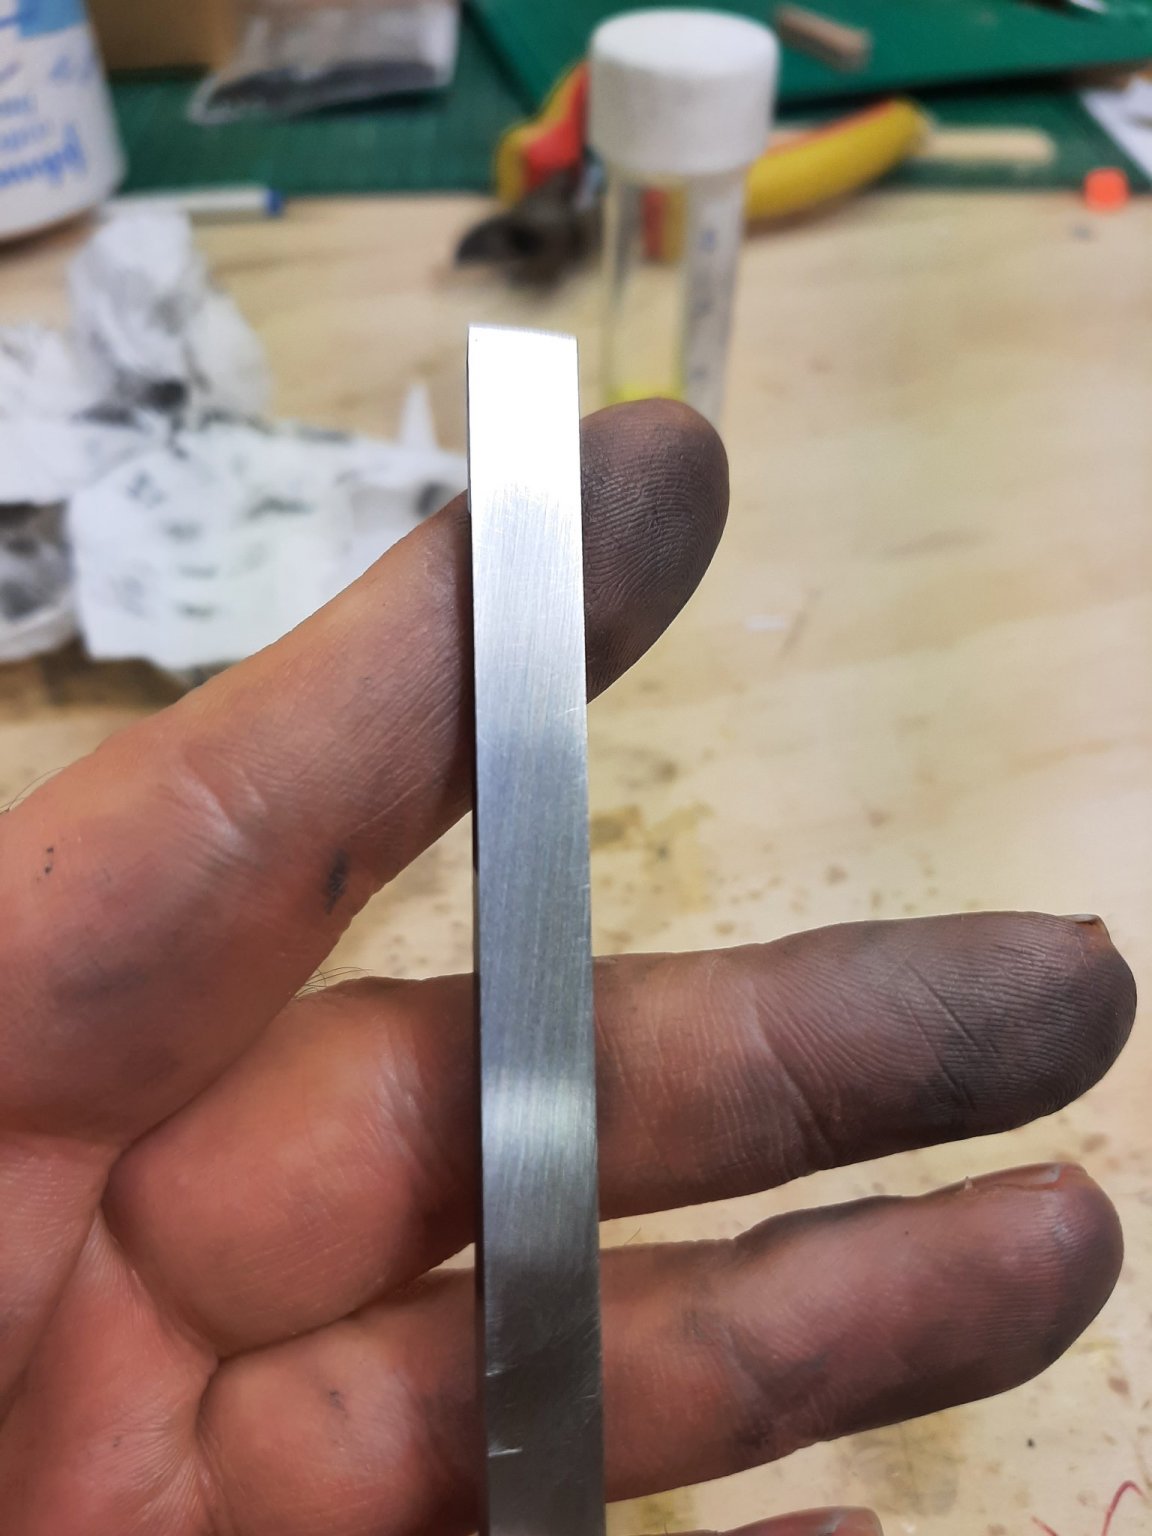
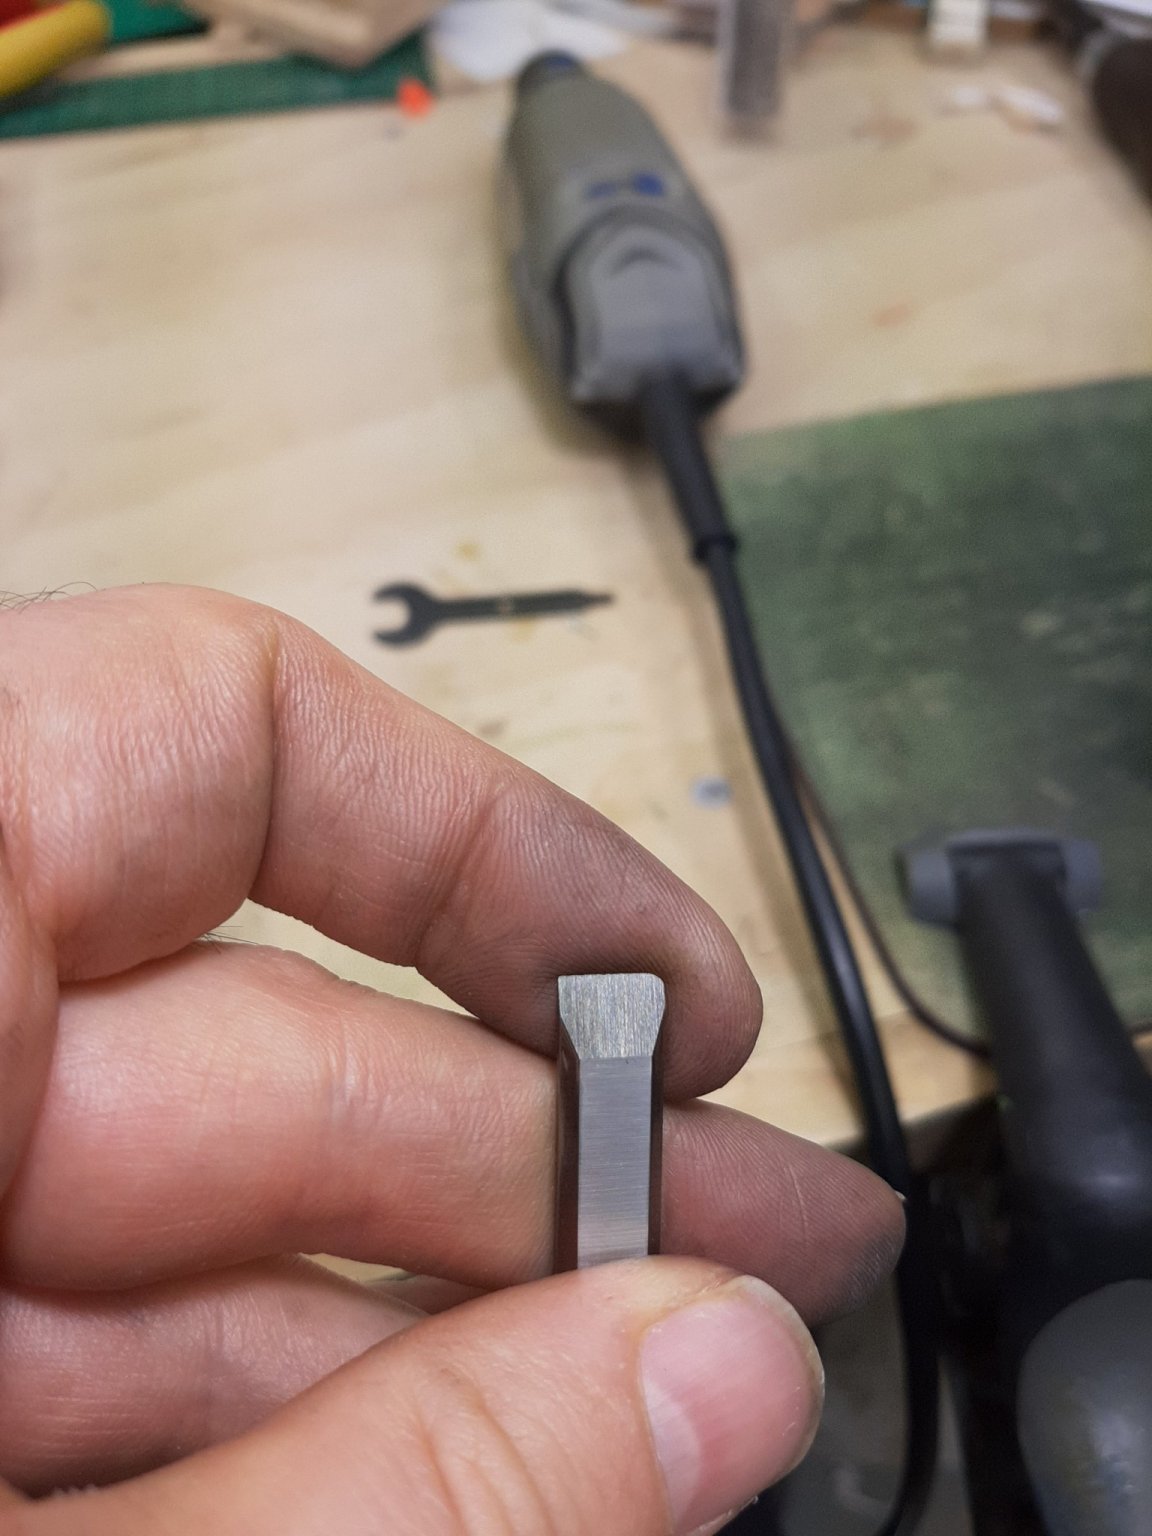
I like Narex chisels very much but out f the box they are of no use at all. The tip is covered but some kind of lacquer and is not sharp. The bevel and the back of the chisel are very rough.


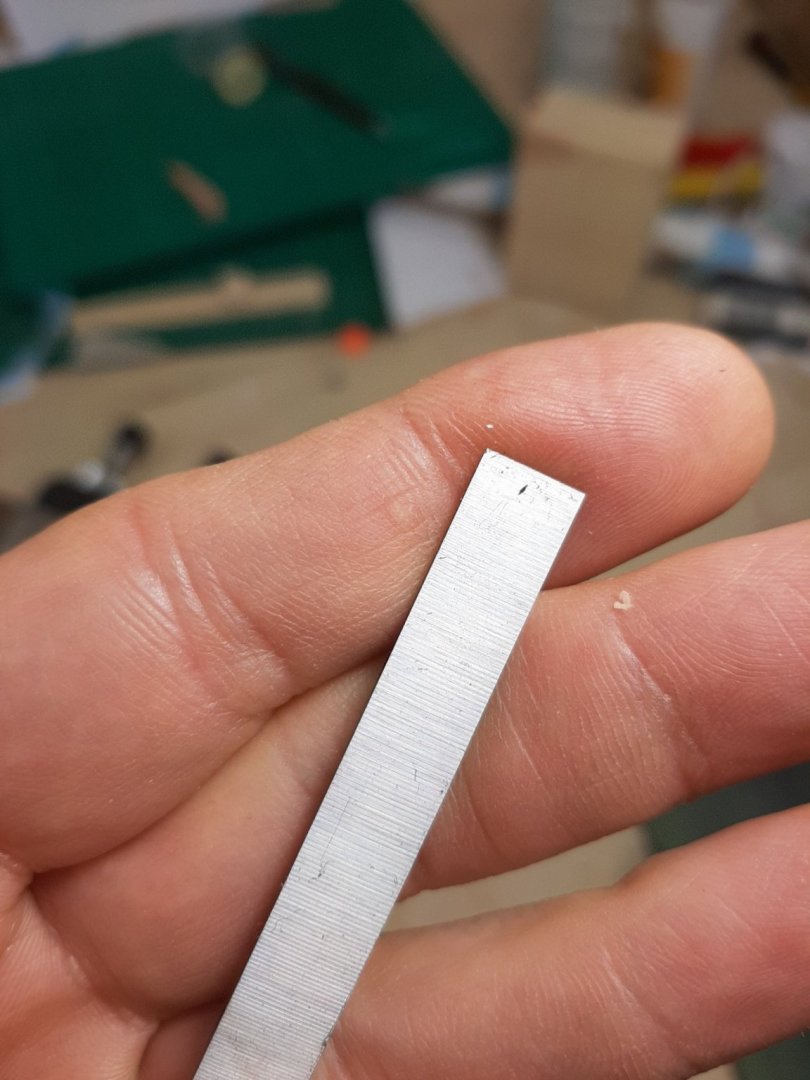

Now, for the chisel to be sharp, both surfaces need to be as polished as possible. So lets start honing this chisel
We will first concentrate on the back of the chisel. This surface will only be worked once, on purchase and will not be touched again. Until the back is flat and polished to mirror finish, we cannot proceed.
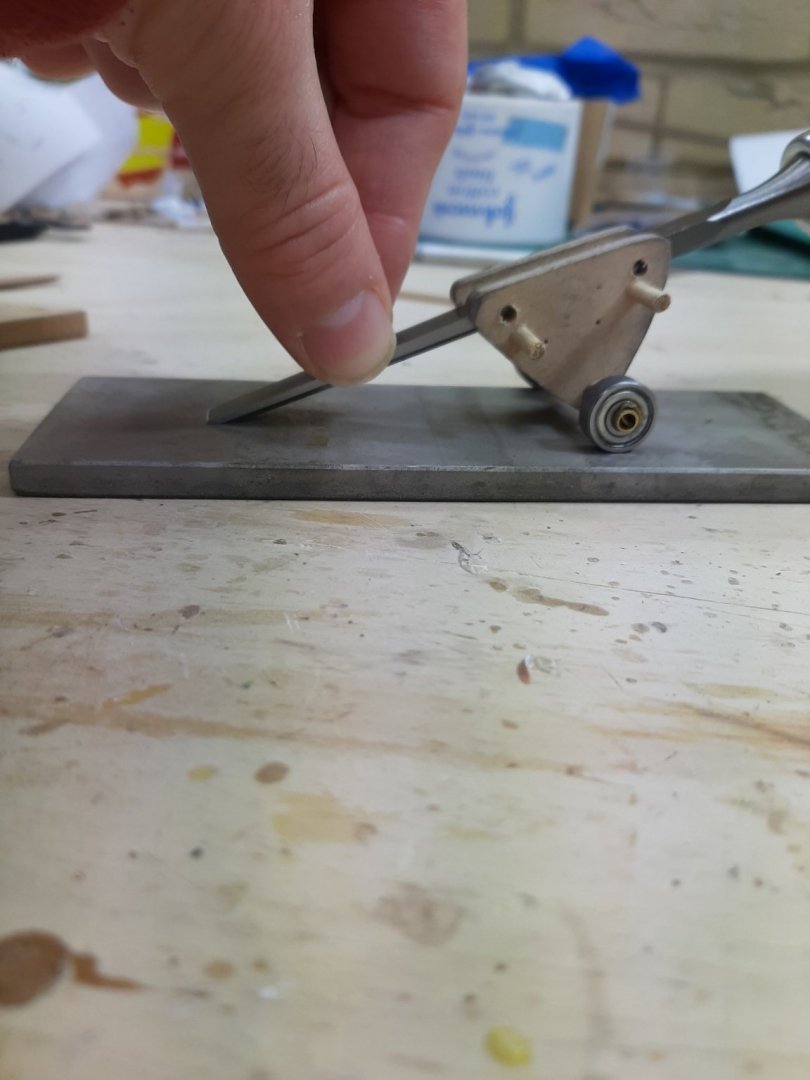
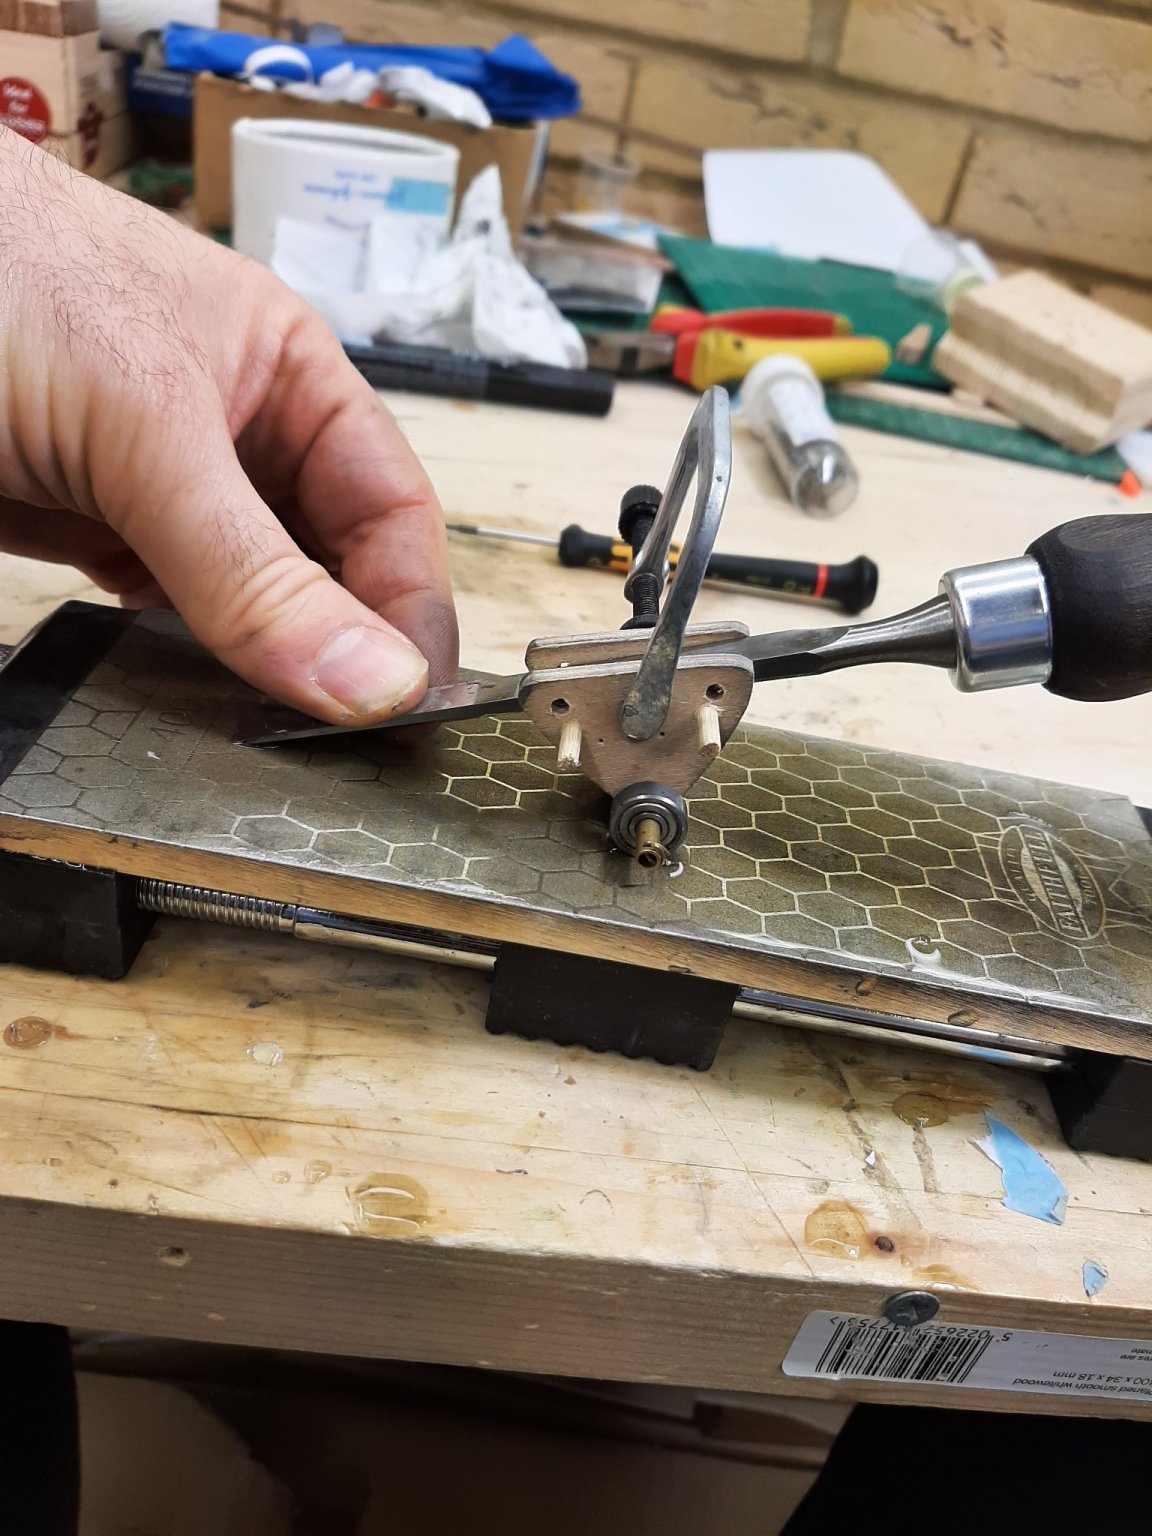
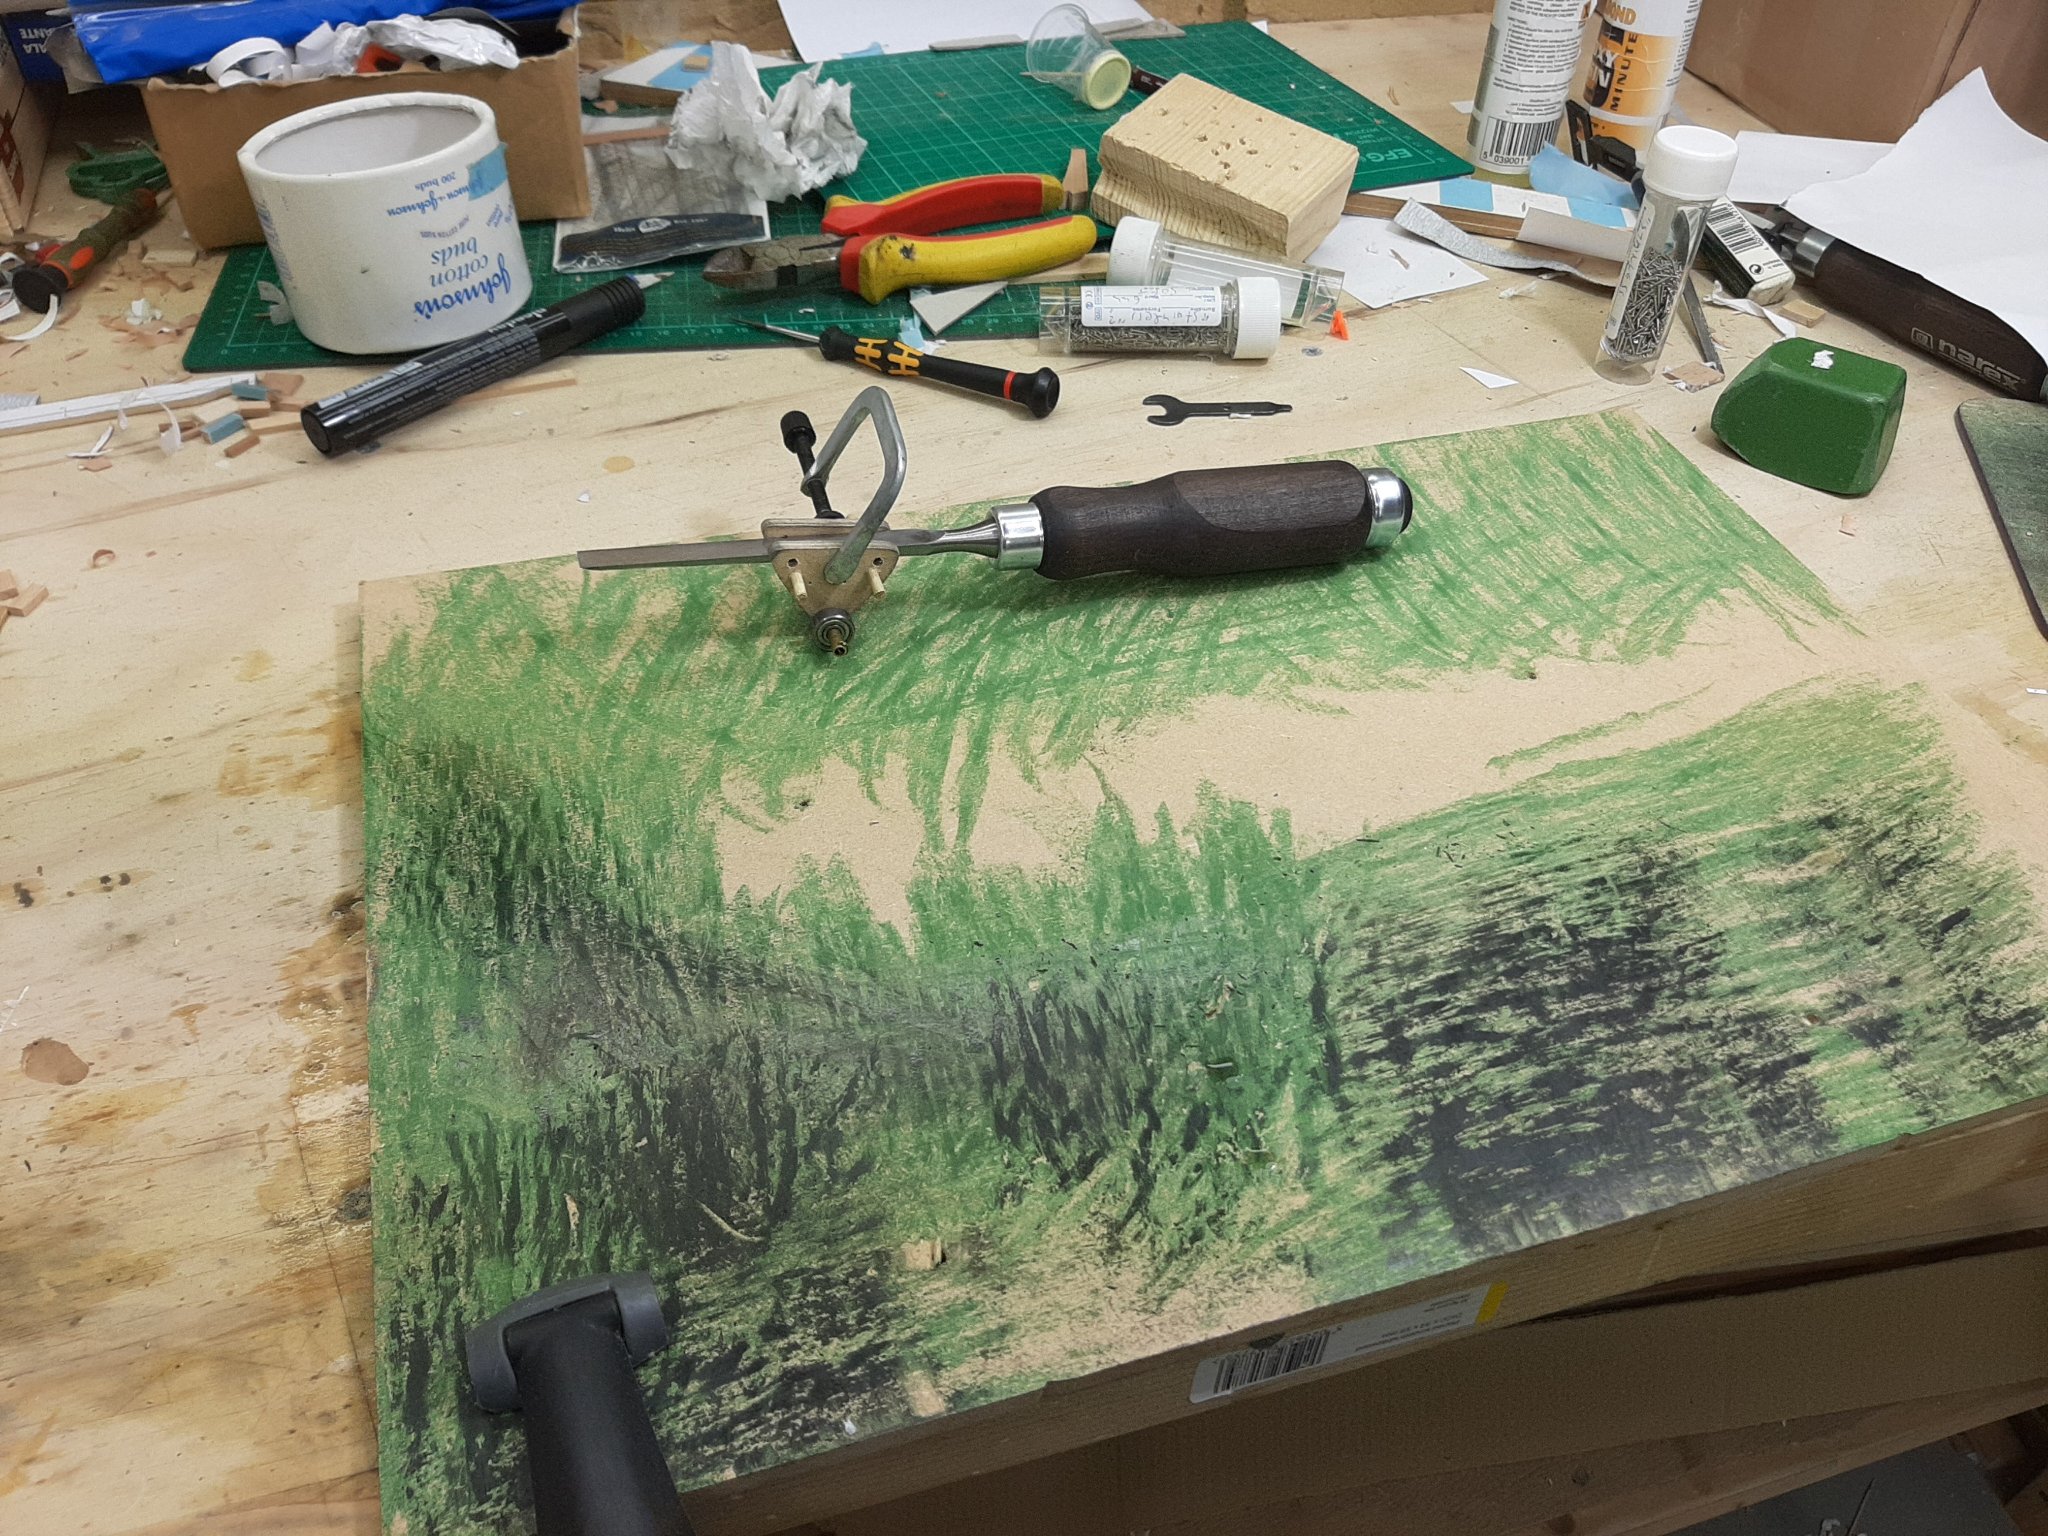
I will use only a cheap combination diamond stone 400/1000 grit, a slightly more expensive 1200 grit diamond stone, an old leather mouse pad turned upside down, a sheet of flat MDF and green polishing compound. I also will use a honing jig I make myself. This jig is absolutely needed unless you have a very steady hand and lots of experience, it can be made with whatever scrap material but some accuracy is needed in its construction-basically a drill press or a very steady hand.


Another thing needed is some kind of jig to make sure the bevel is grounded at roughly the same angle each time the guide is used. I just use scrap wood for this
Now, we start by positioning the chisel on the jig, finding the angle and then marking this position on the scrap wood. The little pieces of wood are glued and then screwed on.
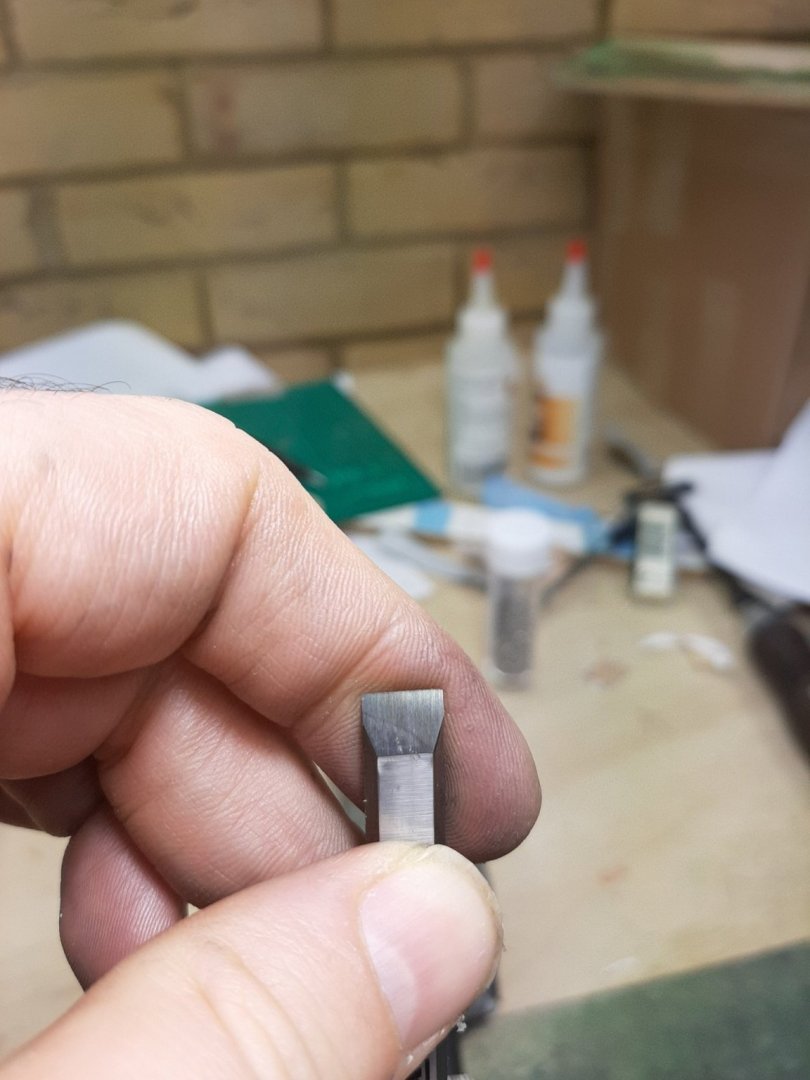
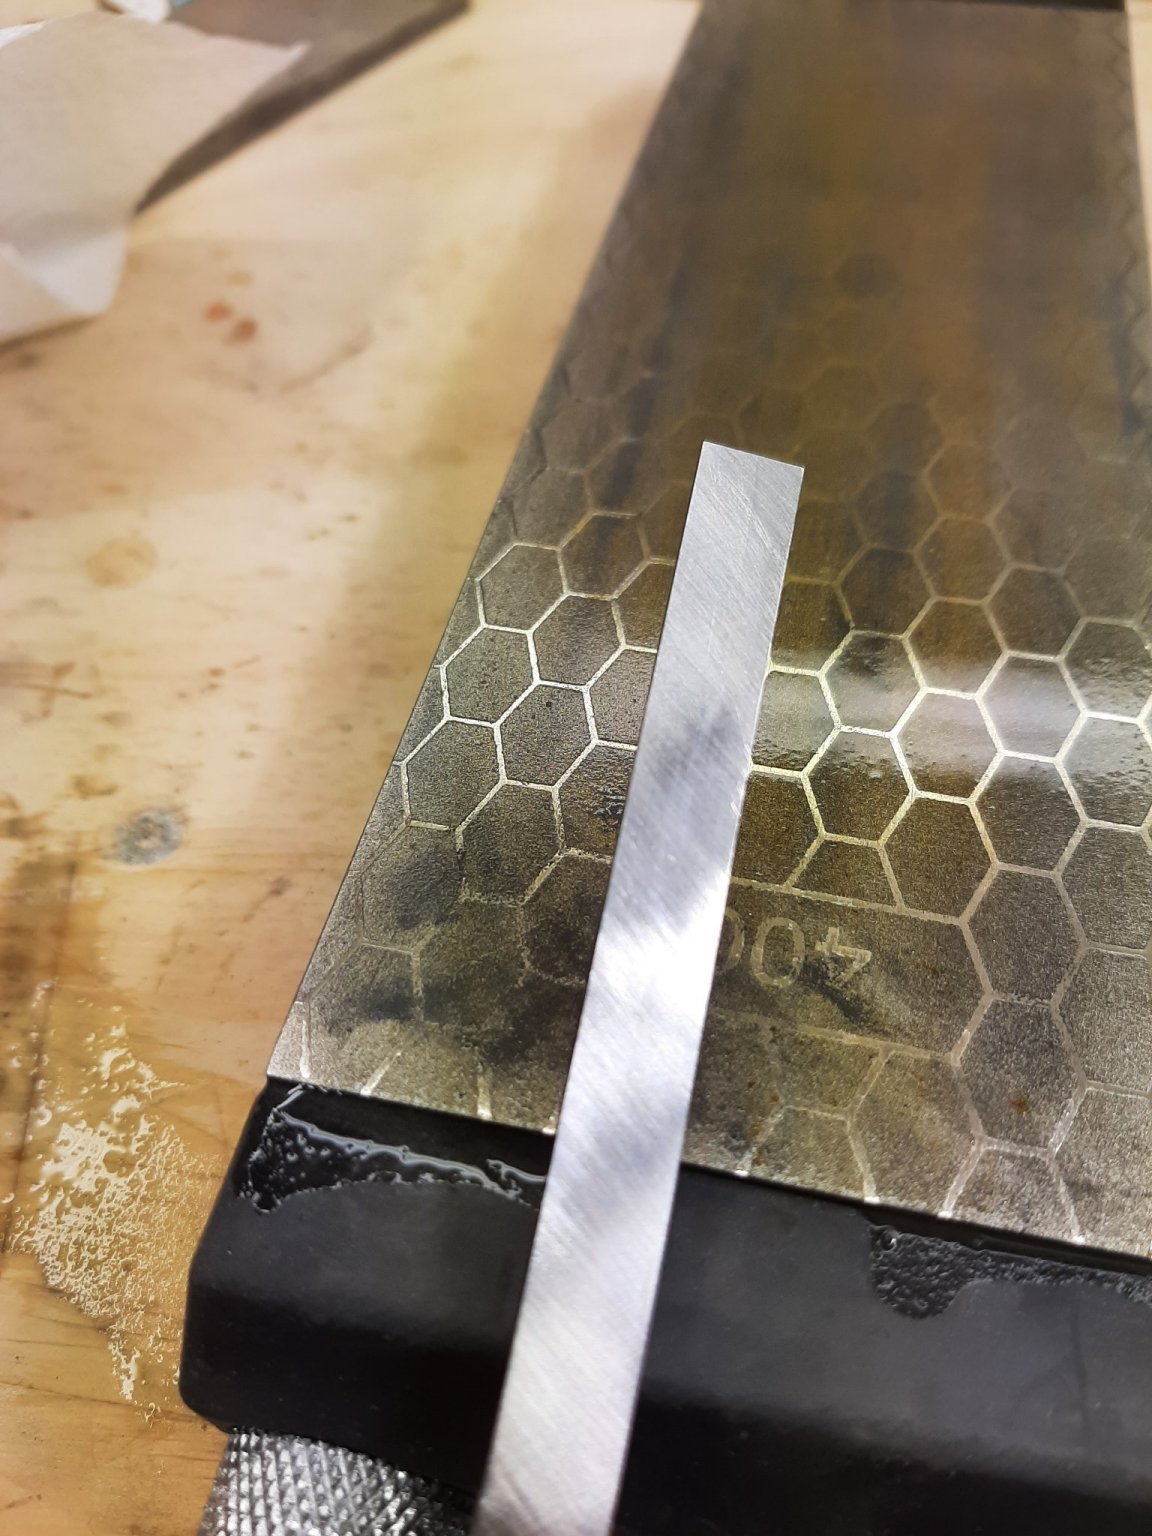
Now we start honing. I start with the 400 grit trying to remove the machine marks. This is the starting point
And this is how it looks after a few passes

Then we move on to the 1000 grit. This is how it look afterwards
Then on to 1200 grit, this is the result
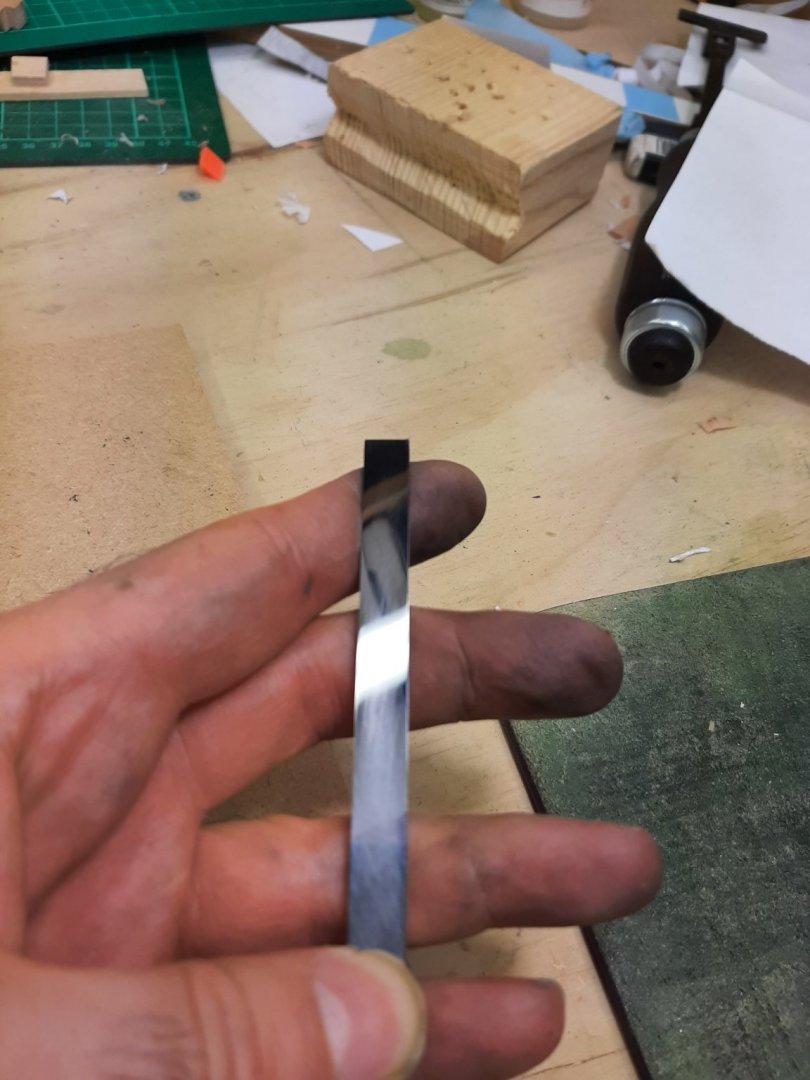
However there is a problem. The back is not flat as the next photo shows
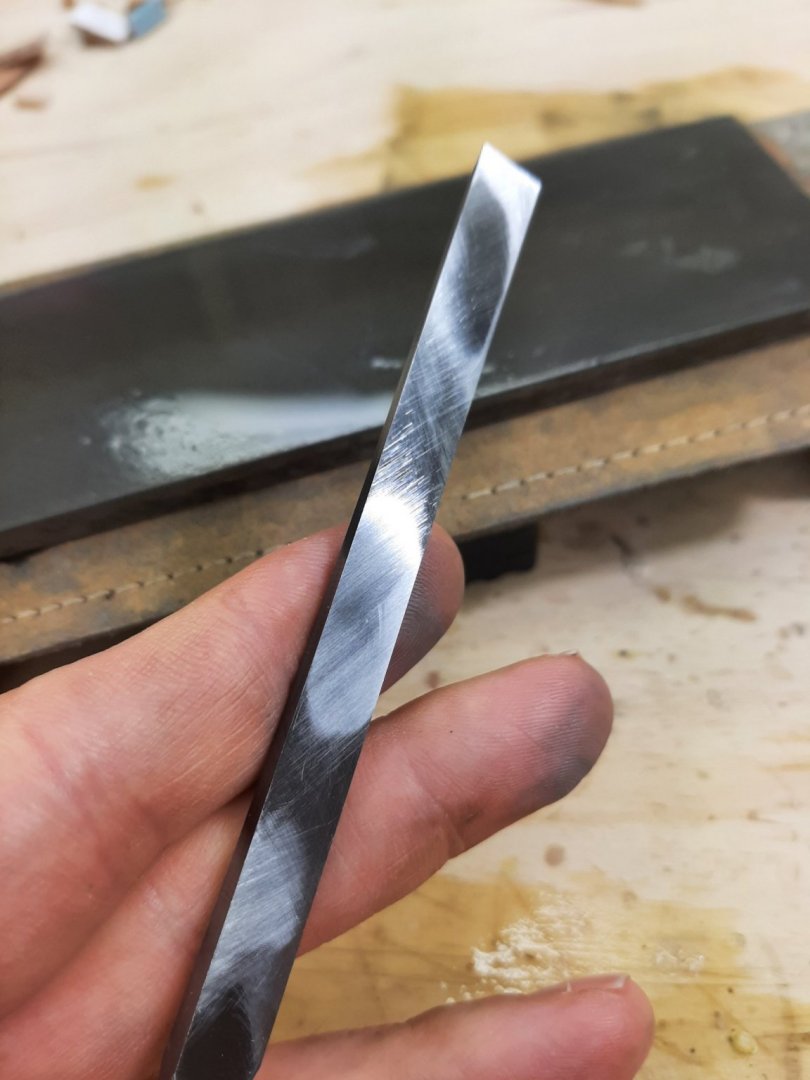
This is a problem. The back needs to be flat or better concave, so that less material needs to be removed making the job easier. So back to 400 grit to remove enough material to make the back completely flat, so the tip touches the stones. The diamond stones are very aggressive, they do not need any pressure, just to move the chisel back and forth.
This is how it looks now at 400 grit...

at 1000 grit...
and at 1200 grit.

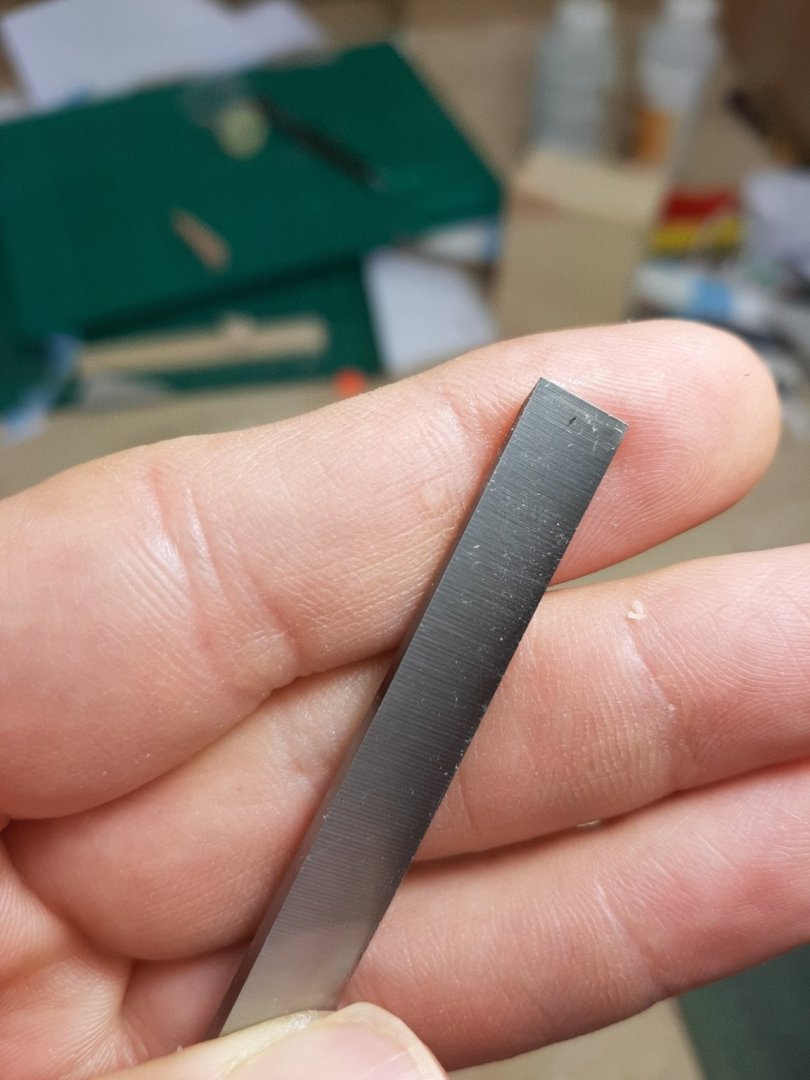
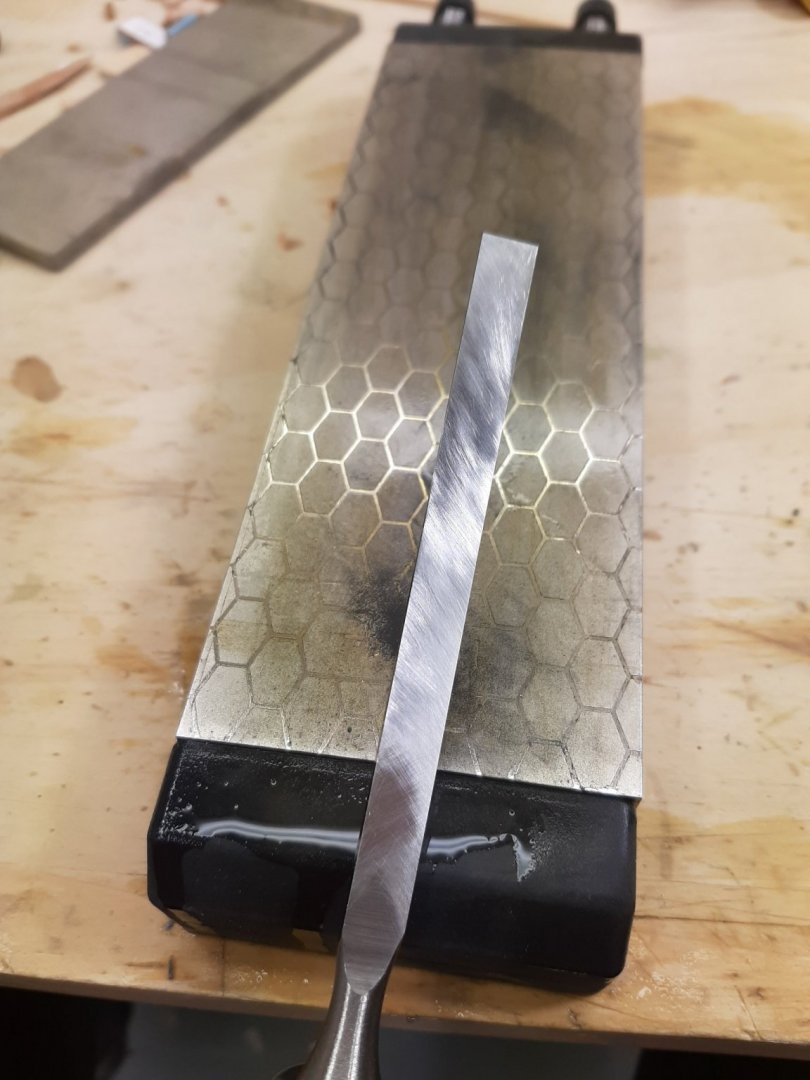
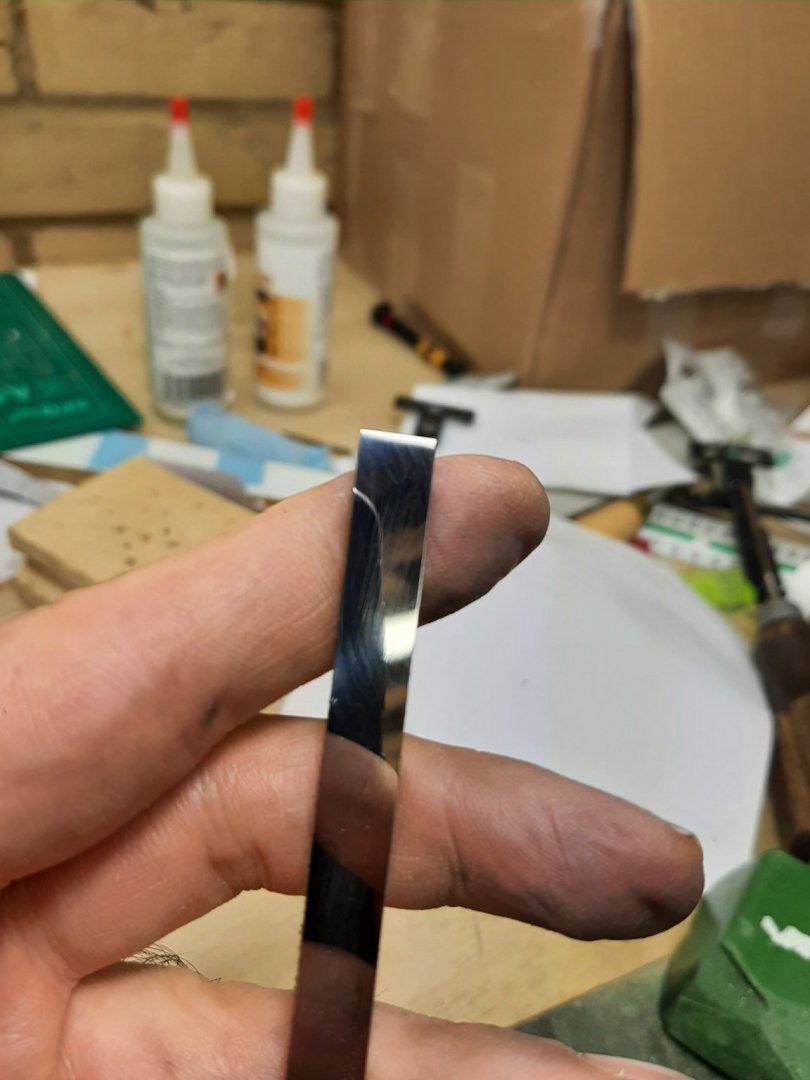
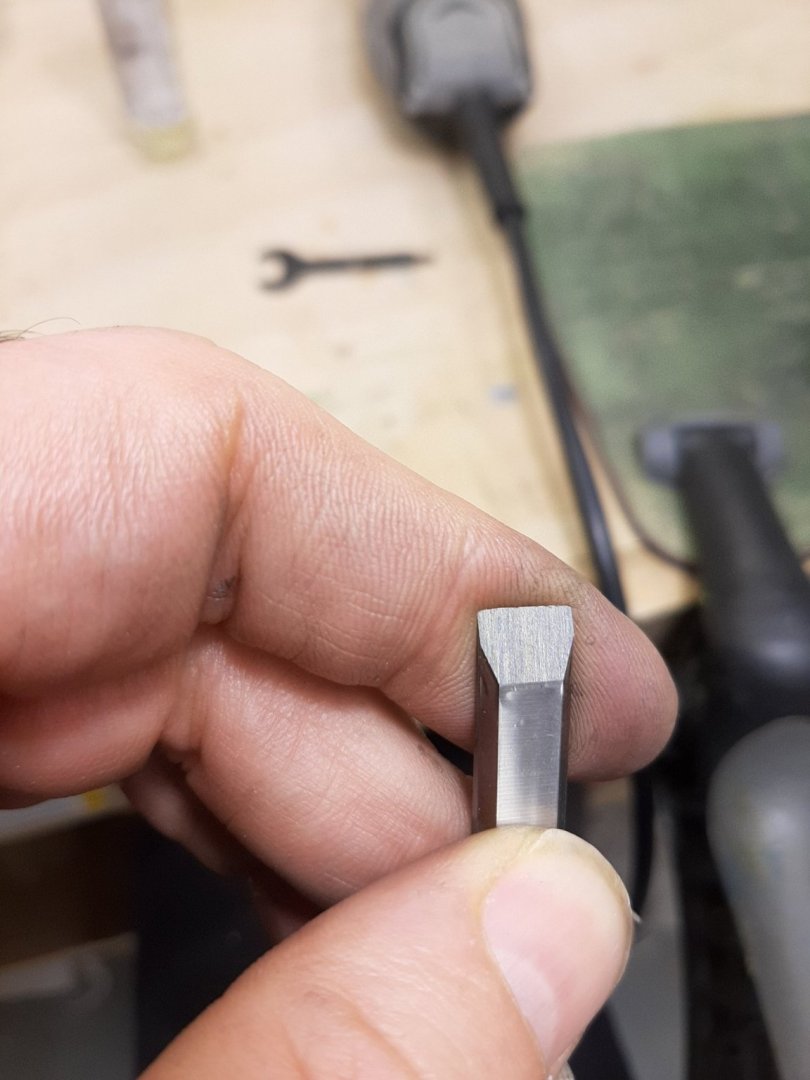
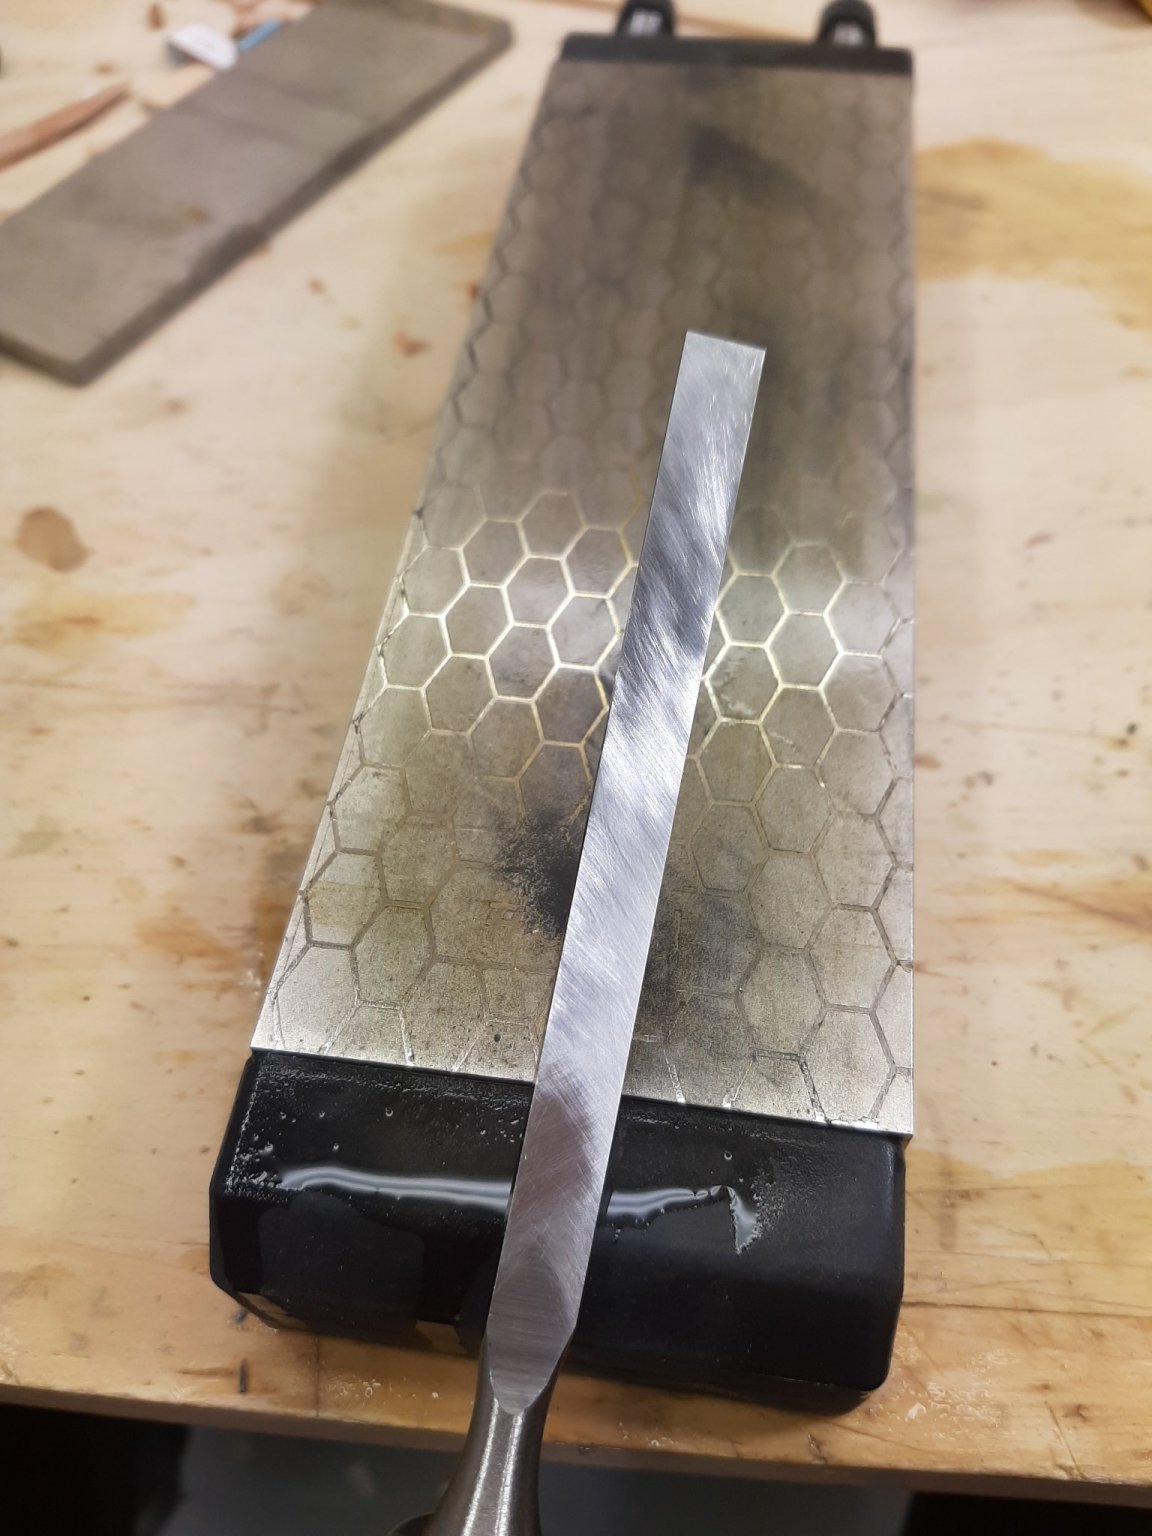
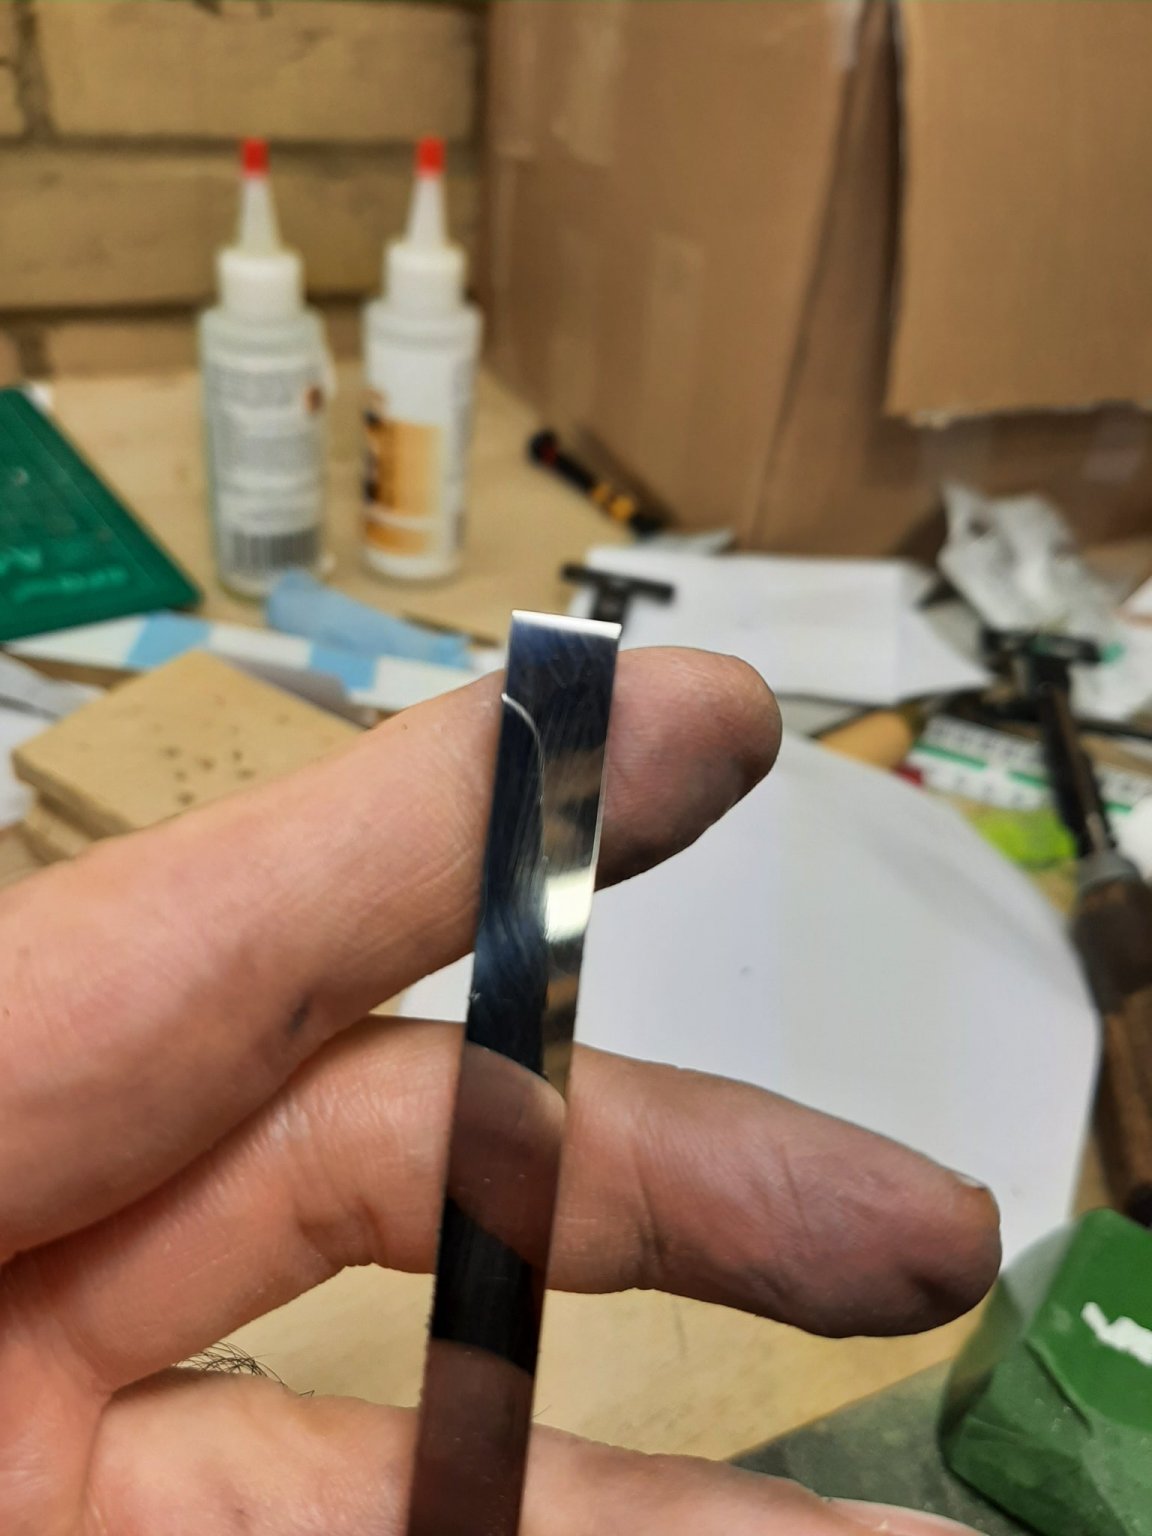
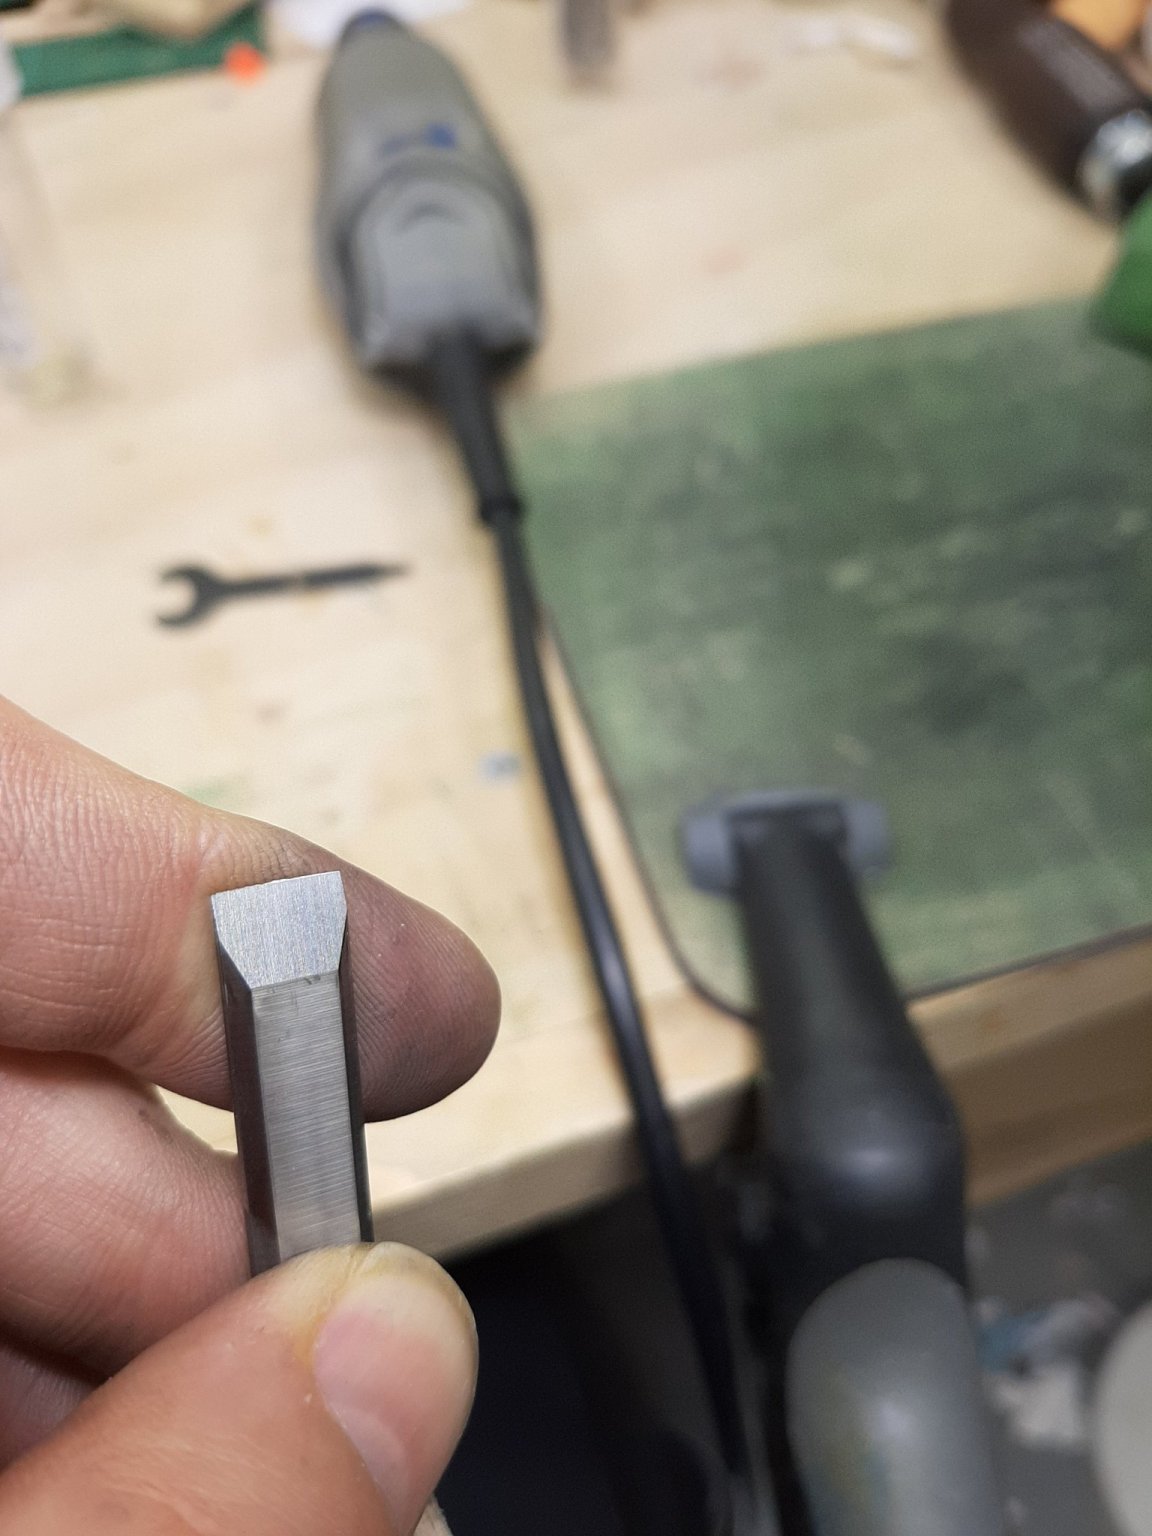
The chisel is already very sharp but we have a long way to go. Next comes the strop. This is how it looks after a few minutes of stropping.

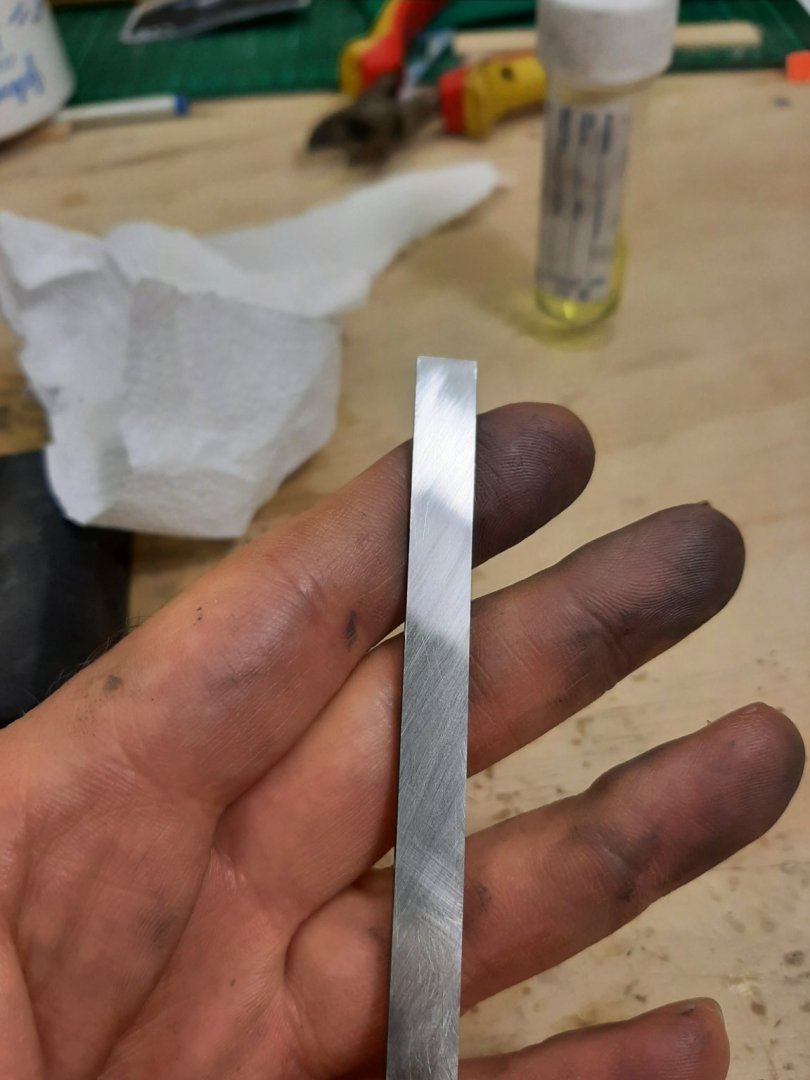
I have found that the fastest way at this point is using MDF. I charged some MDF with the green stuff and starting polishing like crazy moving the chisels in all directions. After just two minutes the results are impressive.
30 sec later
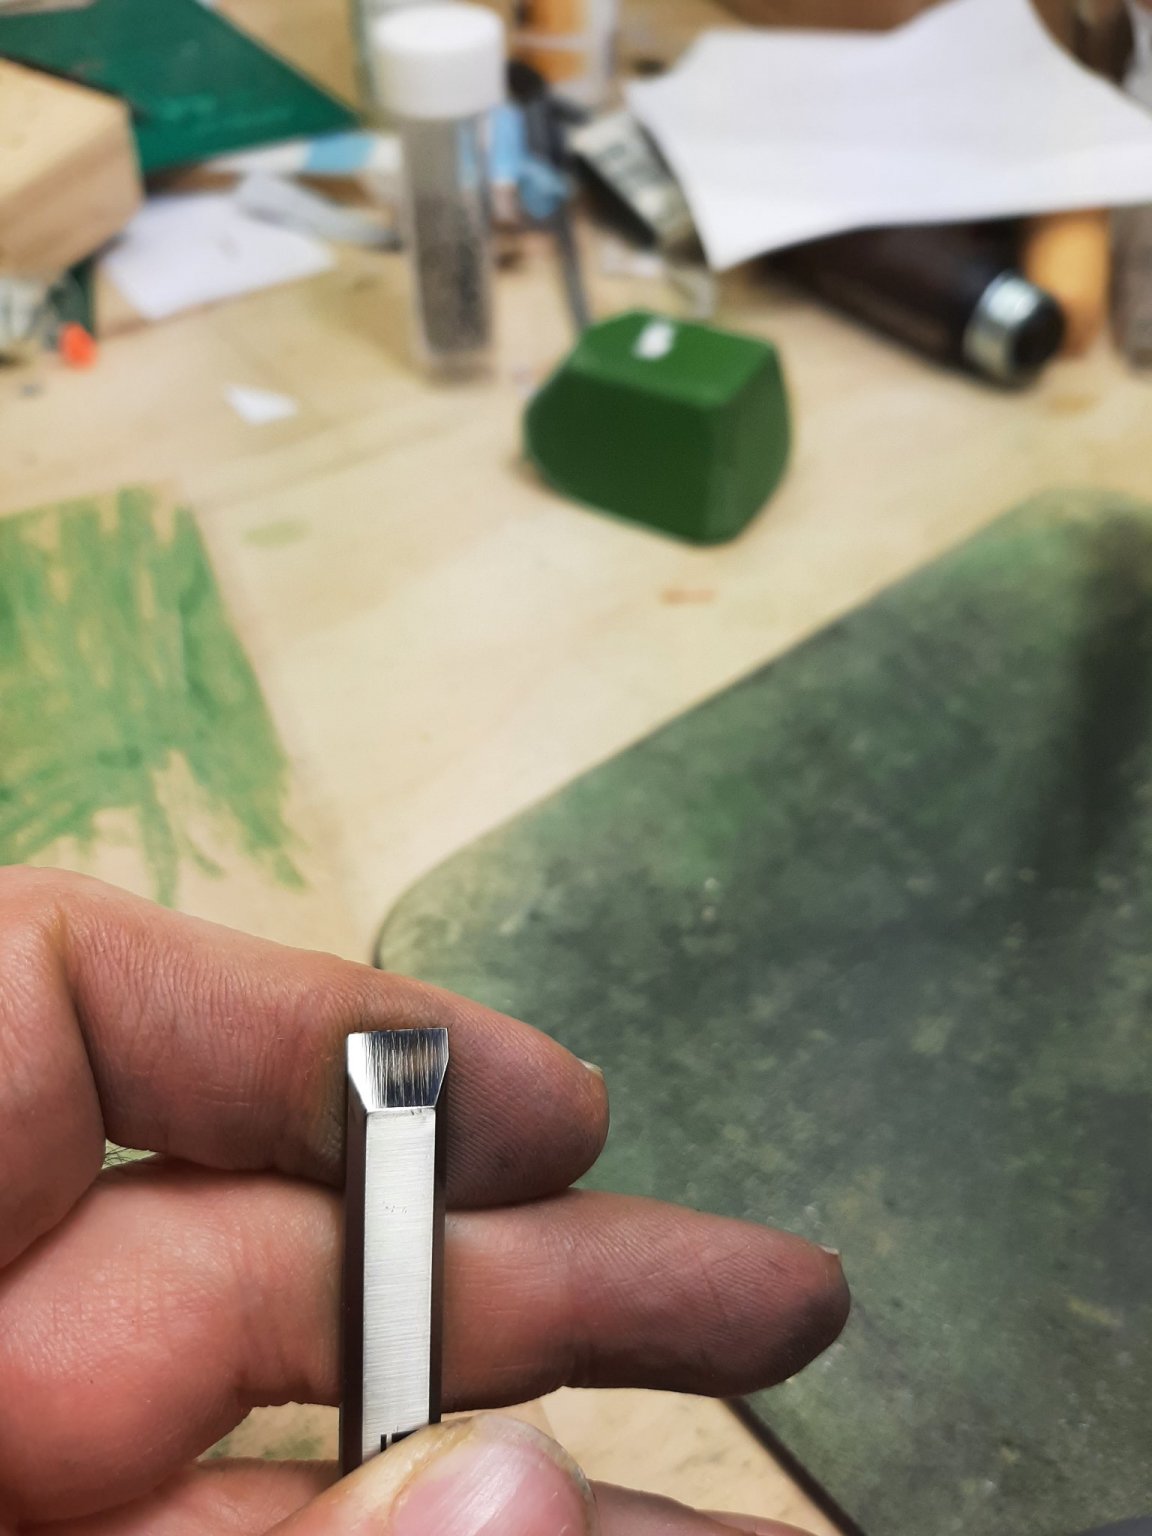
and after 30 more seconds of polishing, we are there. These are my fingers holding the phone shown on the surface, it is like mirror.
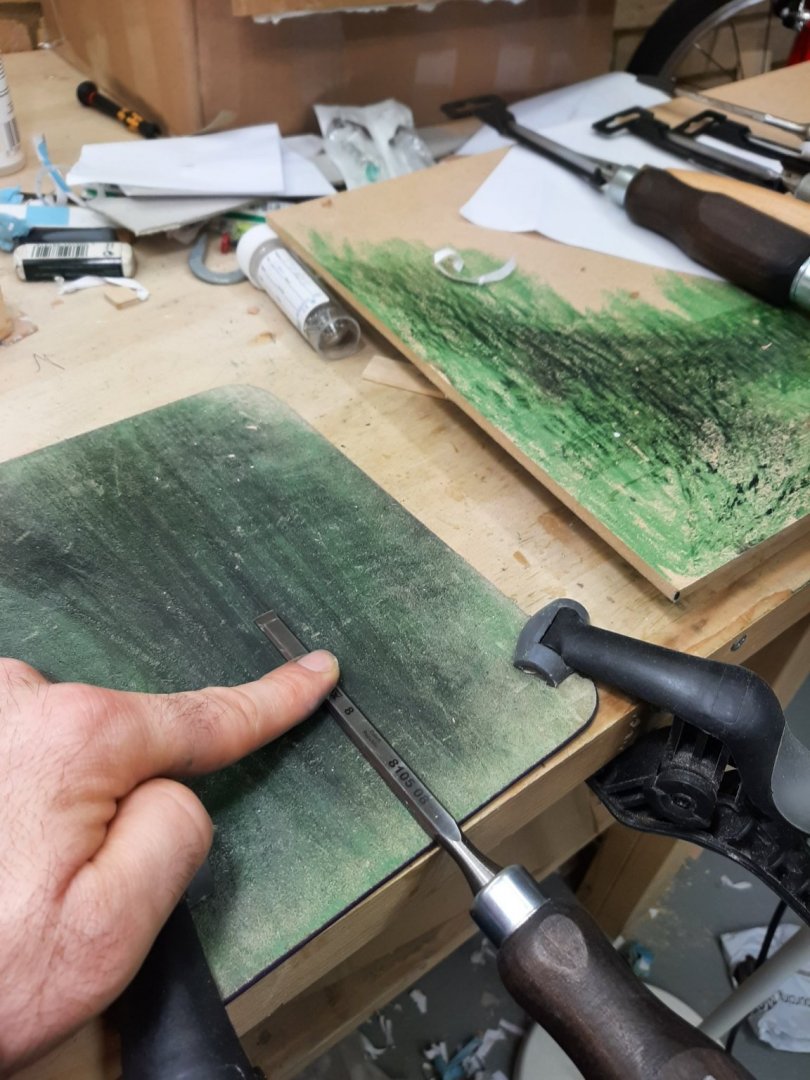
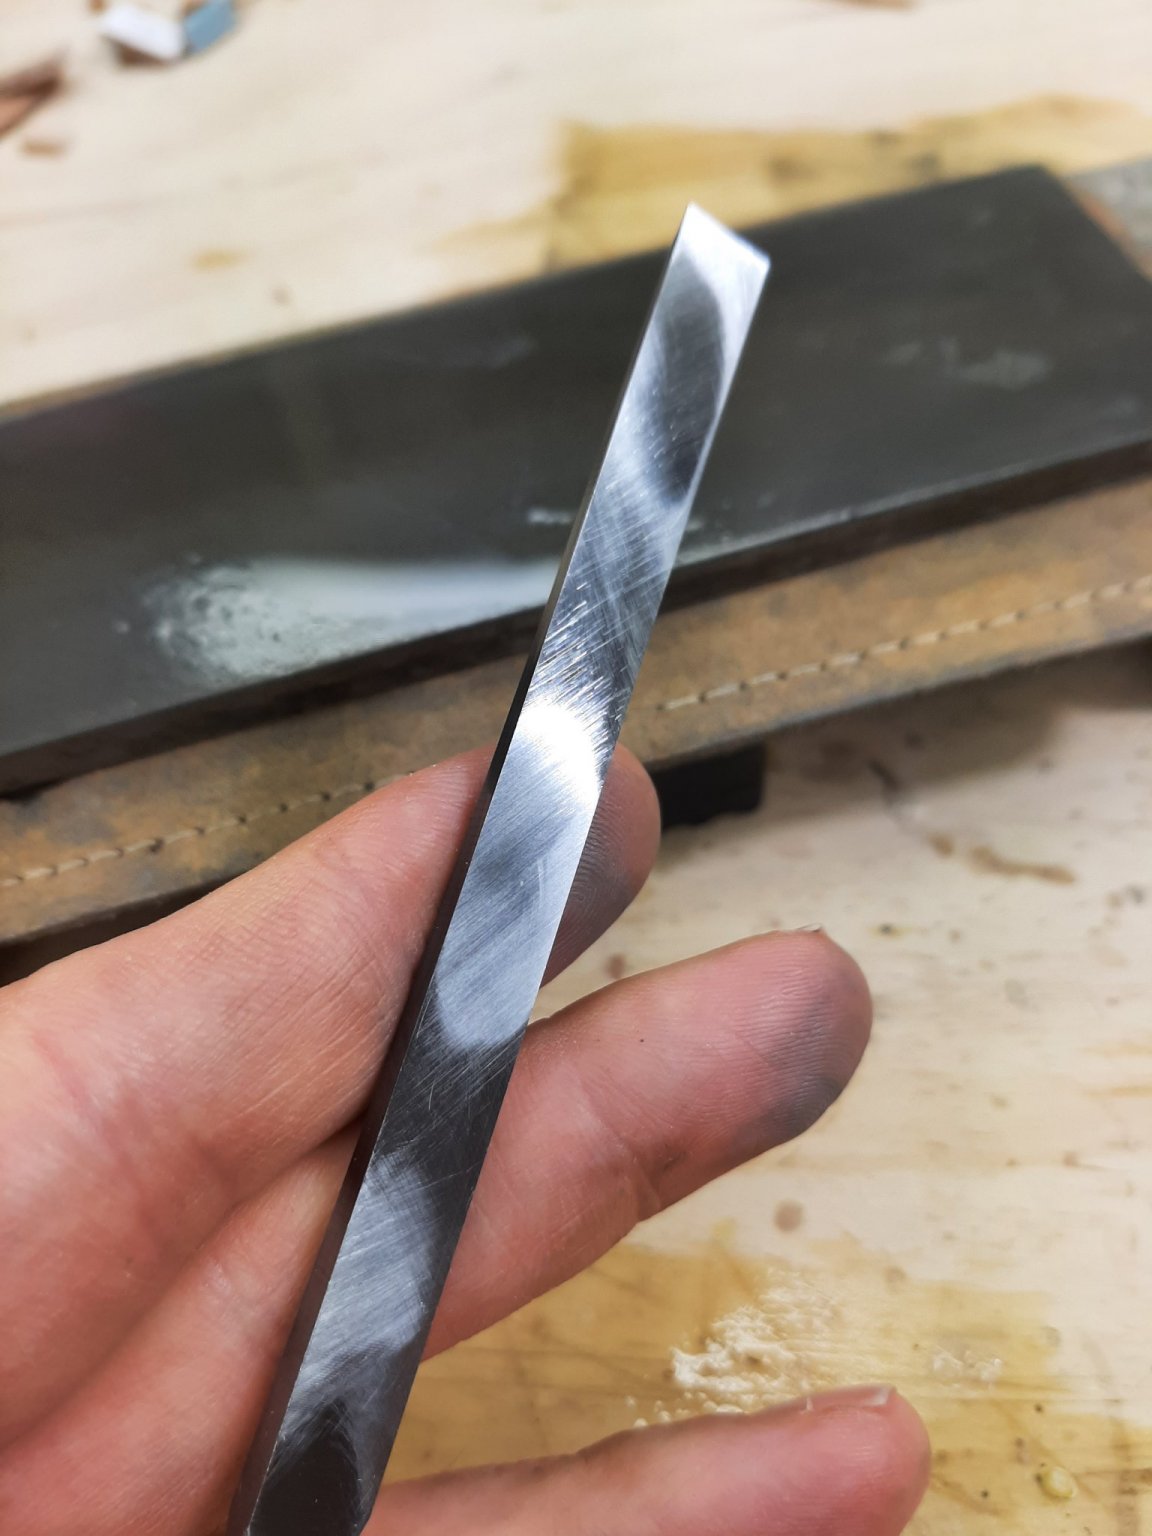
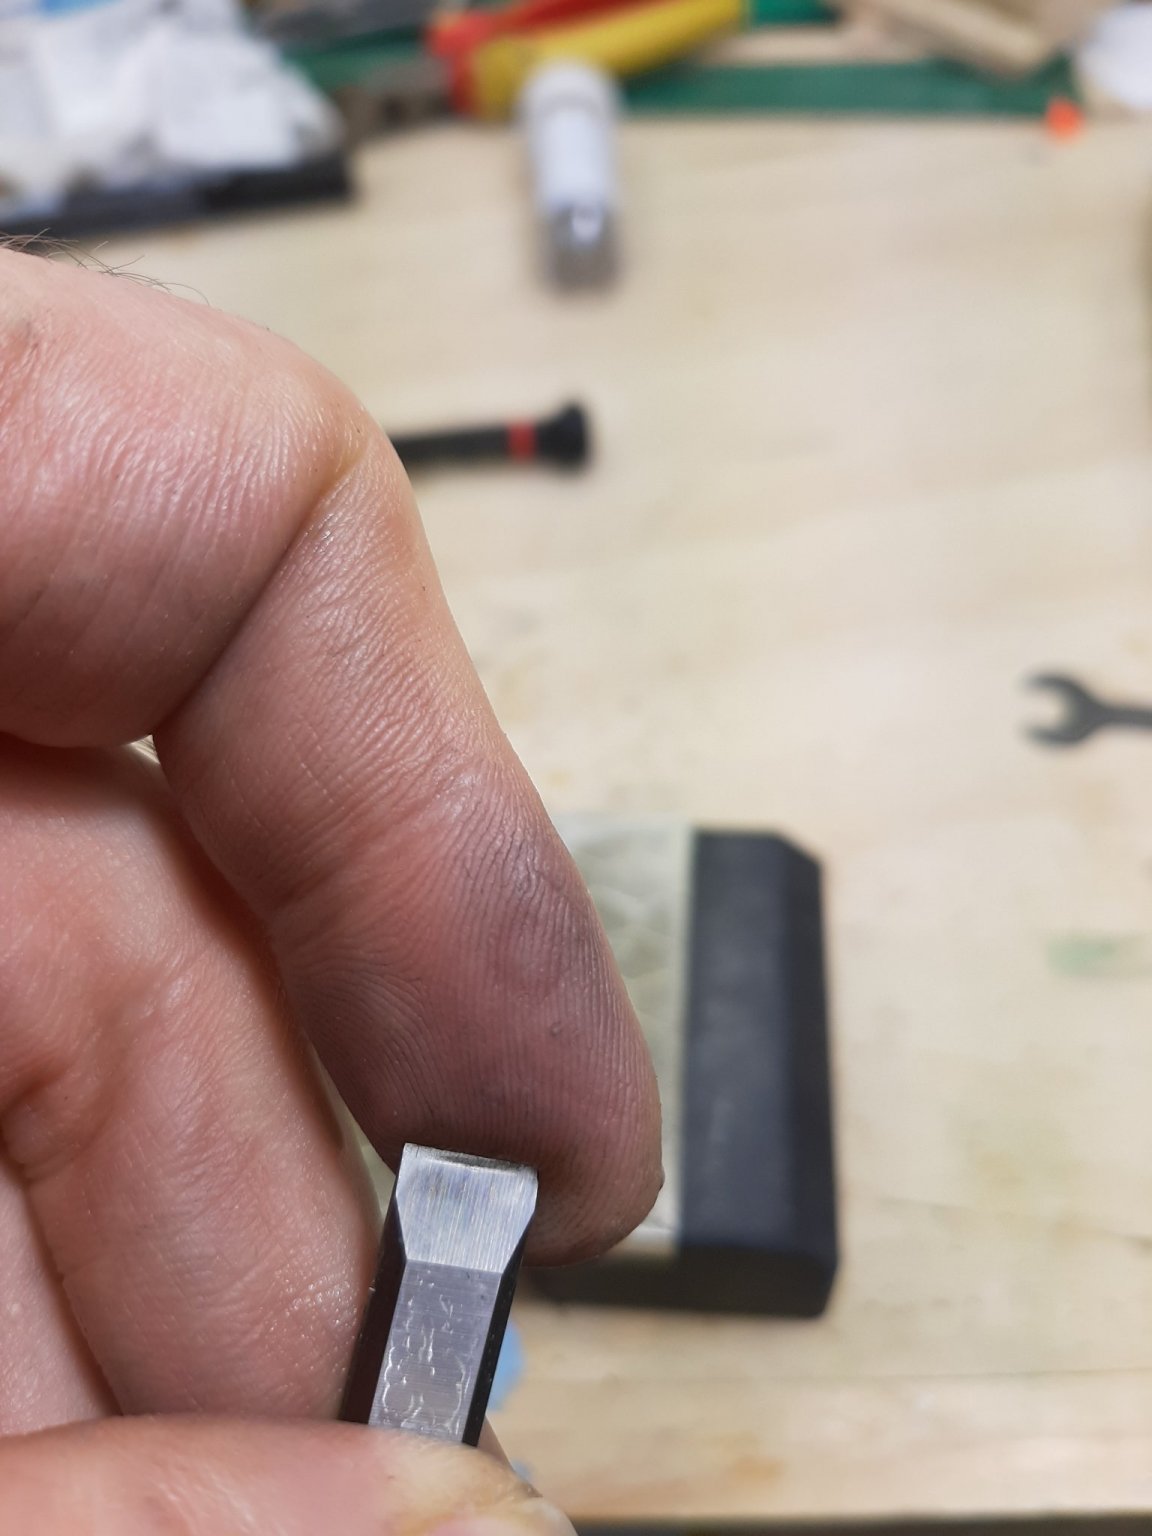
Good, now we move on to the bevel. This is our starting point.
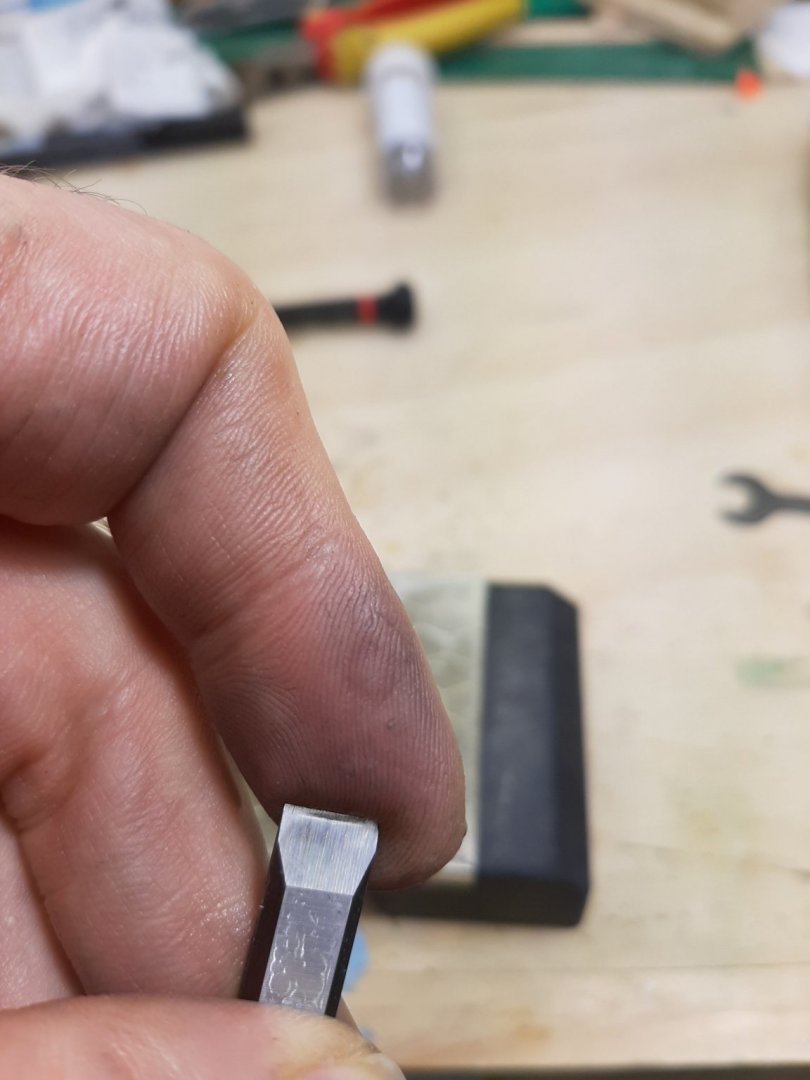
Using the jig we made earlier, the chisel is positioned on the guide. However although close, the positioning is not accurate so we actually need to create our own bevel. So we start with the 400 grit. This is how the new bevel is progressively formed.


Then on to 1000 grit...
and to 1200 grit.

Then we move on to the strop. The bevel takes much less time to polish than the back and actually the leather works better than the MDF. This is the result.

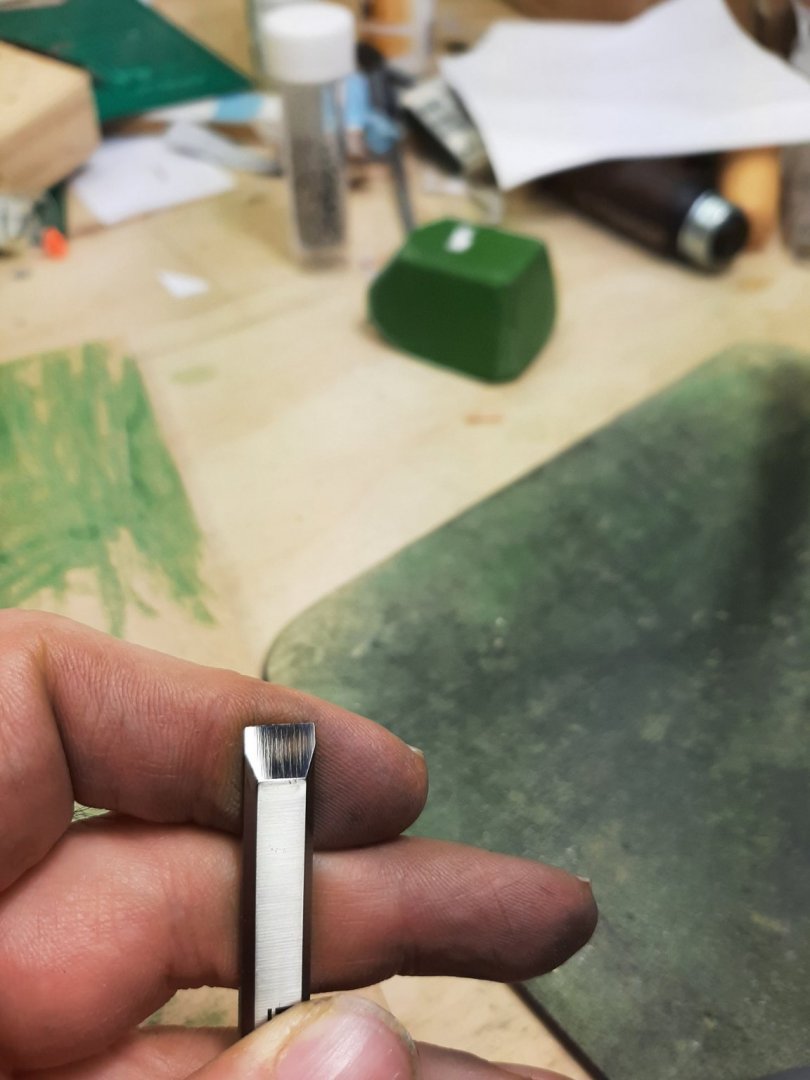

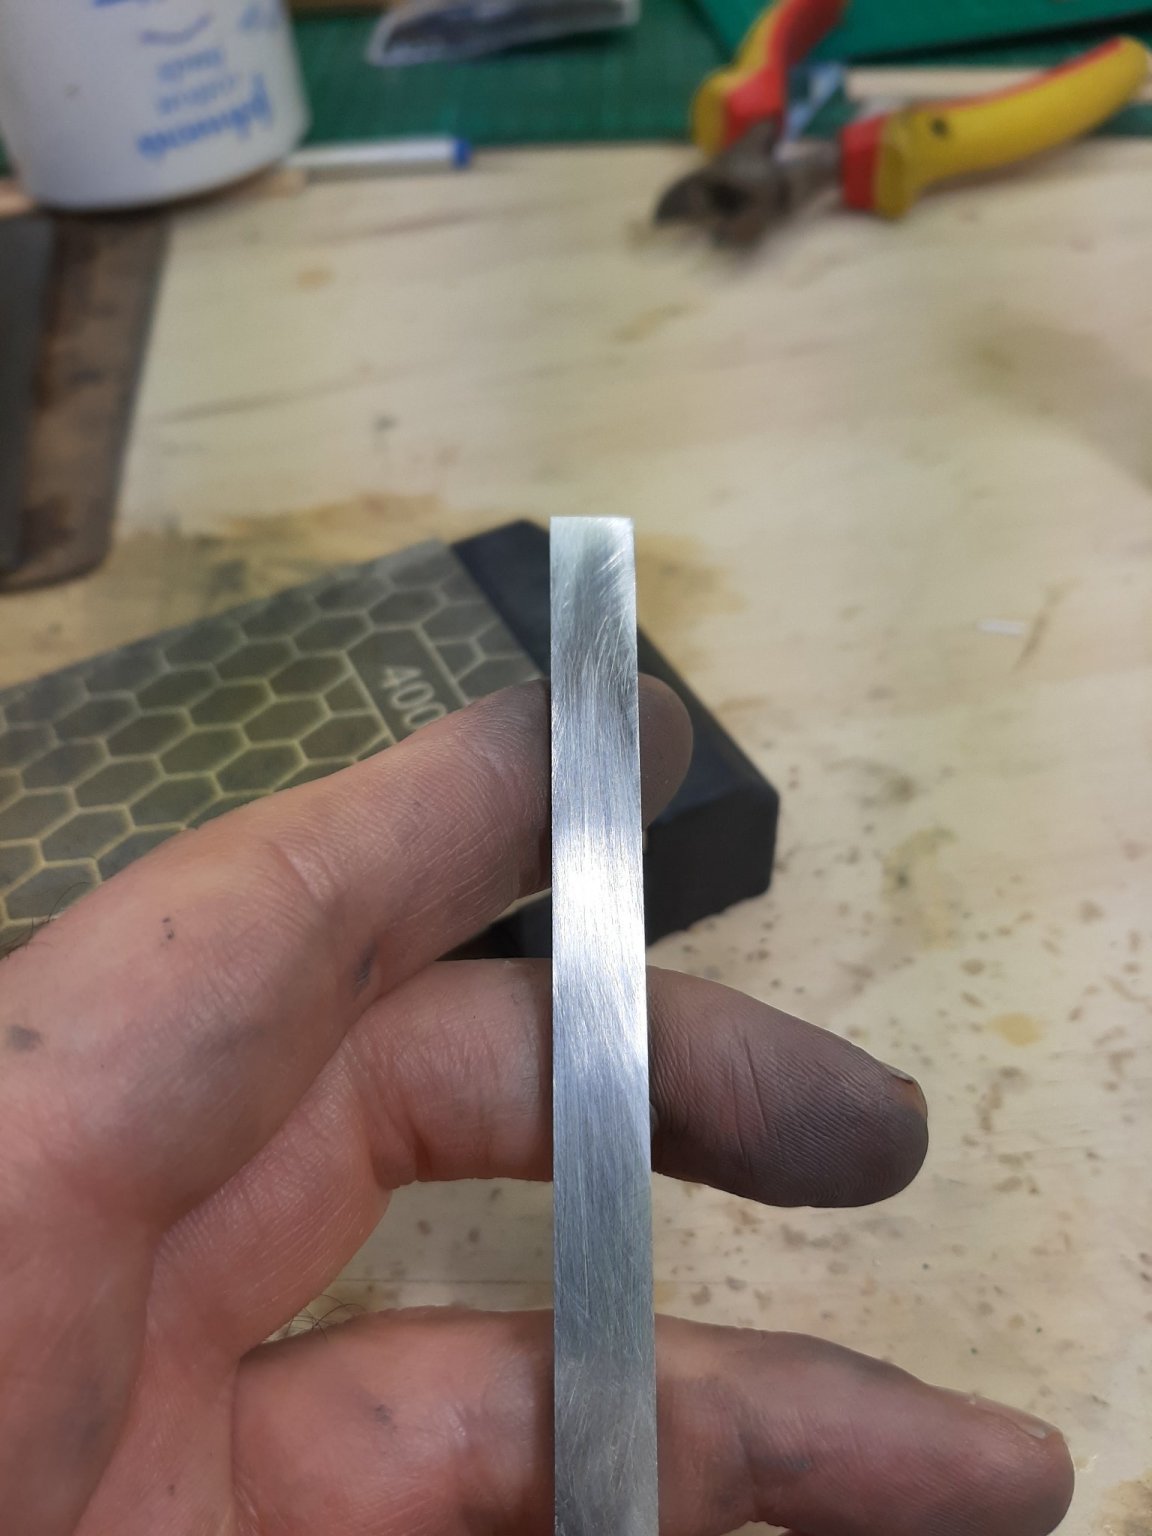
We now need to do a few passes on the back to remove the excess material hanging of the edge.
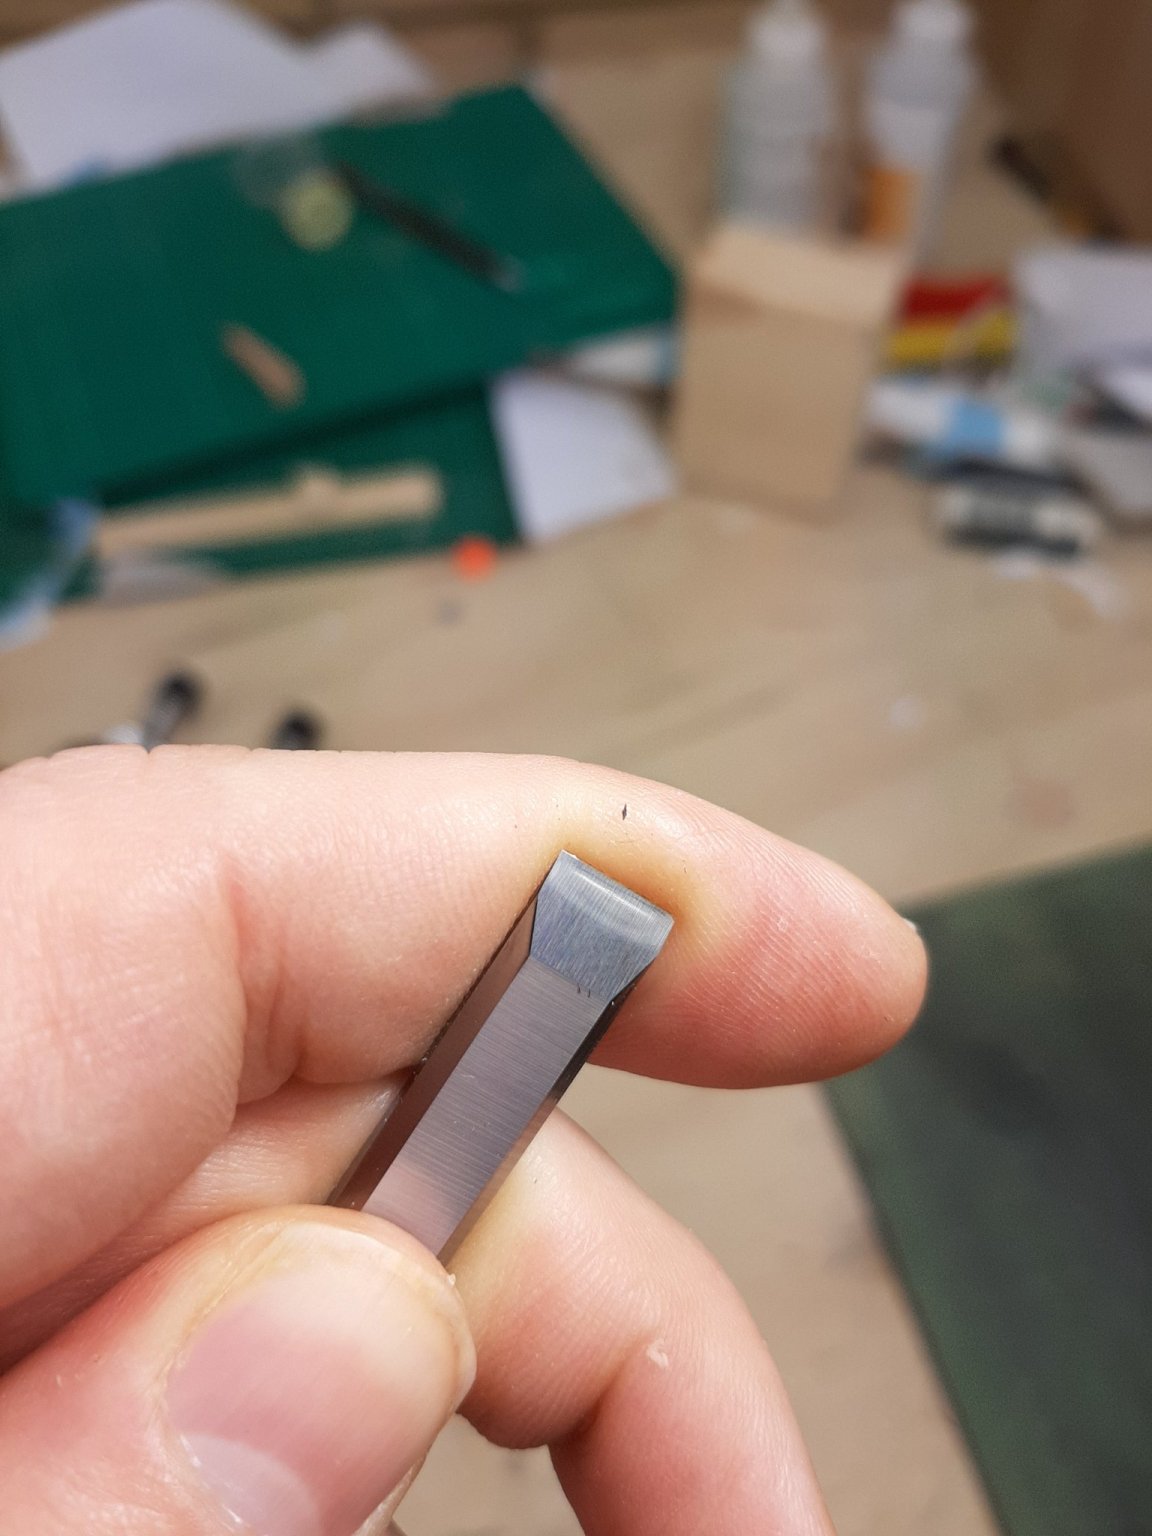
The chisel is now very sharp, sharp enough for what I needed for. It can of course be further polished, the green stuff I think is something like 25,000 grit but it is enough for now. During use, every few cuts, I make a few passes over the strop. With some use, it will get further polished.
I hope this has been helpful for some, a video follows showing the surfaces of the chisel
Regards
Vaddoc
-
17 minutes ago, DelF said:
The best guides I know are made by Richard Kell
These indeed look very nice but are expensive. I make my own guides with scrap material and cheap bearings and they work very well, even for my 3 mm chisel.
- EricWilliamMarshall, mtaylor, Canute and 1 other
-
4
-
I watched the Paul Sellers video and started sharpening my chisels free hand. It did not work for me or to be honest, it worked a bit.
The problem is that using diamond stones free hand, the bevel ends up very convex and this reduces the accuracy when using the chisel. Also it is very easy to hone one side too much and the edge ends up angled. I now use a guide for the diamond stones and the initial polish on the strop but from then on do the frequent touch ups on the strop fee hand. It takes a very long time for the bevel to end up concave on the strop.
I tried sand paper on glass but it eats the metal very slowly compared to diamond stones and is too fiddly and expensive. One wrong move and the chisel will tear the paper but also the paper gets soaked end disintegrates. Good sand paper is also expensive.
Really, the strop with the green compound makes all the difference. If someone is patient enough to give it 200 passes each side, the result will be a scary sharp chisel with a mirror finish.
-
I bought this pen sander and tried to make it work sanding the bevels. It did not.
I would not worry too much. Do your sanding and bring the bevels where they should be. If you need to glue a bit of wood then do it. Bit of sanding, bit of shimming.
I ve used in the past plain folded paper to shim temporary frames which were later replaced with bent frames. When the planks go on, the whole thing will be solid as a rock.
- Tim Moore, mtaylor and Ryland Craze
-
3
-
I ve never built a kit or POB but I think I could contribute a couple of things
Rabet and bearding line are two different things. As the plank meets the keel (or stem or sternpost) at an angle, the meeting point of outer surface of the plank with the keel is the rabet line. The meeting point of the inner surface of the plank with the keel is the bearding line. Now, the rabet line will be visible so needs to be straight or really fair with no big gaps. The bearding line is less important. Now, the frames should stop exactly at the bearding line so that the plank will be supported in all its width.
For tight areas, especially dealing with plywood, a very scary sharp chisel or knife is a good tool. But plywood is terrible. I am using this for permanent frames in my fishing boat-regretted it very much.
You need to keep one of the edges of the frame untouched but sand the other to the appropriate angle. You could maybe paint the edge of the frame so that you know how mush is taken off. Again, I have found that chisels work well for this. But really is a hard job-sand, test with a baten, sand again. In all honesty I ve never done it as I cut the bevels before installing the frames but occasionally I need to touch some frame here and there-same process.
Lay the baten across the whole hull if you like. As you sand all frames, little by little the baten will reach the frames. Or do three at a time to start with, so that the bulk of the excess material is taken off and then do more frames to ensure fairness. It is indeed a ton of work.
I think your questions show you are on the proper path, the hard one...
Regards
Vaddoc
-
Not really. It is pretty easy to make a rope walk. It can be made fancy or with whatever scrap or ebay-cheap material. It is easier to have a motor on one side spinning three yarns. On the other side it just needs some king of bearing connected to a weight. As the yarns spin into tension, the other end automatically will spin the opposite side and make the rope. The lines will get shorter as the rope is created and the bearing will move and lift the weight so some kind of pulley is needed there. A spindle is needed to keep the yarns separate-this will also move towards the motor so it needs to be supported and to be able to slide.
Making rope is very good fun-highly recommended.
-
Stick to the company thinners, they are designed to give the best result. They tend to be more complex than water and isopropyl alcohol I feel and the cost is negligible all considered. But most importantly, always test your chosen finish on scrap wood, not the model itself!
- mtaylor, thibaultron and Canute
-
3
-
-
Many thanks to all for your likes and comments!
9 hours ago, Bob Cleek said:The actual surface shape of a transom has to be "developed" or "expanded" in the lofting.
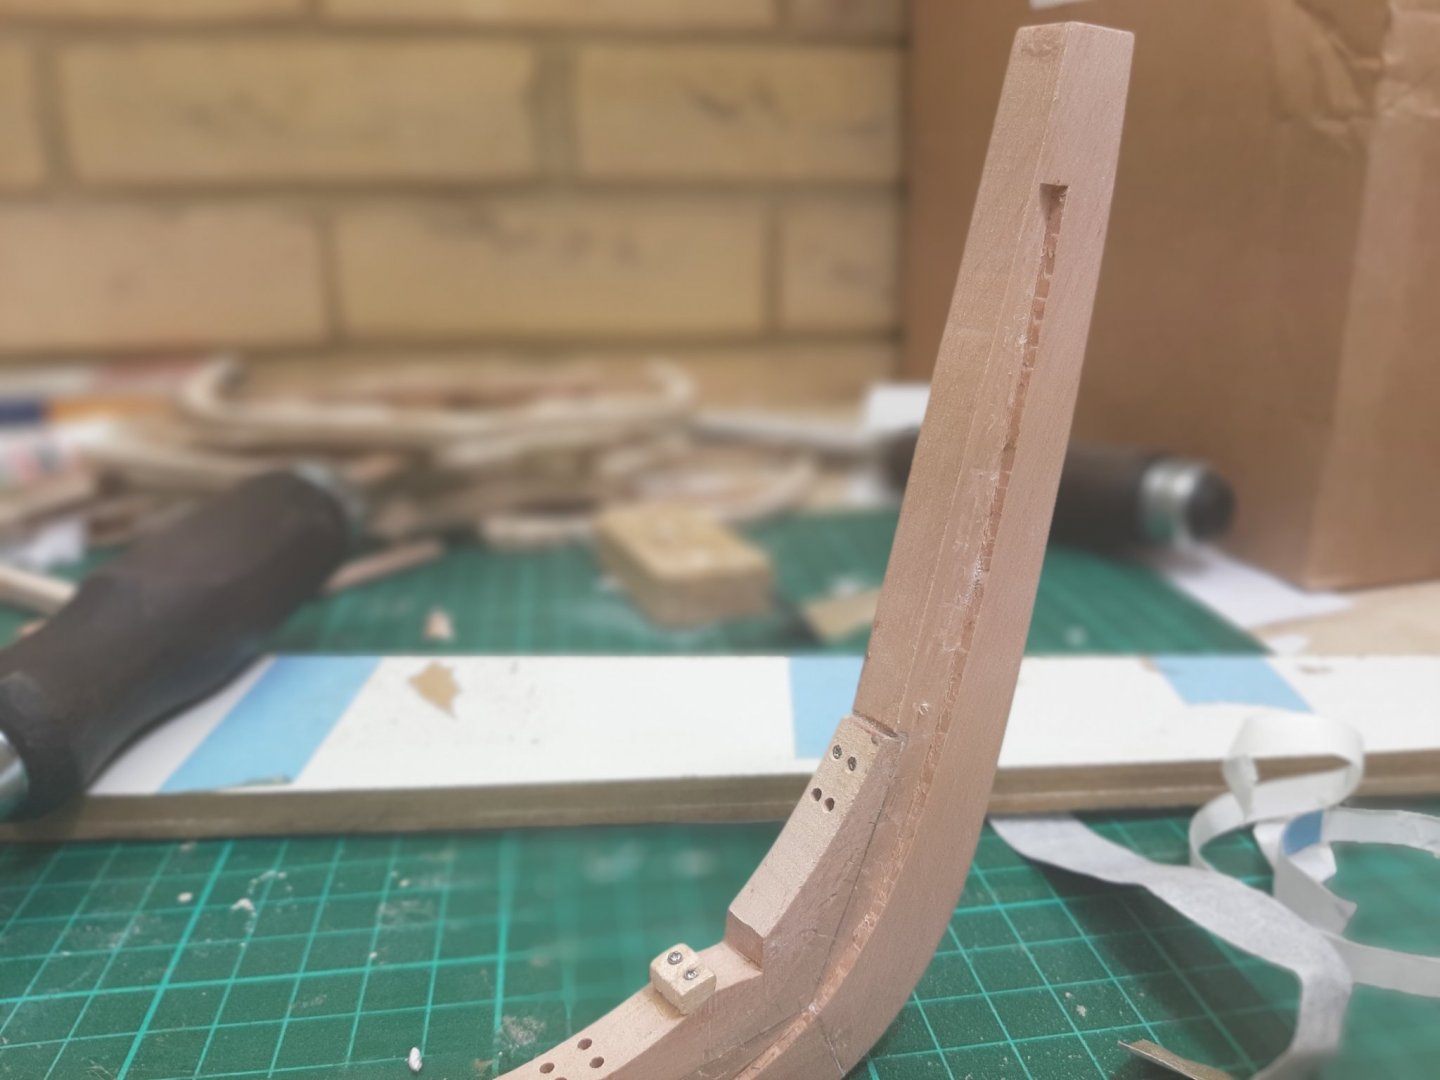
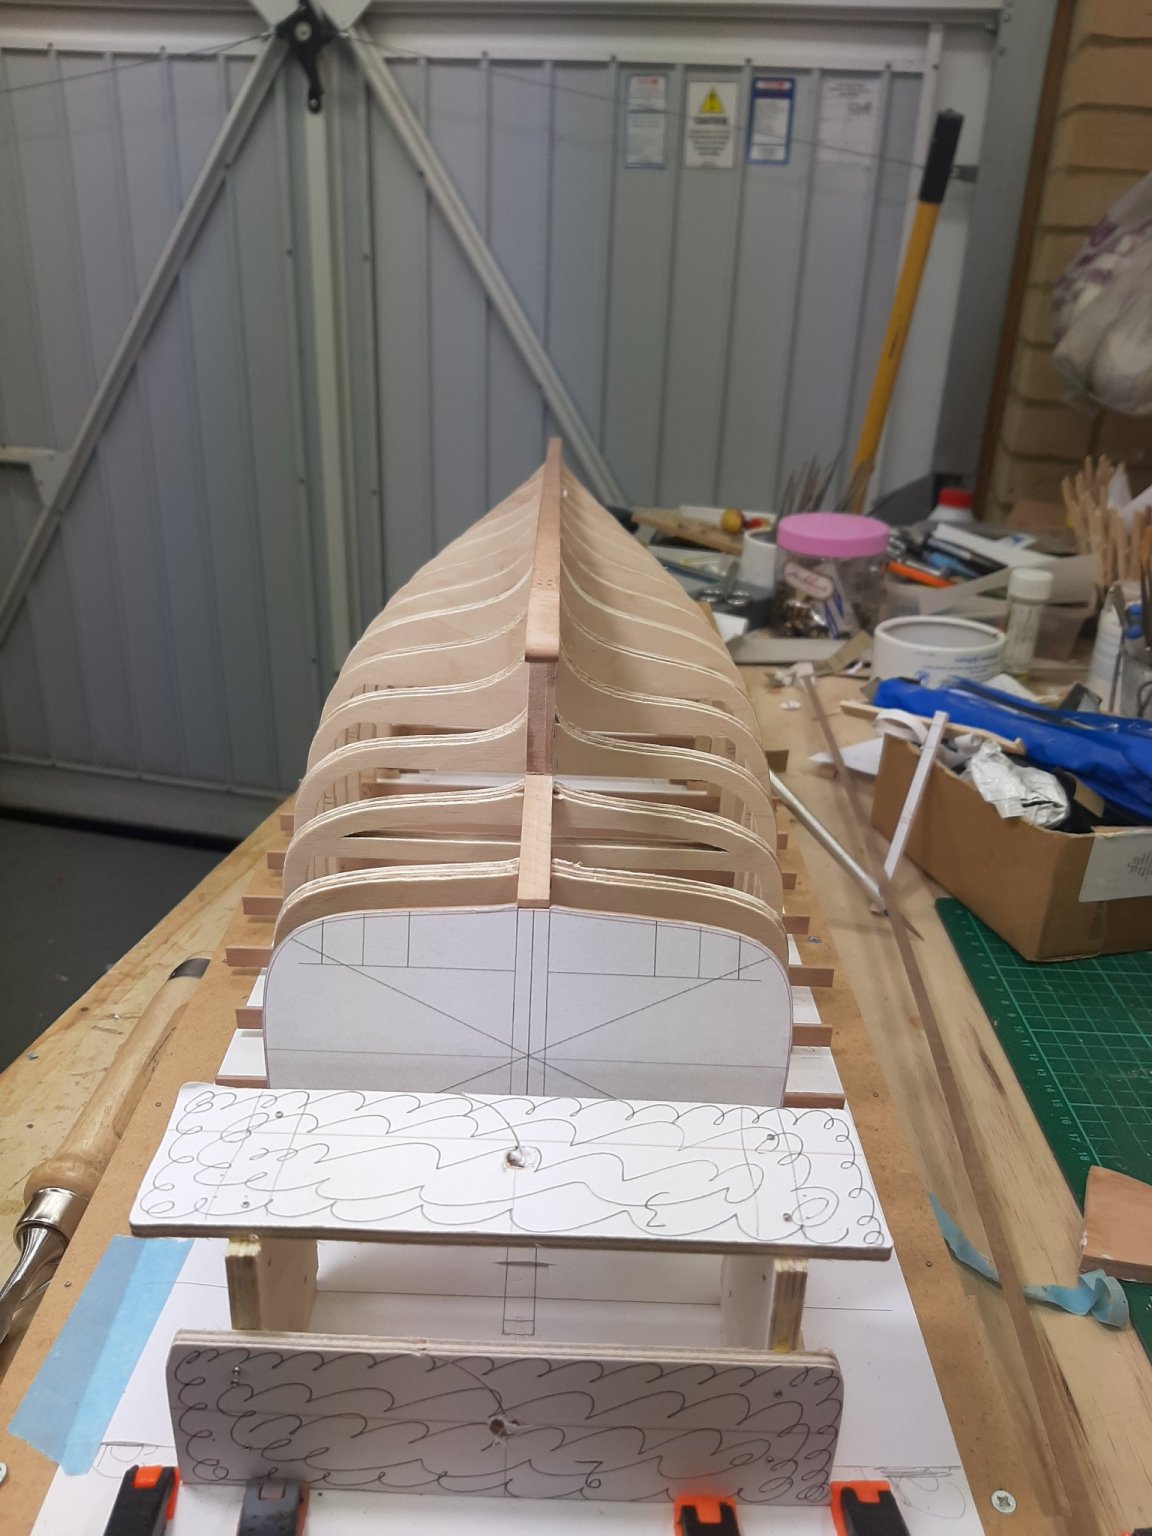
Indeed Bob, in all plans the transom might look vertical but essentially is the projection of the angled transom to the vertical plane. When I developed the plans on CAD, I did the opposite - that is I projected the transom as given in the plans to a surface in the appropriate angle. Then the sheer was faired and the hull developed and faired.
The problem was that the notches on the frames were not deep enough to accept the keel. This was evident as the transom was very accurately cut and positioned but the keel was hovering high up without touching the transom.
No idea how this happened as individually all pieces all seem to be very accurately cut but still refused to work together. So I am forgetting CAD accuracy-I ll just sand and shim things as needed until all curves flow nicely! But I checked the hull and it looks ok.
-
Peter, have a look at the link bellow but also a nose around MSW - lots of good info.
You will need to thin the paint, best thing to practice on scrap pieces of wood, NOT on the model. Cheap plywood works great. When you feel comfortable with your chosen finish, then apply it to the model.
Paint should not be thick and enamels behave much different to acrylics. Have a read, principals are pretty much the same for enamels as well.
-
Enamel over acrylic is generally fine allowing time for the acrylic to "cure". fat over lean!
A few comments from my experience though:
The Valejo polyurethane varnish is good but I am not too impressed with its adhesion to substrate-never used it on bare wood though. Probably it would be fine but I do not think it is designed for this purpose. There are dedicated wood sealers which would be a better choice for sealing wood. The Valejo polyurethane is water based so it will raise the grain and sanding will be needed, I do not think you will be able to brush the paint straight away.
I would use a sanding sealer, sand smooth to 400 grit and then paint with enamel and low odour mineral spirit. If you don't mind the trouble, Humbrol enamels are great. Or you could just use very dilute enamel as first coat to seal the wood but sanding sealer is better
Vaddoc
-
Dear friends
It is done!
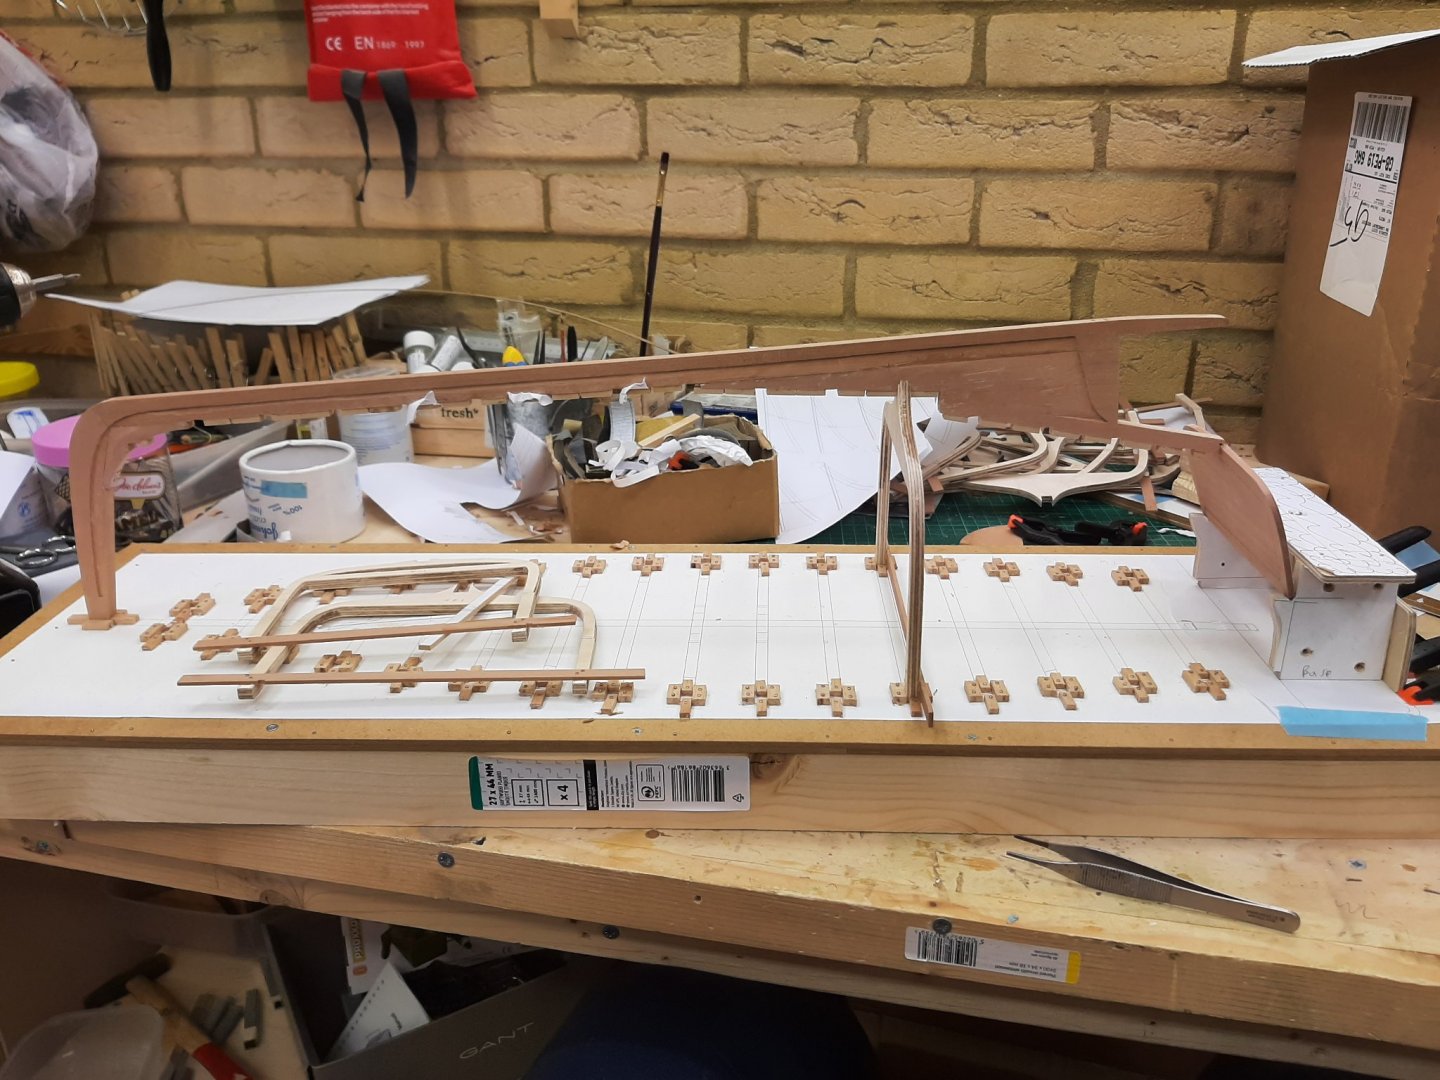
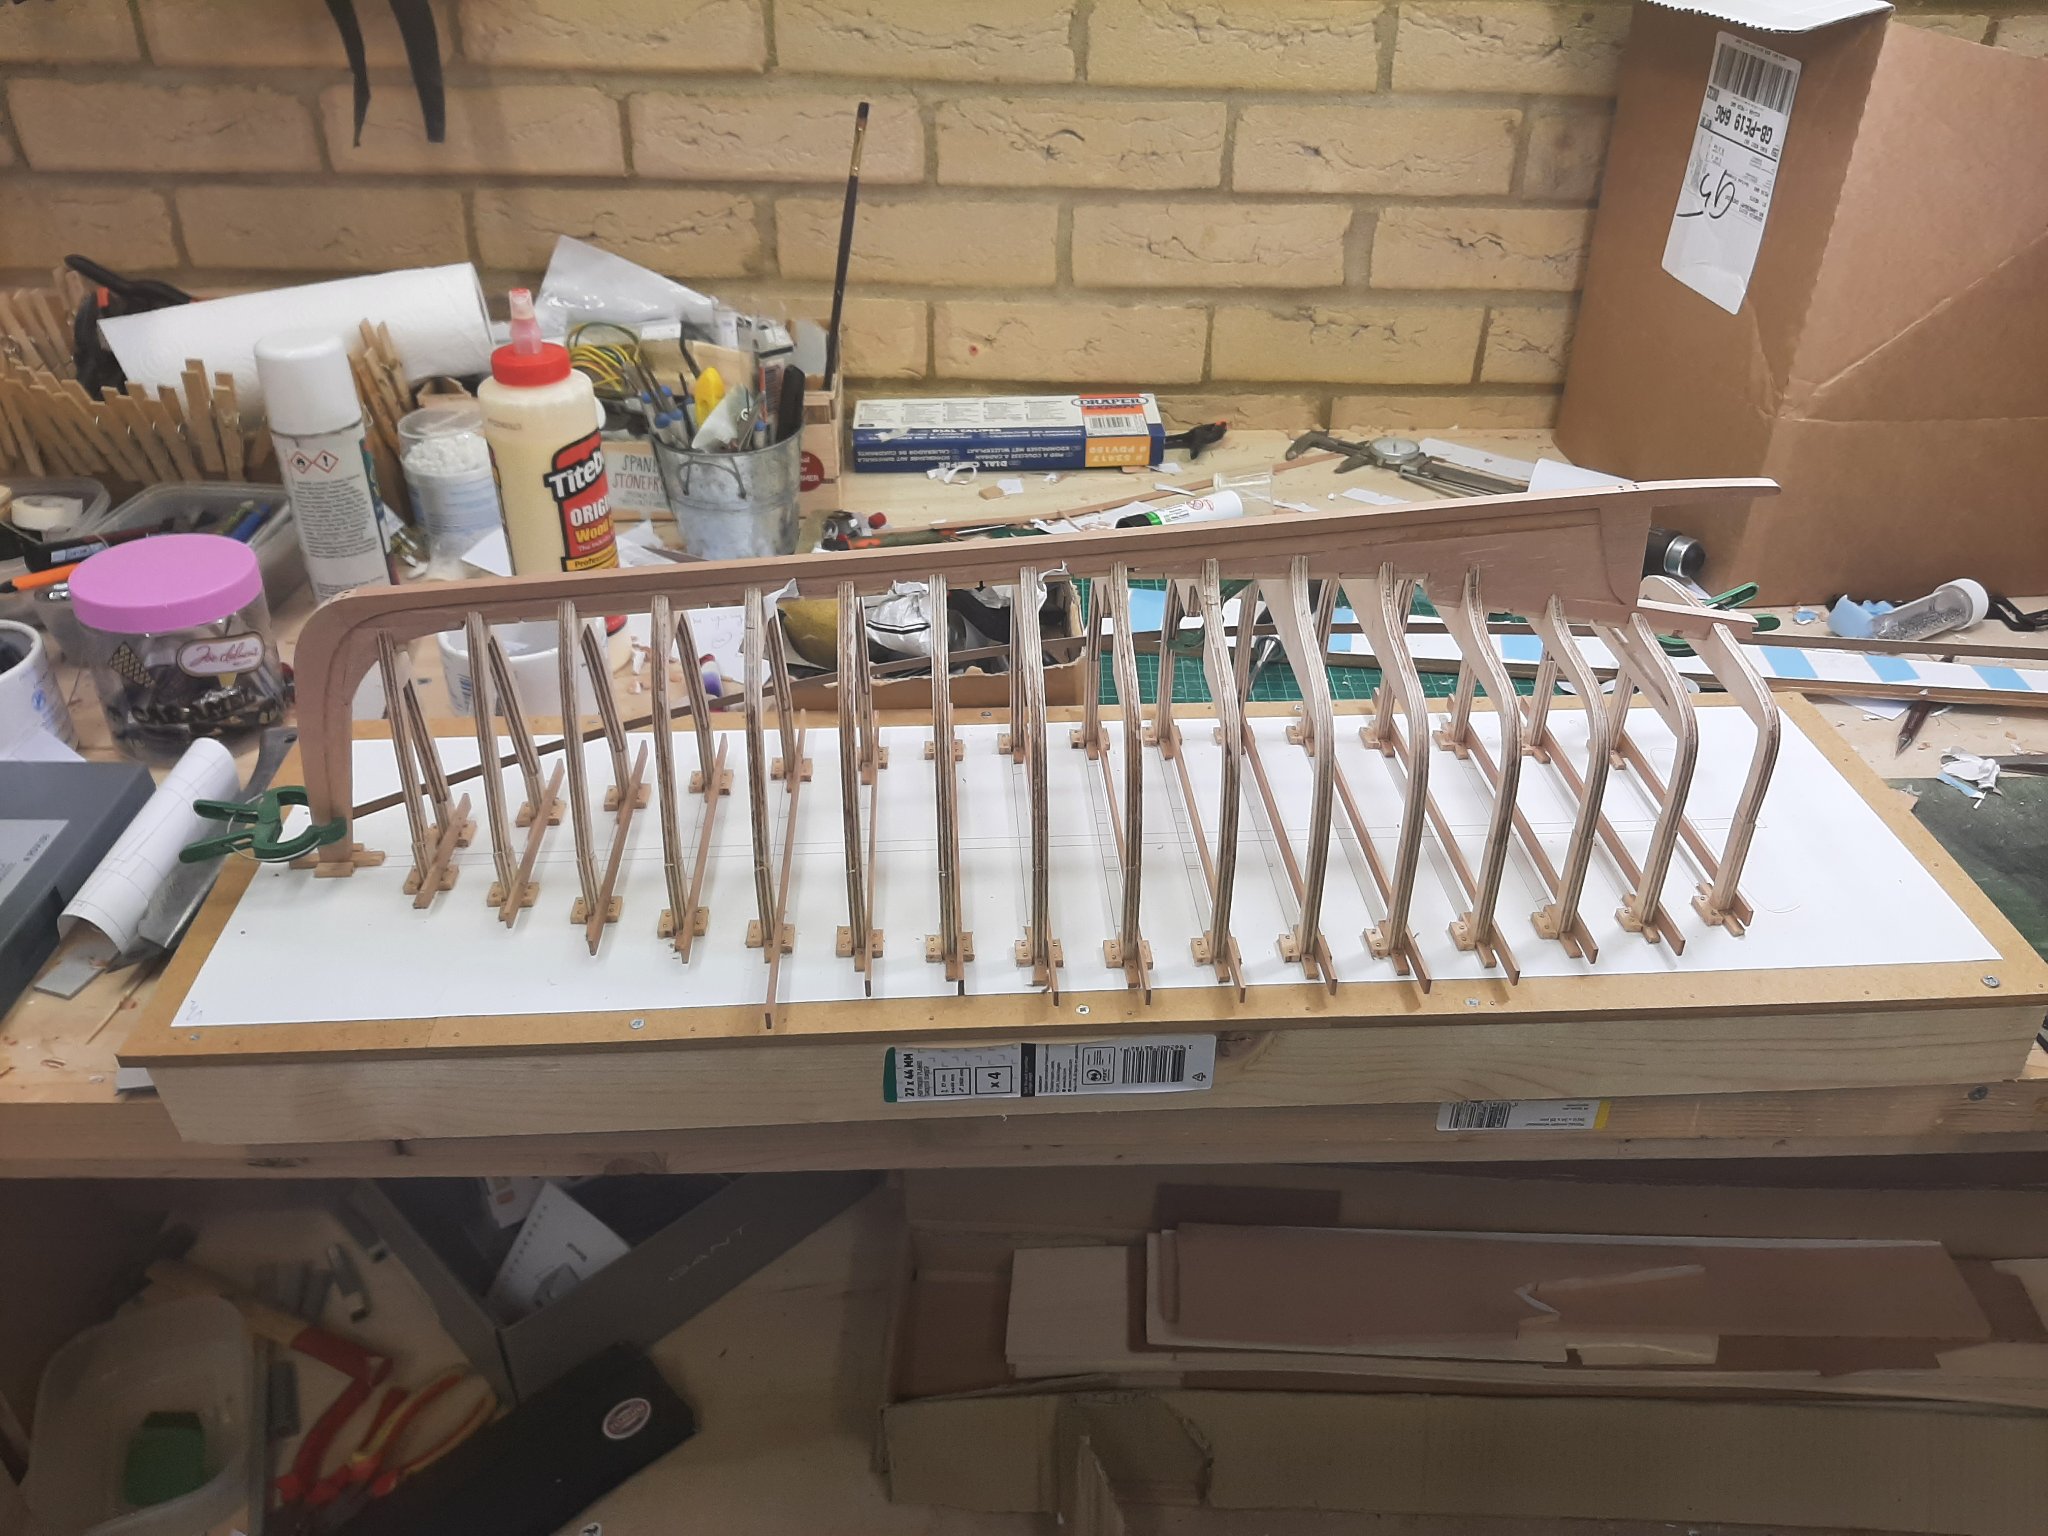
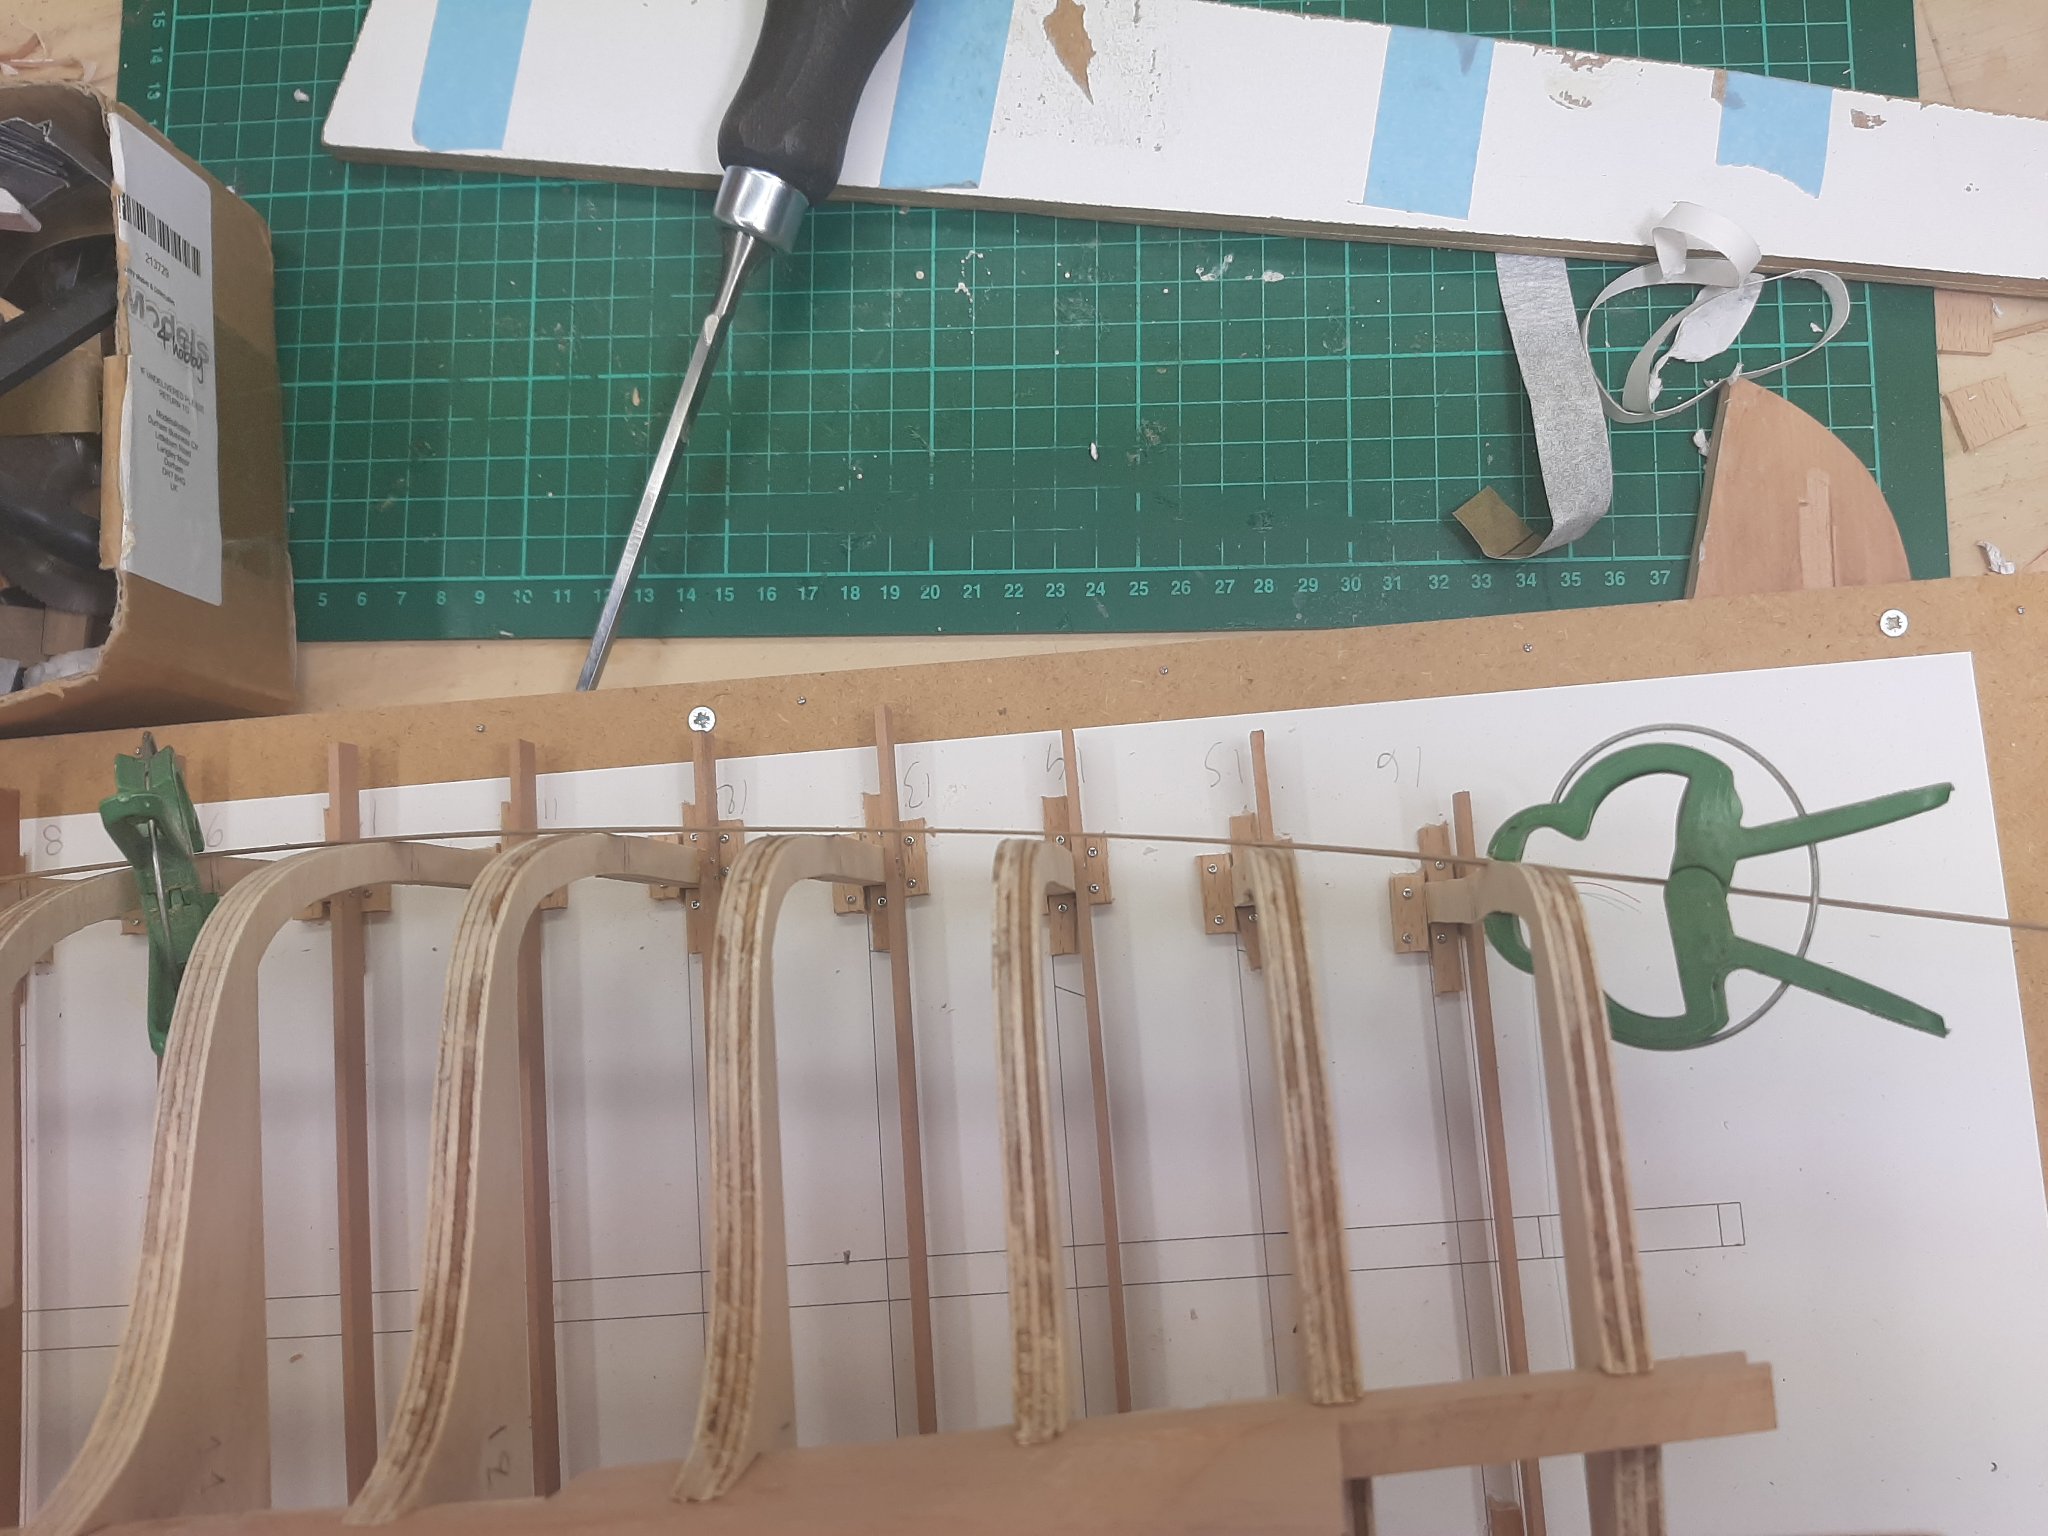
Using the transom jig and the stem as guides, I checked all frames. Almost all had to be sanded to allow the keel to sit properly down at the proper level. Especially frame No 3 had a lot of material taken off. I cannot explain this as everything was cut quite accurately but in any case the frames are now in their proper position, the keel is straight and at the proper height and angle, the same with the trasnom.


Next jobs:
1. Connect all the frames with longitudinal wood pieces to increase rigidity
2. Epoxy the frames to the keel
3. Glue the frame to the transom, cut the bevels and secure the transom to the keel
4. Glue and shape the side horn timbers
5. Plank the boat!
Vaddoc
- mtaylor, FriedClams, Wintergreen and 8 others
-
11
-
Good job Hakan! I thought the first method was desperately difficult but the last method seems elegant and the frame came out fine. Indeed, the scale make this task even more difficult.
The boat is coming along fine
Vaddoc
-
30 minutes ago, EricWilliamMarshall said:
Part of that challenge, in my opinion, is knowing how a sharp tool behaves!
Very true Eric
I recently spend time to hone my chisels. I especially focused on the strop until both surfaces were like mirrors. They are now so sharp that any casual contact with fingers will draw blood. However, I now see how a chisel should work, it should effortlessly cut the wood in any direction, with or across the grain. If it does not, it is not sharp enough.
-
-
Bob, Hakan, GL and to all that hit the like button-many thanks!
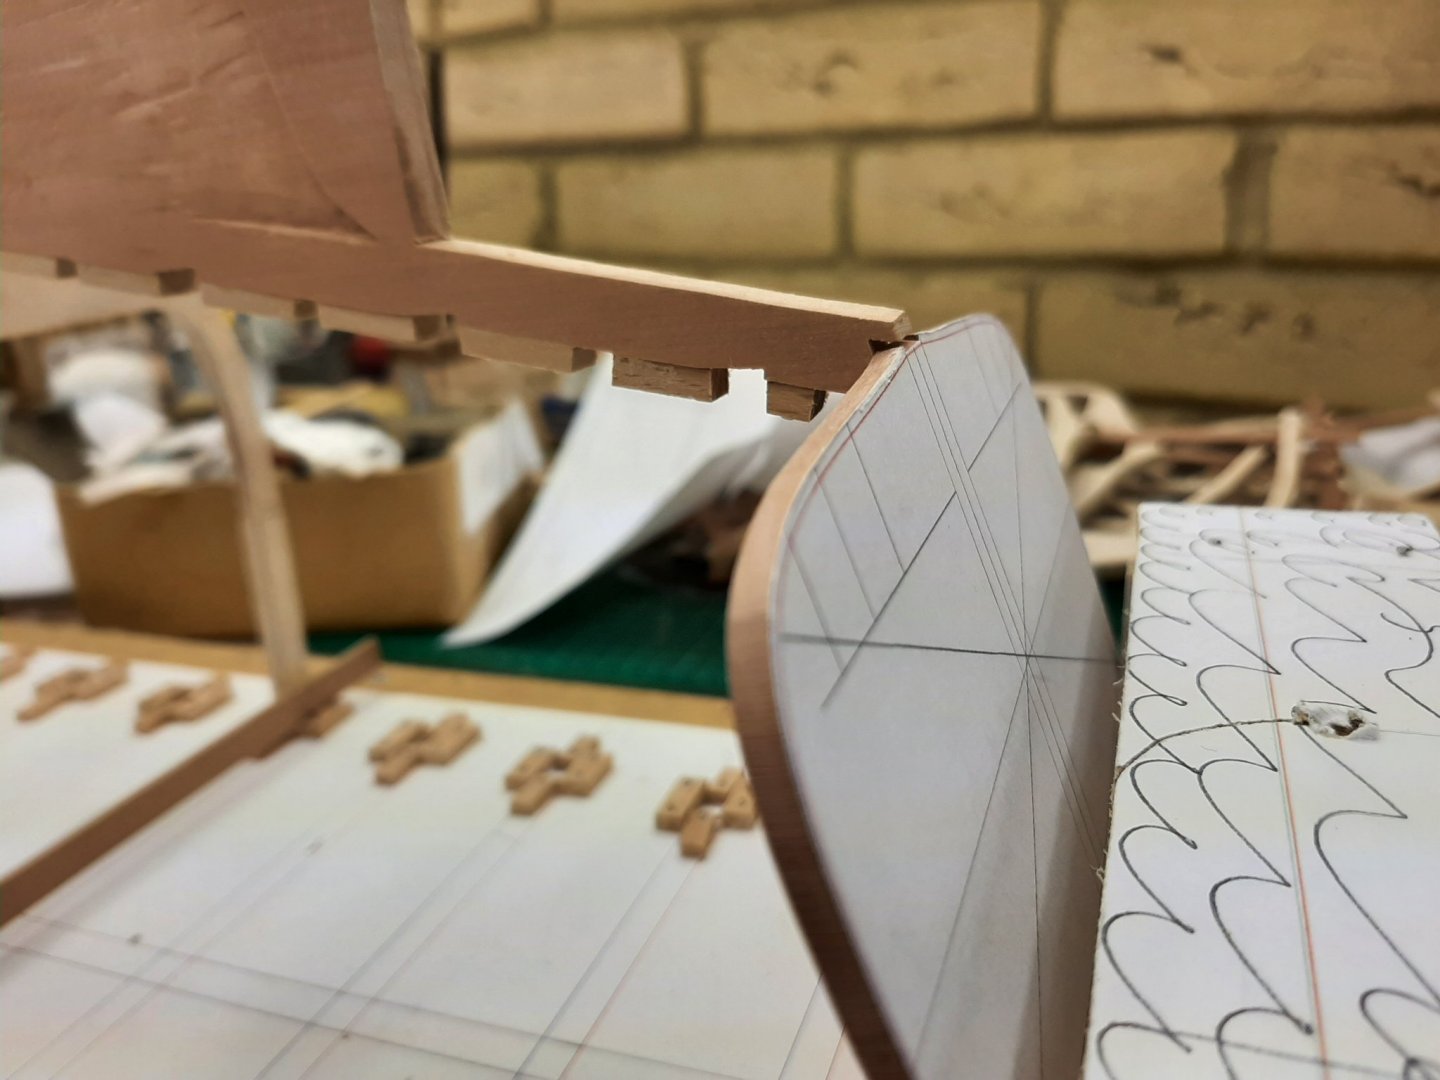
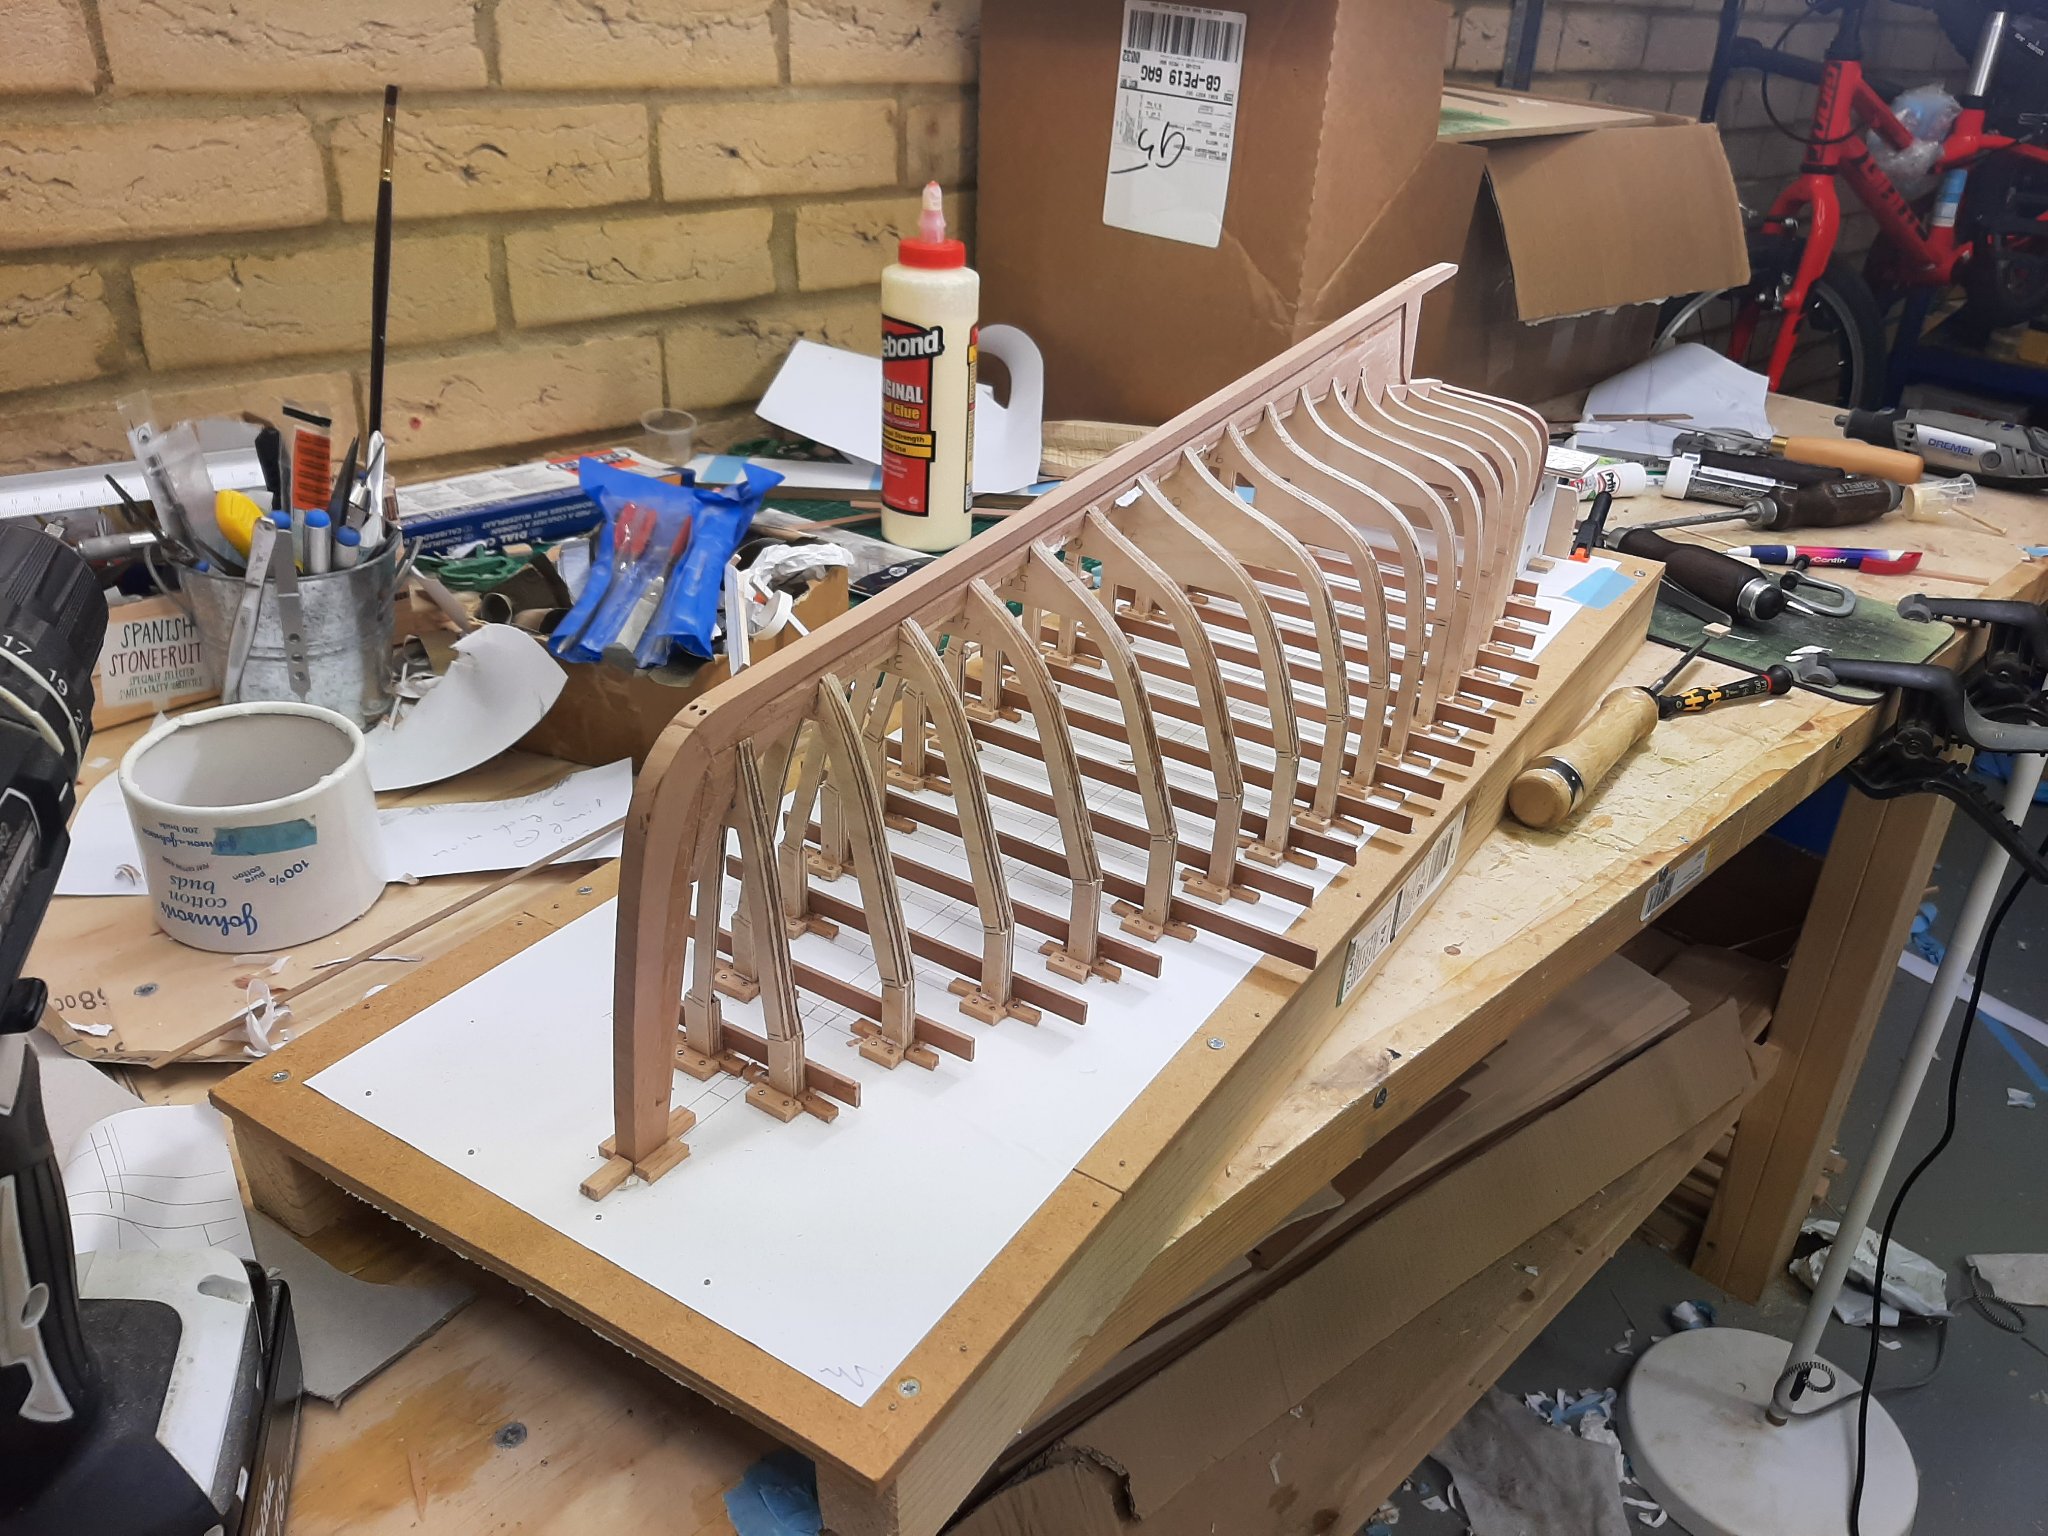
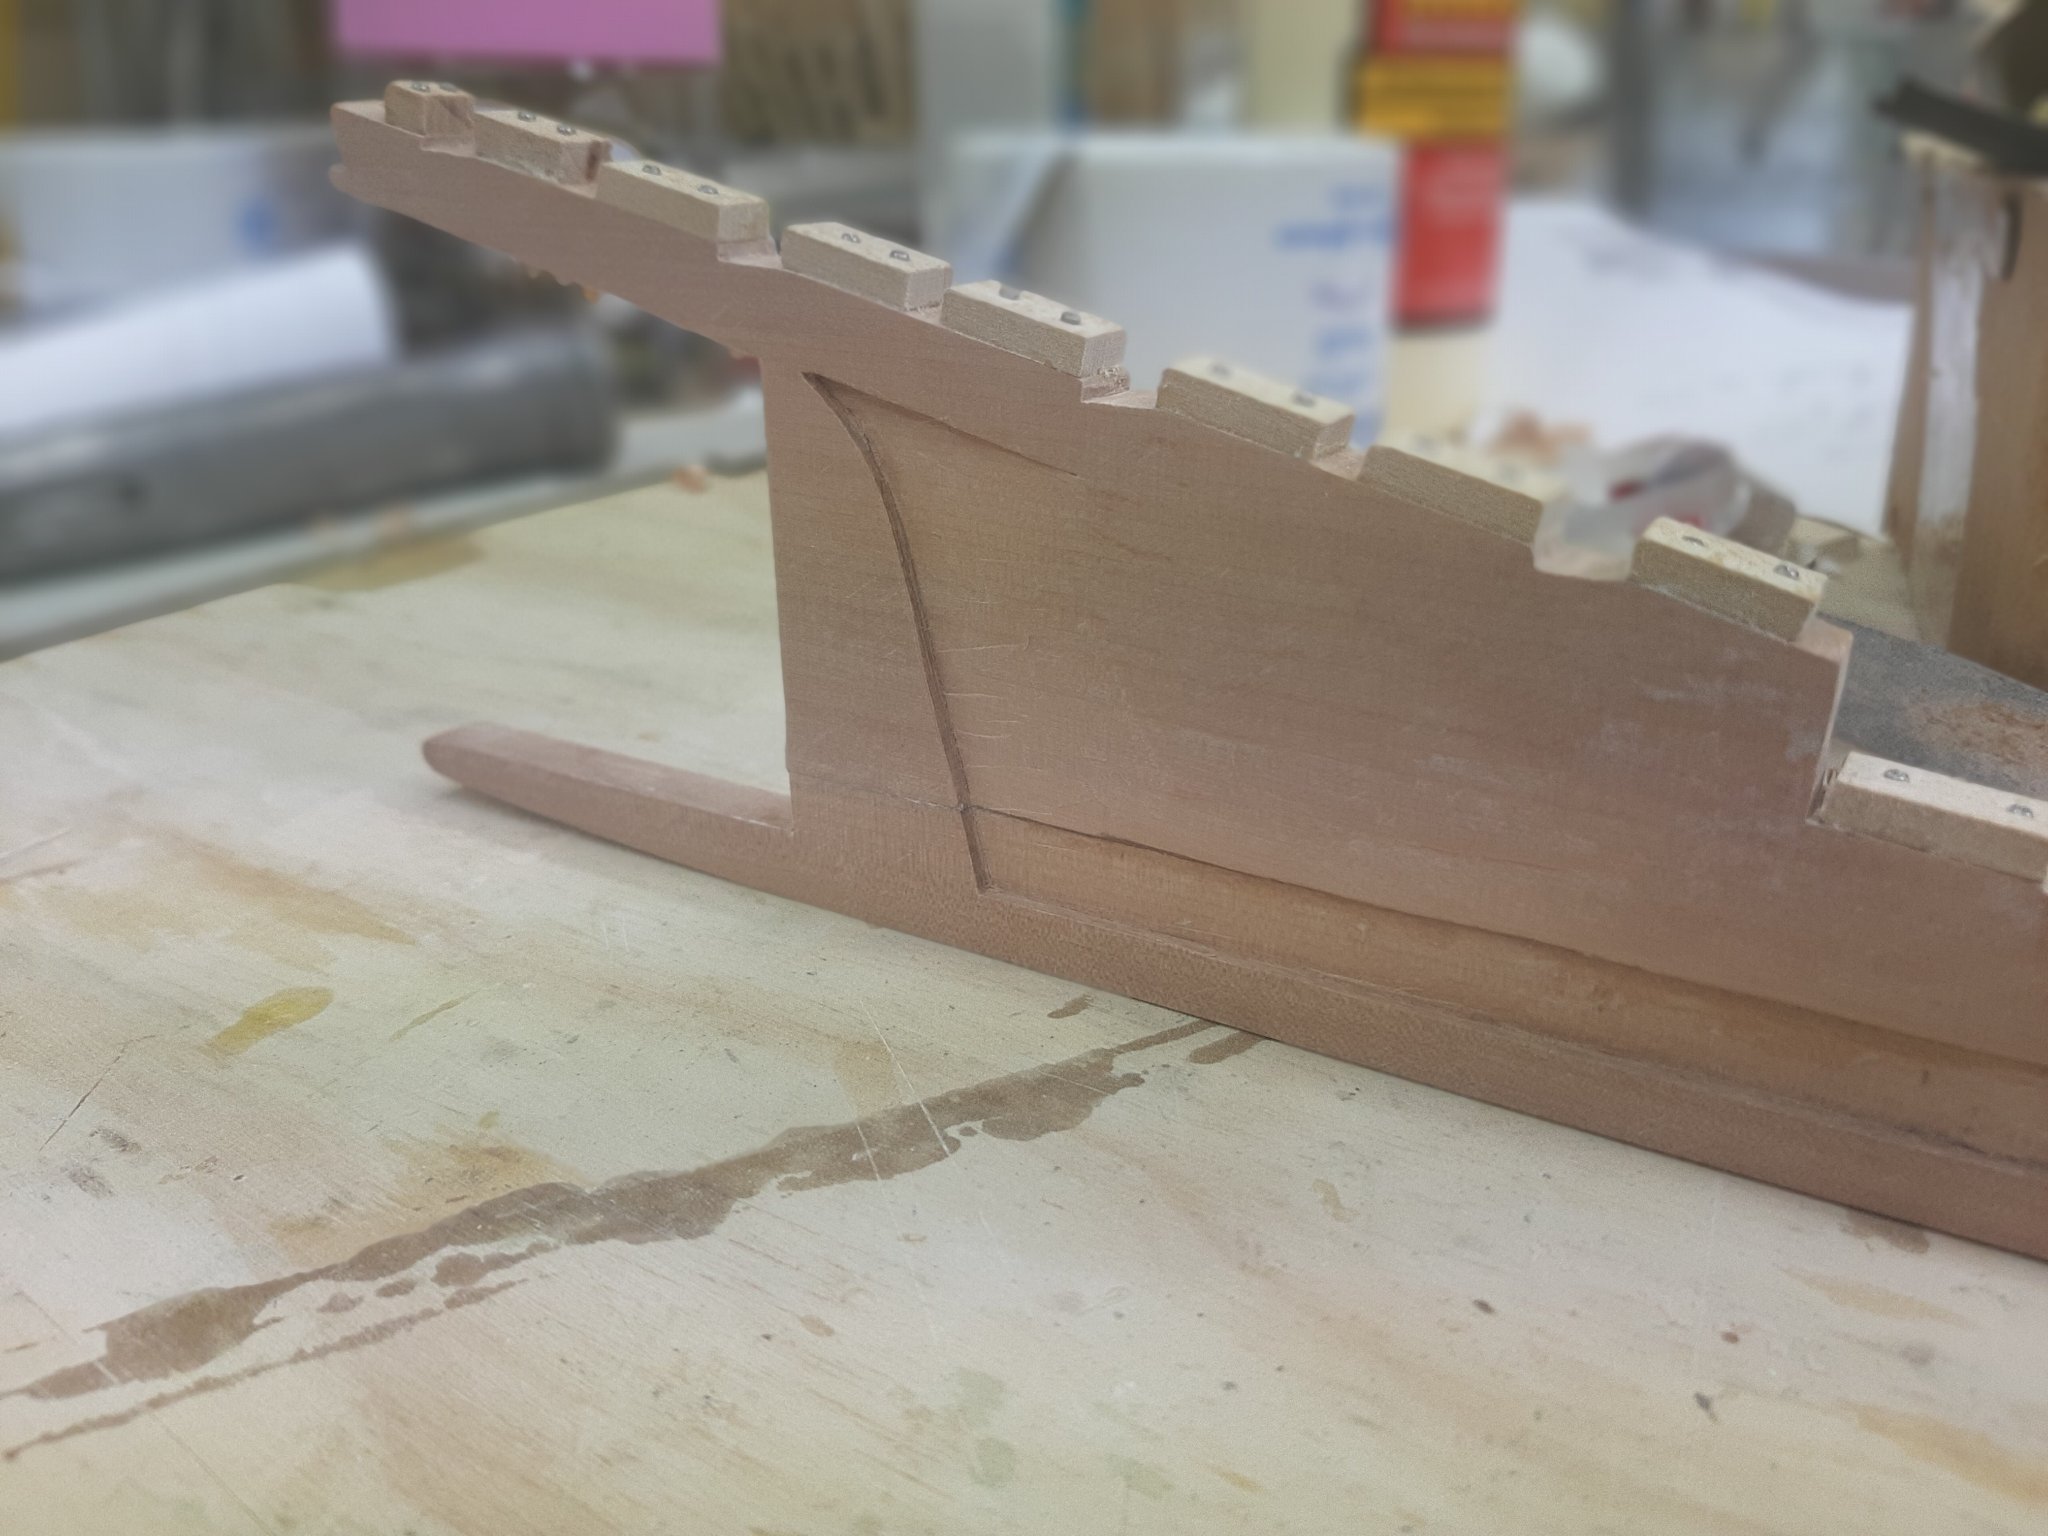
Now, I am struggling with this boat, it just refuses to come together nicely. The CAD plans are accurate and all the individual pieces seem quite accurate as well. However, something is wrong-this was made apparent today when I cut and installed the transom.
Today I had the whole day free and spend it going back and forth between the garage and the computer in the house. I did a bit more work on the transom plans, then cut it from pear wood (took three expensive attempts) and also made a frame to strengthen it. Then I was just too frustrated to take pictures, I apologise!
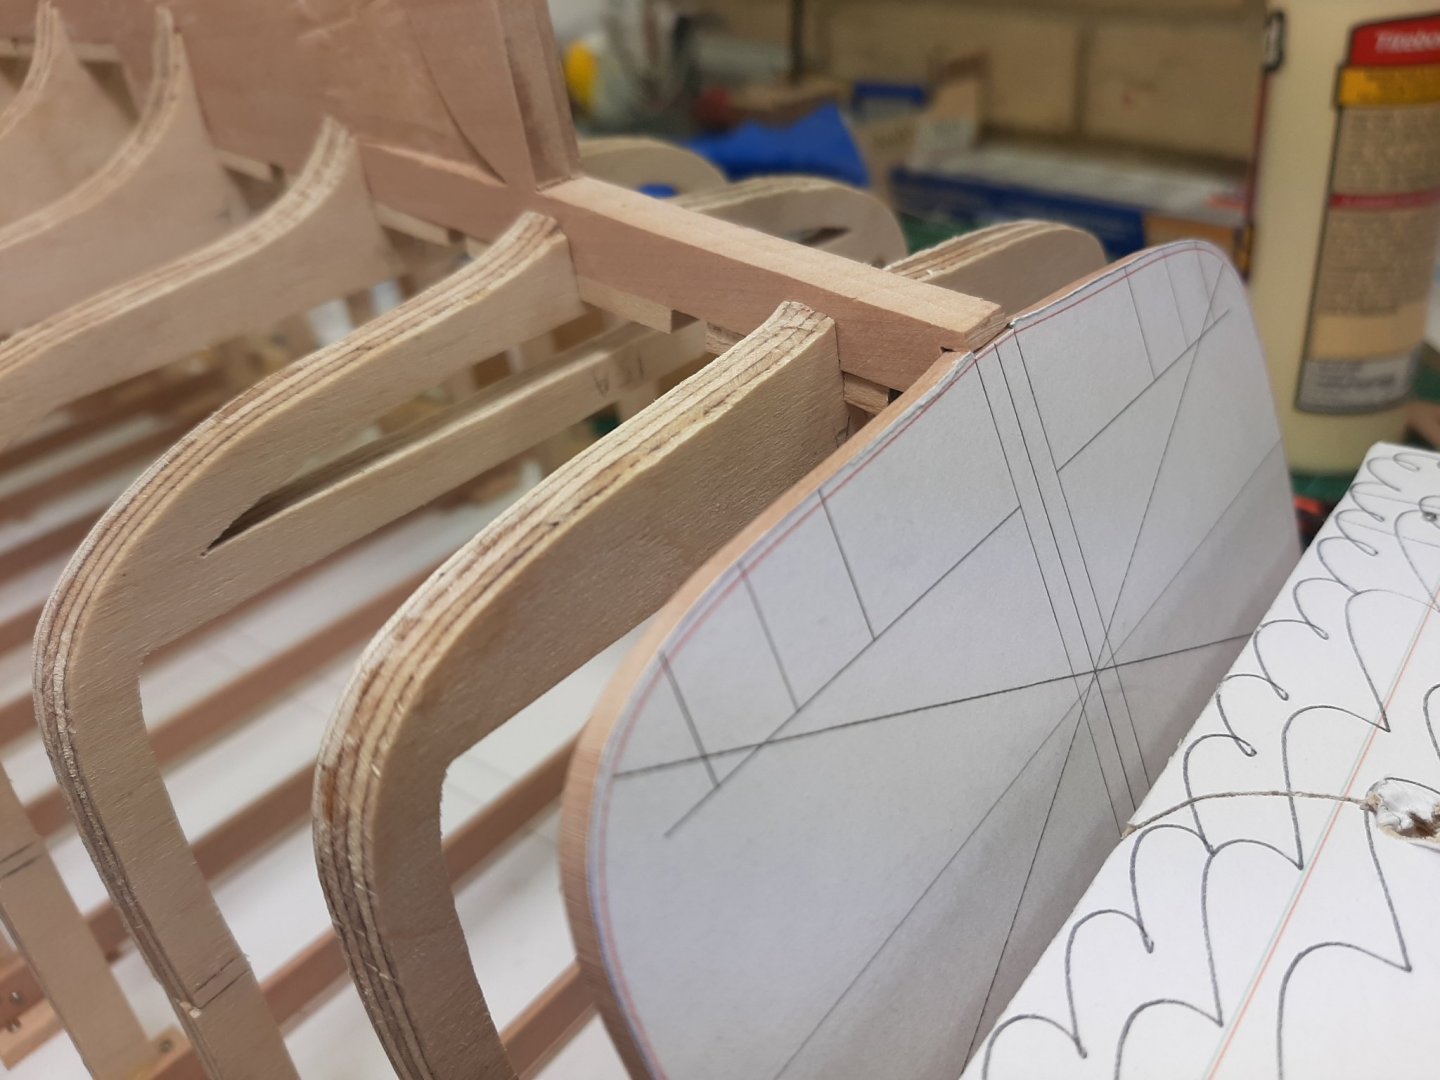
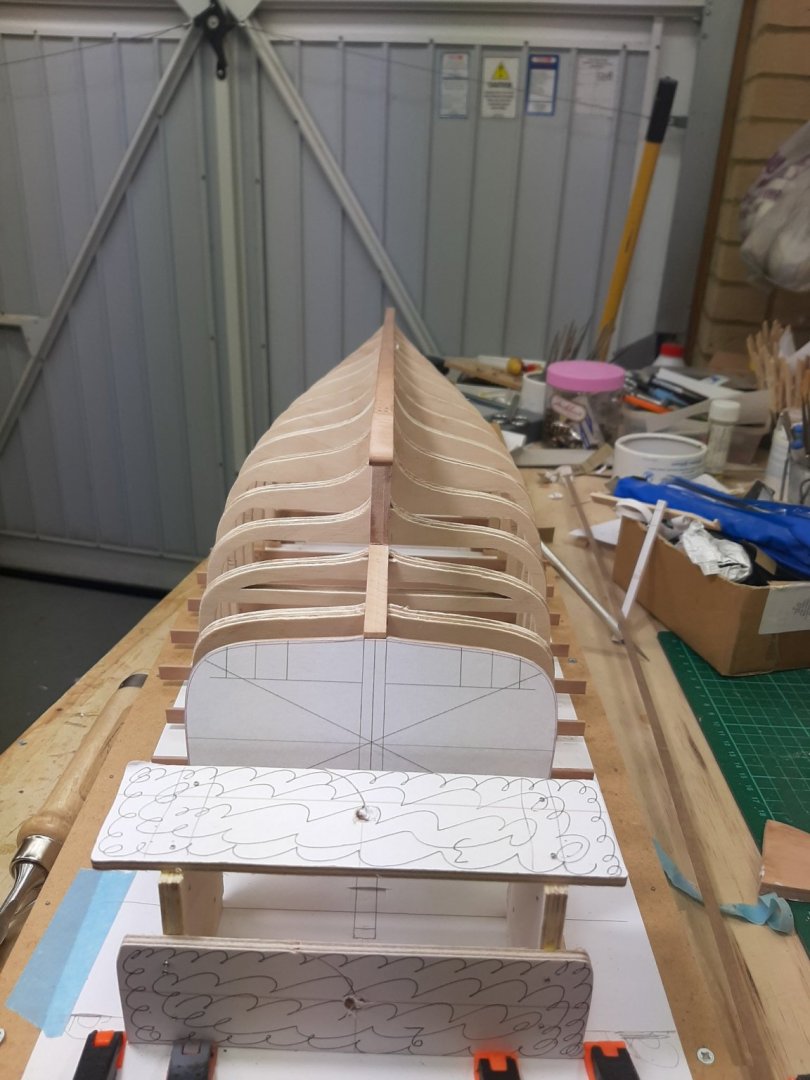
Now, the problems started when I tried to install the transom to the keel. The height and angle of the transom is critical as it cannot be sanded or shimmed - it will show. Also, it needs to be dead centered and squared. A jig is needed to hold the transom securely into the proper position while the boat is planked.
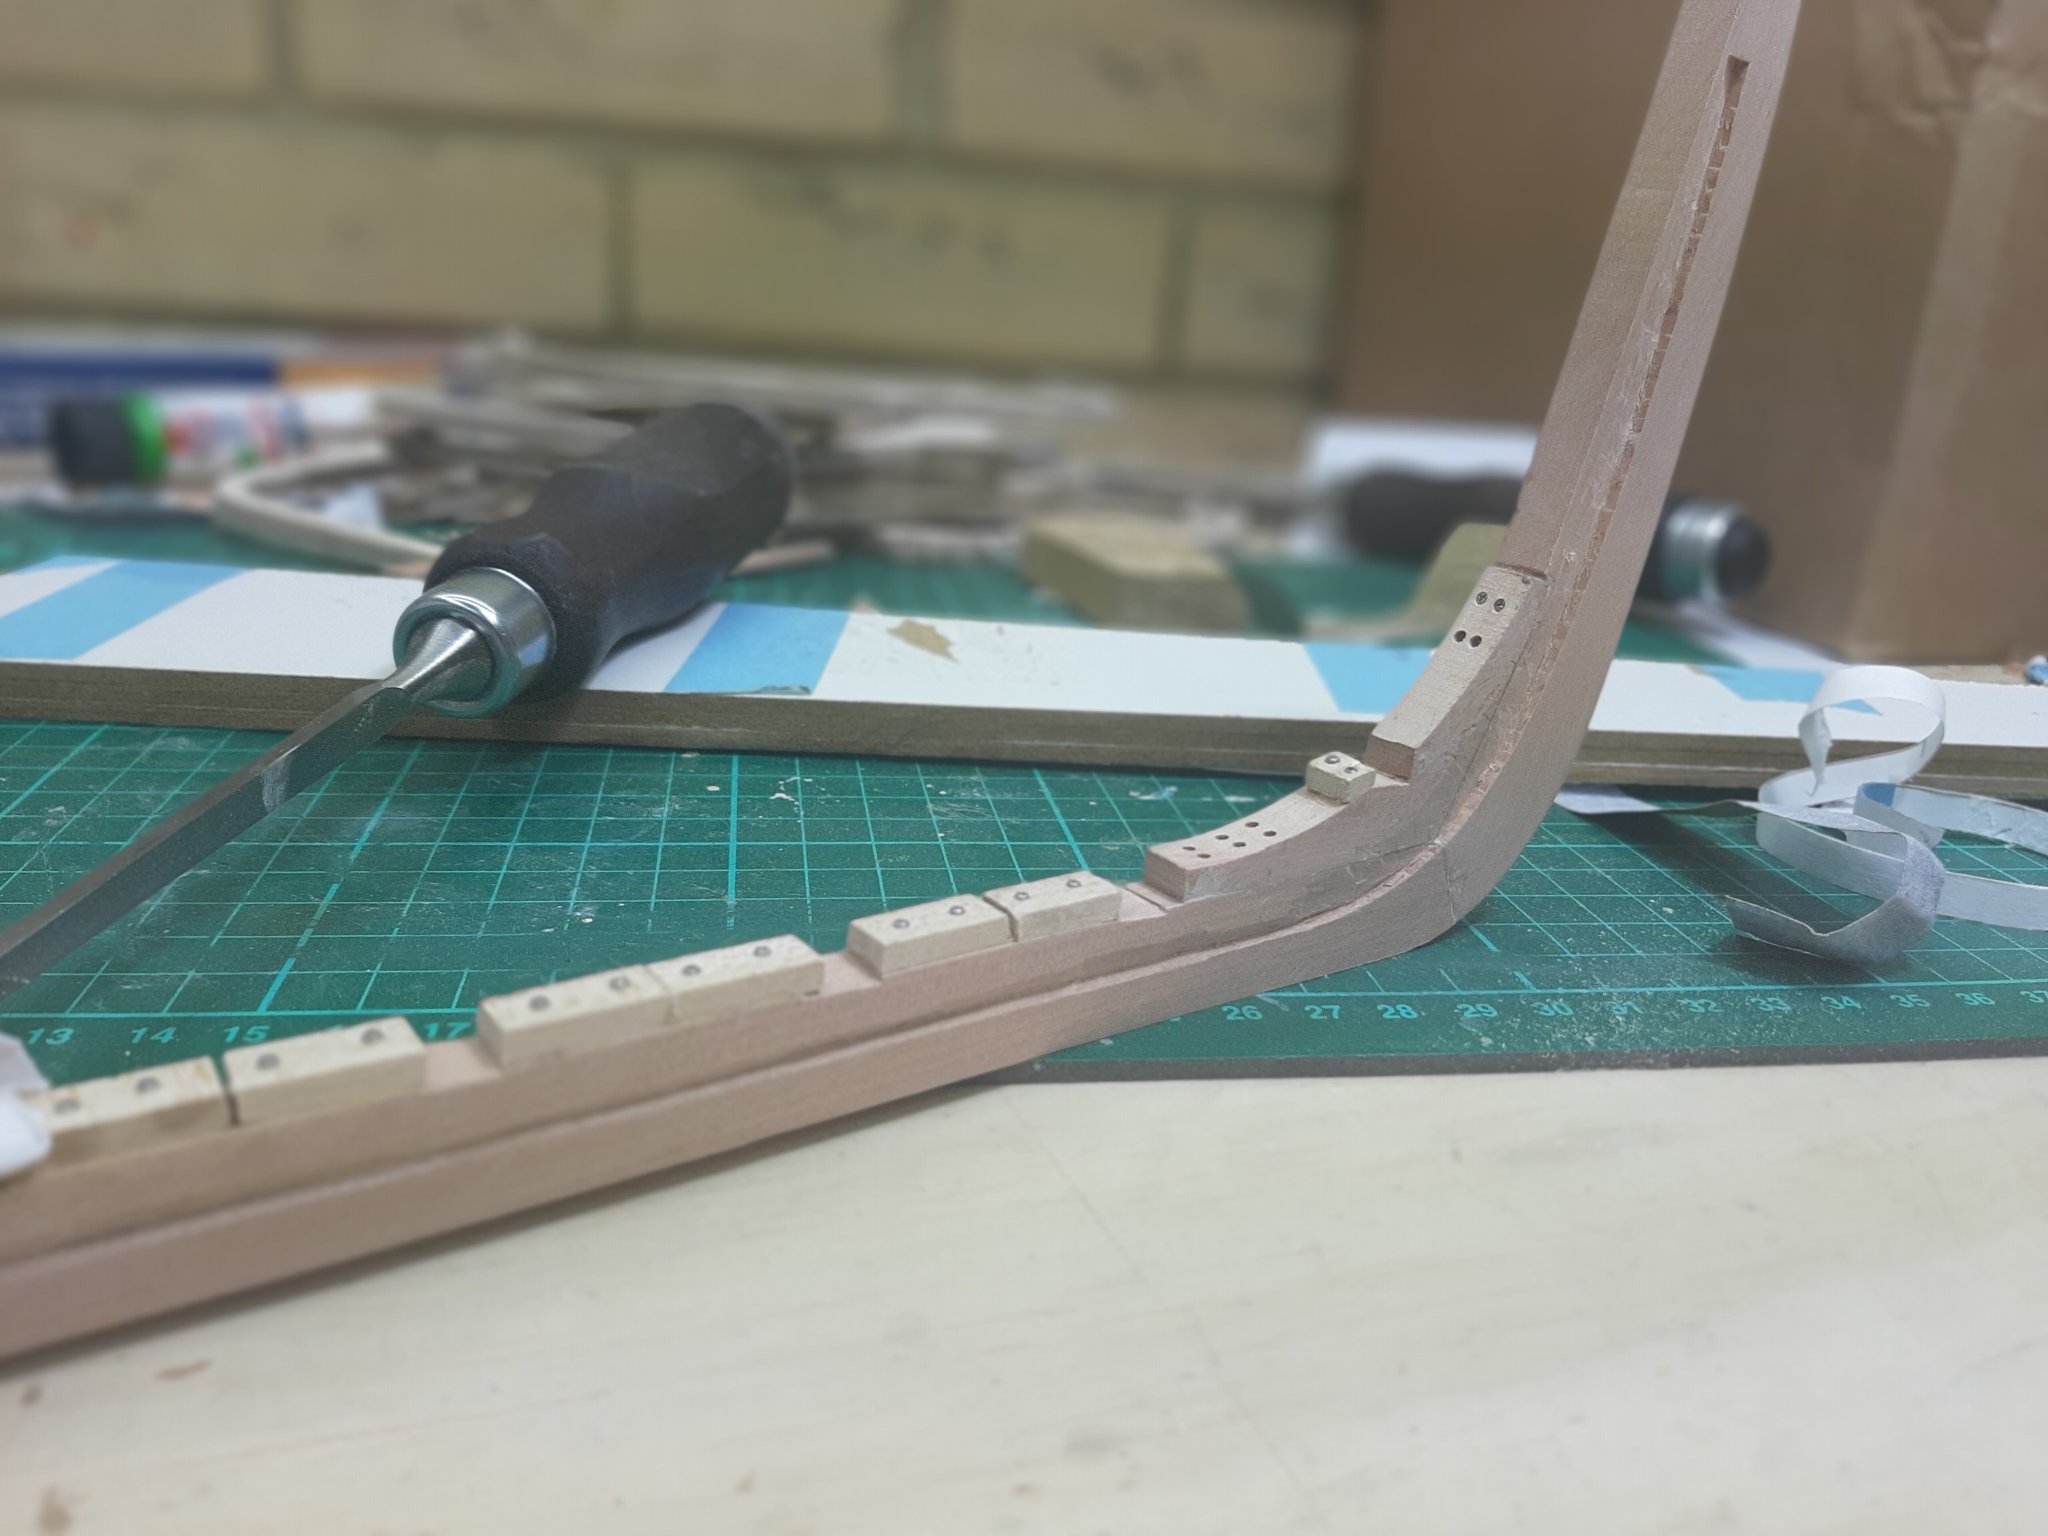
I made a jig from scrap plywood using a template directly from the CAD plans. Now, the transom was very accurately cut, the jig showed the proper height and angle. Well, the keel was sitting too high.
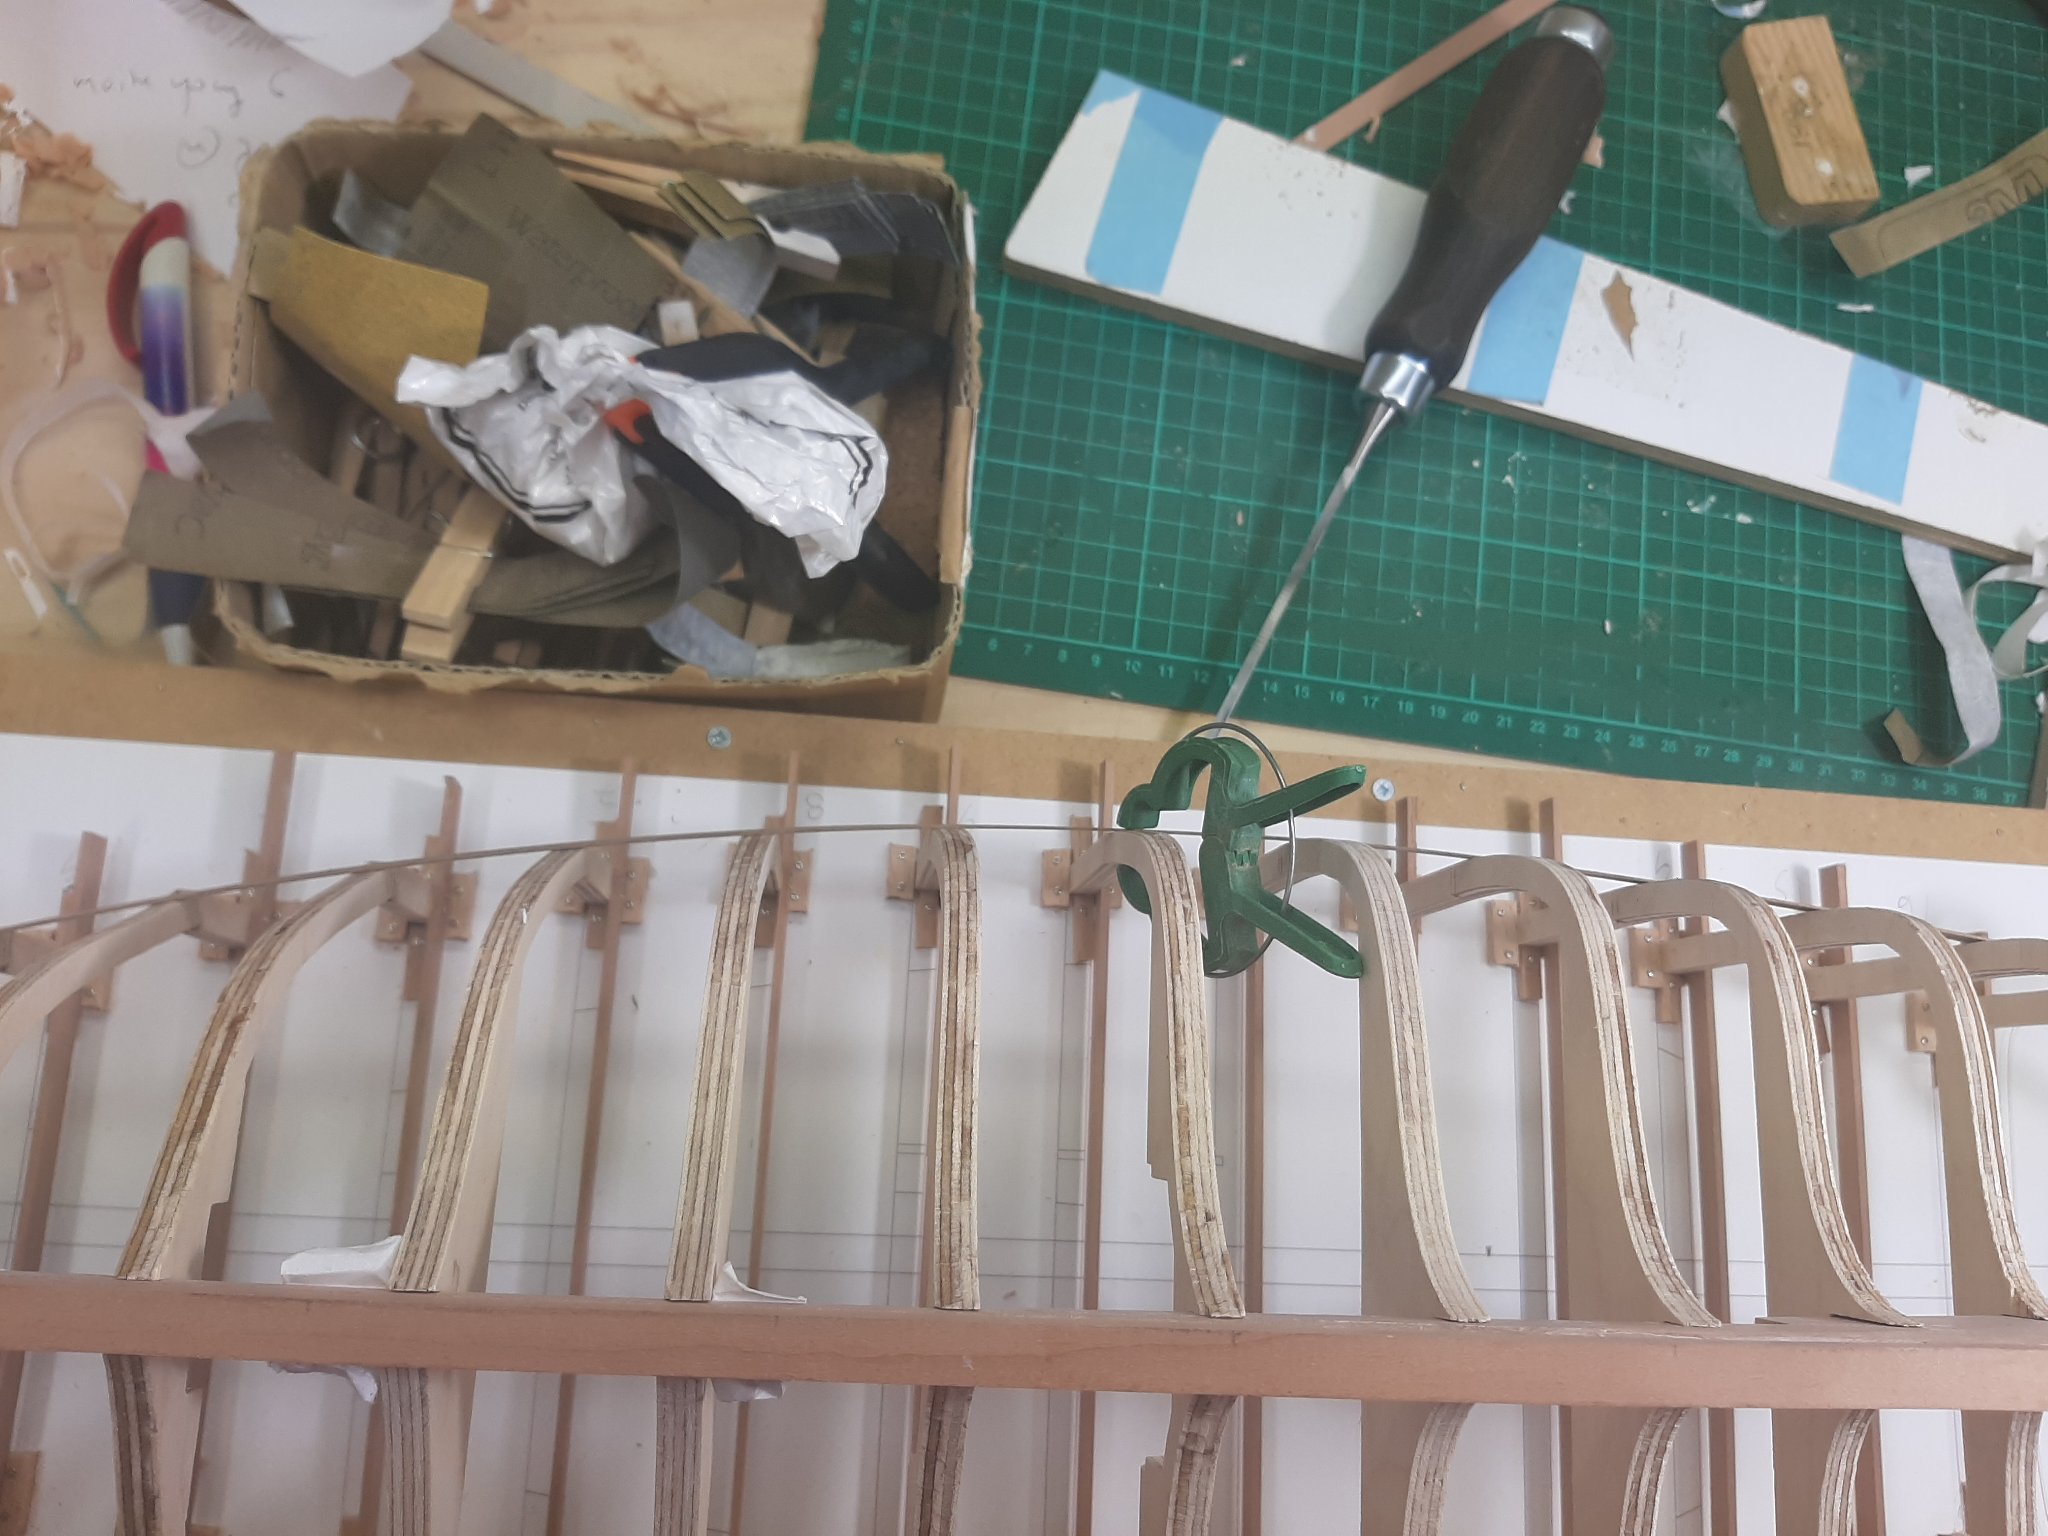
So I removed all the frames. I made a couple of templates and checked the height of the keel at the position of the last two frames, with the keel resting only on the stem and transom jig - spot on. So some of the frames need more sanding to allow the keel to sit lower. Next photos show the transom jig and the pattern confirming all angles and heights are now correct.

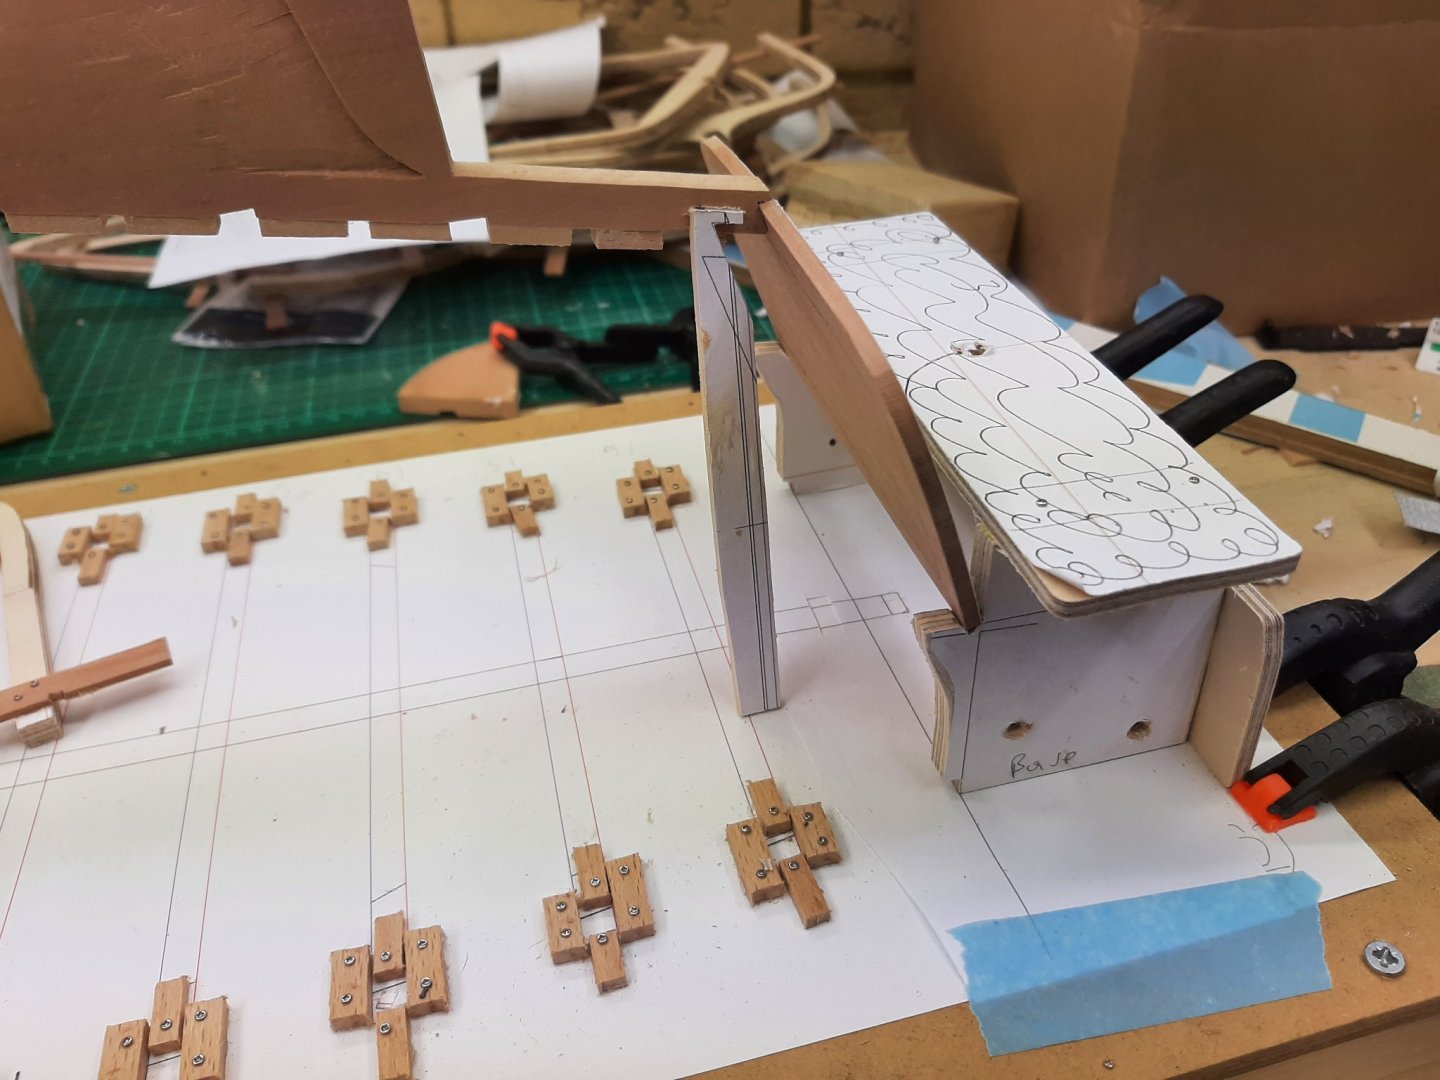
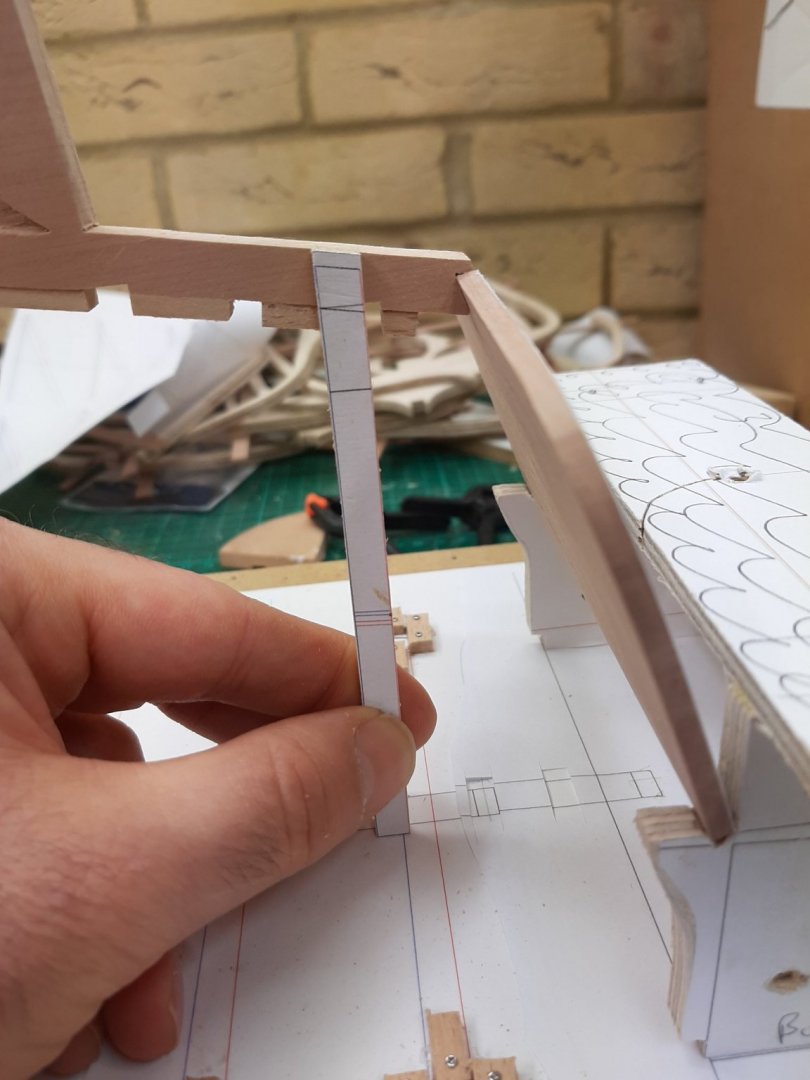
I randomly chose frame 12 to check-indeed, it lifts the keel too high!
So I will need to check each frame on its own to make sure it fits without pushing the keel up and out of position. Then I hope that the boat will finally come together properly.
Now, I have also started doing a bit of thinking on the planking. It is probably going to be more complex than I thought as there will be quite a mismatch bellow the turn of the bilge between the bow and stern and probably stealers will be needed which is I think rather unusual for such a small boat.
Stay safe all
Regards
Vaddoc
- GrandpaPhil, bruce d, KeithAug and 3 others
-
6
-
-
-
Very nice Hakan! Came out just fine.
-
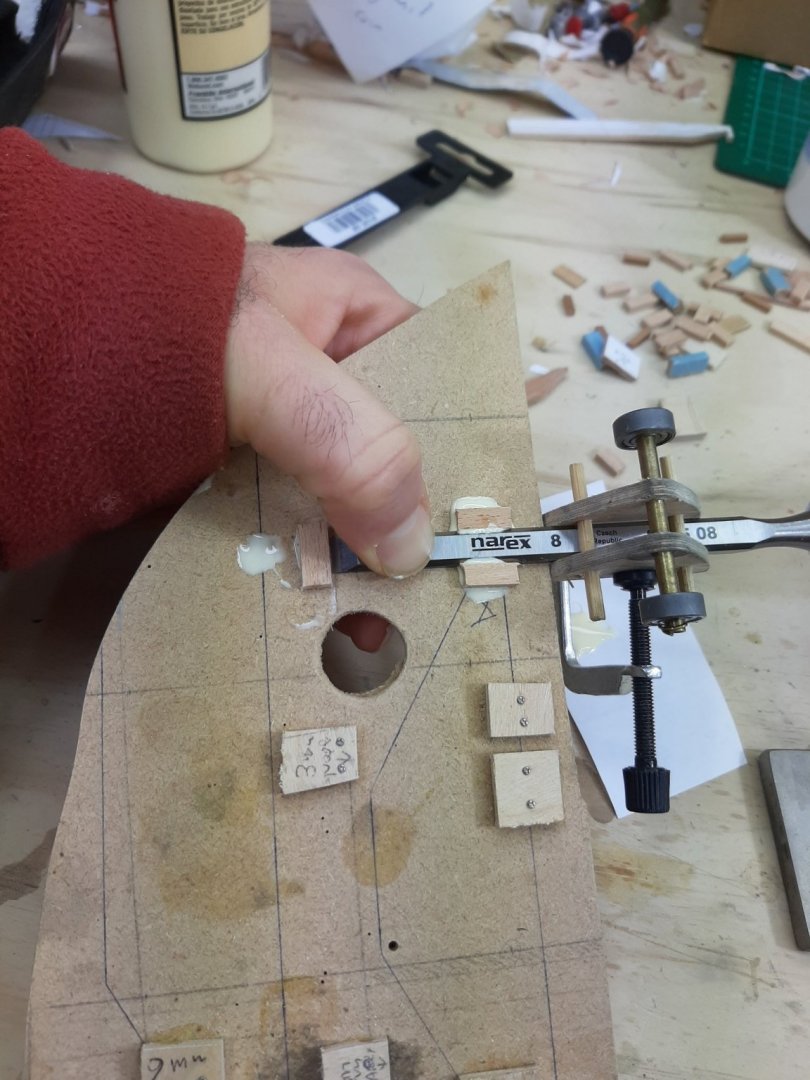
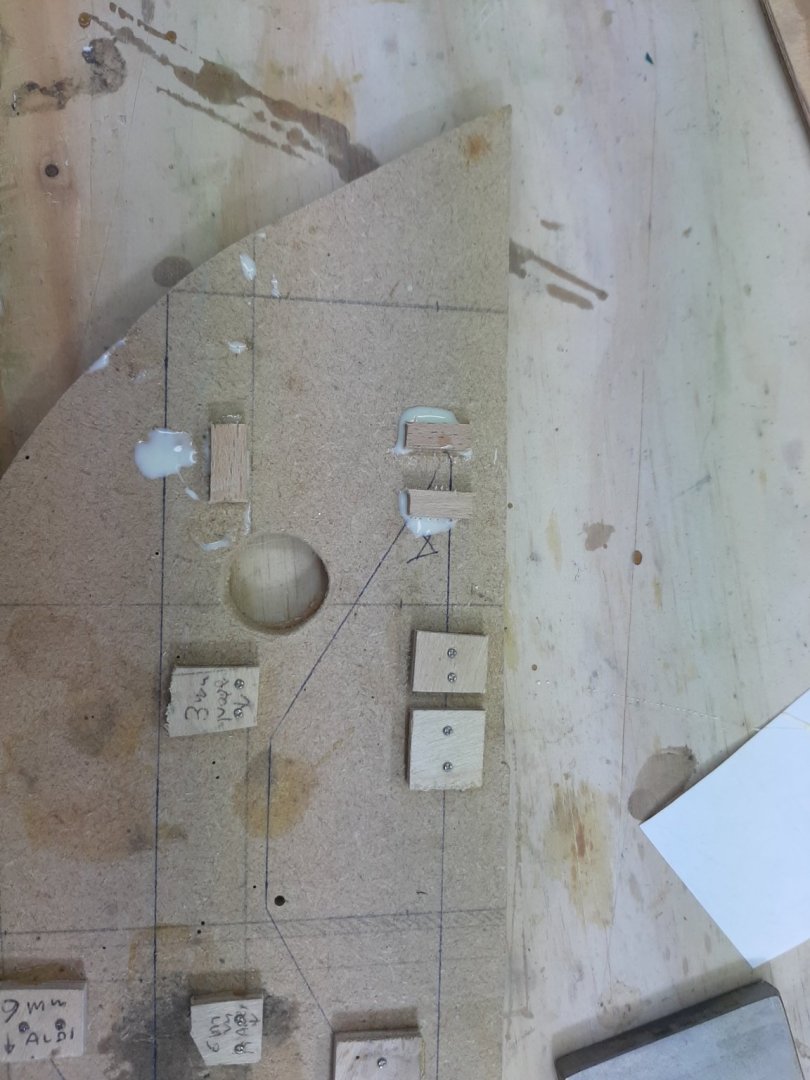
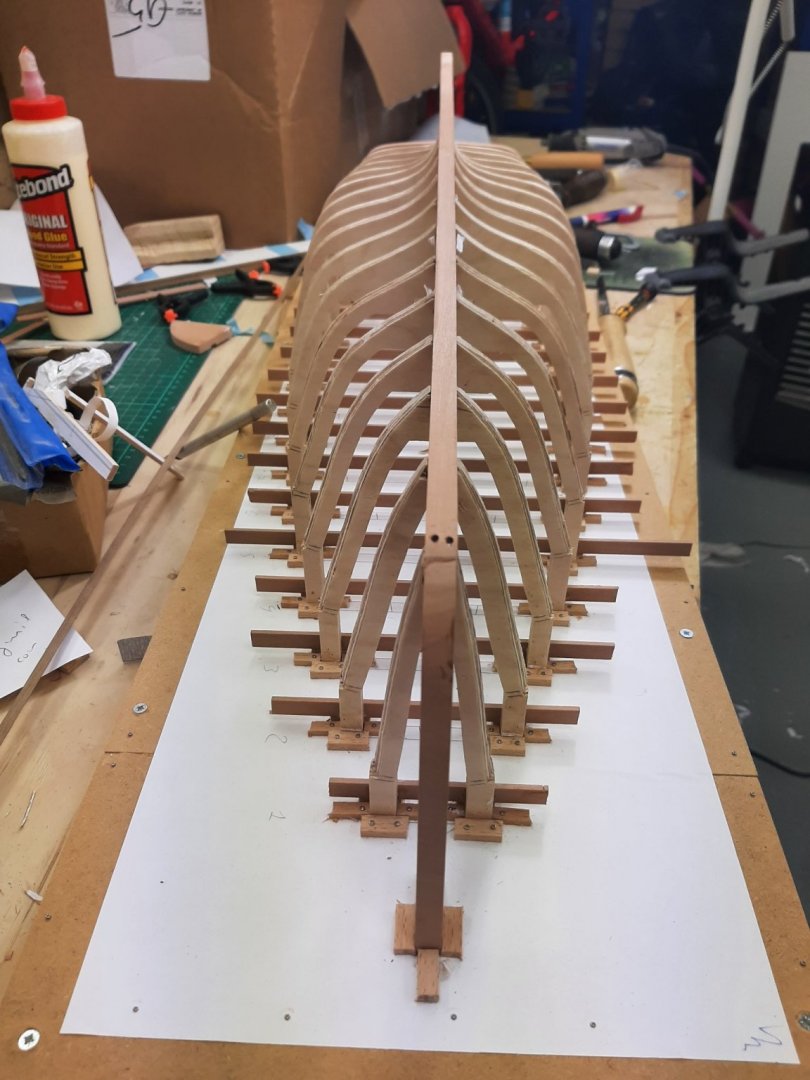
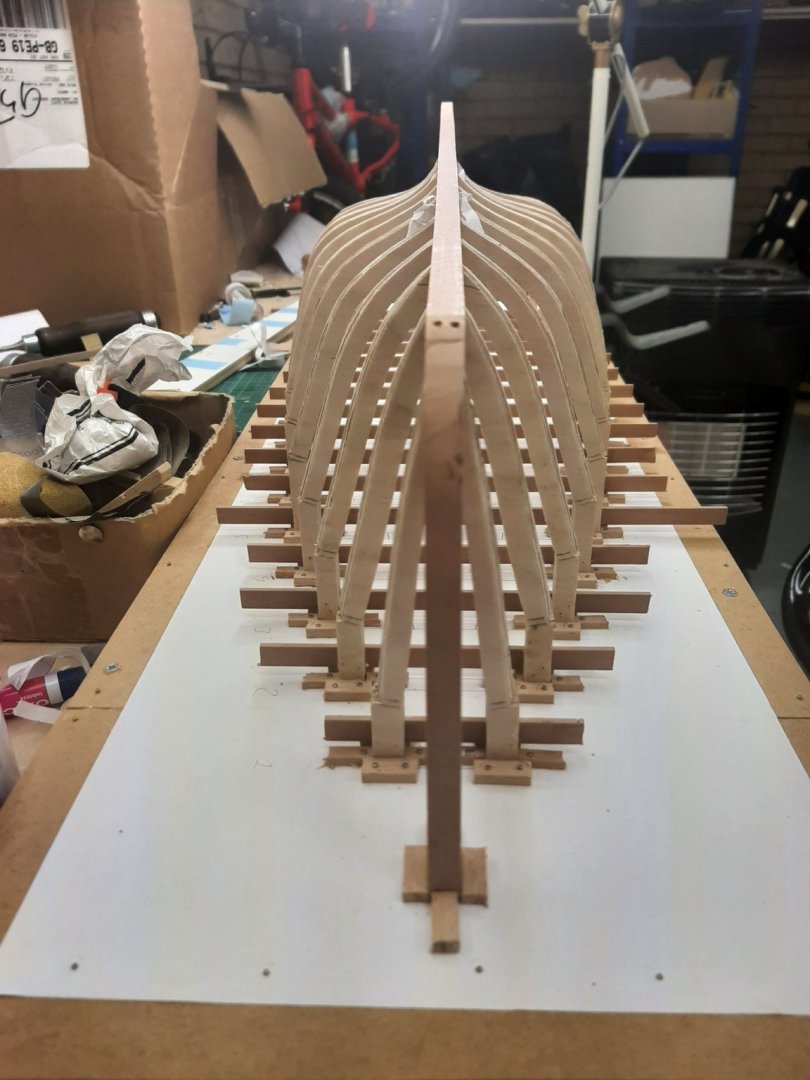
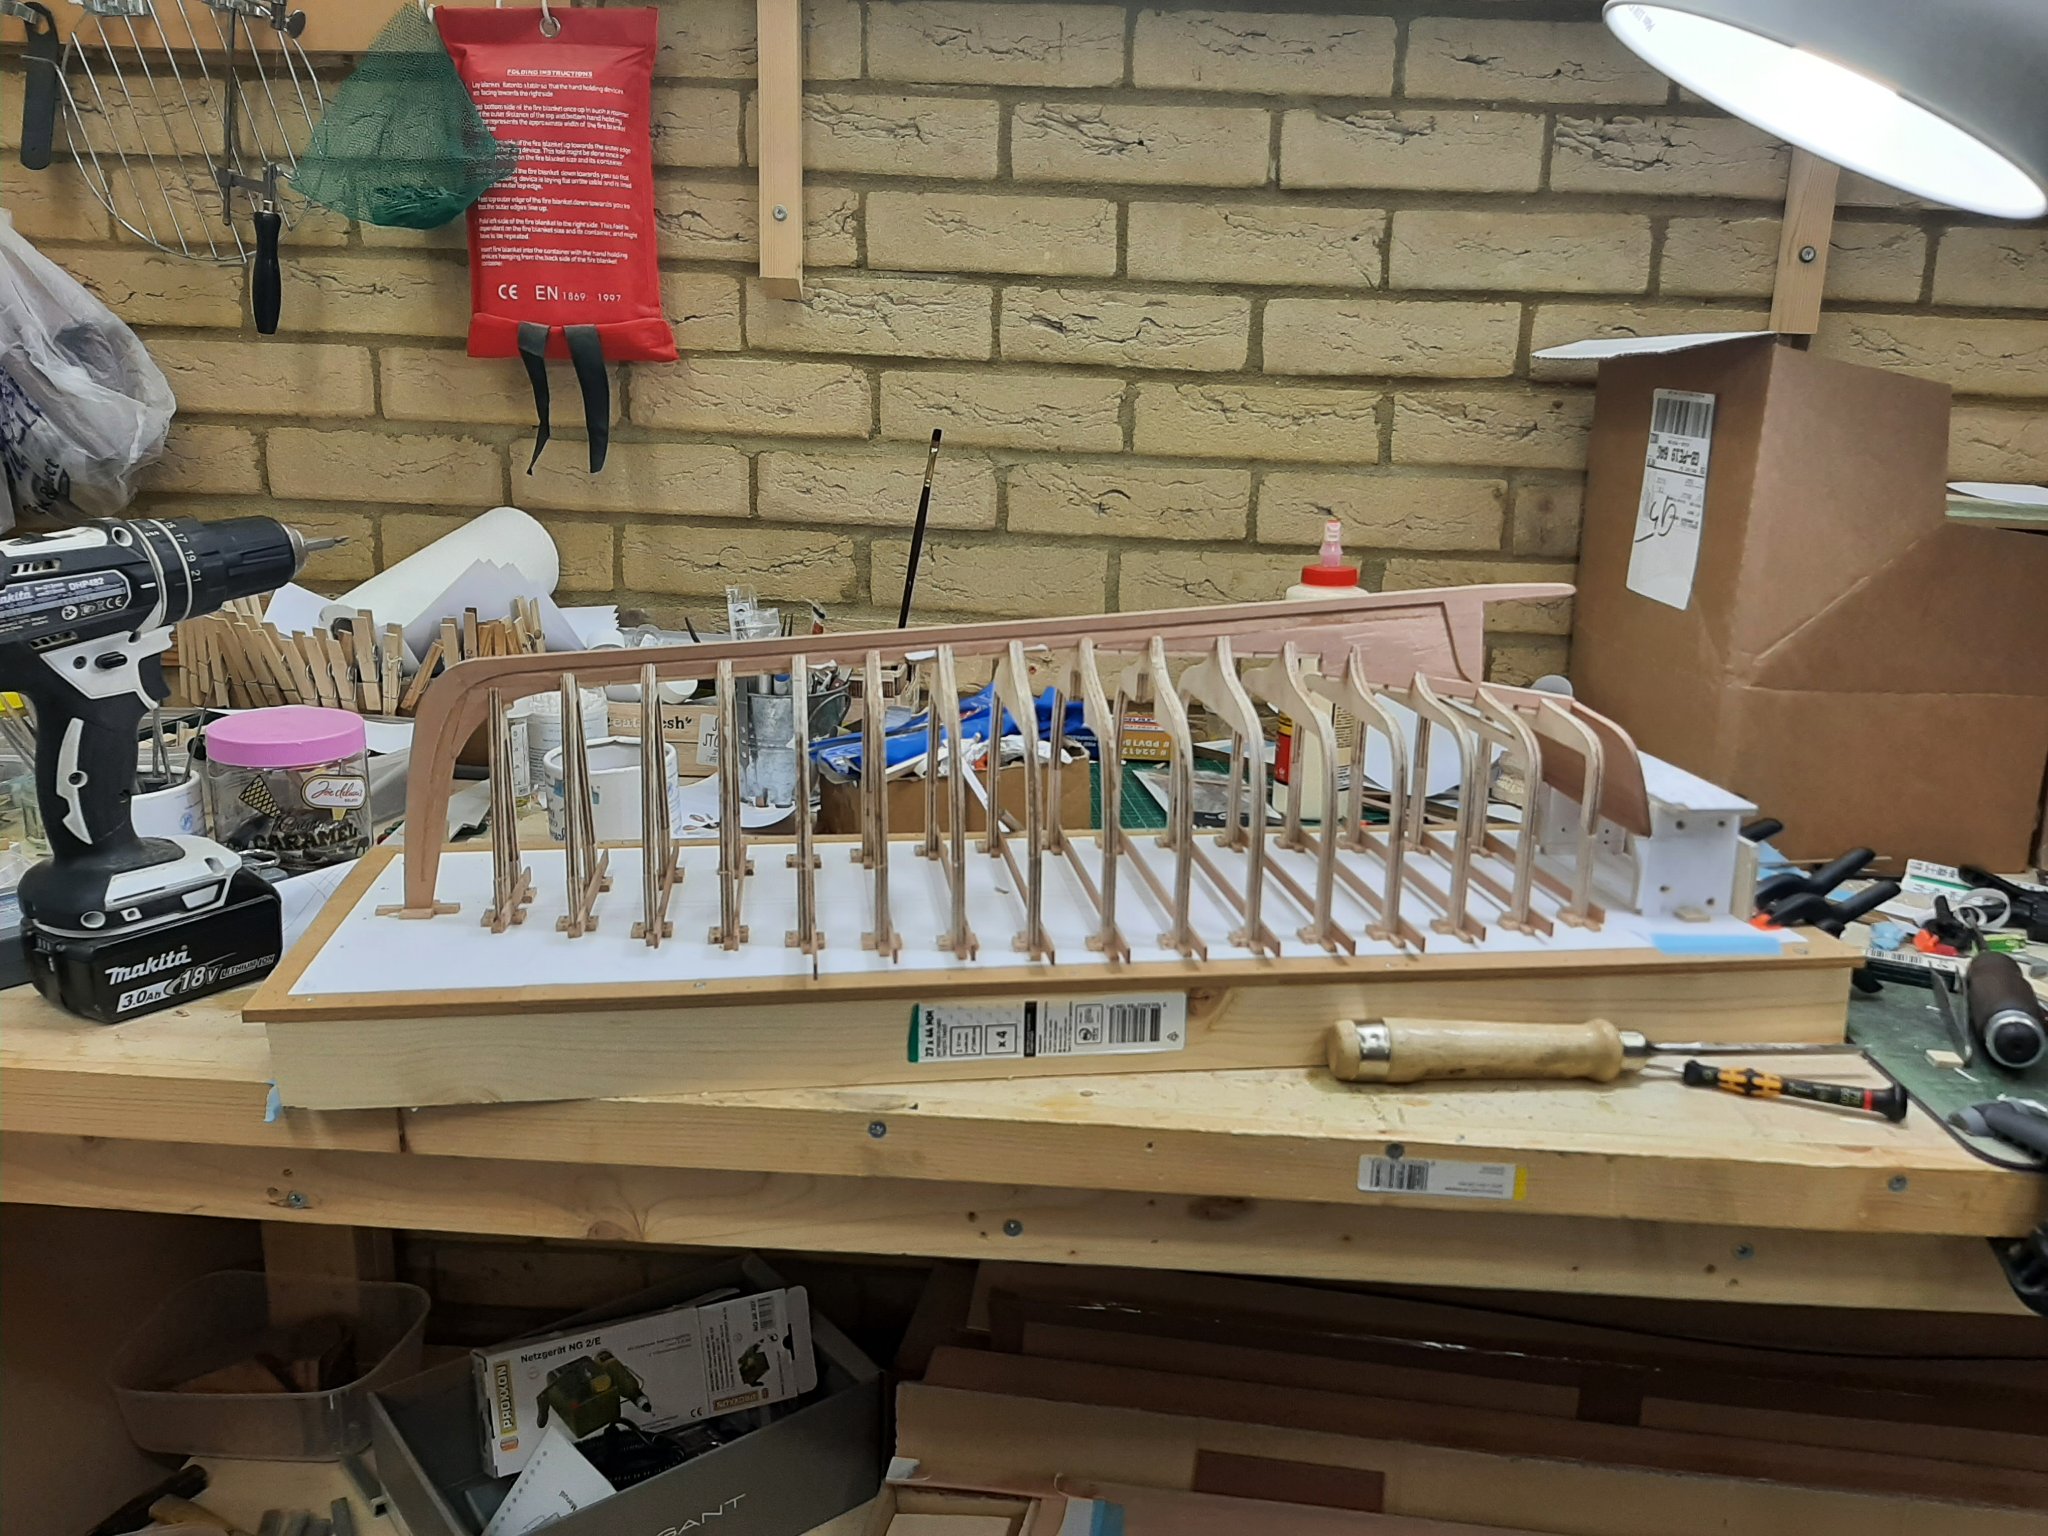
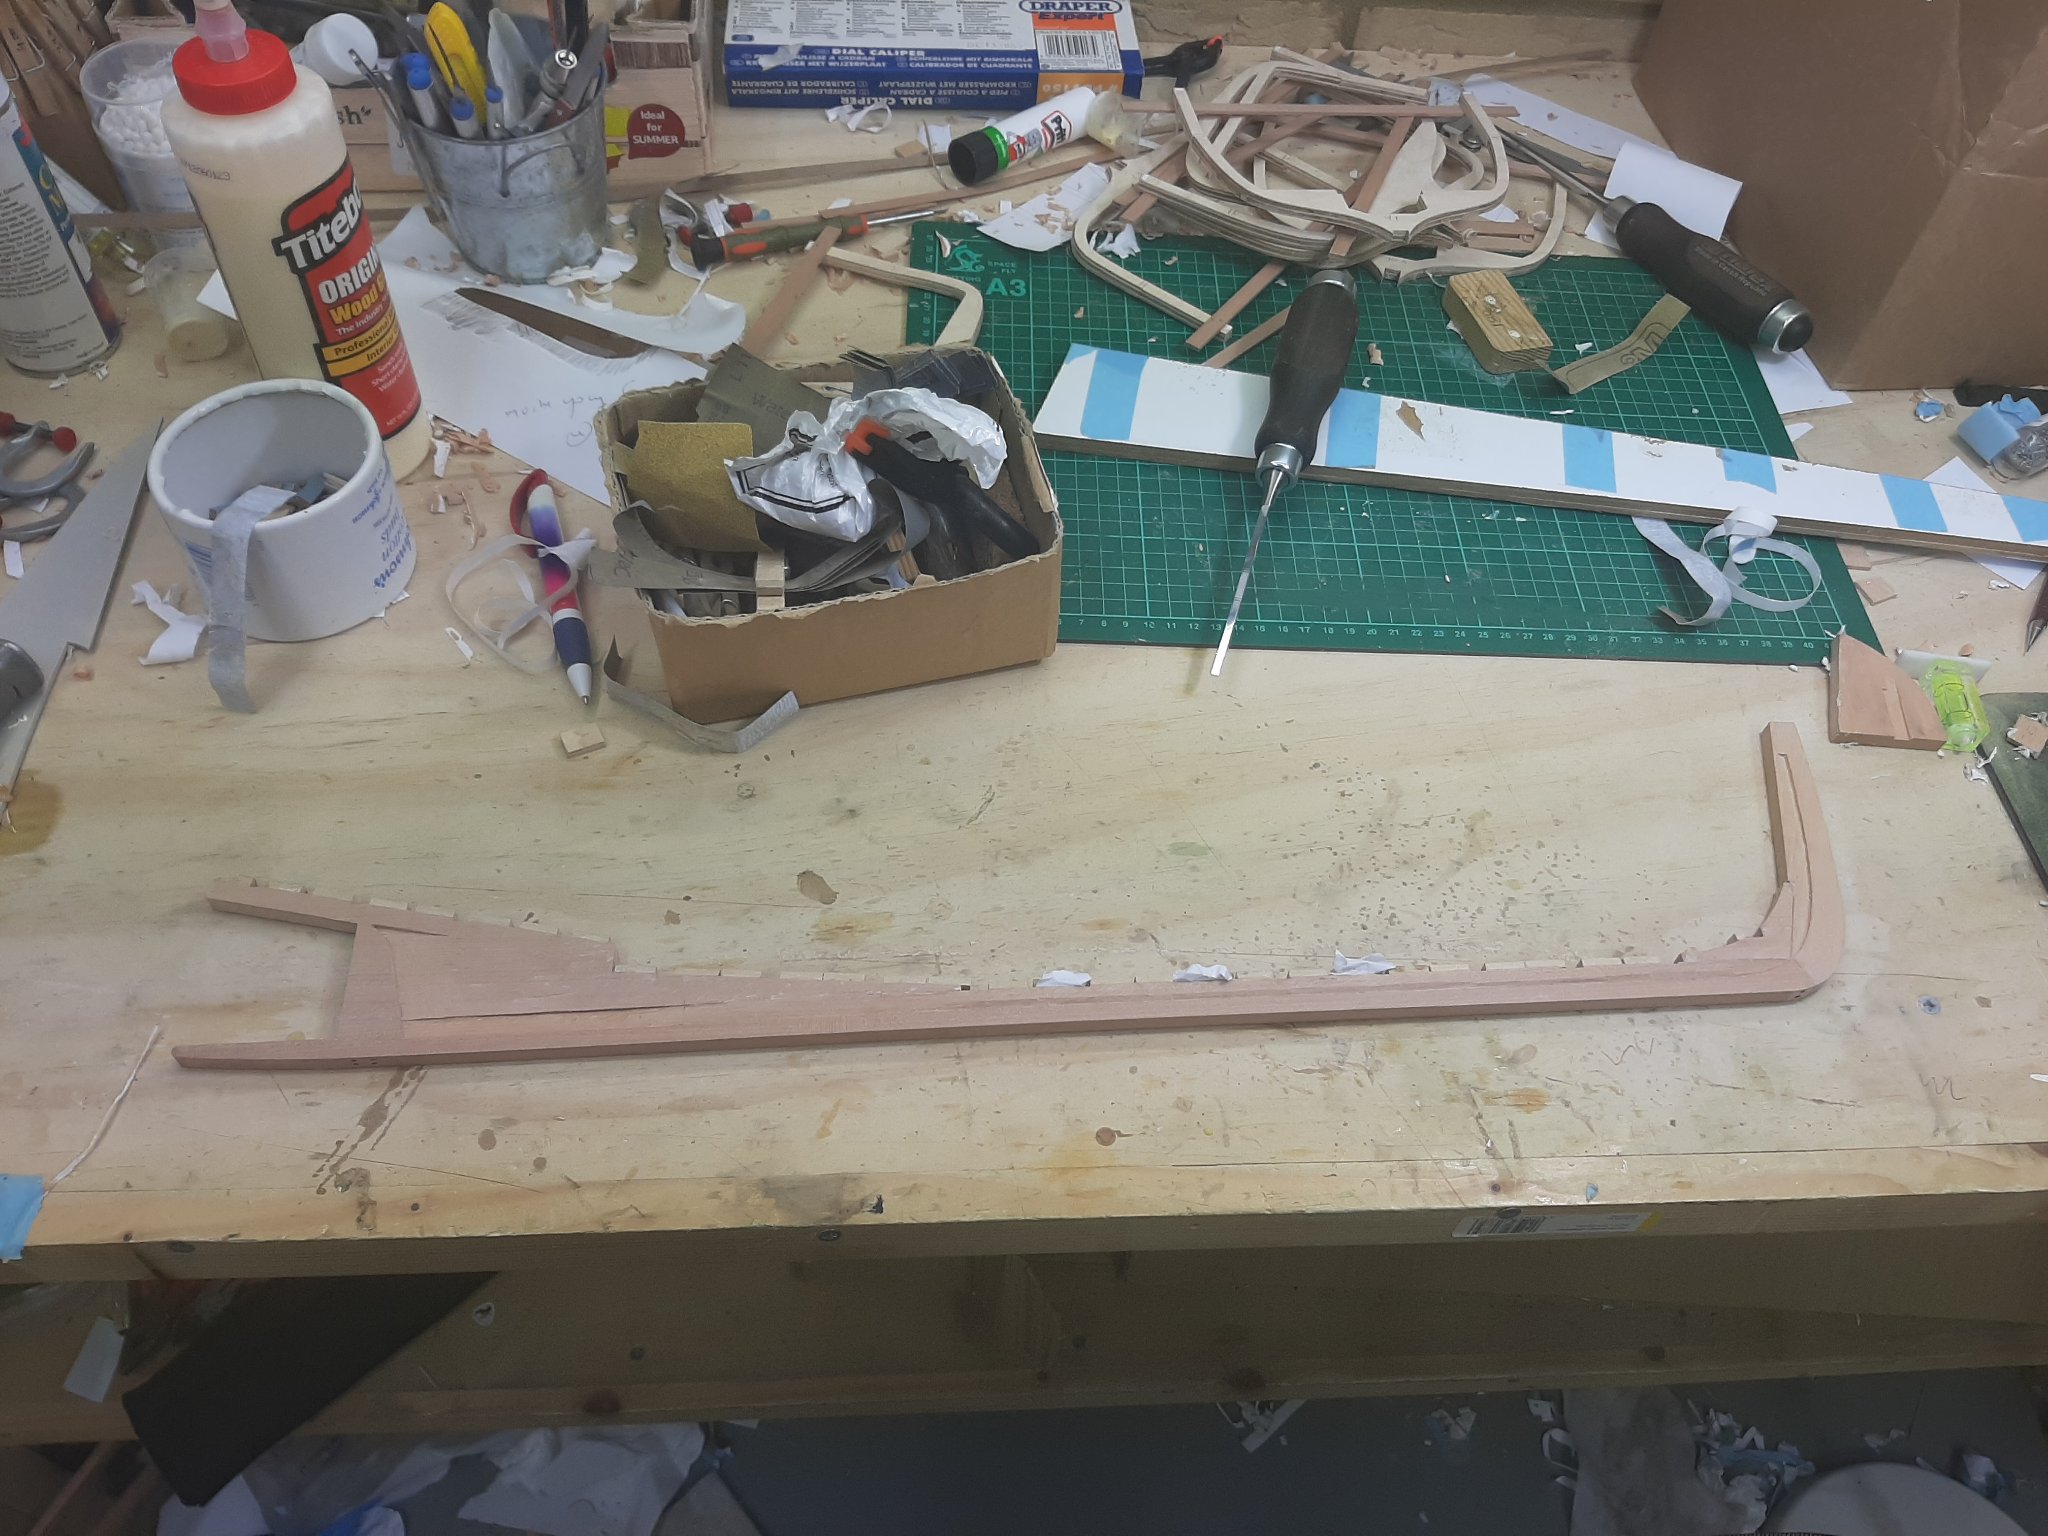
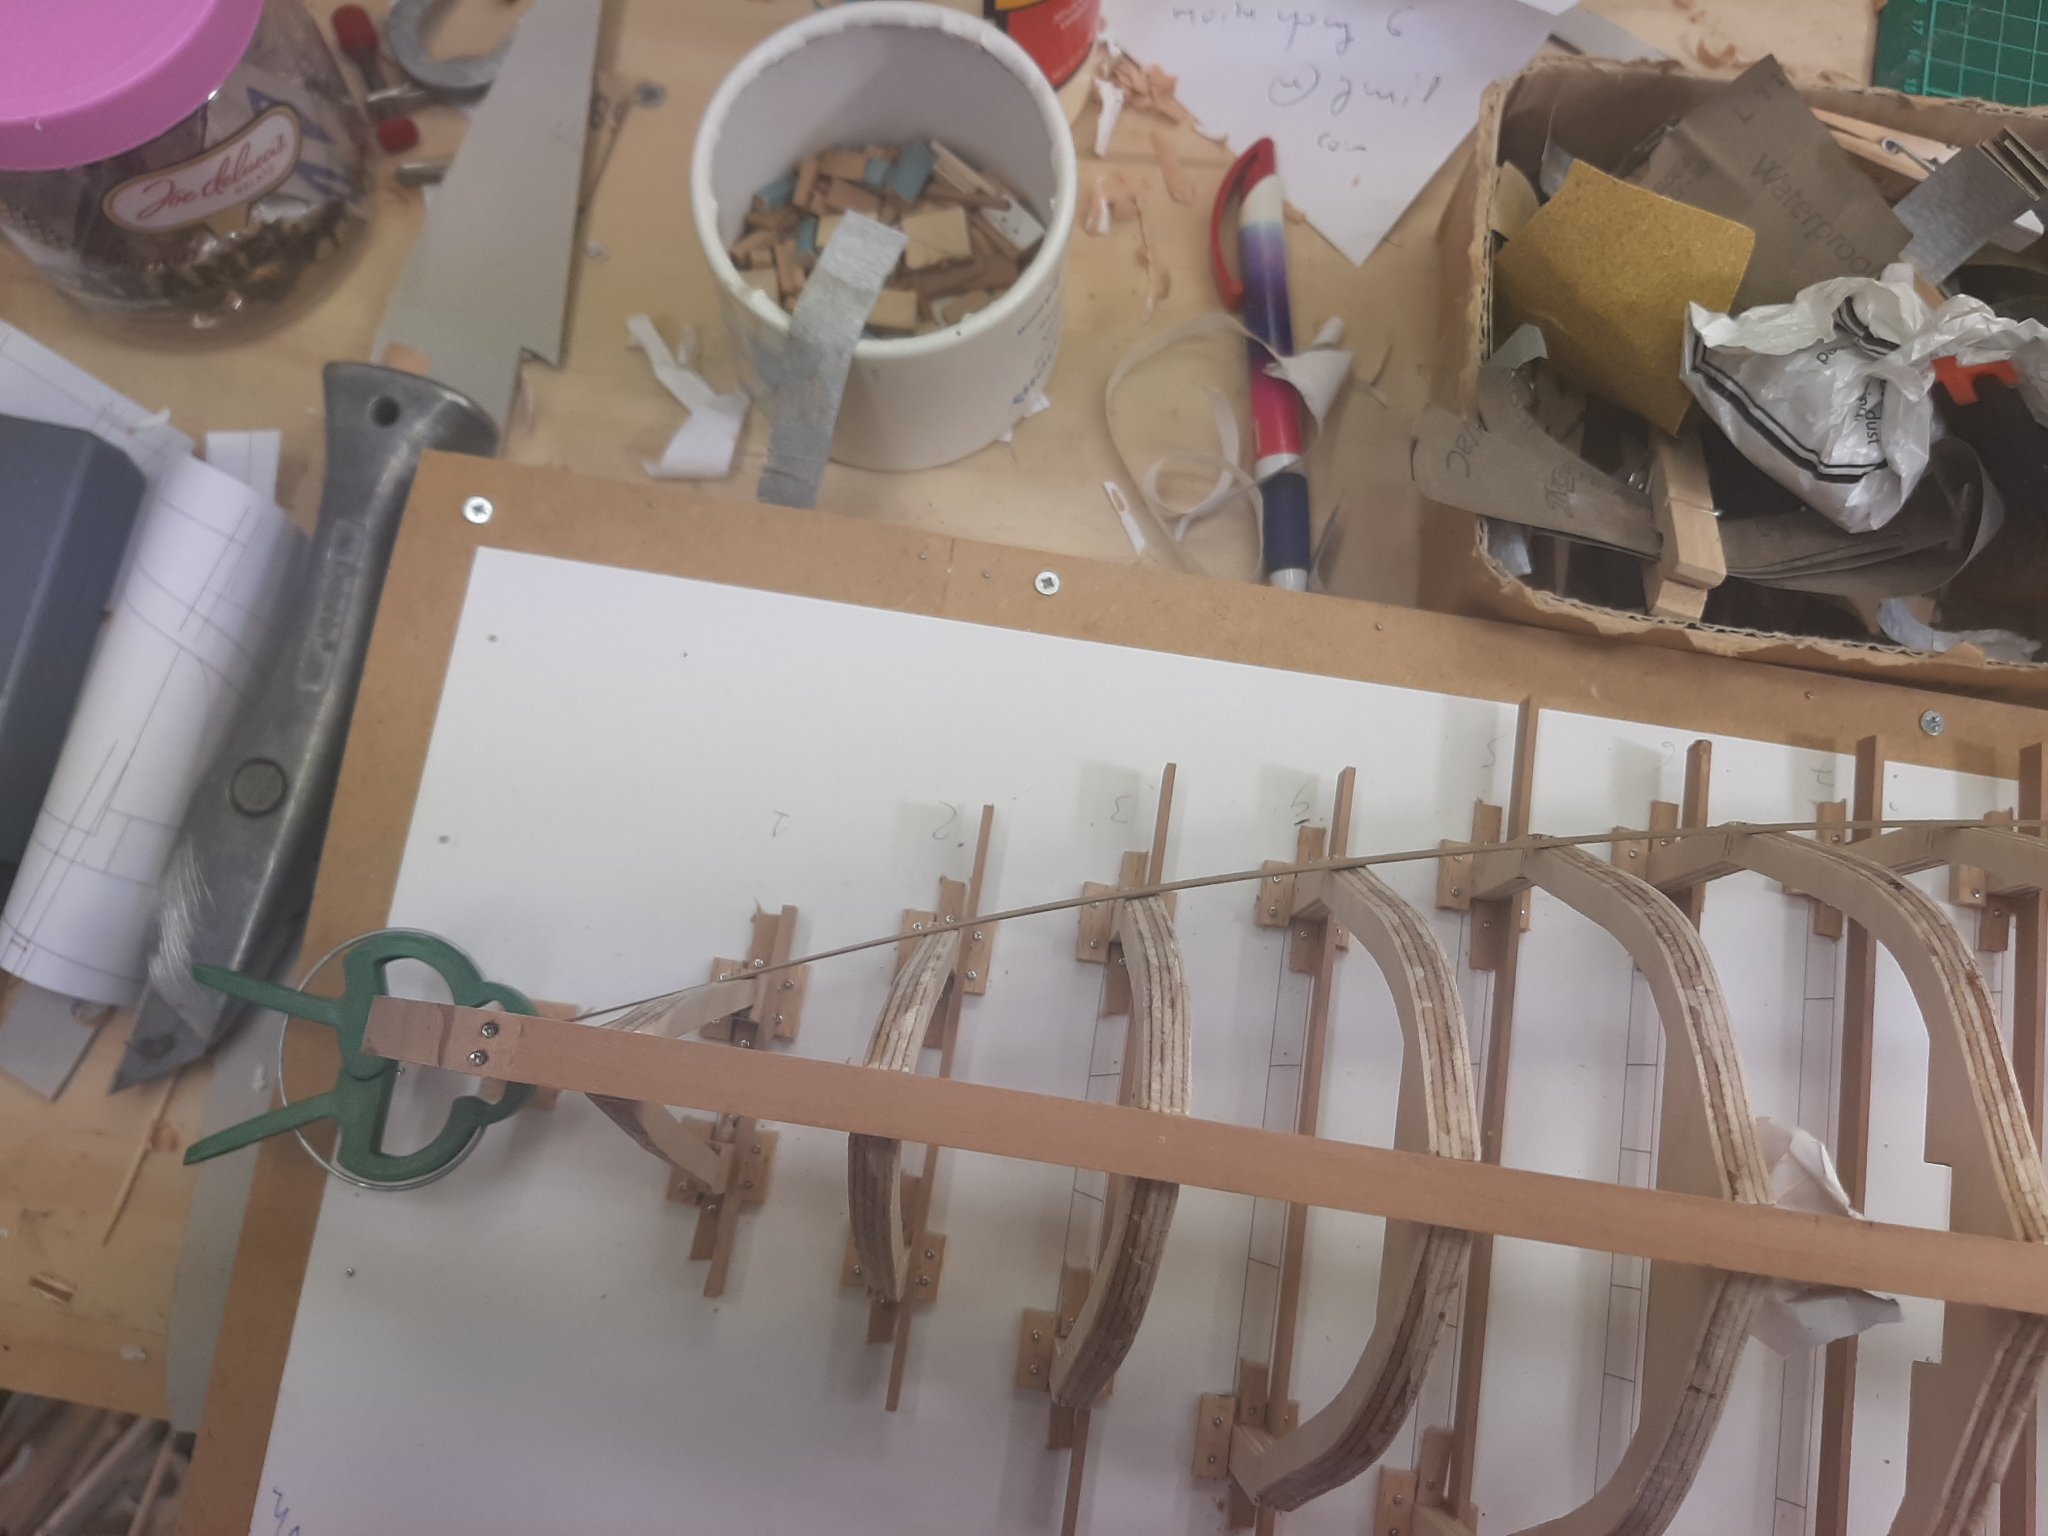
I hit a bit of a milestone today, the backbone of the boat is ready!
I first finished the cross members in all frames and removed the paper templates. Then, I continued work cutting the rabet. At the bow it was relatively straight forward. At the stern however, things were more complex. The problem is that the keel is not horizontal but slopes downward towards the stern. I have no idea how the planks will be arranged and as a result I am not sure how to hollow the deadwood. I installed all the aft frames and eyeballed things, I think there will be more wood to remove but I don't think I am far off.
I ve been using the strop on my chisels every few cuts and now they are extremely sharp, even a casual contact with the fingers will draw blood. This allowed however for very precise cutting. Next I removed the paper patterns from the keel and sanded to 240 grit.


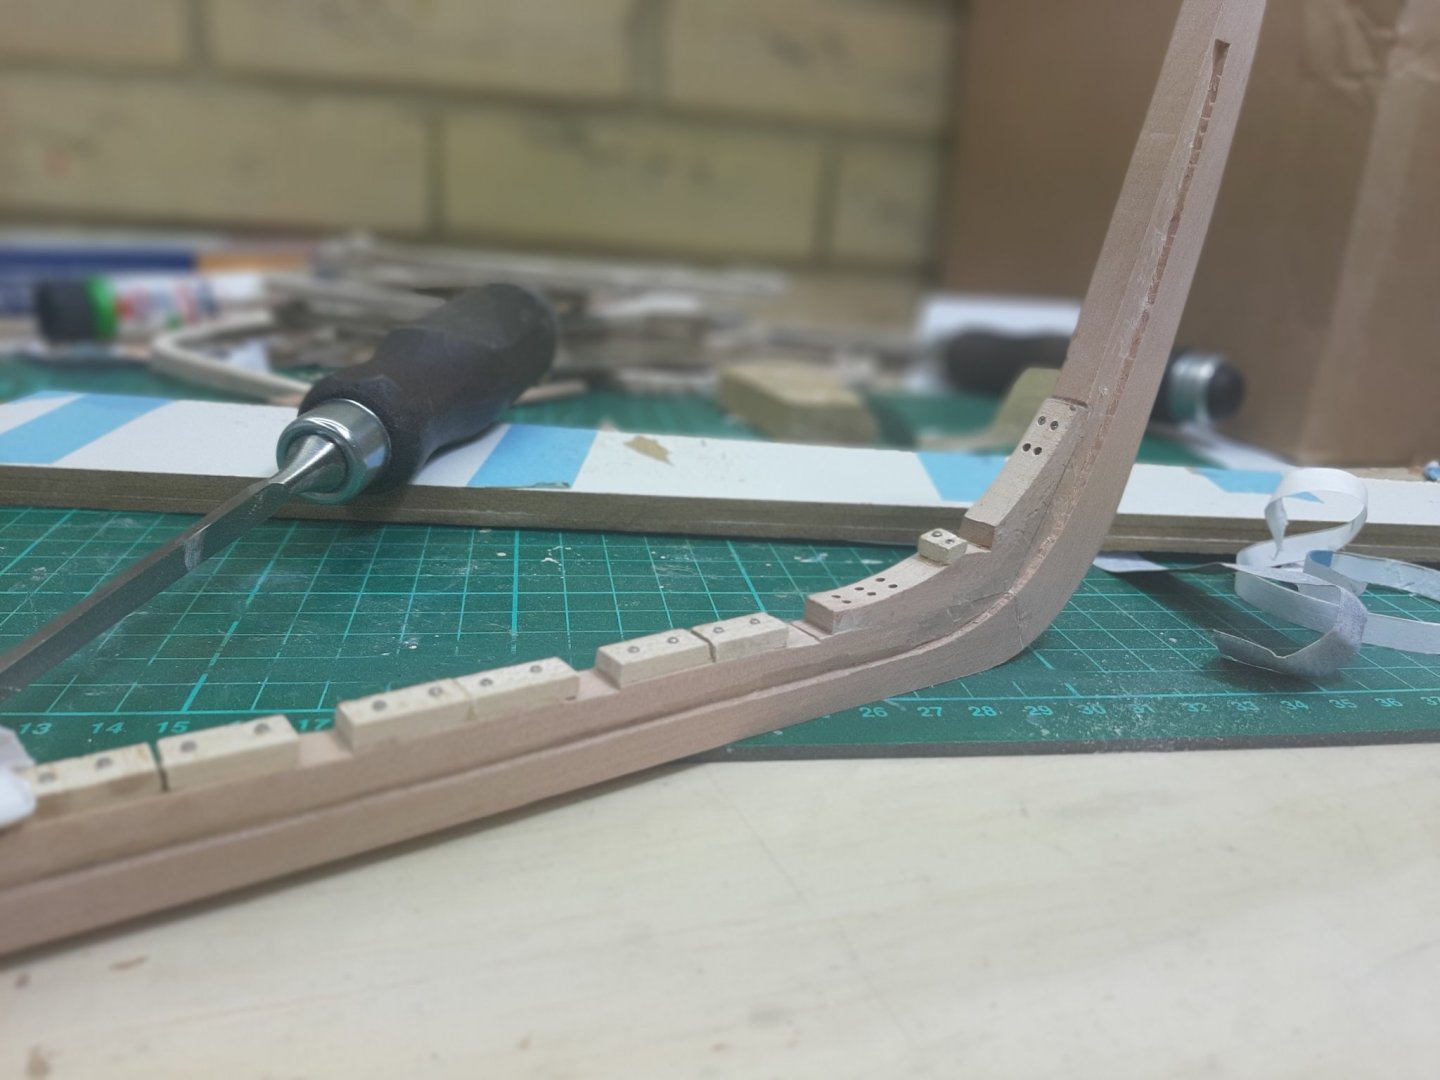
Then I assembled everything and checked for fairness. It looks ok, maybe a tiny amount may need to be taken off frame 1 at places but really it is not far off.


Next, I need to make (again, could not find it) the transom and secure it to the hull. I will need to add some side horn timbers and also to make some kind of jig to hold the transom in place.
A last photo, aren't boats beautiful...
-
5 minutes ago, wefalck said:
Normally, stainless is softer than other types of steel used for scews, as the alloying elements interfere with the hardening process.
Thanks Wefalck
The normal magnetic steel variant is made of some kind of soft mild steel and the head gets destroyed very easily. The stainless variant is just a touch magnetic and much more resilient.
-


Sharpening chisels - my (relatively) simple way
in Modeling tools and Workshop Equipment
Posted
Pleasure Moab!