md1400cs
-
Posts
2,868 -
Joined
-
Last visited
Content Type
Profiles
Forums
Gallery
Events
Everything posted by md1400cs
-
 Peter, Great find indeed. Sat - will have 2 coffees and spend time there. Thanks for posting link 😊
- 61 replies
-
- 2
-

-
- billing boats
- vasa
- (and 1 more)
-
Dave, Always great catching up. Beyond excellent work! PS: your sequence for making the deadeye stropping - now my go to... I used metal wires in my last build, copper would have been SO MUCH easier to work with. Great advice - thanks for sharing your technique.
-
Patrick, Yes ALL charts. That said could be column, line, pie, bar, ...... all confusing indeed. including your Dutch word A naval chart is just another name for a map, could also be nautical chart. FYI https://mapshop.net.au/mscharts.html
- 756 replies
-
- 4
-
-

-
- galleon
- golden hind
- (and 2 more)
-
Well your superb deck won't be covered in paint - but clear "marine lacquer" - perfect!- your attention to scaled details are simply a pleasure to look at.
-
P. As always - a treat to follow. - love the map (could have been called a chart in those days??) MJD
- 756 replies
-
- 3
-
-
- galleon
- golden hind
- (and 2 more)
-
Richard, Awesome start - yes your planking is indeed beautiful work. -almost a shame that it will be covered with paint. Brought my chair will also follow along... Cheers,
-
Matt, Nice start. Will follow along - This one is on my "long List" Always loved this ship. Though, as you prob. know, there is much controversy as to how all of those stern and galleries really looked - depending on diff decades of service; along with the controversy of the circumstances of how she caught fire in 1697 - ending her long career. Cheers,
-
Mark, Yes indeed, as Frank said, quick turnaround. Great choice. I know nothing about Model Shipways product quality - so it will be fun to follow for that as well. Good luck! Bringing my chair as well Cheers,
-
Martyn, Certainly great relief for you regarding your wife - cheers ! Your rigging is looking excellent - happy that those files (I got them from Karl) were useful as well. Still odd to me that DeAgostini would have poor rigging sheets as part of their kit. Frank (fmodajr) and I were laughing yesterday about STILL waiting for the Vasa II rigging book to be released - should have been about two years ago. Our Vasa's would still be collecting dust waiting for the rigging to be done as close as poss. to original with historical accuracy -- haha PS: According to Fred Hocker the 1/10th is not quite right either. He mentioned that some bits are "English" - Regards,
- 91 replies
-
- 5
-
-
- deagostini
- vasa
- (and 1 more)
-
Dave, Always a pleasure and a learning exp. to drop by your log. PS: Yes those guns are indeed awesome (carriages are no that bad either haha) Cheers,
-
Frank, Really superb project. Your attention to details are very noticeable indeed. Nice change from our "typical" logs makes this build even more interesting as well. Regards,
- 510 replies
-
- 1
-
-
- reale de france
- corel
- (and 1 more)
-
Frank, Thanks indeed. We all learn from each other - Glad that some of my ideas are useful for you as well. My work would not be as "good" or as evolved today - had it not been for all that I have learned from and adapted following other builder's logs, yours included. Also all of the very kind advice that members have posted in my logs have been super helpful. Still learning and experimenting a lot - also part of the fun --- figuring out solutions that are "out of the box". Cheers,
-
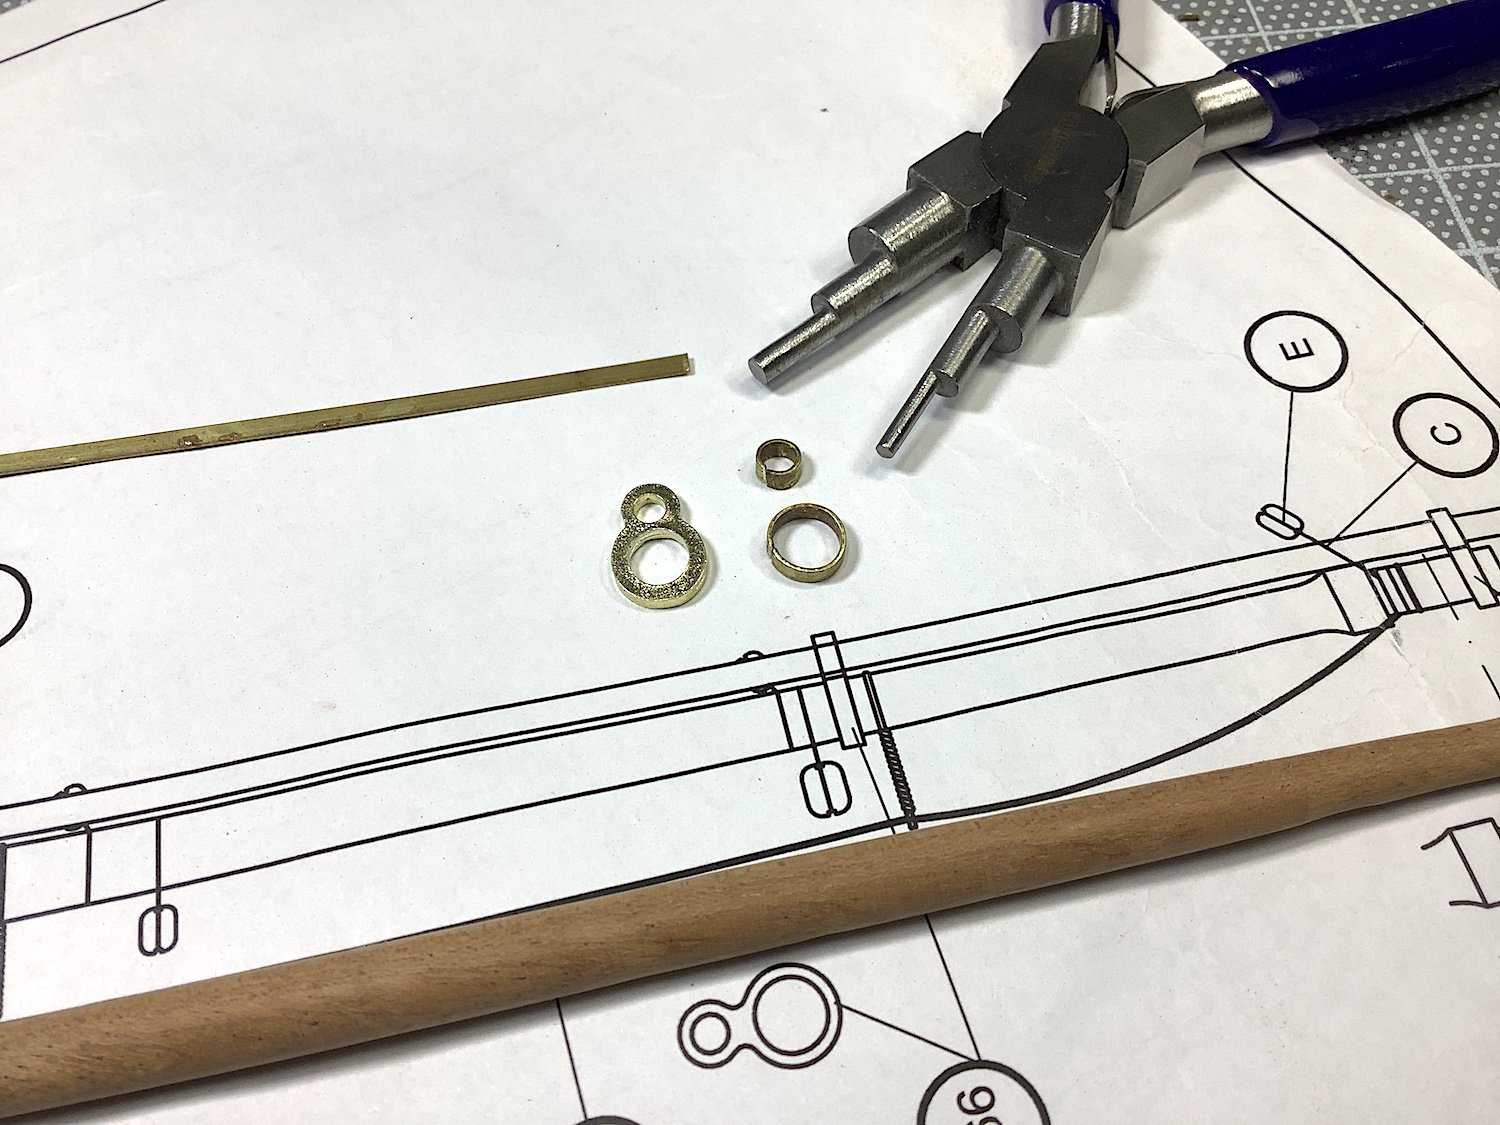
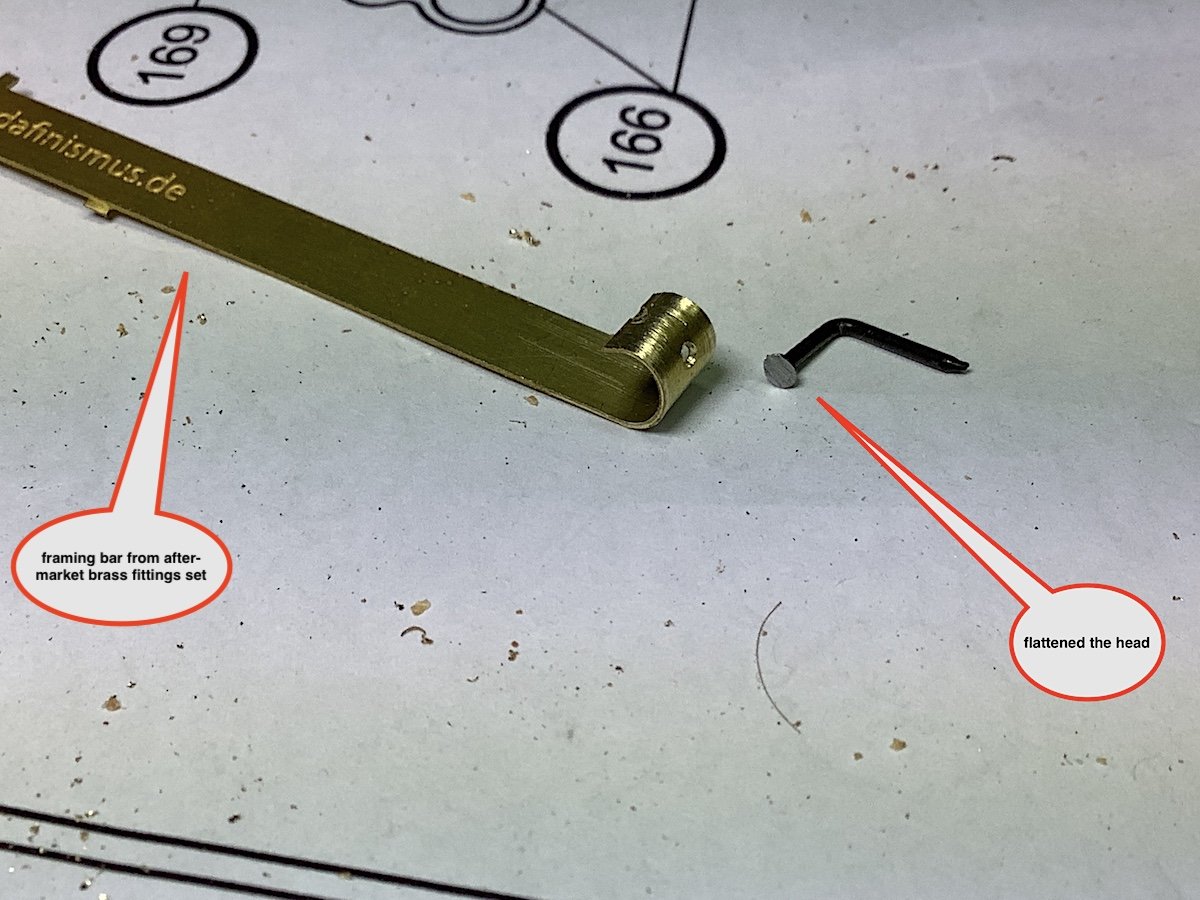
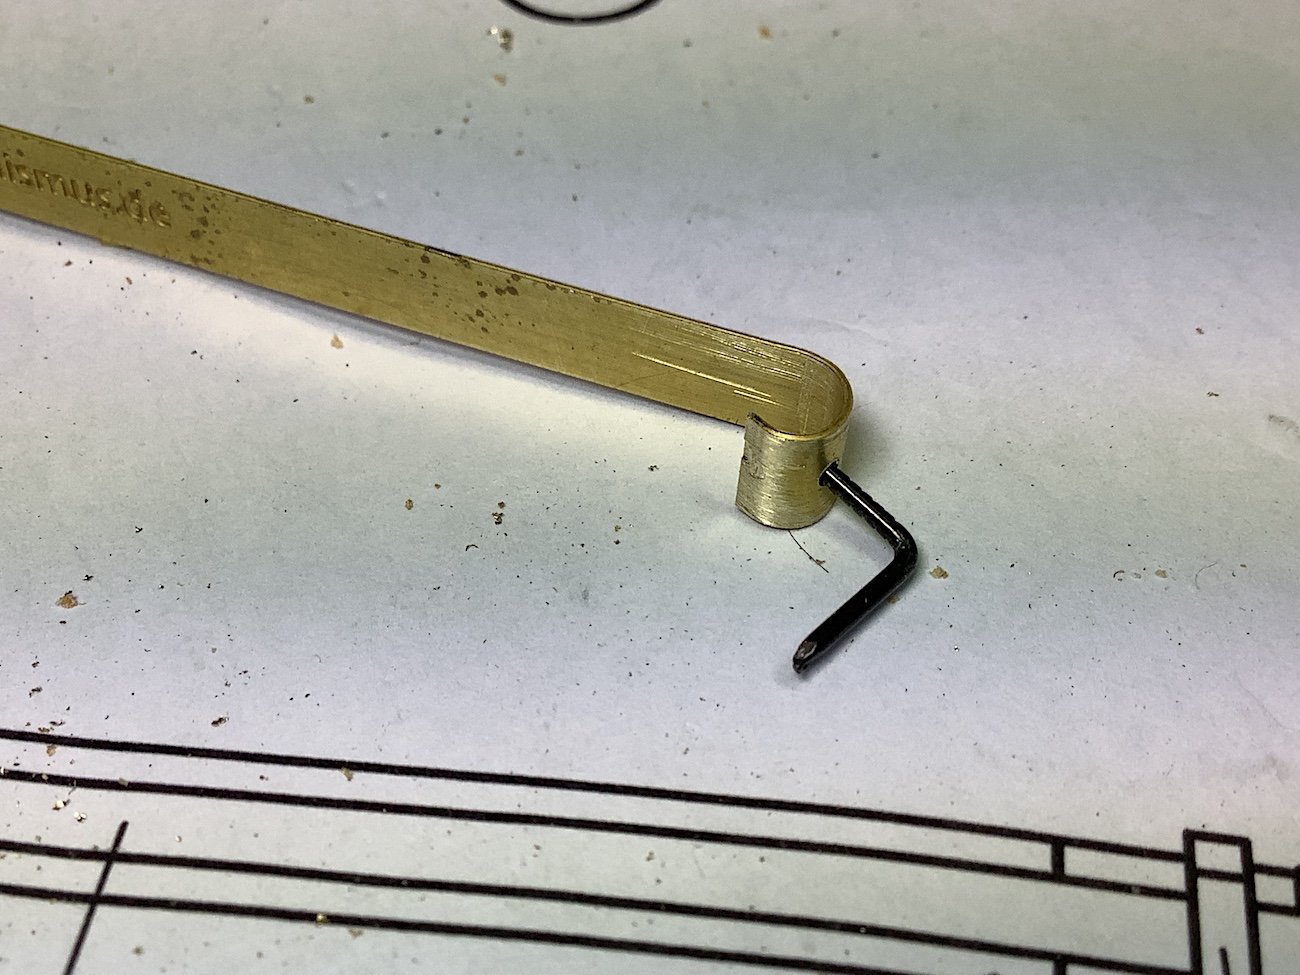
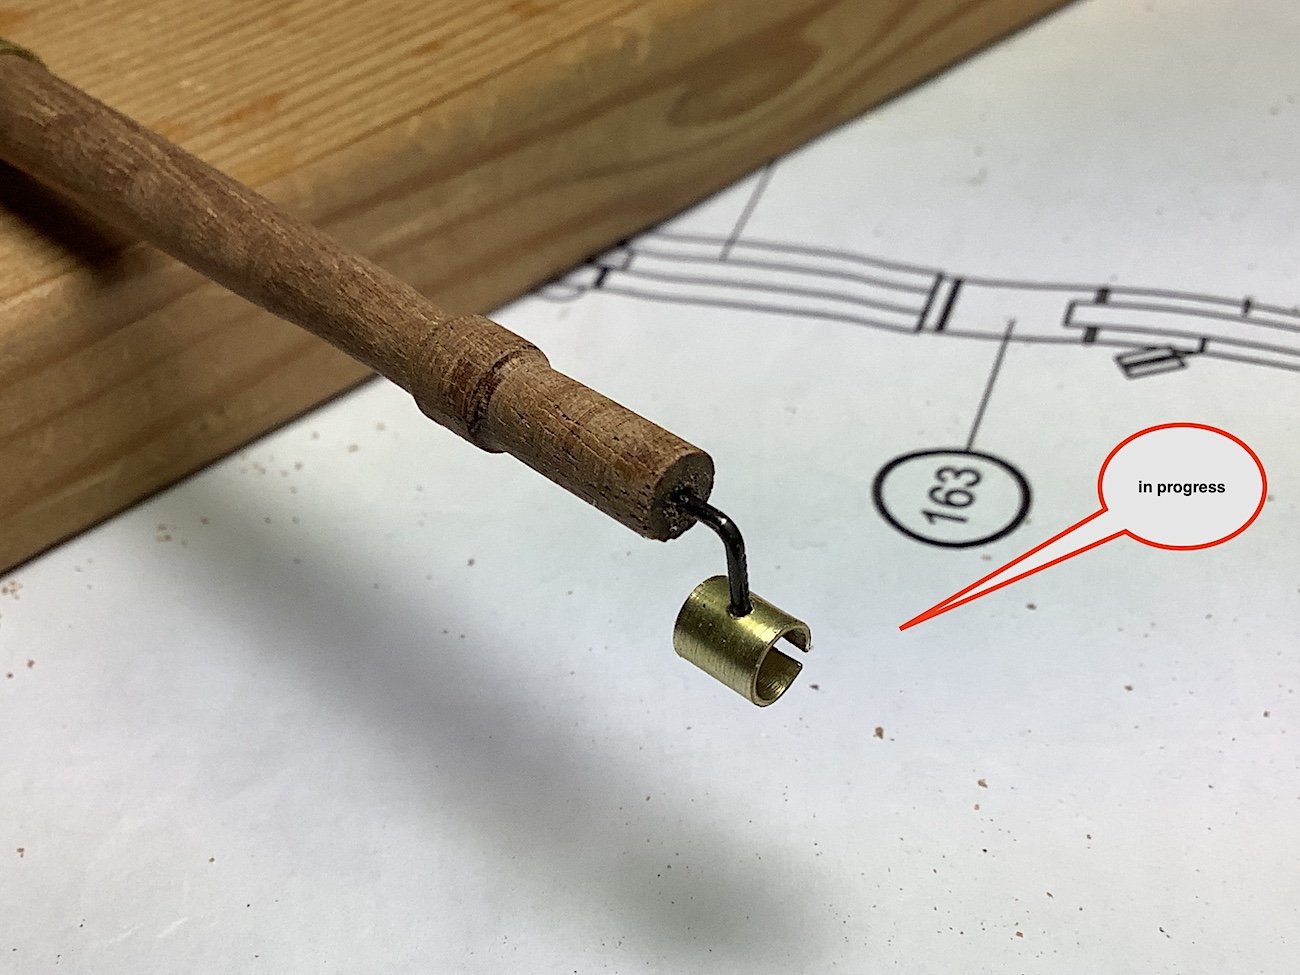
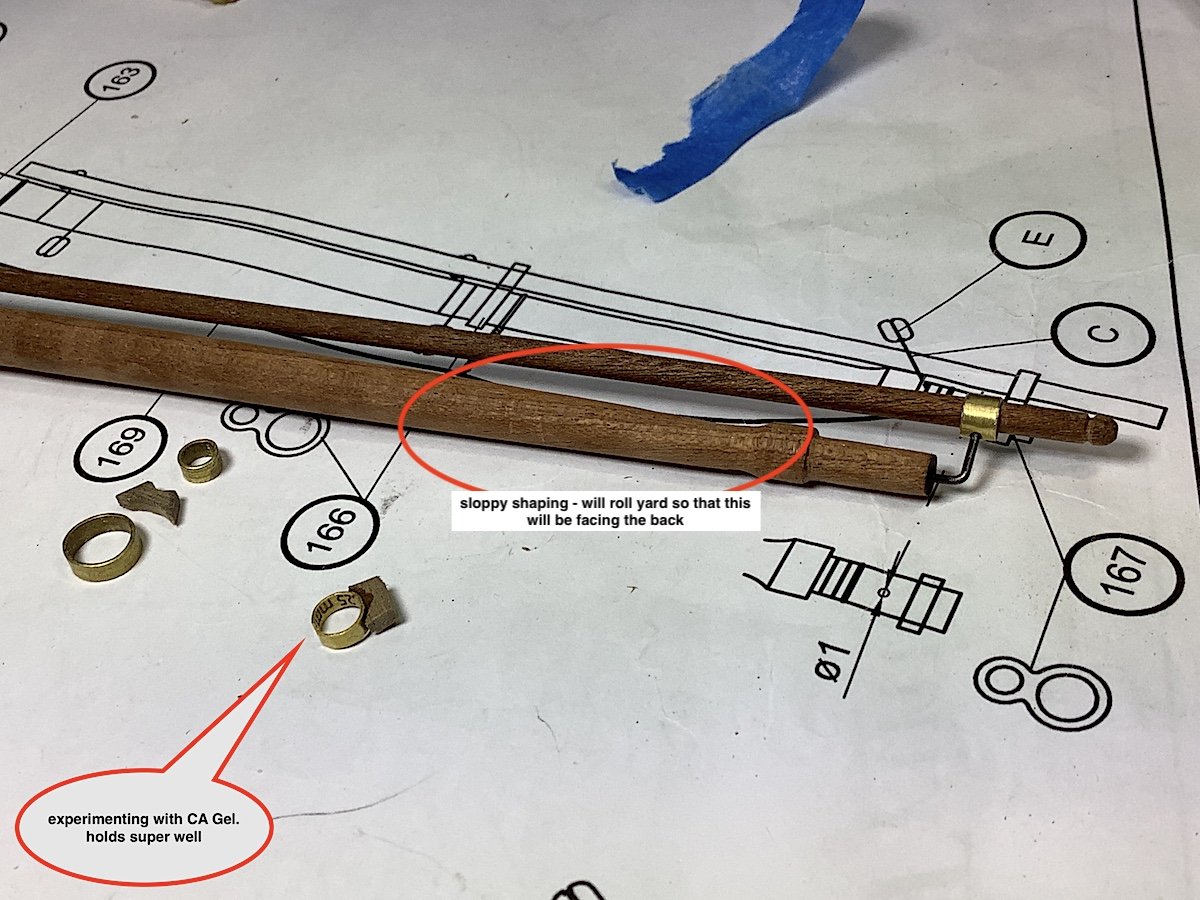
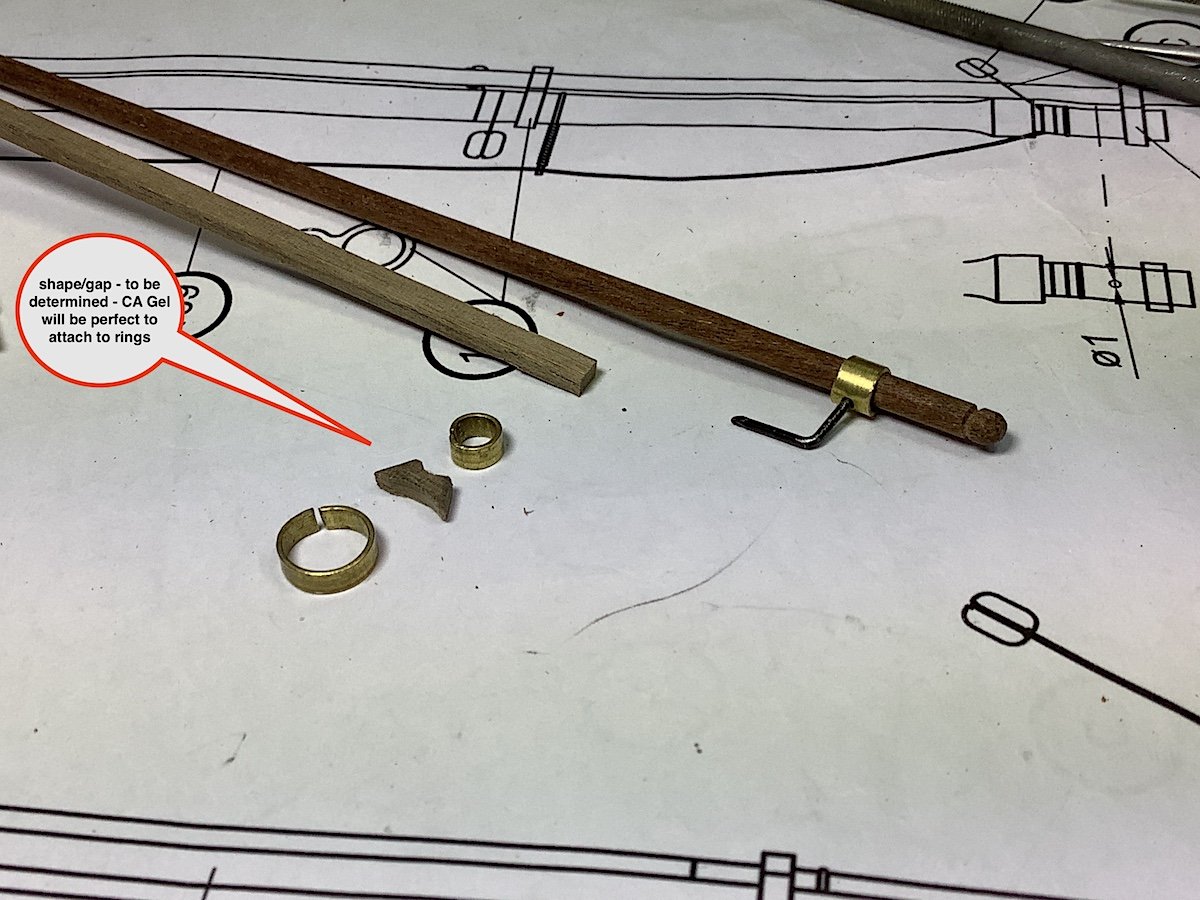
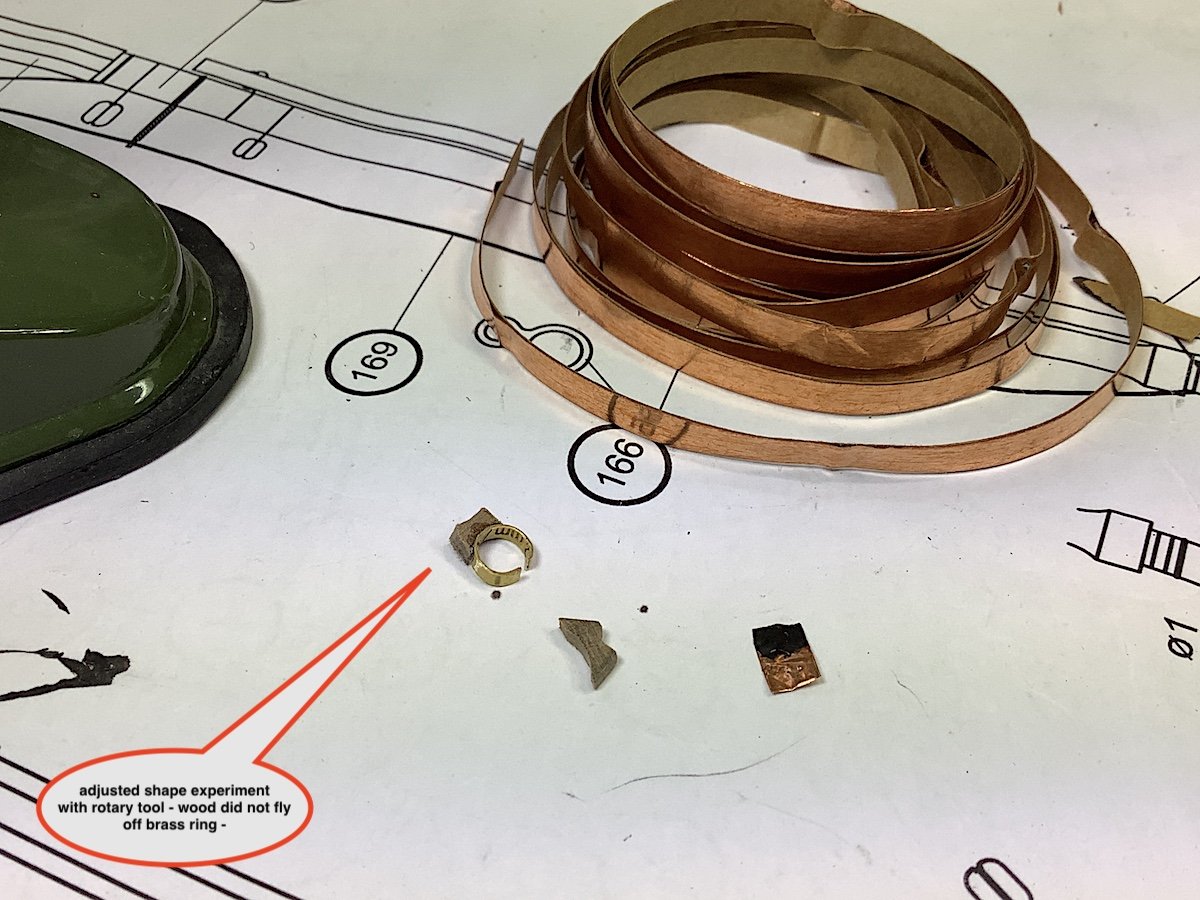
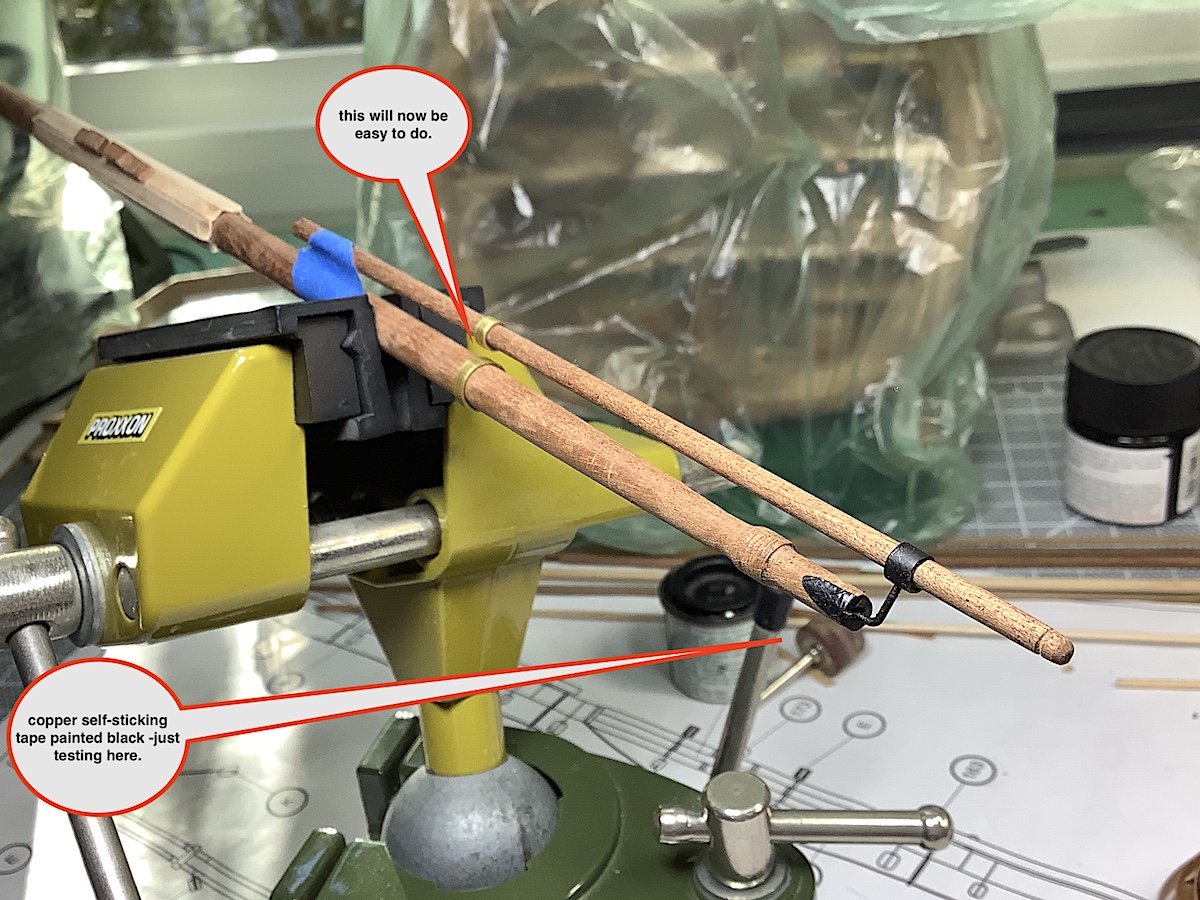
Update: Non-soldering solution to Stuns’l Boom Irons, and learning soldering dilemma (mine). Found this very useful article. Sharing indeed worth a read. Photos are self explanatory – with some added notes. Making yard details.HOW TO,pdf copy.pdf
- 371 replies
-
- 11
-
-
The Lazy Saint - you are so kind - thanks - yes a cross-section is a nice change from accustomed to usual work. Learned a lot working with interiors including new vocabulary 😀- nice variation. PS: My Admiral has called me your avatar -- well sort-of --- haha Patrick - as alway thanks - yes talented indeed - scale is another matter for me. Tom - good thanks for the post So I have decided to do a plan "B" will post an update once things have been worked out. As always thanks s much mates for your continued thoughts and just dropping by.
-
Looks to be an excellent project - Very nice start!! Got my chair to follow along as well.
-
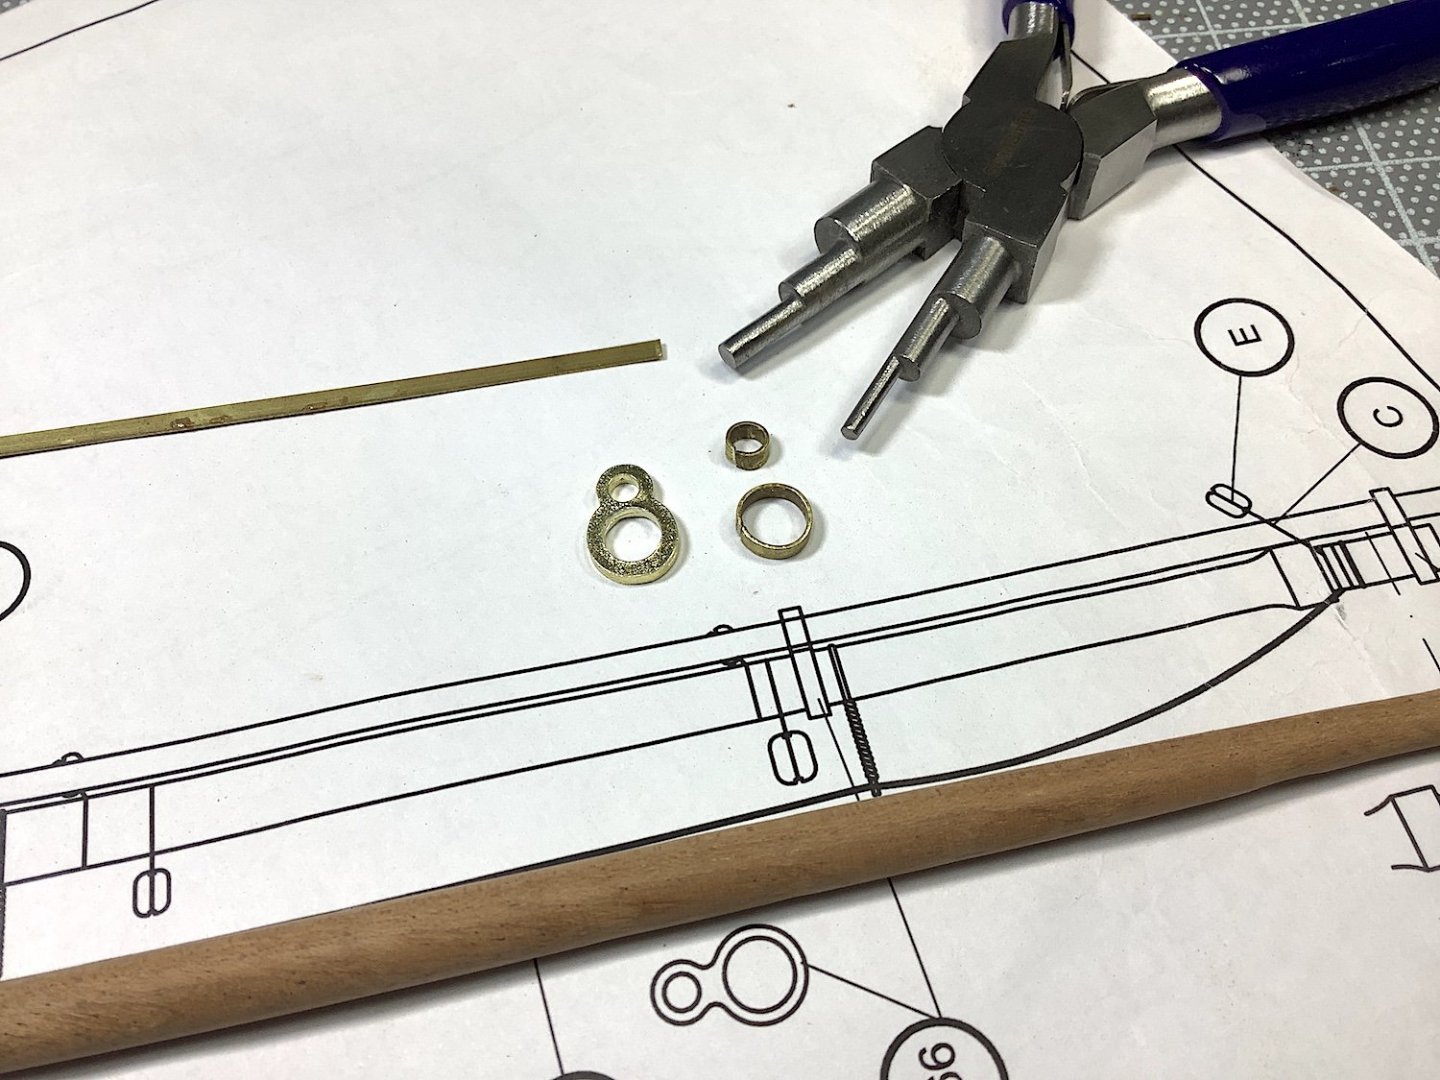
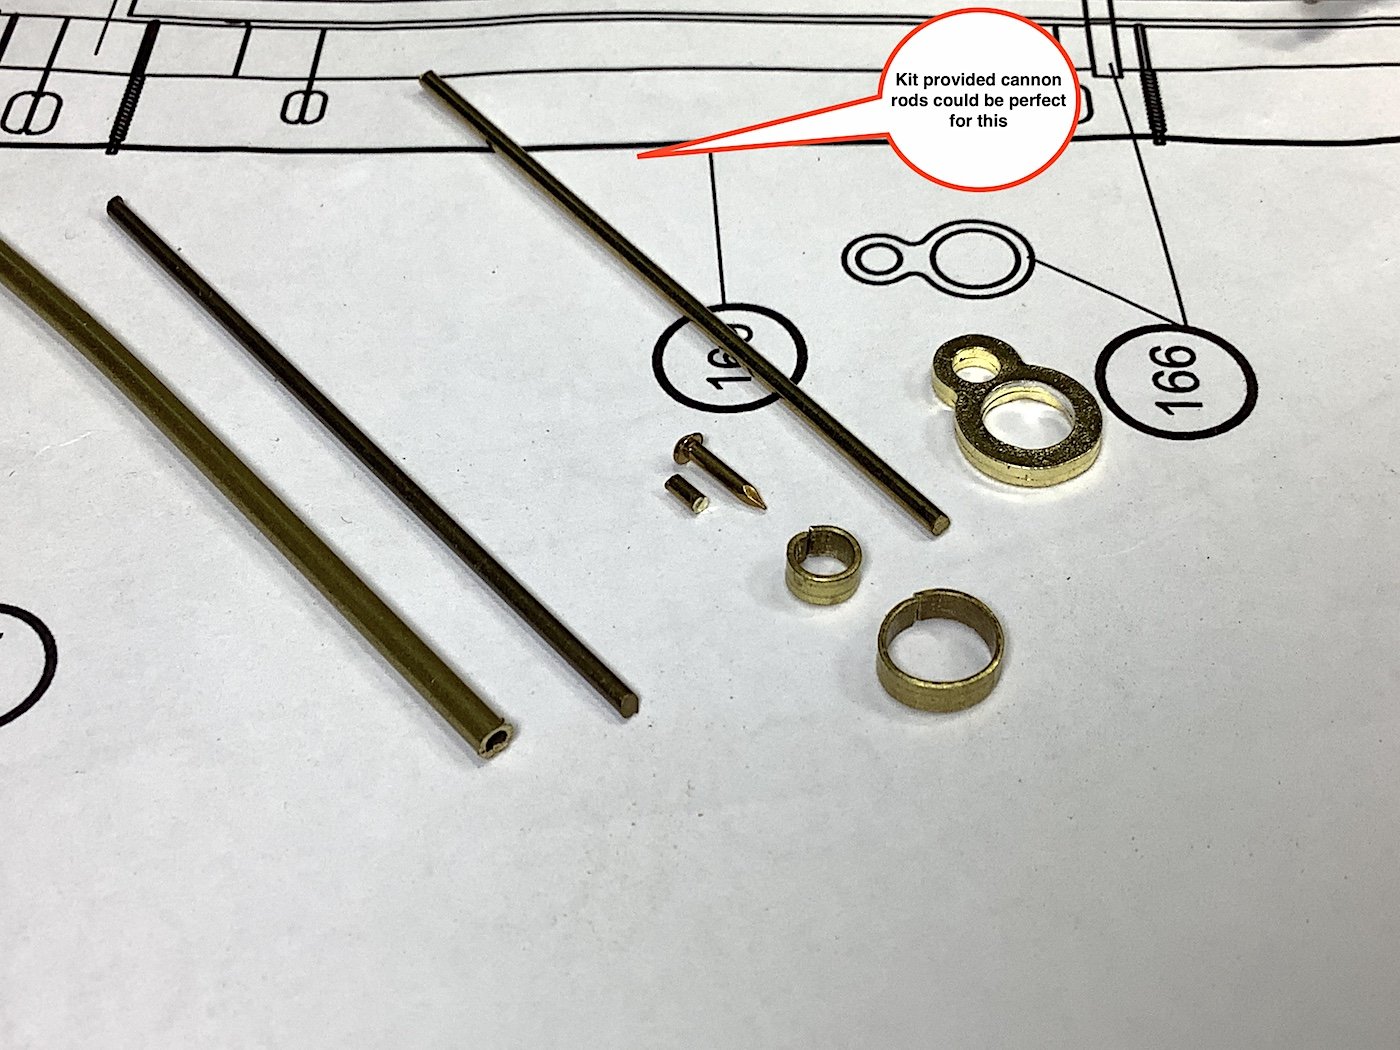
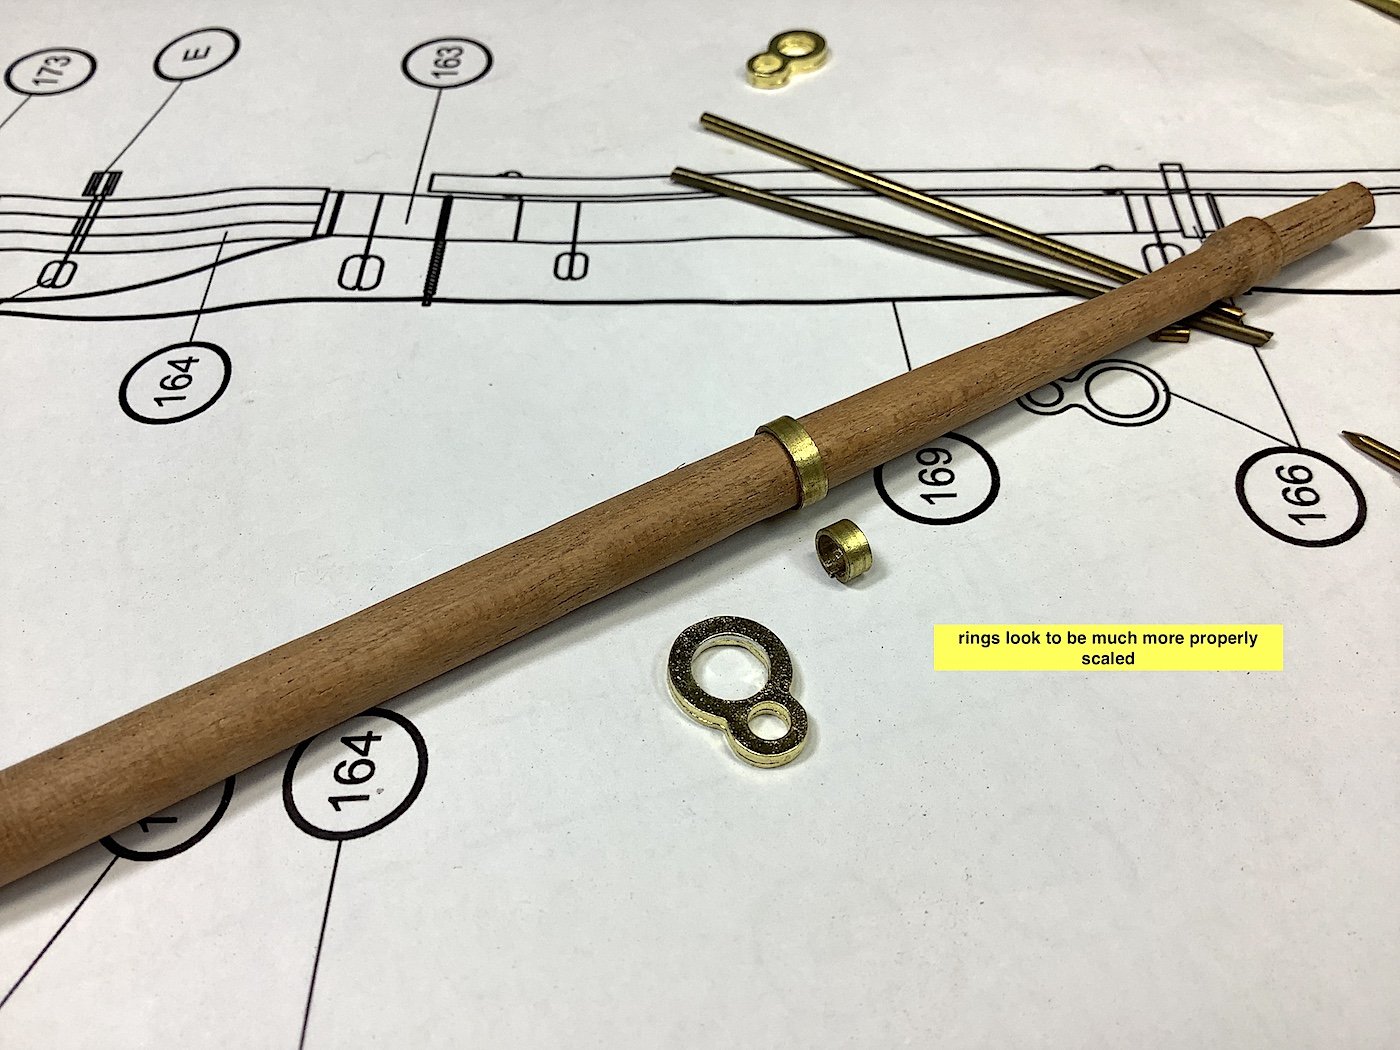
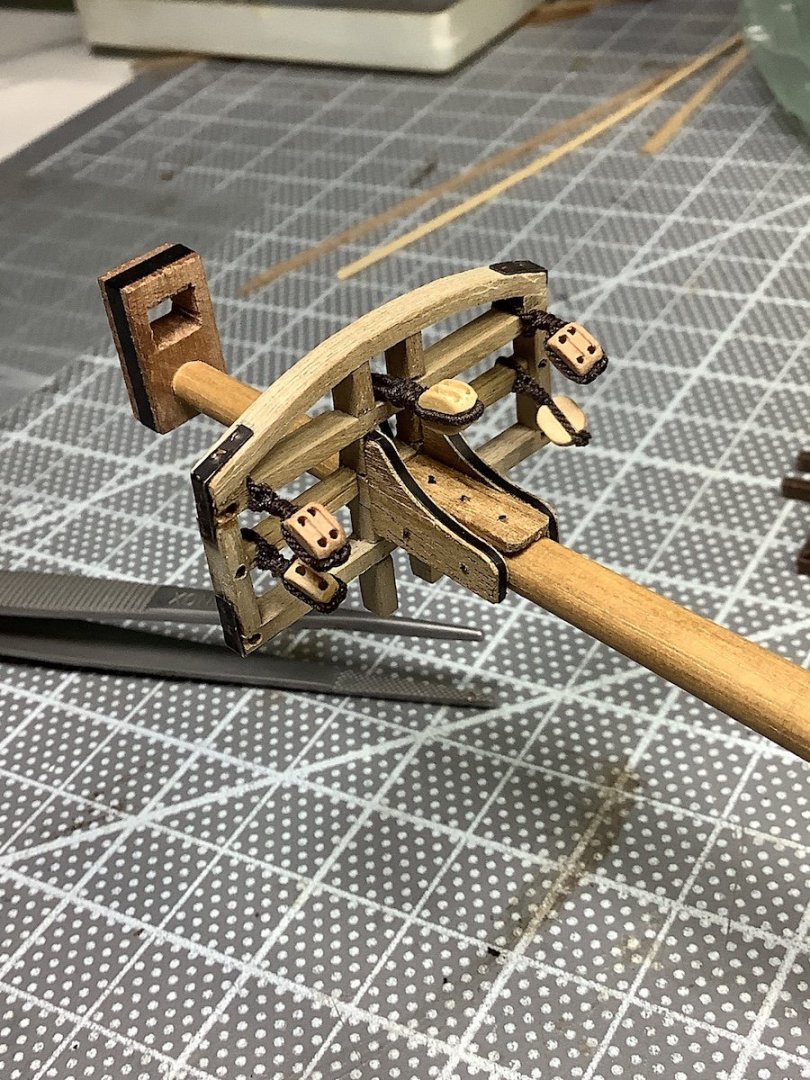
I’ve always been impressed with builders that also work with metal and solder. Way beyond my skill set. But, now I need to get more skilled. --------------------------------------- Completed shaping the lower main yard, also knowing that for the first time I would also need to add Stuns’l Boom irons. Thought that I would use the 2 kit bits, but then decided that “scale look” was an issue (for me). This dilemma also created an opportunity to attempt to learn new skills. Making the rings was, of course, super simple. Two possibilities just drill two holes through the small rings, add a rod, CA the three bits then paint black – or solder the three parts together then blacken the copper in a solution. My concern is that once I solder a rod to one ring then try to solder the second ring – the re-heat will disconnect the first two parts haha Or – brain just woke up - drill two holes through rings insert rod through each hole (at once) that go deeper through each ring, then solder both together – later cut the inside rod protrusions, dip in blackening solution – though I don’t think that the solder will turn black? Need to spend some time here --- hmmmm! In any case the sails are done, but boom metal bits need to be fitted first. Also need to probably purchase a hobby torch or soldering gun, then determine what type of solder to use. Mates any help here would be greatly appreciated. I will also look at help sections here at MSW. Cheers,
- 371 replies
-
- 10
-
-
Hennie, By the way -- Yes to your decision NOT to use the kit provided pre-fabricated upper deck planking sheets. Makes for indeed a big improvement. If I ever get to this kit I will also build the upper deck plank-by-plank. Looking at your's make this one very tempting for me -
- 192 replies
-
- 1
-
-
- sovereign of the seas
- sergal
- (and 1 more)
-
Peter, One of the topics that I discussed with Dr. Fred Hocker (Feb. 018) had, in fact, to do with the cannons. He said that when the ship was launched the Navy had run out of sequential sized cannons and used a hodge-podge blend of available cannon sizes. Hence the odd sizes especially on the upper deck. Also, the king had decided to add a middle gun deck. I also learned that cannons, along with many other bits and pieces are still being located in the area of the sinking. Cannons are indeed one of the most difficult bits to accurately add to any Vasa kit, exclusive of the DeAgostini release. Mine, as with every other Vasa kit that I have followed or seen, disregarded the canon issue. For those of us in this hobby that are trying to be as accurate as possible we do find certain areas difficult to replicate. That said of all of the friends that have come over and seen my example - not a single technical question was ever asked - except, "Oh! how long did this take you?". "I have no idea", I replied" ---- you Peter are indeed on top of that question. Cheers,
- 61 replies
-
- 3
-
-
- billing boats
- vasa
- (and 1 more)
-
Binho, Lot's of interest in your build much learning!! - My next project will be the Amati Drakkar - needless to say I'm also gaining much insight following. I have been putting lots of info together to help for the next project; here are a couple of sources. You may know these links already in case you don't -these might be of help as well https://www.norsemyth.org/2013/10/viking-ship-field-trip.html AND Modelships.de ---- have amazing builders on their site https://www.modelships.de/Gokstad-ship/Gokstad-Schiff.htm PS: Here is another one ((modelships.de tripple click on photos to get super detailed HQ views) https://www.modelships.de/Skuldelev-5/Skuldelev-5_eng.htm Regards
-
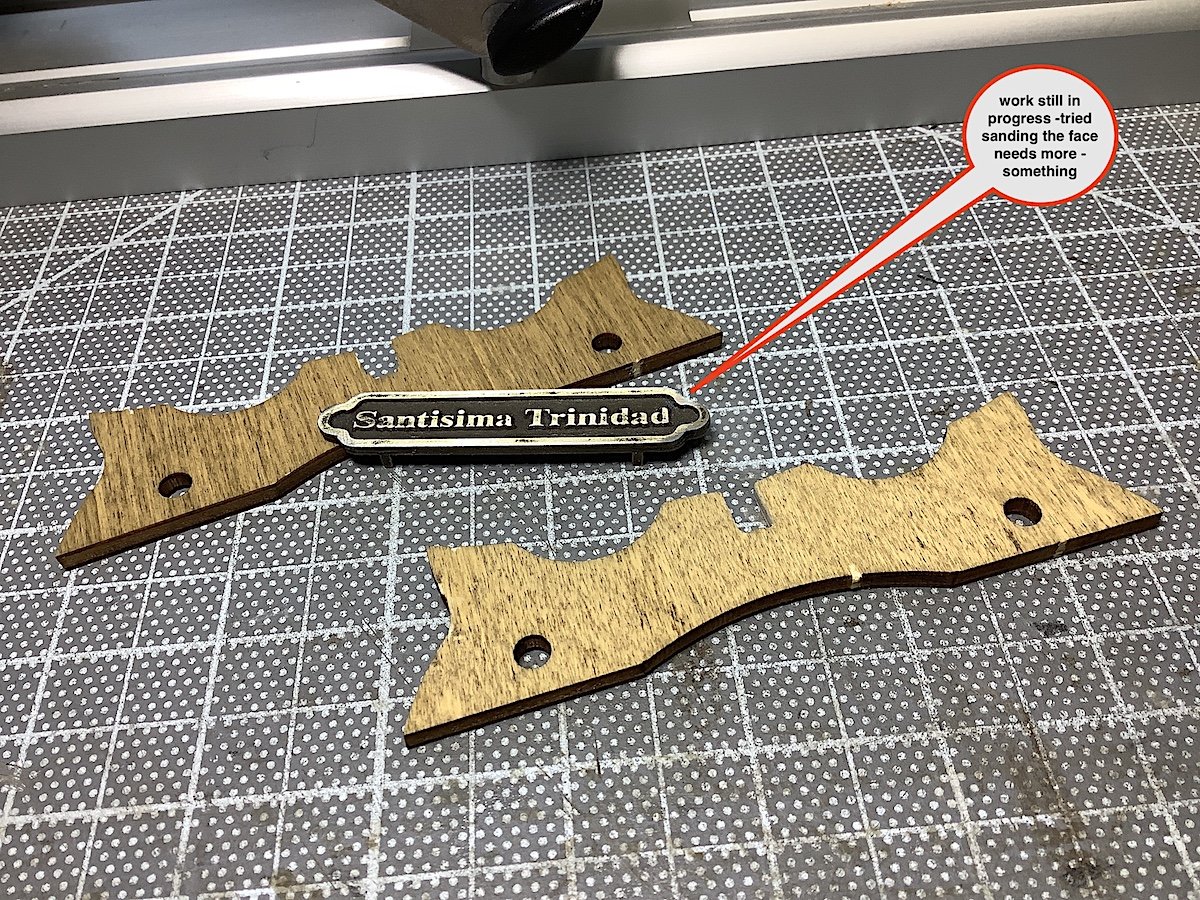
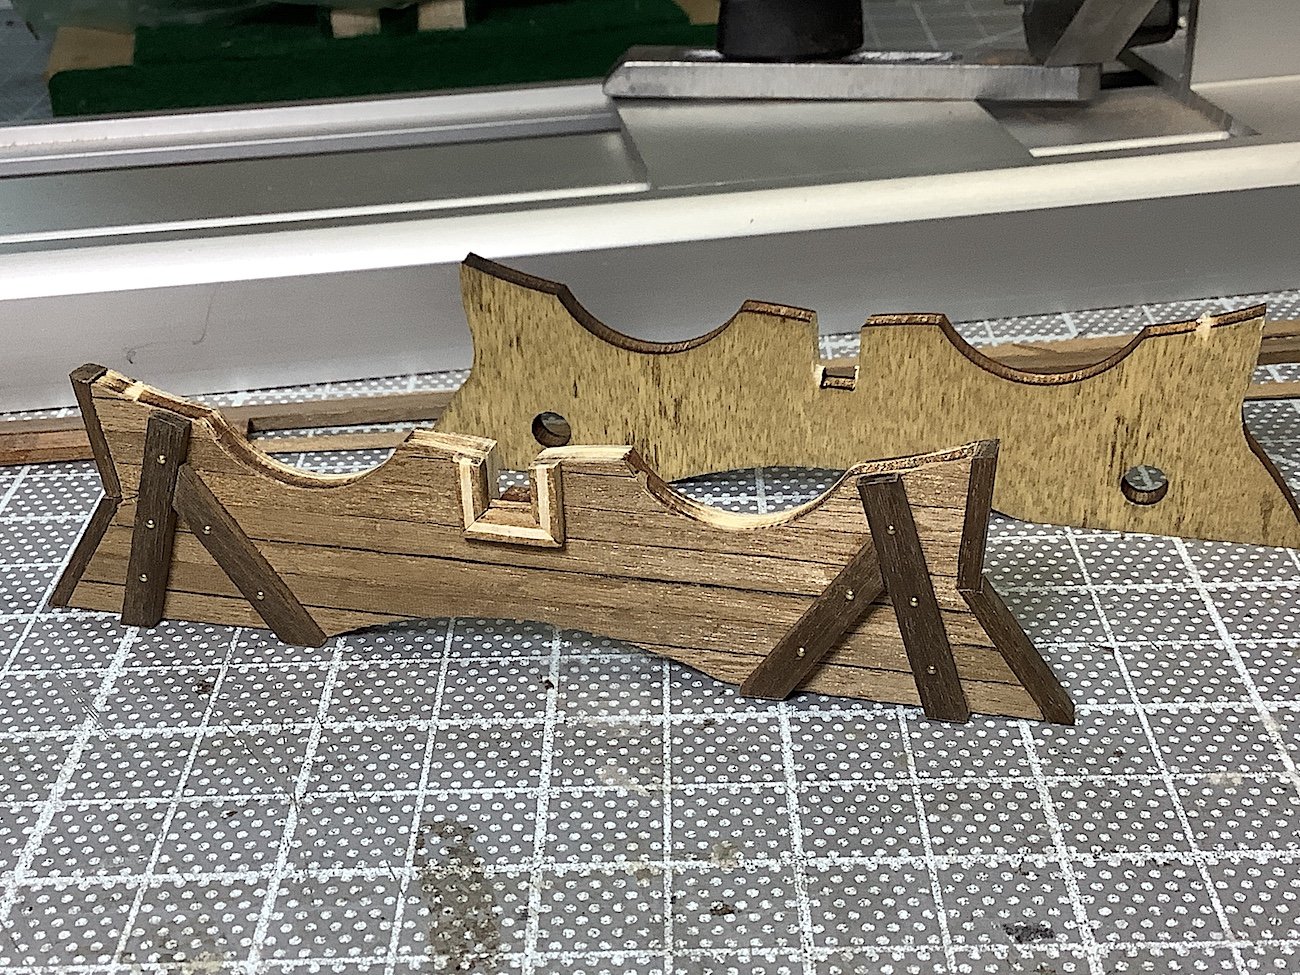
Hi Mates, Doing an “in-between” bit right now. Since all of the masts are done, and now working on the lower main yard, I have exact dimensions needed to start the case; just needed to add the base. Decided to use the kit provided parts just added a bit to the front face. The case will have a minimalist look. It will be wall mounted (not on a second wall stand, just with a painting type hook behind its backside {case will be flush against the wall – will add a slight lip to wood side frames to absorb the hook}). The front, and sides will be Plexiglas (maybe the top as well). The rear interior face will be covered in very light sand colored cloth similar to a sail. The inner space will be very close to completed kit dimensions. The on/off light switch and battery will be, invisible, under bottom of the case – easy access. The same woodworking shop that made the base for the Vasa will build this for me as well. This will be much more involved however. Now need to draw ideas for the case framing. AND live back and forth with mental changes before the shop starts to cut wood (thinking of pear – nice sandy color) As always thanks so much for your thoughts and likes.
- 371 replies
-
- 10
-
-
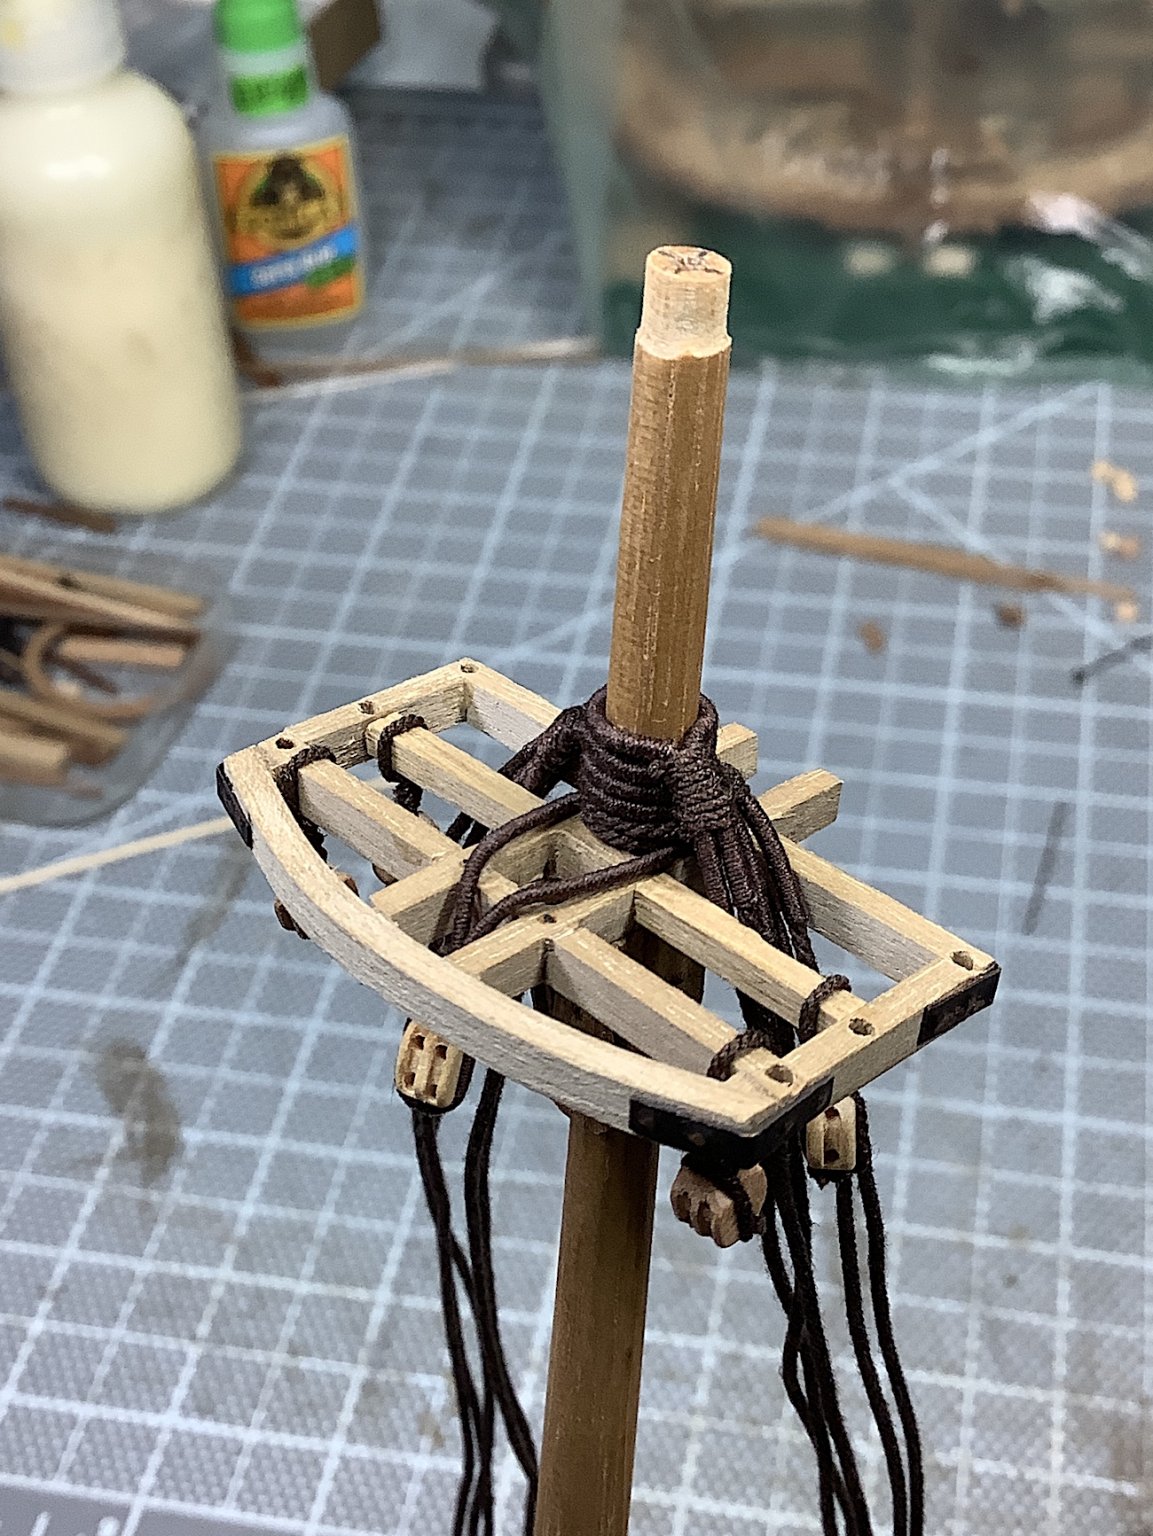
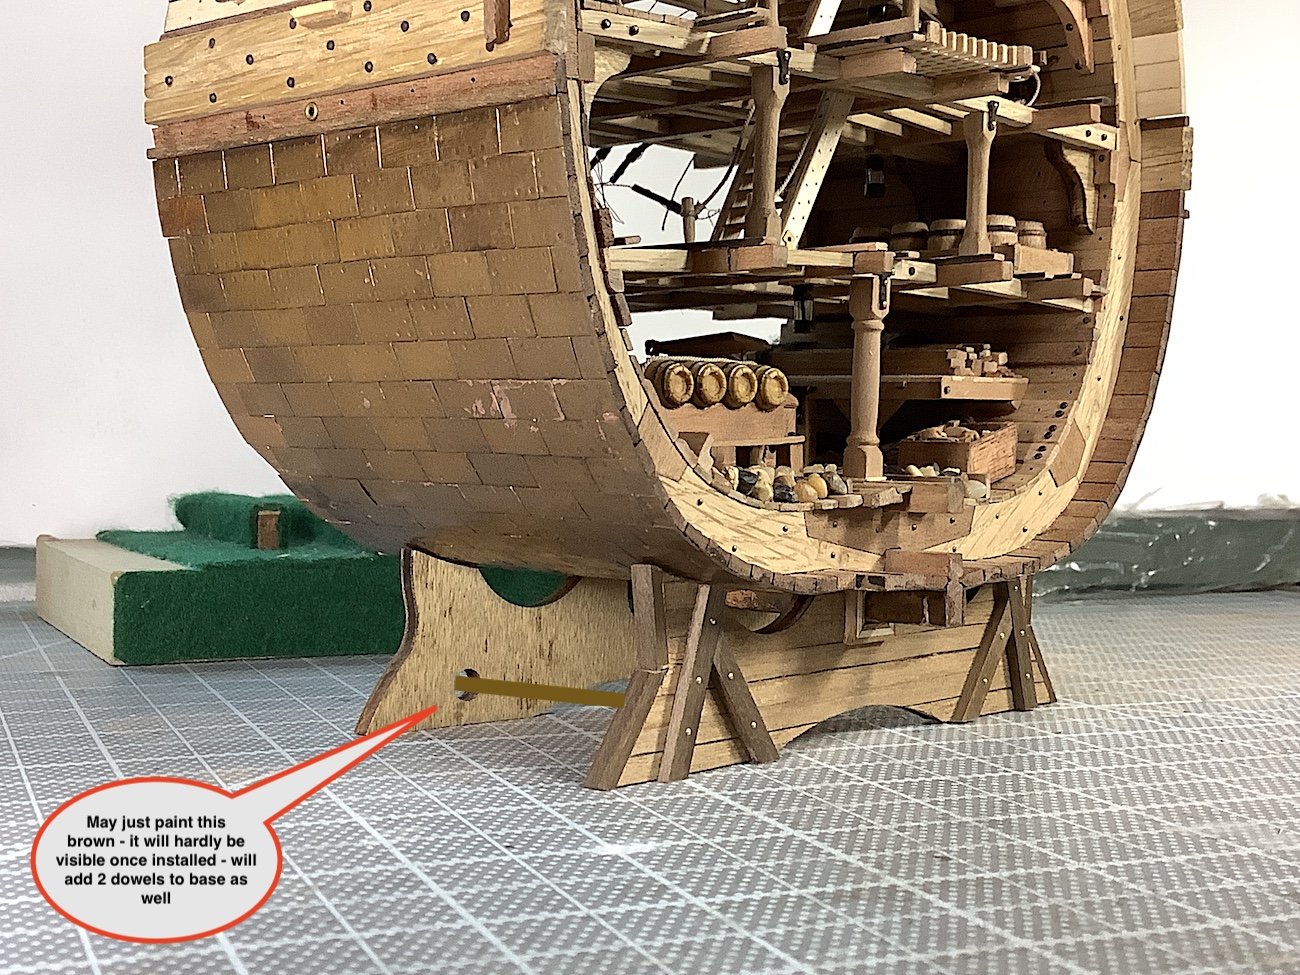
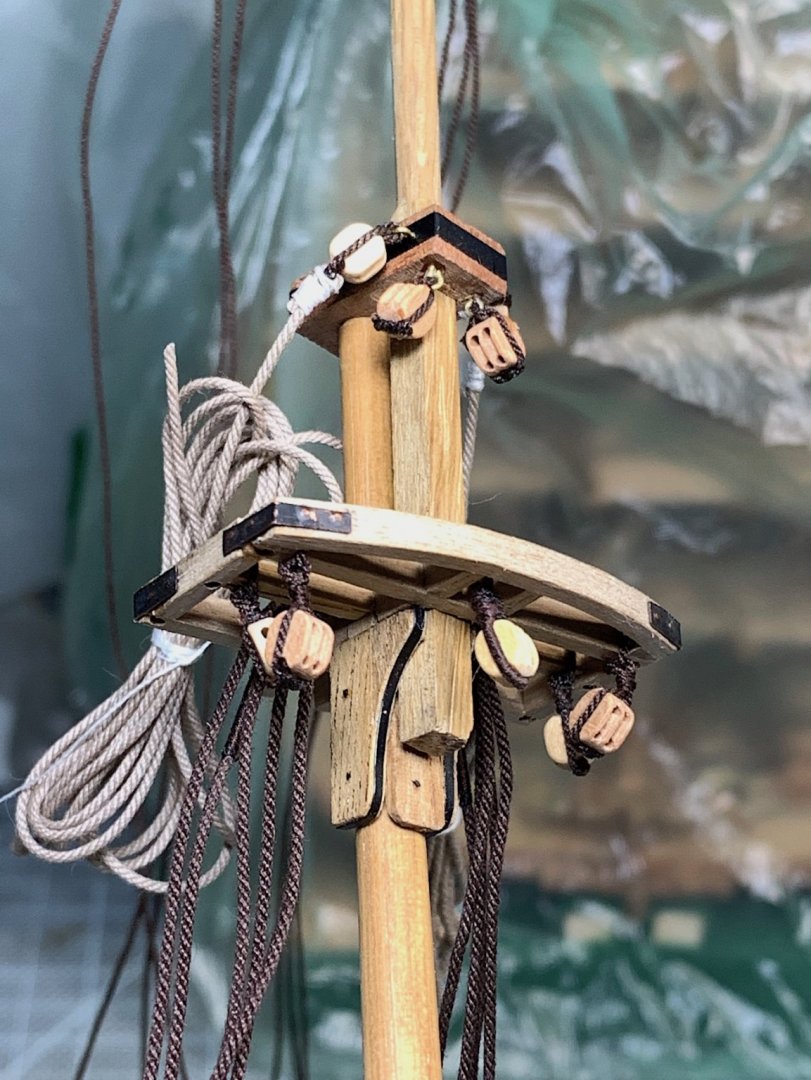
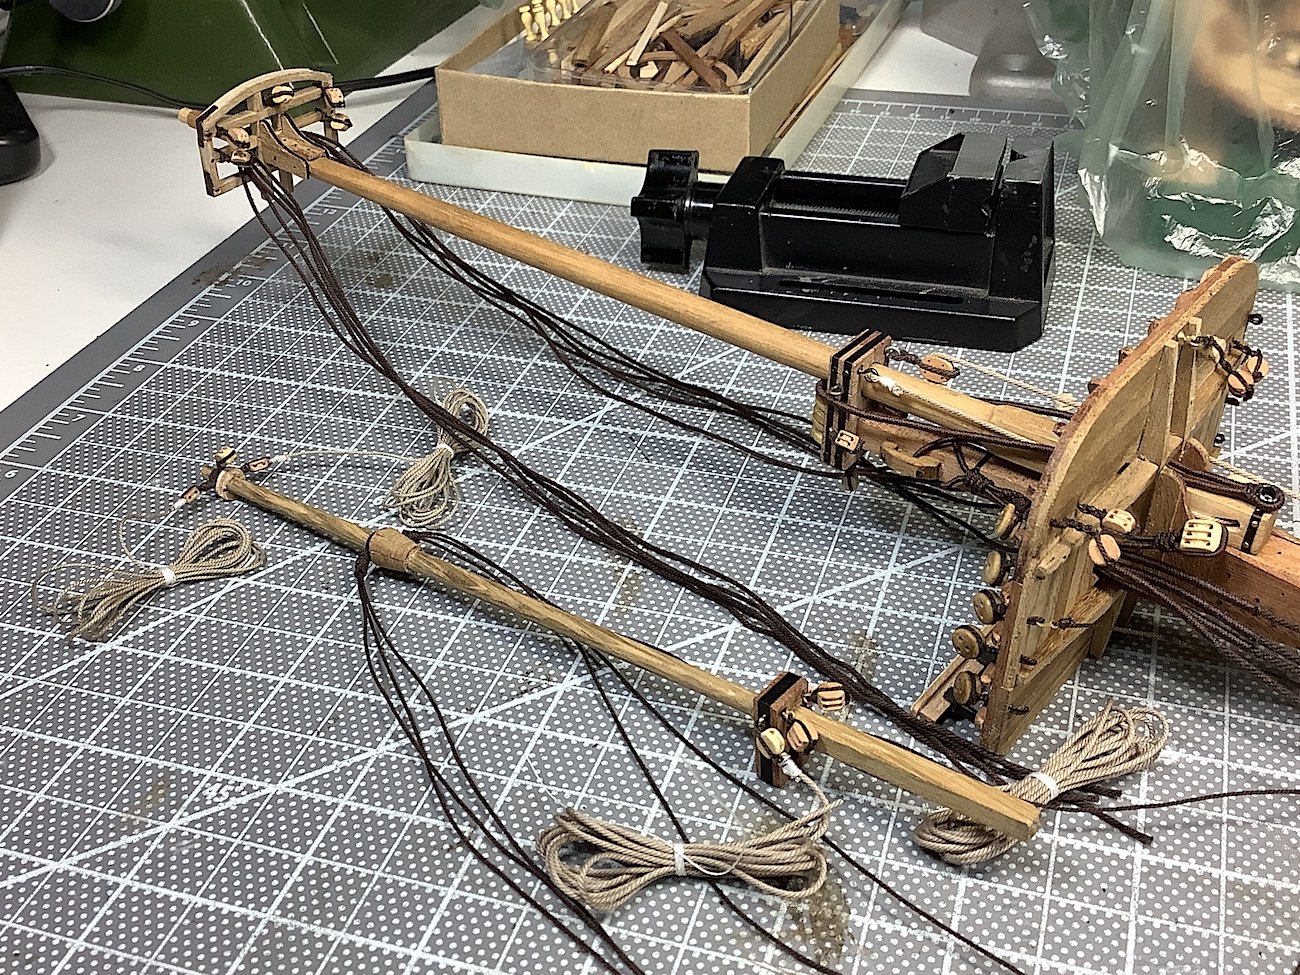
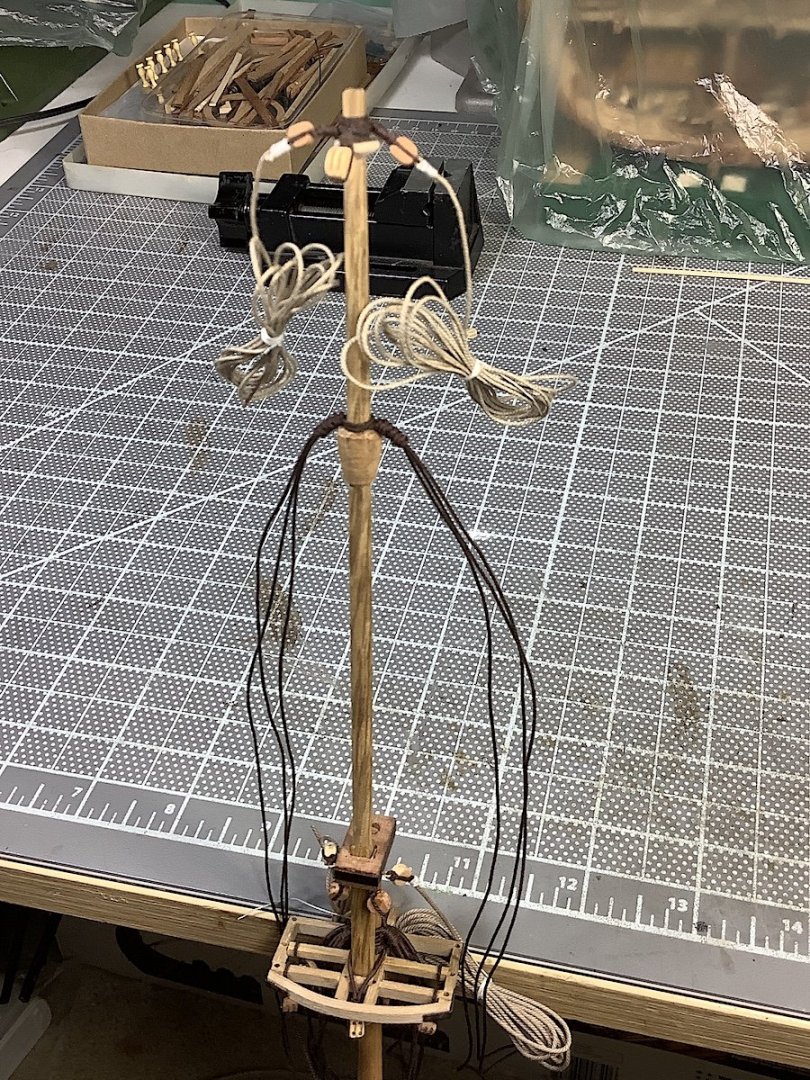
Denis, Ricky thanks for the nice thoughts, Here are some updated areas of work. Will put all of this away for now (nothing is connected together and some details still need to be worked on) Will now focus on the four needed yards. Sails have been made (not using the kit provided ones) will put all of those bits together. I think that I need to place an order with Chuck for more blocks and ropes. PS: Ricky - yes your Wisdom signature is universally true

-
Greg, Superlative work indeed - especially in this scale. Your aircraft are also brilliant - WELL done.
- 345 replies
-
- 5
-
-
- graf zeppelin
- trumpeter
- (and 2 more)
-
Big thanks much appreciated. Lantern install TBD -- Apologies had not intention of taking attention away from your excellent build log 😊 Much enjoying indeed,
- 2,699 replies
-
- 3
-
-
- heller
- soleil royal
- (and 9 more)
-
Brilliant work - I have been "stealthily" following - been very remiss in not posting anything; Your attention to historical accuracy and research are very remarkable Your work with adding to plastic is also beyond quite impressive. The current look of your hull sides are remarkable. Superb work indeed. PS: I think that it was you that had posted a constructive comment regarding my last build (Vasa) you wrote that my stern lantern was much too "basic" for that ship. You were certainly correct!! - I have in the meantime acquired a new lantern that I need to tweek and finally install. Your comment has stayed in my mind all of this time haha thanks -- I think Regards,
- 2,699 replies
-
- 3
-
-
- heller
- soleil royal
- (and 9 more)
-
Stubby, Nice - second start - Do you plan on coppering the lower hull?
- 11 replies
-
- 1
-
-
- constitution
- mamoli
- (and 1 more)