mtaylor
-
Posts
26,273 -
Joined
-
Last visited
Content Type
Profiles
Forums
Gallery
Events
Everything posted by mtaylor
-
There's easier ways to simulate the caulking than something messy... Some run a Sharpie pen down one side of the plank and on one endSharpie's don't bleed when wet from glue, etc.). If you use the Sharpie on all sides, the caulking will look too wide. Others use some thin, black paper. And then there's the white glue with black pigment mixed into it. I've tried all three and I'm partial to the Sharpie pen. The deck is high in the center due to the scuppers being on sides for water drainage more than anything else. With the model at the scale it is, the curve probably wouldn't be noticeable. As for the cannons, they really didn't roll that easily which is why they needed the tackle to re-position the gun after firing.
-
Ah.. good for you. go for it. I ran in to AL's issues with my Constellation build. Ended up just using (after reworking it) the hull to build the 1854 version. That kit I wouldn't recommend to my worst enemy. I'll stop ranting now.
-
CDW, I think many of are behind the times when it comes to drag racing. What kind of top end speed where they hitting? I remember when the first 200 mph run was made by a funny and I think the times were in the 7's maybe?
-
What translator are you using? I'm using Google's and while it's not perfect, it does seem to be getting better.
-
It's great to see you back, Anthony. And the progress on the Mayflower looks good. The idea of thin screws for holding the planking for gluing is a great idea.
-
Marcus, Then I'd say go for it. I do understand stubborn. The first kit I bought (and it was the second one I built) was the Billings' Vasa. After opening the box, I said "whoops" and bought a brig from AL. Between the two of them I learned a lot. This was before MSW so I did a lot of pounding my head on the workbench. It can be done. Just do a build log, ask for help when you need it and you'll do well.
-
Yeah.... Lou... never do they get things wrong. <choke><cough> I didn't know the whole real story until recently. I ran across the Warfar History site following some links from another site while reading up on some naval history. I think I was following links on the battle Taffy 3 fought in WWII. Bad habit... once I follow a link, I look over the site and anyway... I'm buried in the Warfare History site right now.
-
Hi Marcus, Welcome to MSW. If I may be so bold, may I suggest you start with something a bit simpler? The Victory is a large and complex build. Some kits are better than others as to instructions and kit quality. I"ve noticed over the years that probably 90 to 95% of new builder who start off with a large model like Victory never finish so that's why I"m offering the advise. No matter what you decide, you'll find support here. I do suggest you read the various tutorials such at the planking tutorials in the Kit area and those in the Database as they will go a long way in helping you to complete your model.
-
I didn't know the whole story either Lou. I did see the movie from Disney though. Does that count?
-
Thanks Chris.
-
Well, would it be to your advantage to finish and point out the errors or just move on to a better kit? AL is known for their "sloppy" kits.
-
As another one who survived a stroke (mild for me) I wish you a full recovery, Christian.
- 244 replies
-
- 4
-

-
- heller
- soleil royal
- (and 1 more)
-
Jonathon, By all means a build log for your "What is it". Yves, Looks spectacular from here.
-
You really should give some thought to opening a log for this crane in the Non-Ship Model area in the Shore Leave. Looks interesting. And good wishes that you have success with the weathering.
-
Translation to English for the text at the top of Black Wolf's last post: Thanking friends for their appreciation and visit in the wip, I finished updating with the latest images of the MS, as previously shown, I treated straws with straw-colored oil, even if the details are still missing, the straw color oil allows to recover the "stress" of the fibers of the wood derived from the various previous processes by giving essences a softer and honeyed appearance, the walnut takes on a darker shade (probably the natural reaction of the tannin) the cherry is another shade " honey "surely, in both the external fibers" they soften ", if the parts are passed with an old woolen cloth, the surface is polished to satin, that is to say the effect is very beautiful and gives the wood a particular view, there are no problems with the gluing of other pieces of wood on the treated surfaces, over time, being a light treatment loses the polishing characteristics, the only flaw is that it is more ppropriato for the treatment of antique furniture that has a naval model if the intent is to reproduce naturally as it should have been, certainly the exposure to atmospheric agents and the rooms created in "fast" times very different conditions from those obtained with straw oil, however the eye wants its part,
- 197 replies
-
- 3
-
-
- santa maria
- carrack
- (and 1 more)
-
I cheat a bit with rigging. After lines are in place and properly tensioned, I coat them lightly with a 50-50 mix of white glue and water. Outside of re-working the rigging, try what Gregory suggested. One question.... Is the model in "controlled environment"? Humidity usually causes this and we've seen issues with rigging loosening and then tightening as the humidity changes. But that's for cotton.
-
Can you give us some help? What model is a Billings II #600? Actually, depending on the scale, a plank 3mm X 0.5mm could be about right.
-
Here ya' go Denis. Some light reading relating to your build. https://warfarehistorynetwork.com/daily/civil-war/james-andrews-vs-william-fuller-in-the-great-locomotive-chase/
-
Eric, I actually like your planking. It has a (groping for words here)... "real look" to them.
- 599 replies
-
- 5
-
-
- sidewheeler
- arabia
- (and 4 more)
-
I just found the one I was looking for.... Gary is doing a lot aging.
-
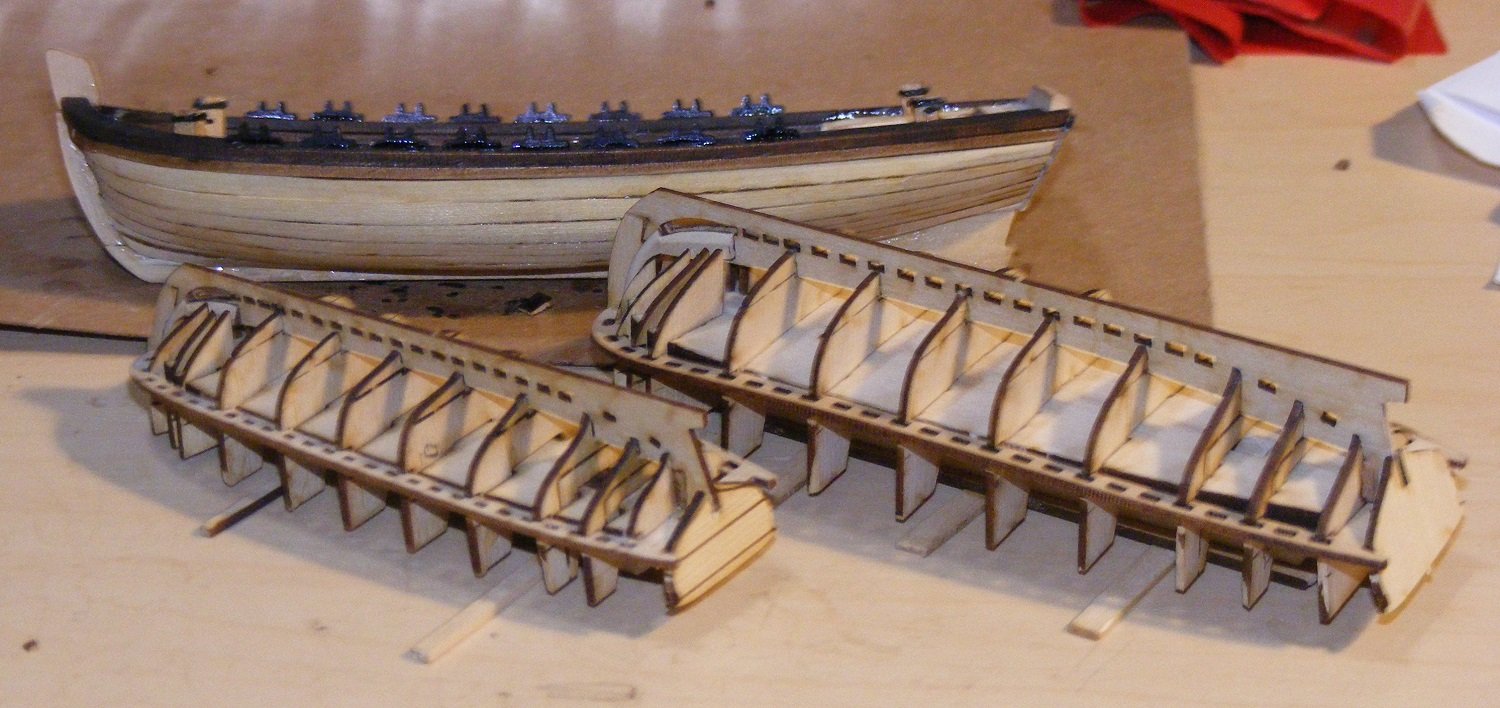
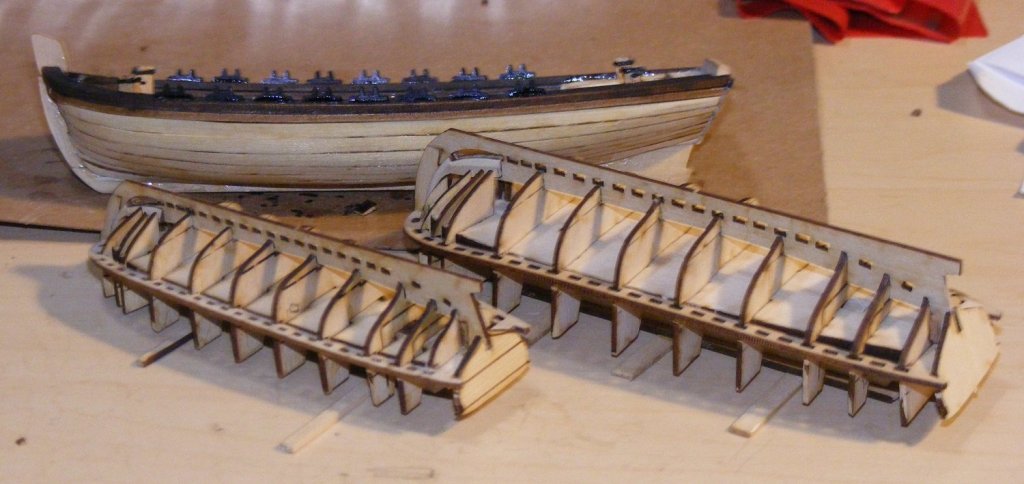
Thanks for the likes and comments. Time for a proof of life update. Life has gotten quite a bit quieter lately, which is good. So I focused on these little boats. The barge (the middle sized one) jig went well and so deciding to be bold and do both at the same time, I started on the cutter jig. Hmm... not so good. It's smaller and everything is proportionally more fragile. So.... spent a lot of time remake parts that I broke in the fitting. I solved the breakage problem by reducing down the laser marking in thickness and expanding the "bits" that hold the pieces together. Ended up coating many of them with 2 coats of white glue and water. Seems to work and tests say I'll be able to snap those naughty bits on the lines without damage. The jigs are built, the keels installed with few other necessary bits and pieces and I'm ready to start actually building the boats. So, I'm off to fix the ribs and start planking. Here's a photo of the jigs and the larger boat (finished). The Longboat (finished) is 6 inches long (152.4mm), the barge is 5 inches (127mm), and the cutter is 4 inches (101.6mm) long.
-
Nicolas, Did you miss this part of the download for the dimensions: As for the rigging, I'm not sure where to look for that as I've not built an English frigate.
-
Sorry, missed that part. BTW, try sending Frank a PM. I see that he was last on this week.