HOLIDAY DONATION DRIVE - SUPPORT MSW - DO YOUR PART TO KEEP THIS GREAT FORUM GOING! (Only 27 donations so far out of 49,000 members - C'mon guys!)
×


mtaylor
-
Posts
26,273 -
Joined
-
Last visited
Content Type
Profiles
Forums
Gallery
Events
Everything posted by mtaylor
-
Ah but I do have one but the problem occured when ripping the planks off the stock and my thickness sander prefers the strips to be a bit longer. I'll sand the deck smooth.
-
I'm over it with proper mental health care assistance. But I do remember the headache I got from it. Your's are looking great, Jerry. i'm assuming that they all will be in the up position?
- 553 replies
-
- 2
-

-
- sloop of war
- constellation
- (and 3 more)
-
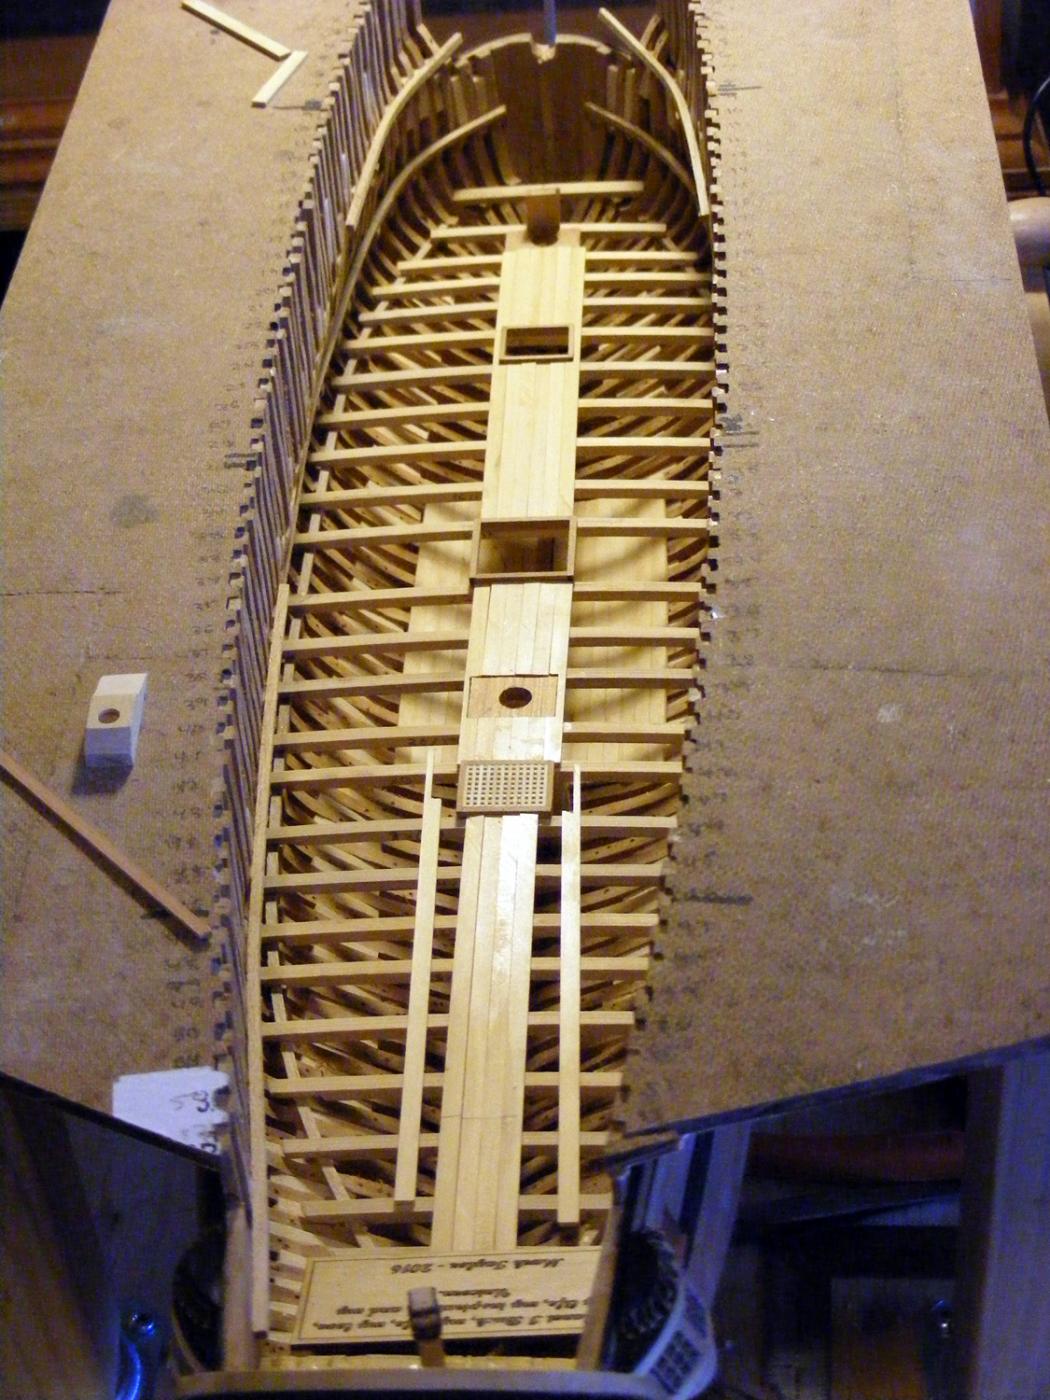
Thanks for all the "likes" and comments. After getting everything else around the house done and then getting the new mill set up, i'm busily planking the lower deck. The first six strakes are finally in and I'm happy with them although there's some serious sanding in my future as they aren't all the same thickness... But I've sorted out the planking scheme that I need to lay down. This deck is all 1 foot wide and 4" thick planking. It's actually thicker then the gundeck which is 3" thick but mostly not as wide. I'll fight that battle when I get to the gundeck as there are some varying widths and thicknesses there. For the lower deck, as near as I can find, the planks are all run pretty much the same width from fore to aft with hook scarfs at the bow and some tapering at the stern. I'm going full width but with the partitions fore and aft, I'm not planking much beyond them... One reason is that the Admirals Plaque is behind the aft partition in the gunroom. Here's a pic.

-
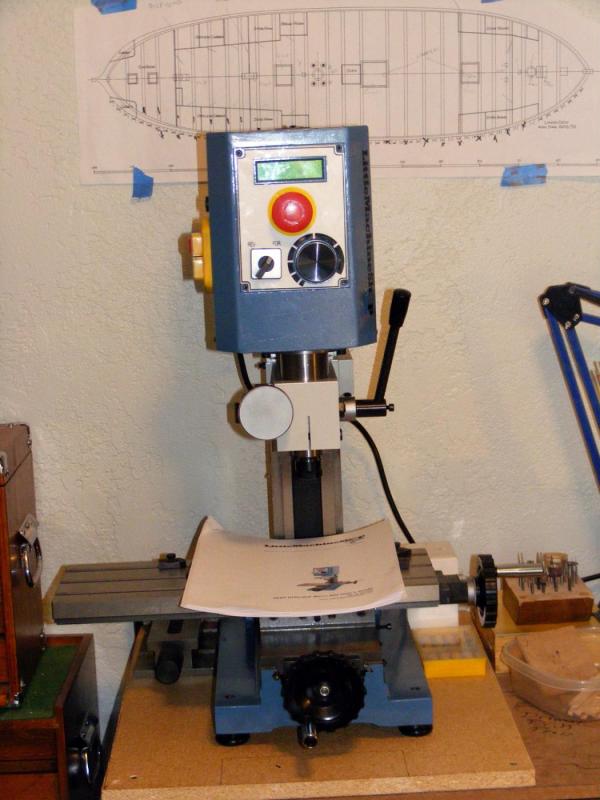
Resurrecting this just for a bit... I finally tossed out my MM Micro-Mill and bought the one from Little Machine Shop. What an amazing difference. First, it weighs twice as much. The base alone was heavier than the Micro-Mill. Everything is dead on solid. The X-Y-Z handles rotate extremely smooth and it's a lot quieter than the MM machine. I'm especially loving the larger table which was what drew me to this machine in the first place. This one is rated for 5000 rpm as opposed to the old one's 2,500 (which I modified to get 10,000 but ran it at half speed most of the time). The X-Y-Z knobs are larger, and the drill press handle is going to be an added blessing. I bought the one using the ER-16 collets as I had a set from MM and they fit perfectly. I also bought the sensitive drilling attachment just for those little holes that need to be precisely drilled like for belaying rails, etc. Overall, on the bench it looks smaller than the MM I had. I also moved the drill press out of the shop as with this mill, I can use it as a drill press. Now to go find something to mill.... I don't guarantee that it'll make me a better modeler but I do think I'll enjoy using it more than the old one.
- 50 replies
-
- 11
-
-
Jerry, The far two of those chocks on the right shows that "handle" as ring. Judging from the shadows, I'd guess they were made out of iron though you could be right about the wood. I'd almost bet they're bolted to the beam between the grates.... Maybe not the farm, but I bet something. For some reason, I thought they used a mix of cradles and davits as built... But then I chickened out and did build them.
-
Looking good, sir. As for your question about Photobucket... the downside is that if there's a network problem, if you close your account, or Photobucket gets bought (it does happen), then the photos in your log will be lost. The safest way is to upload them here. It's not hard to do and instructions are here: http://modelshipworld.com/index.php/topic/540-how-to-add-pictures-in-your-posts-and-pms/
- 20 replies
-
- 1
-
-
- jolly roger
- lindberg
- (and 1 more)
-
Congratulations Patrick. You've done a superb build of her. I do agree that Billings kits need a fair amount of work and a lot of scratch building but you got this one perfect.
- 63 replies
-
- 3
-
-
- vasa
- billing boats
- (and 1 more)
-
ancre le rochefort by cabrapente
mtaylor replied to cabrapente's topic in - Build logs for subjects built 1751 - 1800
Beautiful Cabrapente. I find those forelocked bolts for the windlass to be just amazing. -
Bob, I agree with Carl. You are too modest. Your work is brilliant.
- 348 replies
-
- 5
-
-
- pequot
- cable ship
- (and 1 more)
-
One error and one caveat..... The error is that my gallery drops are pear. The caveat.... Laser cutting castello is great. Only some char and smoke that is easily cleaned off. Engish boxwood however, seems to be oiler or something else maybe. The char is a hard glaze that takes some work to remove.
-
Allan, Castello for most of those bits listed. However, for the gallery and stern windows, all the carvings, English. There's just enough difference in color to make life and viewing interesting.
-
I don't think ash is used much because of it's pronounced grain. It would look totally out of scale. While we're discussing woods.... Here's my list for my current build. I should note that I have planked a hull with cherry and it came out well. Framing and waterways: Cherry Hull... Swiss Pear with ebony wales Keel, stem, and stern post/rudder, and all carvings and the quarter galleries: Boxwood Deck planking, deck beams: Boxwood Deck clamps: beech Ceiling and grating: Silver Maple Misc furniture: Pear Masting and yards... I haven't a clue yet but I'm leaning towards black yards (ebony stain) and whitish wood (silver maple or boxwood maybe?) masts
-
Victory, Bismarck, and now this huge beast. You don't go for the easy ones, do you Kevin? I'm looking forward to seeing this.
- 56 replies
-
- 4
-
-
- sd-14 cargo ship
- card
- (and 1 more)
-
Darrell, Typically it's front to back and bottom to top... forestays and then shrouds and backstays.. Standing rigging first then running. However, we're all different in how we work. Some build up the masts and rigging on ship, many do as much off ship as they can. Such as assemble masts, add upper stays, etc. Yards.... as much as possible off ship. Then there's ratlines... <gulp> I found for me, save the rats on the lower shrouds until last as there's always a few lines you can't quite get to with the rats in place. Naturally.. your milage may vary.
- 648 replies
-
- 2
-
-
- niagara
- model shipways
- (and 1 more)
-
Nice progress, Denis. I'm glad I found this build.
-
Try? You seem to be succeeding, Buck. That's more than "try". Where's Yoda when we need him to explain "try"....
- 515 replies
-
- 6
-
-
- artesania latina
- whaleboat
- (and 1 more)
-
Now that is a fine looking mast and ladder. The railing is the icing on the cake, so to speak. I can't wait to see what's next.
-
Cutty Sark by NenadM
mtaylor replied to NenadM's topic in - Build logs for subjects built 1851 - 1900
Lovely work, Nenad and some great research also going on. Those coops look perfect.- 4,152 replies
-
- 5
-
-
- cutty sark
- tehnodidakta
- (and 1 more)
-
Ron, Any chance of seeing build log?
-
Everyone else said what could say, Patrick. Just a fantastic amazing model. I love the display stand.