mtaylor
-
Posts
26,273 -
Joined
-
Last visited
Content Type
Profiles
Forums
Gallery
Events
Everything posted by mtaylor
-
Micro-Mark MicroLux LaserKnife 2525 – A Review
mtaylor replied to mtaylor's topic in Modeling tools and Workshop Equipment
Thanks Nigel. I'm still trying different things but repeatability is going to be the key. Debbie and Charles are working on their solution. E&T, Thanks for the insight. I believe they all have their quirks being optical systems. And that test cut idea is a great one. -
I've been reading and re-reading those tutorials as well as the Jim Roberts' book on planking. And I should add.. Dan's wisdom has helped immensely with this. I don't have issues, at this point, with the lining and spiling, or the bending and fitting of planks. What has been giving me fits until I started sketching out the area is where the stern ends of the planks start to come around the end of the hull to start landing on the transom. There's a fashion piece that covers the counter and the ends of the hull planks. After re-studying, re-thinking, the Licorne drawings just weren't detailed enough as I was cutting the fashion piece short by about 1/8" or so. Just enough that I was seeing gaps and not a happy camper with the appearance. I've delved into a couple of French frigate monographs and have sorted out that that the lower end of the fashion piece and plank ends are hidden by the quarter gallery drop. The solution was simple once I figured out what was needed... Now that the laser cutter is sorted out, I'm focusing on finishing up the wide planking... sanding... and hopefully pictures in a couple of days. After this, it's the garboard strake and then lining off the rest of the hull for the narrow planking. A bit of the pain to have several different widths of hull planking but it's sorting itself out.
-
Looking good, Nils. I have my fingers crossed for you when you get to the propshaft area.
- 2,625 replies
-
- 1
-

-
- kaiser wilhelm der grosse
- passenger steamer
- (and 1 more)
-
Looking better and better, Denis. What's a bit of overspray among friends? The drawing in the link Sam gave... maybe it's my eyes and probably is, but I swear that the third stack back is the tallest. But that wouldn't make any sense. Maybe it's past my bedtime or I've inhaled too much boxwood smoke today....
-
Micro-Mark MicroLux LaserKnife 2525 – A Review
mtaylor replied to mtaylor's topic in Modeling tools and Workshop Equipment
Days? So far, it's been two weeks. :) One would think that they would have all their crap in one bag, right? I think I'm lucky. Debbie got a turkey of a machine. I wouldn't have tried as long as her and her husband did after the first two weeks and no progress. Anyway... I'm going to go back to planking and figuring out how to do some things like rail carvings, watchkeeper's bench, gun carriages, and hopefully, the ship's boats. There's probably more but I'll have to fiddle and learn as I go. -
Workshop Set Up Question
mtaylor replied to ChrisLBren's topic in Modeling tools and Workshop Equipment
Chris, I agree with Edwin. As far as the drywall and anything else that needs done, find an independent who will do the work you can't do or won't attempt. Drywall isn't hard, just a pain in the neck... Actually find a couple of them. Talk to them, pick their brains and see about looking at some of their finished projects. You should be able to get some ideas on what you can do and what they need to do. -
Micro-Mark MicroLux LaserKnife 2525 – A Review
mtaylor replied to mtaylor's topic in Modeling tools and Workshop Equipment
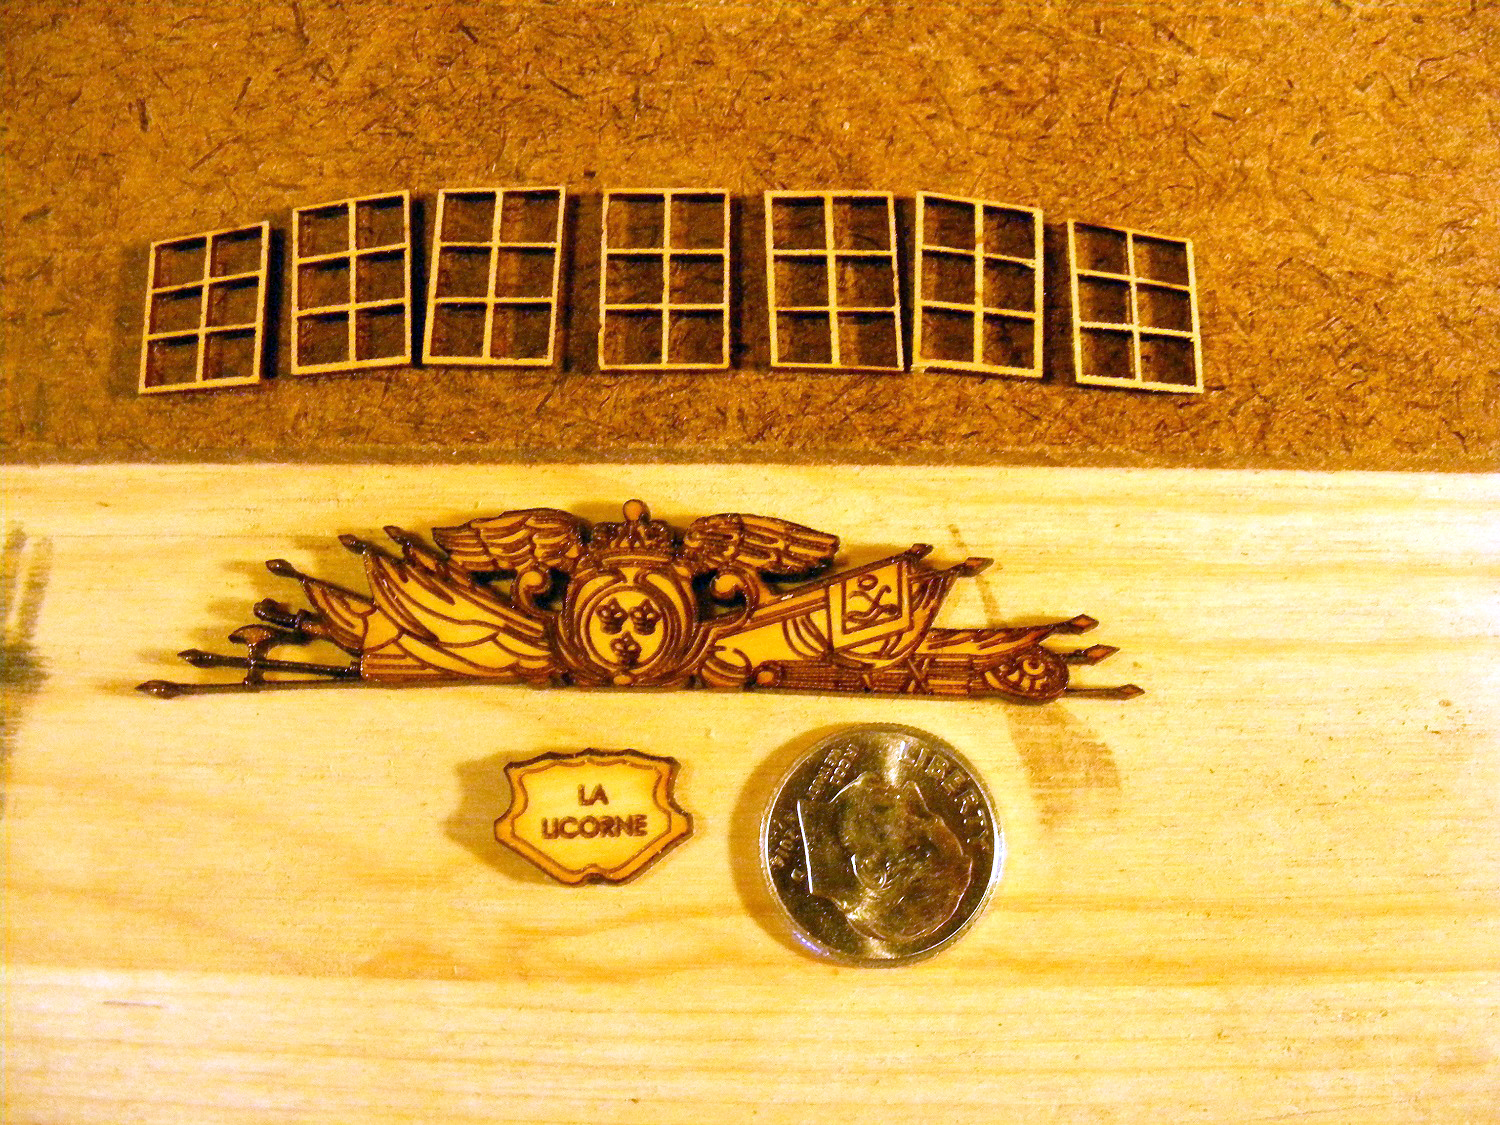
I think.. I hope... this is final test post of this review unless I do something really stupid or find some additional info somewhere. I'll be glad to answer any questions, however and share any knowledge I've gleaned. The lens holder did have issues. The hole down the middle was burred badly at the top (laser light input) and off-center at the bottom (laser light output to lens) which seems to be a common problem with Chinese made machines. There were scorch marks on the burrs and on the inside indicating that it needed to re-machined and made perfectly round. The unit is aluminum and about 2" inches long. Ok... aggravation time. After a some "calm down and focus" time, I chucked it into the lathe and fired it up. Using a boring bar, I took off about 0.010 inch of material and got the inside perfectly round from top to bottom and the top was de-burred. The beast was then reassembled and tested. I noticed that the kerf is a bit narrower and that it's cutting deeper into the wood. For example, what took a speed of 12, power level of 9mA, and 4 passes to cut some of Jason's fine euro boxwood that 3/32" thick, I managed to get up the speed to 16, keep the power the same, and only 1 pass. Similar results on 3/16" thick Castello (not the euro) and for the first time, I managed 1/4" Castello. Took 4 passes but it I was happy since previous tests, I gave up after 6 passes at a slower speed and higher power. On a side note, Boxwood is the toughest wood to cut from what I've seen. Euro box seems harder to cut than Castello with a laser. Maybe in the next couple of weeks, I'll try some ebony which should be interesting to say the least. BTW, basswood cuts like butter now. Here's a picture to compare to the previous one at post #24. Less charring and a cleaner cut. I went for broke on the photo and using the super macro setting went for the biggest image I could get to challenge this fix. Final Thoughts: I'm still not recommending it. There's only been two reviews out there.. this one and the one by Debbie over at Sawmillcreek.org. I'll be adding mine there also. If I had known the challenges I would be facing, I would have looked at a different machine AND a different company. Since my scale of choice is 1:64, I seriously doubt I'll have to cut 1/4" wood but 3/16 is very likely and doable. If my Licorne and the ships I have planned are any indication, mostly it'll be 1/8" and thinner. If anything else pops up.. I'll post it.
- 82 replies
-
- 17
-
-
Shop-made filing-machine
mtaylor replied to wefalck's topic in Modeling tools and Workshop Equipment
Simply.. Wow!!!!! You are truly a master machinist, Wefalck. My hat is off to you.
-
Just phenomenal work on the pulleys...
-
Micro-Mark MicroLux LaserKnife 2525 – A Review
mtaylor replied to mtaylor's topic in Modeling tools and Workshop Equipment
Continuing the saga... I discovered (from another webite... sawmillcreek I think it was) that the lens holder may have issues like the hole between the mirror and lens being too small or off center. It's too narrow or off-center (seems to be a common problem) then the beam hits the sides and power is dissipated and the beam distorted before hitting the lens. Well... mine is off-center about 1/32" or so. I'll be firing up the lathe and re-cutting the opening with boring bar. My late father-in-law who was doctor before he retired, used to say that a good challenge is excellent for keeping the mind sharp. I'm now thinking he meant a "challenge on the golf course" instead of something like this. And for the record, I got an answer back from MM... no inference that they mislaid or ignored the first.... anyway, here it is.. verbatim. I've found lenses on line if I suspect that's what I really need at this point and the water temp is doable without adding ice to the bucket.. There are no lens options available, only factory replacements of the stock lens that comes in the machine. There is not a manual for the CorelLaser program. The ideal water temperature is between 70 -75 degrees Fahrenheit. The temperature should not be allowed to go much over 78 degrees. Cool water can be slowly added into the bucket with the laser powered off and the pump still circulating. To prevent thermal shock and damage to the laser tube be sure the water being added is within 10 degrees of the water temperature in the bucket. Thank you for your feedback, I have passed your comments on regarding improvements to the LaserKnife manual and asked that our quality control check that the laser lenses are properly installed. Micro-Mark Technical Service Department -
Micro-Mark MicroLux LaserKnife 2525 – A Review
mtaylor replied to mtaylor's topic in Modeling tools and Workshop Equipment
Wefalck, There are machines of higher power out there and they all cost more money. I'd hope the price will drop in the near future, but if the market is being saturated with the imports and people are unhappy with the product, they're not going to buy another one unless they really need it for a business. You approach seems very reasonable. -
Micro-Mark MicroLux LaserKnife 2525 – A Review
mtaylor replied to mtaylor's topic in Modeling tools and Workshop Equipment
Nigel, I'm in agreement. There's something strange about this. I rechecked the items she ticked off... bed not level, moving parts not level, mirrors way out of alignment. They're page where they explain things, discusses that these things are tested before shipping. This makes me wonder if the carrier dropped it. My stuff was off but it did work (although not well) out of the box. My alignments, once I figured them out, have been minor in deviation but also pretty intense since you start at one end of the mirror chain and work your way through and then go back and re-check. I'm still testing and feeding my curiousity on these. I've seen aftermarket mirrors, lens assemblies, etc. but one just doesn't know about the quality. I think tha's the killer.. is a $100 12mm, 50.8 focal lens actually better than it's $25 competitor? Are all laser tubes the same? There's one company who will remain nameless for now, who pulls down negative comments to their forum. Word is that they will terminate your warranty for such comments. What's surprising is that they've been reworking, manufacturing, and selling these products for several years. And yes.... safety is priority one when adjusting, testing, etc. The MM has one advantage in the interlocks but I've been around electronics long enough to know parts fail and many times in the "closed" or operating position. Every tool I own has 'bit' me but this is one tool that I'm not going to let that happen. Power is off unless the lid is closed and I'm actually making a cut. -
I used the "Recent Unpleasantness" as that's what some wonderful 'older' ladies I've met down in South called it. Kinda' weird in some ways since they were volunteers at several museums and battlegrounds I visited. The younger ones just called it the Civil War or in one case: "The Uncivil War". If you look at the trouble Lincoln had with Generals (the usual politically connected ones), there was some (much?) with the Navy by inference. The only reason the incompetence didn't come out in the news of the day was there were no major battles fought on the blue water. The rivers, as you say were the Army's turf and they had issues. Things got messy when the Confederates were on the cliffs overlooking one of the rivers as they could never bring guns to bear. Part of the issue was procurement for the guns and mounts... run by politics not by the guys who knew what they needed.
-
Micro-Mark MicroLux LaserKnife 2525 – A Review
mtaylor replied to mtaylor's topic in Modeling tools and Workshop Equipment
Nigel, Thanks. You hit the problem on the head... support for questions. I fear I got bit testy and resent my email with some choice words. I don't really expect a response but at least I feel better. Debbie brought up some interesting points and I'm searching the web for clues... I do hope she and her husband can get some resolution even if it's just her money back. I've got it to where the kerf is 0.03" on most woods but I'm suspecting the lens is one of low quality. I found out that these need to be replaced periodically also. -
Thanks all. At this point, one more row of planks, some sanding the "wide" strakes will be done. I'll do some sanding since it's pretty rough and then some pictures. Soon I hope. I'm having a headache with where the planks roll and twist to land on the counter. If I can get the area to look right to my eyes, I'll be thrilled. I think I have it figured out.... I just need to do it. Now if life would stop getting in the way, I could make some real progress.
-
Cutty Sark by NenadM
mtaylor replied to NenadM's topic in - Build logs for subjects built 1851 - 1900
It's great to hear from you Nenad. I think we were all getting worried. When you're ready to resume Her Majesty, we'll be here.- 4,152 replies
-
- 5
-
-
- cutty sark
- tehnodidakta
- (and 1 more)
-
Oh hell, Jay... blame us all. We push each other. Sometimes we're just like kids back on the playground: "I double-dog dare you to put rivets in those knees!!!" :P
- 572 replies
-
- 5
-
-
- constitution
- frigate
- (and 1 more)
-
ROYAL CAROLINE 1749 by Doris - 1:40 - CARD
mtaylor replied to DORIS's topic in - Build logs for subjects built 1501 - 1750
This is beyond amazing and beautiful, Doris. I think "exquisite" might be start. Thank you for sharing the journey and the final result. Congratulations on the new job. I hope it works out and you find happiness in your work.- 883 replies
-
- 9
-
-
- royal caroline
- ship of the line
- (and 1 more)
-
Ken, They seem to have had just as much trouble. During the Revolution, it apparently was nightmare where excellent commanders with seatime and experience were by-passed to some with "connections". From the little I've read, this was pretty rampant in all of the military up to and through the "Recent Unpleasentness" of the 1860's. It might have continued on but I'm not up on my reading towards the 'newer' eras...
-
Got me.... teach me to post before proofreading. Should be "since the rivets used on the knees were iron..."


- 572 replies
-
- 3
-
-
- constitution
- frigate
- (and 1 more)
-
Micro-Mark MicroLux LaserKnife 2525 – A Review
mtaylor replied to mtaylor's topic in Modeling tools and Workshop Equipment
Debbie and Charles, And here I thought I was the first... :D I think, if you don't mind, we'll converse in the clear.. in public. This site is indexed by Google and it might help someone on the fence buying this product. Or... it might push MM to step up and sort this mess out. Thanks for your feedback. It's been a bit of rough ride to say the least for me and it sounds like it's been hell for you. And some might wonder why I don't recommend this product. By nature, I'm a fiddler and tweaker so I don't usually give things a second thought that aren't perfect. I didn't have as many of the problems as you did but have had and am still having some. I'm still testing but I think I'm almost dead on with the levels of the bed and arms. The bed on mine needed a bit of shimming. I haven't found nearly the misalignments you had. If I had, it would have been back in the box in a New York second. You probably should cut your losses and send it back. On the beam/mirror alignment.. I checked the bed and arm with a bubble level to get everything set up. That's what told met bed was off. The link on the mirror alignment... the mirrors should be checked at upper left and at lower right at a minimum. Yes, this is a modified K40W laser. They upgraded the Power Supply for 220 VAC which why the transformer is needed here in the states and also the mainboard so it would work with Corel. The originals use 110 VAC in an unstable power supply and the mainboard is for MoshiDraw. There are some upgrade parts out there, but the rest of the machine (alignments) have to be spot on and one of the things I'm looking for now is.. do they change?. In spite of the recommendation not to use an extender, I'm using one with no issues at this point other than it takes a bit longer for a large data file to move over to the cutter. Thanks for the tip on the water temp... I'll go freeze a jug of distilled water and put it in the bucket. Crickey... 68 degrees max???? We keep ambient here in the house at 71 degrees. Did tech tell you this or did you find it out on your own? It's nice to know that I'm not the only one with an upside down lens. I'm still looking for a better lens as I'm pretty much convinced that this is a cheaply made one. I'm wondering if your laser tube is damaged or dying? 1/32" basswood should be a snap. But if it's a big kerf with lots of charring, something is spreading the beam. If it's not penetrating and kerf is thin and power setting is high, then tube is shot. I'll test on some basswood in the couple of days. I can currently manage up to 3/32" without a major headache and 1/8" with trial and error. I'm using cherry and boxwood currently since boxwood is the tough nut to cut. The biggest problem is working out the power settings and speed and then number of passes. Once I sort out 1/8" to where I'm happy, I'll shoot for 3/16". That may not be doable without an upgrade to the laser tube. There is a 45 watt tube available but I'm still looking for specs on the power supply to see if it will run it. It might work with the power supply and no increase of power out of the laser but give a longer life at a higher power than recommended for the 40W. The work is passible for what I intend to do with it. Knowing that I have to allow for kerf and not be in a rush is the key and then sand off the char. If this goes back, I won't even deal with tech... I'm still on the fence... Here's a picture of latest efforts. The dime is there for scale. The wood on top is 1/16" boxwood, the middle is 3/32" boxwood and the bottom is 1/8" boxwood. Still a bit too much charring but I'm fiddling. For me, this is a hobby and there's no pressure. I really need to win the lottery... bigger workshop and 50W or 60W cutter would be great.
- 82 replies
-
- 16
-
-
Fascinating reading, Frolick. No one could really make this stuff up... right? I'm reminded by these of the logs that Hahn put in his Ships of the American Revolution. There's a sense that some of the information really isn't quite what it seems.
-
Jay, Since the rivets were iron on the knees... black paint will work.
- 572 replies
-
- 3
-
-
- constitution
- frigate
- (and 1 more)
-
Gripen 1591 by NAZGÛL (Matti)
mtaylor replied to NAZGÛL's topic in - Build logs for subjects built 1501 - 1750
Google Translate seems to work fairly well on these two links also. -
Doing a 1:1 model then, Matija. Happy birthday, and hope you'll post some pictures of this project (maybe in Amazing Photographs) when you get her done.