Mark Pearse Posted October 24, 2017 Author Share #181 Posted October 24, 2017 Hi Carl no, in this case I used wire - but my technique has improved. I was careful about the flame direction & the wire & it went easily. Thanks for the prompt, I will experiment with paste. all the best mtaylor 1 Quote completed 1:12 28' Ranger type yacht, scratch build - COMPLETED 1:12 20' 1930 open sailing boat, half model, scratch built - COMPLETED 1:12 24' Ranger type yacht, scratch build Link to comment Share on other sites More sharing options...
cog Posted October 24, 2017 Share #182 Posted October 24, 2017 Glad to hear you can manage with wire. Silver solder is expensive enough not to waste it! Looks spiffy mtaylor and Omega1234 2 Quote Carl "Desperate affairs require desperate measures." Lord Nelson Search and you might find a log ... Link to comment Share on other sites More sharing options...
KeithAug Posted October 24, 2017 Share #183 Posted October 24, 2017 Really nice brass work Mark. mtaylor 1 Quote Keith Current Build:- Cangarda (Steam Yacht) - Scale 1:24 Previous Builds:- Schooner Germania (Nova) - Scale 1:36 https://modelshipworld.com/topic/19848-schooner-germania-nova-by-keithaug-scale-136-1908-2011/ Schooner Altair by KeithAug - Scale 1:32 - 1931 http://modelshipworld.com/index.php/topic/12515-schooner-altair-by-keithaug-scale-132-1931/?p=378702 J Class Endeavour by KeithAug - Amati - Scale 1:35 - 1989 after restoration. http://modelshipworld.com/index.php/topic/10752-j-class-endeavour-by-keithaug-amati-scale-135-1989-after-restoration/?p=325029 Other Topics Nautical Adventures http://modelshipworld.com/index.php/topic/13727-nautical-adventures/?p=422846 Link to comment Share on other sites More sharing options...
Mark Pearse Posted October 30, 2017 Author Share #184 Posted October 30, 2017 I've made the mast base for the spreaders, the mast ring is open at the forward side - just looking at it now I may widen that a little. The horizontal double flanges are for the spreaders & the tangs behind them are for the lower shrouds. I'll drill the tangs when I've worked out the detail for the shroud ends. The spreaders could be in brass tube with flattened ends, or maybe timber. Timber spreaders would look pretty but I'm not sure that I want to draw attention to them.... dvm27, Omega1234, flying_dutchman2 and 9 others 12 Quote completed 1:12 28' Ranger type yacht, scratch build - COMPLETED 1:12 20' 1930 open sailing boat, half model, scratch built - COMPLETED 1:12 24' Ranger type yacht, scratch build Link to comment Share on other sites More sharing options...
cog Posted October 30, 2017 Share #185 Posted October 30, 2017 marvelous soldering work. You really got the hang of it. mtaylor and Omega1234 2 Quote Carl "Desperate affairs require desperate measures." Lord Nelson Search and you might find a log ... Link to comment Share on other sites More sharing options...
kees de mol Posted October 30, 2017 Share #186 Posted October 30, 2017 Beautifull model. mtaylor and Omega1234 2 Quote Current build: Dutch beamtrawler KW88, Pelikaan 1/75 Completed build: Dutch sidetrawler KW49, Antje 1/75 Completed build: Scottisch 10m trawler 1/25 Want to see some real Kitsch... With a capital K?!! Visit my 'museum' here at MSW My blog: Link to comment Share on other sites More sharing options...
Jim Lad Posted October 30, 2017 Share #187 Posted October 30, 2017 Your blacksmithing is very impressive, Mark. John Omega1234 and mtaylor 2 Quote Link to comment Share on other sites More sharing options...
gsdpic Posted November 1, 2017 Share #188 Posted November 1, 2017 I'm very late to the party but will follow the rest of the way. The work you've done so far looks fantastic, and as everyone has said, the brass work is really impressive. That is something that intrigues me, and that I have never really tried. Omega1234 and mtaylor 2 Quote - Gary Current Build: Artesania Latina Sopwith Camel Completed Builds: Blue Jacket America 1/48th Annapolis Wherry Link to comment Share on other sites More sharing options...
Mark Pearse Posted November 1, 2017 Author Share #189 Posted November 1, 2017 thank you everyone, Gary I'm new to brazing but I had done some work with brass before. I reckon brass is more similar to working with timber than anything else, it's a pretty soft material to work - it drills, files, sands, polishes all quite easily. The number one thing I've learned is that you don't have to be the world's best brazer, good cleaning up can turn a sow's ear into something surprising - have a supply of small files & sandpaper glued to sticks & try & get some really fine paper, even 2000 grit or finer. Holding the parts when brazing is difficult too. But, this forum has a lot of information & a lot of people very generous with their knowledge & skills. all the best, Mark cog, gsdpic, mtaylor and 1 other 4 Quote completed 1:12 28' Ranger type yacht, scratch build - COMPLETED 1:12 20' 1930 open sailing boat, half model, scratch built - COMPLETED 1:12 24' Ranger type yacht, scratch build Link to comment Share on other sites More sharing options...
Jond Posted November 6, 2017 Share #190 Posted November 6, 2017 Thanks for these last black smith lessons. The way you support pieces as they are set for braising makes good sense. It inspired me to try harder. Thanks Jon Mark Pearse and mtaylor 2 Quote current build Beam Trawler Harvard 1926 Lightships of Boothbay. WAL 605 Overfalls ;Blue Dolphin Maine_ Arctic Schooner ; H G Berry_ Brigs of Boothbay; first pinky in Boothbay diorama; Bluenose 1:24 ; ernestina-morrissey-by-jond-1:48; aphrodite 1853 1st ship in boothbay ; Bowdoin diorama; dancing feather 1853 pilot schooner RC ; Boothbay Harbor One design racing sloop 1:6 radio Charles Notman 4 masted Downeast schooner 1:48 radio Link to comment Share on other sites More sharing options...
michael mott Posted November 7, 2017 Share #191 Posted November 7, 2017 (edited) Hi Mark Just to be clear I read that you are using 46/60 resin core solder. My understanding is that this would be called soft solder and not silver soldering or brazing. Silver solder is called hard soldering and uses a much higher temperature it also comes in a paste and is expensive. Looking at your brasswork which is nice and clean, it would appear to me that you are indeed soft soldering and not hard soldering. The reason for my comment is that in reading the comments I get the impression that some might think you are hard soldering. Michael Edited November 7, 2017 by michael mott mtaylor, cog and Jack12477 3 Quote Current builds Bristol Pilot Cutter 1:8; Skipjack 19 foot Launch 1:8; Herreshoff Buzzards Bay 14 1:8 Other projects Pilot Cutter 1:500 ; Maria, 1:2 Now just a memory Future model Gill Smith Catboat Pauline 1:8 Finished projects A Bassett Lowke steamship Albertic 1:100 Anything you can imagine is possible, when you put your mind to it. Link to comment Share on other sites More sharing options...
Mark Pearse Posted November 7, 2017 Author Share #192 Posted November 7, 2017 Hi Michael, to be honest, I thought I was silver soldering, but that's a more reliable indication of how little I know than anything else... The product I'm using proudly calls itself 'silver bearing solder' on the packet, but the company's webpage for the product doesn't seem to use the word silver http://www.harrisproductsgroup.com/en/Products/Alloys/Soldering/Lead-Free-Solders/Stay-Brite-Kit.aspx You're certainly correct that I can sand the solder afterwards & remove the excess quite easily with sandpaper & files, & am using a Dremel VersaTip butane torch. I also bought some silver bearing solder paste (image below of the product), I have been able to melt it but it's more difficult to get it to flow than the Harris product & I've not experimented enough with it. It would be good to know for certain, to clear it up both for myself & for the benefit of others. Mark mtaylor and Omega1234 2 Quote completed 1:12 28' Ranger type yacht, scratch build - COMPLETED 1:12 20' 1930 open sailing boat, half model, scratch built - COMPLETED 1:12 24' Ranger type yacht, scratch build Link to comment Share on other sites More sharing options...
kurtvd19 Posted November 7, 2017 Share #193 Posted November 7, 2017 Part of the definition of Silver Soldering is that the solder melts at a temp greater than 780 deg F or 420 deg C. The product you show lists a melting point of 430 deg F so it's not a true silver solder. But read on - it's probably more than adequate. I have a product similar to what you show - Silver Solder Paste with Flux from Pro-Craft and it is available in "Easy" with a melting point of 1240 deg F, also as "Medium" with a melting point of 1275 deg F and "Hard" with a melting point of 1365 deg F. I have used this quite a bit and it's fairly easy to use. Stay-brite also has a melting point of 430 deg F and I have found it completely adequate - see the discussion at The info below is info taken directly from my Silver Soldering Power Point that has been presented at 2 NRG Conferences. The IT would probably never find a use in modeling unless one is doing an operating boiler. The easy flow is used mostly by jewelers for repair work as it's use will not undo previous work. I have been told that easy flow can be used on photo etch but I myself would use stay-brite for photo etch. Mark Pearse, michael mott and mtaylor 3 Quote Kurt Van Dahm Director NAUTICAL RESEARCH GUILD www.thenrg.org SAY NO TO PIRACY. SUPPORT ORIGINAL IDEAS AND MANUFACTURERS CLUBS Nautical Research & Model Ship Society of Chicago Midwest Model Shipwrights North Shore Deadeyes The Society of Model Shipwrights Butch O'Hare - IPMS Link to comment Share on other sites More sharing options...
Mark Pearse Posted November 9, 2017 Author Share #194 Posted November 9, 2017 The spreaders are pretty much finished now, the arms are from 3mm brass tube flatten each end with soldered in the squashed end as a filler. Polished & shiny, but I'll likely dull them off to a brownish colour. from forwards, sitting on the stock that will be the mast from aft side, the lower shrouds fixing tangs visible thanks all cog, Omega1234, Farbror Fartyg and 5 others 8 Quote completed 1:12 28' Ranger type yacht, scratch build - COMPLETED 1:12 20' 1930 open sailing boat, half model, scratch built - COMPLETED 1:12 24' Ranger type yacht, scratch build Link to comment Share on other sites More sharing options...
KeithAug Posted November 9, 2017 Share #195 Posted November 9, 2017 Lovely job Mark. I get the impression that much of your brass work is hand made without the use of machine tools. Am I correct? Do you have machine tools Lathe / Mill etc? cog, mcpwilk, mtaylor and 1 other 4 Quote Keith Current Build:- Cangarda (Steam Yacht) - Scale 1:24 Previous Builds:- Schooner Germania (Nova) - Scale 1:36 https://modelshipworld.com/topic/19848-schooner-germania-nova-by-keithaug-scale-136-1908-2011/ Schooner Altair by KeithAug - Scale 1:32 - 1931 http://modelshipworld.com/index.php/topic/12515-schooner-altair-by-keithaug-scale-132-1931/?p=378702 J Class Endeavour by KeithAug - Amati - Scale 1:35 - 1989 after restoration. http://modelshipworld.com/index.php/topic/10752-j-class-endeavour-by-keithaug-amati-scale-135-1989-after-restoration/?p=325029 Other Topics Nautical Adventures http://modelshipworld.com/index.php/topic/13727-nautical-adventures/?p=422846 Link to comment Share on other sites More sharing options...
gluedandscrewed Posted November 9, 2017 Share #196 Posted November 9, 2017 dont mean to stir anything up but i see a lot of references to soldering and brazing so i thought i would put my two cents in, i believe and if my memory still serves me right, the american welding society defines soldering as anything below 900 deg F. and brazing as anything above 900... by the way , that is some beautiful work!! Omega1234, cog and mtaylor 3 Quote Link to comment Share on other sites More sharing options...
cog Posted November 9, 2017 Share #197 Posted November 9, 2017 Those spreaders really came out well. It's that I know it's a model build log, else ... it might as well be the real deal John Allen, Omega1234 and mtaylor 3 Quote Carl "Desperate affairs require desperate measures." Lord Nelson Search and you might find a log ... Link to comment Share on other sites More sharing options...
Mark Pearse Posted November 10, 2017 Author Share #198 Posted November 10, 2017 thanks all, the positive character of this forum is very helpful in so many ways. Hi Keith, that's right I don't have many tools but it seems to be enough. Some years ago I built a sailing boat, & when starting wasn't sure what tools I would need so decided to only buy them when I couldn't do the job another way using an existing tool - & I've kept using that philosophy notwithstanding the pangs of looking through catalogues of delicious tools. I can understand the allure of beautiful machinery & learning how to get it purring - plus the amazing results that tools & knowledge together can bring - but this is my way I suppose. I couldn't do without the 10x vision headset. all the best, Mark Omega1234, mtaylor, John Allen and 1 other 4 Quote completed 1:12 28' Ranger type yacht, scratch build - COMPLETED 1:12 20' 1930 open sailing boat, half model, scratch built - COMPLETED 1:12 24' Ranger type yacht, scratch build Link to comment Share on other sites More sharing options...
gluedandscrewed Posted November 10, 2017 Share #199 Posted November 10, 2017 kudos mark,,,i too am using left over tools from my 25 foot barrelback build of a few years ago, envy the guys with the fancy equipment but find it more challenging and rewarding to do more with less,, scrounging around the house and barn to see what can be utilized,,, on current build even a pair of boxer shorts was sacrificed Mark Pearse, Omega1234, mtaylor and 1 other 4 Quote Link to comment Share on other sites More sharing options...
Mark Pearse Posted November 27, 2017 Author Share #200 Posted November 27, 2017 I've shaped the mast, it's been sanded since this photo & one thin coat of varnish applied with a cloth & rubbed until satin finish. The timber is plantation Kauri Pine, lovely fine grain without pores & a good colour for this model. One interesting thing to note is that I bought some 12mm diameter dowel & it looked too thin, even though it was only a small amount under sized. So I made this one at 12.5 - 13mm diameter & it looks right. The mast step is to replicate the kind of fitting mostly used, at least here anyway - which is a roofing fitting called Dektite - designed to shed water on a metal roof around a circular flue. The idea is the brass gets painted dark grey (a rubber boot) & the plate is left silver (aluminium & rubber base). Bad news was that I didn't realise the metal was steel rather than stainless steel, the colour threw me because it has a sandblasted finish. It rusted a bit overnight, so I sanded it & put a coat of varnish on it. If that doesn't work then I'll just paint it grey. The chainplates for the mast shrouds are underway. I didn't plan the installation when building the hull, except to put a kind of sheer clamp in below the deck. I'll glue the chainplates in with epoxy, I think that will work. KeithAug, hexnut, mtaylor and 4 others 7 Quote completed 1:12 28' Ranger type yacht, scratch build - COMPLETED 1:12 20' 1930 open sailing boat, half model, scratch built - COMPLETED 1:12 24' Ranger type yacht, scratch build Link to comment Share on other sites More sharing options...
cog Posted November 27, 2017 Share #201 Posted November 27, 2017 You are quite accomplished at soldering Mark. I wouldn't have tried to solder stainless steel though ... still wonder if such a weld would hold at all ... so maybe it is a bit of luck it isn't stainless Cheers mtaylor and Omega1234 2 Quote Carl "Desperate affairs require desperate measures." Lord Nelson Search and you might find a log ... Link to comment Share on other sites More sharing options...
Jim Lad Posted November 27, 2017 Share #202 Posted November 27, 2017 Mark, I'm not sure that even epoxy will hold them safely without any sort of mechanical assistance - there's a heck of a lot of pressure on them once the shrouds are tightened up. How about a pin or two through the planking just to assist the epoxy? John cog, Omega1234 and mtaylor 3 Quote Link to comment Share on other sites More sharing options...
Mark Pearse Posted November 28, 2017 Author Share #203 Posted November 28, 2017 thanks Carl, perhaps I'm one of the people (including drunks) that the gods protect from their own ignorance...I had no idea it might be tricky. I heated the plate from underneath & soldered from above. Hi John, appreciate you thoughts on that, I'll work something out to pin them. A small patch in the paint will be straightforward to repair. Omega1234, mtaylor and cog 3 Quote completed 1:12 28' Ranger type yacht, scratch build - COMPLETED 1:12 20' 1930 open sailing boat, half model, scratch built - COMPLETED 1:12 24' Ranger type yacht, scratch build Link to comment Share on other sites More sharing options...
Mark Pearse Posted December 19, 2017 Author Share #204 Posted December 19, 2017 some progress: the shroud chain plates were finished & installed, & the mast base likewise. I was hoping to do a simple & well scaled way of terminating the shrouds at the chain plates. The initial idea was as per the sketch below, but it didn't include the turnbuckles. So I turned one end of the turnbuckle into the shaft of the T. Not quite finished, but it's a test run. thanks, Mark KORTES, Roger Pellett, mtaylor and 5 others 8 Quote completed 1:12 28' Ranger type yacht, scratch build - COMPLETED 1:12 20' 1930 open sailing boat, half model, scratch built - COMPLETED 1:12 24' Ranger type yacht, scratch build Link to comment Share on other sites More sharing options...
KeithAug Posted December 19, 2017 Share #205 Posted December 19, 2017 Lovely work as usual Mark. cog, Mark Pearse and mtaylor 3 Quote Keith Current Build:- Cangarda (Steam Yacht) - Scale 1:24 Previous Builds:- Schooner Germania (Nova) - Scale 1:36 https://modelshipworld.com/topic/19848-schooner-germania-nova-by-keithaug-scale-136-1908-2011/ Schooner Altair by KeithAug - Scale 1:32 - 1931 http://modelshipworld.com/index.php/topic/12515-schooner-altair-by-keithaug-scale-132-1931/?p=378702 J Class Endeavour by KeithAug - Amati - Scale 1:35 - 1989 after restoration. http://modelshipworld.com/index.php/topic/10752-j-class-endeavour-by-keithaug-amati-scale-135-1989-after-restoration/?p=325029 Other Topics Nautical Adventures http://modelshipworld.com/index.php/topic/13727-nautical-adventures/?p=422846 Link to comment Share on other sites More sharing options...
Jim Lad Posted December 19, 2017 Share #206 Posted December 19, 2017 What Keith said! Better hurry up, Mark - the Sydney to Hobart starts in less than a week. John mtaylor 1 Quote Link to comment Share on other sites More sharing options...
vaddoc Posted January 9, 2018 Share #207 Posted January 9, 2018 Beautiful work Mark, very clean, you make it look so easy! Difficult to tell but you seem to have managed to plank the hull without a lot of spilling. The deck seems to have a very small crown height, I read that the typical height is something like 1/4 to 1/2 inch per foot of beam. How did you come up with the beam shape? I am currently struggling to understand decks! Also, did you brush paint the enamel on the keel? If so this is a fantastic result. Regards mtaylor 1 Quote Current projects: 21' Fisherman's Launch - plans by Howard Chapelle Completed projects: 21' Yawl Longboat - plans from the National Maritime Museum Deben 5 tonner - a Whisstock yard design 24' exploration gaff rigged ketch - a Tad Roberts design 15' knockabout sailing boat Link to comment Share on other sites More sharing options...
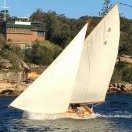
Wintergreen Posted January 9, 2018 Share #208 Posted January 9, 2018 Lovely piece of modelling going on here! I second what everyone else said about your metalwork. Also, the model resembles the very smallest boat in Rolex Sydney Hobart, is that by chance? mtaylor 1 Quote Happy modelling! Håkan __________________________________________ Current build: Atlantica by Wintergreen Previous builds Kågen by Wintergreen Regina by Wintergreen Sea of Galilee boat, first century, sort of... Billing Boats Wasa Gallery: Kågen (Cog, kaeg) by Wintergreen - 1:30, Billing Boats Regina - 1:30, Billing Boats Dana, Link to comment Share on other sites More sharing options...
Mark Pearse Posted January 10, 2018 Author Share #209 Posted January 10, 2018 Hi Vaddoc with the planking, the timber (Huon Pine) is very supple so it was happy to flex across the planks & I was able to push a plank up against the next one. If I understand correctly, 'crown height' is deck camber? ie: the amount of curve? If that's correct, then yes it's got pretty flat decks, just a slight camber. I measured the height on a similar boat & set up the curve based on that, & all the deck beams have the same radius. The decks also curve up slightly towards the bow, I was concerned that the plywood wouldn't want to do that double curve, but I used some minute screws that were strong enough to hold the curves down while the glue went off. The model scale is 1" to 1'. I got the deck shape from the half plan on the lines drawing, as copied below. Thanks for complement on the painting. The underwater paint is a water based acrylic, matt finish. It took a few coats, but my main recommendation is to get brushing thinners, it will help to keep a wet edge when you paint. Quality brushes help a lot too, I use synthetic sable flat brushes, one about 12mm wide & one about 6mm wide. Using brushing thinners is a balance between opacity & the extra time that you get to 'join' the new paint to the old. I used the same technique that you use on a full sized boat - a series of vertical applications, starting at the bow or stern. Where each of the vertical strips meets the next is where the brushing thinners will help to avoid a visible overlap of paint. Another suggestion is Tamiya masking tape is worth getting for the boot top line & any masking jobs. I'm actually painting our yacht this week, I'll post some photos when it's done. Hi Hakan, nice to meet you. Well spotted, yes this boat is similar. The boat is the Sydney/Hobert was launched in 1931 & is also 28', & both were designed by Cliff Gale, this yacht was designed in the mid 1960s but never built. Maluka was designed for ocean voyaging, with stiffer lines & more buoyancy in the bows so the bows. This yacht is the last version of this design that Cliff did & was primarily for harbour racing & some cruising, so needed only to be able to deal with medium offshore conditions. The introductory post for this build includes a couple of Maluka photos, & you can see how her keel is much deeper, & you might be able to see how how lines a much 'squarer' - to give additional righting moment from buoyancy. Thanks for your kinds comments on the metalwork, I'm struggling with the rigging still but will have something to show for it in a couple more weeks. Mark Quote completed 1:12 28' Ranger type yacht, scratch build - COMPLETED 1:12 20' 1930 open sailing boat, half model, scratch built - COMPLETED 1:12 24' Ranger type yacht, scratch build Link to comment Share on other sites More sharing options...
vaddoc Posted January 10, 2018 Share #210 Posted January 10, 2018 Many thanks Mark, this was really helpful Vaddoc Quote Current projects: 21' Fisherman's Launch - plans by Howard Chapelle Completed projects: 21' Yawl Longboat - plans from the National Maritime Museum Deben 5 tonner - a Whisstock yard design 24' exploration gaff rigged ketch - a Tad Roberts design 15' knockabout sailing boat Link to comment Share on other sites More sharing options...

Recommended Posts
Join the conversation
You can post now and register later. If you have an account, sign in now to post with your account.