


James H
-
Posts
5,964 -
Joined
-
Last visited
Content Type
Profiles
Forums
Gallery
Events
Posts posted by James H
-
-
-
2 hours ago, Jeffrey D said:
Thanks, I have been looking at videos and collecting tools clamps, things I think I might need, there is also a step by step with 30 videos, I think, building this exact model
I'm I'm honest, Beagle is doable as a first model if you ask questions, progress slowly and also have a forward-thinking mind. If you've ever made models before, either plastic or wood, then this model is within your grasp.
My first ever kit, against the advice of some folk I knew, was Artesania's San Francisco, and that turned out real well for me. It's certainly no less difficult than Beagle. I found the whole process a fantastic learning experience, plus the videos that OcCre made will help to create a pleasurable experience. Of course, we are always around to ask too!
-
My review, here at MSW:
- mtdoramike, JeffT and mtaylor
-
 3
3
-
1 hour ago, Vane said:
Yes I agree fully that the cutting out gunports are one of the tasks that would really benefit from being simplified.
Incorporating them into frames and bulkheads is genius. No templates or guesswork.
An extract from Chris's original Amati Victory manual:

-
As a quick update, Amati are currently printing the full size plan-set for me and the MDF, ply and PE parts will shortly be cut and sent over.
They are now sourcing the high-pressure castings for the cannon and other fittings.
I now have the instruction manual that Chris Watton put together, and this will serve as the basis for building the Victory and producing a manual for them in their current format. I'm busy studying the build from the keel upwards!
The manual Chris made is actually very good and very much of the style you see in his new Alert kit, but Amati want the whole lot shot against a white background in a photo-caption style format that you see in their recent kits such as the Orient Express Sleeping Car etc. These are glossy, perfect-bound books.
I've had some long talks with Amati over the last months. Things are now moving along!
-
3 hours ago, Norway said:
As you already have seen my English is not impressive! 😊
It's far better than my Norwegian! 😂
Welcome to MSW. I'm sure you'll have many happy hours here with all of our content. Looking forward to seeing Pickle too.

- EricWilliamMarshall, JeffT and mtaylor
-
3
-
Amazing details. Absolutely blown away

-
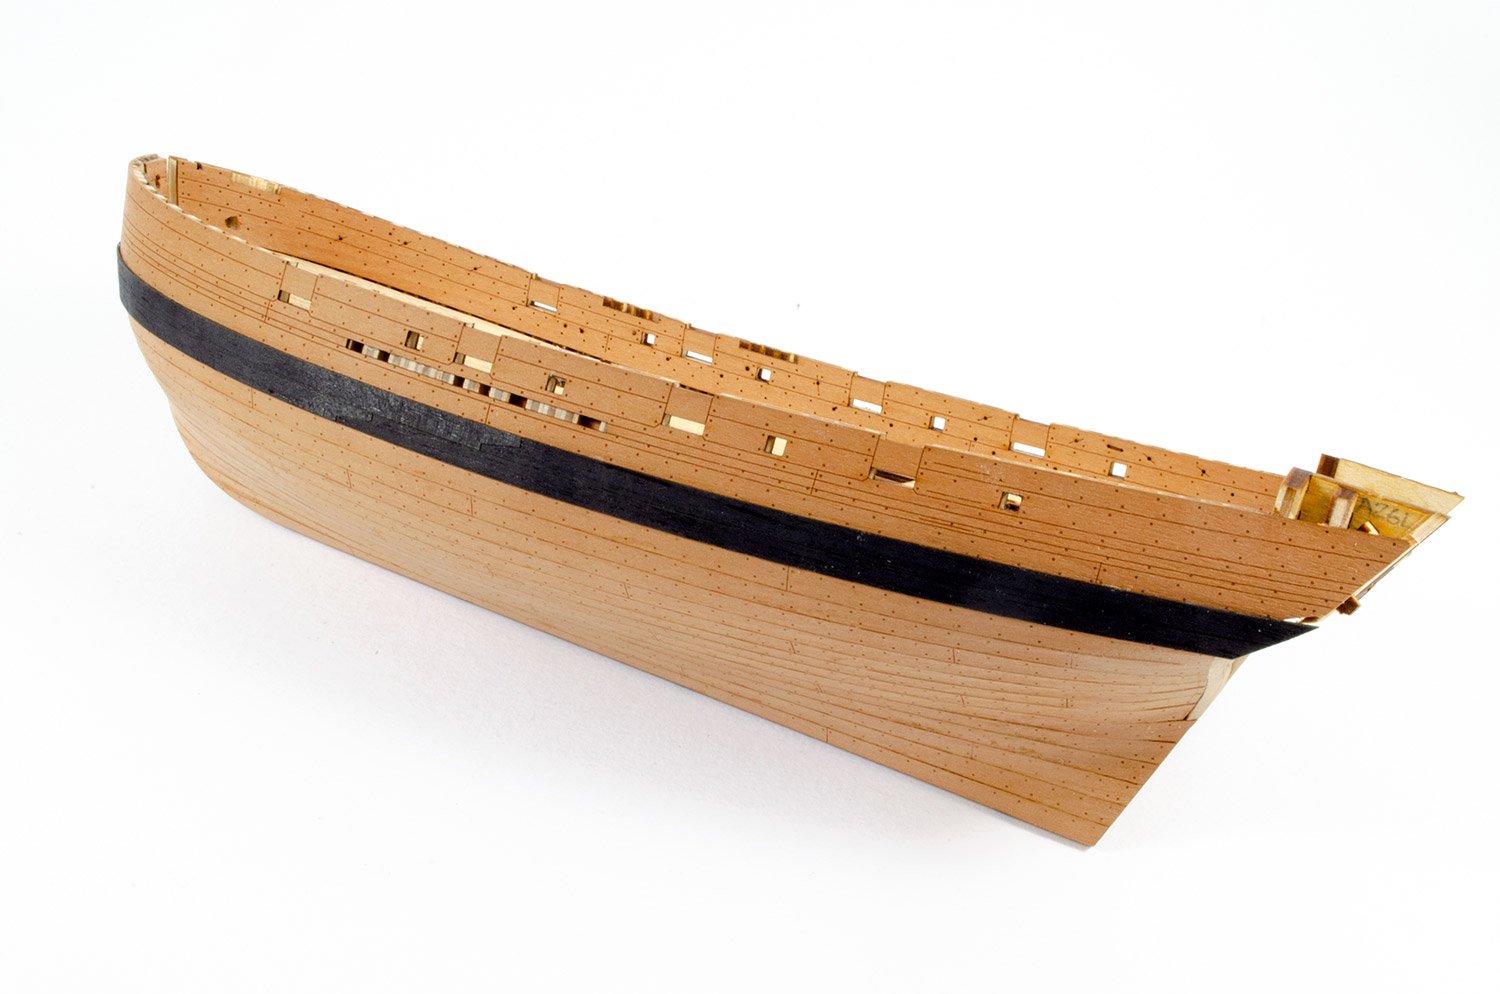
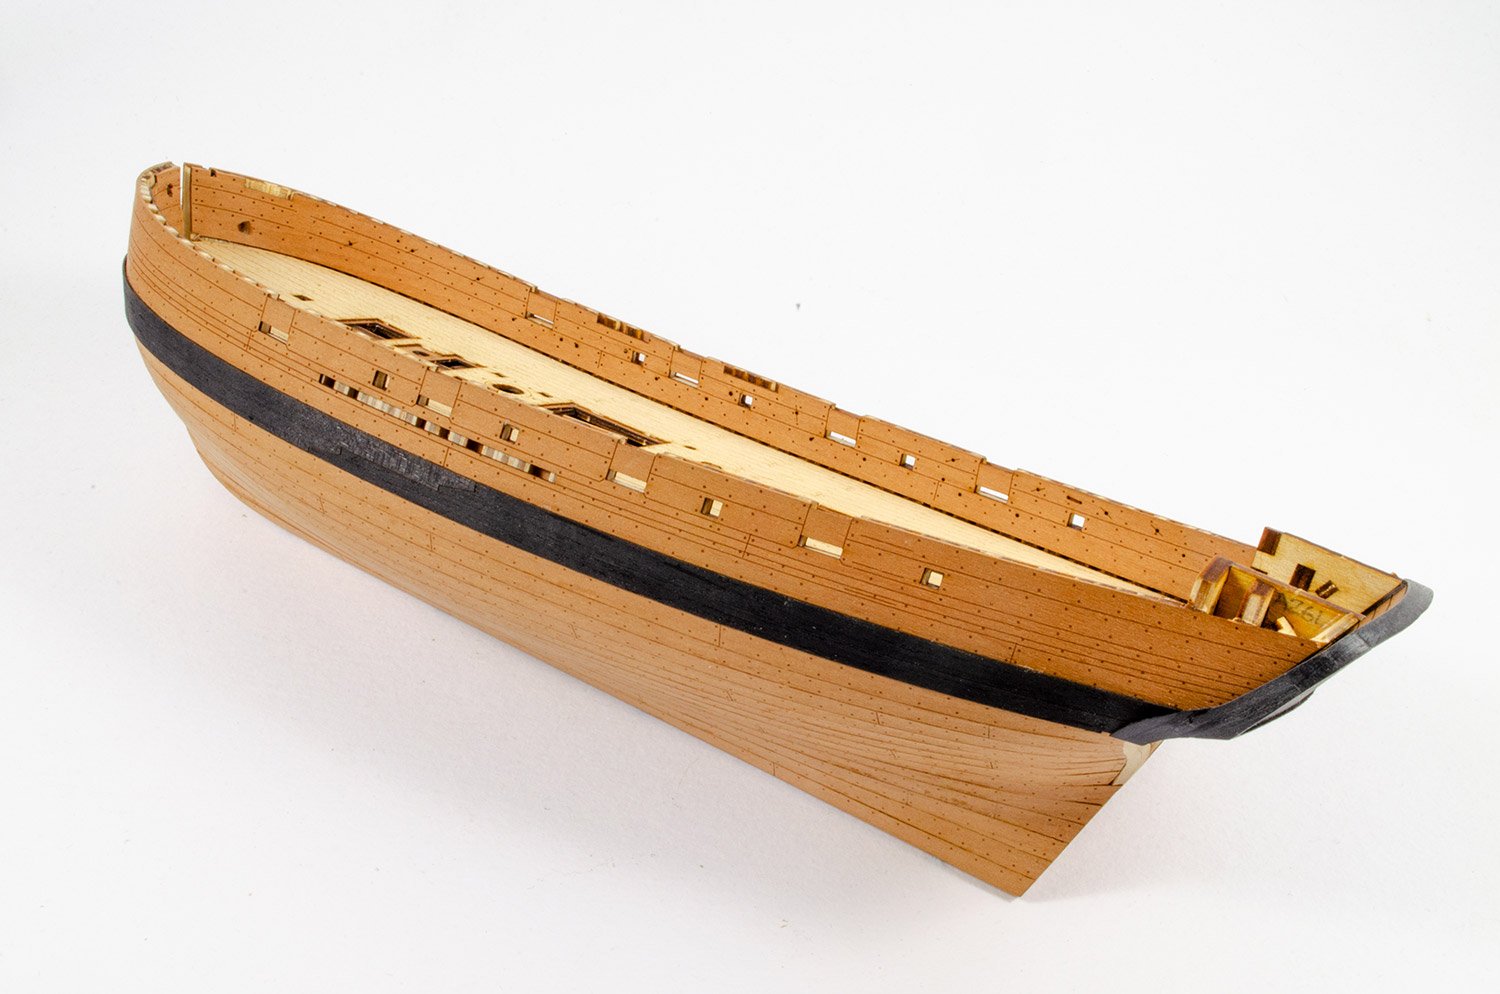
It's been over 6 weeks since I was on this model due to being hawked away for more magazine work.
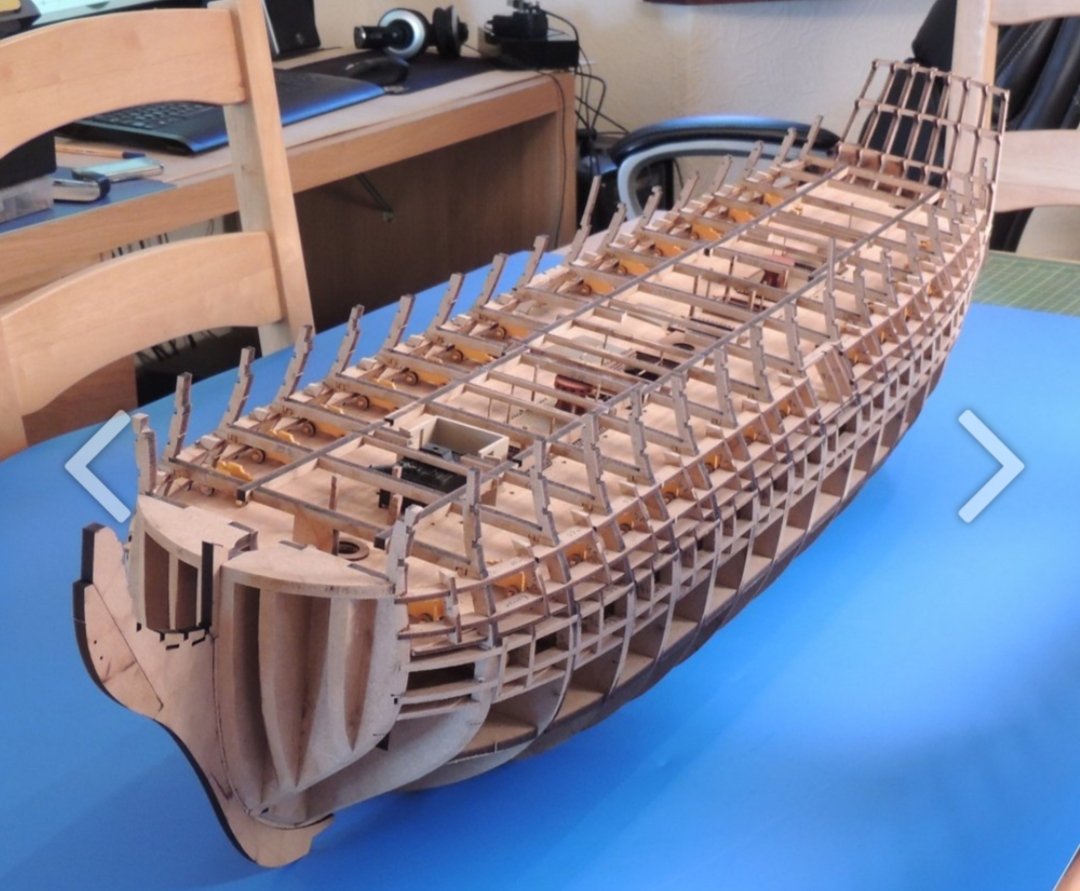
Got to say that I've really missed working on this little beauty, and it was good to get it back on the bench again.
There's not really too much to report on at the moment except to say that I've now added the wales and a few other bits. Thee wales are pre-cut in two parts per side, perfectly interlocking along the length. They really do make a hell of a difference the appearance. I also cut out the timber from the gun ports to open them up and added the cap rail sections. These needed to be carefully aligned to allow further laser cut parts to be fitted.
As a slight change in working order, I have also added the transom. This isn't shown as fitted for a few stages yet, but there's no reason why it can't be added now and the preceding hull stages then completed before the bowsprit is made.
Again, I am loving this build!


-
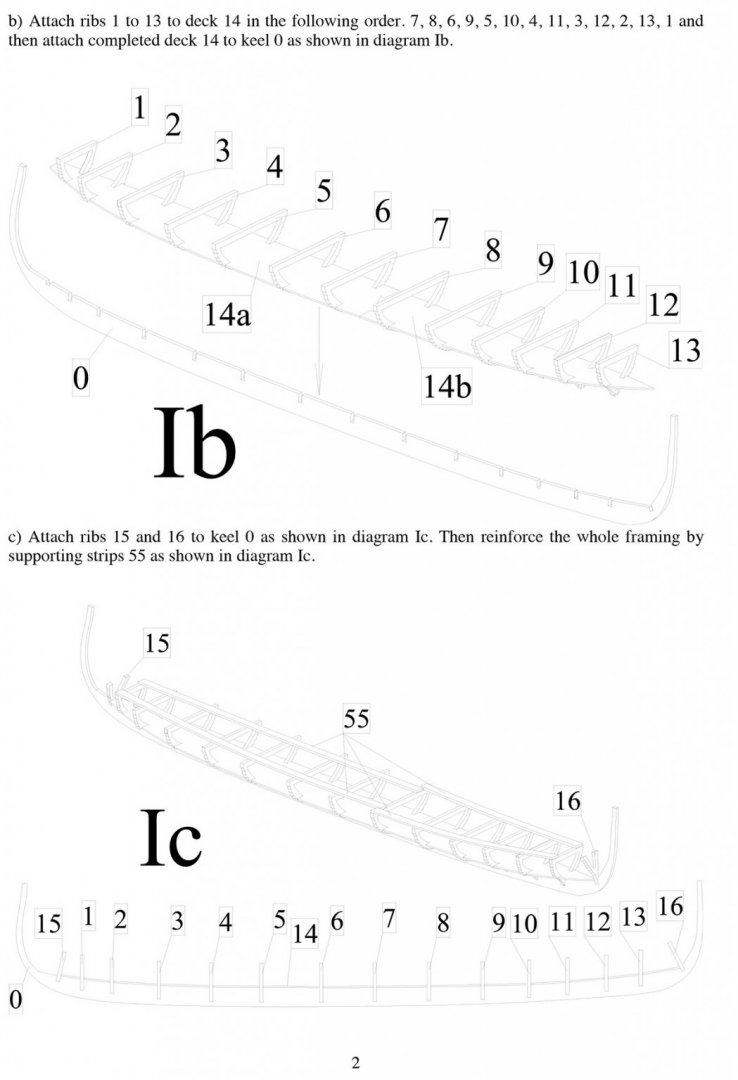
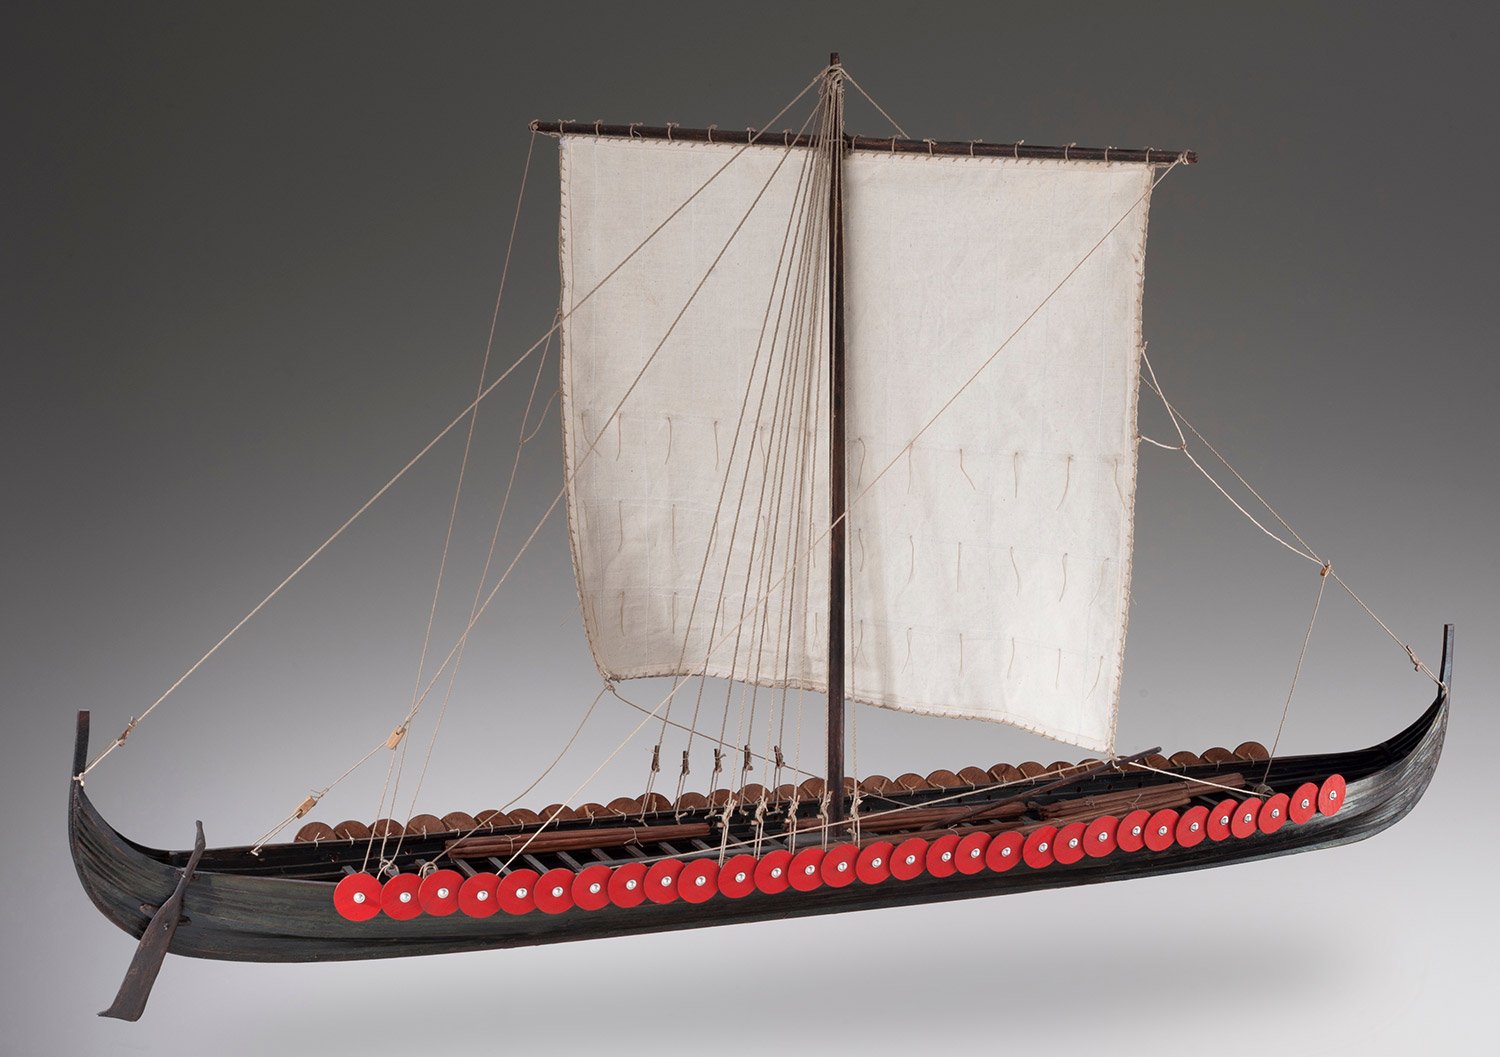
1:35 Viking Longship – 11thCentury
Dusek Ship Kits
Catalogue # D005
Available from Dusek Ship Kits for €149.00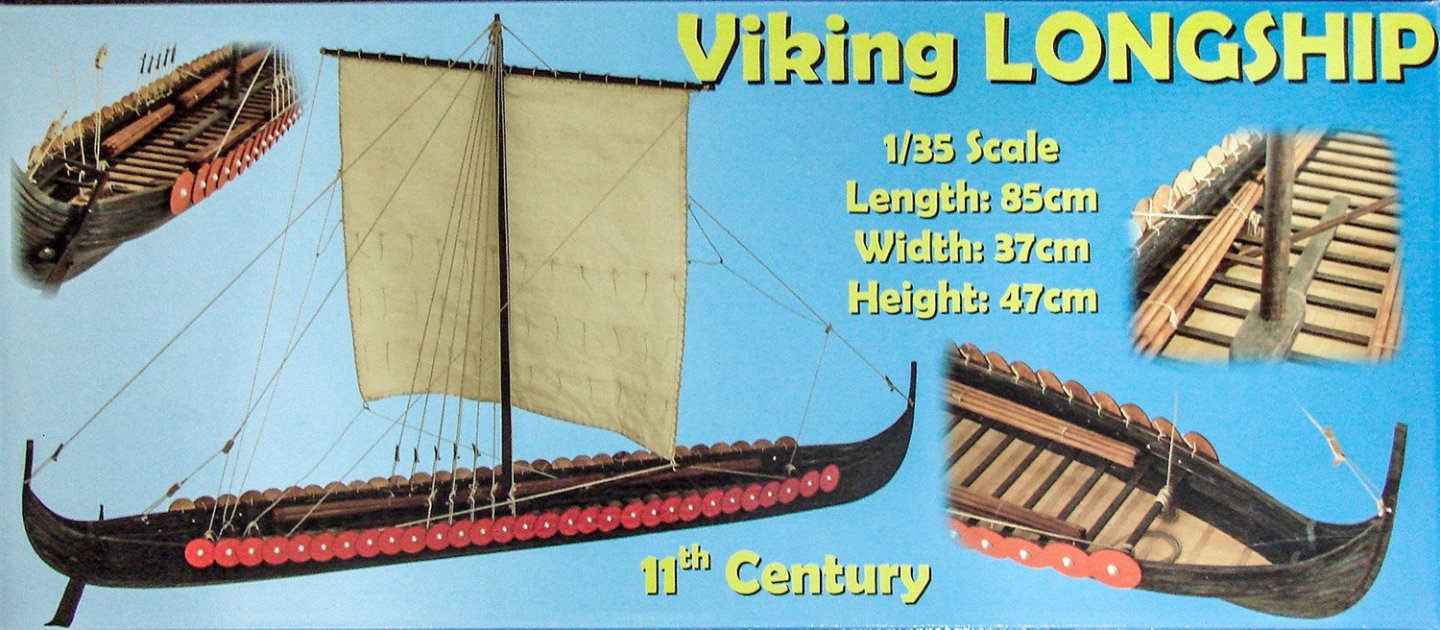
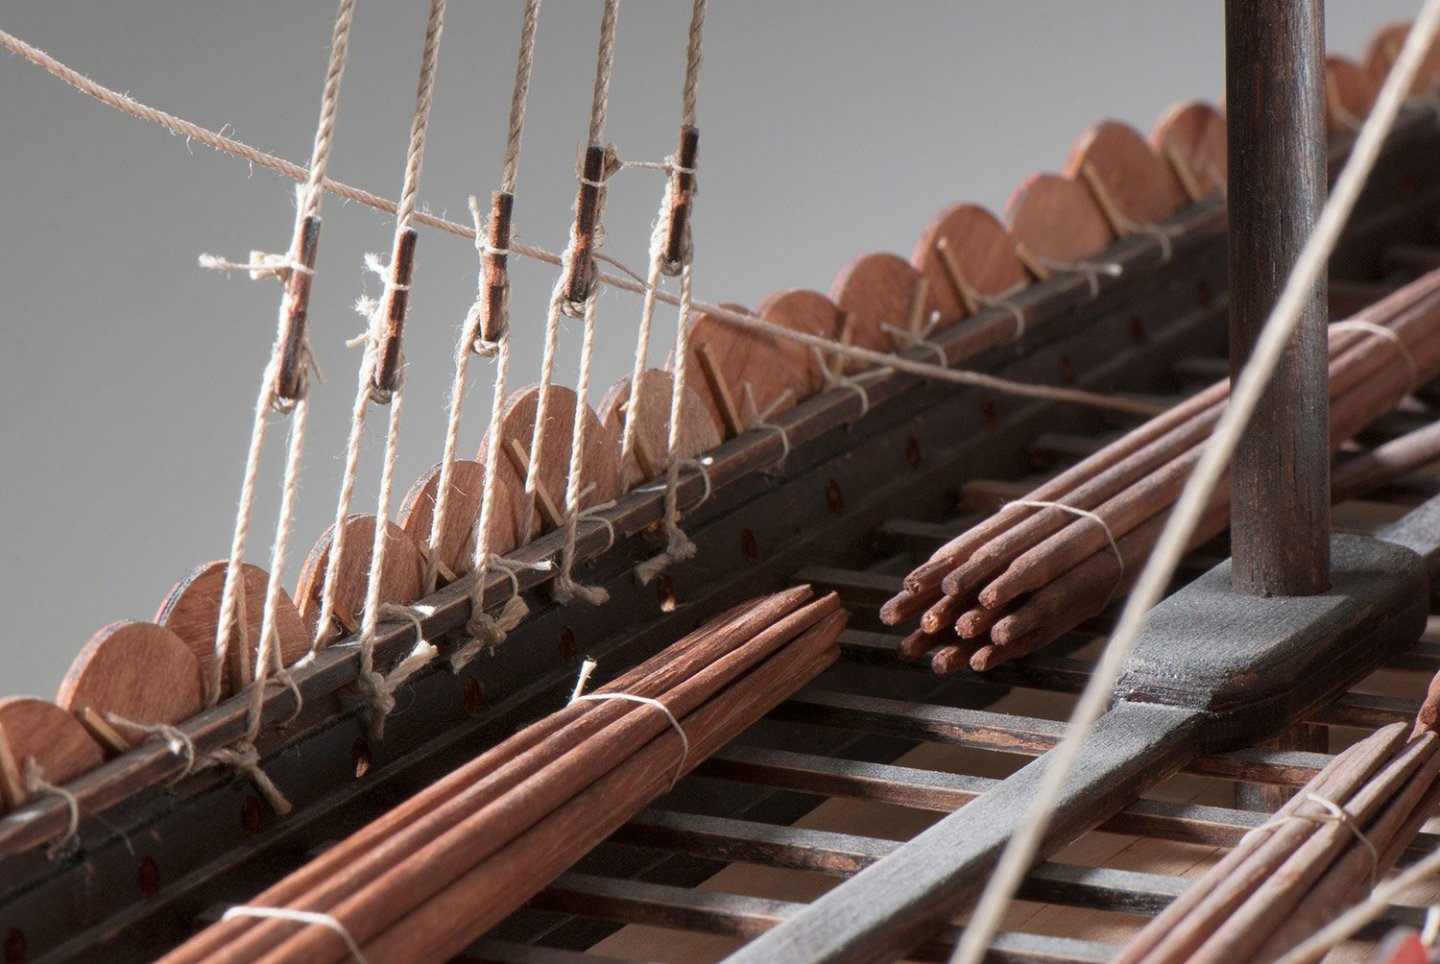
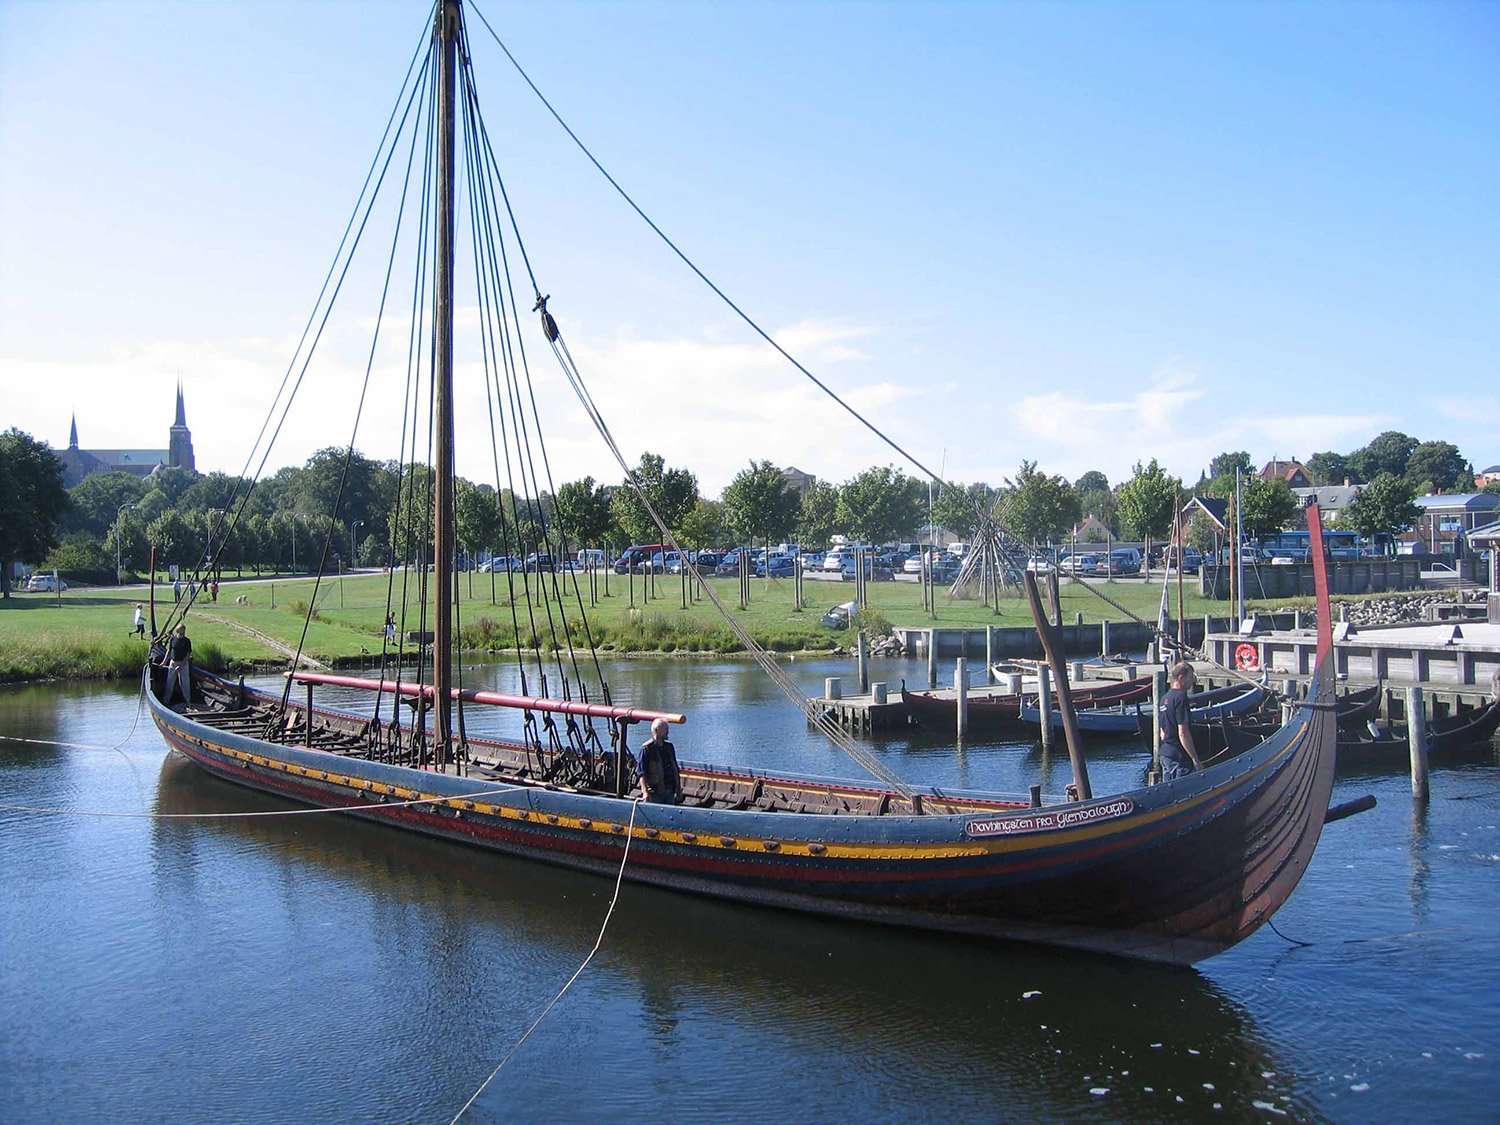
Longships were naval vessels made and used by the Vikings from Scandinavia and Iceland for trade, commerce, exploration, and warfare during the Viking Age. The longship's design evolved over many years, beginning in the Stone Age with the invention of the umiak and continuing up to the 9th century with the Nydam and Kvalsund ships. The longship appeared in its complete form between the 9th and 13th centuries. The character and appearance of these ships have been reflected in Scandinavian boat-building traditions until today. The average speed of Viking ships varied from ship to ship but lay in the range of 5–10 knots and the maximal speed of a longship under favourable conditions was around 15 knots. The longship is characterized as a graceful, long, narrow, light, wooden boat with a shallow draft hull designed for speed. The ship's shallow draft allowed navigation in waters only one meter deep and permitted beach landings, while its light weight enabled it to be carried over portages. Longships were also double ended, the symmetrical bow and stern allowing the ship to reverse direction quickly without having to turn around; this trait proved particularly useful in northern latitudes where icebergs and sea ice posed hazards to navigation. Longships were fitted with oars along almost the entire length of the boat itself. Later versions sported a rectangular sail on a single mast which was used to replace or augment the effort of the rowers, particularly during long journeys.
Longships can be classified into a number of different types, depending on size, construction details, and prestige. The most common way to classify longships is by the number of rowing positions on board. Types ranged from the Karvi, with 13 rowing benches, to the Busse, one of which has been found with an estimated 34 rowing positions.
Longships were the epitome of Scandinavian naval power at the time and were highly valued possessions. They were often owned by coastal farmers and commissioned by the king in times of conflict, in order to build a powerful naval force. While longships were deployed by the Norse in warfare, they were mostly used for troop transports, not as warships. In the tenth century, these boats would sometimes be tied together in battle to form a steady platform for infantry warfare. Longships were called dragonships(drakushiffen) by the Franks because they had a dragon-shaped prow.
The kit
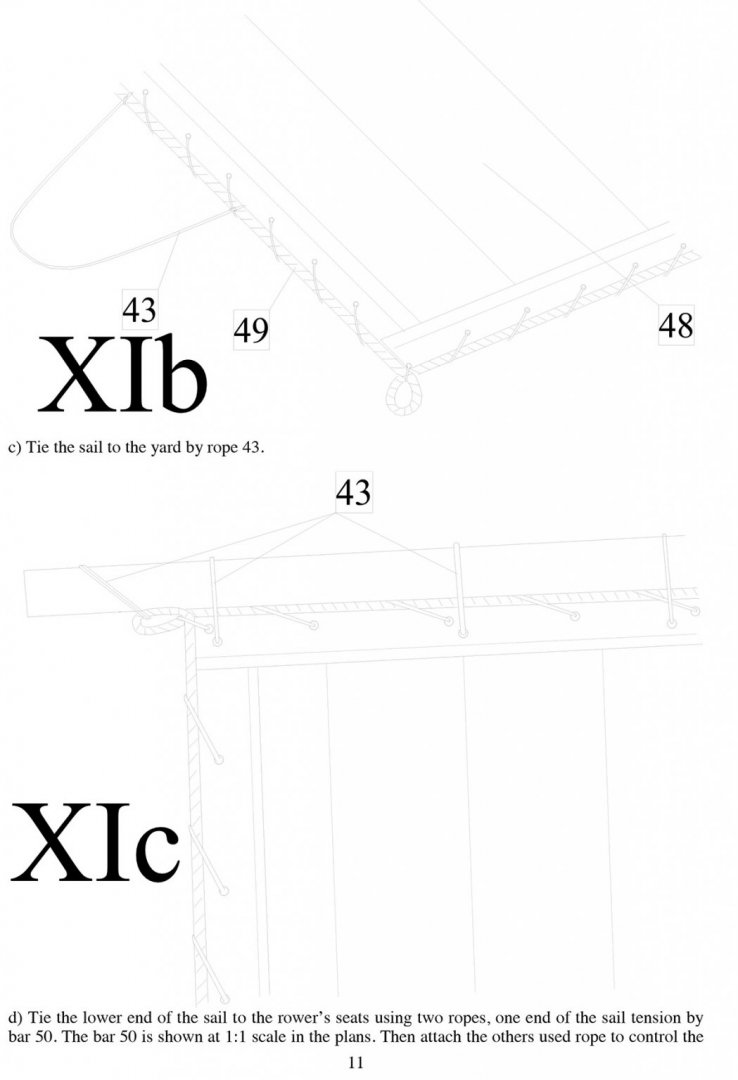
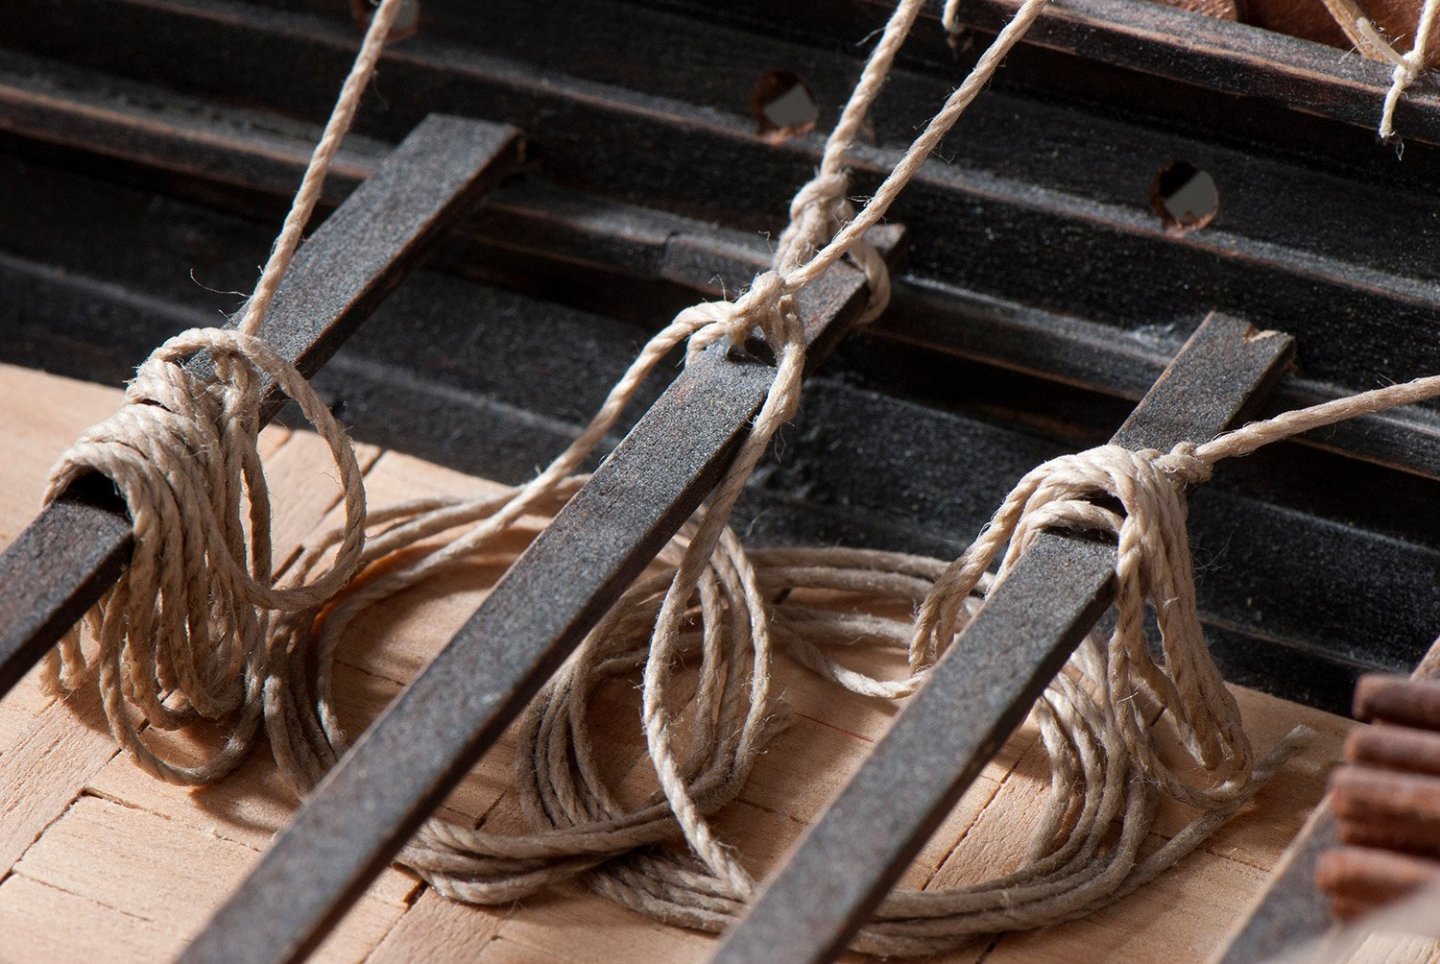
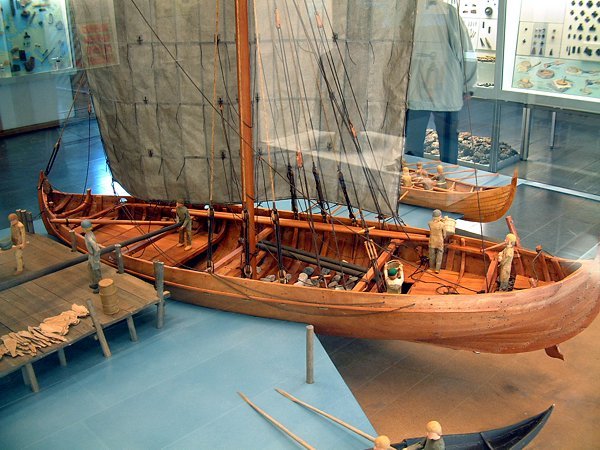
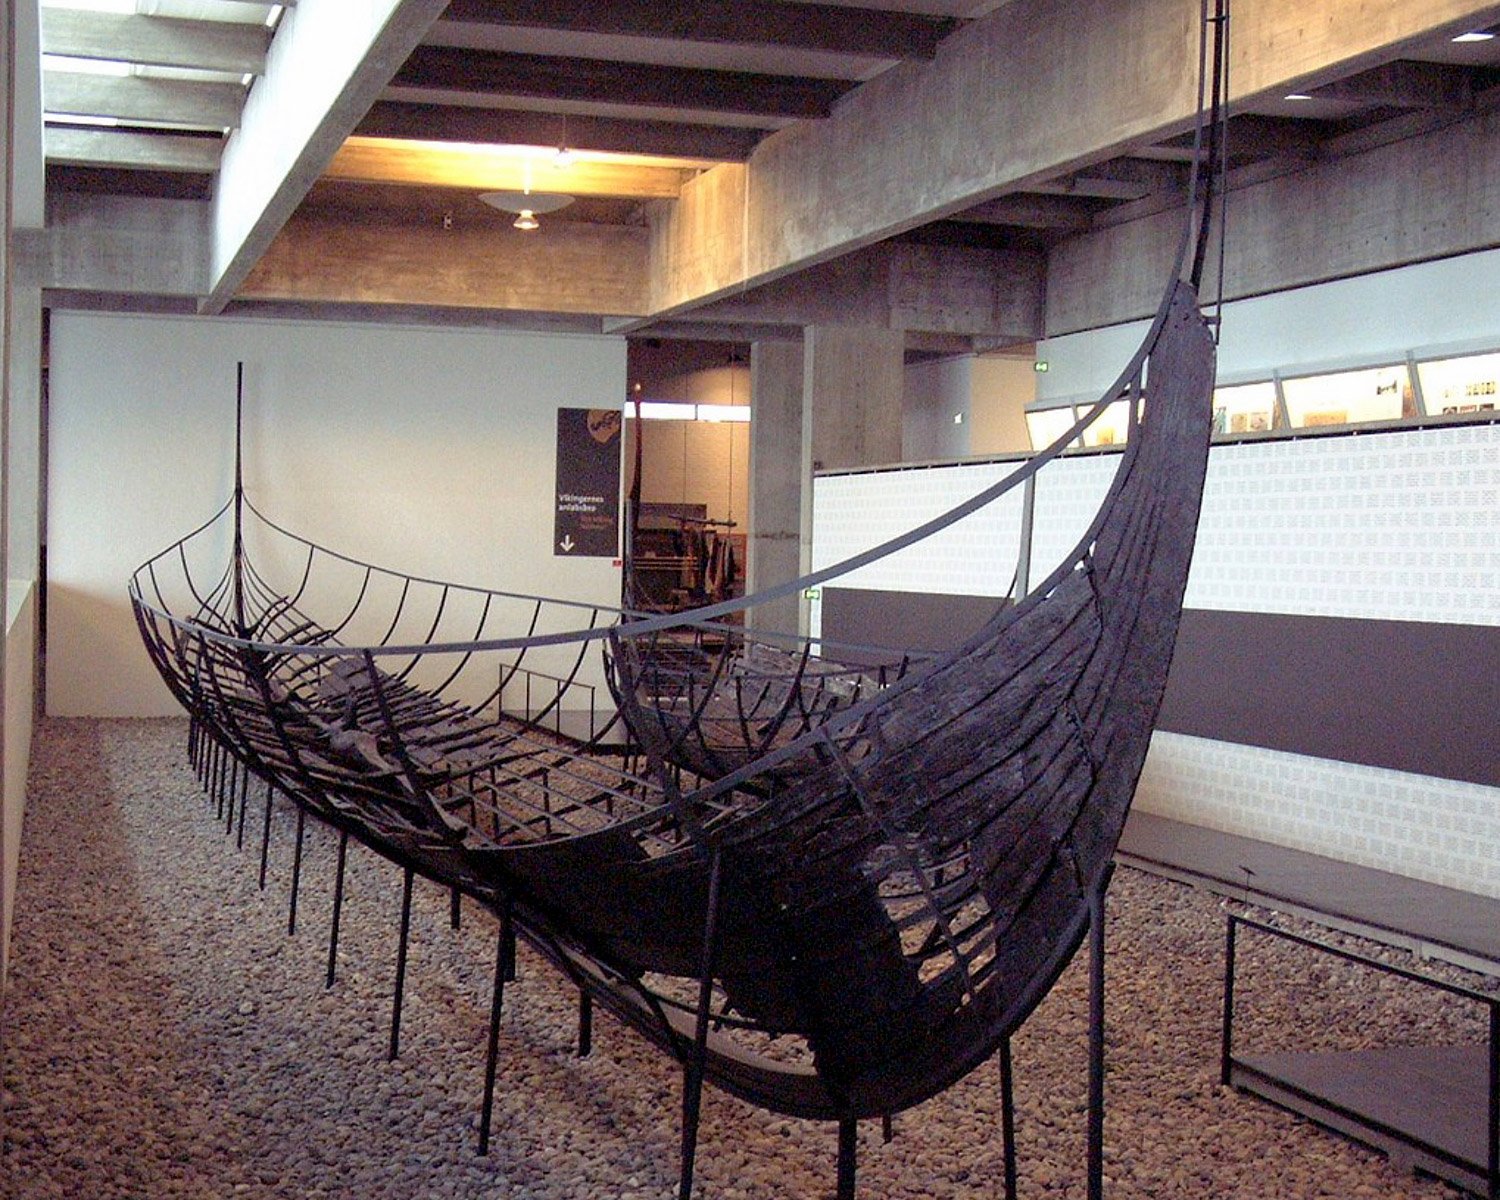
This model represents the similar long ship which was found near the village of Skuldelev at Denmark and which is known as Skuldelev 2. The original was constructed primarily of oak wood about the year 1060 in Dublin. The ship had a length of 30 meters and width of 3.8 meters. The ship could sail with 60-100 Viking warriors onboard and was driven by a large rectangular sheet. In the case of no wind, there were 60 oars. Always great to have a backup plan when your intention is to go raiding! Of course, oars were commonly used for inland waterways. The sight of a sea-borne ship heading inland must’ve been terrifying to those communities in Dark Ages England.

In 1:35, this is a large model, and would be a perfect shelf-mate for the Dusek Knarrthat we reviewed about a month ago. As with that vessel, this also represents an 11thCentury incarnation of this iconic legend. Dusek give the dimensions as thus:
- Length: 850mm
- Width: 370mm
- Height: 475mm
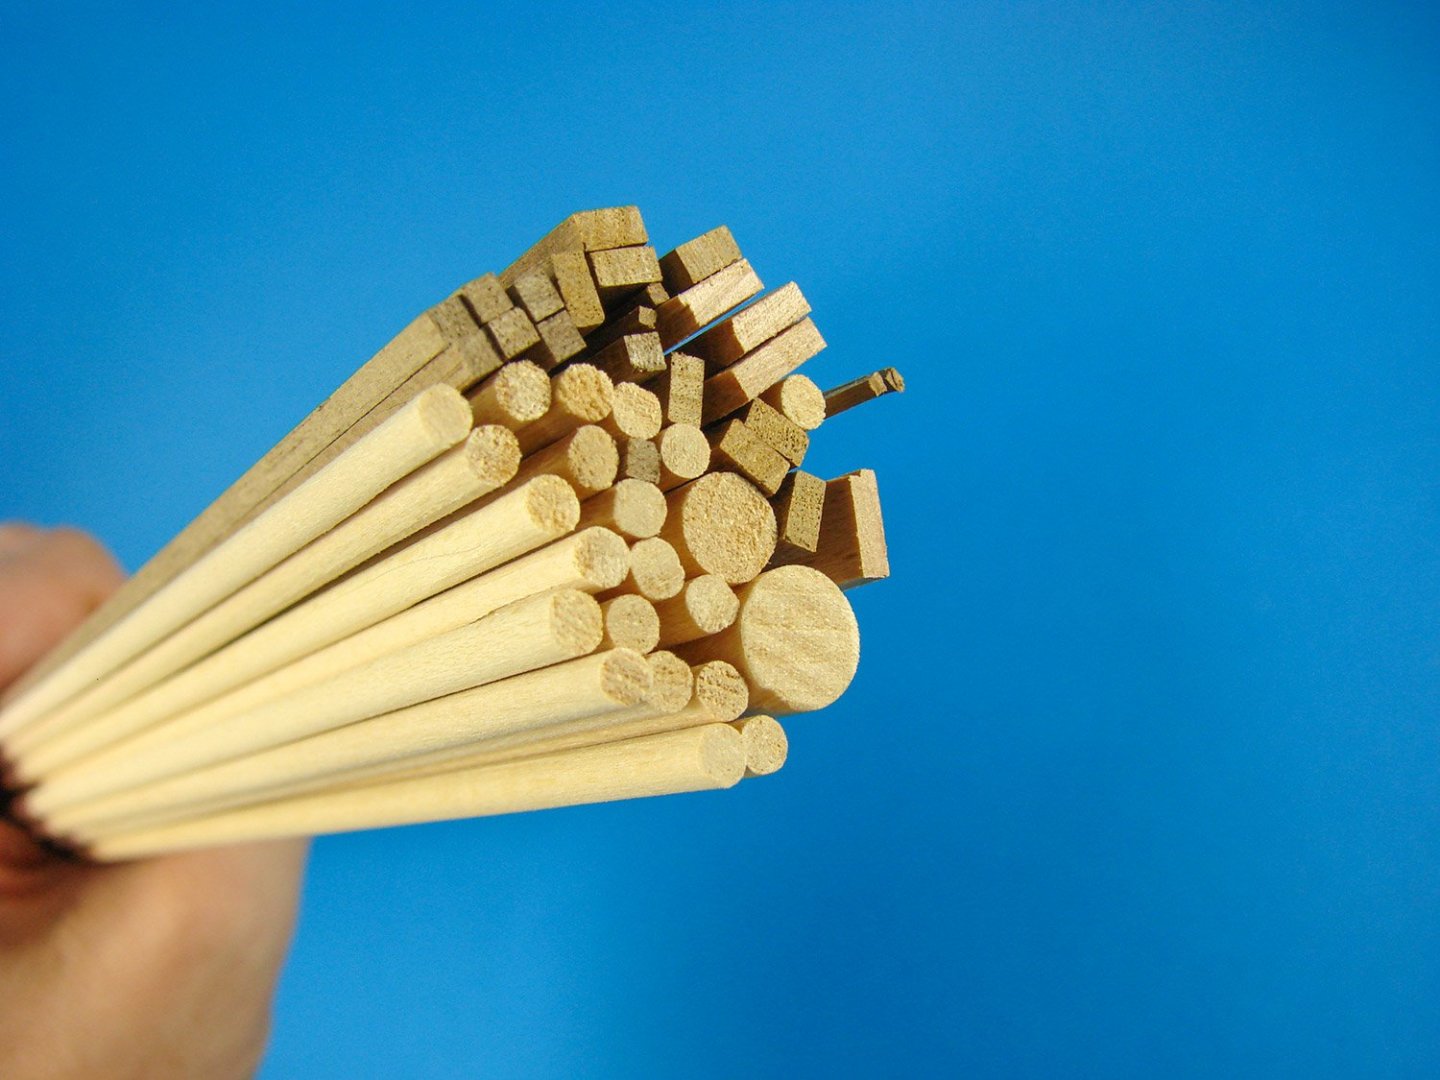
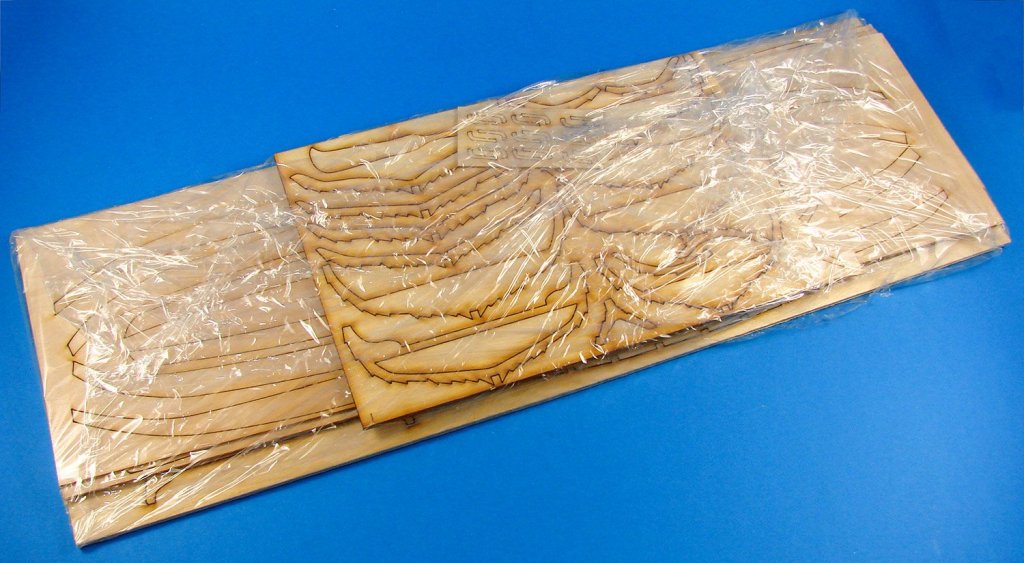
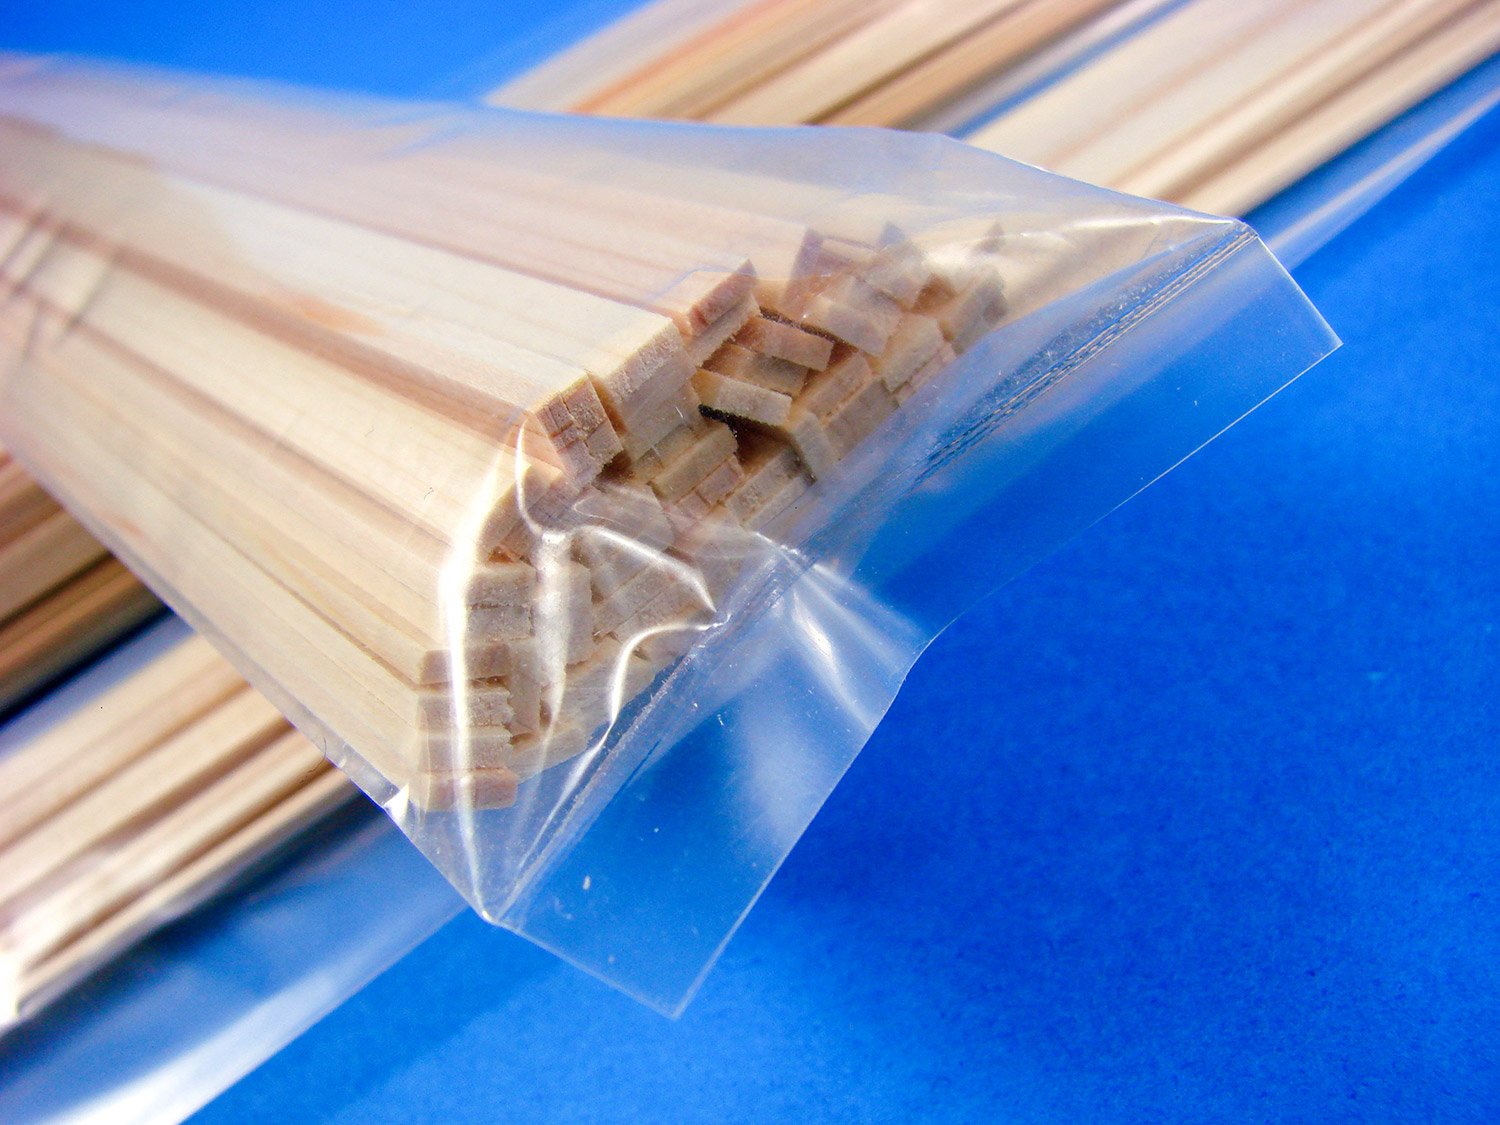
As with the Knarr, this kit is packaged into the same style, extremely robust box with a glossy lid depicting several images of the completed model, fully rigged and at sail. Inside the box, we are presented with numerous timber sheets which are wrapped in clear clingfilm, a bundle of dowel and strip wood, a bag of parts including rigging cord and sailcloth, and finally the instructions manual and plan.

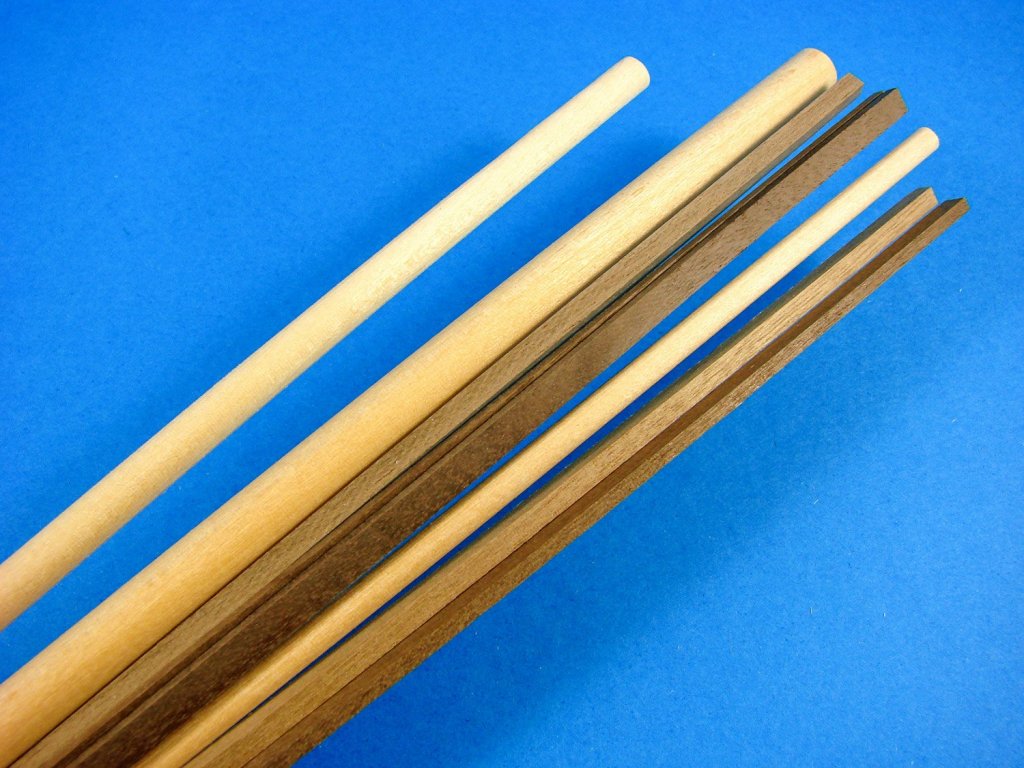
I really do have to say that I like the dowel and strip material that Dusek supply in their kits. Thee material here is finely grained, consistent, die-straight and sharply cut, with no fuzziness. Timber itself looks like walnut, Ramin, and maybe lime. Not too sure, but the colours are of course natural, unlike some of the stained timbers we see in legacy kits. Dowel is of course supplied for the mast and the multitude of oars that you’ll need to make.
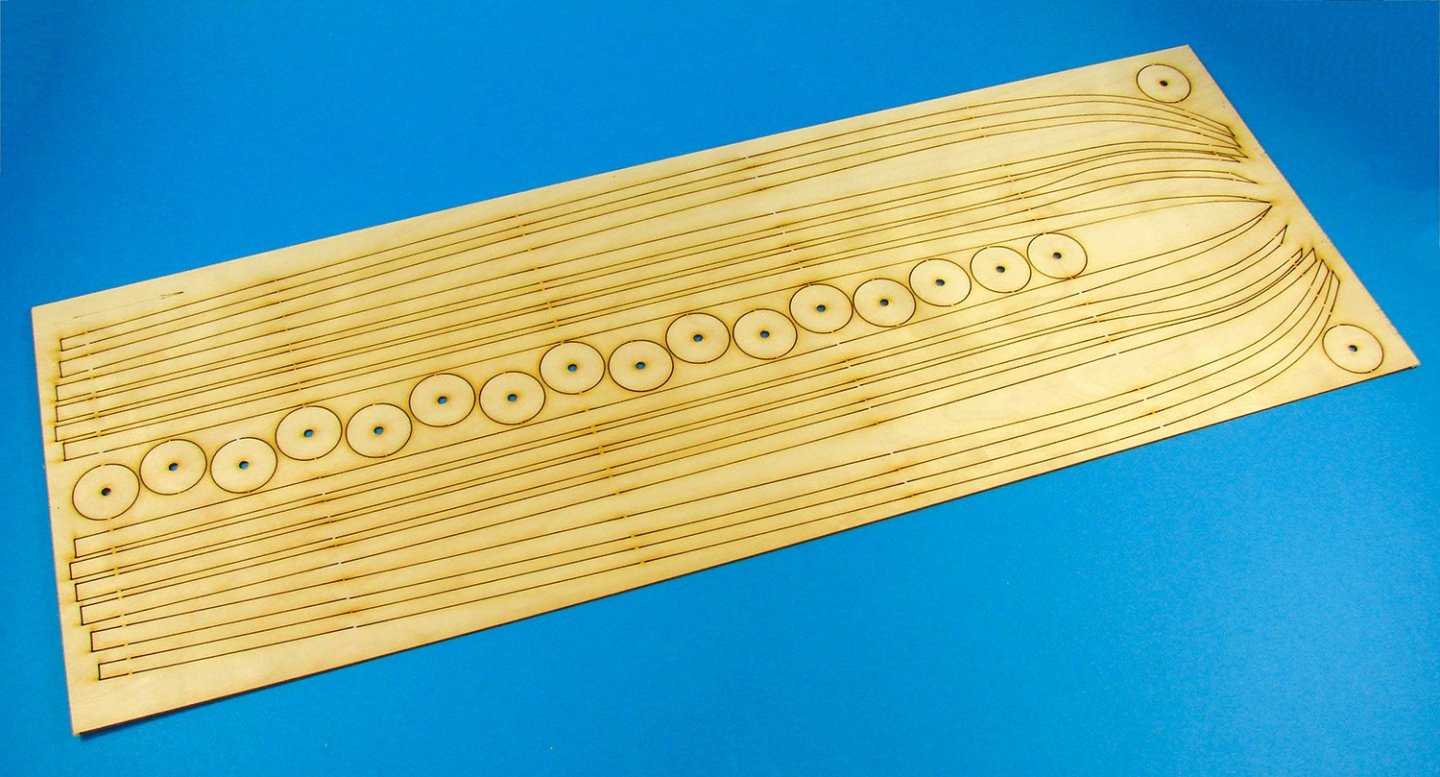
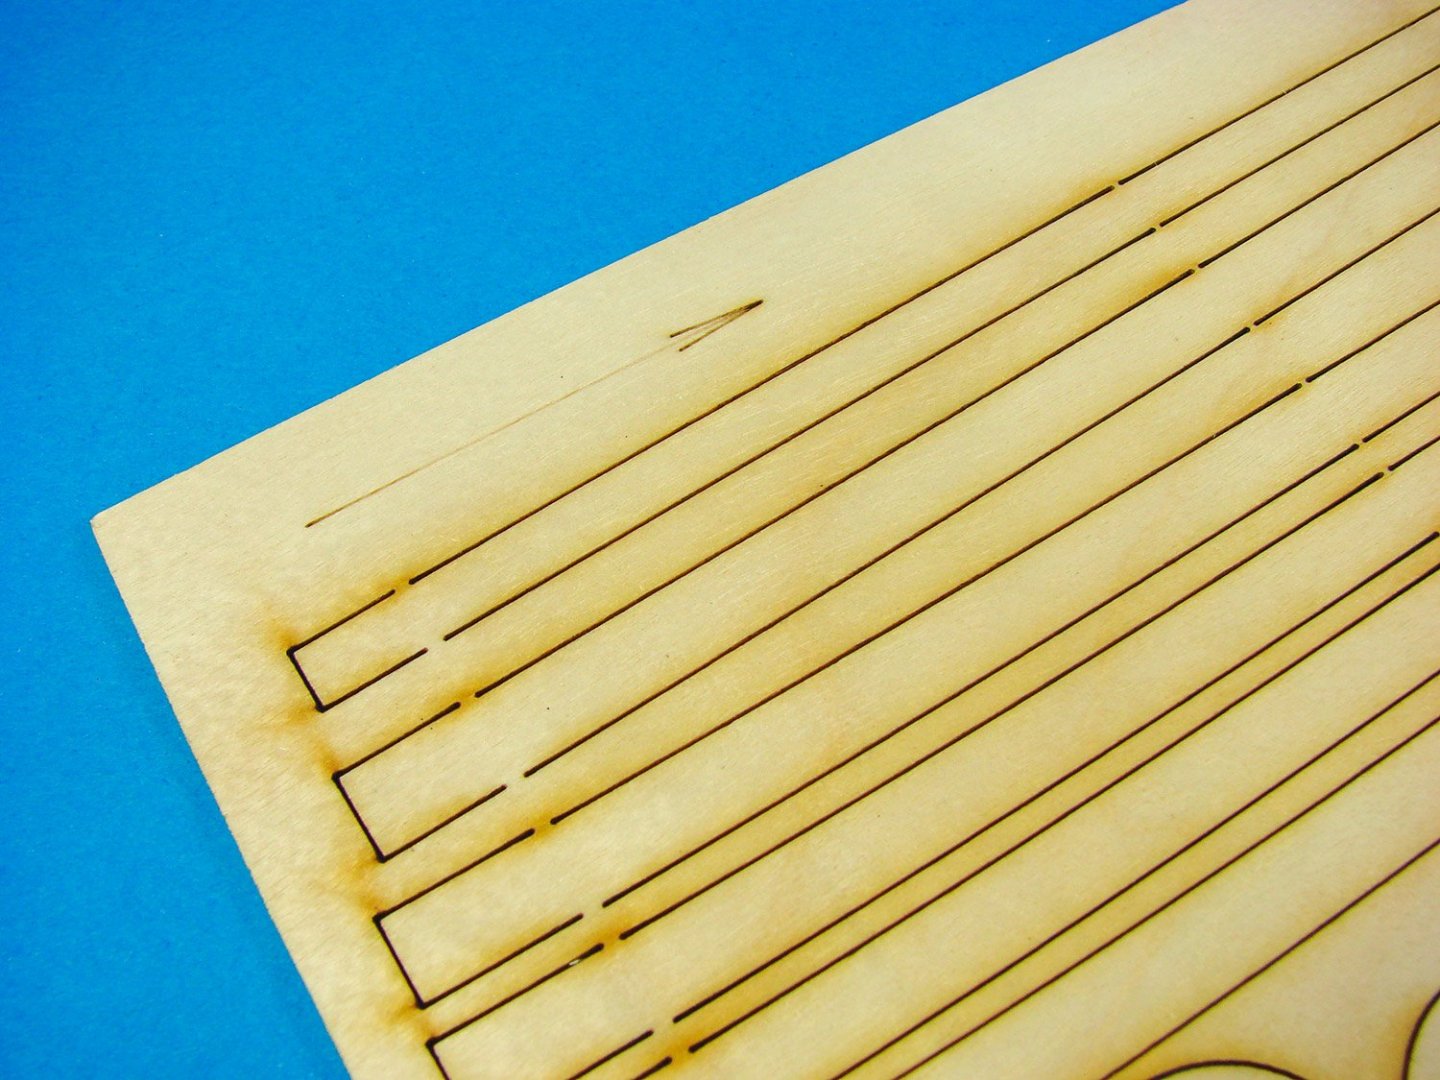
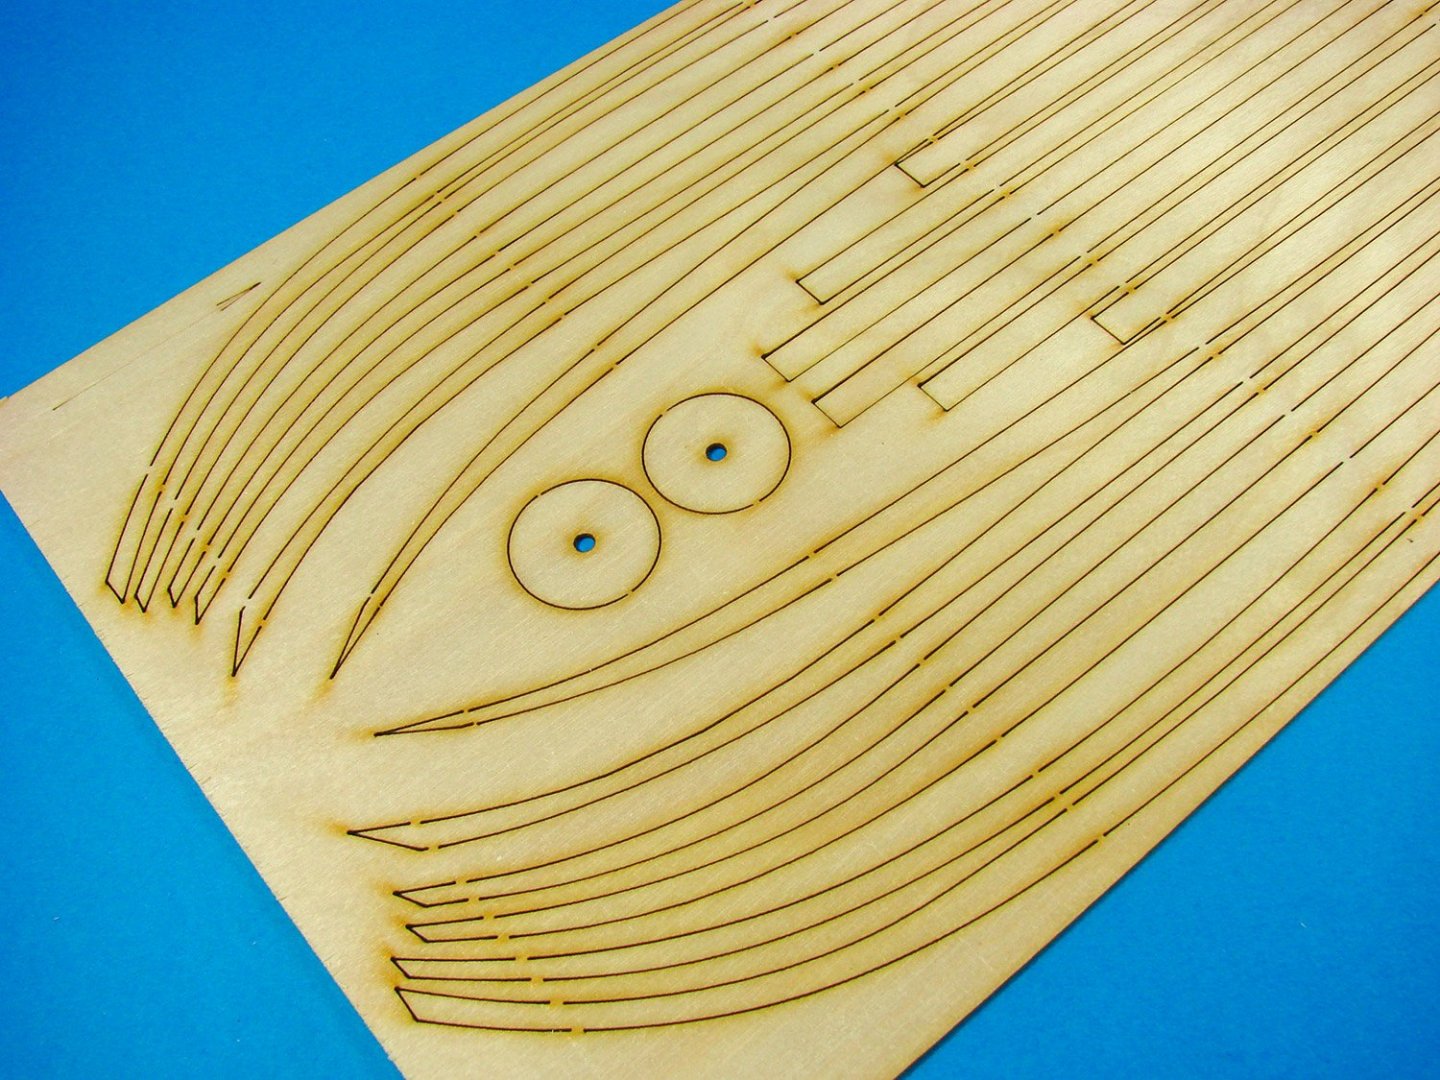
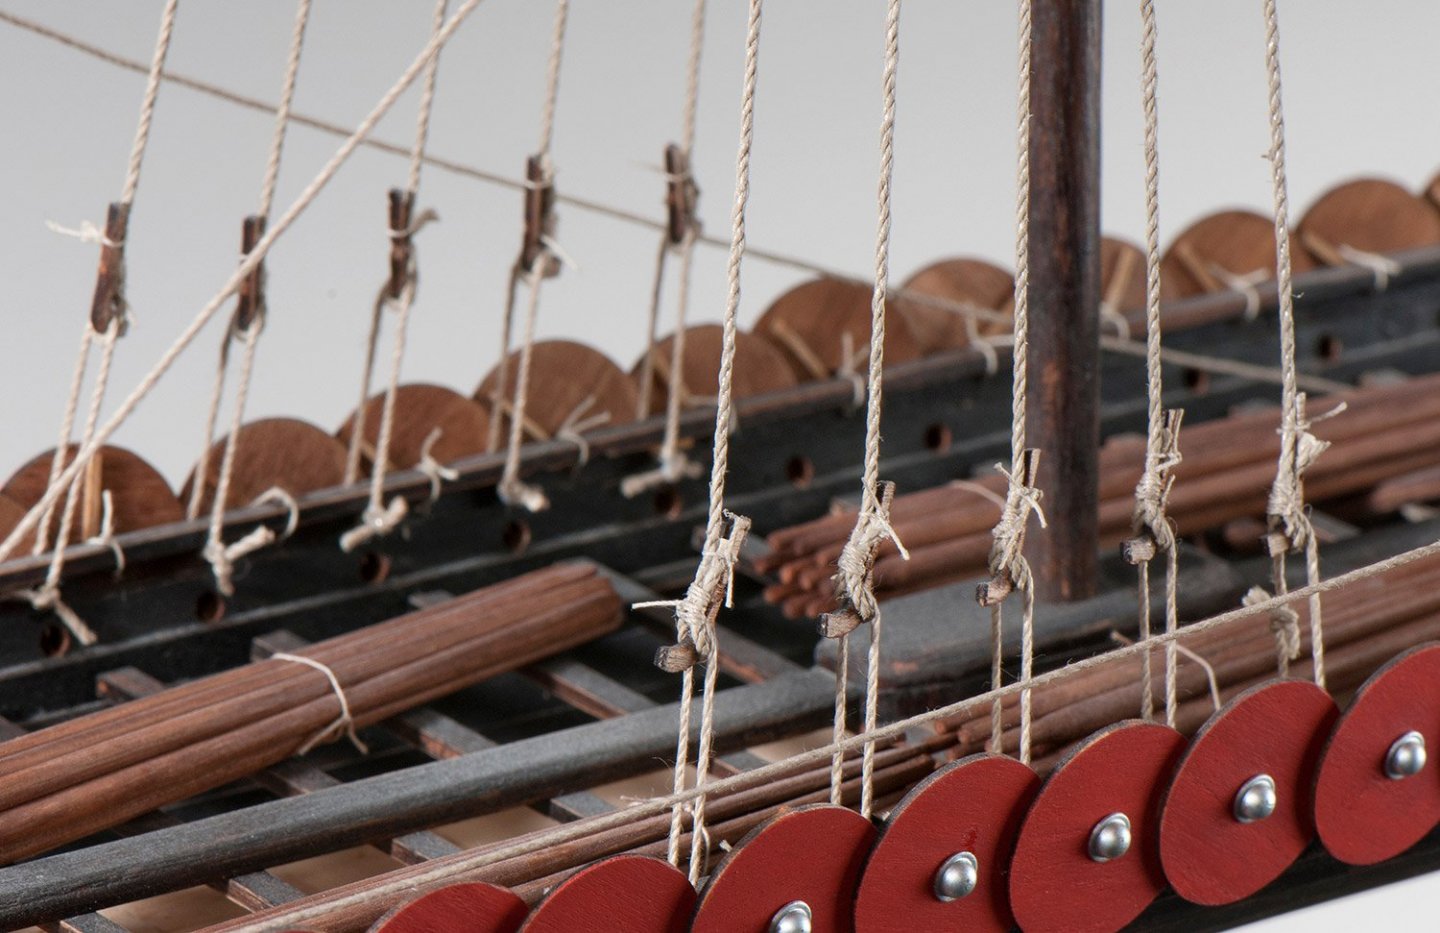
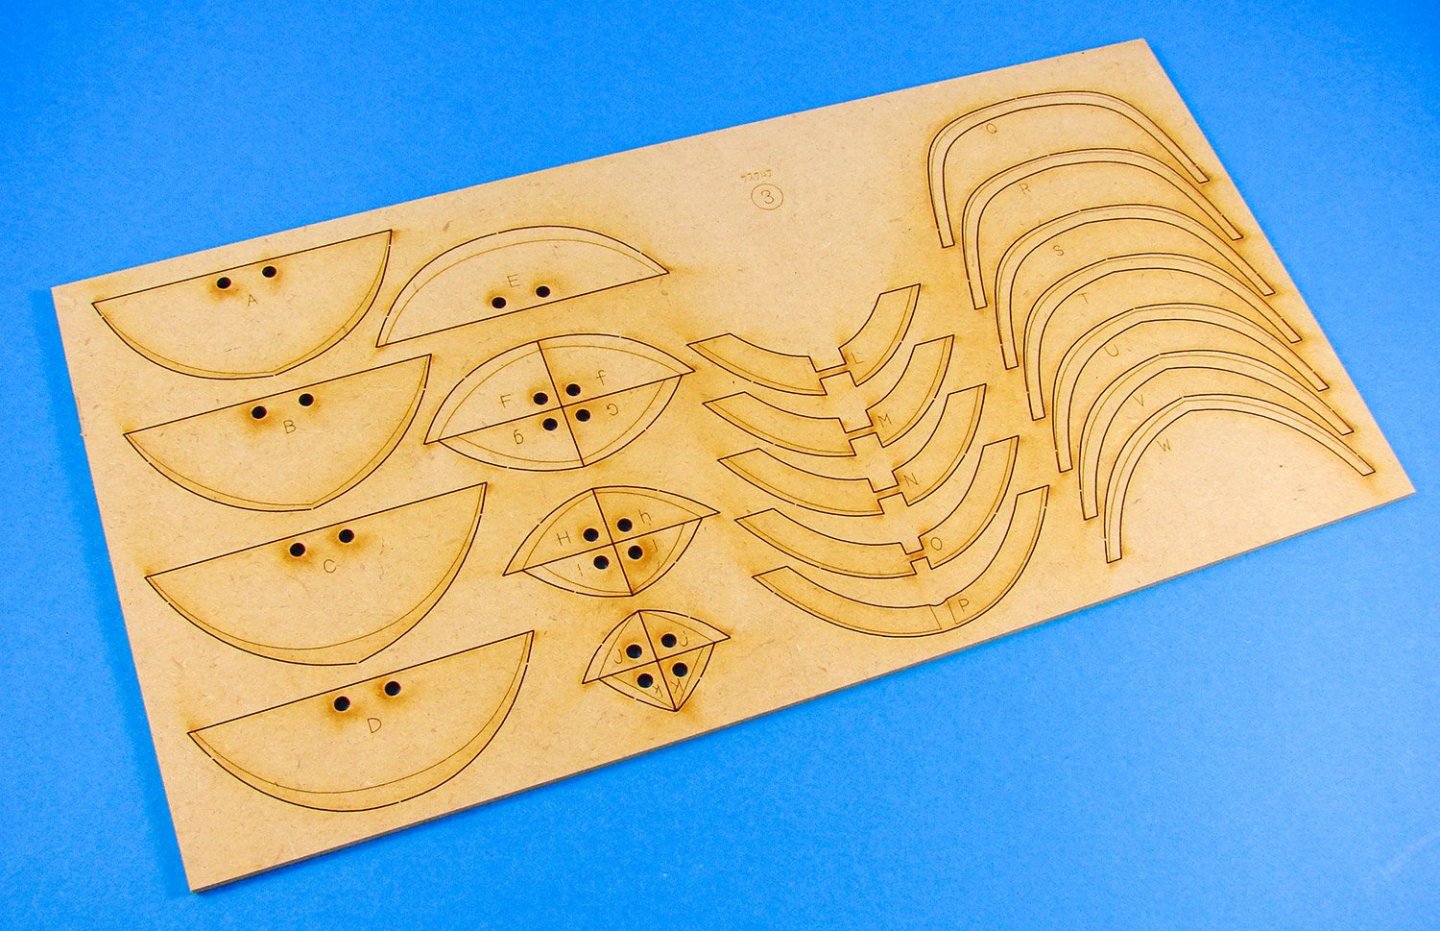
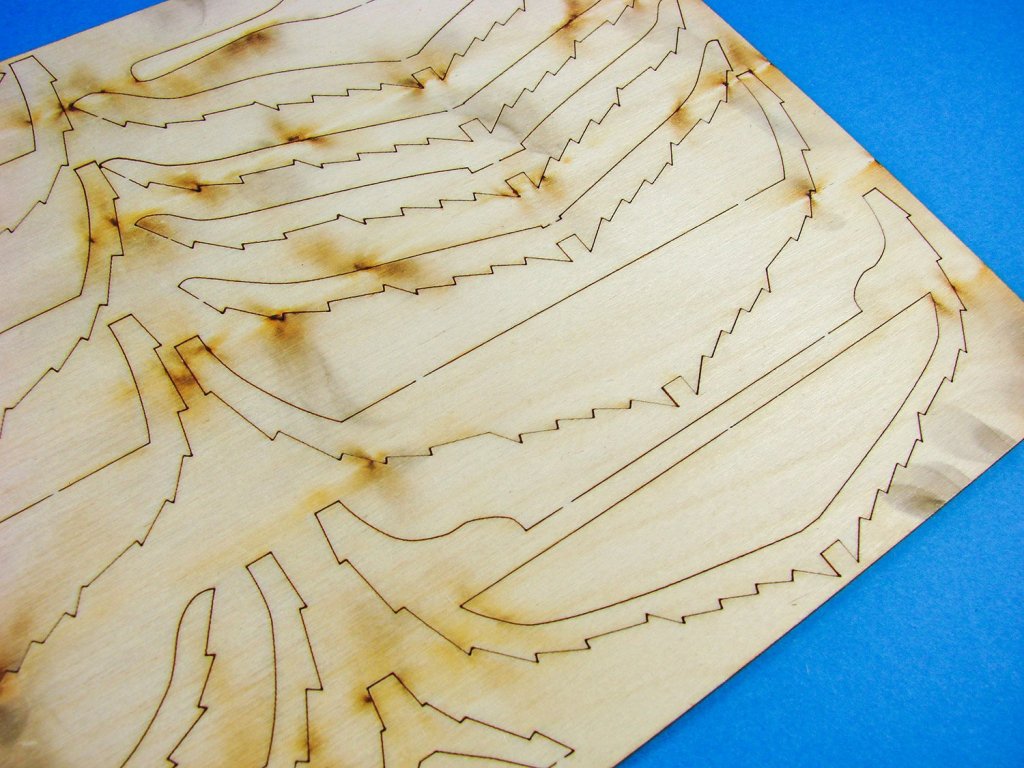
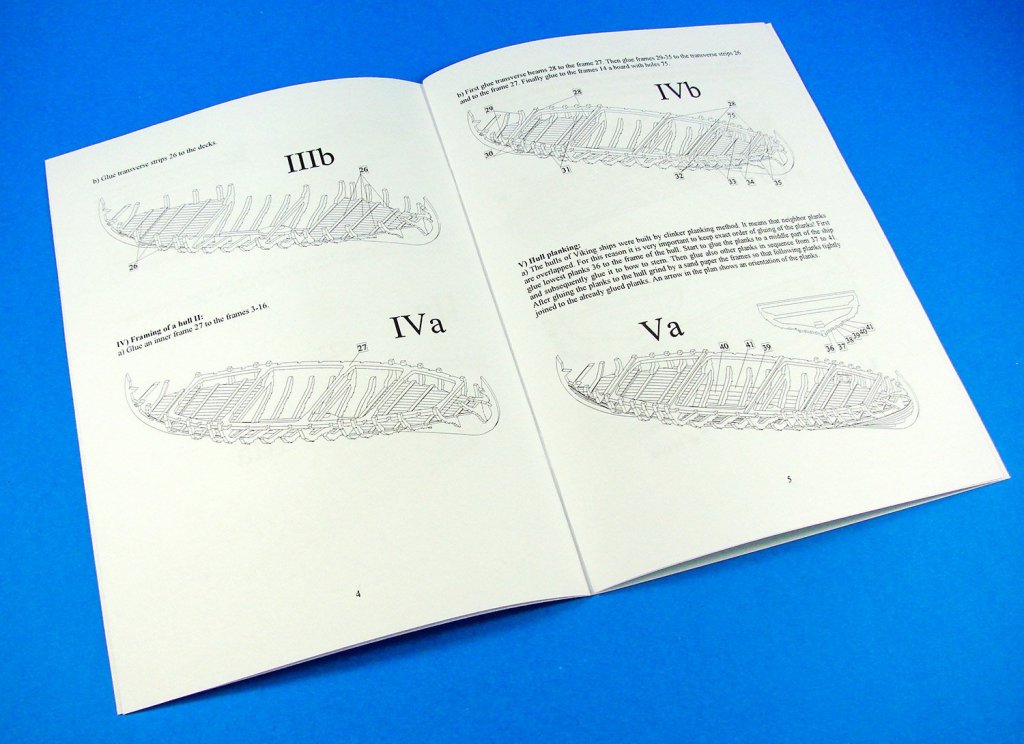
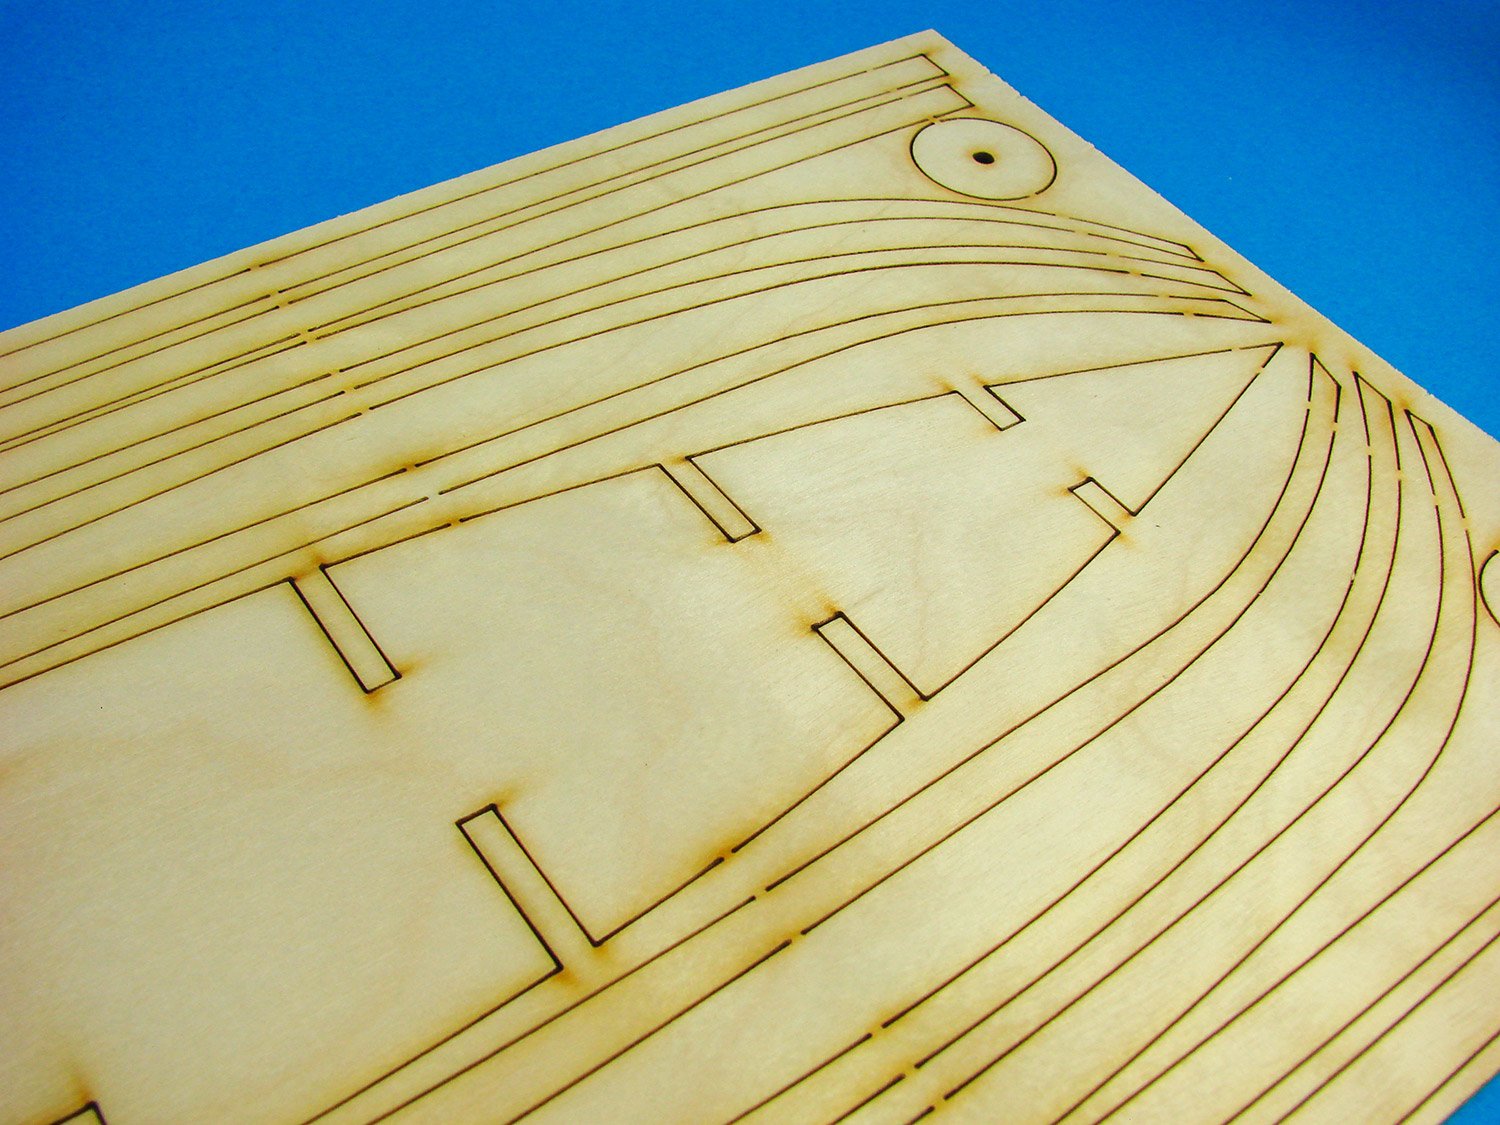
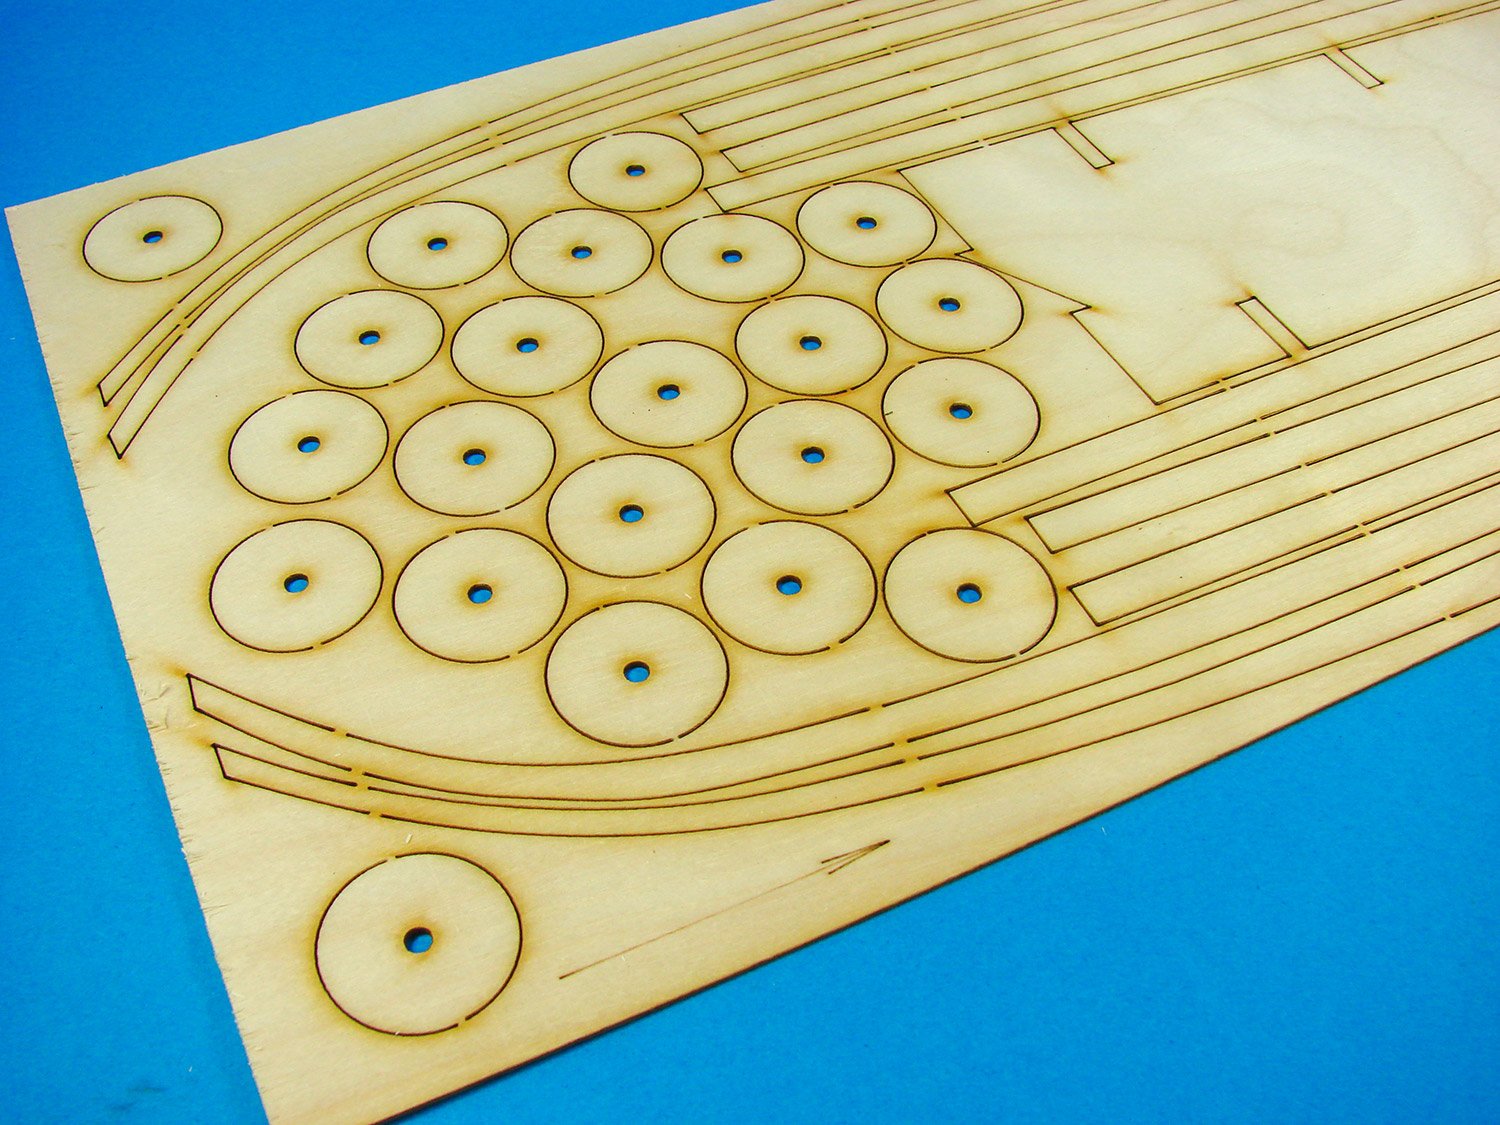
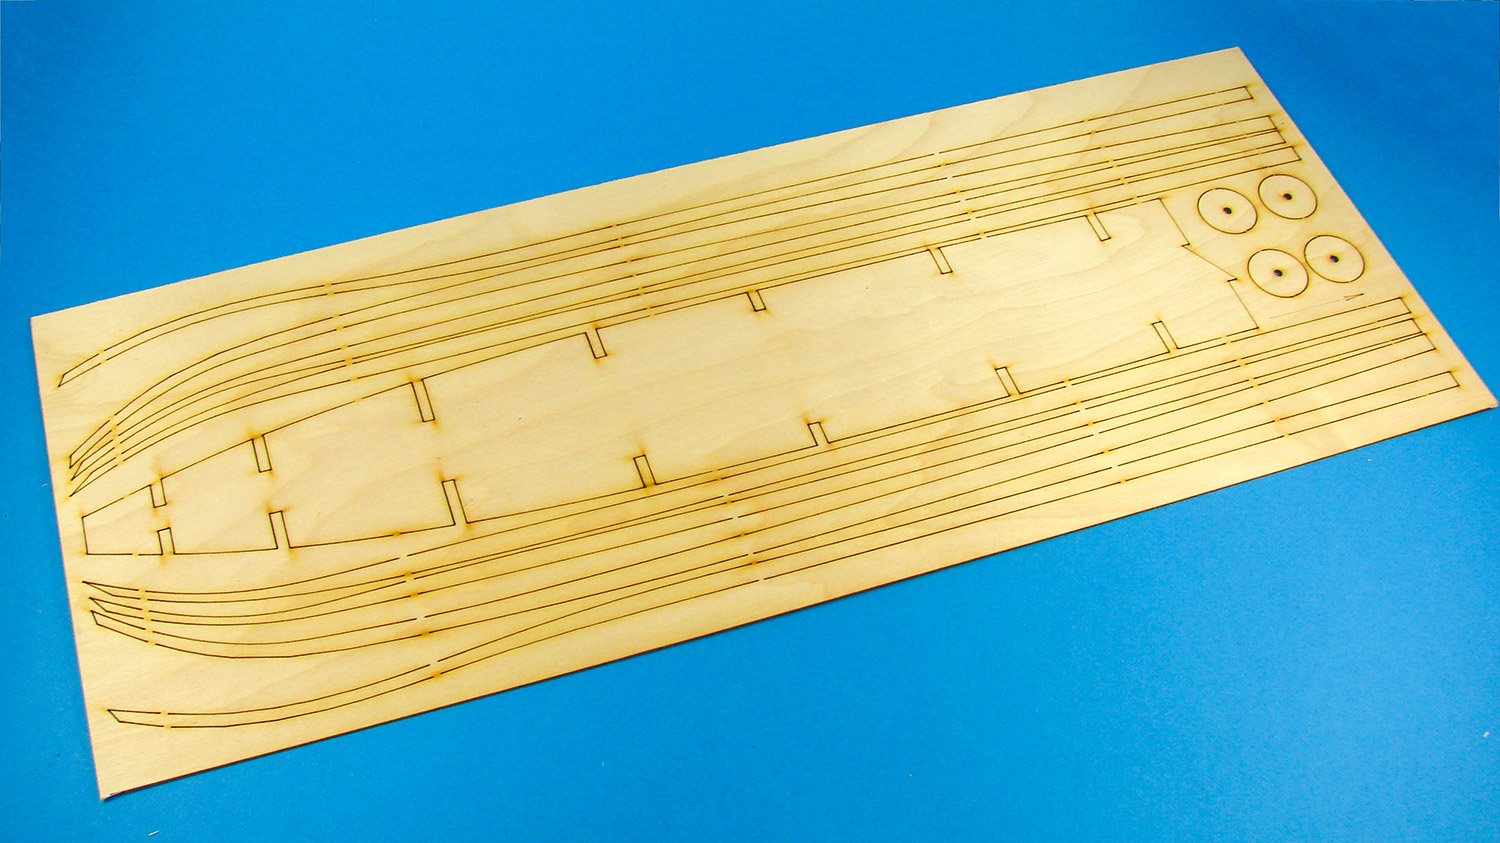
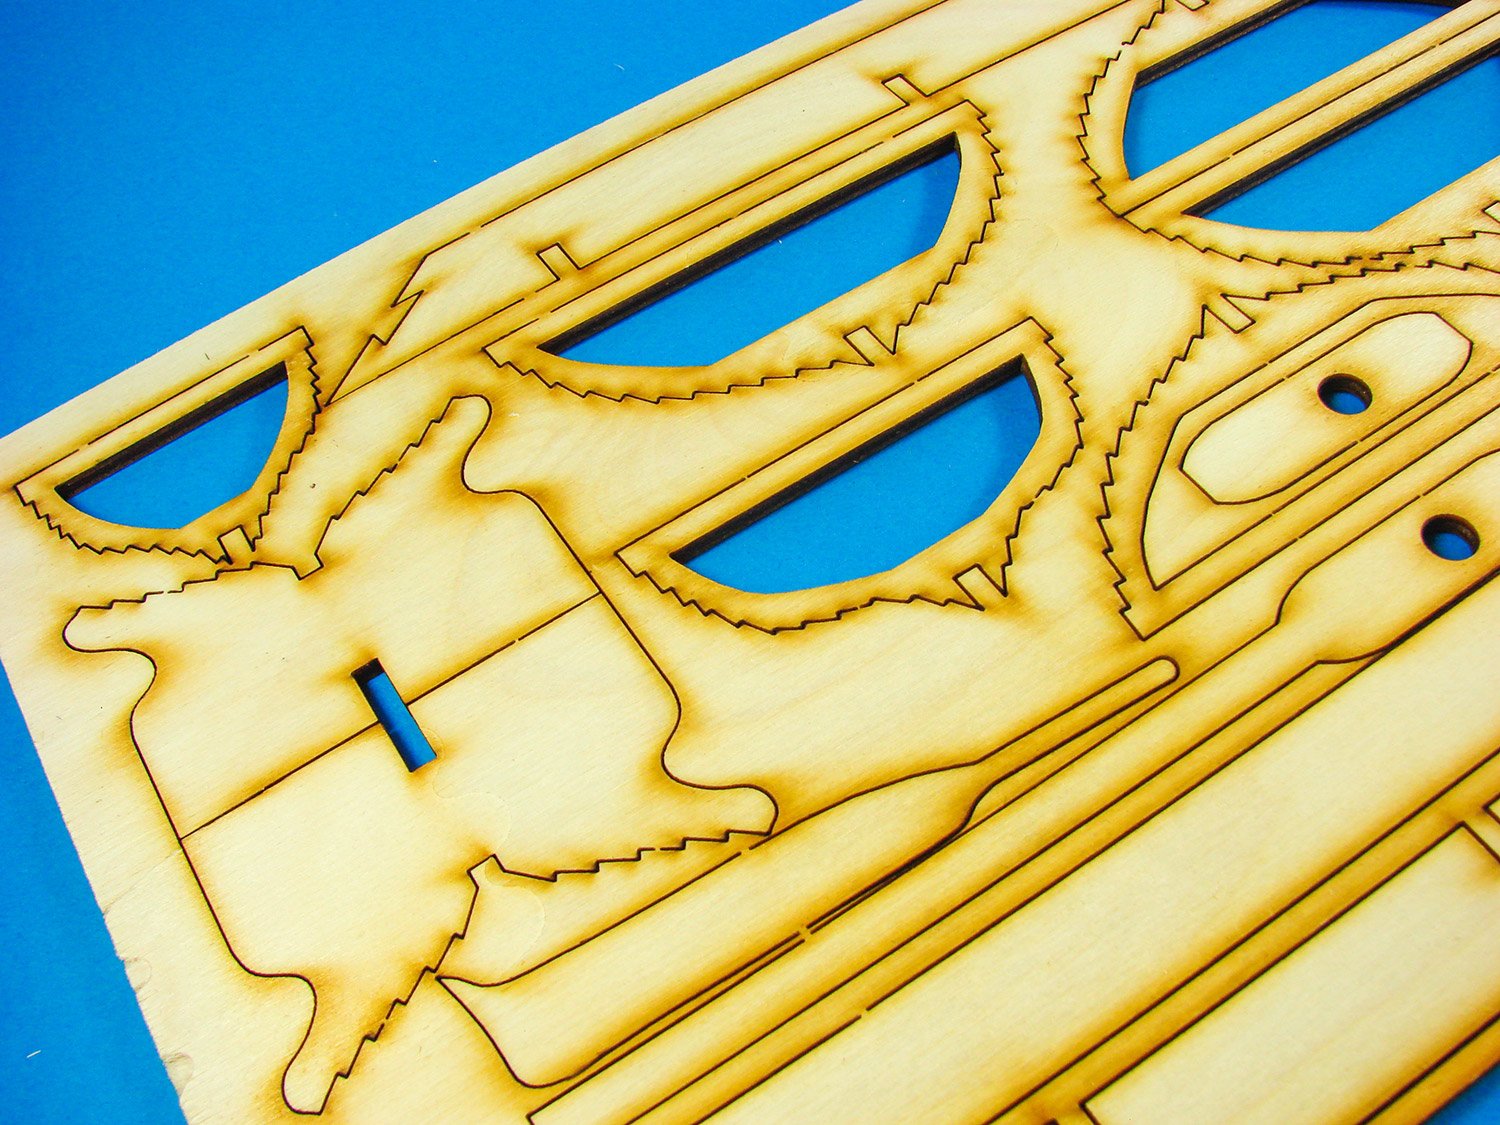
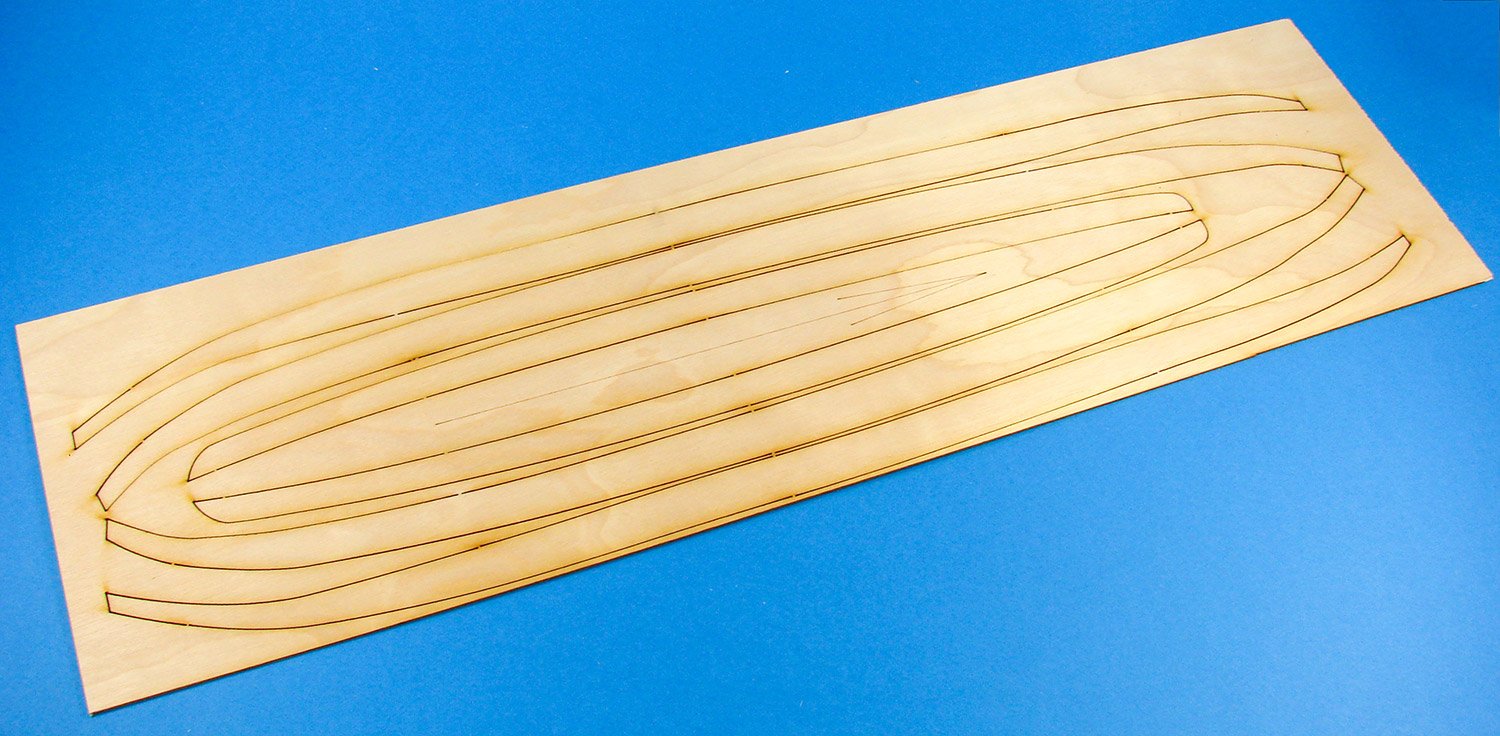
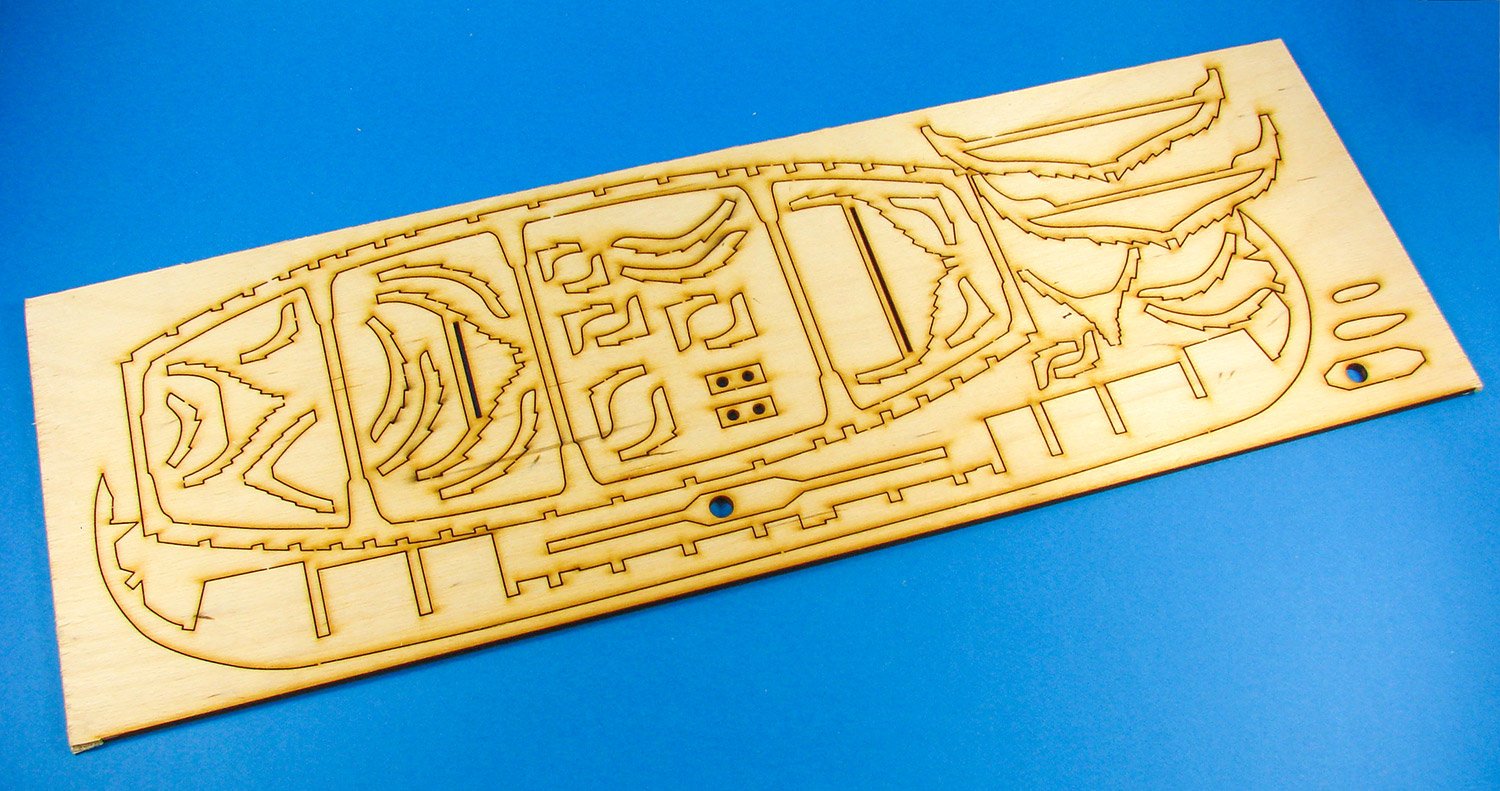
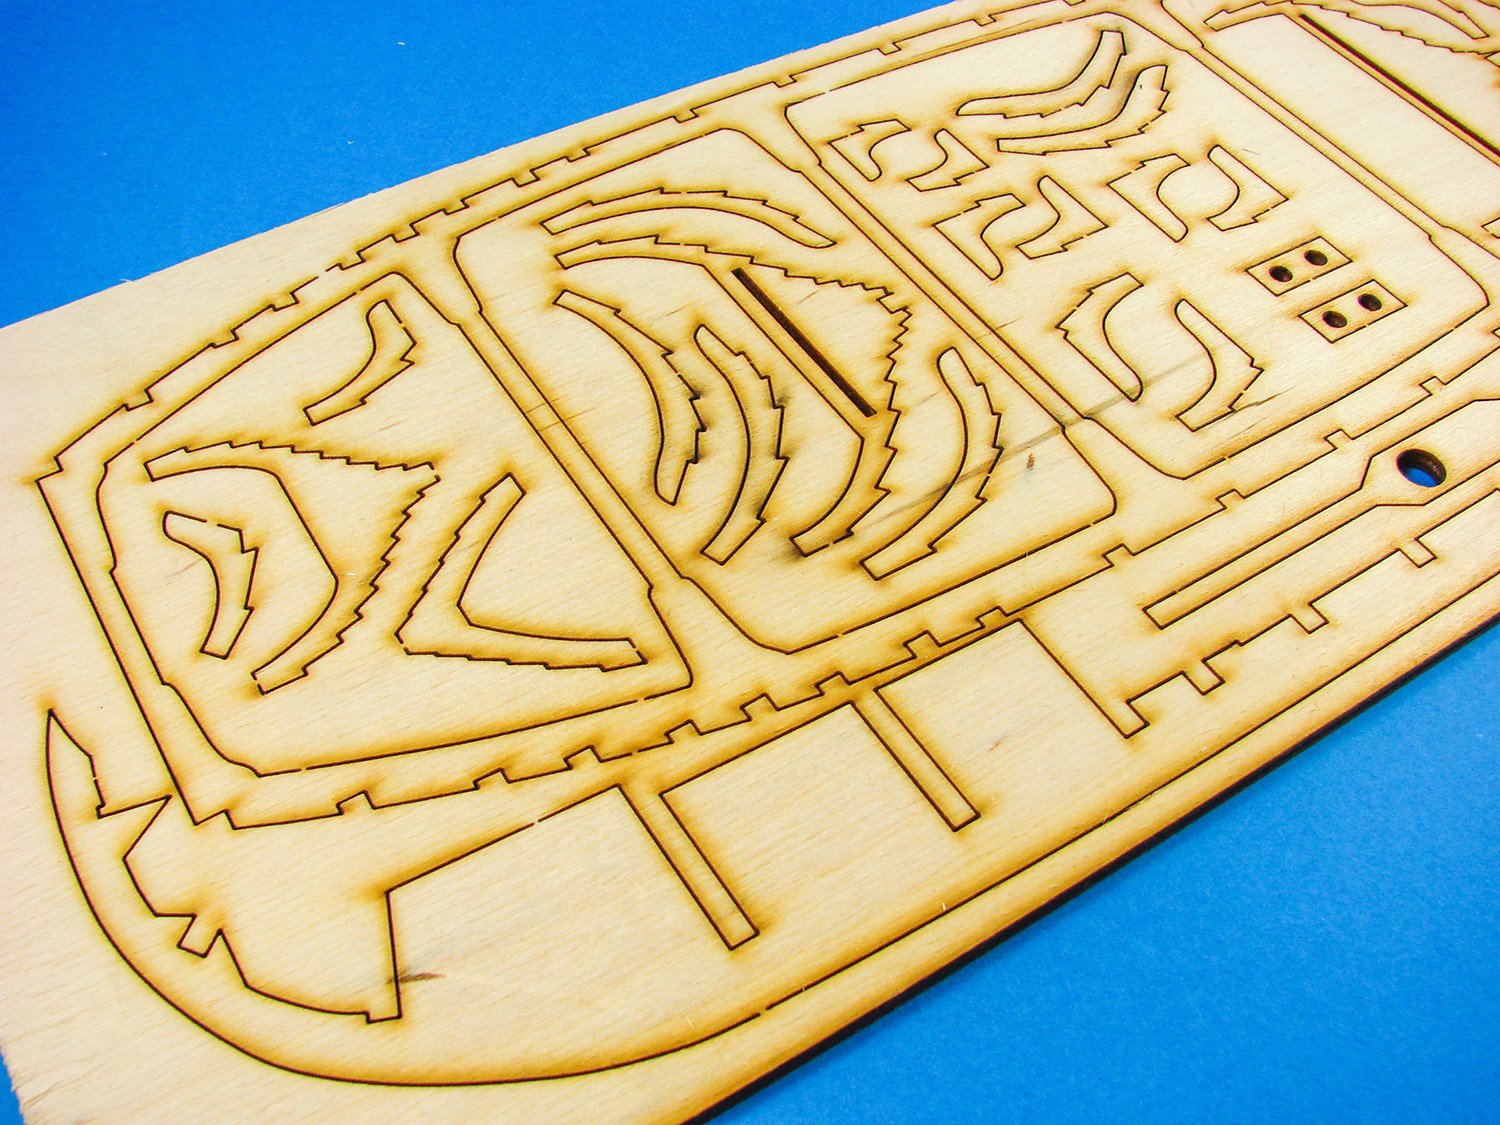
Numerous sheets of high-quality, thin ply are included, with all parts sharply laser-cut. Where planks are included, you will note a laser-engraved arrow on the timber that points towards the longship’s bow. Remember too that these vessels were also clinker-plank, and you will start at the garboard plank and work your way upwards. On this particular sheet, you also get the basic shield shapes too. In a short while I’ll explain how these are embellished.

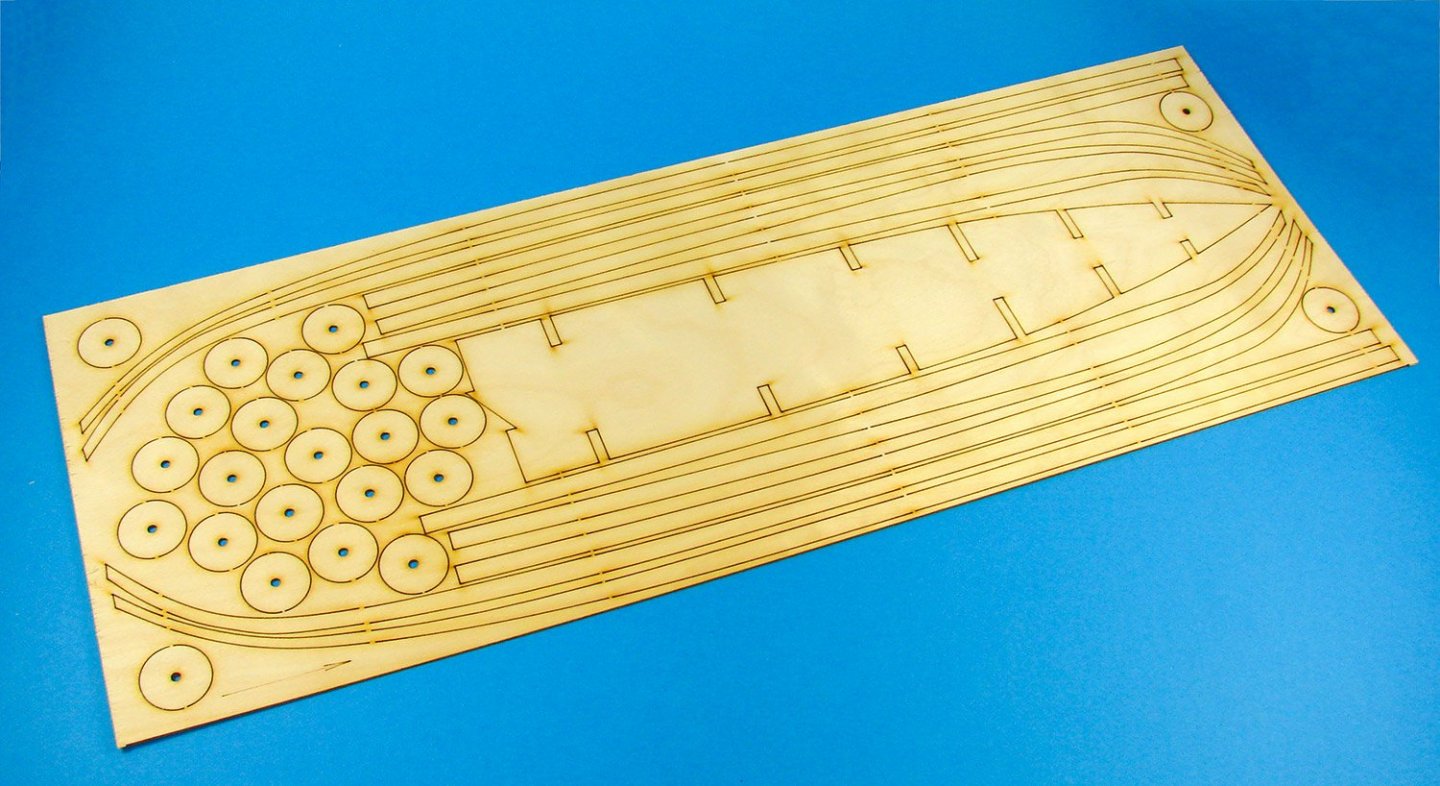


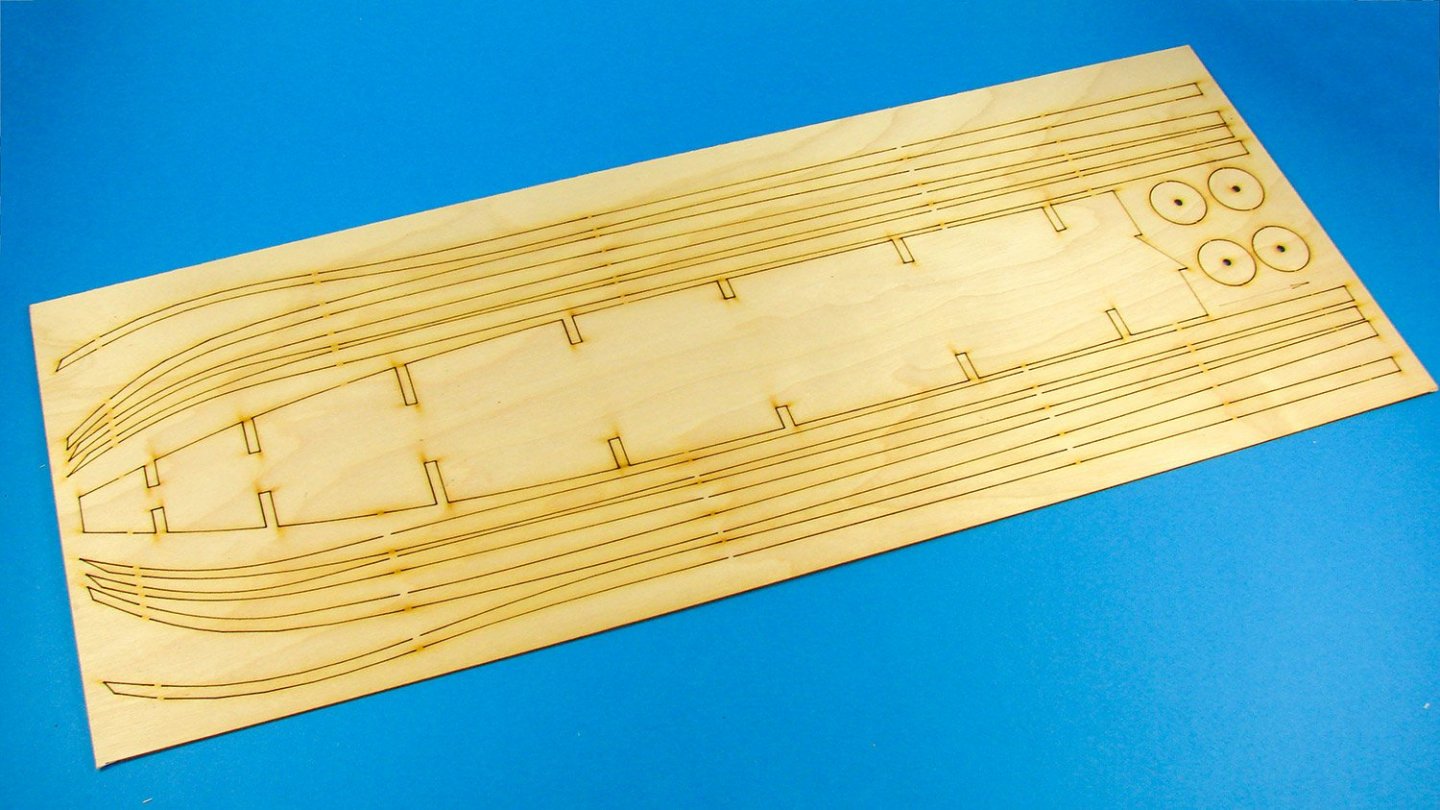
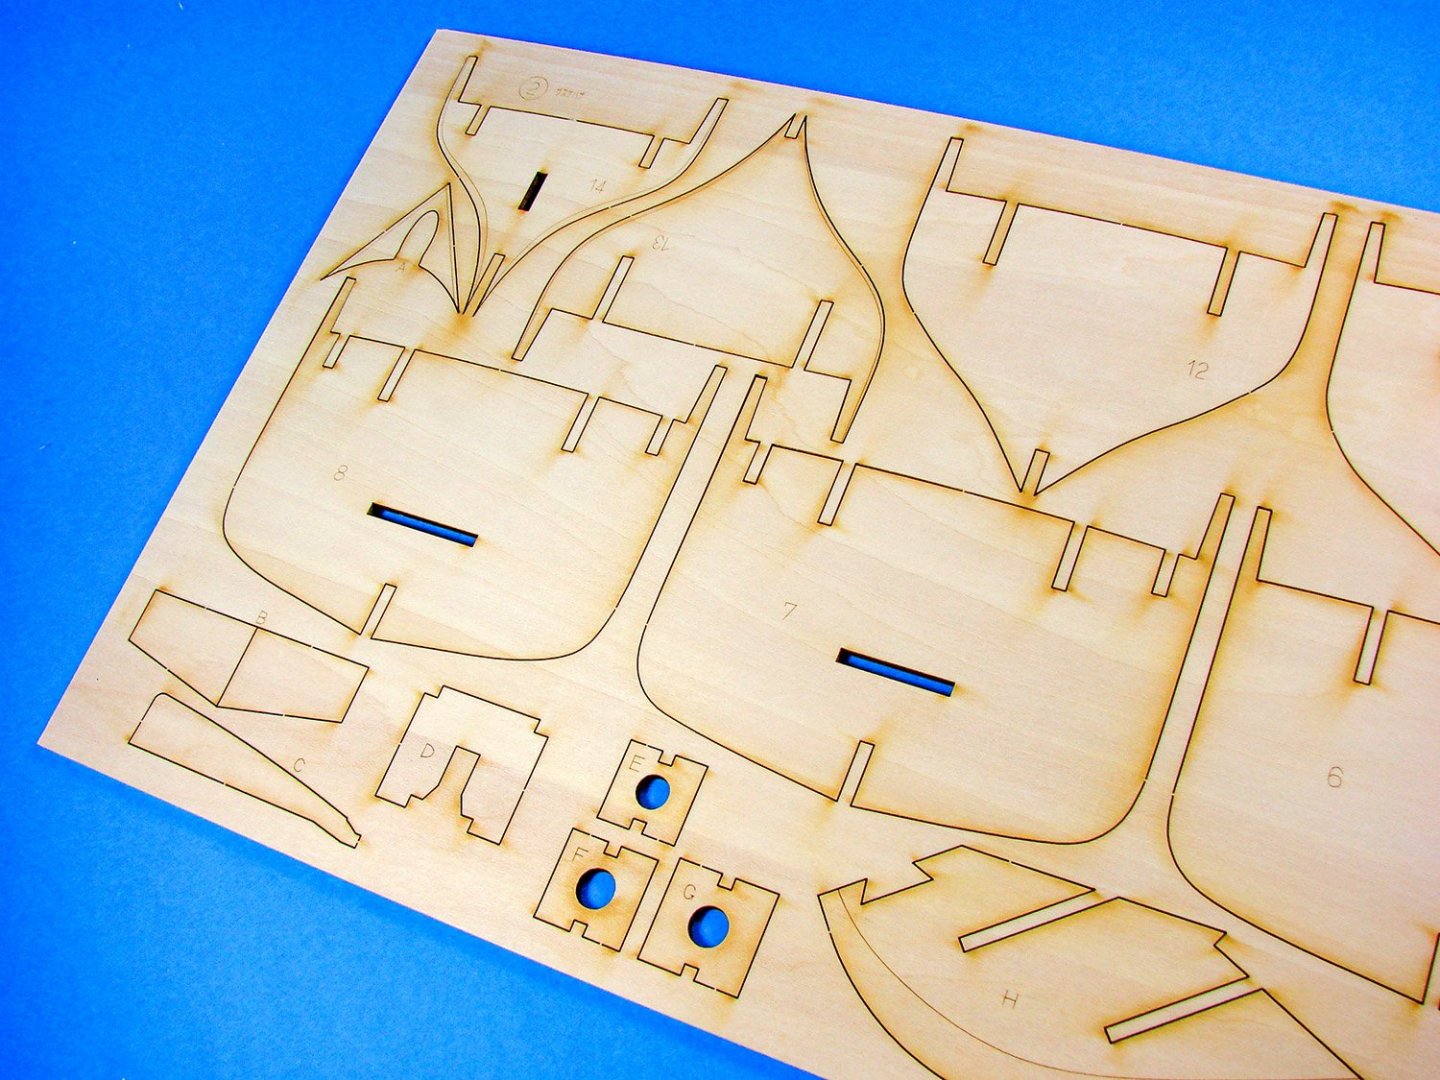
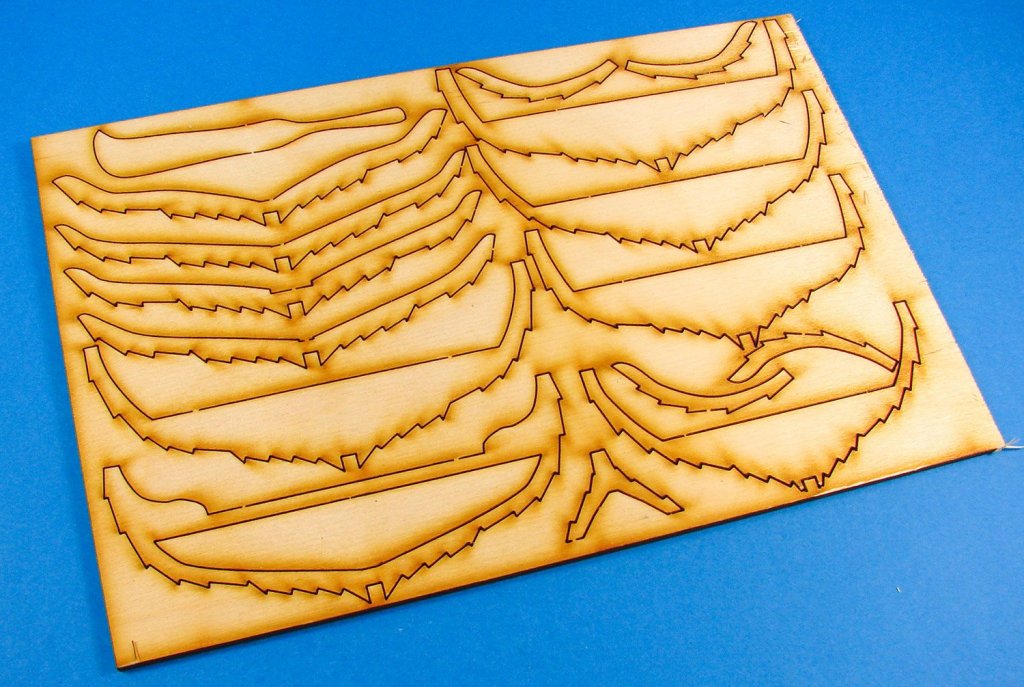
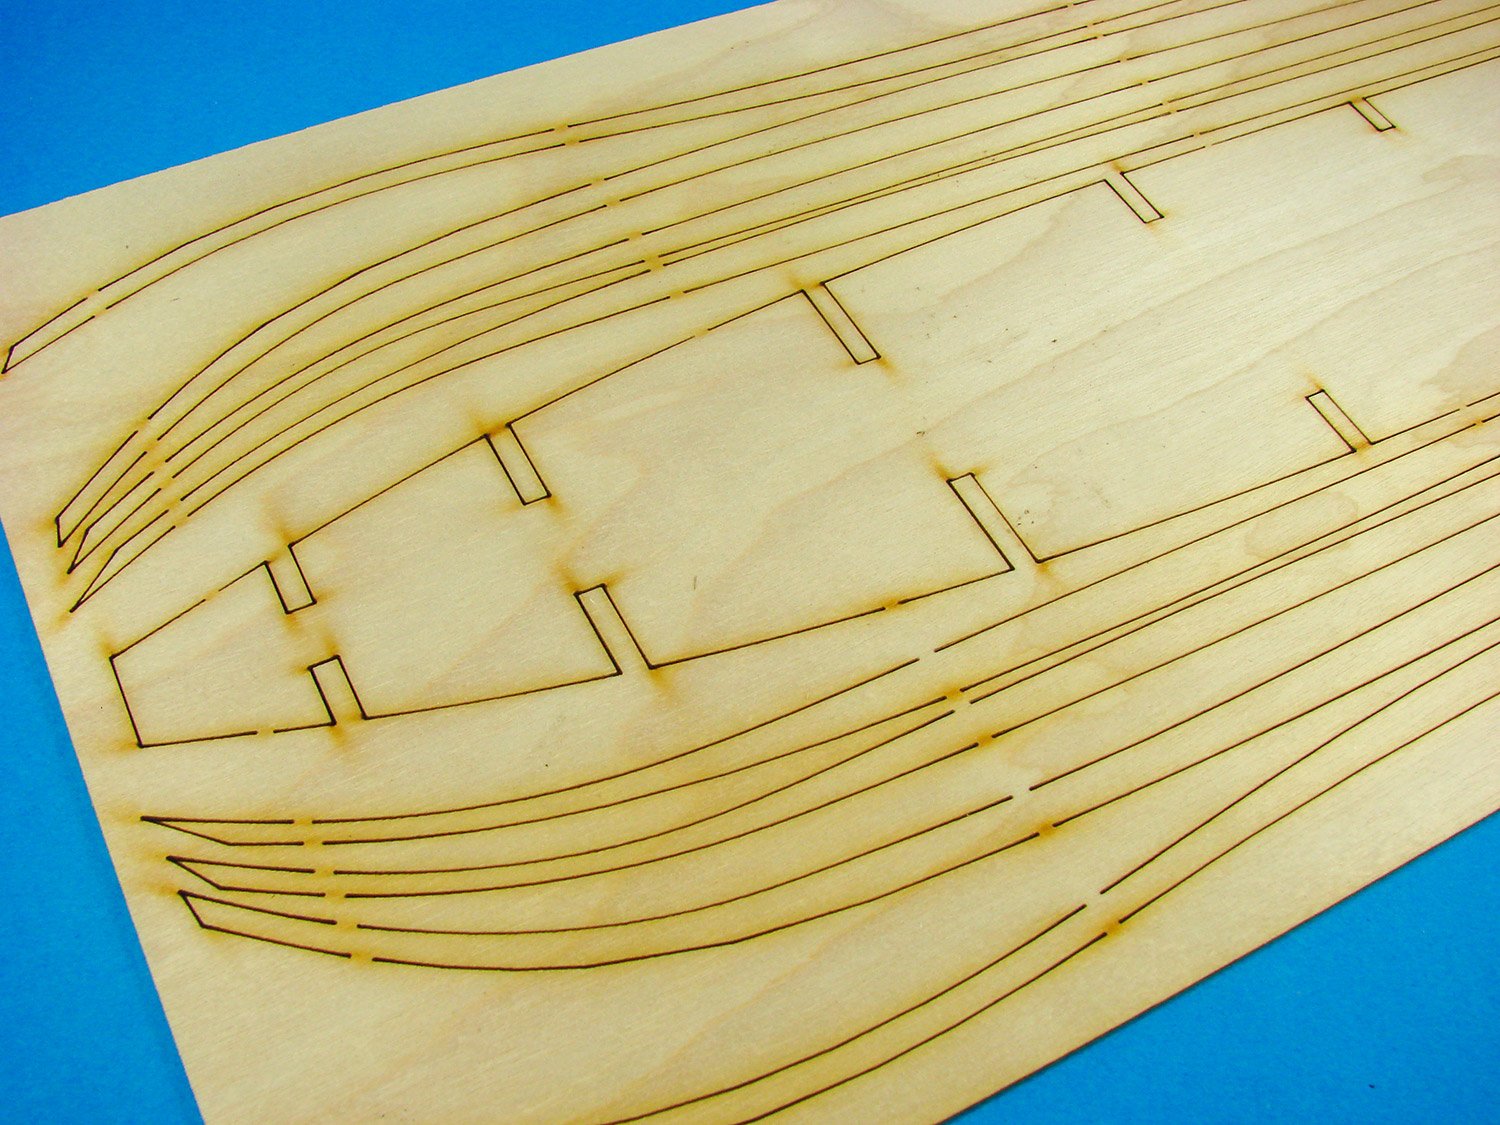
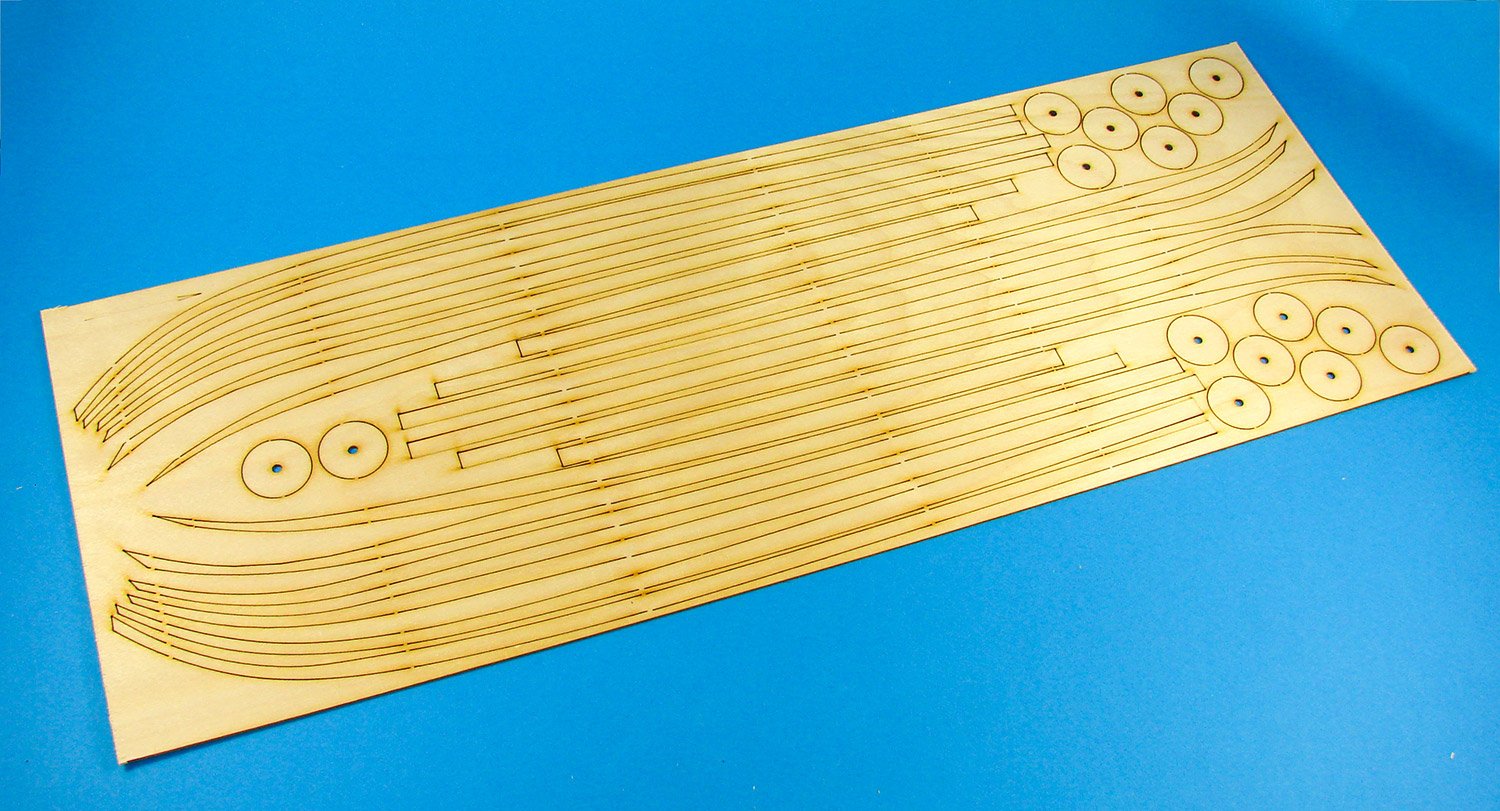
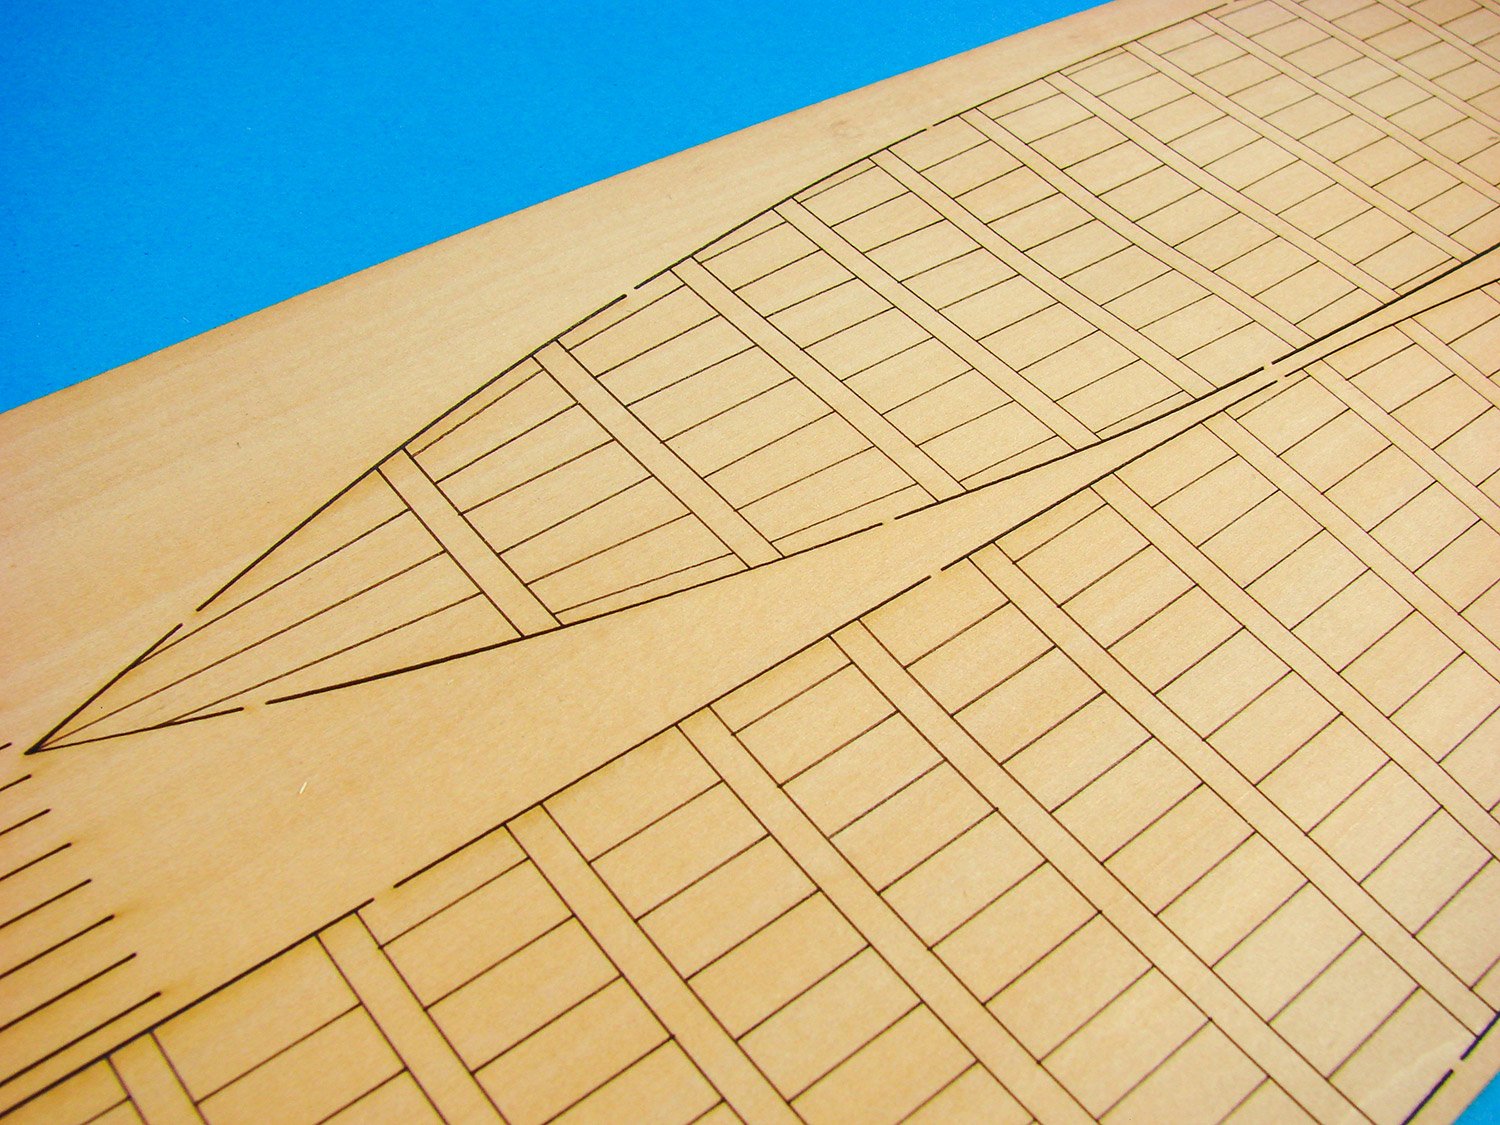
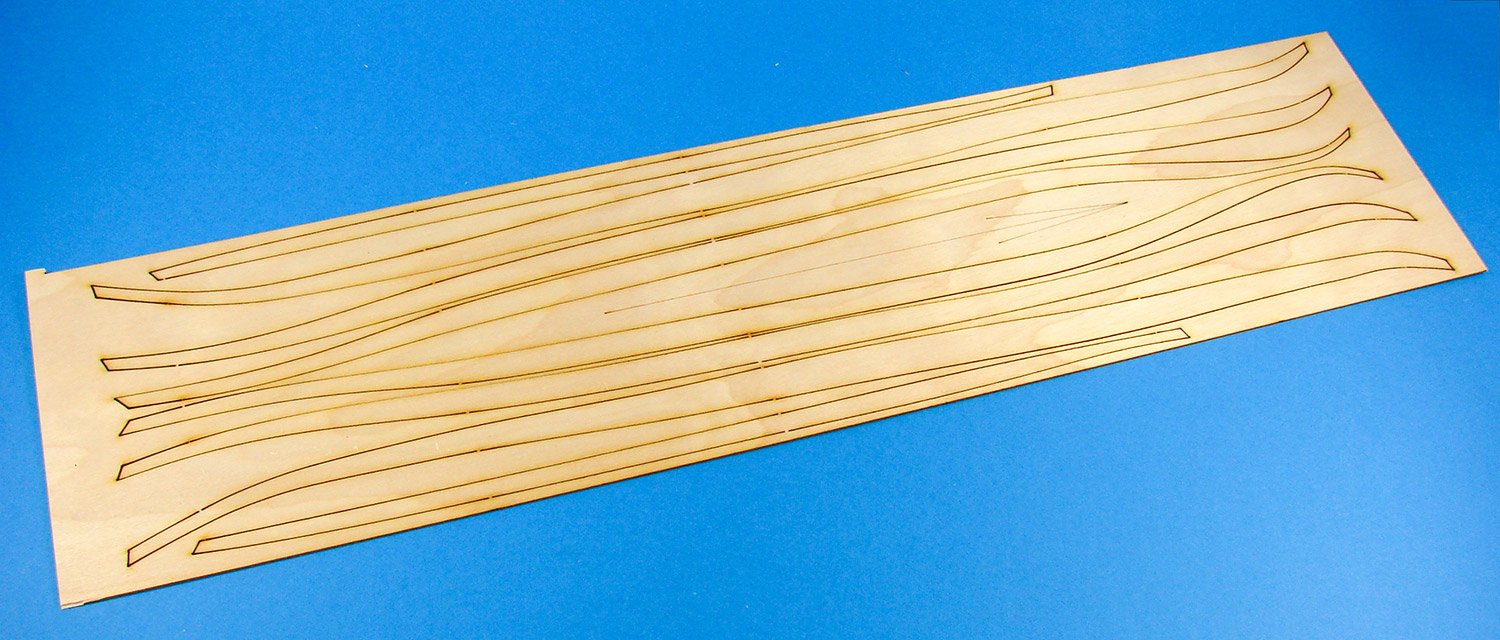
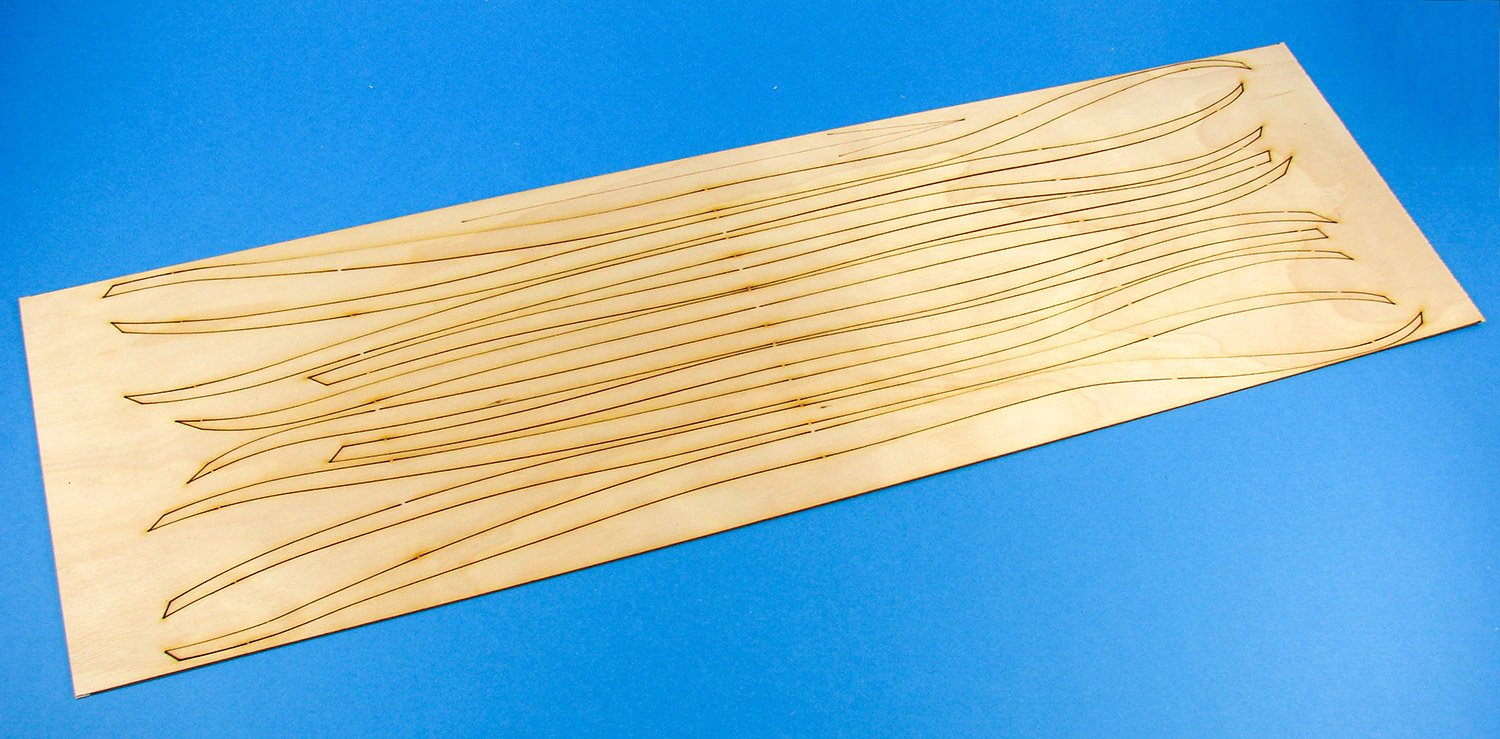
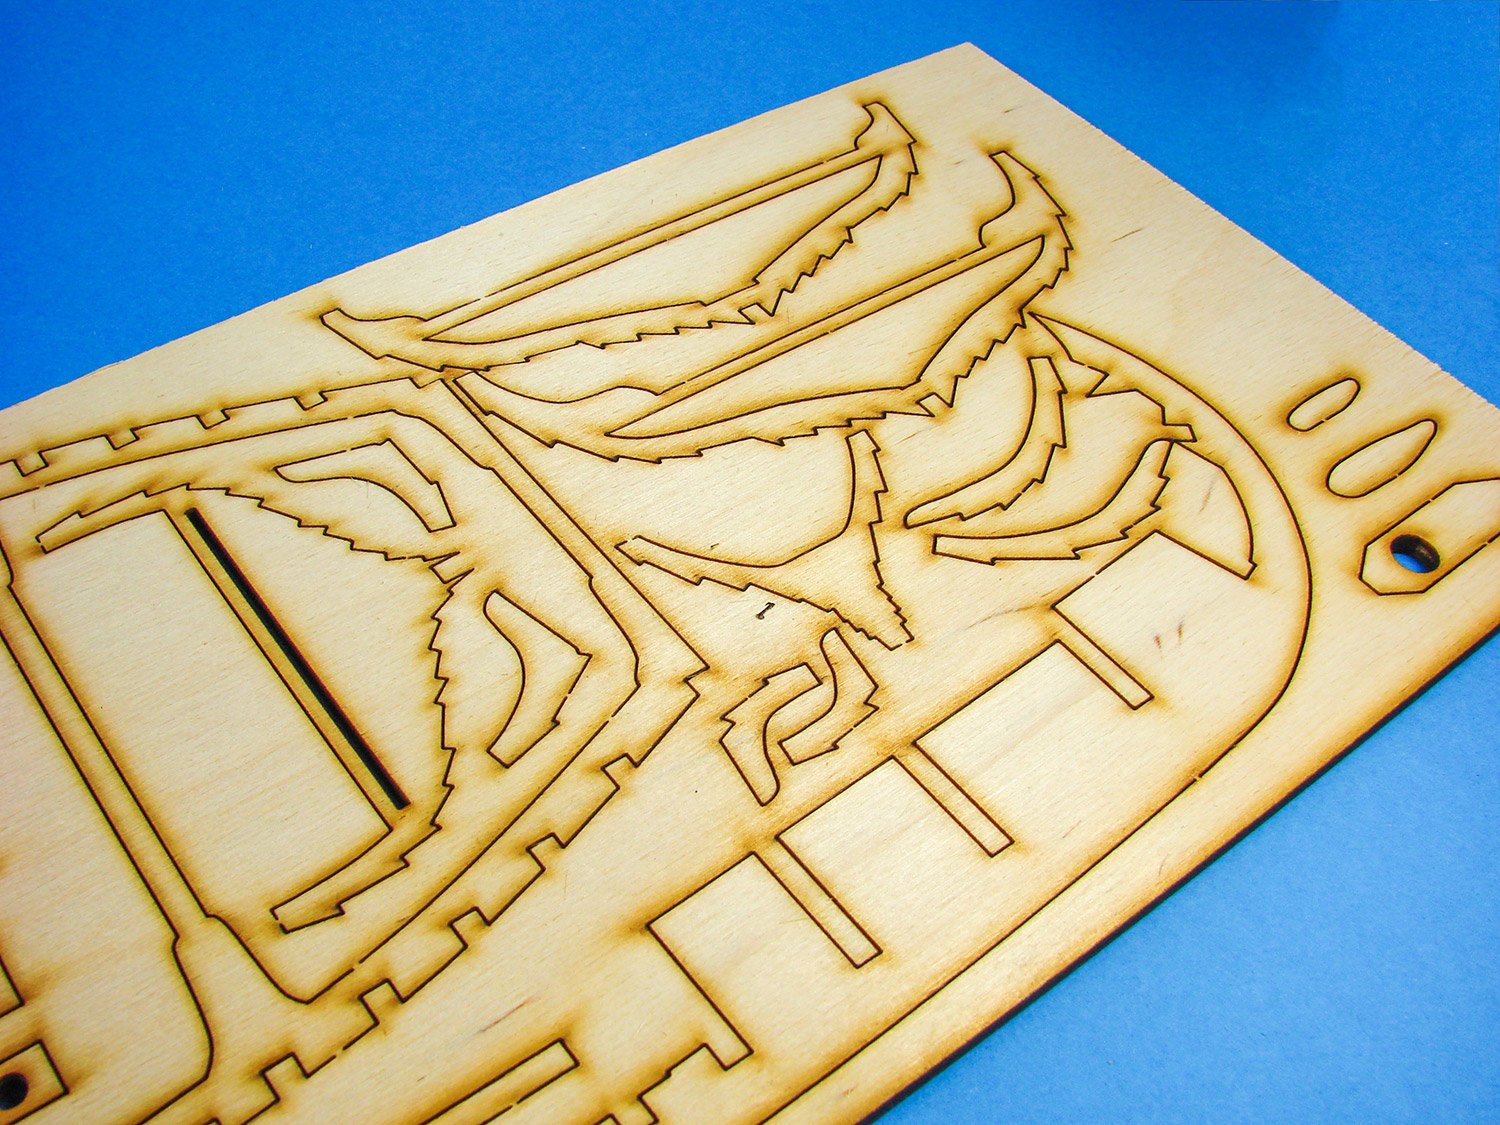
On these four sheets, we have more planks. Remember that this model is very long, and you will need to join the plank lengths together when running each strake. This might seem a pain in the backside, but it’s no different to any other model ship, in that respect. The model will also be finished in a dark brown colour to represent the tarred appearance of each ship. The Vikings were experts in tar production, although their methods aren’t entirely clear. It does appear that tar was made by burning resinous pine logs over a buried fire pit. Very much an industrial-sized process! That’s enough history. Also note the deck sections here, and more shields.


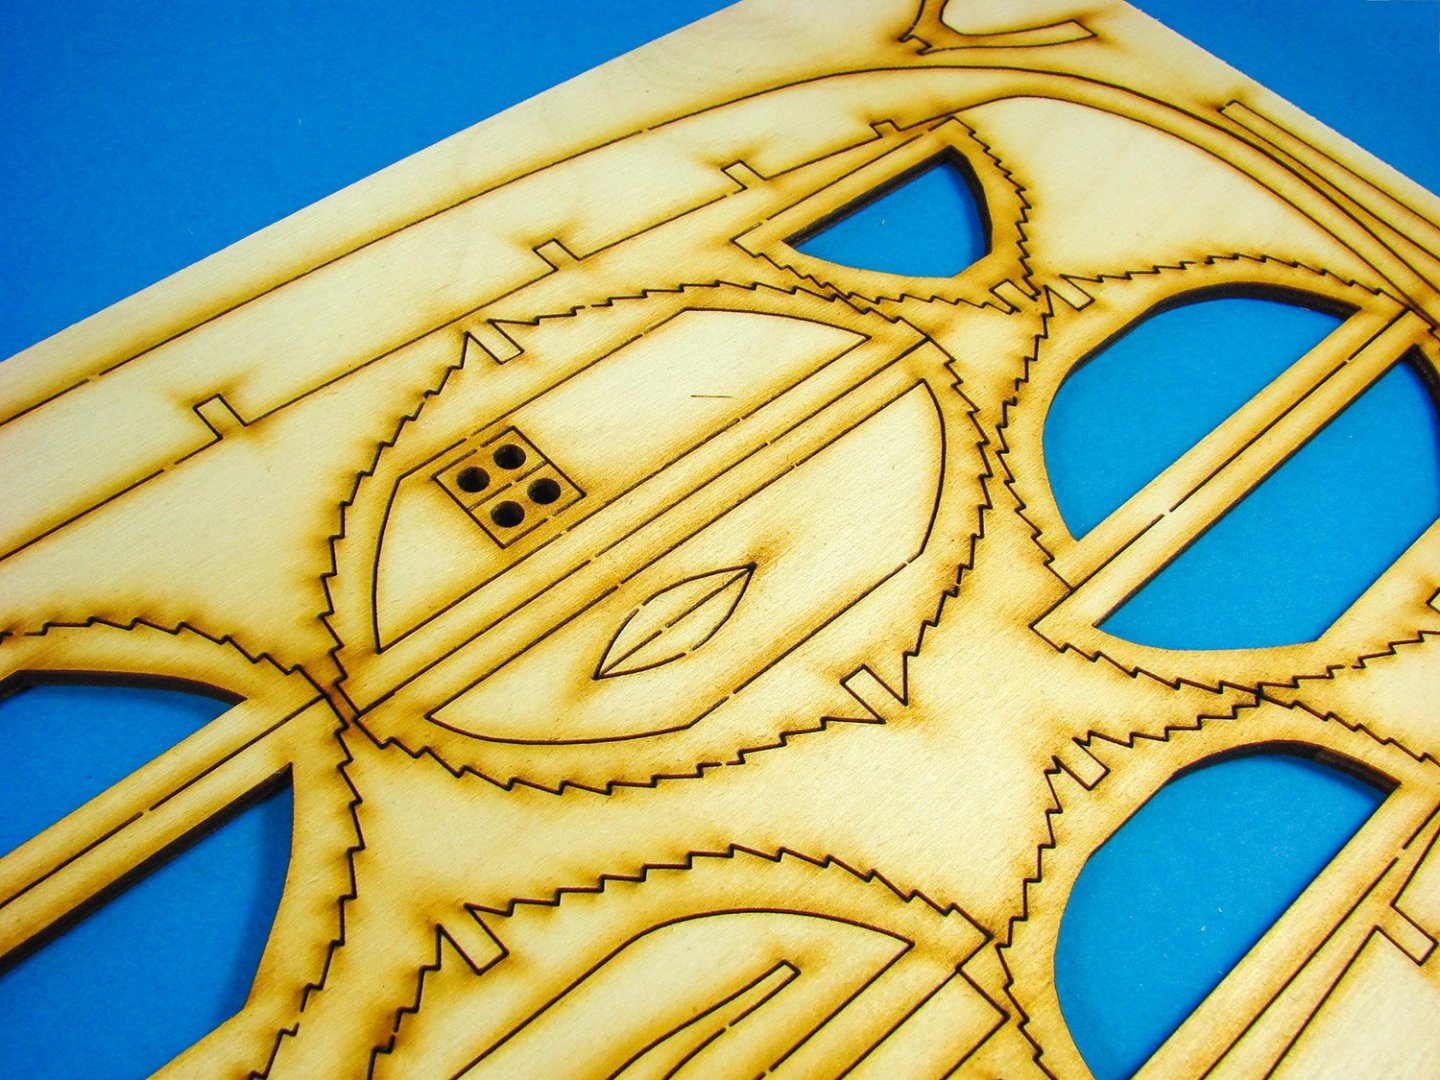
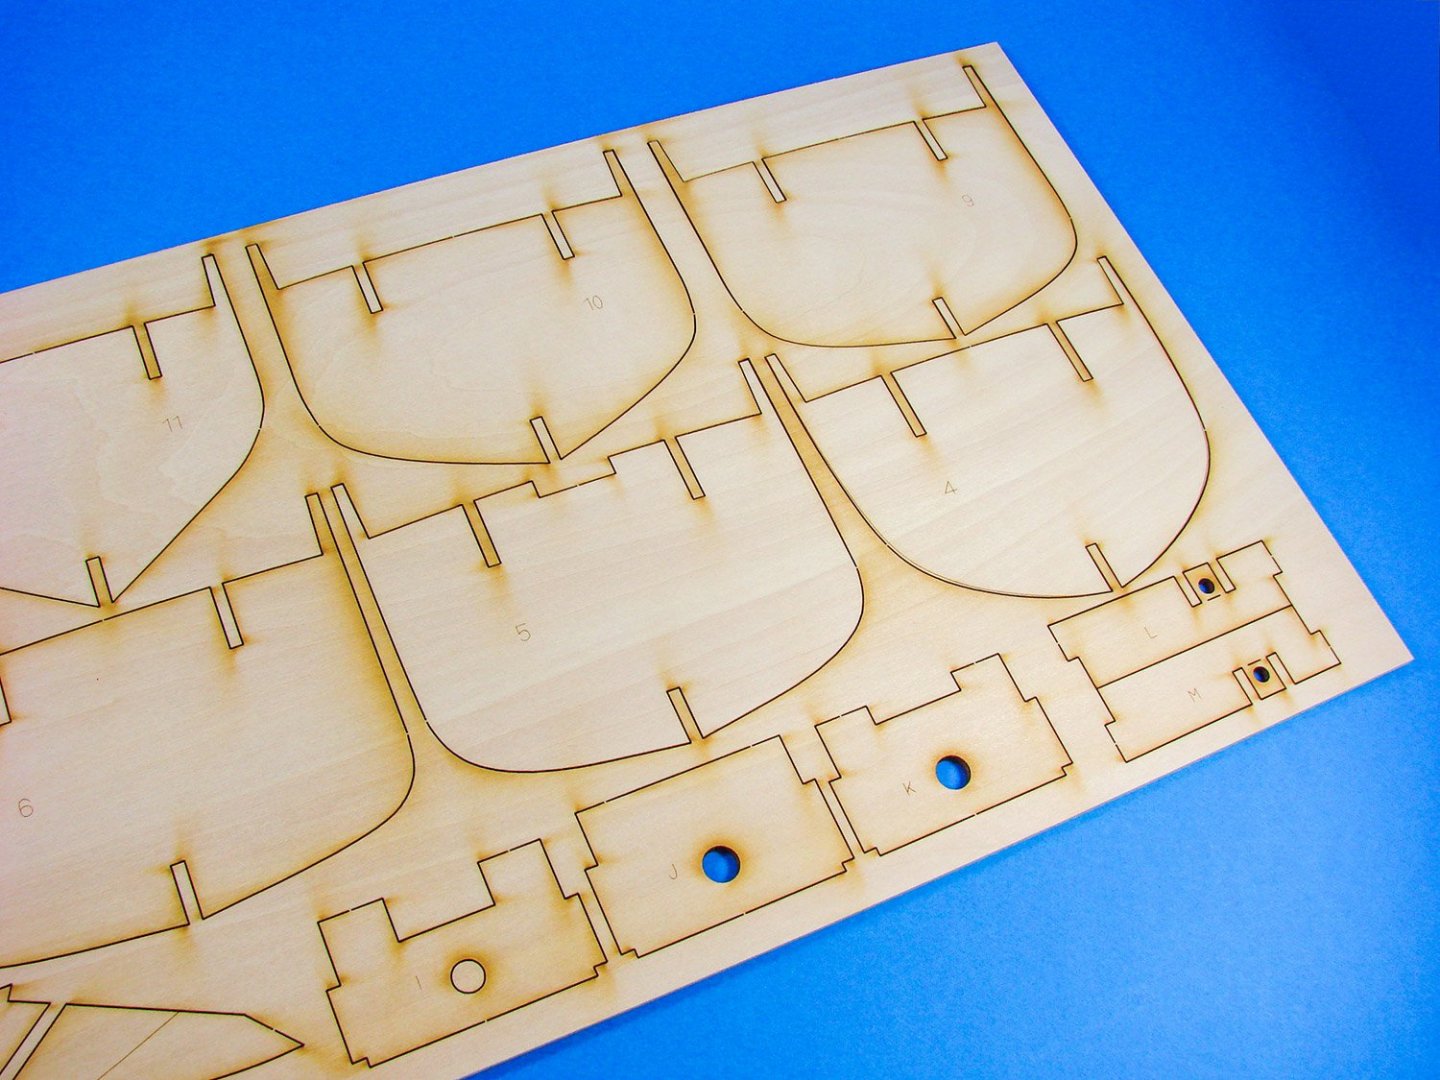
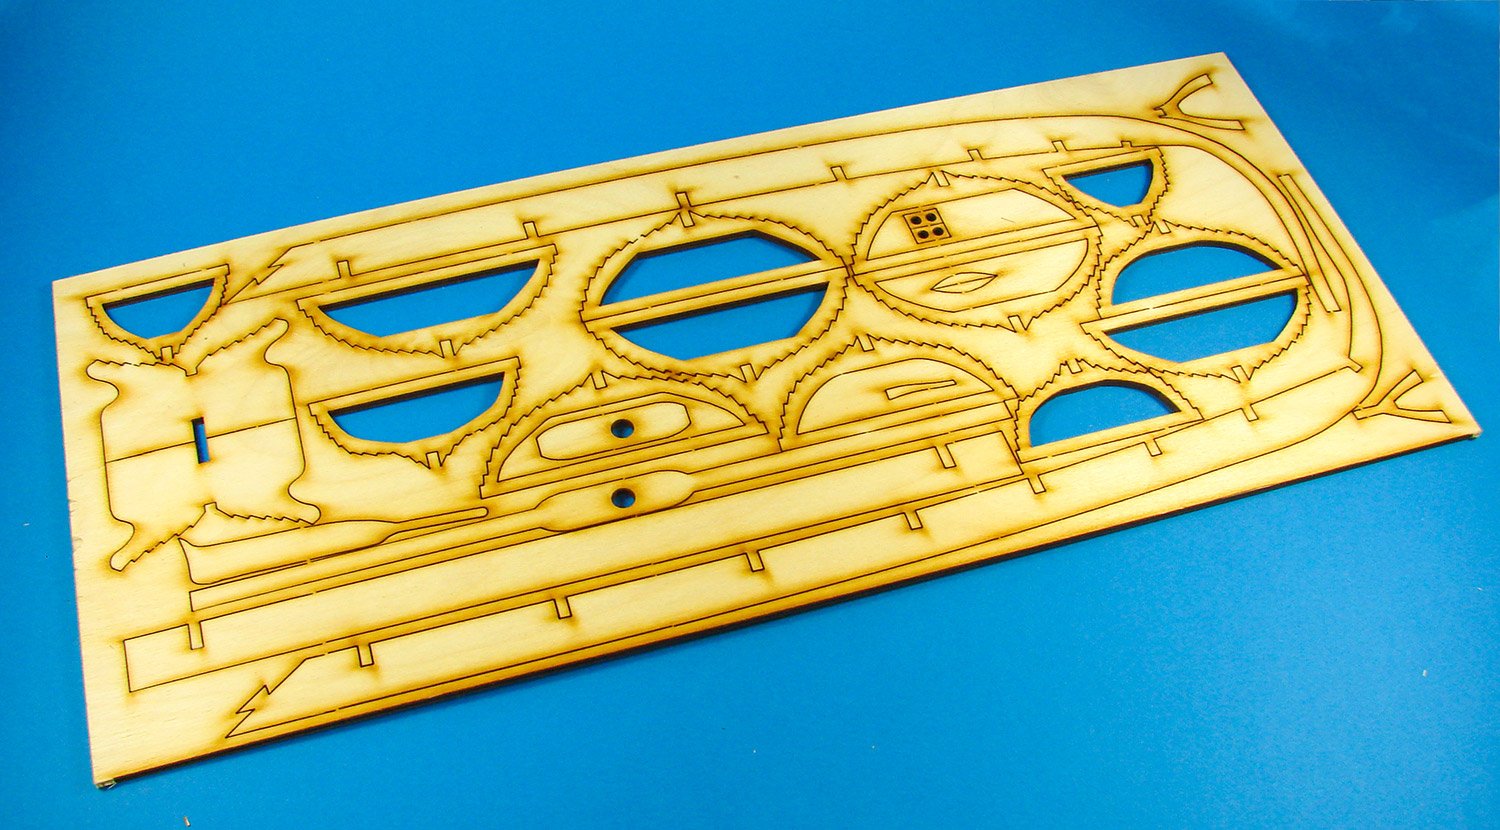
Where we now diverge from the previous sheets is with this thicker ply sheet. Here you will find the thirteen bulkheads used along the length. The edges of these are channelled out so that the planks will sit snugly into them. You will need to bevel these slightly, but due to the sheer length of the vessel and how narrow it is, the bevelling should be quite minimal. Looking at the sheet, you will also see the two-part false keel, mast foot, steering oar and also a very welcome stand on which to sit your finished model. As with the bulkheads, this is also channelled out so that your clinker-build hull will sit neatly upon it.


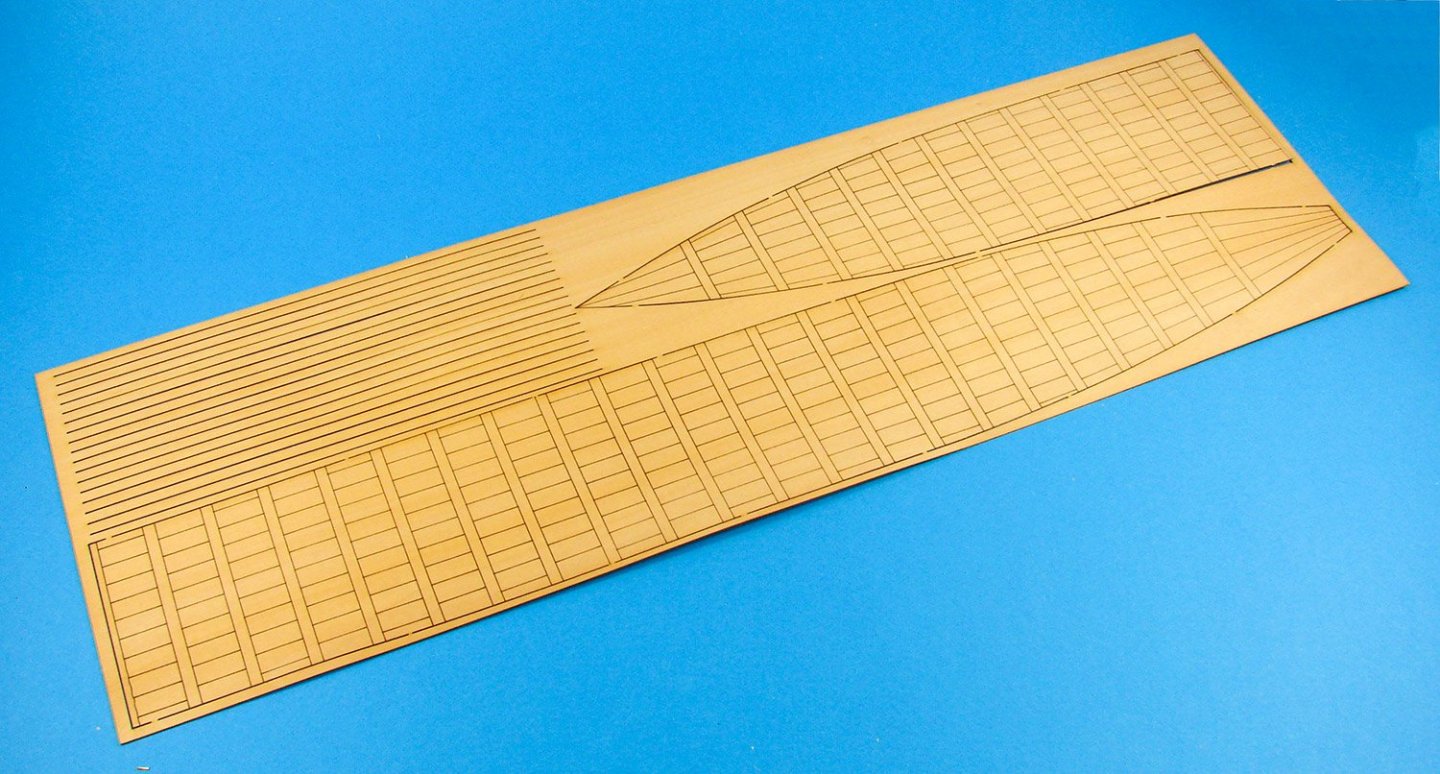
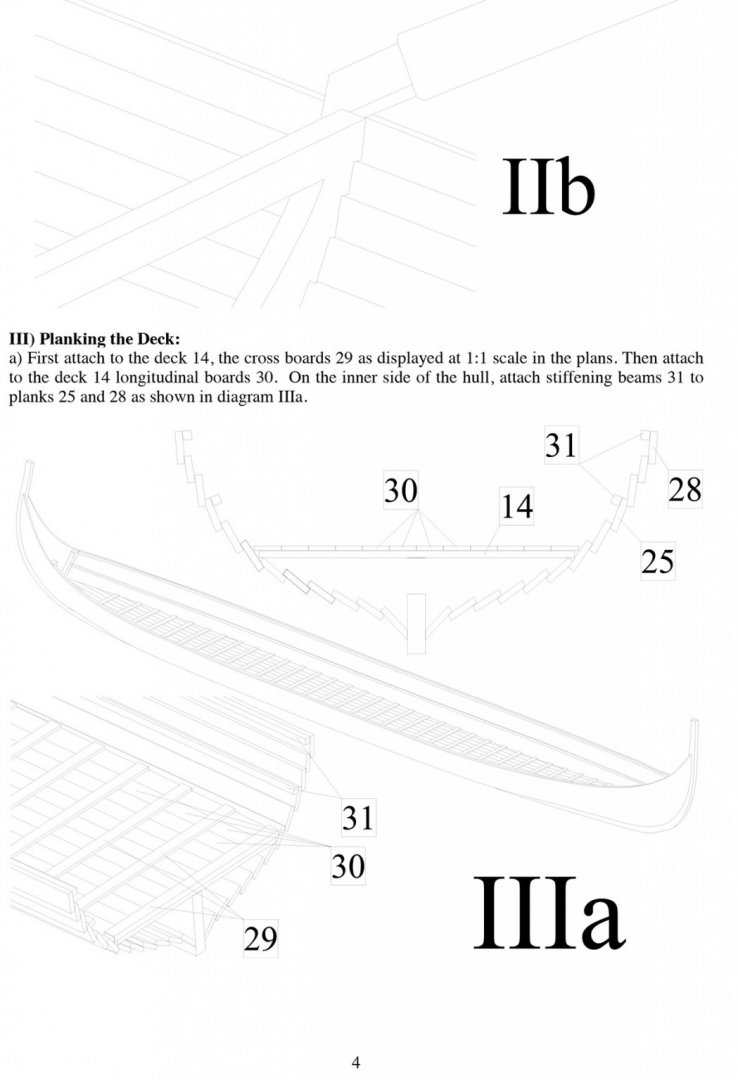
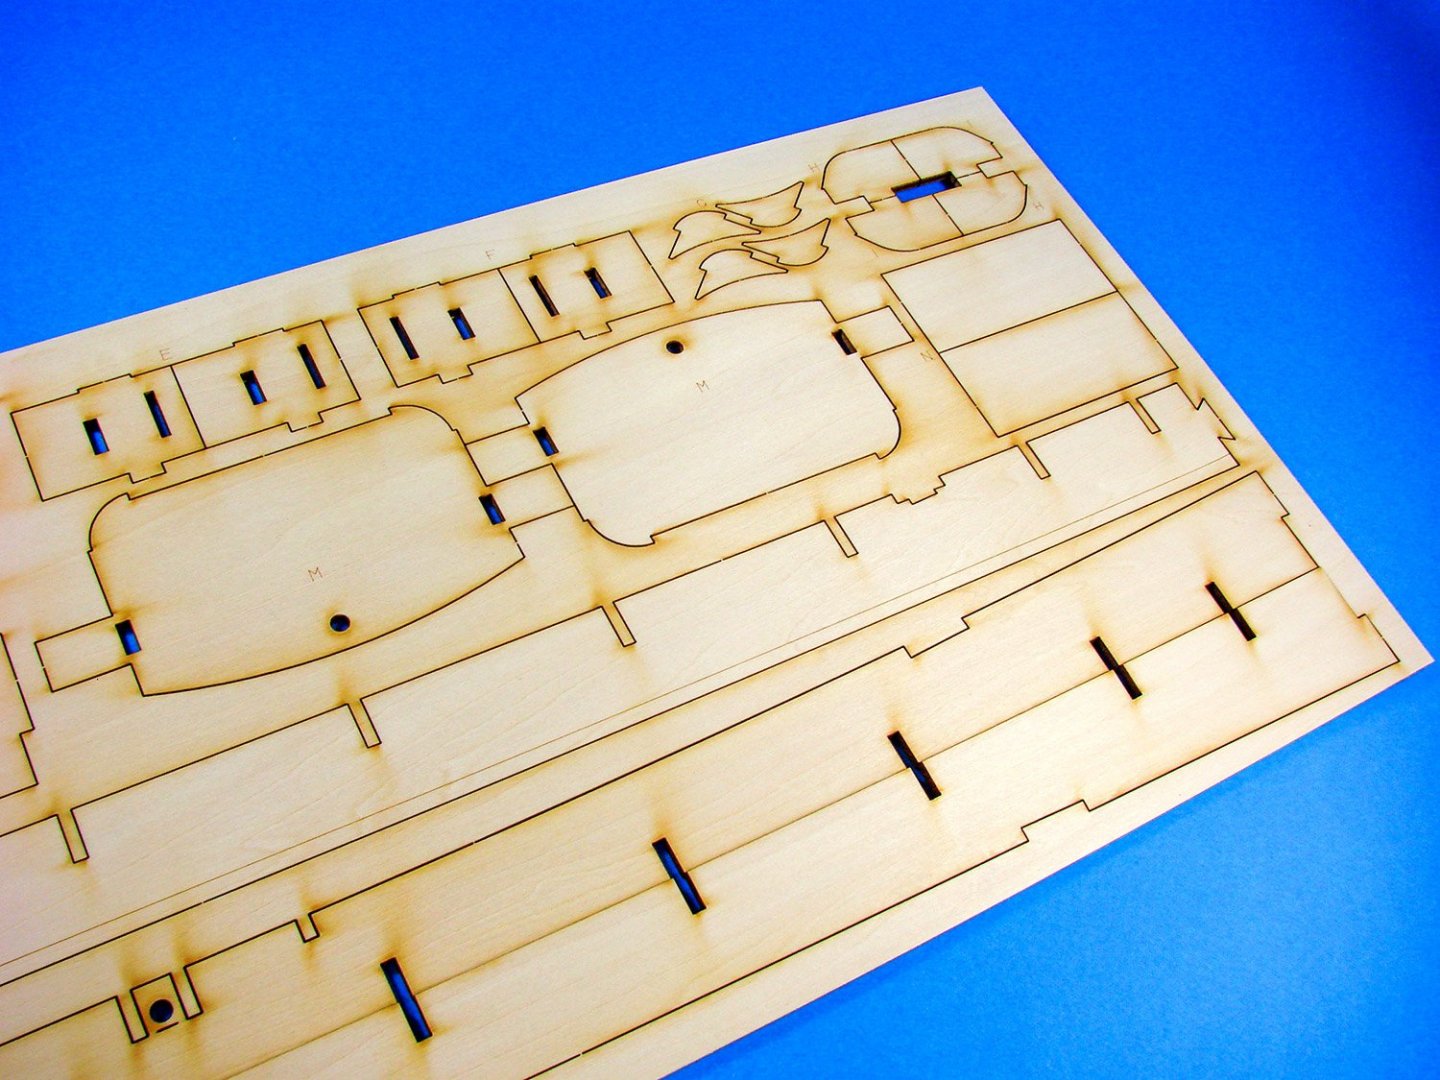
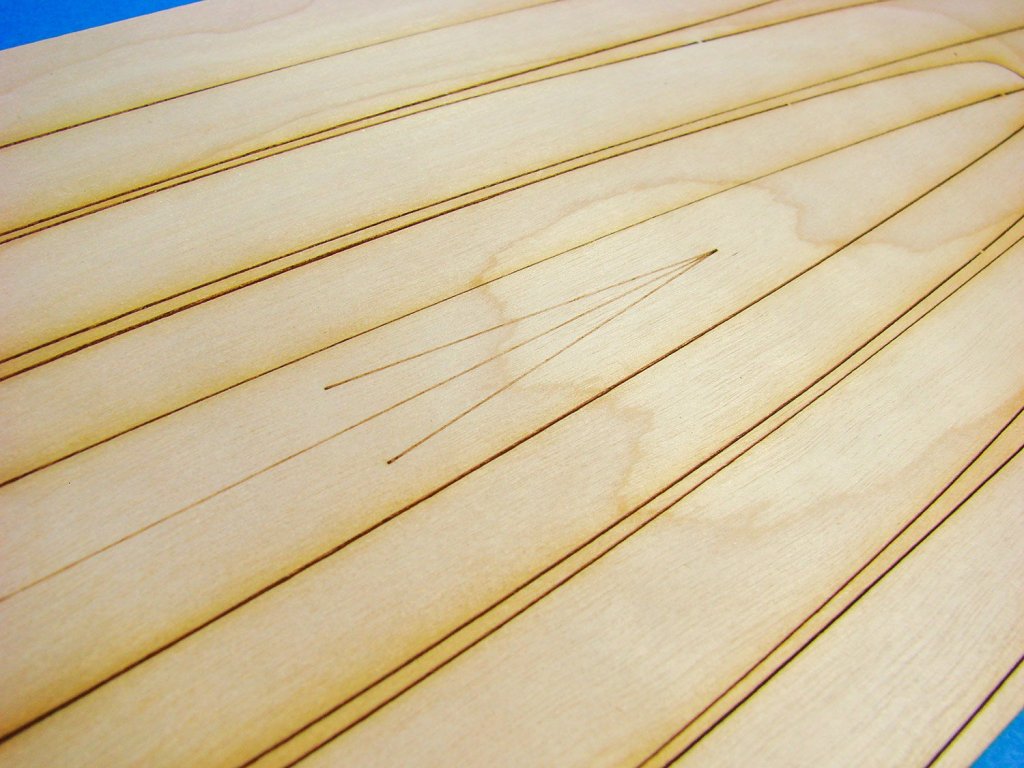
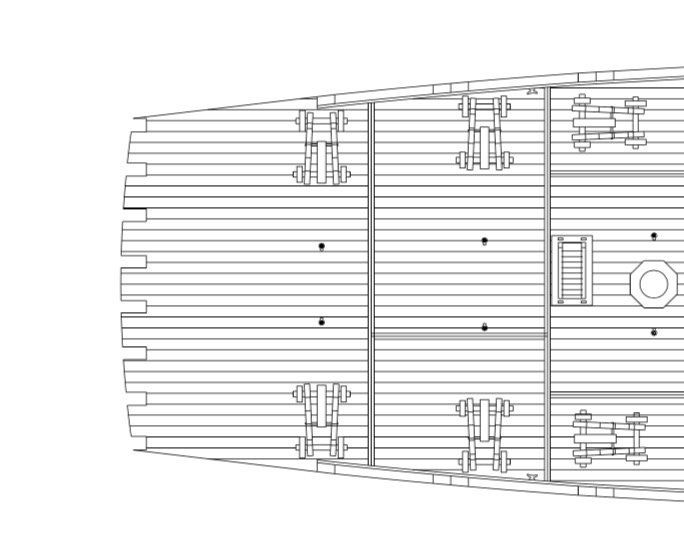
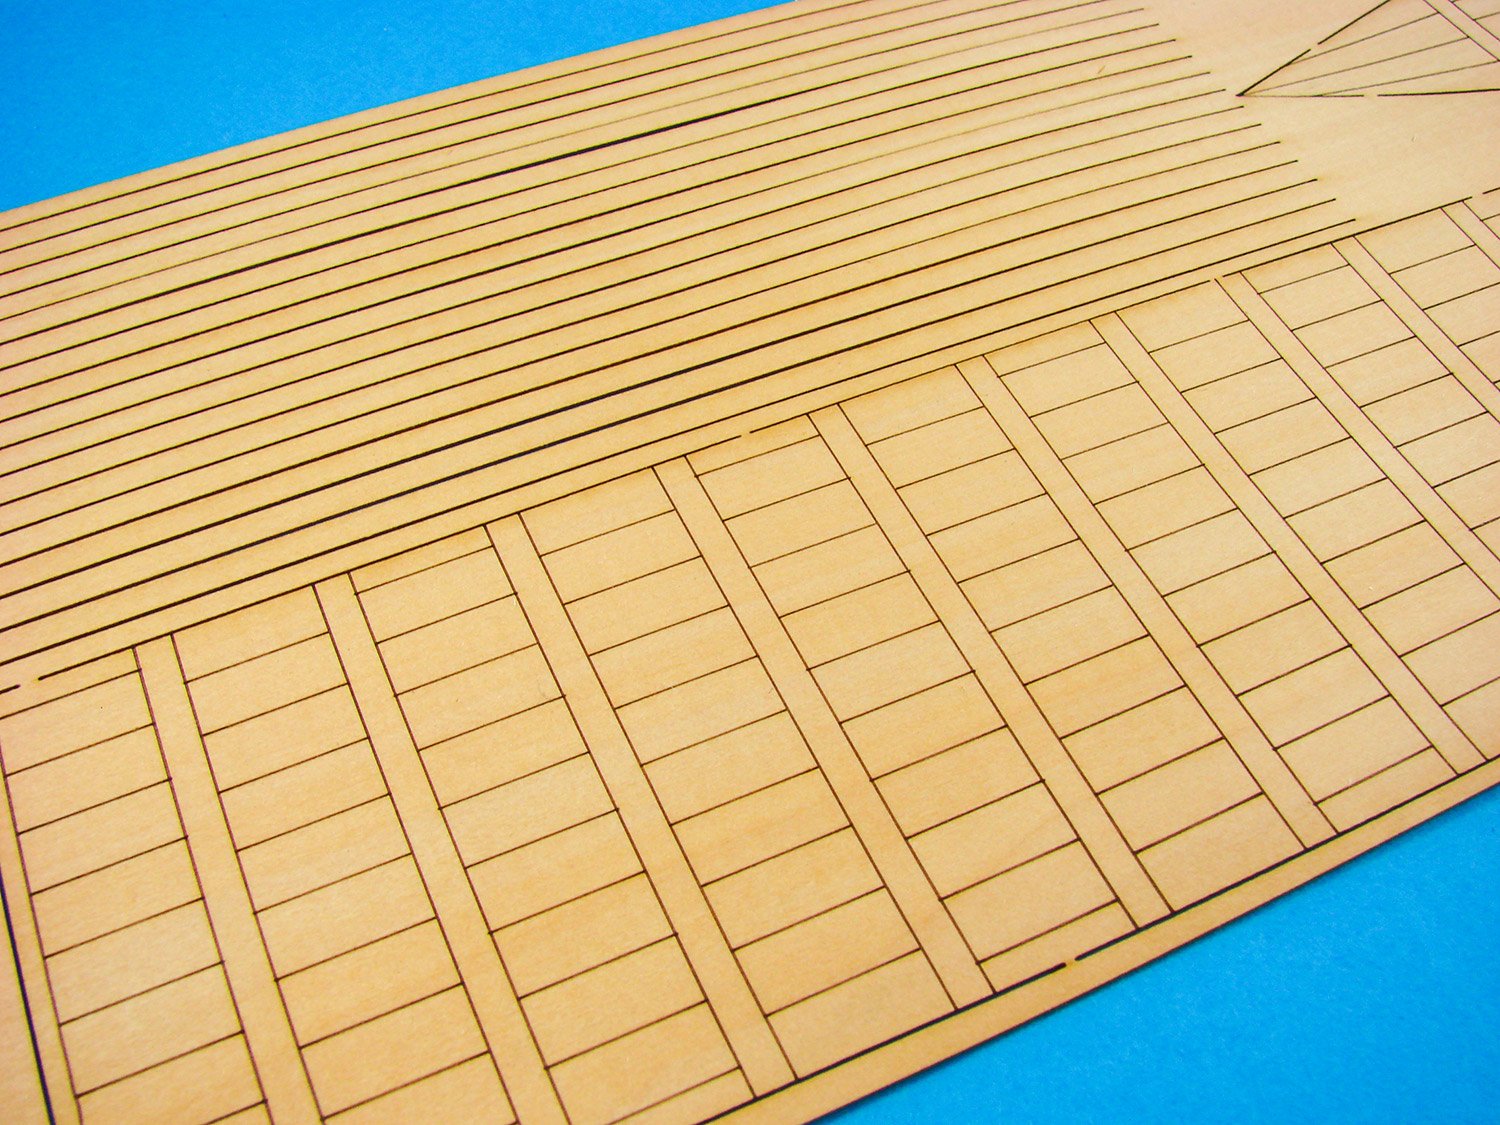
Now for something a little different. The last large laser-cut sheet is supplied in beautiful pearwood. This very thin sheet contains the single-like planks for the decks. I do believe that in some cases, these could be lifted, and stowage placed underneath. The strips you see are the transverse plank strips.


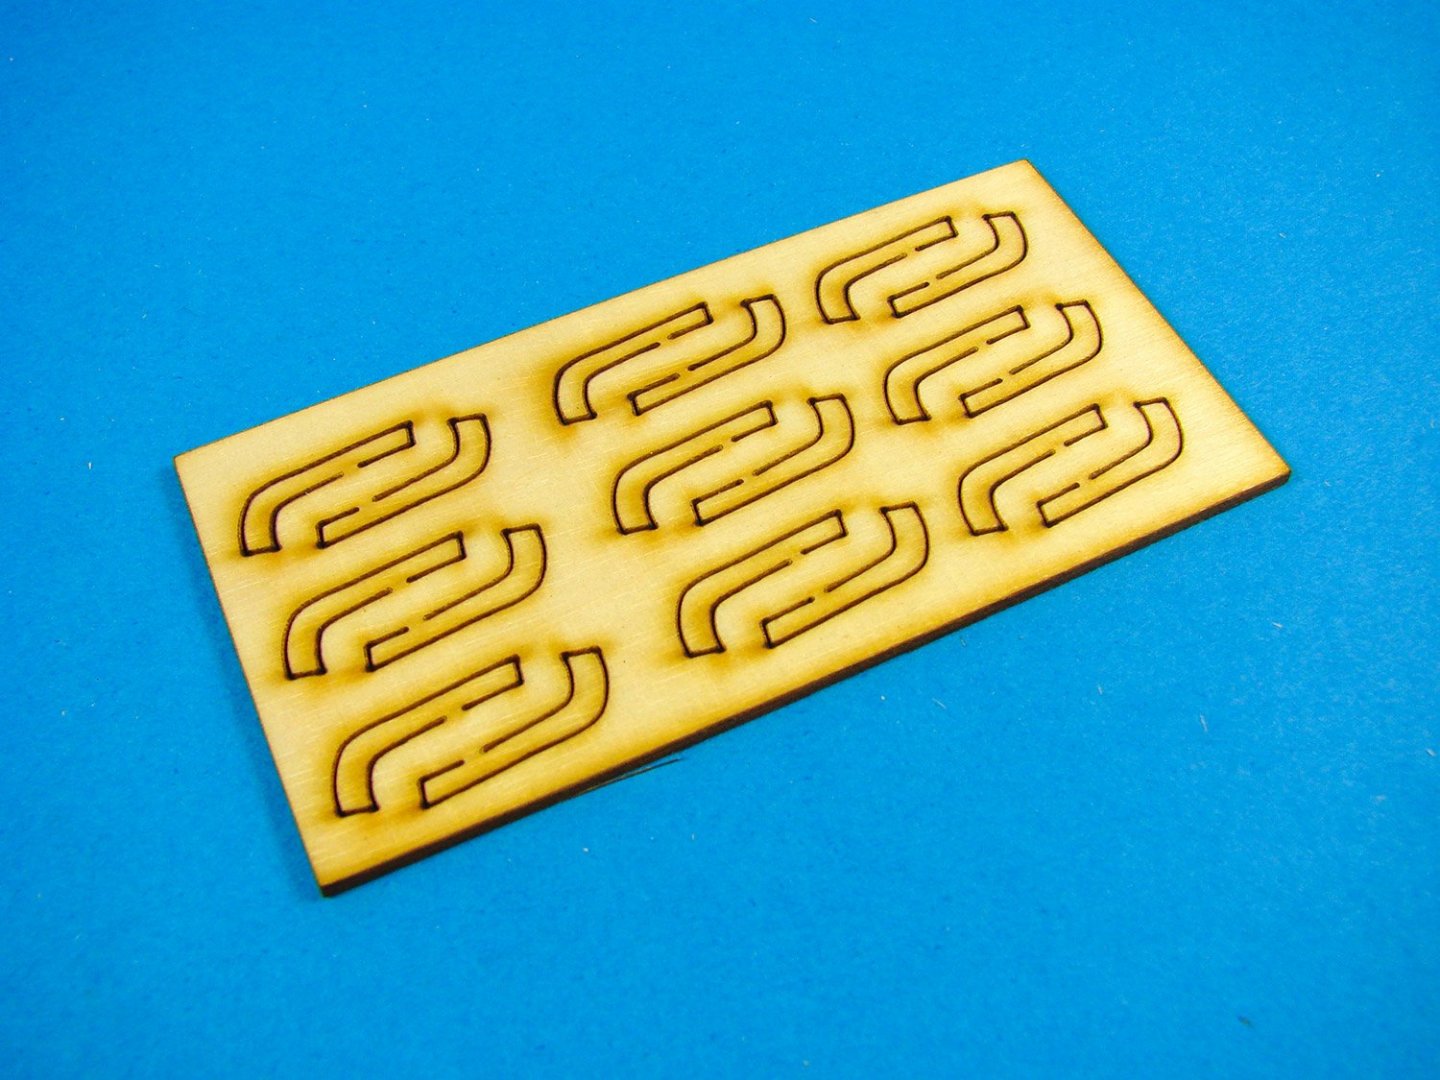
For the last little ply sheet, we are given a series of shroud pins.
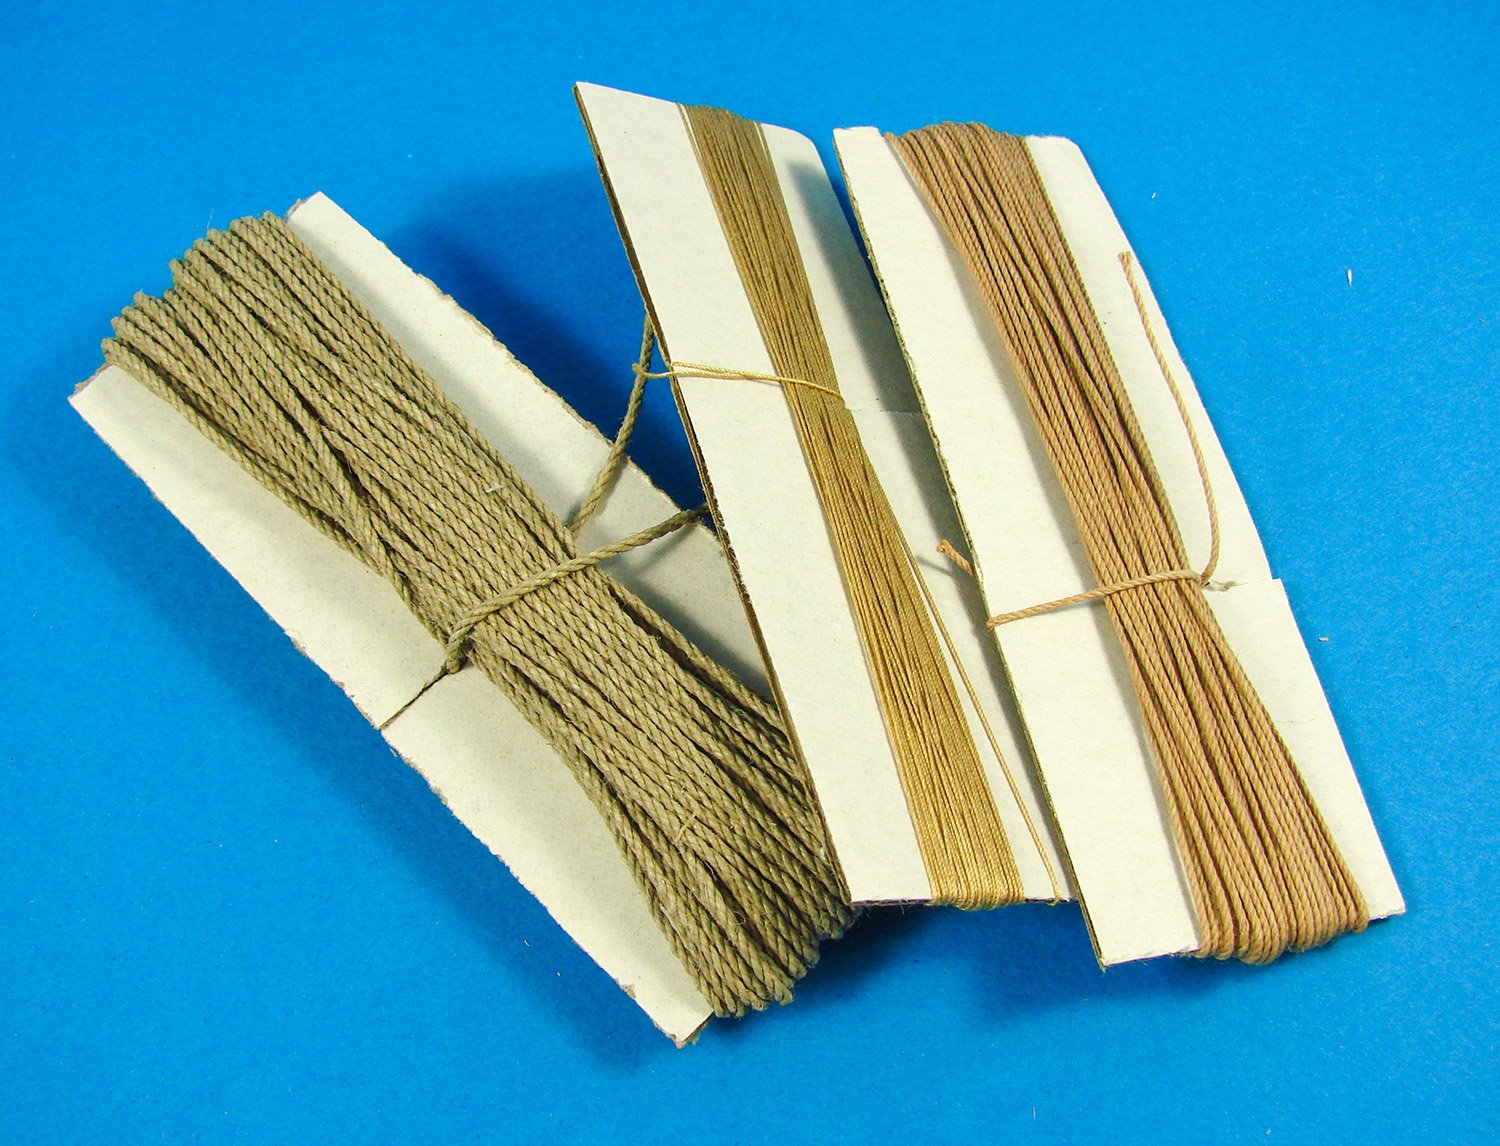
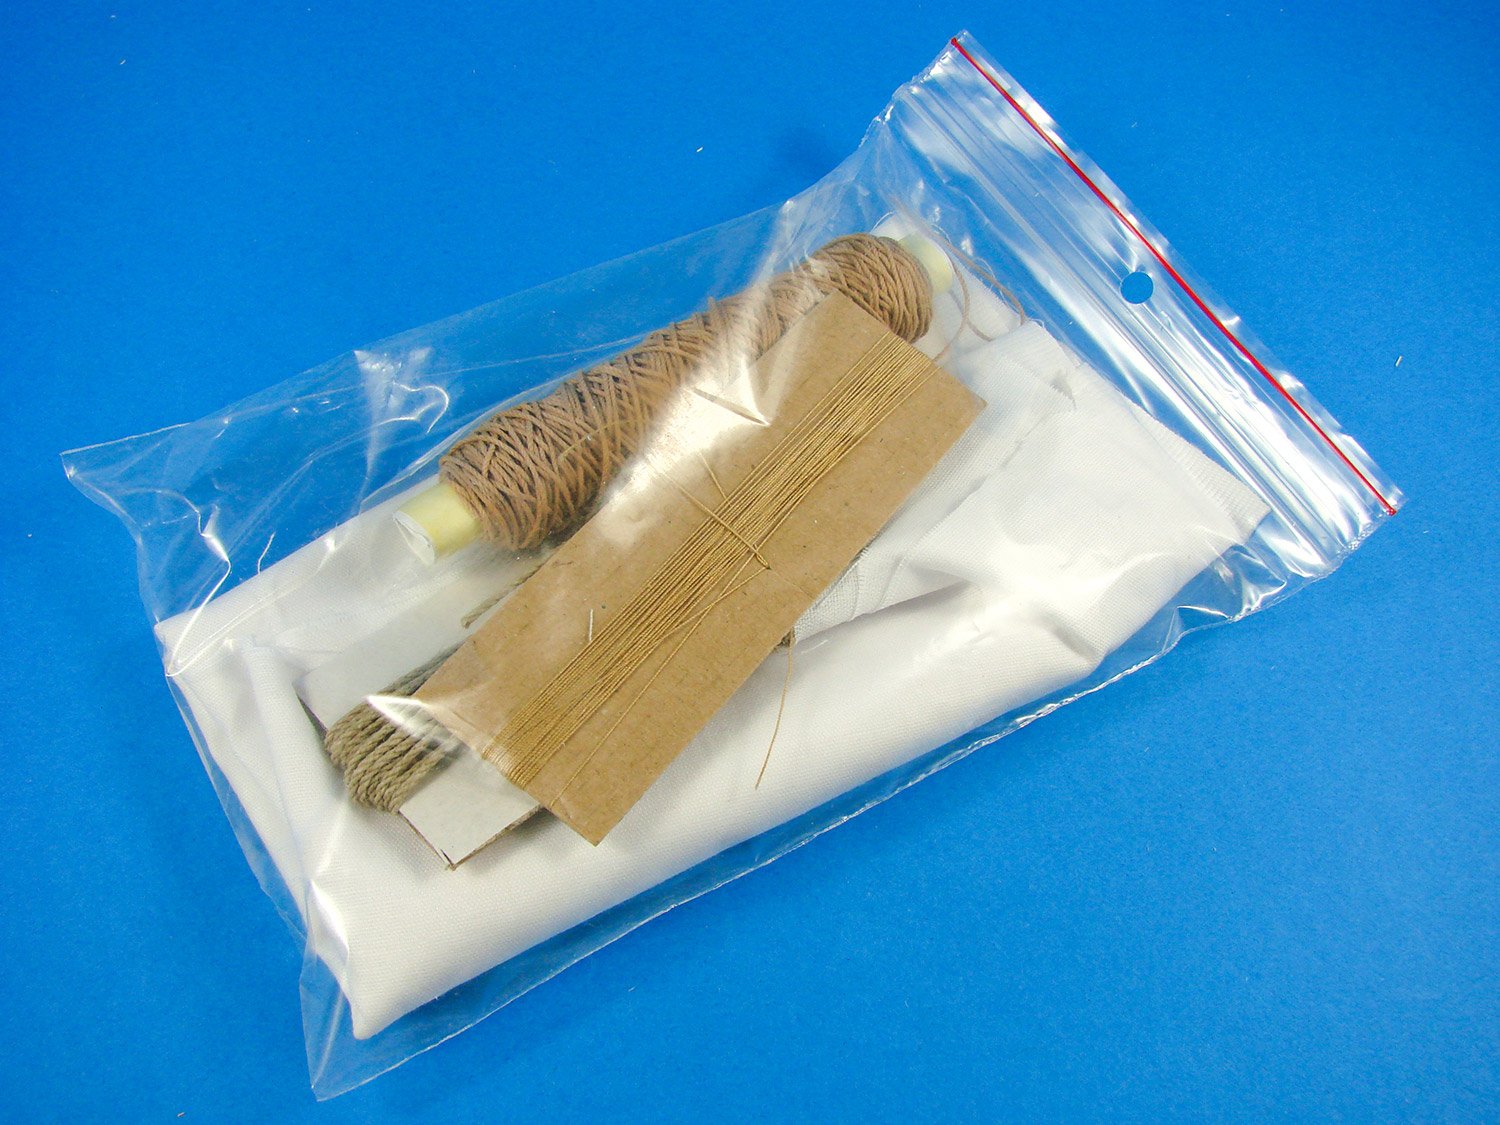
Now onto the bagged components. In this large, clear sleeve can be found the rest of the parts for this model. Three different sorts of rigging cords in a very natural looking colour. These are wrapped around pieces of card to prevent them from getting tangled. The thick rope is the only one of these with any fuzzy ends, and still these are few and far between. It certainly looks like Viking rope should do!
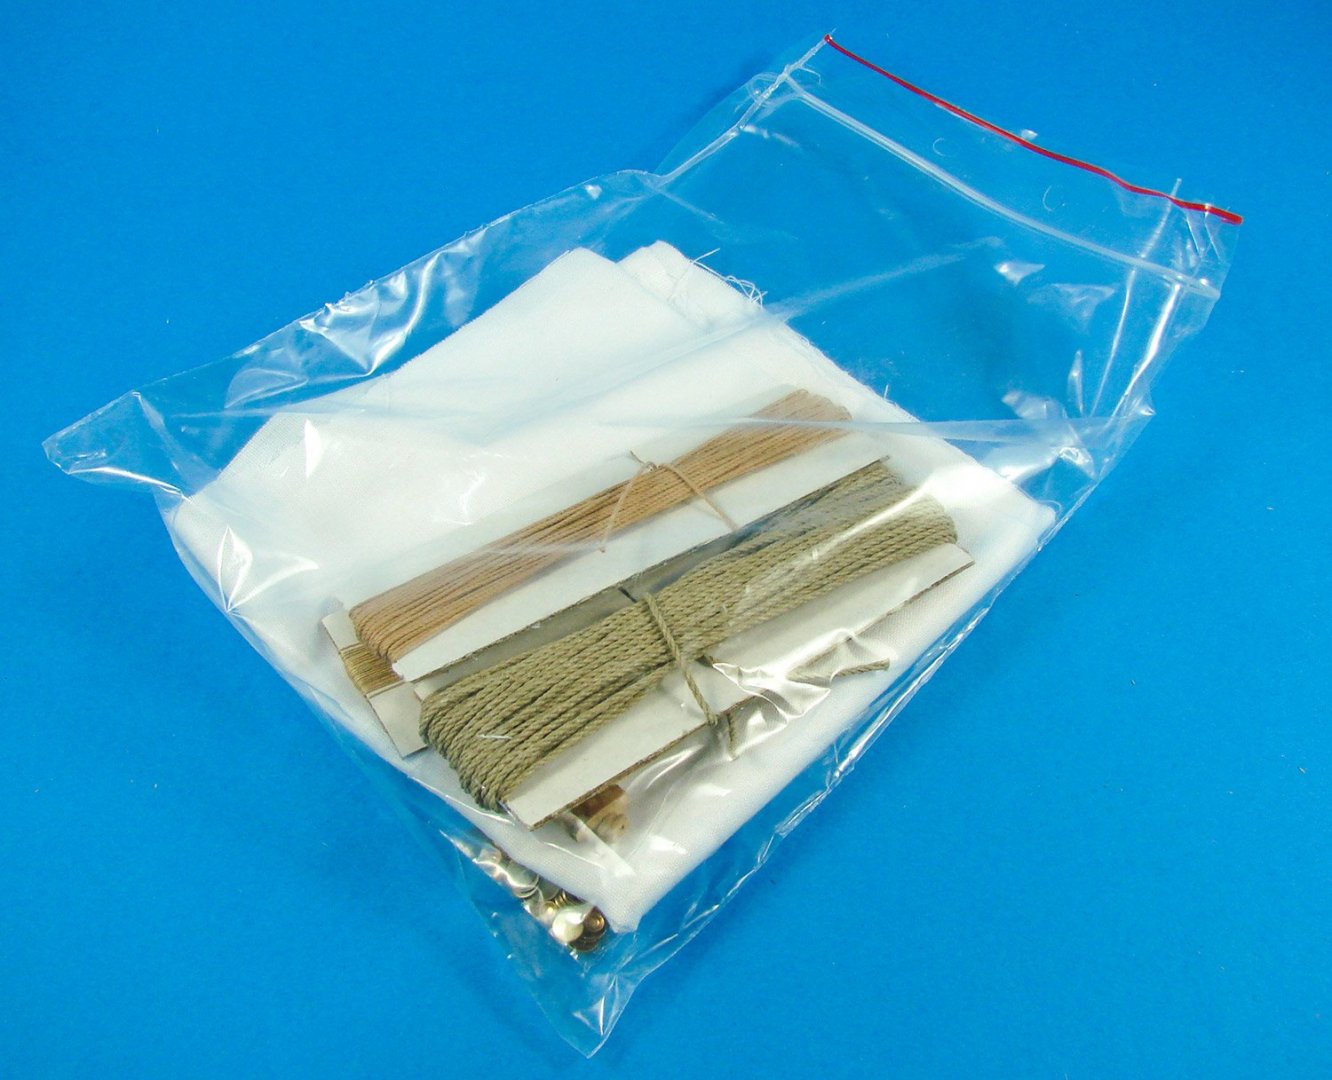

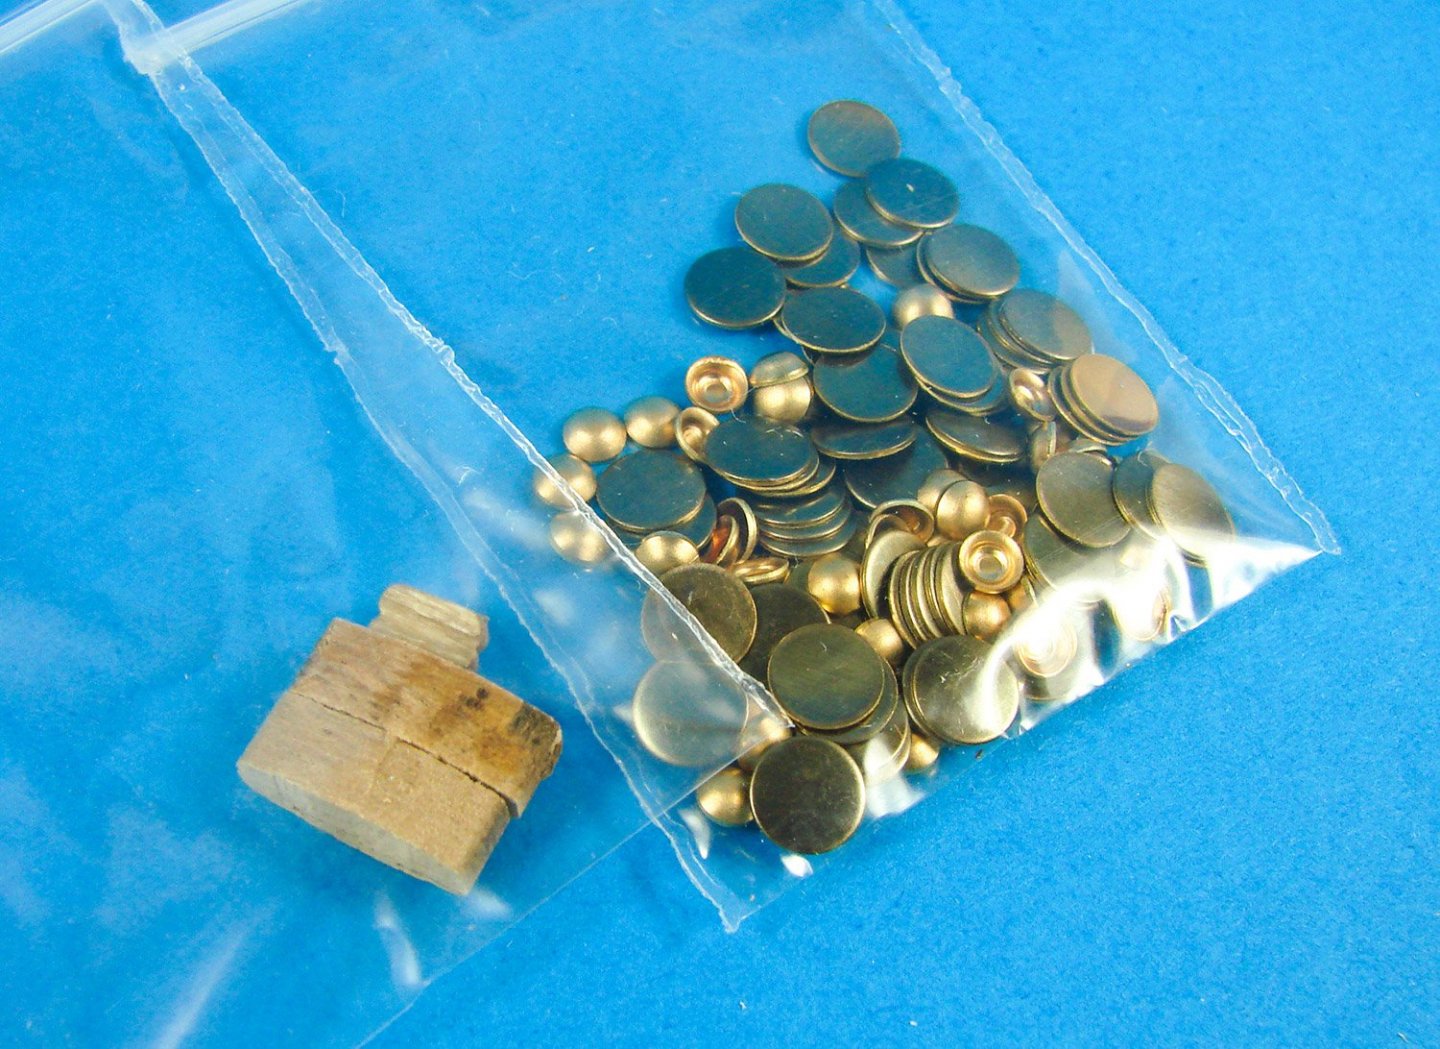
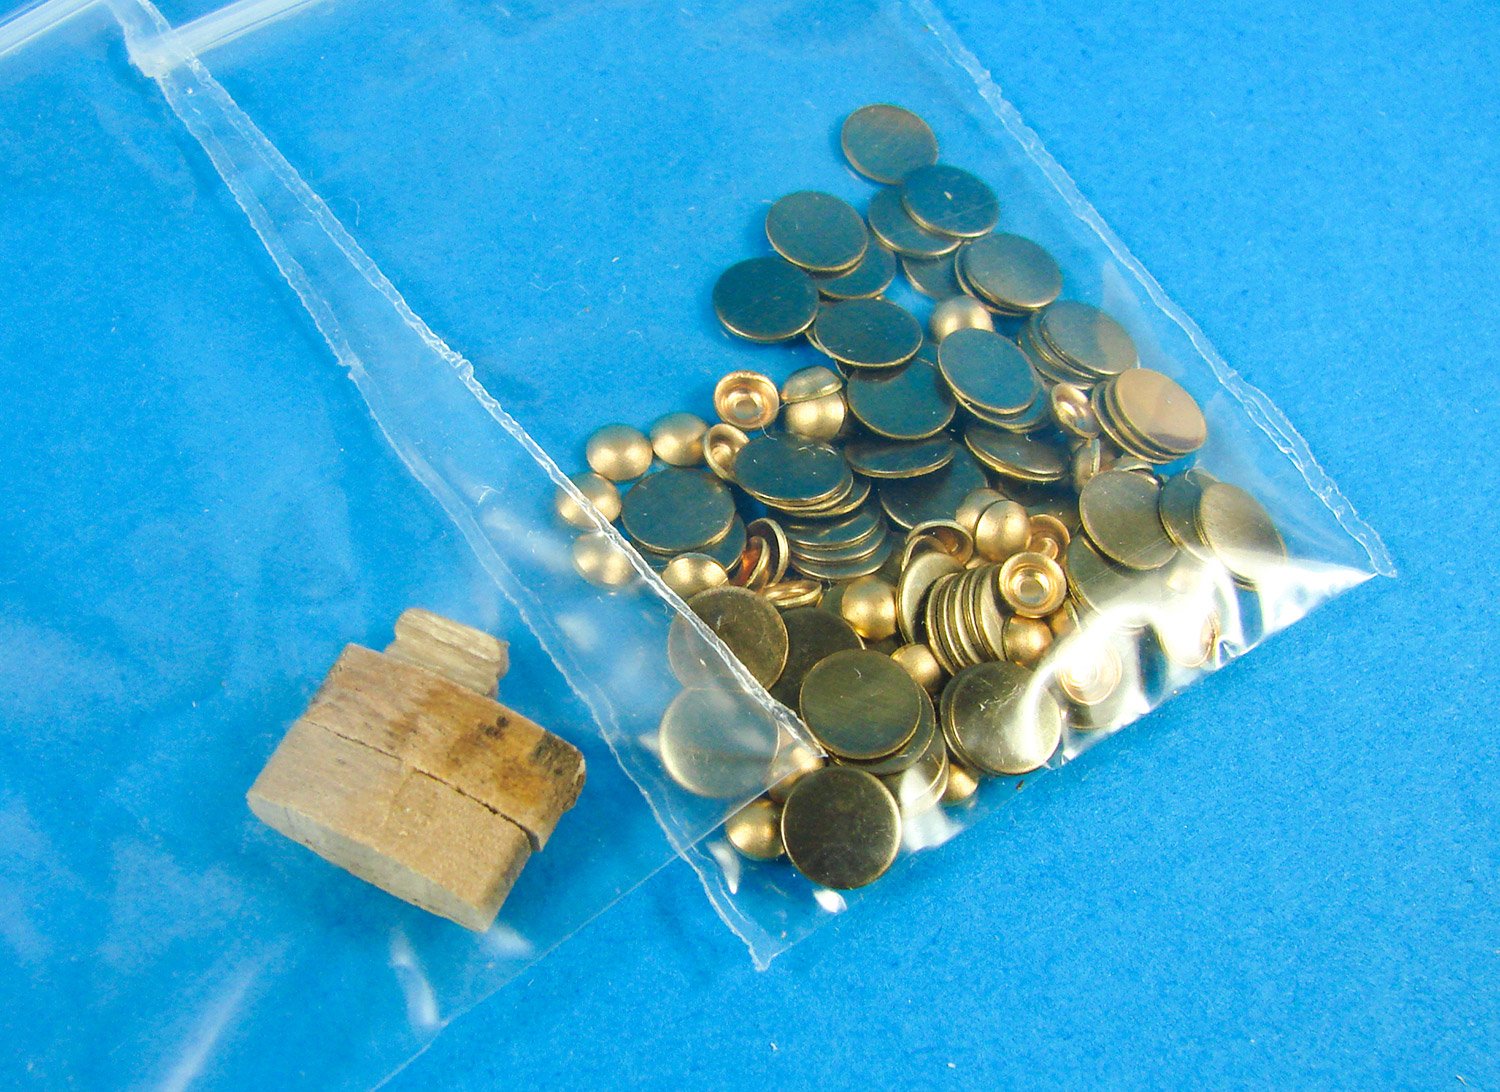
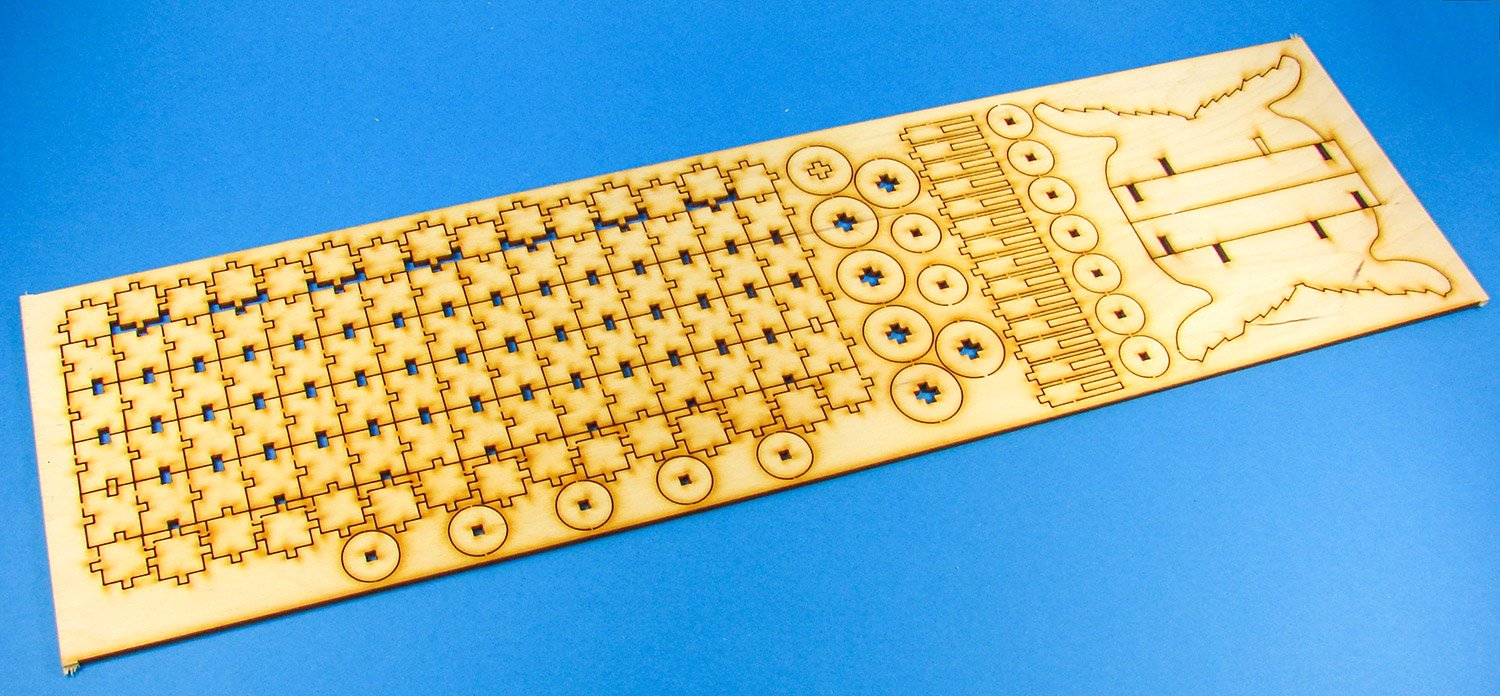
This next photo shows the three rigging blocks. These are in two different sizes and remember, these shouldn’t be the pristine items we see on later vessels. Instead, they would have been quite crude. To the right of the blocks is a bag containing the embellishments for the many shields. These consist of two-part hubs (base disc and central hub). To be honest, I’d have liked to have seen more to these shields, but the kit parts give a great basis from which to work.
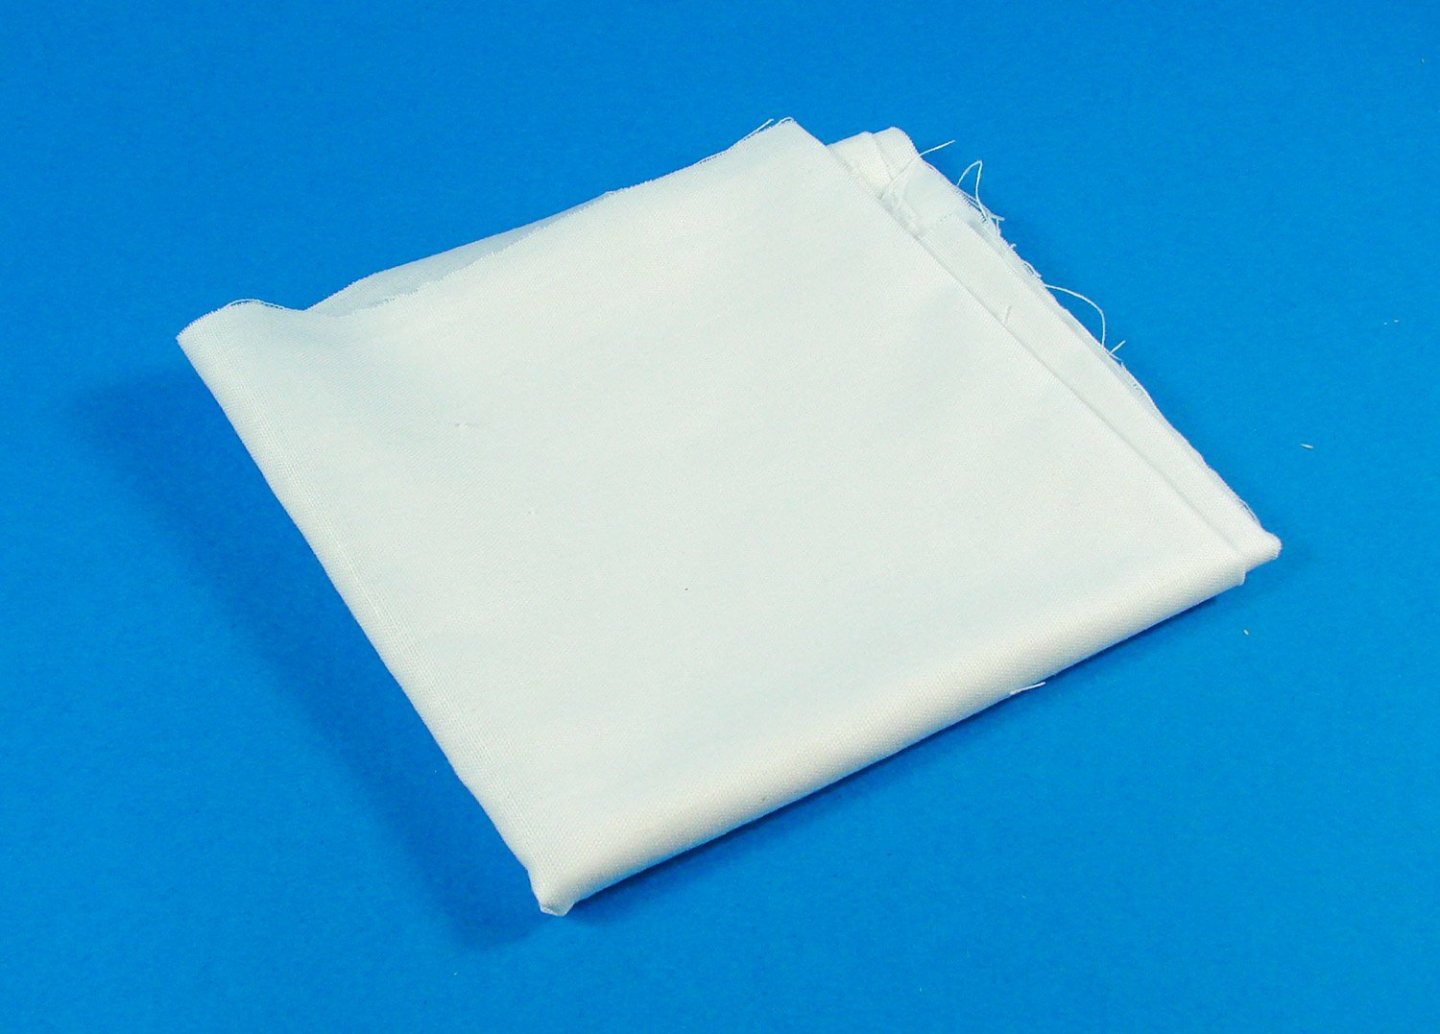
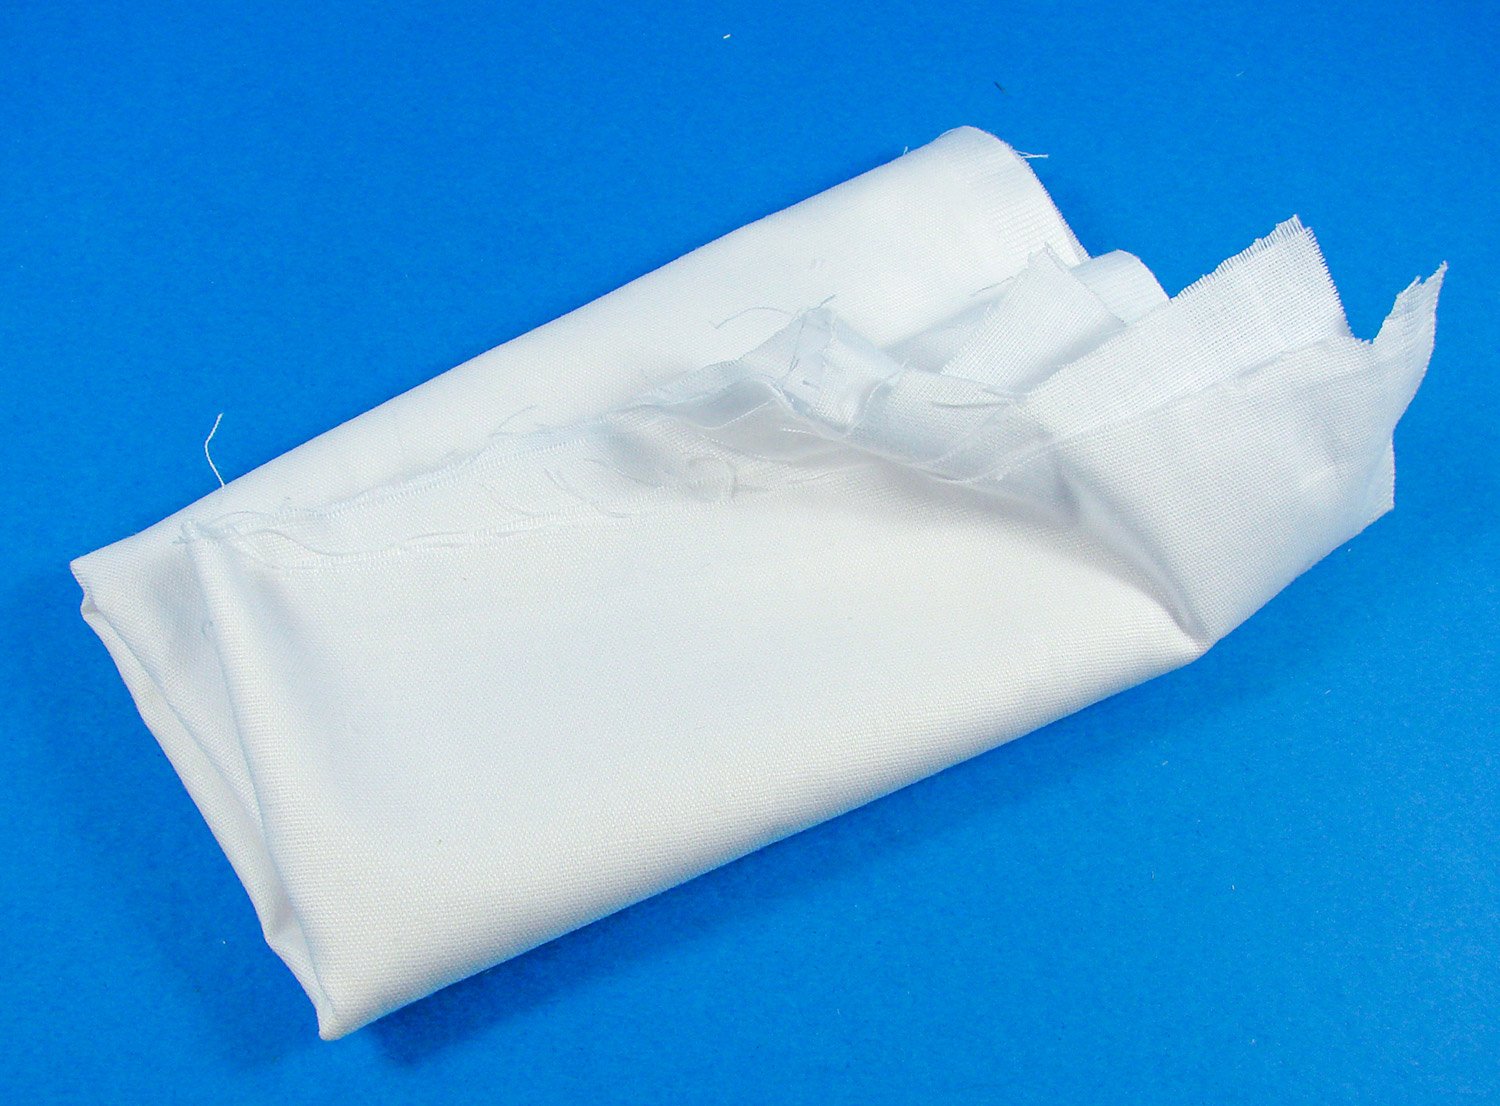
Sail cloth is supplied, and you will need to work with the drawings to make your own sails, including the stitching of a boltrope around the edge. Vikings sometimes also tarred their sails, but you should at least seriously age them and perhaps decorate with the same motif you would use on the shields, indicating the loyalty to a specific king or earl.
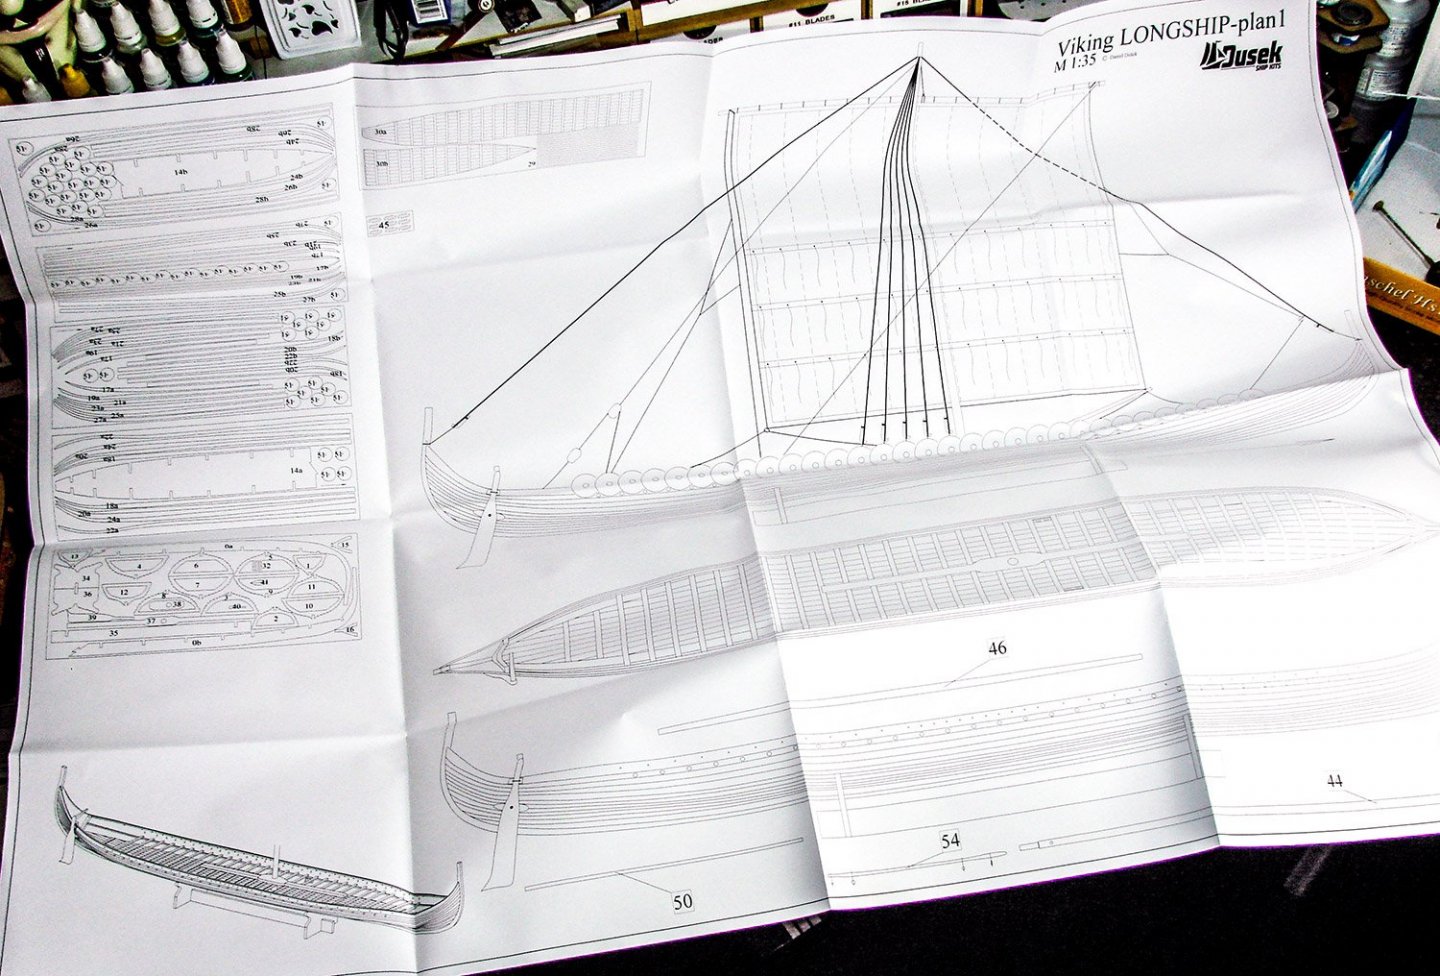
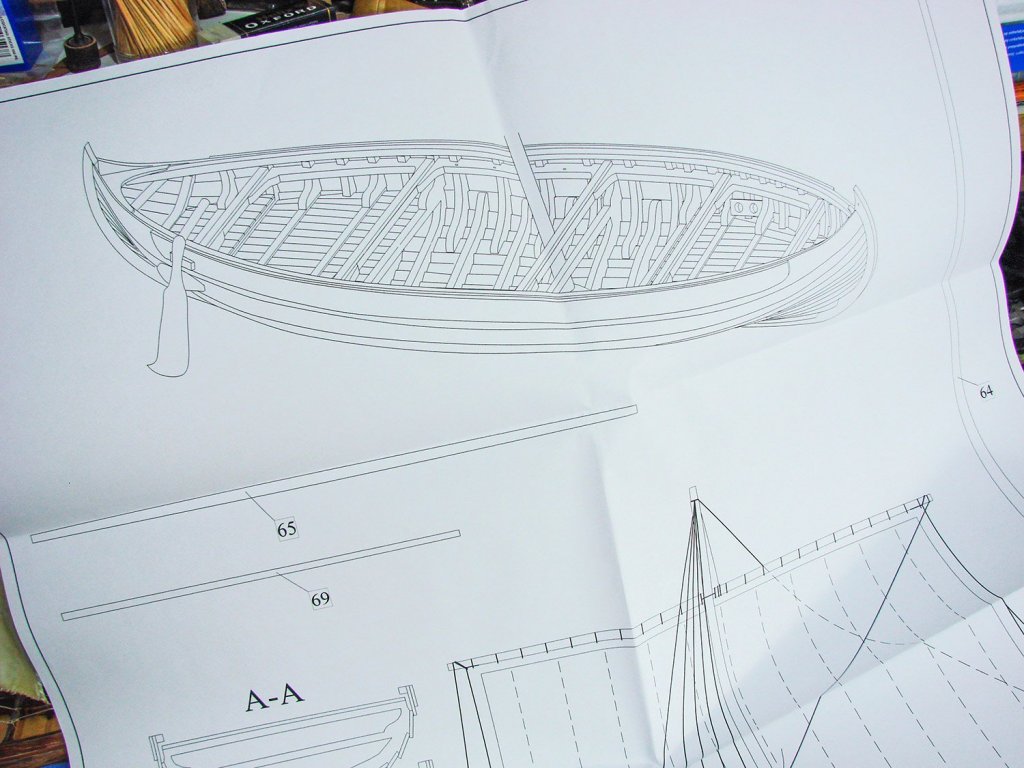
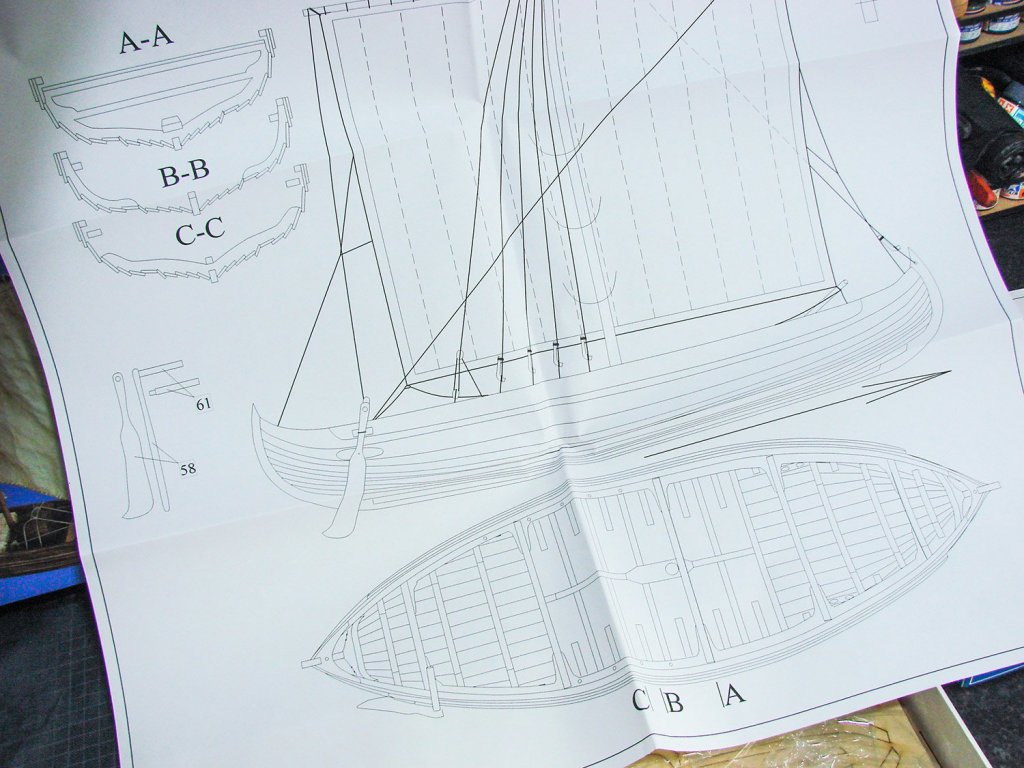
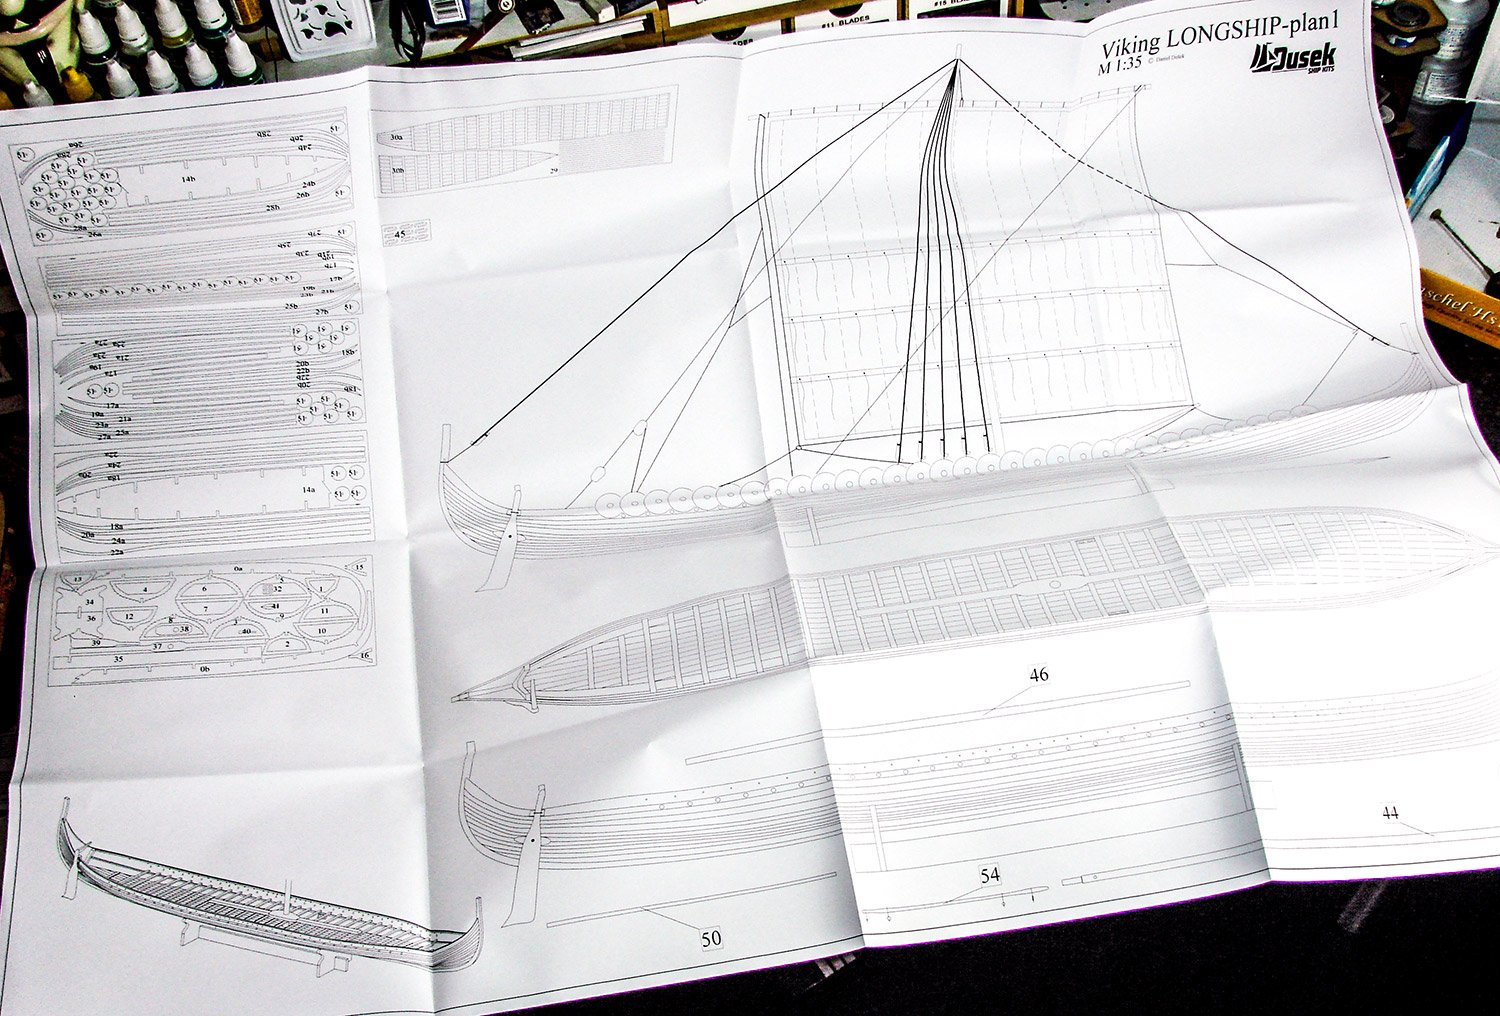
A single plan sheet is included which shows the various views of the finished model, including rigging. This is more of a reference as the building itself can be more or less done via the manual. On the left of the plan is a parts map.
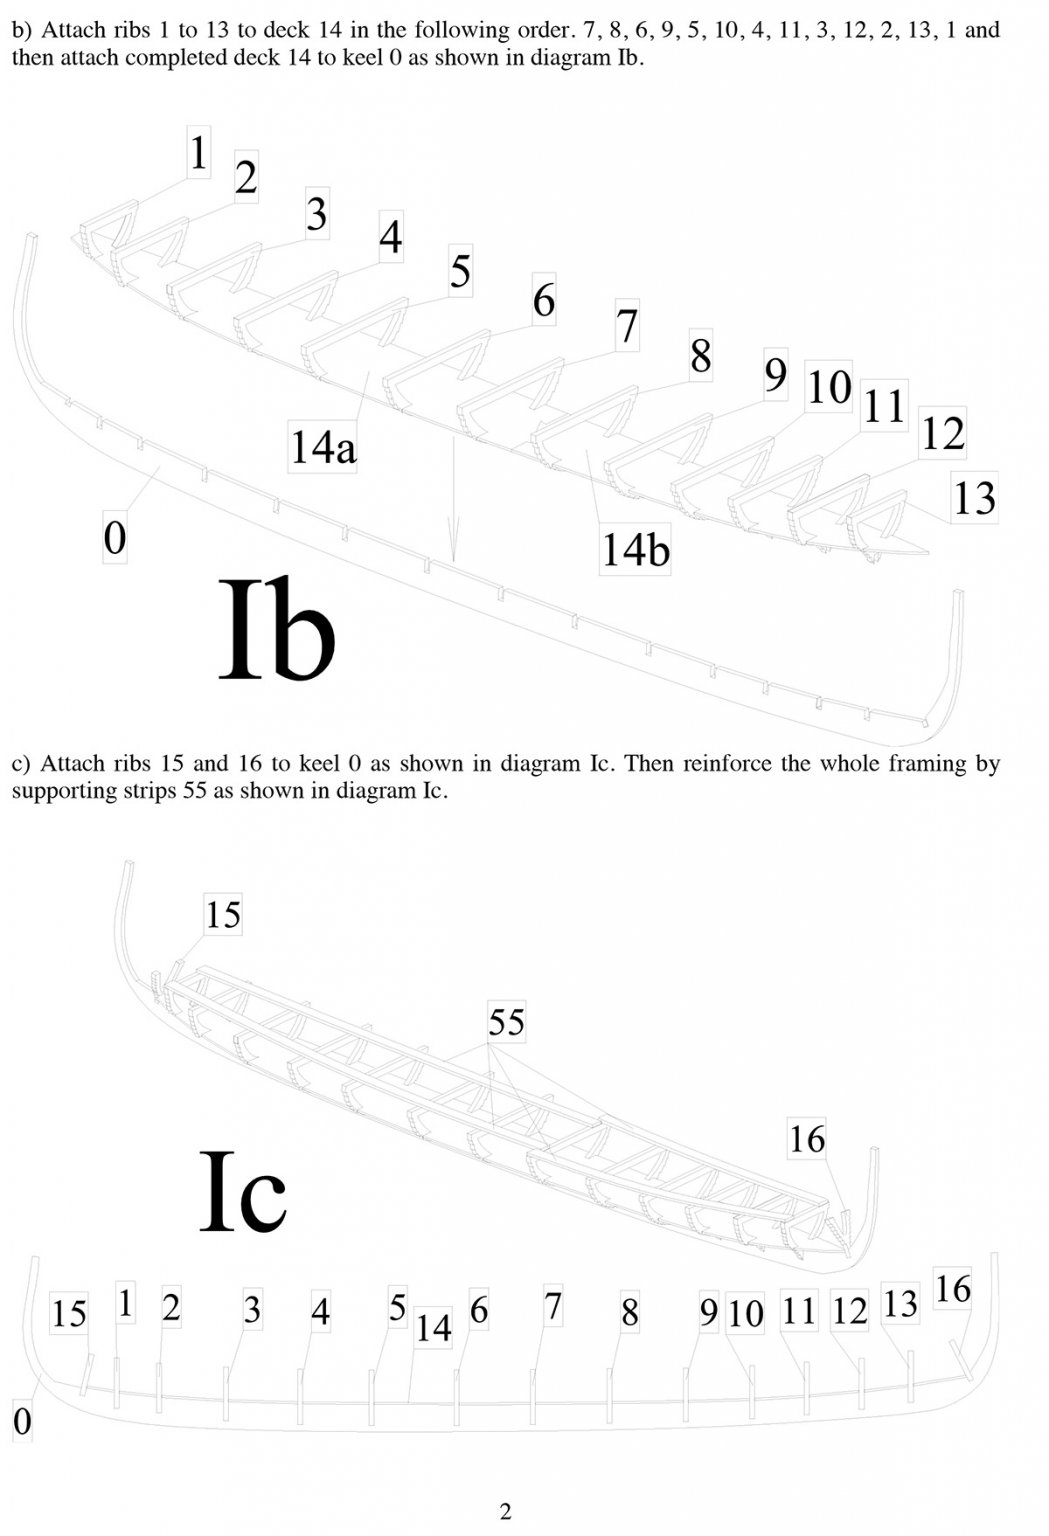
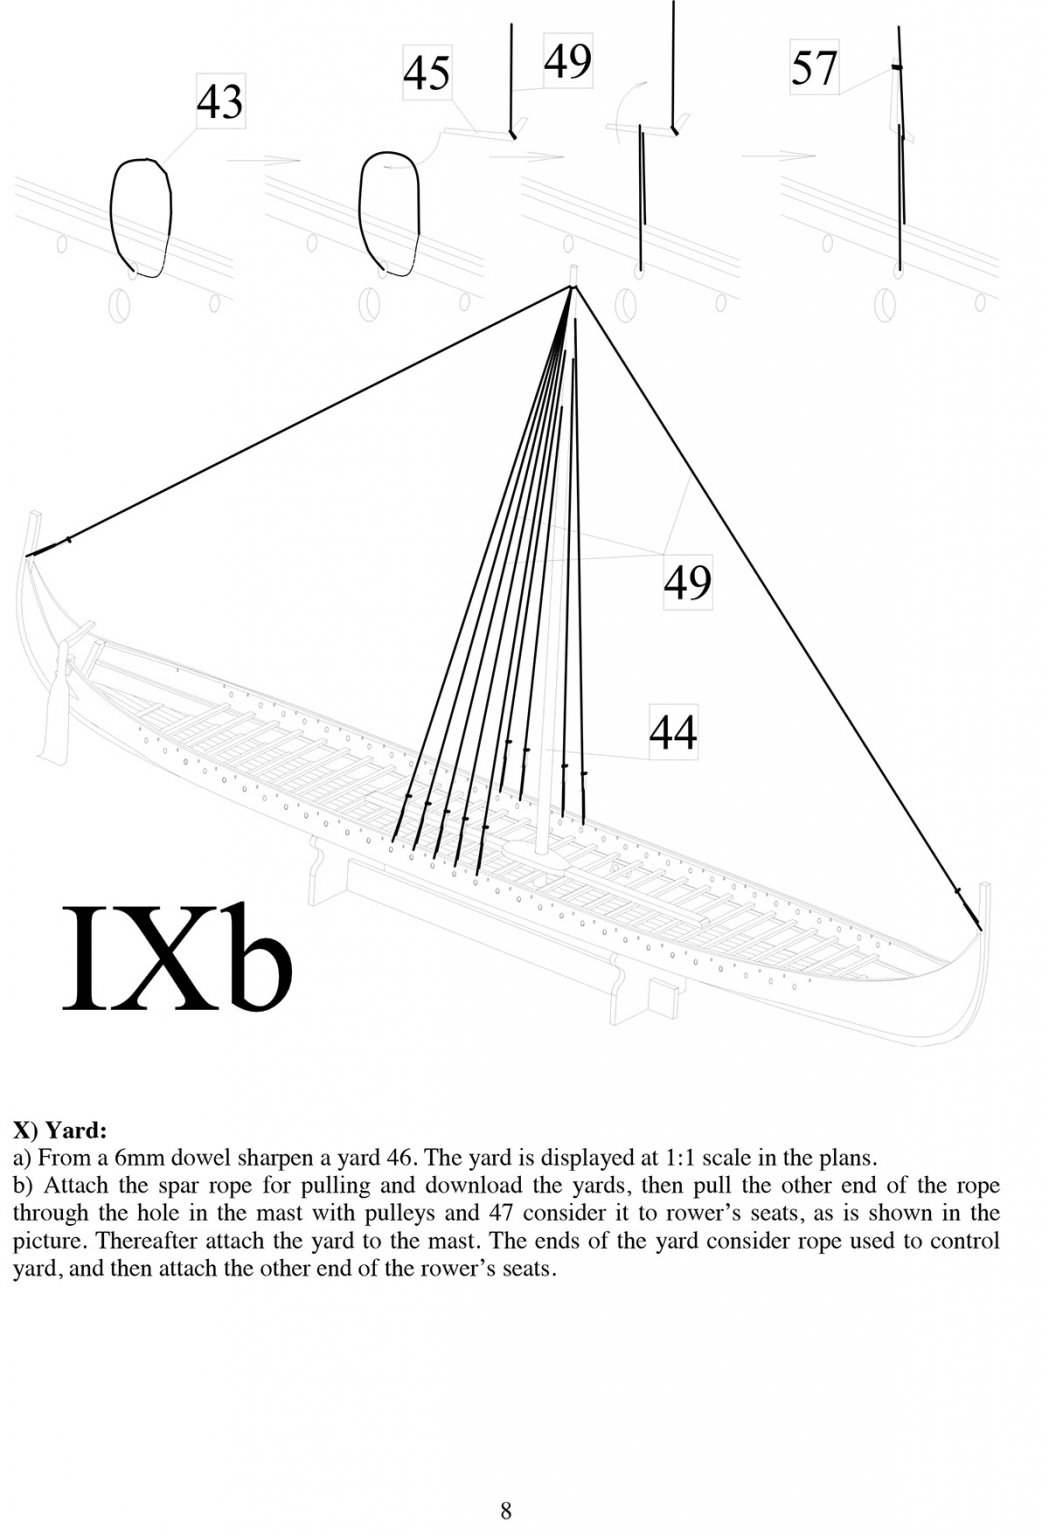
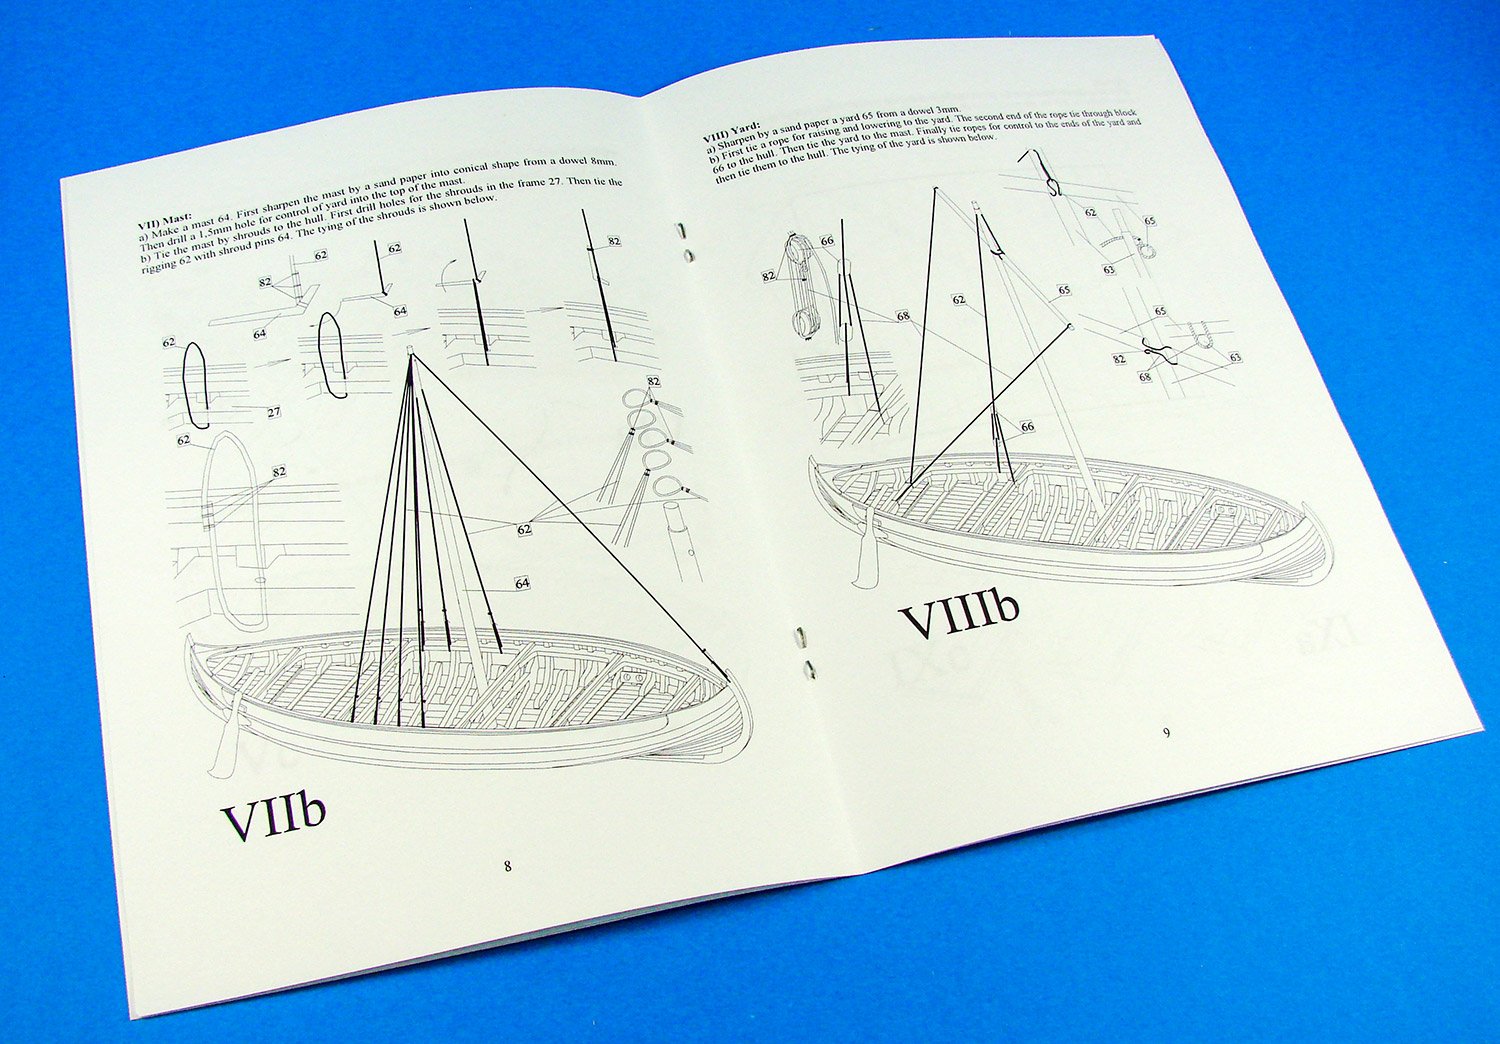
Instructions are supplied on a 16-page A5 manual, simply printed and stapled. These are clearly printed and easy to follow with their simple line drawings and very good English text. The end of the manual has a parts list and reference names for the various elements.
Conclusion
There are a few options out there for a modeller who wants to build a Viking longship, and this is certainly a worthy contender, being a more traditional vessel without the dragon’s head or other embellishments we see in Hollywood movies. These ships were generally tarred too, giving them a dark brown, almost black appearance, so the extensive use of plywood in this kit isn’t really an issue, as you’ll need to finish the inside and outside of the hull to suit. This is a large model too and should actually look quite imposing with the shields on display. I really do love these ships of antiquity and what they achieved in terms of exploration and settlement. In all, this is a great quality kit which is easy to build. It also won’t damage the bank balance too much either. If you’ve any interest in this period of history, or want a change from your usual type of model, this kit would prove to be ideal.
My sincere thanks to Dusek Ship Kits for the sample seen here in this review. To purchase directly, click the link at the top of the article.

-
1 hour ago, catopower said:
Nice kit review, James! Glad to see you got a review kit from Woody Joe.
I'll add that everything about this kit is pretty much standard Woody Joe product. Plastic blocks and deadeyes are standard in all their kits, as is the beautiful packaging and indexing of the parts. Very much Billing Boats like. And, as you point out, these parts are easily swappable for your favorite wooden deadeyes and blocks. Though, my preference is still the Syren stuff 😉
Their kits can sometimes be a little light on some details, but they also tend be pretty accurate on the measurements and scale, so it's very easy to do some of your own upgrades.
I agree that RC is not the intention of the motor addition – it's more of an add-on capability "just for the fun of it".
I'm not sure that one can actually buy direct from Woody Joe for shipment overseas. So, I'm surprised to see the store link. I've received things from Woody Joe before, but never a purchase.
Actually, I highly recommend purchasing from an online hobby dealer that I and many members here have dealt with, Zootoyz.jp.
The owner of the business, Kazunori Morikawa, can communicate in english and his site is in english too, making ordering much simpler than trying to do it in Japanese. He's also a great person and always sends little goodies with your model kit orders, and you won't get gouged on pricing like what I've often seen on Ebay and Amazon.
He's very conscientious about his business and the products he sells. So, PLEASE, if anyone is going to buy one of these kits from him, make sure you know what you're getting into first, so you don't bch and moan to him if you're not happy with Woody Joe's lack of a free replacement parts policy – he takes your complaints very seriously and personally.
Clare
Thanks for the info.
I've been trying for quite a while to get contact with WoodyJOE, and I have to thank a fluent Japanese speaker from the Czech Republic who I believe helped me break through to them initially.
You're right, the kit itself is superb, plastic blocks aside, and there could room for a little further enhancement once more reference is sourced.
Thanks also for the info on the company to purchase from if outside Japanese territory.
- mtaylor, thibaultron, Canute and 3 others
-
6
-
7 minutes ago, mtdoramike said:
Very nice kit review, but the Woody Joe link doesn't work. This kit reminds me of the Billings kits in that it uses quite a bit of plastic molded parts, which I detest. But it looks like a great kit and I love the fact that they were future thinking enough to build the kit with Radio Control in mind if you so desire.
I'm not entirely convinced their plan was RC, but I'm sure it could be adapted with the paddle wheels.
The link works for me, but here it is again: http://woodyjoe.shop-pro.jp/?pid=144494623
- thibaultron, catopower, Matt D and 2 others
-
5
-
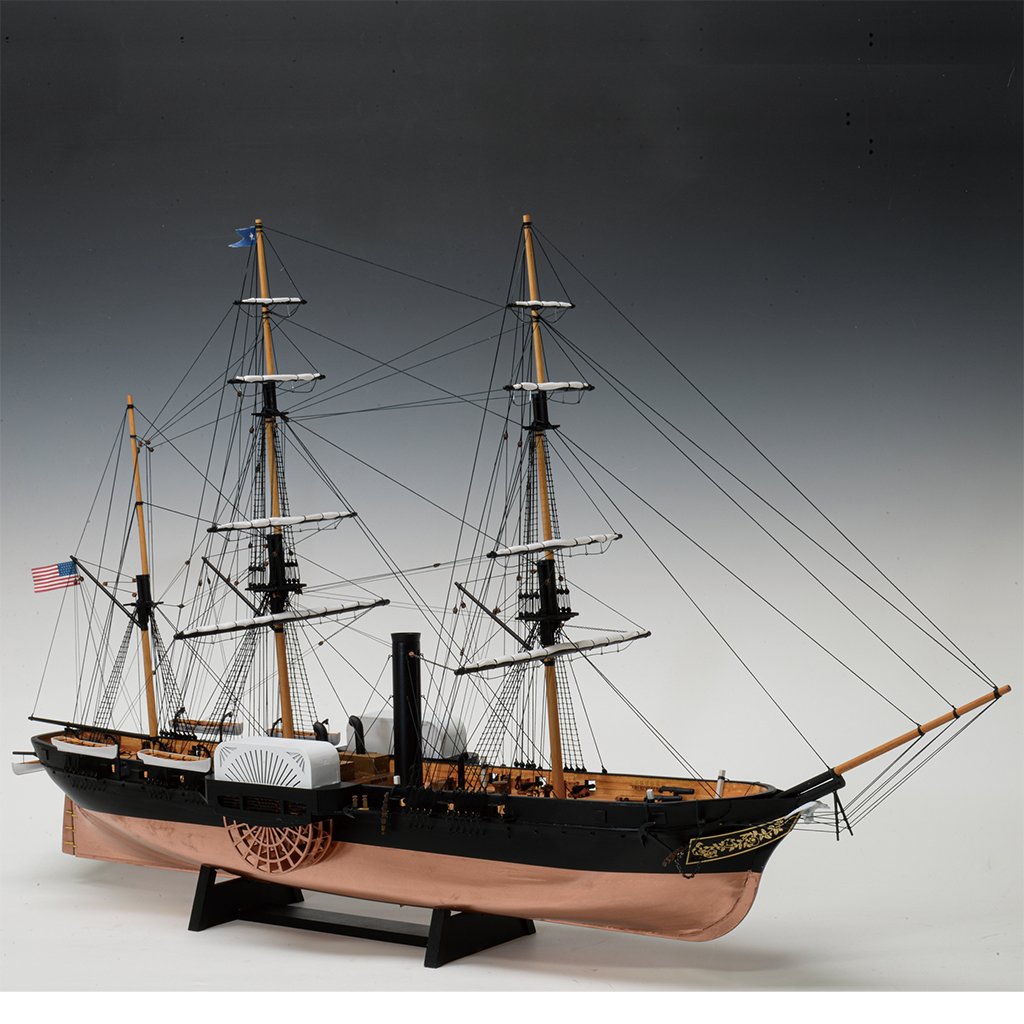
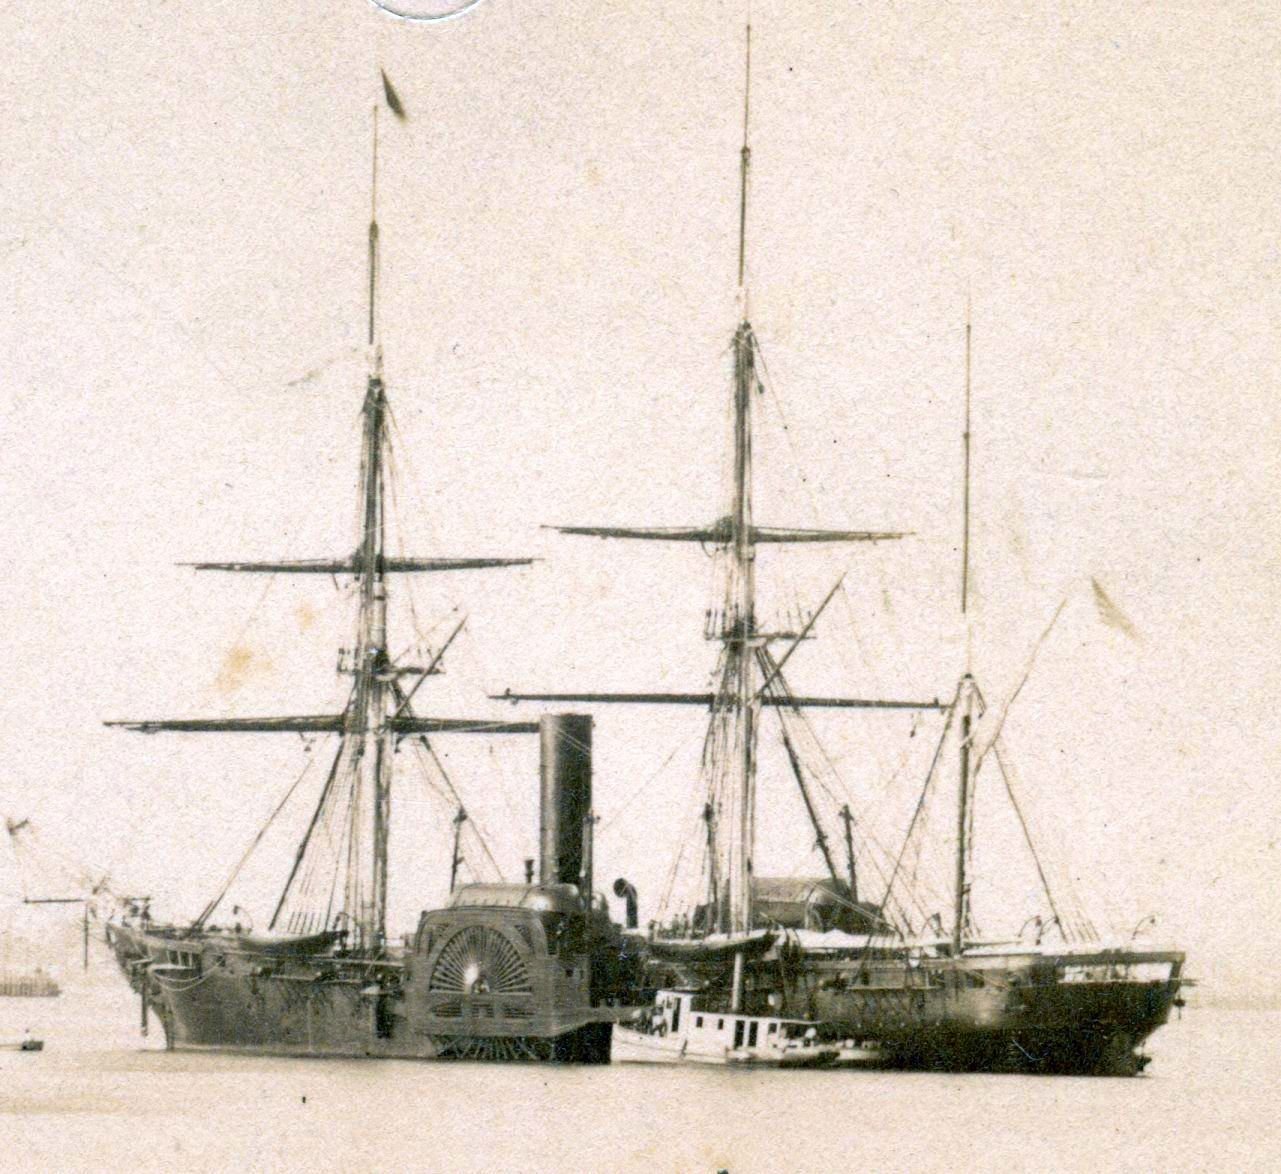
1:120 USS Susquehanna
WoodyJOEAvailable from WoodyJOE for ¥ 43,000 (approx. $400/£335)
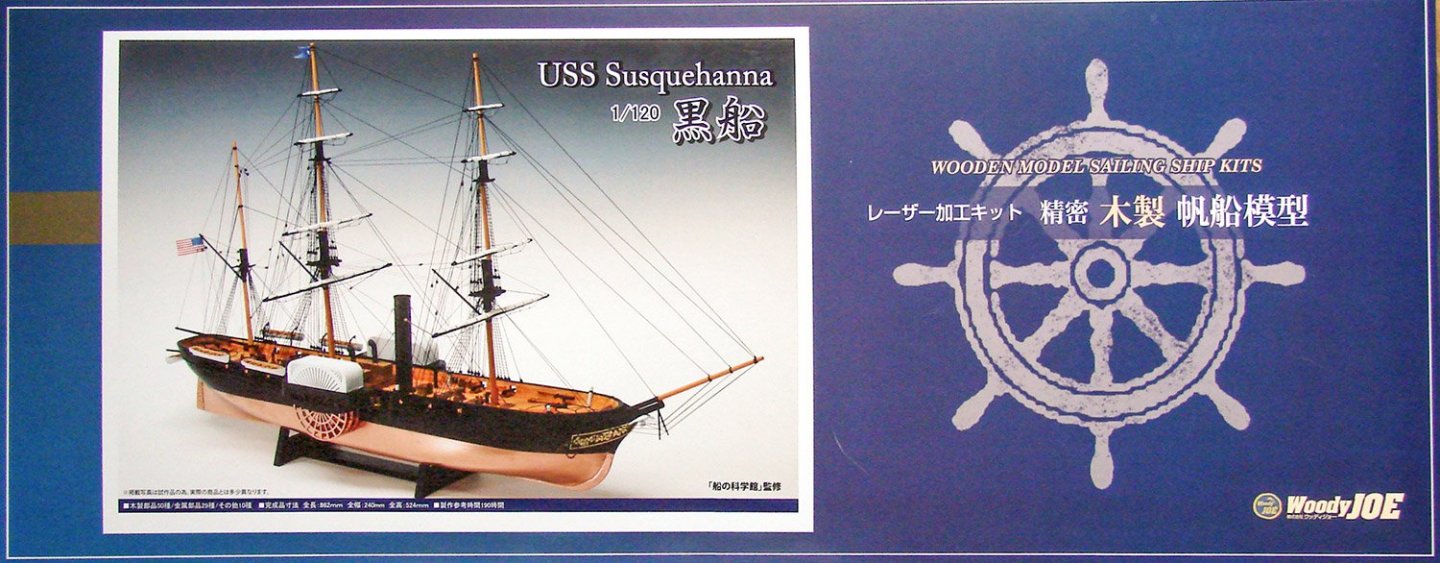
USS Susquehanna, a sidewheel steam frigate, was the first ship of the United States Navy to be named for the Susquehanna River, which rises in Lake Otsego in central New York and flows across Pennsylvania and the northeast corner of Maryland emptying into the Chesapeake Bay. Her keel was laid down by the New York Navy Yard in 1847. She was launched on 5 April 1850 and was commissioned on 24 December 1850, Captain John H. Aulick in command. After completing her trials, which she began in January 1851, the side-wheel frigate sailed on 8 June for the Far East to become flagship of the East India Squadron under the command of Commodore John H. Aulick. Aulick's orders included instructions to visit Japan and negotiate a treaty opening diplomatic relations with that country. After presenting demands and an official letter from President Millard Fillmore to the Japanese government on 14 July, the American warships departed on 17 July. On 12 February 1854, Susquehanna returned with the squadron to Japan as part of Perry's show of force, resulting in the signing of the Convention of Kanagawa on 31 March 1854.

During the American Civil War, the ship was assigned to the Atlantic Blockading Squadron and sailed for Hampton Roads. Late in August, Susquehanna participated in the joint Army-Navy expedition to Hatteras Inlet, North Carolina, which captured Fort Clark and Fort Hatteras on 29 August. During September, she captured two British schooners: Argonaut on 13 September and Prince Alfred on 28 September. In the same month, she also took two Confederate schooners as well: San Juan on 28 September and Baltimore the following day. Following the end of the American Civil War, Susquehanna brought American delegates to Veracruz bay in Mexico during the destruction of the Second Mexican Empire in order to open up relations with the United States backed Mexican president Benito Juárez. When the Susquehanna found out that the acting imperial ruler Maximilian I of Mexico had decided not to abdicate, the ship turned around to head home 1866. The ship ended her active service as flagship of the North Atlantic Squadron. Decommissioned at the New York Navy Yard on 14 January 1868, Susquehanna was laid up until she was sold for scrapping on 27 September 1883 to E. Stannard of New York City.
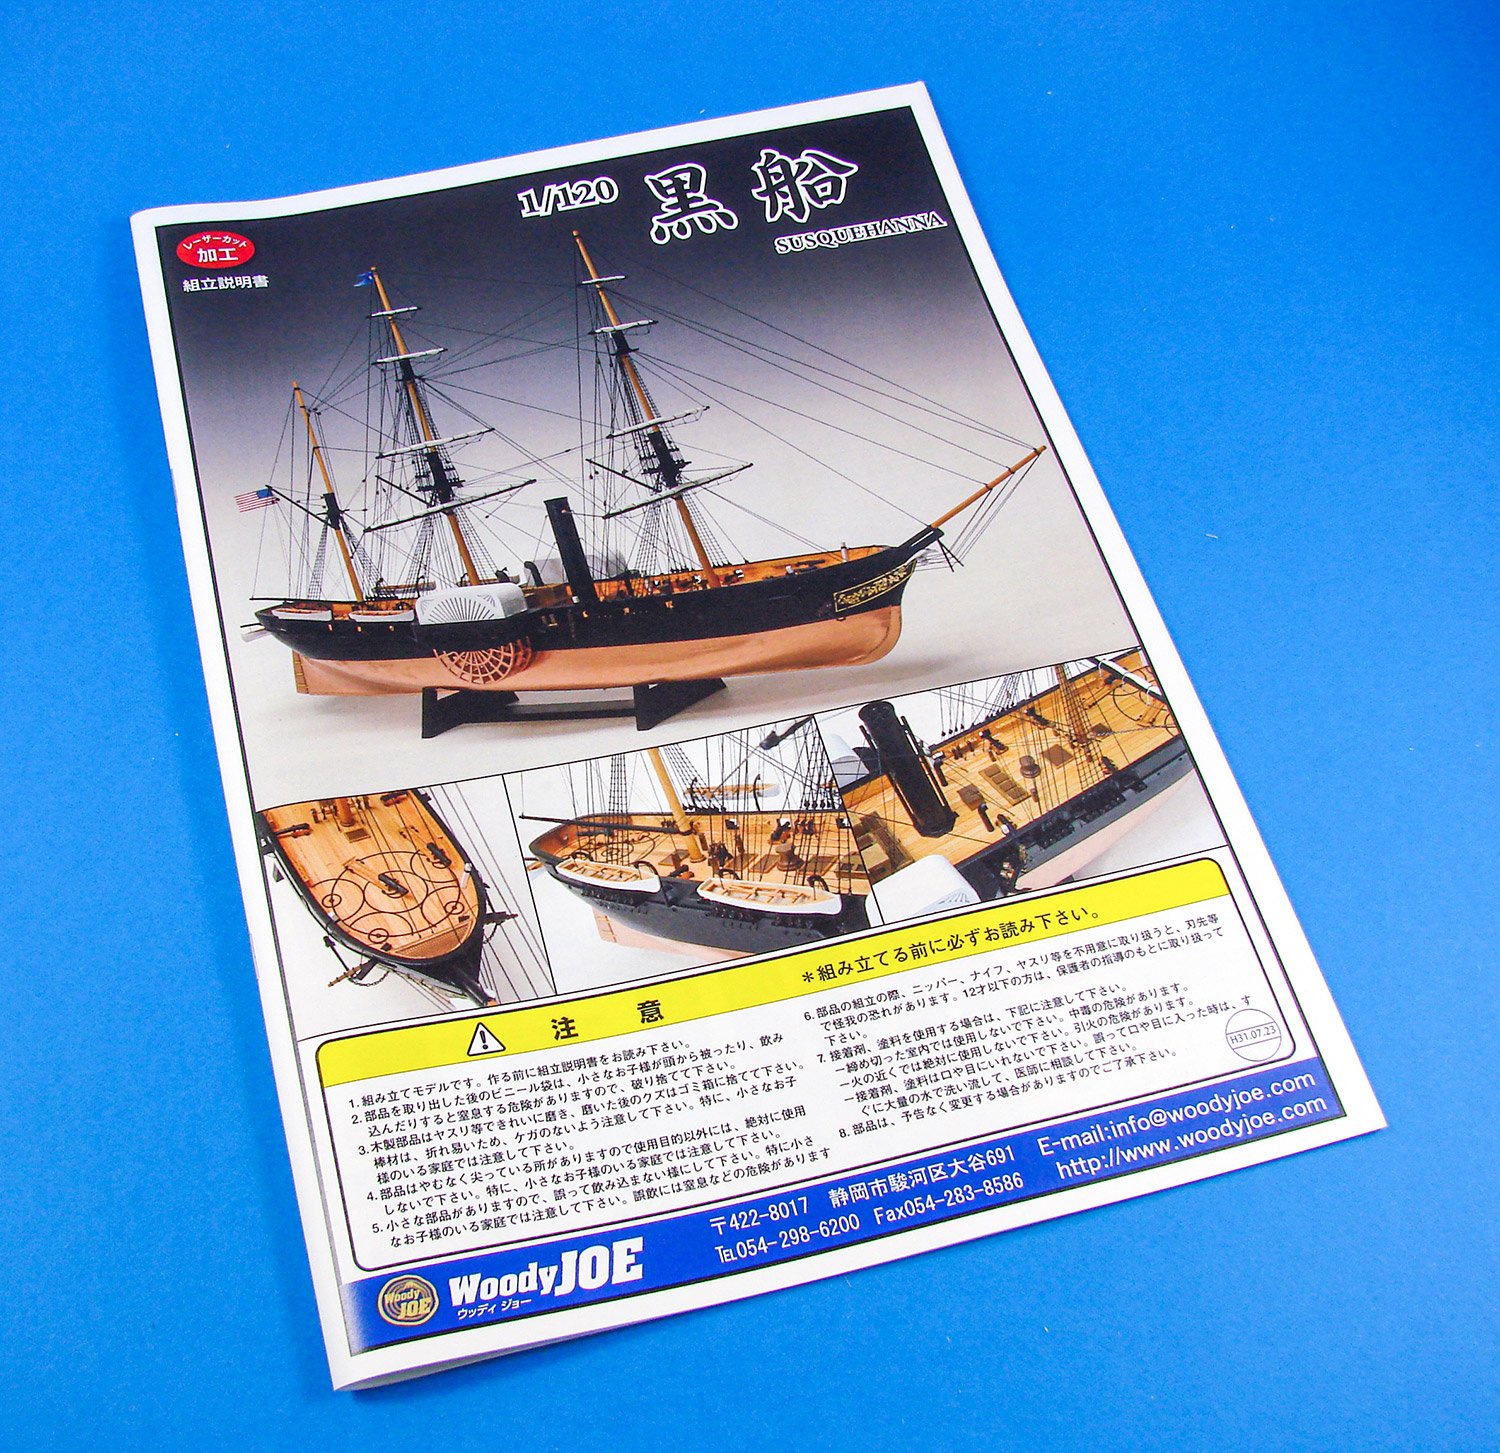
The kit
This is the very latest release from Japanese company, WoodyJOE. For those of you with Facebook, WoodyJOE has shown some of the development of this kit over the last months, with their finished model designed to show a finished ship on one side and the construction on the other…presumably for model fair display purposes. The box itself is sort of average in size for a model with these dimensions, but it is certainly heavy! Packed into an attractive but generic nautical-themed box, a product label for Susquehanna is affixed to the lid in a way that it looks printed on.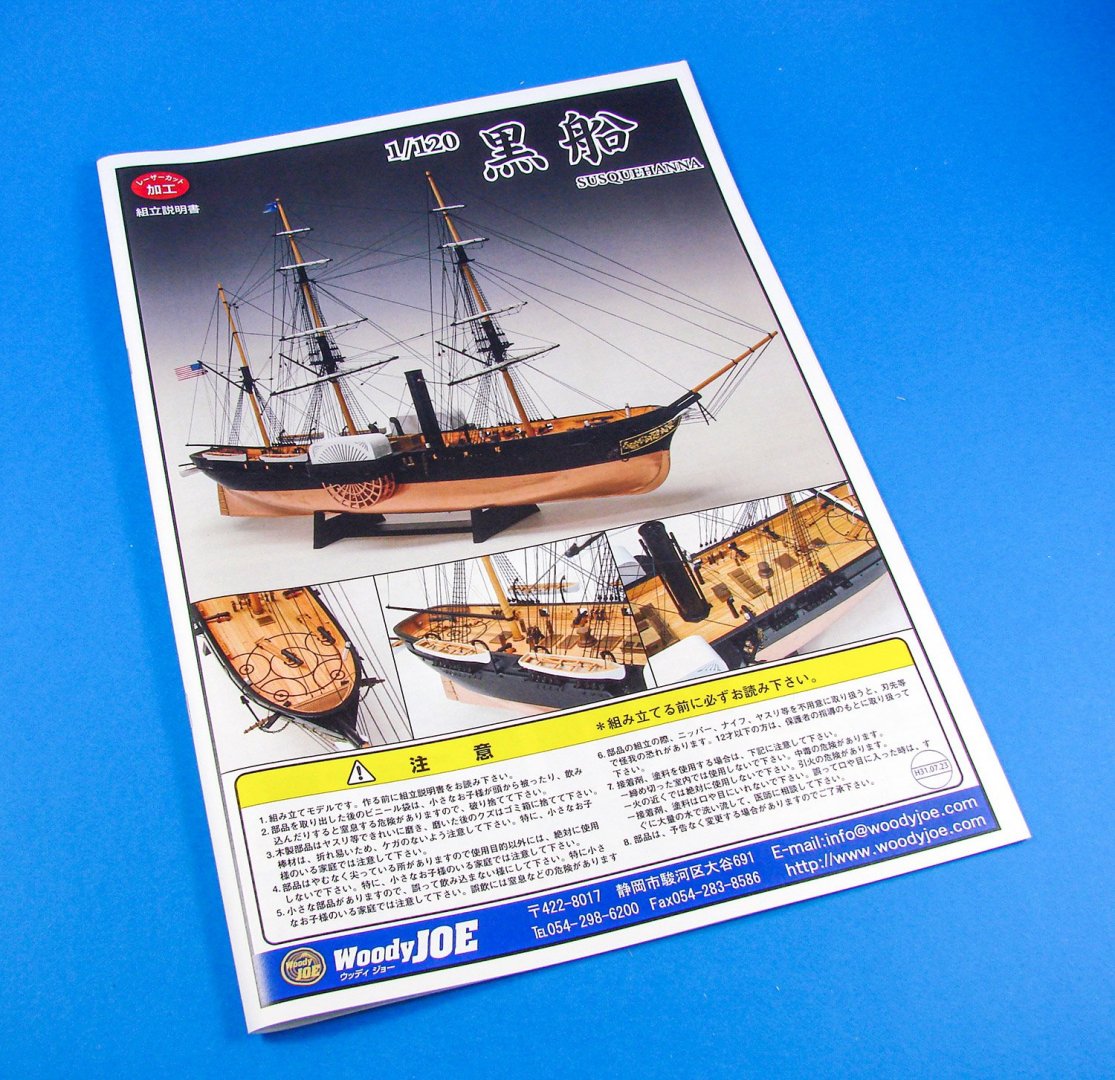
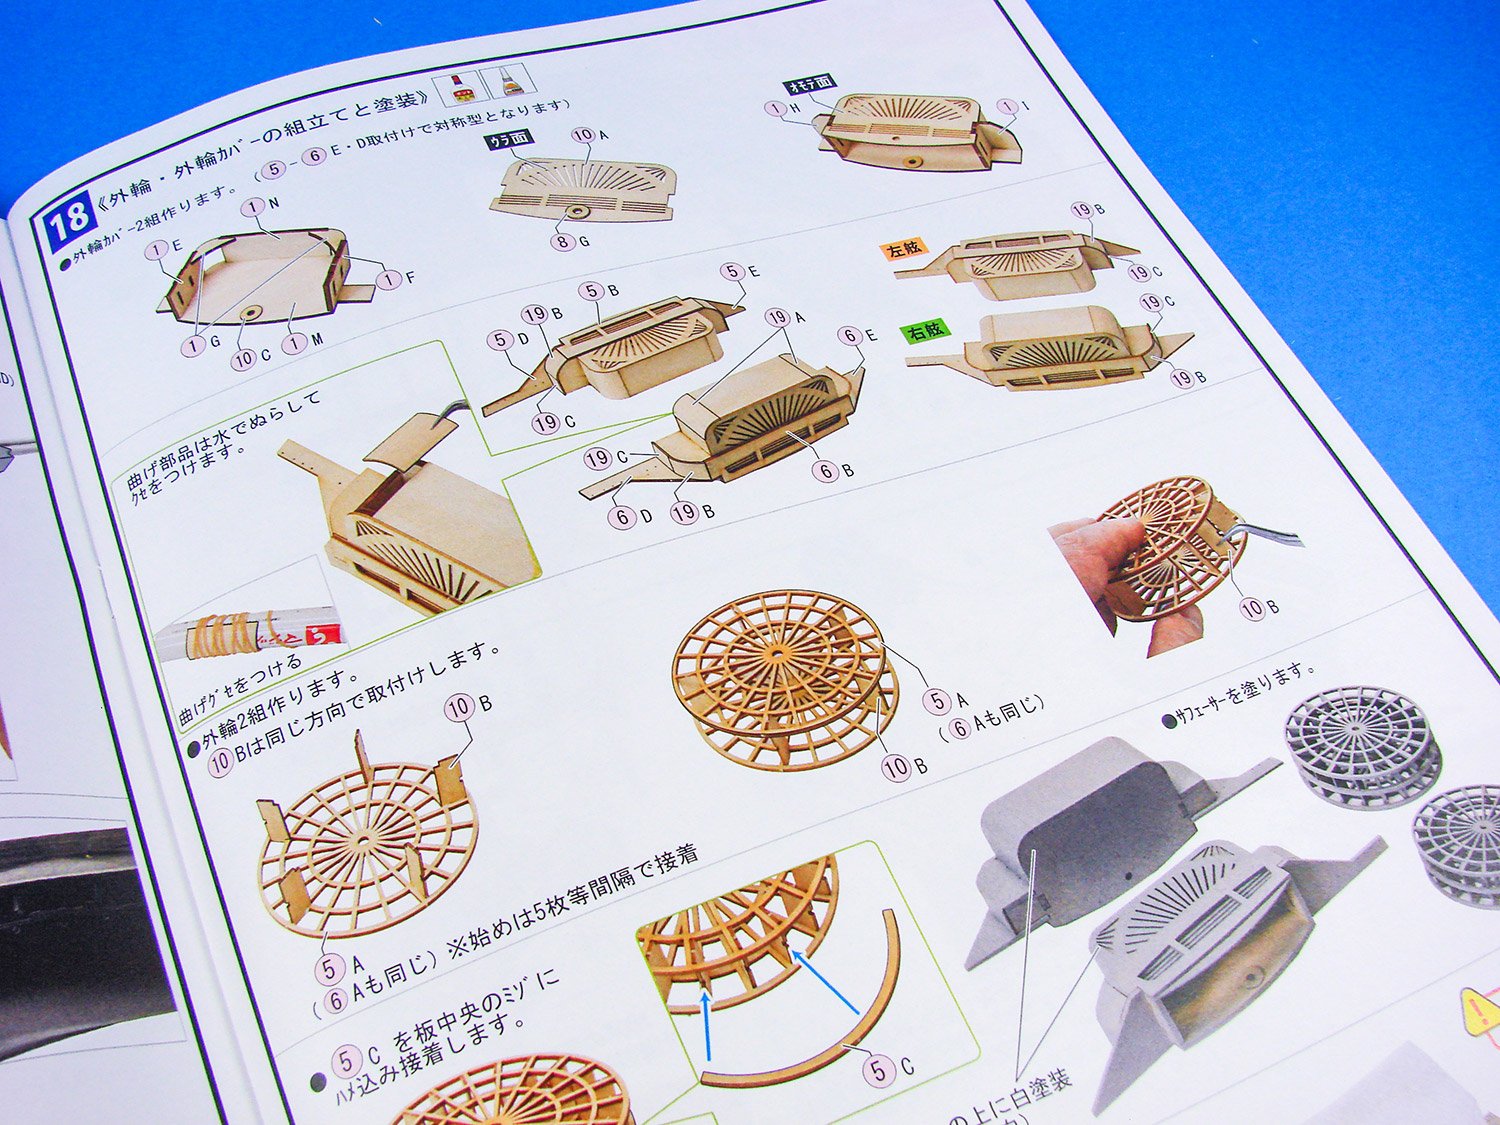
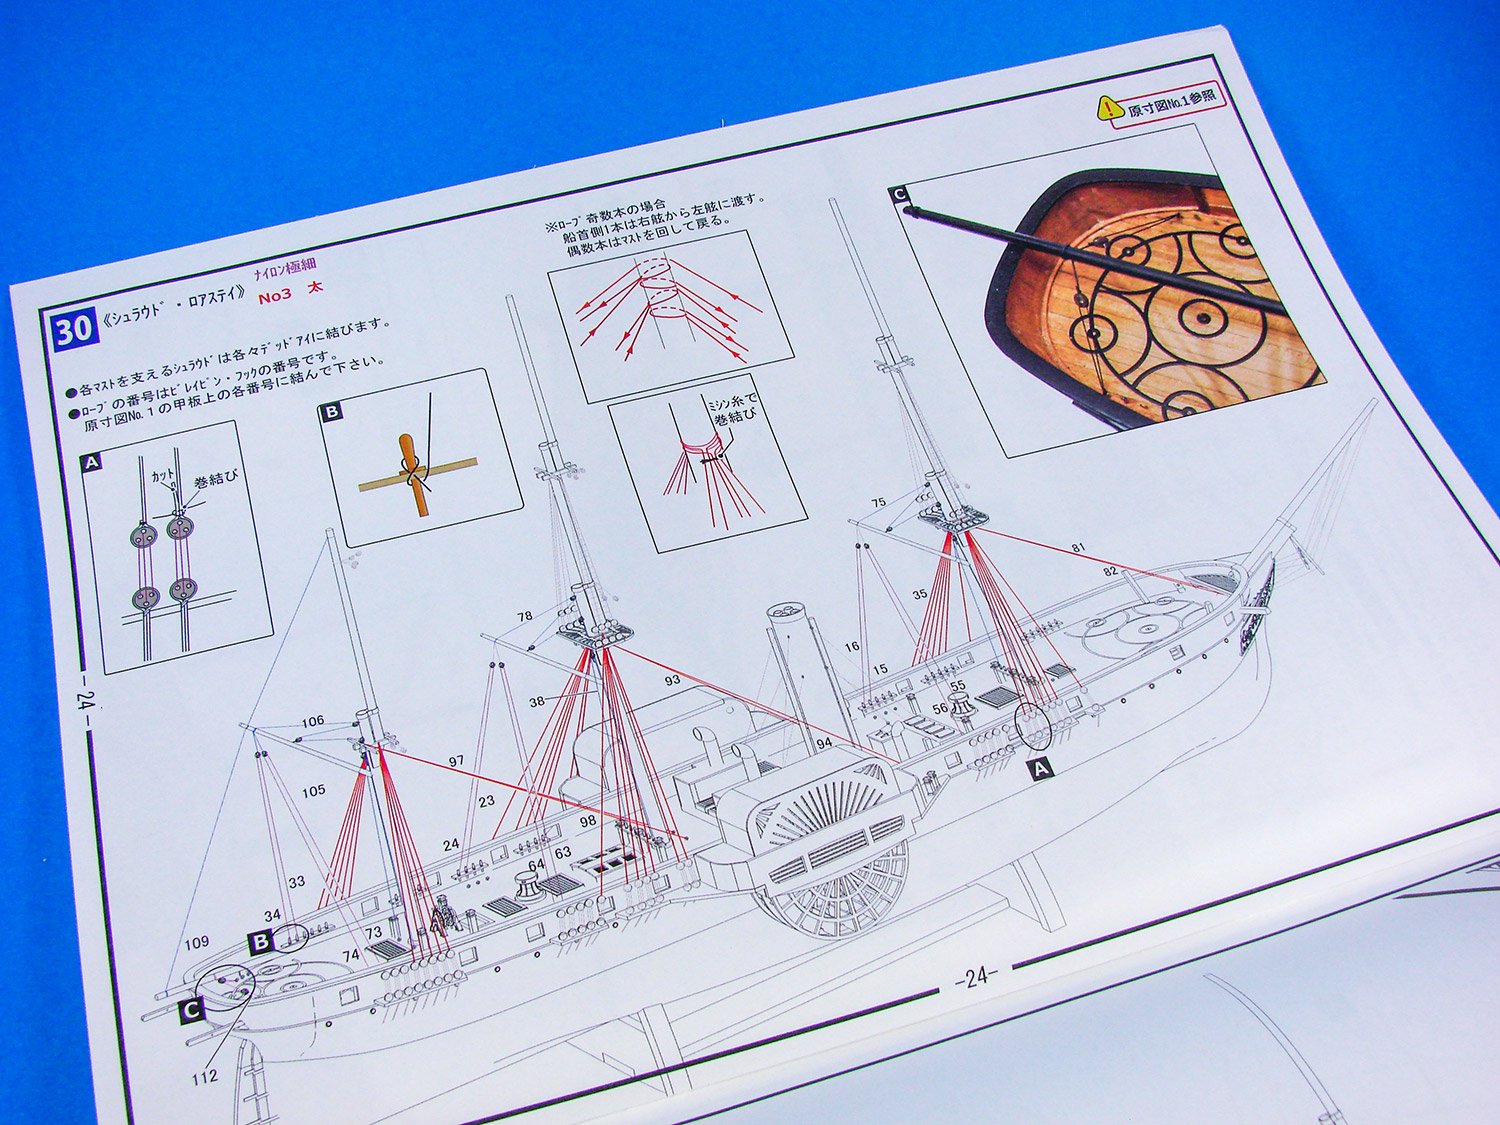
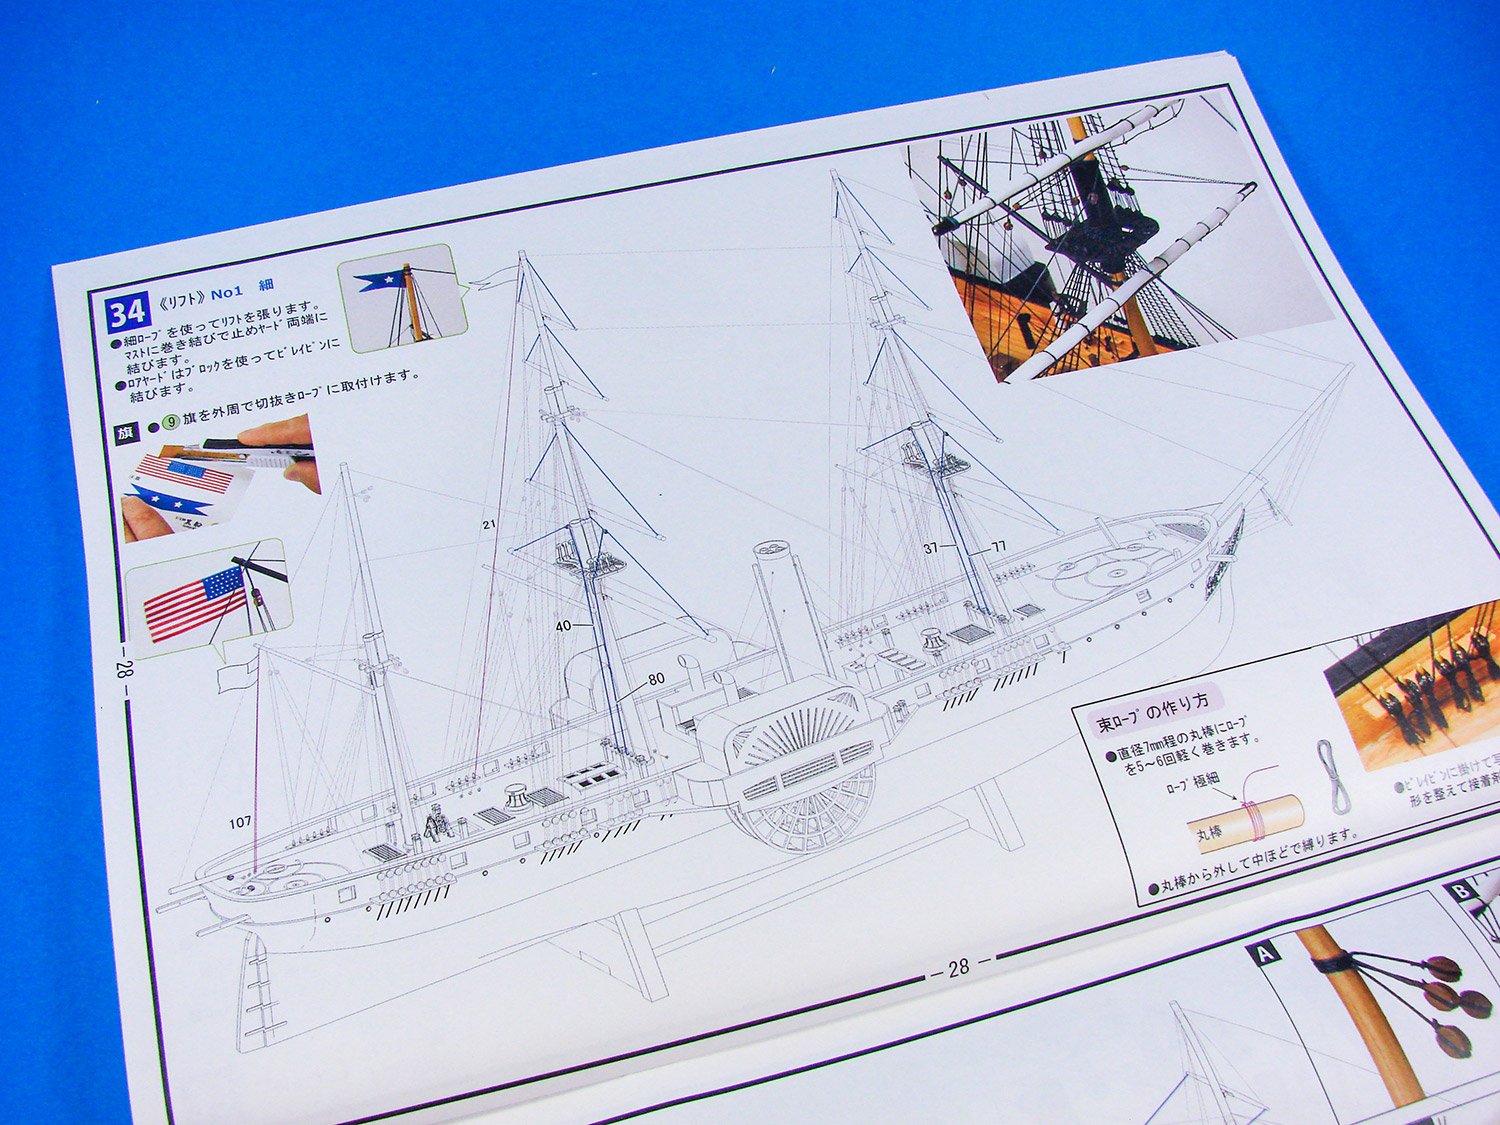
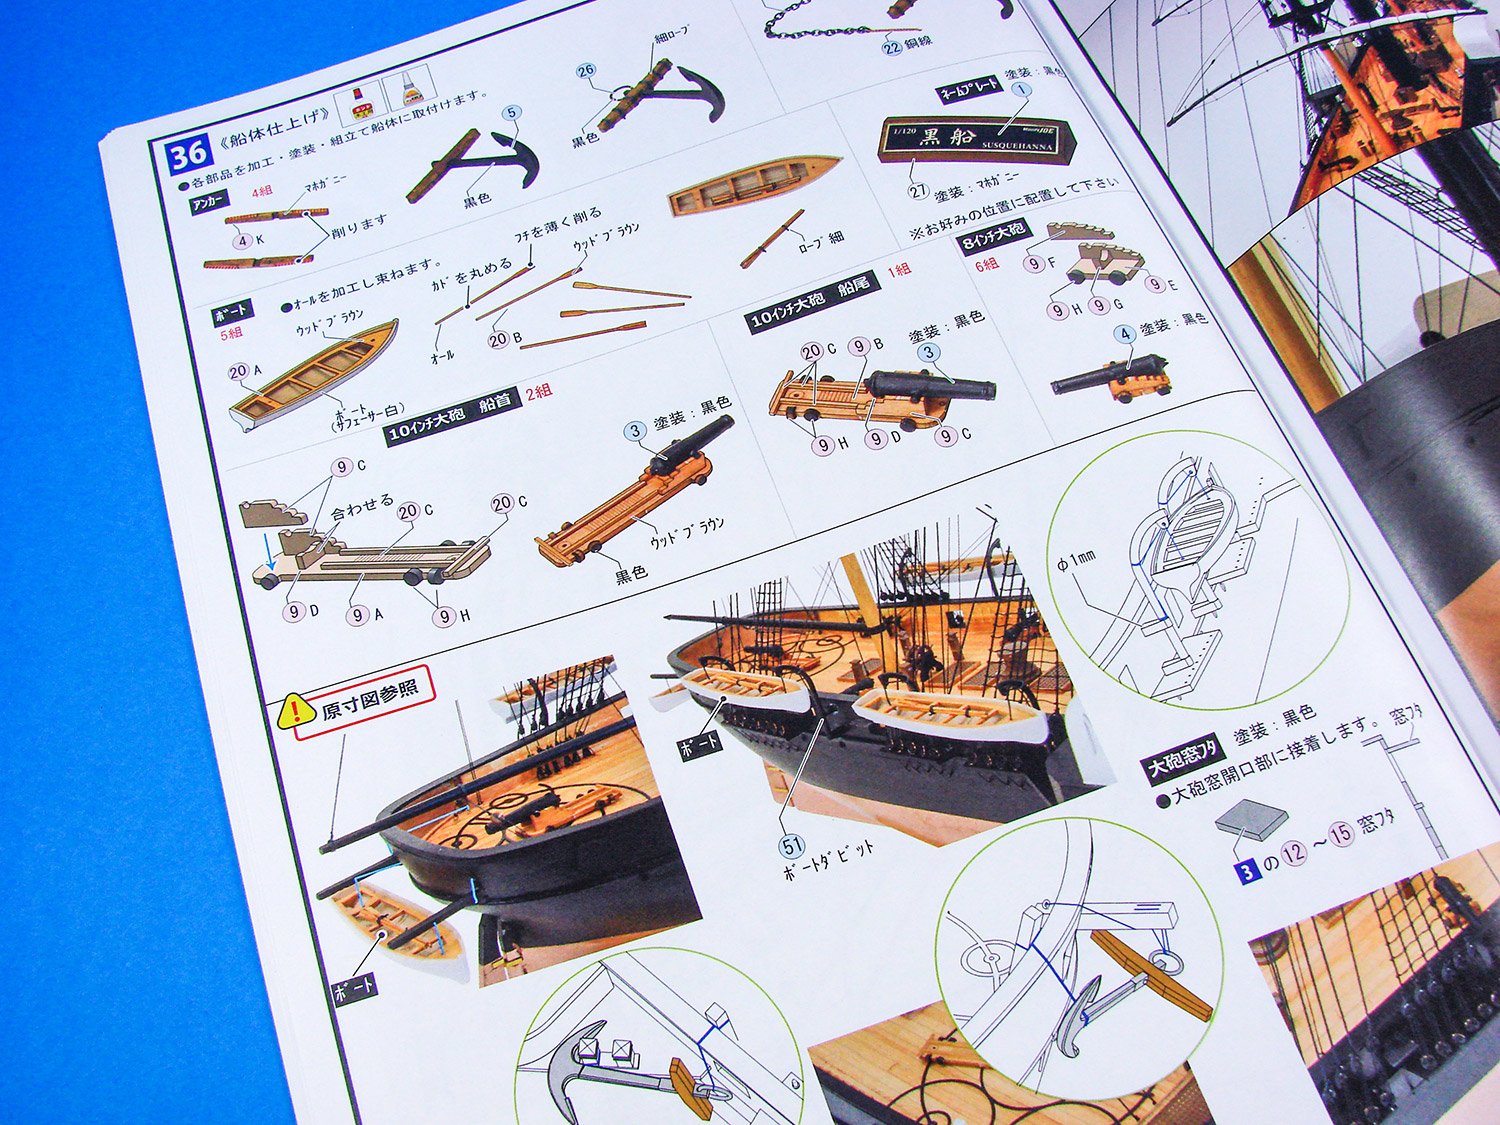
Upon opening the box, the first thing to check out is the colour-printed instruction manual. This 32-page, stapled booklet breaks the construction down into 36 stages, but most of those have many sub-stages, effectively creating well over 200-300 sequences. Rigging illustrations are supplied too, and they are beautifully clear to understand. Photo annotation also refers to the specific part number, whether it be strip wood, sheet parts or metal elements. A full parts list is supplied at the beginning of the manual, as well as suggested paints etc. All of this is in Japanese though, befitting a kit that’s probably aimed for their home market.

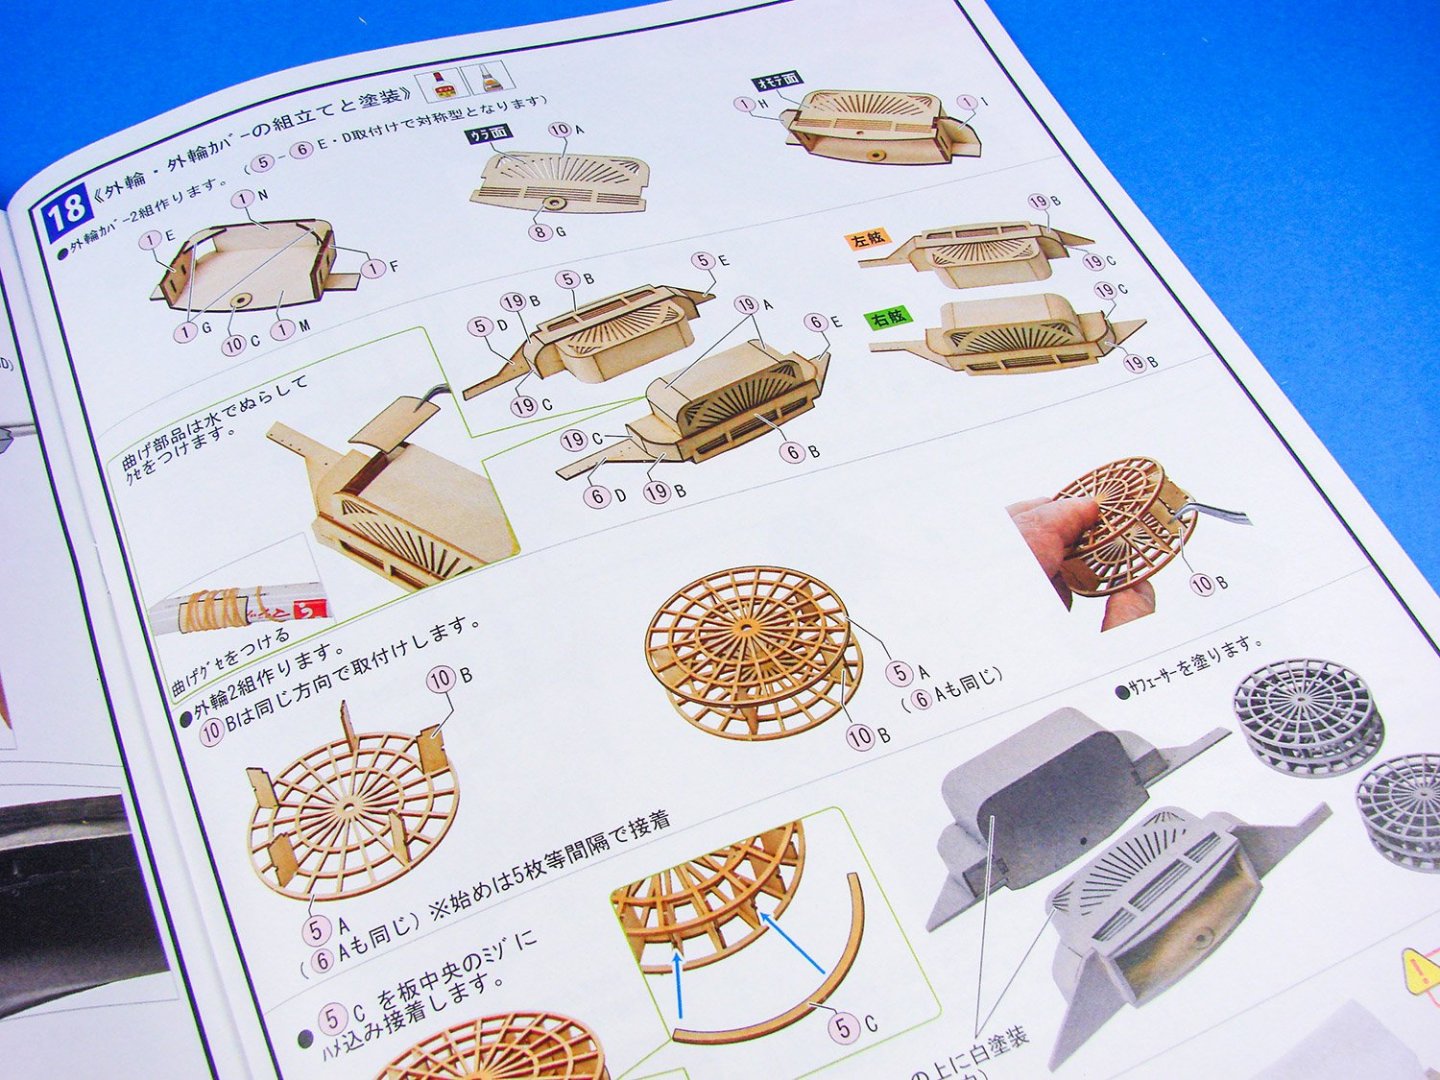
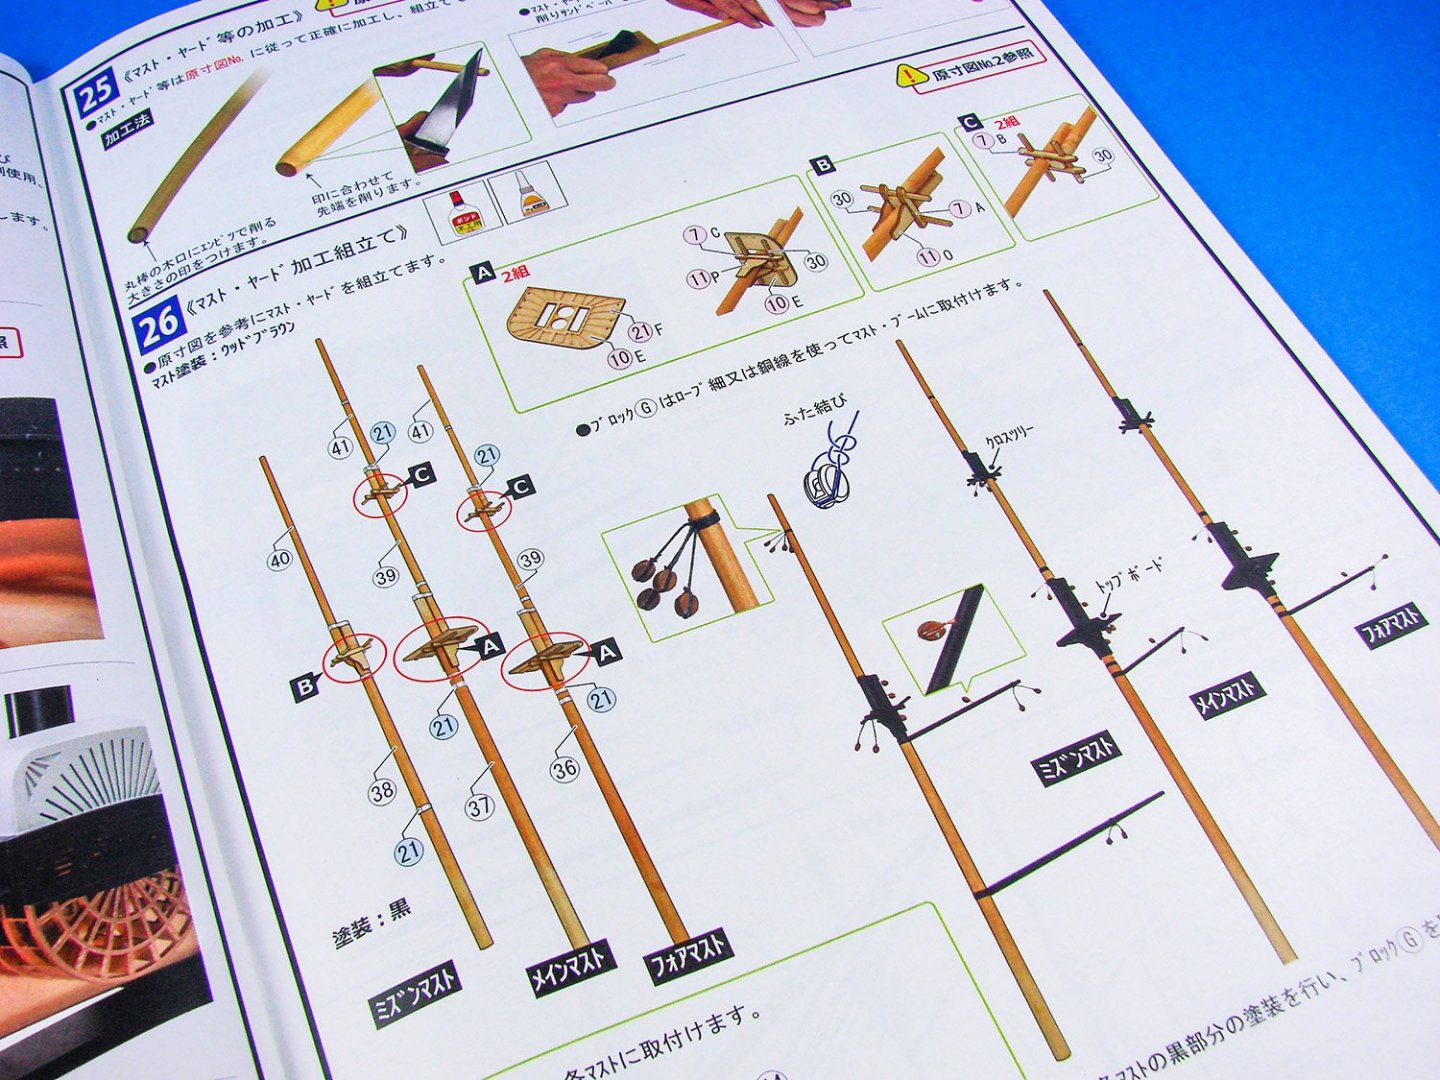


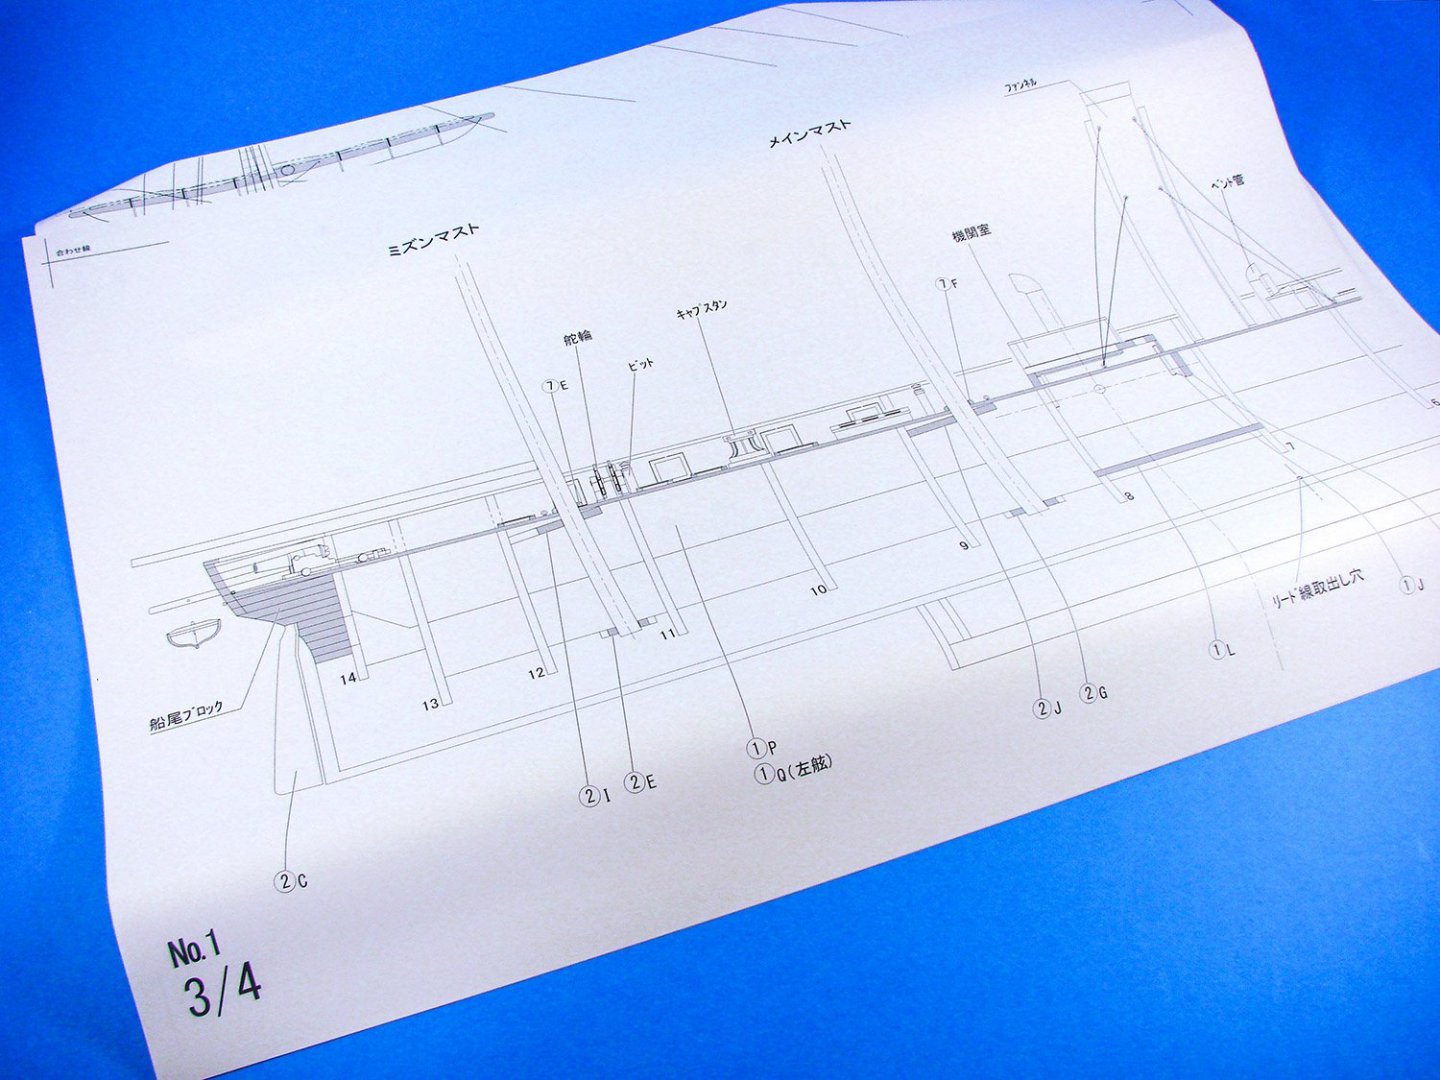
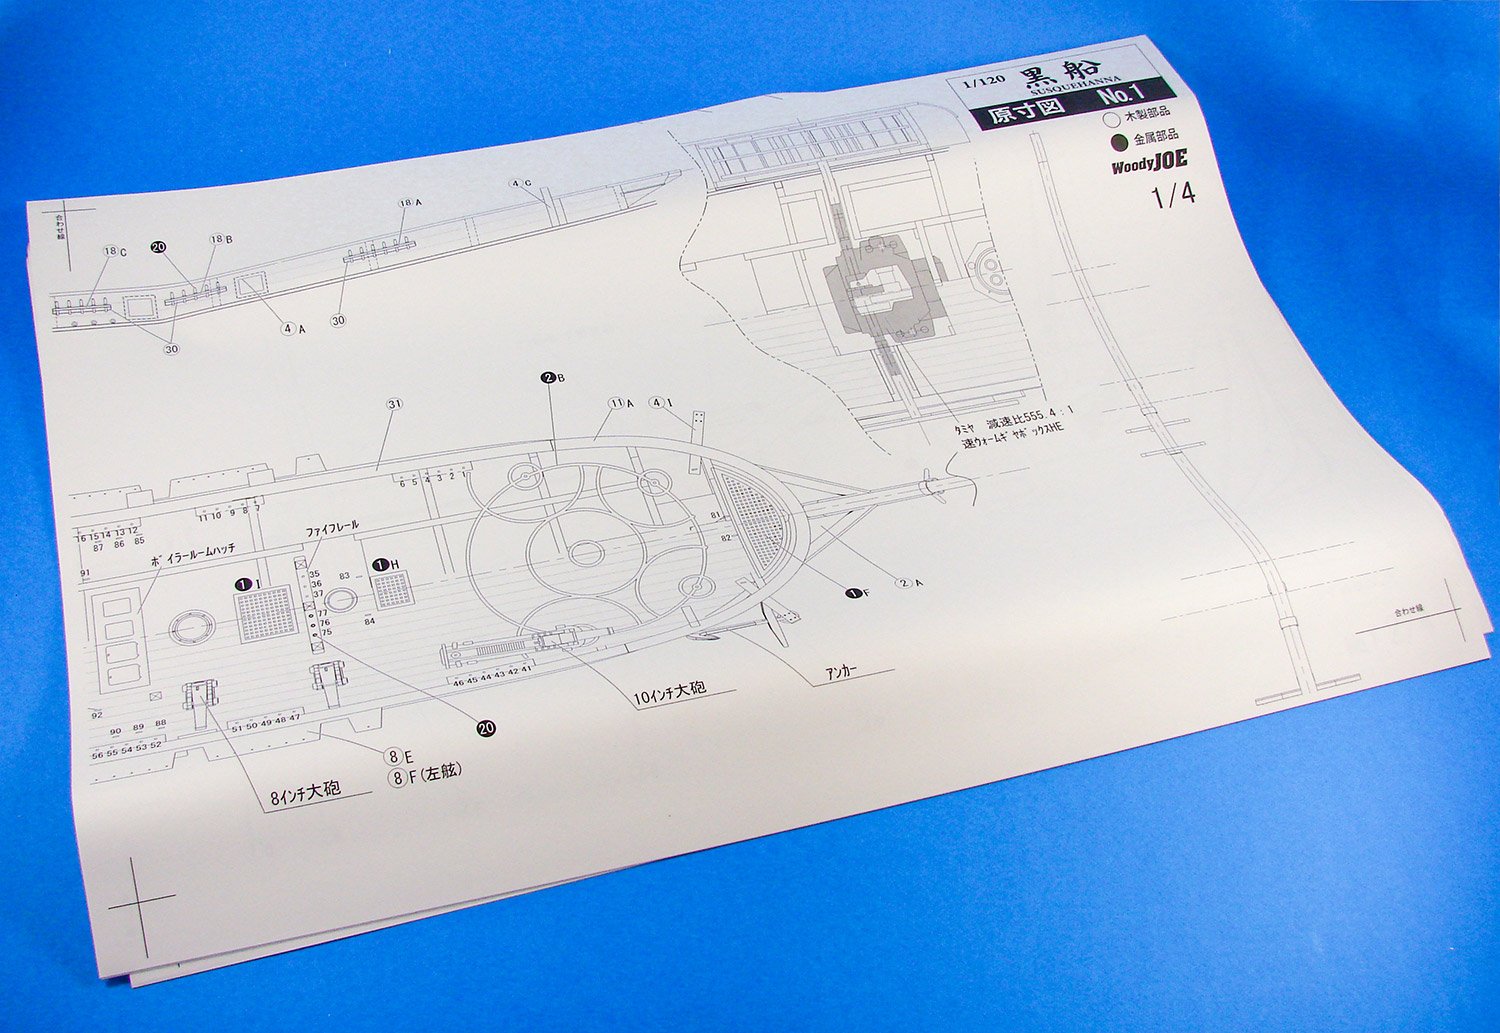
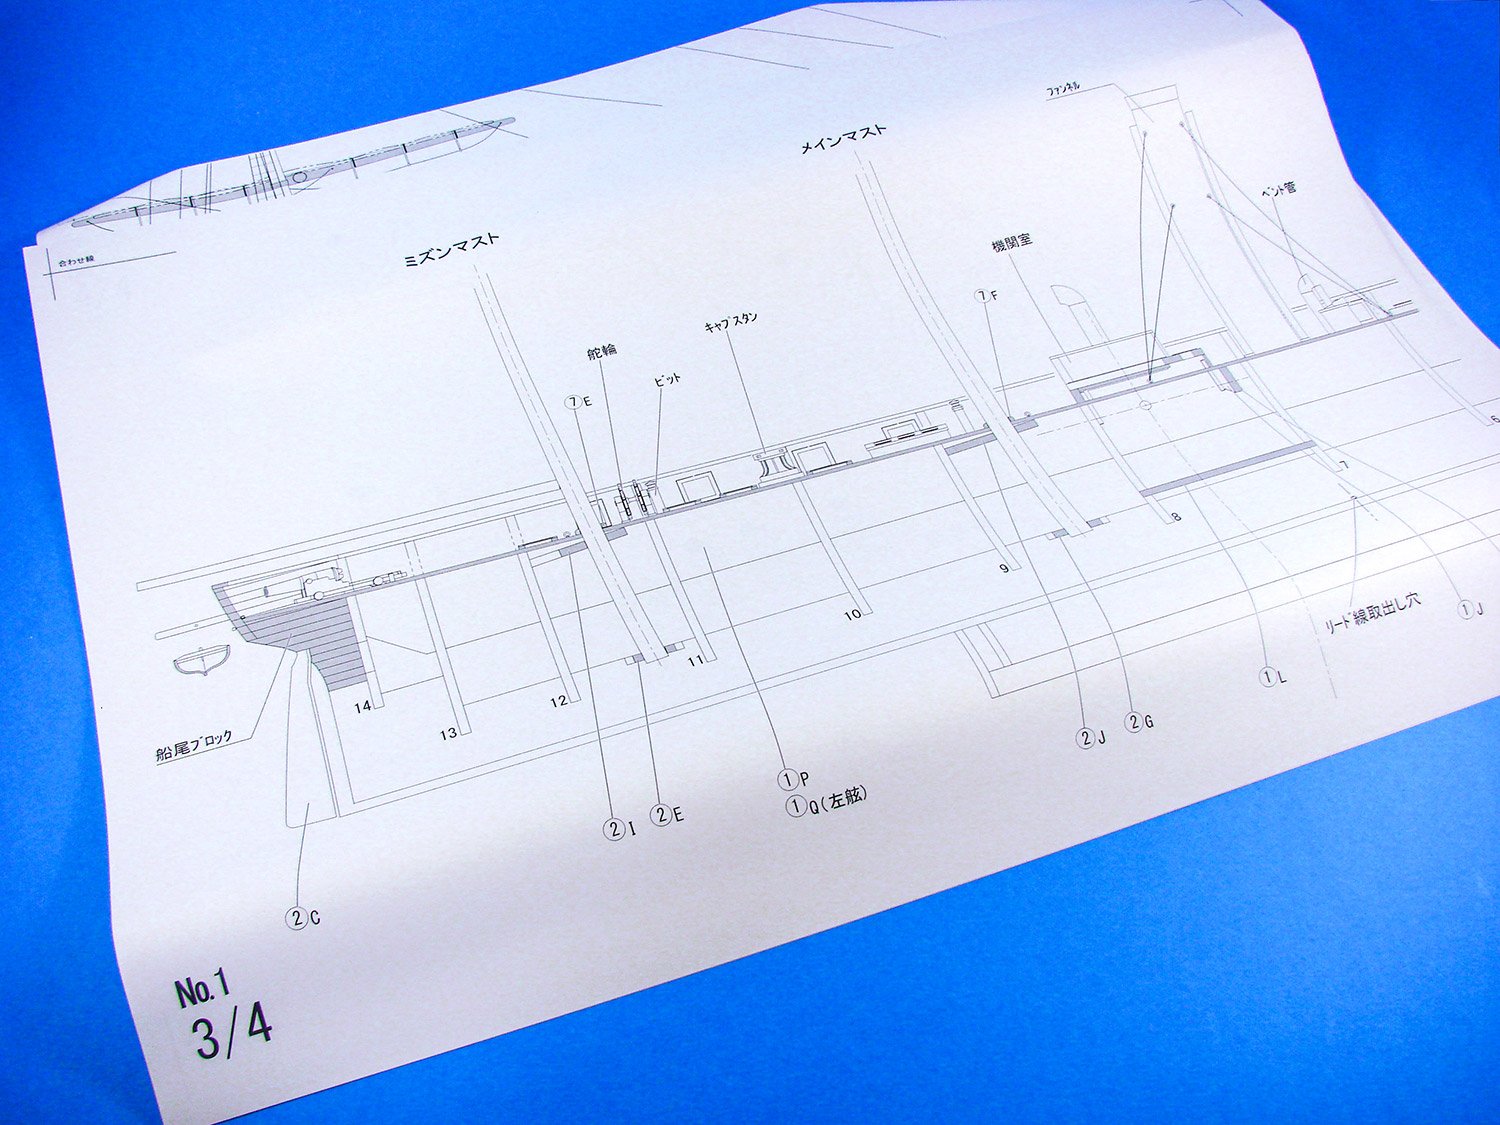
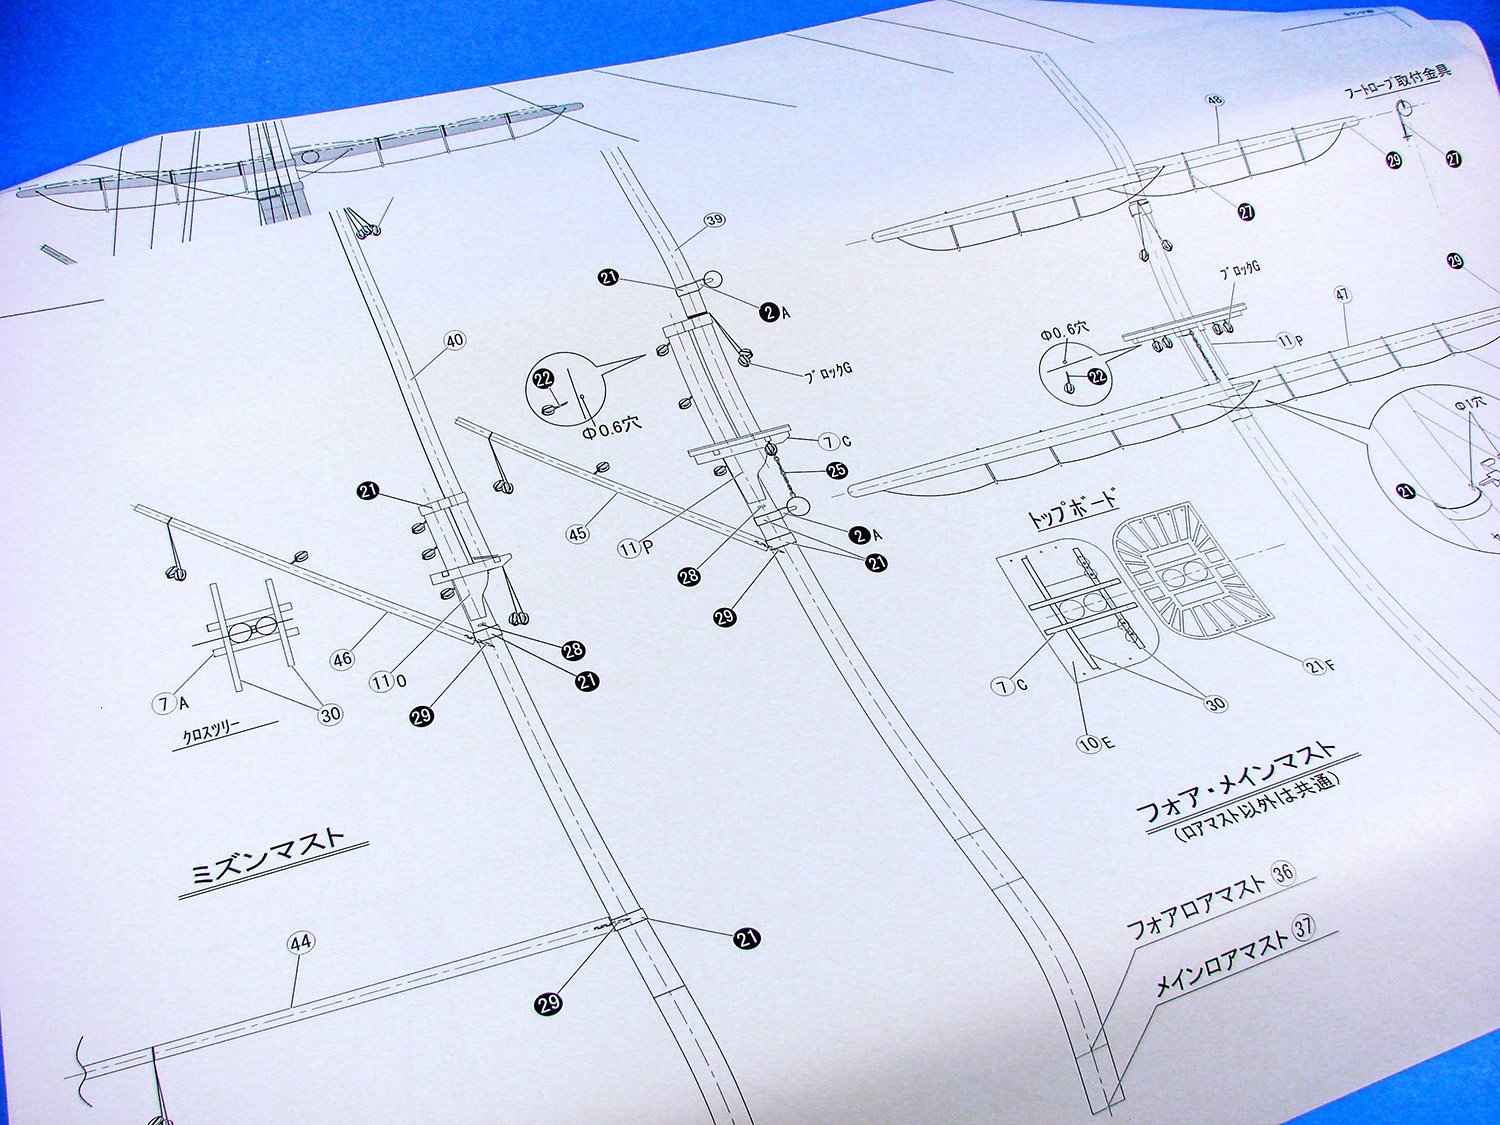
A series of sheet plans is included for just about everything you will need, such as hull profiles, fitting positions, masting etc.


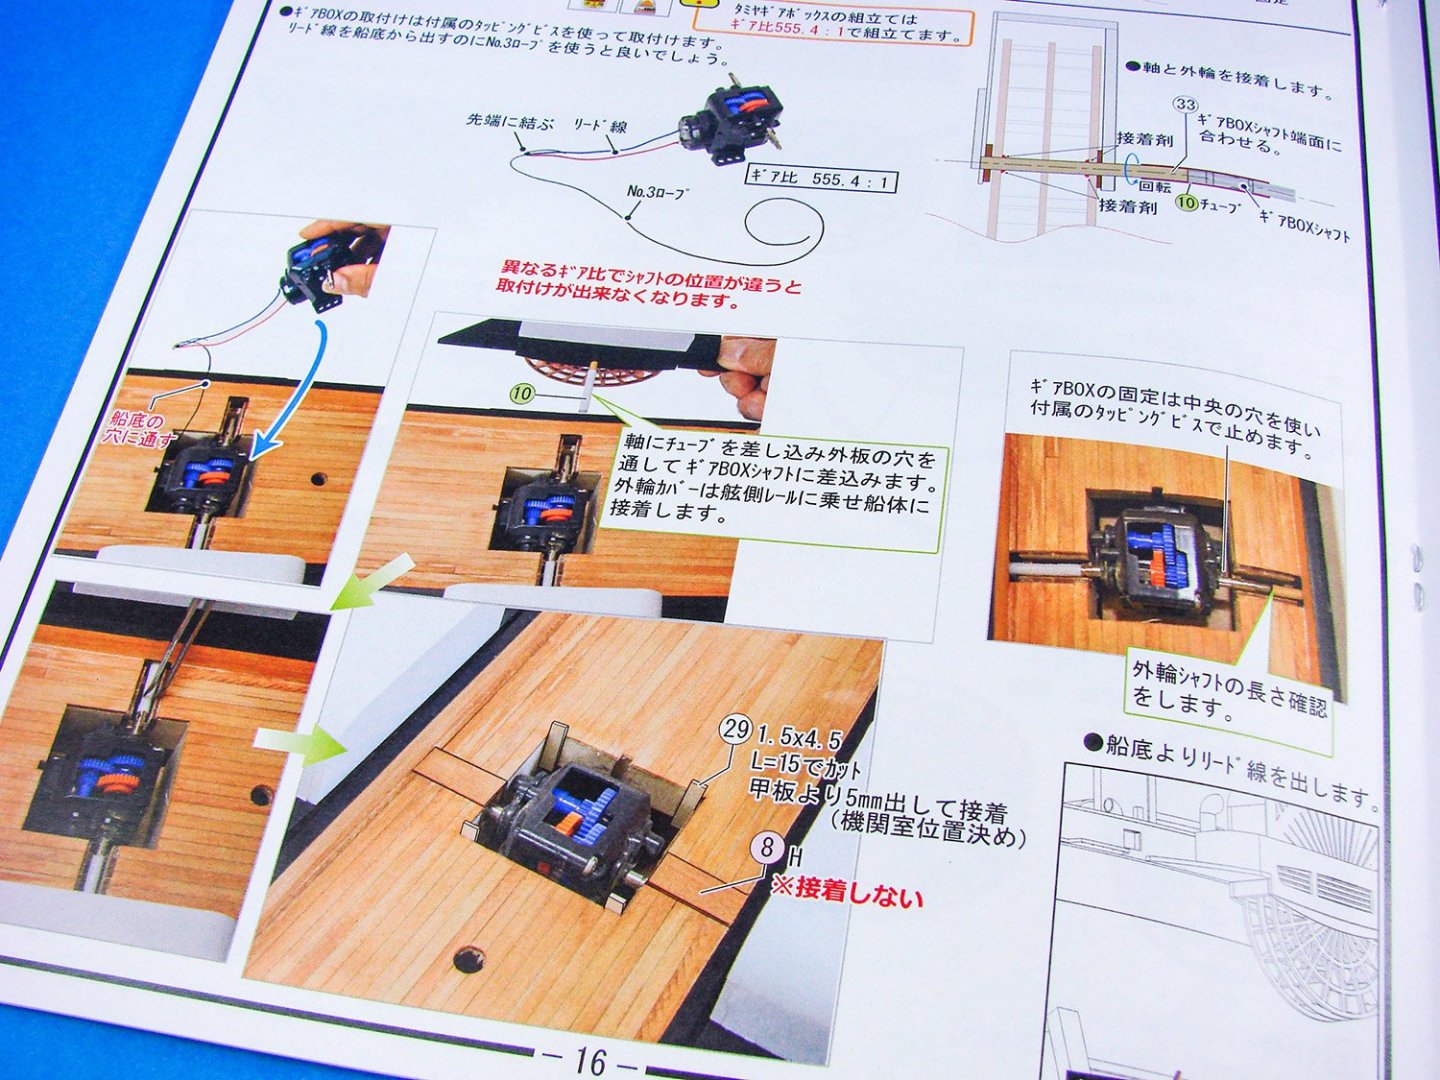
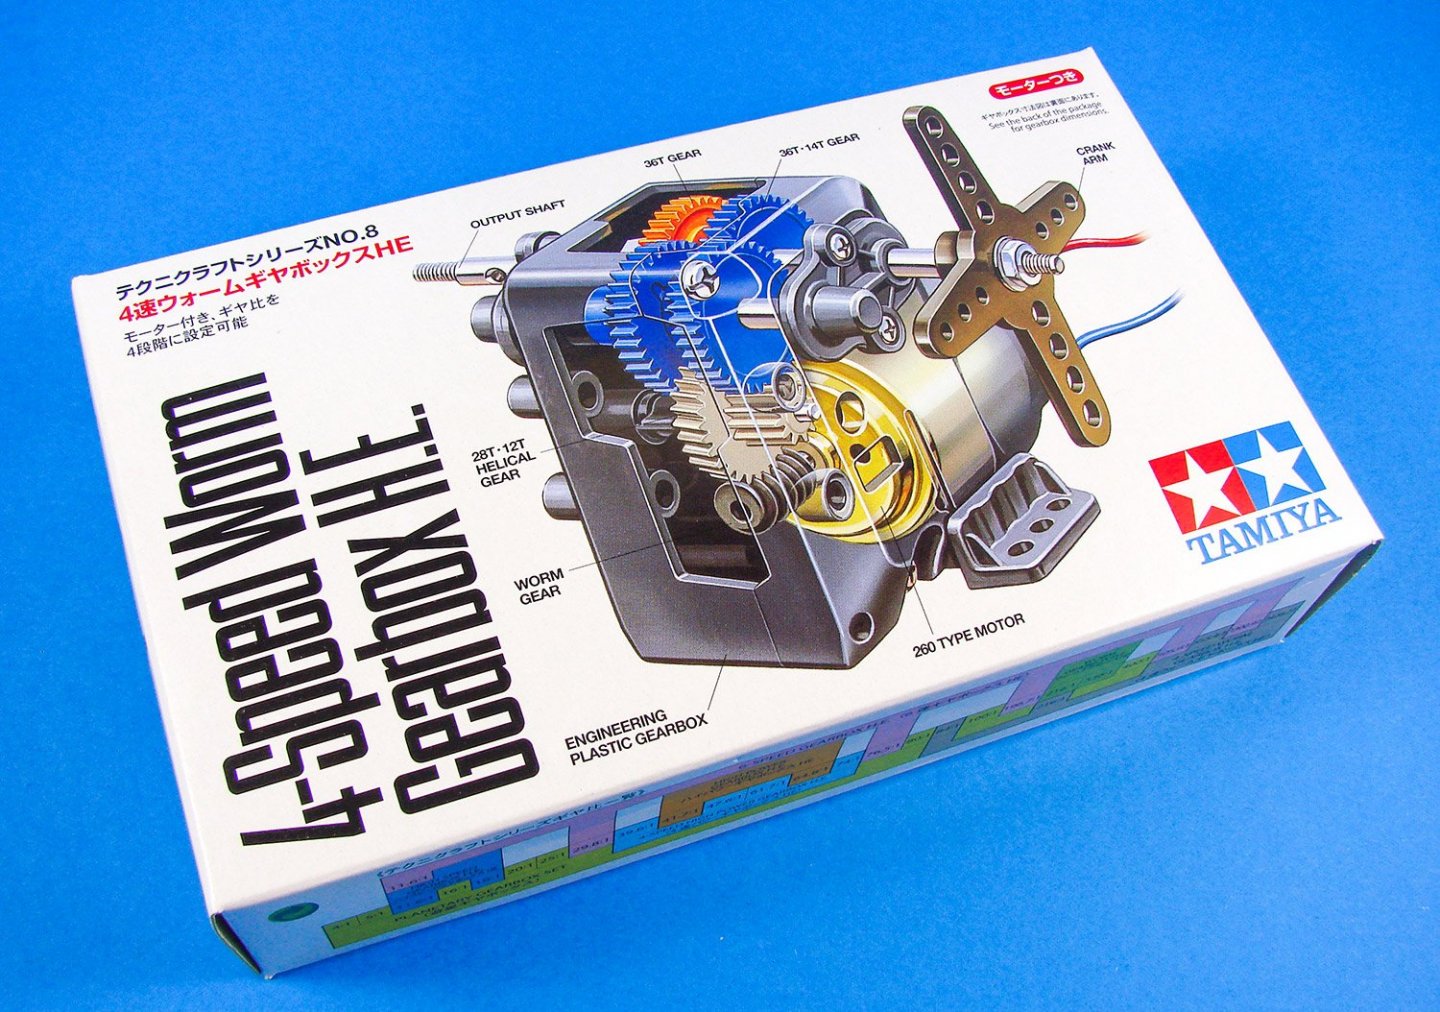
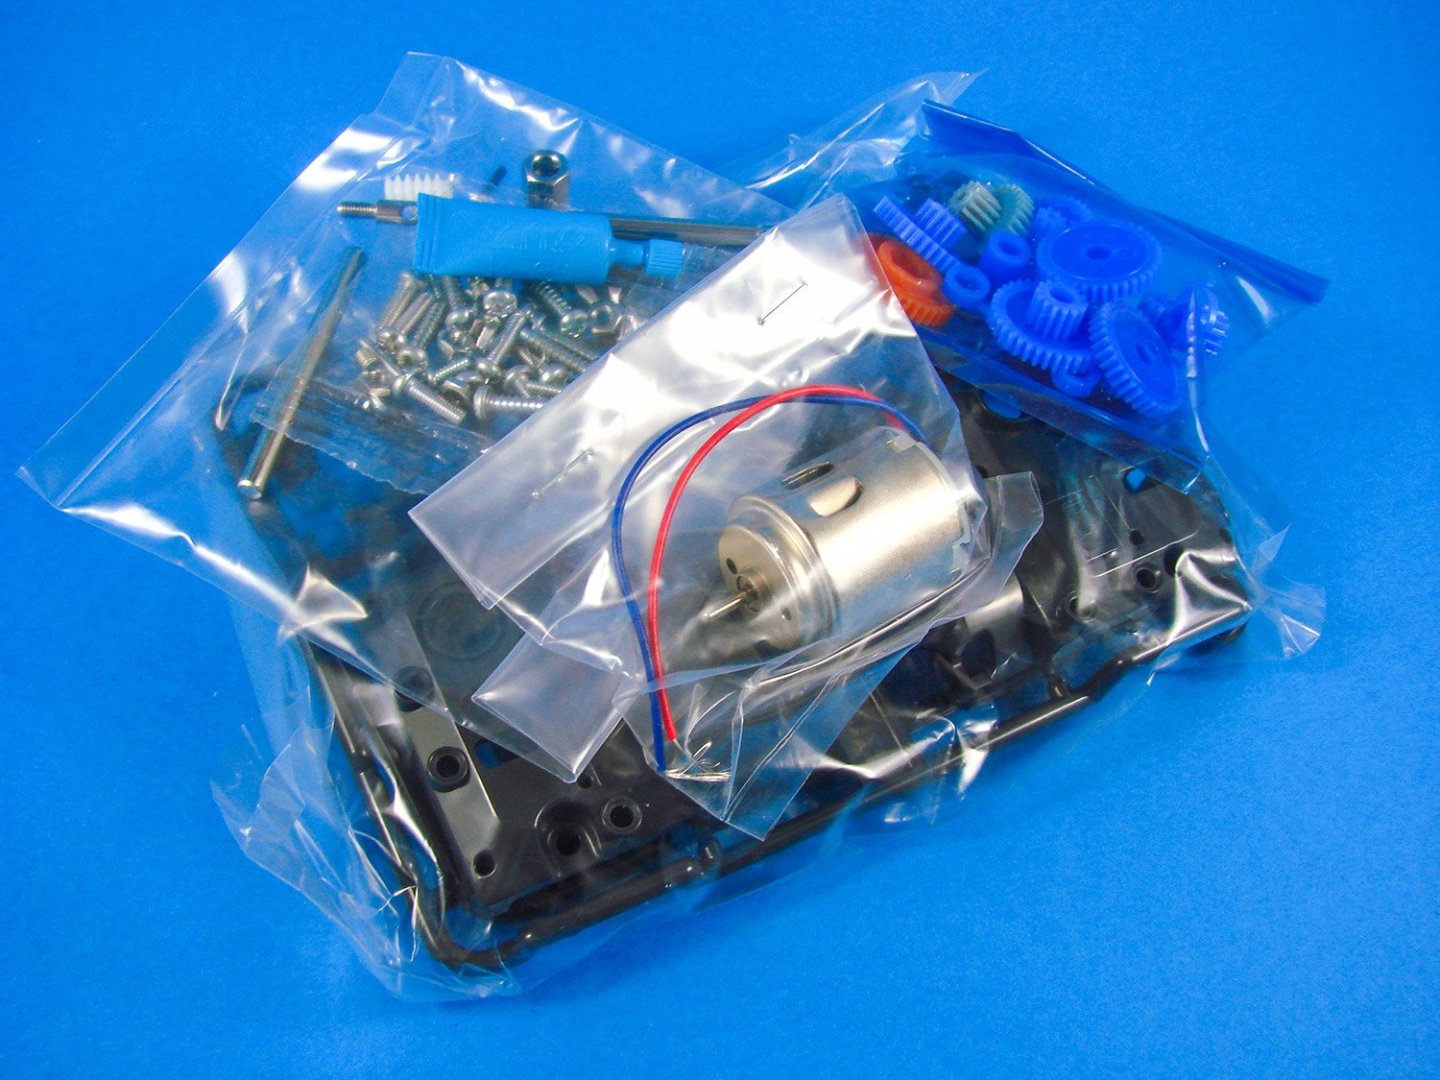
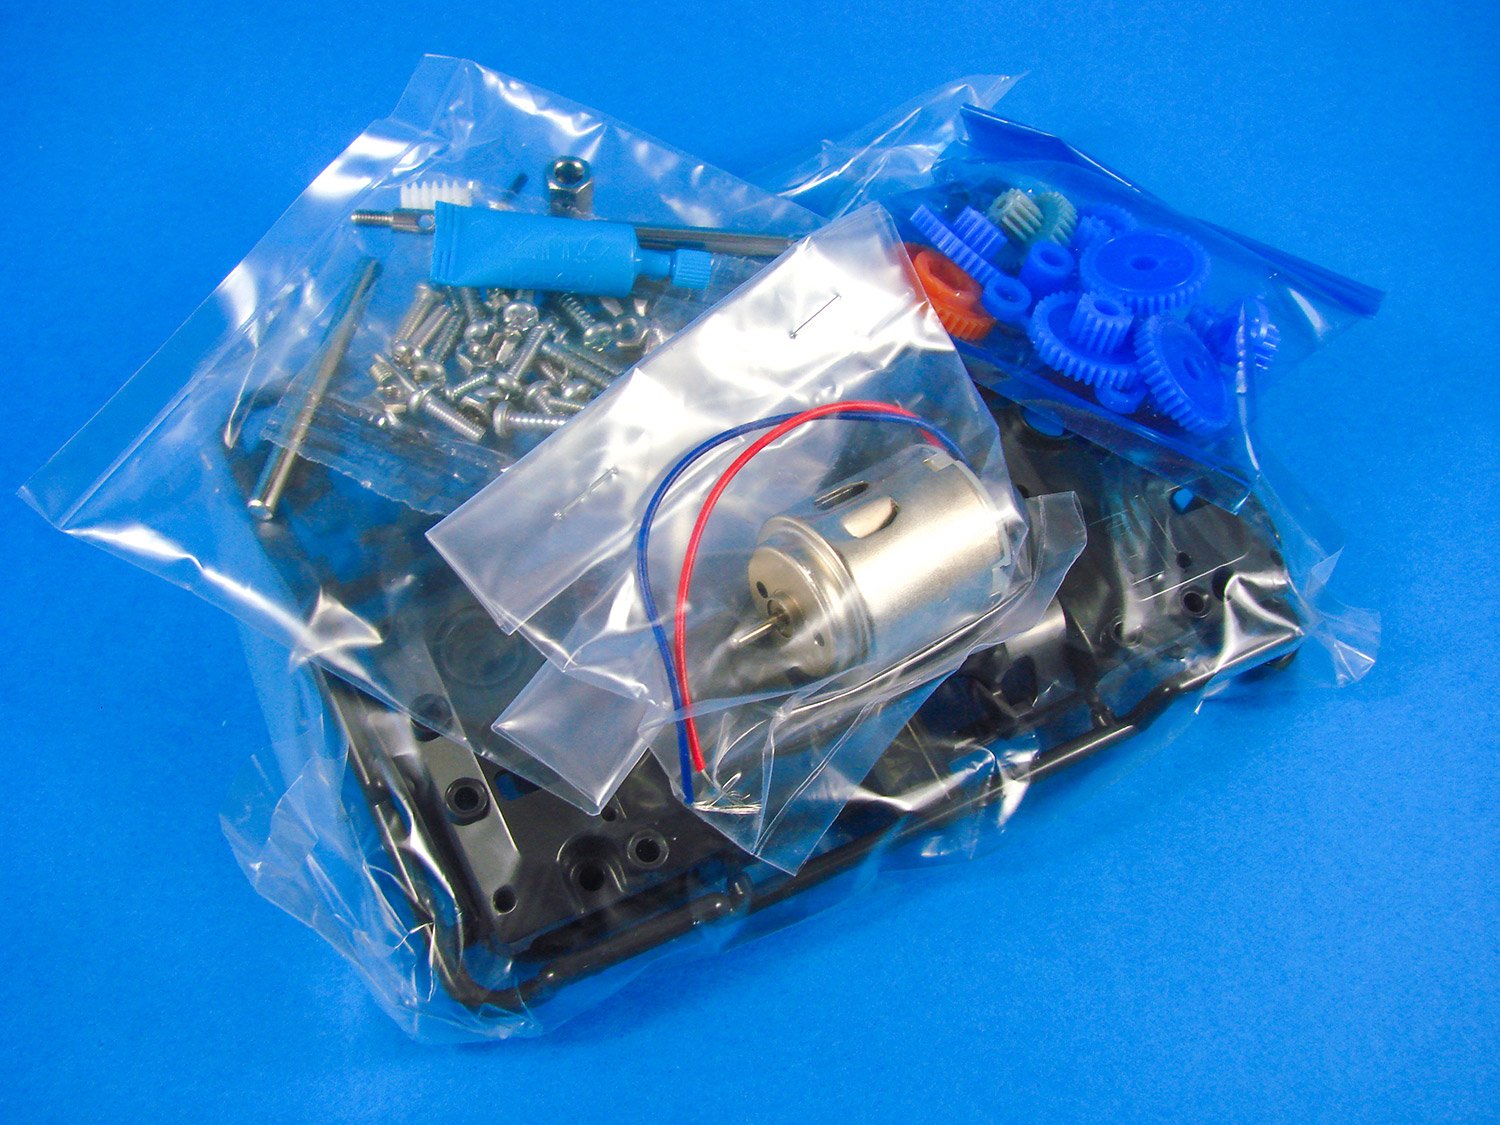
WoodyJOE kindly popped the Tamiya gearbox unit into my sample. This isn’t a standard part in this kit, but it is of course designed to specifically fit this unit, should you wish to purchase it extra. As with Tamiya products, you are expected to build this itself, and it is supplied as a mini-kit, complete with electric motor and a small tube of grease for lubrication.
Another item to be purchased separately is this battery box. A relatively inexpensive item costing only a £/$ or so.

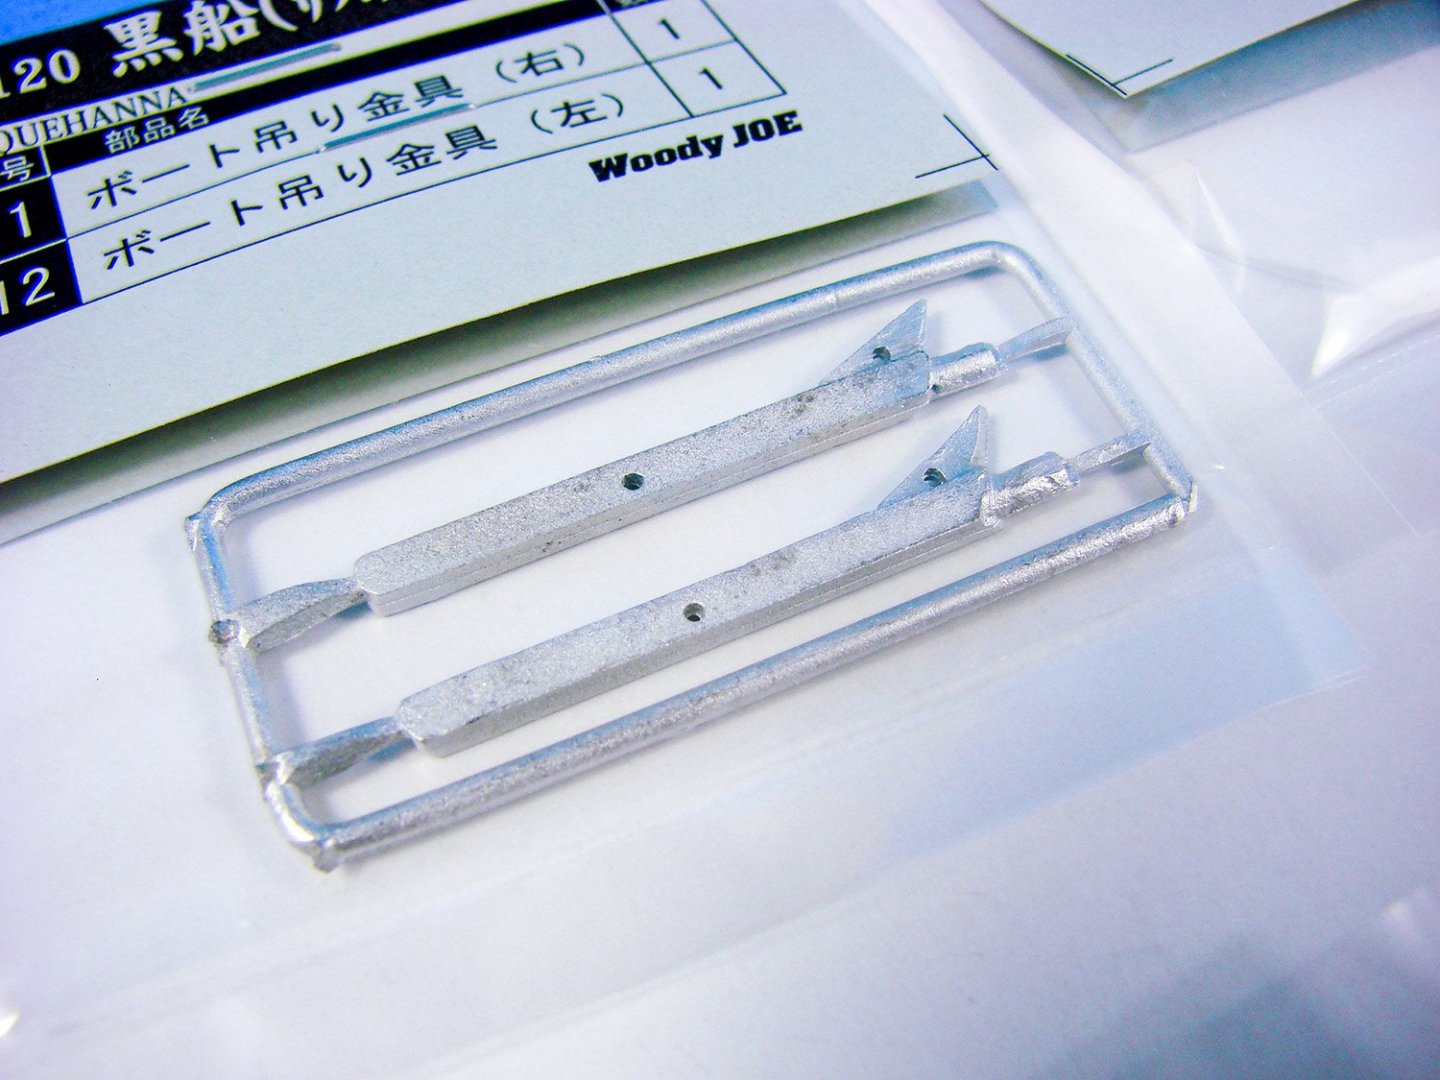
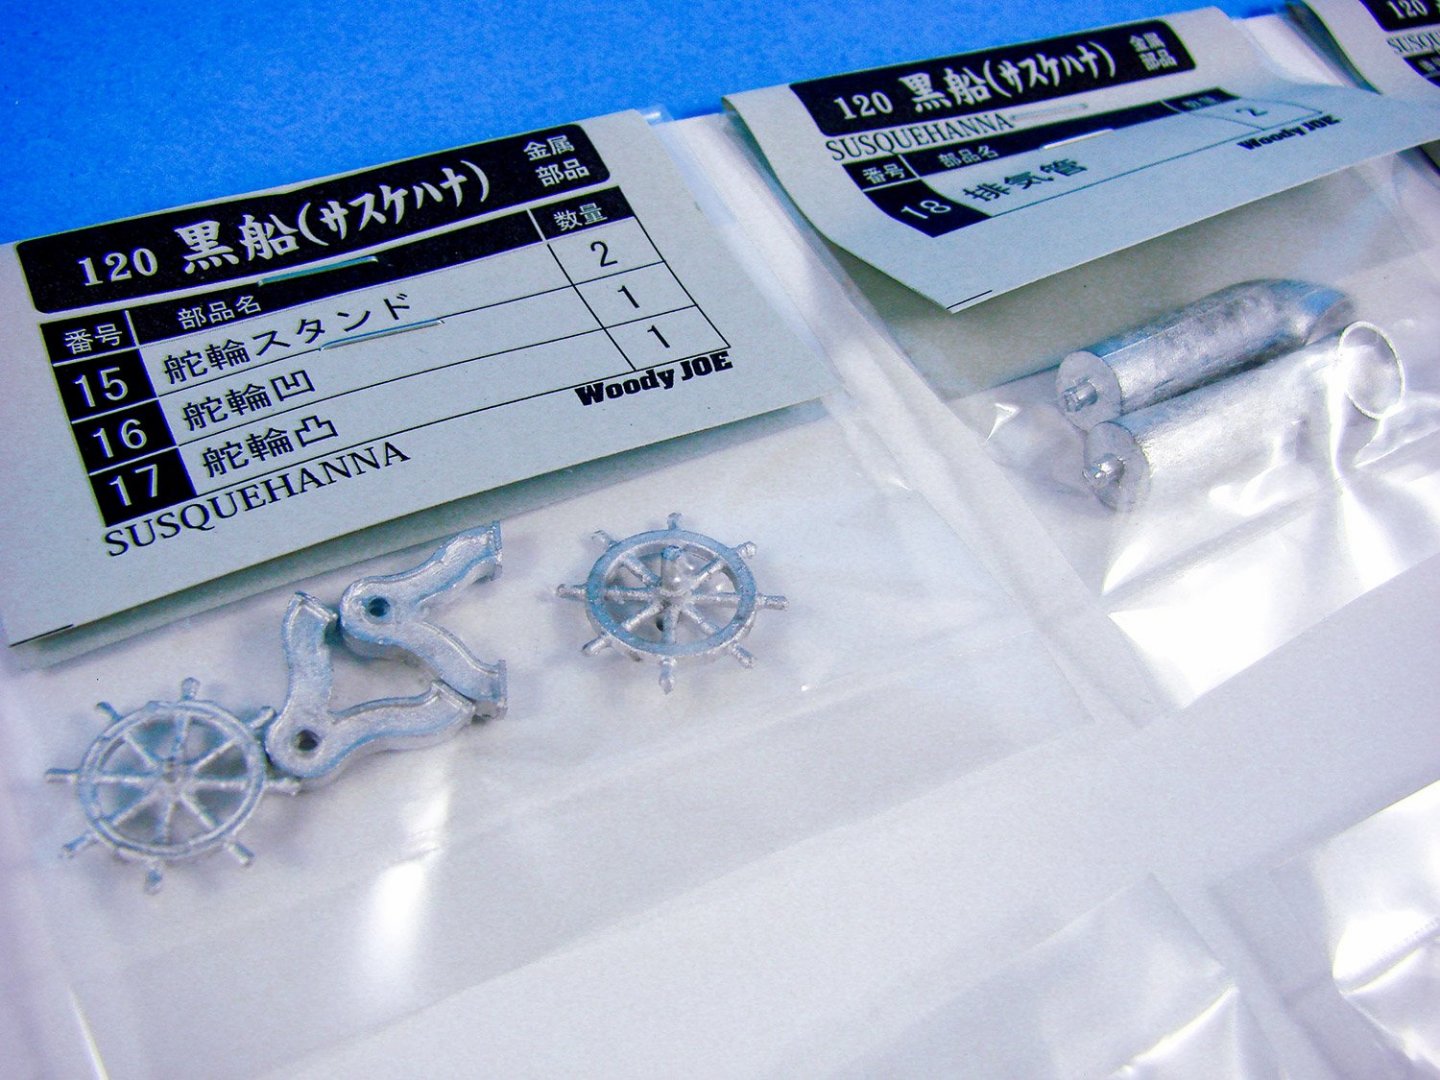
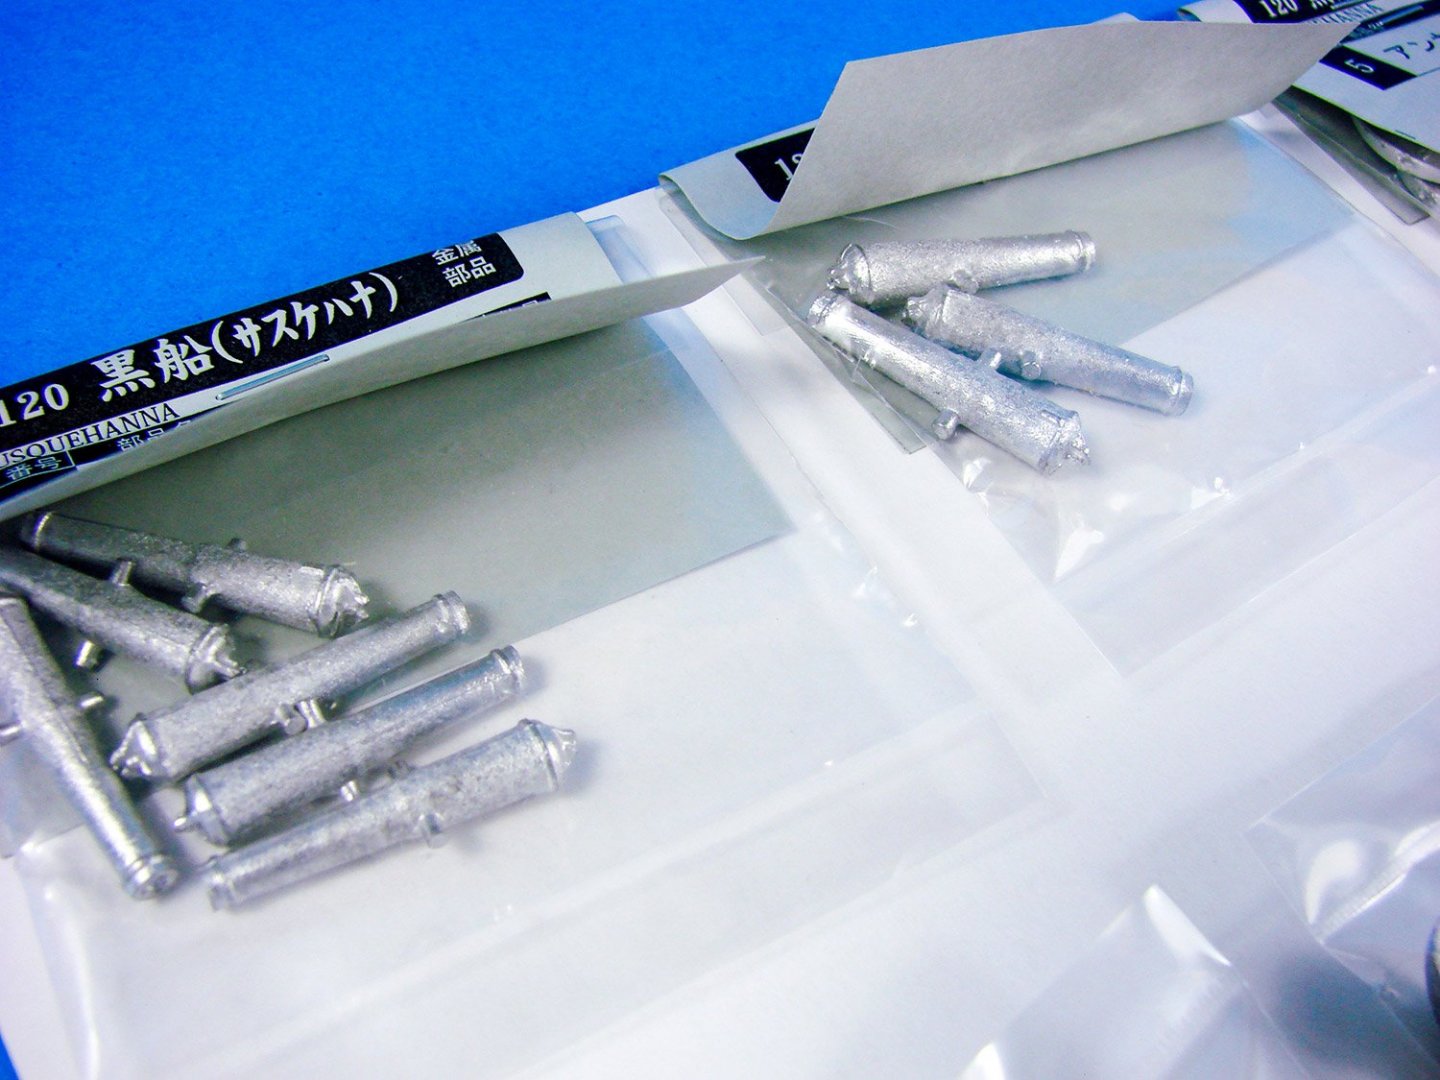
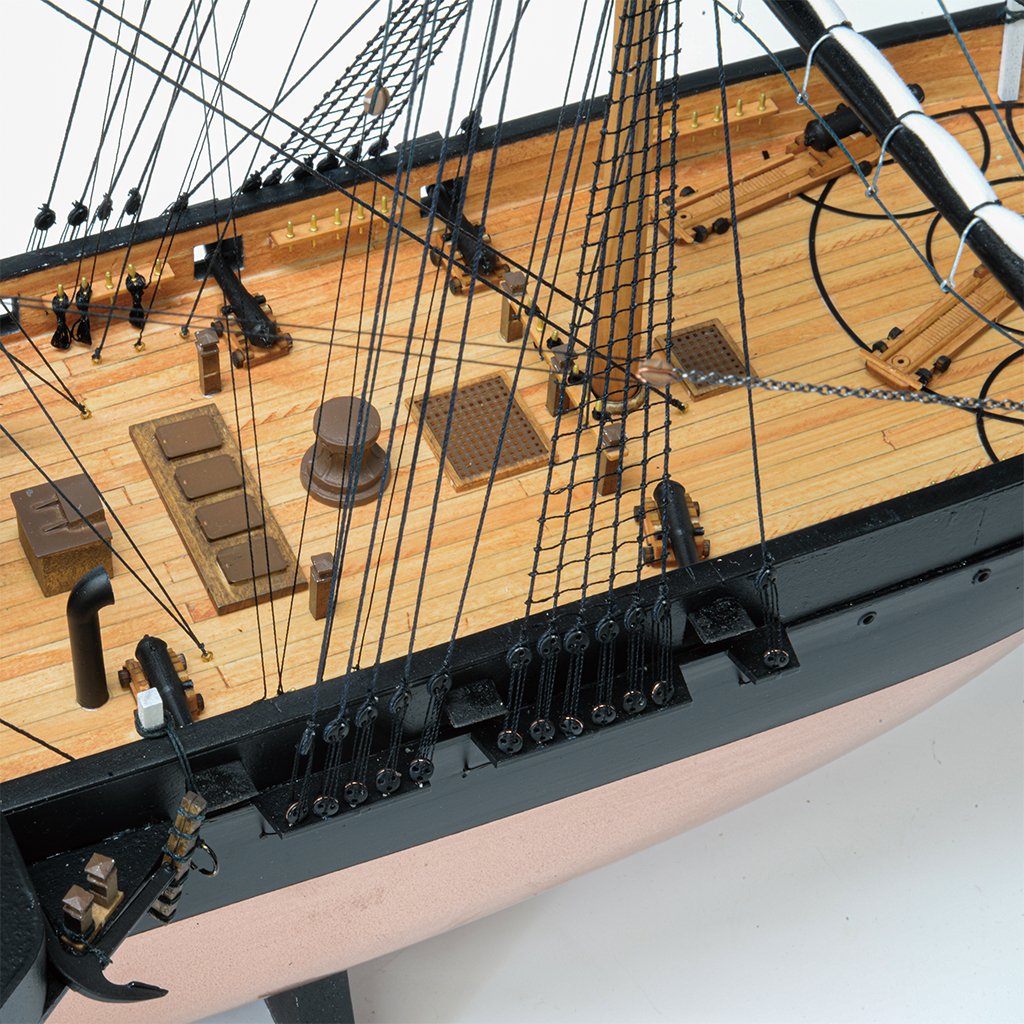
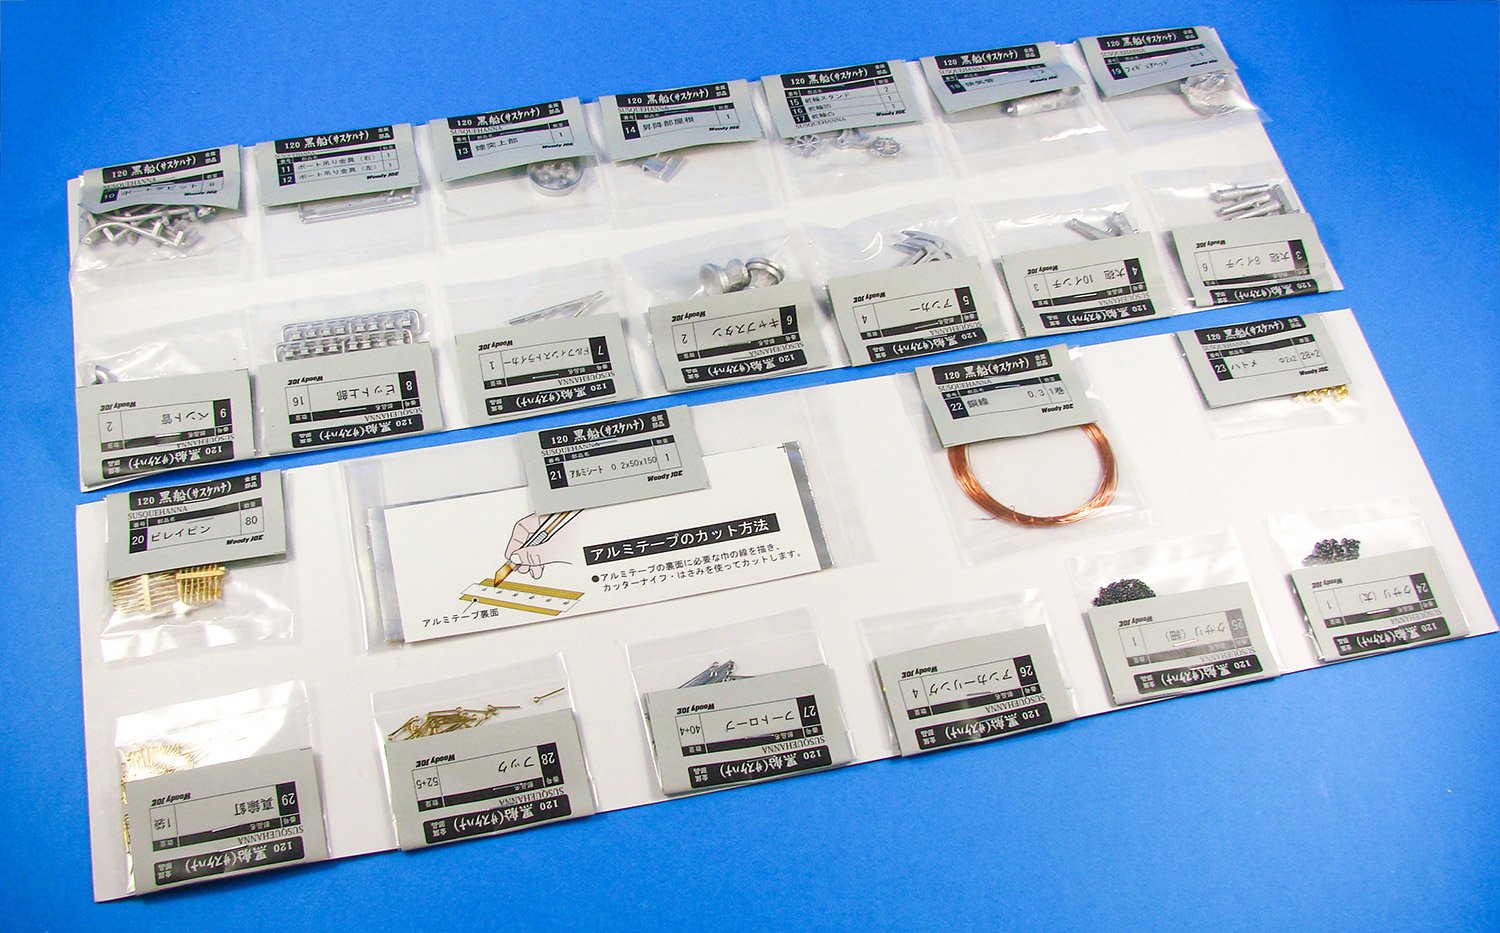
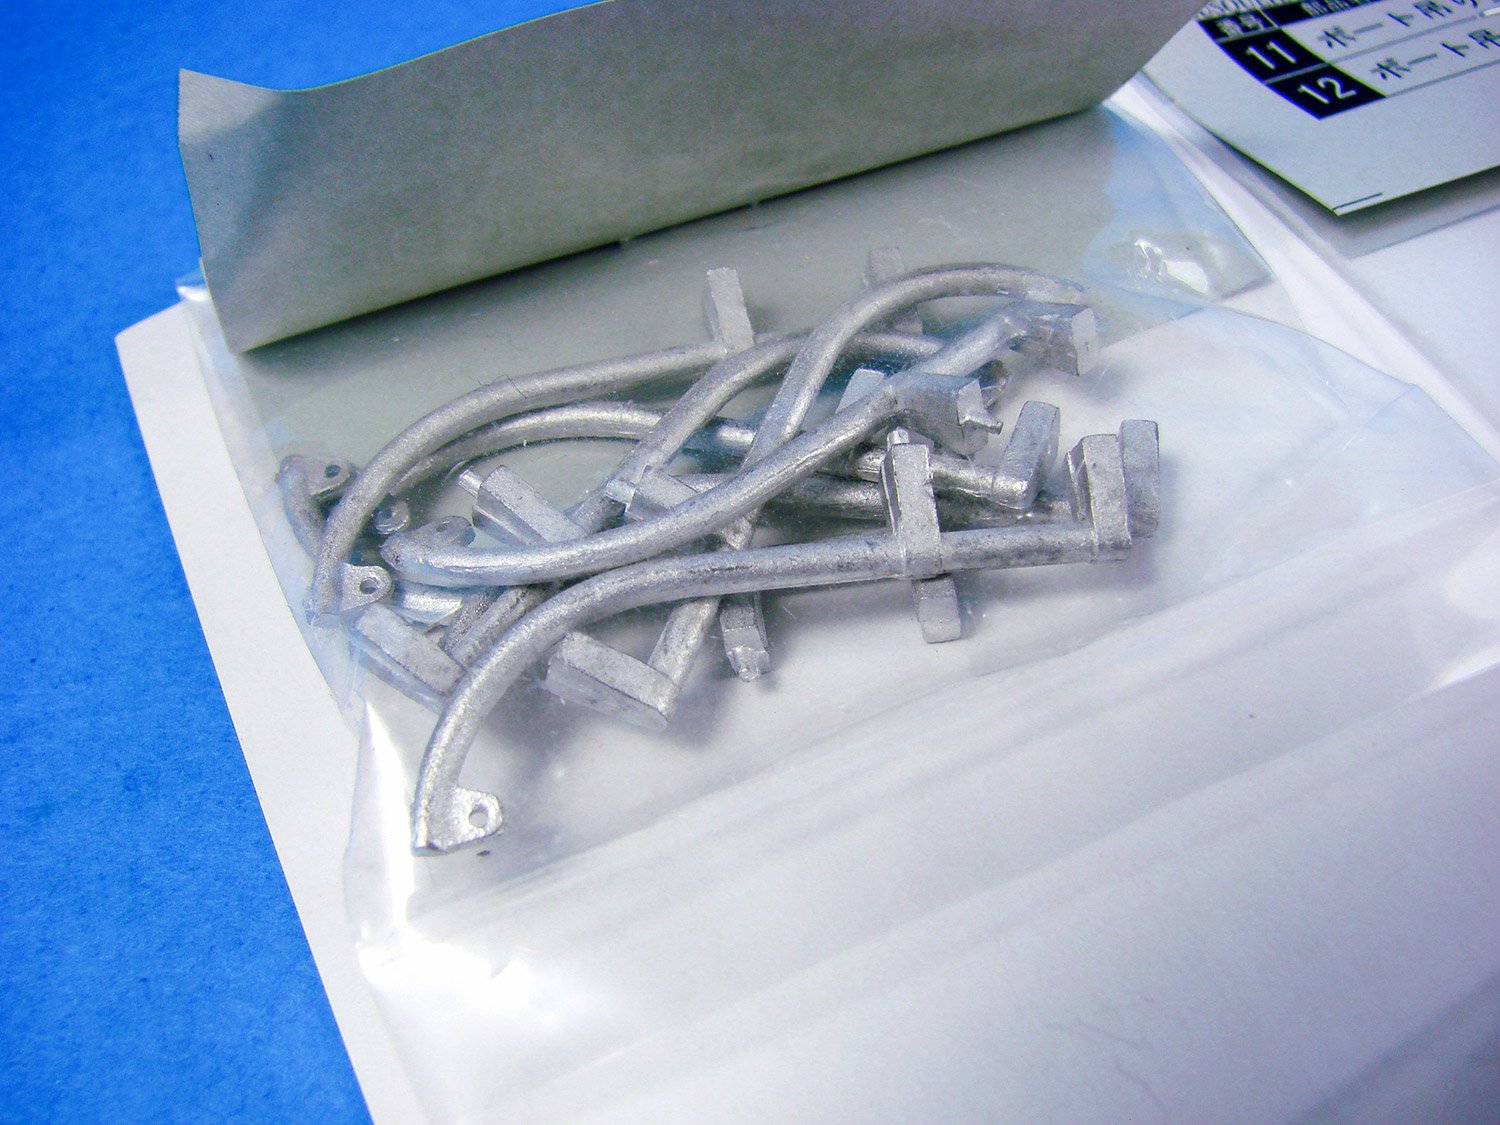
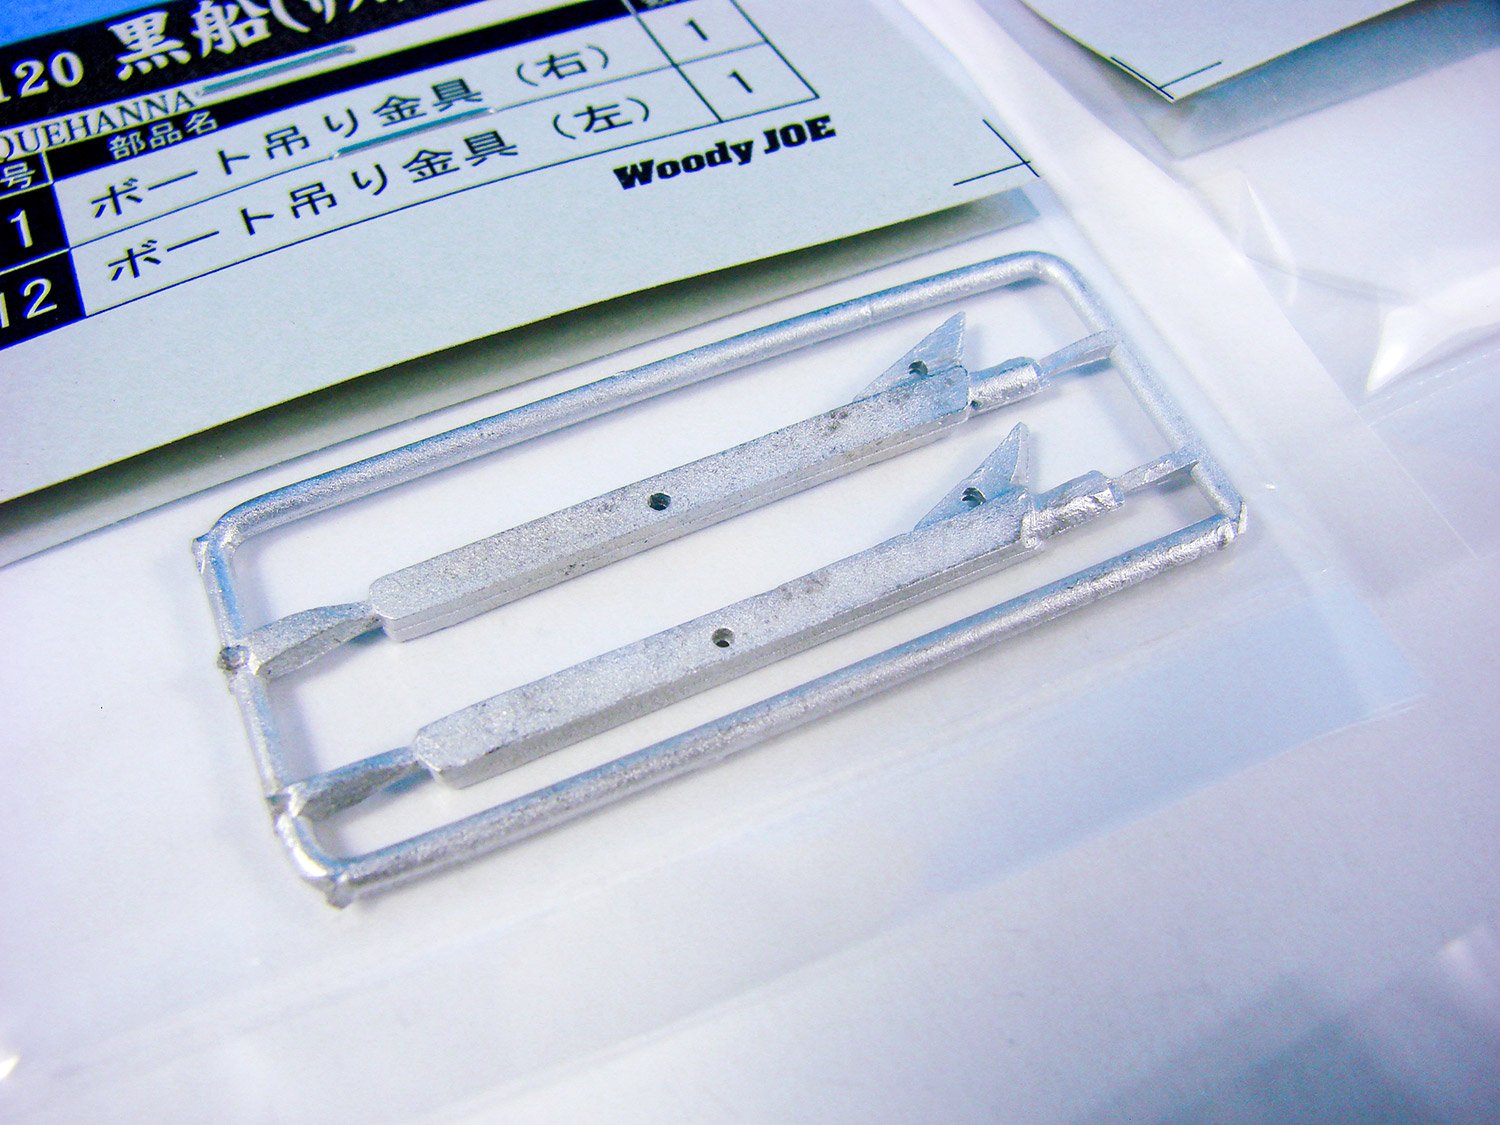
Now, onto the various fittings. These have been supplied stapled to two sheets of card and certainly keeps everything neat and in order. Each packet of parts is also neatly labelled (in Japanese). Here you will find that parts are generally cast in white metal, but with very good definition in the most part. There are a few lines on the cannon that look like an original 3D-printed master wasn’t fully cleaned up, but this is easy to deal with.


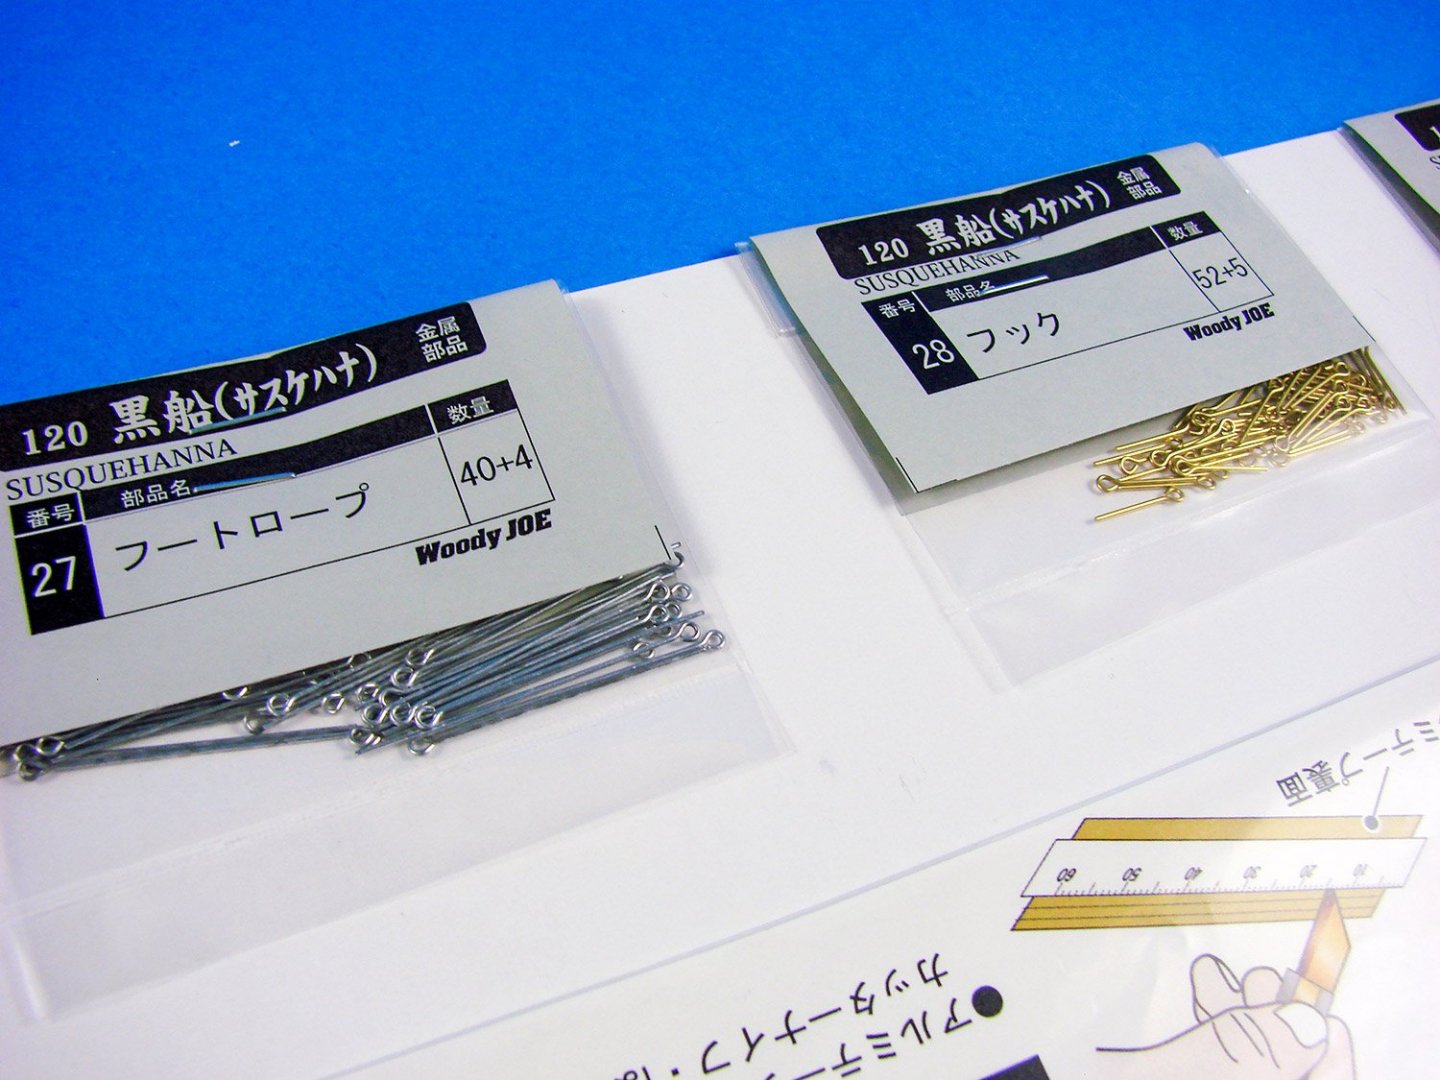
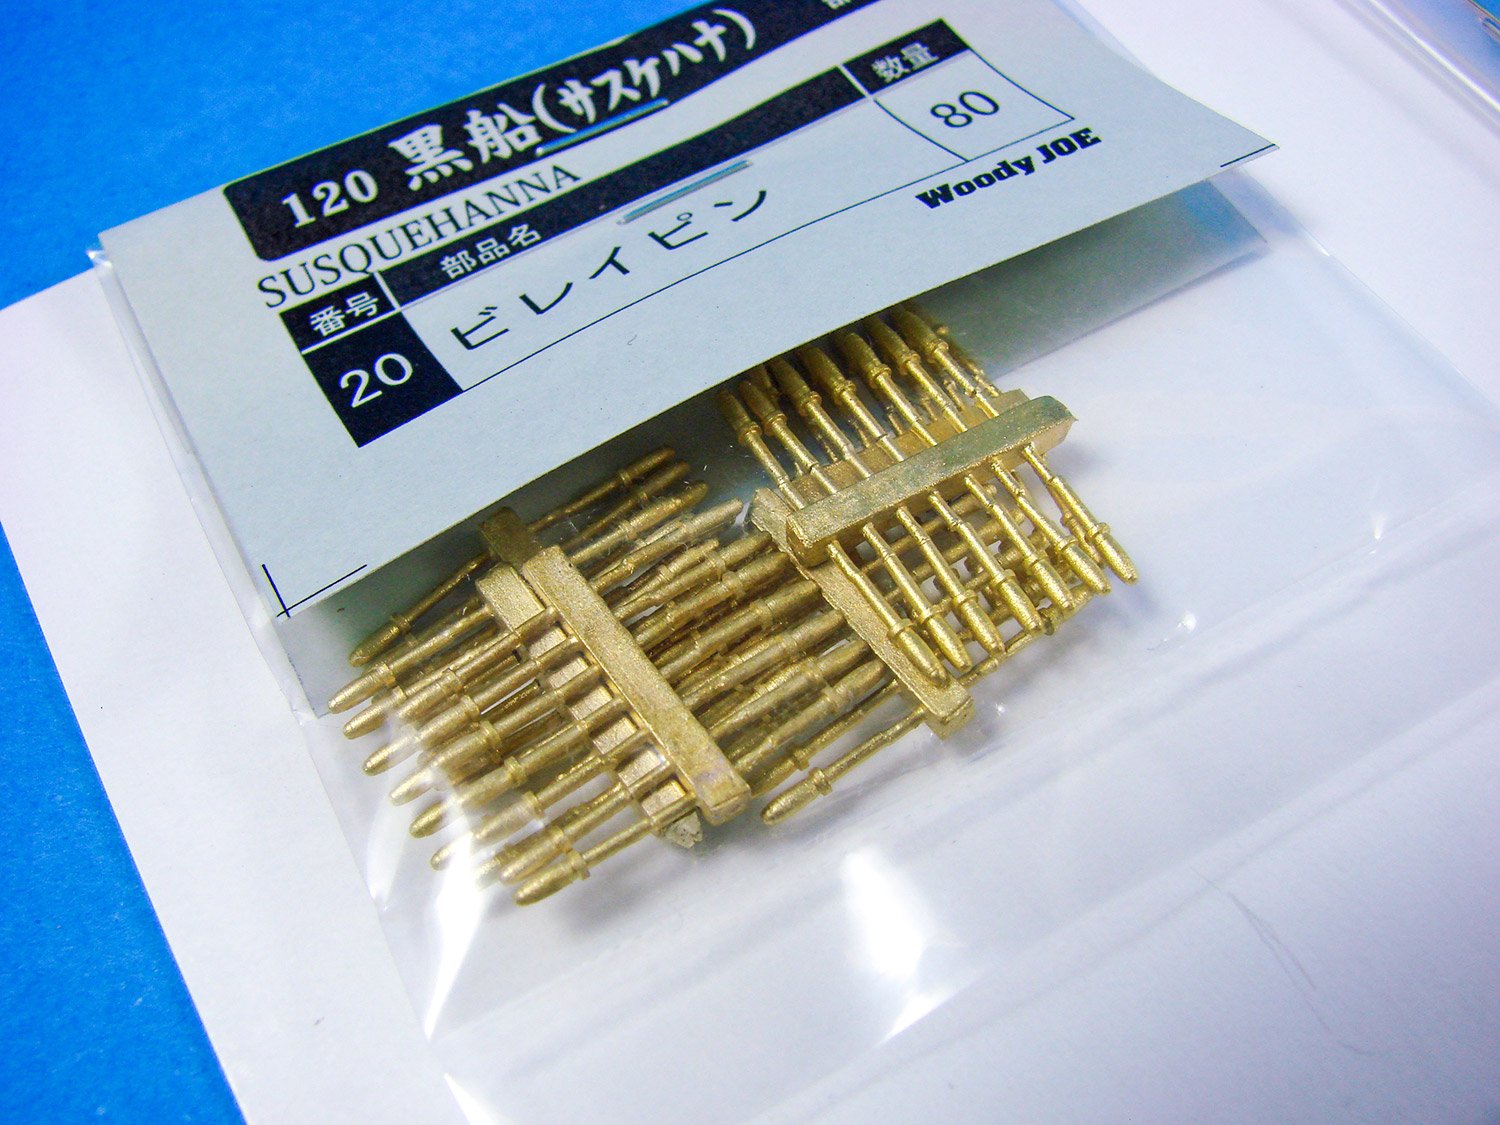
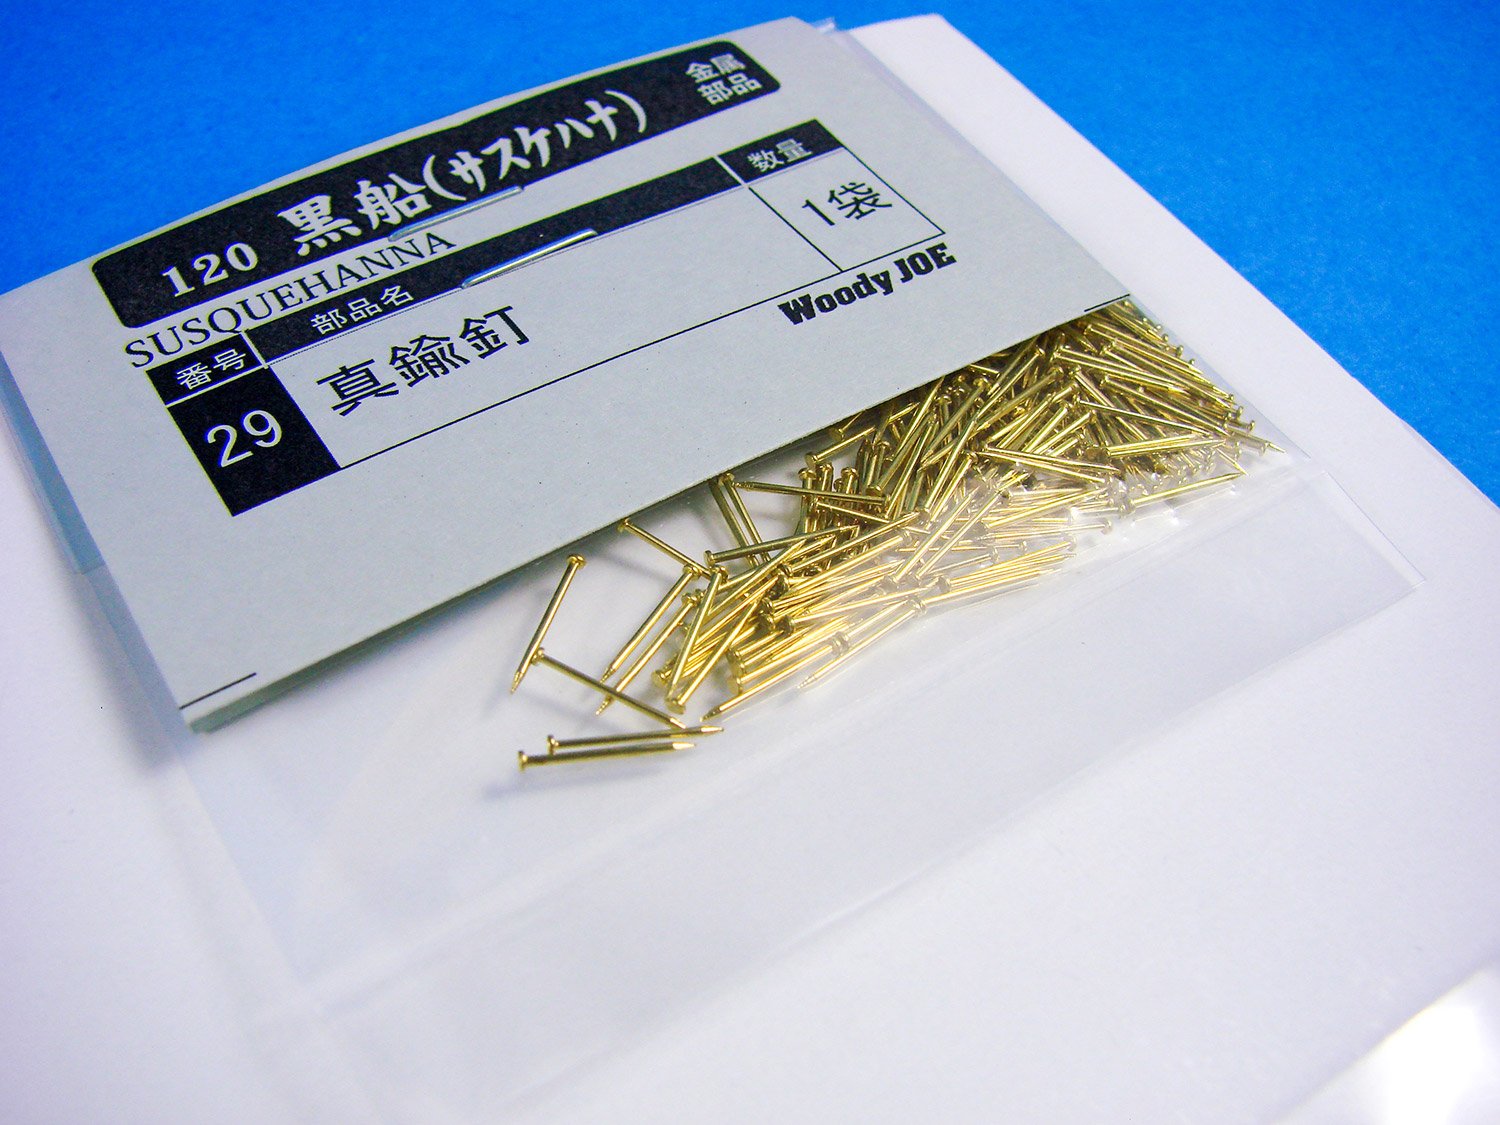
Instead of white metal, WoodyJOE have opted to include the belaying pins as cast-brass items which must be removed from their casting block and cleaned up prior to installation.

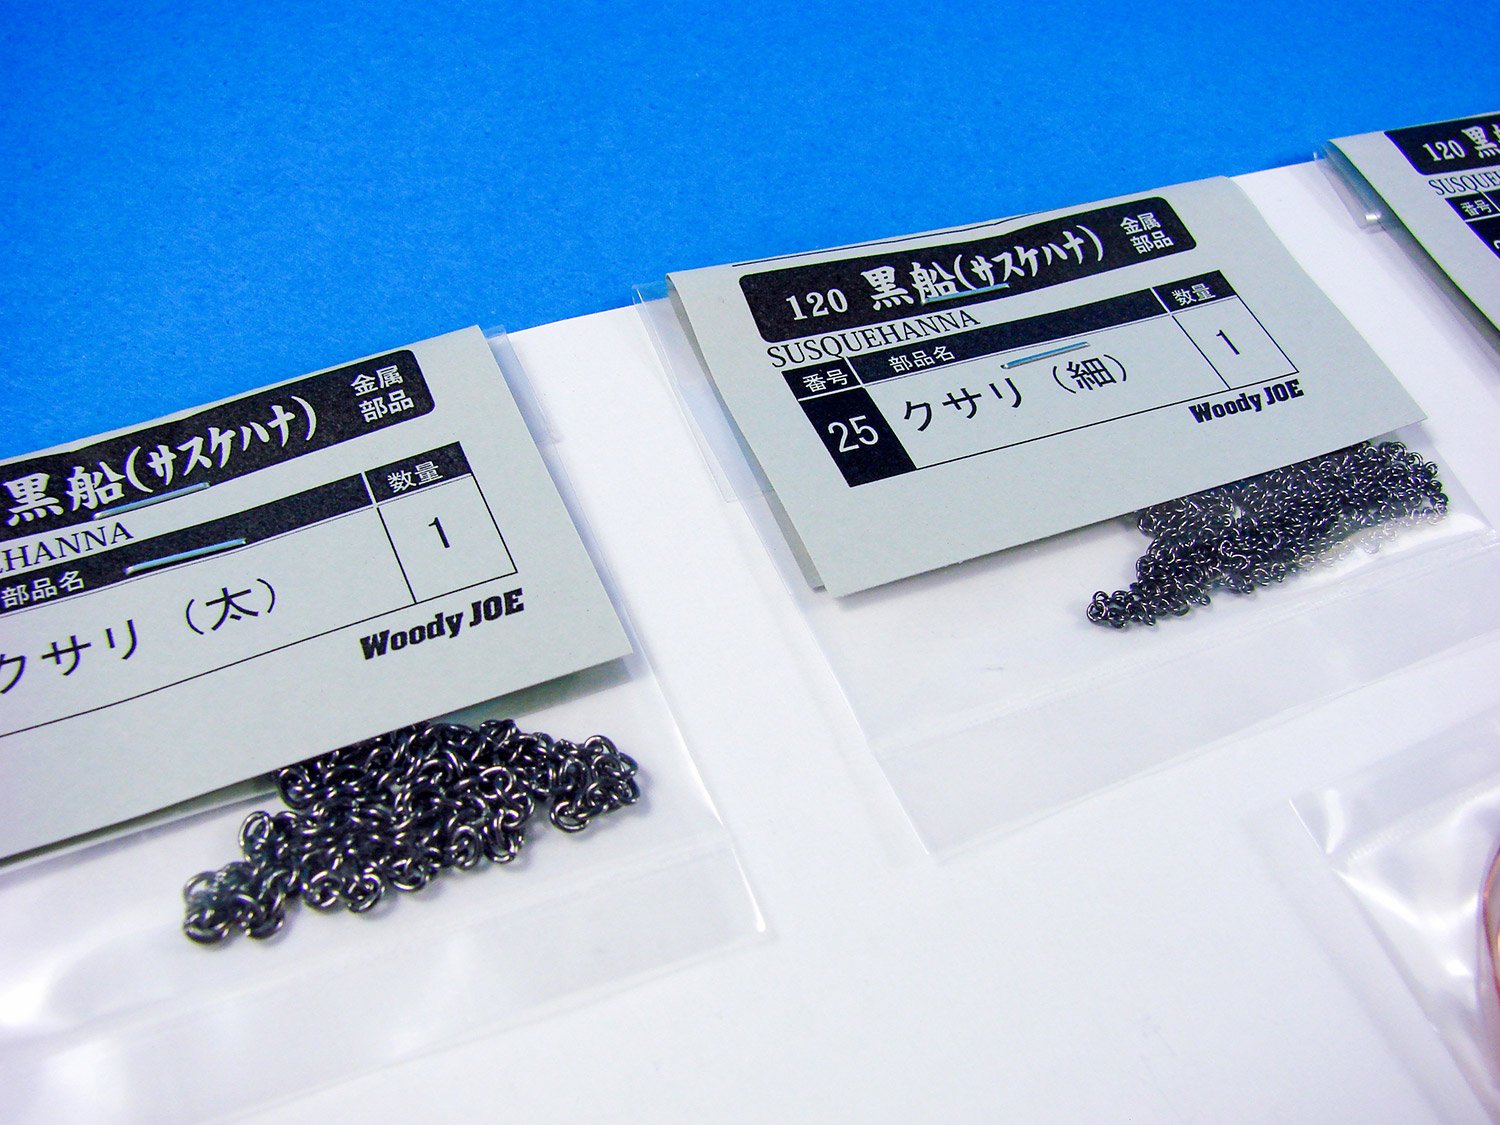
Other bagged items include wire, ferrules, varying chain sizes, pins, rigging pins, etc.
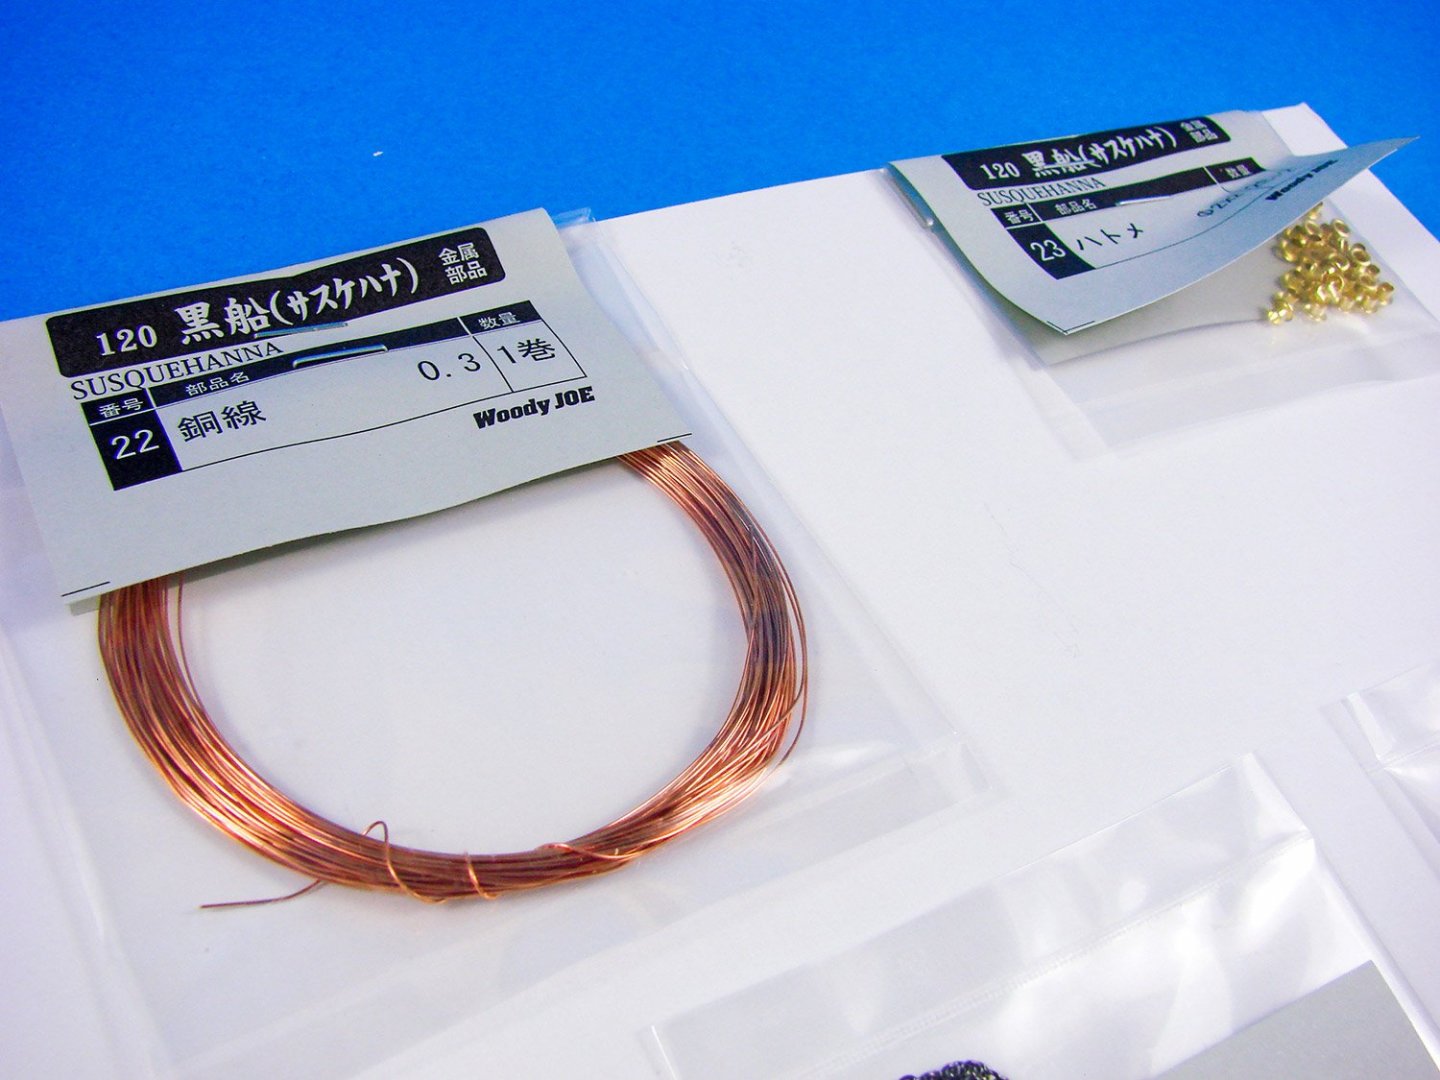


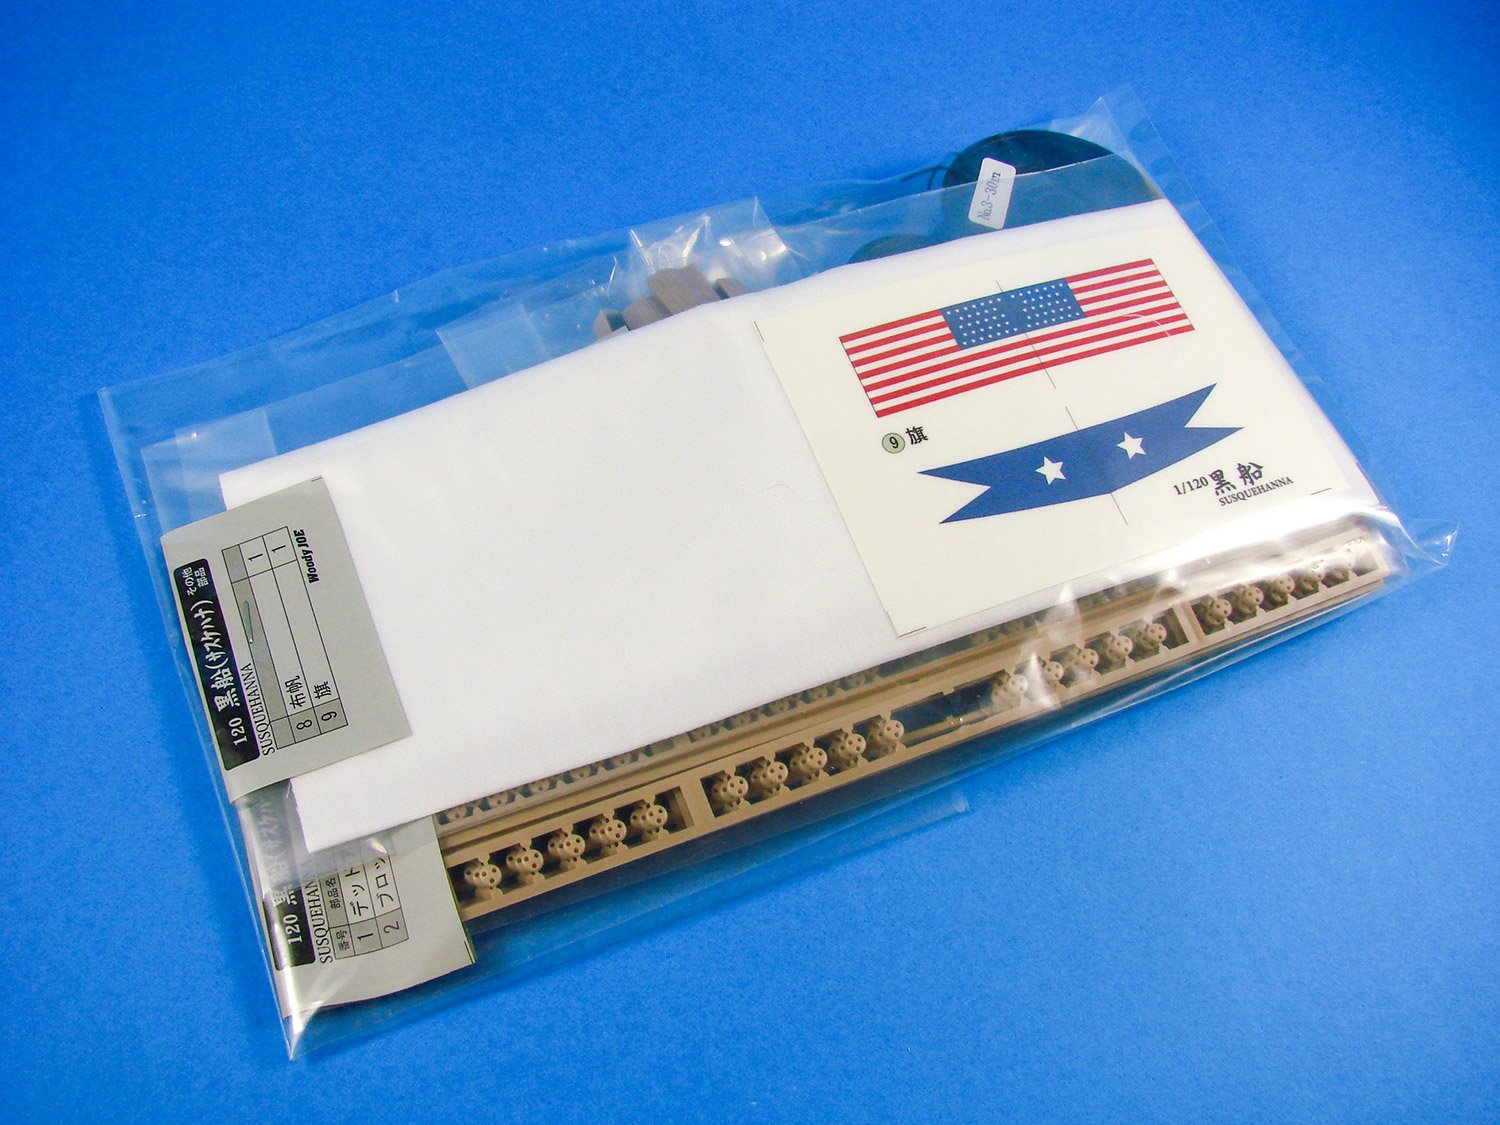
A number of parts in this kit are labelled in the same fashion as those on the card sheet but are bagged instead.

This is where you will find spools of rigging cord that are clearly numbered in reference to the rigging drawings.

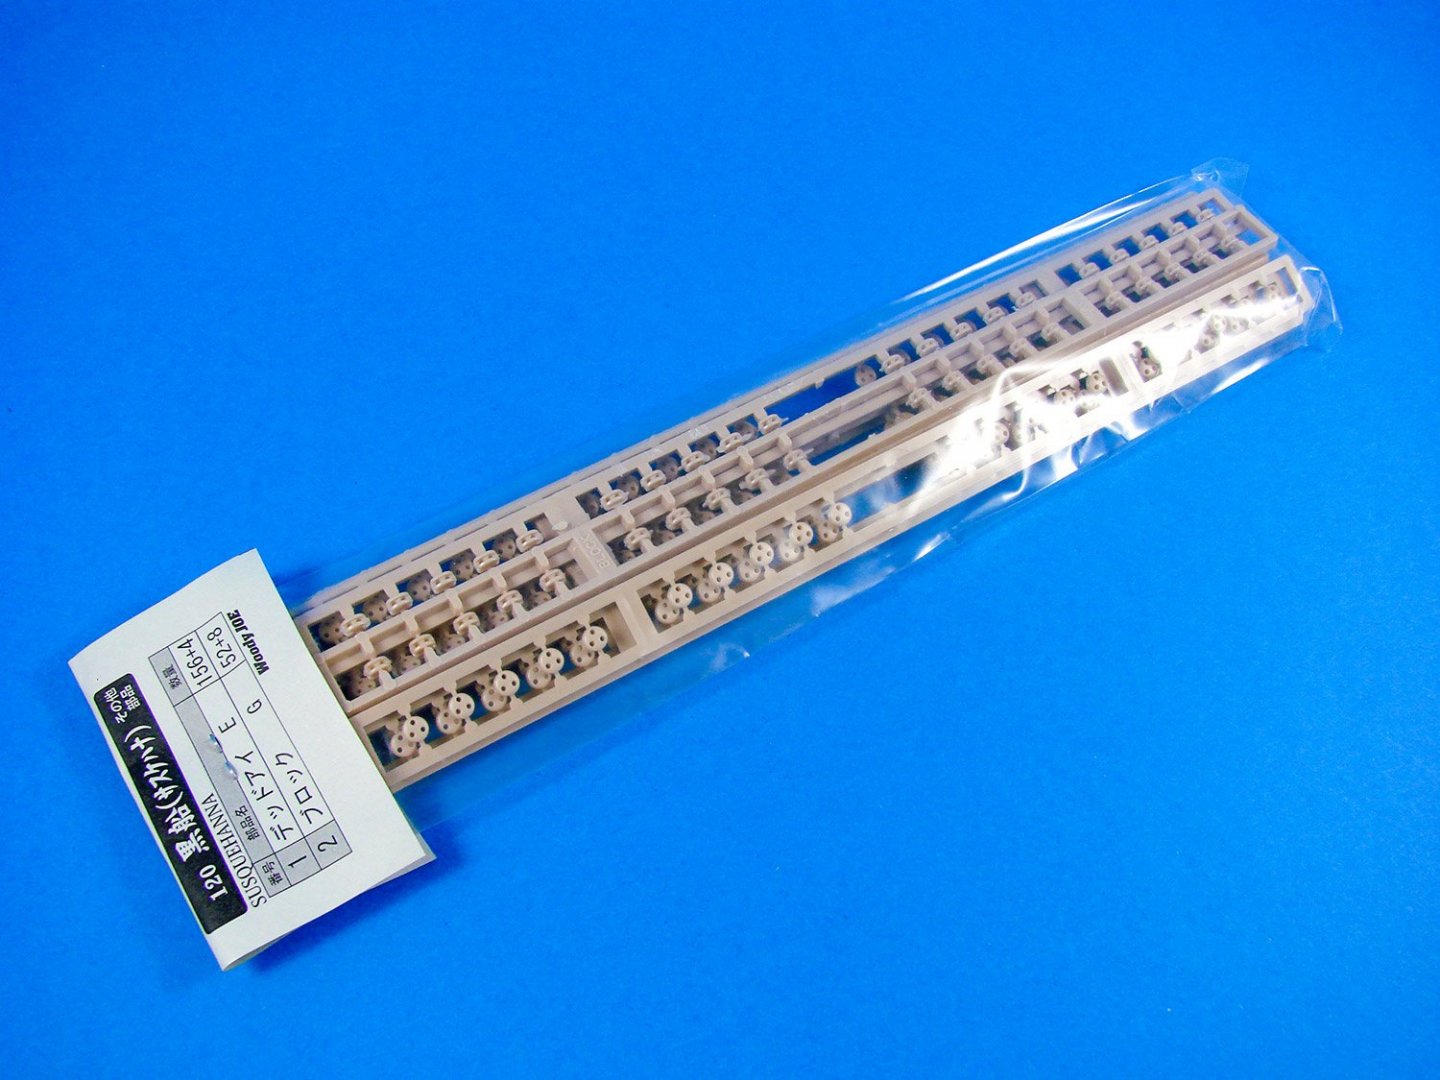
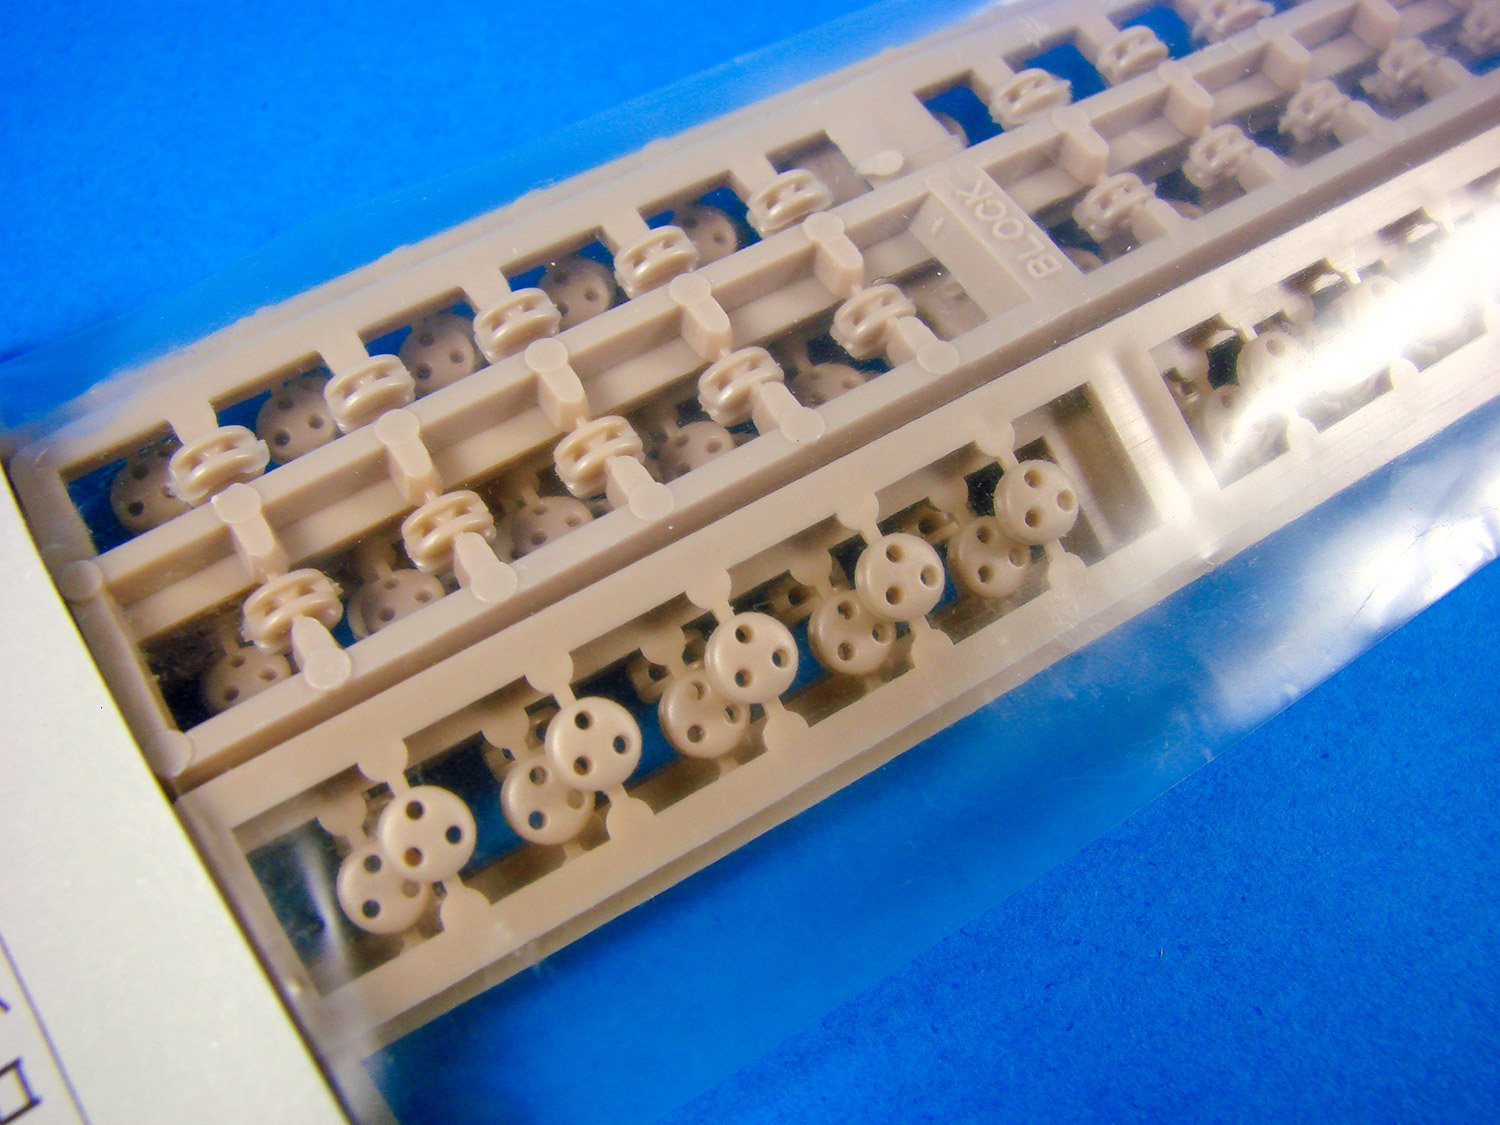
Ughhhhh!! I really don’t like these! Here are the plastic rigging blocks. For me, there’s only one place to store these. However, if they don’t bother you, then they are actually very nicely moulded, but you will need to paint them appropriately.

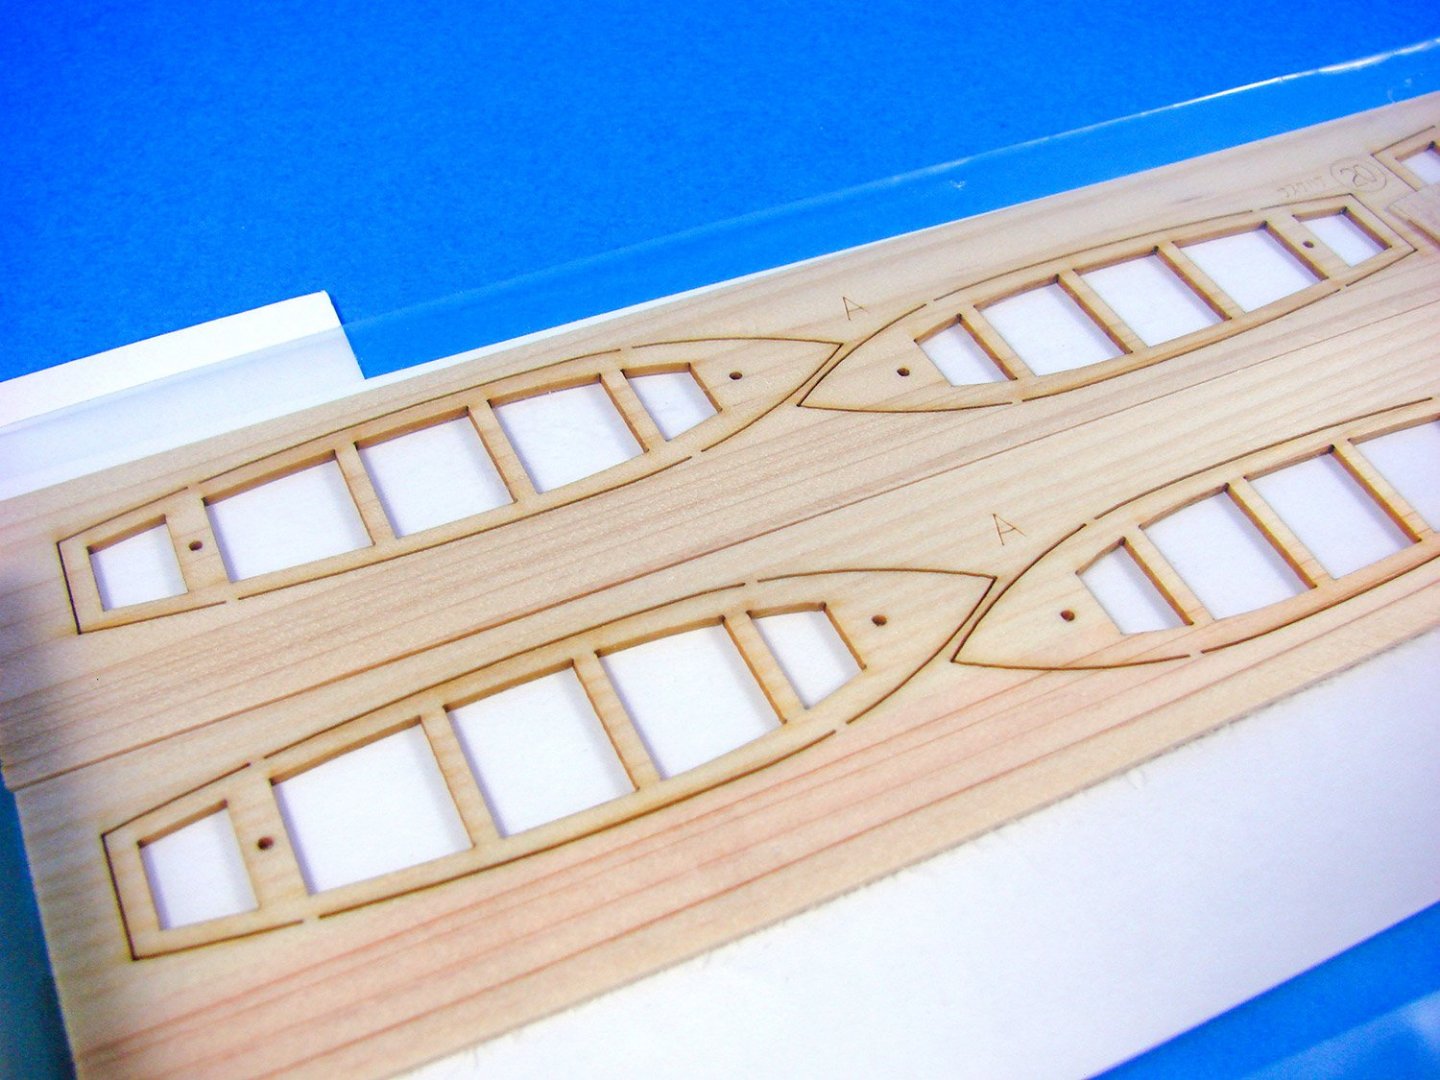
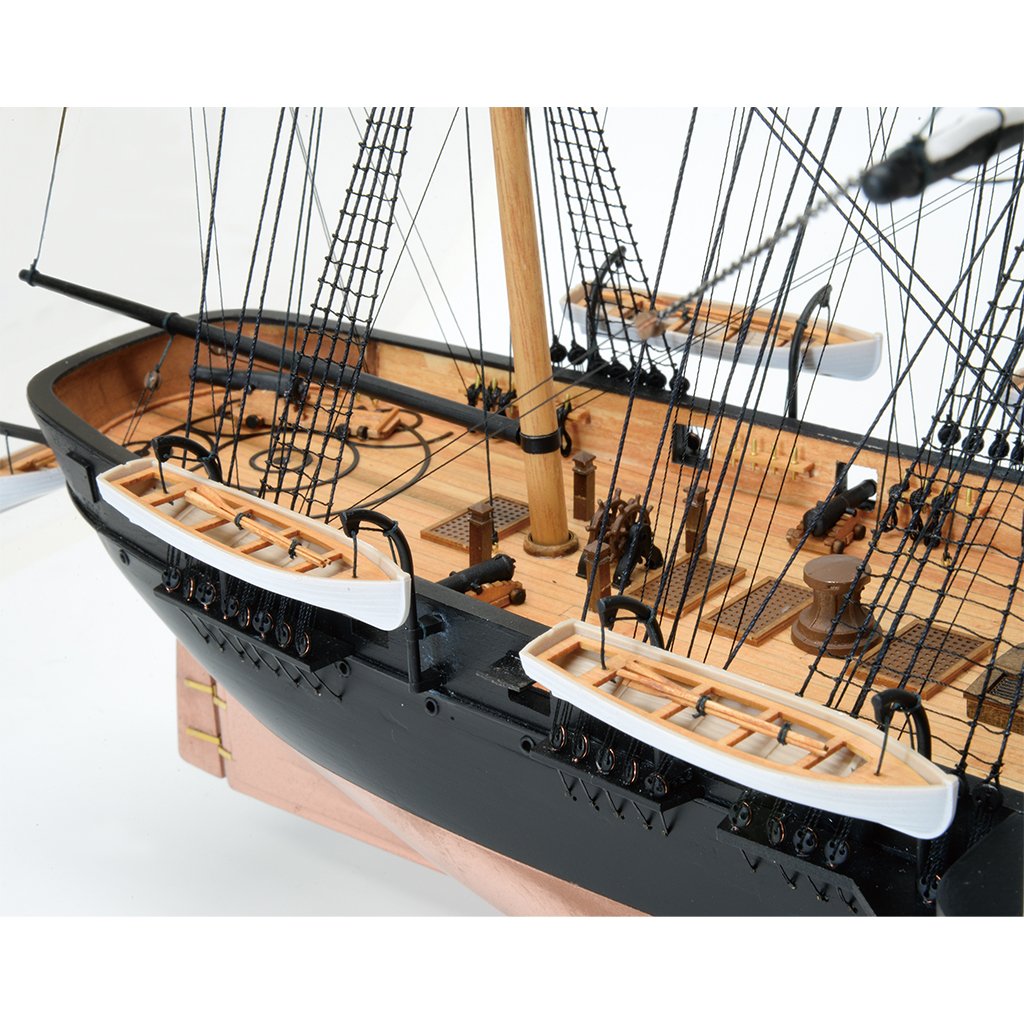
Plastic also features on the ship’s launches, with the basic hulls being supplied. These are painted though, and will be fitted out with timber, so it’s not a deal-breaker. The mouldings are also superb.

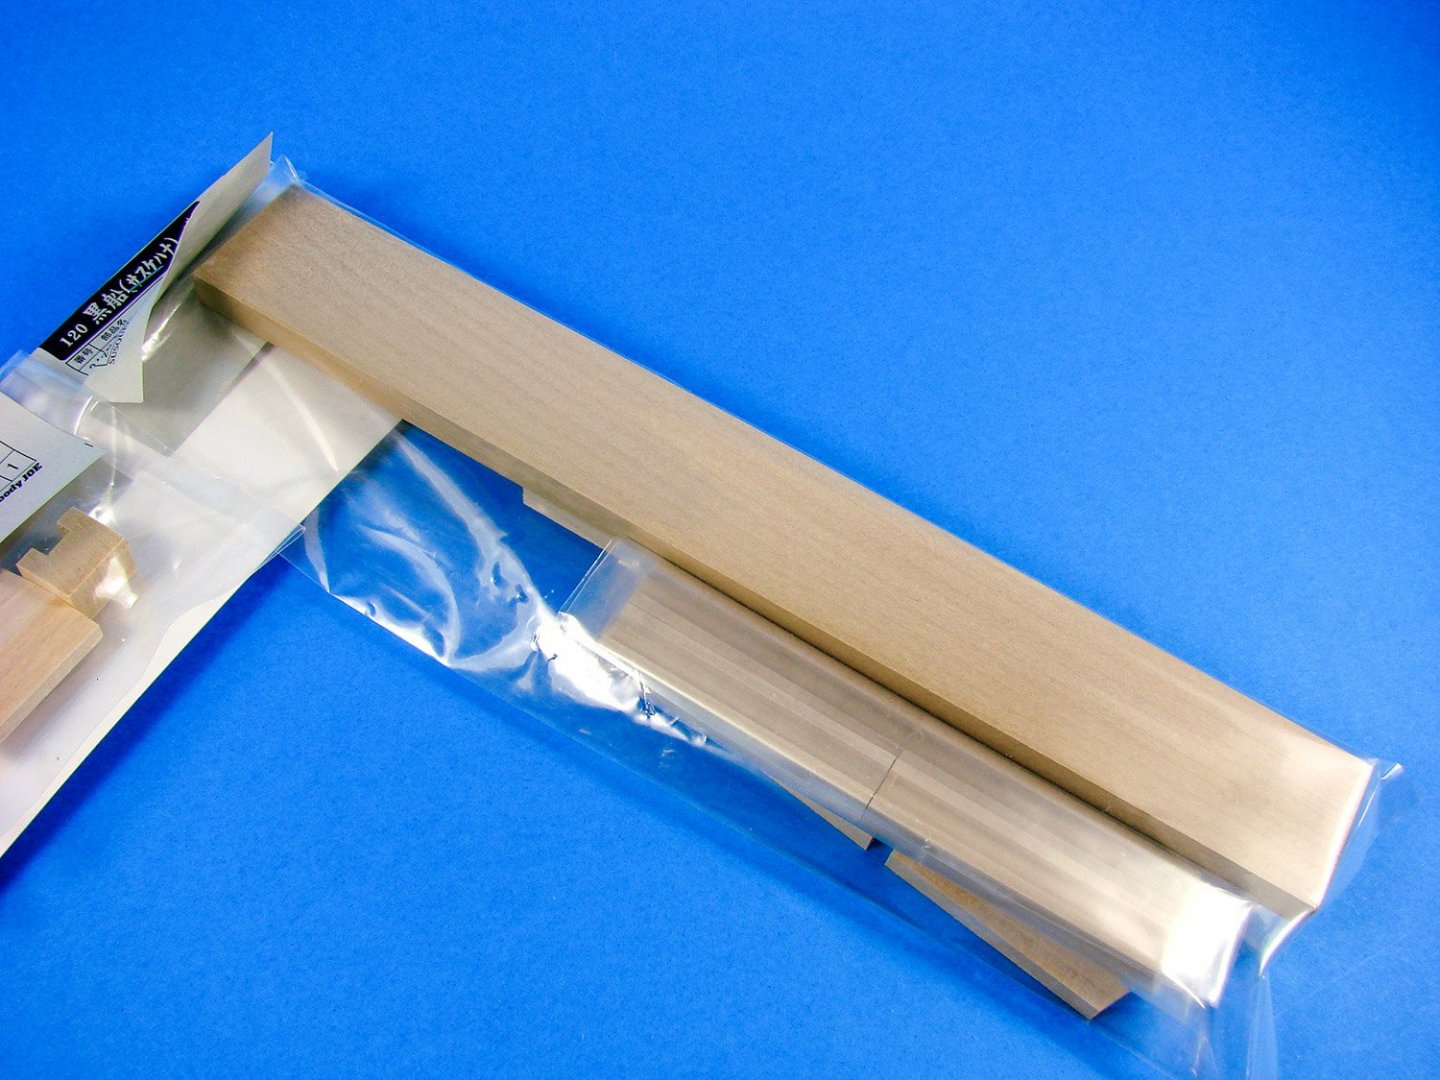
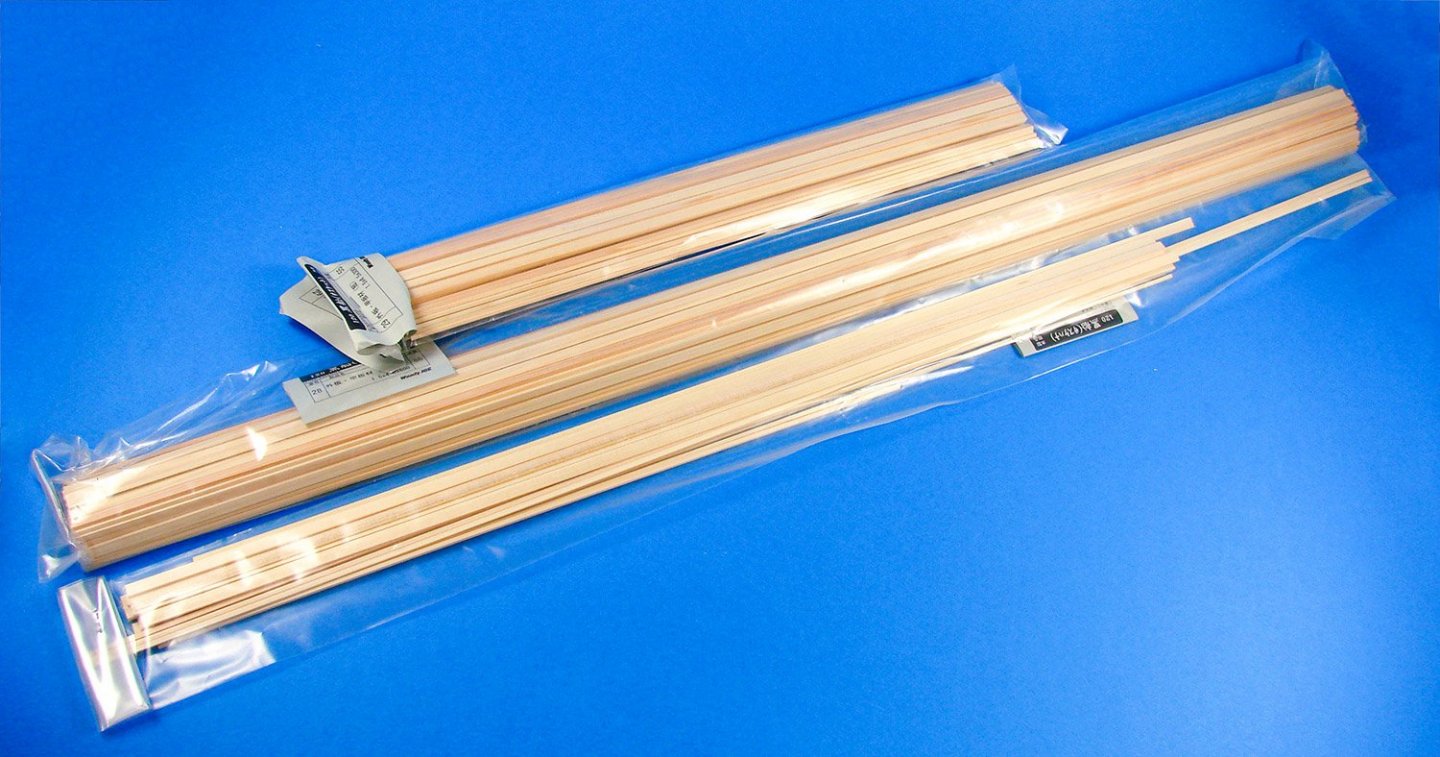
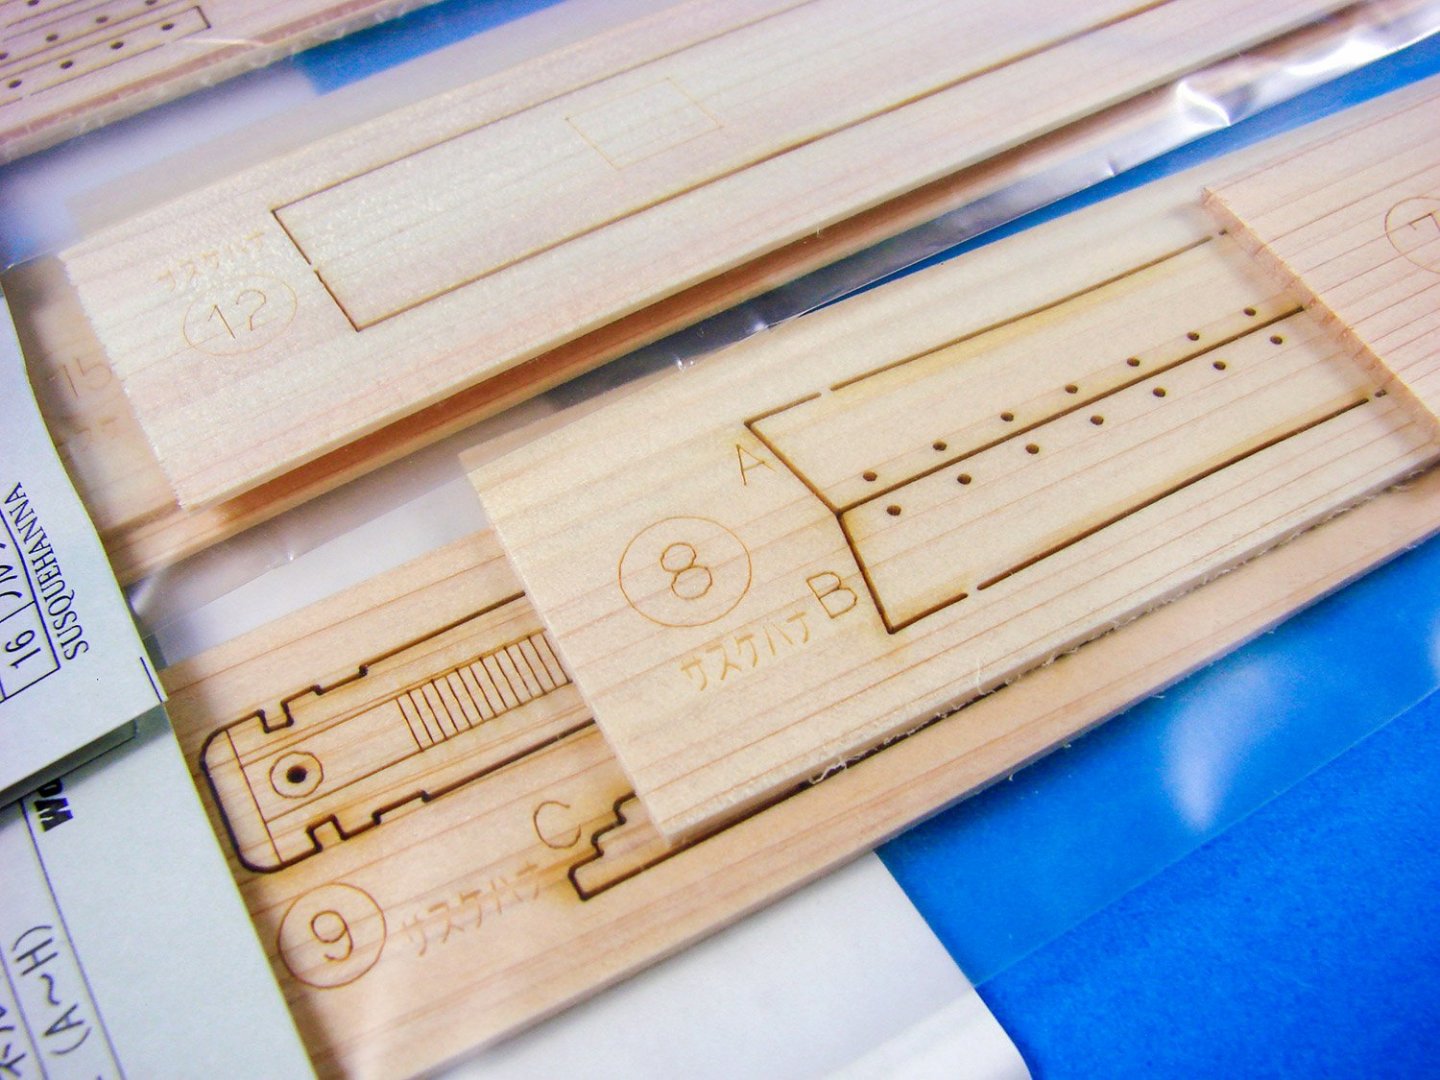
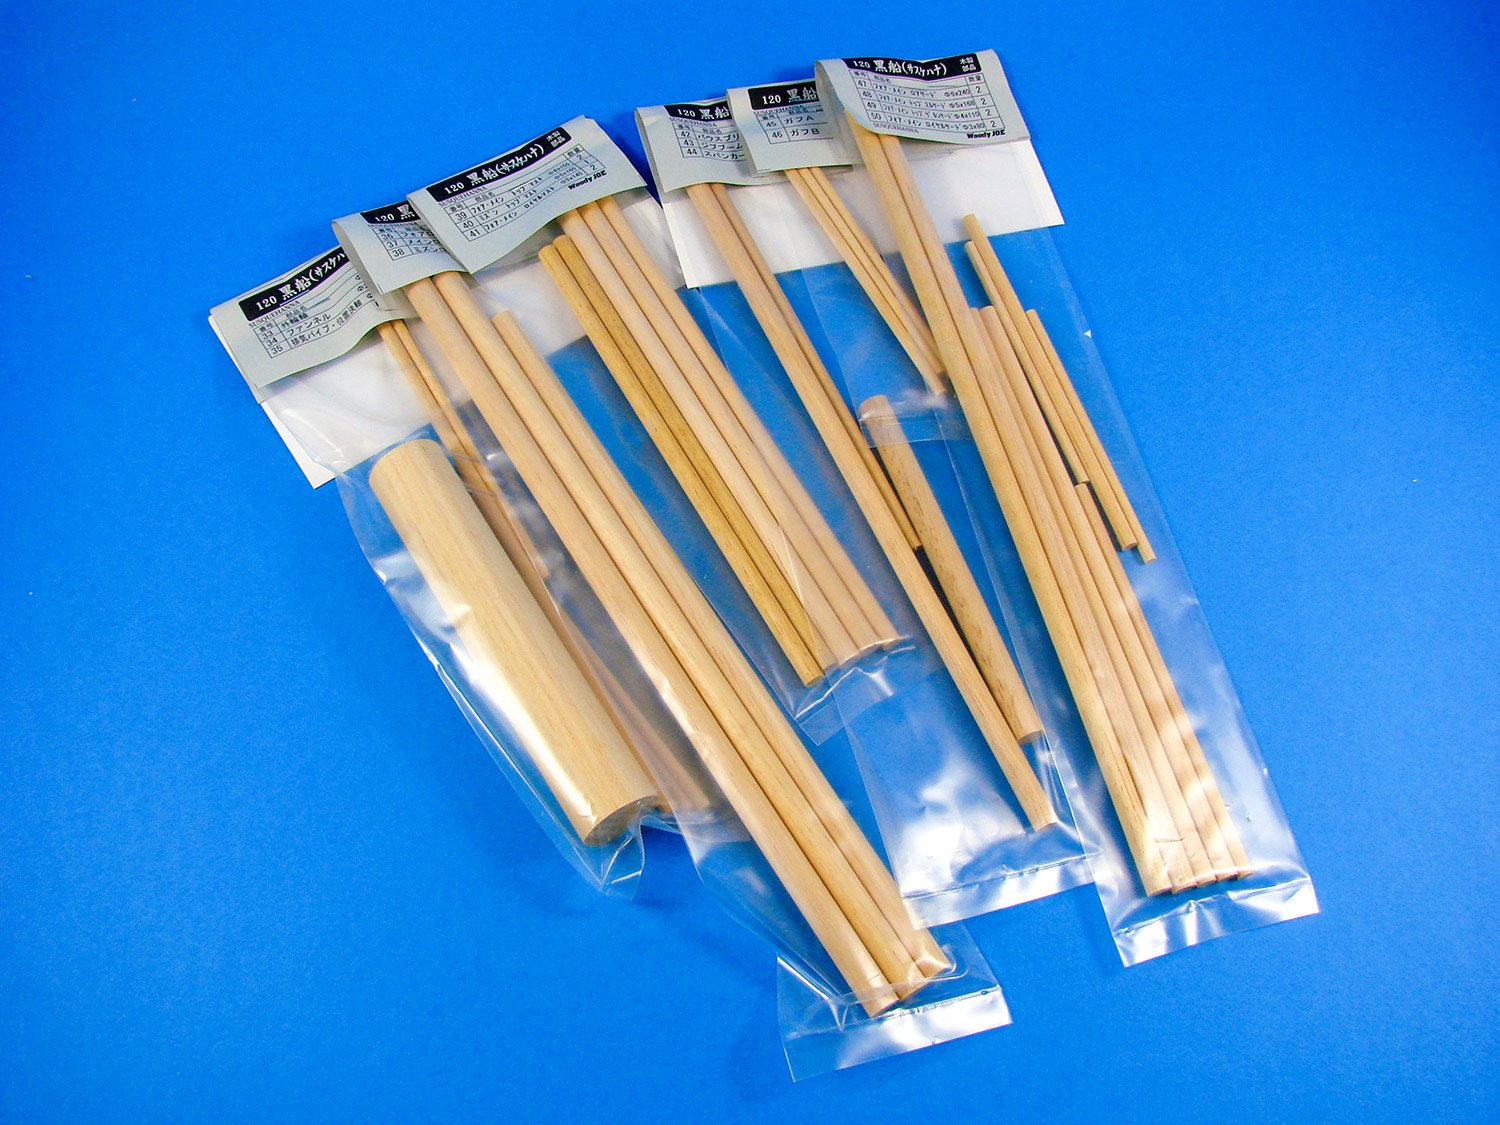
You will find numerous timber elements also individually bagged and labelled too, clearly referencing their use within the instruction manual. This applies to the various lengths and diameters of dowel and strip. A quick look at these shows the superior quality of all timber. Some of the finest I’ve seen in a kit.


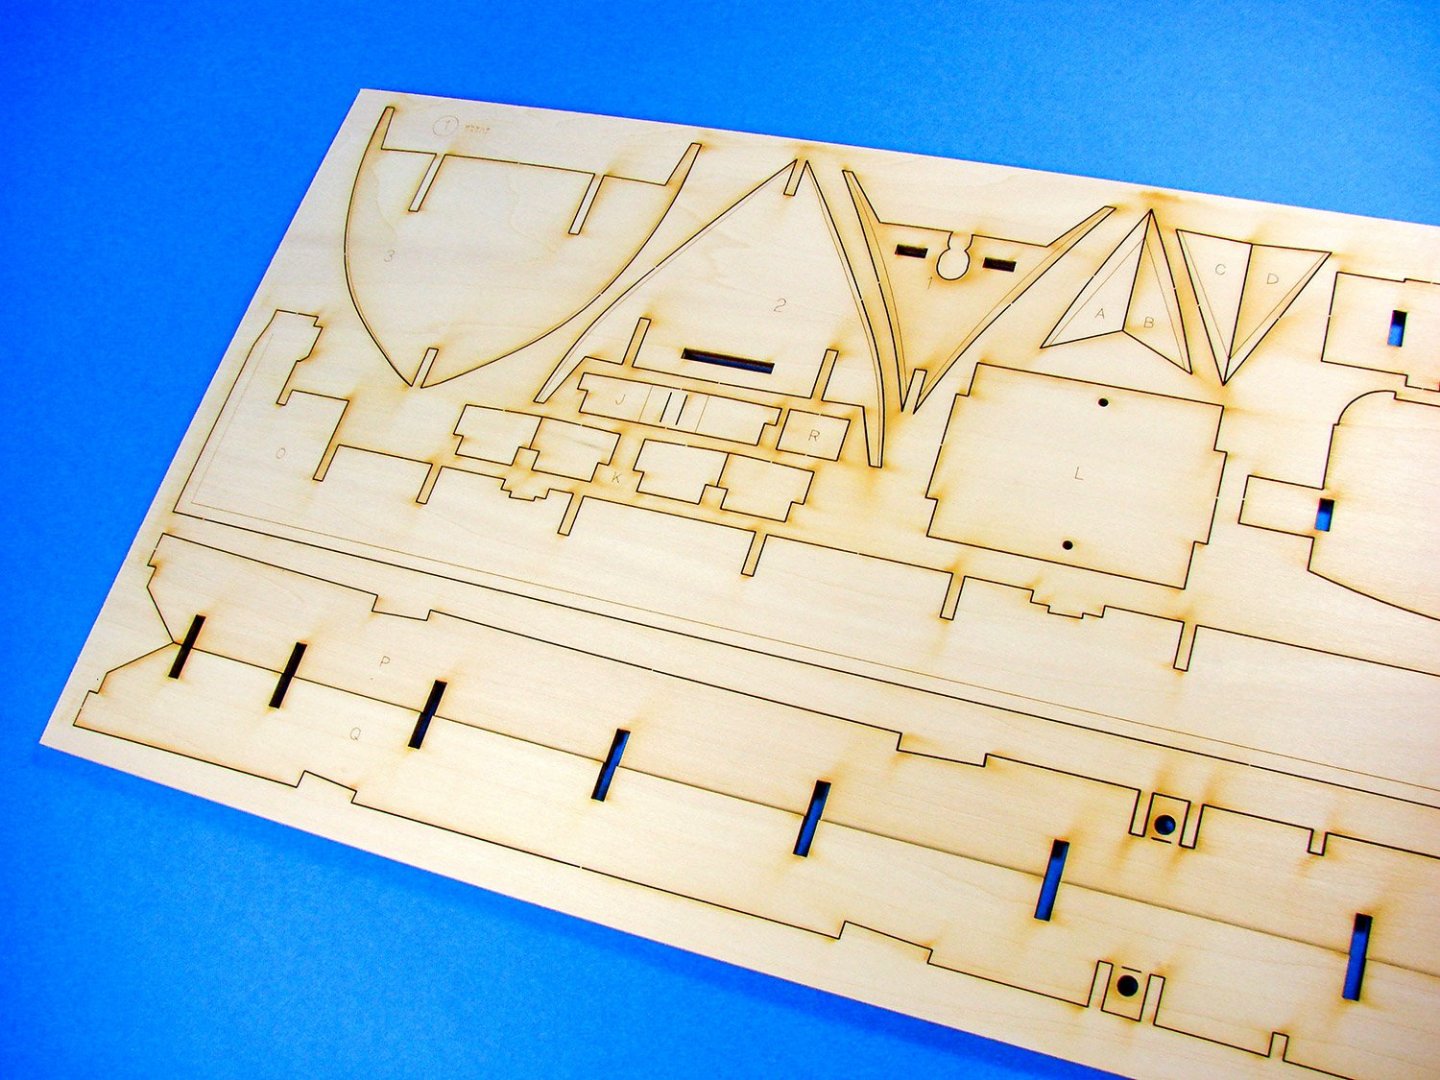
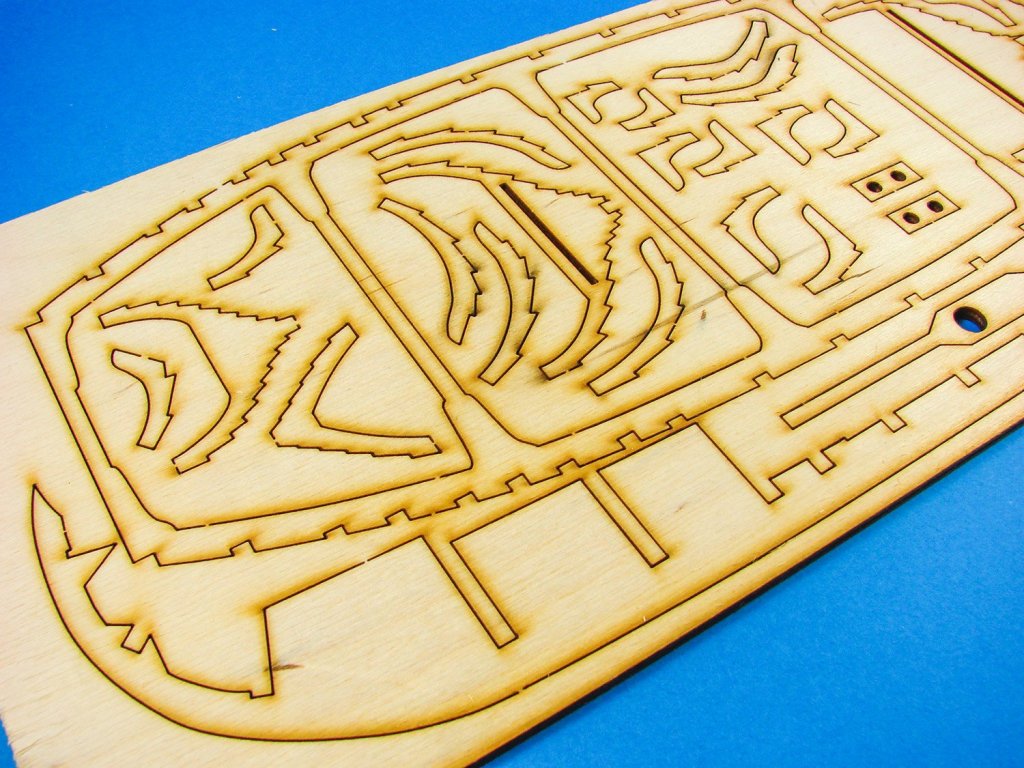
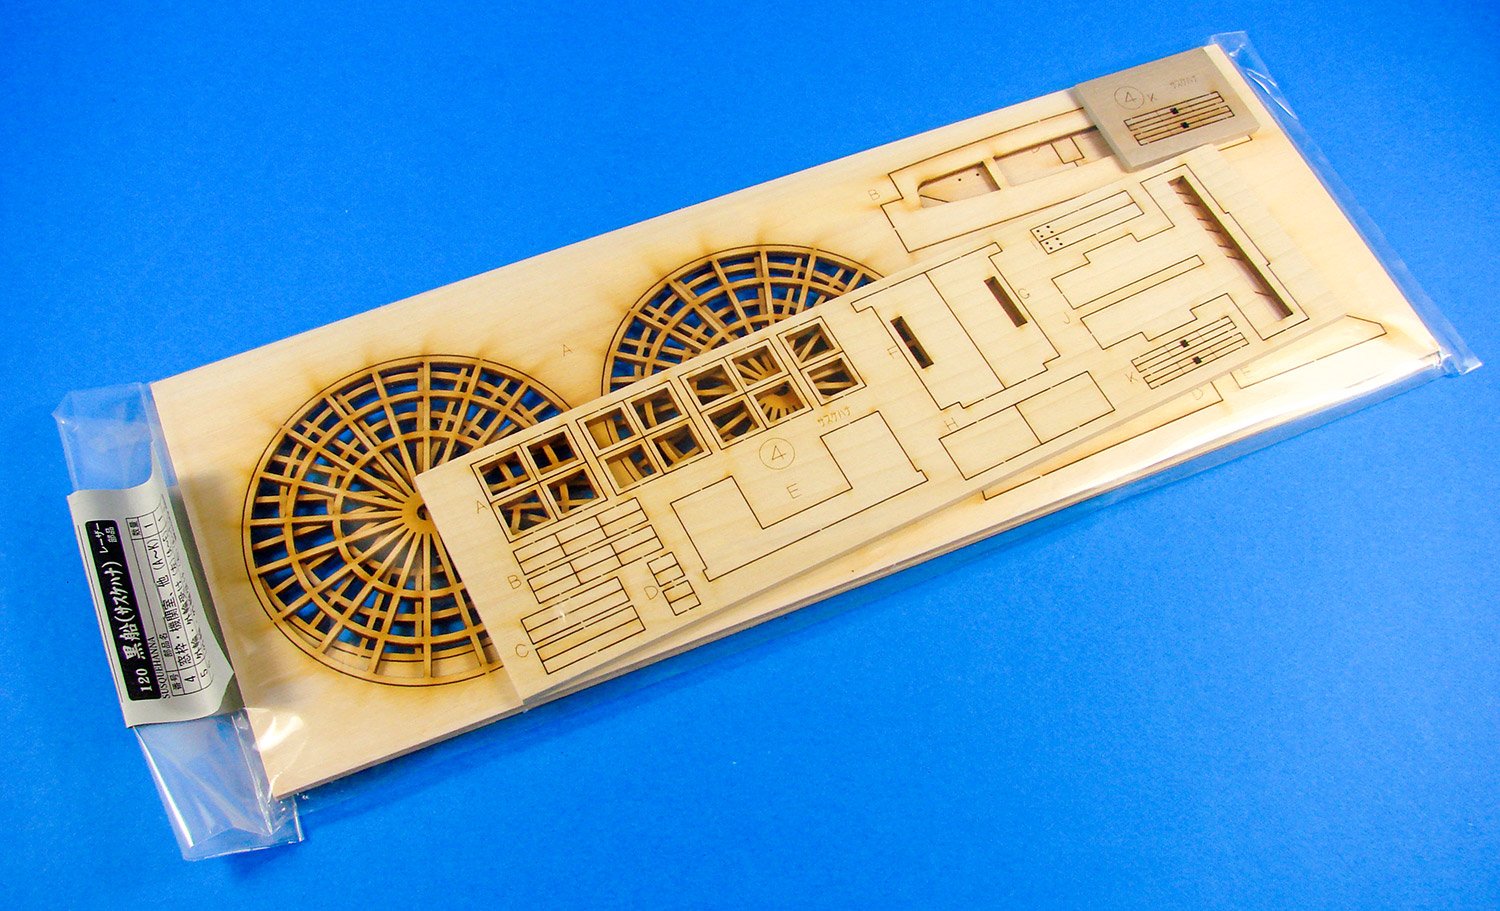
Another sheet of card has several packages stapled to it that contain various sheets of laser-cut timber parts. Notice parts here for the launches, mast tops, cannon bases, channels.
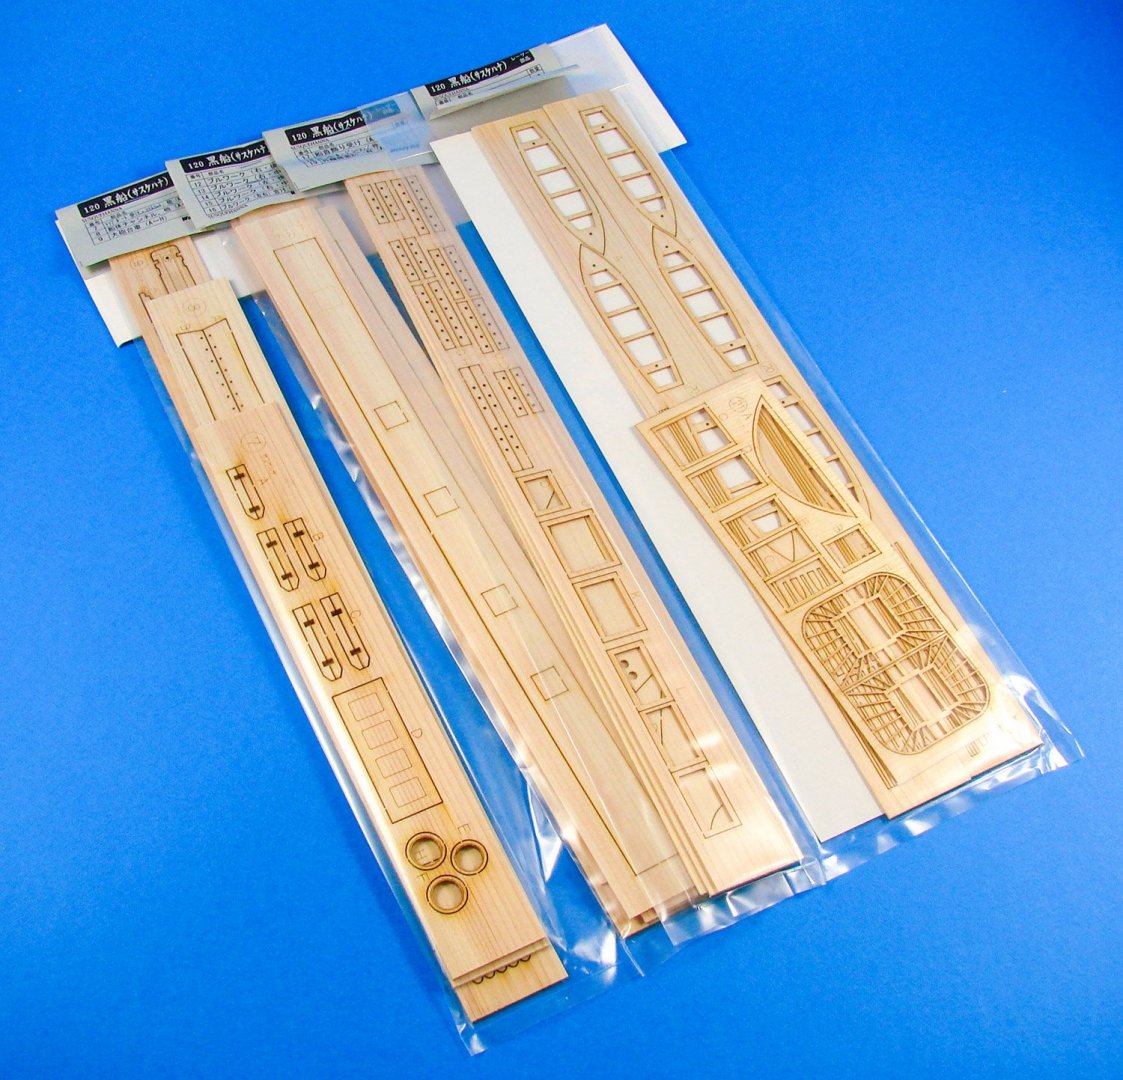
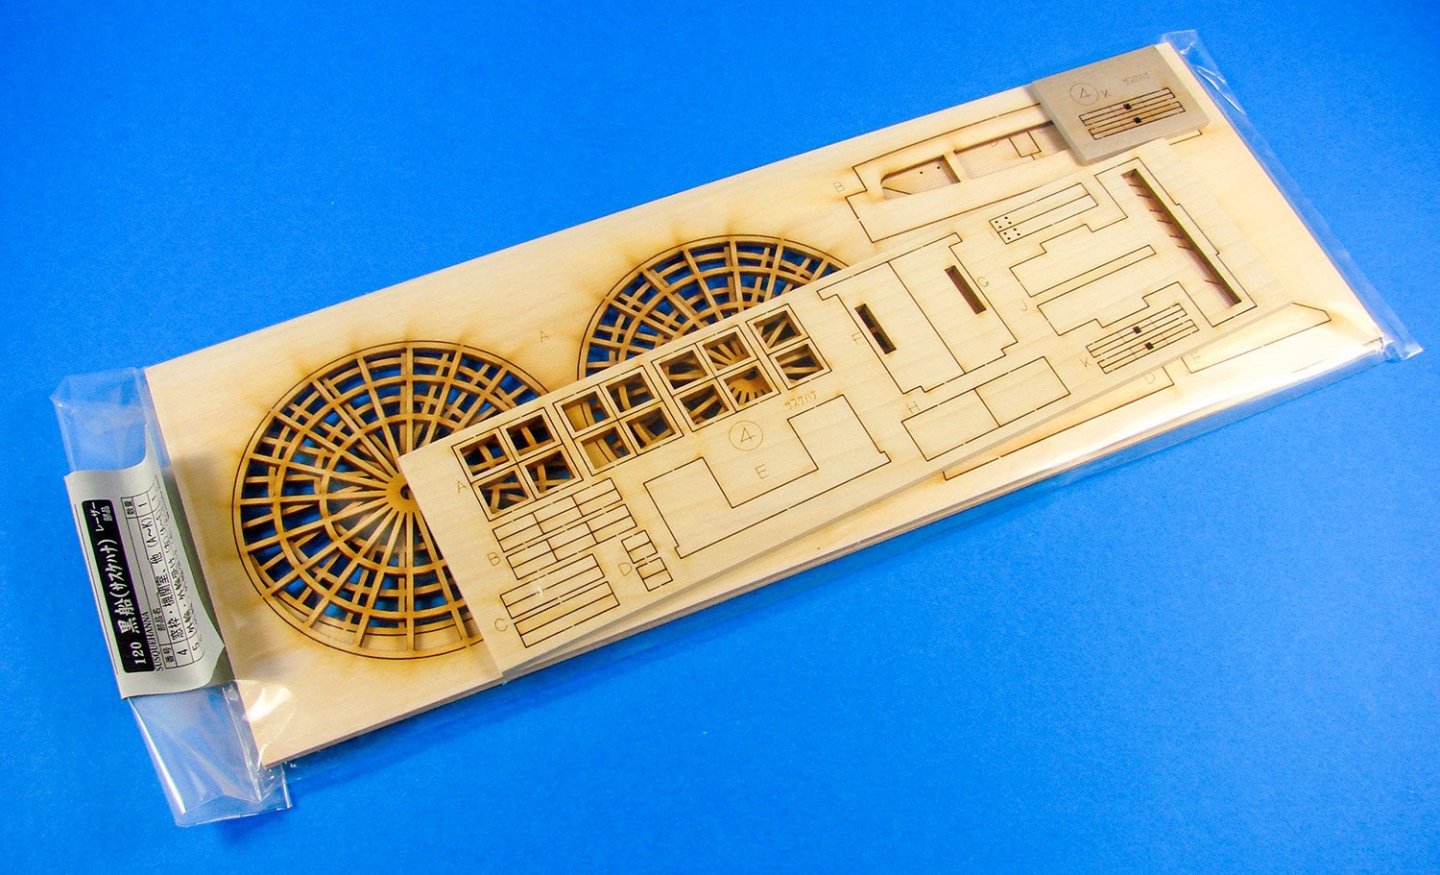
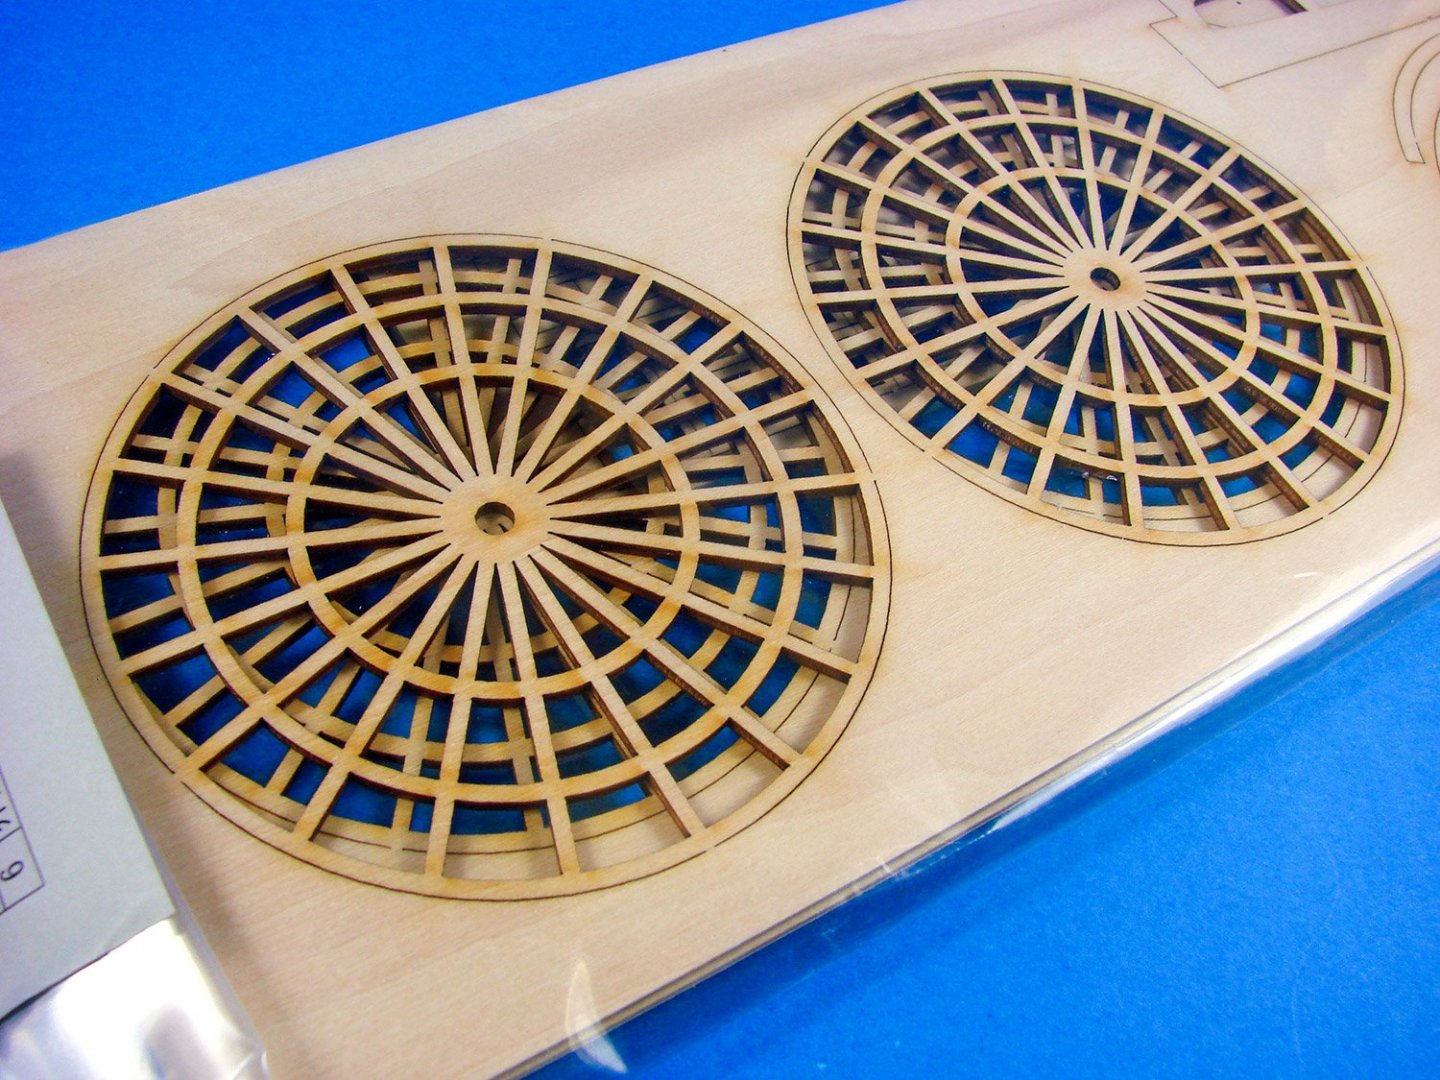
A second and third packet of laser-cut parts contains the clearly identifiable paddle wheels and stern rails amongst other parts that are spread over numerous sheets.

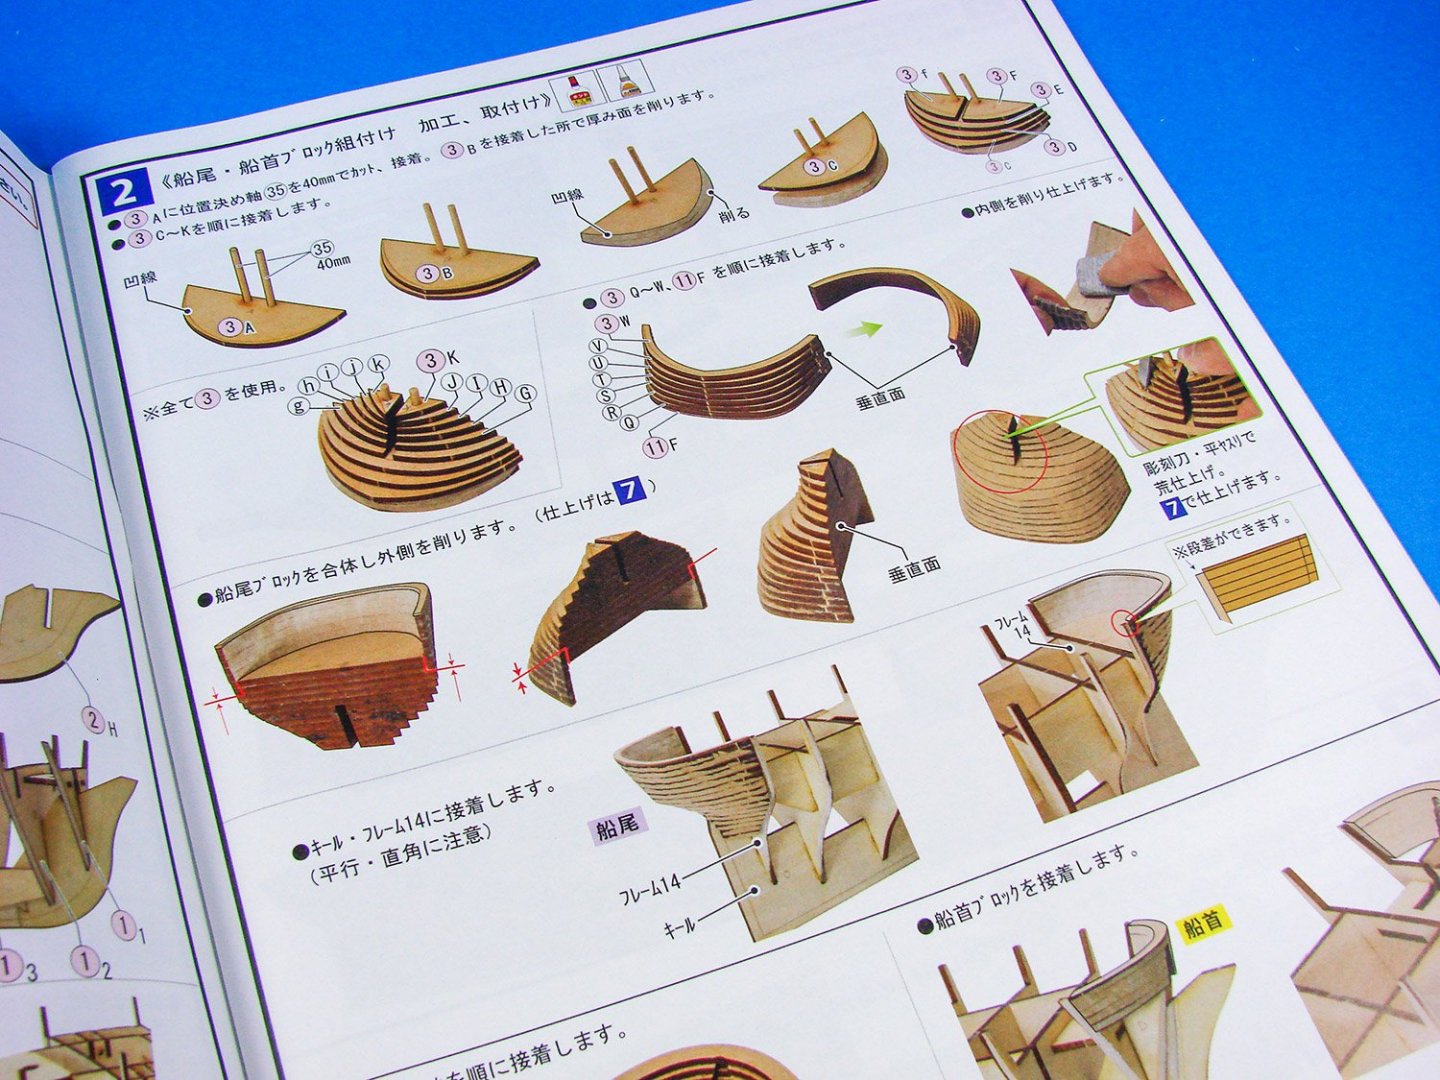
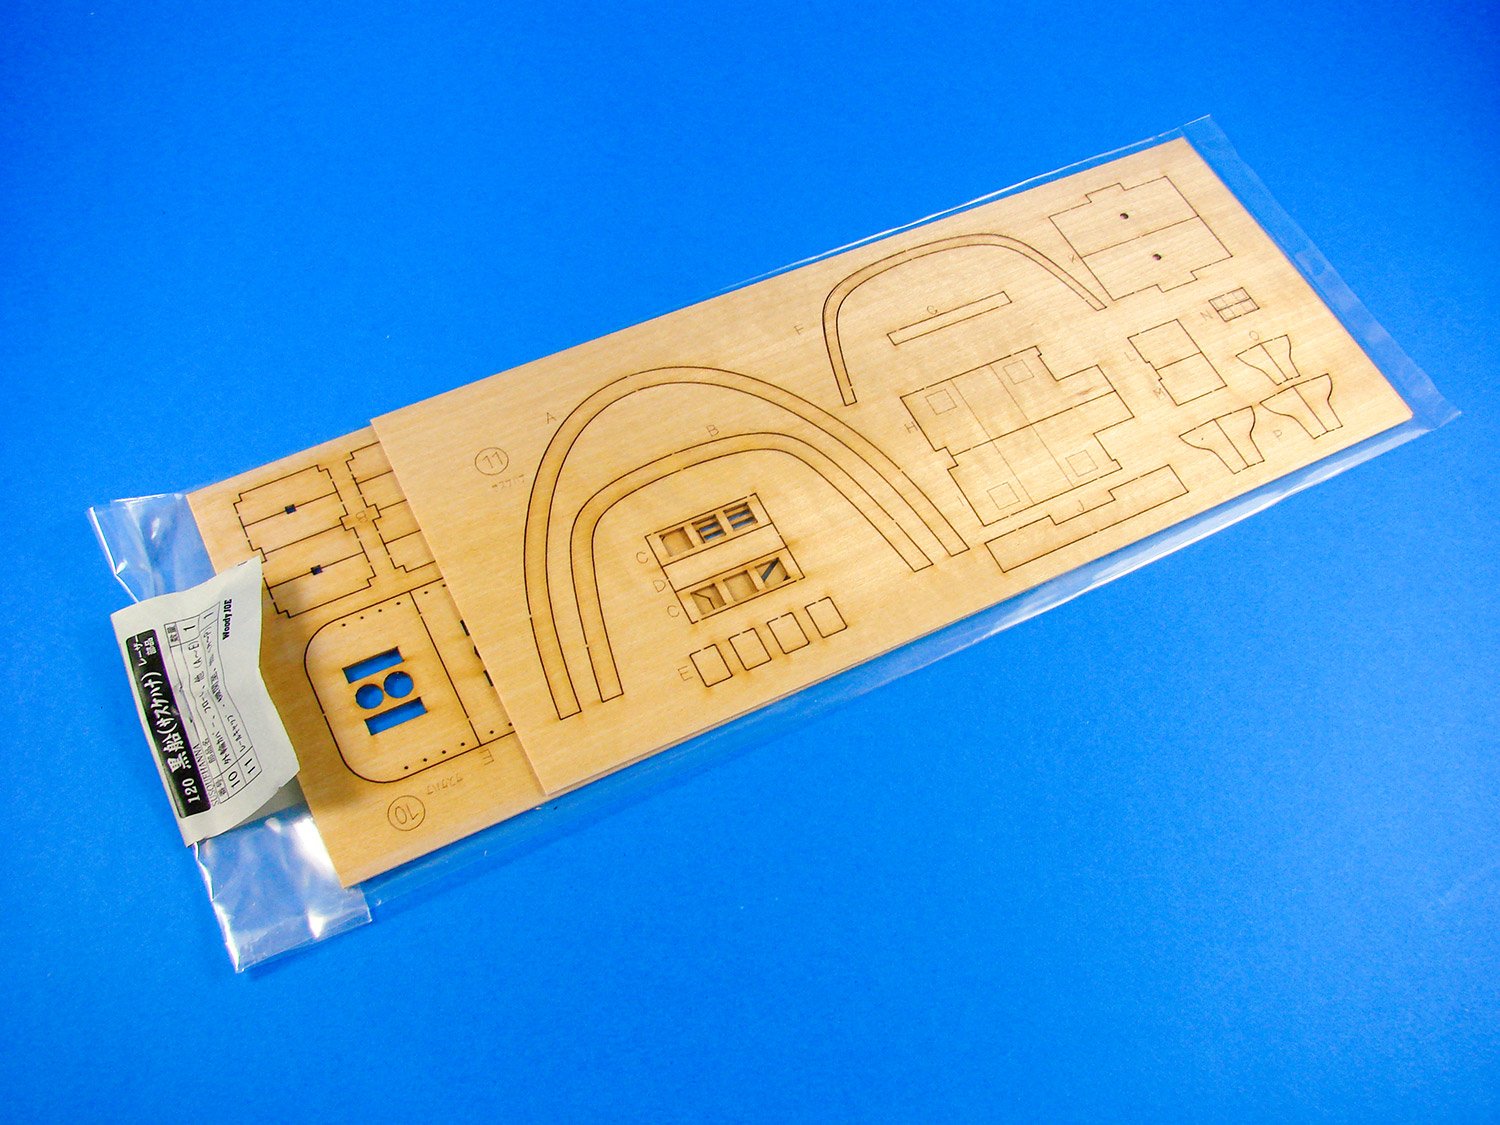
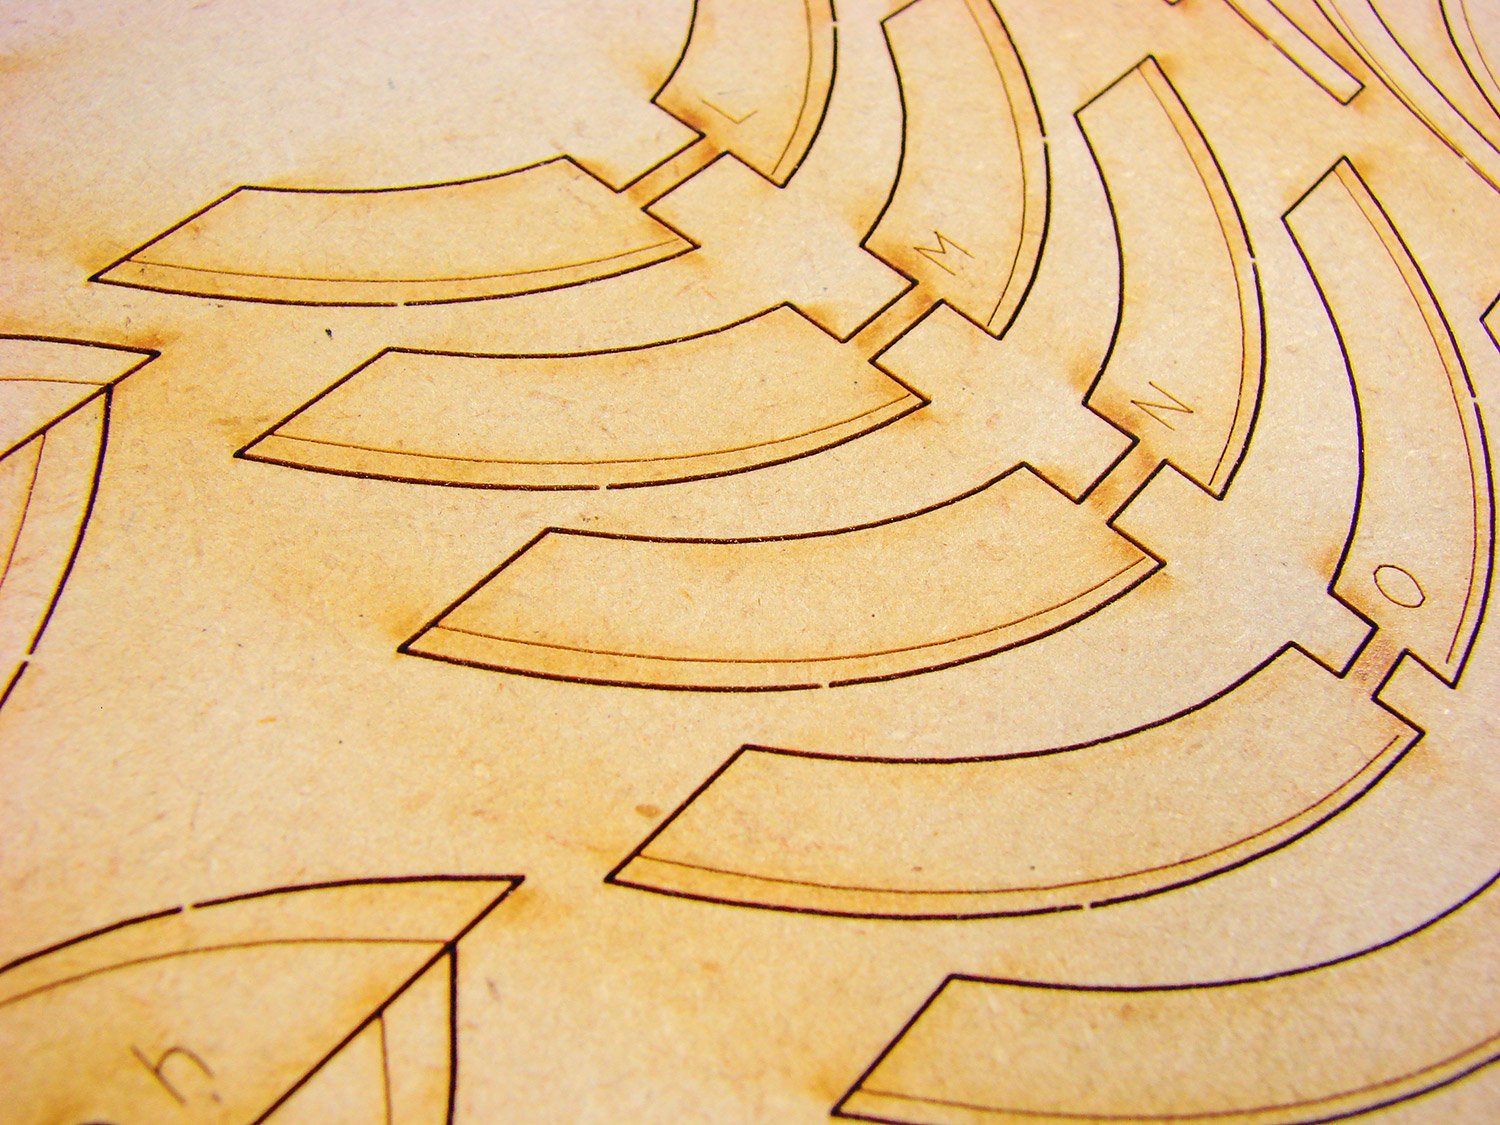
Now we come onto the sheet materials, with this first sheet containing the parts for the stern. Note the engraved bevel marks to help you shape these properly.

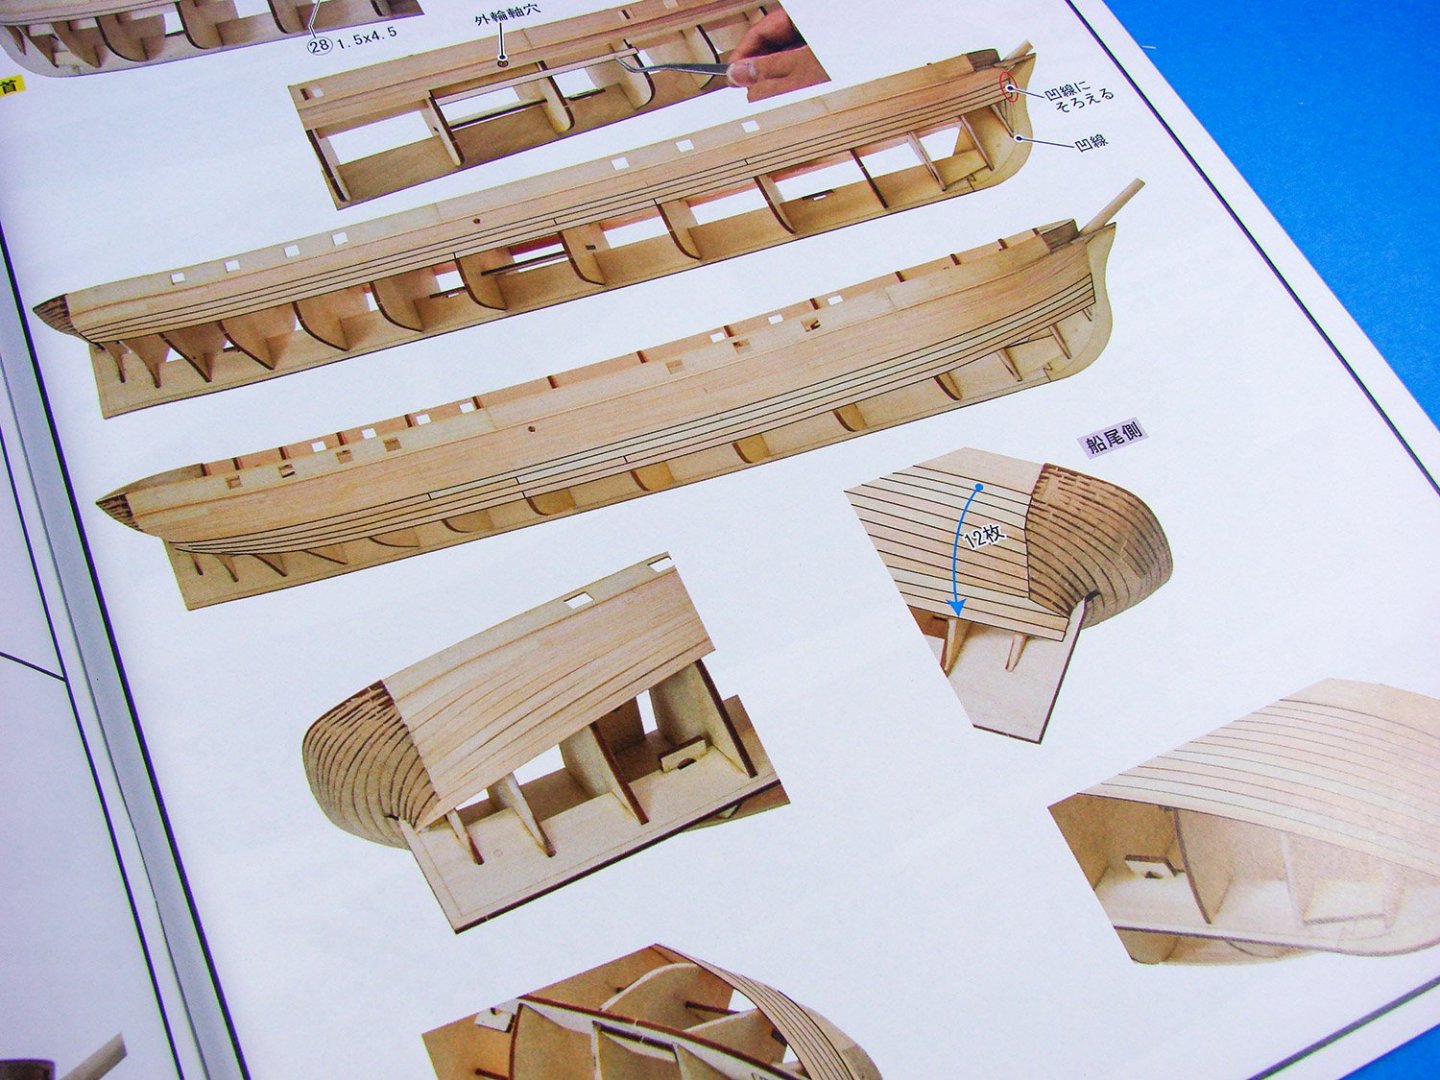
A large sheet of high-quality ply contains the hull bulkheads. In my opinion, there should be more of these, especially on a single-planked model. Laser cutting is excellent.
An equally large sheet holds other key hull components. Here, as well as more bulkheads, you can see the false keel and long ply parts that will further help align the bulkheads and provide further rigidity.
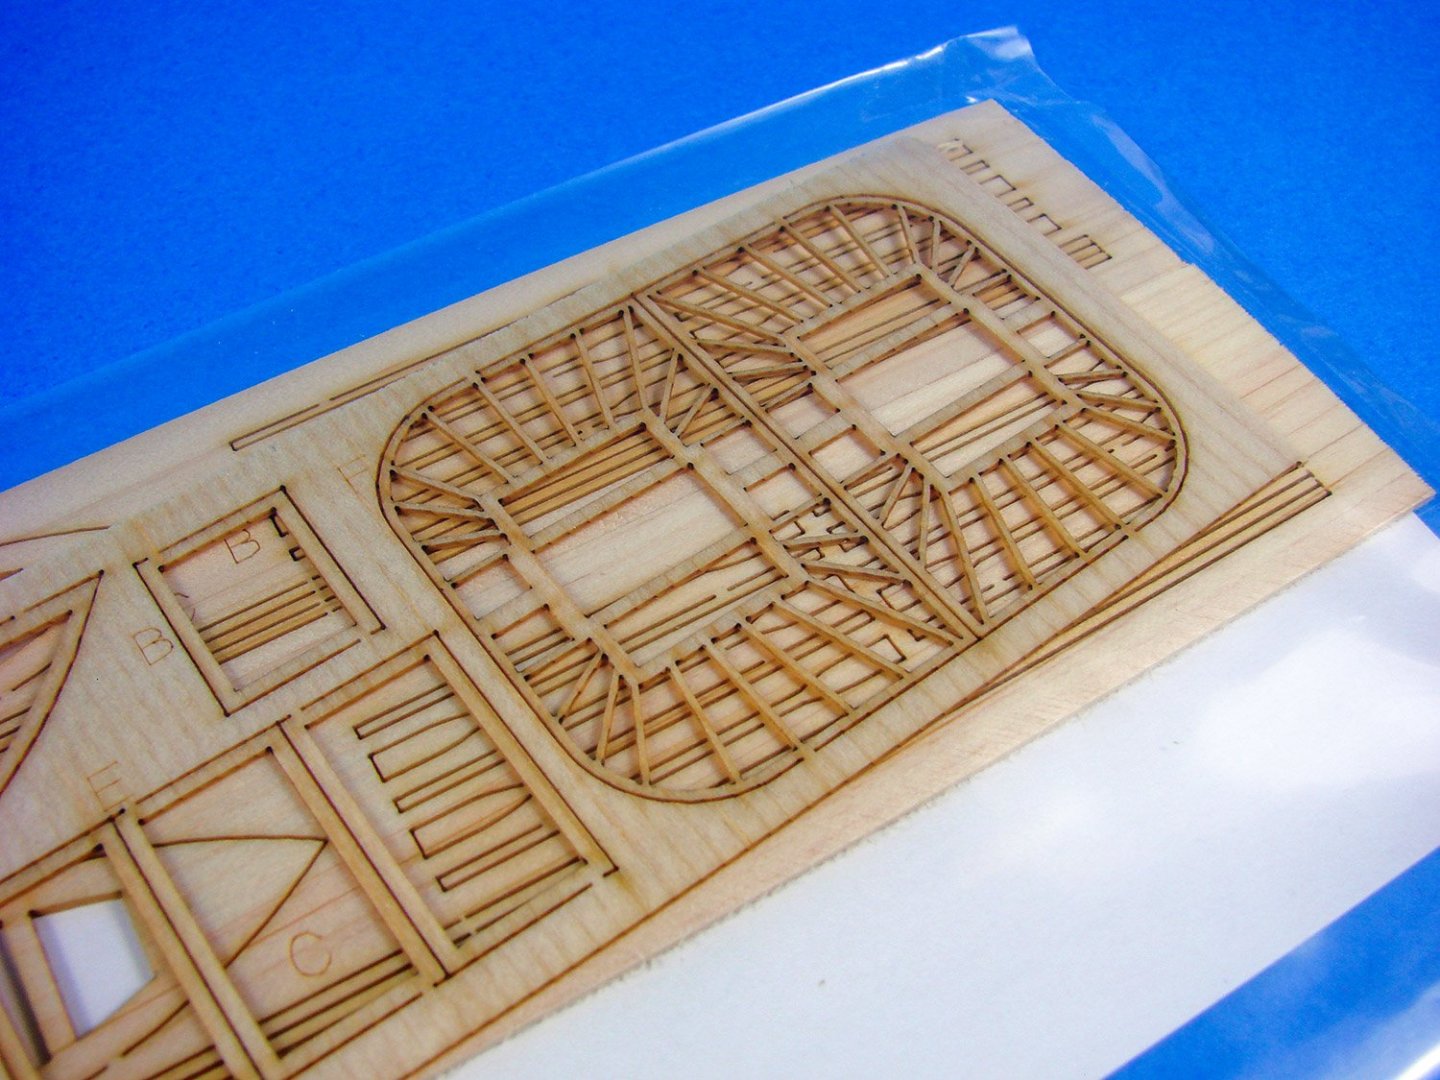
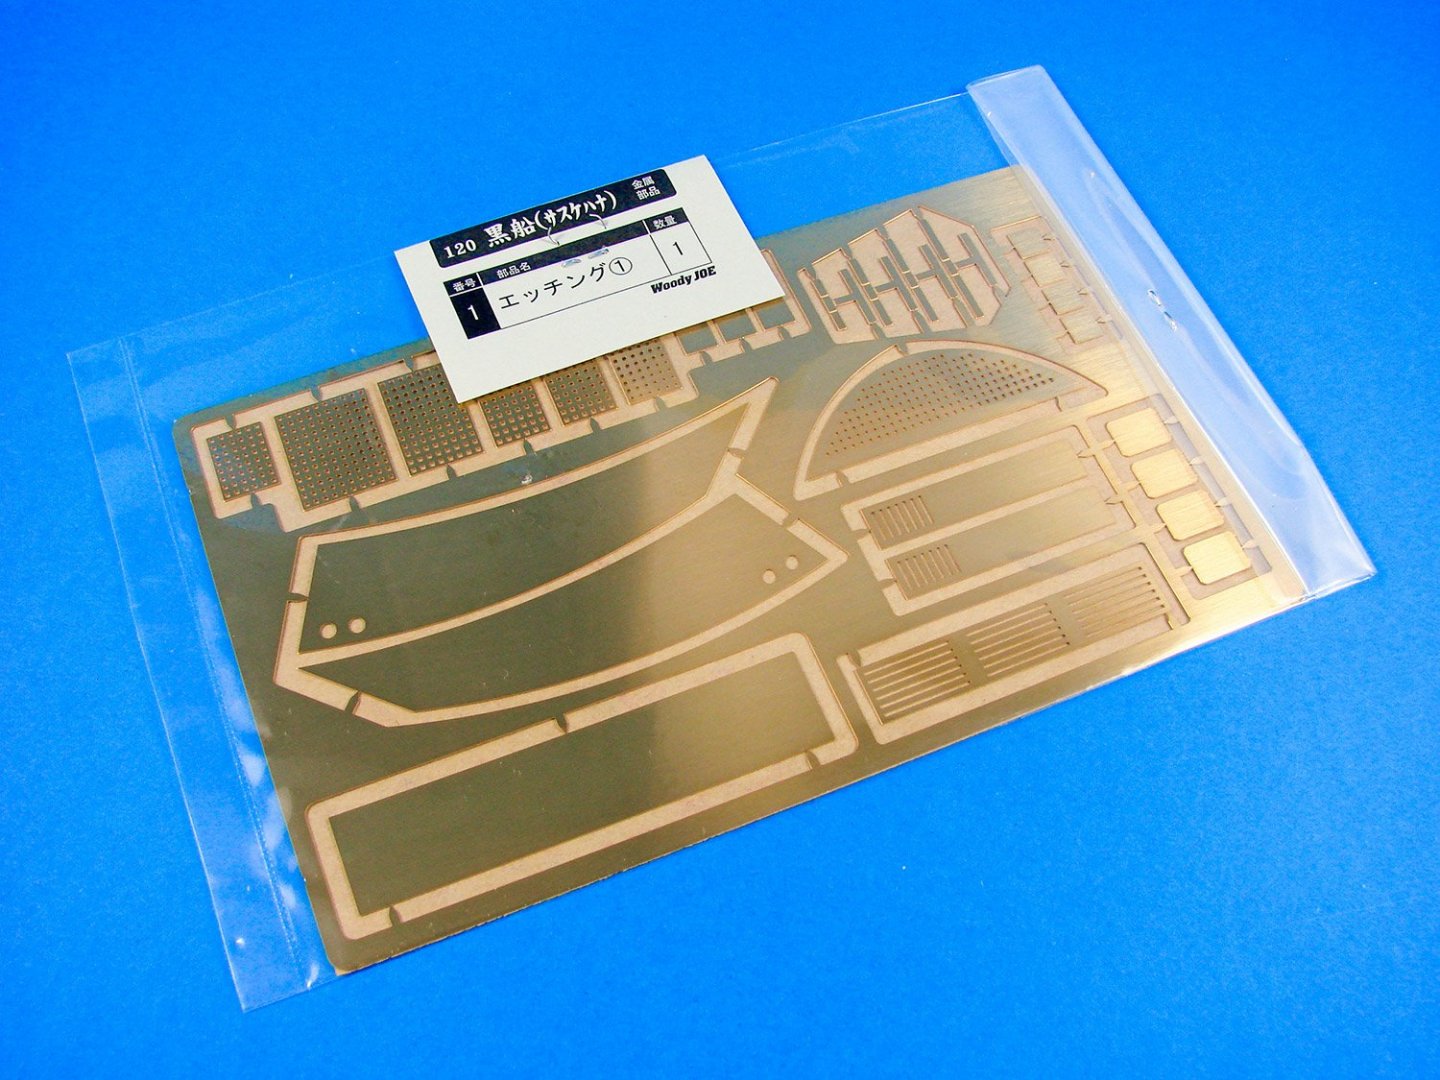
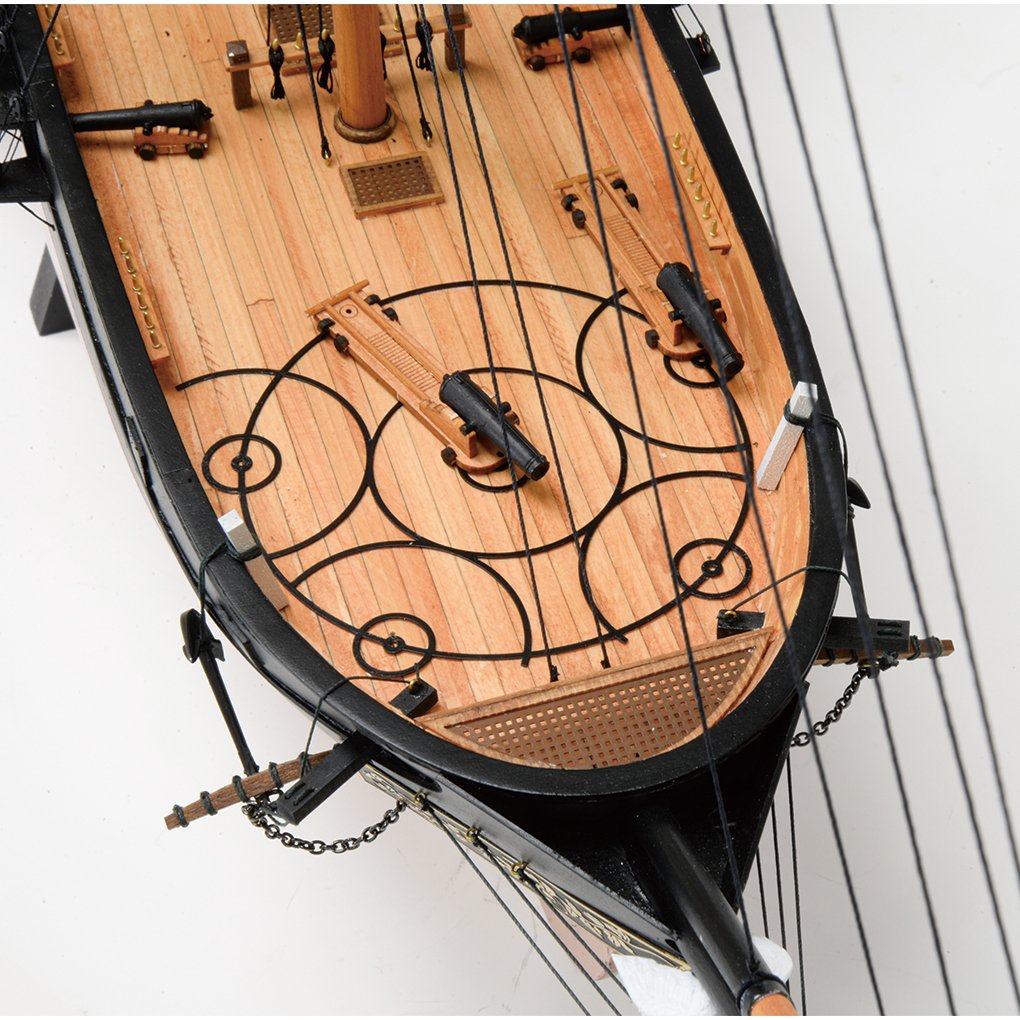
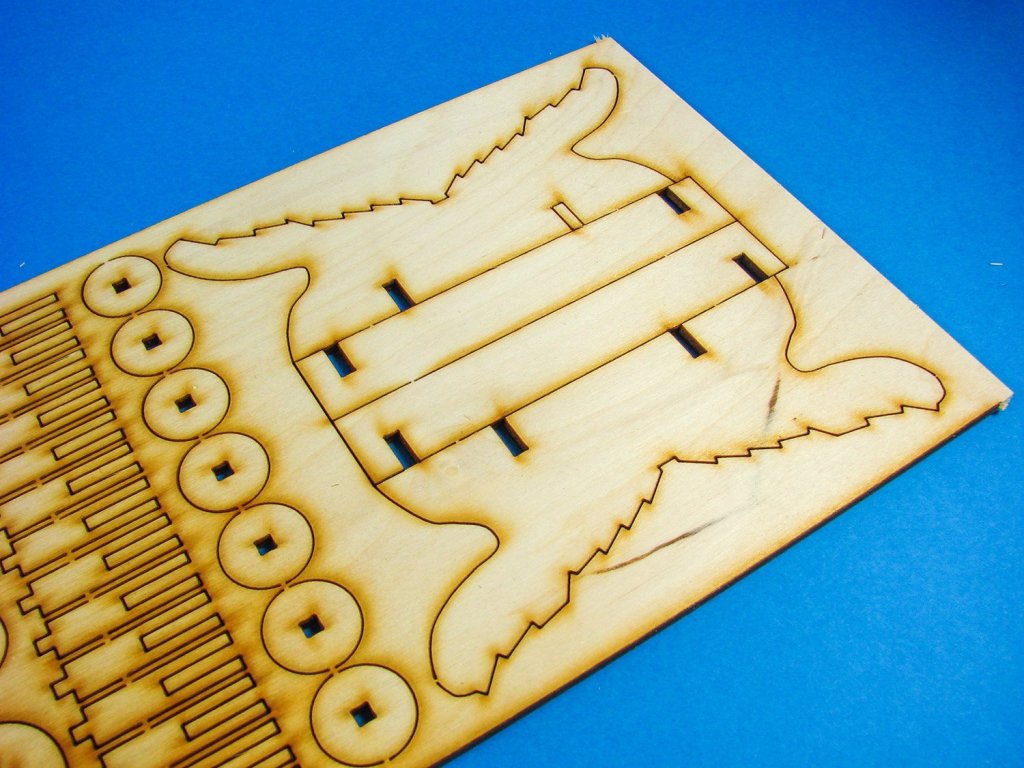
It will come as no surprise to see that there are a few sheets of photo-etch (PE) parts in this release. These contain everything from gratings to deck structure elements, and also those large gun swivel mount circles that you see at both bow and stern areas of the ship.

Conclusion
Of course, this is such an unusual subject to tackle and in many ways has some unusual construction techniques that aren’t typically seen in today’s kits, such as the stern that is built up from slices. It would have been good to see the Tamiya gearbox kit added as standard, as it’s generally a very low-cost item to purchase by itself (around £11 at time of writing), but of course, not all modellers would want to use this anyway. Personally, I think this model is aimed at those with some experience, and I wouldn’t recommend a single-planked hull for anyone without the prerequisite skillset to tackle it. As the bulkheads are perhaps spaced a little too far apart for my liking, you’ll need to ensure that you don’t create any sag between them when planking, giving an uneven finish to the hull. Another thing I would have liked to have seen would be copper plates supplied for the lower hull instead of notes on painting it in that colour. Even a roll of self-adhesive copper tape would’ve been a nice touch. A real oddity is the inclusion of plastic rigging blocks. This is probably my biggest single gripe with this kit, and I guarantee those will be thrown away and replaced with something more suitable in timber, possibly from Master Korabel. Now, that’s the gripes out of the way, and in no way do I want you to think that this isn’t a lovely kit to look at. It genuinely is. At 862mm long, it’s certainly not a small model, despite the 1:120 scale, and it definitely has to be the best thought out model I’ve seen in ages with regards to material identification and presentation. Everything is designed to make the modeller’s life as easy as possible. The drawings are also excellent, as well as the photographic instruction manual. Of course, all text is in Japanese, which does sort of indicate that their primary market is Japan. There are ways of translating this, such as with smartphone apps that will translate the image when you hover your phone camera over. With regard to the instruction manual stages, I do think many of them are fairly self-explanatory anyway. But…the smartphone translator app is free!In all, a high-quality package with excellent timber and some very nice fittings. The whole lot will build up into an outstanding finished model that is most certainly very different from your regular sail ships. If you get the chance to get one, I doubt you’d be disappointed.
My sincere thanks to WoodyJOE for sending this new release out for review here on Model Ship World. To purchase directly, click the link at the top of the article.

- J11, EricWilliamMarshall, Canute and 10 others
-
13
-
3 hours ago, Steve Greenfield said:
Hi all. I am a new member as of today so still finding my way around what looks like a great site. I did lots of modelling in younger years and some about 10 years ago but never a wooden ship. Approaching retirement I am now thinking of adding this to my hobbies. This is a really helpful post but I am still wary of what to try first. I am an engineer by profession so quite technically and practically minded. I also work on traditional woodland crafts as a hobby. I want some challenging enough to feel it was worth it, not too expensive as to waste money (up to £150ish) and of the warship 18th century genre. It sounds like double planking is advisable. San Francisco II has caught my eye and I am thinking I should maybe take a closer look at that one. Any help would be really welcome. Many Thanks.
Hello Steve,
It’s a great hobby, and very therapeutic. I started when I was just over 30yrs old, but I’ve had some time out, with me only just getting back into it again as I approach 50. I was also am engineer before I moved into education.
Personally, I think that if you are engineer-minded, can take care and thought with your modelling, then Vanguard Models ‘HM Cutter Alert’ would be a perfect kit. It’s been designed by the best in the hobby….Chris Watton, and he’s a member of MSW also. He’s designed models for Caldercraft, Amati etc. in his time. Check out my review…..and yes, the model is double-plank. Also 18th Century.
To purchase this kit, click this link:
https://vanguardmodels.com/h-m-armed-cutter-alertstatic-2
There are two versions….one at £160 and one at £180. Take a look, but this looks to be in your price range.
San Francisco II is by Artesania Latina. The company recently went defunct too, and I know the quality of their materials isn’t very good, and certainly not on par with what we expect today.
I’d love to see you create a build log so we can follow along.
-
Just stunning. I like how you left those parts in bare wood. I think I'll do the same.
- Peta_V and Mirabell61
-
2
-
Such beautiful and precise work. This has been a joy to watch.
- Mirabell61, greenstone, Peta_V and 1 other
-
4
-
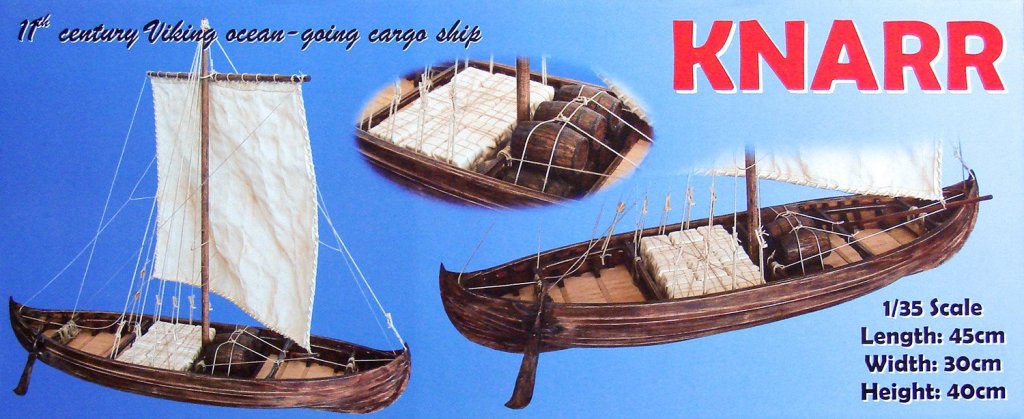
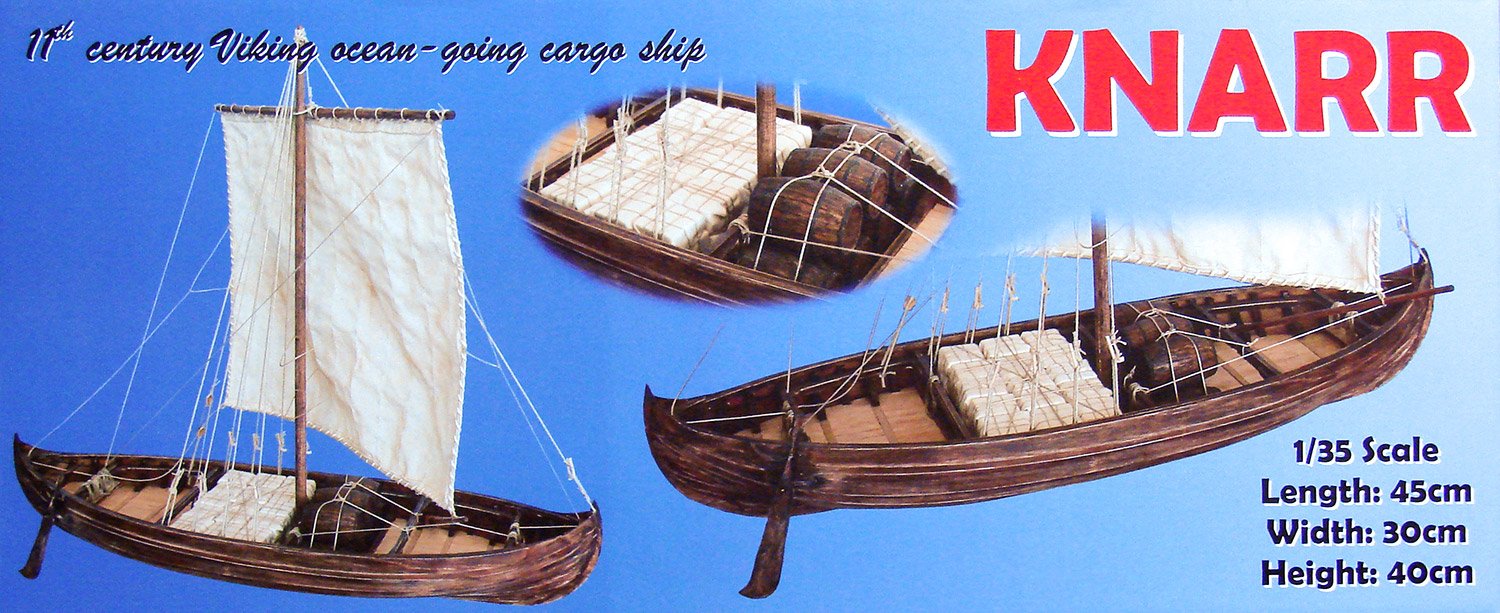
1:35 Knarr – 11thCentury Viking Ocean-Going Cargo Ship
Dusek Ship Kits
Catalogue # D007Available from Dusek Models for €149,00
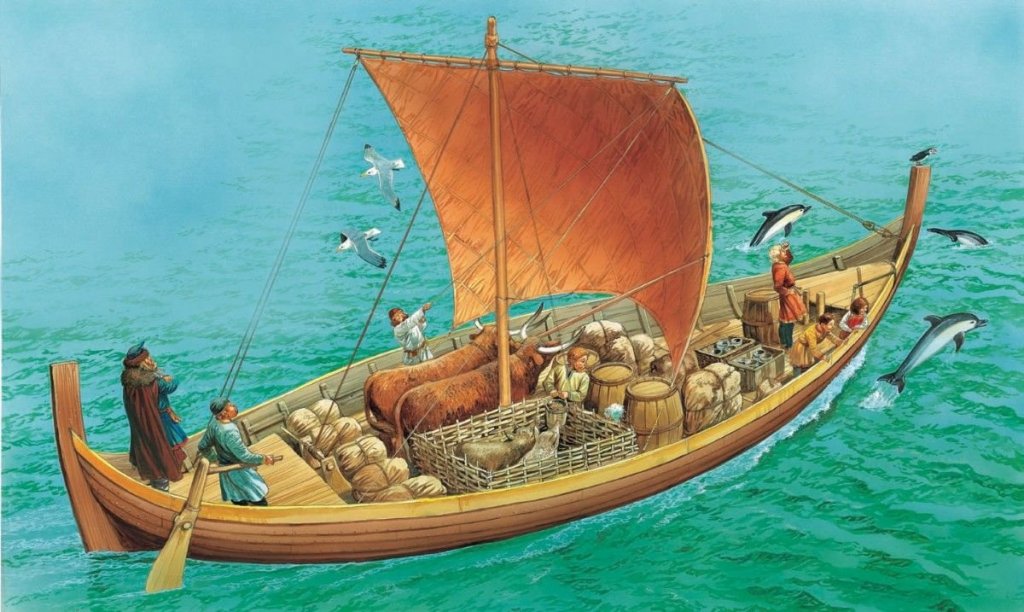
A knarr is a type of Norse merchant ship used by the Vikings and was constructed using the same clinker-built method as longships. ‘Knarr’ is the Old Norse term for a type of ship built for long sea voyages and used during the Viking expansion. The knarr was a cargo ship; the hull was wider, deeper and shorter than a longship, and could take more cargo and be operated by smaller crews. They were built with a length of about 16 m (54 ft), a beam of 5 m (15 ft), and a hull that was thought capable of carrying up to 24 tons. It was primarily used to transport trading goods like walrus ivory, wool, timber, wheat, furs and pelts, armour, slaves, honey, and weapons. It was also used to supply food, drink, weapons and armour to warriors and traders along their journeys across the Baltic, the Mediterranean and other seas. Knerrir (plural) routinely crossed the North Atlantic carrying livestock such as sheep and horses, and stores to Norse settlements in Iceland, Greenland and Vinland as well as trading goods to trading posts in the British Isles, Continental Europe and possibly the Middle East. They may have been used in colonising, although a similar small cargo vessel (the byrthing) is another possibility.
Only one well-preserved knarr has been found, discovered in a shallow channel in Roskilde Fjord in Denmark in 1962. Known as Skuldelev 1, it was placed among two warships, a Baltic trader, and a ferryboat. Archaeologists believe that the ships were placed there to block the channel against enemy raiders. Today all five ships, known as the Skuldelev ships, are exhibited at the Viking Ship Museum in Roskilde.
The kit
Dusek models manufacture three different types of Viking vessel of which this is just one. They are also available in 1:72 and 1:35 scales, with this review kit being in the latter scale. I’m unsure of the actual initial release date for this kit, but I can’t see any information going back further than a handful of years. For those who are space-conscious when it comes to starting new projects, then the Knarr shouldn’t be too hungry of your shelf real-estate, even in 1:35. Finished dimensions for this are given as:- length: 440mm
- width: 300mm
- height: 400mm
The model itself is quite a simple affair, by any standards, and is packaged into one of Dusek’s very sturdy and thick cardboard boxes with a nice glossy lid depicting three views of a completed model. I know the timber looks to have a strange finish, but it’s thought that Viking vessels were generally protected with a layer of tar, from around the 8thcentury. It could also be used to waterproof sails. The box model shows a suitably weathered Knarr that’s obviously been much used. Indeed, the model is also laden with cargo, which is also included in this kit. Inside the box, several sheets of laser-cut timber are wrapped in a layer of clingfilm, plus there is a bundle of dowel/strip, and a further bag of components. A single sheet plan, instruction manual, and a parts map complete the package.
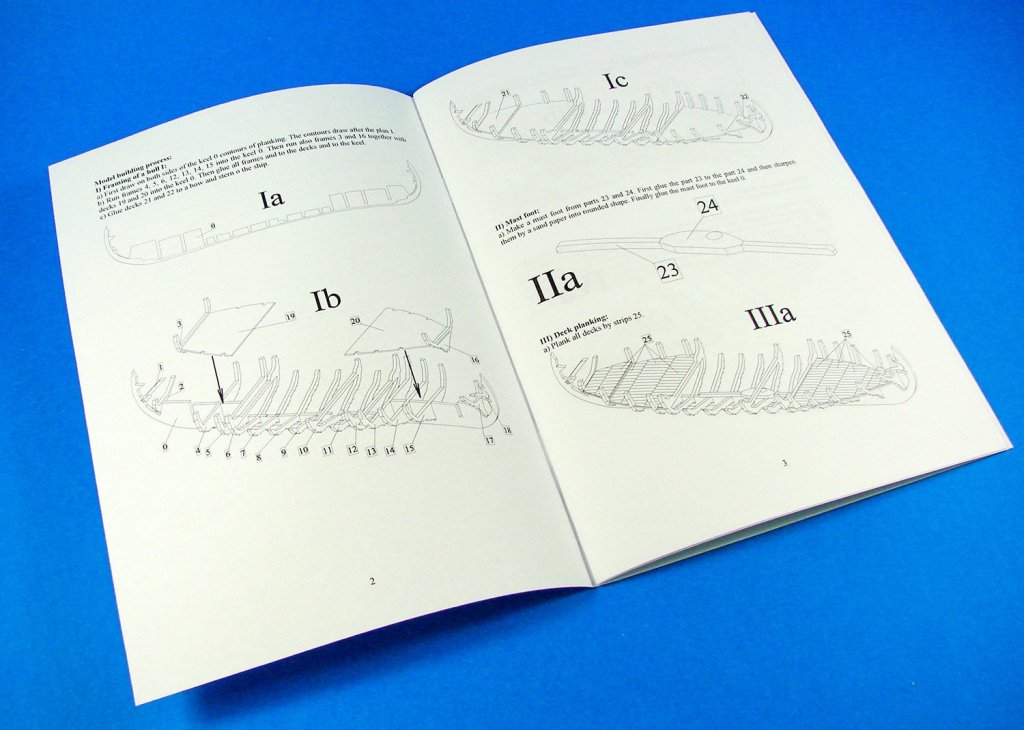
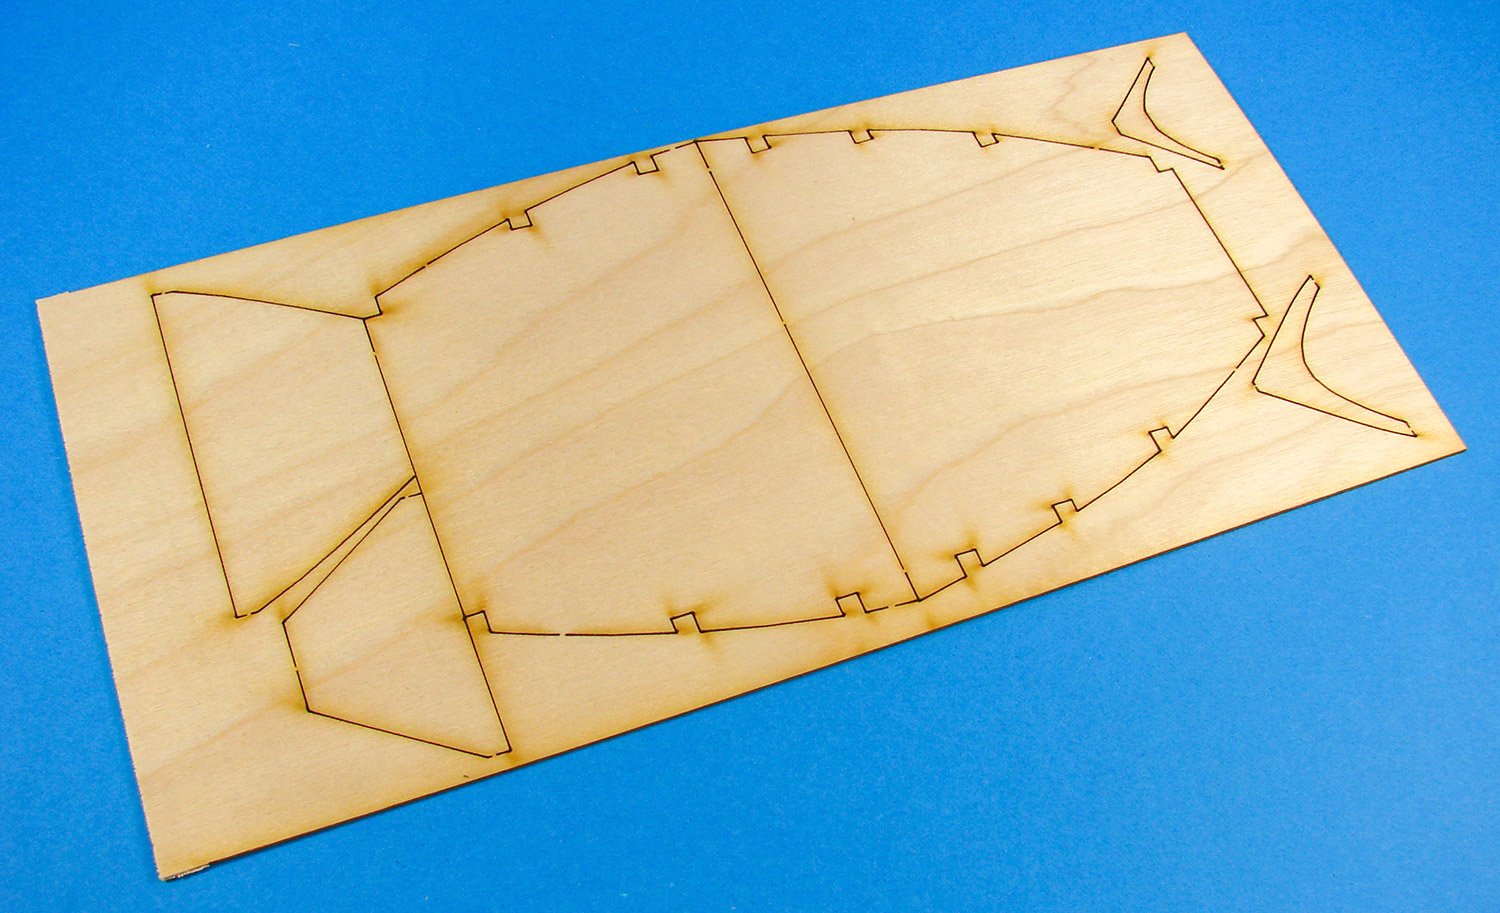
If you’ve read my review on Amati’s Viking longboat, then you’ll see that this ‘s construction is very similar to that in many respects. Construction begins by taking the false keel and slotting onto it the series of eighteen bulkheads. These bulkheads are flanked either side by the raised section of deck in their basic plywood form. The area between these deck sections is totally open, that is, simply the full depth of the hull. This was for storing cargo. Those ply sections are now sheathed in short lengths of planking. In this kit, these are supplied on the one thin sheet of pearwood veneer, and they really do look great. Another large frame section is then installed which encompasses both the cargo hold and raised deck sections. In all, that should provide a solid basis on which the next stage can be begin. That is the planking.

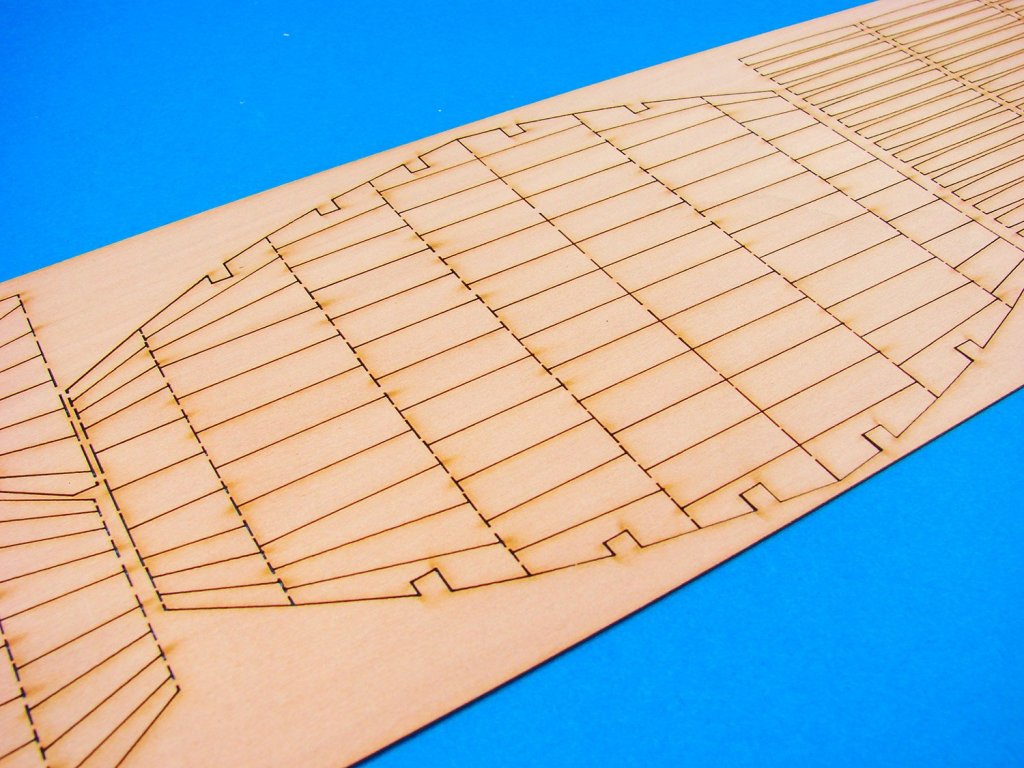
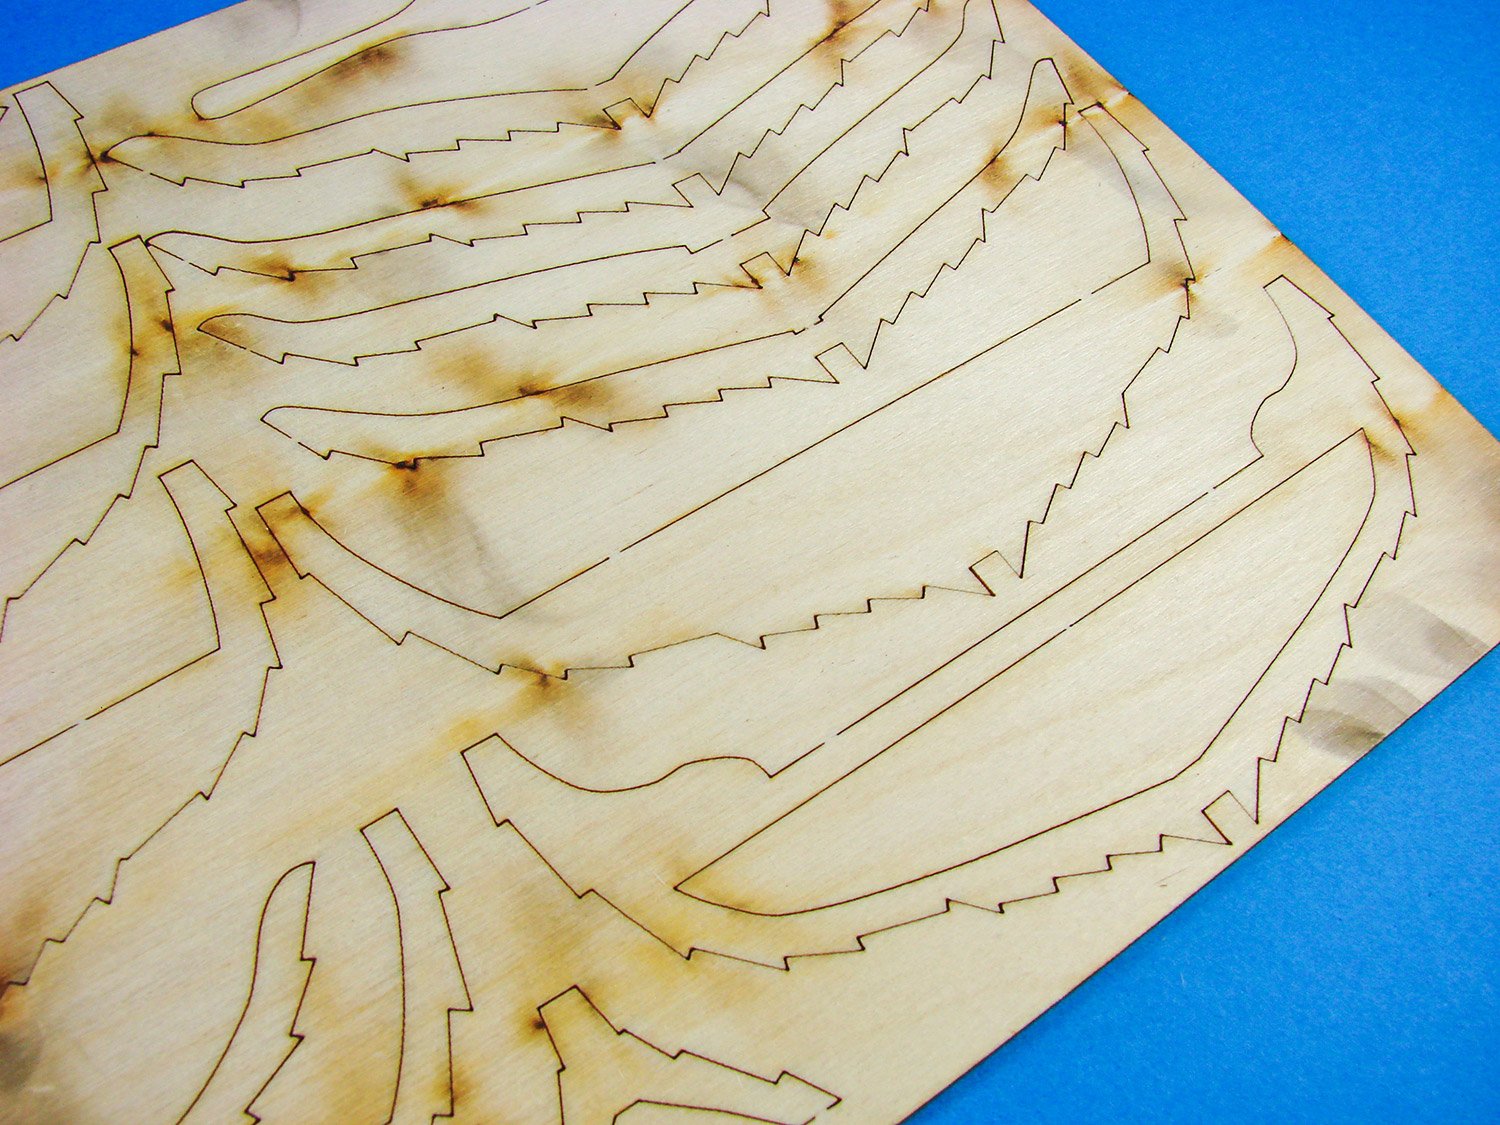
Now, here’s where you see the similarity to the Amati kit, with the bulkheads that are channelled out for the planks, and those very planks are supplied pre-cut on three thin sheets of plywood. The shape of the hull with the curved and clinker-laid planks is quite obvious when you look at the shape of them on the sheets, and of course, you lay the lower, garboard plank first. You will need to refer to the parts map as no parts on this model are marked on the sheets themselves. With the planks, each sheet is also engraved with an arrow to identify the bow direction of the Knarr. One thing the model instructions doesn’t mention is any possible bevelling of the bulkheads prior to planking. You will need to check this as you begin the process by laying an initial plank and seeing how it fits. Before all planking is added, a series of keyed frames will be added to the cargo area, onto which the upper plank strakes will sit.


In all, there are TEN sheets of timber here (9 x ply, 1 x pear), plus a nice little bundle of timber strip, all of high quality. Laser cutting, whilst leaving scorch marks, is very good, and of course, the hull will be finished in a colour to represent tar, so there’s no real need to start removing that char. Just get on and enjoy building the model.


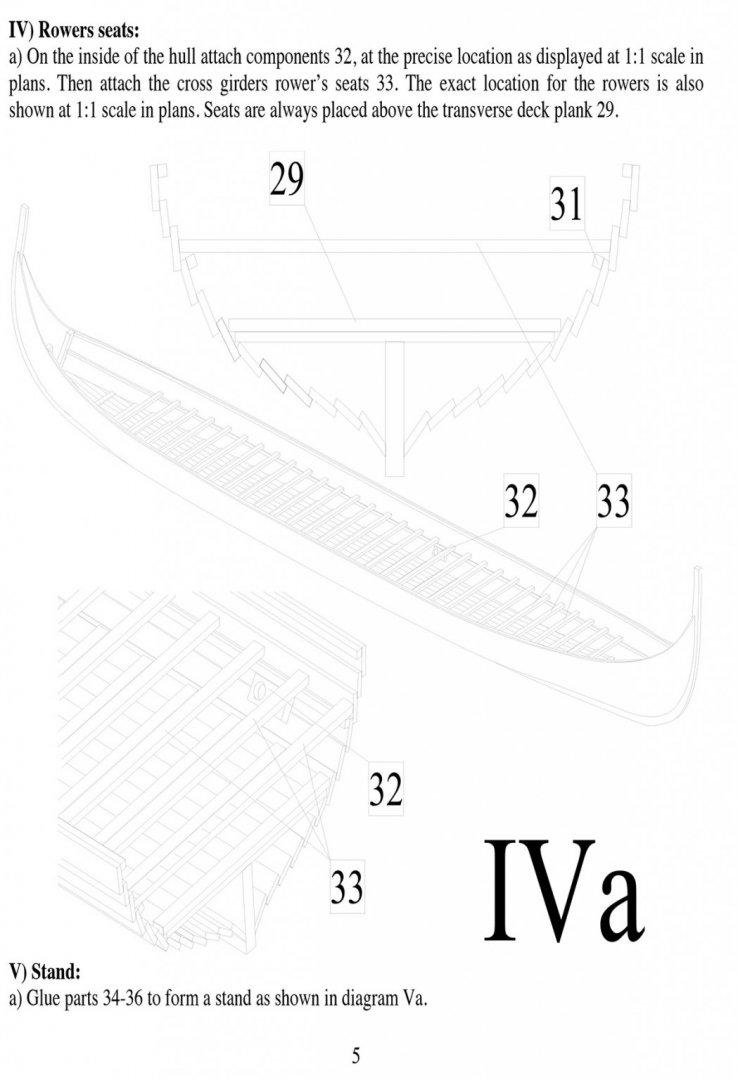
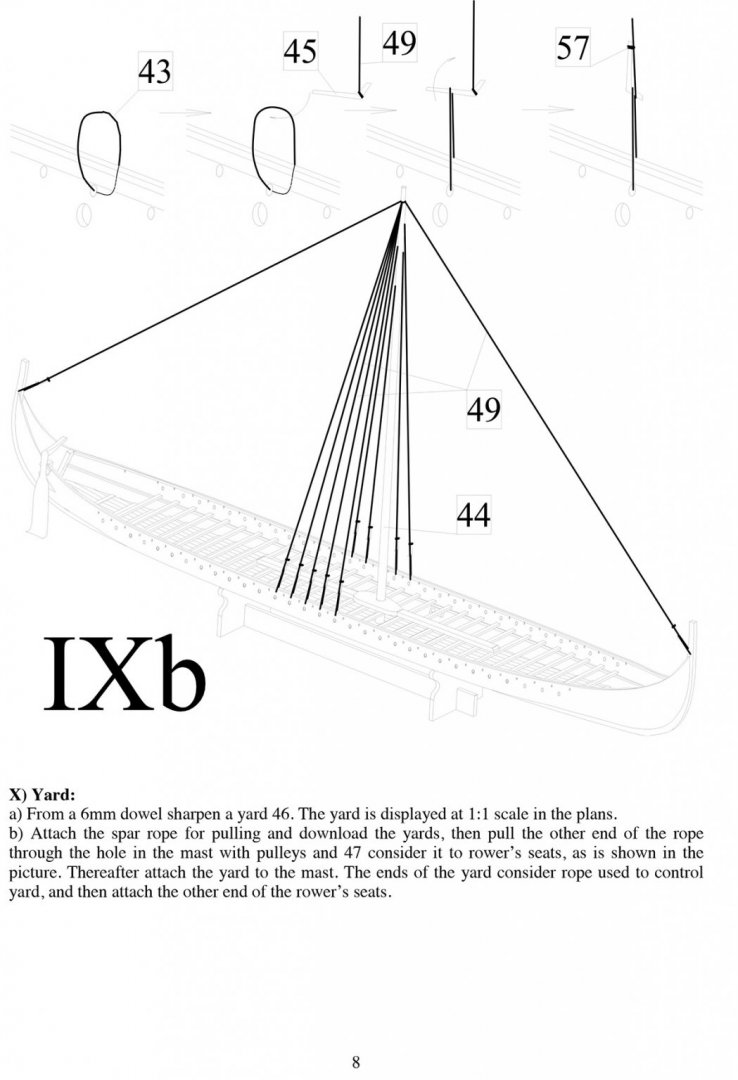
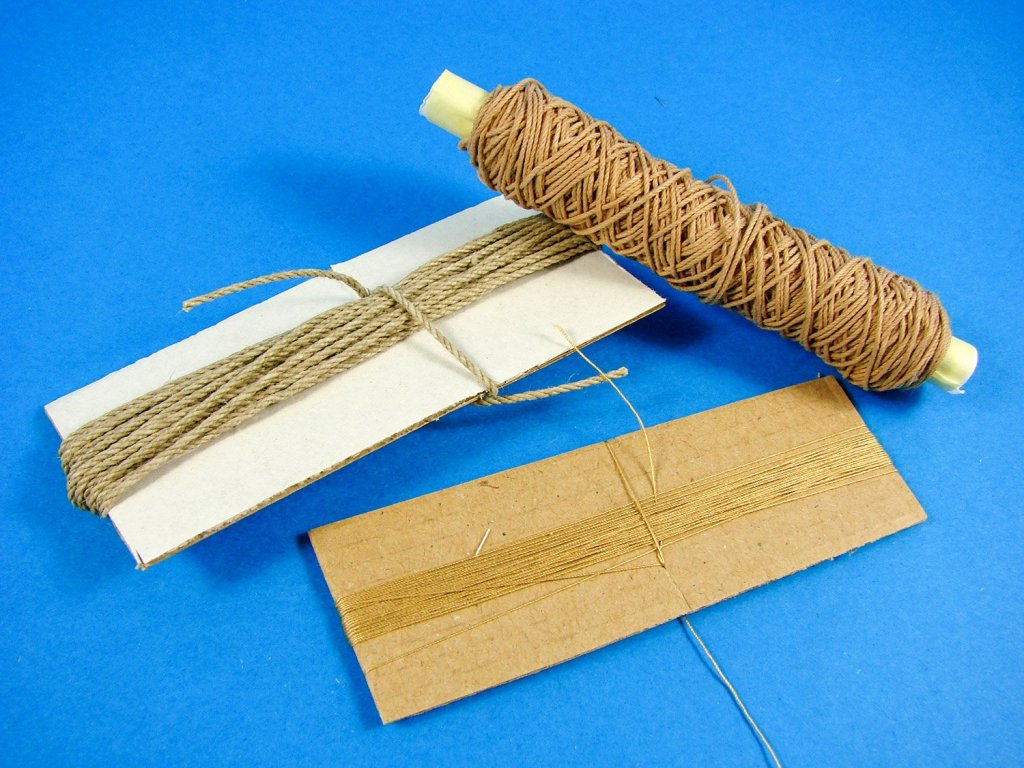
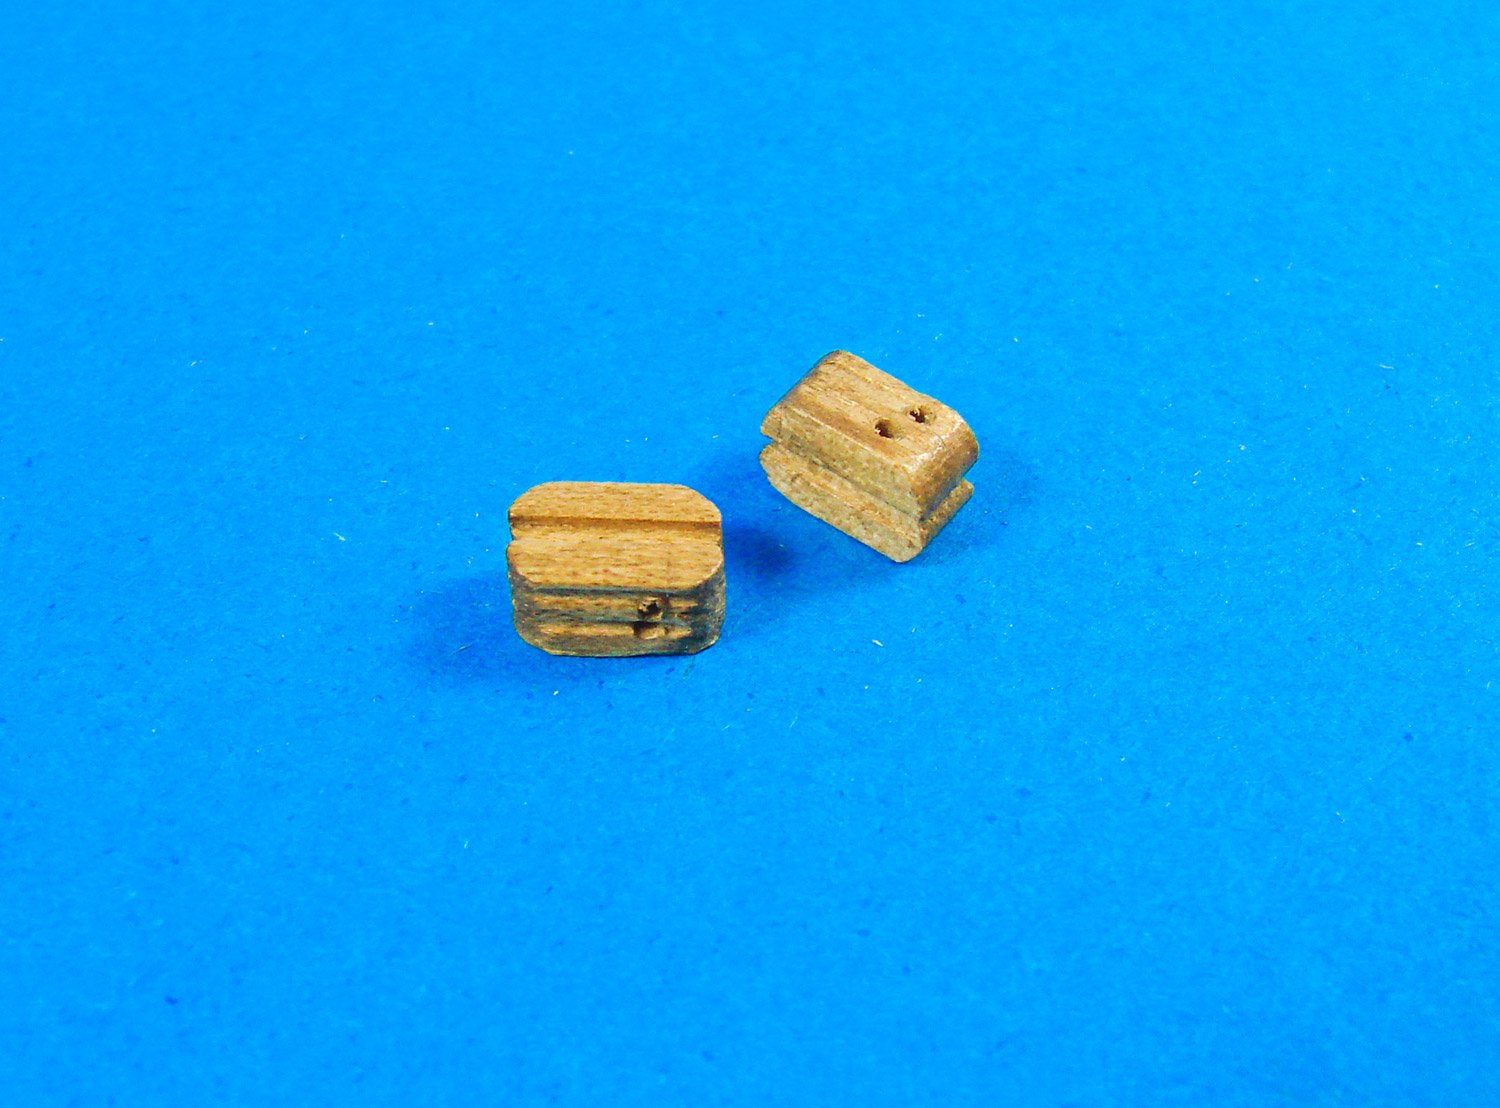
Masting and rigging a Knarr is quite simple. In fact, the model only has TWO wooden, double blocks! Thee mast only has five rigging points, and the single yard has just three, of which those two blocks are obviously used. Rigging cord is supplied and this has the natural appearance of the material, as it should, and with that brown hue that could be indicative of some previous tar application. Three sizes of cord are supplied on spool/card wraps.
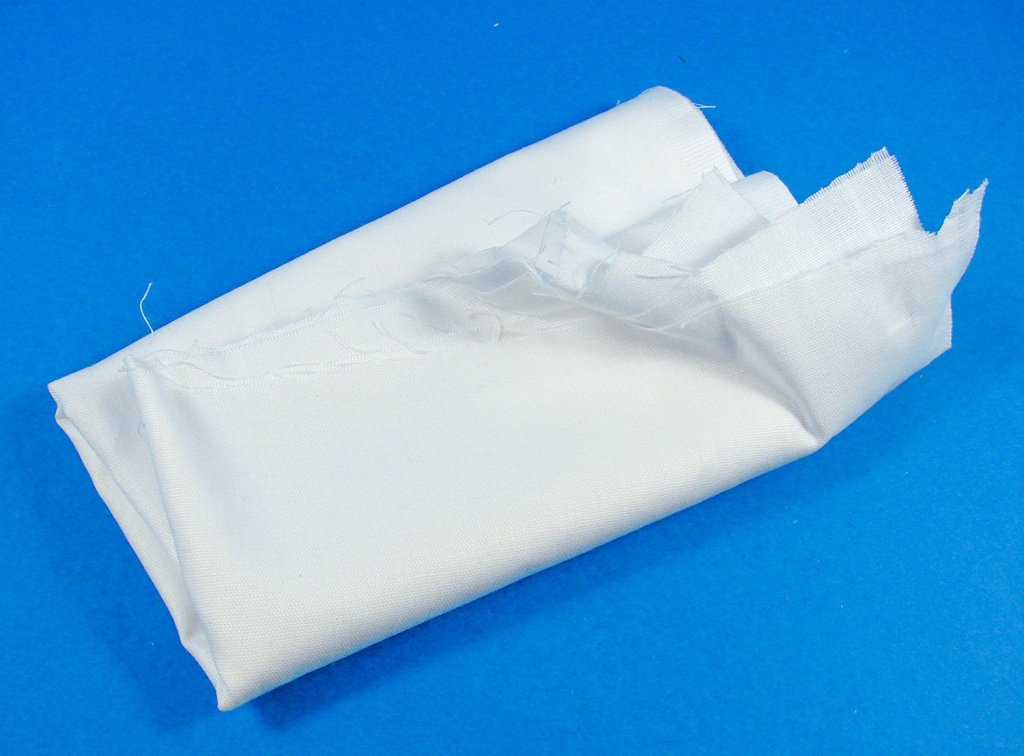


When it comes to sails, some almost pure white cloth is supplied, and the quality is excellent. You will need to use the drawings and instructions to make and sew your own finished items, and I also suggest you soak the finished items in some strong tea to age them and give them that appearance of worn tar. You could also dye them red, and then age by using the tea-dye trick. You’ll need to work on this aspect, as you would with any ship of this sort of antiquity.

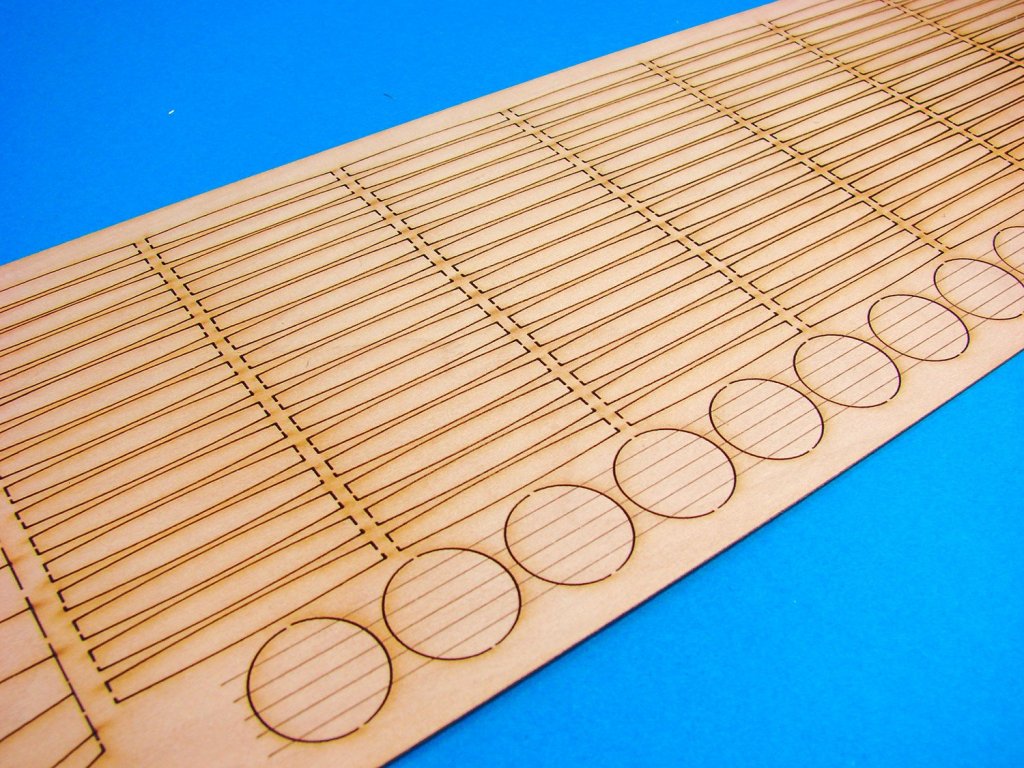
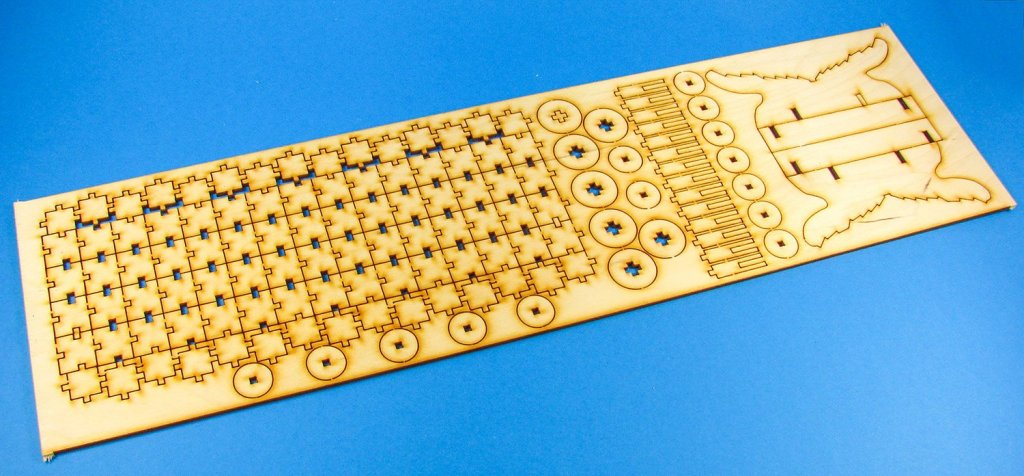
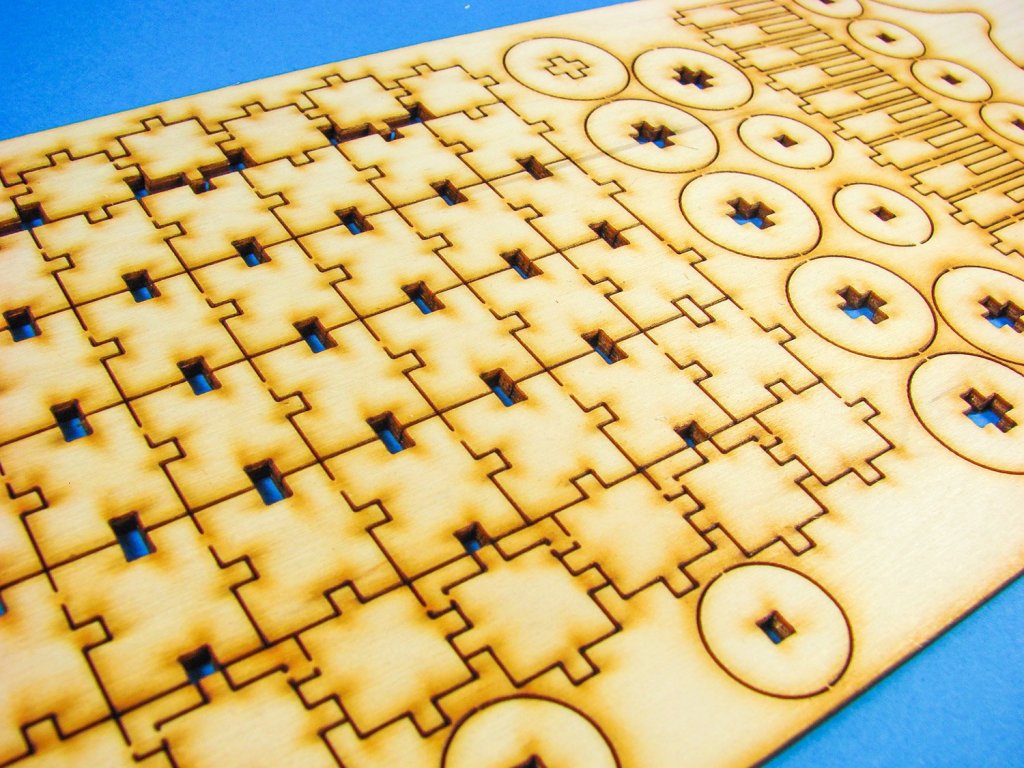
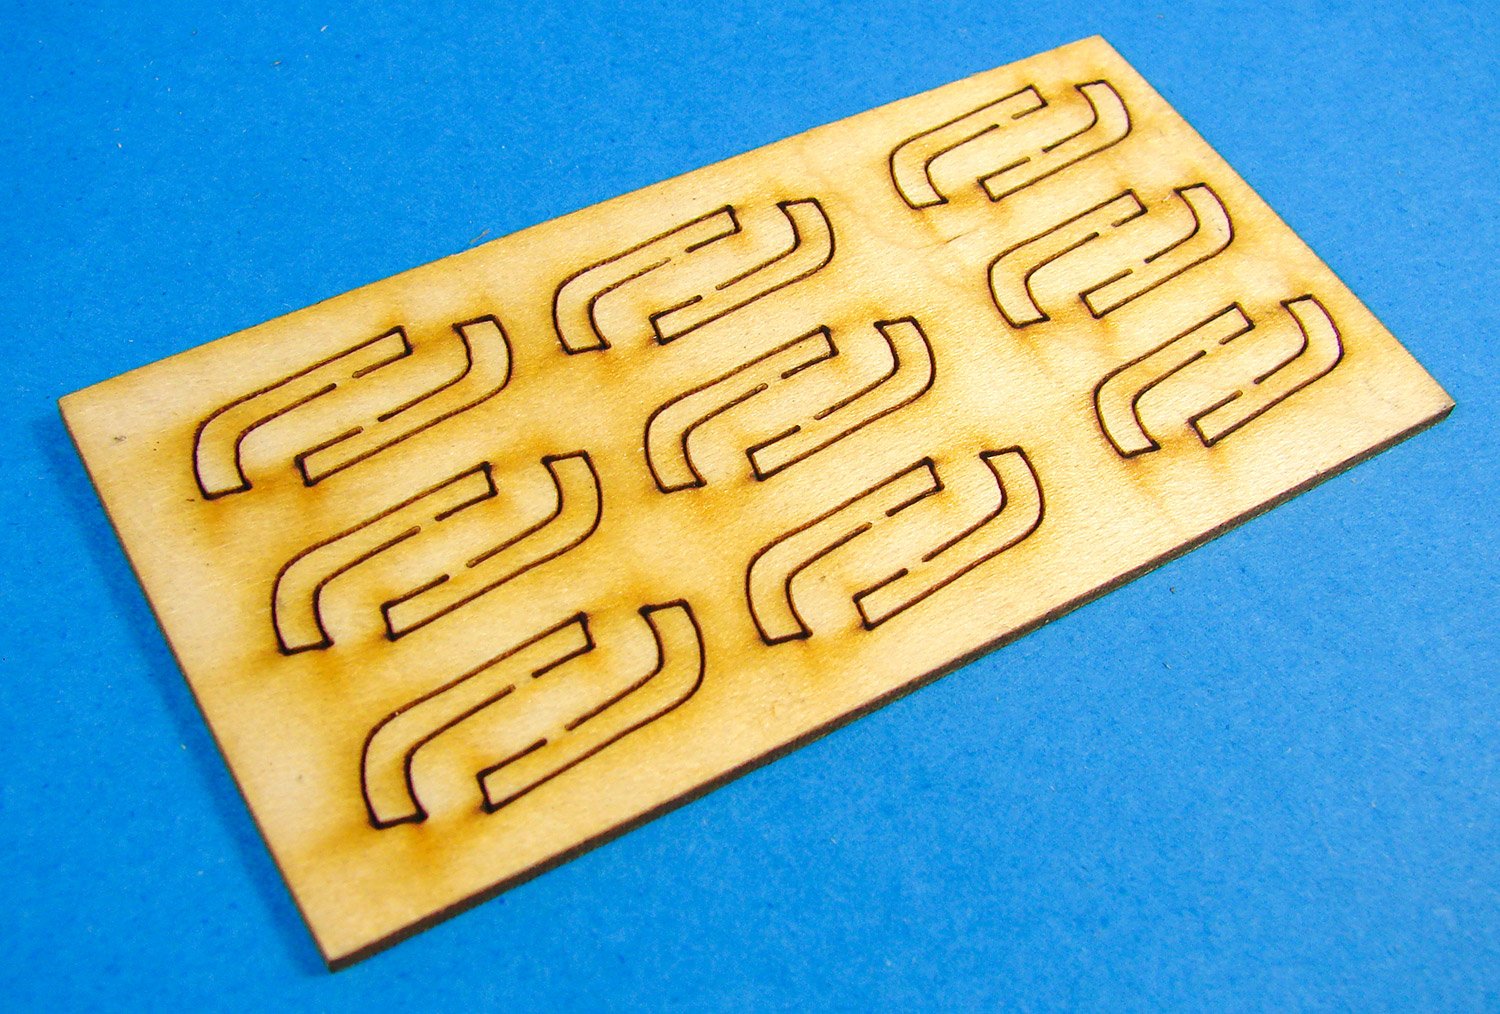
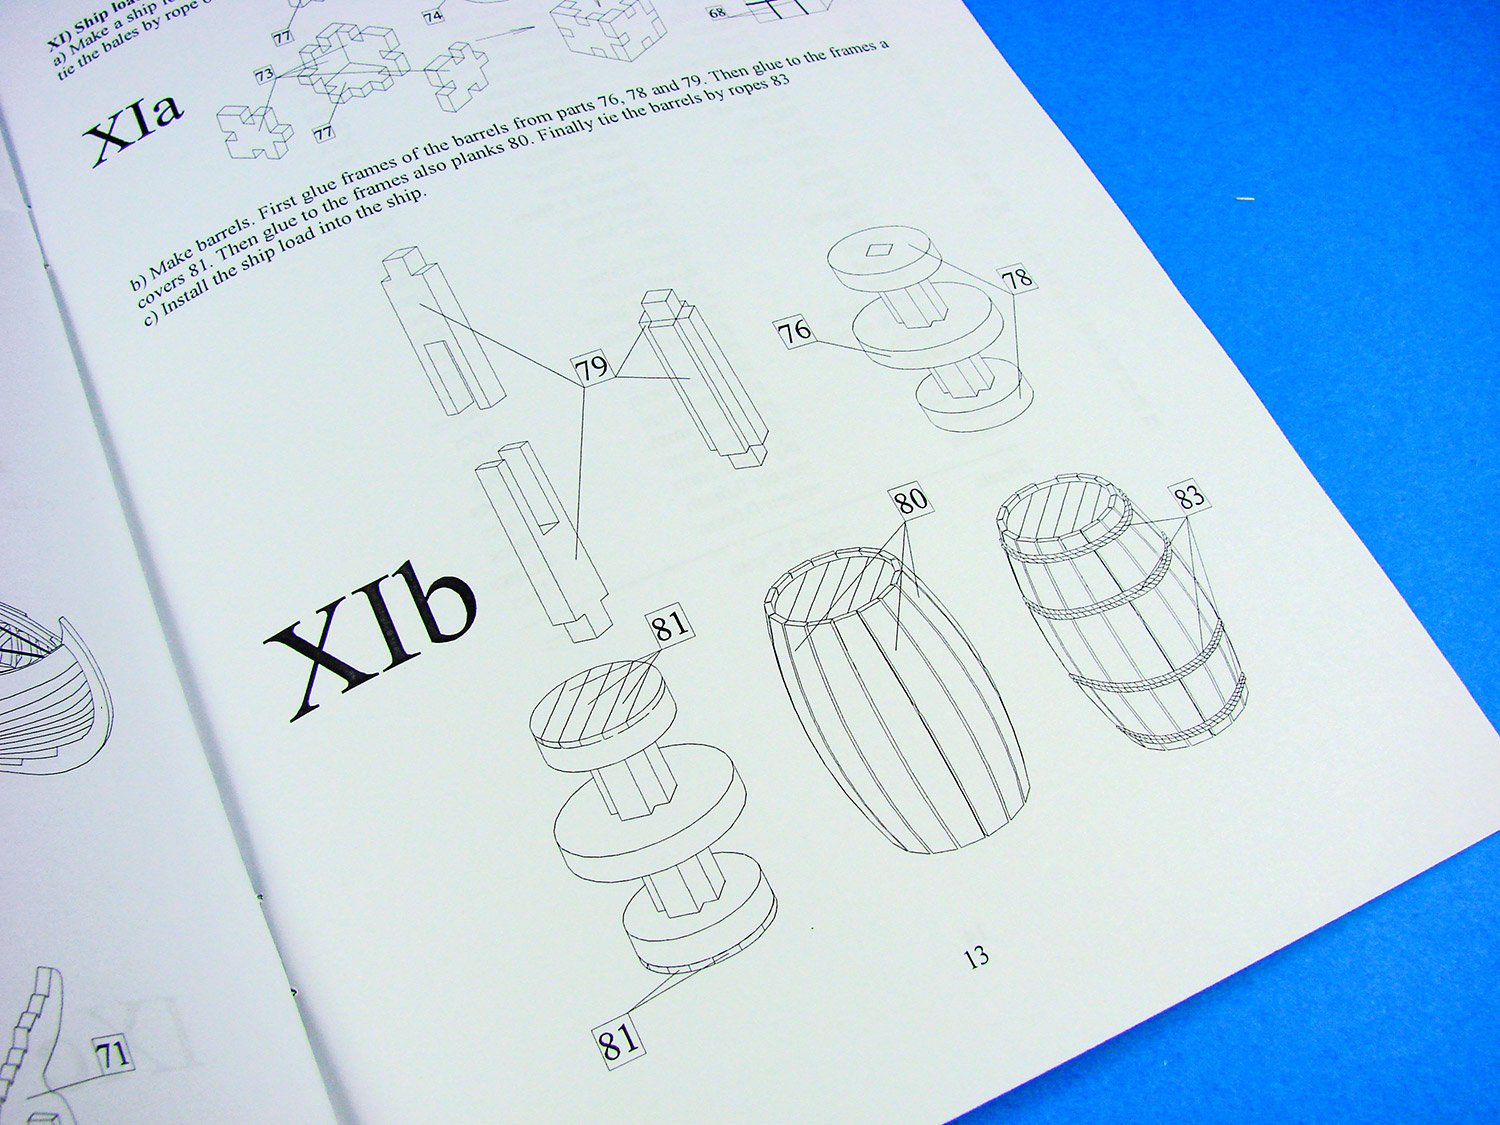
A cargo ship needs cargo, and there is plenty here in the form of crates and barrels. The crates much first be assembled as small plywood jigsaw puzzles and then swathed in some of that tea-aged fabric you used for the sails, creating a package. Some of the cord is then used to tie then up. Each barrel has to be constructed around a plywood core. Onto this sit the pearwood exterior parts, such as the engraved head parts and the staves. Dusek has finished item lashed with rope. I don’t know how accurate that would be (or strong enough in the real world!). You may wish to use some thin metal foil, painted.
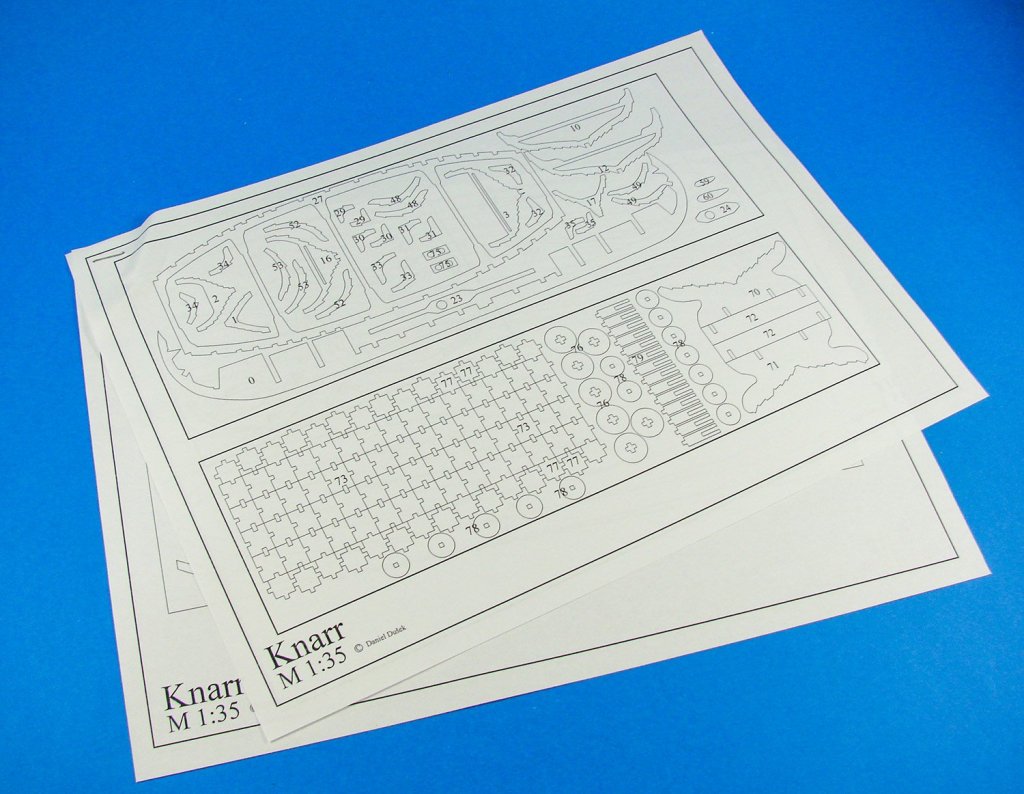


This model also contains a display stand within the sheet parts, again, shaped to accommodate the clinker planking.
The instructions and manual are so simple to follow and should present the modeller with no problems. The English annotation is excellent.
Conclusion
This really is a lovely kit and will build up into a most unusual model. You really can let your imagination go as to how you finish this with regards to final appearance. Maybe time to watch the recent History Channel series, Vikingsand enjoy the stories of Ragnar Lothbrok. I’m pretty sure these vessels are in the series, so it’s a good excuse for some televisual research. Materials quality is excellent with no warping etc. and the sheet of pear for the deck planking and barrels is an unexpected bonus.If you want to see a Viking vessel that is more of a fighting and conquering classic, then we’ll be reviewing another Dusek kit in a couple of weeks or so. Stray tuned!Highly recommended.
My sincere thanks to Dusek Models for the review sample seen here. To purchase directly, click the link at the top of this article.

-
24 minutes ago, Vane said:
64 guns vs 100... I dont think the keel will be the key point deciding the price. The price of the competition is definitely highly relevant. Currently there are 3 large shipkits from the Nelson era. Victory in 1:72, Vanguard in 1:72 and Agamemnon in 1:64. I would guess that it end up around 1200-1500Euros.
Strangely enough, I already gave a total guess price of about €1500/£1500 somewhere else recently, as a non-scientific calculation.
- mtaylor, Canute and Edwardkenway
-
3
-
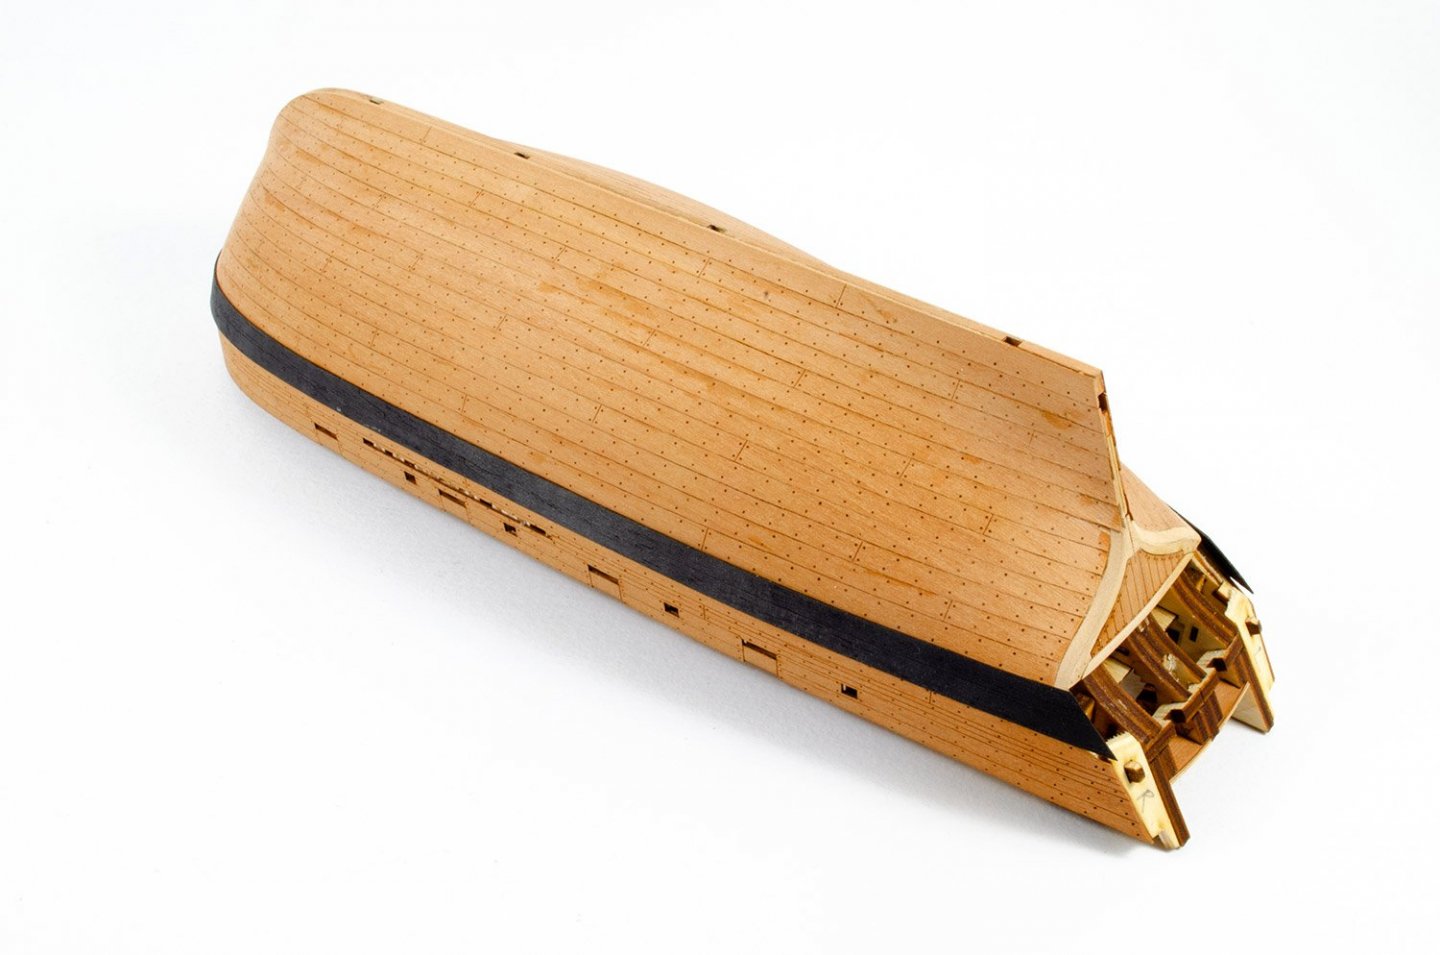
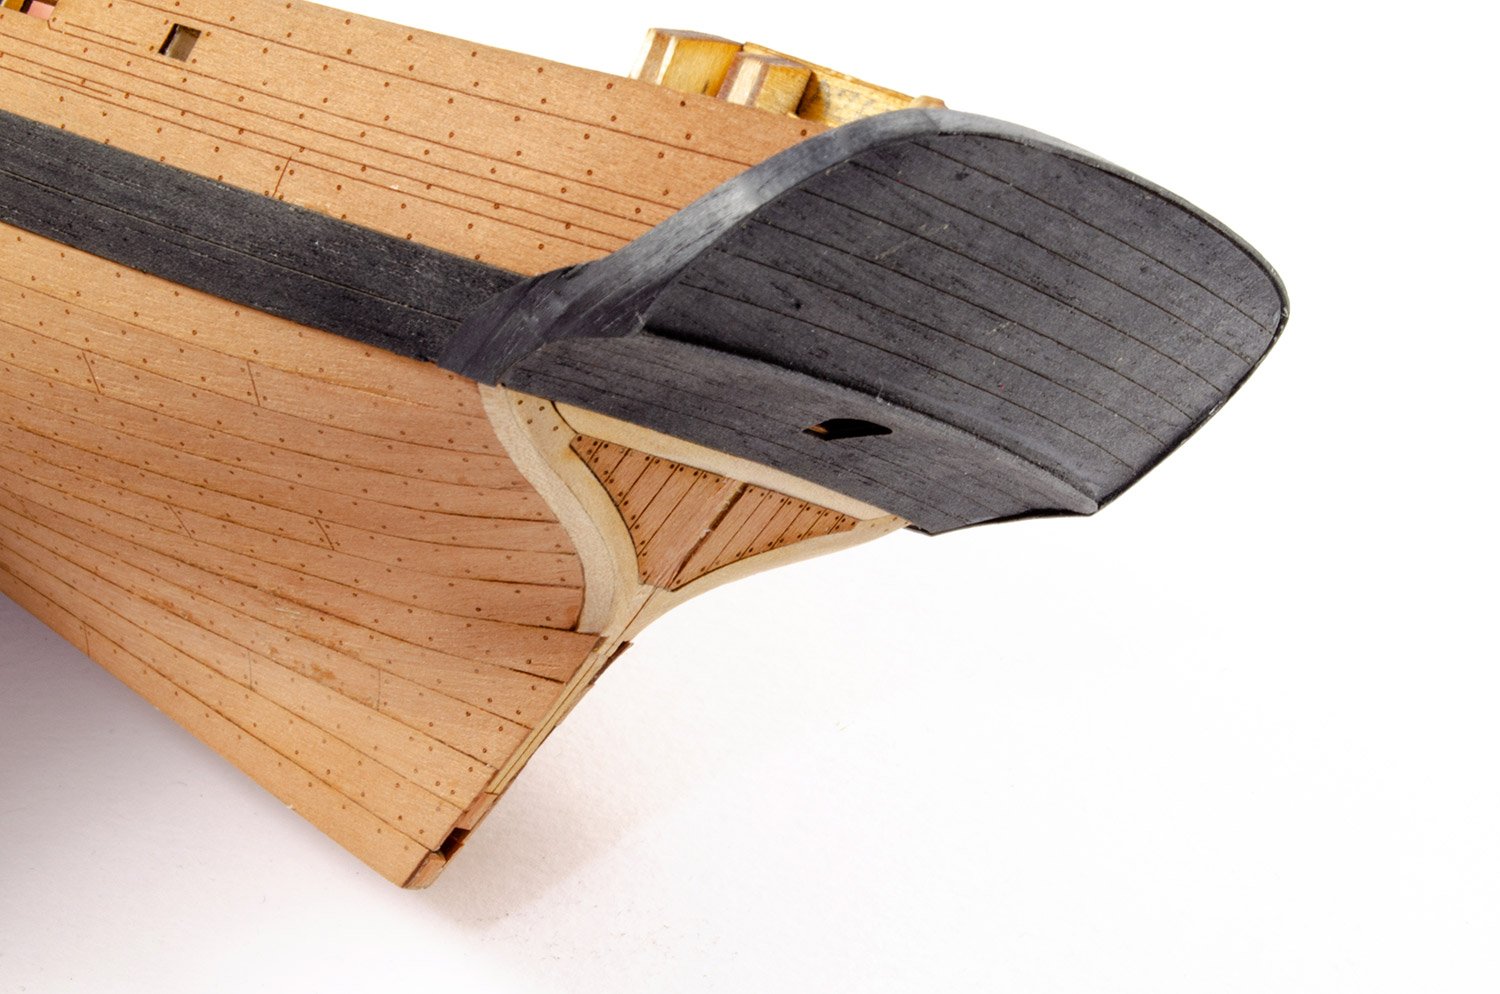
My only struggle so far was the three-piece black veneer cap over the transom area. Thee veneer was so thin, that even with soaking and nipping, it kept splitting. Those short lengths have to do acrobatics by bending in different directions.
-
2 hours ago, Vane said:
U can get the 3rd rate HMS Agamemnon in 1/64 for about 900 Euros in UK.... Victory is probably 50% bigger. It should not be rocket science. 😛
You can compare two models of different scales and by two different manufacturers?
You could draw a comparison and make a guess, but it's not rocket science that your figure will be just that.....a total guess. Factor into that two different manufacturers with different pricing structures.
Also, HMS Victory isn't about 50% bigger than Agamemnon in 1:64. It's only around 15% larger in length than Agamemnon.
-
9 minutes ago, CWG said:
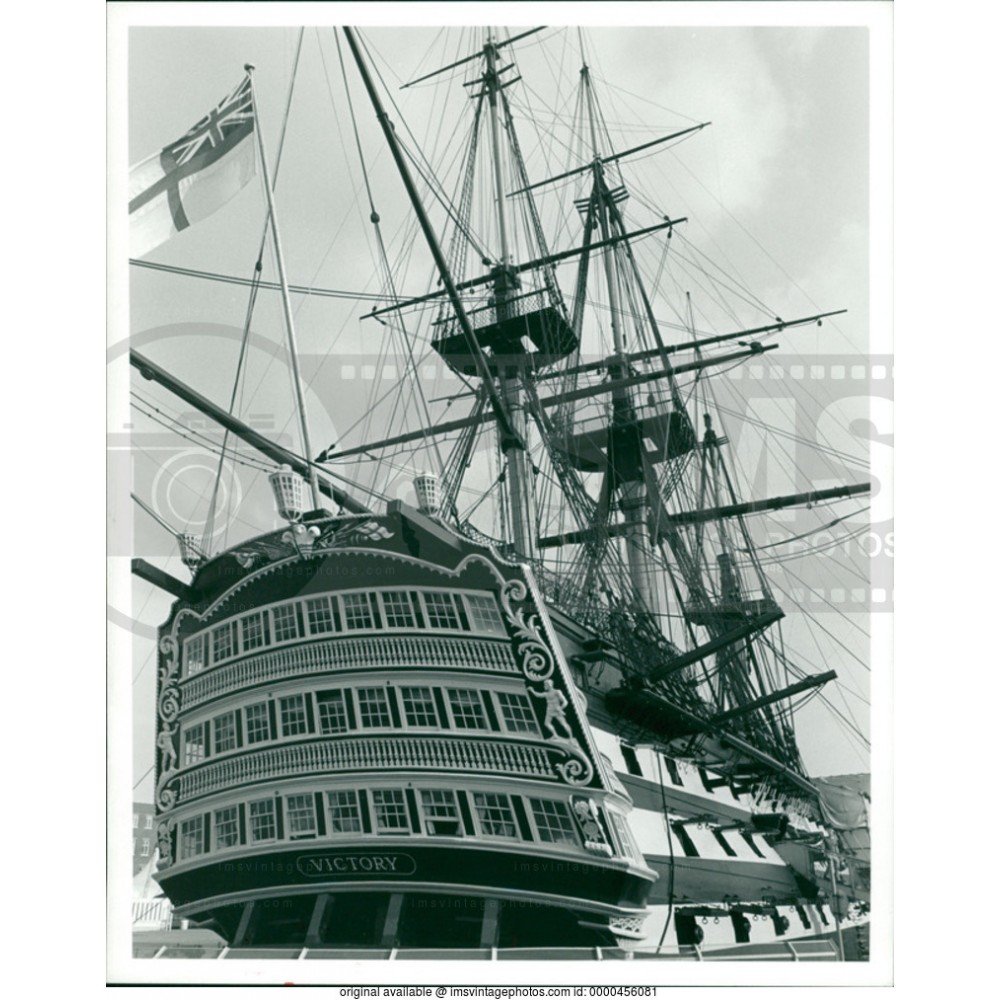
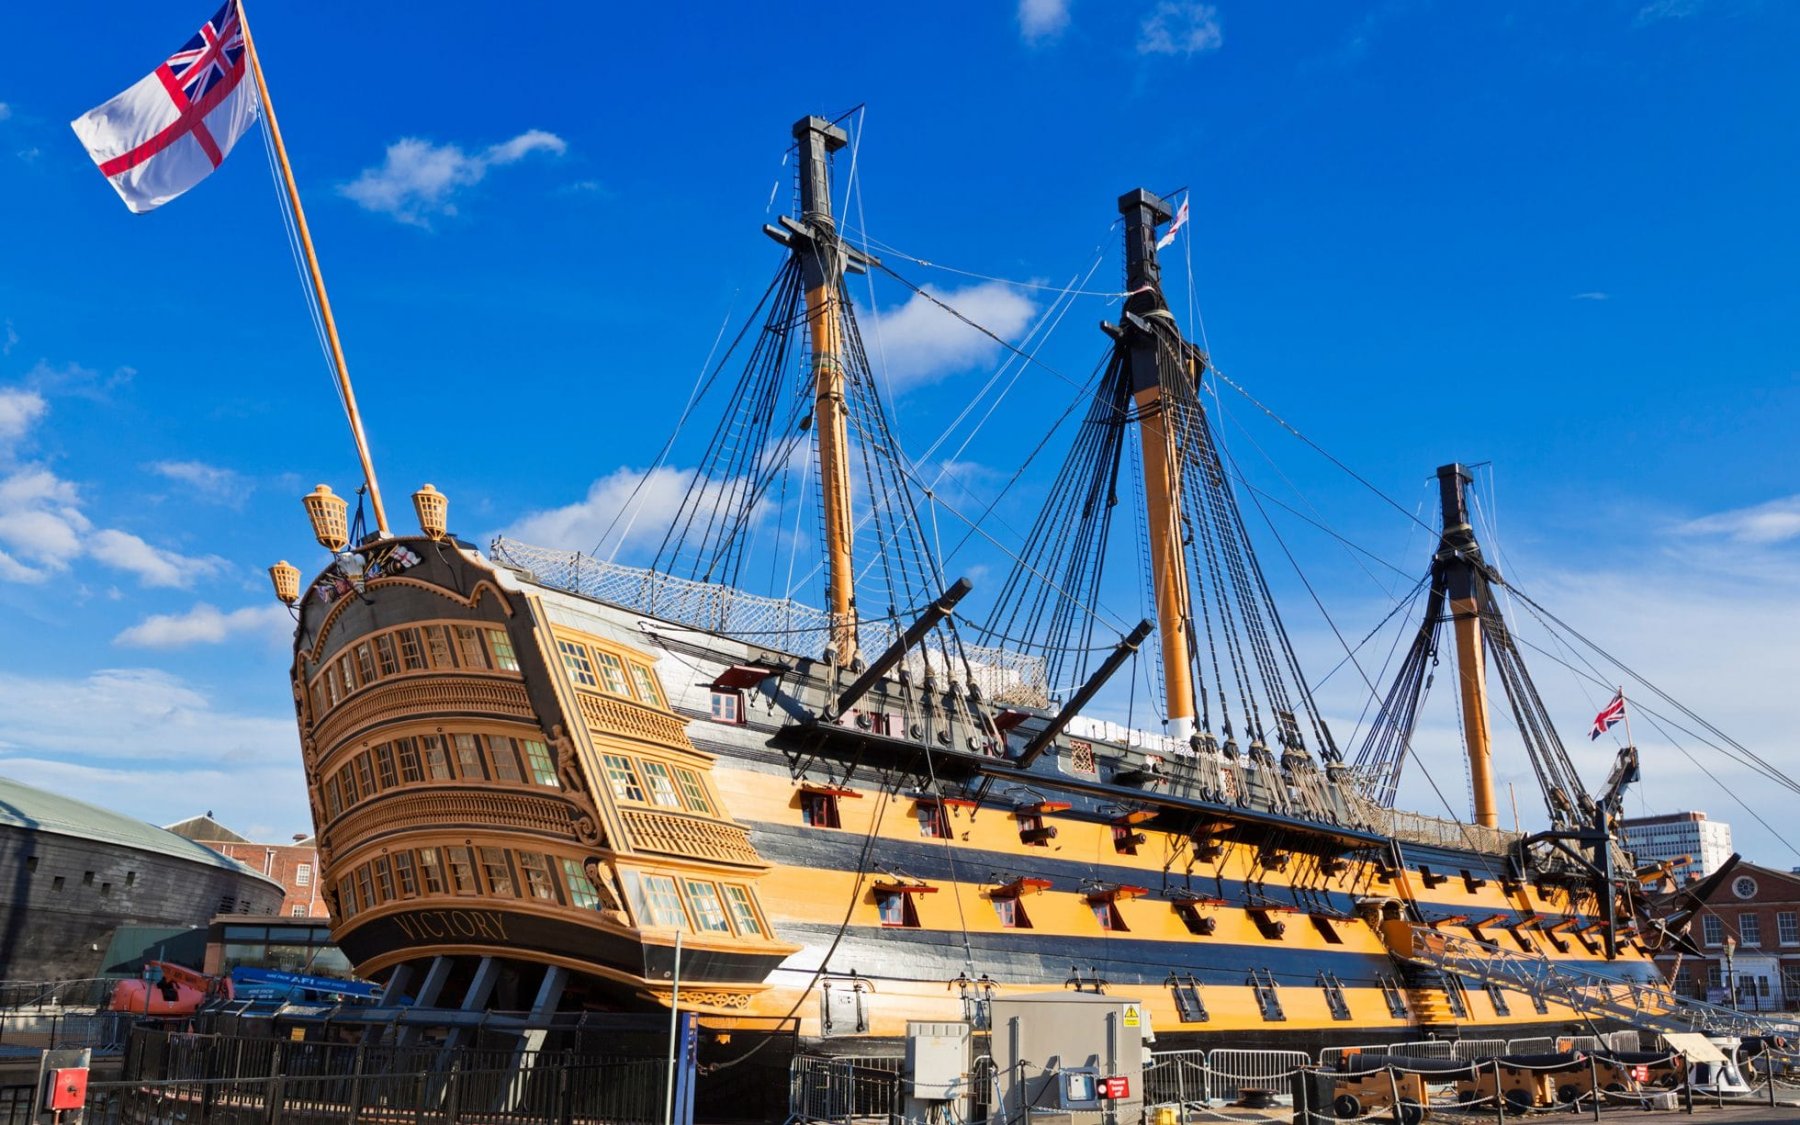
The stern of the Amati Victory is too flat. It should have curvature. See the pictures of the real ship on the internet.
I don't think it has much curvature. From photos I've seen and ones I've taken, it appears to have a gentle curve.
I can also tell you, without doubt, that the model isn't too flat. Here's a couple of photos from the plans for this very kit...
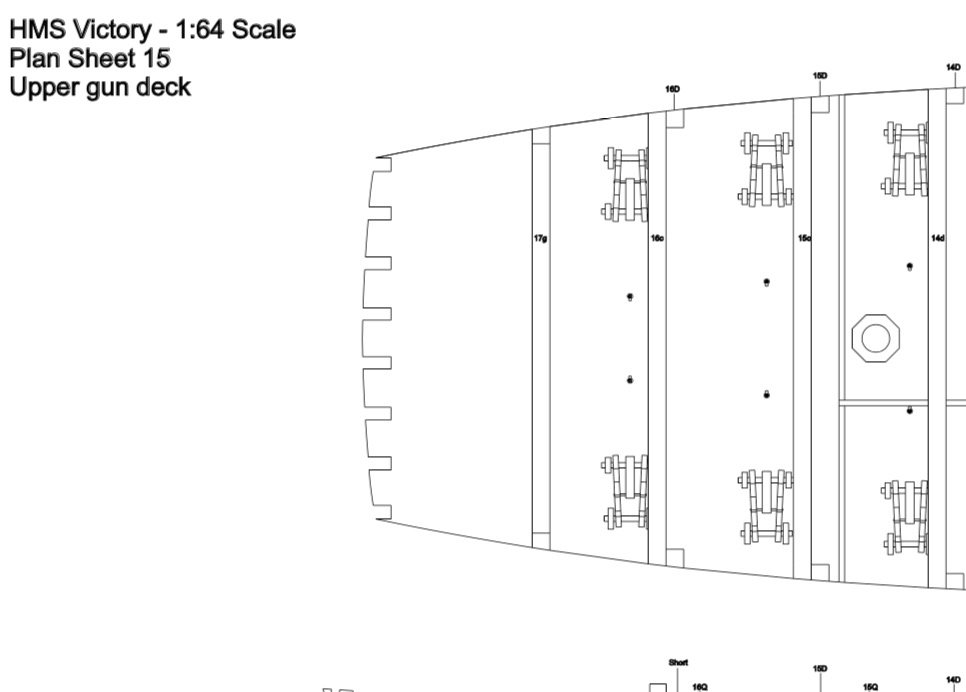
Be careful as some online photos look strange with fisheye effect.
Here are some images I've trawled for you:
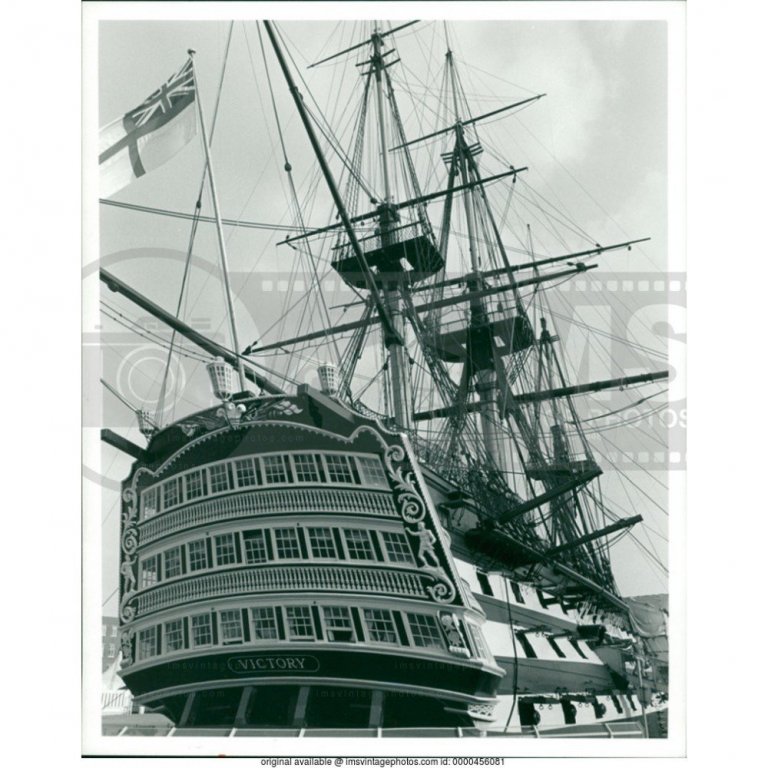
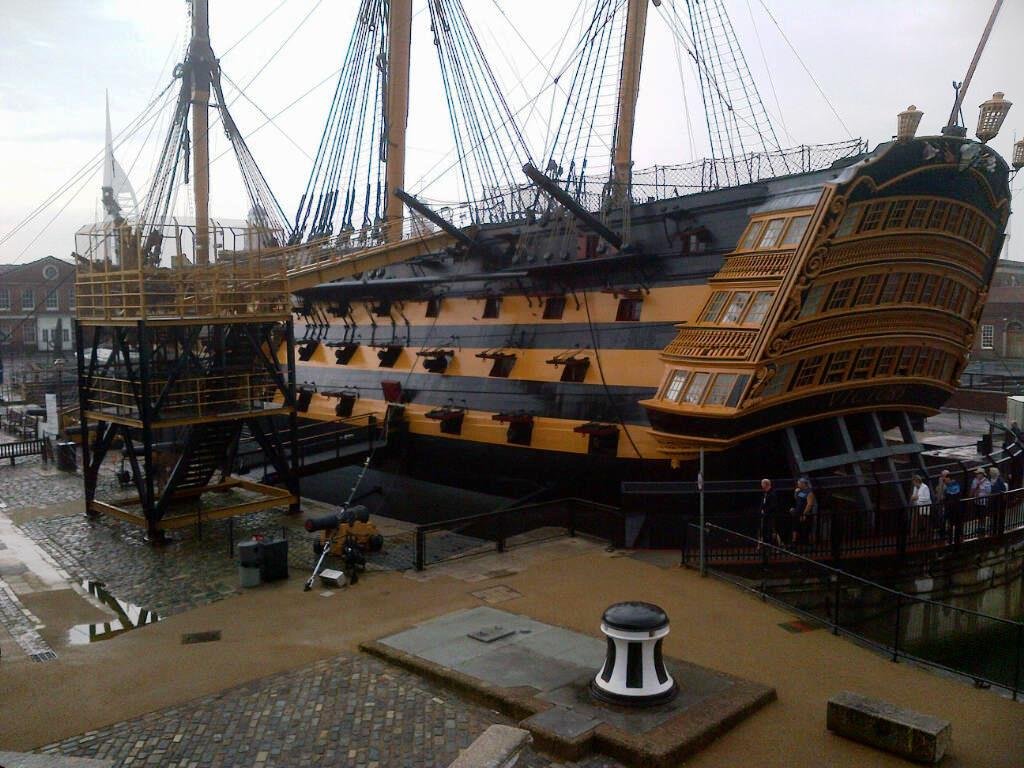

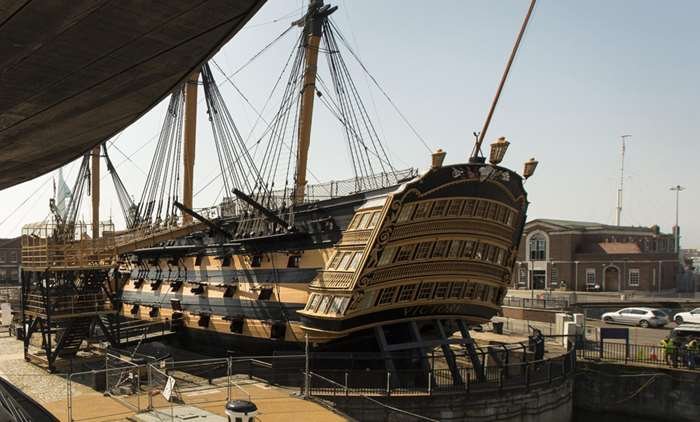
THIS one appears to show it very curved, but it looks like it's fisheye as you can see it curve inwards at far outside edge.

-
-
That's some neat blackening. I have actual brass-black, and access to hydrochloric acid. I might play around with the chemistry a little.
Thanks for the update.
-
-
This is coming along so well. Not too far from the finishing line now, relatively 😁


Mary Rose by James H - Caldercraft - 1:80
in - Kit build logs for subjects built from 1501 - 1750
Posted
Did you make any progress/drawings for the changes at all?