GuntherMT
-
Posts
2,213 -
Joined
-
Last visited
Content Type
Profiles
Forums
Gallery
Events
Everything posted by GuntherMT
-
She's looking great Brett. Hopefully when I get that far my planking will be good looking enough that I have a hard choice as to whether or not to paint!
-
So I do believe that you lot of scallywags in this community have completely warped my concept of what exactly a "kit" for building a model is...

- 831 replies
-
- 18
-

-
- Armed Virginia Sloop
- Model Shipways
- (and 1 more)
-
That tiny brass turnbuckle?
-
Very nice. I think there are as many lines on your bowsprit, as my first build (the Carmen) had altogether.
-
As long as it's the original Tite Bond, water should work. Depending on how long it's been glued you may have to let it soak for a while. If you can get a wet rag or gauze or something up against the connection you want to de-bond, and keep it wet for a while, it should free up after a while. If it's Tite Bond II (I think) which is waterproof.. well, then I don't know.
-
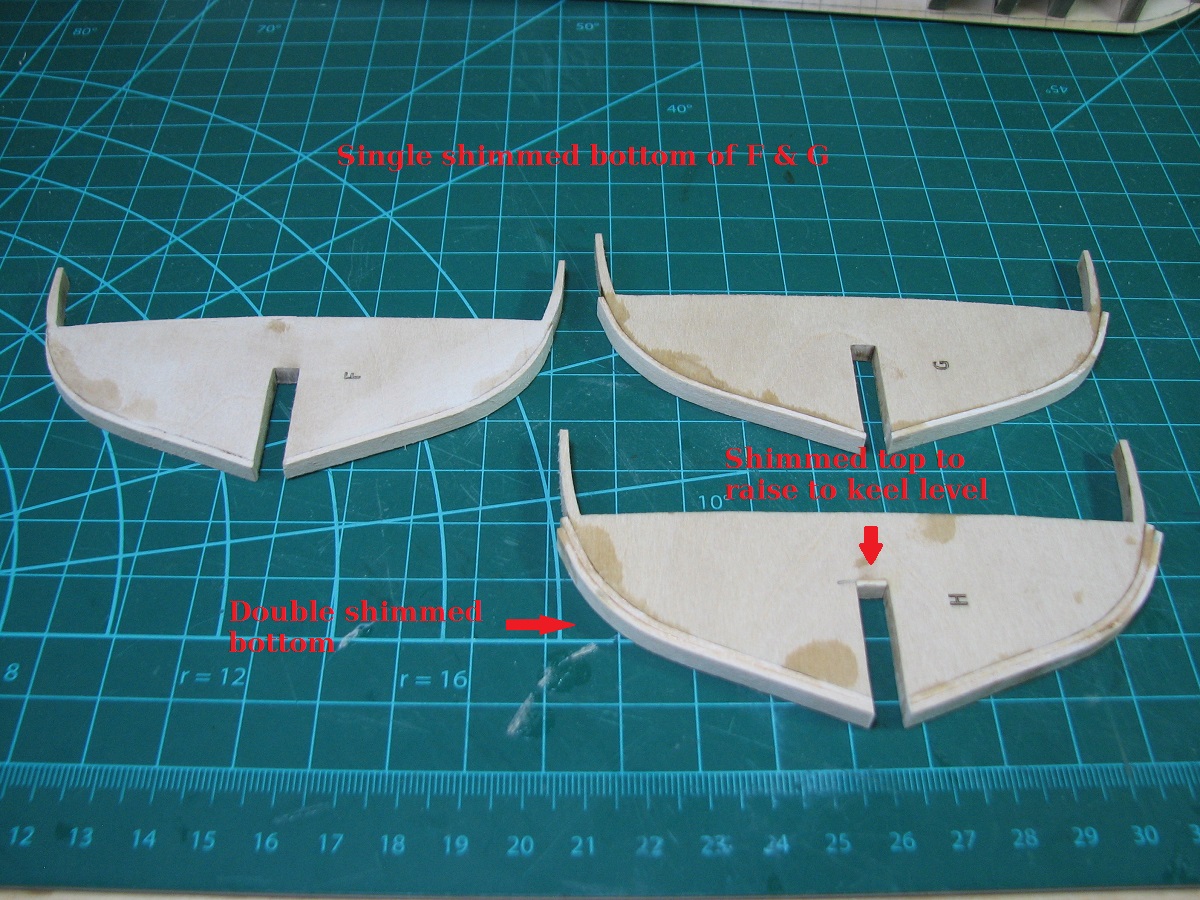
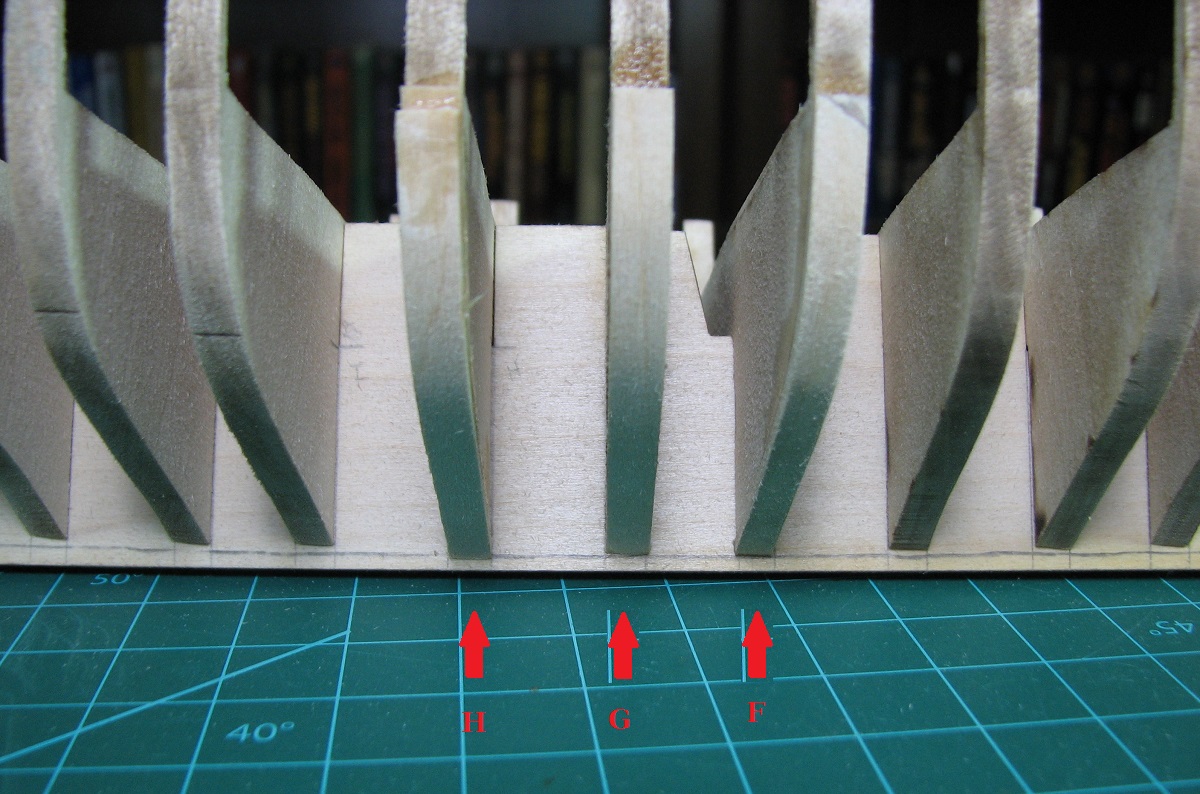
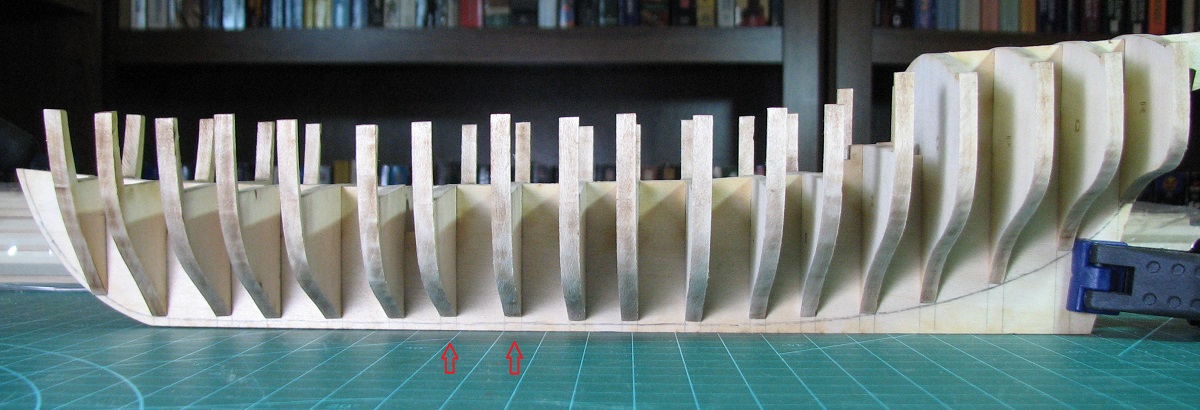
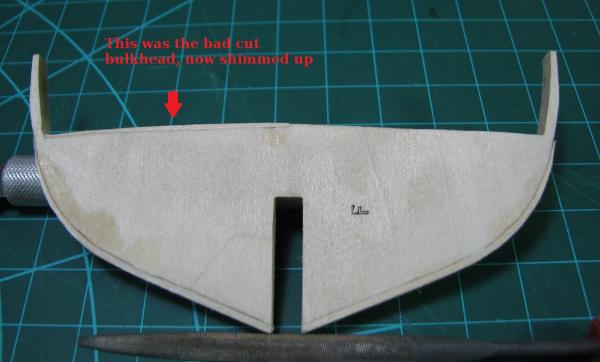
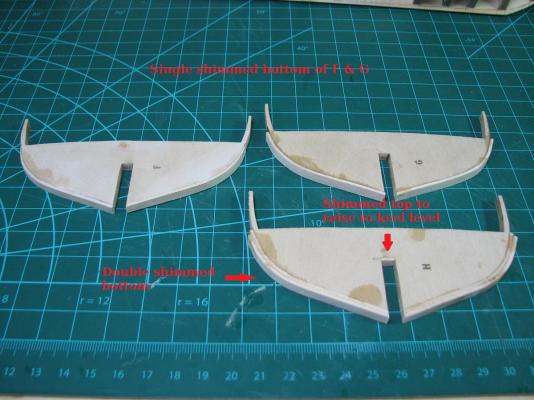
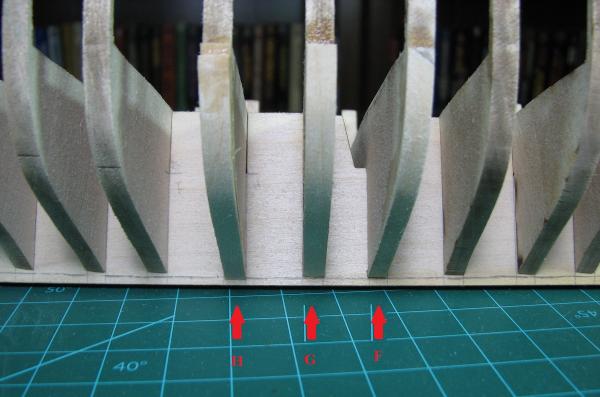
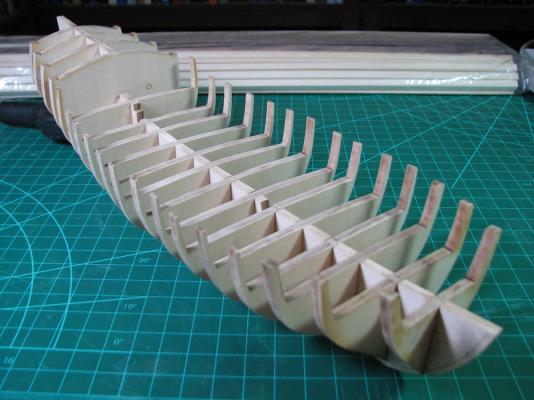
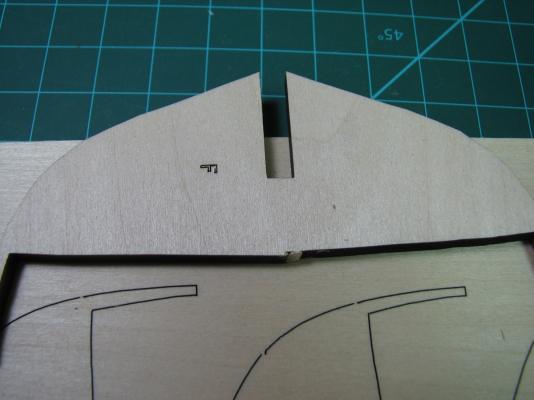
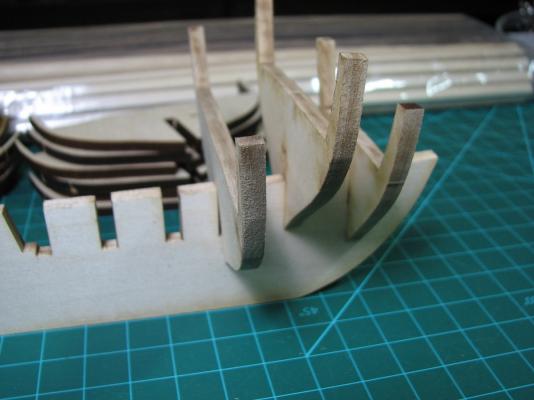
So this is really much easier than I expected it to be. I measured along the longest bulkhead from keel to deck level with a tick strip, and set my chopper to that length and cut up one of the 3/64 basswood deck planks. This made 9 pieces of the exact same width as the bulkheads. I threw these into water to soak for a while, and then got after it. I started with bulkhead F, which was the one that had the bad laser cut, with one side lower than it should be. It's also the '3rd' bulkhead in the previous photos that didn't reach the bearding line, so I shimmed the top and sanded it down, and then shimmed both sides of the bottom. The wet basswood is really amazingly easy to bend. All of the terrible time I had with the planks on the Carmen made me think this was going to be a giant frustrating mess, and instead, they just bend right around the bulkhead, no problem at all. I went ahead and bottom shimmed G, and double bottom shimmed H. Couldn't ask for anything better than the result. Based on how easy this was, I'm going to use more of the deck planking (since I'm not going to plank the deck with it) and shim out every bulkhead that isn't touching the bearding line, even if it's very close. That way I should have a much easier time fairing, as I'll not run into a low spot that makes me have to shim a bulkhead that is already glued to the keel. Thoughts on extending the shims up the bulkhead extensions? Is there any point to that, or will I just need to sand them all down like I did on bulkhead F already?
- 831 replies
-
- 11
-
-
- Armed Virginia Sloop
- Model Shipways
- (and 1 more)
-
Hi Grayarea, how is your build going? It's looking great, but then nothing since April. I love the detail you give in how you got everything to work when fairing the hull and bulkheads.
-
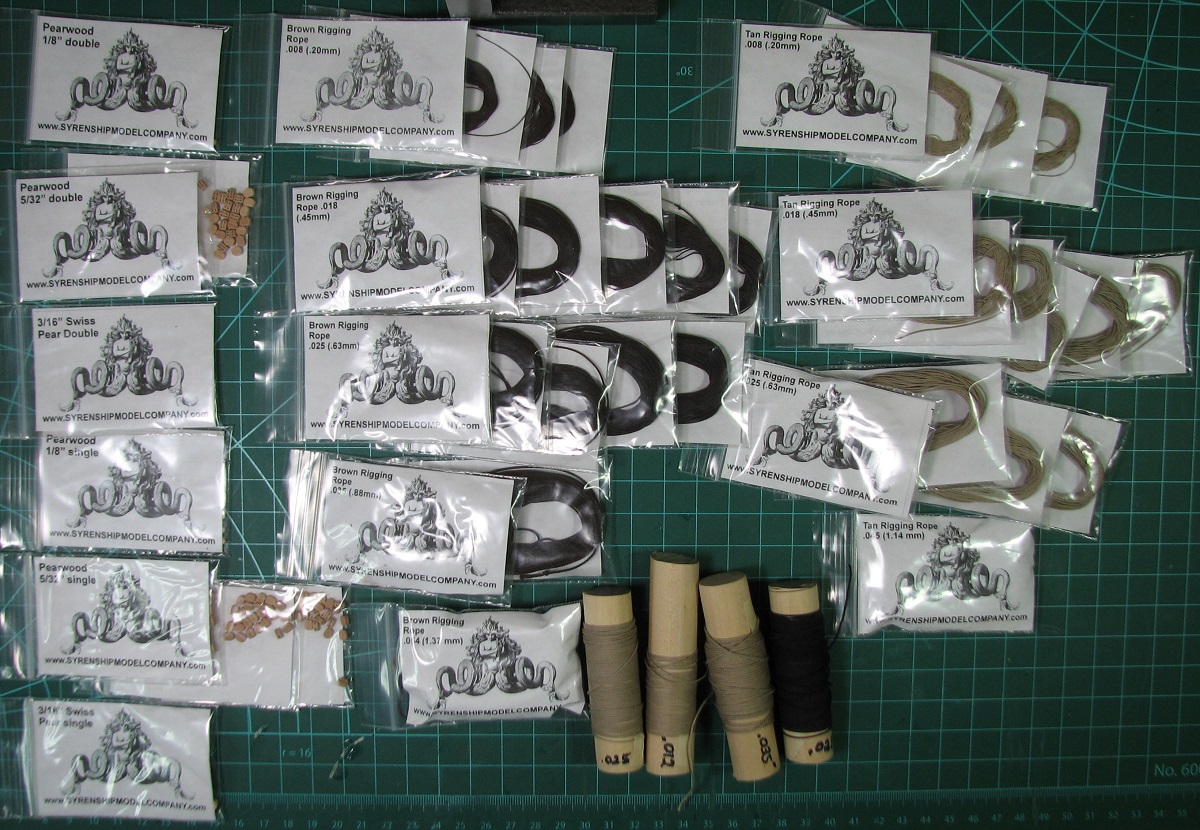
Thanks for the input Russ & Joe. I've sent off an order form to Jeff for both Holly and Boxwood, but I've also ordered some other woods (no Holly available) from another source - 'tallships_model_builder' on Ebay, a source I found listed here on the forum. Ordered some other miscellaneous woods to experiment with for making furniture and stuff, so will try to keep busy with things if I get to the point of deck planking until Jeff gets back so I can see both sorts of wood and maybe make some test decking. In the mean time, it's looking like the bulkhead shimming, and then fairing is going to take me a while if I want to do it right.
- 831 replies
-
- 1
-
-
- Armed Virginia Sloop
- Model Shipways
- (and 1 more)
-
Fantastic looking bow you've got there!
-
Are the nets across the gunports period correct, or are they modern additions to keep unleashed children from going swimming?
-
The level of research you are doing on this is something else Chuck. I admire it, but I don't think I'm ready to embark on that sort of thing for my own builds. You are building an amazingly researched historic model. I'm building a model boat out of a box.
-
Thanks gentlemen. I did send a note to ME, but am going to move forward as if it's not going to be corrected. I cleaned up all the bulkheads. I expect that almost all of these will need fairing which should clean them up further. Then I began test fitting, and adjusting each bulkhead. Every single one needed to be opened up slightly either on the bulkhead slot, the keel slot, or both. A few sat slightly high at the top of the keel and needed the slot sanded a bit deeper, and one of them required about a 1/32 shim. Overall I think they came out pretty well, but I'm concerned about two bulkheads (and probably the one ahead of these two as well) as they do not extend down far enough. What is the best approach to fix this? Is it easier to sand the slot down until the bottom is good, and shim the top for the deck, or am I better off adding material to the bottom of these bulkheads and then fairing them down? I'm thinking that adding to the bottom will be more difficult, but is probably the right approach so that I don't mess up the bulkhead extension positions (although looking at the photo's, those appear to have 'high' extensions as well). Other than those 'short' bulkheads the rest seem to be pretty good. The Carmen was a lot easier when I had no idea I was supposed to do any of this stuff. A good number of the bulkheads do not extend down to the bearding line. Do I need to add material to all the bulkheads that don't extend to the bearding line, or just to the ones that break the 'flow' along the bulkheads?


- 831 replies
-
- 5
-
-
- Armed Virginia Sloop
- Model Shipways
- (and 1 more)
-
Looks fantastic to me. Nicely done.
-
Beautiful ship Sjors, and quite large!
-
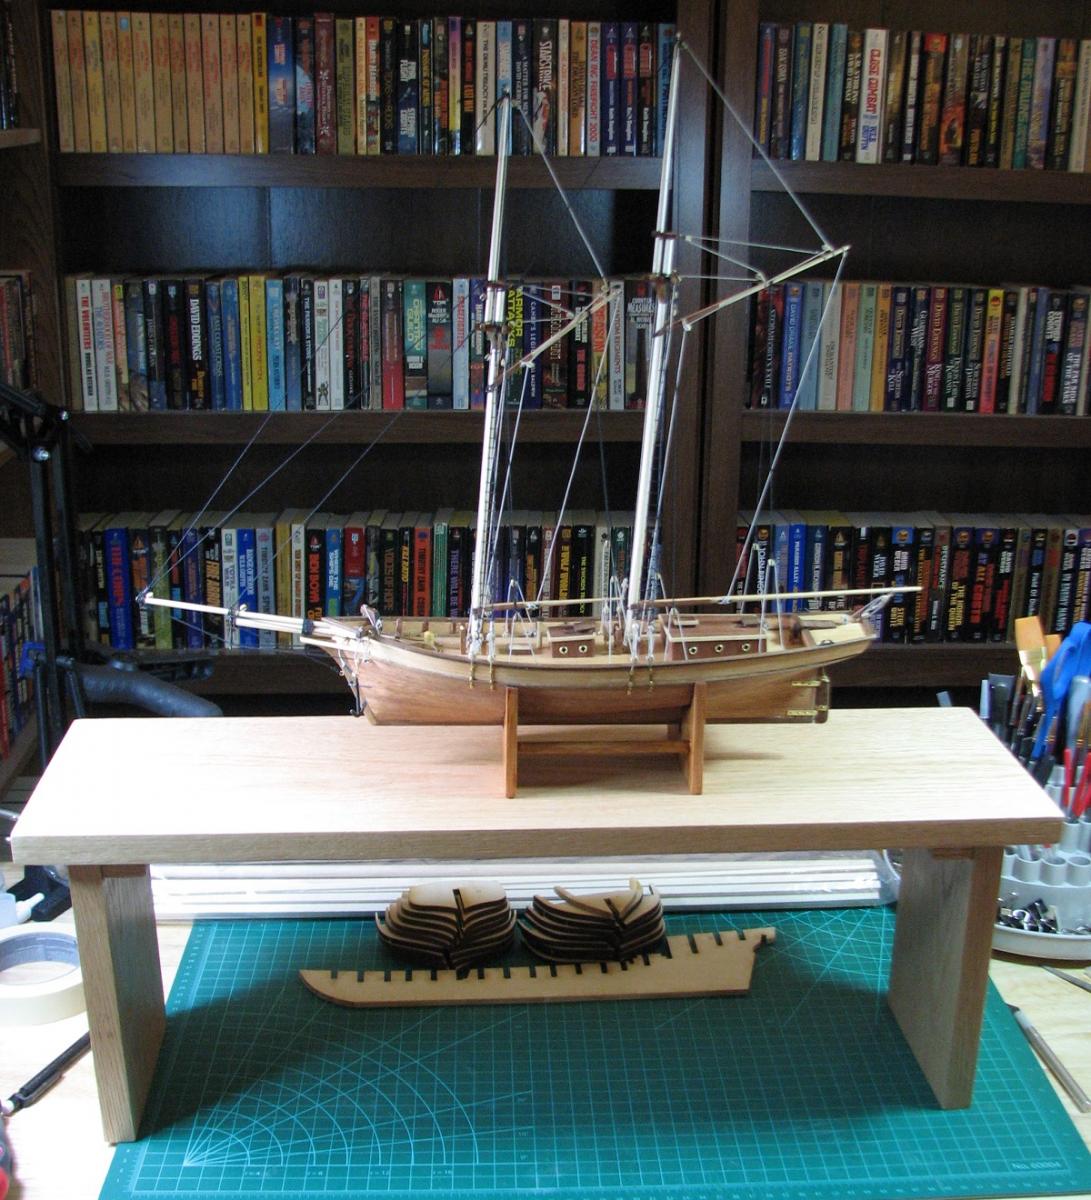
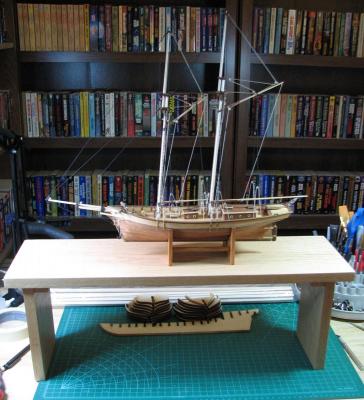
The cleaning crew is pretty decent, it's just that the model is so very light that I was concerned that they'd knock it around when wiping down the counter tops. The shelf is pretty heavy, and since the ship stand is actually screwed to it, they would have to do something intentionally, which I don't think they'll do. The shelf will be placed on a counter top where it will have walls on the left and rear, and a piece of computer hardware on the right side, so they would have to actually pull the shelf out to knock it over. The force required for that would knock over a case just as well I think. Thank you for the concern though.
-
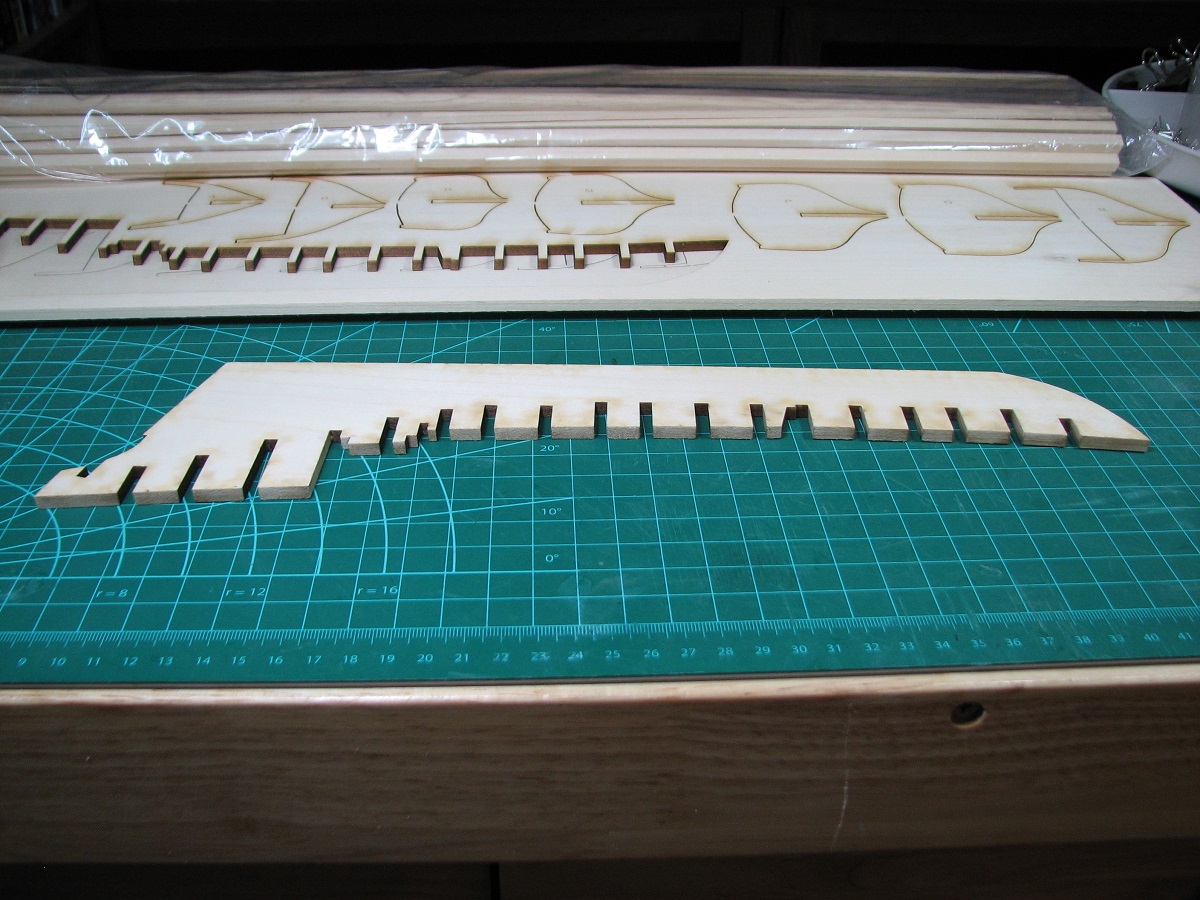
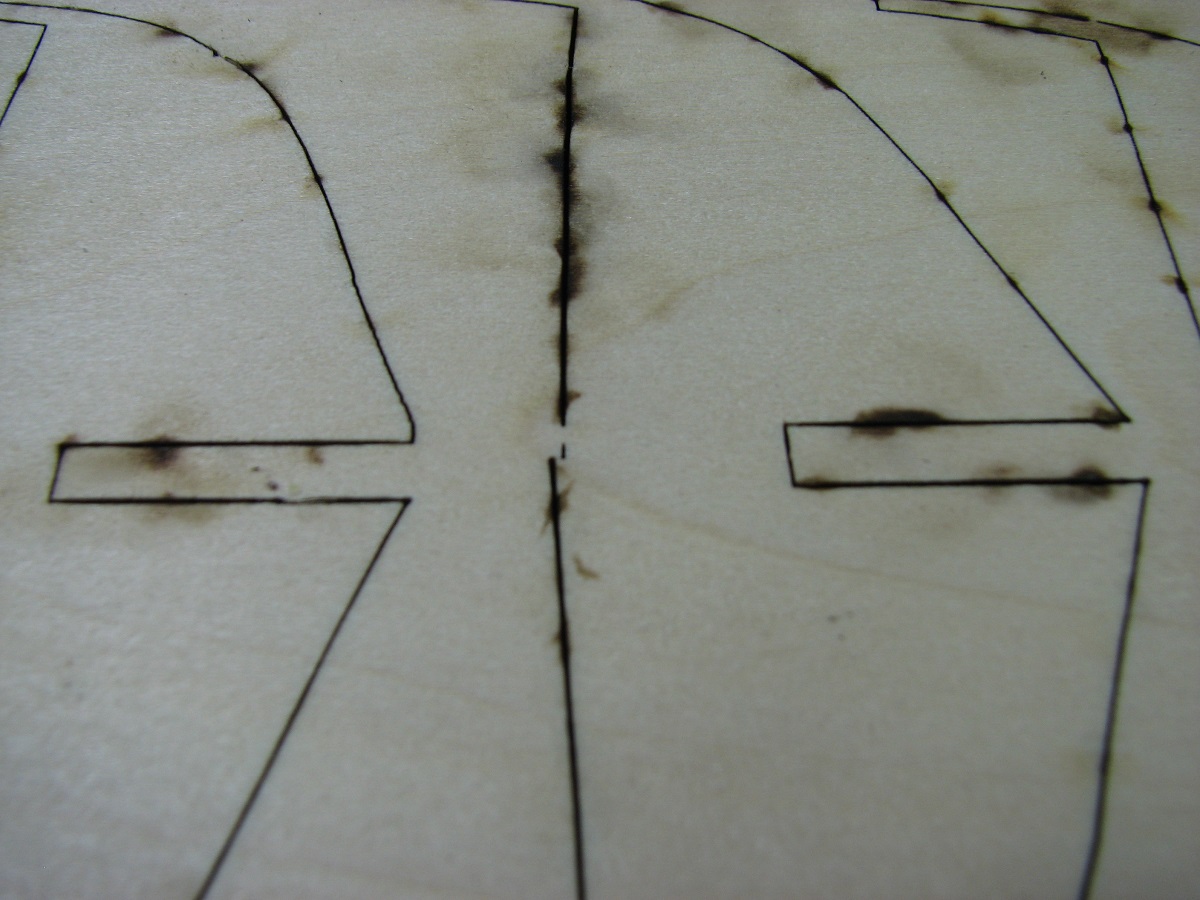
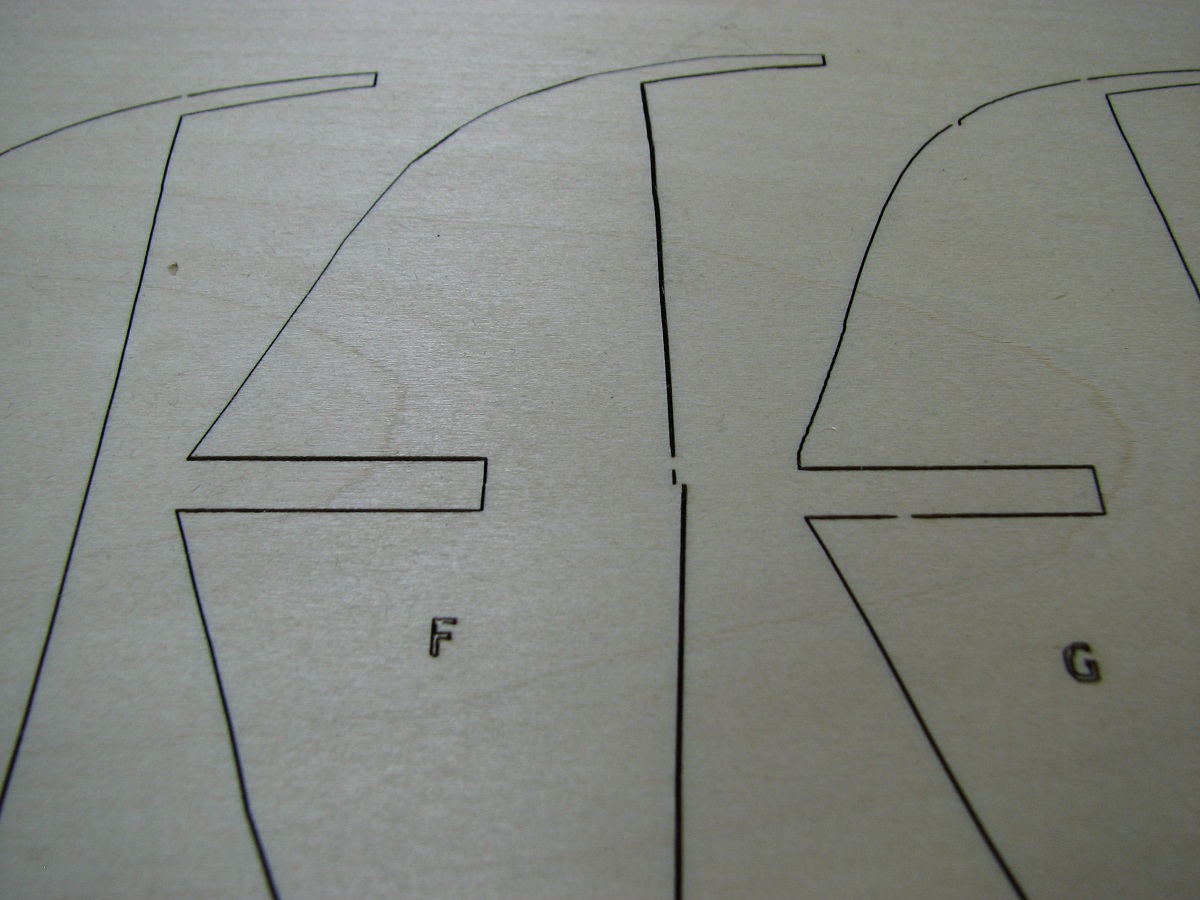
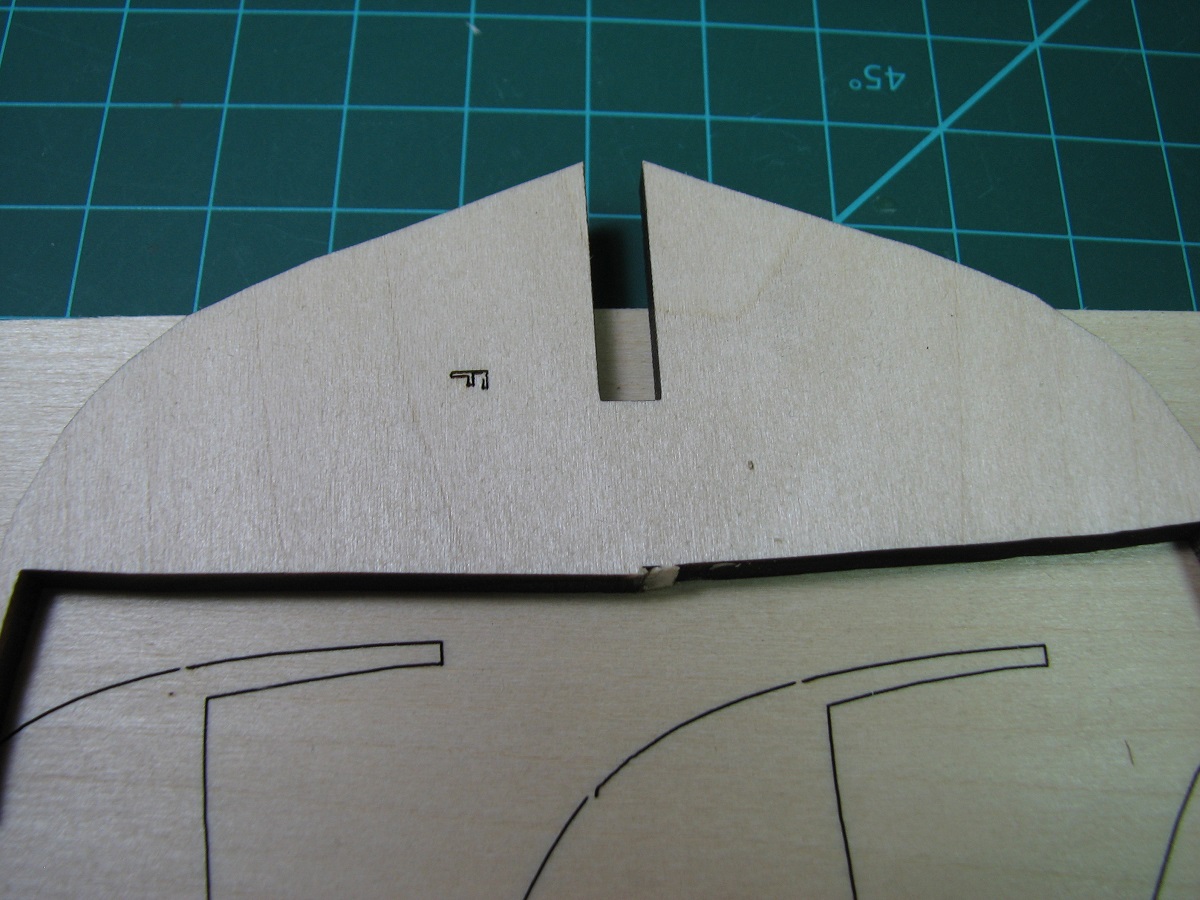
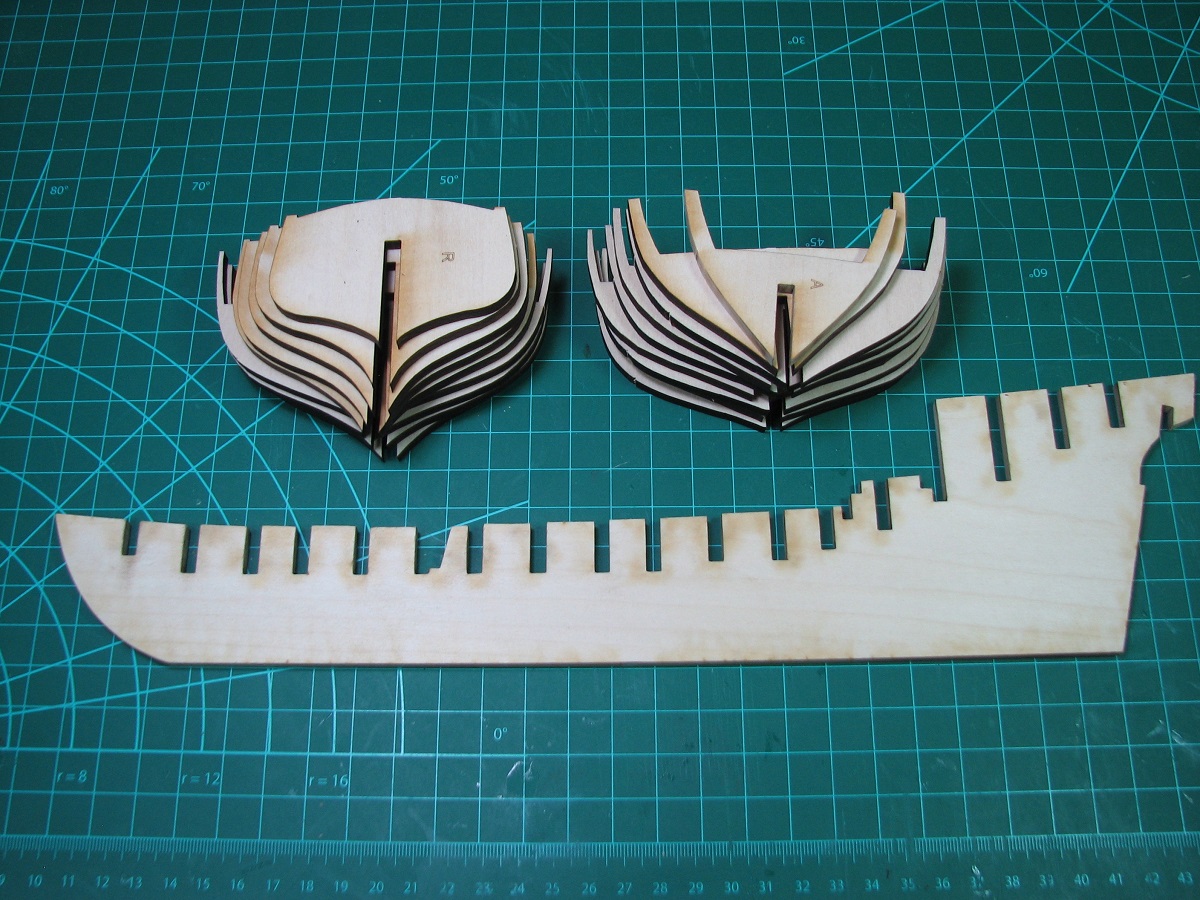
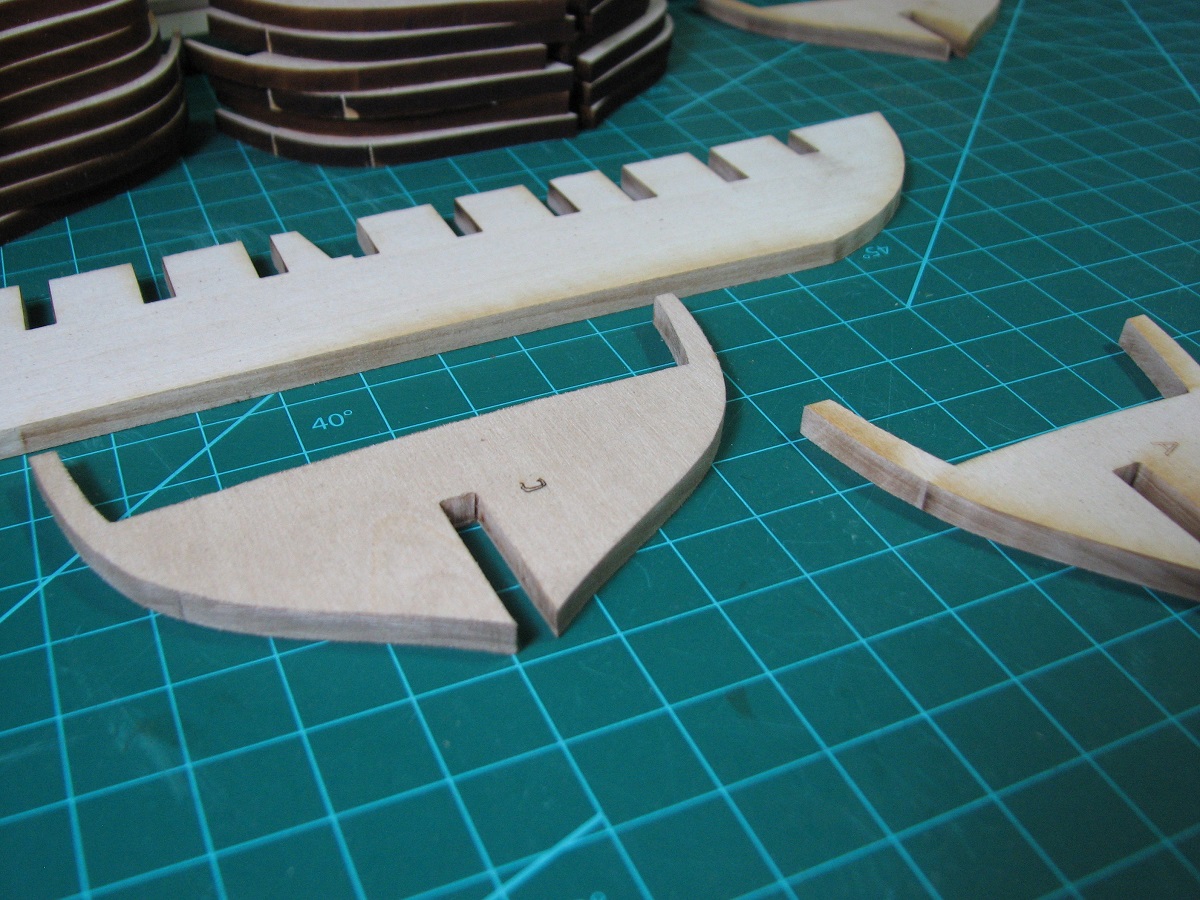
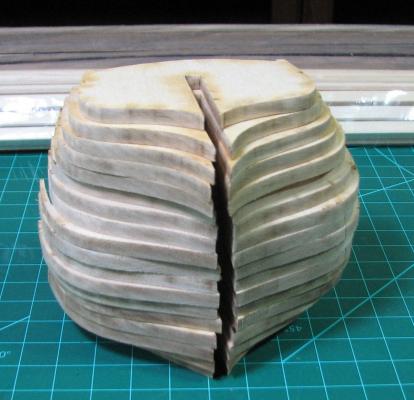
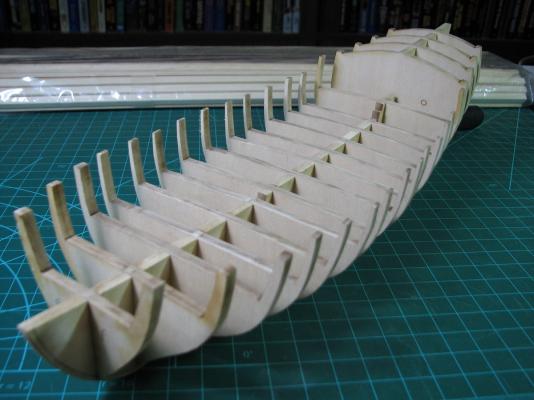
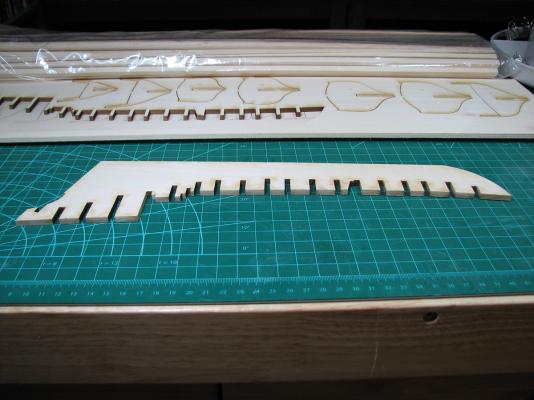
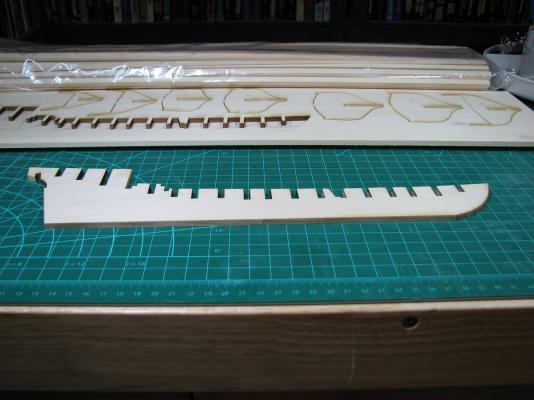
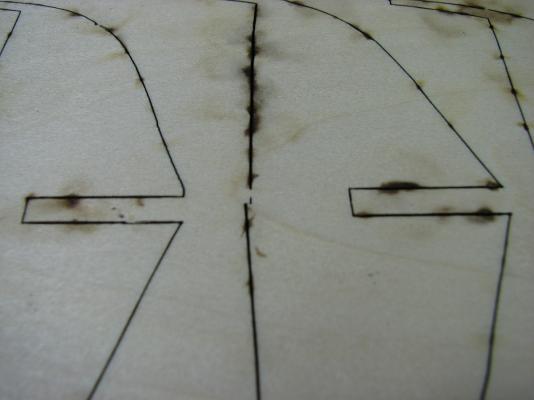
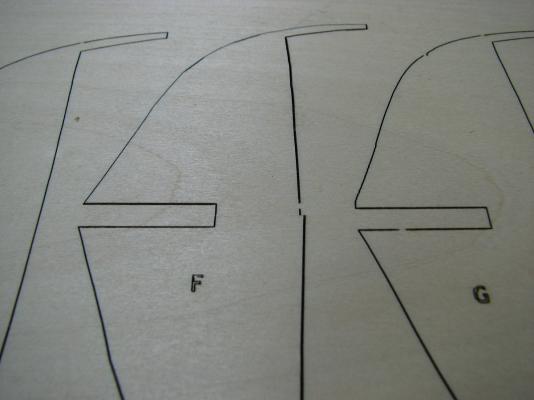
So I've begun the very first bits of this build, and have already run into one problem, and a question. The false keel appears to be very good. There is an almost imperceptible lift when it's laid on a flat surface, as can be seen here where the bow has a tiny gap under it. All of the bulkheads and the false keel are cut from basswood, not plywood as some people have reported in their MS kits. When it is flipped to the other side there is no gap anywhere, it lays perfectly. When I sight down it I can't detect any deflection at all. First problem. Bulkhead F is not cut correctly. I don't understand how this could happen, as I would hope that the laser cutting is a computer controlled process, and it shouldn't be able to cut incorrectly. I would think that every single kit would come out like this if it's a flaw in the computer control plan. When I lay this bulkhead on the plans, it's clear that the 'high' side is correct, so I will likely have to add some material to the 'low' side to correct this, but I'm not sure how I'll approach this as the height difference isn't very large. I may try to use some of the veneer from the Carmen kit here, or else I'll cut the thinnest piece of basswood I can, and just sand it down. All of the bulkheads and the false keel. So far none of the bulkheads fit into the false keel after cleaning up the burns. Either the keel or the bulkhead, or both need to have the slot opened up more in order for them to fit. Is this typical? And now to my question. I'm working on cleaning up the lasercut burns, and leveling out the surface where it's left an angle, but I can't find a good reference for 'how much' of the burn needs to be cleaned up. Does it need to be taken down to where there is no 'brown' at all, or is what I've been doing as seen in this picture good?


- 831 replies
-
- 9
-
-
- Armed Virginia Sloop
- Model Shipways
- (and 1 more)
-
The fact that this fantastic and huge model is being made out of paper just continues to amaze me. There is no way I'd complete something like this without managing to wreck it completely with my clumsy ham-fists.
-
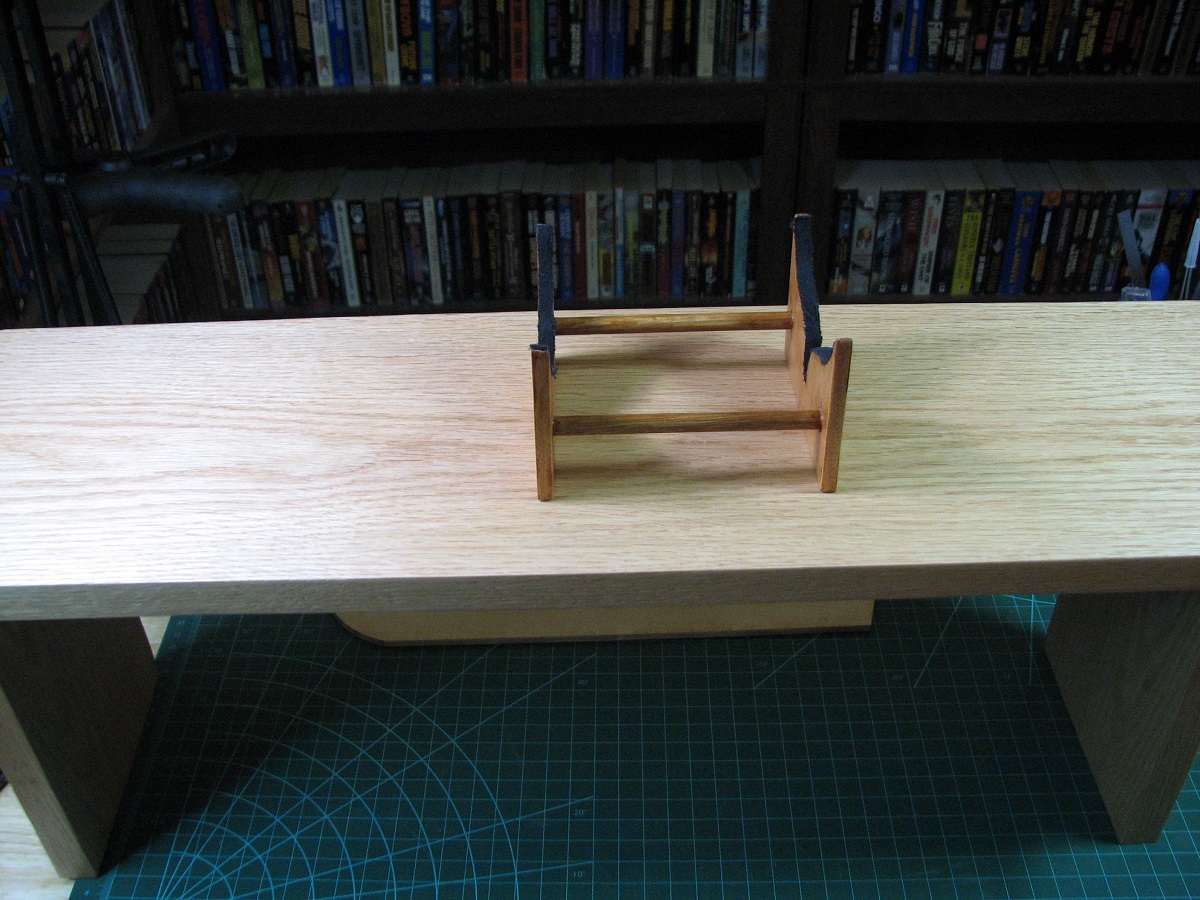
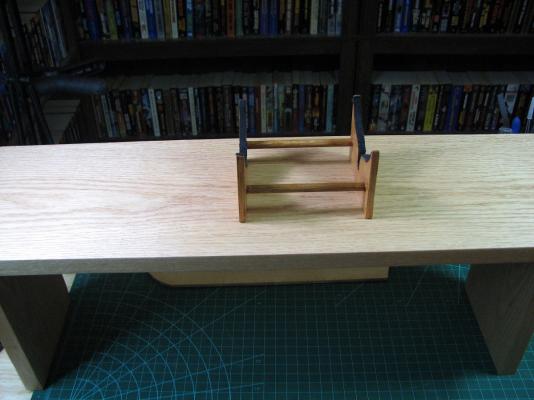
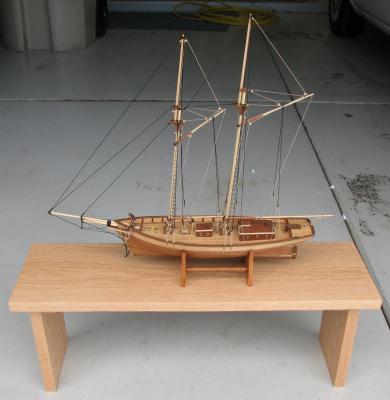
Thank you for all the likes and kind comments, and now for a final update on the Carmen. For display, I decided that I'd like to take it to the office and keep it there, since I'm a bit of a hermit and nobody would ever see it at my house. The problem is, that being both very light, and a bit fragile, I figured it would be a week or less before the nighttime cleaning crew managed to knock it over and wreck it. So I decided to make a display shelf. I went to Lowe's and bought a couple short pieces of red oak. Since I have no 'full size' woodworking tools besides a circle saw, that's what I used to cut the wood, but of course I have no way to make proper joints, so I just cut a couple of pieces of the 'leg' wood and glued them inside the main legs for support, used lots of Titebond wood glue, and clamped the hell out of it overnight. Seems pretty solid, especially considering that it's only got to hold up a really light little boat. It's main purpose in life is to anchor the boat down. For that, I measured the spot where the boat's stand needed to sit to keep it centered on the shelf, and drilled a couple holes part-way through the shelf, and then drilled much smaller holes the rest of the way through. I then drilled a couple small holes into the boat stand, and anchored the boat stand to the shelf with some small wood screws. I then finished it by using Min-wax wipe on Poly (clear satin), and gave it three coats with steel-wool buffing between coats. Pretty happy with it considering my lack of tools to do a 'proper' job. I certainly wouldn't try to use it for anything that could put significant side to side stress on the legs. And in natural light. Monday morning Carmen is off to the office!
- 119 replies
-
- 12
-
-
- carmen
- constructo
- (and 2 more)
-
I tried CA glue in a syringe, and it works fine as long as you don't want to use it for more than a single session. The problems I ran into (I've only tried this for a single session, so it may be a learning curve as much as anything) are that it's so thin that it's quite difficult to get only a tiny bit to come out, it tends to act on the plunger quickly, making it harder to compress, and then you get too much glue out with the tiniest of squeezes. This might be moderated by a thinner syringe, mine are too large diameter for this application I think. You can pull the plunger back and suck up the excess. Also, it forms white crystalline structures inside the syringe, especially on the plunger, so everything is tossed in the garbage bin after the session, as using acetone to clean it up degrades the plunger seal.
-
Lots of builds on here show the deck planking cut into individual planks with the caulking. Just go through the wooden Connie logs and find what you need and scale it properly to your build, and it should work out. There is also a huge amount of information about this in the framing & planking subforum here, along with some really great tutorials in the pinned topics which would include the different patterns and typical lengths of the planks. I think a wooden planked deck would really make your kit look sharp. You might also consider scribing a line into the side of your gun carriages to simulate the two-piece construction of the carriages.
-
I think you should do whatever makes you happy, it's your build. Of course there is always that 'peace in the home' consideration!
- 1,756 replies
-
- 4
-
-
- constitution
- constructo
- (and 1 more)
-
Looks great. That window screen for netting really works well.
-
Nice recovery on the hull. It looks pretty good now, and that's one of those things that once it's finished, you will probably be the only one that notices it.
-
Bill, very nice work on this kit, and I'm watching with interest, as I was given a really nice sale offer for this kit, so of course, having no self control at all, I bought it. I'm starting to accumulate a pile of 'future' builds already!