


GuntherMT
-
Posts
2,213 -
Joined
-
Last visited
Content Type
Profiles
Forums
Gallery
Events
Posts posted by GuntherMT
-
-
I just want to say that I appreciate your dedication and what you provide to this hobby. I ordered a book a couple of months ago and was actually surprised at how rapidly I received it given the issues with the post office and being near the election.
Thanks and best of luck for your continued success and good health!- mtaylor, Canute, Ryland Craze and 4 others
-
 7
7
-
Nicely done Mike, and beautiful joinery. I'm sure if I had tried to work on a 30" piece like that off the ship I would have broken it about a dozen times.. lol..
- davec, FrankWouts, Rustyj and 1 other
-
4
-
-
-
Nice work on both resizing your plank, and the scuppers, they look good!
Unless I'm mistaken, this is a double planked model, so the rough planking is no big deal, the first planking just forms the base for the 2nd, and you can fill and sand until it's good for the 2nd. It's all about learning by doing.
-
Looking good. Those braces will serve you well as you fair the bulkheads for planking. You may already know this, but the fairing, while it can be quite boring and doesn't show much progress, is an incredibly important part of your build. Take your time and get it right, and you will be rewarded later with a beautiful run of planks to cover up all that work on the bulkheads.
")
- Estoy_Listo and Duanelaker
-
2
-
Looking forward to seeing some pictures of your work.
I would advise caution when using the amazingly useful Dremel tool. While they can be a huge help, if you are not careful a single slip can wreak some major havoc on a wooden model, so use care and have a steady, hopefully braced, hand!
-
Looks like a very nice start you have. I've seen a number of Bluenose models, they make a lovely looking ship when you are done! Look forward to seeing you progress.
-
I drew a stupid picture in Paint to hopefully demonstrate better than my words what the 'jig' would look like in order to get a bunch of cuts at the exact same length. The brown boards are glued to the base board. The blue board is just stuck into the jig for cutting and held by hand.
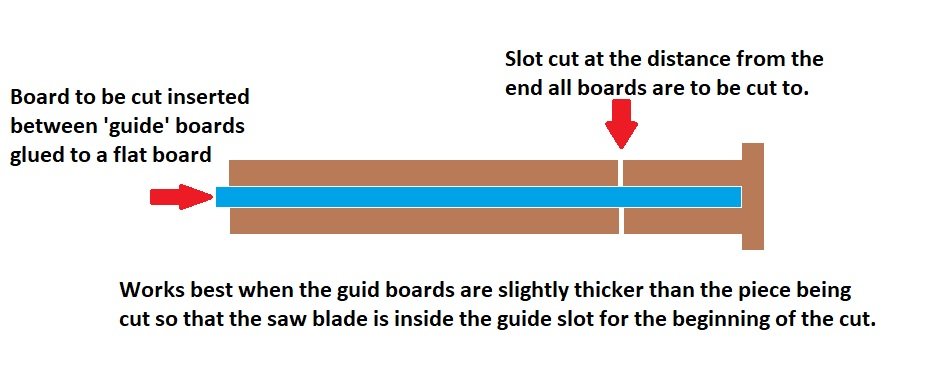
The cool thing about a little jig like this is you can use it for all kinds of different lengths, just add new slots for the new lengths, and you can write a note onto the base board at each cut telling you what that specific cut length was for.
- Rik Thistle, Hsae, Nirvana and 3 others
-
6
-
Look like you are moving along nicely.
You posted a question in there about how to get a bunch of things cut to the same length. The answer is to make yourself a simple jig.
I'm not sure what sort of saw you are using (or maybe just using a knife if it's basswood you are cutting), but for those little posts you could just make yourself a simple cutting jig by placing two parallel pieces of wood on a flat piece of wood leaving a gap just wide enough for the pieces you are cutting to fit. Then cut off the ends so that they are even and place a 'cap' across that end so that when you put your piece to be cut down, it 'stops' at that end. Then measure from that end and cut your first piece, while at the same time cutting a 'slot' into the two guide boards. Pull out the cut off piece, put your board back in, and now cut using the nice 'slot' that was created on the first cut. Every piece should come out almost exactly the same.
Basically you are making a square "U" shape jig with a slot at the distance from the bottom of the U where you do the cutting at.
Hopefully that makes sense!
-
-
Glad she made it intact Rich!
- Ryland Craze and HIPEXEC
-
2
-
-
Chris - I am curious if it would be possible to add one piece of information on the website (way too late for the boxes obviously) for all your models. Hull size.
Every model lists 'overall' size, but it's really hard (at least for me) to get a real grasp on the size of a model by looking at the pictures and only knowing that it's 580mm 'overall' because of how much of that length is in the masting. I would love if manufacturers would start listing the hull length in addition to the overall length, it would really help people like me to visualize the true size of the bit that I would be working on!
Thanks! -
Good work on the chain plates. I really should have soldered mine, but I didn't and I can tell on close inspection.
For blackening parts, I also used a chemical brass blackener from a company called "Jax".
What I found worked best (learned from someone else on this forum) was to first.. etch and clean the brass thoroughly. First put the brass into a light acid (I think I just used distilled vinegar) where I used a paintbrush while immersed in the vinegar to make sure to remove anything. Then put the part into distilled water to kill the acid, where I hit it with another paintbrush while immersed, and then rinsed it again in a separate batch of clean distilled water.
Only after the parts were thoroughly dried did I use the blackening agent. Once again immerse in the chemical and while immersed use a brush to make sure it's getting through any air bubbles left on the brass, and again rinse twice.
Instead of trying to get the part completely black in a single pass, I did multiple short immersions in the chemical as the results were much better, and it was easy to control how dark I got the part.
Hope that's helpful!
- CiscoH, Ciciak35 and Ryland Craze
-
3
-
Hope it makes it completely intact Rich!
- Ryland Craze and HIPEXEC
-
2
-
Cool Rich, I'm glad you found it such a great home!
- HIPEXEC, Ryland Craze, Elijah and 1 other
-
4
-
No model is ever complete without a bit of deconstruction!
- JpR62, Ryland Craze, mort stoll and 8 others
-
9
-
 2
2
-
Matus,
The second line labeled 'buoy line' attaches to the anchor buoy which is attached to the end of the anchor which has the 'prongs'. An anchor when properly set is designed to dig into the bottom, and trying to pull it up from the top just sets it deeper. In order to retrieve an anchor you must first dislodge it from the bottom if it's dug in, and to do that they grab the line which is attached to the end of the anchor (the buoy line) by retrieving the buoy which will be floating above the anchor location. They winch up that buoy line to dislodge the anchor from the bottom, and then haul up the anchor to the surface using the main windlass (not actually shown on this model design). Once the anchor is at the surface they attach the hook from the line on the cathead to haul it up the rest of the way out of the water and then lash the anchor to the ship and stow the anchor buoy and line as it's shown in the drawing.
Hope that's clear.
-
So... I'm not sure if you are as OCD as I am, so not sure if it bothers you, but I had one of my swivel-gun supports get in the way of the shroud laying cleanly just like your photo shows on yours. Now is the time to fix that if you want to, not later. It's honestly not that difficult of a repair if you can get it to separate cleanly, just a bit of paint/finish touch up after you get it off and moved slightly rearward to allow the shroud to lay clean.
If it doesn't bug you, then don't bother! I'm just crazy OCD and I knew it would bug me forever if I didn't fix it. Lol...
- HIPEXEC, captain_hook and Ryland Craze
-
3
-
13 minutes ago, Kevin said:
lol i told the wife and her reply was, dont understand why you didnt order it all at the same time, it would have cut down shipping costs and export duties
She's right you know!
- mtaylor, BobG, Old Collingwood and 1 other
-
4
-
6 hours ago, DocBlake said:
Thanks, Ken!
You can get it at a hardware or big box store. Here's a link that will give you the option of 8 different diameters and more than enough for several lifetimes!: https://www.amazon.com/gp/product/B07QM8249H/ref=ppx_yo_dt_b_asin_title_o03_s00?ie=UTF8&psc=1
To use, choose an appropriate diameter tube and slice off the bands with a sharp X-Acto knife. Slip them on the stock in proper position and put the stock in a preheated 300 degree oven for 5-10 minutes. Done!
I have possibly the same exact box of shrink-wrap. I never even though of the oven though, I just use a small micro-torch, being careful not to direct the flame right at the tube and it will shrink up in seconds! You could also just use a soldering iron or even a heat gun or blow dryer to shrink them, but would have to be careful about hitting them with too much airflow and changing their position.
-
29 minutes ago, DocBlake said:
Hey Brian! I stole the trick about the gun handle's from you! Remember?
Yeah, but I stole them from someone else! Haha.. I don't remember who, but I probably mentioned it in my build log if I actually remembered where I saw that method.
-
Amazing how fast your development of new models has gone Chris, and I love the look of the kits you have produced so far, although I've not purchased any as I'm in a bit of an 'off' period in my model building and already have several started that I need to get back to and finish someday.
It was touched on briefly recently about the thoughts of doing a more modern 'yacht' of some kind, and when that was mentioned the one that immediately popped into my mind was the beautiful SY Adix, a 3 masted schooner that you can actually charter right now! Not sure how anyone else feels, but I would have a hard time thinking of a more beautiful vessel. I would love to build something like this (well, a model of her) someday.

Best wishes to you and your continued success in this crazy business!
- usedtosail, JpR62, Rik Thistle and 3 others
-
6


GLAD TIDINGS 1937 by Jerry Sturdivant - Model Shipways - Scale 1:24 - Pinky Schooner
in - Kit build logs for subjects built from 1901 - Present Day
Posted
While it's a bit too late now to take a different approach, and the one you are using should work for this, I highly recommend doing a forums search for 'planking tutorials' here on MSW. Chuck Passaro has some excellent tutorials and video's on how to properly layout planking and how to edge-bend planks using nothing but heat that will be priceless to you when you move to another project like the longboat where the planks are left exposed.
Some good problem solving on your own here, and by using the oversized planks and letting them go where they want and trimming them back later, you should end up with a nice looking hull.