Cathead
-
Posts
3,058 -
Joined
-
Last visited
Content Type
Profiles
Forums
Gallery
Events
Everything posted by Cathead
-
 Very well done, that looks really slick! If you manage to swing an inside tour, please report back here, I (and I'm sure others) would love to hear about it.
- 46 replies
-
- 4
-

-
- Fast Response Cutter
- Dumas
- (and 2 more)
-
Timber-framed outdoor kitchen - Cathead - 1:1 scale
Cathead replied to Cathead's topic in Non-ship/categorised builds
Yep, we use pretty much everything. Feet make especially good broth. -
Timber-framed outdoor kitchen - Cathead - 1:1 scale
Cathead replied to Cathead's topic in Non-ship/categorised builds
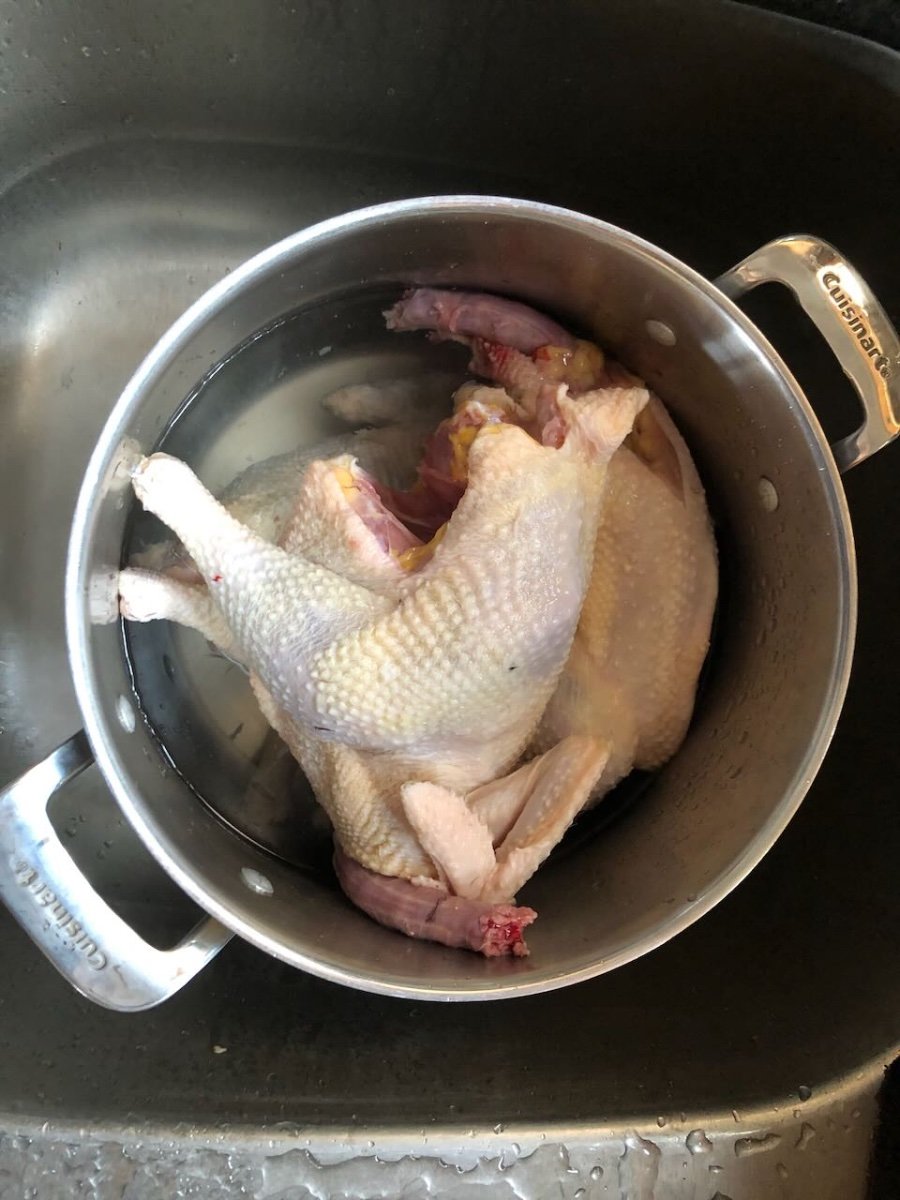
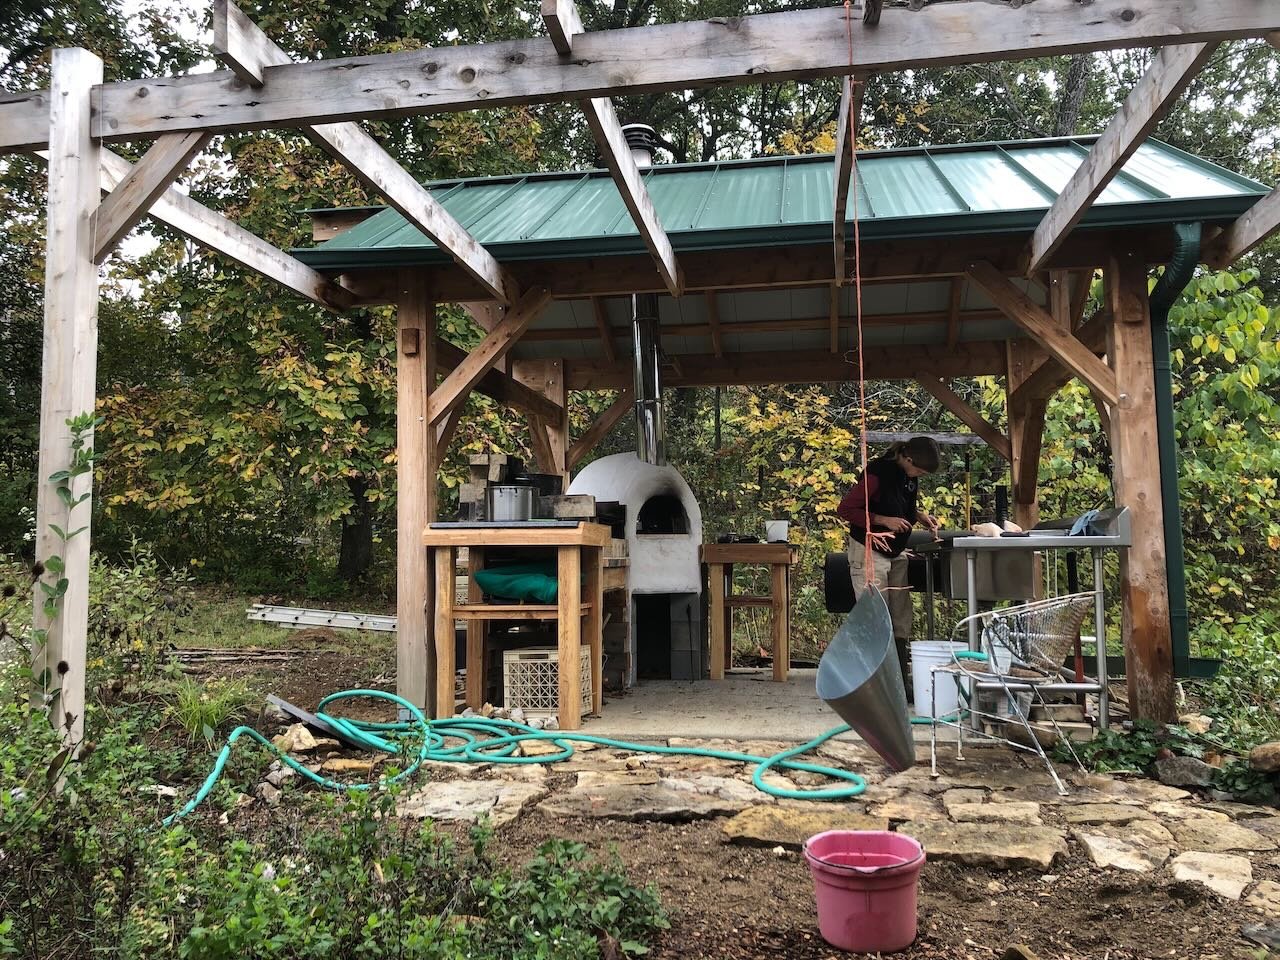
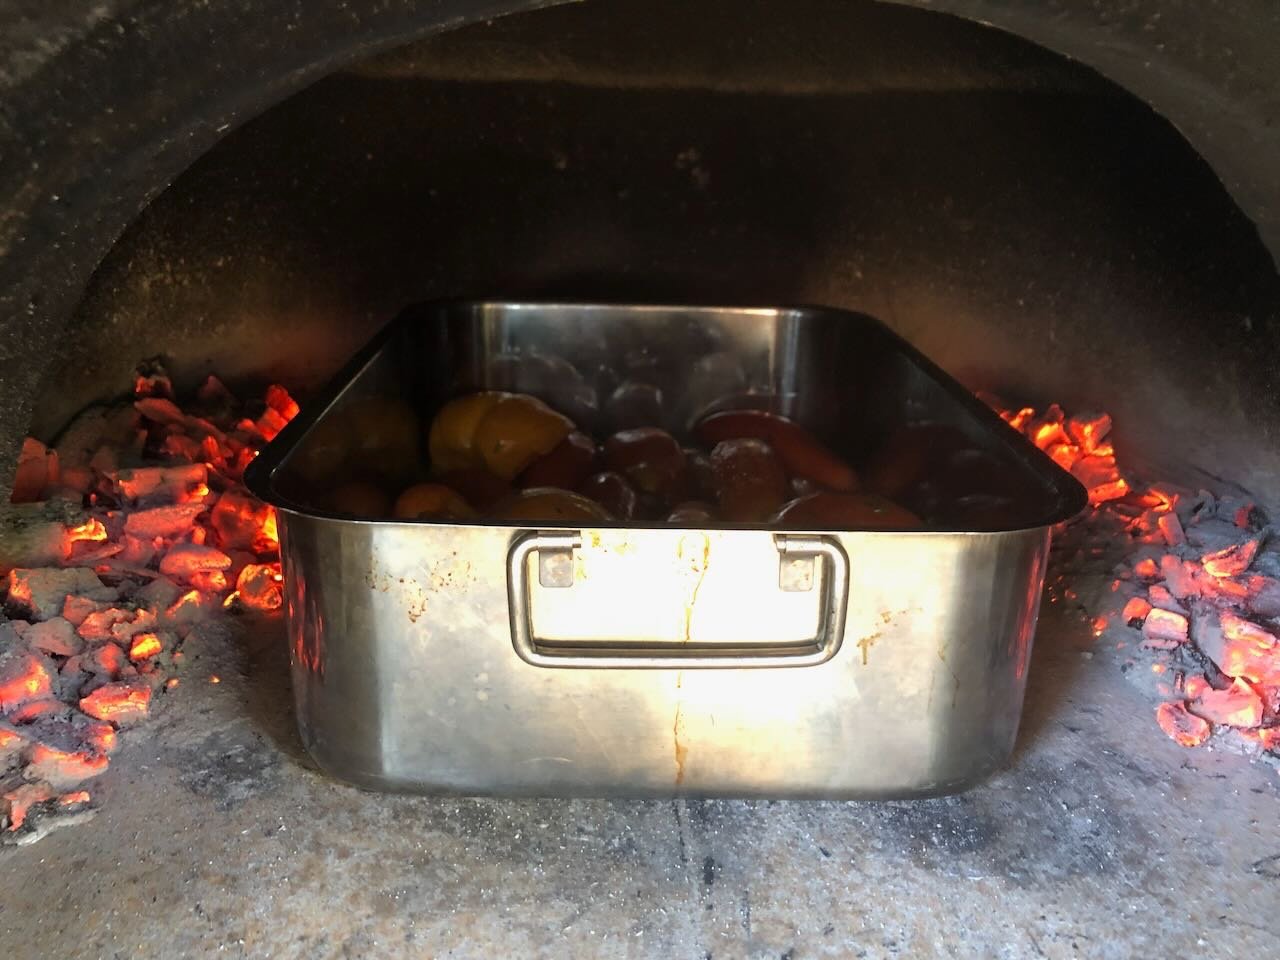
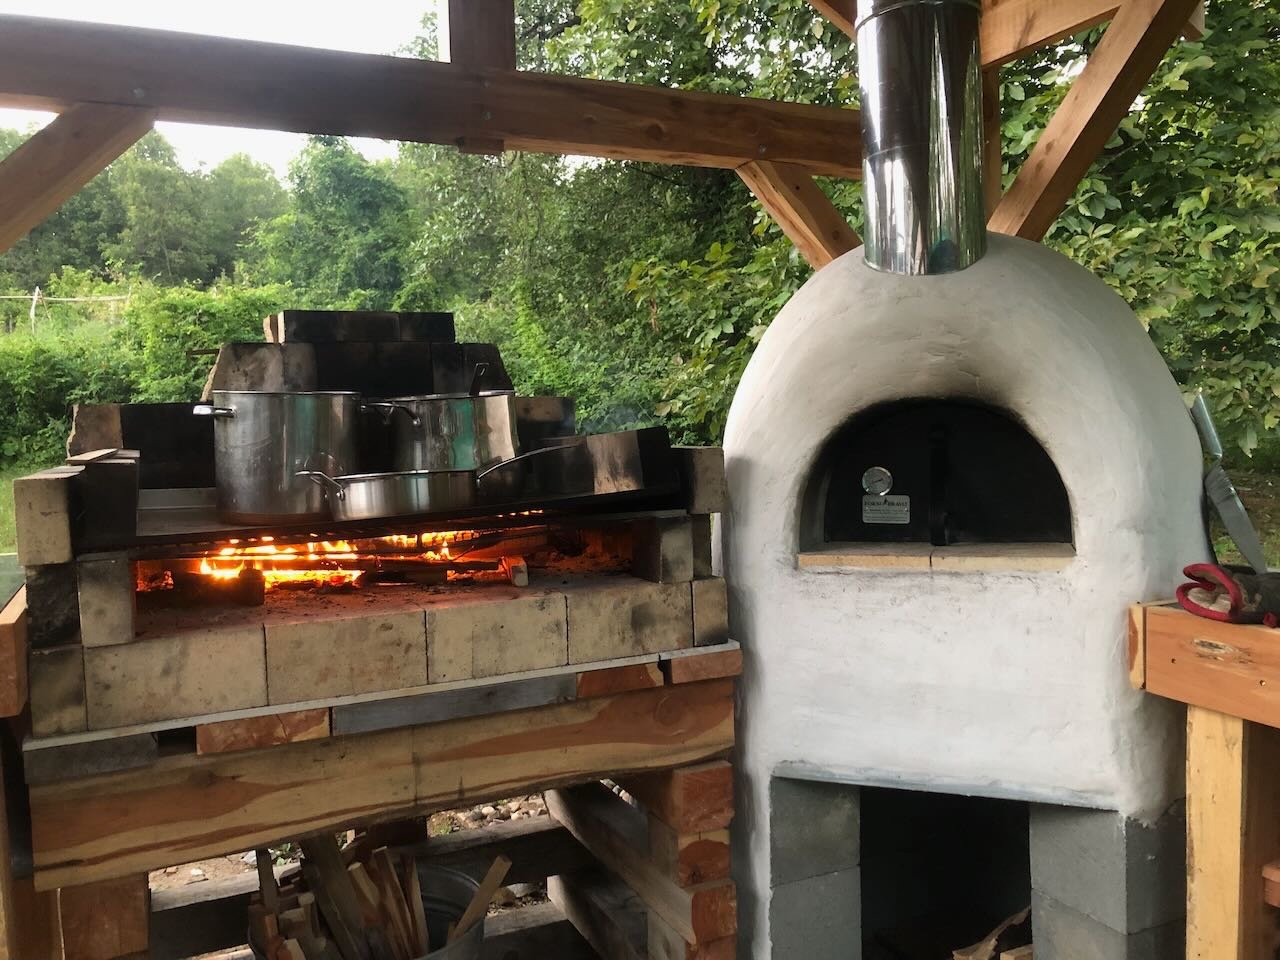
Well, the outdoor kitchen has very much fulfilled its potential during the late summer to fall harvest & preservation season. We regularly used the big grill to process large batches of garden tomatoes for canning, keeping a lot of heat out of the house and using on-farm wood instead of off-farm electricity. We also roasted many trays of tomatoes in the wood-fired oven before canning or freezing them, adding extra flavor. We've continued to host various friends and family with excellent meals of pizza, venison roasts, breads, and lots more. Haven't been taking photos of these but we continue to find dishes that the even wood-fired heat improves. I said I wouldn't do too many food posts, but the following was particularly special. Today we hit an especially worthwhile milestone that yet again proved this project's worth to us: chicken processing. We've kept chickens for a very long time, peaking at a laying flock of about 50 back when we ran a full-time vegetable farm. But we had to get rid of the flock a few years ago for various reasons and have missed having them. So this spring we bought four laying hens from an organic farmer friend of ours and free-ranged them in our orchard for the summer, not only producing copious eggs but providing significant pest control. It's probably not a coincidence that our cherries and grapes did especially well this year. Anyway, the plan was always to process these layers for meat in the fall. When we had our larger flock, they were a long-term investment. We did our own breeding and brooding every year, and always laid in a supply of chicken from the unwanted young roosters and older hens that needed to be retired. But we didn't want or need to keep these four over the winter; we'll just get more next year if we want. So they needed to go under the knife, and we've always done all of our own meat processing (deer, goats, hogs, chickens, rabbits, etc.). Earlier in this thread I showed how this kitchen structure supports deer butchering; well, it was great for chicken processing as well. The grill kept hot water at just the right temperature for scalding (necessary for feather plucking) without having to run back to the house stove for hot water. The killing cone hung easily from the open trellis, and the rest of the work could happen on the stainless steel table. The roof was especially welcome as this was a cloudy, drizzly day that would have been cold working in the open. We processed all four in the morning, then fired up the wood oven. Three went into the freezer, and one went into the oven for a low, slow roast. Dinner was an extremely satisfying and extremely fresh roasted chicken (rubbed with garden herbs) roasted in a cast-iron Dutch oven with garden onions, carrots, and turnips; fresh sourdough bread (also from the oven); garden okra and broccoli sauteed in freshly rendered chicken fat; and a garden salad of greens and homemade feta cheese (and purchased walnuts, how very feeble). As with everything else, that oven elevates whatever you put into it. Crispy skin with fall-off-the-bone tender meat and a rich, slow-cooked flavor made this a special meal. And all with a handful of wood (and a fair amount of work). This kitchen project continues to be worth every minute we put into it.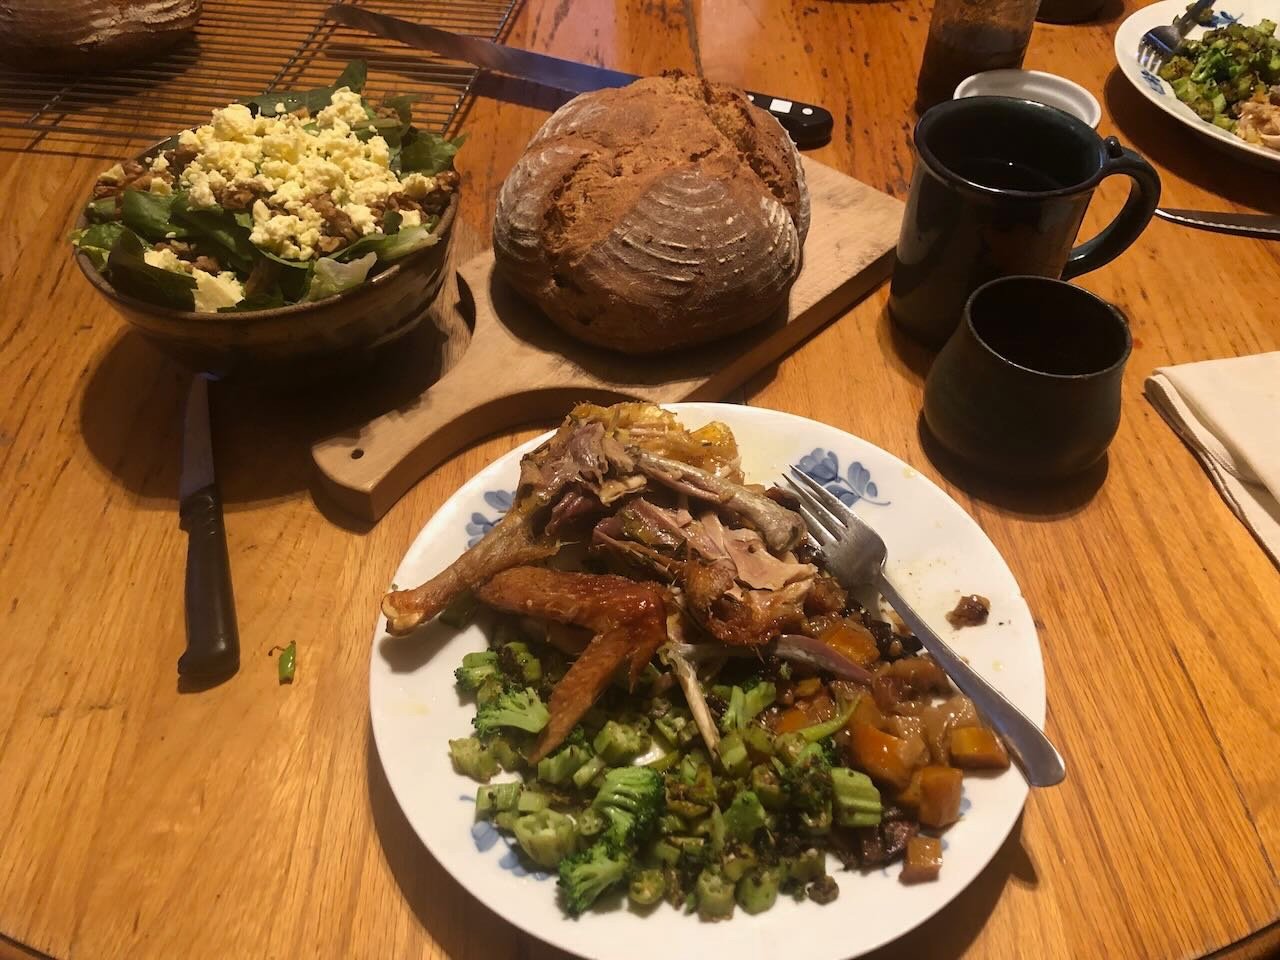


- 131 replies
-
- 10
-
-
Using the masking tape method, I found that when I needed to insert something into a square hole that I'd drilled or cut out, that the extra little wings of tape at each corner actually helped hold the square stock in place when it was pushed down in; just a bit of extra friction fit. I think you're right that it won't be noticeable regardless.
-
Thanks, LJP! Sadly it'll probably be a while longer before I can report progress, but I'm looking forward to getting back to it.
-
Looks great all around!
-
Barncave Shipyard by mbp521 - Scale 1:1
Cathead replied to mbp521's topic in Non-ship/categorised builds
Fantastic work. Well thought-out and executed. -
Wow, has it really been 8 years? Thanks for digging up and enjoying this old chestnut!
-
Oh, they were certainly dangerous and deadly. There's a steamboat wreck every few miles along most of the lower Missouri River. One blew up near where I live, so badly that the boat's safe ended up in the hills on the other side of the riverfront town. That one orphaned a whole mess of Mormon immigrant children who were subsequently adopted into the small town's families. The point I was making above was that a full complement of lifeboats wouldn't have saved many victims of the deadly explosions and fires, and generally weren't necessary for the more benign incidents.
- 58 replies
-
- 1
-
-
- Robert E Lee
- Amati
- (and 4 more)
-
Great job, that's a really attractive model! . For what it's worth, steamboats of this era didn't carry "lifeboats" at all. The existing boats are for the general use of the crew; there was essentially no provision for evacuating the vessel in case of emergency. In part this was due to relaxed conventions of the era, but also the reality of river vs. ocean navigation. Although steamboats sank fairly frequently, it was a very different process than for an ocean-going vessel. Loosely speaking, steamboat sinkings tended be either mild enough that lifeboats were unnecessary, or violent enough that they were functionally irrelevant. If the hull was punctured by river debris (or an occasional collision), there was almost always time to navigate close enough to the riverbank that the vessel would just settle into the mud and people could be gotten off in a leisurely manner, at worst having fled to the upper decks (where most passengers tended to be anyway). It was rare to sink in a channel deep enough to swallow the whole vessel right away, and these vessels almost never overturned. The more disastrous events usually involved a boiler explosion, which tended to rip the superstructure apart and/or set it on fire (these boats quickly became infernos once set alight), and when this happened, there was little time or ability to competently launch lifeboats for hundreds of people even if they had existed. And even in these circumstances, an explosion or fire rarely compromised the hull, because all the machinery and most of the superstructure was above the water line, so anyone who wasn't killed, maimed, or burned faster than a lifeboat could be deployed was generally safe on the hull as it drifted to shore. Finally, most of the river corridors on the Mississippi, Ohio, and lower Missouri were fairly well settled and heavily traveled, so there were generally other folks around with boats who could respond quickly. Quite different from a disaster in the middle of the ocean or on some remote storm-wracked shore. This isn't to say that sufficient lifeboats wouldn't have been useful under certain circumstances, just that the context was very different for what would make them worth carrying and deploying. These vessels weren't designed in a way that carrying lots of boats on instant-deployment davits (e.g. Titanic) would have been very practical, and having piles of boats lashed down somewhere on deck (e.g. your average sailing vessel) would have been too slow to deploy in most steamboat emergencies in which they would have been useful. That's my perspective, anyway.
- 58 replies
-
- 3
-
-
- Robert E Lee
- Amati
- (and 4 more)
-
Nice job on the figurehead, I like the way that looks. Though I admit that when you said "like a real beagle" I honestly thought of Snoopy first and was momentarily confused by the brown!
-
That looks great!
-
I'm so glad you're back! I certainly haven't forgotten you, since I was the last one to check in before your return! I admire your extraordinary work and am thrilled to see it return on this project. Looking forward to progress.
-
Great work on an attractive model! Thanks for sharing.
- 74 replies
-
- 1
-
-
- Oseberg
- Billing Boats
- (and 1 more)
-
That's really cool. A quick question: with the understanding that the original images are highly stylized, I noticed that the mosaic you shared shows the rudder piercing the hull below the aft castle, while you placed your rudders fore of the aft castle. Just curious what the thought process there was, if you felt that below the castle just wouldn't work (and thus it's just a style thing in the image) or if there are other mosaics showing the rudders coming out where you placed them.
-
These turned out great, and I absolutely agree that giving the impression of the clips is the right approach whether or not it's a literal recreation of them.
-
Roger, sorry if this wasn't clear: we used Amtrak to shuttle our vehicle, not the canoe. Though I love the image of loading that thing into a baggage car! Basically, there are multiple towns along the river that have Amtrak stations and nearby waterfront parks with boat ramps. So first thing in the morning, I dropped my wife off at the upriver boat ramp with the canoe, drove down to the downriver ramp and parked the car there, walked over to the train station and took the morning Amtrak train back upriver (there are two trains a day each way along this route between Kansas City and St. Louis). We were on the river by mid-morning, and when we arrived at the downriver ramp our car was there waiting for us. The funny thing, when it comes to asking about taking canoes on the train, is that this Amtrak route IS bike-friendly, and mostly parallels the 240-mile Katy Trail State Park rail trail that crosses most of Missouri. We've been using the rail line to bike the entire trail in four parts this summer, without having to stage or shuttle vehicles, because the trail connects to Amtrak stations across the state. We're 3/4 done, only one 60 mile segment to go that we'll hopefully get to this fall. Thanks for sharing your canoes' heritage! Our canoe was once my mother's and I have a very long history with it, though it hasn't needed any restoration so far. She's still an active paddler in her mid-70s, though now she uses a small ultra-lightweight boat that she can still lift herself.
-
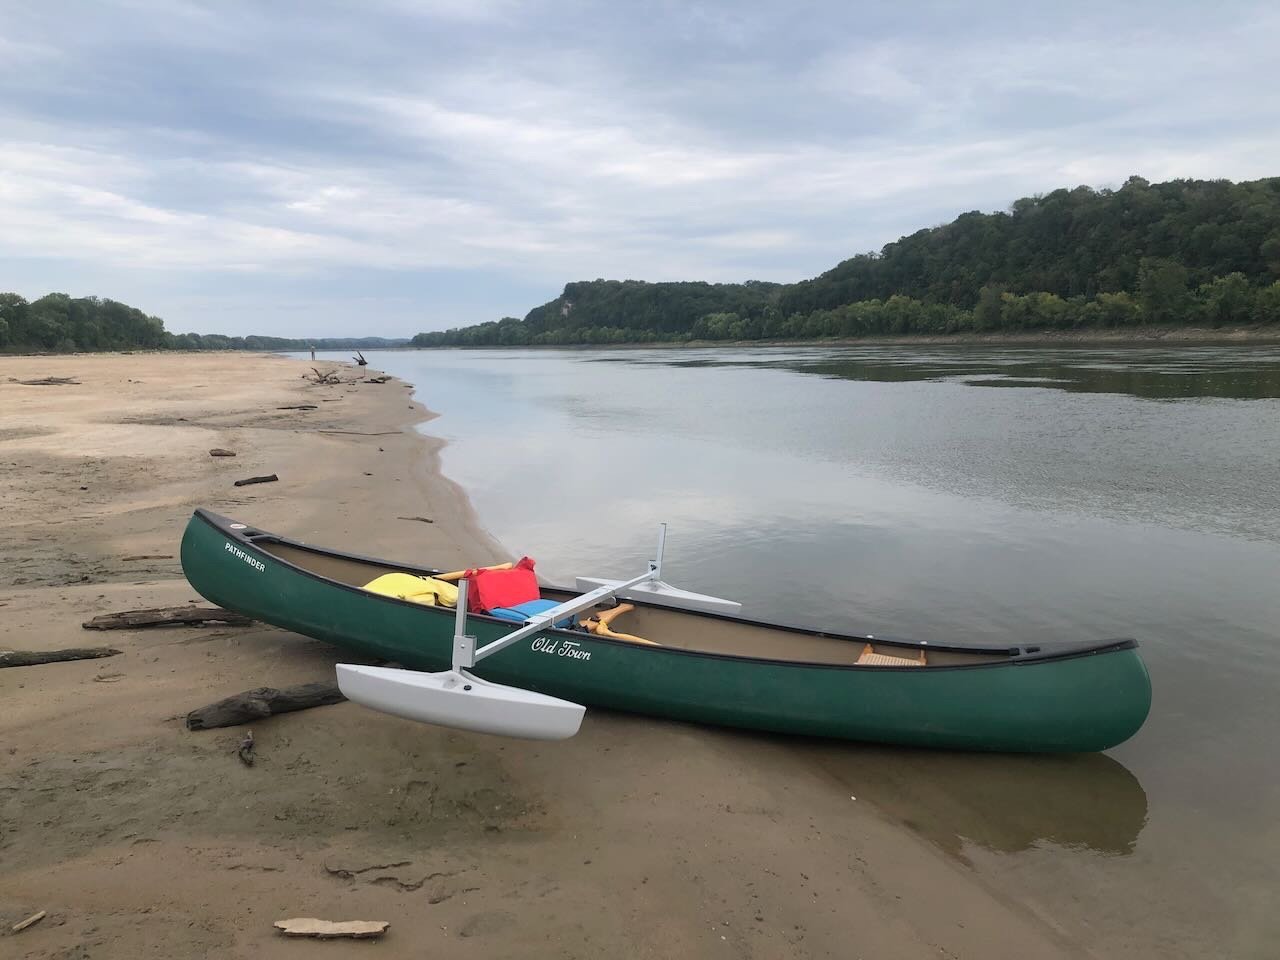
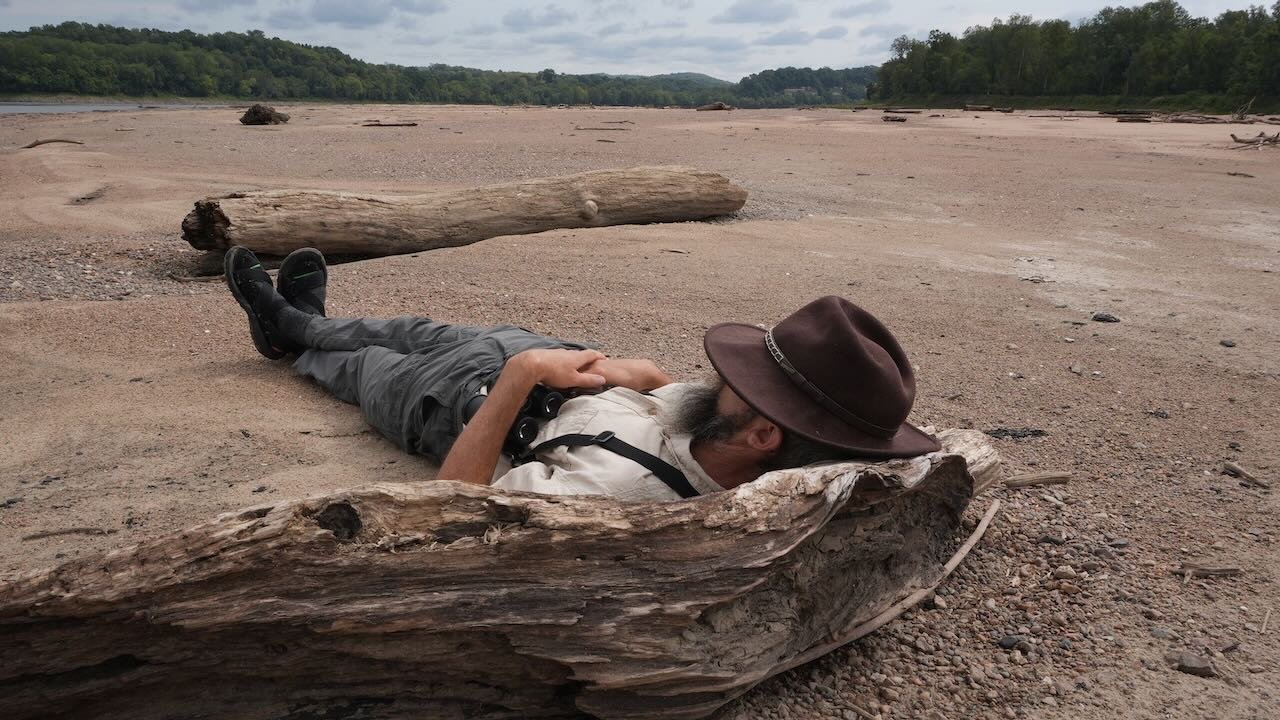
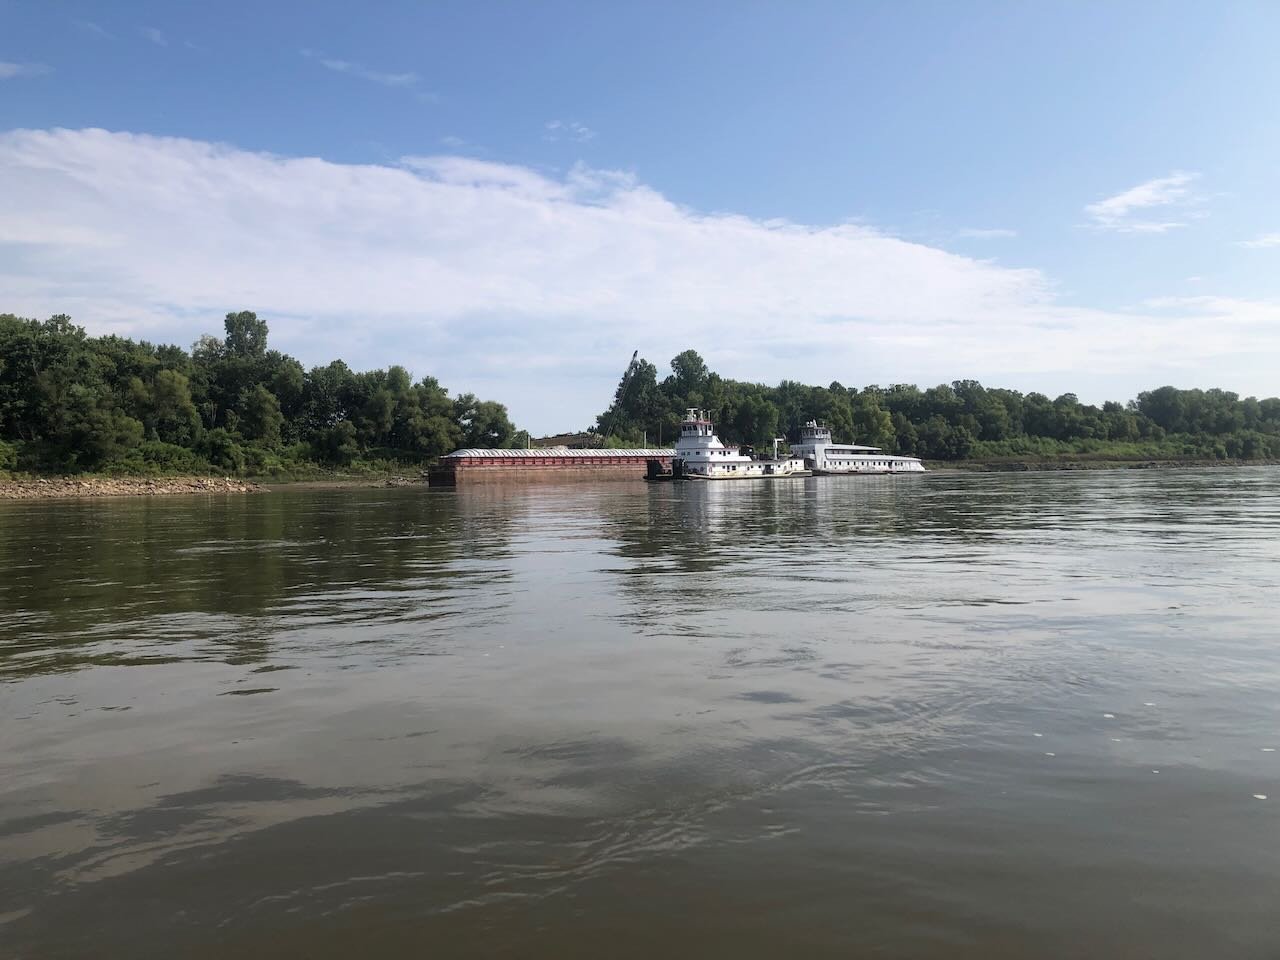
Also, while you all wait for more progress, here's a bit more geographic context. Mrs. Cathead and I were able to get away for a day-trip paddle on the Missouri River, on a stretch that Peerless certainly navigated many times (although the modern channel is very different). We did an easy 30 mile paddle, using Amtrak service that parallels the river to shuttle our vehicle. Here's a couple towboats waiting on a sand & gravel barge to be loaded (I thought of @mbp521's current project when taking this shot): Here's a representative view of river bluffs and sand bars; the river is very low as Missouri's been in various stages of drought for close on a year now, especially bad for most of this summer: If you're wondering about the outriggers, we're testing them for longer trips. The Missouri is a large, fast, deep river with a lot of control structures and other hazards, including woody debris. It's also a very isolated channel with very little development, access, or services; when you're out on it it feels more like you're in remote Montana than the Midwest. We're highly experienced canoeists and Mrs. Cathead used to be a researcher on the river. For day trips these aren't really necessary but we're planning some longer multi-day trips, and once the canoe is loaded down with supplies, outriggers really add some safety stability. Even those towboats can generate large wakes that can be bothersome. These huge drought-exposed sandbars make great napping points. Even though the channel is very different now, maybe you can envision Peerless steaming along under 200-300' tall bedrock bluffs, dodging extensive sandbars blocking the old river's braided channel, and trying not to hit logs like you see above that could easily punch a hole in her thin hull. Just a fun image to hold onto while the build waits patiently to resume.
- 259 replies
-
- 14
-
-
YOU'LL be anxious? 😁 Seriously, though, I don't think it'll be bad due to some pre-planning. You might recall that I already pre-built the base frame for the boiler deck, as shown in this previous photo: I used this as a template to lay out the post-holes in the planked deck, which you can see drawn in on the sub-main-deck in the photo above. I also re-checked using the actual framing as I laid the decking, and checked again when I finished the main deck. Things appear to line up really well, such that posts inserted in the holes in the main deck ought to line up right with the beam junctions in the base frame for the boiler deck. That's the theory, anyway.
-
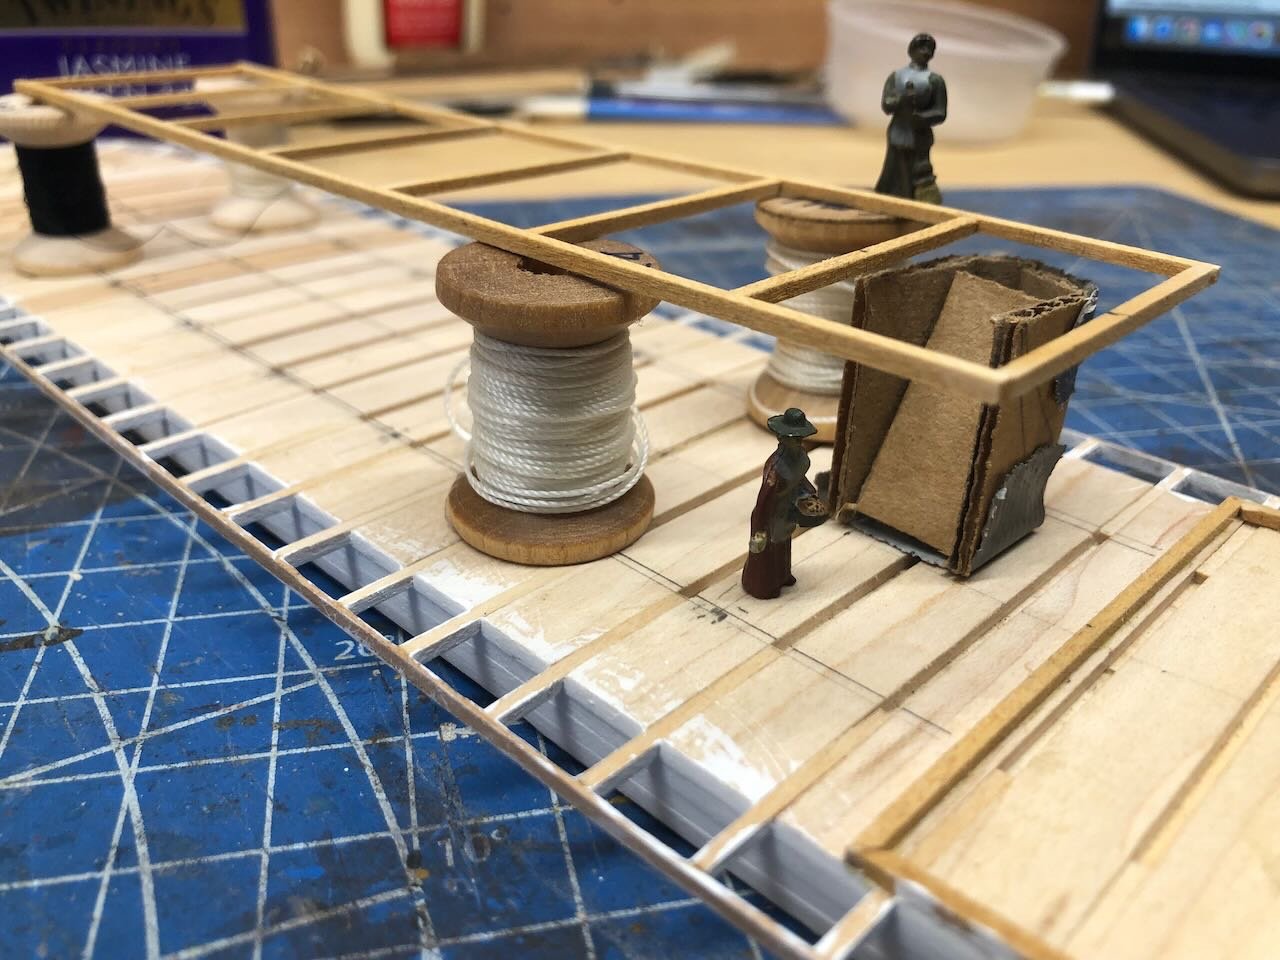
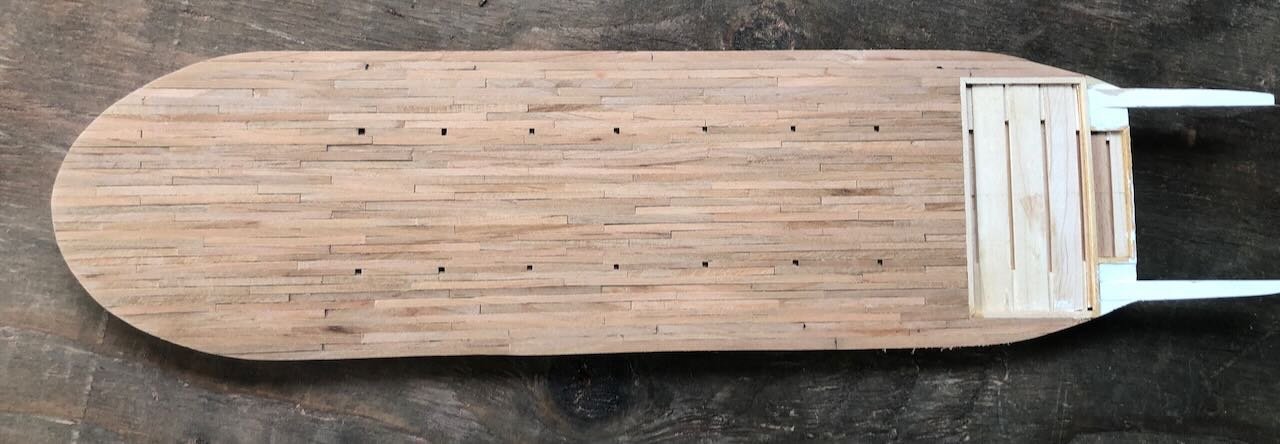
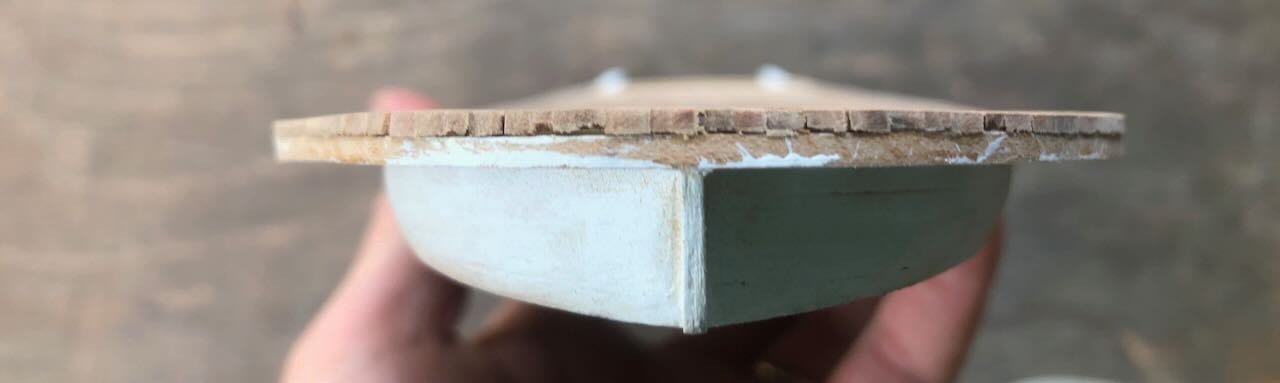
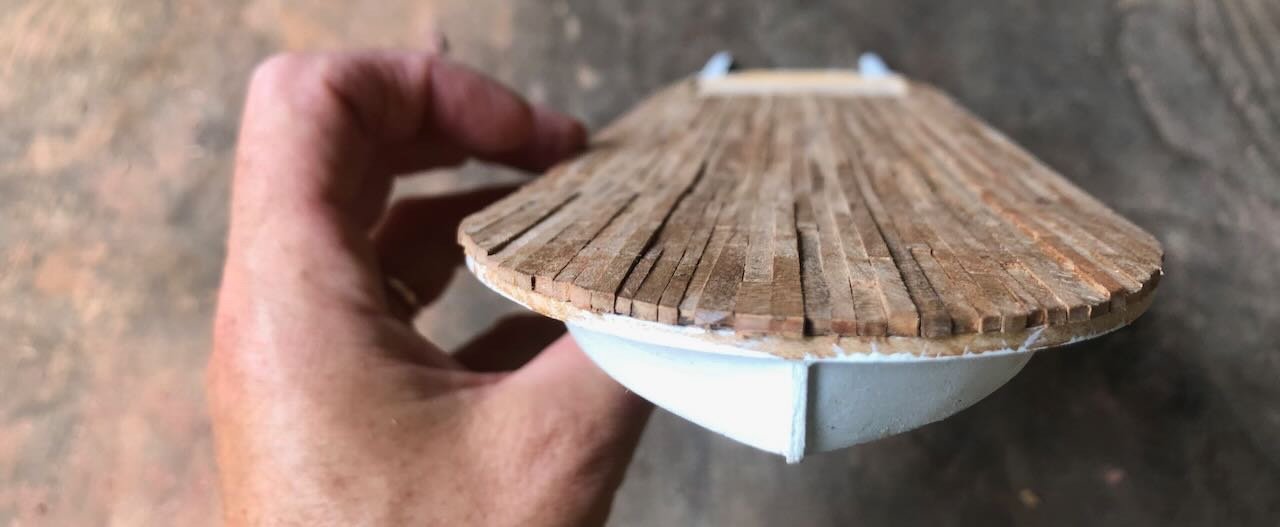
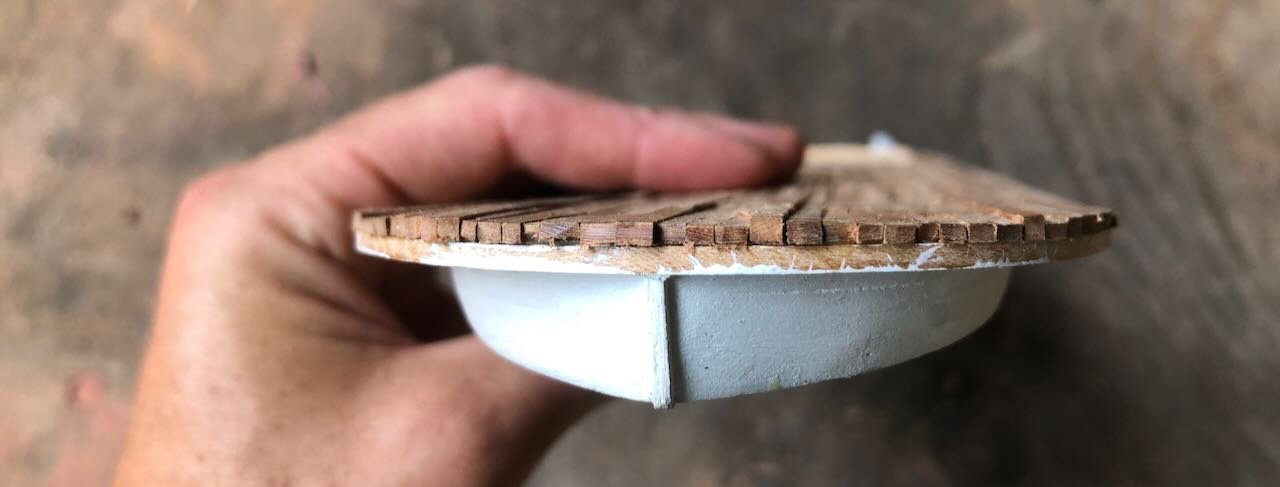
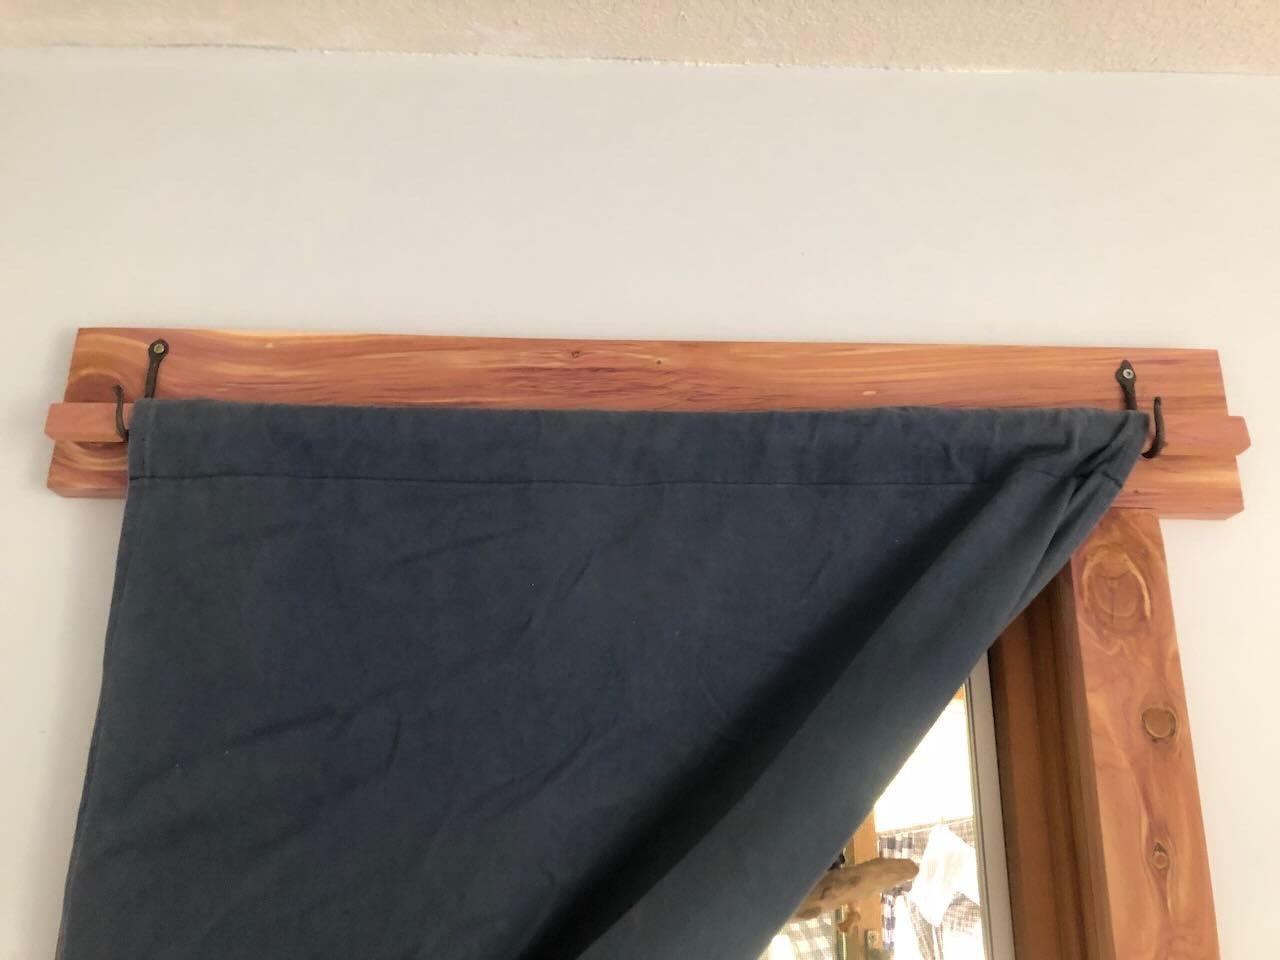
Finally finished the main deck! This was delayed, in part, by yet more other projects, such as finishing the renovation of another bedroom by replacing drywall, repainting, and adding new window, door, and floor rustic trim made from cedar lumber cut and milled on-farm. This not only used up free time but made me less inclined to work on yet another wood project (the model). Now it's done, with window and exterior door curtains hung from cedar bars suspended on iron hooks made by a local blacksmith. Anyway, I finally milled the last bits of deck wood needed, installed them, then started sanding down the deck. First, here's a clear look at the limitations of my current ability to mill precision scale lumber: Those planks are all over the place in both thickness and width, despite using the NRG's depth gage made for the Byrnes saw. The good news is that this gives the model a very rustic appearance. I knew I'd need to do some significant sanding and just accepted that. I decided early on that I'd rather mill things too thick and sand them down, than deal with too-thin segments prone to breakage. I took an orbital sander to this deck, starting with coarser grit and working down. I'm quite pleased with the final product, which I still need to buff by hand with very fine paper. You can see that the deck preserves its subtle camber even after sanding: The sander made this mostly smooth, with just a touch of texture left where the biggest differences in plank thickness remain. This gives it a lot of visual appeal; as the viewing angle changes you can still see hints of shadows between different planks and it really pops and looks like a rustic deck. This is a great example of an approach I've become comfortable with in modeling: focusing on what looks good/right over what's technically right. Any contest judge would instantly notice the inconsistent deck lumber thickness and some of the wider-than-scale cracks between individual planking runs. But visually, these create the impression of a rough-built vessel in the way that a truly accurate to-scale deck would not. The photos don't really capture the effect fully, it really comes out in person, and I love it. The cherry wood is already halfway to the reddish color the deck should have (like my other steamboats) and I'm debating how far to go on further coloration (painting/staining/weathering) as the natural wood's variability brings out a lot of interesting complexity. I was debating how to handle the boiler deck (next level up) as it's a much more fragile construction than this main deck, sitting up on its little posts with not much superstructure beneath it. If I were using perfect scaled planking from a commercial source, I'd just built it in place. But since I've shown no sign of being able to mill consistently thin scale planking, I'm thinking about building the whole boiler deck as a separate piece off-model, sanding it down once it's built (but when it can sit firmly on a solid surface while doing so), then installing it in its precarious final position on the model. Thanks for your patience with this slow build. It's going to be a while before more progress is made due to an imminent family visit (one impetus for the timing of that bedroom remodel) and other commitments; fall is a very busy time on-farm between major produce harvest, start of bow season for deer, and various other commitments. I do appreciate likes and comments that remind me others enjoy this work as well!

- 259 replies
-
- 14
-
-
Peter, it must have been a temporary problem on my end because they're all displaying properly now. I had no trouble in your previous log. Sorry for the distraction; I've never seen that happen before.
- 30 replies
-
- 1
-
-
- Corel
- wappen von hamburg
- (and 1 more)
-
Just to head off a potential and easy-to-make error, the hog chains you're working on were not literally chains, but solid iron rods tightened with turnbuckles. Modelers unfamiliar with steamboats can easily be misled by the terminology, so I thought I'd offer a heads-up just in case you hadn't recognized this.
- 58 replies
-
- 2
-
-
- Robert E Lee
- Amati
- (and 4 more)
-
Peter, this looks like an amazing and unique project. Thank you for the thorough introduction. One question: I'm not sure if this is just a problem for me or for others also, but none of the images you've linked using "modelbrouwers.nl" are loading within MSW. They all have broken link errors. If I right-click and open them in new tabs or windows they load fine, even if I click on them directly they work, but they're not loading naturally within your post. Can you perhaps check how you're linking the photos? You may even not be able to check this directly because maybe they load fine in the Netherlands but not here in the US. But it would be a shame to have to separately load every photo in what will be a fascinating build log.
- 30 replies
-
- 1
-

-
- Corel
- wappen von hamburg
- (and 1 more)
-
That looks so good!