


G.L.
-
Posts
1,553 -
Joined
-
Last visited
Content Type
Profiles
Forums
Gallery
Events
Posts posted by G.L.
-
-
She looks very good in those colors
- BobG and popeye the sailor
-
 2
2
-
Chapter II. The hull
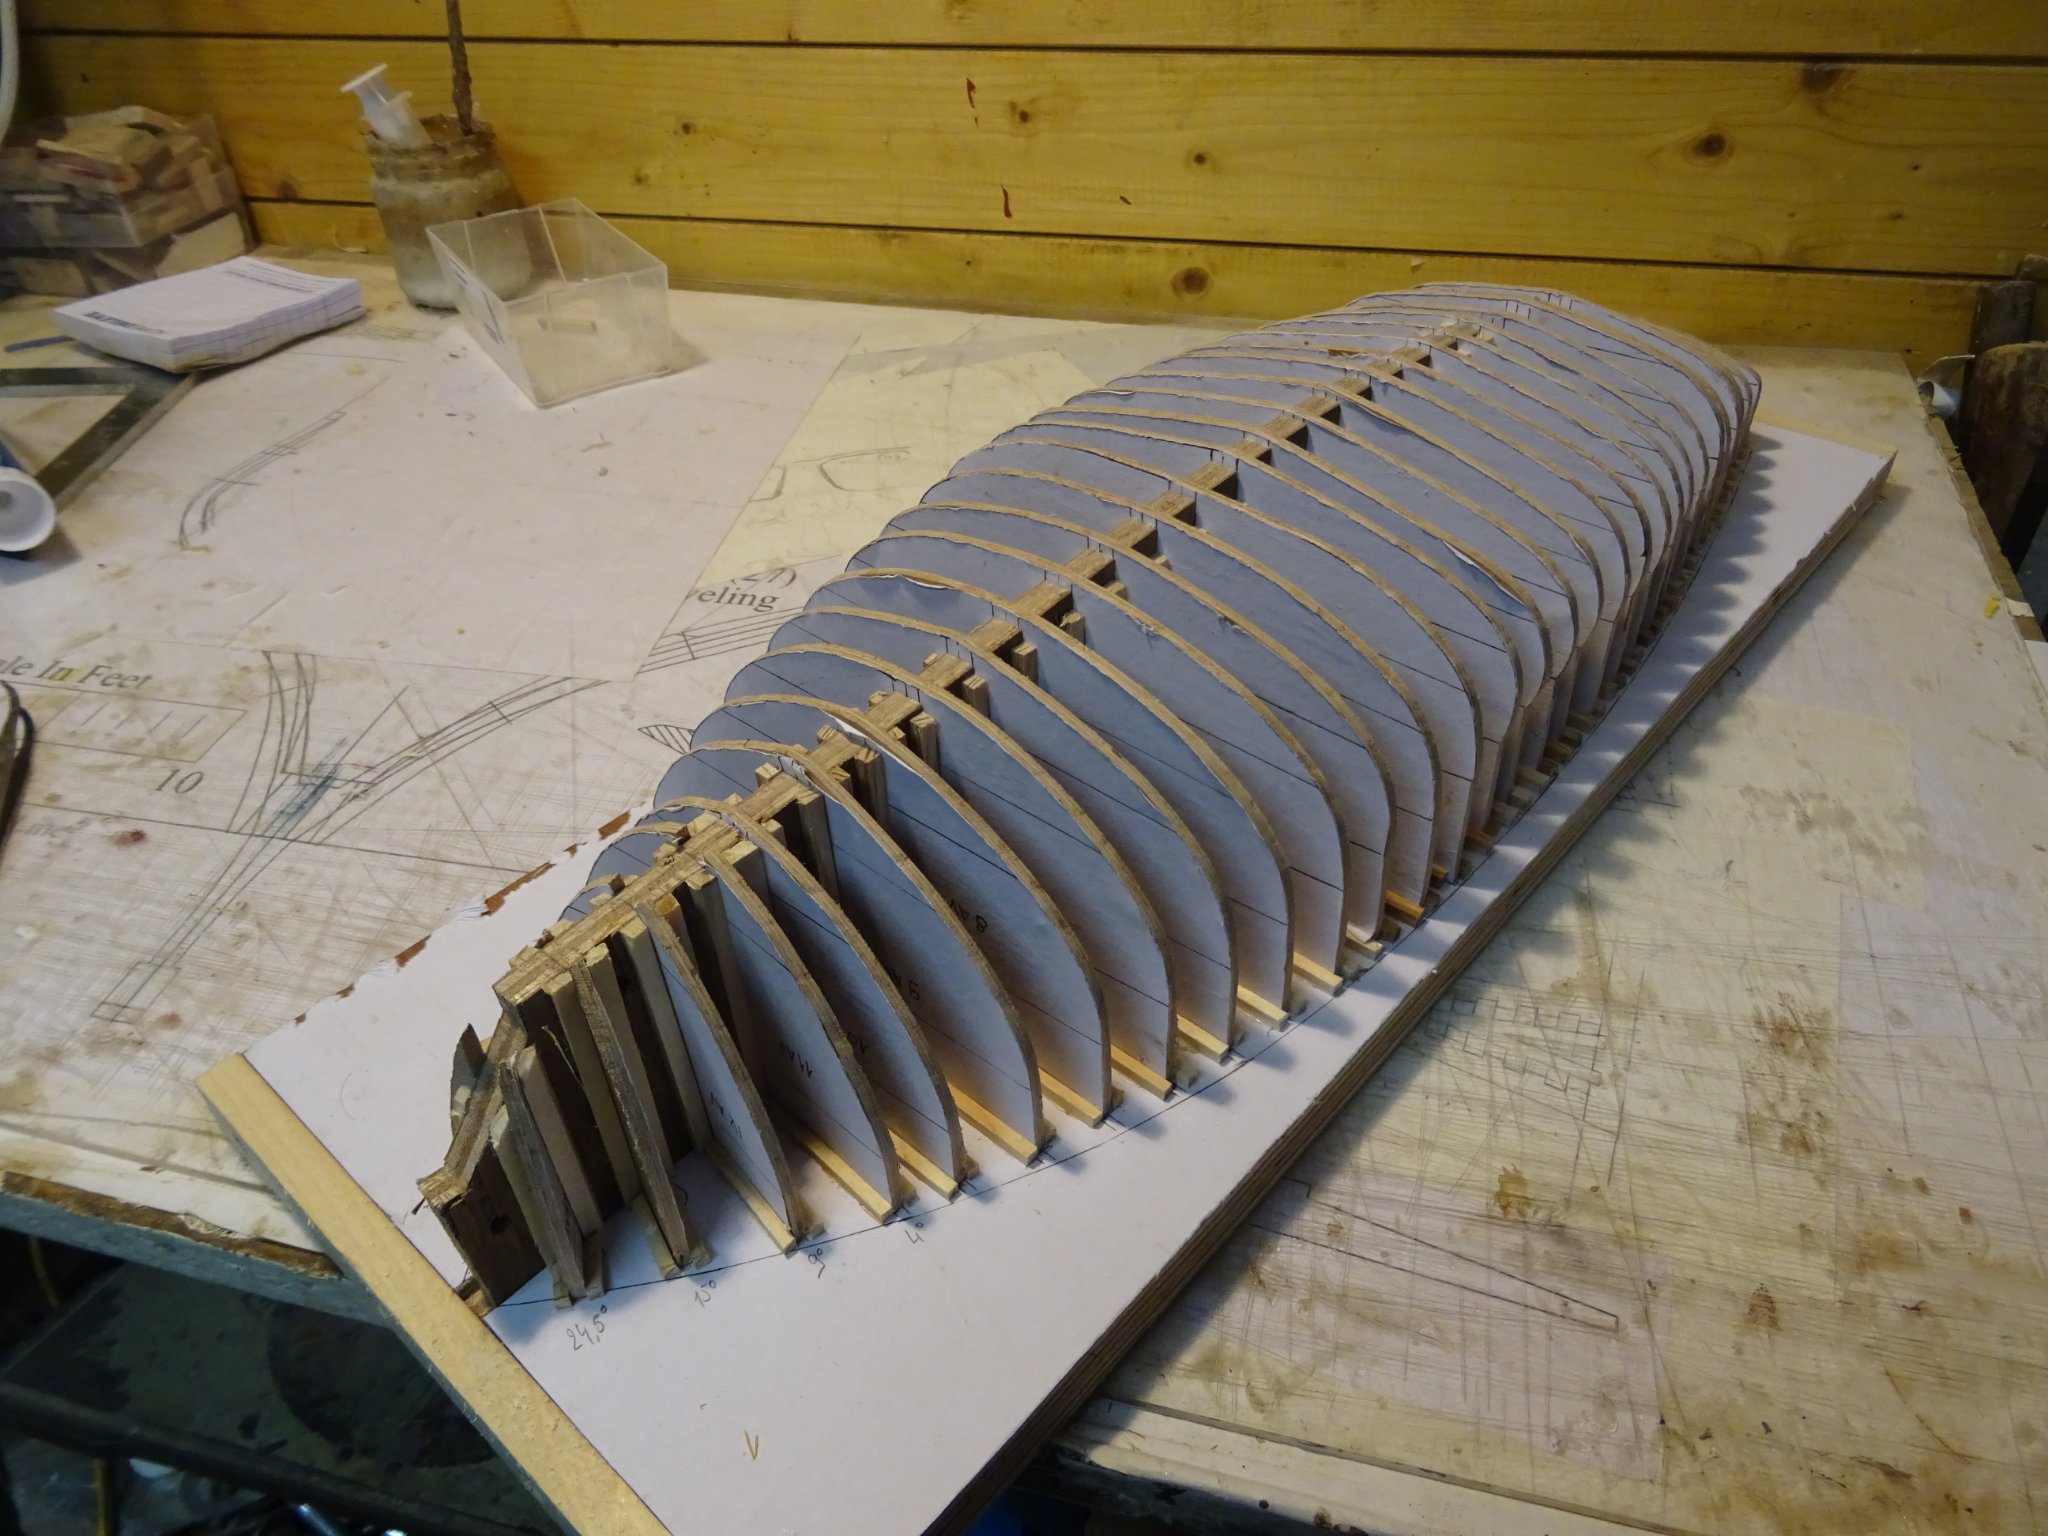
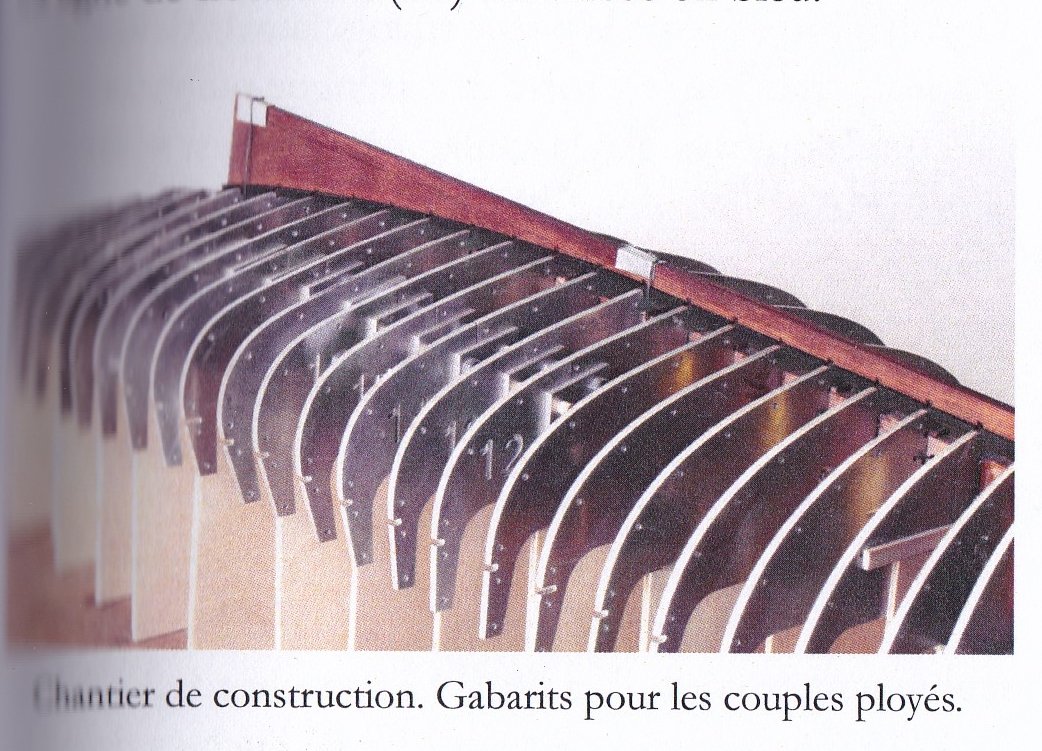
1. The building board
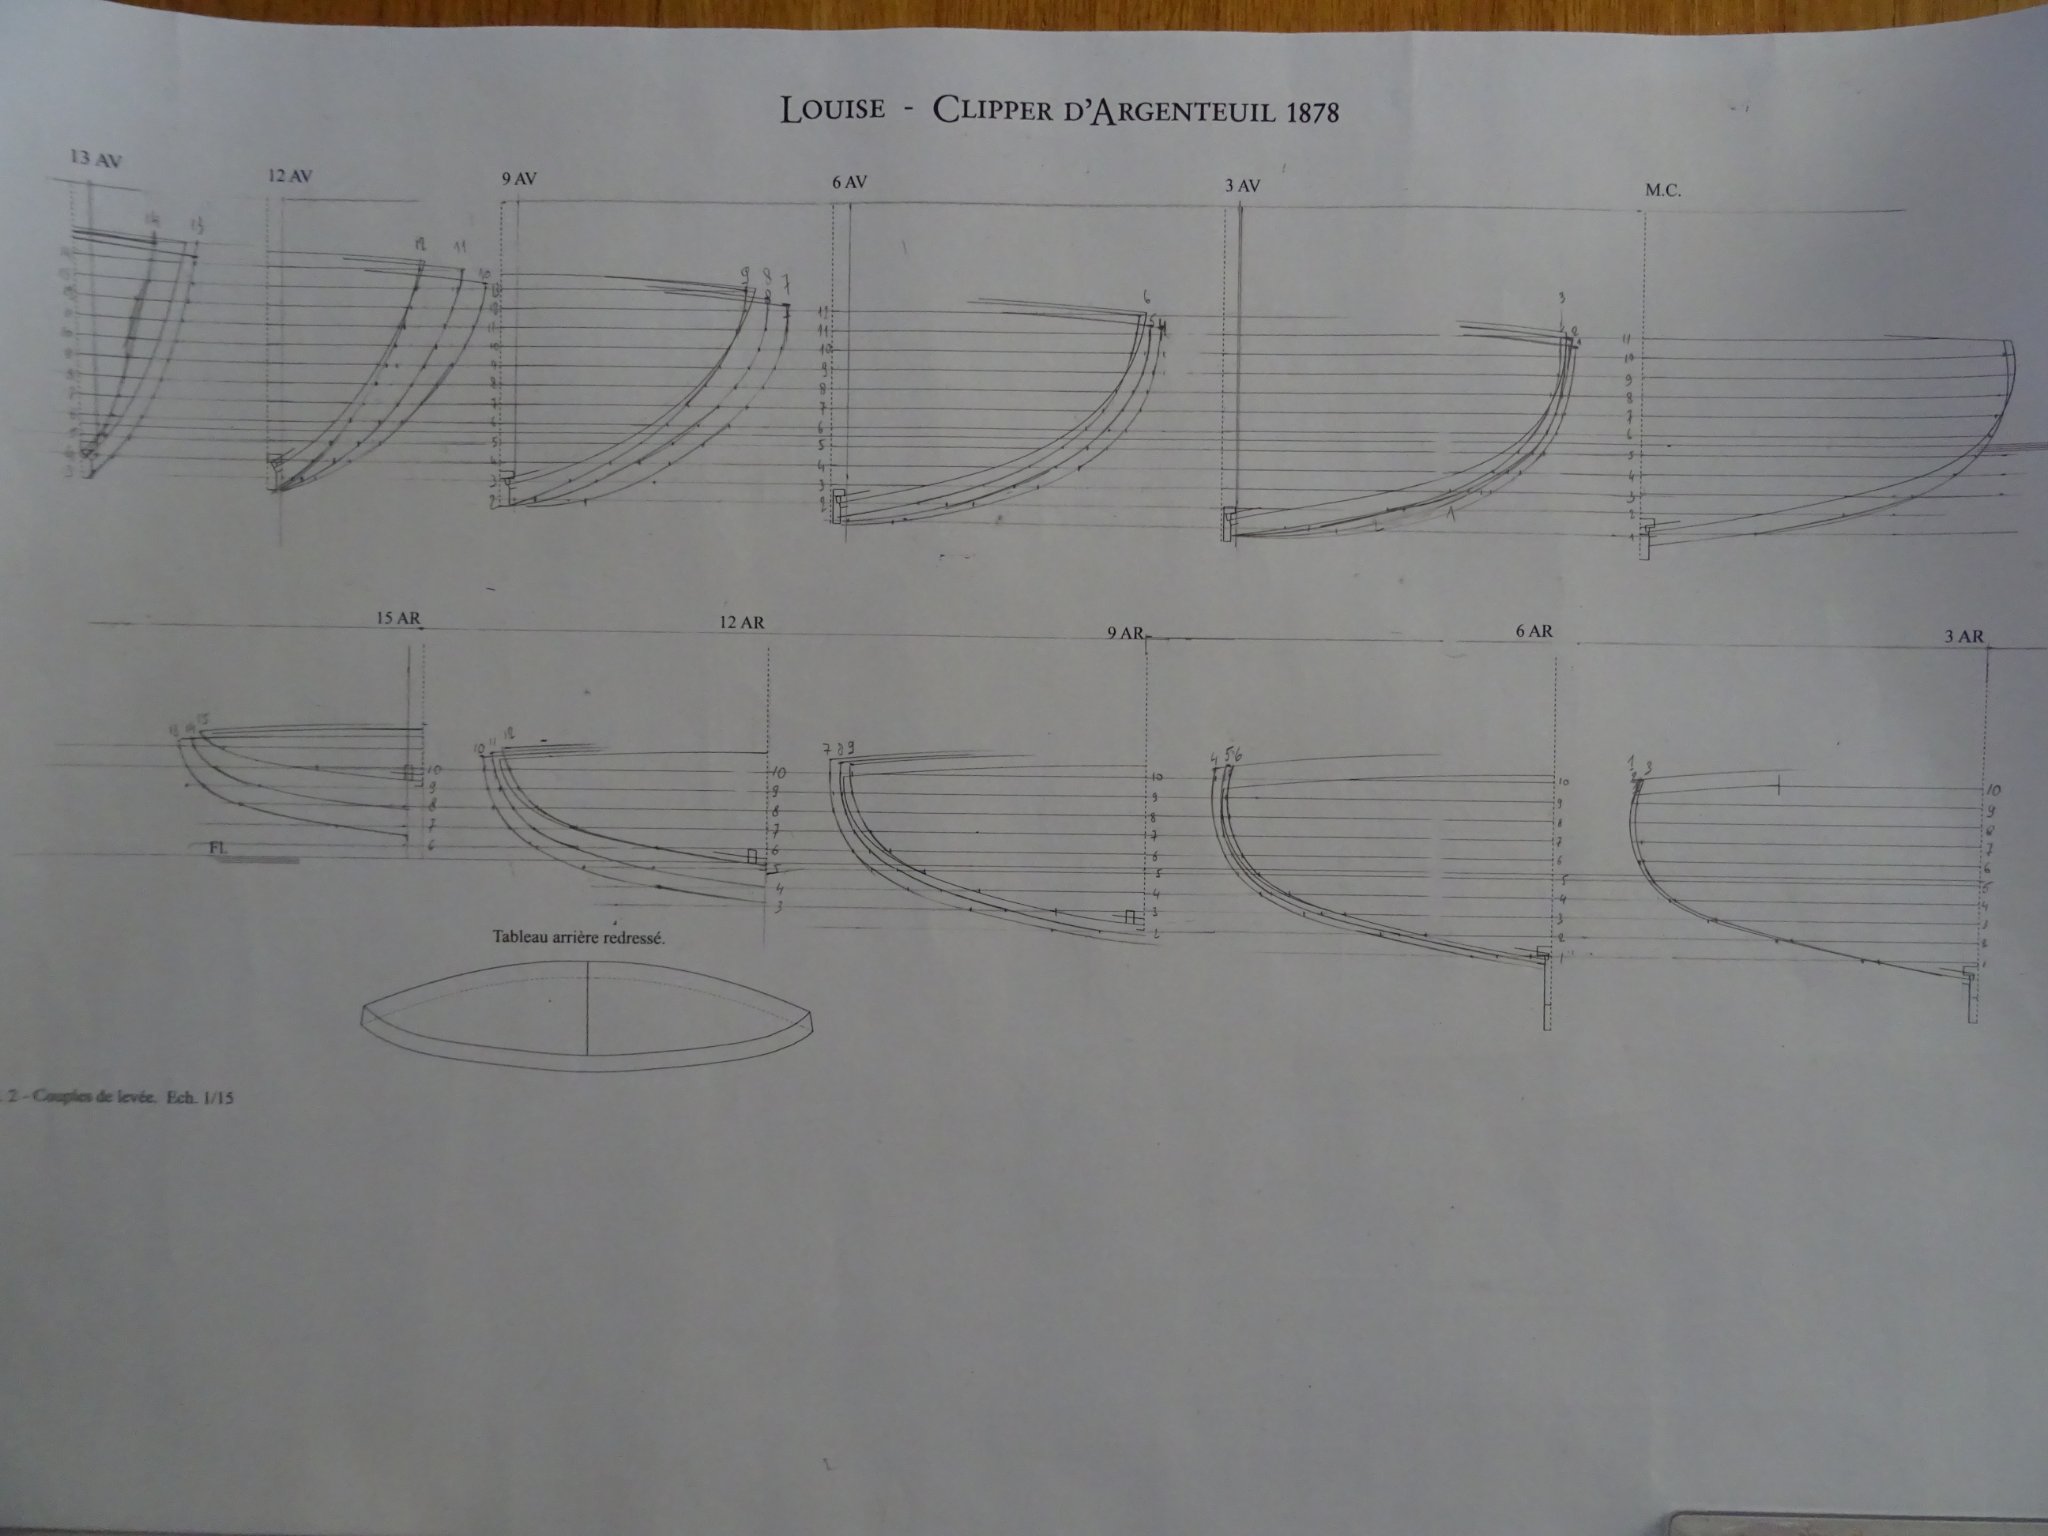
The drawings in the monograph give frame drawings every three frames. The frames will have to be laminated, so I will need a frame template for every frame, therefore I draw the missing frames by taking over the measurement from the line plan.

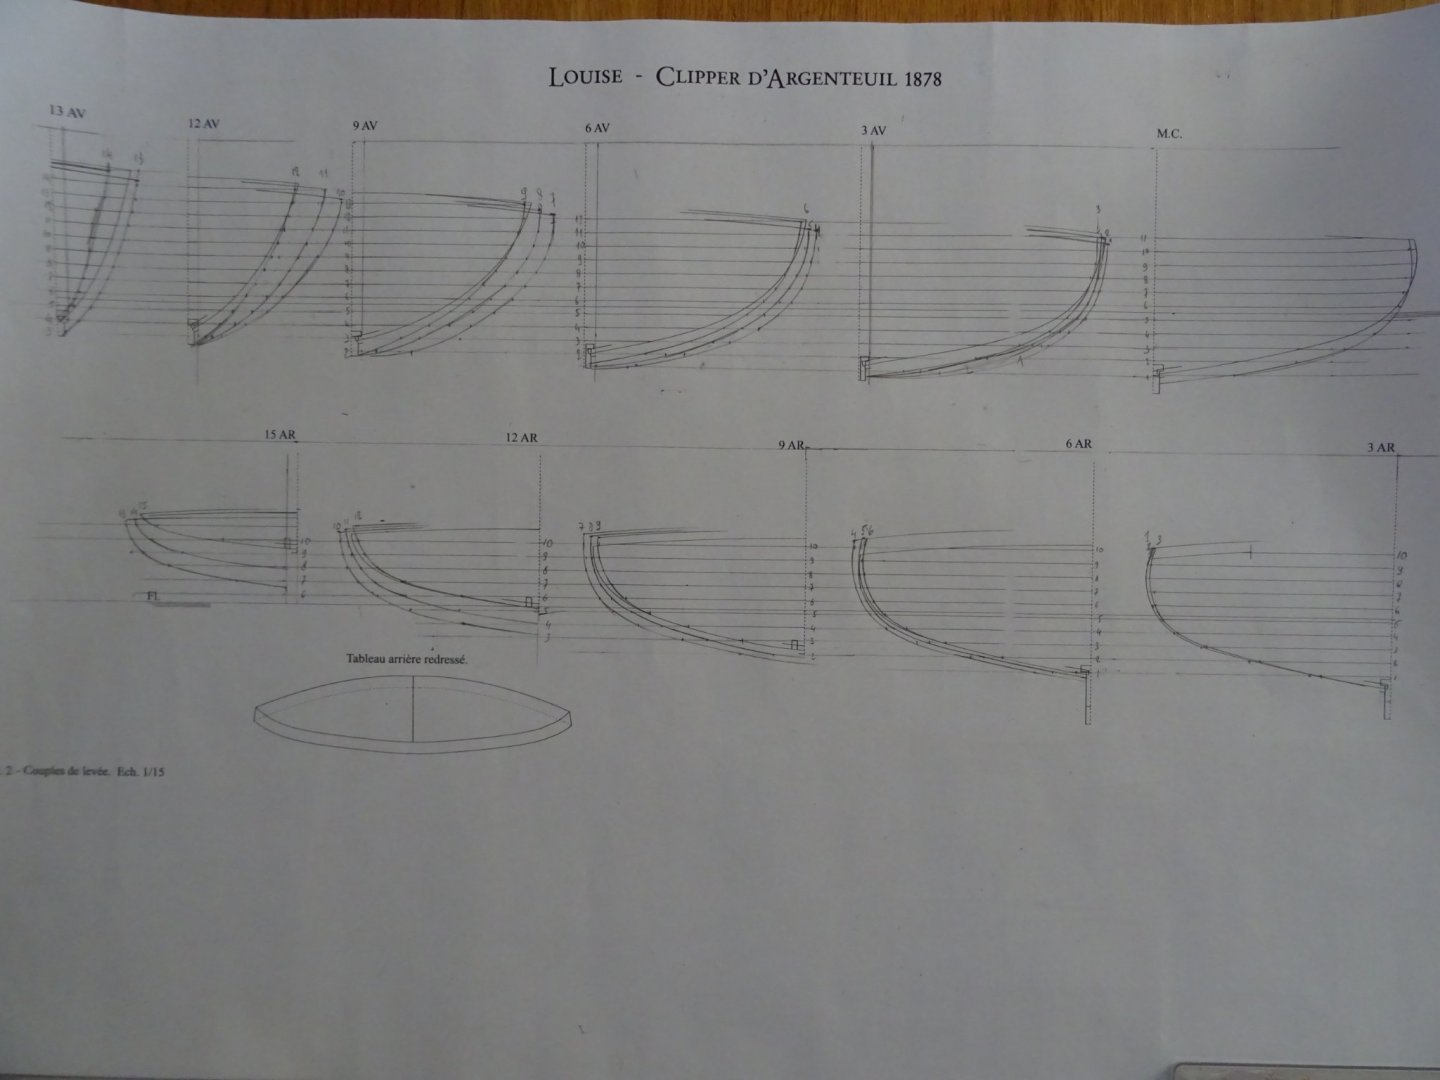
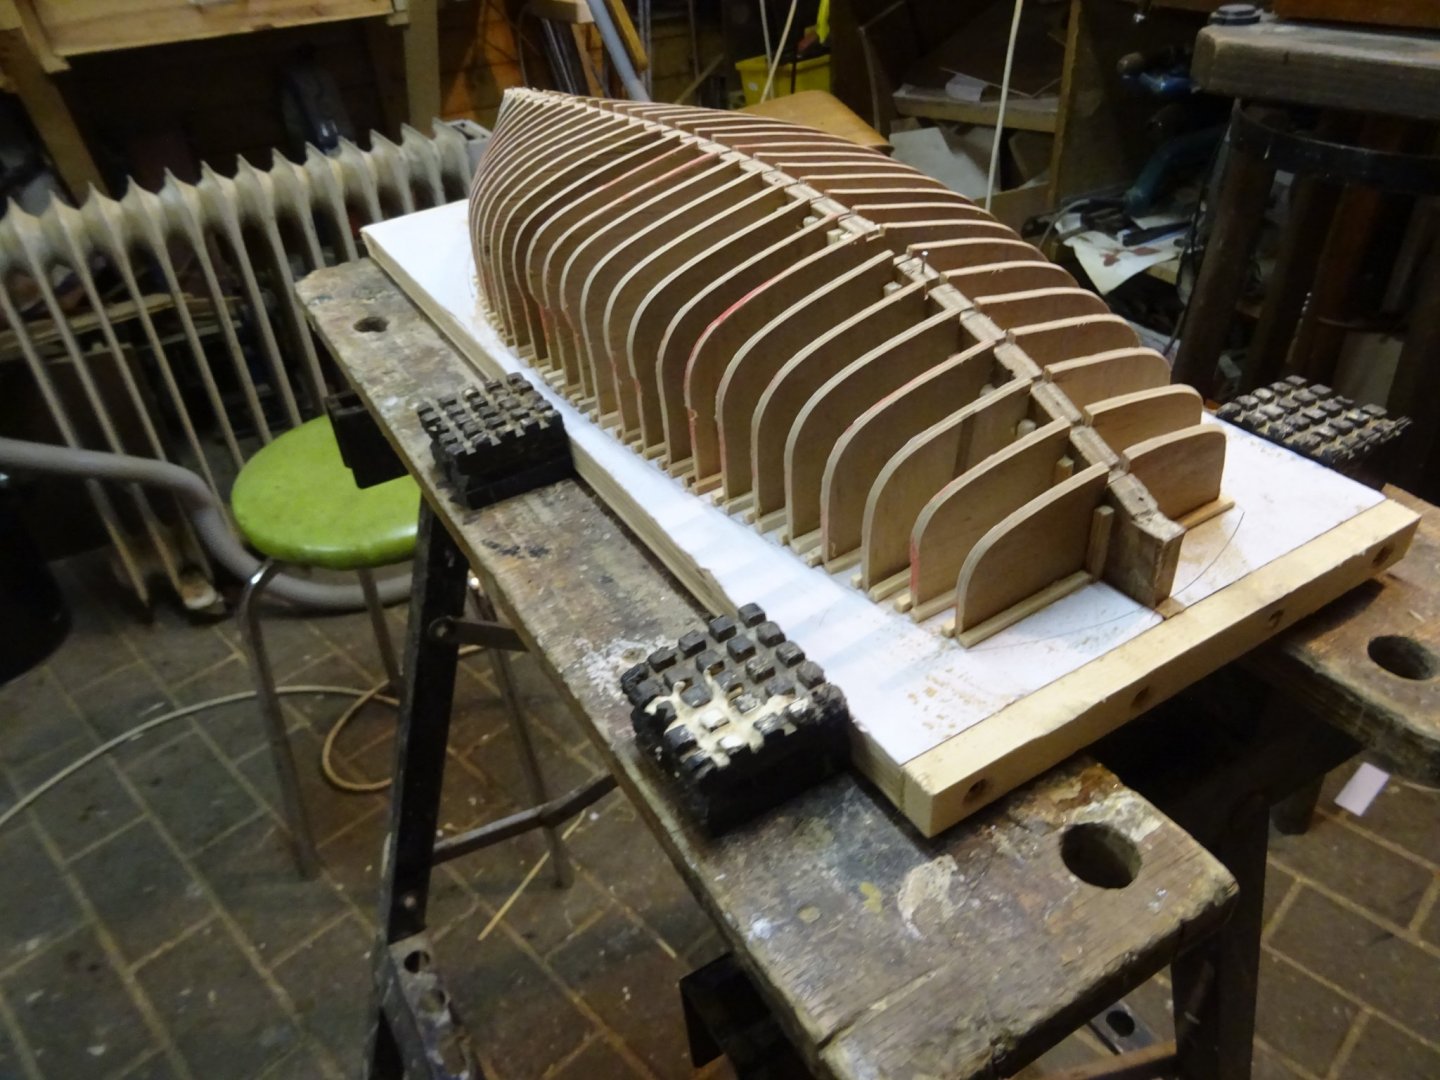
I use the frame drawings to saw out 29 frame templates in 3mm plywood. I make also a base and a backbone for the building board.
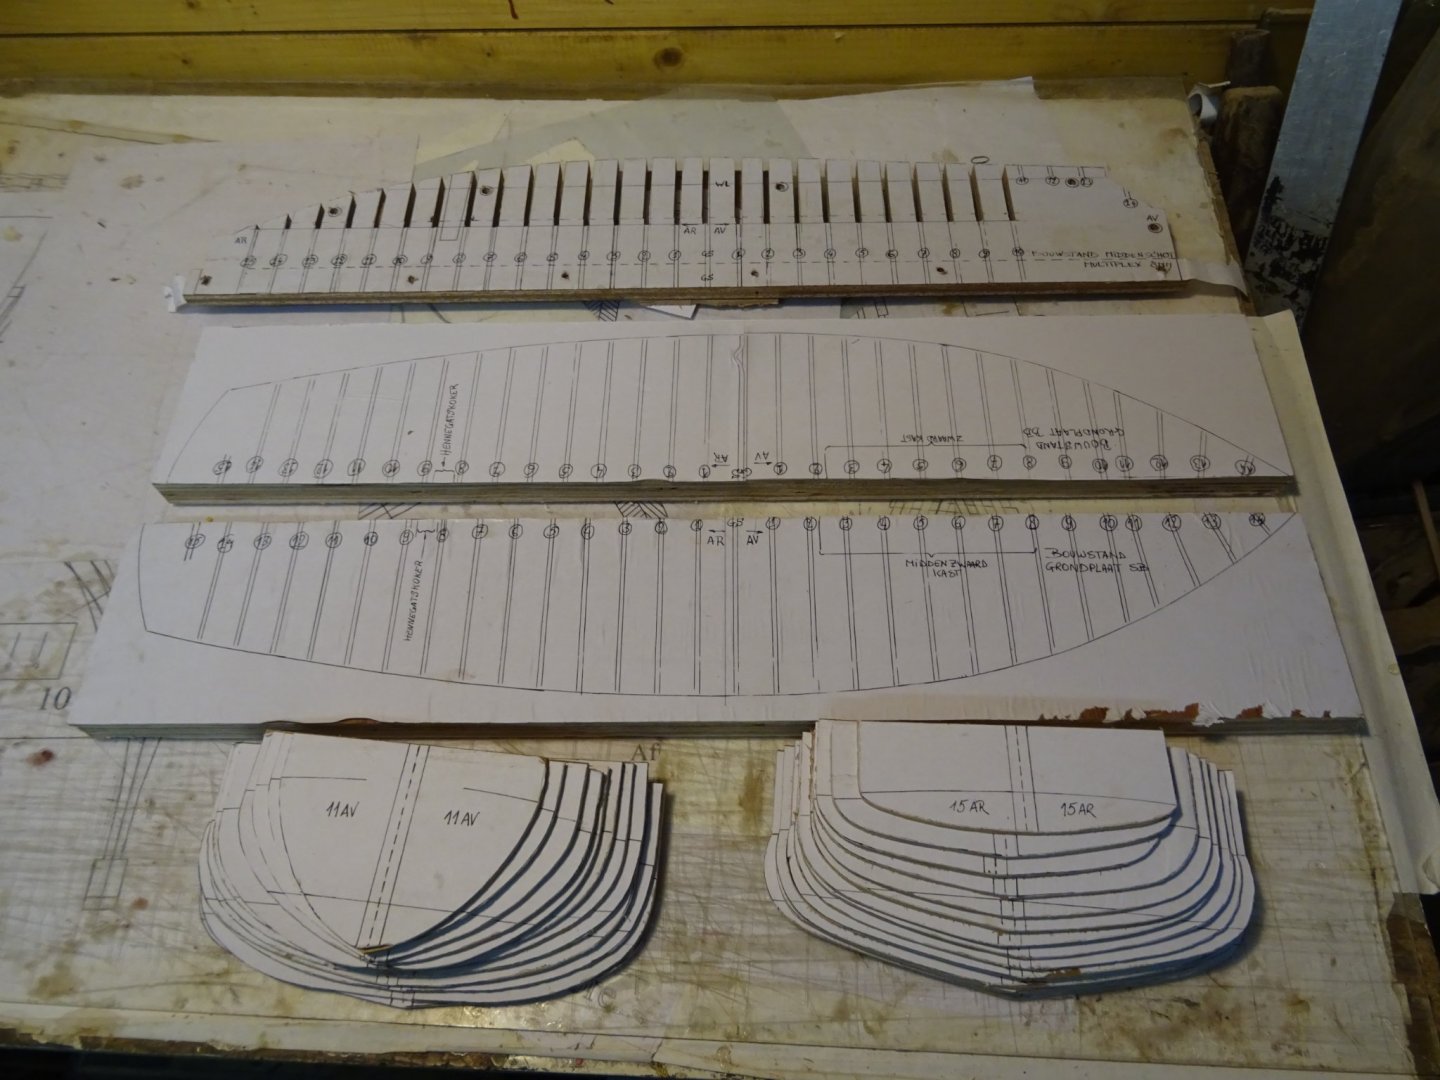
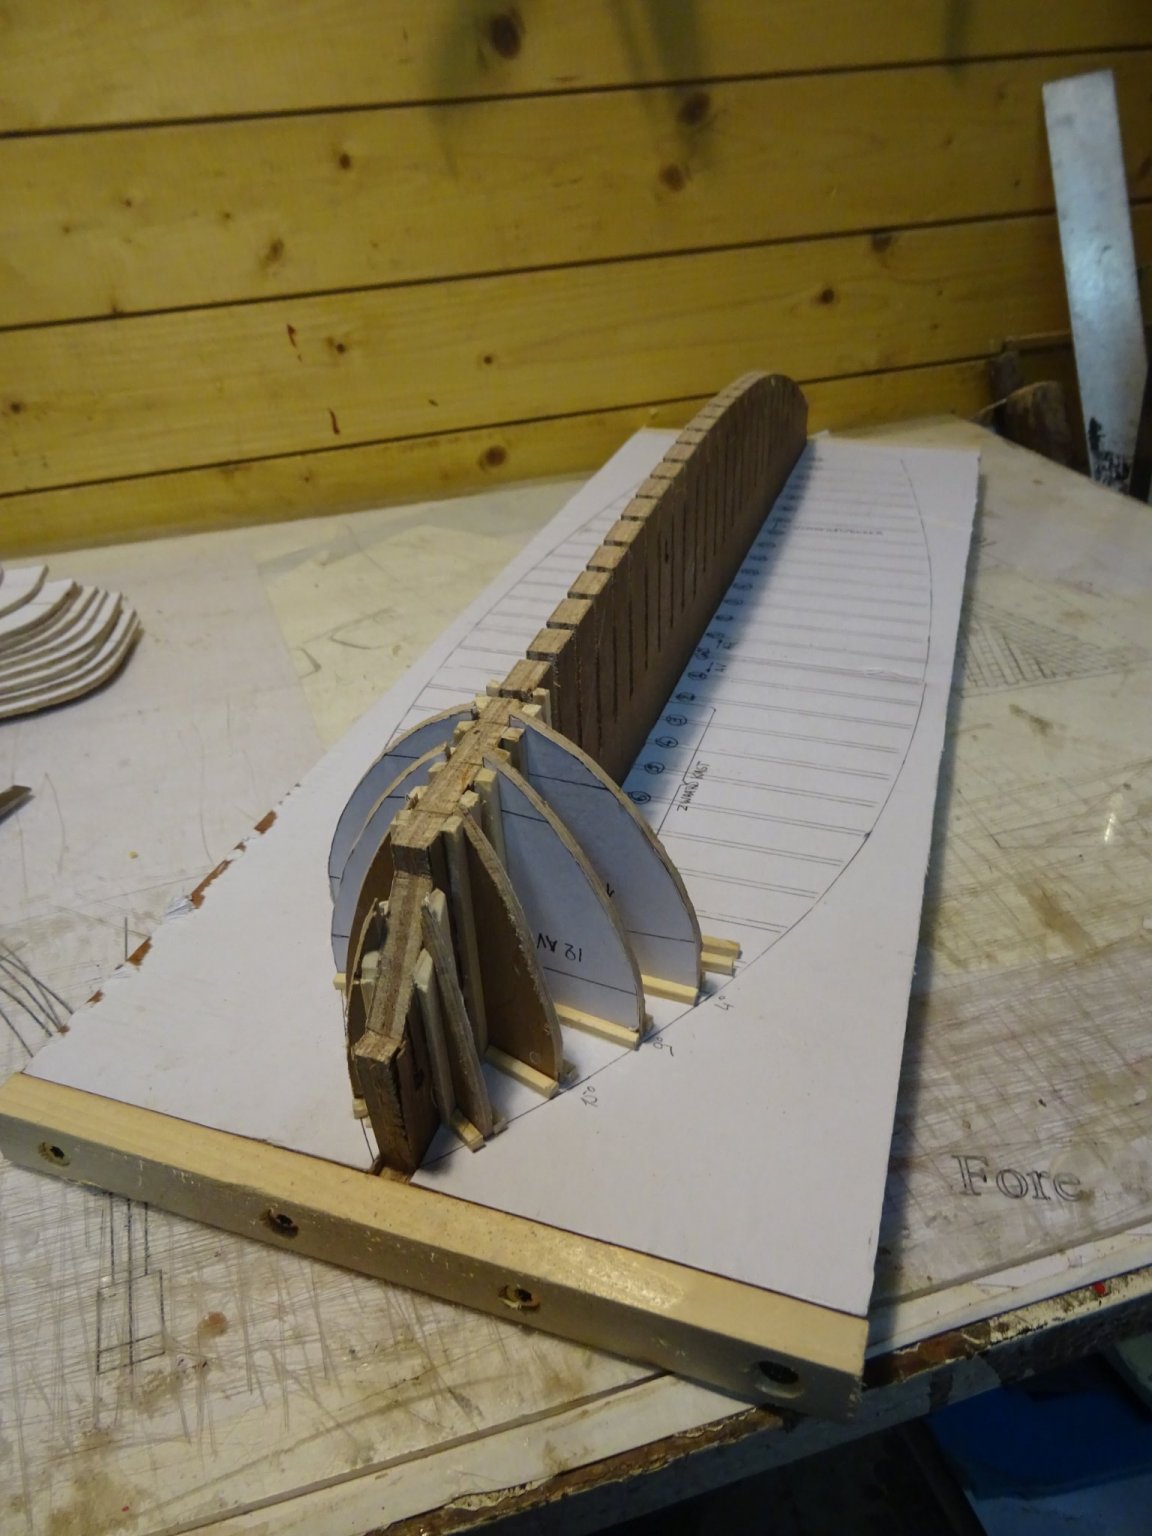
Base plate and backbone screwed together.

Starting to place the frame templates. The forward four are cant frames and have to be placed in pairs at an angle to the backbone.

All the others are perpendicular to the backbone.
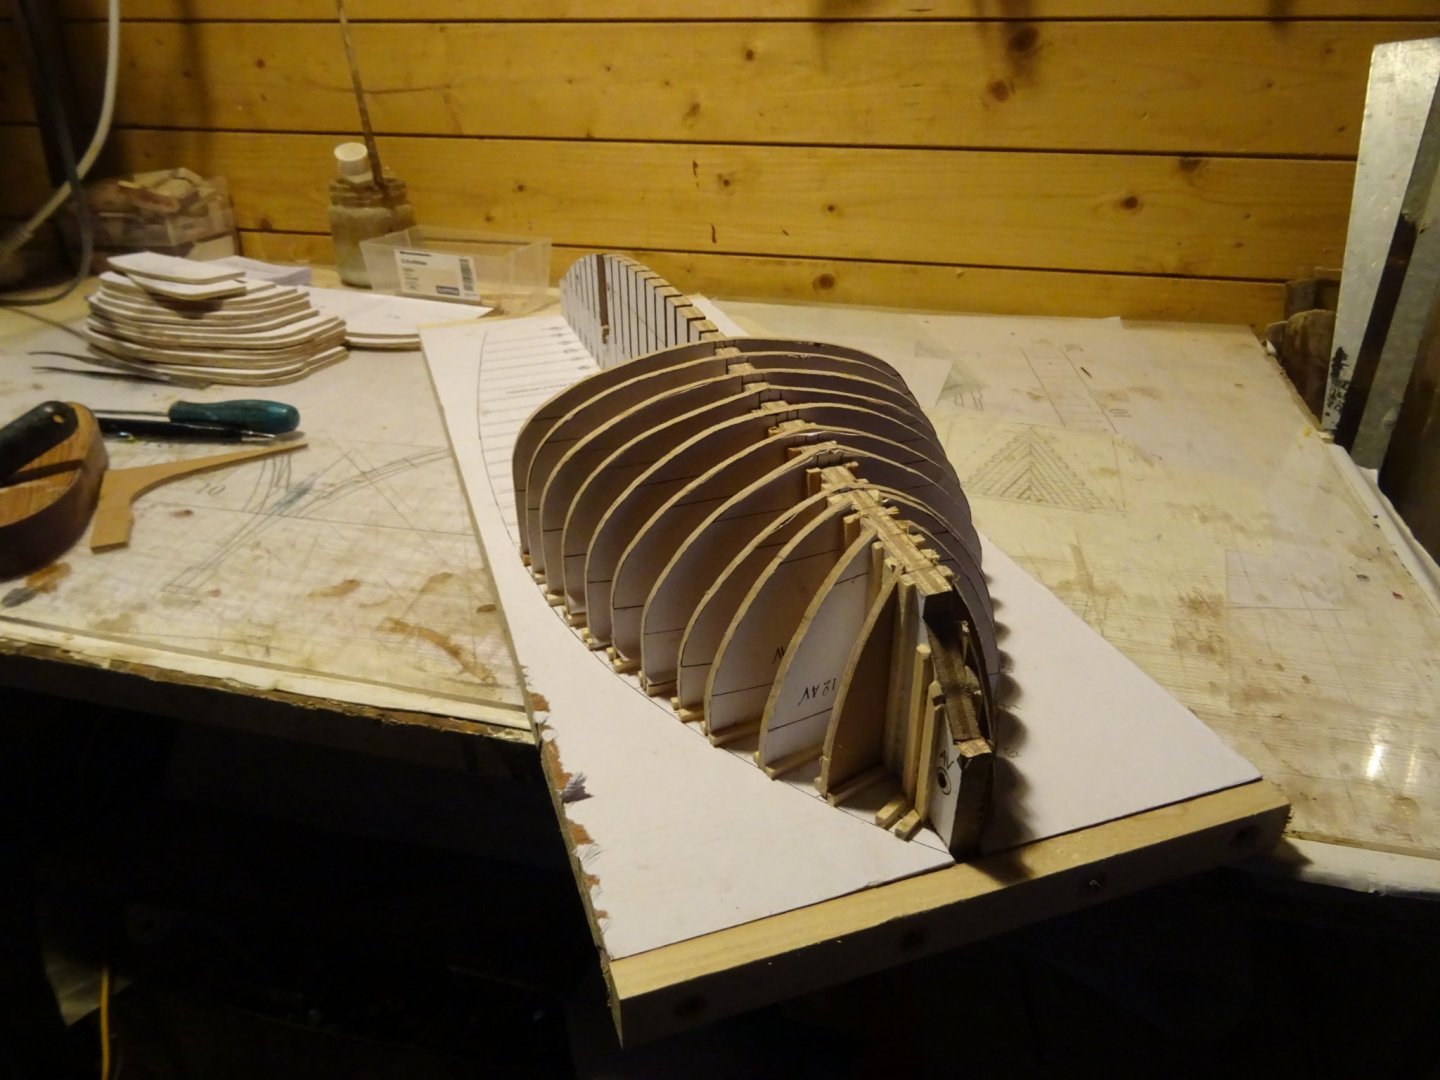
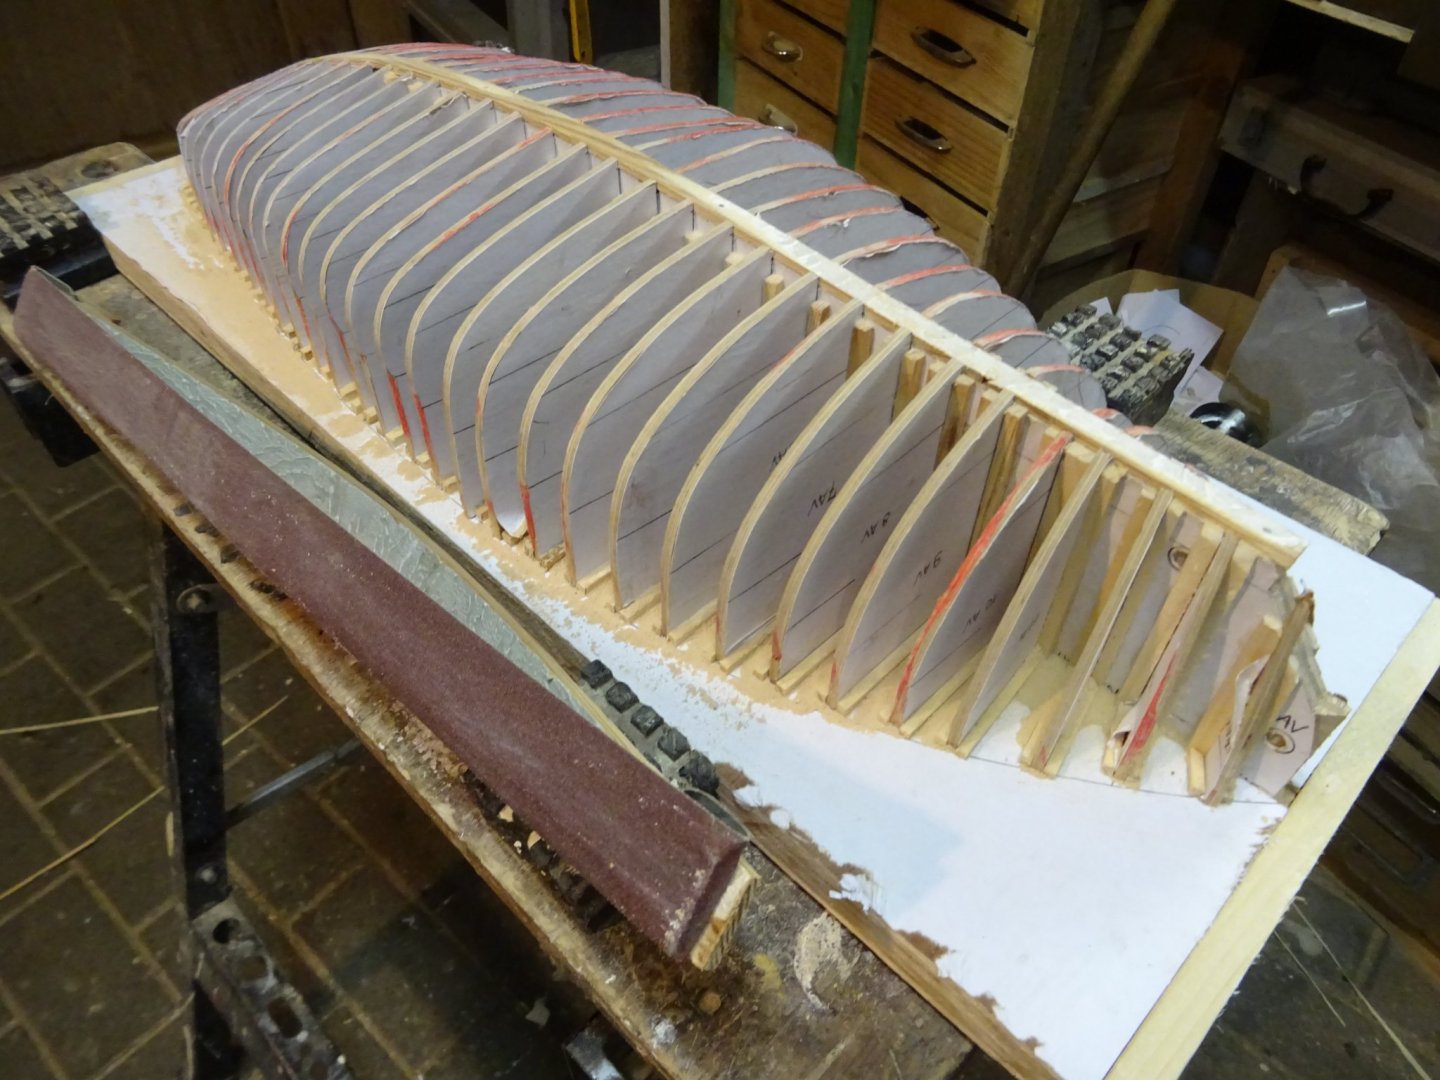
The frame templates are placed in such a way between guide slats that they can easily be lifted out again. I check the horizontal and vertical angle while gluing the guide slats.

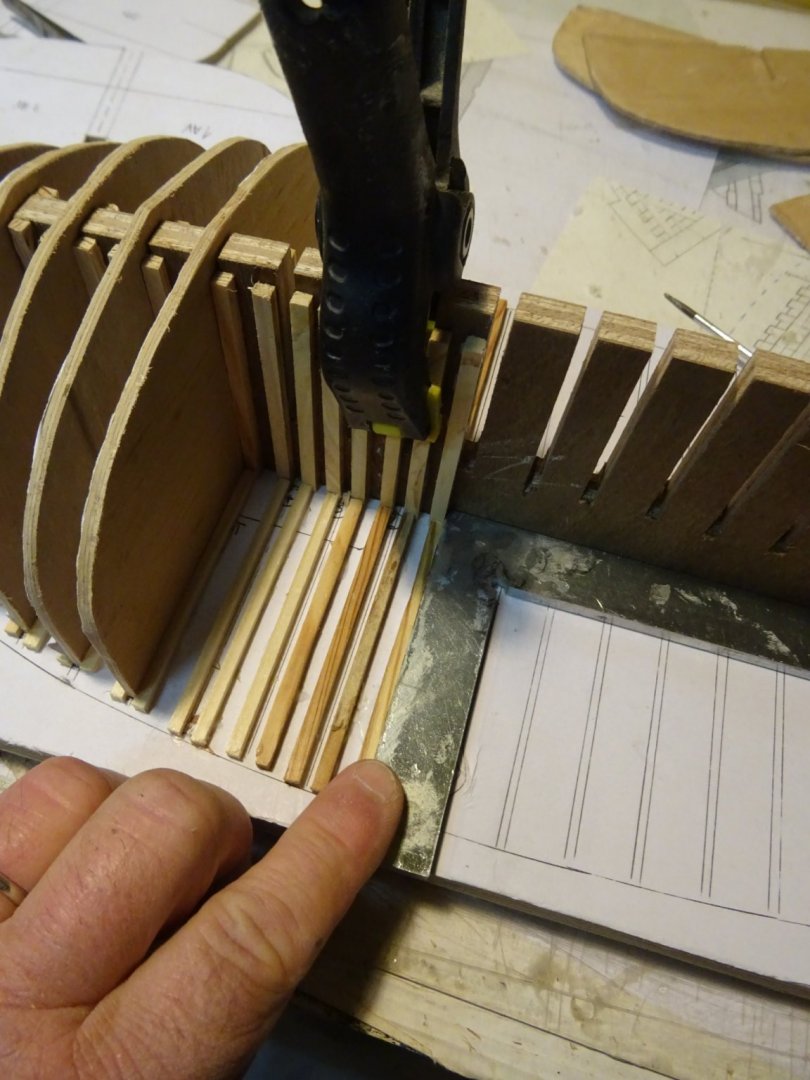
After a while all the templates are placed.

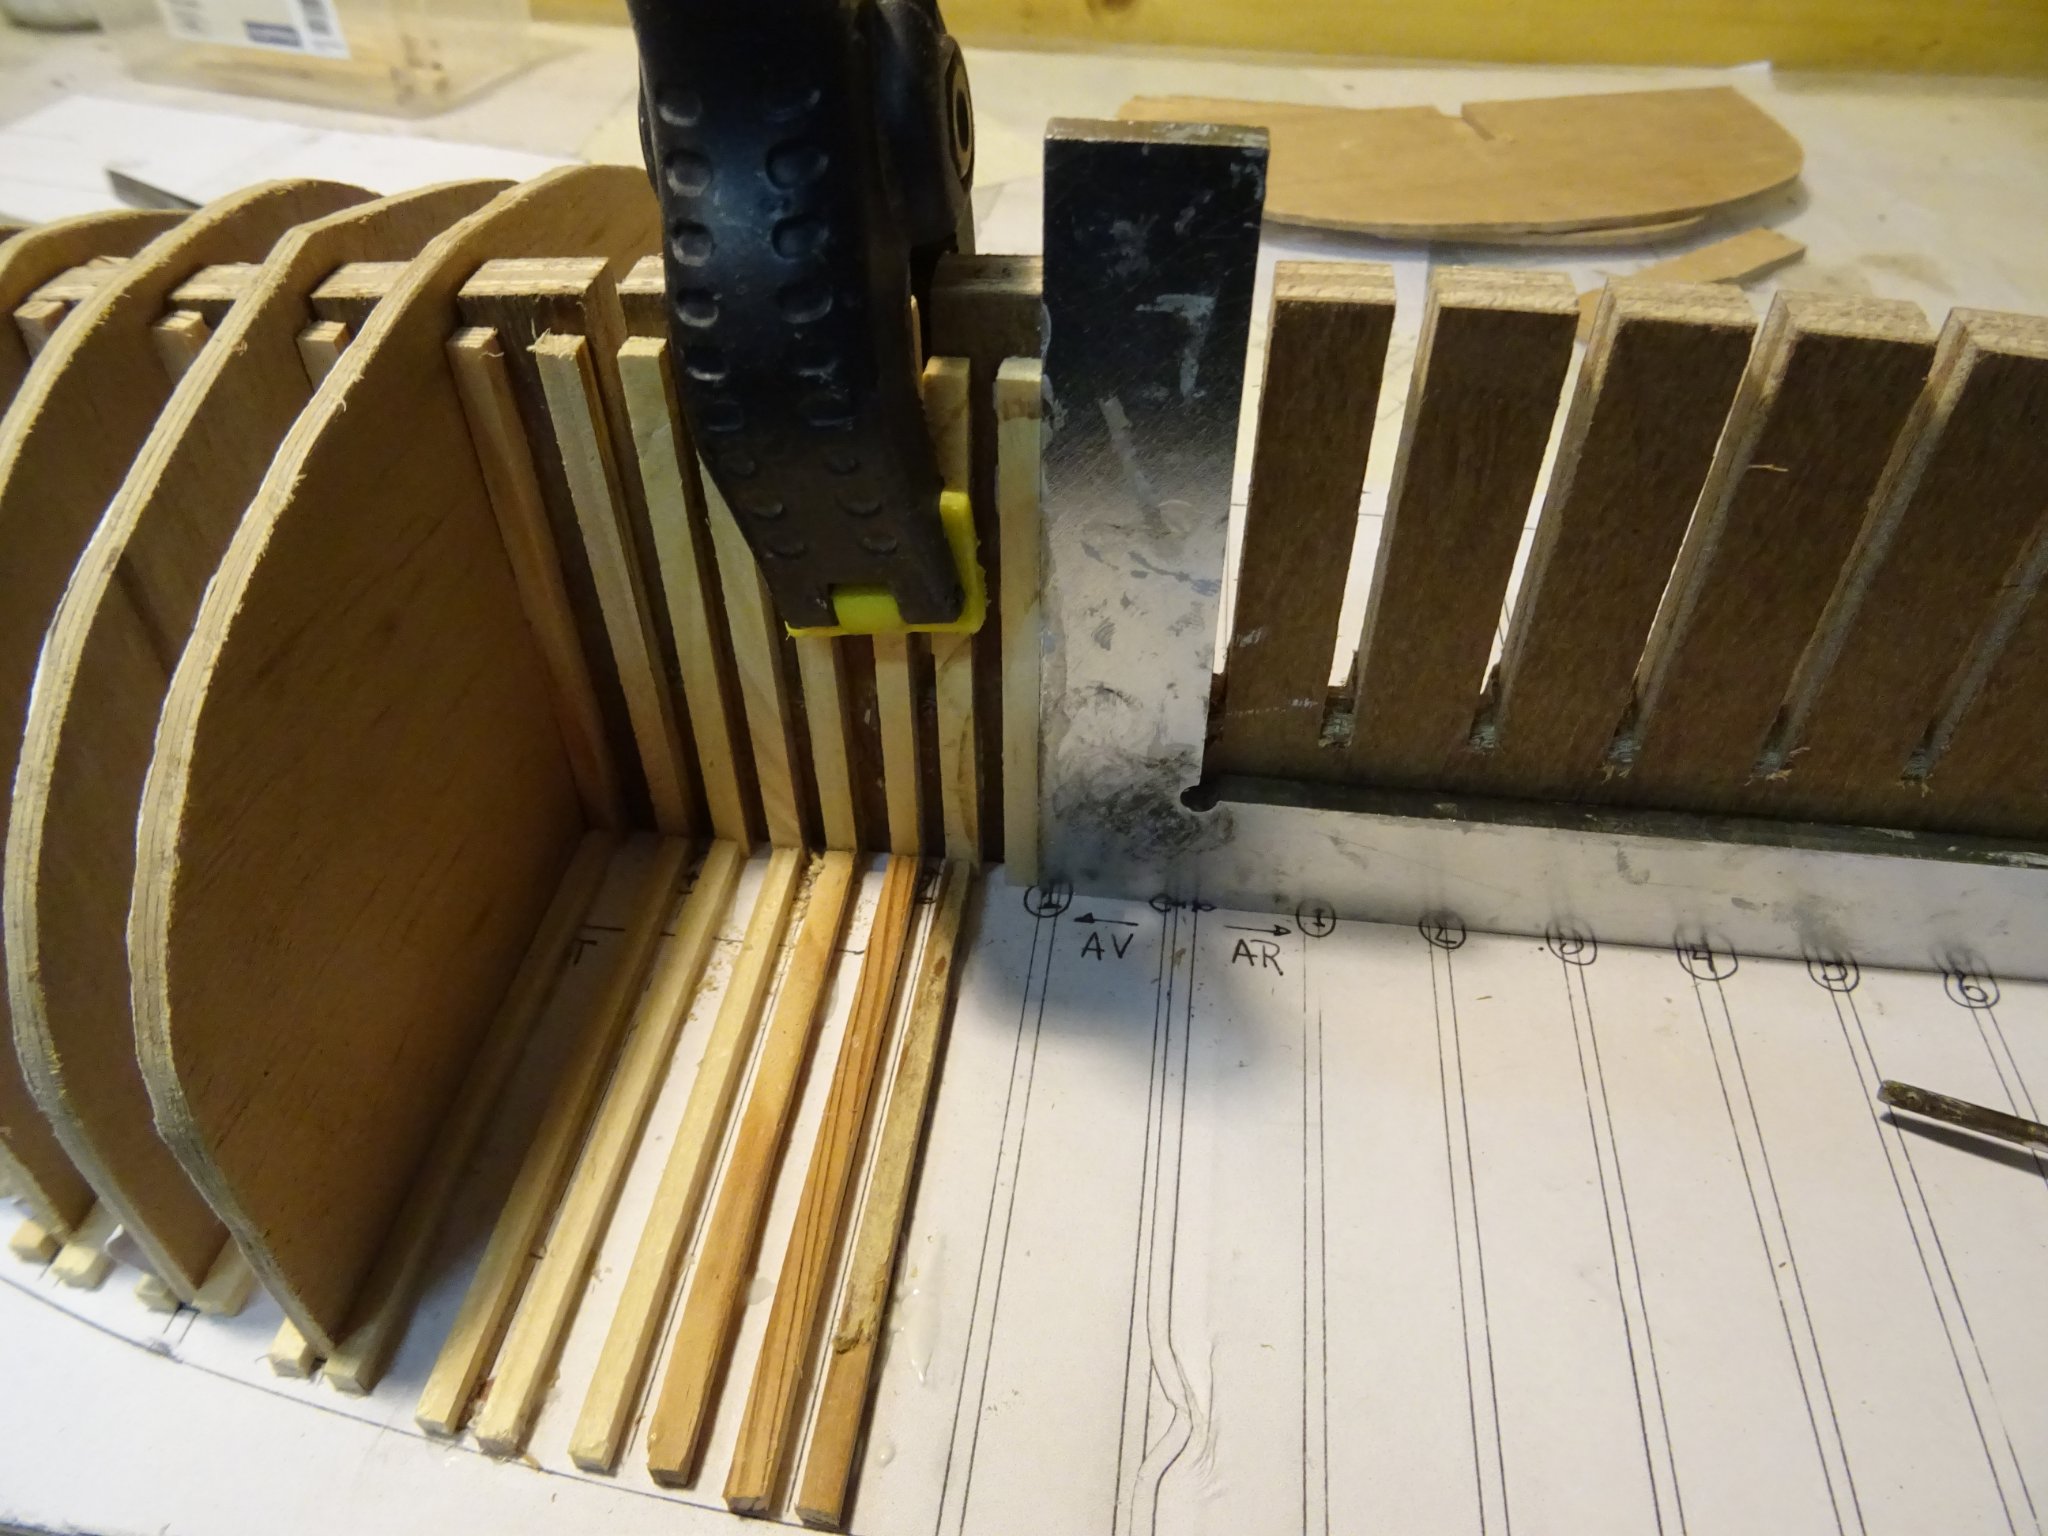
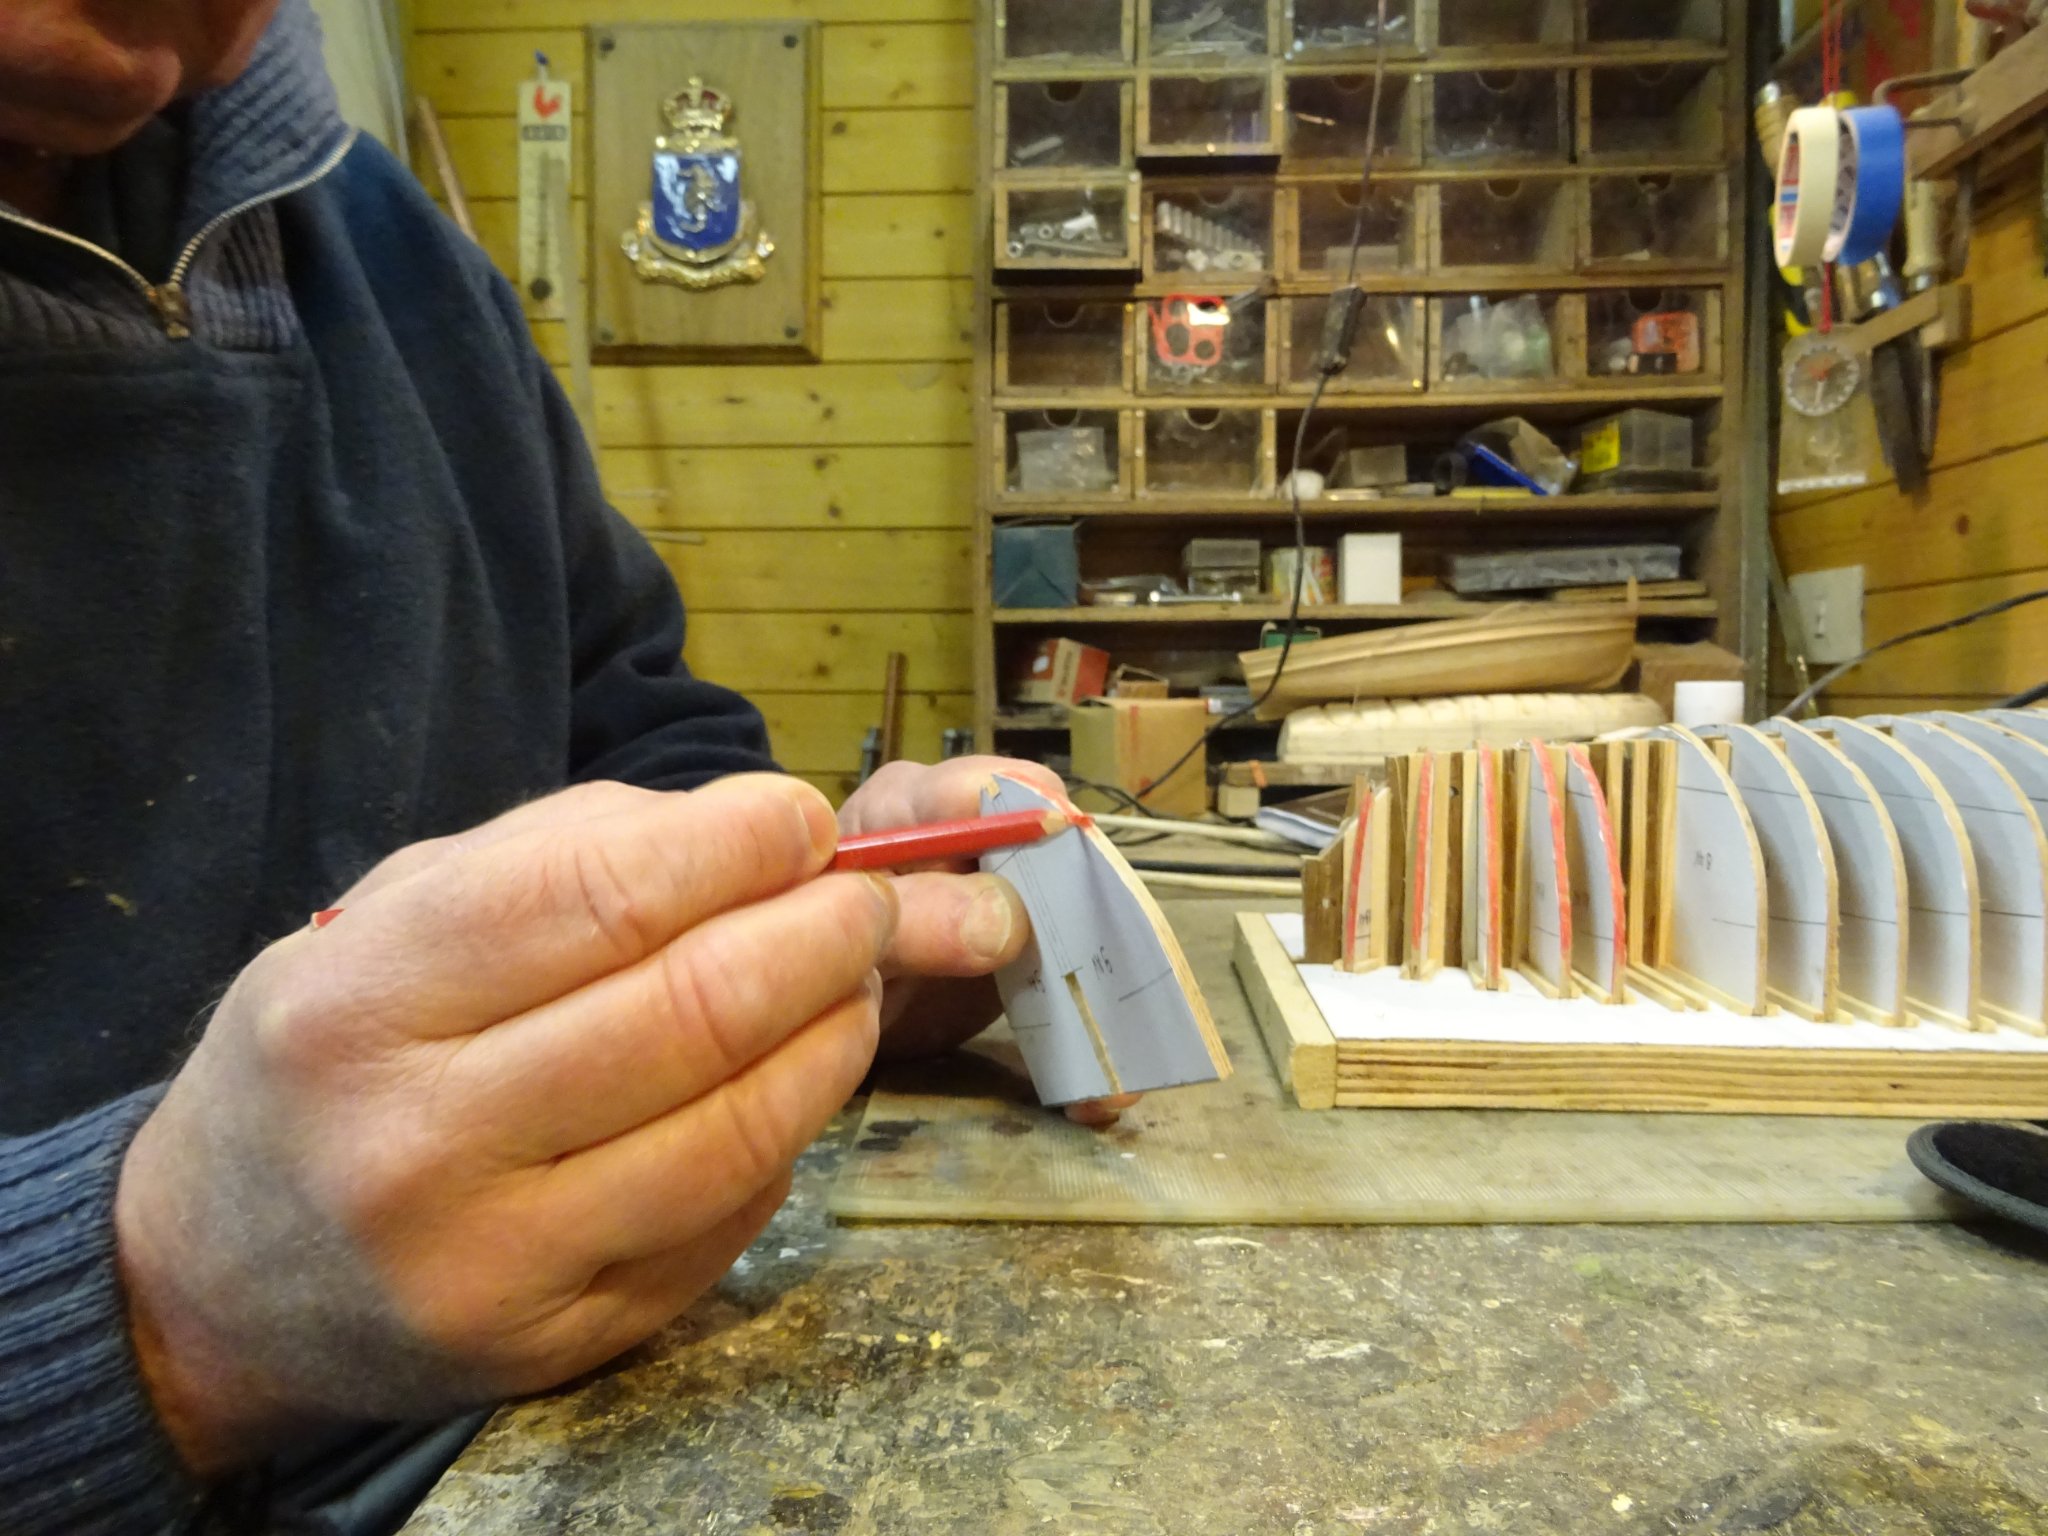
All frames have a different bevel, depending on the position at the front or rear. To smoothly sand the beveled edge of the templates, I start by coloring the edge of them with a red pencil.
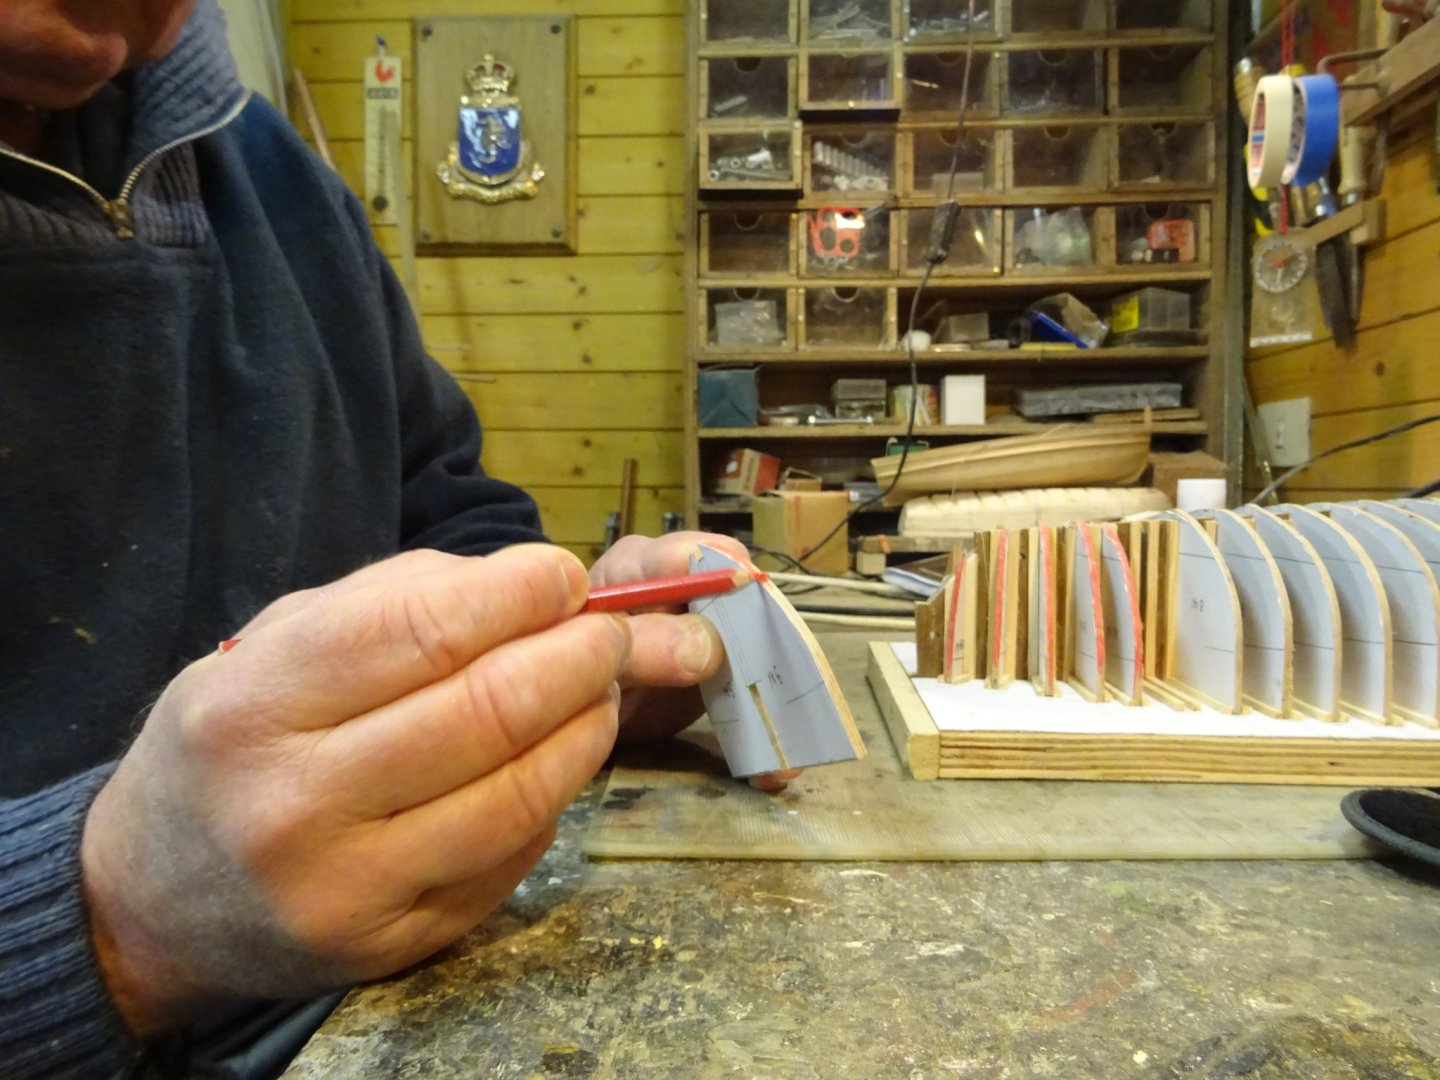

The third after template is visibly wrong and has to be remade.
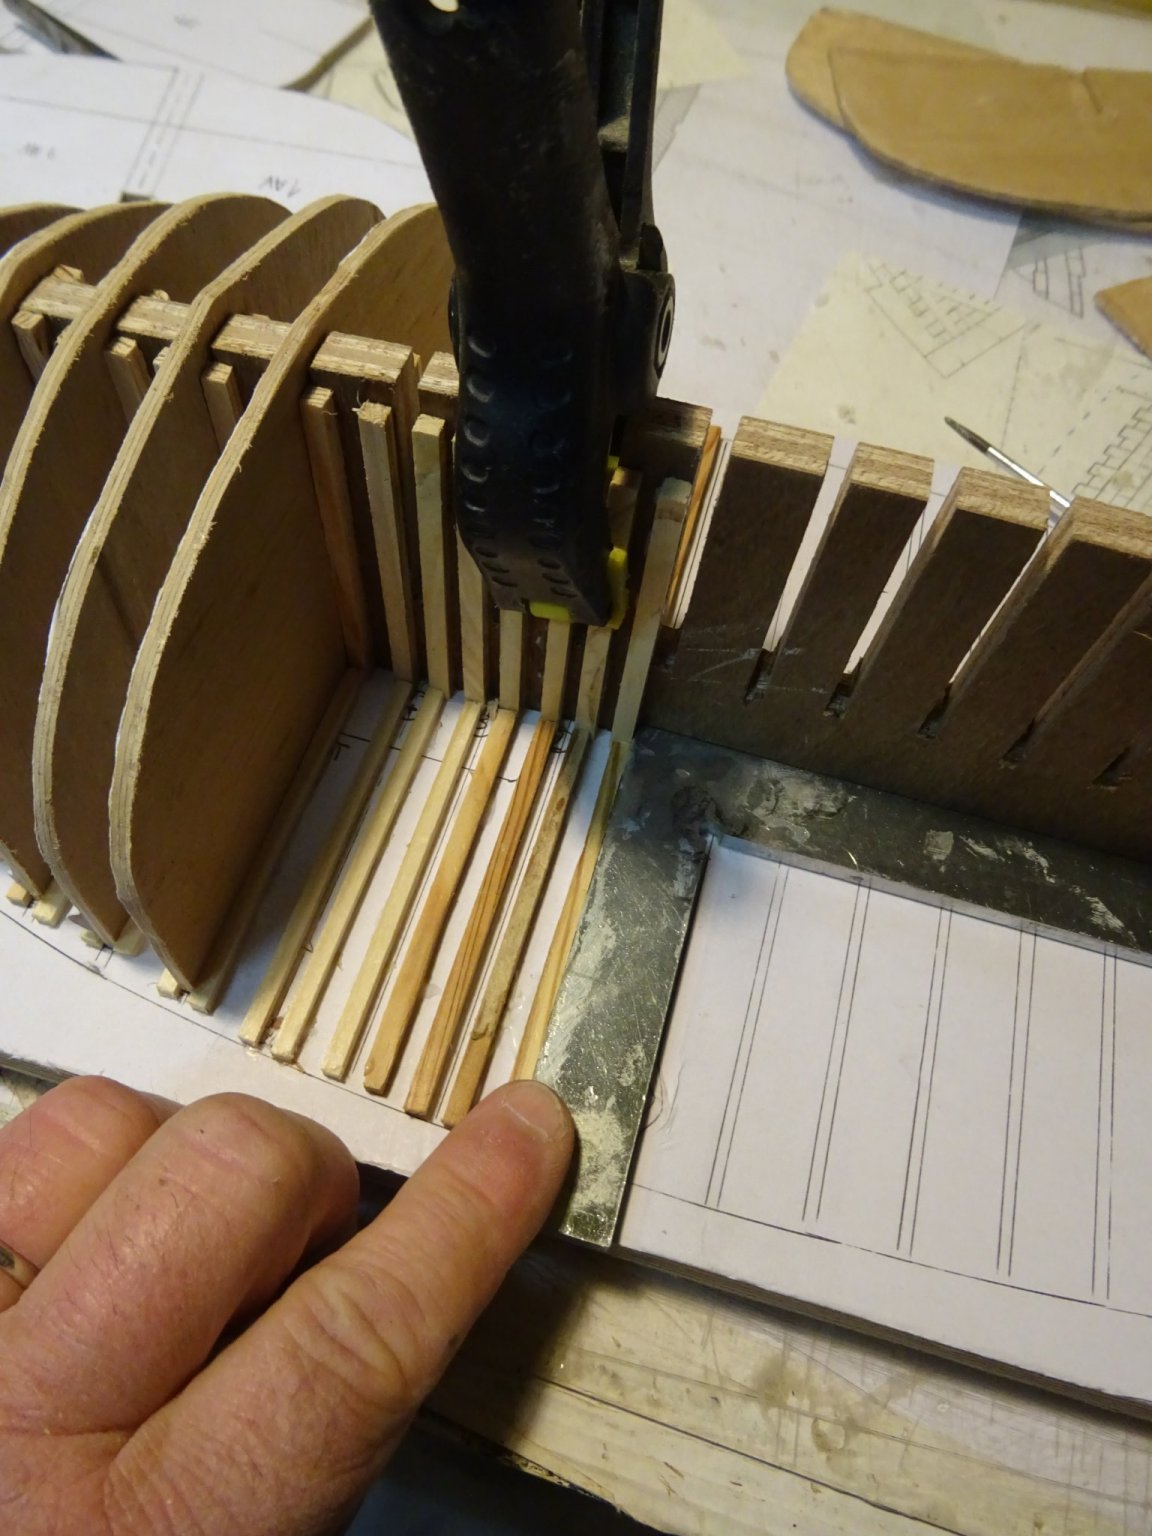
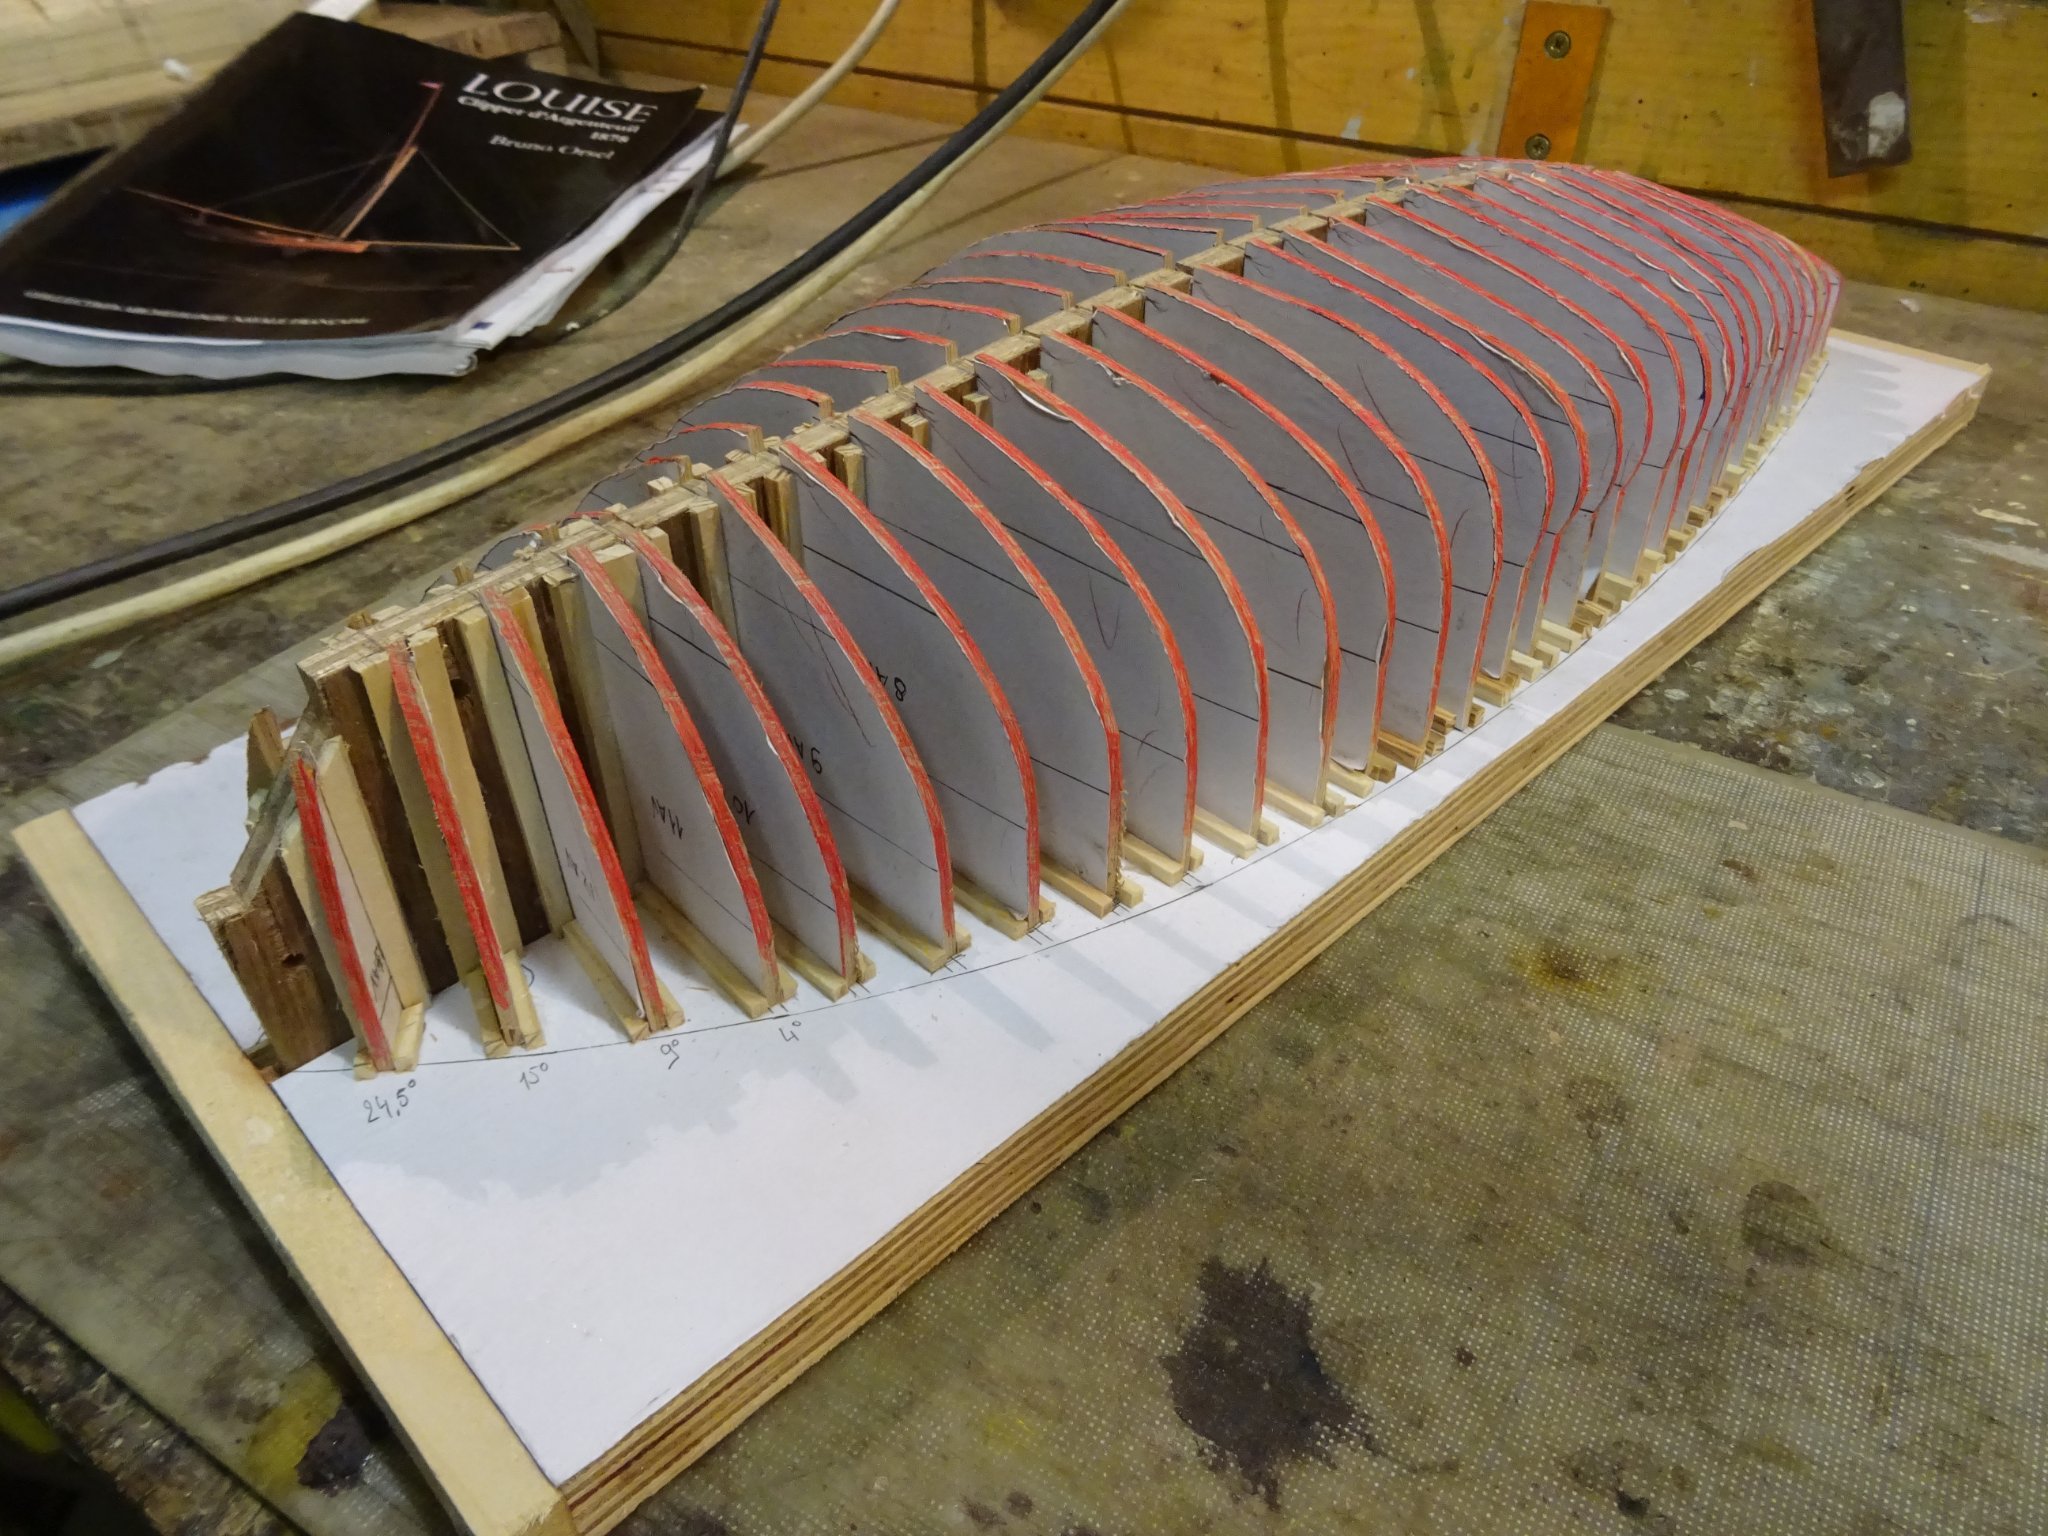
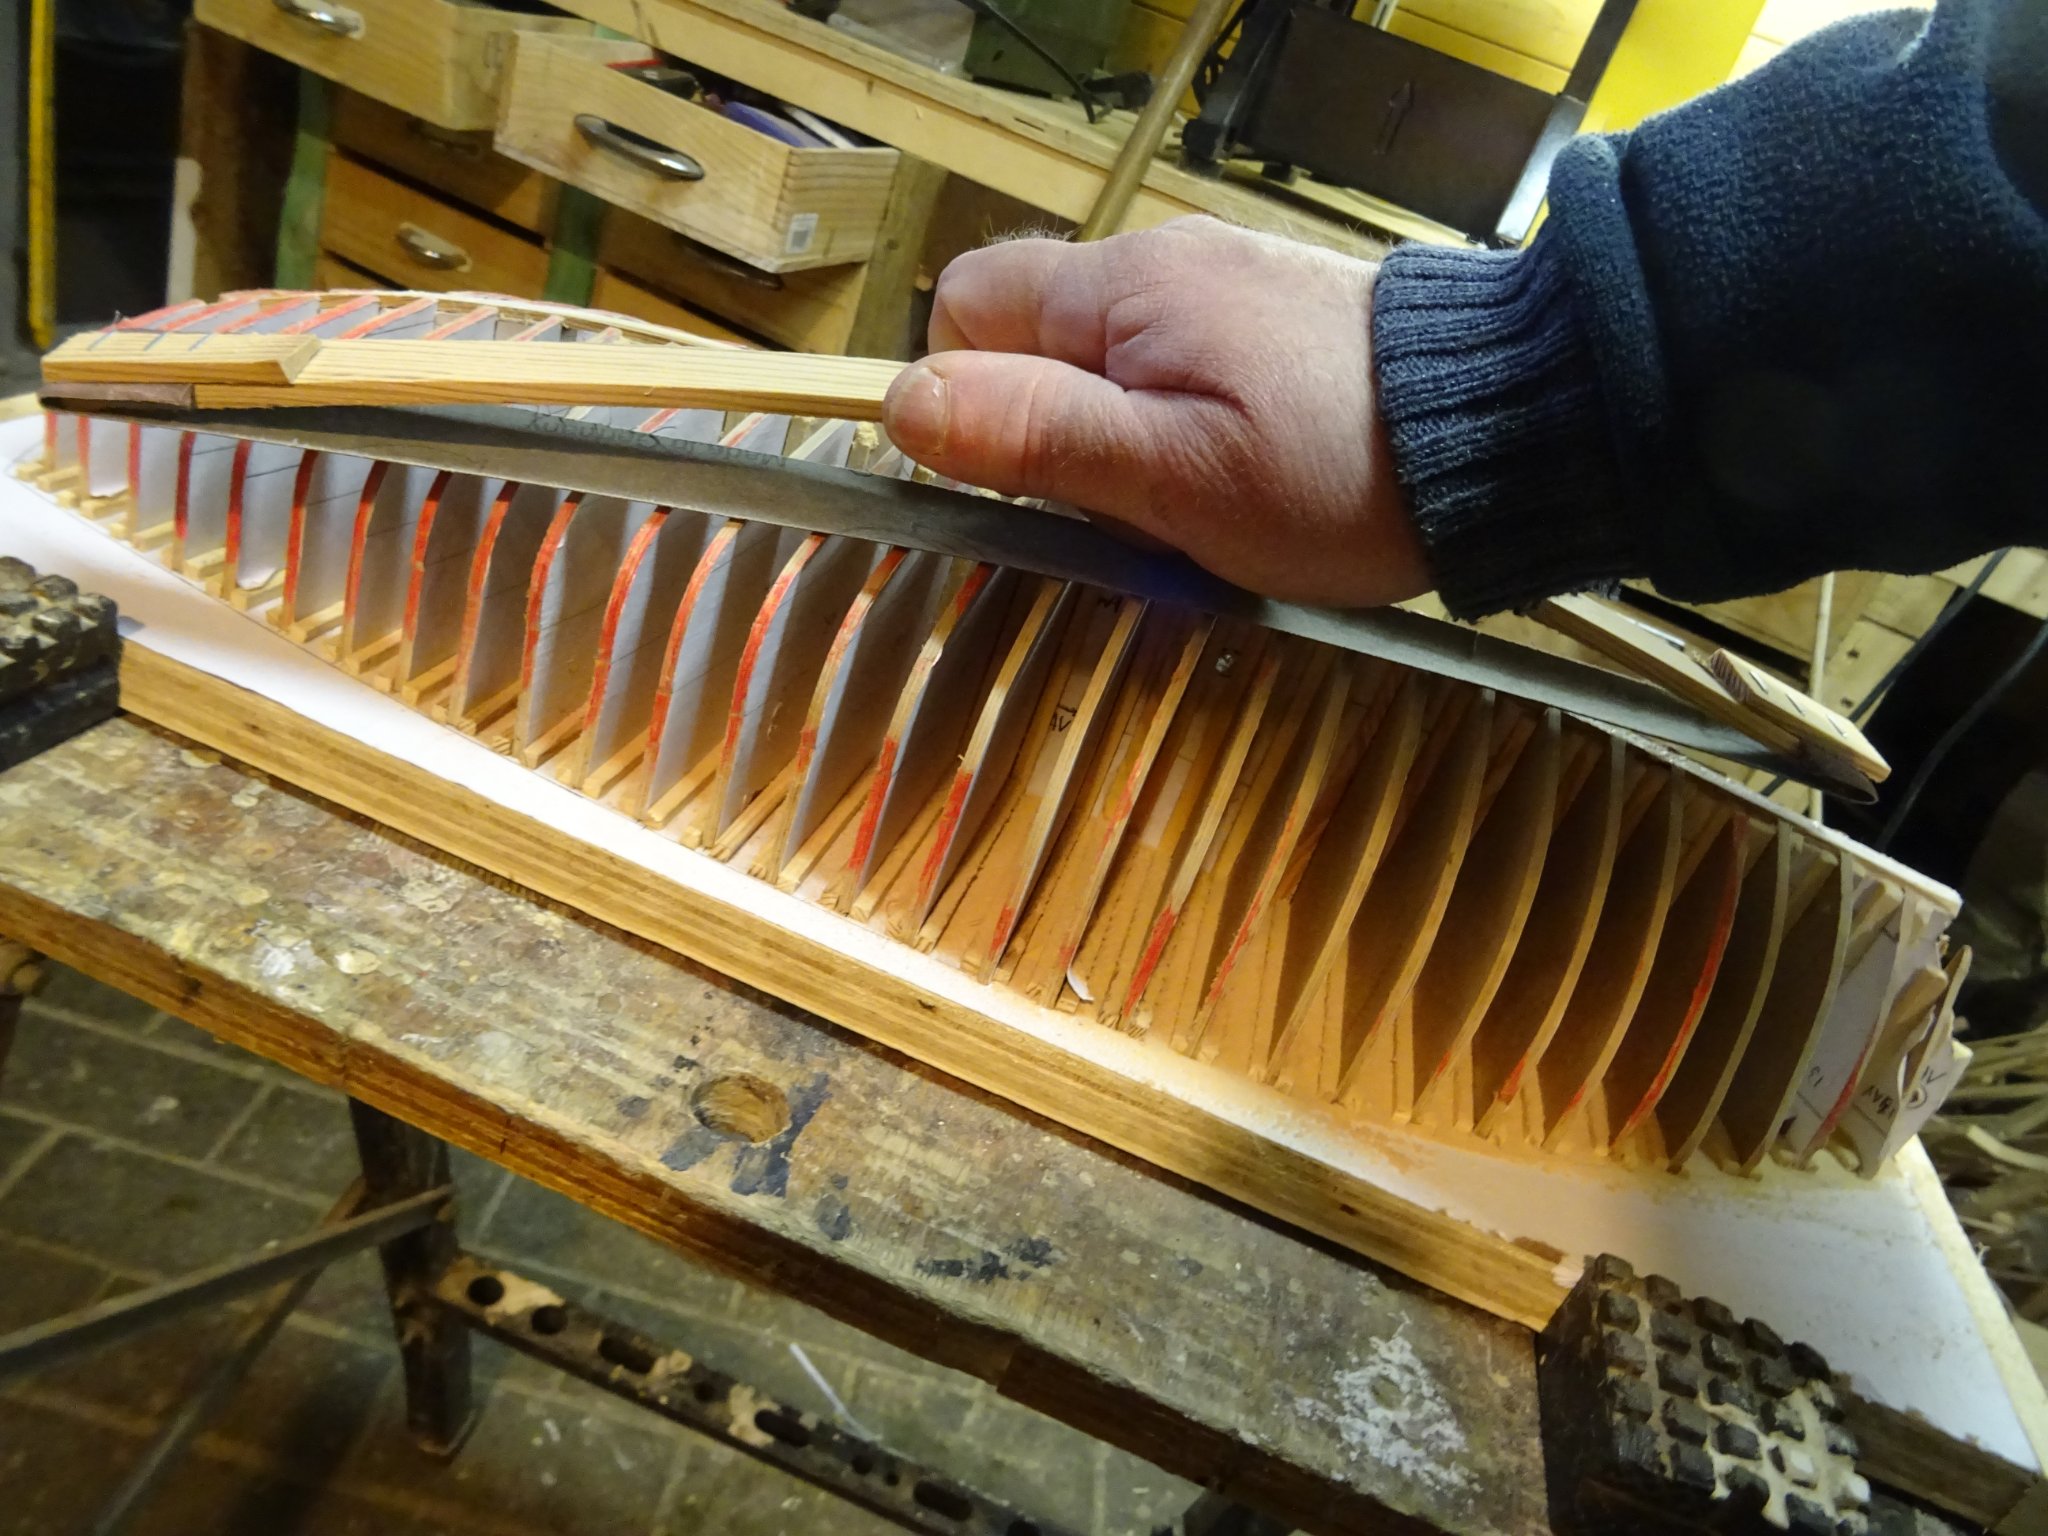
Sanding the templates. I use a kind of bow to do it, a flexible batten with a strip of sandpaper stapled on it. I sand until the pencil color has just disappeared

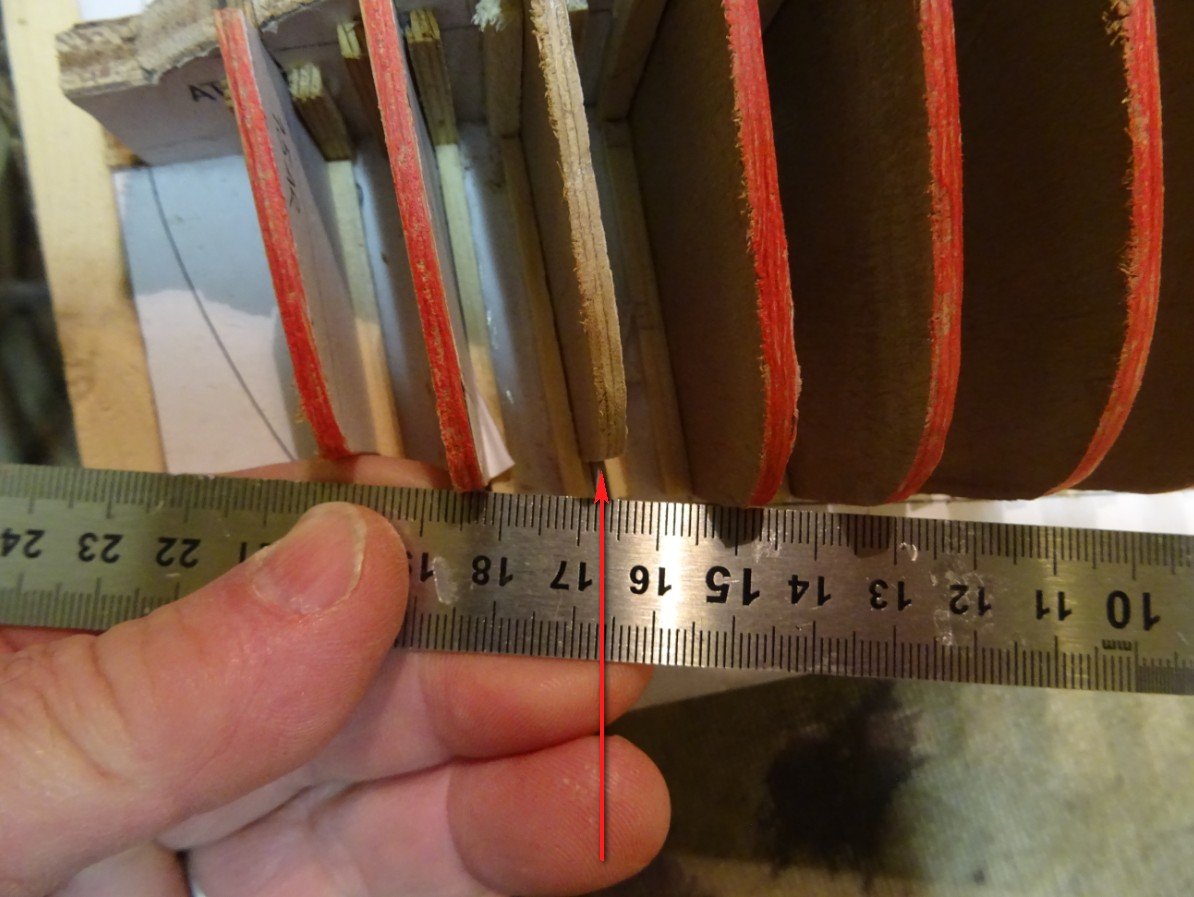
Portside is done:
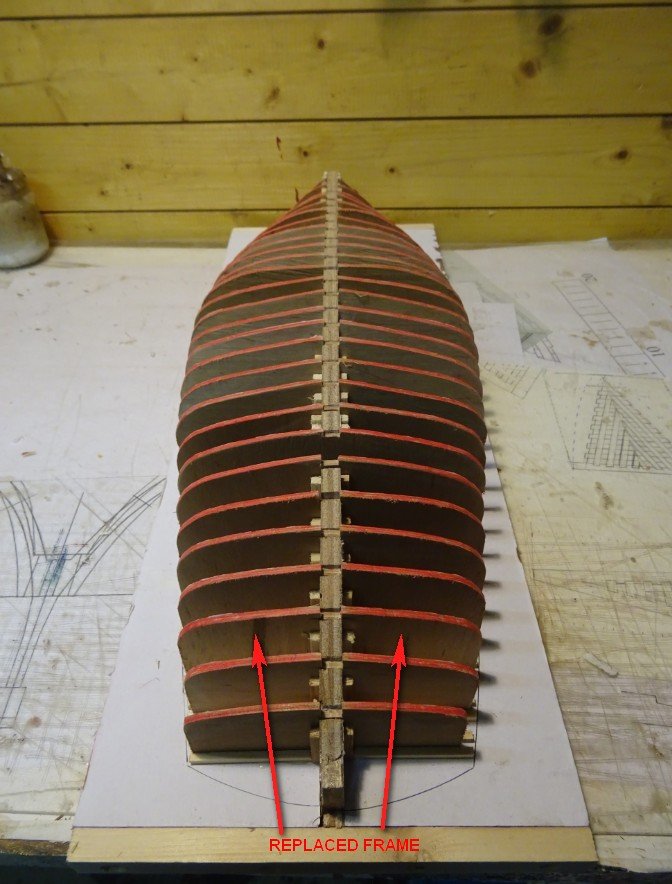
when both sides are sanded, it becomes clear that the fifth frame from the front is also a bit too narrow. This one must also be remade.
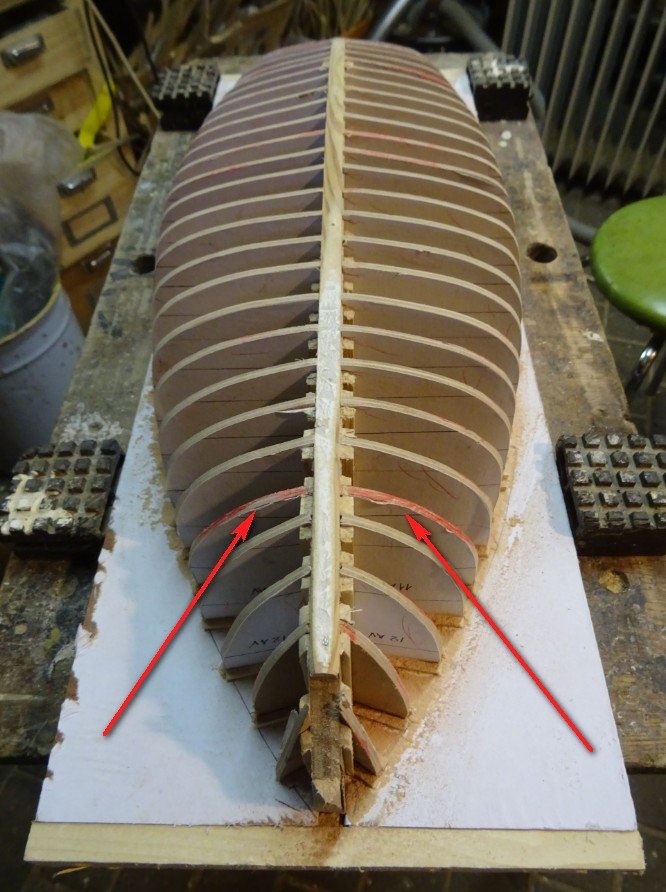
Frame remade and sanded.

Now I can start to make the frames.Thank you for reading this log, for your comments and likes.
Till next week!
-
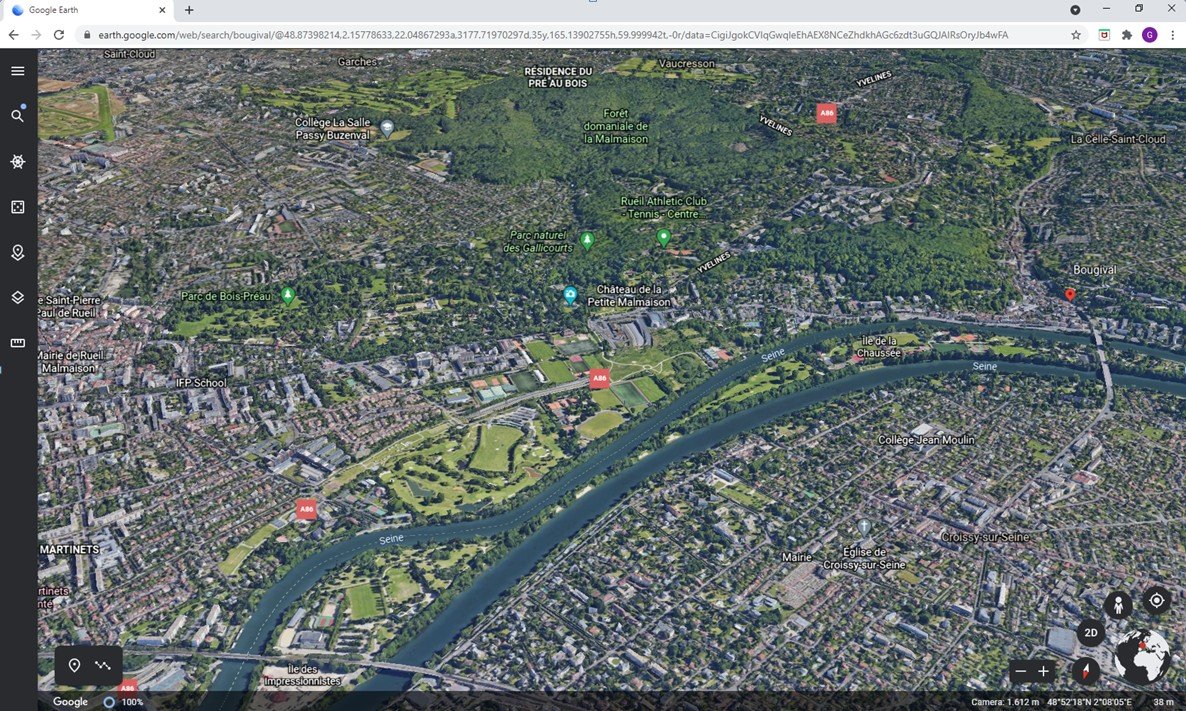
Before starting the work in my workshop I will have to make a new virtual trip to France (I would like to do it in real time, but unfortunately that is not allowed now). Eberhard (Wefalck) lives in the Paris region and pointed out to me that the Bassin d'Argenteuil is situated about ten km further to the southwest than I wrote in my introduction. I took a walk there, again virtually with Google street view, and indeed, the banks of the Seine look much more pleasant over there and invite to water sports. So, to correct my mistake, follow the Seine a dozen km further upstream from the bridge of Argenteuil and you arrive here at this lovely location (source Google Earth):
-
Nice progress, Vaddoc. The hull is starting to take shape. It looks as in real live.
-
-
Looks like a beautiful project.
I am looking forward to your new log.
- mtaylor and Jorge Diaz O
-
1
-
 1
1
-
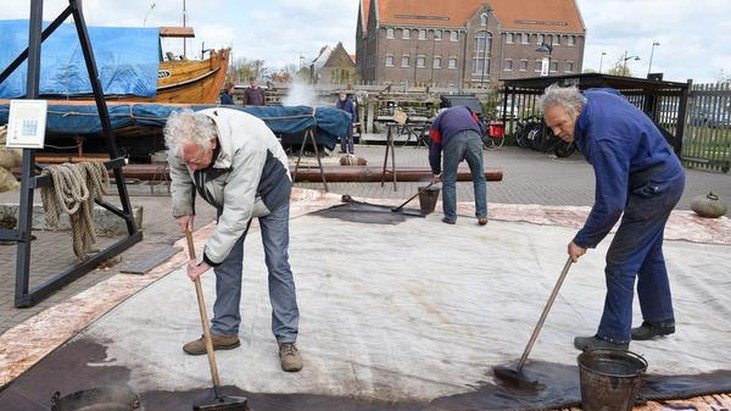
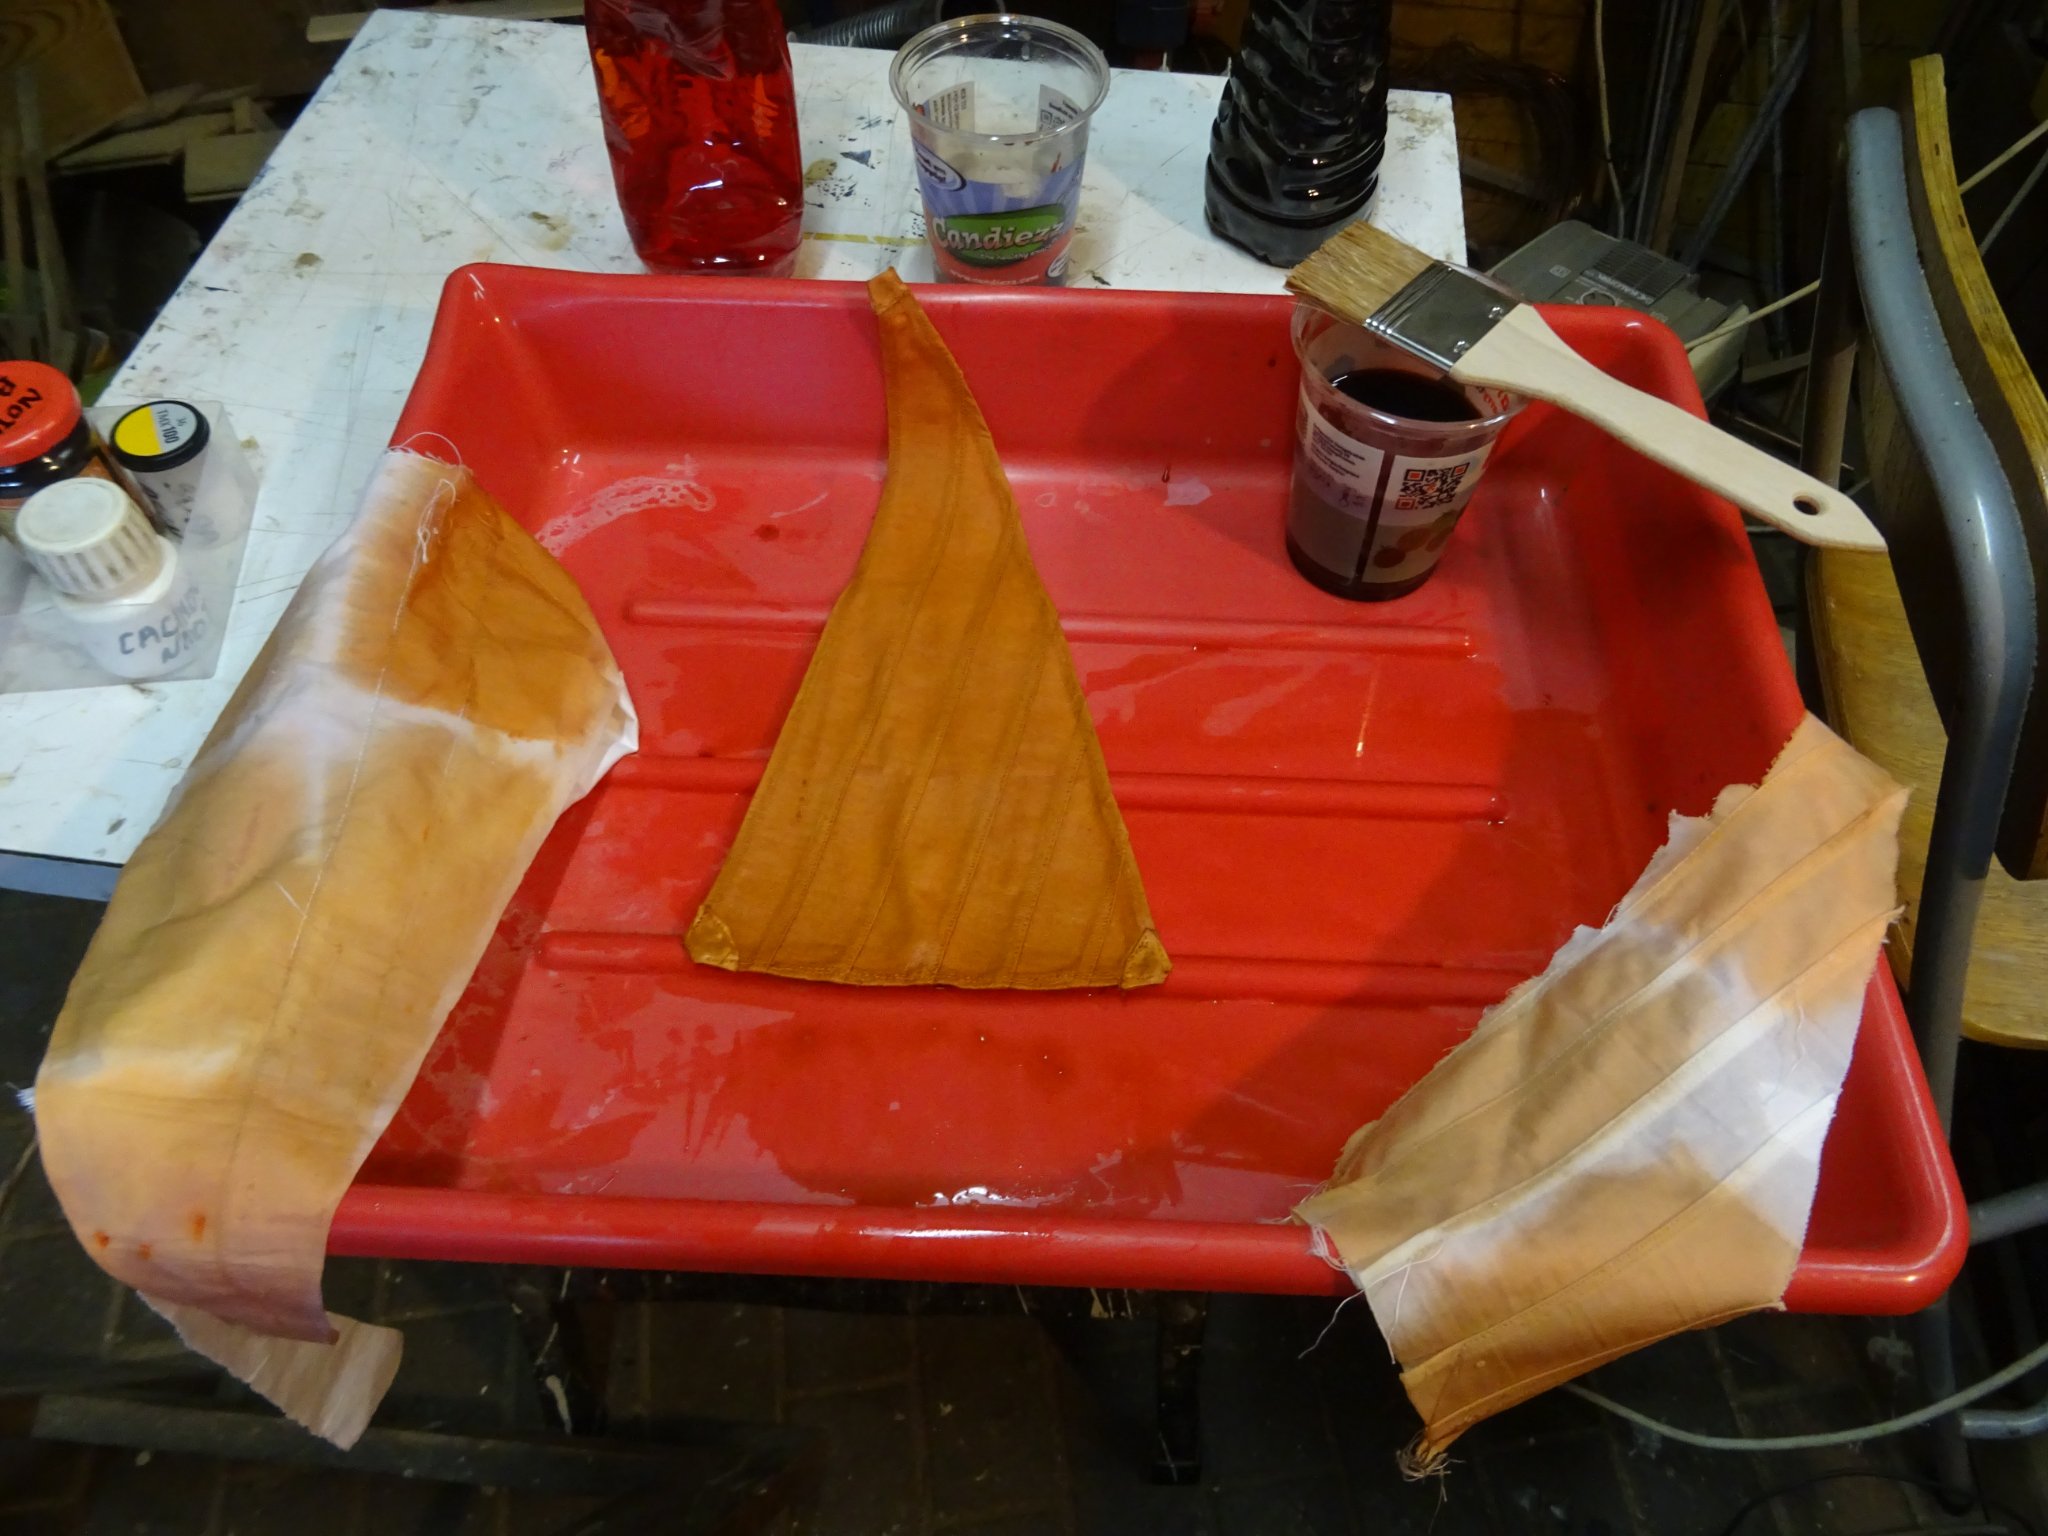
A new boat first sailed a year with new white sails until they get well their shape, than they are tanned. The tanning was done by soaking the sails with an infusion of oak bark or the bark of betel palm or acacia. The reason of the tanning was to protect the sails against mold or rot. The tanning was done with scouring brushes on a concrete or stone floor. After the tanning the color of the sails can vary from dark brown to red.
(Source of the photo: Noord Hollands Dagblad)
To make my color a modeler friend gives me the necessary ingredients: bister powder of walnut and cashew nut and soda crystals (sodium carbonate). The color has to be made by diluting some bister powder in boiling water and adding a bit soda crystals as a fixate. I make two colors : dark brown with walnut and red with cashew. I use a table spoon walnut on one liter water and a teaspoon cashew on one liter water (cashew is more intense).
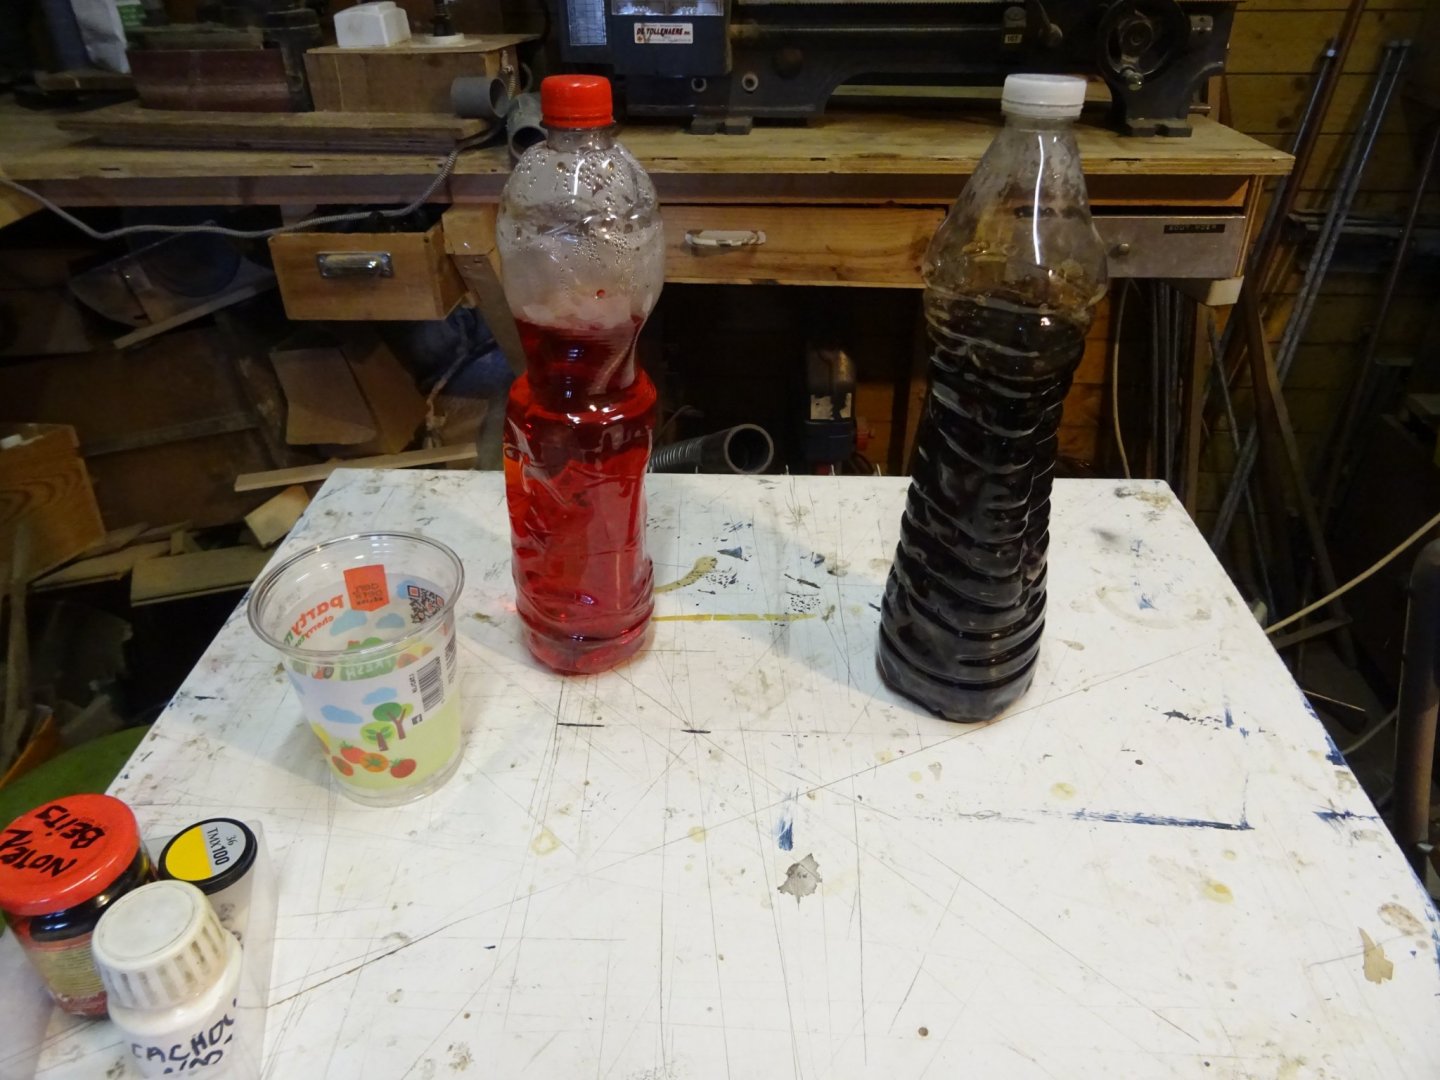
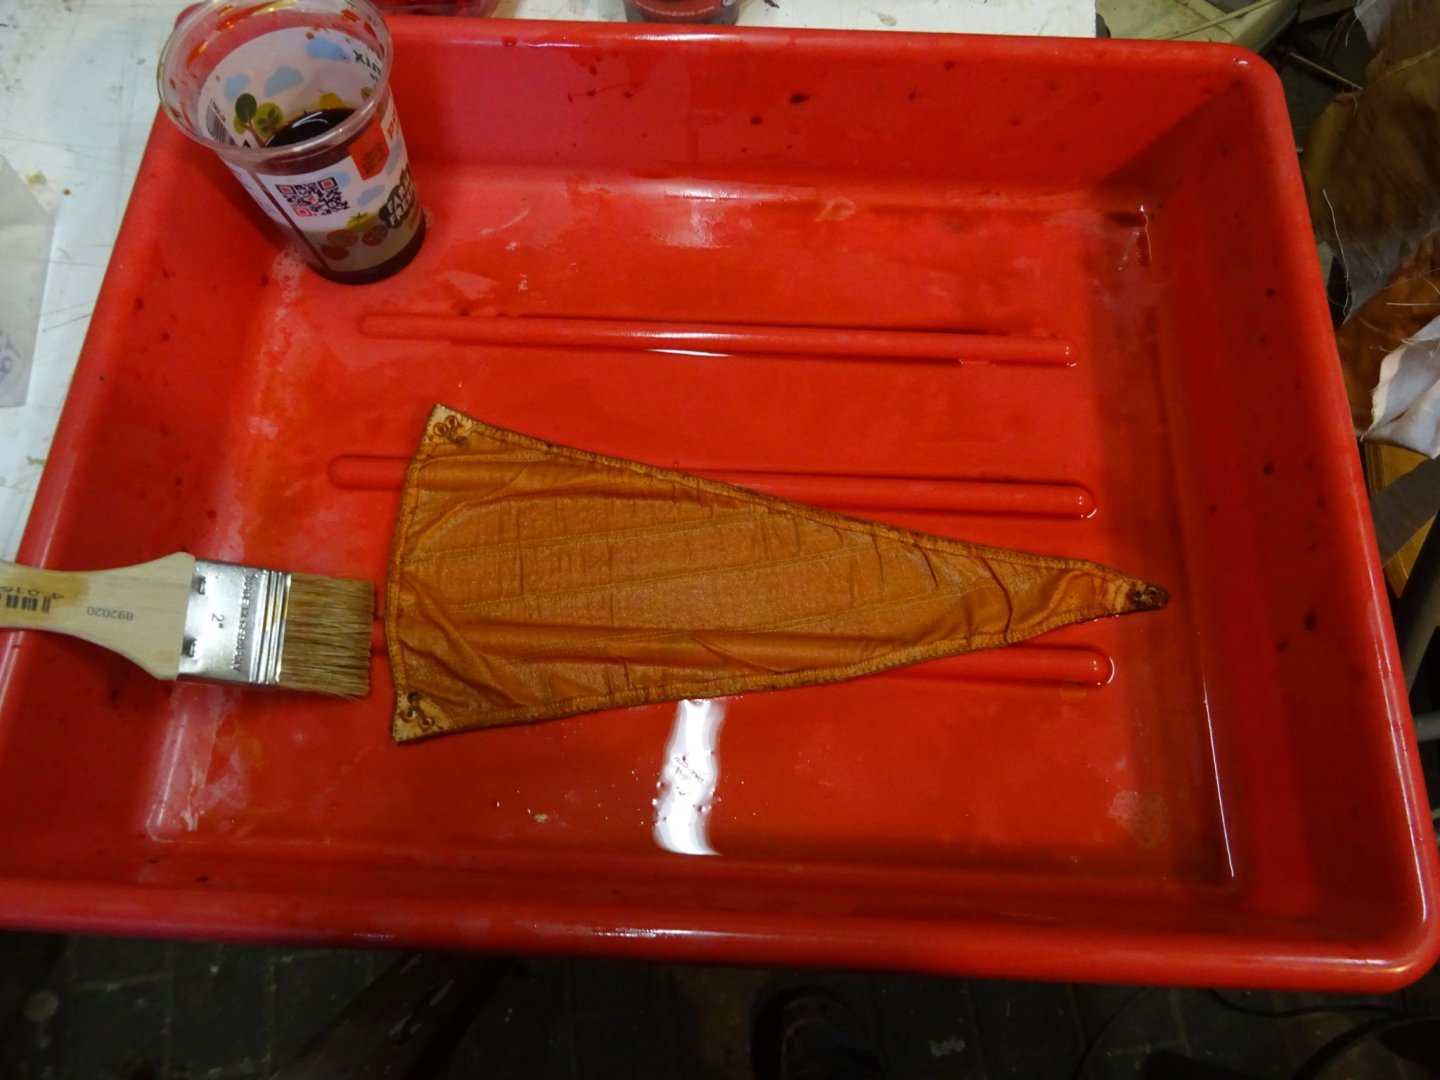
I want a color that leans more towards the red and start to try out various mixtures on samples of sail textile.

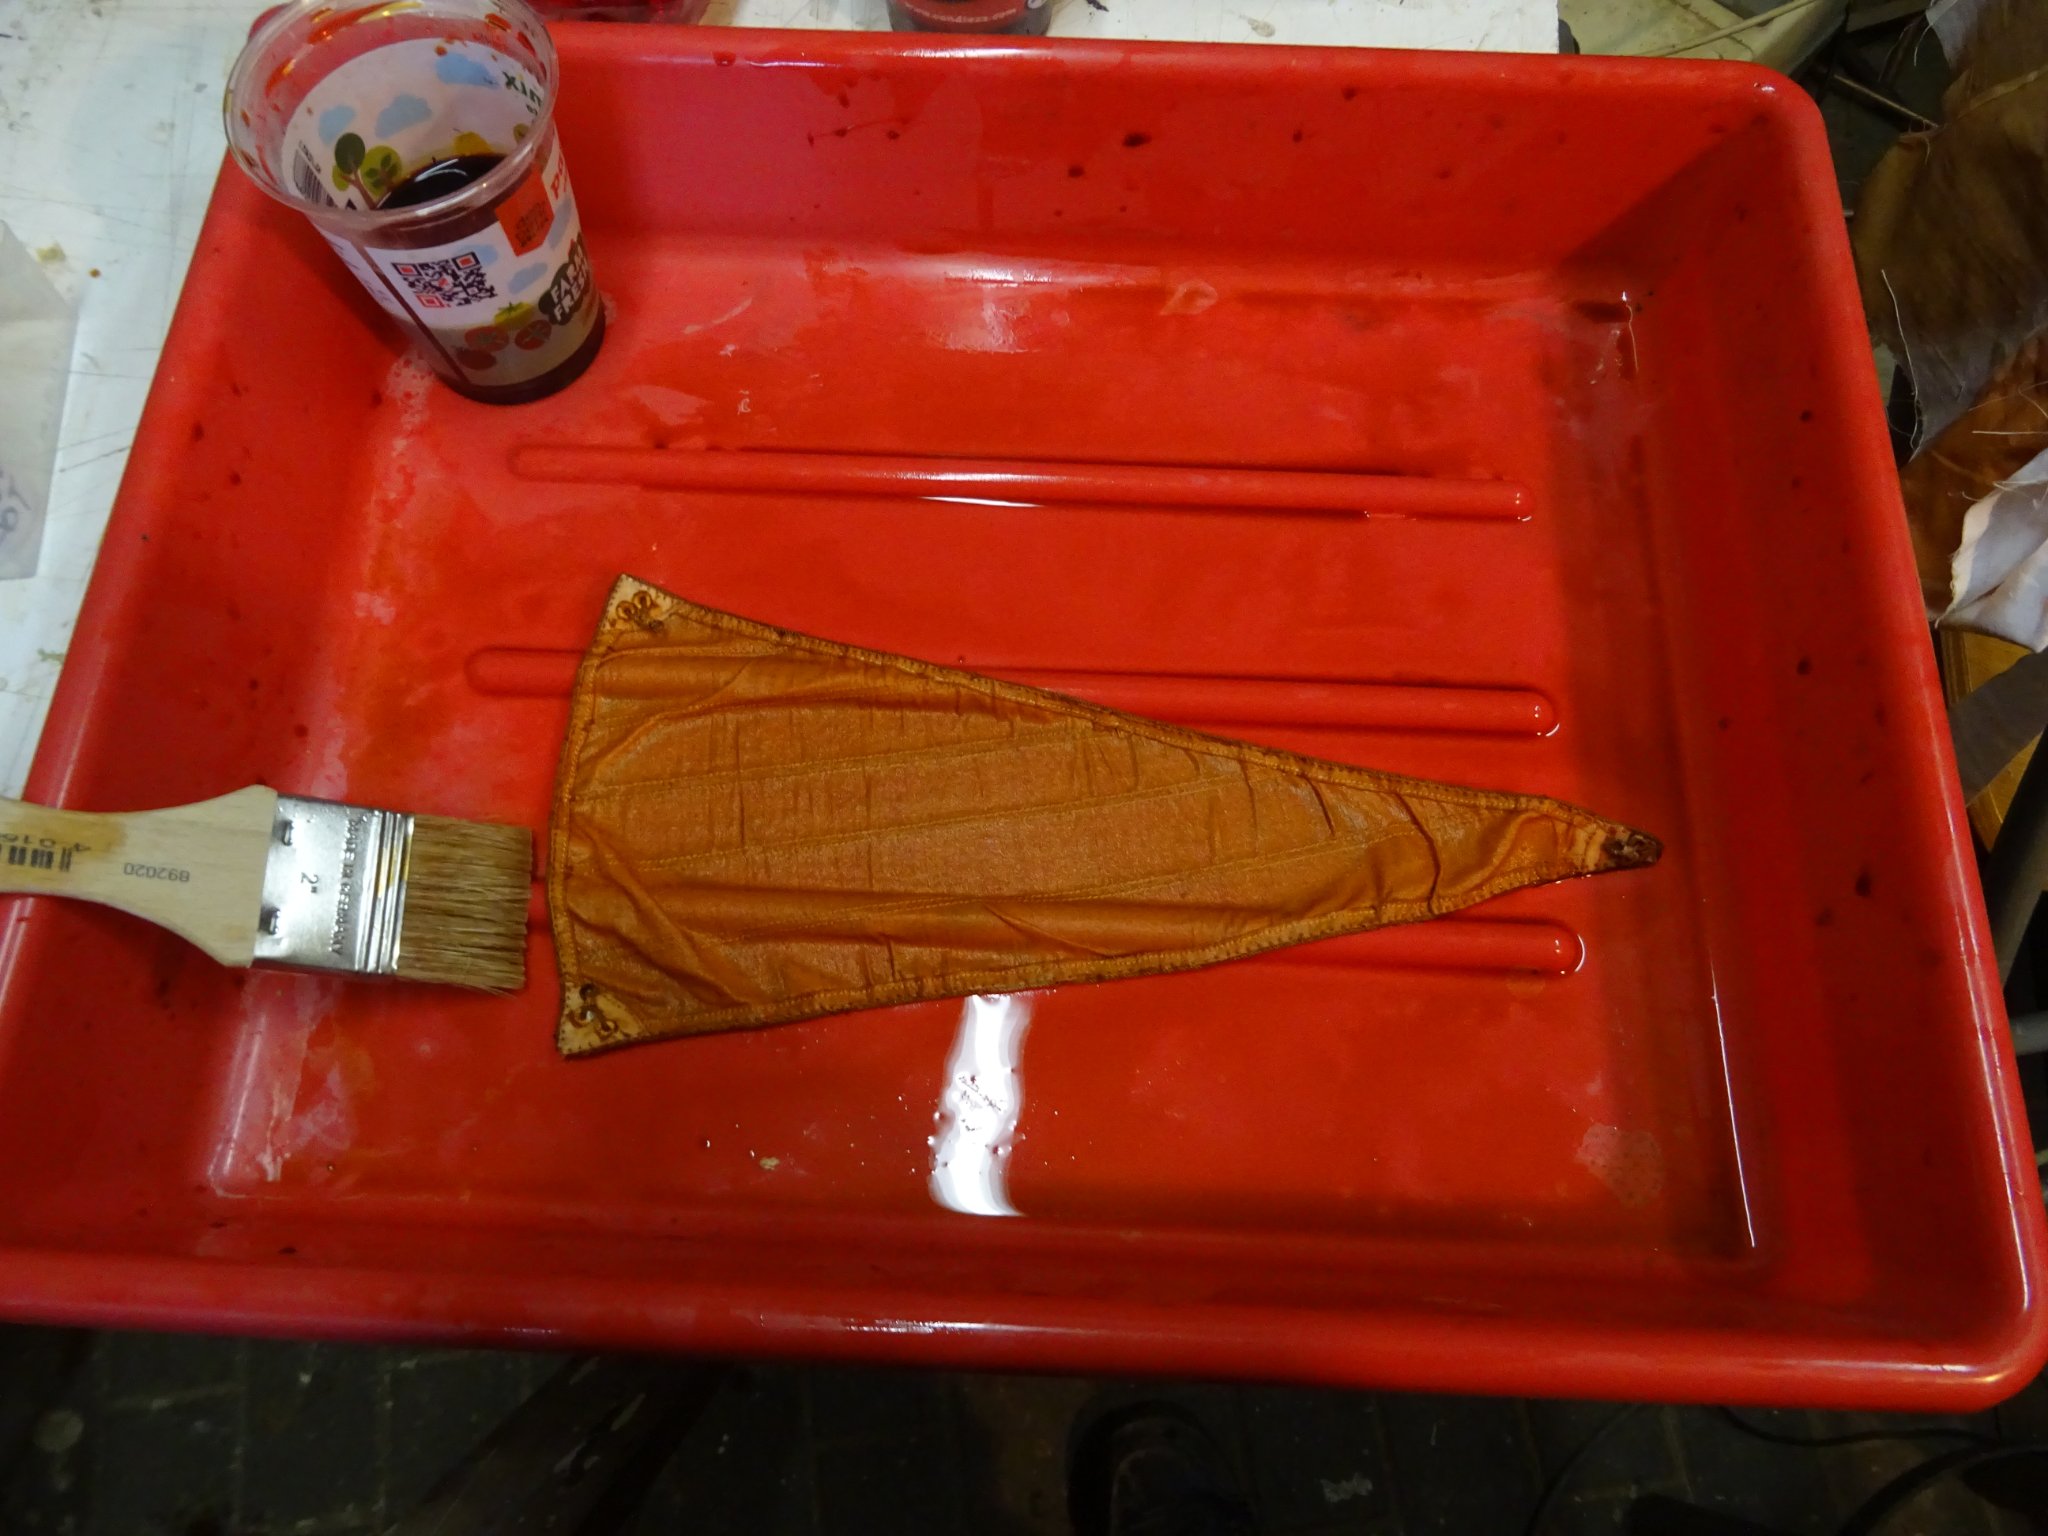
I finally find the shade that I need and start to color the sails. The tanning is done with a wide brush in a photo development tray.
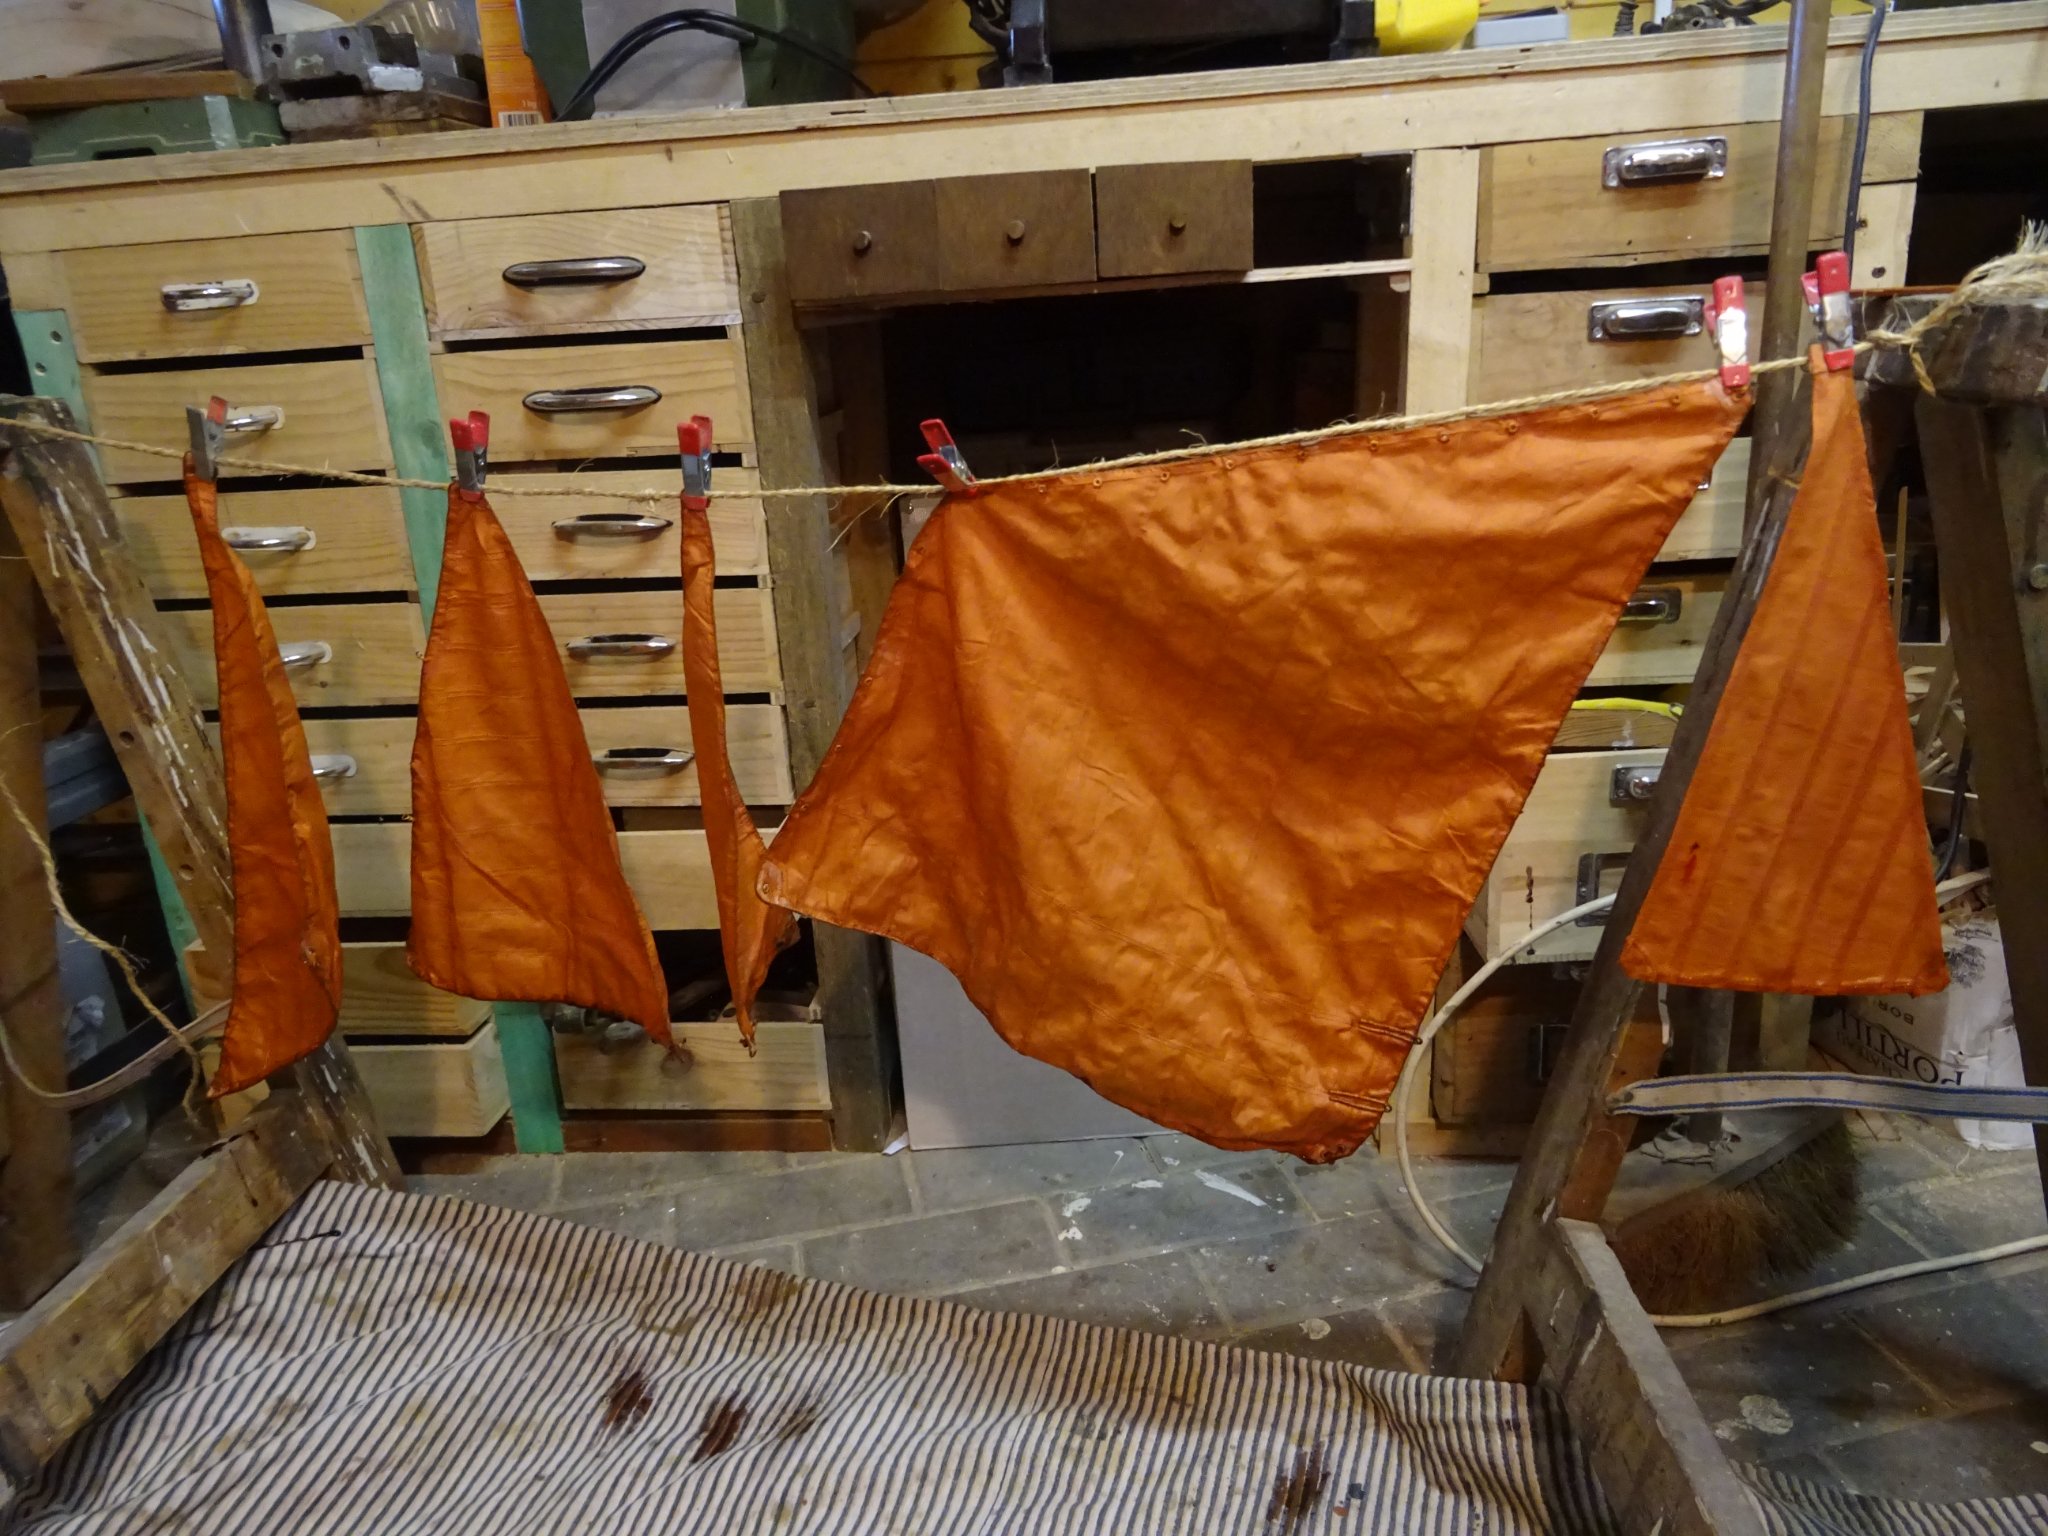
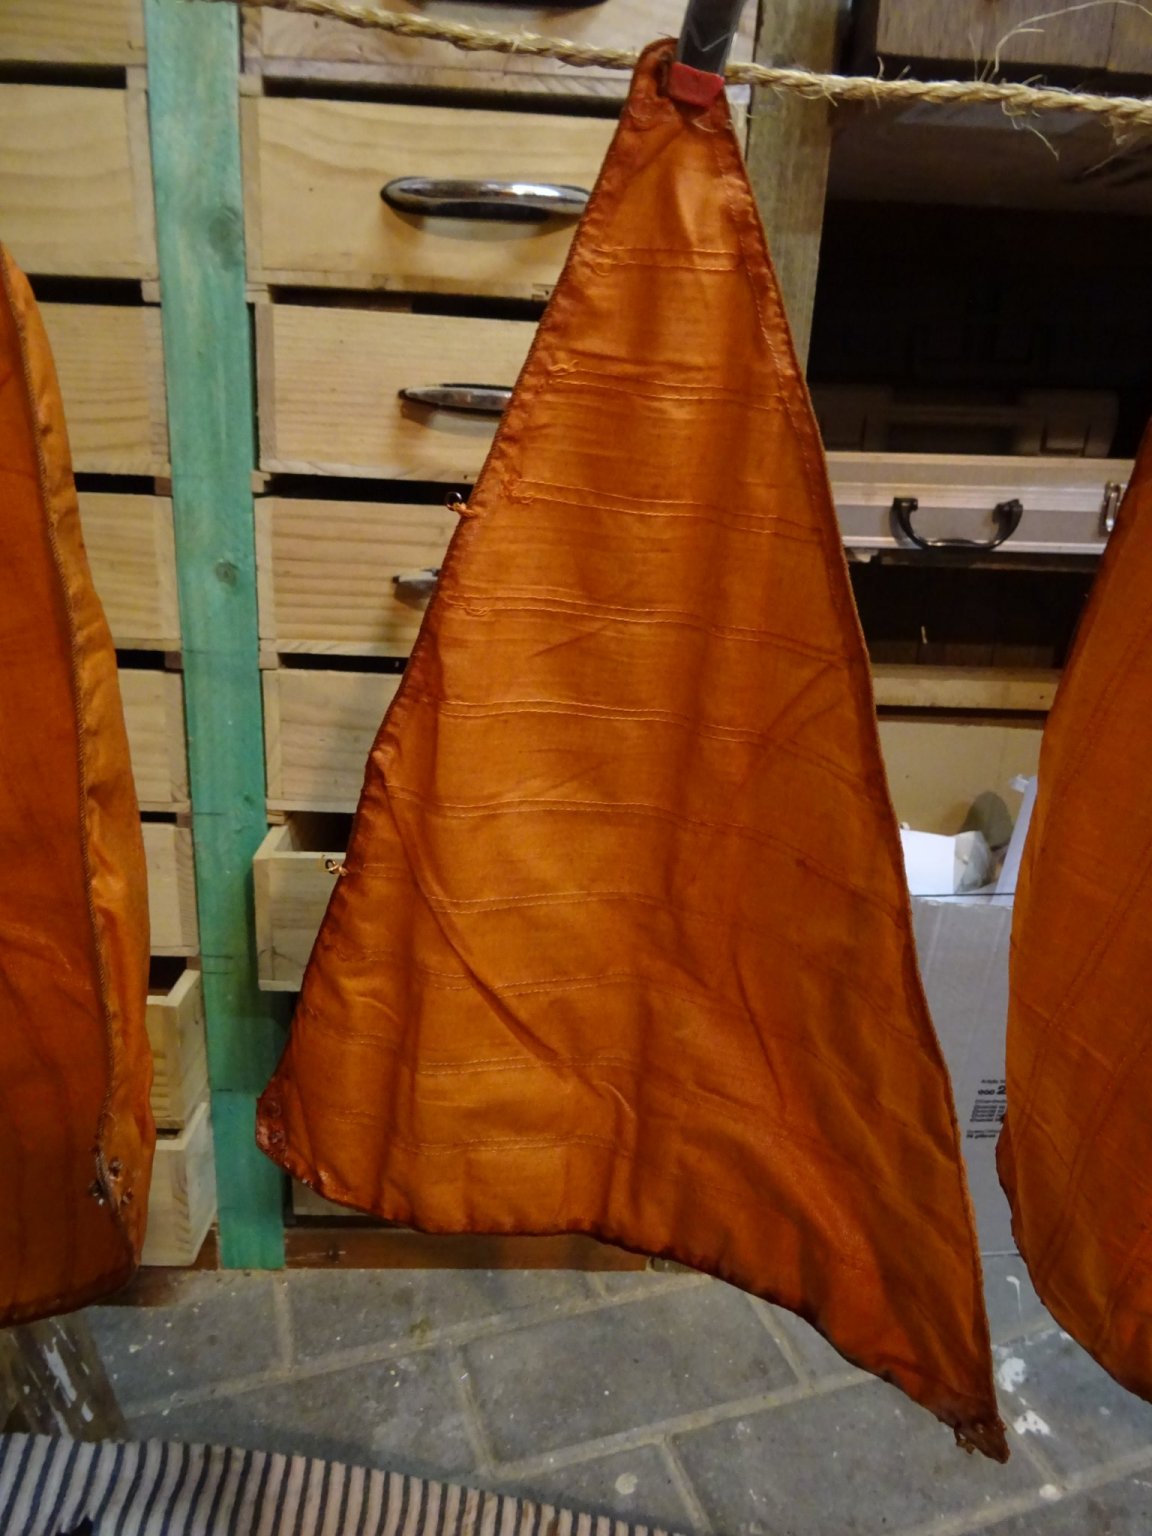
I hang up the sails to let them drain.

After a while, the color starts to sink and the sails darken on the underside.
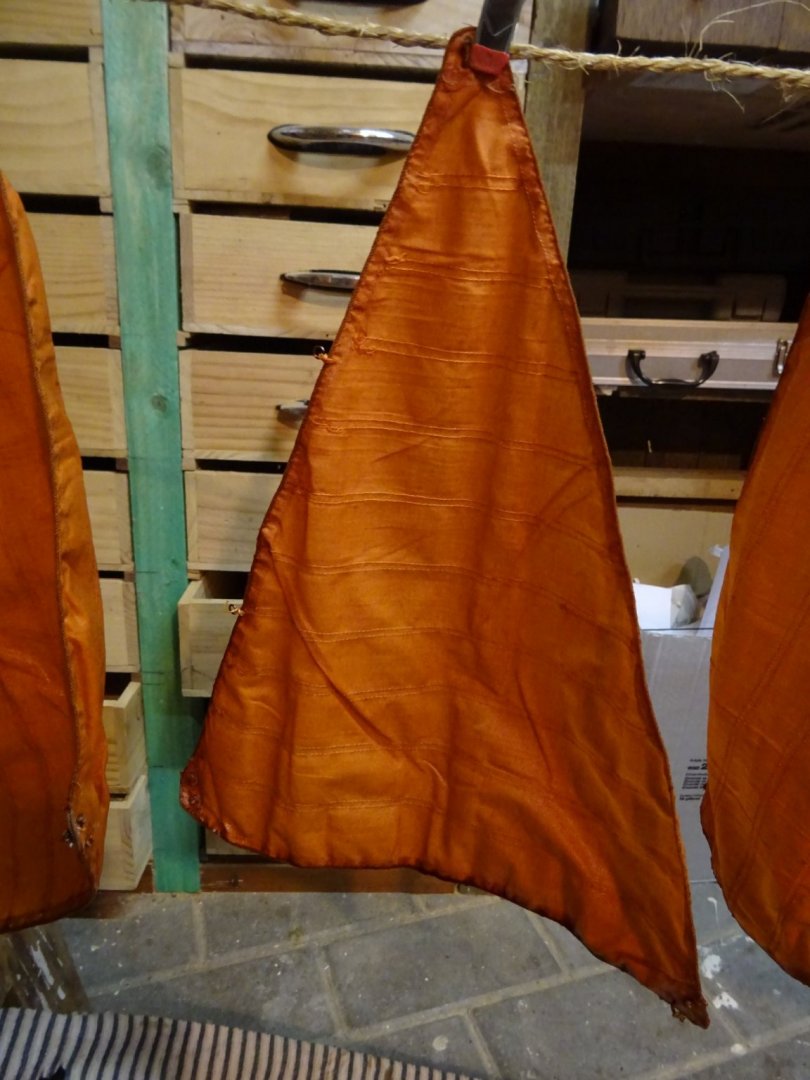
That's why I turn them over to get an even distribution of the color.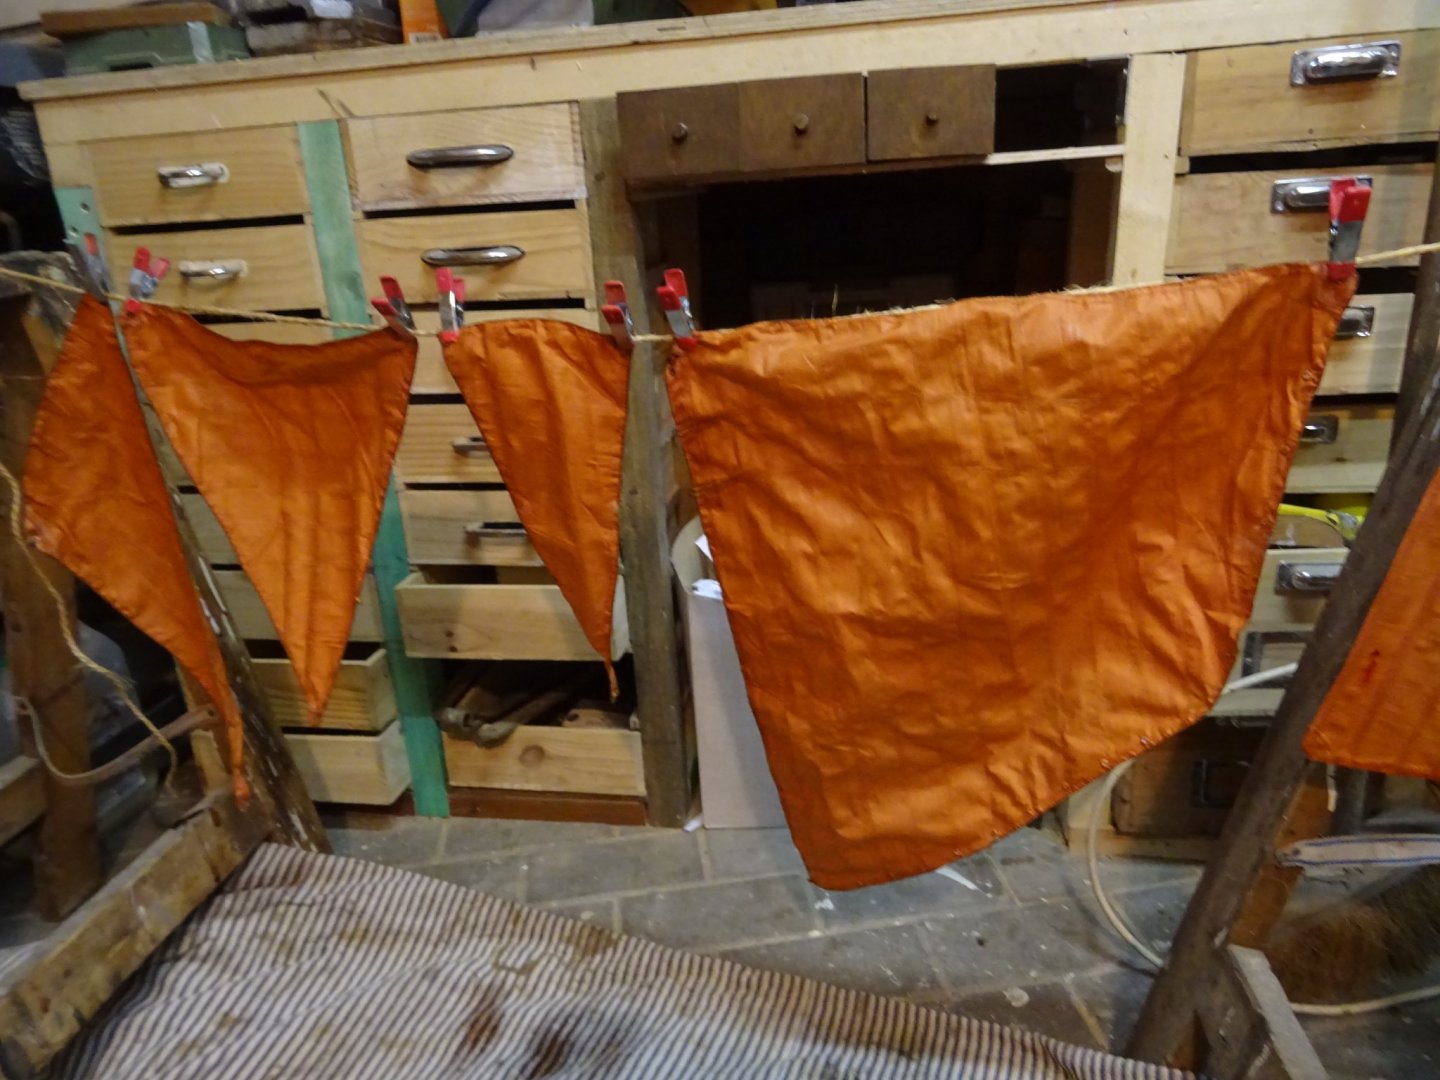
Thank you for reading this log and for your likes.
Till next week!
- tarbrush, GrandpaPhil, wefalck and 2 others
-
5
-
On 3/23/2021 at 10:50 AM, tkay11 said:
If you haven't already seen it, you can follow a nice discussion by Bruno of his planning, design and building of the Louise on the Marine & Modélisme d'Arsenal forum at LOUISE - Tentative de reconstitution d'un clipper d'Argenteuil.
I look forward with much interest to this build.
Tony
Yes, Tony, I read Mr Orsel's log. I think this is necessary to build this model because this log contains a lot of information about making certain parts. The monograph only describes the background of the vessel and the ten enclosed plans.
-
-
10 hours ago, wefalck said:
Nice to see a project here on this Ancre monograph. I had the opportunity to see the original (I mean the model) LOUISE at the big model exhibition organised by the Association des Amis du Musée de la Marine (AAMM) in Rochefort in October 2018. A splendid model.
I have completed a few months ago a manuscript for a three part series of articles on 'Boating on the Seine in the Age of Impressionism' for the German quarterly Das LOGBUCH. The first part is with the printers. The third part on sailing will appear in autumn. As a matter of fact, I live about 12 km away from Argenteuil ...
The Bassin d'Argenteuil is not the part upstream of the railway bridge of Argenteuil, but the stretch of the river below, reaching down to Bougival, where the weir is located that created the bassin. The area between Argenteuil and Bezons has been quite industrialised already at the time in question. After all, this is where the Caillebotte family made their money, which allowed Gustave and his brother to live the life of gentlemen of leisure (though the Caillebottes still looked after their business), leaving behind a signifcant cultural footprint in sailing (Gustave was a founding member of the French sailing club), painting and art collection (Gustave's collection was the seed to what is now the Musée d'Orsay in Paris), and philately (the Caillebotte collection became after their sale by the brothers the core of the philately department of the British Museum in London).
Chatou was one of the focal points of the rowing and sailing activities on the Seine. Remember Renoir's 'Lunch of the Rowers' / 'Dejeuner des canotiers' ? It was painted there on the balcony of the Maison Fournaise, a popular restaurant. Today, there is a museum in part of the building. Next door to it, there is the boat-house of the Association Sequana (https://sequana.org/), which has 'clipper' and a copy of one of the boats Caillebotte designed, had built in his own yard, and sailed on the river.
I am looking forward to the development of this project !
Eberhard,
I know the original Louise model only from the photos in the monograph, but I agree that it is a splendid model. Mr Orsel must be a master modeler. I will do my best to make my model as good as possible but I realize that I cannot achieve such a degree of perfection.
Thank you very much for clarifying the clipper d'Argenteuil and the era. I was not aware that anyone with local knowledge of the site and the subject would read this log. It will certainly stimulate me to build this model as well as possible. I would like to read your articles on 'Boating on the Seine in the Age of Impressionism', but unfortunately I don't speak German.
I will correct my mistake about the location over the Bassin d'Argenteuil in one of my next posts. -
A very successful model! Congratulations, Bob!
-
Chapter I. Introduction
It is already a year ago that I bought this monograph of 'Ancre' publications. Since a couple of months it is laying on my desk waiting for me until I have enough courage to start with it because it seems to me to be a project of high difficulty. A few weeks ago I made my decision and bought the necessary wood.
It is the first time that I have purchased an Ancre monograph, so I was very curious. It is a study, written by Mr Bruno Orsel about the 'Clipper d'Argenteuil', a small open regatta sail boat for use on inland waters. Mr Orsel calls his model 'Louise', but that is a fictional vessel. His model is not the reproduction of a specific clipper d'Argenteuil, but a thorough study of the boat type.

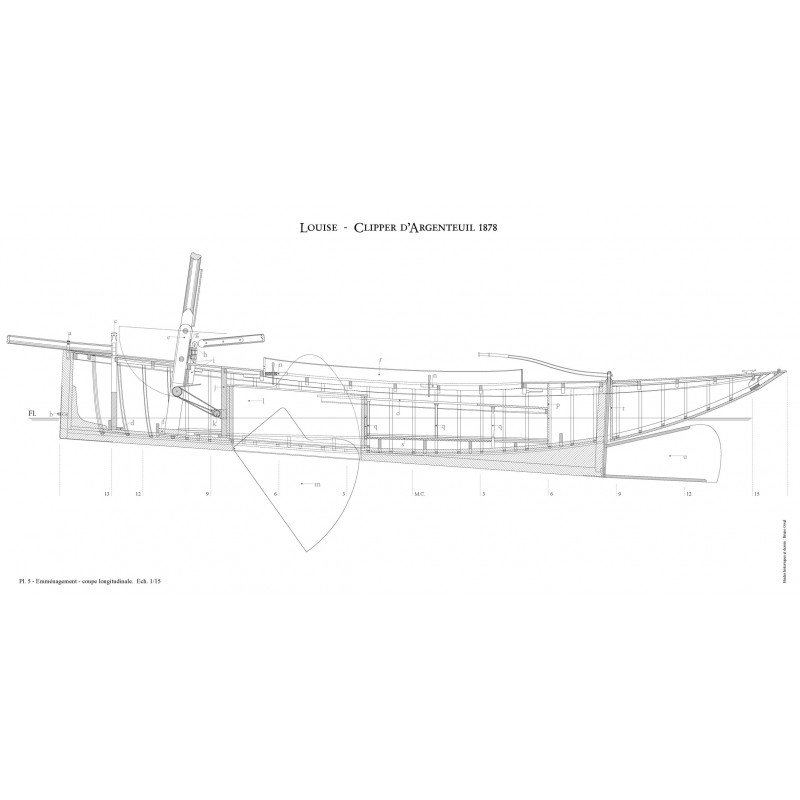
The photo above comes from the website of Ancre publications and suggests that the monograph is a voluminous book. In reality it is only half as thick as it looks in the picture. However the folder contains a booklet with a lot of nice drawings, 3D images and color pictures of the model with a detailed description of all plans and, very important, 10 very detailed plans in 1/15 scale.Before I discovered this monograph I did not know the type of vessel at all. I was immediately struck by its elegance. It reminded me of the sandbagger of which I read the construction log on this forum months ago. The plans are drawn on a scale of 1/15. This is perfectly within the range of scale I enjoy working with. Mr Orsel built his model as a semi-open model. That is also something that attracts me enormously.
Everything I know about the clipper d'Argenteuil comes from the monograph. Here is a very brief summary:
In the second half of the nineteenth century the rail network began to expand in France. It became easy for the Parisians to leave the city. It was the 'Belle Époque' when townspeople began to appreciate the countryside. Many of the Parisian bourgeoisie took the train with their families at the end of the week and arrived half an hour later in the small villages on the banks of the Seine to spend the weekend. A lot of them practiced water sports: swimming, rowing or sailing in the Seine.
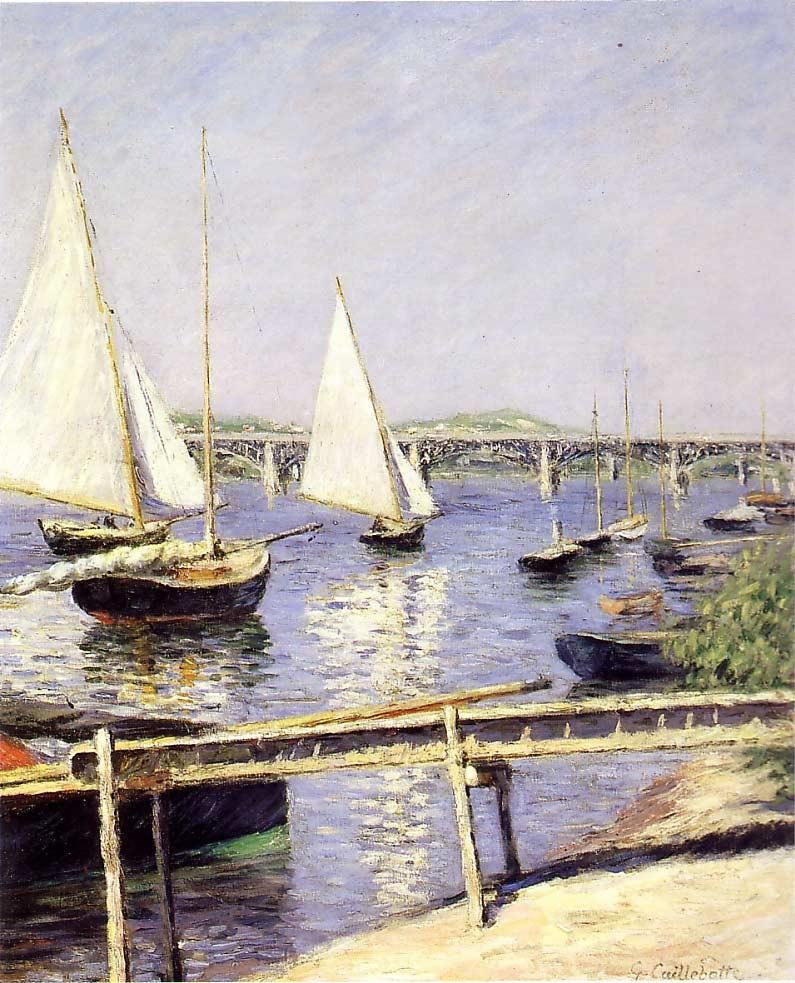
One of those villages was Argenteuil where the river Seine was about 200 meters wide and there were no obstacles like bridges for over a distance of 10 km. The 'Bassin d'Argenteuil' was an ideal place to organize sail regattas.
(Painting: 'Le Bassin d'Argenteuil' by Claude Monet property: Musée d'Orsay, Paris)

Originally they sailed with uncomplicated small sailing boats, but in 1850 a member of 'Le Cercle de Voiles de Paris' participated at the races with an American sandbagger 'Le Margot' and was joined some years later by a catboat (also imported from the United States) the 'New York'. The ordinary sailing boats were no longer a match for these super-fast competitors. The more affluent club members had new boats designed by local yards. They used the sandbagger and the catboat as a base for their designs. The Clipper d'Argenteuil' was born.
(source drawing: publicity brochure Ancre publications)
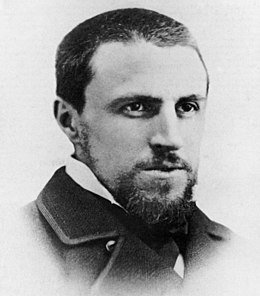
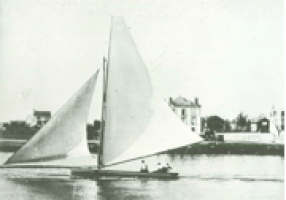
One wealthy club member, the impressionist painter Gustave Caillebotte spent fortunes designing and building increasingly high-performance racing yachts. Between 1878 and 1880 he had three consecutively built. When the last one, the Condor, did not win during its first participation in the regatta, he rigged the yacht with silk sails. With this secret weapon, the yacht beat all opposition in the next race.
(Photos: Gustave Caillebotte and yacht Condor with silk sails)
Clippers d'Argenteuil, painted by Gustave Caillebotte
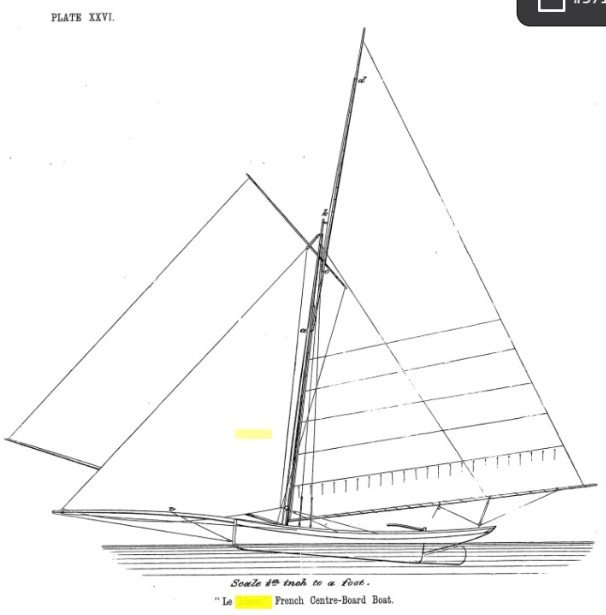
The 'Lison' standard example of a clipper d'Argenteuil (source: 'Manual of yacht and boat sailing' by Dixon Kemp).
I don't know if there are still sail regattas on the basin d'Argenteuil. I visited Argenteuil on Google Earth and I have the impression that the village has been absorbed in the last 150 years by the expansion of the Paris metropolis. It doesn't look as idyllic as it did when Claude Monet had his floating painting studio there. But maybe I am mistaken because I have never actually been there.
(Screenshot Google Earth)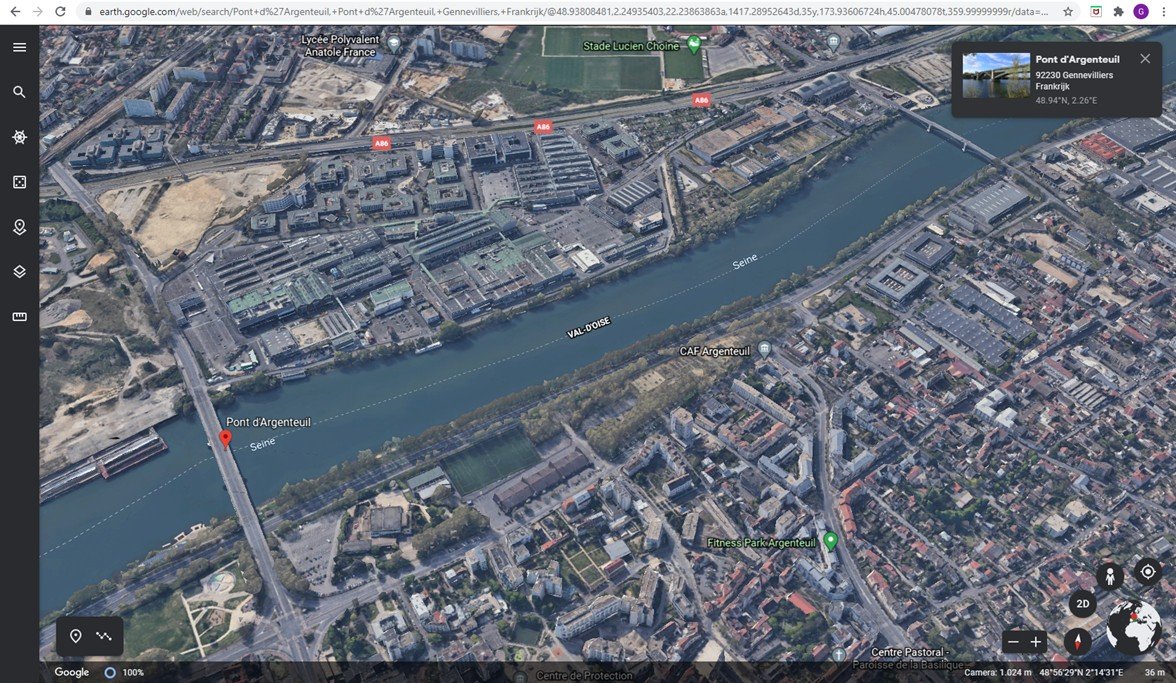
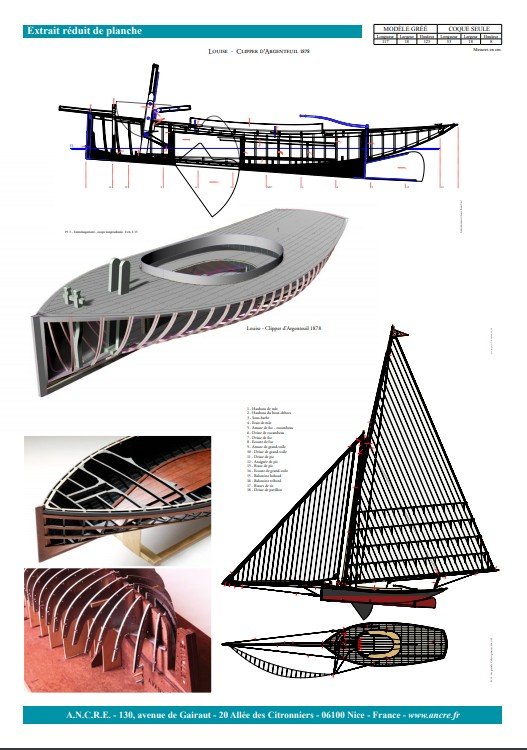
Mr Orsel he based his study on the clipper 'Argenteuil on drawings that appeared in the magazine of le Cercle de voile de Paris and on yacht models of the 'Musée de la Marine'.
(Image extract promotion brochure monograph Ancre)
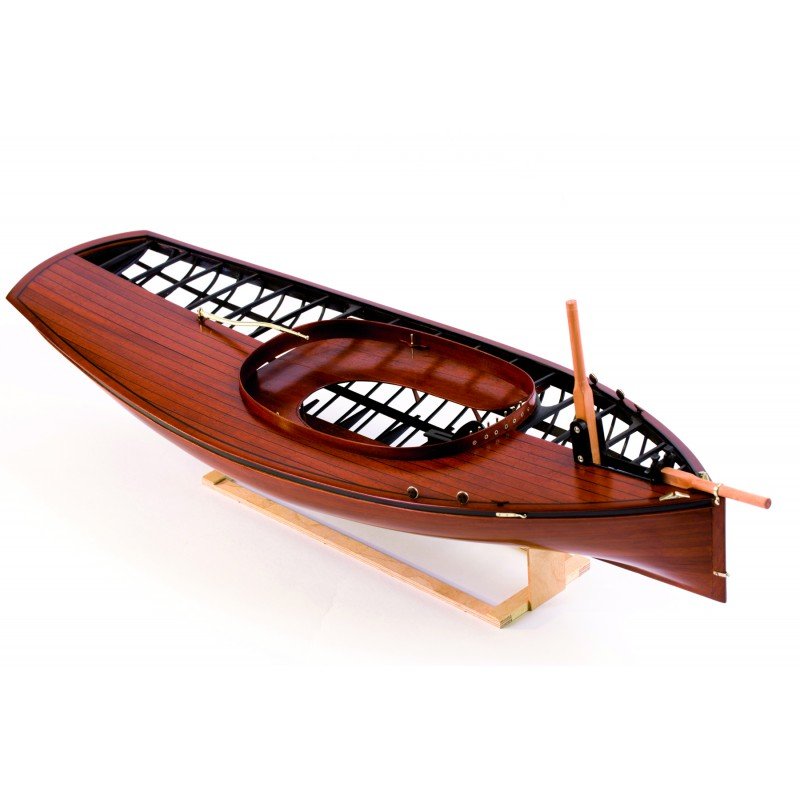
This is the model, built by Mr Orsel. I hope my model can approach this standard somewhat.
(Image extract promotion brochure monograph Ancre)
Now it's time to stop dreaming and get started so that I can show something tangible next week.Till next week!
- Rik Thistle, Ekis, vaddoc and 13 others
-
16
-
Today it is Sunday and also the first day of Springtime. A perfect day to start a new log for a new project.
A small remark before starting:
This will be a log for Sunday sailors and freshwater mariners.😁I think this will be a fairly long project. Below you will find the impetus for the index. As the log grows, this index will grow with it and allow to quickly navigate to the desired paragraph.
Index
Chapter I. Introduction
Chapter II. Hull
1. The building board4. Horn timbers
5. Transom
6. The wales
9. Centerboard case and Centerboard
10. Bottom boards
11. Thwart
12. Cockpit coaming
13. Mast tabernacle
14. Step of the mast and peripherals
15. Bulkhead
16. After deck beams
17. Assembly of the prepared sections
18. Laying the deck
Charter III. Spars and rigging
1. Blocks
2. Cleats
4. Mast
Chapter IV. Sails
Chapter V. Conclusions
- Barbossa, bolin, FriedClams and 3 others
-
6
-
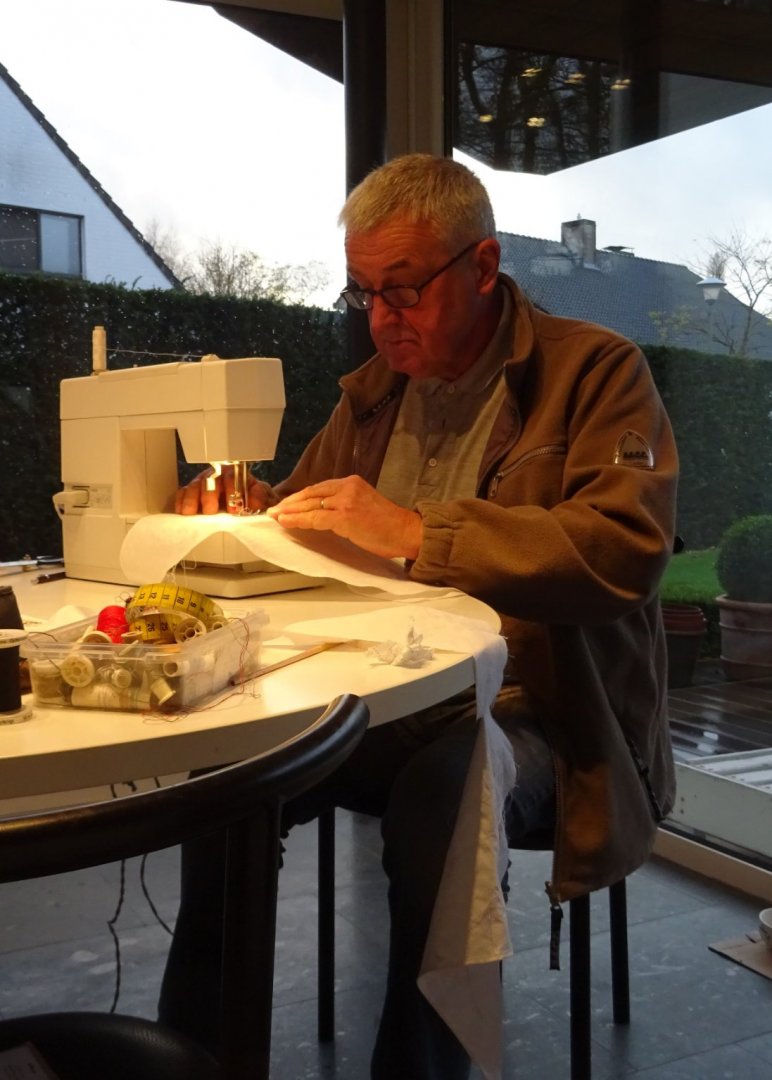
Once rigged, the model had to receive its sails and at this point the project fell asleep. I had no idea how to start to make sails. I had to learn to work with the sewing machine; my threshold fear was a bit too high, so I postponed this as long as possible. I thought I rather worked with wood than with textiles.
In the meantime I have built a model of gaff sailboat with a simple sail wardrobe. My wife taught me how to handle a needle and thread and taught me how to work with her sewing machine. (In the beginning of the covid pandemic, I even made face masks for the whole family).
Now during winter time I reserved the sail making work for the days when it is to cold to work in my worshop.
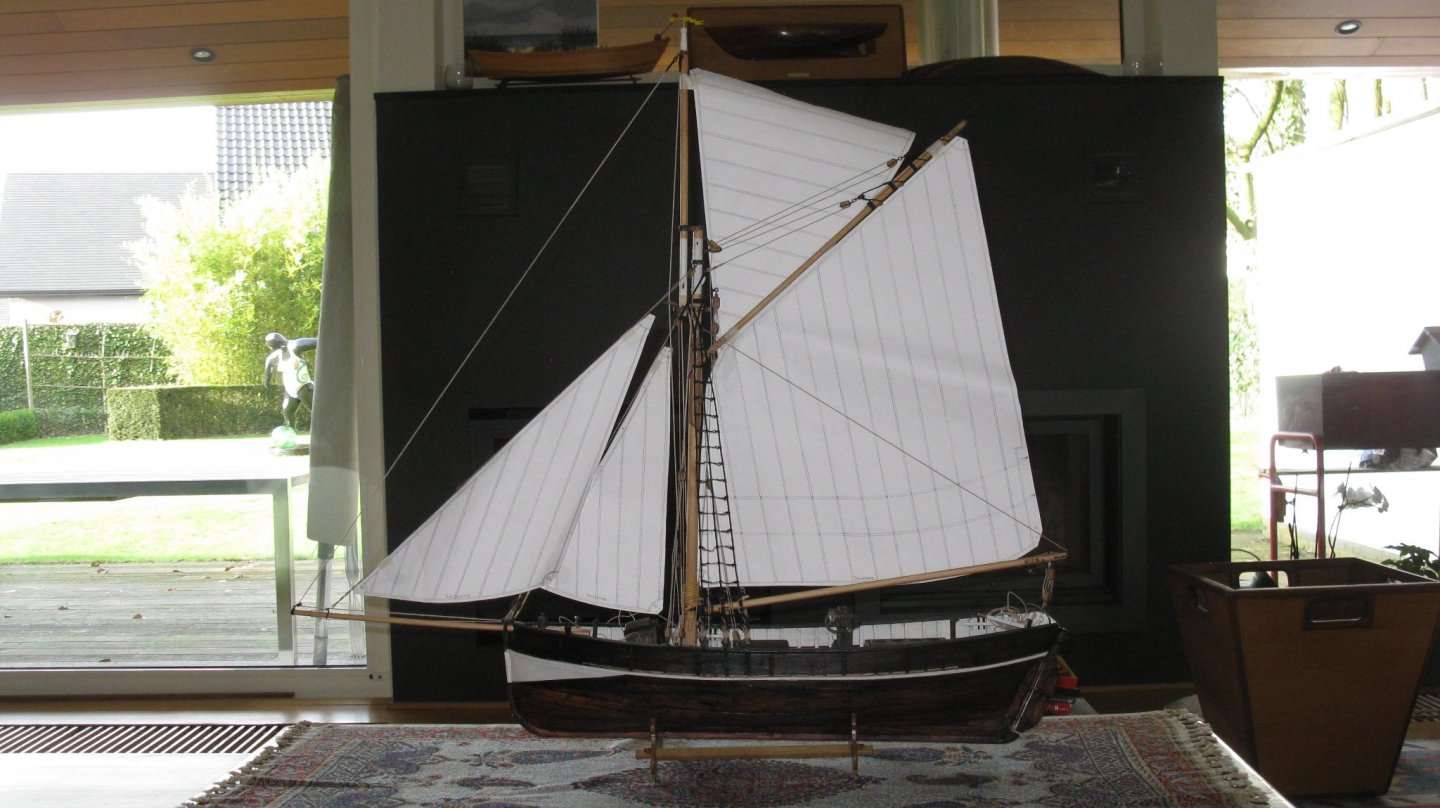
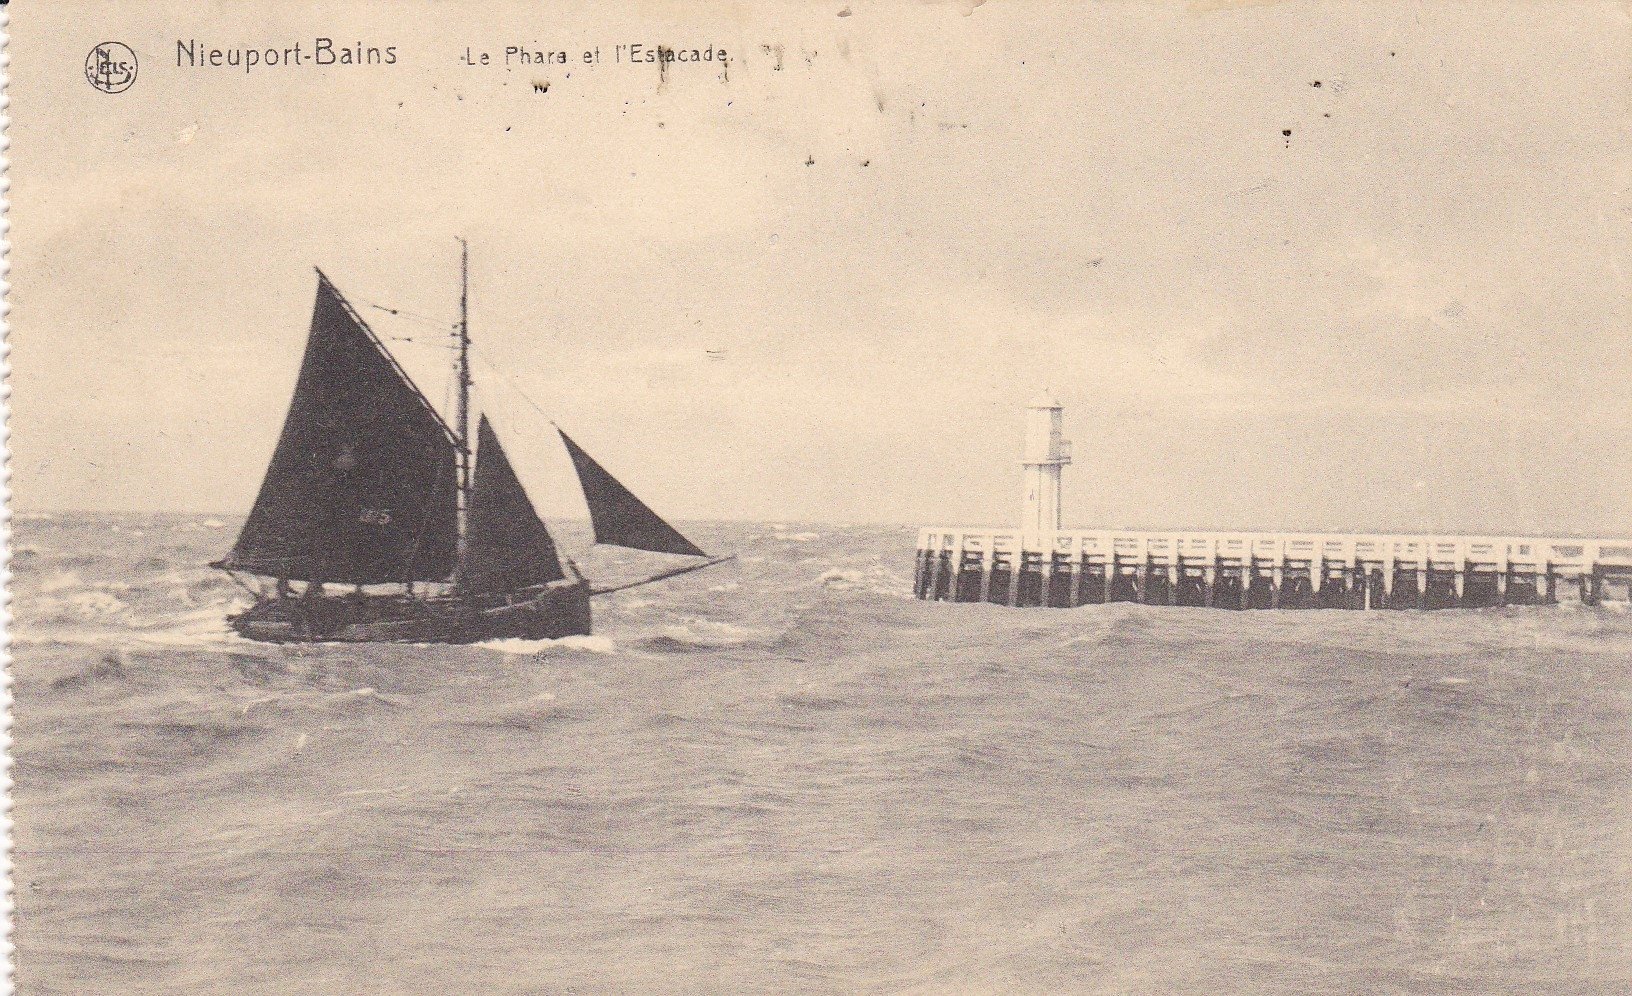
Before starting to sew, here is a contemporary photo of the vessel that is the subject of this log.

I made paper templates for the model:
These patterns serve to cut the fabric for the sails.
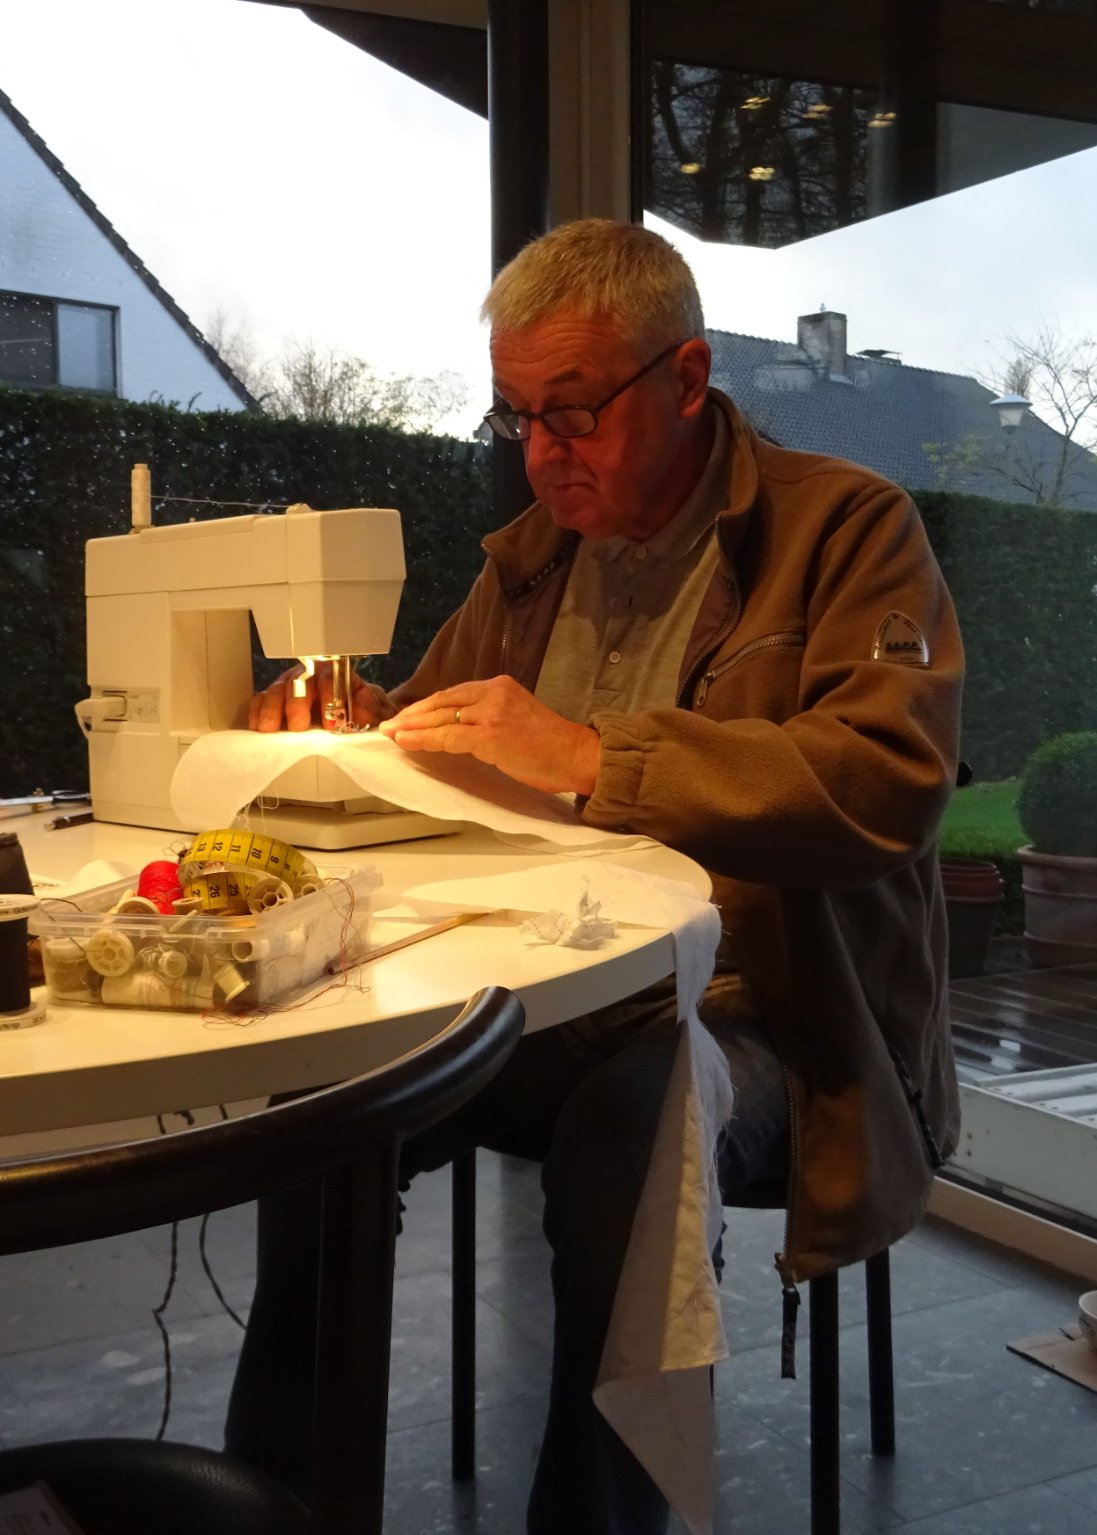
Once the sails are cut the work with the sewing machine can start. I stitch the borders of the sails with the sewing machine and double parallel lines to simulate the lanes. Concentrated on the sewing machine:
I described the sail sewing process already before in detail in: -day-gaff-sailing-boat-with-center-board-Now we switch to manual sewing. First I sew ropes at the sides, the leaches.
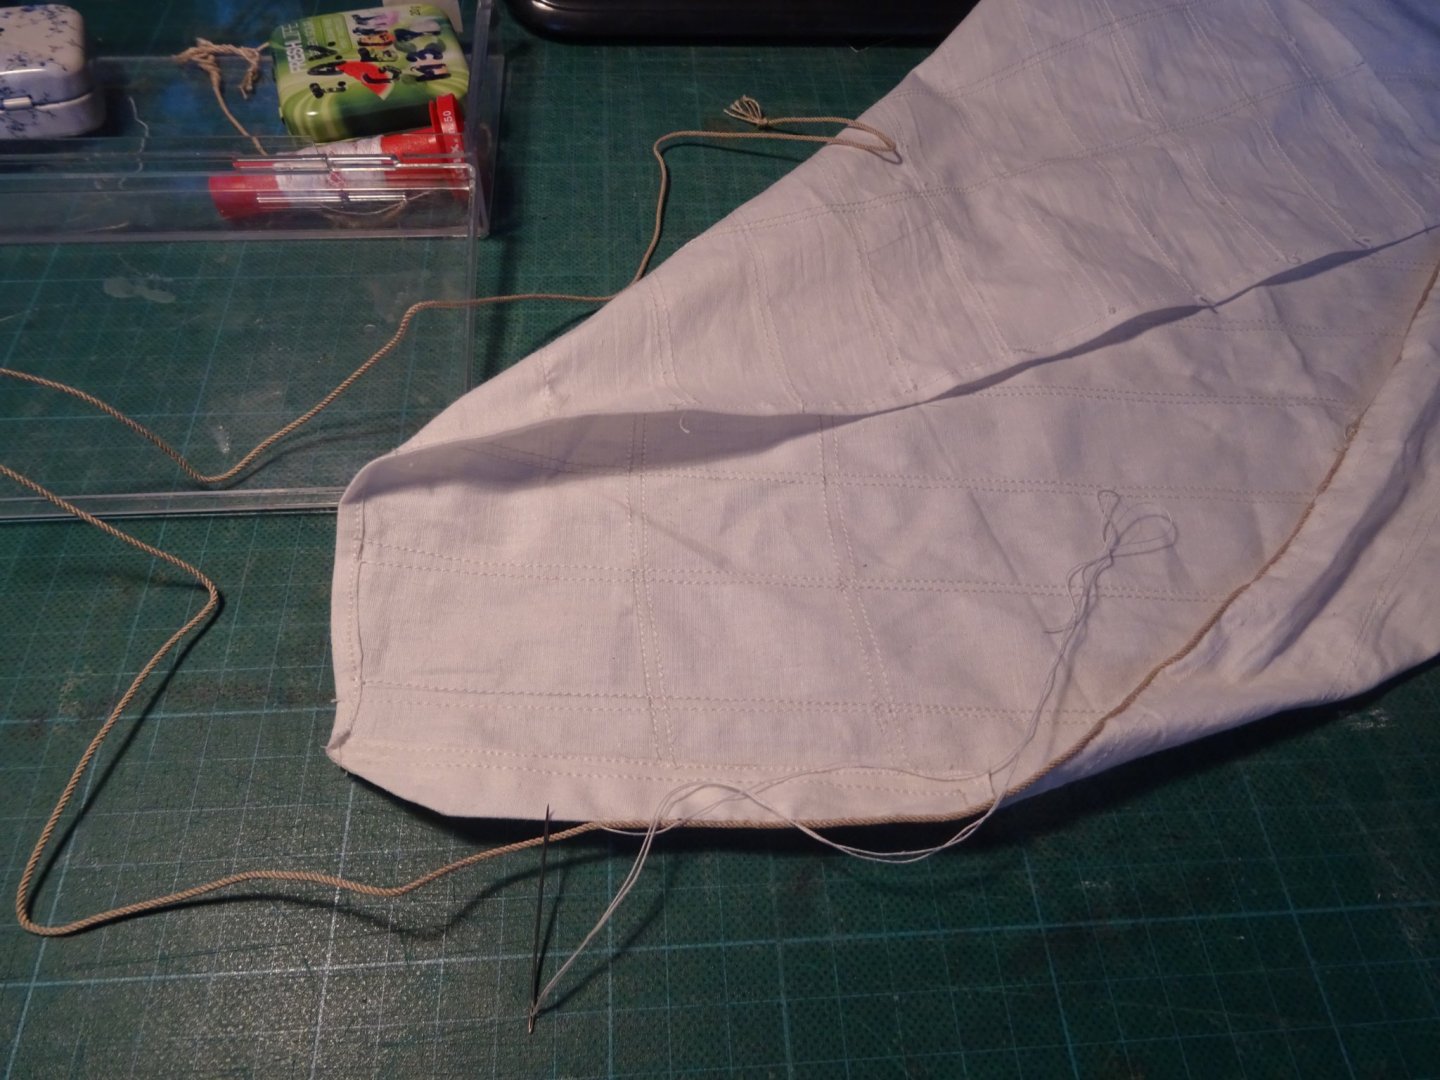
That is written in one sentence, but it takes me several weeks to sew the leaches of all four sails.
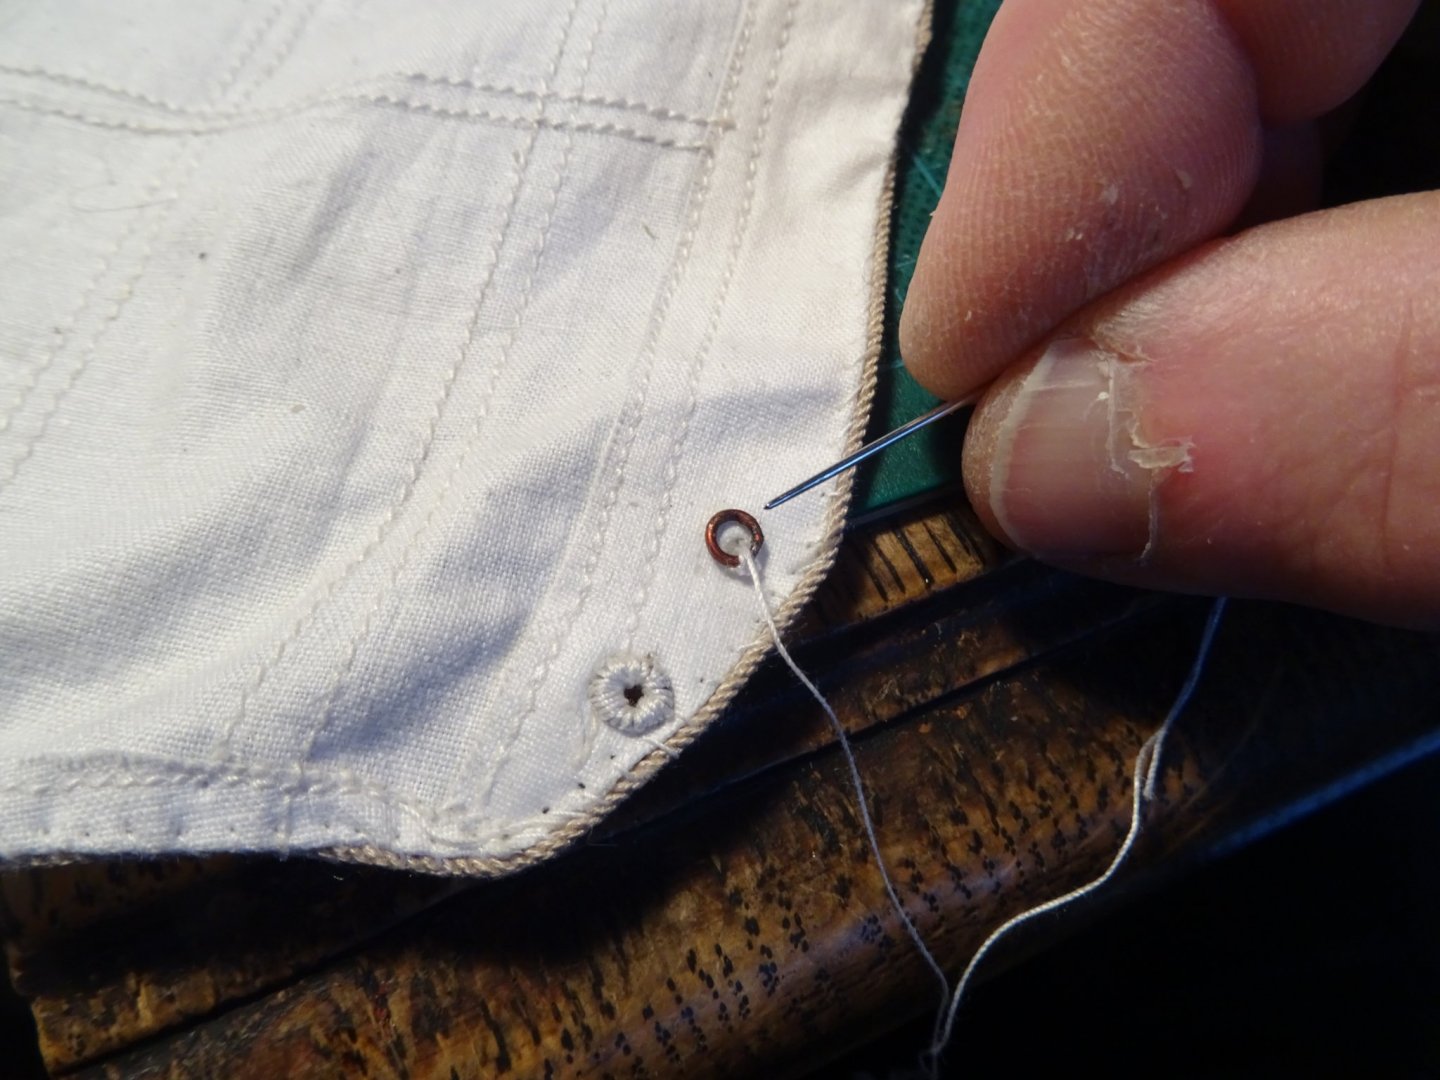
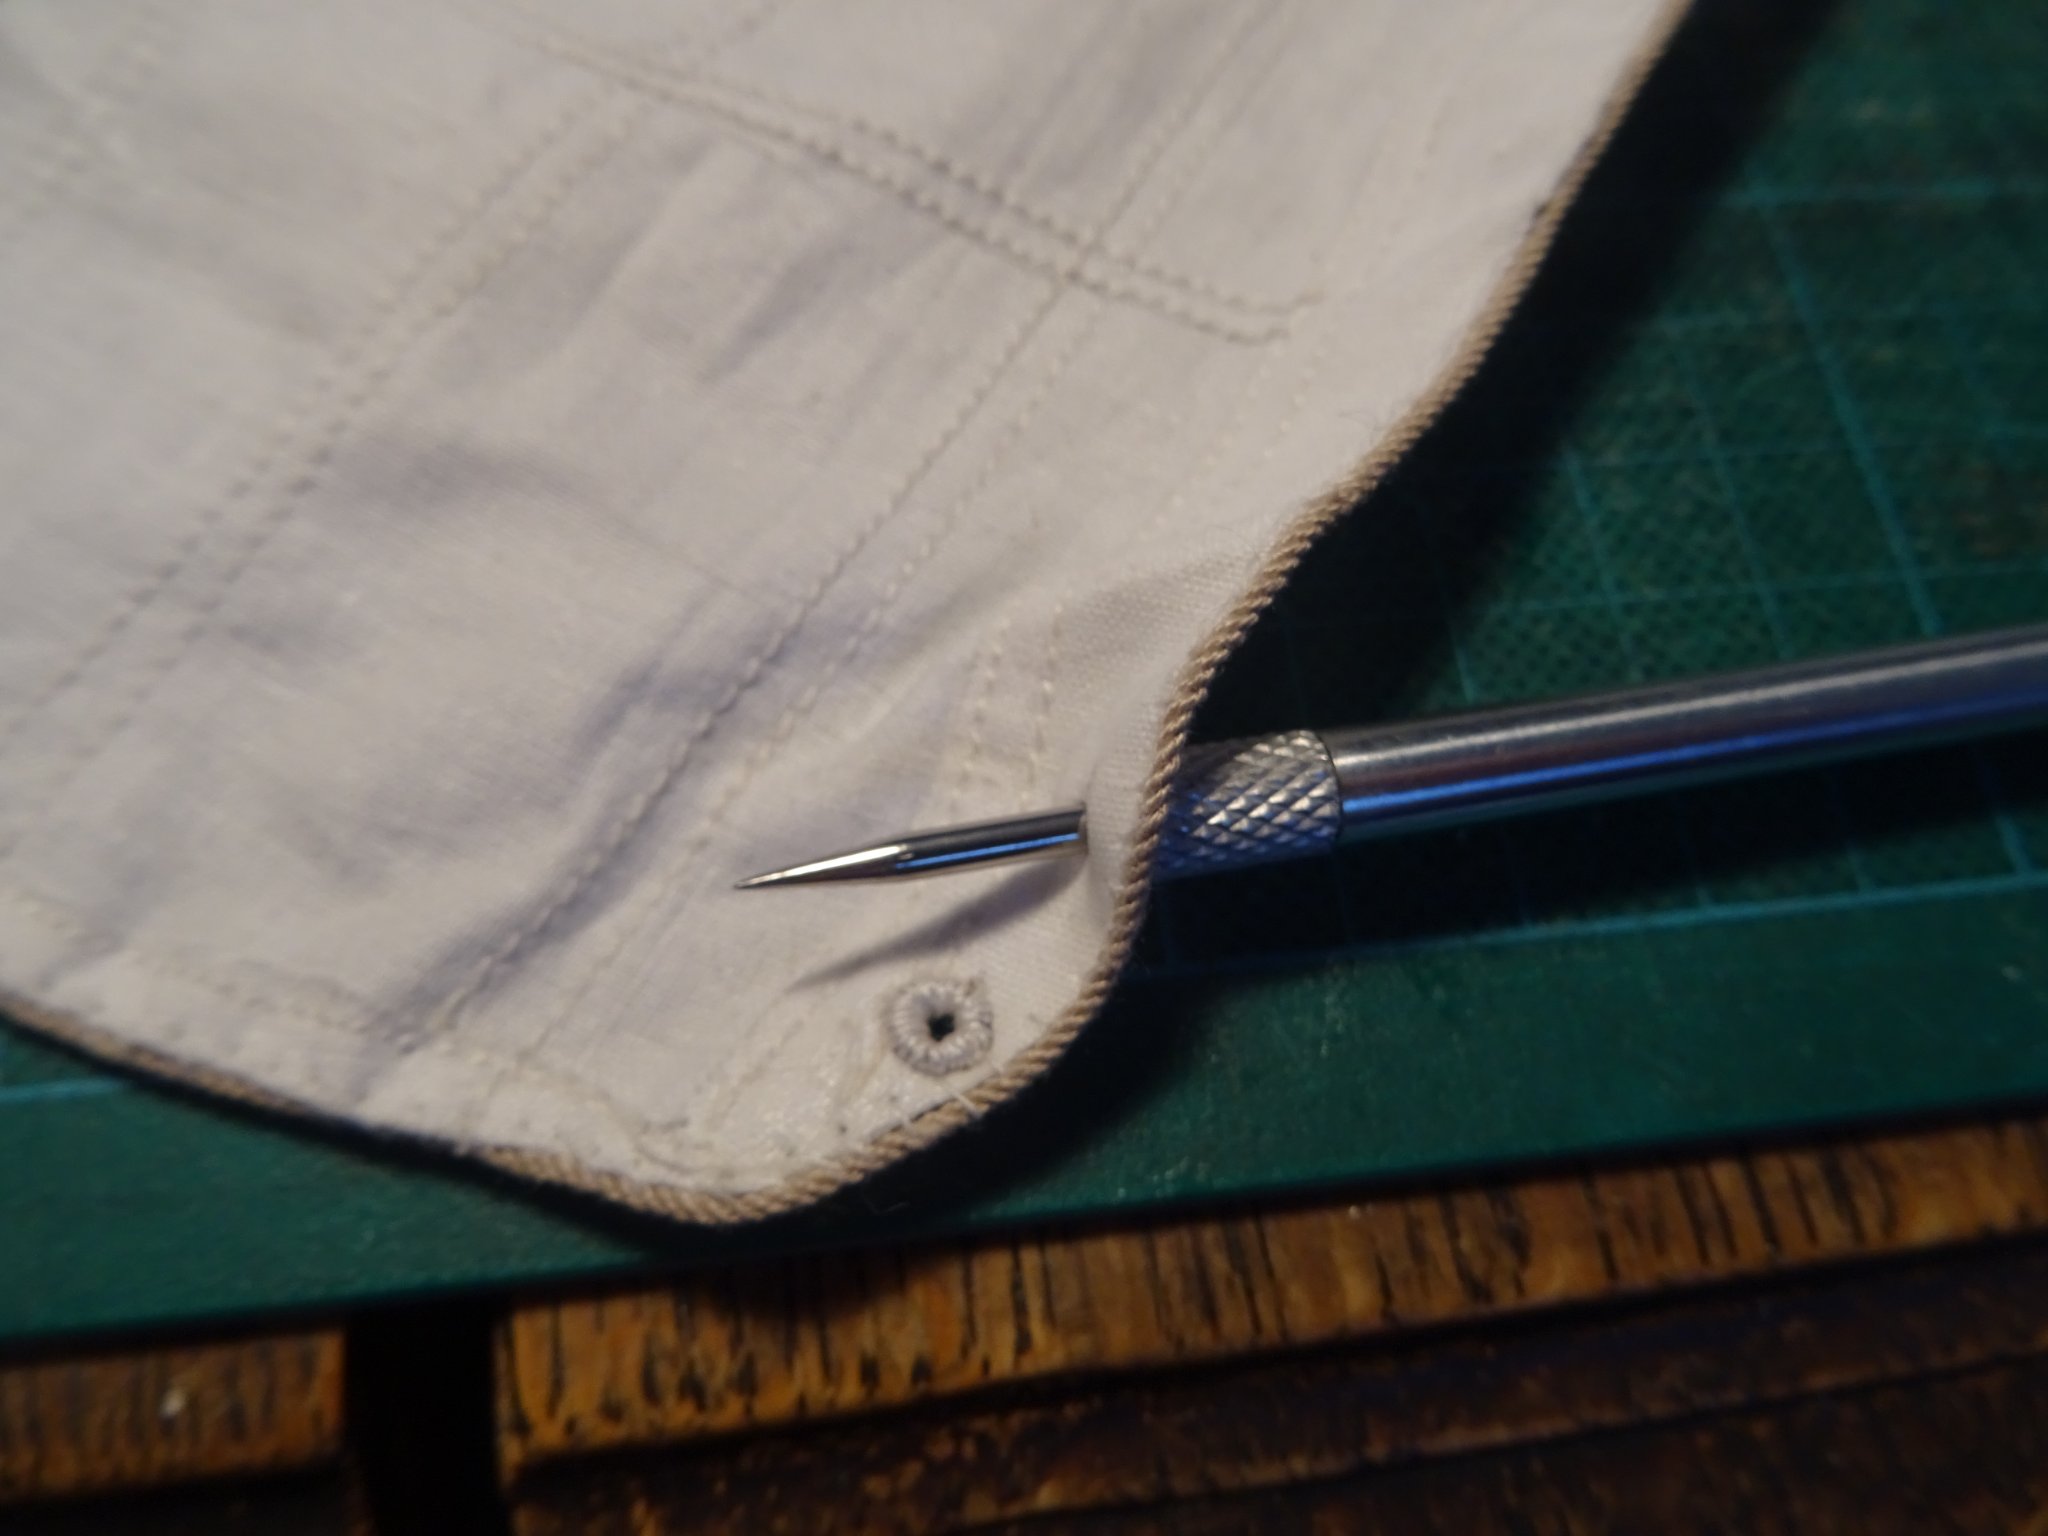
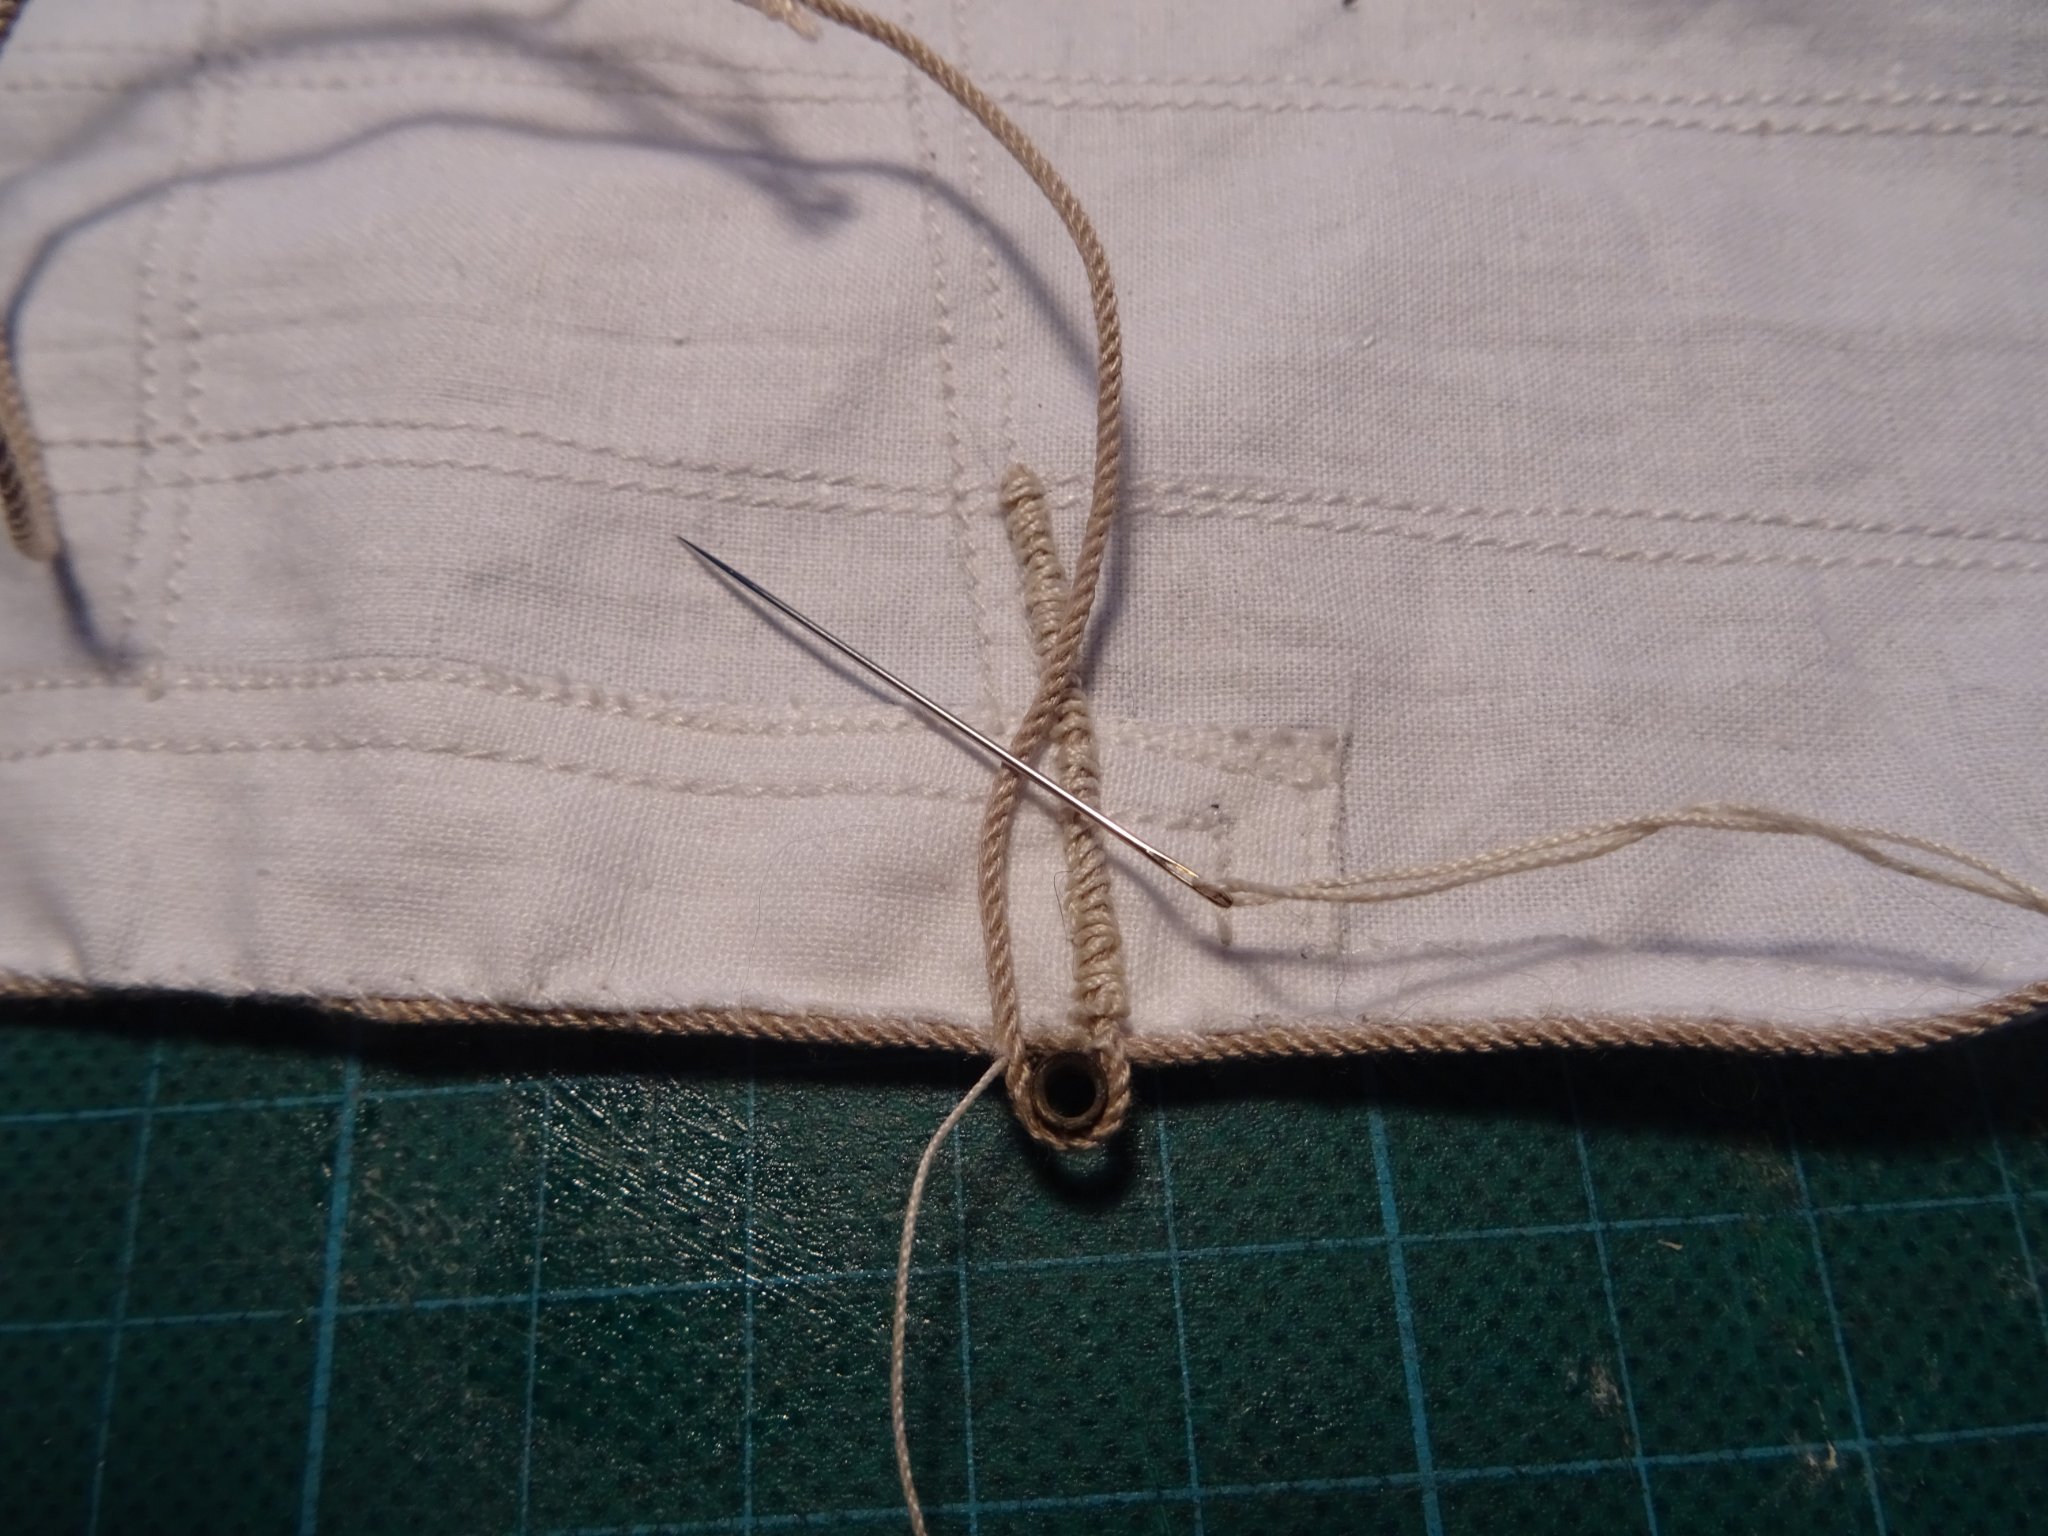
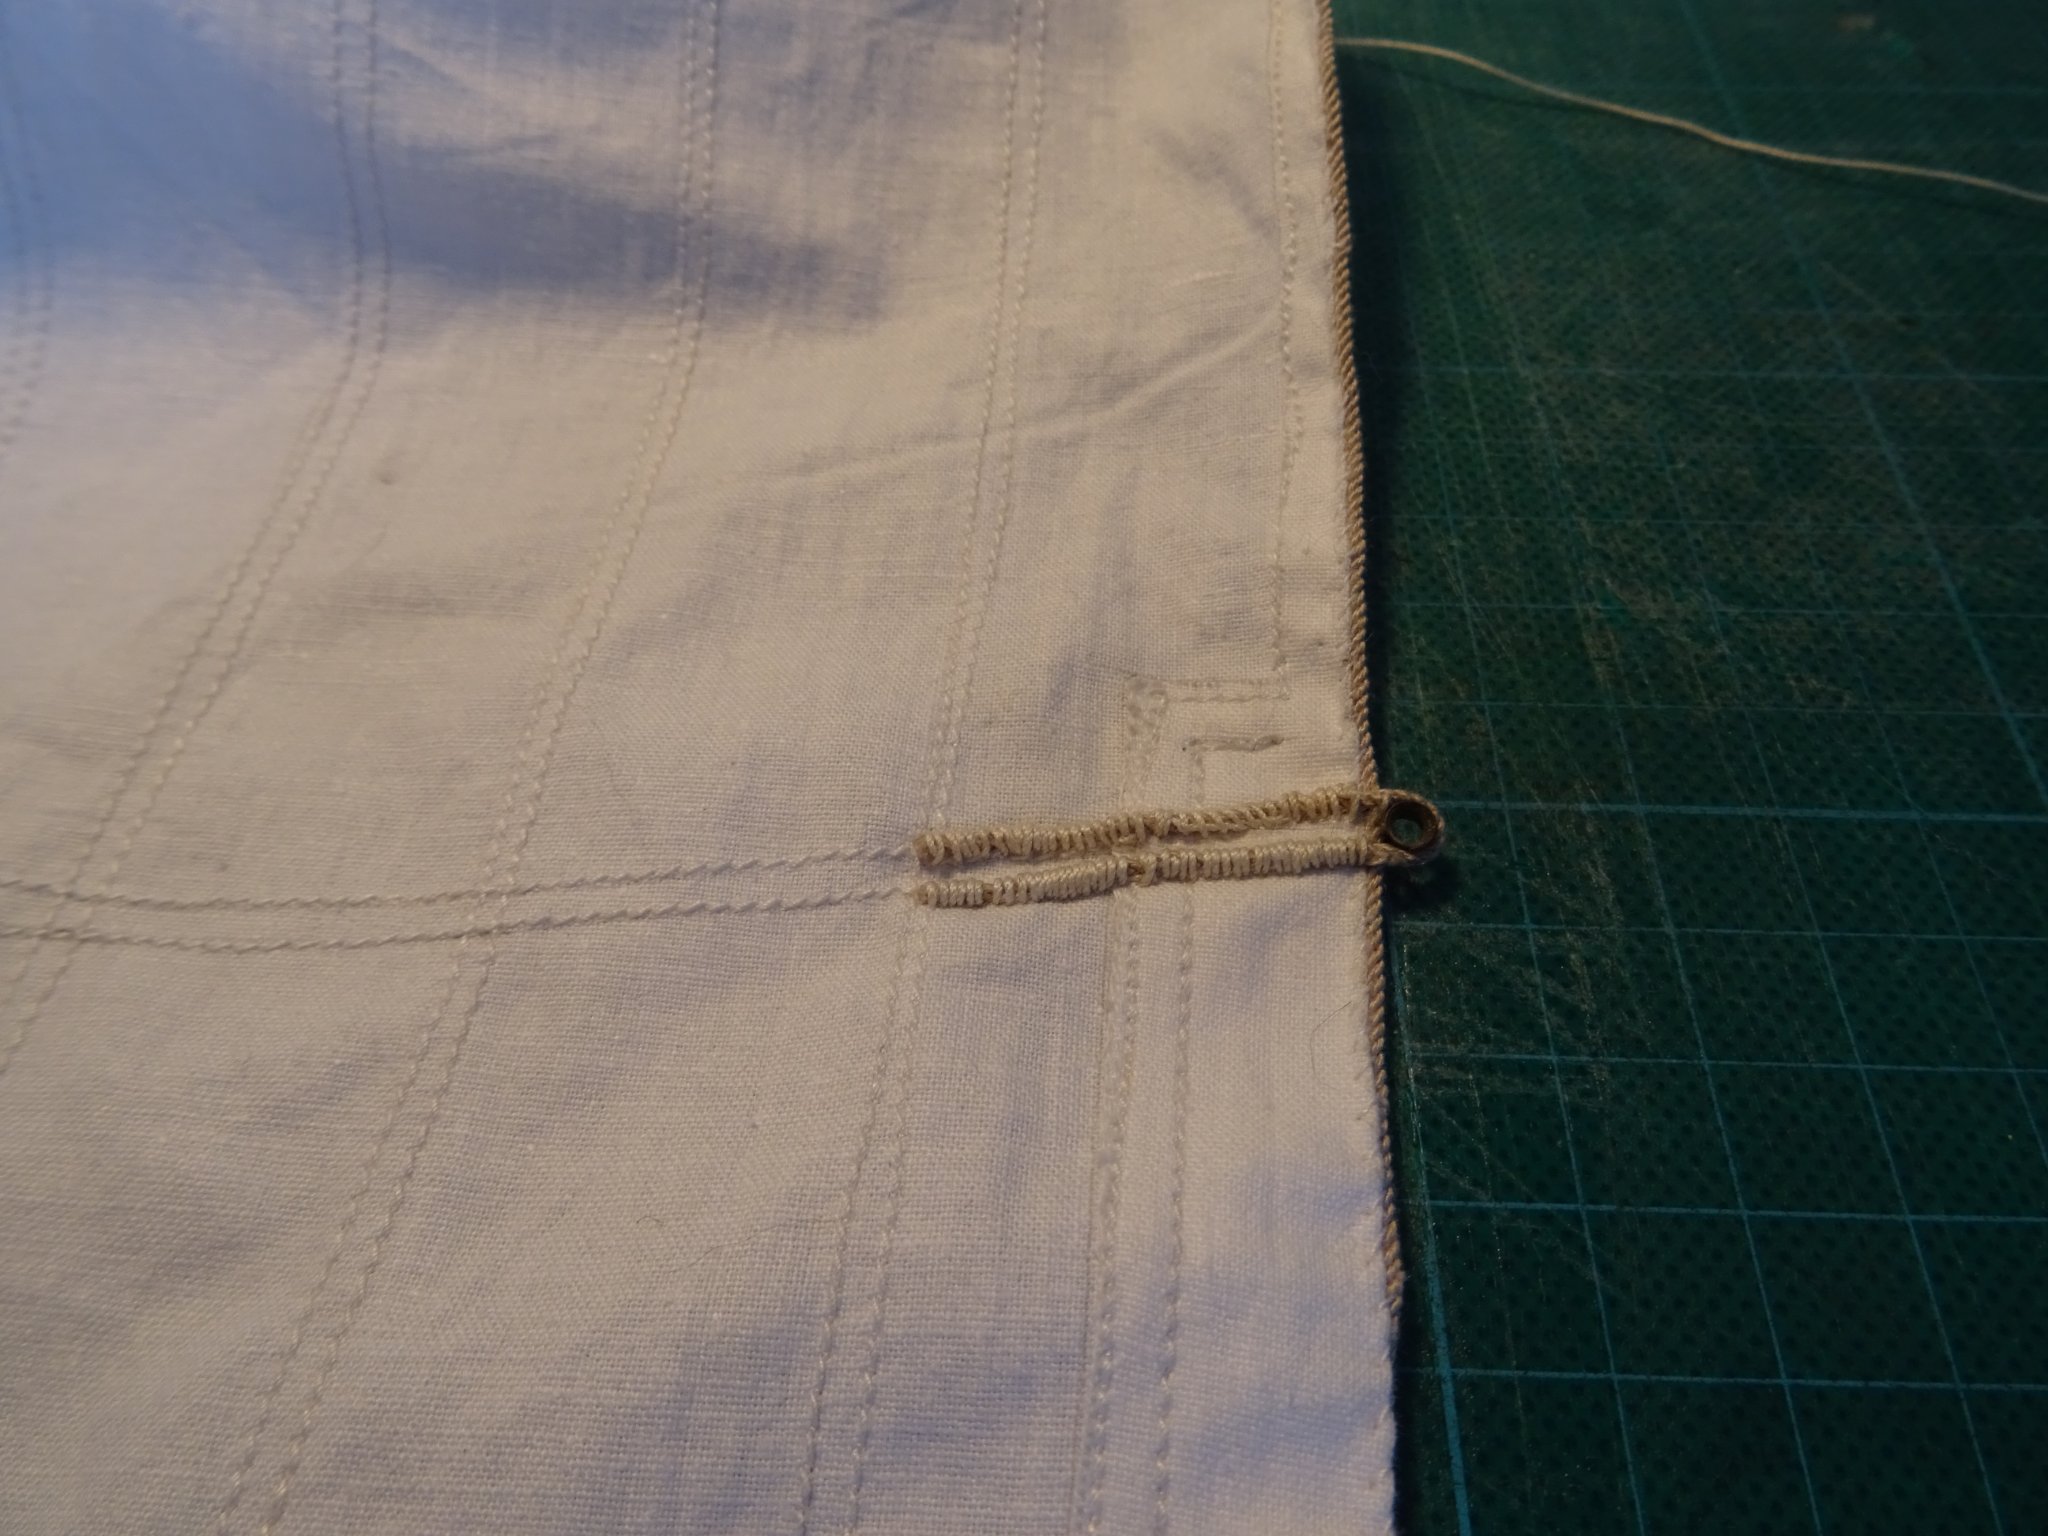
Each sail has several holes with thimbles like you see on the bottom of the picture..
I start by making a hole with a pricker.

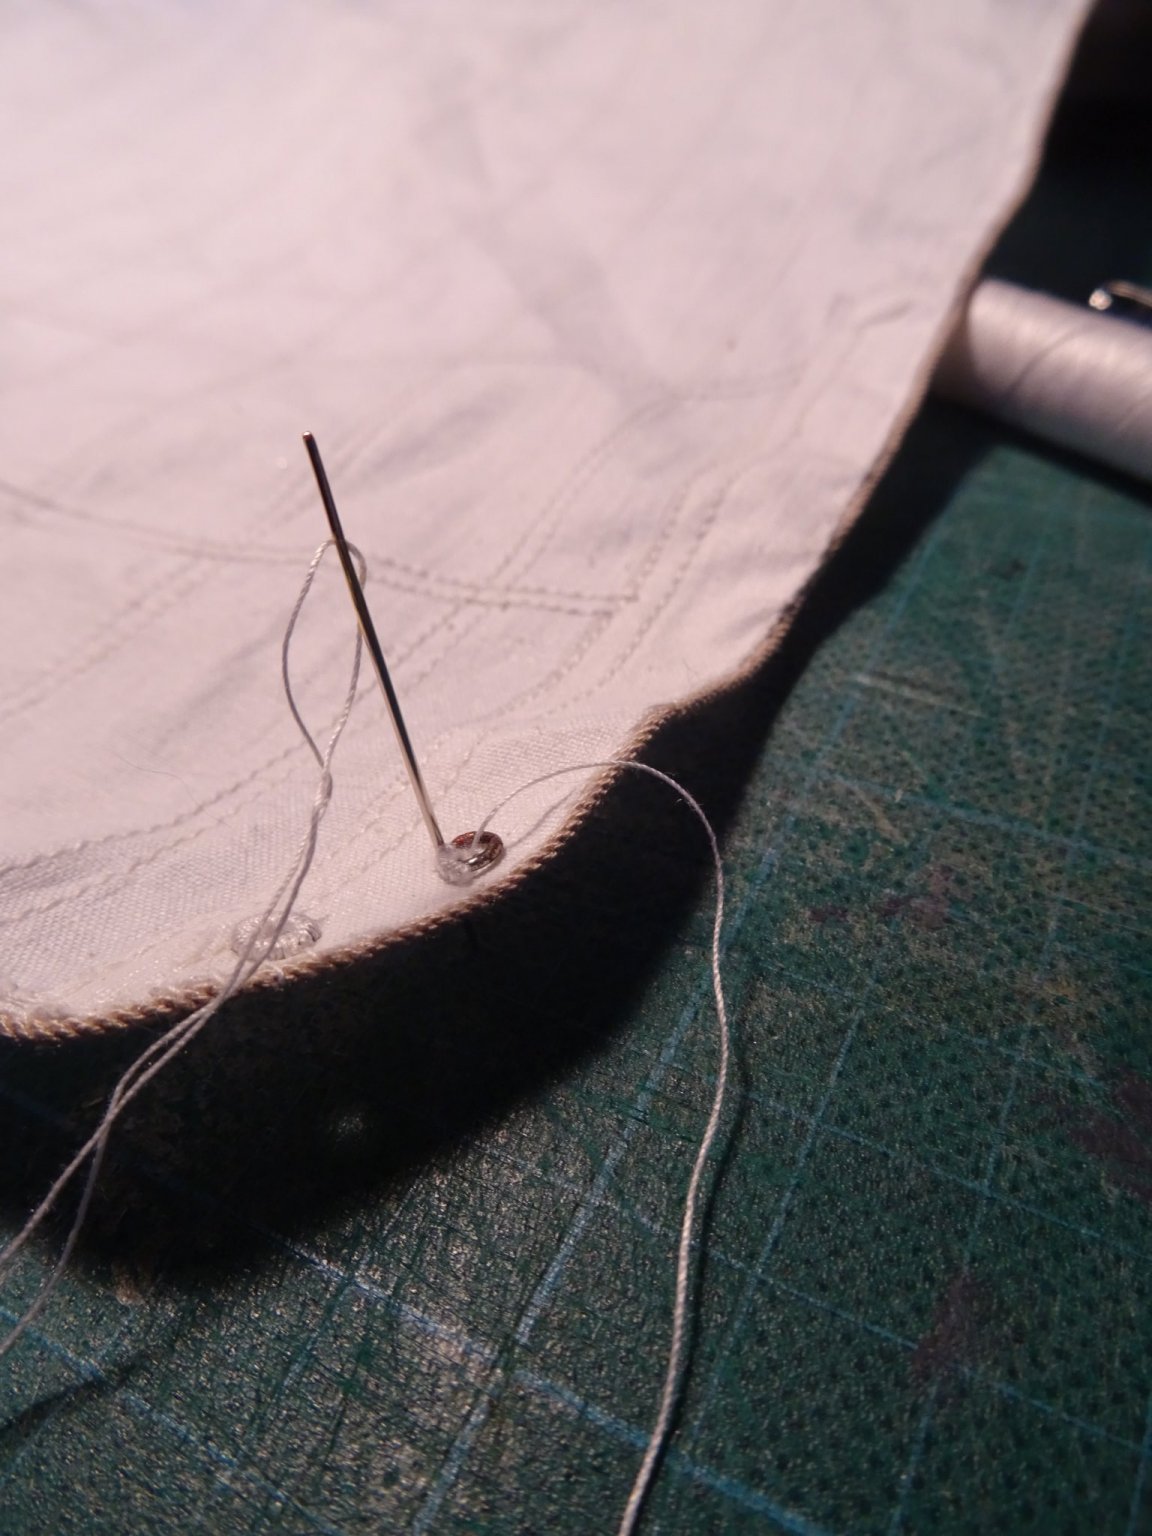
Then I lay a copper ring over the hole.
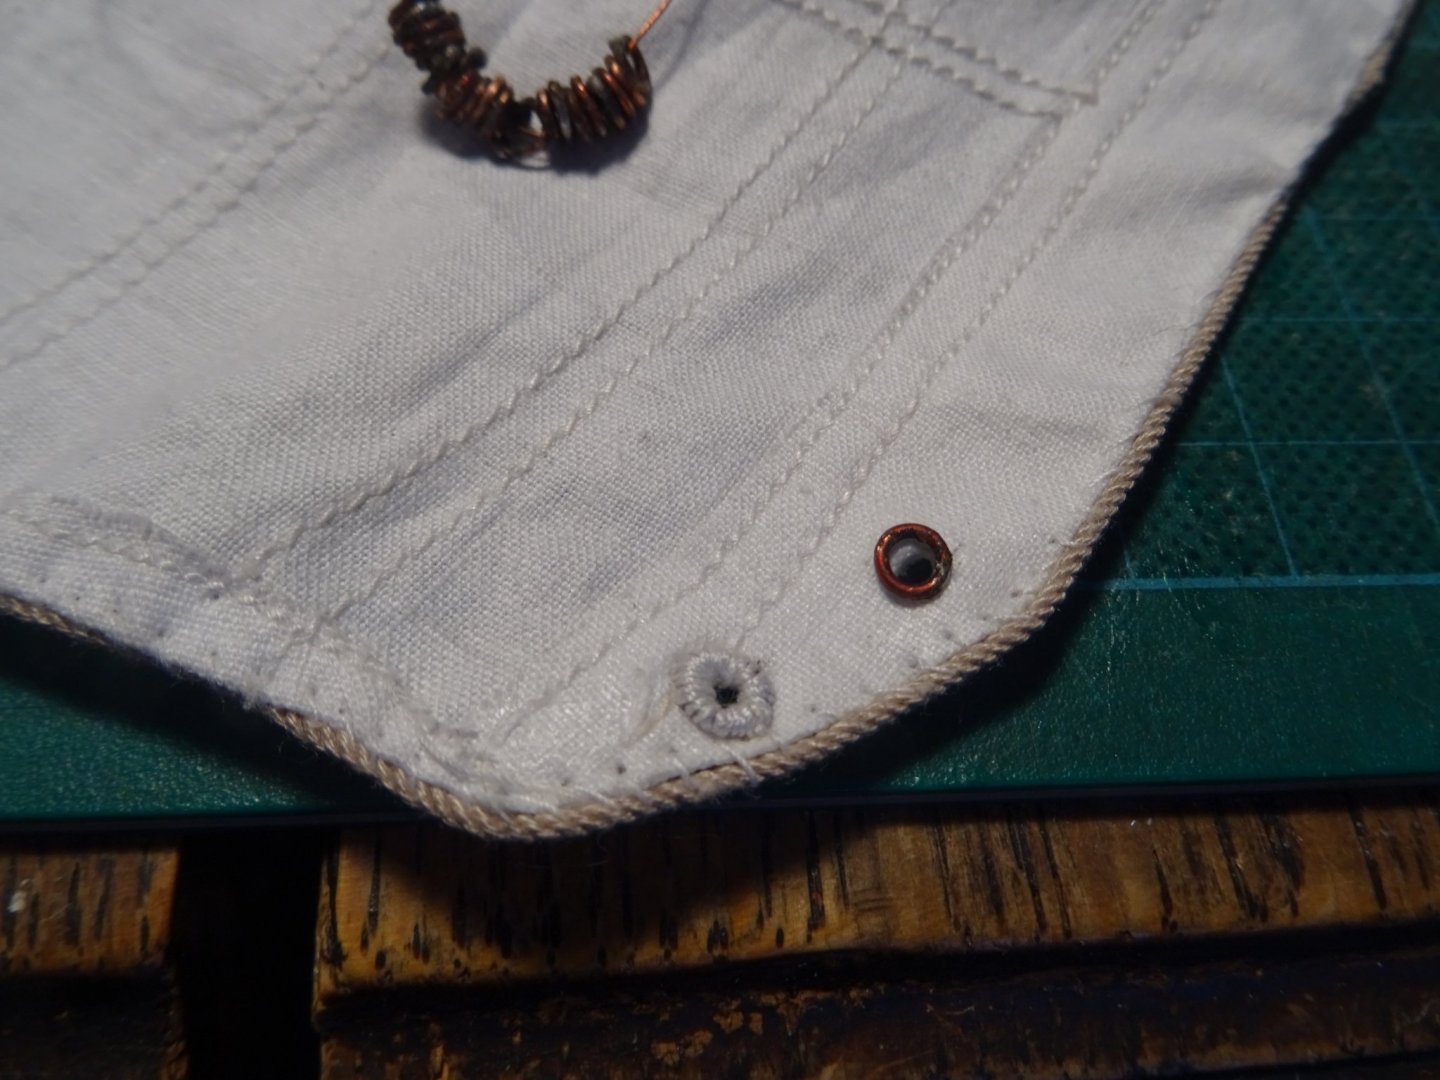
And I start to sew in and out around the ring.

The main sail has two reefing levels. I sew now the reefing cringles with a thimble in them.
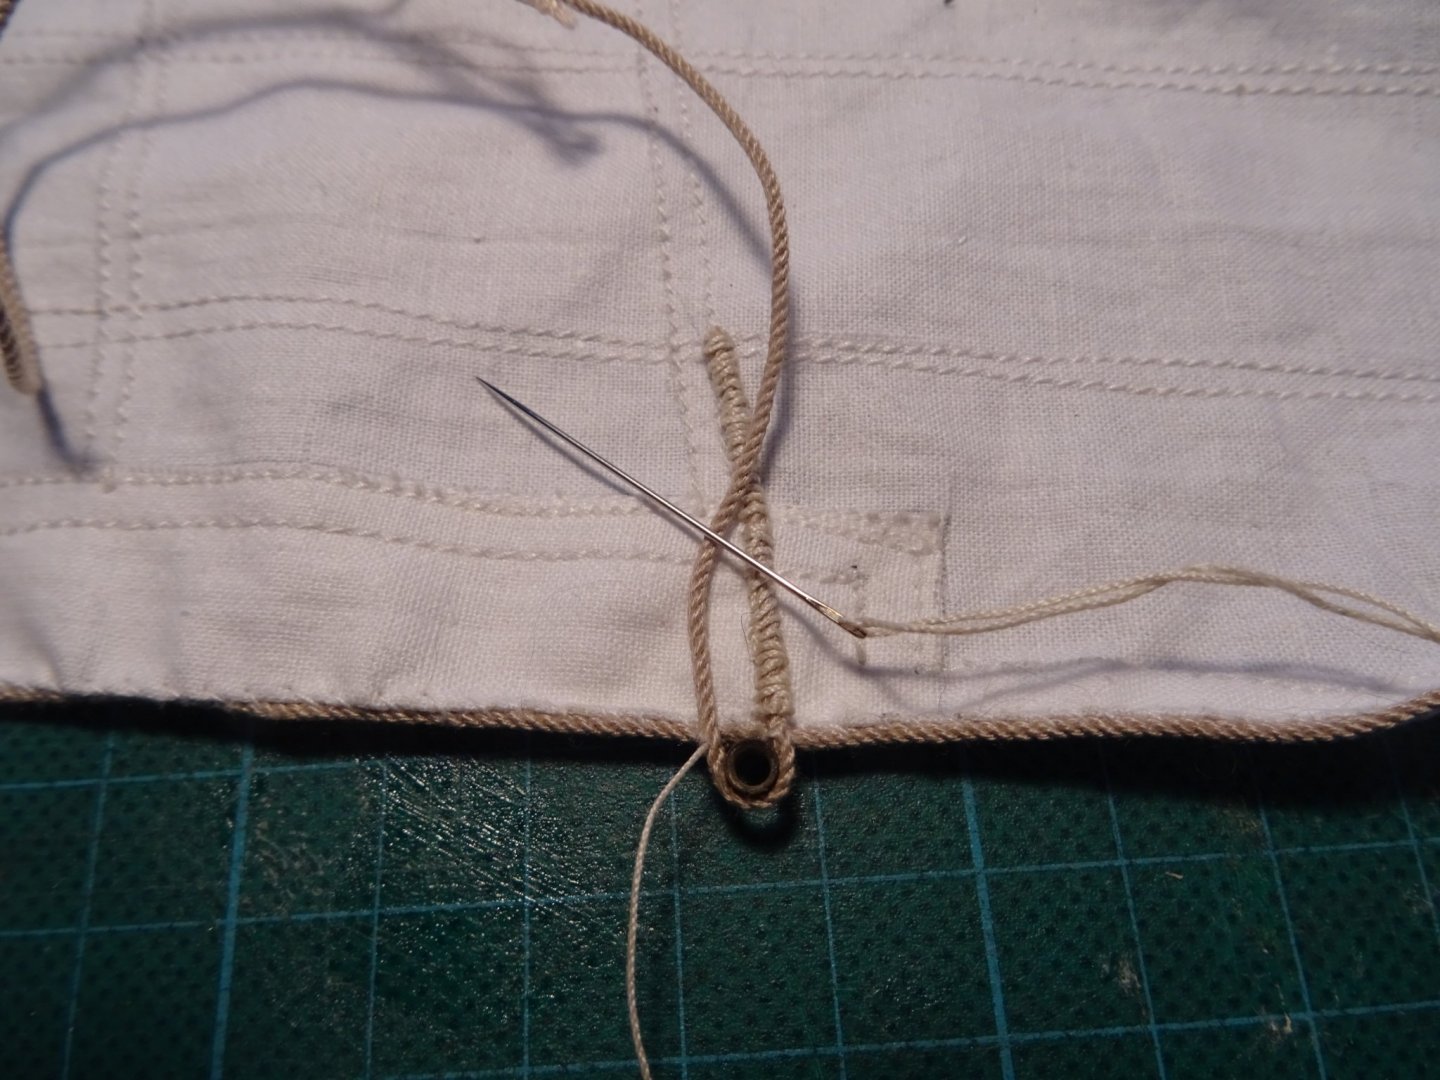

Again several weeks later the sail wardrobe for my shrimper is sewn.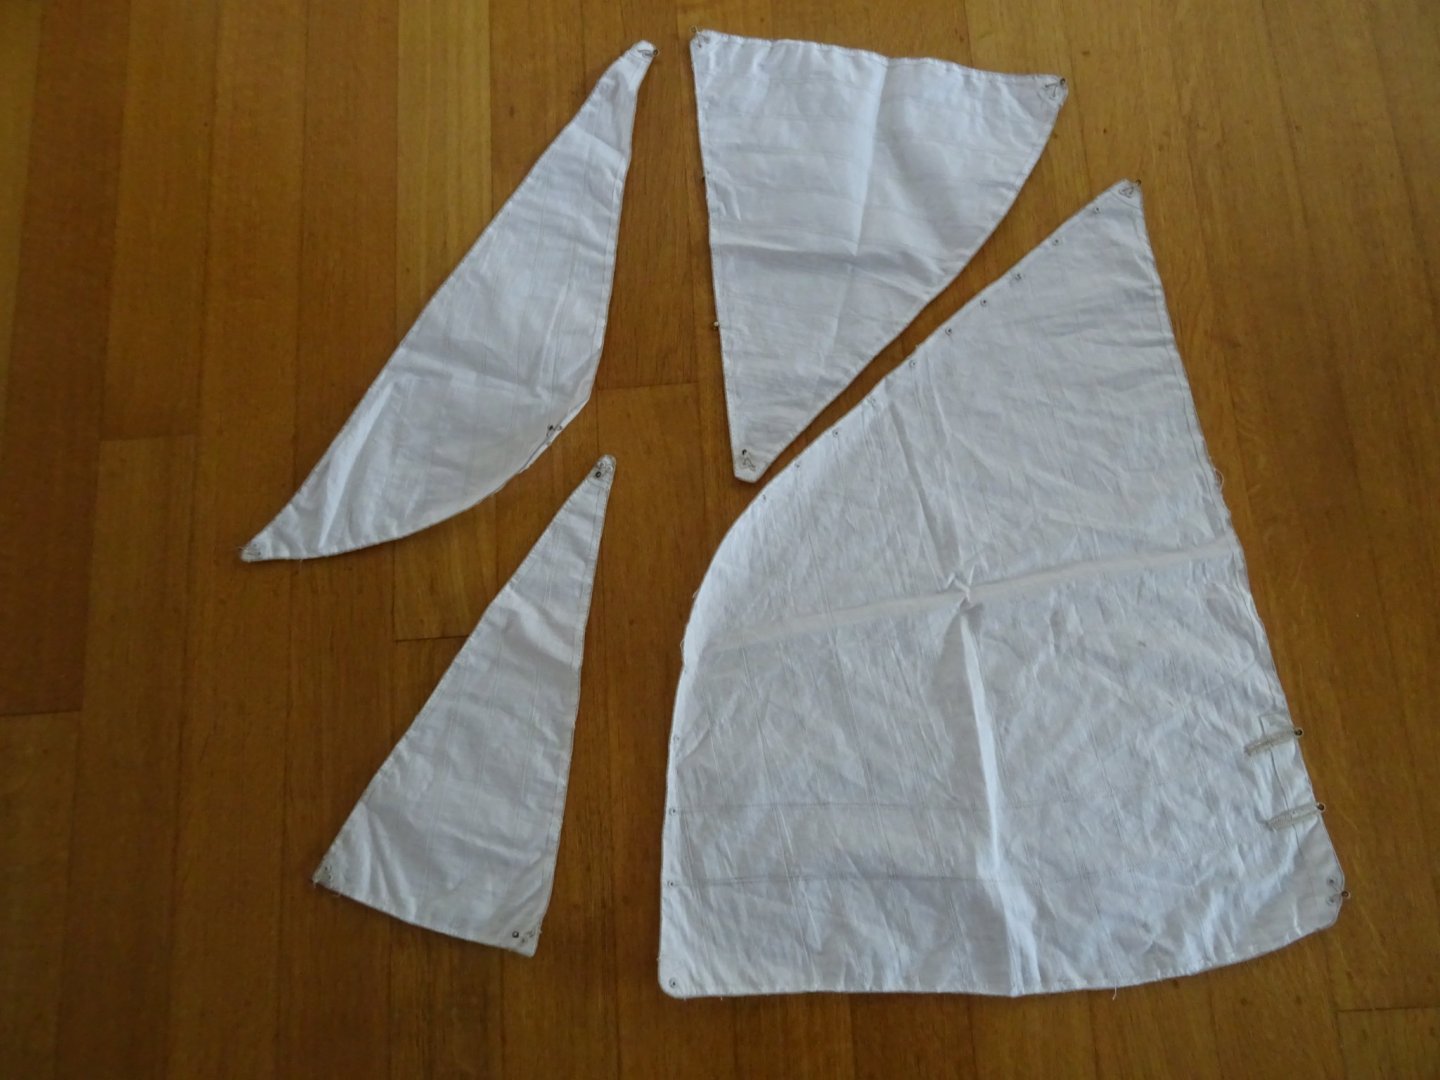
-
Thank you very much for this clear explanation, Vaddoc.
- mtaylor and thibaultron
-
2
-
-
Your pram looks very neat, Bob!
-
-
On 3/11/2021 at 5:44 PM, bruce d said:
Hello Geert, it looks good and I will watch to see what happens next.
👍
Bruce
Thanks, Bruce. I am now sorting the pictures of the last couple of weeks and will post an update by the mid of next week.
-
-
-
-
On 3/7/2021 at 11:50 AM, captain_hook said:
Absolutely beautiful!
Thank you, Captain.
-
Michael, is there something you can't make? 😵


Clipper d'Argenteuil by G.L. - scale 1/15 - POF - SMALL
in - Build logs for subjects built 1851 - 1900
Posted
Eberhard,
Bruno Orsel indeed used a very sophisticated set-up that he built with a friend using CNC technology.
(picture from monograph)
I don't have that technology and would rather have the model become a product of my own handiwork, so I'll have to make do with the skills that are within my reach.
If what I have in mind works, I will not need any clamp to laminating the frames.
Vaddoc,
I am used to work with PVA so I will try to laminate with PVA. If it doesn't work I'll have to try something else; I have no experience with epoxy. I have some workshop time again in the second half of the week, in the weekend I will report how it went.
That's what Bruno Orsel writes in his monograph. I wouldn't use silk sails, first of all, I couldn't afford it and it doesn't seem like a good idea to sail with it on a windy day. But let's not forget that these gentlemen sailed on the sheltered waters of the Seine far from the sea (with blazer and tie). I suppose a silk sail will catch the lightest breath of wind compared to a canvas sail.
I started this log with the note that was for fresh water sailors and Sunday mariners😈.