


Chuck
-
Posts
9,052 -
Joined
-
Last visited
Content Type
Profiles
Forums
Gallery
Events
Posts posted by Chuck
-
-
Nope your good…looks great. The line is really before fairing and removing any char at all. There is plenty of meat on those frames so you are doing perfectly. That is exactly how it should look and be. Mine was exactly the same.
- JeffT, Stuntflyer, Ryland Craze and 2 others
-
 5
5
-
-
Thank you guys...we leave tomorrow.
Yes I am headed out to the north and south fork of Long Island. Gonna check out some maritime stuff including some museums that have small boat collections. Still researching that block island Cowhorn. There is supposed to be a nice one in the museum there. I will be online using my phone though....me always needs some MSW time....lol.
Planking has started...today.
The facstle is completed. Nothing to really add except that I followed the planking scheme provided on the plans. You can see that here. You guys may of course change it. I cut these from a 3/64" sheet following the plans rather than use strips. There is quite a pronounced curve to these and they are small enough so it wasnt a chore. I basically traced the plan sheet. Tweaked and sanded to suit. I used a #4H pencil to simulate the caulking between the planks.
Progress below. One plank at a time. The outermost planks are the hardest but not terrible.
-
Yes but why in the world would you risk that. To many ways for that to go wrong. So rather than do that I drill them on each side separately and you dont have to go all the way through. I am just cautious like that. Especially when you can only see one side at a time.
- Rustyj, Freebird, Stuntflyer and 3 others
-
6
-
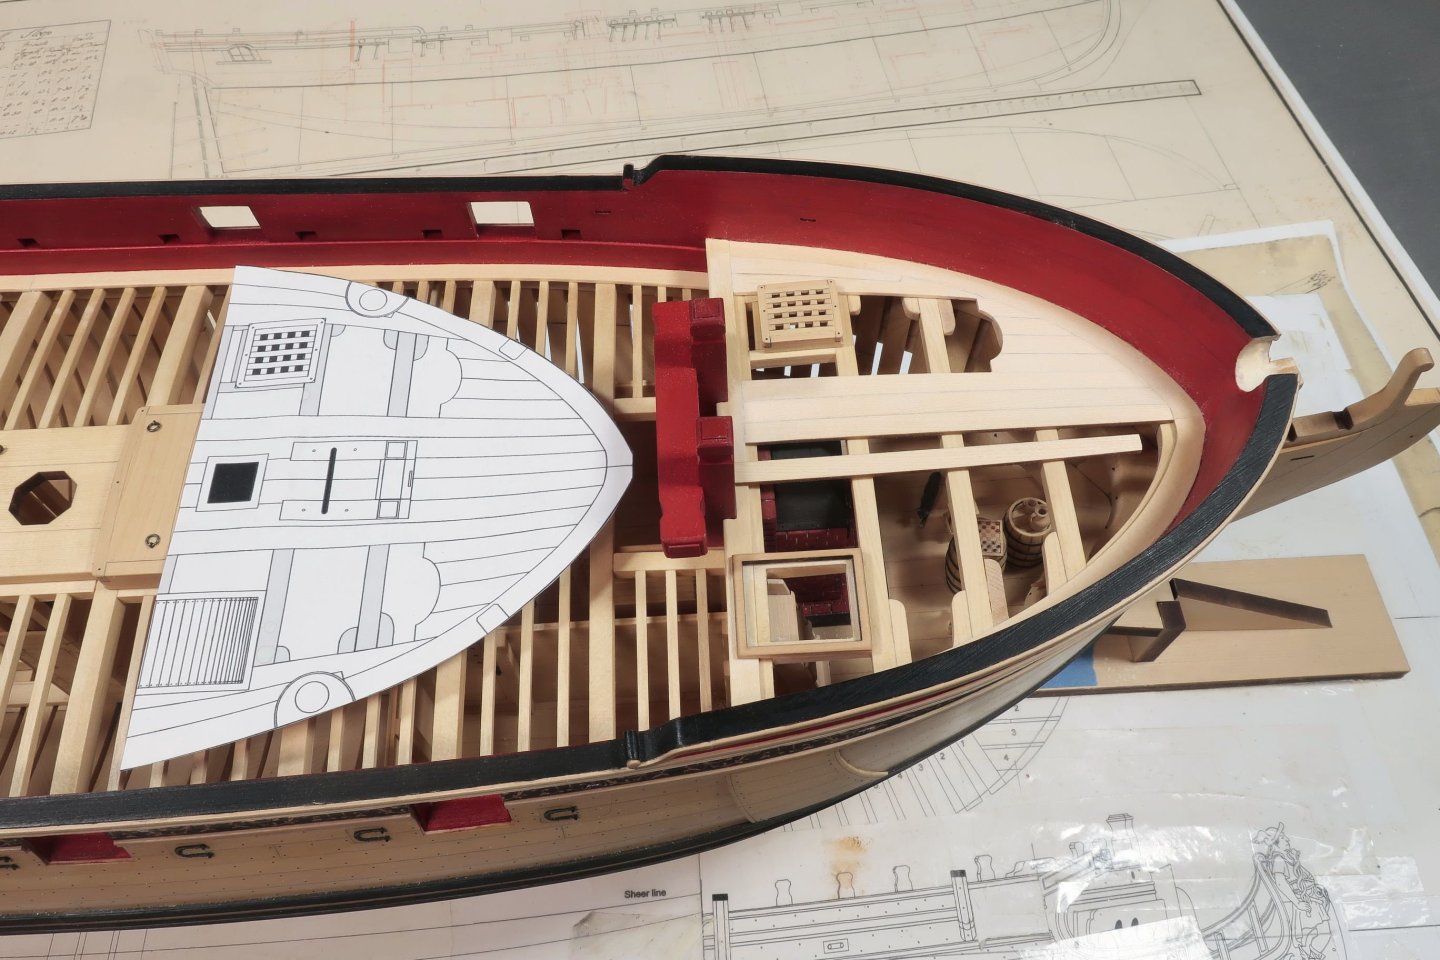
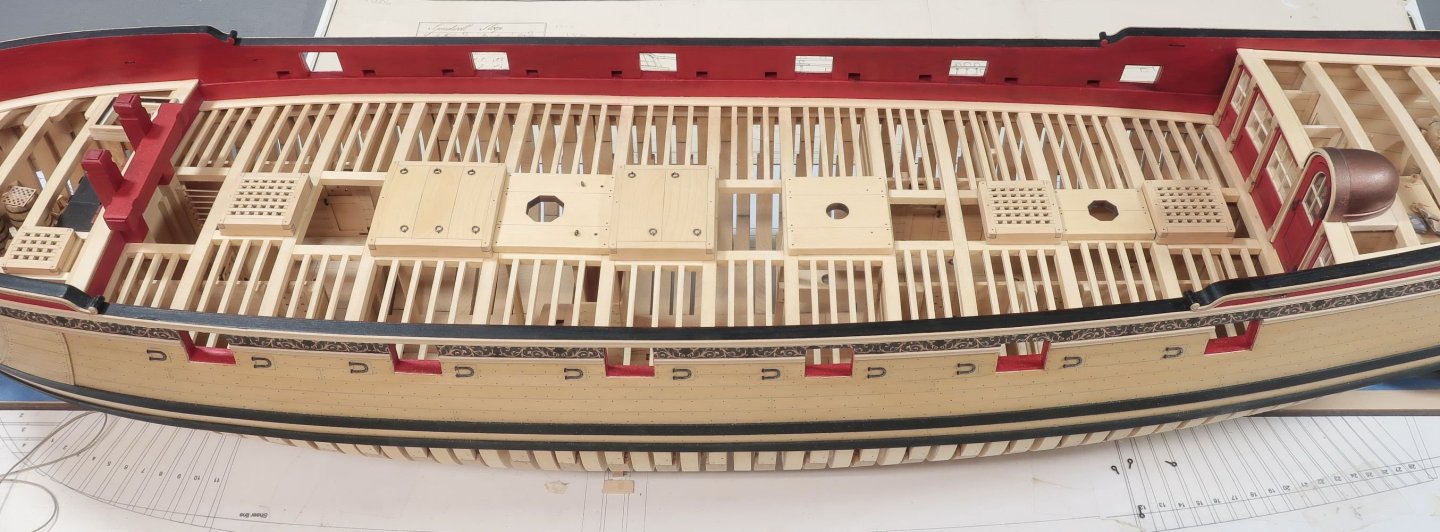
Just a quick follow up....All of the coamings and hatches and partners are now glued onto the model. Not much to see but here are the details.
The mast partners went in first. Really important was to get them down the center line so your masts arent slanted or crooked. It is best to use a dowel or even any strip of wood near the same diameter as the masts to also check the rake of the masts to determine the position of the partners. I dont have a picture of that but you guys mostly know this already.
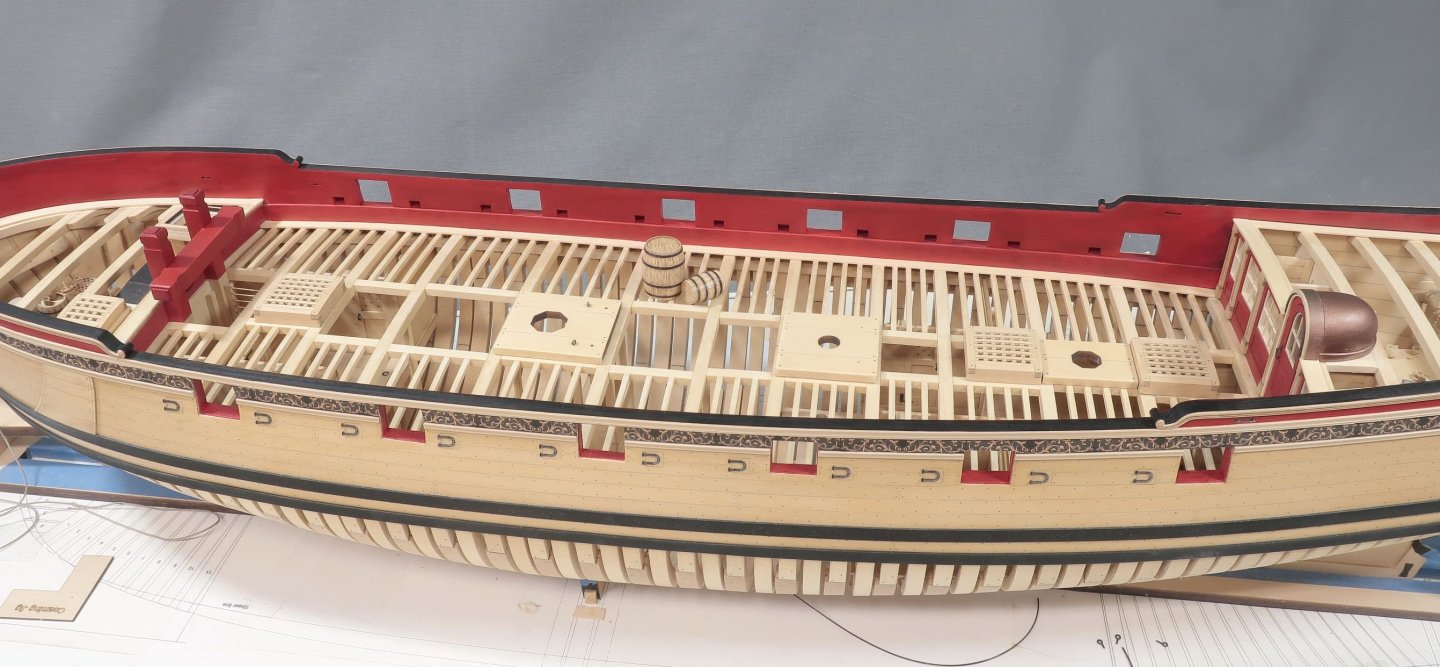
The main mast partners needed to have the pump tubes made before I could glue it on the model. I am only making the pump tubes below deck at this time much like Greg did on his model. I used a 1/4 x 1/4 cedar strip and marked it out to become octagonal. I used the 7-10-7 template provided on the plans. You can see it in the picture below. Then I drew lines down each side so I could begin shaving the corners. I just use a sharp #11 blade to carefully shave the corners down to the lines. Just before the lines actually. Then I use a sanding stick to finish it off. Some of you may have some machines that could do this more accurately but this works just fine.
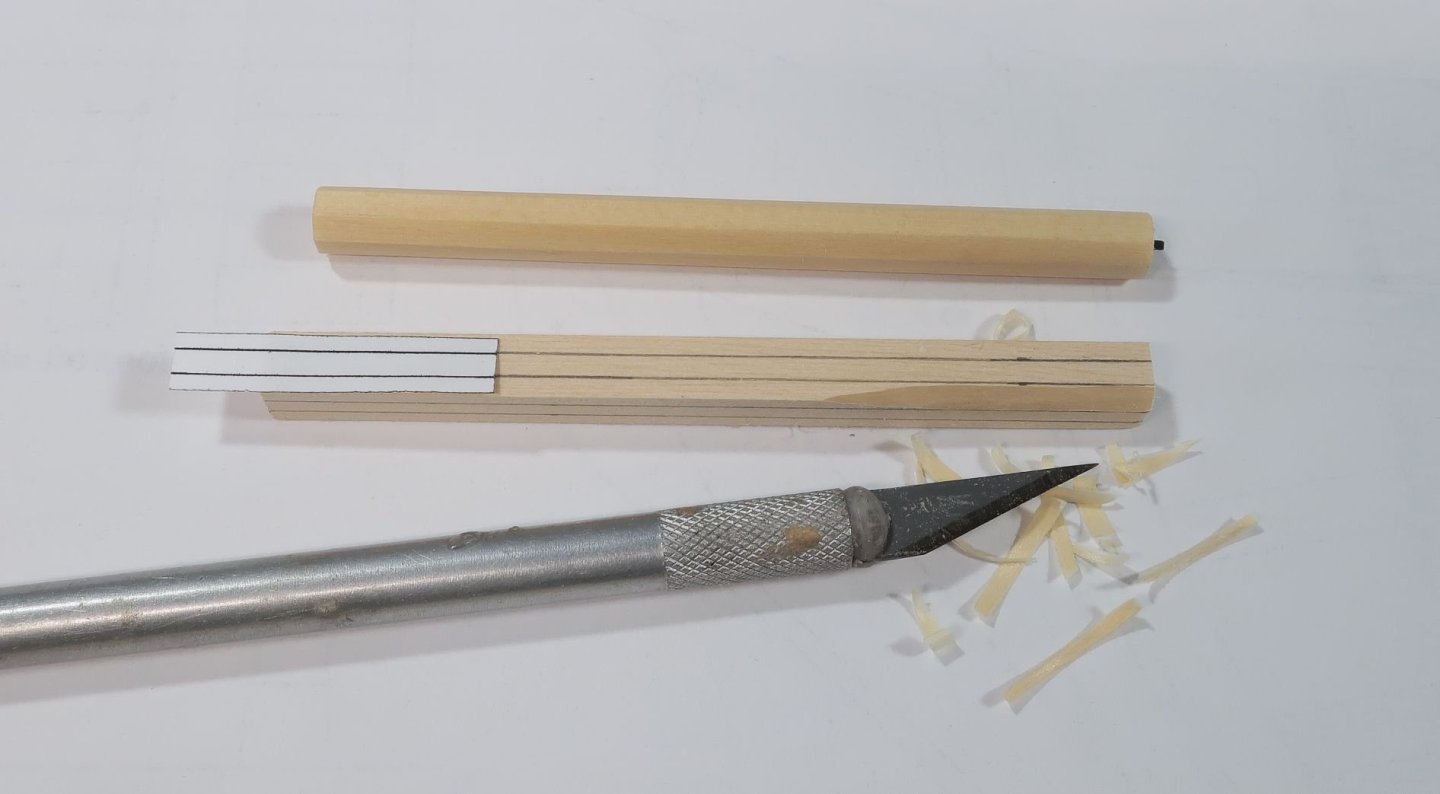
You will notice a small length of 19 gauge black wire I inserted into the top end. This will be inserted into the holes laser cut in partners. The pump tubes are not vertical...so when glued into the bottom of the mast partner I created the slant for these using the plans as a guide.

Then it was just a matter of gluing the main mast partners onto the model. You can barely see these pump tubes under the partners but here is a bad photo showing them entering the well below deck. We will make the top half of the pumps much later and the same holes on the mast partners will be used to register them so they look continuous through the deck. So dont make the wire too long on the top of the tubes. Make them short enough so some room remains to do the same when we add the top of the elm tree pumps later.
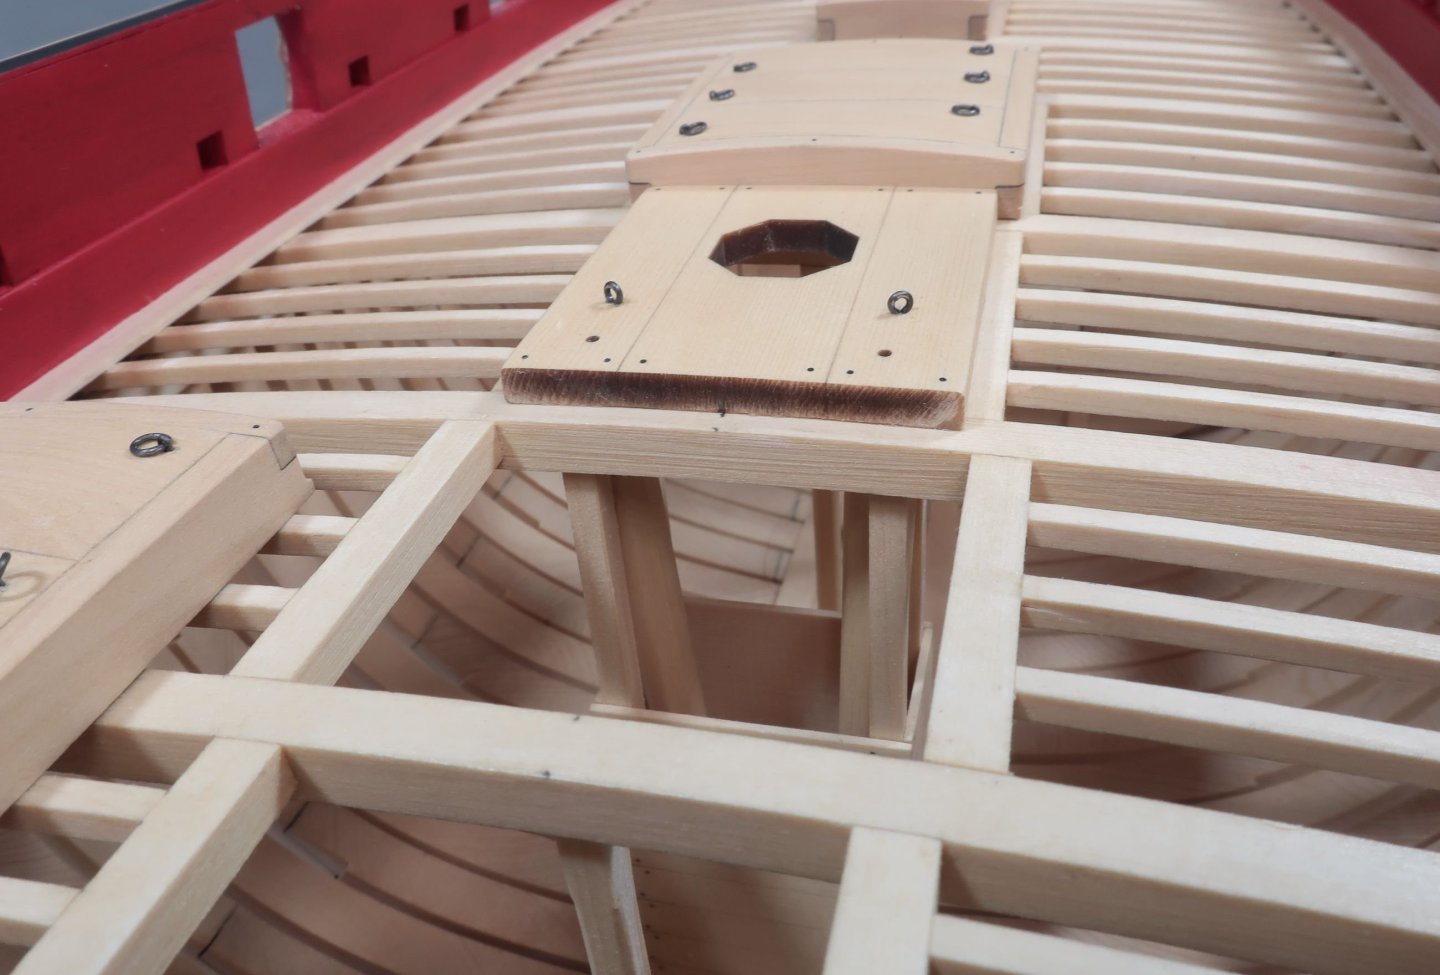
The other gratings and hatches were added down the center line permanently.
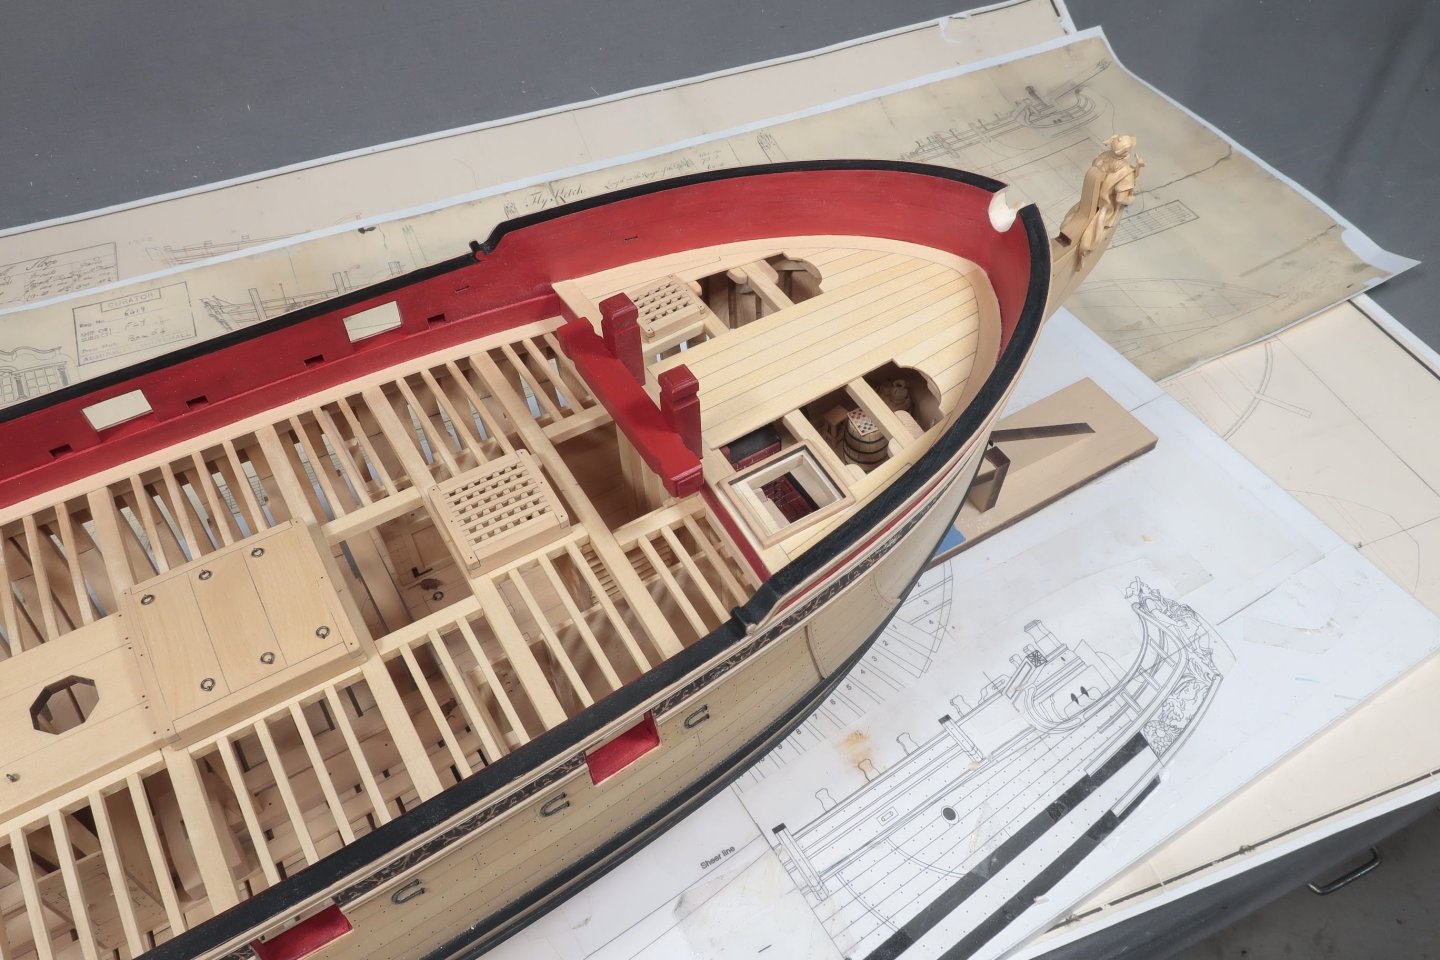
The last remaining issue was the capstan partners. We need to make the capstan drum below deck. This is easy enough. Its just a round drum that tapers. I started with a 3/8 x 3/8 strip of cedar. Then I converted that into an octagon just like we did for the pump tubes. I have provided another 7-10-7 template for this strip so you can proceed to make it an octagon.
Here is a photo after I rounded it off and tapered the octagon. I just dis this by hand but you can chock it in a hand drill or if you happen to have a lathe....have at it. The length can be taken from the plans as well as the diameter at the bottom so it fits in the capstan step below deck.
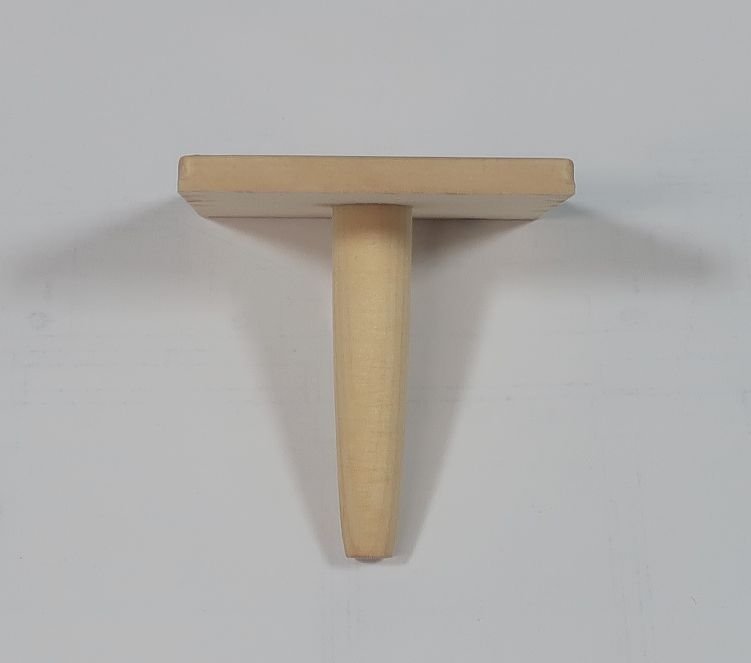
Once completed I glued the capstan partner onto the center line of the deck so the drum sits in the step nicely. You might also notice that I made the drum a certain length so there was still room in the hole of the capstan partners. This will allow me to register the actual capstan above deck after we make it. Hope that makes sense.
Thats it for now as I am off to the beach for a few days to recharge....and decompress. I will be back sometime next week ......or maybe not....
-
Very nice....that will certainly make framing easier and quicker.
-
8 hours ago, wmherbert said:
I would appreciate a reminder of how you made the lifting rings on the hatches. I remember you explained it some where but couldn't find it.
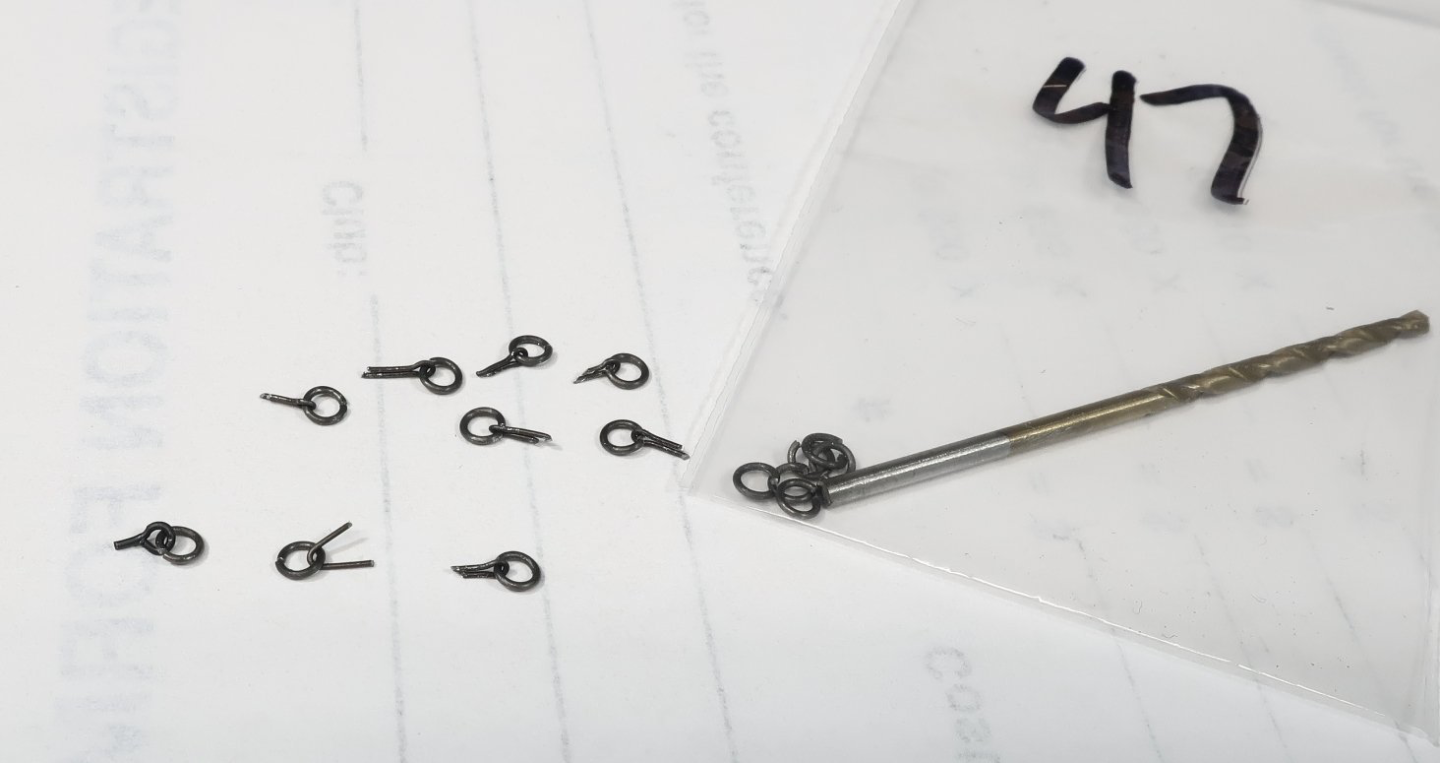
the rings are made in the usual manner. Wrapped around a 47 drill bit and parted with a razor saw. The bent wire is much lighter and thinner gauge. In my case here…24 gauge for the split rings and 28 gauge for the codder pin bent and inserted into the deck.
-
I am not really sure but would guess that it was one of the hatches as well. If I was going to show that detail I would have one of the coverboards removed and the anchor cable passing through it. My guess would be the forward cover board of the forward hatch. But I am no expert in that area. Honestly I would need to do a lot more digging.
- Jack12477, mtaylor and Ryland Craze
-
3
-
Really nice progress...in the home stretch as they like to say!!!
-
Thank you Jim...
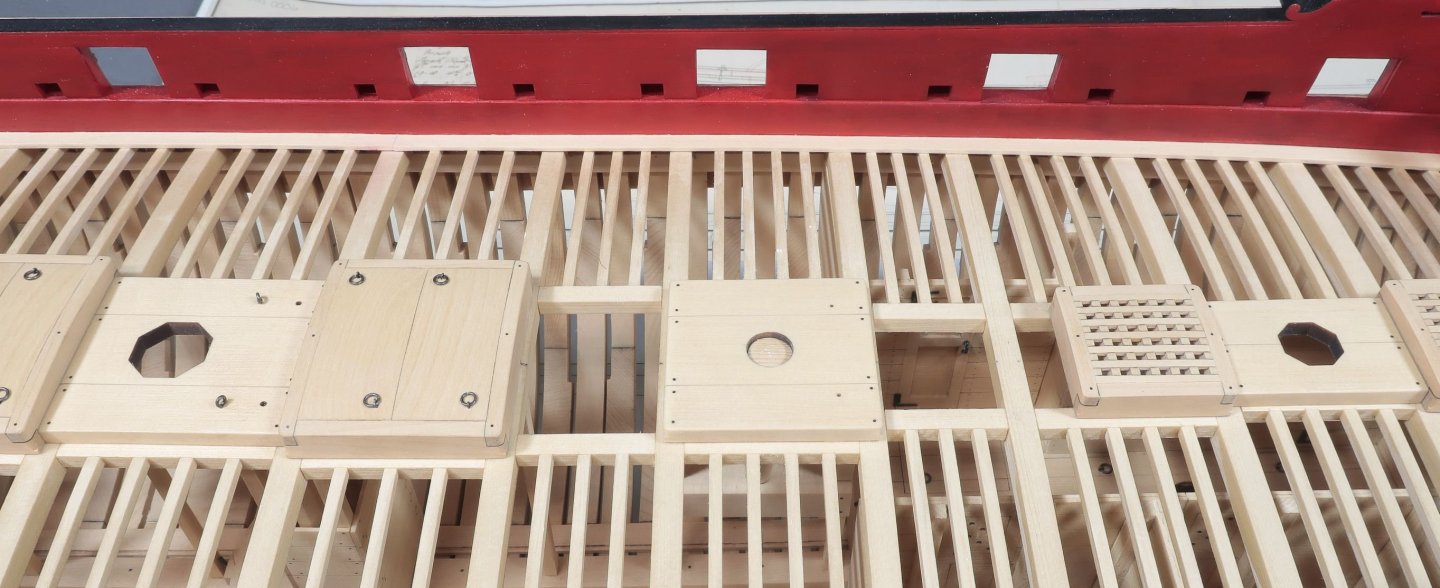
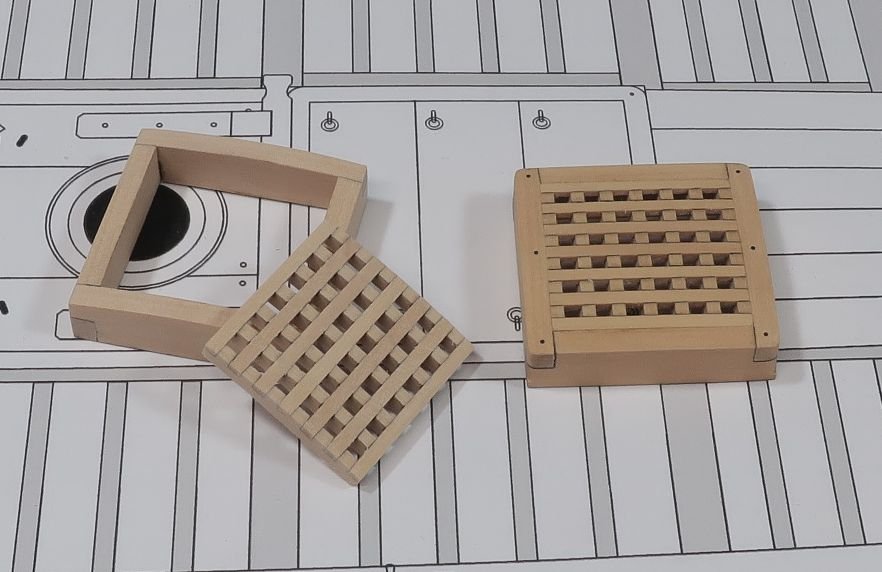
I have completed all of the hatches, gratings and partners to be placed on deck. You have seen how the gratings were made. The two hatches are pretty similar. The only difference is they have cover boards rather than gratings within in the coamings.
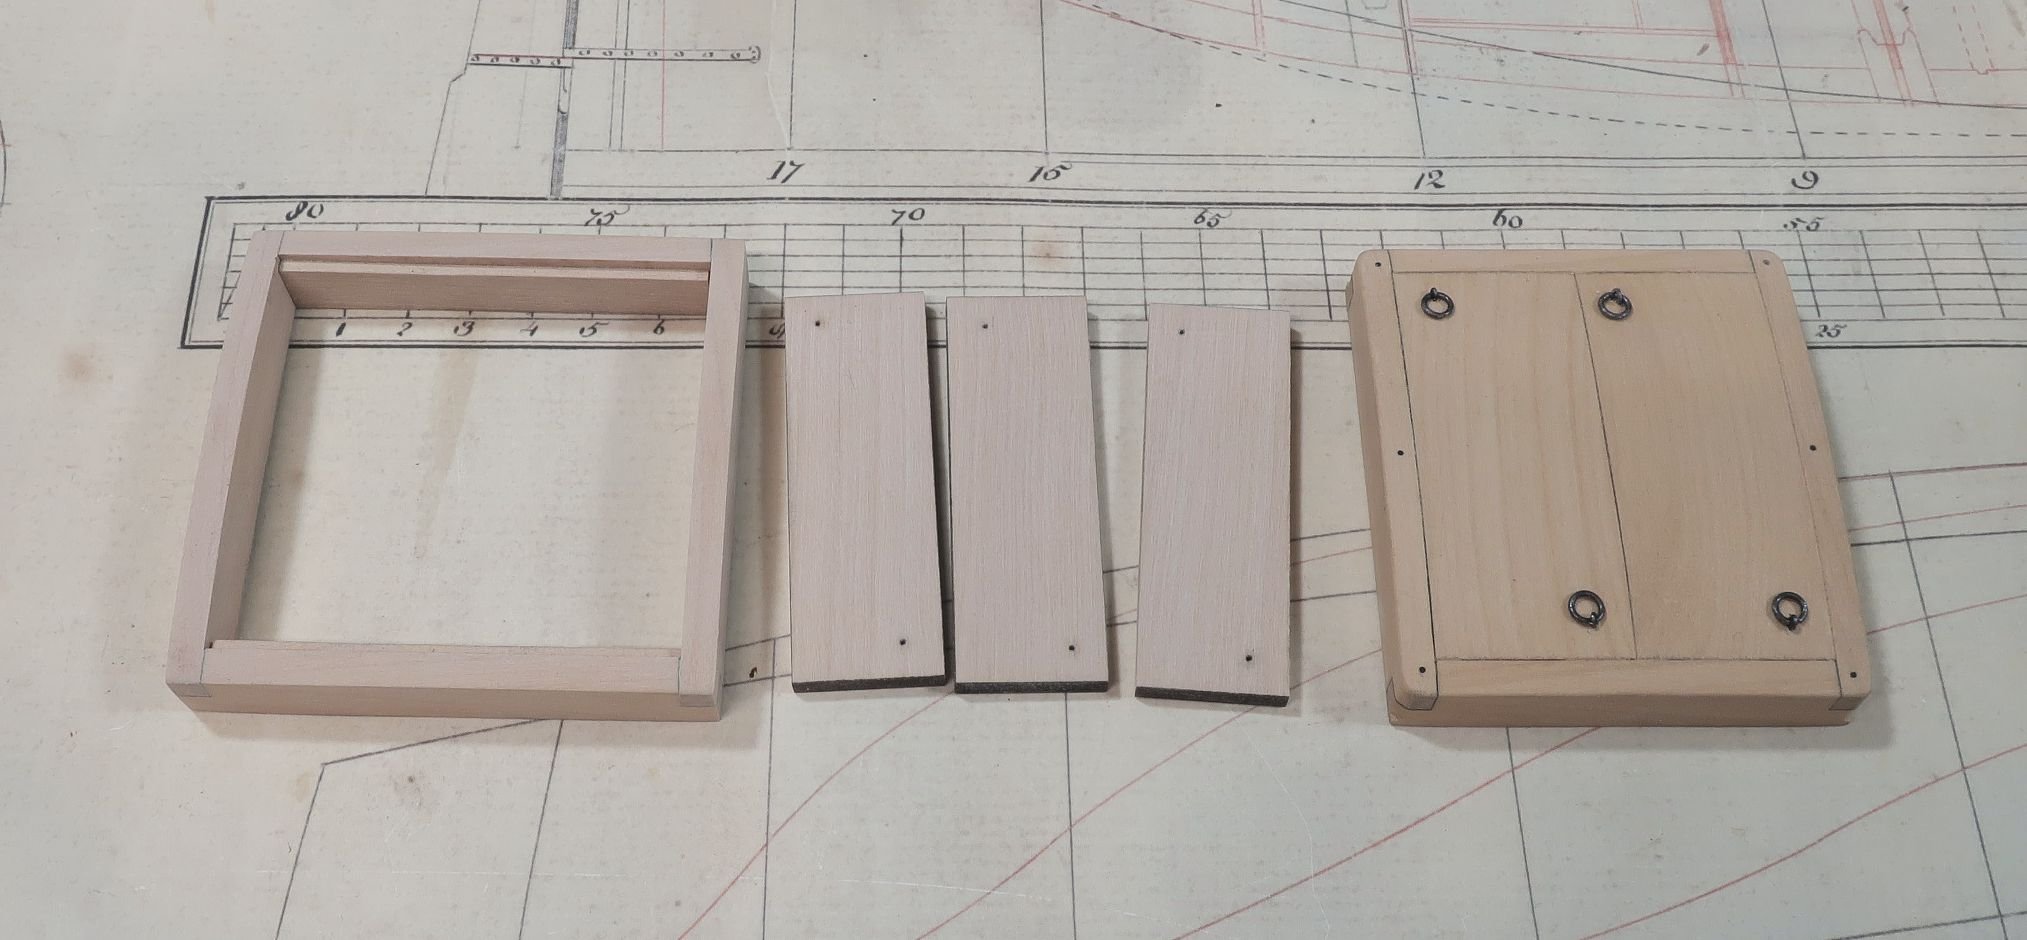
The photo below shows the laser cut coamings assembled. There is no need to remove the laser char from the lap joints at the corners. In fact it probably isnt a good idea at all. They are precision cut so you end up with a perfectly squared up coaming the correct size. You can and should sand both sides of the sheet before removing these laser cut parts to clean the char from those sides. Just glue them up using the same right angle jig provided earlier. Then sand the char off the top of the completed coaming being careful to keep the round-up consistent.
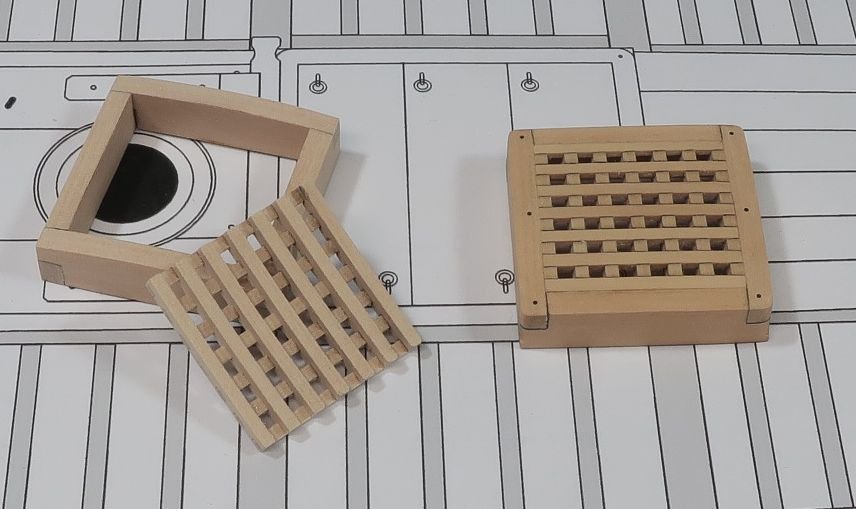
You can see the smaller hatch completed. The larger one shows the three cover boards also laser cut waiting to be glued into position. But this you will also note the ledge created on the inside of the coaming that the cover boards will sit into. These are laser cut for you and can be glued on the port and starboard insides of the coaming.

This photo shows the three coverboards in the coaming. They are pretty thick, but only so they are flush with the center of the coaming to allow for the round-up. The round-up along the sides of the coverboards should be sanded flush to the top edge of the coamings along the P & S sides. I know some folks like to show one or two coverboards off the coaming. You can do this if you want to. But then you should sand that roundup into the bottom of the coverboards as well. But I will show them all in place like the contemporary model.
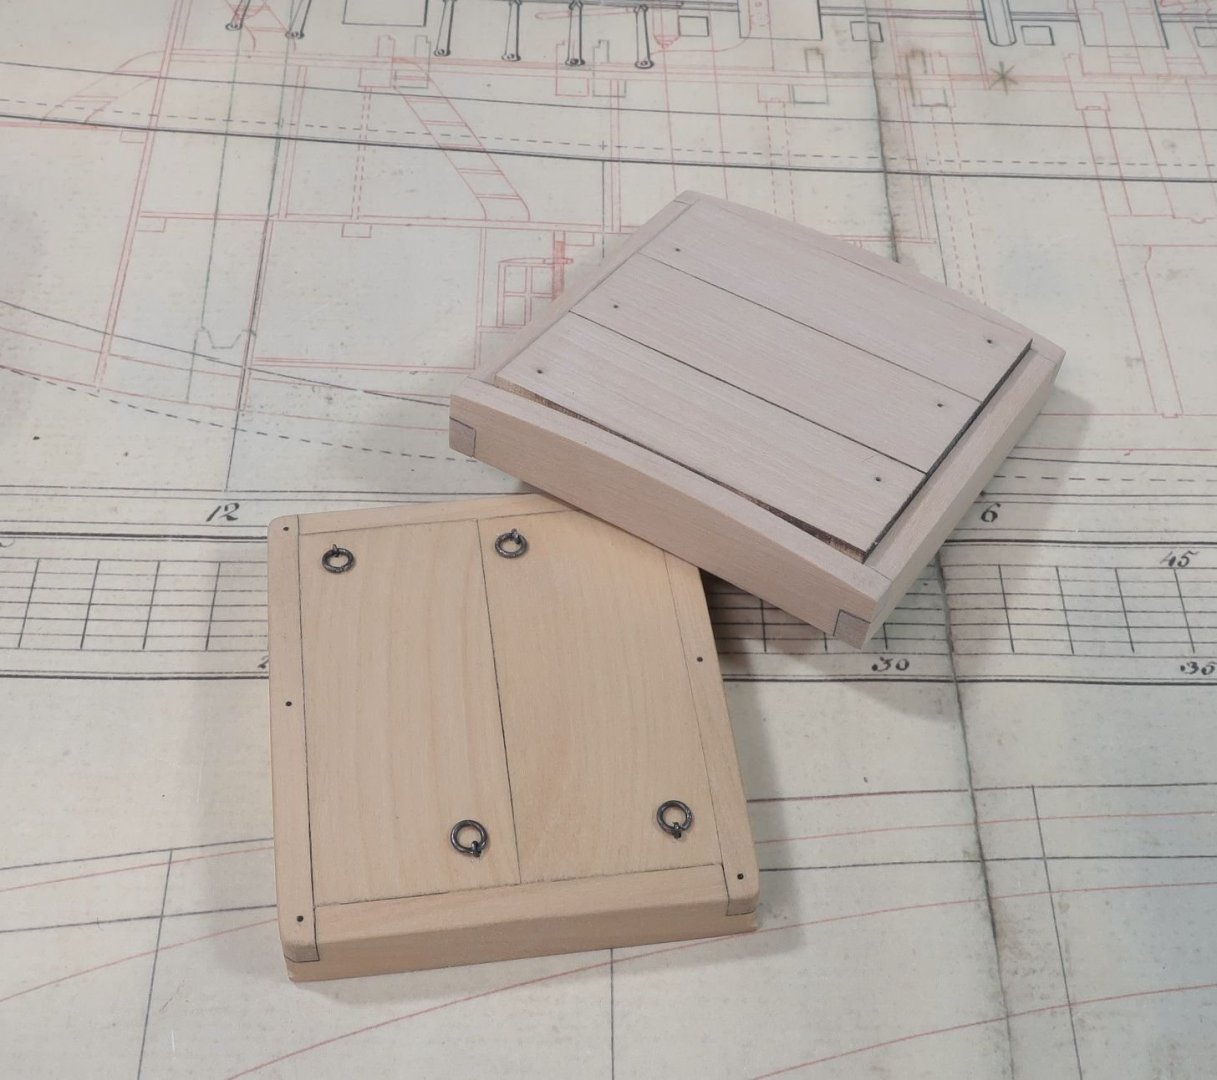
To finish off the hatches...round off the corners using the right angle jig like you did for the gratings. Trim them down to the top of the deck planking. The bolts were added using black fishing line in the same way. The iron ring for handles were made just like those on the lower platforms. Exactly the same.
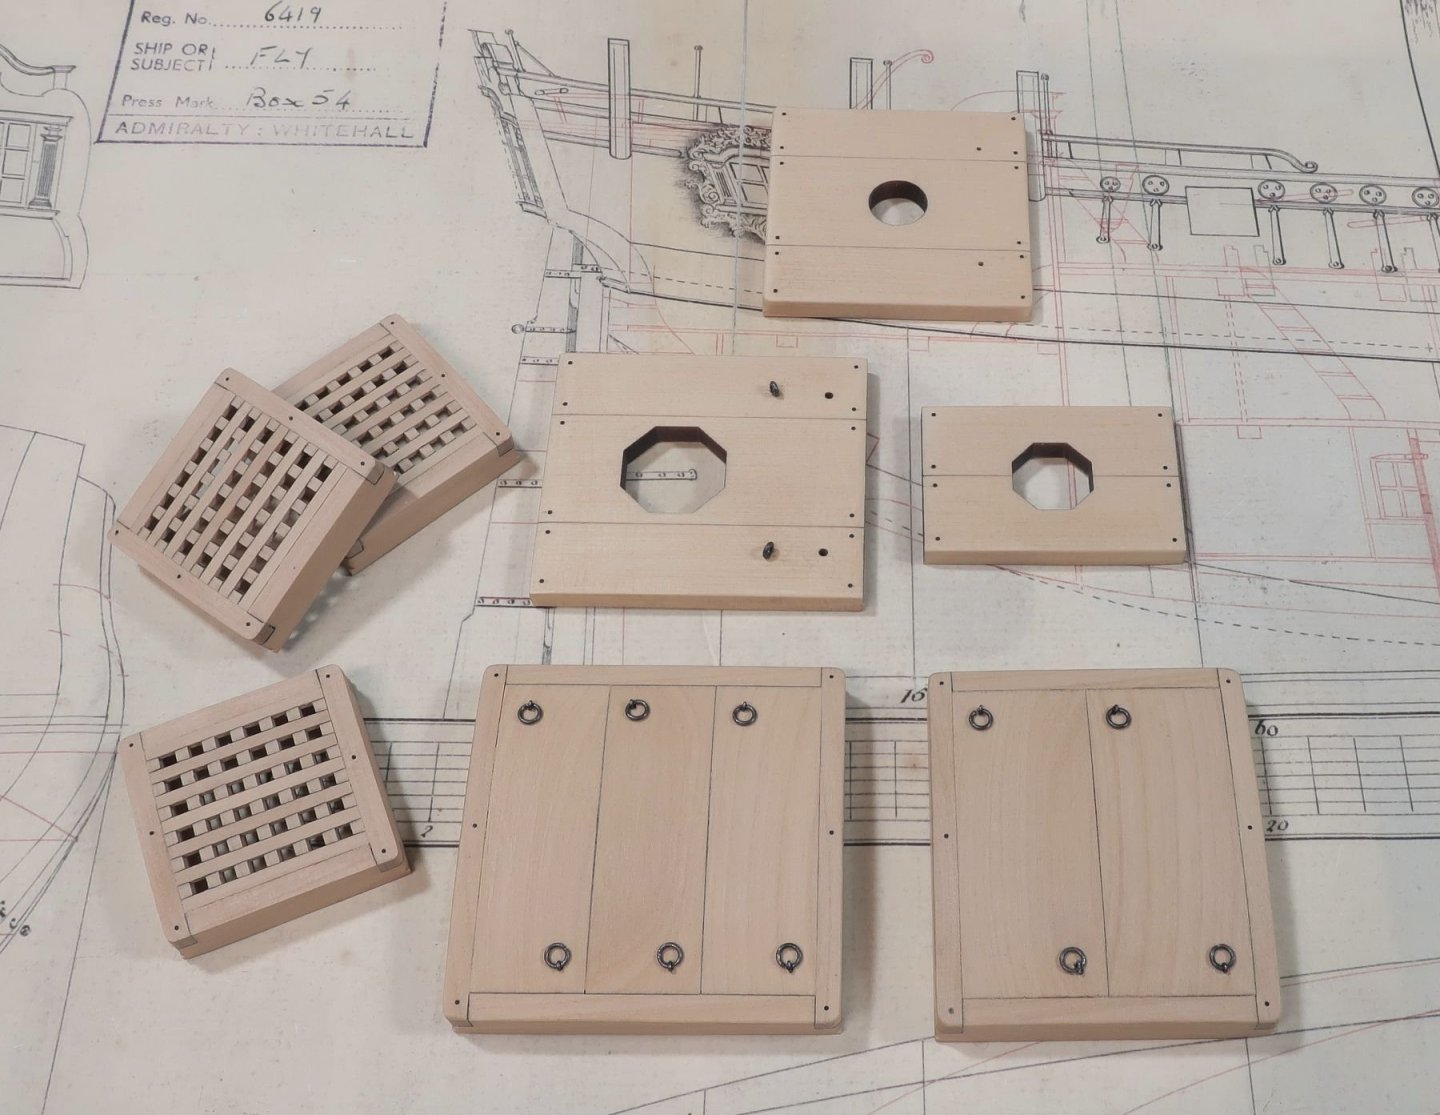
Also shown in the photo above are the mast and capstan partners. These are completely laser cut for you. They have etched lines to show the separate sections. All you have to do is sand them clean and round off the corners as described earlier for the capstan partners only. Soften the top edges as well. Add the fishing line bolts and the eye bolts on the main mast partners. Now some of these can be glued onto the model. They are all ready to go so you can start planking the decks.
BUT there are a some like the main mast partners and capstan partners that need some extra work. I will describe that next. For example the elm pump tubes below the main mast partners and the capstan drum as well.
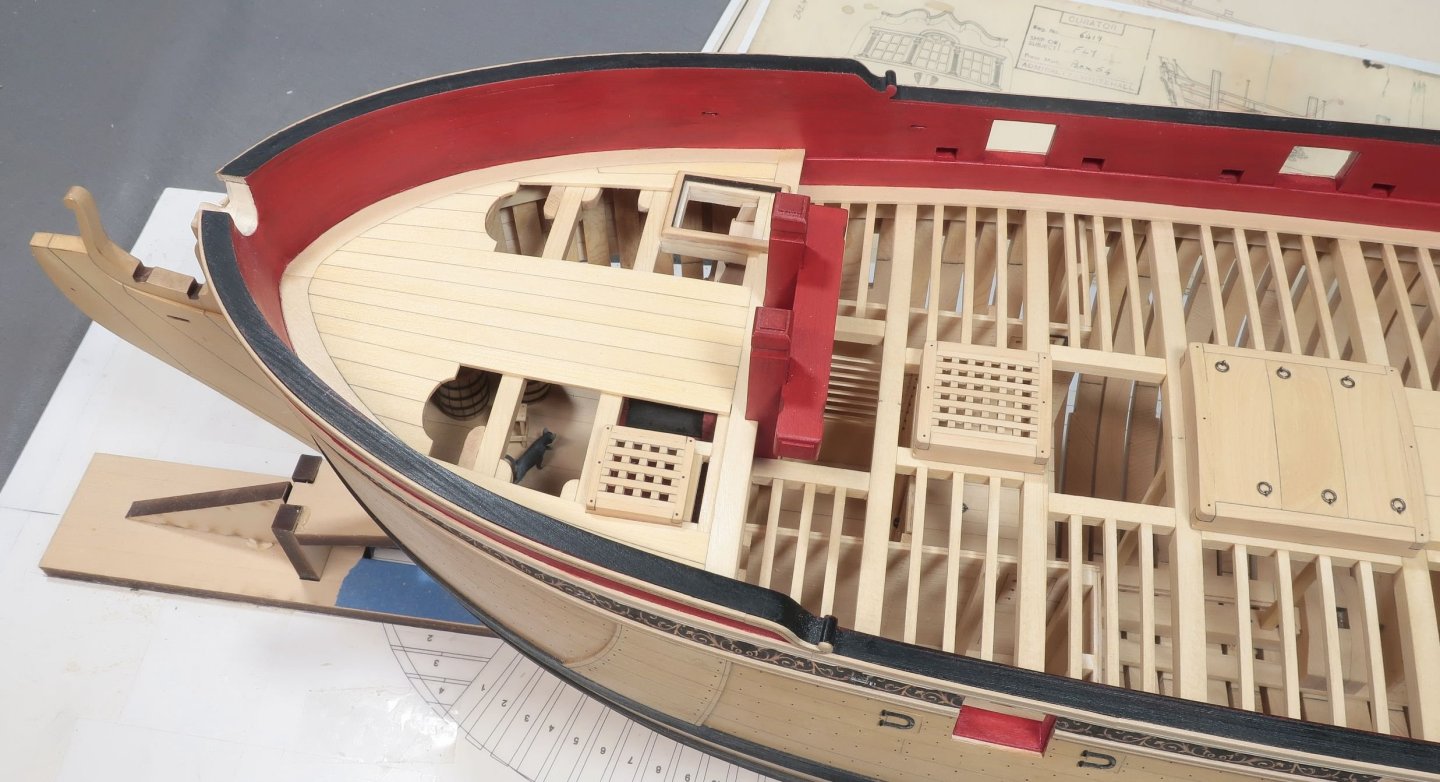
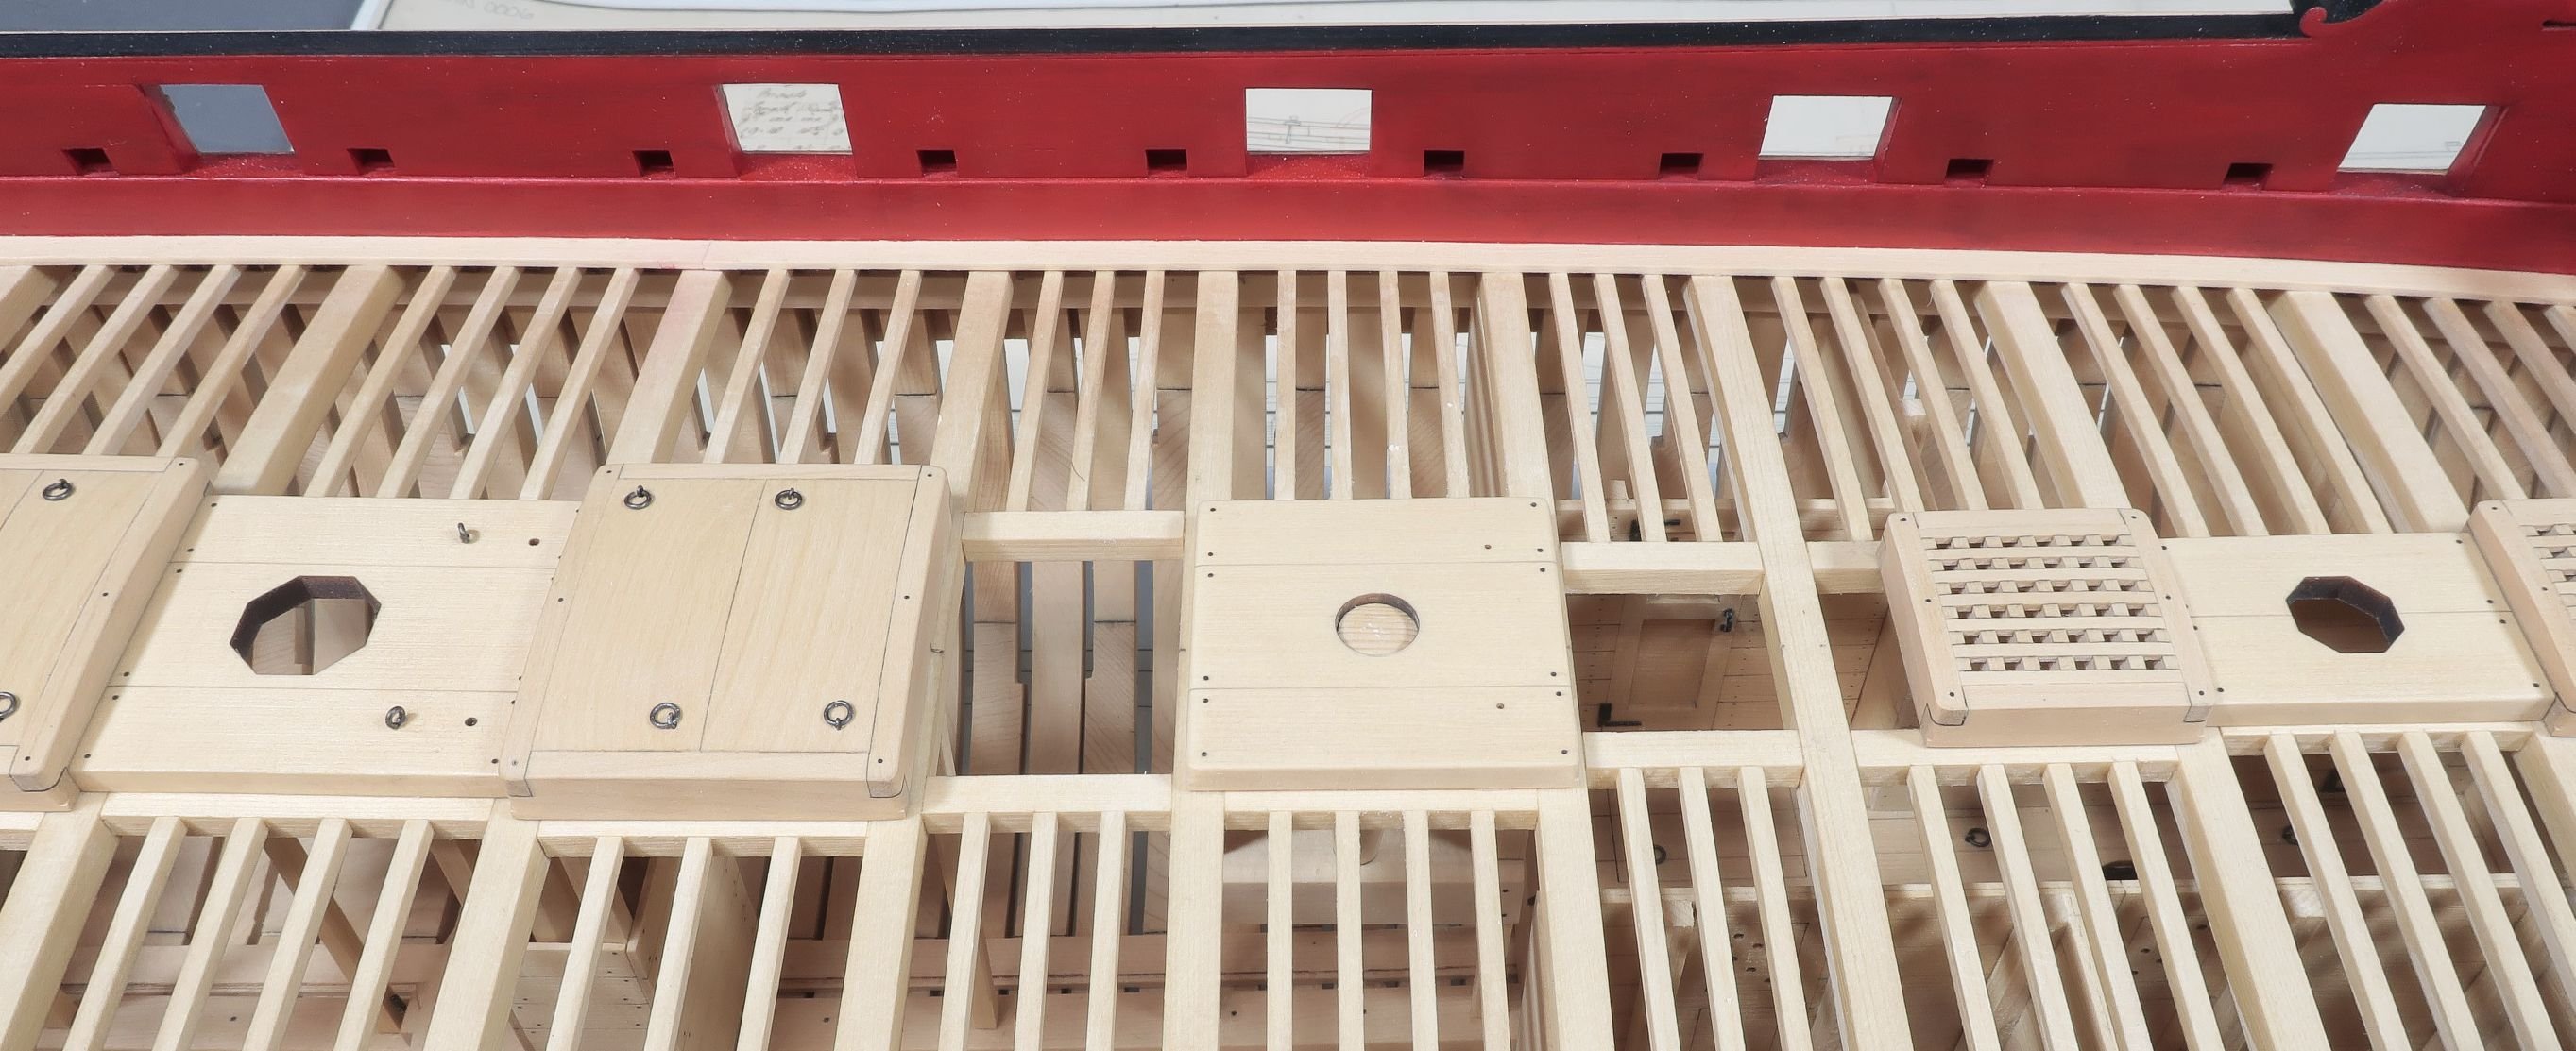
More to follow...but here is a photo with the all of the hatches, coamings and partners simply test positioned on the model. They are not glued into position yet. I did however glue the smaller grating and coaming on the forecastle deck in permanently....those are all finished up. Its getting there!!!
- CaptMorgan, Beef Wellington, KenW and 39 others
-
38
-
 4
4
-
Nice save....I have a bit of room on that sheet so I have added a second pair of those parts 9 & 10 just in case. Best to have a back up... I am watching the current builds closely so I can add extra back up pieces based on which ones might need it if room on the sheet allows.
-
-
-
Coming soon. Resin cast barrels.
I have three sizes of cast resin barrels that will soon be available on my site. Currently I have the 11/16" tall and the 1" tall barrels. I am waiting for my casting guy to make the third smaller size. I may even make a fourth smaller size later as well.

I have the two smaller sizes and I am waiting for the last larger size not shown. They are cast in white resin or a light tan like my carvings for the ship models I make. This makes it so much easier to prepare than building my laser cut versions. Those will still be available but these resin versions will give you guys more options. These can be prepared in minutes...
Just clean whatever flashing which is minimal. And remove the small vent hole plugs with a sharp #11 blade.
Then brush on some gel stain...in my case pictured, I used General Finishes Fruitwood gel stain as usual. I have one coat of stain on these. You can add more to deepen the color as you see fit. Then I just used a black sharpie to color the raised iron hoops. You could use any color you want for those as well. You could use a copper leaf pen for example. It isnt difficult....and takes just a few minutes vs. a much longer time to build my laser cut versions.
Each size will be sold two per package.
Its unfortunately too late for me to add these in the hold of Speedwell....but when you need to make a dozen or more barrels for the hold its nice to not have assemble them one at a time.
And Buckets...crates...and other items will soon follow. And whatever else I can possibly think of...please let me know if you guys fancy something in particular.
-
Maybe but it looks pretty good to my eye from the pics.
- Ryland Craze and Freebird
-
2
-
Yes just knock the corner off a bit. I would continue the taper lower a bit…not much by maybe a 3/4”.
- Freebird, Ryland Craze and davec
-
3
-
-
No I wont be selling a wood package. I just dont have time to mill wood and sell lumber. I work directly with Joe at MS. We are old friends that go way back...he mills and supplies me with all of my wood at Syren. In fact we are hoping to go to a yard to pick up a whole bunch of cedar really soon. We are currently very low on it.
Chuck
- ccoyle, Ryland Craze, davec and 4 others
-
7
-
-
That would be so nice but it probably would put the builder at risk of being abused.
Anyway....those gratings
You will basically get all of the laser cut parts in this chapter. There are only four hatches with gratings. They are not very large. Here are all of the elements needed. You will get two layers for the jig. The two layers are glued together to form the jig.
You also get a right angle jig which is 3/64" thick. The thickness is very important.
Lets get started.
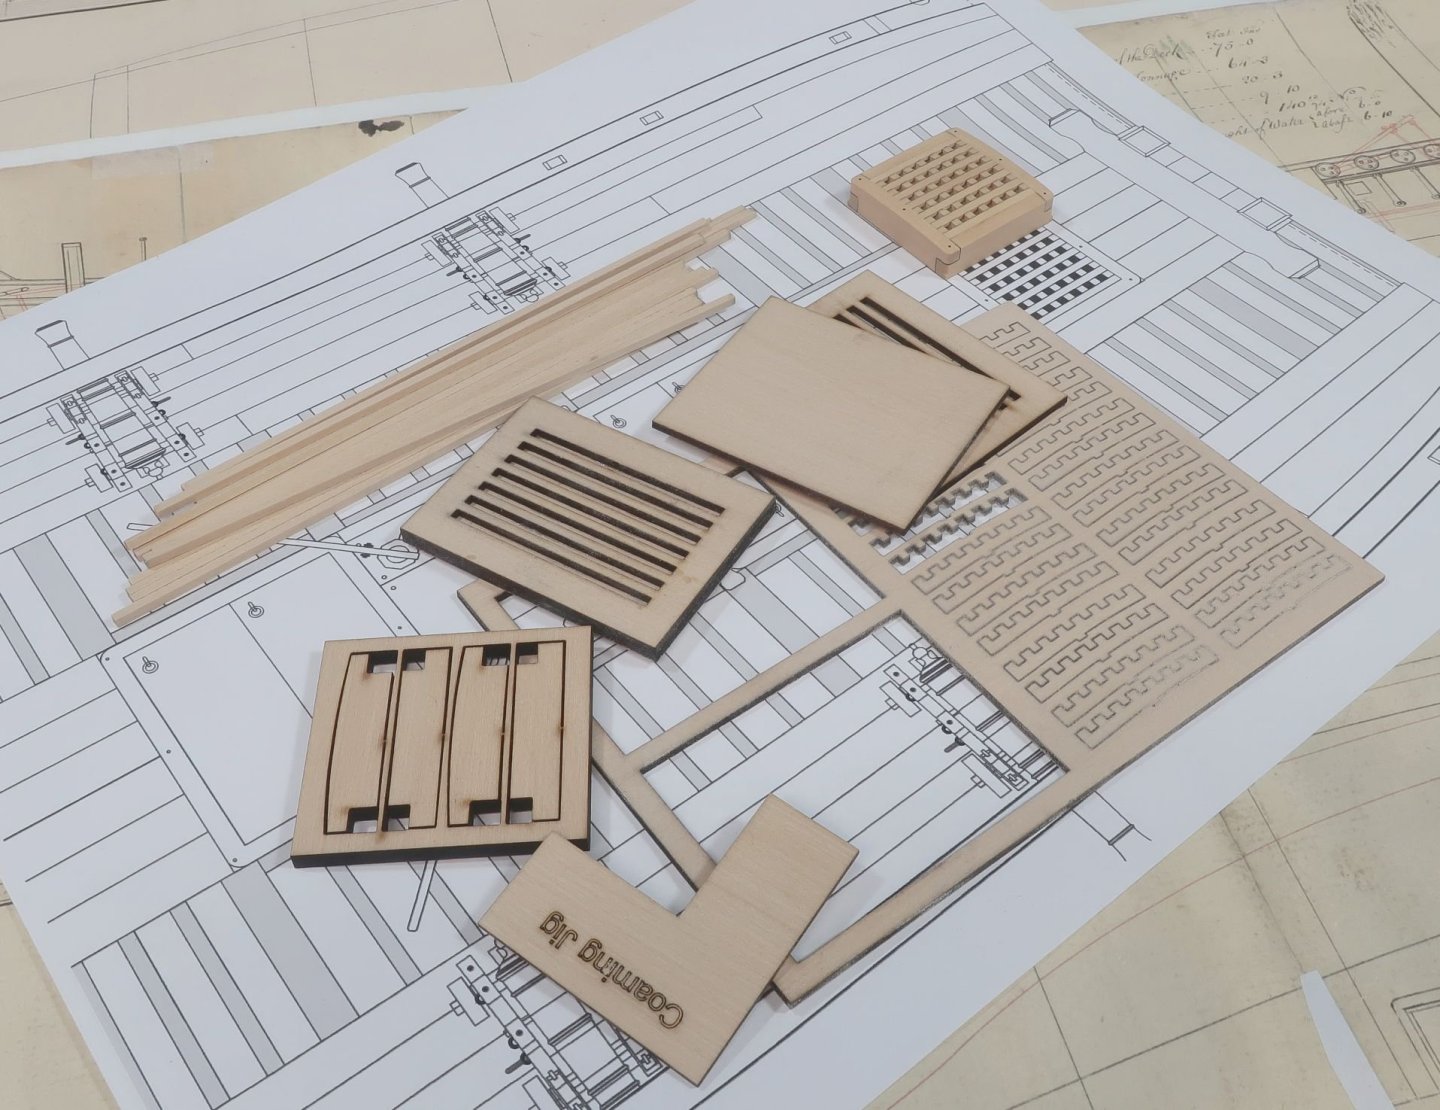
Start with the coamings. They are laser cut and 1/8" thick.
The fore and aft sides are already shaped with the round-up of the deck....or camber as usually described but is an inaccurate term.
Use the right angle jig to glue two sides together...dont worry about the laser char just yet. Then glue the remaining two sides together using the same jig to make a nice right angle.
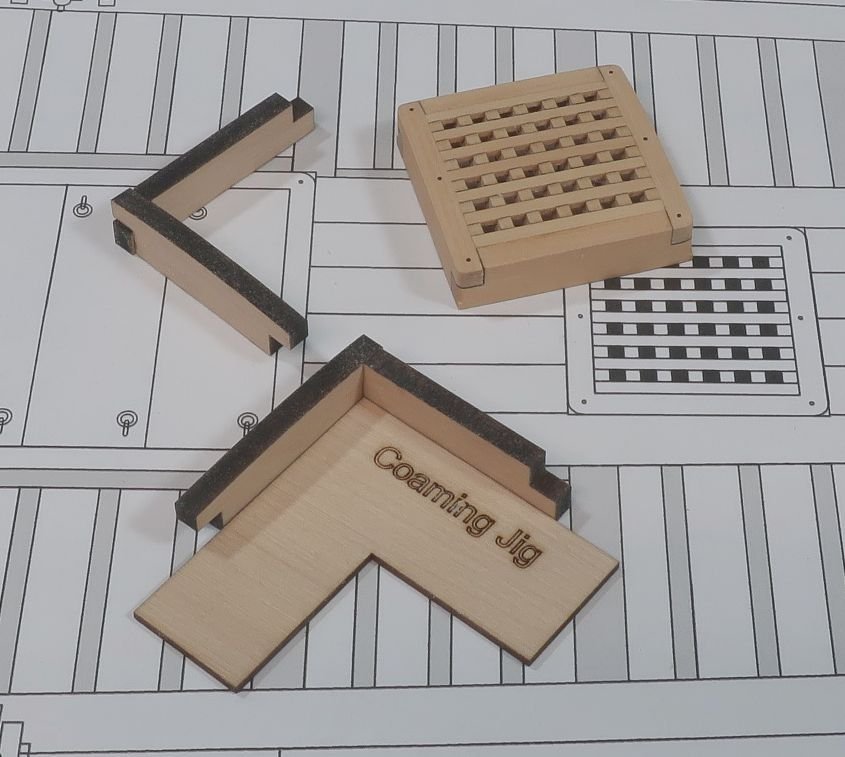
Glue the two right angles together to form the coaming. Sand the sides clean which are left a bit longer as you can see in order to remove the char and leave a nice bright smooth surface. Also sand the top sides to clean the char. You can see the cleaned coaming below.
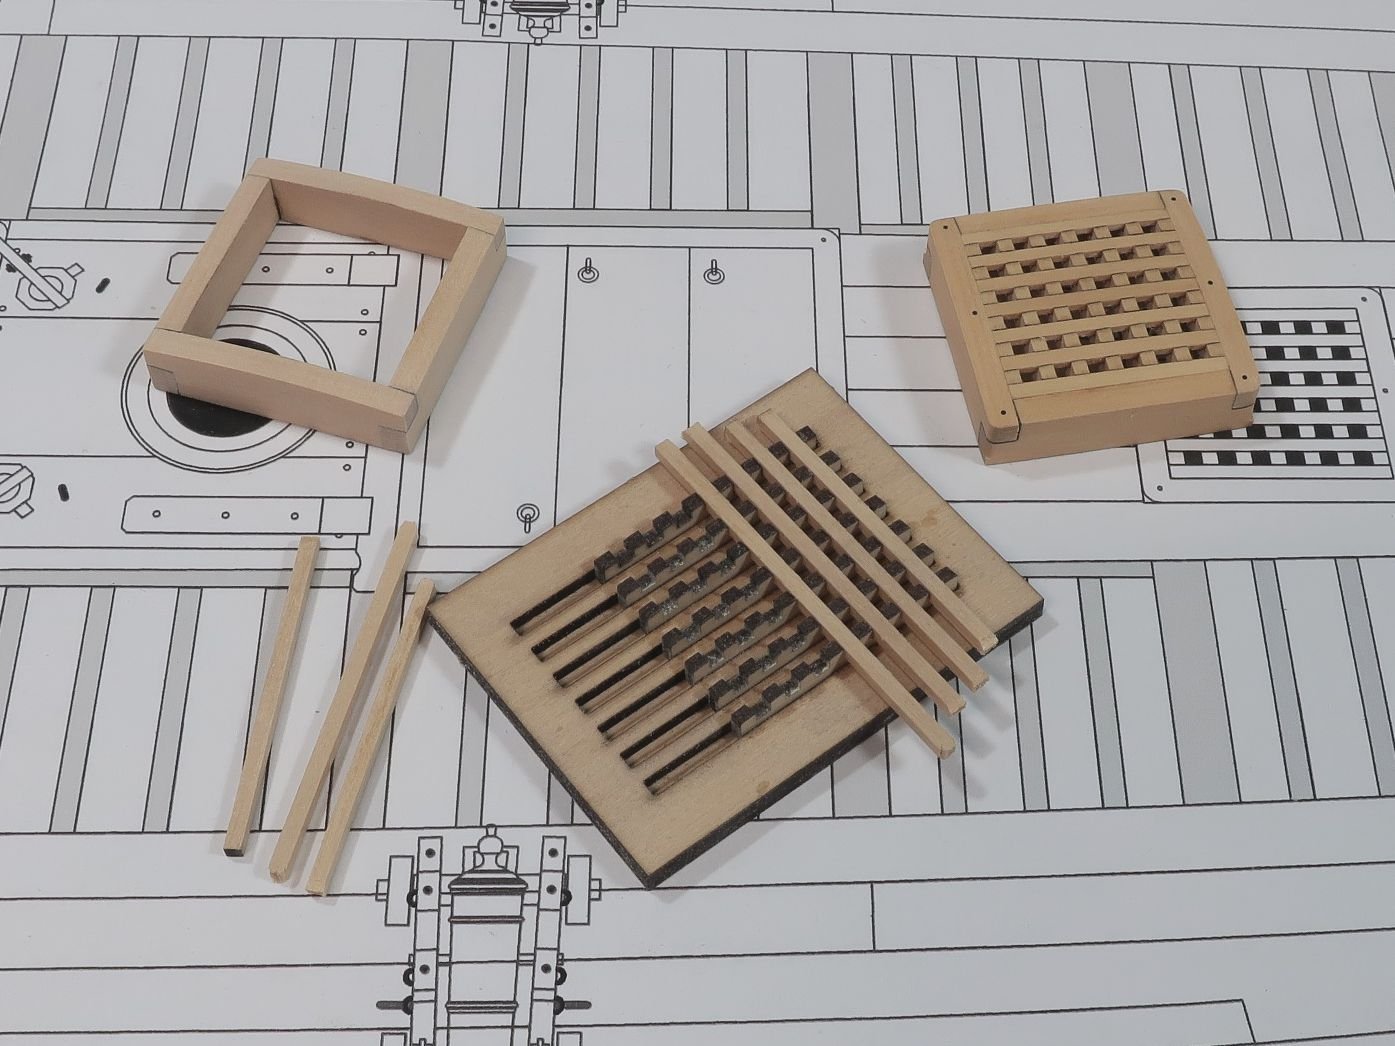
Then you can start working on the grating. Again just like my other smaller scale grating kits.
Insert the laser cut grating strips in the slotted jig. NO GLUE of course!!! This is just for alignment.
Then start adding the cross battens. These are glued in position. They may be too tight as you want a press fit. So just run the small strips 1/16" x 1/16" through your fingers with some fine sandpaper. Not much. Just enough so the battens fit into the slots. see below. There are seven batten strips and seven laser cut grating strips for three of the hatches. The fourth is made the same way but is much smaller on the fcastle.
When all the strips are glued in position, remove the grating from the jig. Snip off the edges as shown below. Then sand all four edges clean. Try and not distort the perfect square shape. In the photo two sides have the ends snipped off. The smaller hatchway will have fewer battens and more to snip away. Also sand the top surface clean and smooth. Once again try and maintain the proper shape with the round-up. You will know when its all done when the char is cleaned from the laser cut grating strip squares.
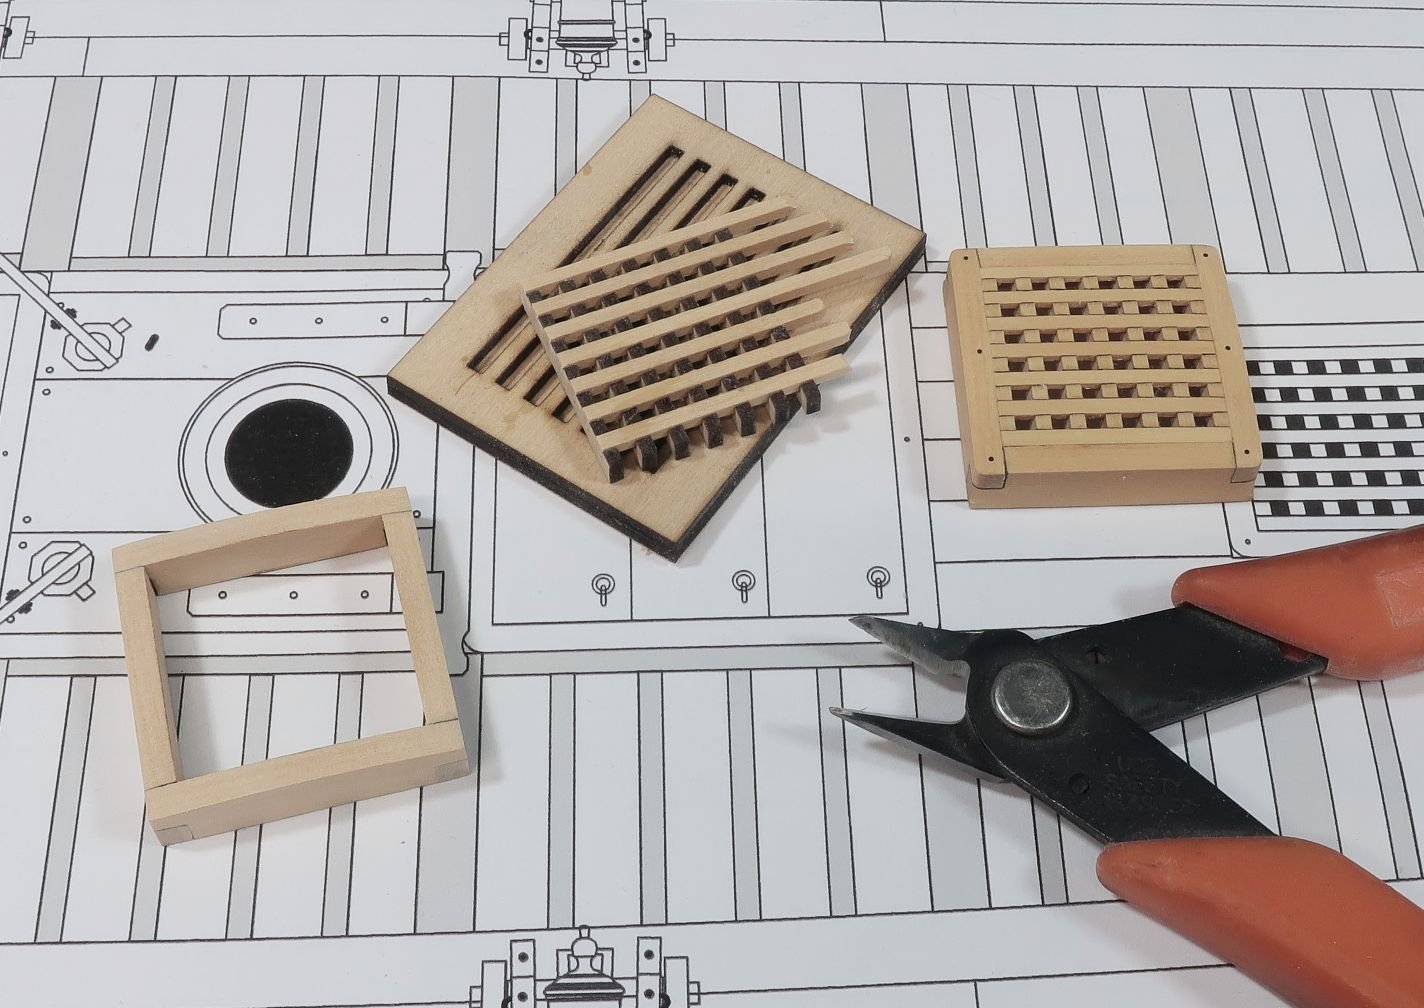
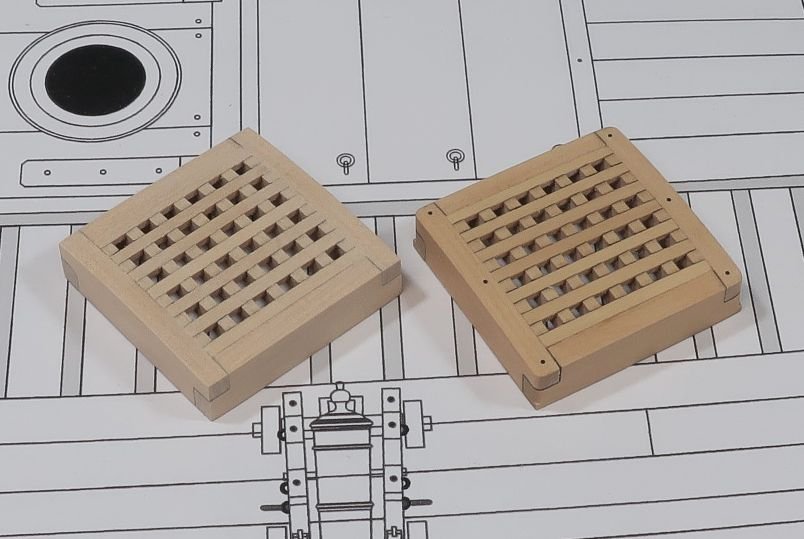
The photo below shows the top of the grating and sides all clean and nice and smooth. It makes a nice grating. The holes are 1/16" or 2" on the real ship and perfectly in scale.
You should but dont have to sand the bottom side as well. Here is a look. The battens are clearly less thick than the grating strips and these are pretty close to actual construction methods. Or at least the impression of it.
And almost done...you will see how nice and tight the grating fits in the coaming. Dont over sand the edges and you should test the grating in the coaming as you sand the edges. In fact, the coaming normally has ledges on the port and starboard sides inside the coaming. These create a ledge that the grating sits on so it doesnt fall through. You can add those if you like. But in my case the gratings fit so snug that they were not required. I simply glued the gratings into the coamings making sure the top of the coaming was flush with the grating. I sanded it smooth with some 400 grit paper.
The four corners of the coaming are very sharp at this point. You dont want that. They should be rounded off. But they are only rounded off down to the deck level. That is when you take that same right angle jig and use it.
The jig is the same thickness as the planking. So you can place the coaming into the corner and use a sharp #11 blade to slice away the corner. Slice it down to the top of the jig only. You can make a stop cut at the jig level before slicing off the corner. Then just round off the corner.
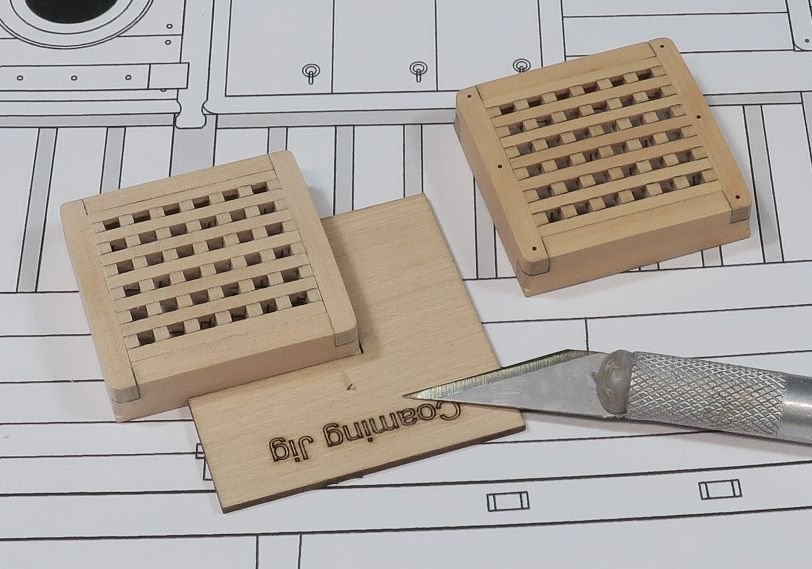
Dont slice off too much. Just a little bit to round off each corner.
To finish it off I drilled three holes with a #76 bit. I used 20lb black fishing line to simulate the bolts on the top of the coamings. Three on each side. They cut flush with the top of the coamings with a sharp blade.
All done!!!
- AnobiumPunctatum, JpR62, westwood and 34 others
-
37
-
Yes, another forum but seriously most already know what they are like...thats why I wanted to post publicly for everyone not to take the bait. Its just not worth it. Just stay clear of the whole bunch.
Chuck
- hollowneck, mtaylor, druxey and 7 others
-
10
-
I am just about to post an update with those...LOL
The gratings for Speedwell are different but the same basic concept. They are a different scale to reflect the larger size needed. They will have 1/16" square openings which at 3/8" scale would be a 2" hole. Just right and exactly the same number of holes as the contemporary model.
These will all be included in the chapter along with the jig needed.
I will have construction pics really soon.
I have been distracted lately with the topic on the SOS where the staff and admin are trashing this project relentlessly....but its a lot fun to watch. Many of you guys have sent me messages alerting me about it.
I have to thank Ben however for being a brave soul to have something nice to say about it knowing he will get the wrath for it. I must be the worst kit designer in the world if you read some of that stuff over there. But seriously...dont put yourself out there because if you do say anything positive about Syren or any of my projects on SOS they will lambaste you. So no worries. Dont put yourself in that position. Its not worth it. Most folks know its all nonsense. And I am well aware. But thanks for the positive notes of private support.
Anyway...back to building gratings.
- hollowneck, CiscoH, druxey and 14 others
-
17
-
-


Medway Longboat 1742 by Blue Ensign - Syren Ship Model Company - ½” scale
in Medway Long Boat - 1742 - Public group project.
Posted
Looking lovely. I forgot what a beautiful shape this longboat has. Yours is showing that elegant form very well.