
HOLIDAY DONATION DRIVE - SUPPORT MSW - DO YOUR PART TO KEEP THIS GREAT FORUM GOING! (Only 24 donations so far out of 49,000 members - C'mon guys!)
×


michael mott
-
Posts
5,198 -
Joined
-
Last visited
Content Type
Profiles
Forums
Gallery
Events
Everything posted by michael mott
-
 Jan looking at all your rigging lines I am really impressed! I feel glad that I only have 4 deadeyes on my build. Michael
 -
Ed your attitude regarding getting it right is most inspiring! Michael
-
Alex it is Interesting, watching your research come together, and as you suggest it makes sense that the documents are more than just fantasy and are based on the actual observations of the artist. Nice work on the construction. Michael
-
John the mast hoops and the top fittings look great, the light at the end of the build must be more than just a glimmer now. Michael
-
Russ, Germanus, Carl, John. thanks for your thoughts, and information. Here is a correction, and this is just to get a sense of what I am dealing with. Michael
-
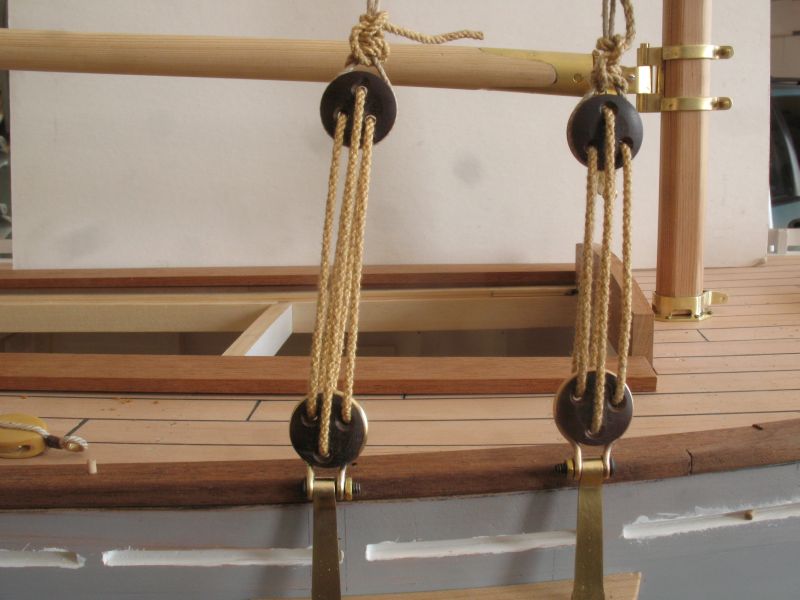
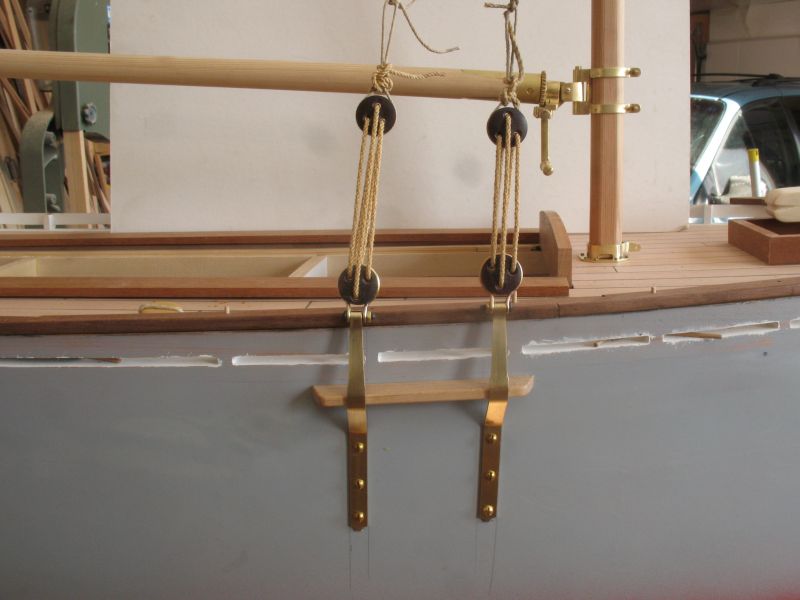
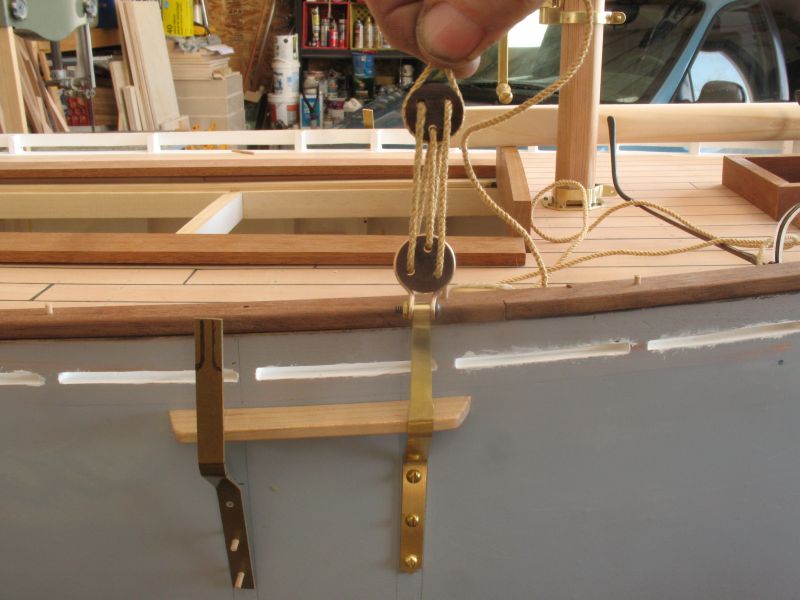
Carl, bob, John, Thanks for looking in. Carl you mentioned a contrast in colour, I thought there was already quite a contrast. Russ, Thanks for the heads up, These are not actually attached to anything at the moment Just looking at the overall proportions. I am going to use some black thread to make the shrouds I think I will be able to make the length just long enough without lengthening the rope walk. Michael
-
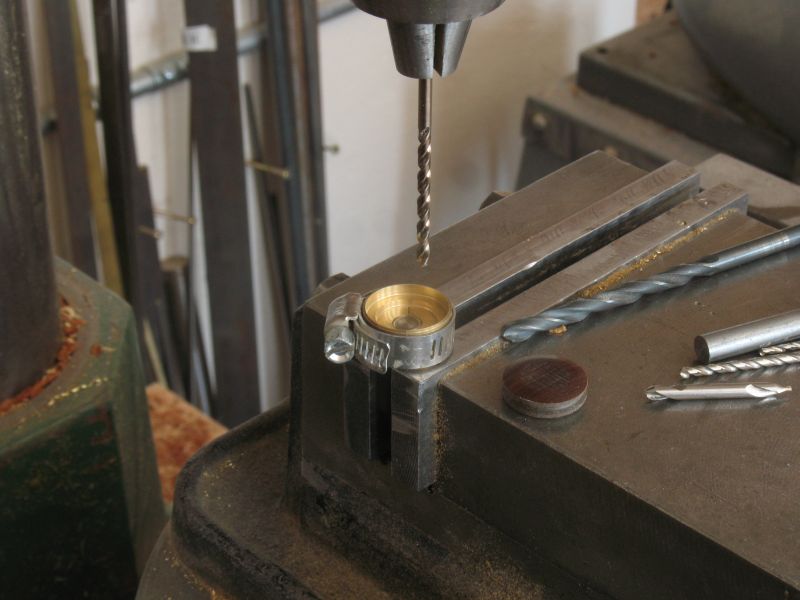
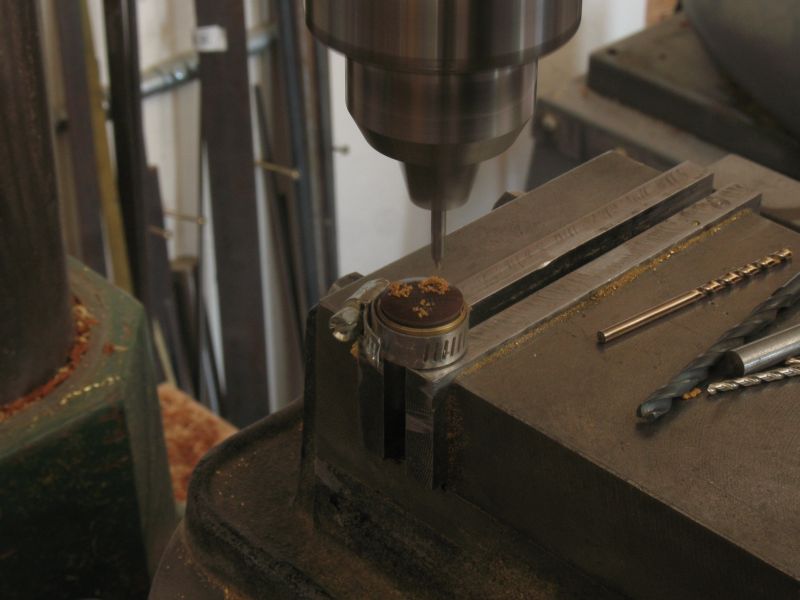
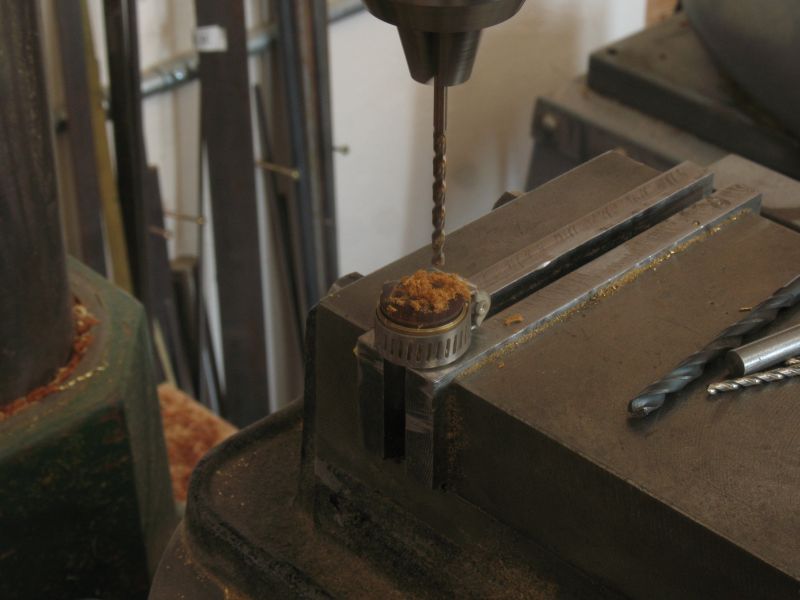
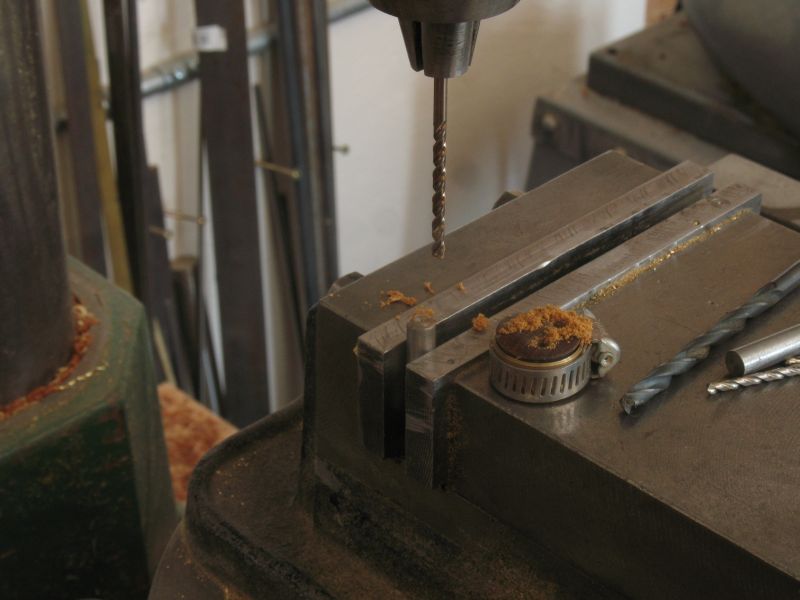
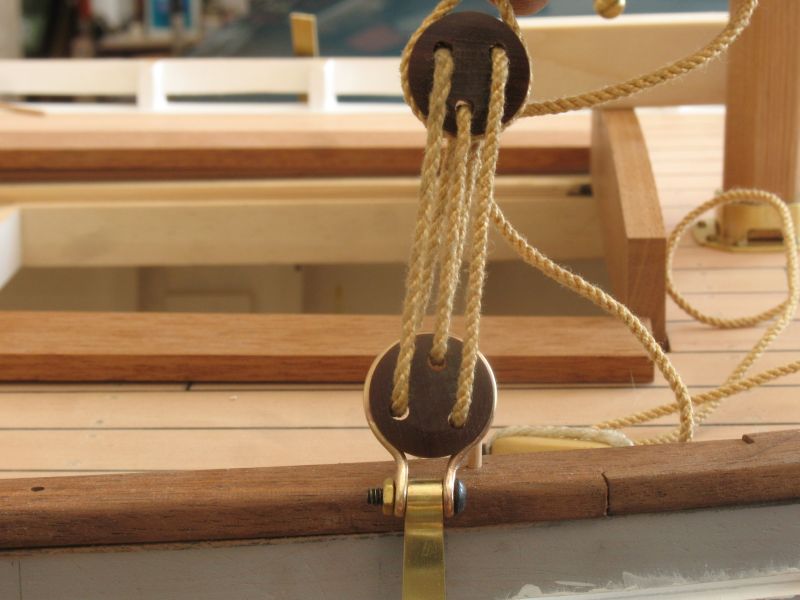
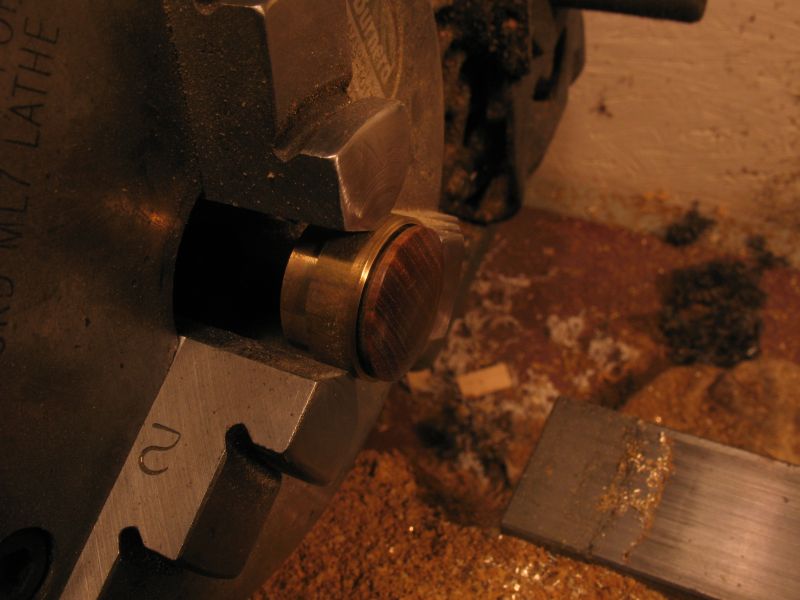
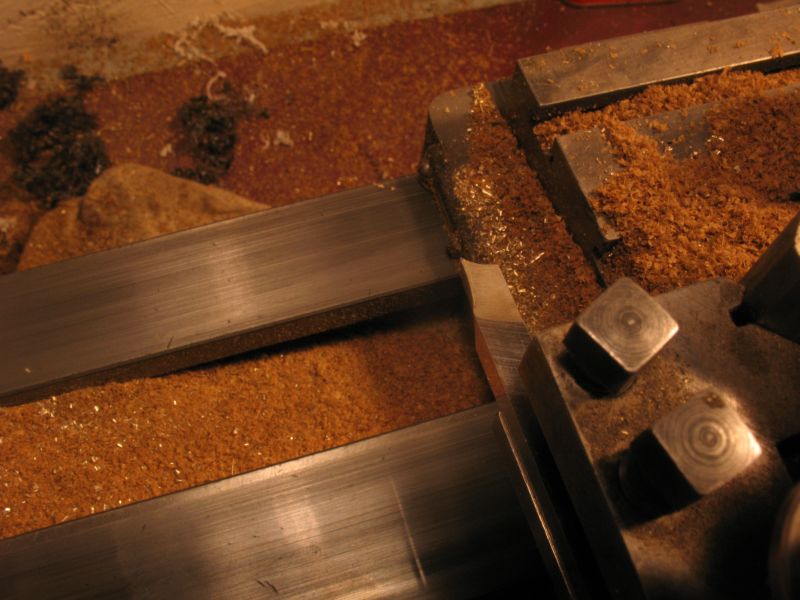
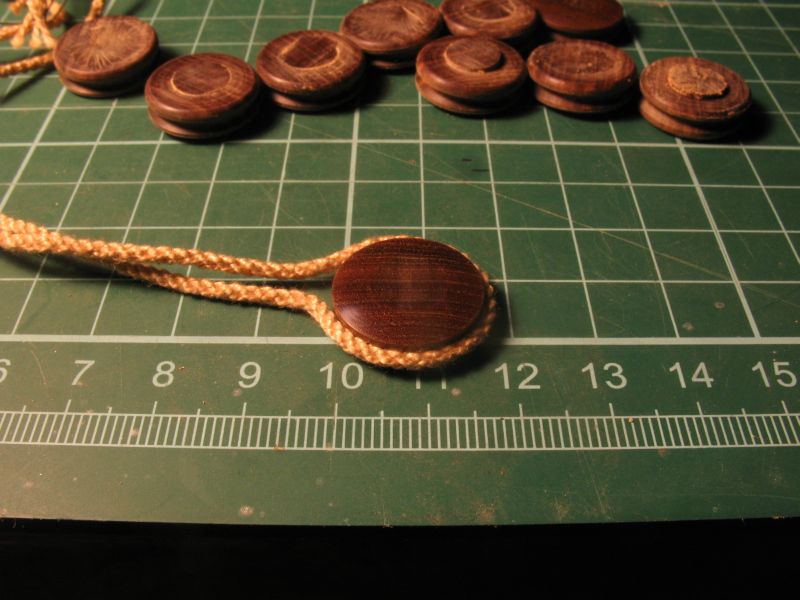
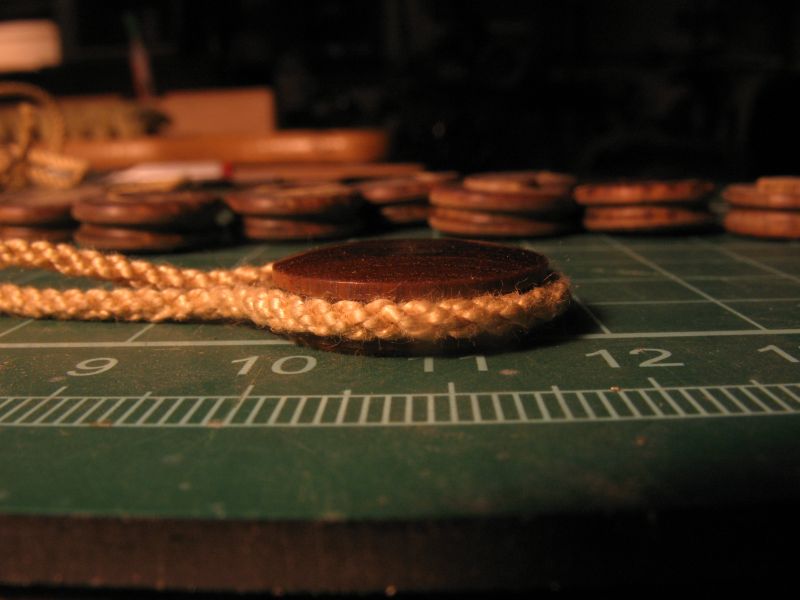
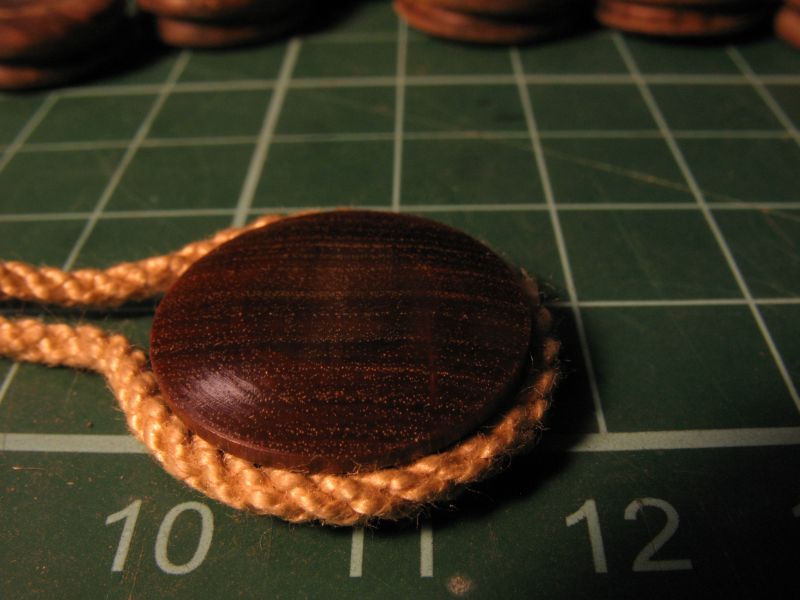
Druxey ,Mark, Bob, and Kevin, thank you so muck for those kind words. I used the same slit chuck to drill the holes in the deadeyes. by adding the hose clamp it worked to hold the deadeye. and rotated on the 1/4 inch dowel held in the mill vice. I like to use a centre drill for the wood sometimes especially since the holes were close to the curved part of the deadeye. After threading the rope through the deadeyes they look to be OK proportion wise. Now I just have to finish the rest of them. Michael
-
Daniel, looking forward to the rework. Michael
-
Matt the sails look great!!! .... I cannot see the stitching am I missing something? Michael
-
Great to revisit I still think that is a giant dog. Michael
-
Great stuff Popeye, All the little details make the setup all the more lifelike. I too wonder about the starfish, don't those critters move at a snails pace? Michael
-
Sarah this looks very interesting, I shall be following along. my wife keeps asking about getting a full size one.....for the lake. Michael
-
Buck that french polishing looks rather splendid, want to come and do my grand piano! just kidding I don't have one. It is great to see some traditiona finishing methods being used amid all the new polyurethane type finishes. Michael
- 515 replies
-
- 1
-

-
- artesania latina
- whaleboat
- (and 1 more)
-
Sherry absolutely beautiful work on fitting together those stem pieces, Shows what one can do with simple tools. The jewelers saw is one of my favorites and it is really just a smaller version of the coping saw. The older scroll saw looks like a gem. I'm not sure why scratch building is referred to as the dark side. However since you are here use the force..... Michael
-
USF Confederacy by Rustyj - FINISHED
michael mott replied to Rustyj's topic in - Build logs for subjects built 1751 - 1800
Beautiful workmanship Rusty, I always forget just how small all these parts are. Michael -
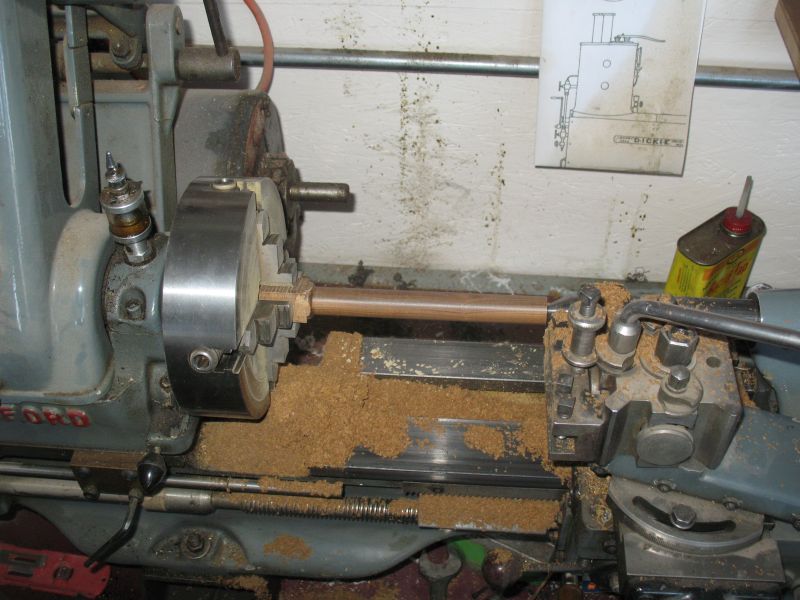
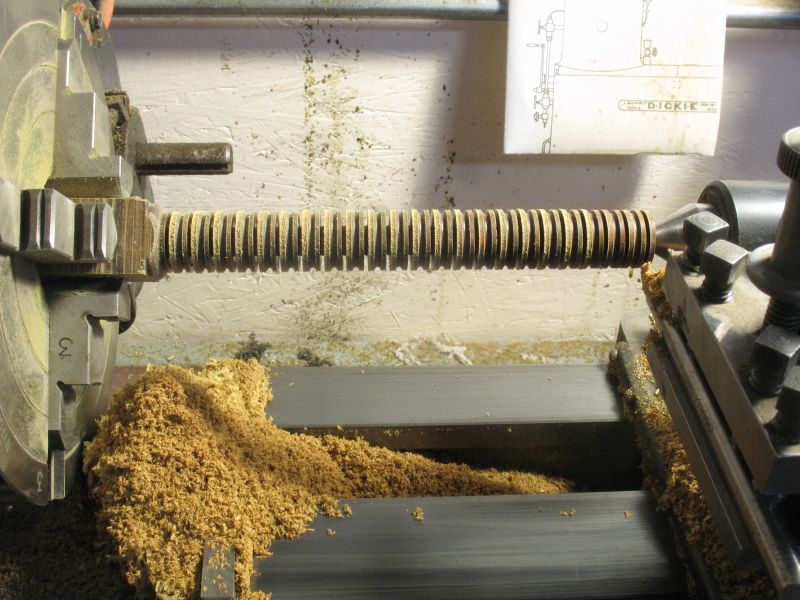
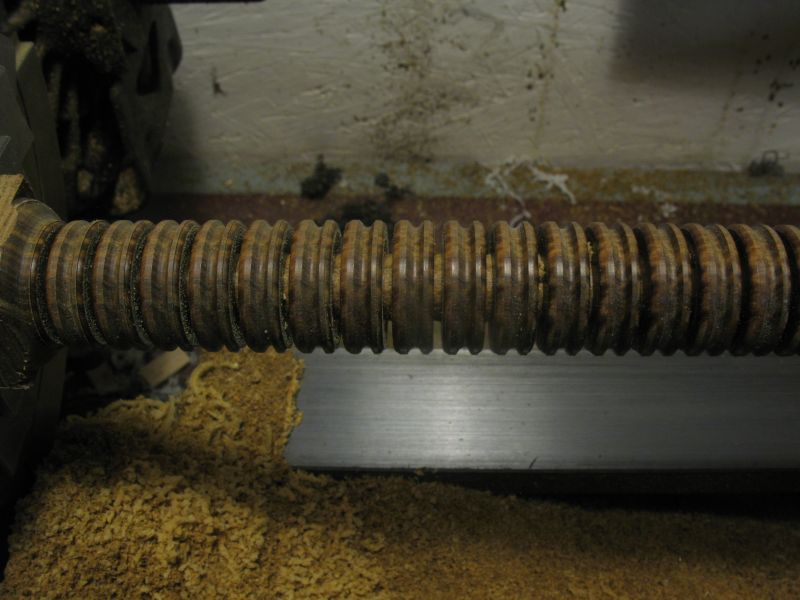
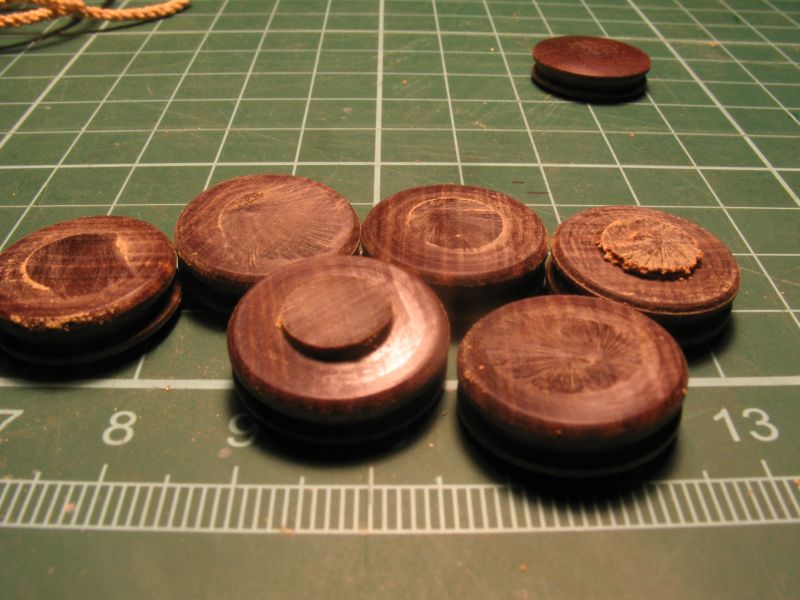
Bob thanks for those kind words. here is a link to a one man art show I had a few years ago. http://s5.photobucket.com/user/my30mm/library/artshow%20dec%2005?page=1 David Thanks for dropping by. A long time ago I was given a block of Lignum Vitea, it is tough as nails but slippery, due to the oils within the structure of the wood. First I made a dowel Then indexing along I cut the grooves for the shrouds and lower brackets. Then a different form tool to round the edges there is no sanding the finish is just from the tool. Next the blank was cut into smaller blanks with a jewelers. Then a small brass split chuck was made to hold the rough blanks The shaping tool for the face First one I am really impressed with the way this wood turns on the lathe. Now I need to sort out a jig to drill the holes. That rope does look like old hemp rope. Michael

-
Ed your attention to detail and correcting errors is a great teaching aid, it is also good to see your comments about files riflers etc. Michael
-
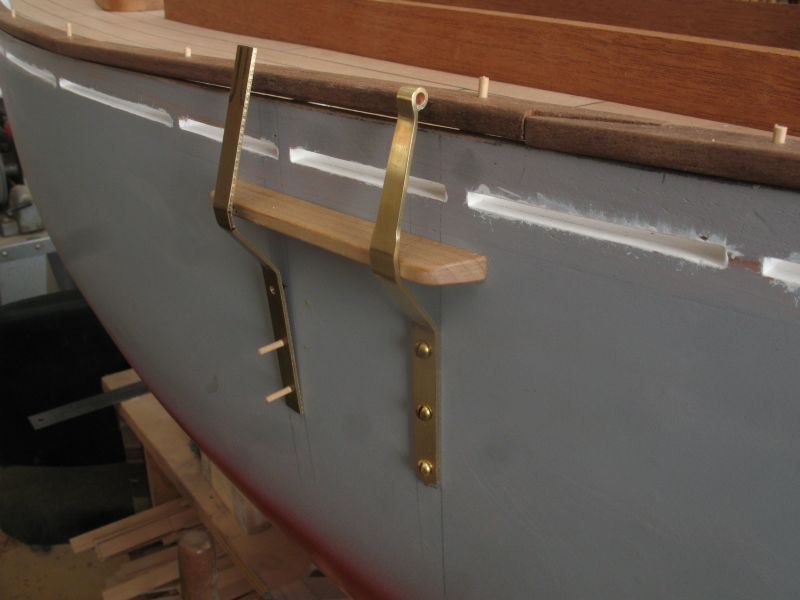
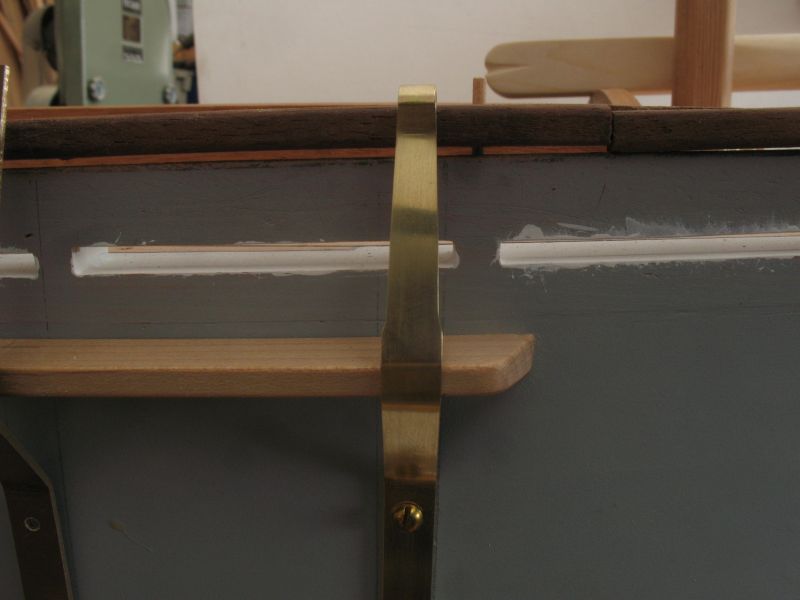
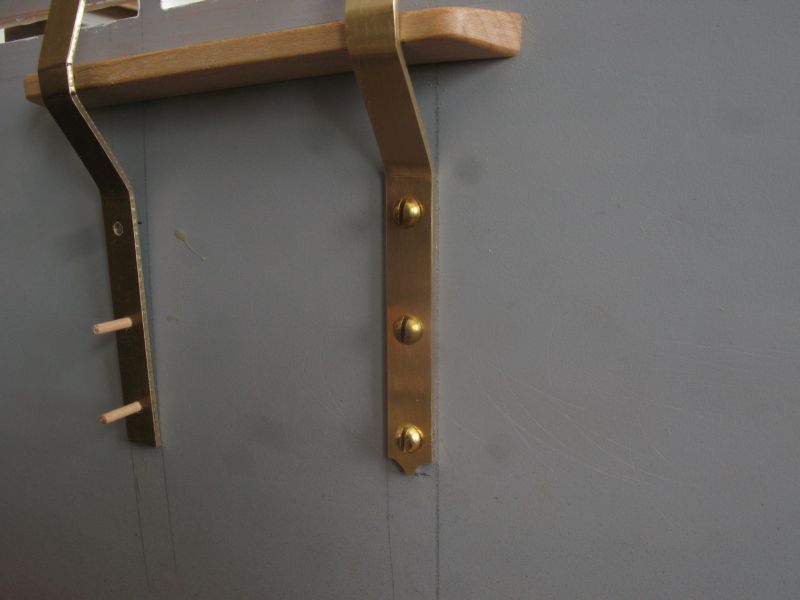
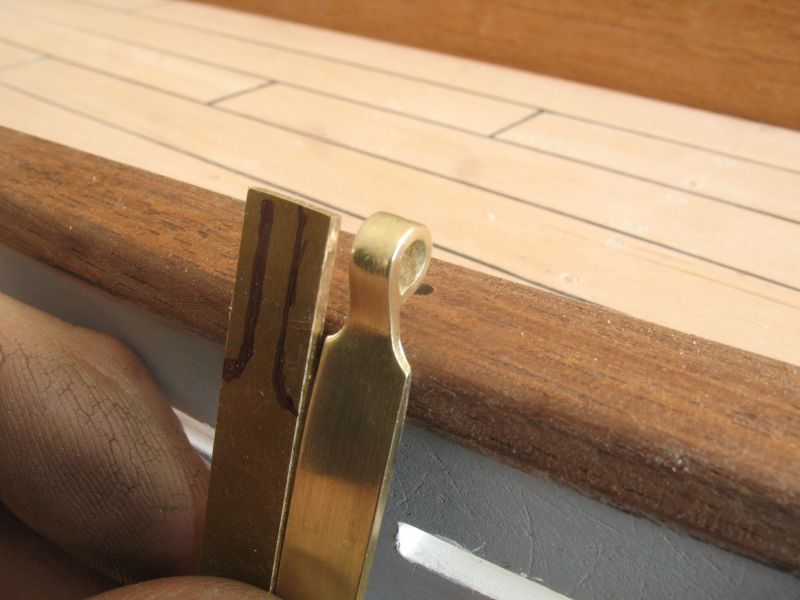
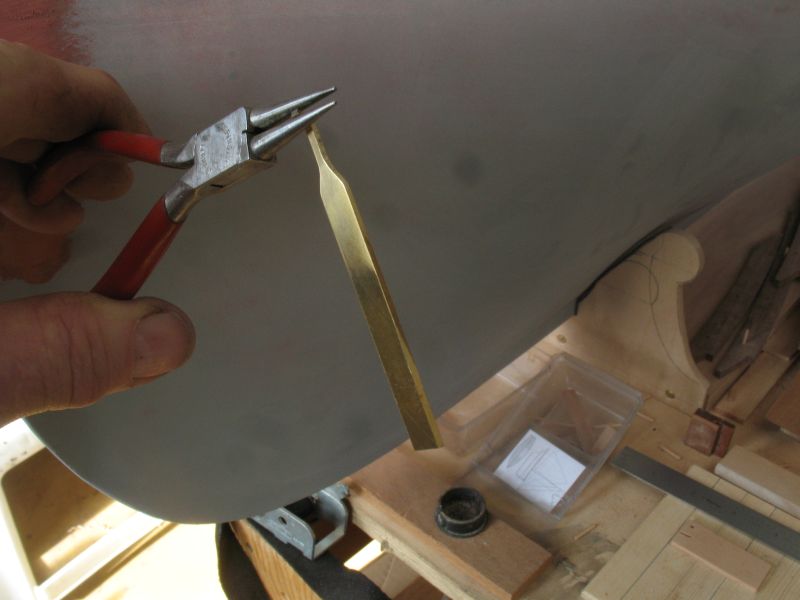
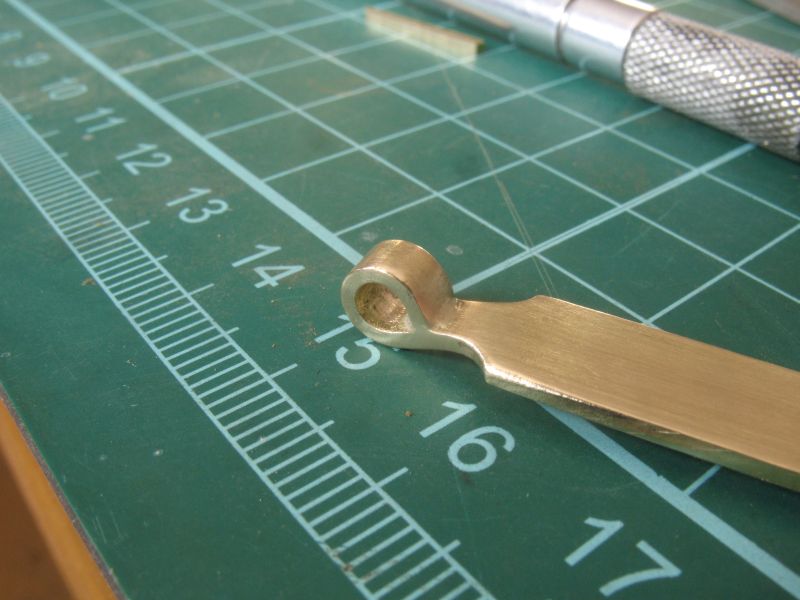
Carl, the first chainplate was not actually a chainplate it was just a test on a scrap to sort out how to fold and solder the loop. This is a final shape and now just needs cleaning up a little more. Michael
-
I managed to get one of the chainplates roughly shaped today it is mostly tapered with a parallel section below the spacing block. I thought a decorative flourish works for the bottoms. The screws are 1 inch long 4x40 brass machine screw.I need to reshape the head to get rid of the slots. Most of the day was used up collecting some firewood and helping a friend move some steers and Heifers. Michael
-
Hello Carl on this page scroll down to see the honeycomb soldering block. they are not that expensive and the honeycomb is great because you cat put rods in to hold and line things up. http://www.silversupplies.com/catalog/new_product/soldering_block.shtml or go to this link http://www.fdjtool.com/Category/965_1/Solder_Blocks.aspx I purchased mine at the local silver smiths supply house in Edmonton. Michael
-
Russ, thanks, Silver soldering always feels a bit nerve wracking for me. Popeye, thanks for following along. Mark, thanks for the compliment, regarding the torch, it is an air acetylene one and the tip is a medium size, I have a smaller tip but have misplaced it. My friend the silversmith does use a torch about the same size. John, thanks, that'l teach ya for turning around! Daniel, thanks I think it all has to do with that 10,000 hour rule, I have been doing metal for a long time, and I really enjoy it. Dale, Thanks, I think that some of those models you speak of were probably an influence in my early years when I spent hours in places like the South Kensington Science museum and Greenwich. Getting her in the water is a very motivating goal. The interesting thing about working on this model is that for me it feels more balanced than some of the other projects that I have worked on over the years. There is so much scope for working on different materials and elements from wood to metal and fabric. I am also learning so much by reading all of the wonderful build logs that are shared within this wonderful community of ship and boat builders. I am actually looking forward to working on the sails, and firing up the old treadle sewing machine. Michael
-
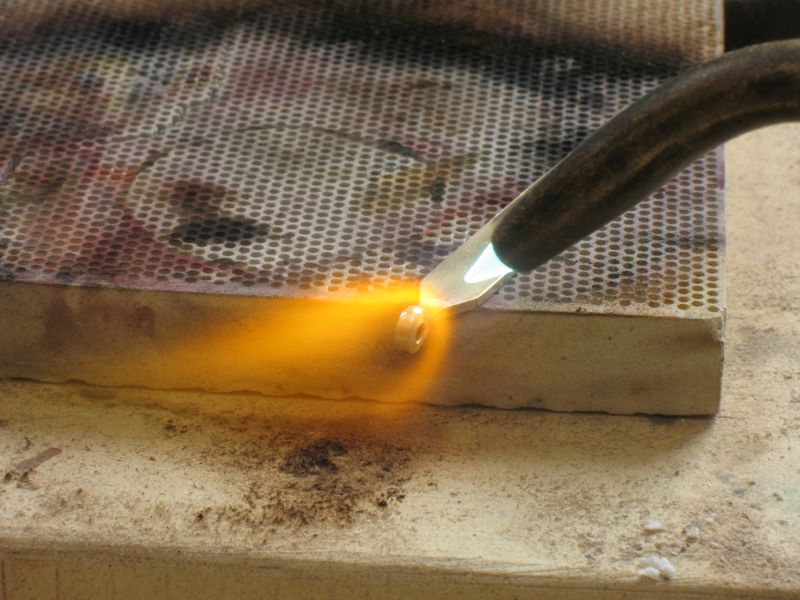
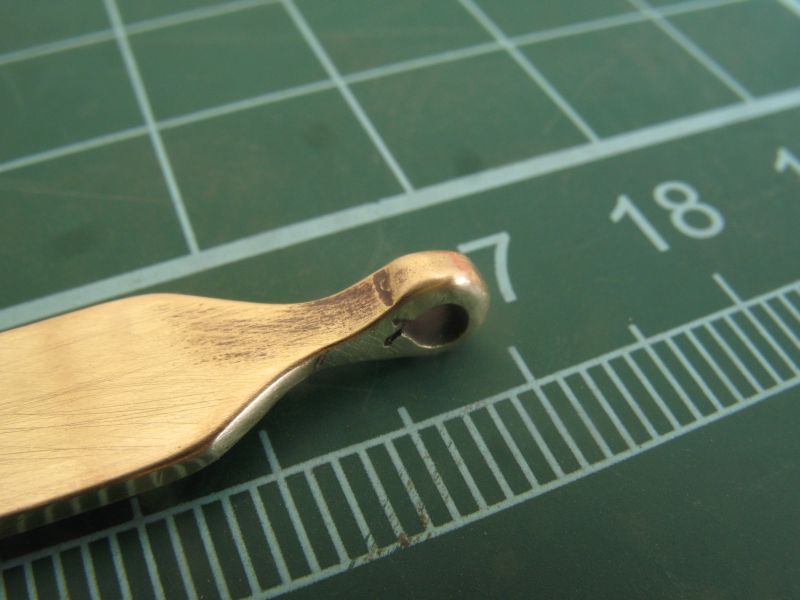
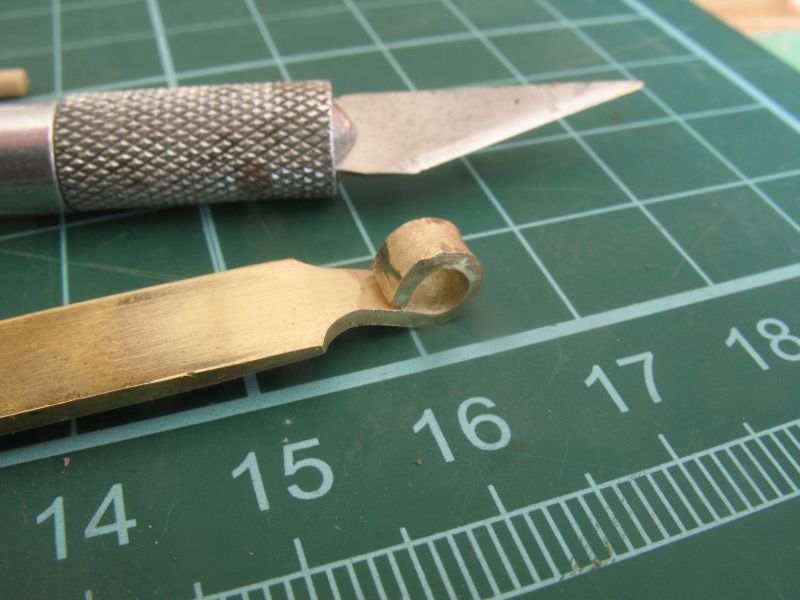
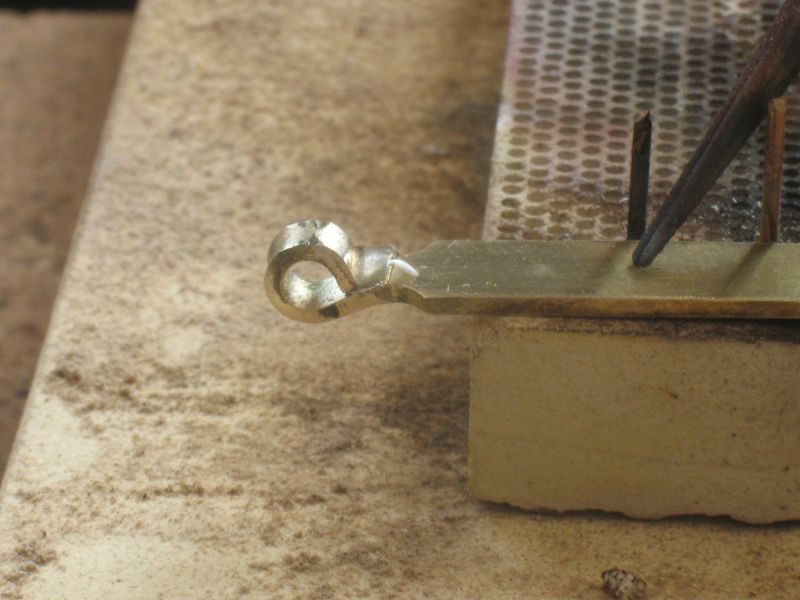
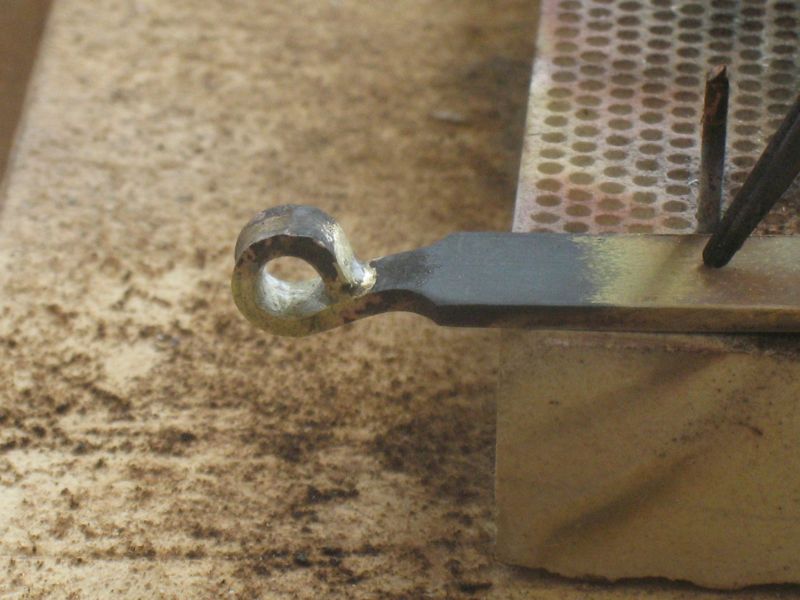
Thanks, Sherry A test to see how to make the top of the shroud chain plates. the first test was a bit rough. after fretting out the shape on a scrap piece I annealed it then curled the loop with some round nosed pliers the taper could be longer on these pliers. silver soldering The loop is a little too small and I overheated the metal, also I should have closed the loop a little better the joint was not good. Second test with a larger and wider loop ready to solder the small piece if silver solder is wet with the Vigor liquid flux. soldered cleaned up with emery and steel wool Checking the look, I think I will taper the plates down to the wooden standoff rather than have the cut shoulder. Tomorrow I will make the loops on the chainplates. Michael
-
Your work is so very clean, it is great to see how you approach each task. michael
-
Popeye, Bob, thanks for those kind comments. Matt I think I will keep the RC as simple as possible, there will be a fair bit of sail on her so I will probably set the sails before doing any sailing. We get quite a few light airs here in the summer around 2:30-3:00pm (becalmed at the finish line on the full sized ones enough times) so I think it will be more to make it easier before setting out when there is a little more breeze. Michael
-
SS Vinal Haven by TBlack - FINISHED
michael mott replied to TBlack's topic in - Build logs for subjects built 1851 - 1900
Tom, excuse my ignorance but what is a "charlie noble" incidentally "That thing" looks to me like the bucket wheels that were used in Northern Alberta when they started to dig up the Tar sands, they use a different method now. Michael