michael mott
-
Posts
5,200 -
Joined
-
Last visited
Content Type
Profiles
Forums
Gallery
Events
Everything posted by michael mott
-
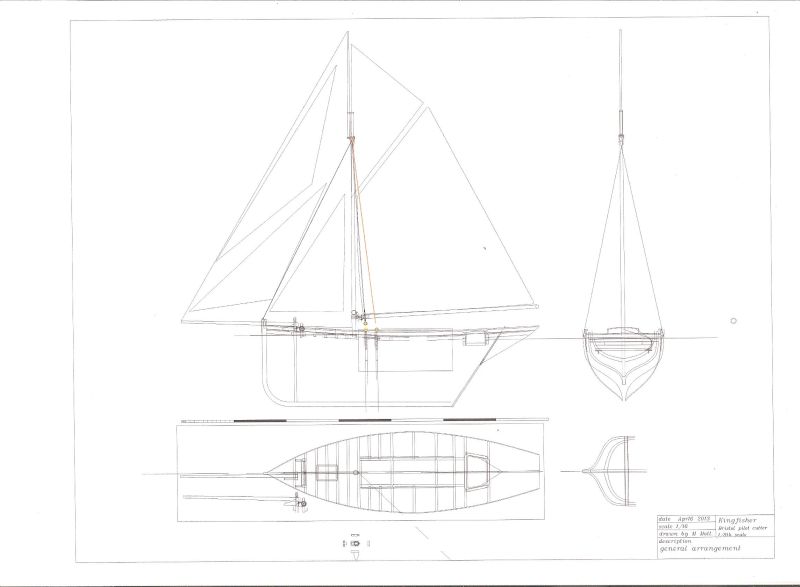
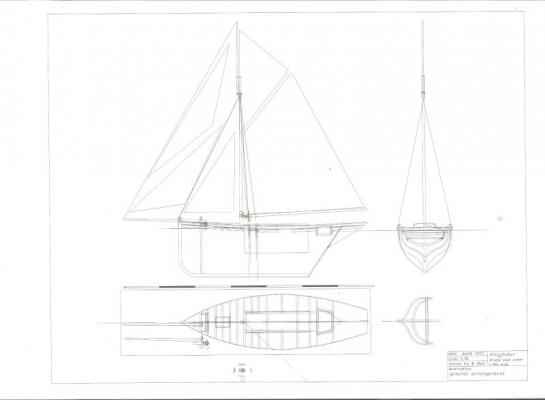
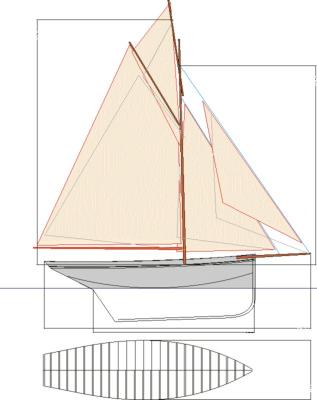
 John Thanks Bob, the plans are my own based on a single sheet from the original MAP plans. The only part of the original plan that I used were the station lines. here is a shot of where the plans are at the moment The first drawing is one that was done in Corel These drawings are from Autocad As I finish parts if I modify it I go back and modify the cad drawings, some parts get made then I do a drawing. The challenge on the next model will be to do the research then the drawings and then follow the drawings. This model it is really a hybrid of pilot cutters and fishing smacks, and is giving me the experience and confidence to work on the next one when this one is finished. Michael
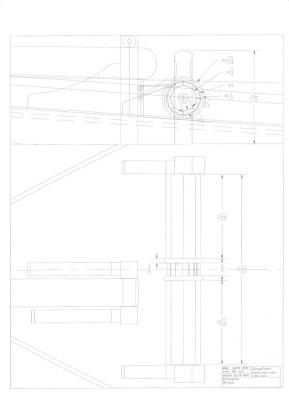
-
Daniel , The printed windows work very well at this scale. Michael
-
Qwerty I am a little confused, the last two pictures show the decking and a hull that has no Bondo on it are they the same hull? Am I in a time warp? Michael
-
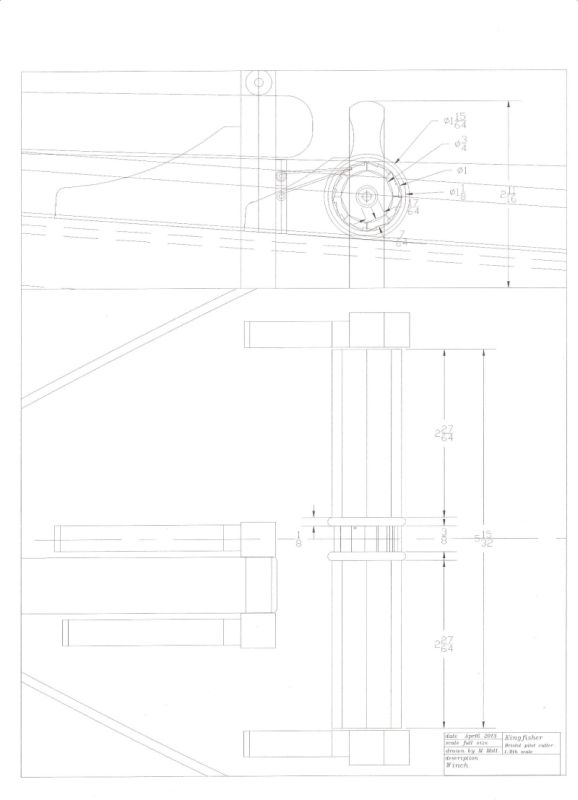
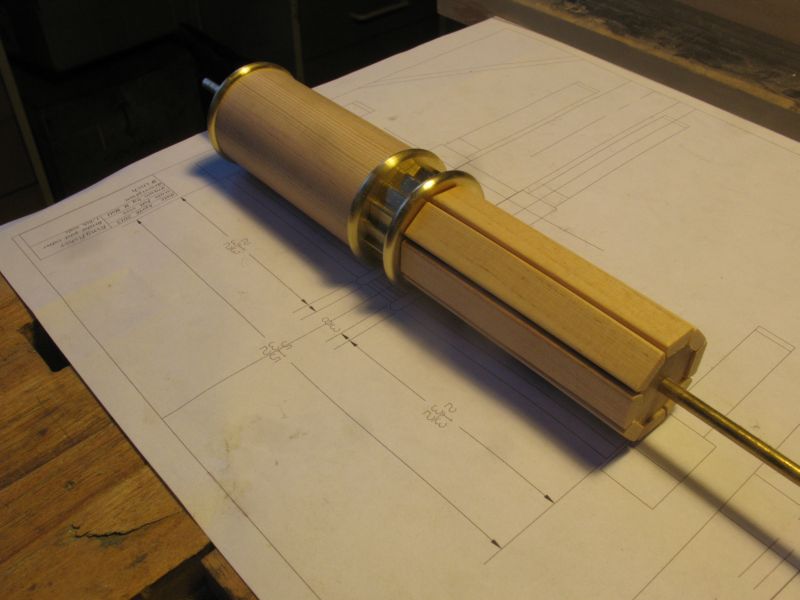
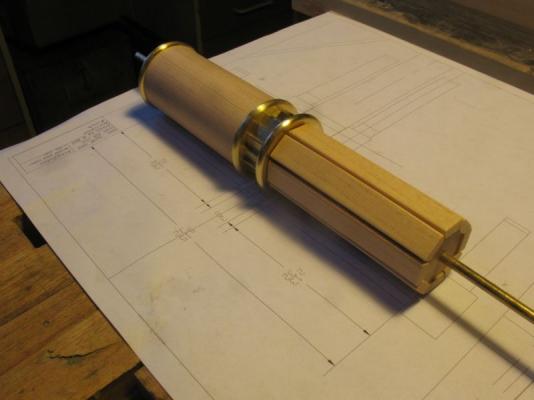
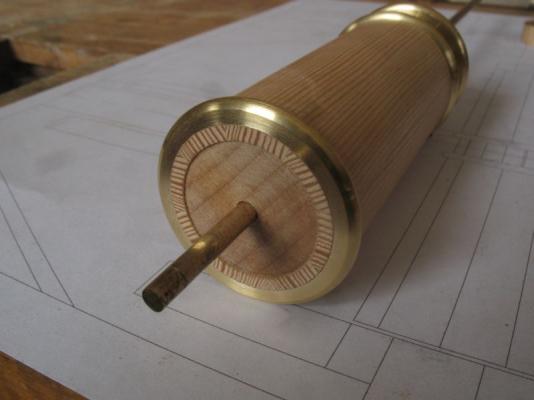
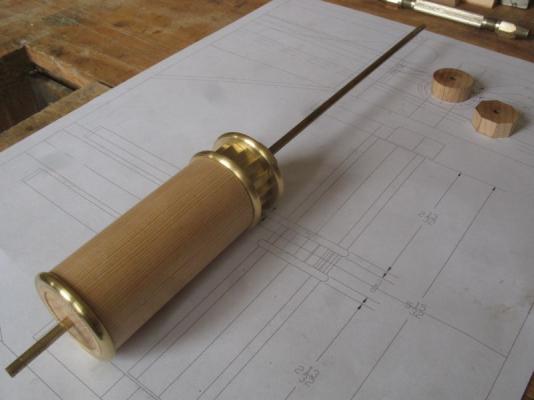
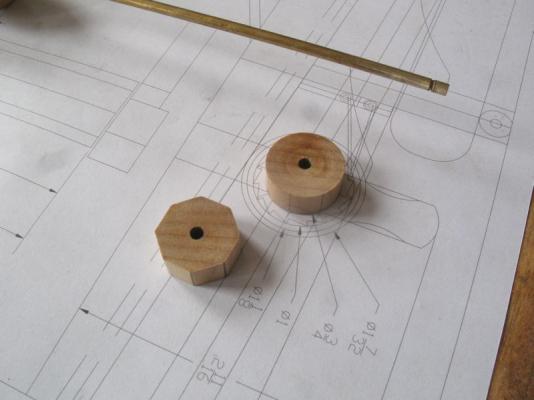
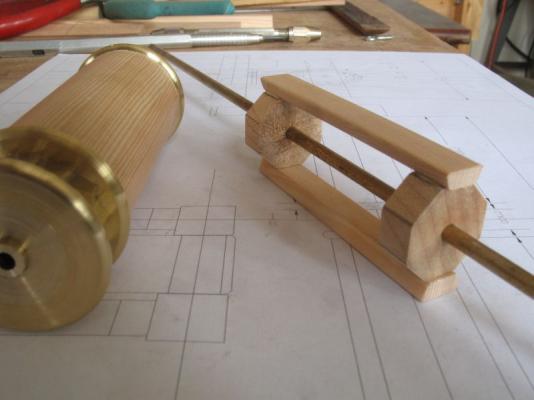
The barrel staves were machined to take the brass rings and plates The ratchet was milled using the same 30 tooth gear as a guide that was used to make the gear for the roller reefing, I just indexed it 2 teeth at a time to give 15 teeth on the ratchet. The section that is for the anchor chain was made with individual strips spaced around the maple formers, as I glued the last piece on I realized that I had missed the middle former and looking closely I also realized that I had made it a bit uneven so tomorrow I will cut some new discs and staves and redo that end. adding the middle one so that when it comes to adding the bolts there will be the three formers inside. I will soft solder the discs to the gear Michael
-
SS Vinal Haven by TBlack - FINISHED
michael mott replied to TBlack's topic in - Build logs for subjects built 1851 - 1900
following along Tom I like the brass plate on the door, nice touch. The netting on the handrail looks great. Michael -
Qwerty, glad I was able to inspire you. Now that hatch cover looks like a finicky bit of work, how did you make it? Michael
-
Carlos, thank you for those links, I already know of some of them but others were new. Now that half my day has gone reading I will head out to the shop toss some firewood into the stove and ponder the next step. Michael
-
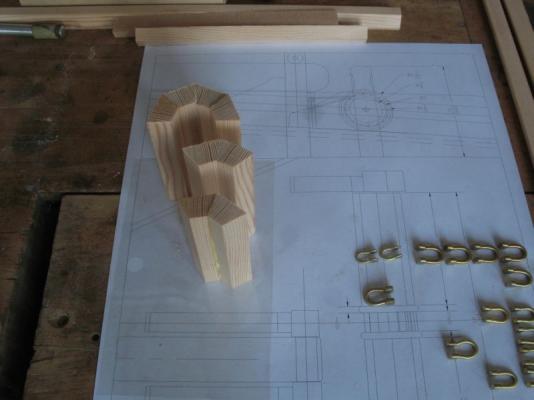
Carlos, In the very beginning of building this model I really did not know very much about this type of vessel. This model will be going into the water and I noticed that many of the sailing models added an external Keel to give the model stability, I did not want to do this, and Since my model is based on a set of plans that were quite simple there were only five stations plus a transom on the MAP plans. I modified it so that the ballast will be internal. All the rest of the details are really am amalgam of cutters and smacks. Now that I am learning a few things the next model will be drawn to better reflect the real shape of the cutter's hull form. In fact the next model will be either Doris which is a Bawley or Shamrock V, I have the Rene Sarero plans of Shamrock to build an 8 foot long hull. Michael
-
Hi Andy, checking in since I was in the neighborhood, the other thread of build logs. The last photographs look great, As I was perusing the image it occurred to me that I am not the only one who gets so wrapped up in the task at hand the the space on the dockyard gets smaller and smaller until there is no room to move. Then one makes a resolution to be better organized and......... well you know the rest of the story. Michael
-
Sky hooks! Michael
-
Garward you model reflects your superior craftsmanship. Michael
-
Alex I am sure that when you start the rigging you will do an excellent job. Michael
-
Wow John, I had no idea your model was so small, with all the detail I had thought is was much larger!! Just goes to show what a superb craftsman you are. Michael
-
Daniel it is interesting to follow your research into the colours and weathering of the woods on the ships and boats. Michael
-
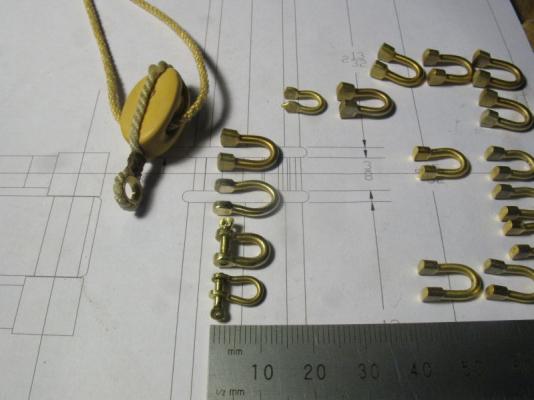
Popeye, thanks for the though. Germanus, thanks again for your thoughts and compliments, I have found another great link regarding shackles and their sizes and capacities Very interesting this will help me in the long run. Carlos, thanks for looking in. Michael
-
Exquisite Dan!! are those bolts properly threaded? Michael
-
Alex I use a small centre drill with an X Y table and hold the shackle by slipping it over a piece of maple in the vice. I will take a photo of the drilling when I get to the drilling of the rest. Daniel I am also looking forward to the rest of the rigging, The thing that appears a little daunting is all the rope I am going to have to make, and sewing the sails. John you are exactly right. Germanus, thanks for looking in and giving me that critical eye. So now I will have to re evaluate the whole Shackle issue to make sure they pass inspection. Germanus a good lathe is one of those tools that I would suggest is something to search for, they can be had if you look hard enough. I would be lost without mine ...... no I would jury rig something;>) Yea it is sunny today , I think a lot of the snow will melt today. Michael
-
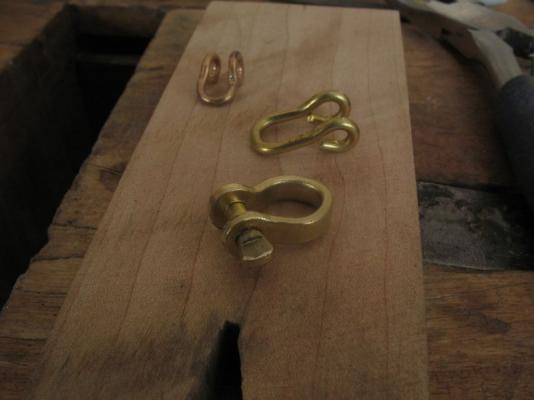
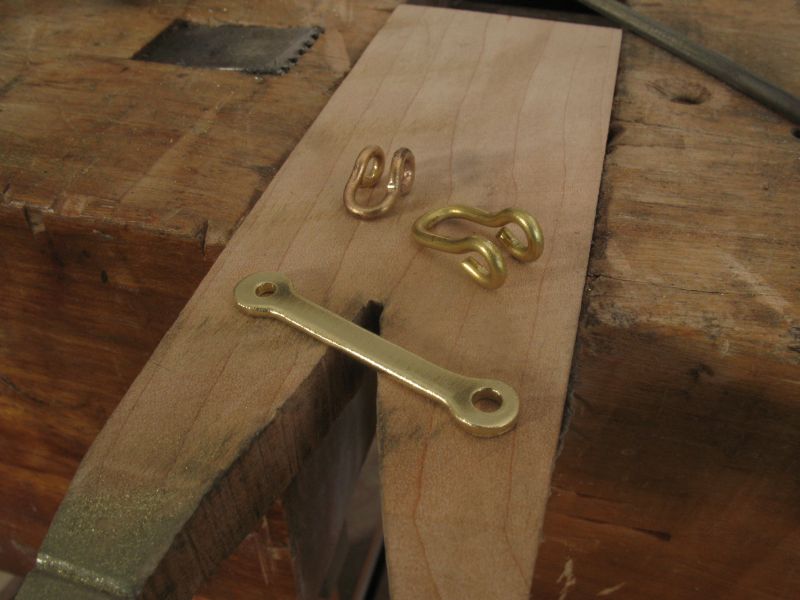
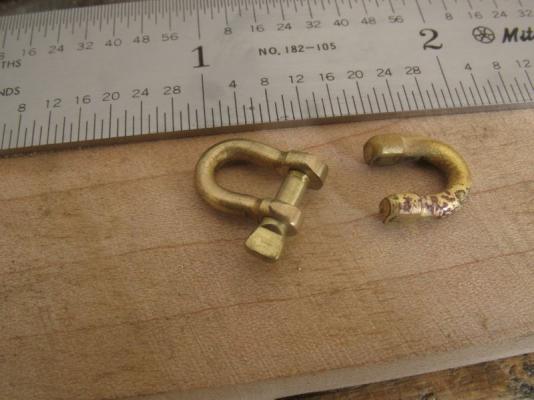
Andy, thanks for the compliment, I was tired by the time I got to the photographs, I left the holes for today. John, yes, the interesting thing is that there are all sorts of shackles, I have some that are made from sheet stainless that are used in small boats., looking at the photographs of the full size smacks and Cutters it seems that many of them are either galvanized or bronze. Alex today I used the metric side of the scale so that you don't have to do the calculation, I also made some smaller shackles. Druxey I suppose that swageing the ends is akin to forging in a way, thanks for stopping by. Tom, The first one is still OK it is going to stay in the lower bob stay fitting, I must say though that I prefer the aesthetics of the turned and swaged shackles. Mark thanks, for that comment. Daniel, I am happy that you think it looks easy, As I was working on them I was thinking about some of the metal work done by the folk here like Remco and Recon and Gaetan turning up all those cannons and all the little bits that go with them , makes my humble little shackles seem rather clunky. Regarding the little cutter I am giving my eyes a rest, I will get a little more done soon. Sometimes I wonder why I go to all this effort but I am having a lot of fun. Today I started to manufacture a few more shackles some were turned from some 1/8th inch rod and some from some 5/32 inch rod, a couple were from 3/32 Inch rod. I used the same process as before, I did these while waiting for the segments to glue for the winch barrels. Flattening the ends of the turned parts This pic shows the smaller shackles Evening up the ends prior to drilling Gluing up the barrel staves I am gluing them in pairs which I find much easier that trying to glue them all at once. this way they do not need clamping. family shot of the different sizes of shackles. The new smaller one has a 1x72 threaded pin which was made from 1/16th rod I have a busy day tomorrow in town and into the evening so that's it for a little while I will be happy when this snow is finally gone and I can get the door open and get the hull painted with some top coats. Michael

-
Paul it must feel good to be back to "Normal" whatever that means;~) The work is looking great, very clean. Kevin a much less expensive way to buy Styrene sheet is from a commercial supplier in 96 inch by 48 inch sheets, over here they are not that expensive and the 5 thou and 10 thou sheets are rolled to carry home. Michael
-
Robert, you tease us with the first photograph, I am eager to see more of how you accomplished this wonderful model. Your wife must be smiling. Michael
-
Ah thanks Bob, Had I been sharper I would have sorted that out from your extensive description, one of those can't see the forest for the trees moments, but in this instance can't see the fish for the bait(knife) Michael
-
Hello Walter, your little problem must have been rather annoying, But it sounds like you have got the situation sorted and on track to get where you want to be. This dance we play of one step forwards and a step or two back seem to come with the territory of model boat building. Good luck with the fix you have outlined. Michael
-
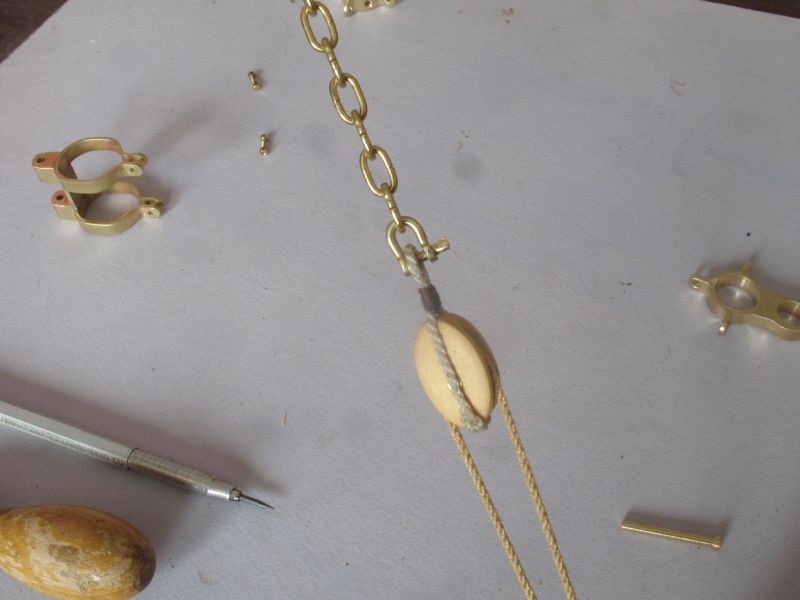
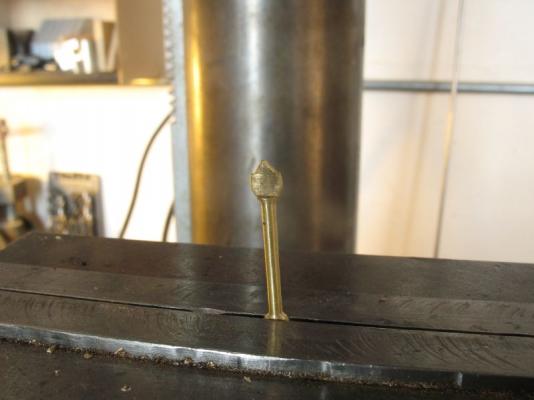
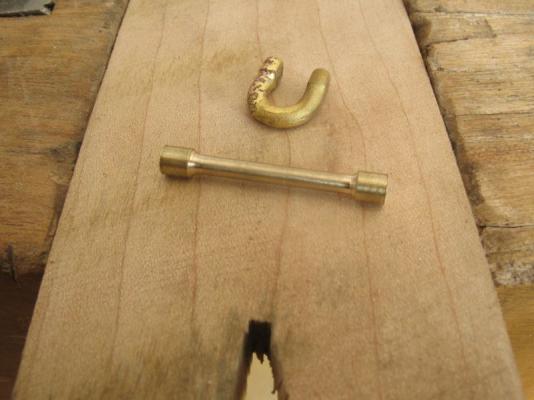
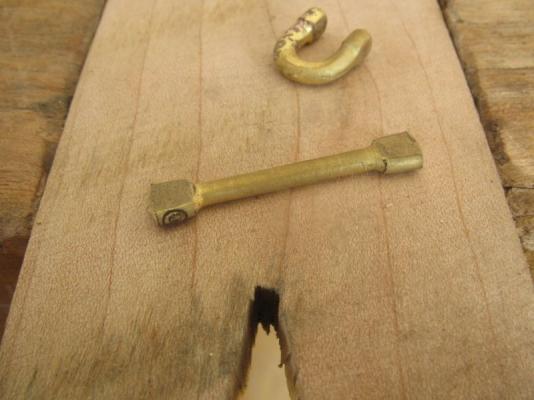
Druxey, Sherry, Mark, John thanks for the kind comments. I feel a bit like a dog with a bone sometimes, The shakle thing was still bothering me so I did some more experiments today and the results are promising. First I thinned down a bit of 3/32 brass rod into a sort of dumbbell then I annealed and flattened the ends re annealed and flattened a little more Then holding the unit in the round nosed pliers folded up the ends next the ends were flattened in the vice to ensure they were flat to each other Then drilled and tapped 2x56 and added the pin and hooked it up to a pulley. I think I will use this method for the rest of the shackles big and small. Michael


-
Dan the insetting of the ebony is a masterful touch, it is great that you did not give up and glued the pieces together and continued. The end result speaks volumes. Michael
-
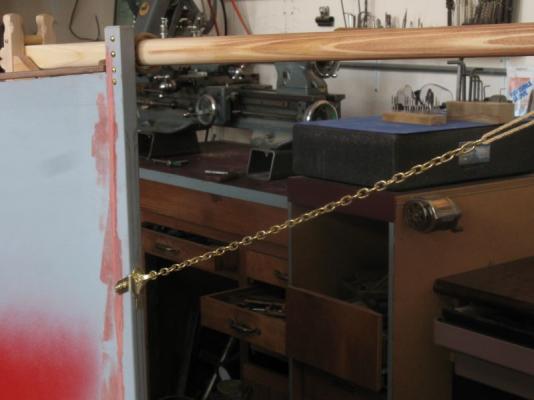
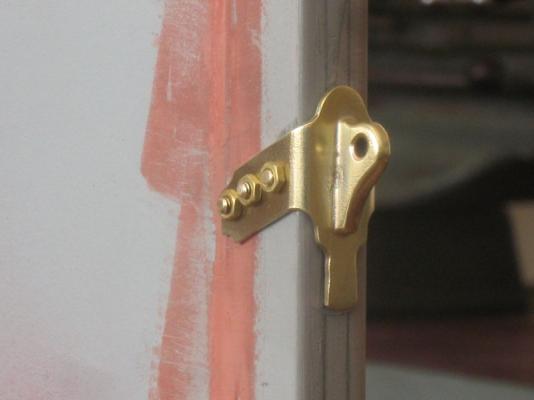
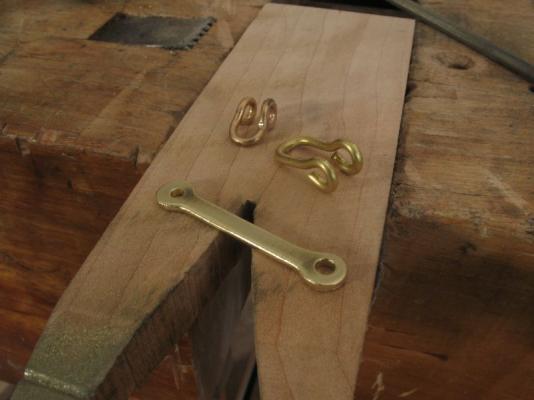
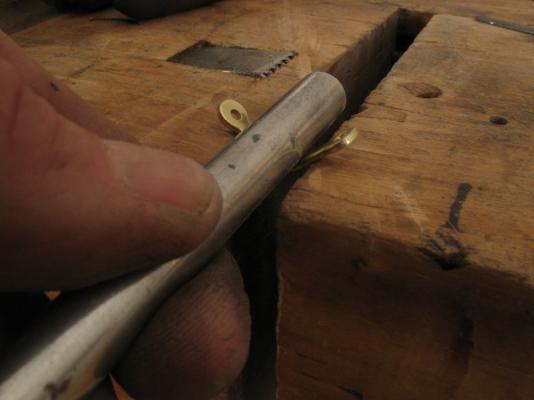
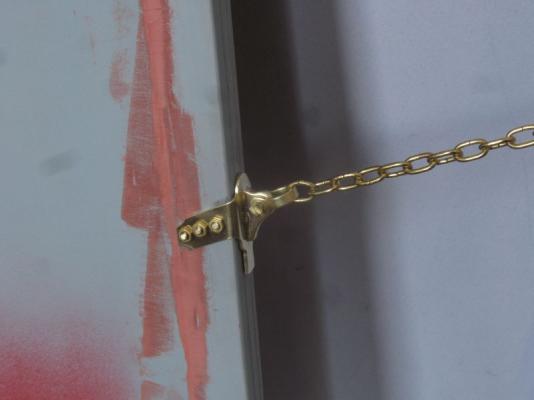
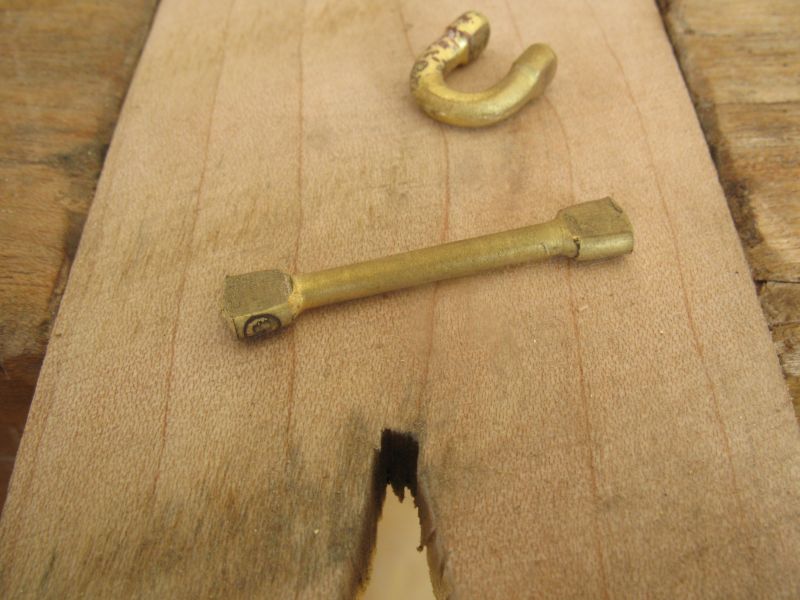
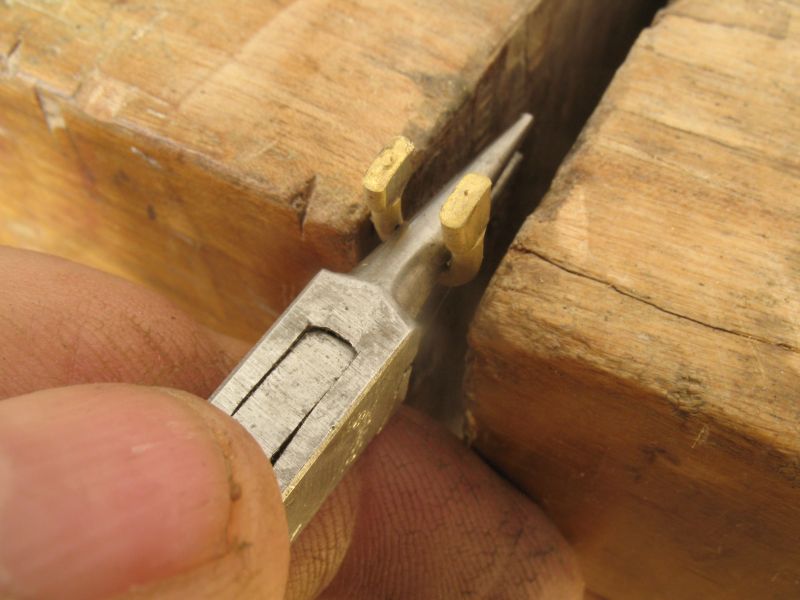
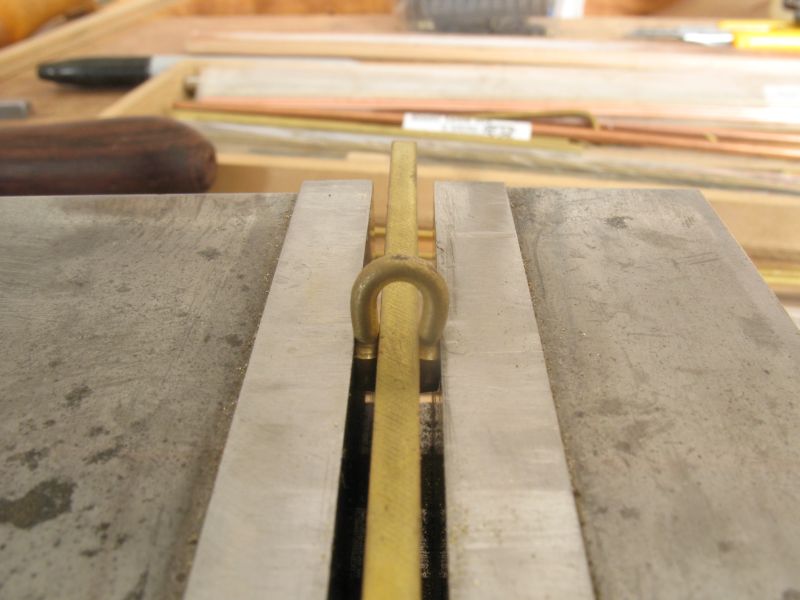
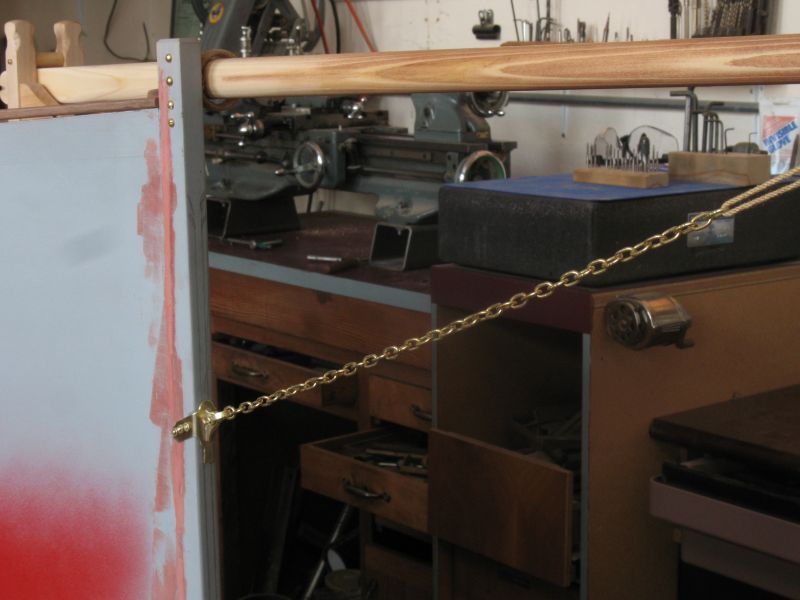
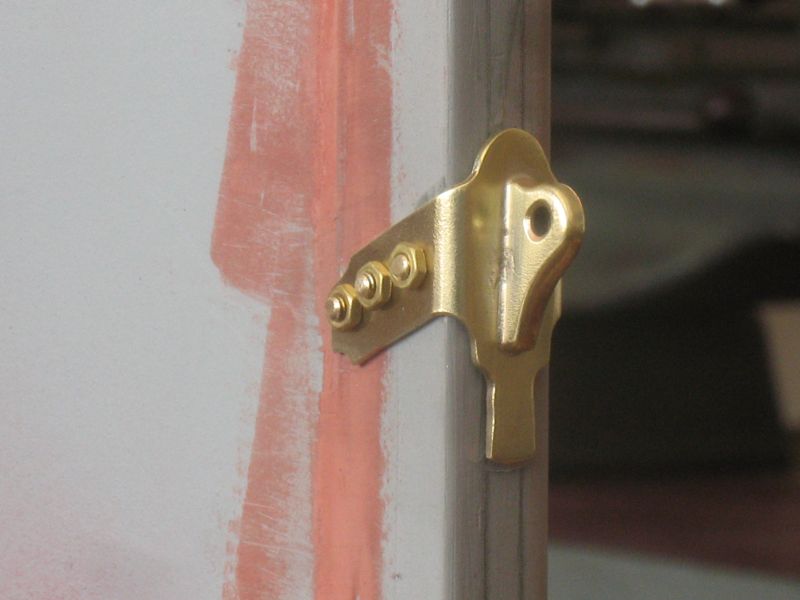
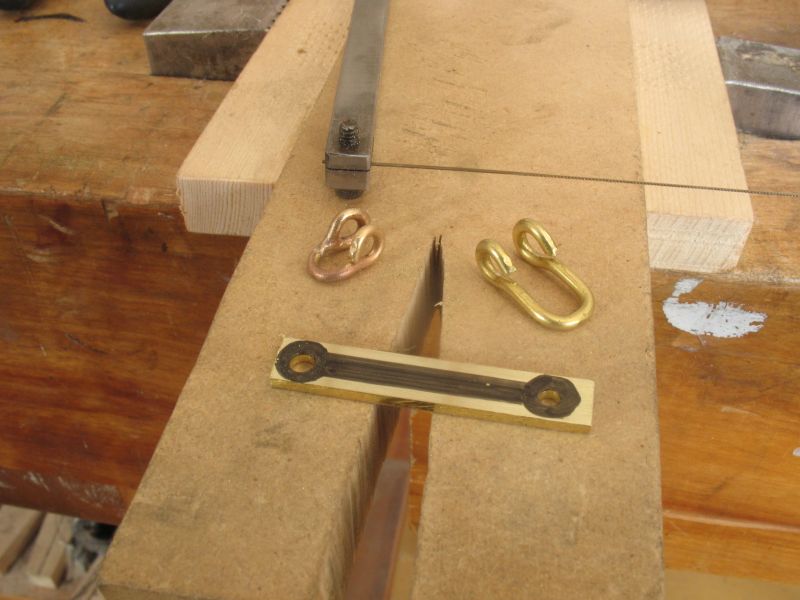
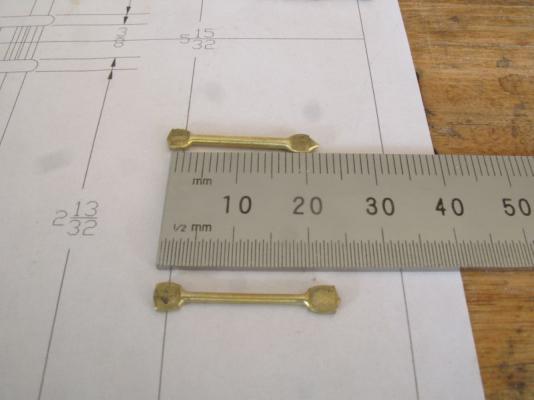
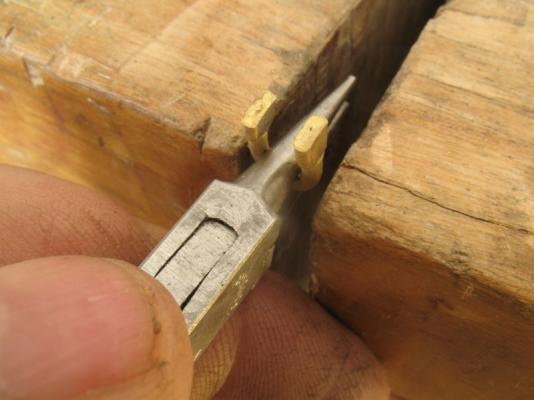
John Thanks for pointing me to the site. Today I did a little more metalwork, made the bob stay fitting and then mucked about sorting out a shackle. The fitting on the stem was fretted out folded and then the holes drilled and tapped then the tab was silver soldered on. The shackle was a lot more work than I thought it would be. At first I bent up some different diameters of brass rod, but was not really happy with any of it. So opted to make one out of some 5/16 x 1/16 brass strip. Bending it to shape was a bit harder because I did not want to anneal the brass I wanted to keep it hard. After the main body was bent to shape I tapped the locking side and then turned up a pin and flattened the end to facilitate winding it in, I still need to drill a small hole in the flattened end to add a safety wire. I had a little chain not quite the right stuff but good enough to get a good Idea of how the final will look. Michael