gjdale
-
Posts
4,894 -
Joined
-
Last visited
Content Type
Profiles
Forums
Gallery
Events
Everything posted by gjdale
-
 Glad to hear the soldering worked for you Slog - should save some frustration with trying to glue them. Your work to date is looking great.
- 244 replies
-
- 5
-

-
- borodino
- dom bumagi
- (and 1 more)
-
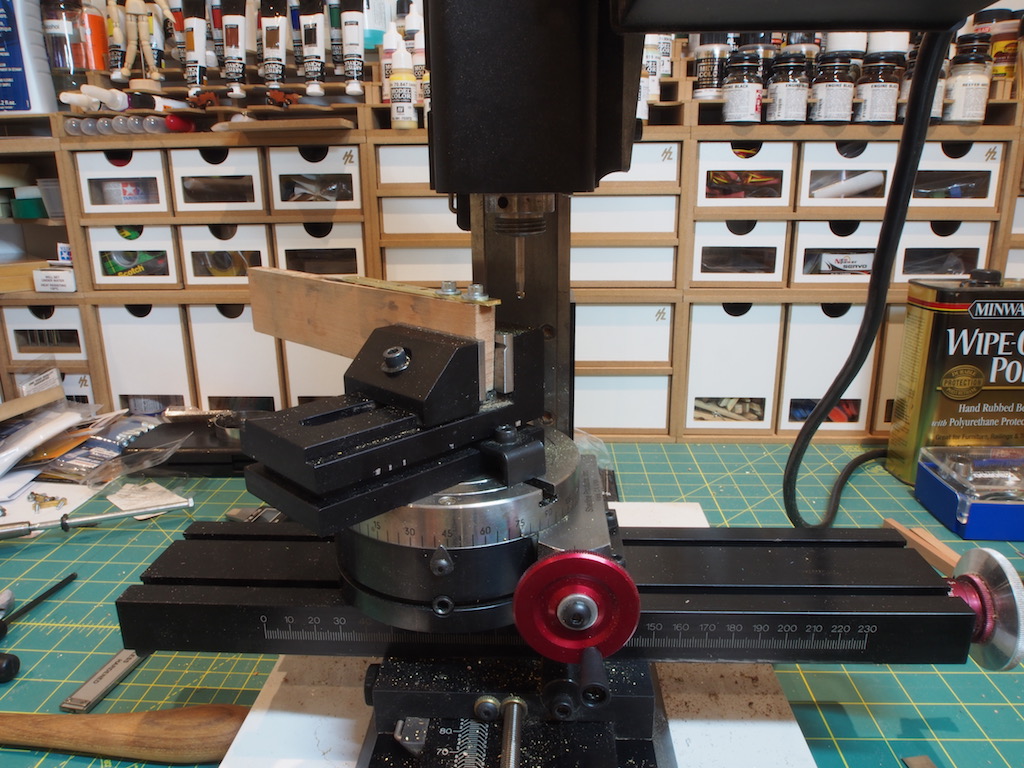
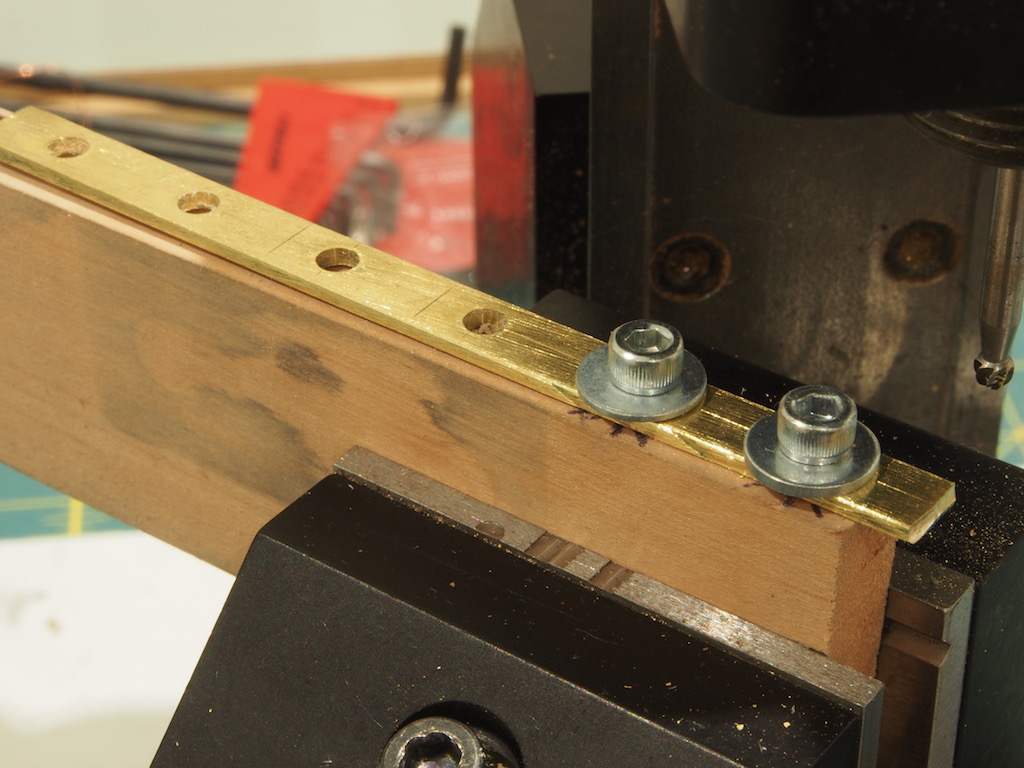
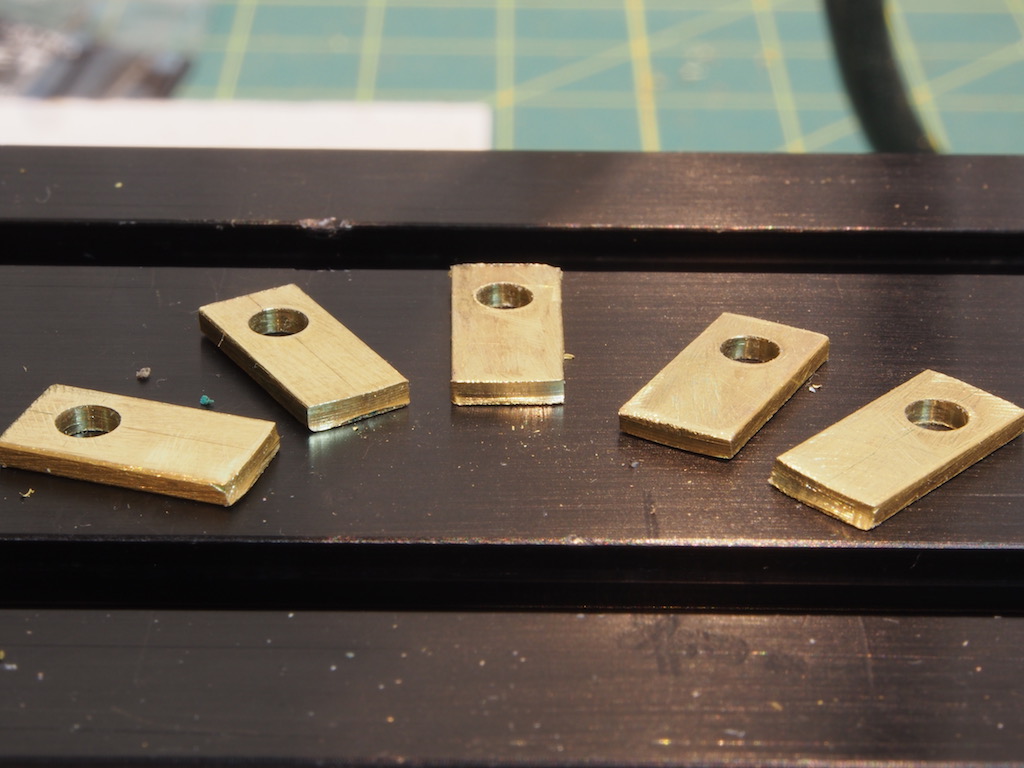
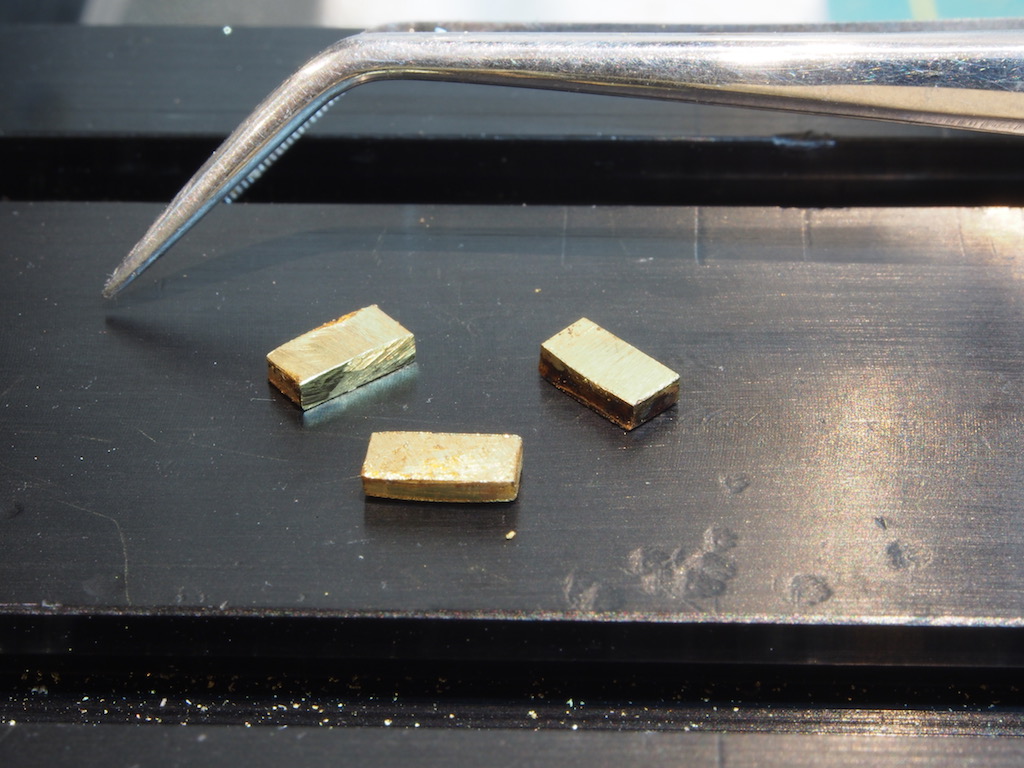
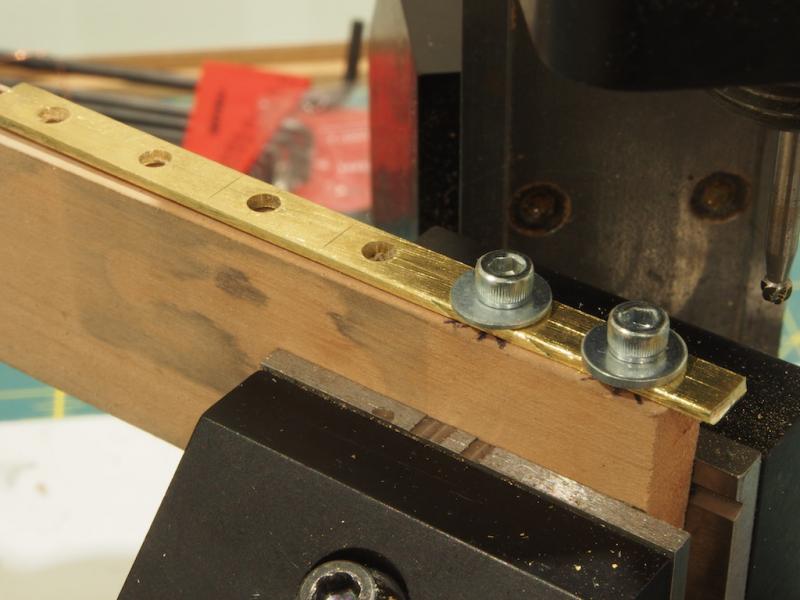
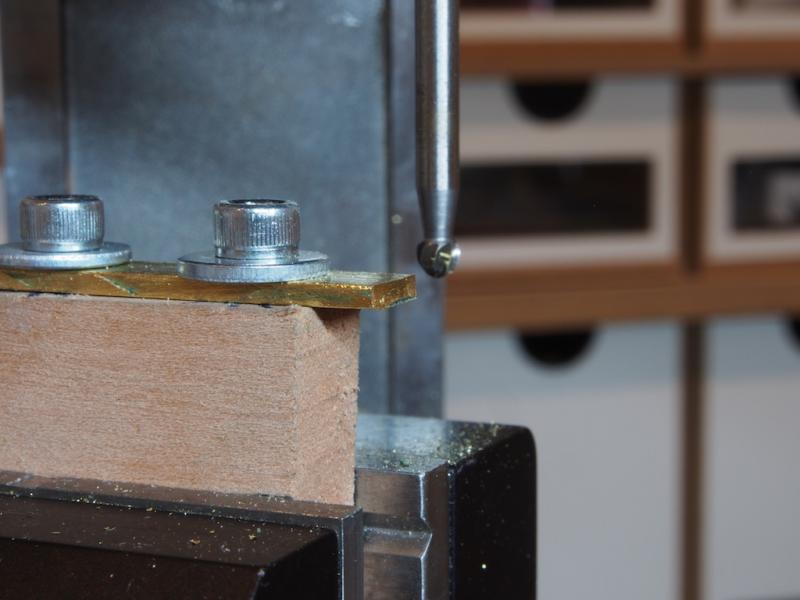
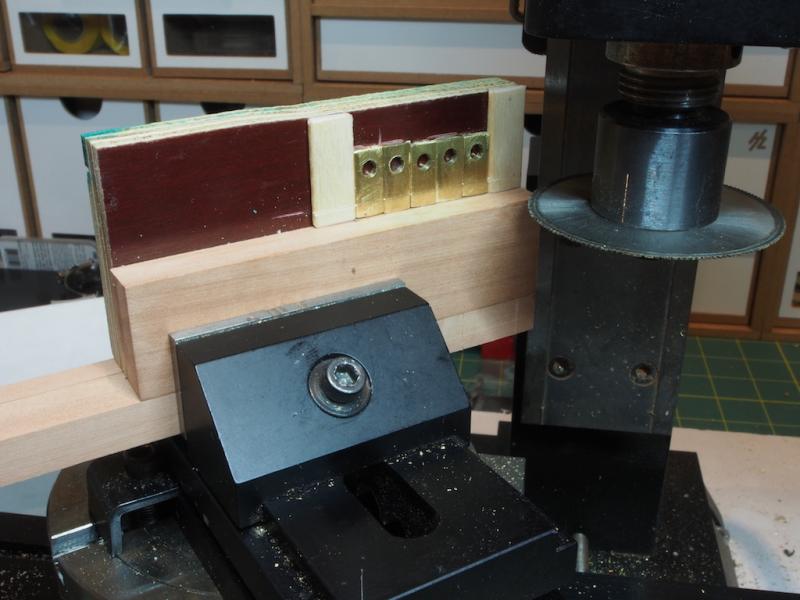
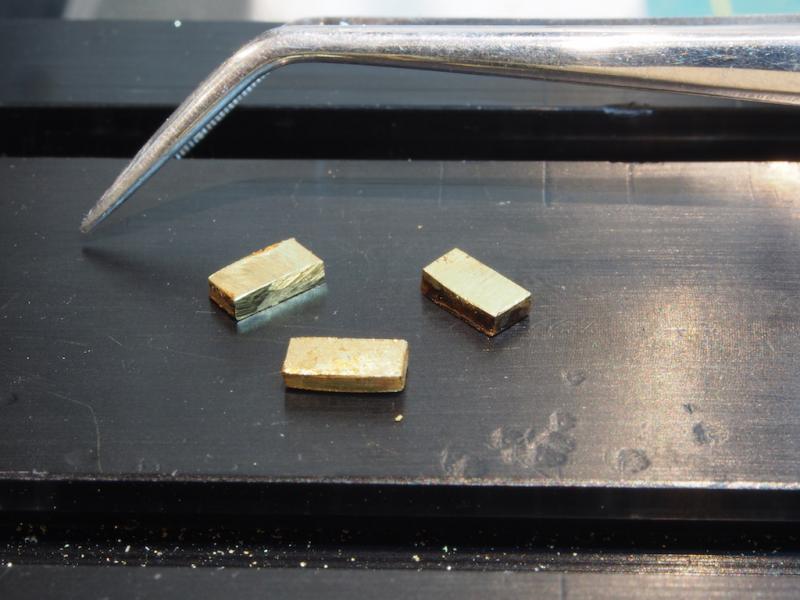
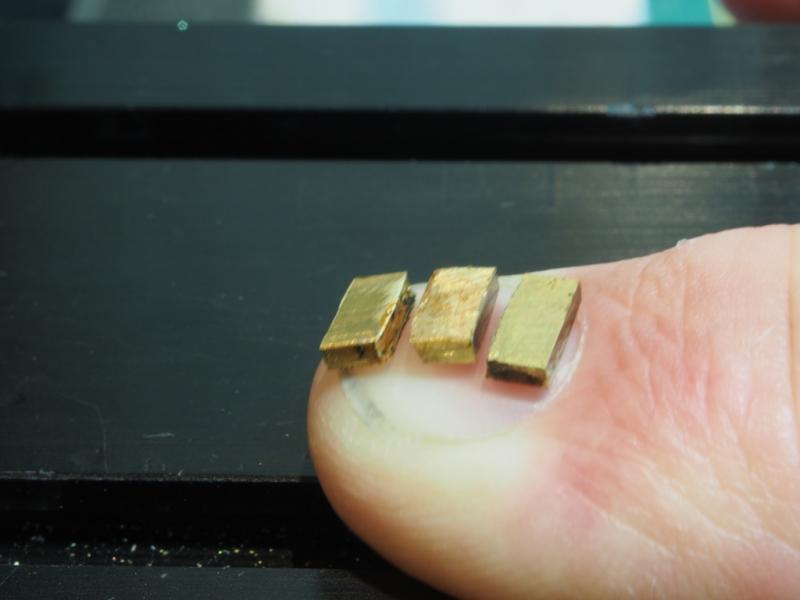
Thanks Keith, Mobbsie, Ken, Sam and Popeye for your generous comments, and to all those who hit the "like" button. Wheel Building Continued The spoke holders, which will be attached to the inner face of the wheel rim, were next to be machined. These are milled from a piece of brass stock 1/4” wide by 1/16” thick. The outer end of each piece needs to be milled with a convex radius of 1” (to mate with the 2” diameter of the wheel). Additionally, the end needs to be cut with a concave surface so that it will mate cleanly with the curved surface of the wheel rim. Kip gave a good description of his process, using the rotary table to achieve the convex radius and a 3mm ball-end cutter to achieve the concave cut. While it took me a while to get my head around all of this, eventually it made sense. However, I came unstuck in trying to follow Kip’s method exactly as he used a narrow vice to hold the parts while milling the 1” radius. Without a thinner vice, I had to devise a holding jig of some sort. It took several days of thinking through but I got there in the end…… I started by drilling a series of 9/16" clearance holes in the 1/4" x 1/16" brass strip, starting 10mm from the end and then at 15mm spacing between centres. I then drilled and tapped two 6-32 holes in a piece of scrap timber such that one was centred 5mm from the end and the other 20mm from the end. This meant that when I attached the brass strip to the timber, it would be held securely with 5mm overhanging the end of the timber while the rear most cap screw would be centred 25mm from the end of the brass. Then I just needed to align that cap screw in the centre of the vice, over the centre of the rotary table and then offset that centre from the cutting bit by 25mm (+ 1.5mm for the radius of cutter). Here is a picture of the overall setup. And a close-up of the holding jig: After making the first pass to create the end shape, I removed the strip from the jig and cut off the end at a pre-marked point using a razor saw and mitre box. Because of the threaded hold-downs, I was able to remove and replace the strip in the holding jig without changing any settings on the X,Y or Z axes of the mill by simply undoing the 6-32 cap screws. After cutting off the freshly milled piece, I simply re-installed it with the next set of holes to have the end protruding exactly the right amount again and we were ready to repeat the milling cut. Here is another close-up of the milling in process: And here are the five resulting pieces ready to be cut to final length. I only need three of these but thought it best to make a couple of spares. Turned out to be a good decision! The next step was to cut these to final length. According to Kip’s instructions, that length was to be 7/64”. I converted that to metric to make it easier to operate the mill wheels, and rounded up slightly to 3.0 mm. In order to cut these precisely to the same length, I made a jig to hold them in the mill vice while I used the slitting saw to make the cut. The parts were held onto the jig temporarily with CA glue. Here is the setup: It turns out that CA is not a good choice to use for this purpose. When it heats up the bond gives way fairly easily. I’ll put that one in my Homer Simpson “Doh!” file!!! So, those extra two parts came in quite handy as by the time I’d completed the cut, two of the “keeper” ends had vanished (although I had all five of the “offcut” ends!). Here’s a pic of the final parts cut to size. The tweezers in the background are to give a sense of scale. And just in case that doesn’t do it for you, here is a shot with all three of the pieces on the fingernail of my index finger. Man, these things are small! And the next job will be to drill a series of 0.5 mm holes into the long narrow inboard edge to receive the spokes. Stay tuned….


- 339 replies
-
- 13
-
-
- dumas
- Chris-Craft
- (and 3 more)
-
....along with a grand piano......so who plays Jerry? You or Charlene, or both of you? And what type of music gets played?
-
Looks great Slog. Had you considered soldering the handrail pieces together before applying to the skylights? Was just thinking you could do this, leave the "legs" a bit longer and then trim them to length prior to fitting. Might save some aggro with trying to glue them together?
- 244 replies
-
- 6
-
-
- borodino
- dom bumagi
- (and 1 more)
-
Just stunning Nils! What a lovely model you are producing here. Every update shows your care and attention to detail.
- 2,625 replies
-
- 7
-
-
- kaiser wilhelm der grosse
- passenger steamer
- (and 1 more)
-
Great work Daria. I see you have given the yucky tasks (filing) to Dad - good move!
-
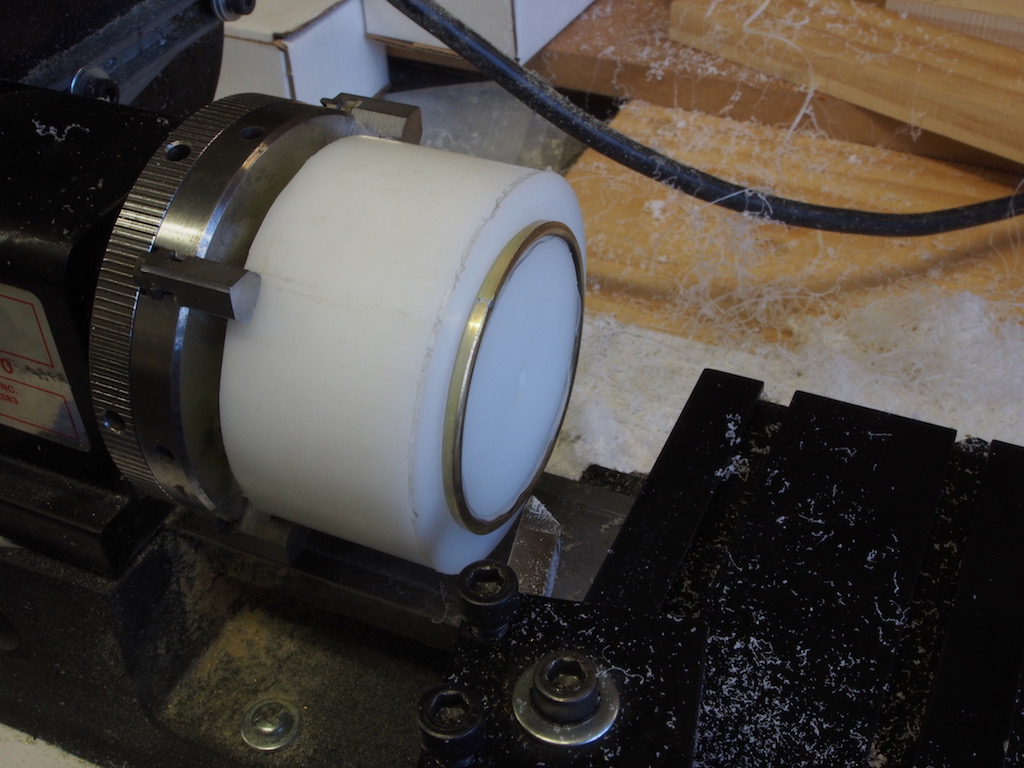
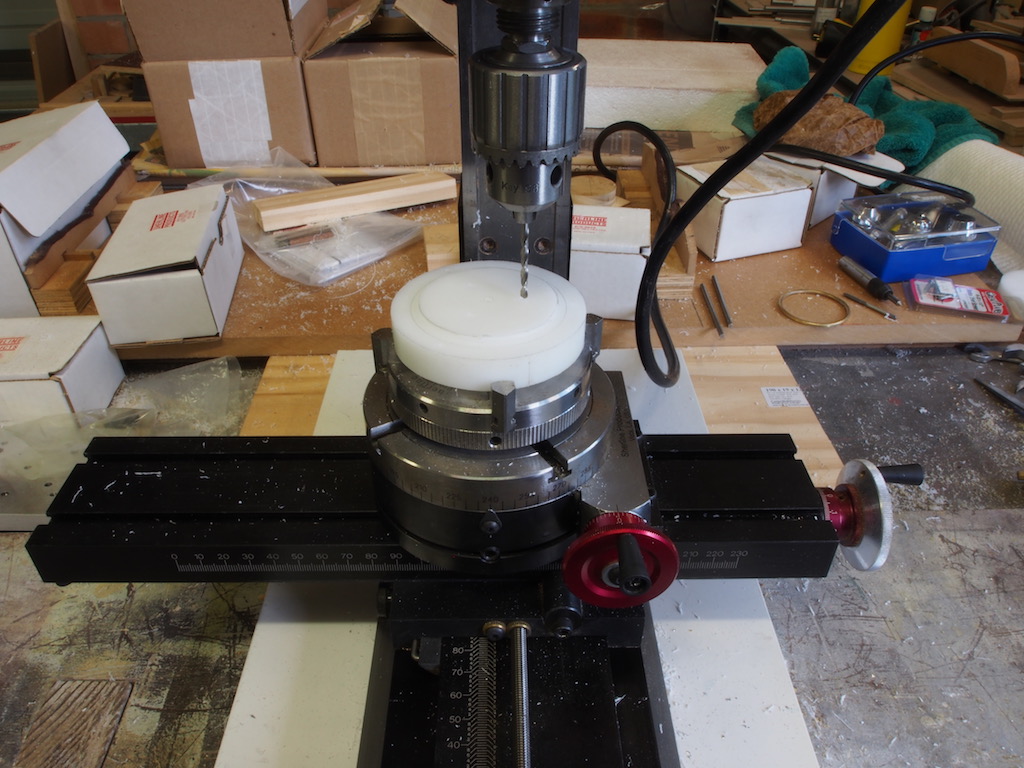
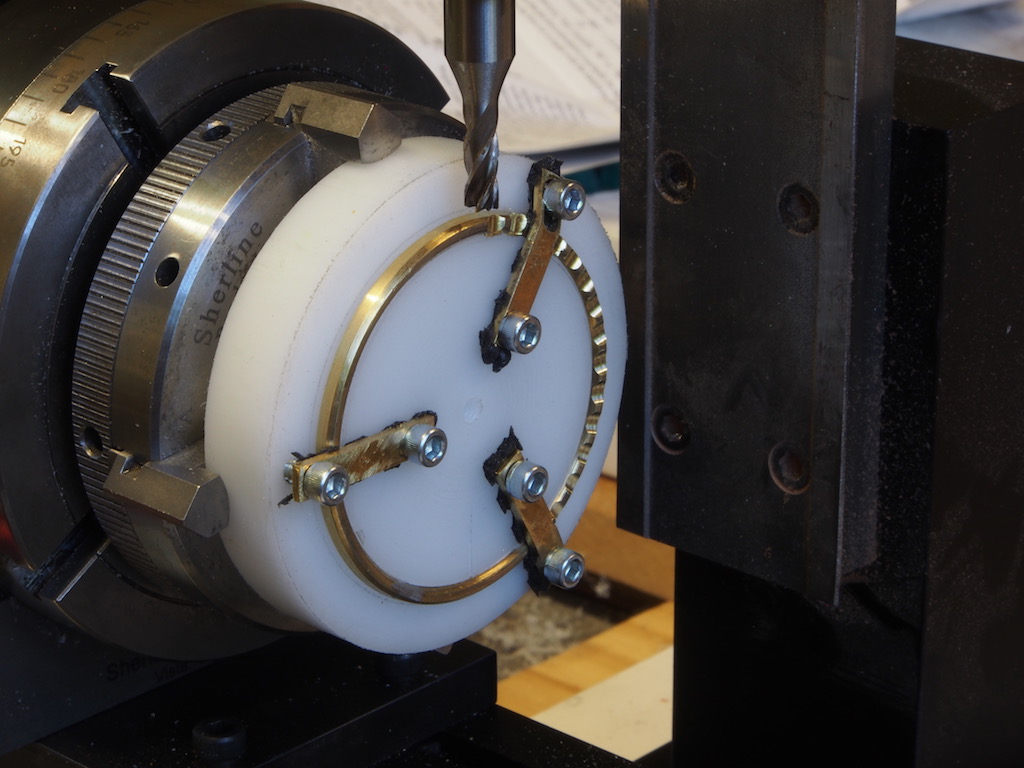
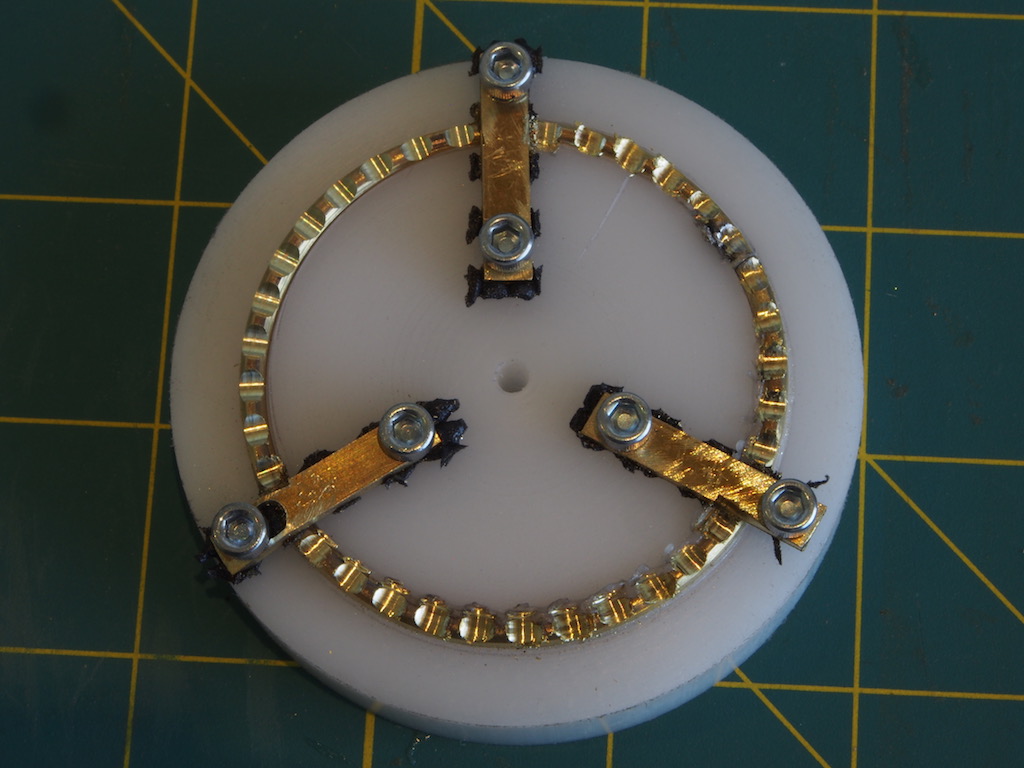
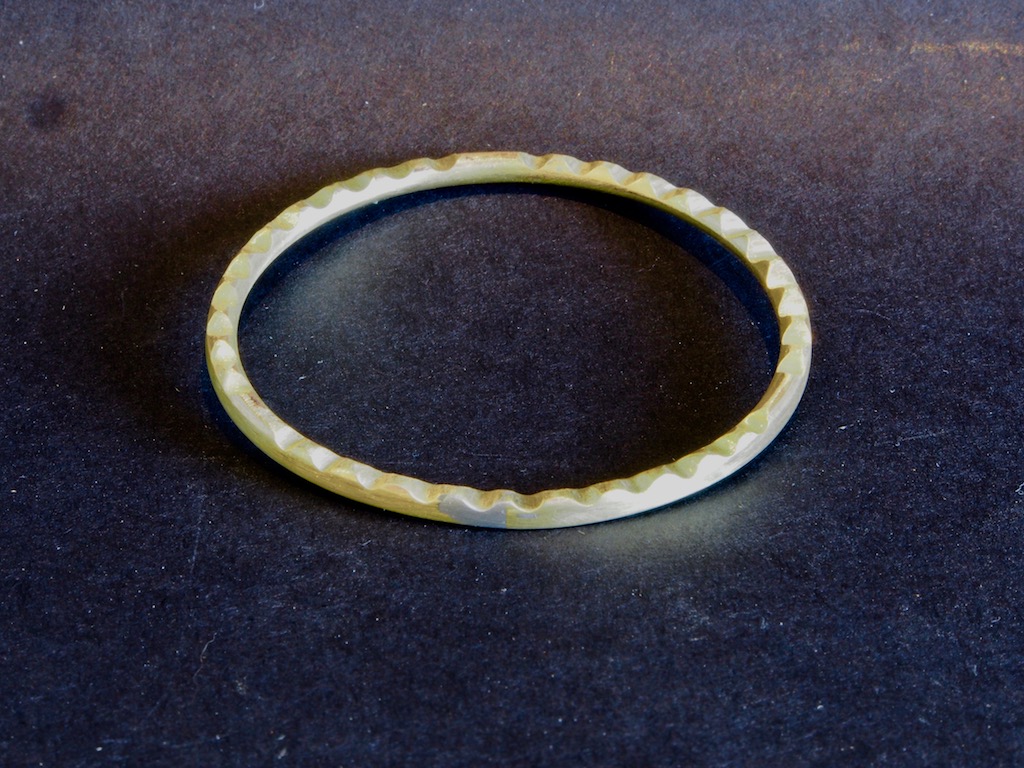
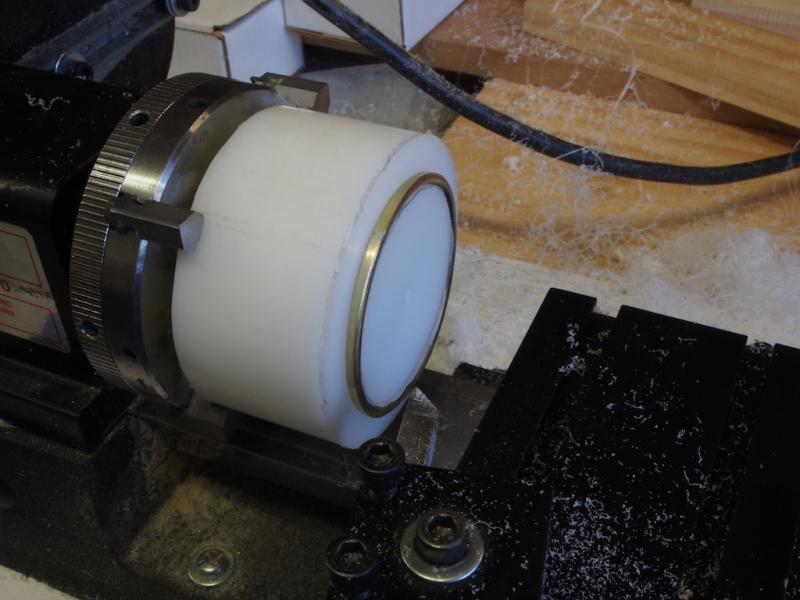
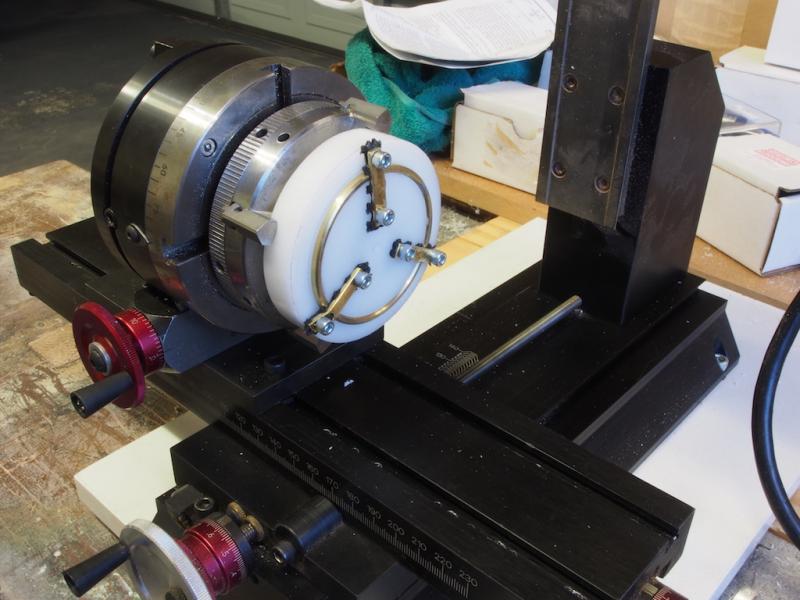
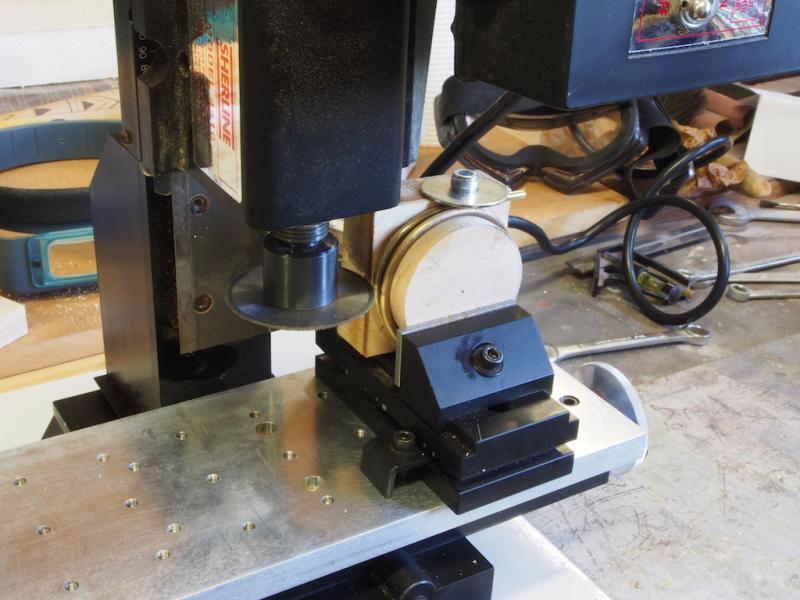
Thanks for dropping in Mobbsie and Popeye, and thanks to all who hit the "like" button. On with the show.... Wheel Building Once again, I’m following Kip’s process for this. The next stage was thinning and shaping the wheel and adding the crenallations (finger grips). It took me a while to get my head around the cross-section shape of the wheel, but essentially it is egg-shaped, with the thinner part of the egg towards the back of the wheel (actually the forward side), where the finger crenallations will be. A couple of emails back and forth with Kip, and finally I understood what I was doing. To begin with, the soldered wheel was placed back on the wooden forming buck. Because of the removal of the saw kerf from the diameter of the wheel, it was now a very tight fit on the buck, and so it could be spun on the lathe while files were applied to create the shape. First of all, the thickness of the outer rim was reduced by 1/32” by using a flat file. Then the outer part of the back face was given a slight angle, again with a file. The wheel was then removed from the buck and held in the lathe chuck so that the inner part of the back face could also be angled, giving a very slight “v” shape to the back part of the wheel. Now we needed to create a jig to hold the wheel while the crenallations were milled. Once again, I followed Kip’s lead and turned a piece of 75mm diameter HDPE (a plastic of sorts) with a 2.37mm deep rabbet around the outside, such that the wheel would just go over it. I also centre-drilled the jig while it was there. I had never used this material before, but after reading Kip’s method, I stumbled across a piece of exactly the right size in my local machinery supplies shop and they let me have it for free – just goes to show how much money I’ve spent there……. Anyway, this material (which I believe also goes by the name of Delrin), is a joy to work with. It machines beautifully and can be tapped and threaded with ease. So, the next job was to drill and tap some 6-32 mounting holes for some hold-downs. Hold-downs were made from 1/16” brass strip, 1 inch long by 3/16” wide, drilled for clearance for the 6-32 socket head screws. A strip of honeycombed rubber (off-cut from a non-slip drawer liner) was inserted under each strip. The wheel was then mounted on the jig, the jig on the lathe chuck, the lathe chuck on the rotary table for the mill, and the rotary table on the 90-degree angle table. As Kip says, that’s a lot of mounting! Okay, time for some milling……almost……. Kip noted that the original wheel had either 12 or 13 crenallations in each of three 120 sections. The sections are separated by the spoke holders, where there are no crenallations. He estimated that the spoke holders cover about 10 degrees each, leaving 110 degrees of arc to fit the crenallations into. Kip did the math on this and worked out that for 12 crenallations, the centres needed to be 9.17 degrees apart. Way too hard for me Kip – too much chance of going wrong. I decided I would use 11 crenallations, making them 10 degrees between centres, which just happens to be two complete turns of the hand wheel on the rotary table. Much less chance of stuffing it up, and who’s going to notice anyway? Kip also advised using a 3/16” end mill and cutting to a depth of 0.0255”. Seriously Kip? And you think we’re crazy with our metric system! So, that converts to 0.65mm (rounded to two decimal places). I was still a little nervous about how this was going turn out – I didn’t want to be making several “practice” wheels, so before going near the mill, I sat at the computer for a couple of hours and played with my CAD program to work out how these would take shape on the wheel. It was an interesting exercise – that merely proved that I should have just trusted Kip in the first place and saved myself two hours! So, off to the mill. In the above picture, I’m about one third of the way through milling the crenallations. It all went smoothly, except that the hold downs were a very tight fit between mill passes. In fact, the mill shaved a little off them as we went. The only issue I had was that the silver solder joint failed during the process. Fortunately, that didn’t affect the rest of the milling. Here is the completed part fresh off the mill and before clean-up. I used a scrap piece of MDF and quickly drilled and tapped some 6-32 holes so that I could use my hold-downs again while I re-soldered the join. Once the soldering was completed, it was simply a case of cleaning it all up with some files and sandpaper. And here is the finished wheel rim: I’m pretty happy with the way it turned out. Thanks to Kip’s trail blazing, I managed to get this on the first go. The next task will be making the spoke attachments for the rim. Stay tuned…..


- 339 replies
-
- 21
-
-
- dumas
- Chris-Craft
- (and 3 more)
-
Liver of Sulphur is great for blackening Copper, but it will not work on Brass. Another option for blackening Brass is Jax Pewter Black, which despite the name, works very well on Brass.
-
Mini Mill recommendations
gjdale replied to StebbinsTim's topic in Modeling tools and Workshop Equipment
Tim, For what it's worth, I'd encourage you to go with the Sherline. As my Dad always says, quality is remembered long after price is forgotten! You will never regret the extra expense of the initial outlay for the Sherline. And then of course, you'll never be saying "I wish I'd held off a little longer and bought the Sherline instead"...... -
Nice progress Daria - I see you've worked out how to use clamps properly and you are even starting to get the hang of using an airbrush! Keep up the great work.
-
Nice to see some progress Steve. Looking good!
-
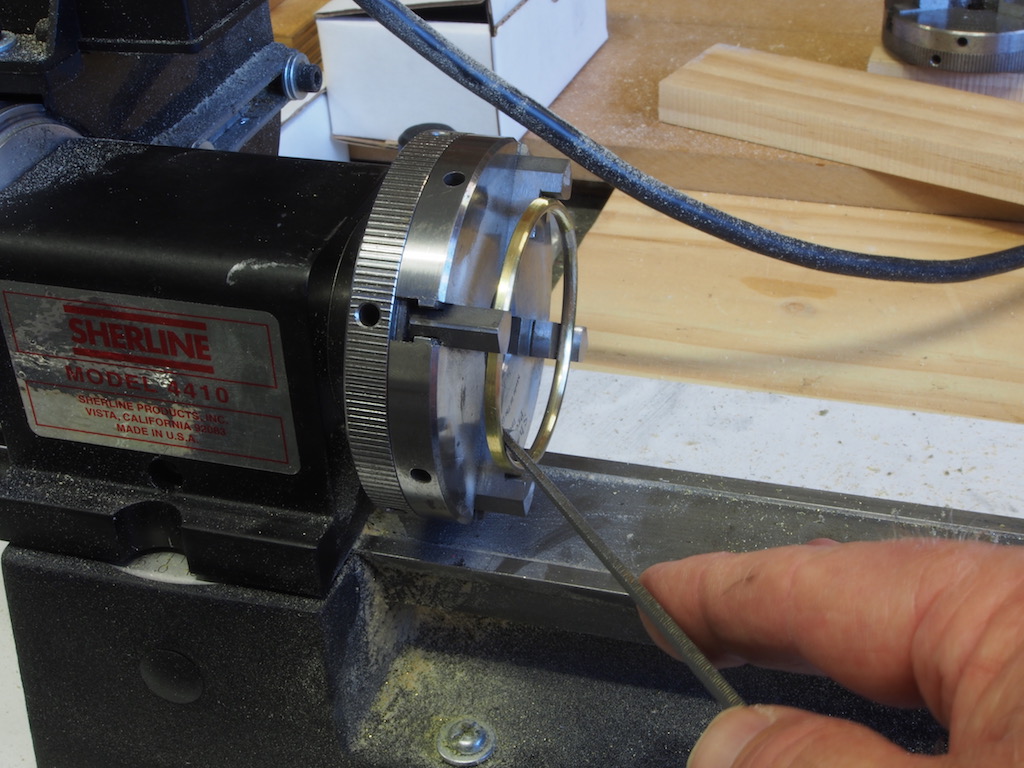
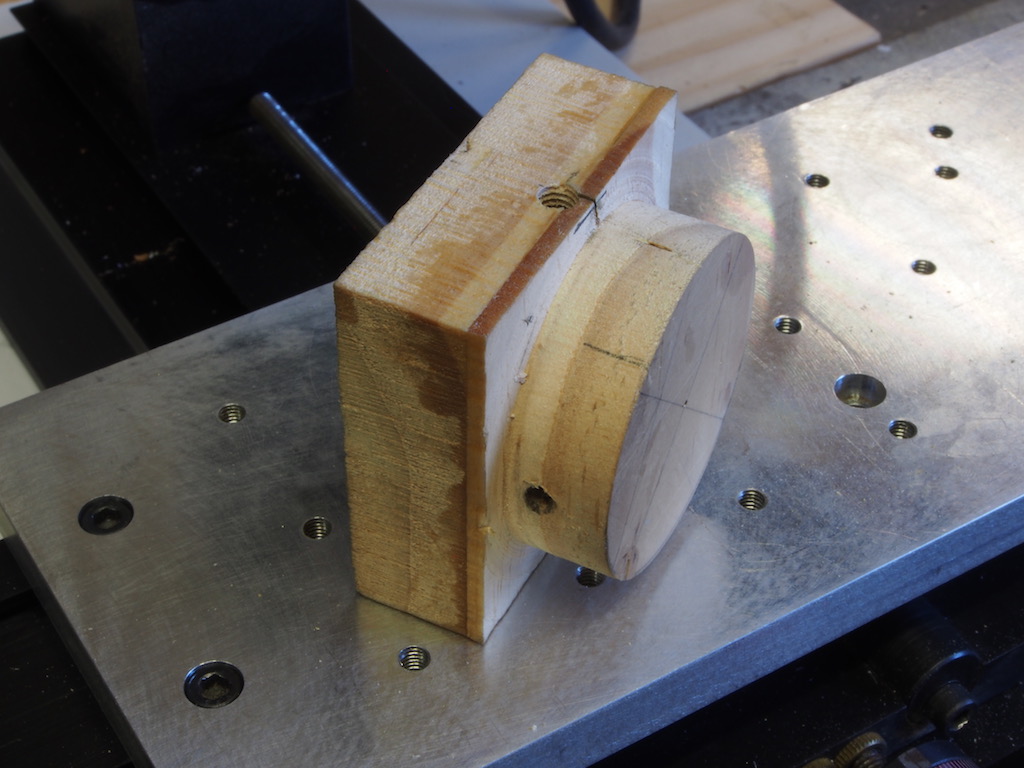
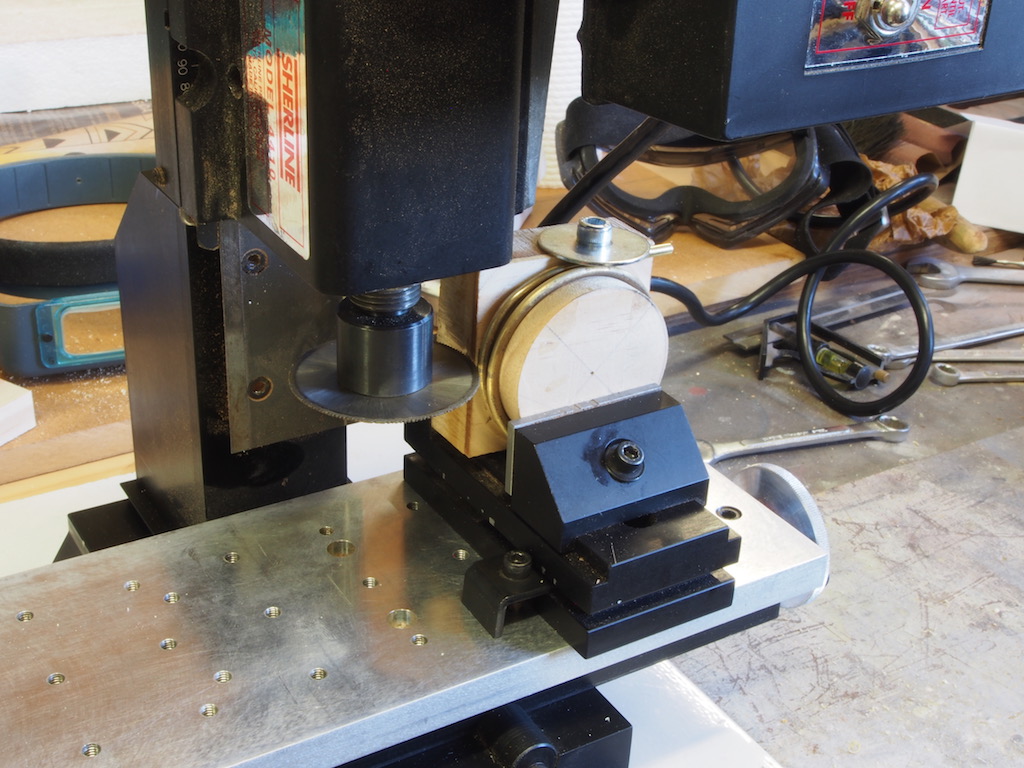
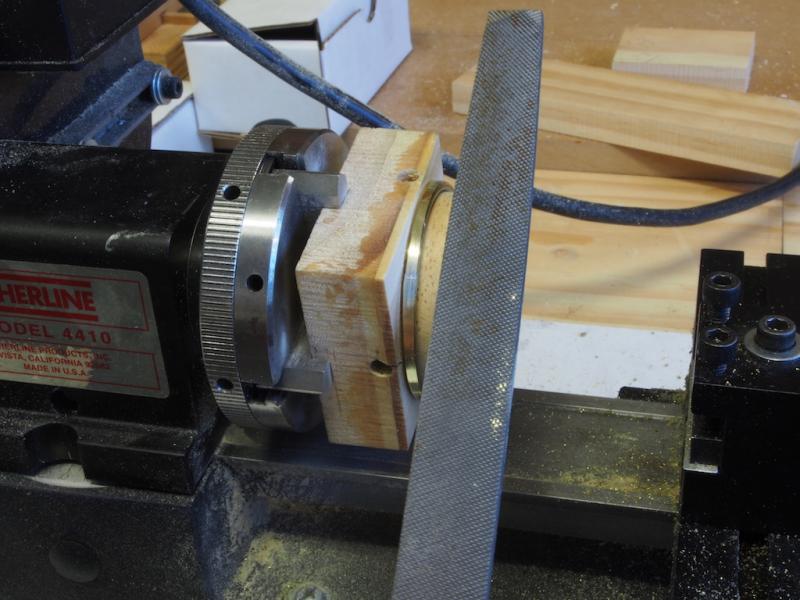
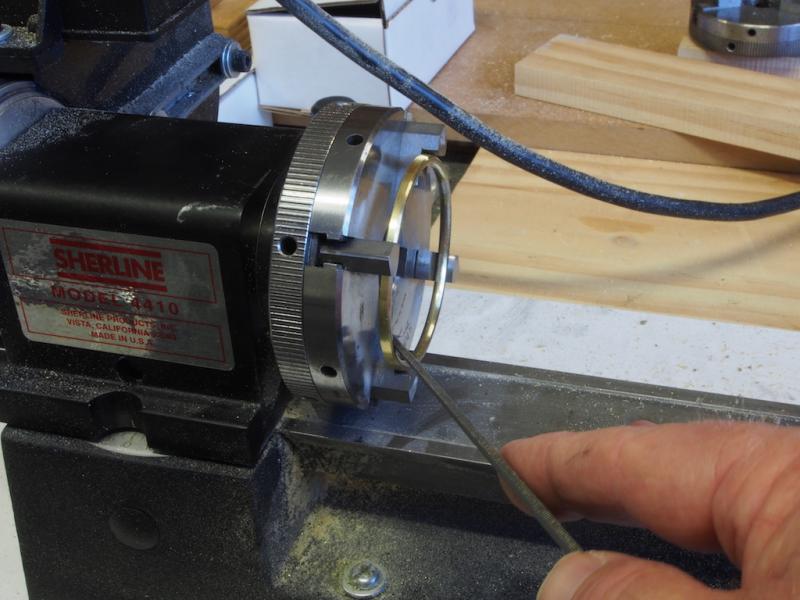
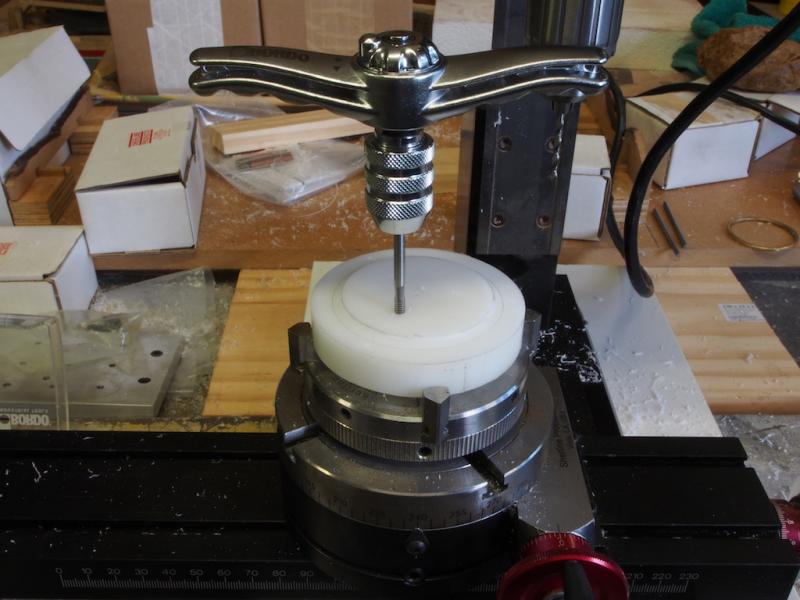
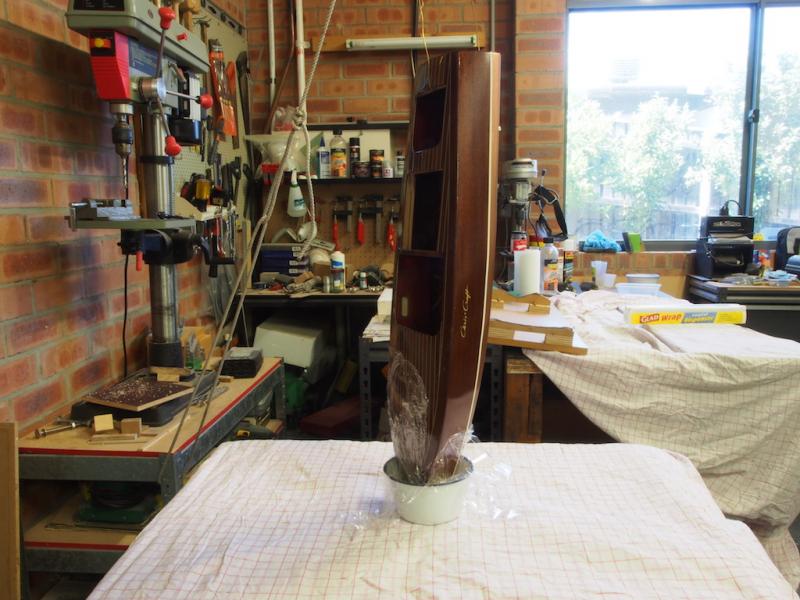
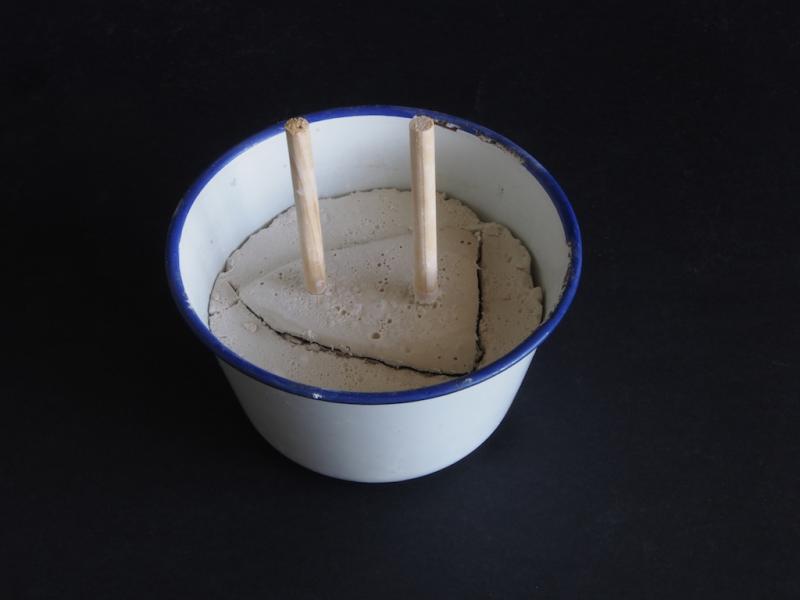
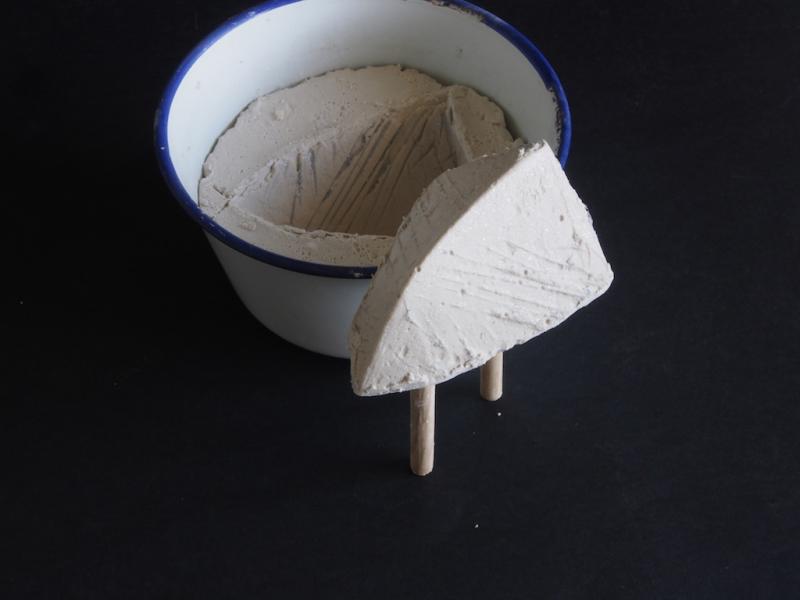
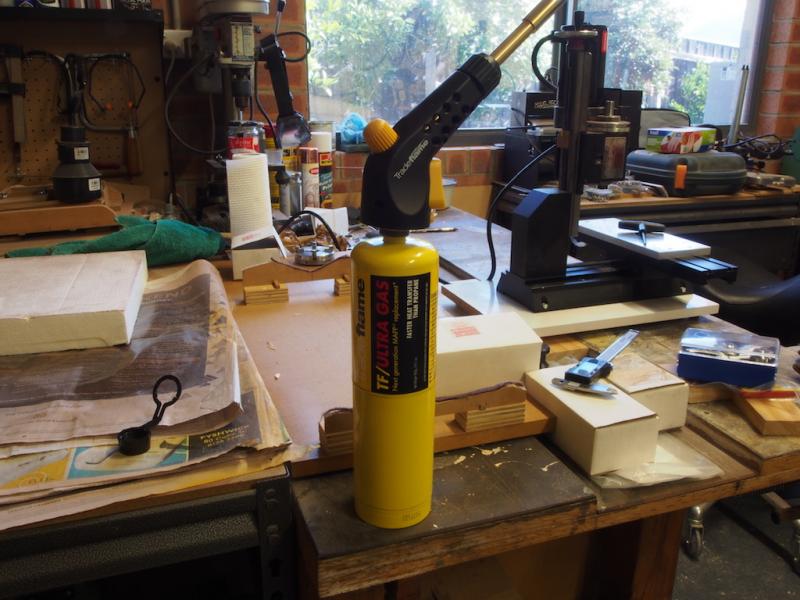
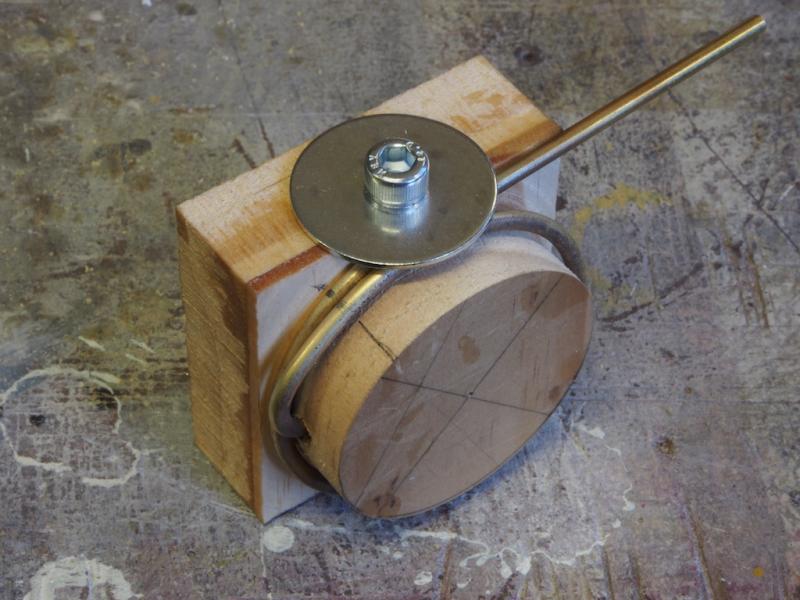
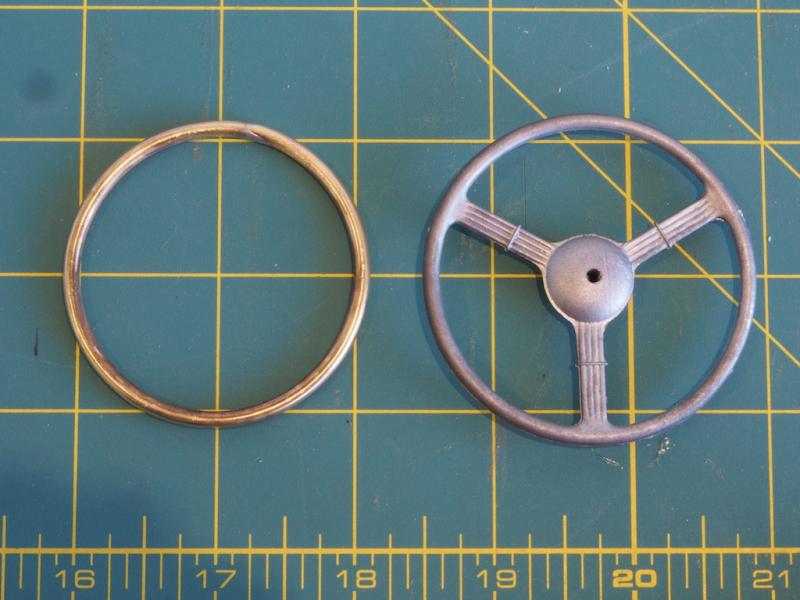
Many thanks as always for all the kind comments and the "likes". On with the show.... Of Moulds and Wheels Before completing the finish on the hull, I decided to take a little diversion in two directions. Firstly, I decided that it would be a good time to make a mould of the bow so that I could work on the cutwater off the model (and hence protect that lovely surface). And secondly, I decided it was about time to start tackling the building of a new steering wheel. To make a mould of the bow, I bought some plaster from the local art store. I could have gone all fancy and bought some very expensive mould making material, but as this is a one-off job, I decided to keep it simple and inexpensive. To create the mould, I mixed up some plaster and water and then suspended the boat above it by looping some brass wire through the rudder post, then attaching some rope hooked over the garage door tracks, and then lower the boat into the plaster. Of course, I had taken the precaution of wrapping the bow in cling wrap first! Once the plaster had set, I removed the boat and coated the mould with some silicon grease to act as a release agent. Then I mixed up some more plaster and water and poured it into the mould. I also inserted two pieces of dowel to use as “handles” later on. In this picture, the cast has set and I have cut around the top edge prior to lifting out. And here is the final product: After this photo was taken, I cleaned up the cast with a light sanding and then painted it with a coat of finishing resin to (hopefully) prevent it from crumbling as I work with it. More on the cutwater to come at a later date. I had decided to replace the kit-supplied steering wheel after reading an excellent “how-to” by Kip Catanese over on the RC Groups forum. Kip made a replacement wheel for a fellow forum member and documented his process so well, that I decided to try and replicate it – at least as far as I am able. What follows then, is an implementation of Kip’s methodology. I hope I can do it justice. The starting point is a piece of 1/8” diameter brass rod. This needs to be bent around a form and then silver soldered to form our basic wheel. To create a form, Kip turned a “buck” on his lathe to the correct diameter to match the finished wheel’s Inside Diameter of 2” (50mm). This is slightly smaller than the kit supplied wheel as Kip reckoned it was a little too large for the scale. That’s good enough for me Kip! So, following Kip’s lead, I laminated two pieces or 2 ¼” square x ¾” scrap timber together with epoxy, marked the desired diameter, mounted it in a four jaw self-centering chuck, and then turned the outer portion down to the correct diameter. Although Kip used hand tools on his lathe for this operation, I stuck with regular metal cutting tools and they worked just fine. Once the outer portion was turned down, I drilled a 1/8” diameter hole in the cylindrical section to anchor one end of the brass rod, and then drilled and tapped an M6 thread into the square section of the buck. The purpose of this will become clear shortly. In order to bend the brass rod around the buck, it first needs to be annealed to make it soft enough to bend easily. I had not done much in the way of annealing before, so had a go with my little butane torch that I use for silver soldering. Well, all I can say is that this was an abject failure. I stopped and thought about it for a while and concluded that I simply wasn’t getting enough heat to the rod overall. A quick (and not inexpensive) trip to the hardware store solved my problems…… This little torch uses something called Ultra Gas, which apparently is the “next generation MAPP replacement”. I wouldn’t know about that, but what I do know is that it heated my brass rod to cherry red in no time at all, and after a quick dunk in a bucket of water, it bent like a piece of soft rubber around my buck. In the picture above, you can see the purpose of the threaded hole (again a direct copy of Kip’s method). I have used an M6 socket head screw with a “mudguard” washer to hold down the very end of the brass rod and keep it nice and tight on the buck while it is being cut. After this picture was taken, I moved the threaded hold-down to the next face around (ie 90 degrees) as I found this to be more secure. The whole assembly was then mounted in the milling vice and the ring cut using a slitting saw. This ensured that the two mating faces were perpendicular to each other. Once the piece was cut free, it was placed back on the buck with a hose clamp to ensure that it remained as true to shape as possible. Then it was just a simple case of silver soldering the ring closed and doing a little clean up with a file. Here is a picture of the finished ring, alongside the original kit-supplied wheel. You can see that it is slightly smaller – the outer diameter of the new wheel is about the same size as the inner diameter of the kit wheel. Next up, thinning and shaping the exterior of the wheel, and then milling the finger crenallations. So far Kip’s treatise has been a dream to work with. I’m hoping that the remainder goes as well!


- 339 replies
-
- 21
-
-
- dumas
- Chris-Craft
- (and 3 more)
-
Here is another video on Bandsaw setup/adjustment that I think is really good.
-
Mini Mill recommendations
gjdale replied to StebbinsTim's topic in Modeling tools and Workshop Equipment
You can't go wrong with a Sherline. I love mine, and I'm still only a novice when it comes to using it. Just remember that you will likely spend more on attachments/accessories than on the basic machine. But then, that's half the fun really isn't it? And the same will be true regardless of brand. -
Very nice John. With the end almost in sight, have you decided what's next?
- 745 replies
-
- 2
-
-
- francis pritt
- mission ship
- (and 1 more)
-
Congrats on the milestone Mark. Can't wait to see her free of the jig! As for the camera, sounds like you have an excuse to deploy HMS Visa into action again!
-
Nice to see you underway again Rusty. Lookin' good!
- 310 replies
-
- 3
-
-
- cheerful
- Syren Ship Model Company
- (and 1 more)
-
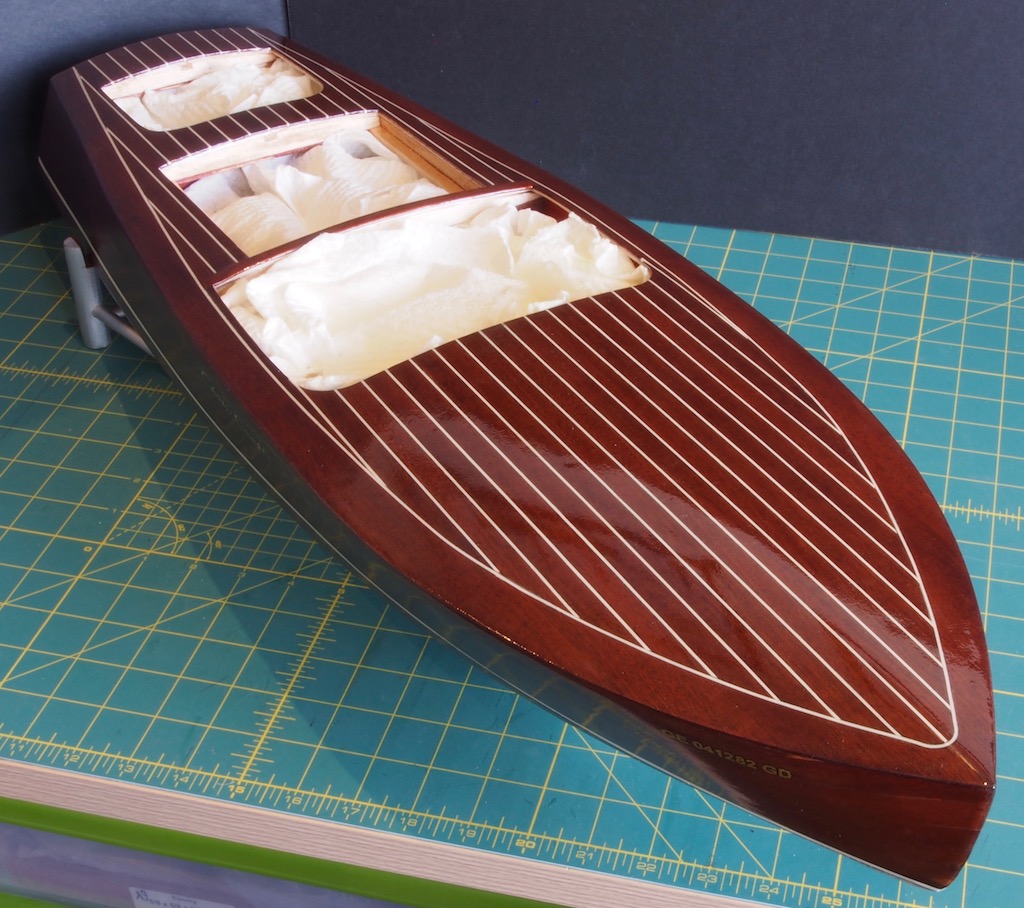
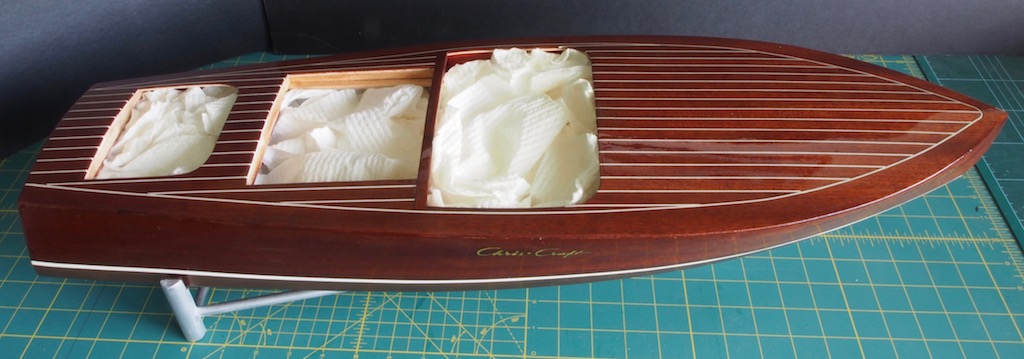
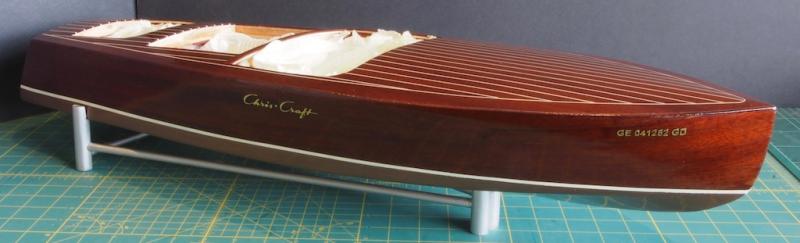
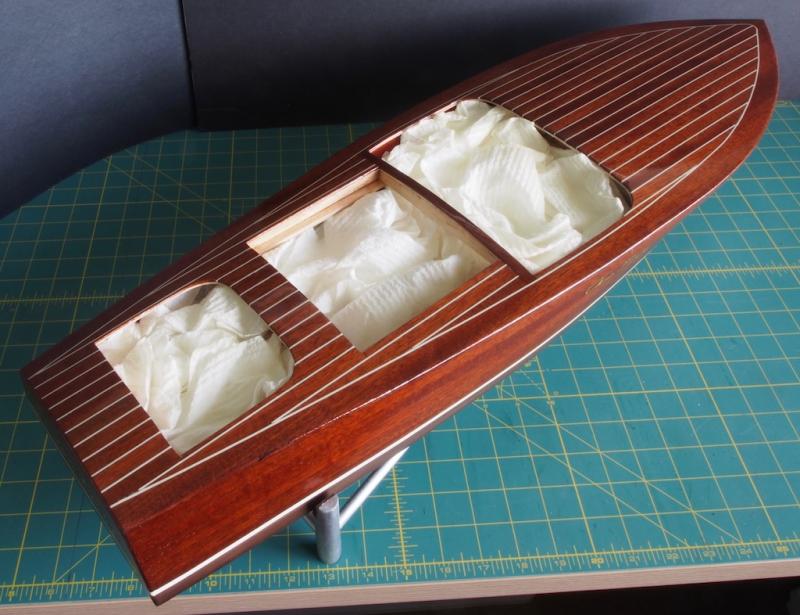
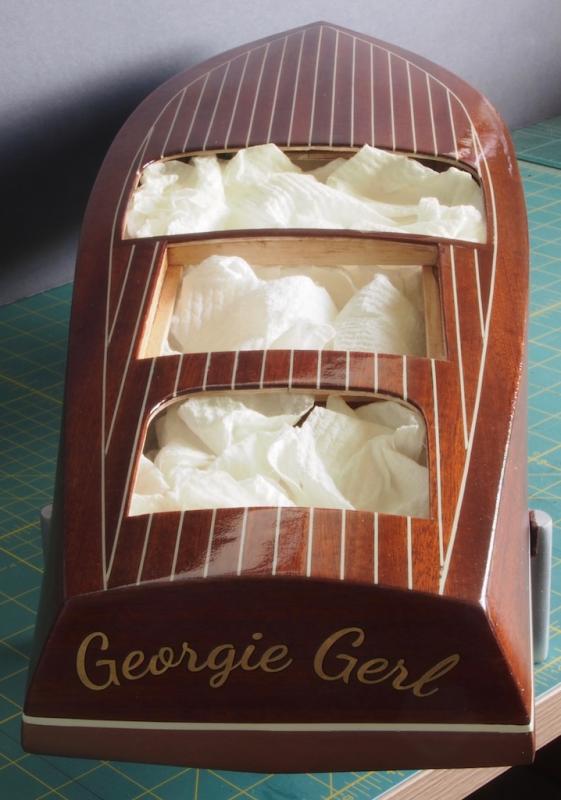
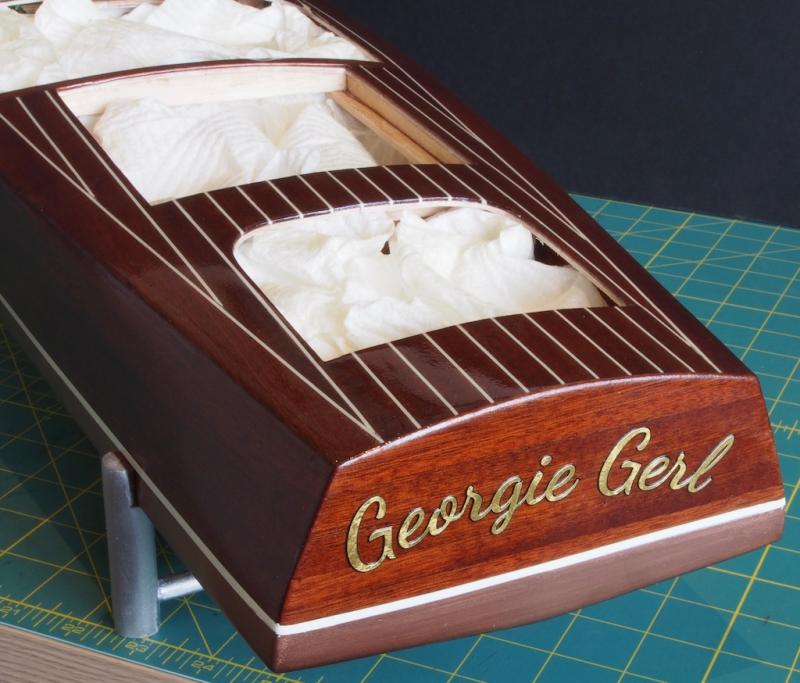
Thanks again for all the kind comments and all of the "likes". Another mini-update....... After a further three coats of clear finish, with wet-sanding between coats using 1200 grit paper, I think we are done with the spray-gun at last. I’m quite pleased with the way that it has come up, although the camera can be a little unkind. It looks better to the naked eye! It still needs several hours’ worth of polishing before it’s really done, but here are a few glam shots by way of update.


- 339 replies
-
- 24
-
-
- dumas
- Chris-Craft
- (and 3 more)
-
I've recently started using Vallejo acrylic paints and they are excellent. Their main range is called Model Colour, which can be brushed as is or thinned to use in an airbrush. They also do a range called Model Air, which is designed to be used in an airbrush without thinning, though I understand that some folks do thin them anyway. The colour range is extensive; if you know the standard international designator for the colour you want (I can't remember what the dsignator system is called) you will be able to find it, or a very close match in the Vallejo range. That should help with your colour blindness. Most local hobby/toy stores seem to carry the Vallejo range.