gjdale
-
Posts
4,894 -
Joined
-
Last visited
Content Type
Profiles
Forums
Gallery
Events
Everything posted by gjdale
-
 Jerry, You might want to have a look at the Krylon brand "foil" paints. I emphasise the "foil" in the name of the paint. They are a spray can. Although i have recently acquired some, I have not used them yet myself, but fellow MSW member Ken Foran ("xken") has used them extensively in his exquisite brass model building (check out his book on this subject too). You will find a link to his book in his build log for Niagara. You might also wish to PM him for further advice. Ken is also the kit designer for the Model Expo model of the Allerton Steam Pumper. Hope this helps.
 -
George, Have you tried art-supplies shops? That's where I get mine over here. They are expensive, but I think they are worth the investment.
- 525 replies
-
- 1
-

-
- cutty sark
- mantua
- (and 2 more)
-
I like your wood clamping idea Jay and will also "borrow" it. Just this last weekend I ran into that exact problem and could have used this method instead of marking my pieces with the steel clamps.
- 572 replies
-
- 3
-
-
- constitution
- frigate
- (and 1 more)
-
Per, Sounds to me like your problem is priorities, not $$$ :)
-
Today I made a Light (box) Stand
gjdale replied to AON's topic in Modeling tools and Workshop Equipment
Love it Alan - thanks! -
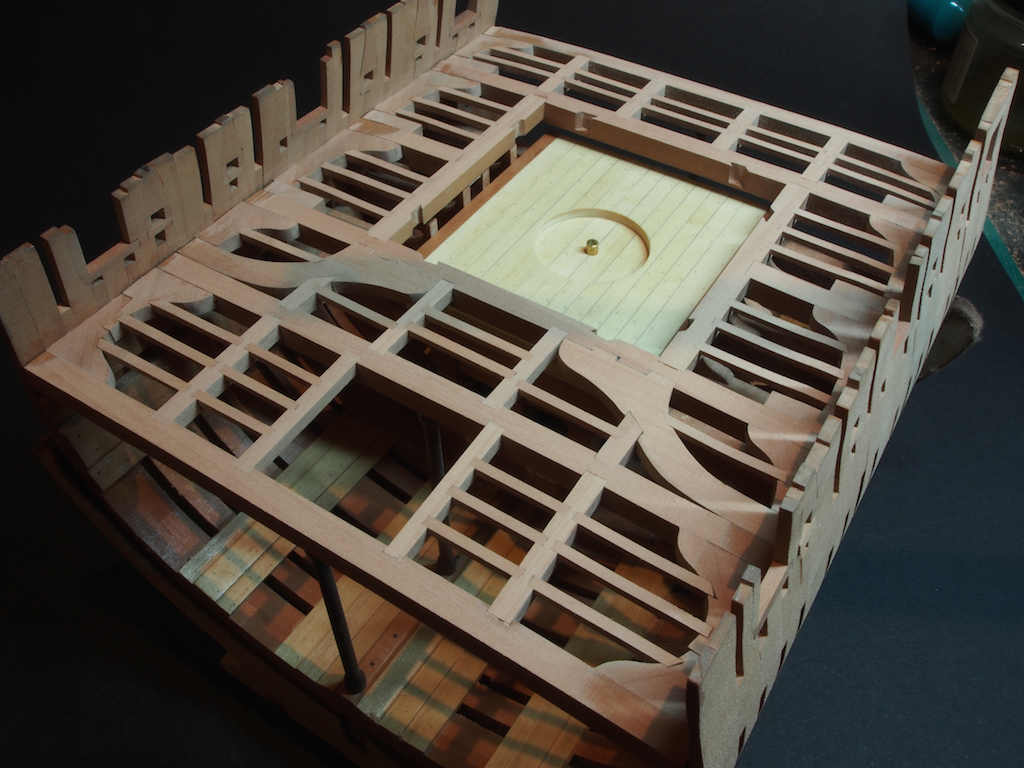
It seems to have been a long time since my last post, so just to show proof of life here is a quick update. Upper Deck Framing These last few weeks have been a very busy time since returning to work, and so visits to the shipyard have been few and far between. As the opportunity has arisen, I have kept plugging away at making the various knees, Carlings and Ledges. Preparation of the Carlings was very similar to that for the Deck Beams, with notches cut on the mill and finished by hand with a chisel. Knees and Beam Arms were all cut on the scroll saw and finished on the Spindle and Disc Sanders. Unfortunately, despite the care that I took in aligning the Deck Beams, Beam No.2 is slightly out, meaning that the Carlings between Beams 1 and 2, and between Beams 2 and 3, are also slightly out of alignment. Here is an overall shot to show progress to date – of course the angle was carefully selected to hide as many imperfections as possible! This shot was taken immediately after sanding, so some clean-up is still required. The side that will not be planked will also receive a coat or two of Wipe-on Poly in due course.

- 456 replies
-
- 19
-
-
- finished
- bomb ketch
- (and 2 more)
-
Cutter Cheerful 1806 by rafine - FINISHED
gjdale replied to rafine's topic in - Build logs for subjects built 1801 - 1850
Great to see your new log started Bob. I'll be following your progress with interest.- 525 replies
-
- 1
-
-
- cheerful
- Syren Ship Model Company
- (and 1 more)
-
Boyd, I could have sworn I posted something here yesterday, but it seems to have been lost in the ether. If the knots on the rings are what is bothering you, try using a fake "splice". They are not hard to do and look convincing.
-
I don't think "luck" has anything to do with it Nils - just your very well thought out approach and excellent skill in execution.
- 2,625 replies
-
- 4
-
-
- kaiser wilhelm der grosse
- passenger steamer
- (and 1 more)
-
Solder and brass blackening
gjdale replied to Cabbie's topic in Metal Work, Soldering and Metal Fittings
Chris, The nature of these products make it unlikely that you'll find them at one place. It's only us weird folk called model builders who need the two items in our workshop together. -
Congratulations Bob. It's all been said by others already, so I'll just echo all of their comments. A truly outstanding build - well done Sir!
-
Very impressive stove Alex!
-
Great work Mobbsie. Okay, I took the hint.........it's been a busy few weeks back at work.......hopefully the shipyard will re-open this weekend and I can start playing catch-up again!
- 255 replies
-
- 5
-
-
- granado
- bomb ketch
- (and 2 more)
-
Micro-Mark MicroLux LaserKnife 2525 – A Review
gjdale replied to mtaylor's topic in Modeling tools and Workshop Equipment
Very interesting review Mark, thanks for posting. -
Solder and brass blackening
gjdale replied to Cabbie's topic in Metal Work, Soldering and Metal Fittings
Chris, Here's a link for Birchwood Casey Brass Black: http://westernfirearms.com.au/cleaning-gun-care-bluing-wood-metal-care-brass-black-p-1599.html You can get some solder in a syringe through Micromark. There are other suppliers, but I seem to have lost the links. Hope this helps. -
Missing parts Mamoli HMS Victory (moved by admin)
gjdale replied to John Allen's topic in Wood ship model kits
John, Like Mark, I'm not sure I understand what you are asking about. If it is brass rings, making your own should be pretty straight forward. Otherwise, have you tried looking at Cornwall Model Boats online? They seem to carry a pretty comprehensive range of parts and fittings. -
Hms Victory boats
gjdale replied to Harvey's topic in Discussion for a Ship's Deck Furniture, Guns, boats and other Fittings
Hi Harvey, Glad to have been of help. You're right about the drawings being the wrong way around in the AOTS book. I'm pretty certain that the Sea Cutters are 25ft though. Not sure of my source - I'm still away from home. -
Hms Victory boats
gjdale replied to Harvey's topic in Discussion for a Ship's Deck Furniture, Guns, boats and other Fittings
Harvey, My recollection (from reading AOTS notes (I think the drawings were slightly out from the notes) and I think the AOTS notes are supported by Longridge, though I'm away from home at the moment and can't check): Launch - 34ft Barge - 32ft Pinnace - 28ft Jolly Boat - 18ft Cutters (x2) - 25ft (these being the ones carried on the quarter davits and clinker planked). As for scaling, the math is fairly straight forward. If "X" is the actual size in feet, then to convert to mm at 1:98 scale: "X"ft x 12 (inches per foot) x 25.4 (mm per inch) / 98 or, more simply: "X" ft at 1:98 scale = "X" x 3.11 mm So: 34ft = 105.74mm 32ft = 99.52mm 28ft = 87.08mm 25ft = 77.75mm 18ft = 55.98mm Hope that is helpful. -
Very nice progress David.
-
Another masterpiece (and master class) to follow along with Ed - I'm pulling up a chair too!
- 191 replies
-
- 1
-
-
- young america
- clipper
- (and 1 more)
-
Just think of them as "practice" Harvey Are you going to clinker plank the cutters?
-
That's some seriously nice work there Harvey!
-
Congratulations Jerry on completing another fine build. You can be justifiably proud of your efforts.
-
Congratulations on completing a very fine build Joe! You can be justifiably proud of your accomplishment.
- 302 replies
-
- 1
-
-
- granado
- caldercraft
- (and 1 more)