gjdale
-
Posts
4,894 -
Joined
-
Last visited
Content Type
Profiles
Forums
Gallery
Events
Everything posted by gjdale
-
 Wow! And I thought the first one was pretty darn good! Great job Remco.
- 1,215 replies
-
- 1
-

-
- sloop
- kingfisher
- (and 1 more)
-
Thanks Frank. I still consider myself very much a novice at this, but one who is willing to have a go and learn along the way. Picking up tips from people such as yourself helps to understand the capabilities of the machines and how to use them. Then it's just a case of putting them into practice - that s the easy part!
-
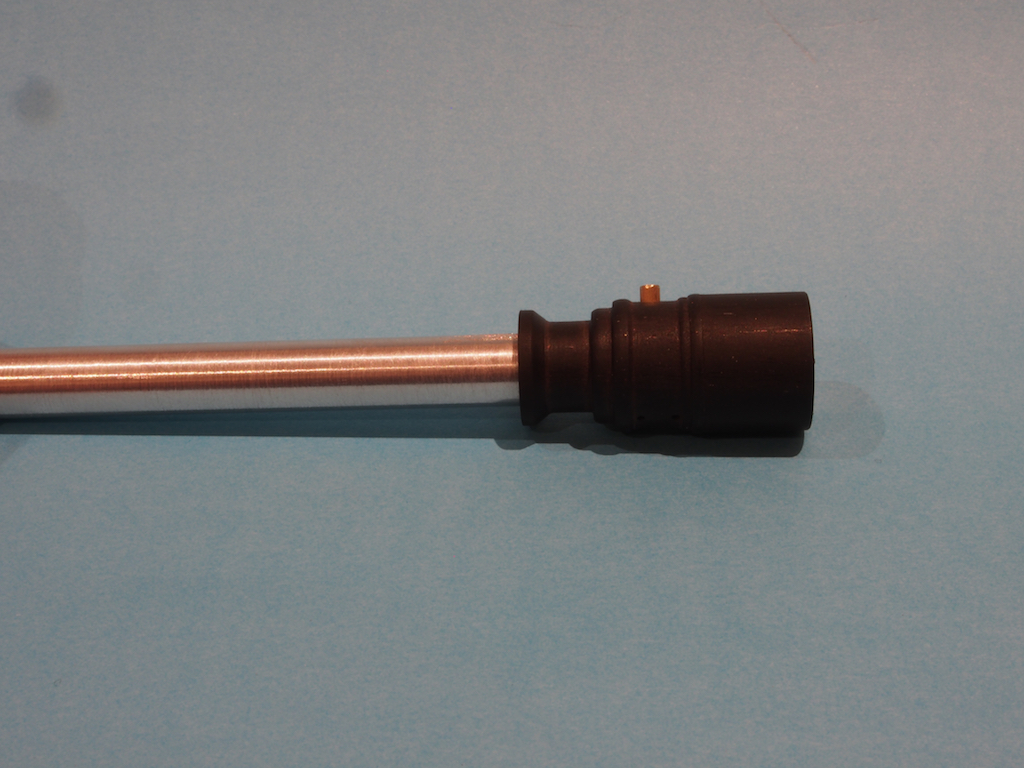
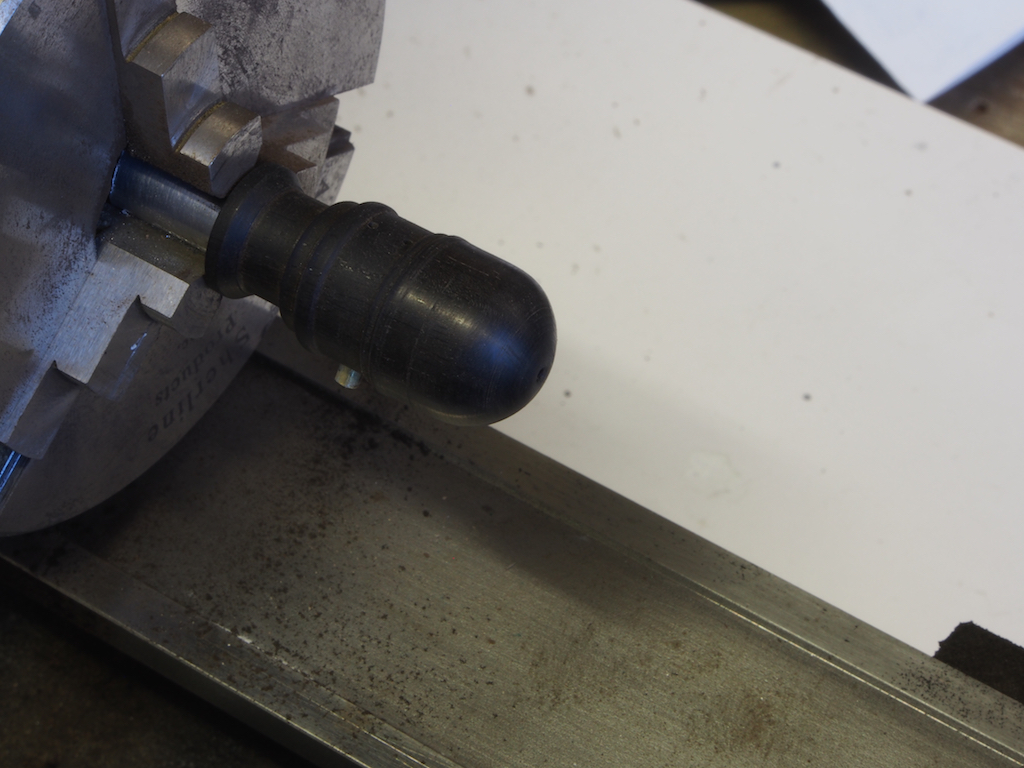
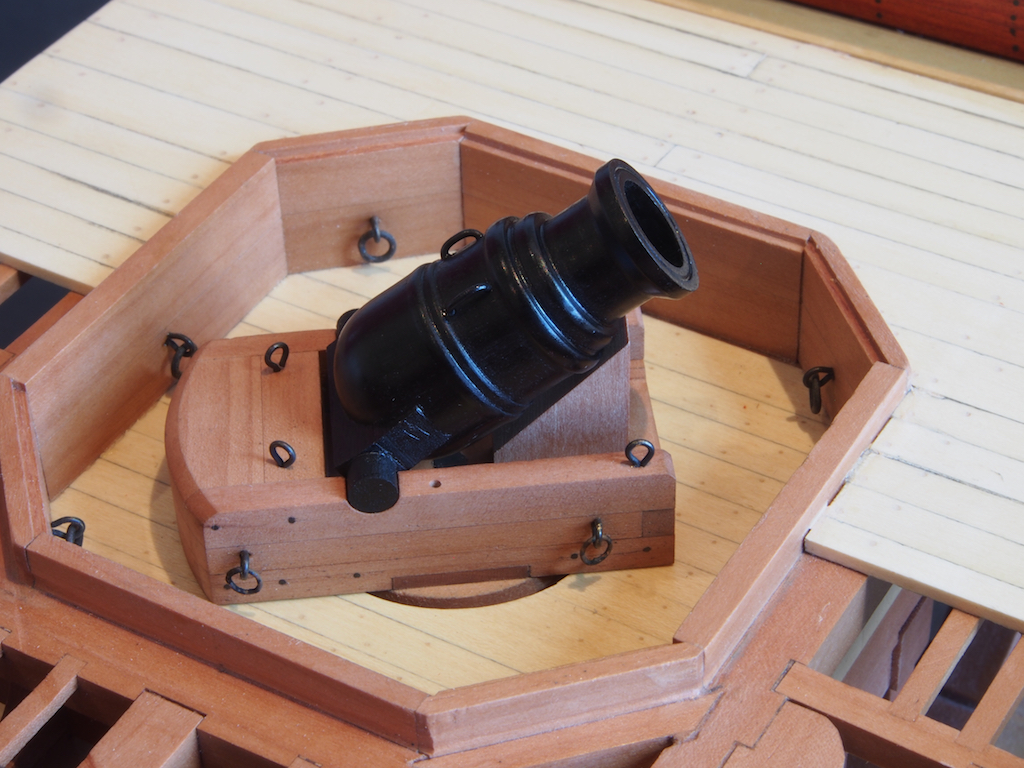
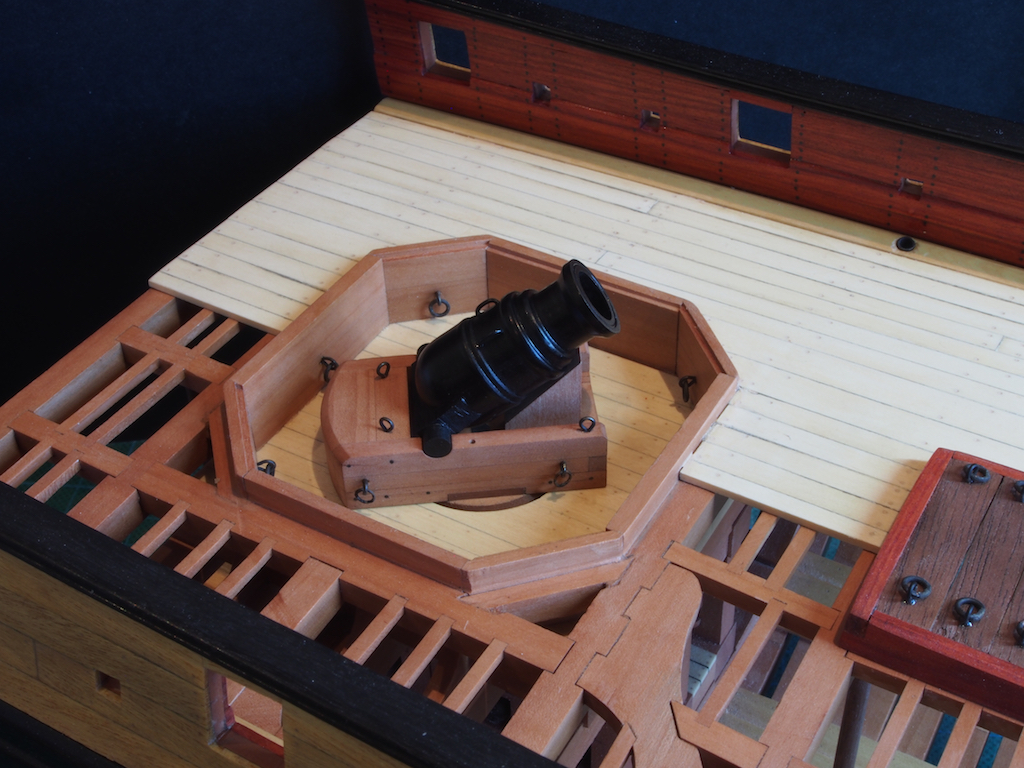
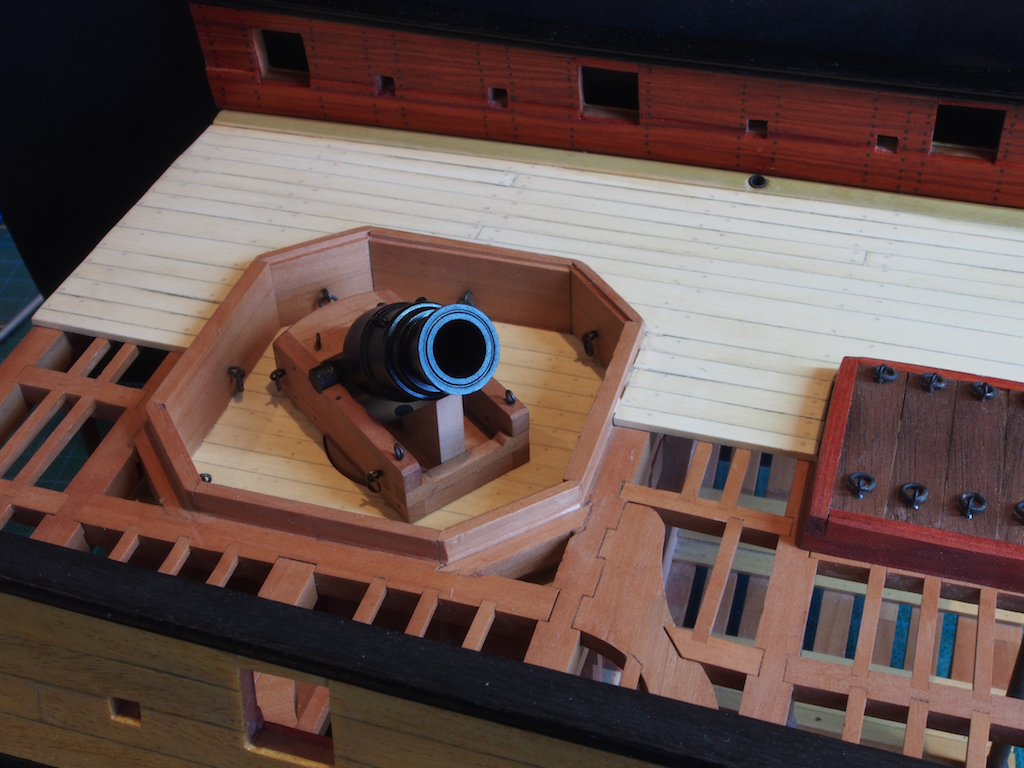
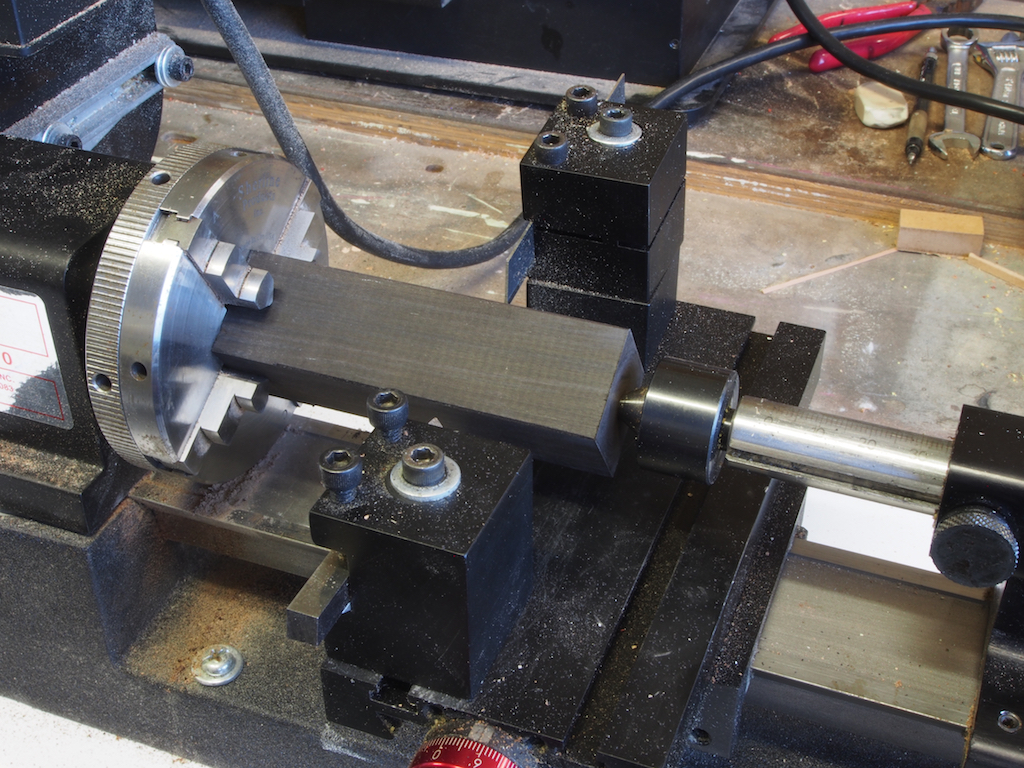
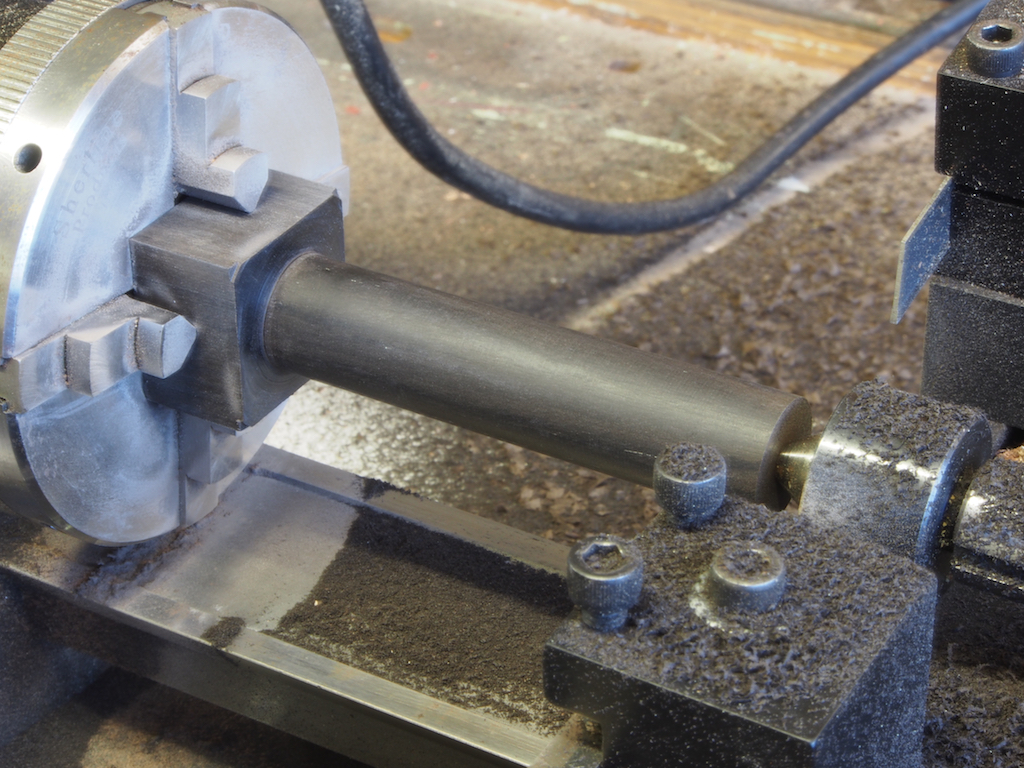
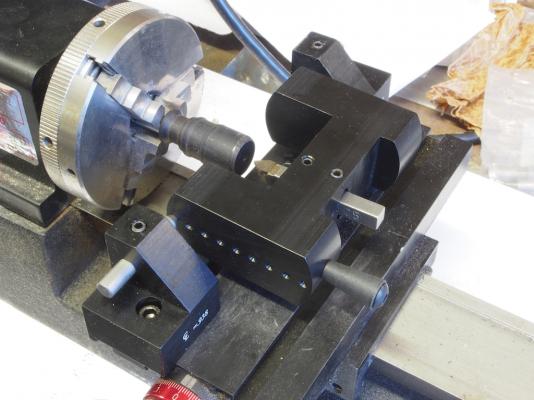
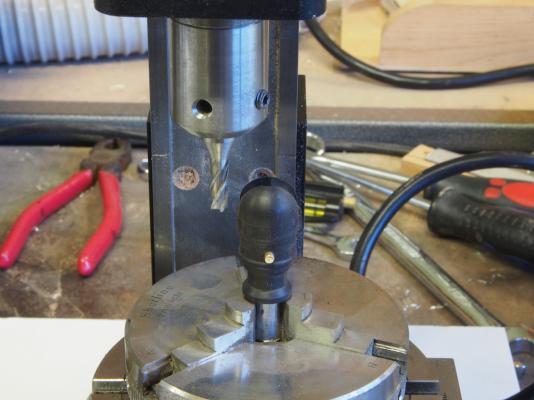
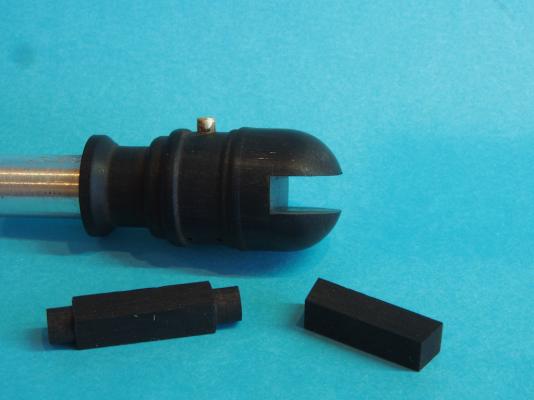
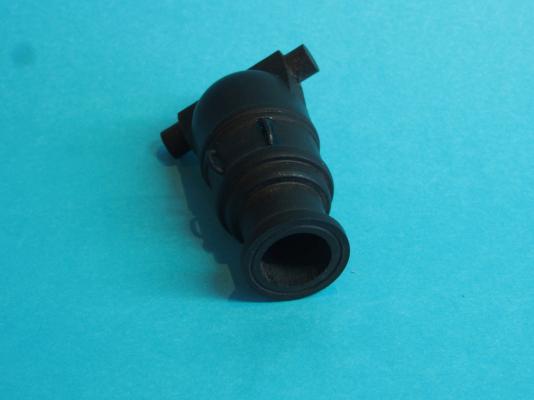
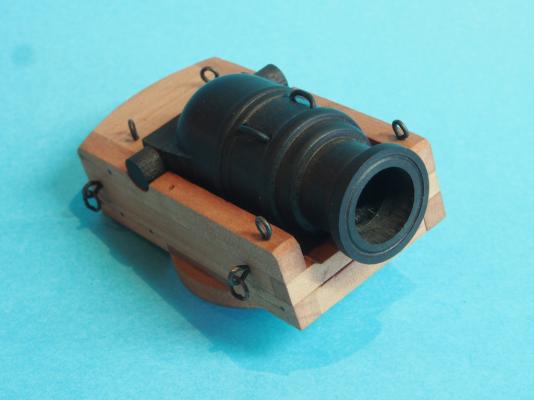
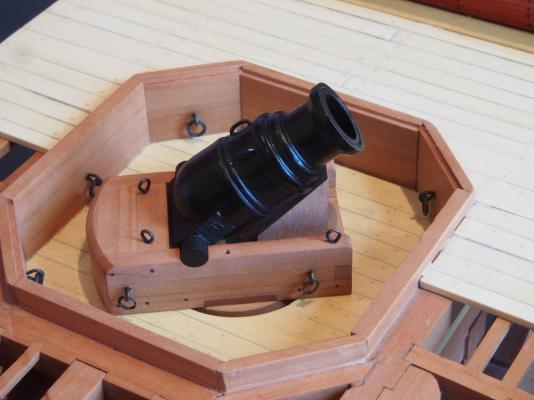
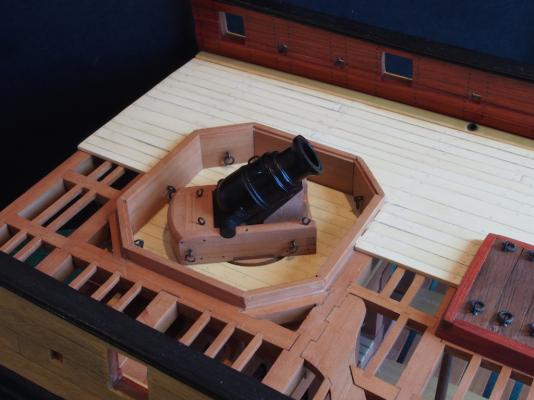
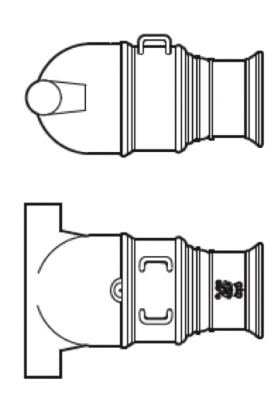
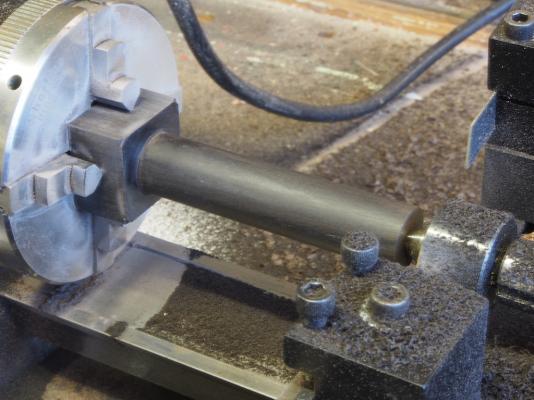
Mortar Barrel continued.... Once the barrel had been bored, it was time to part off the workpiece to its final length and shape the base end. A mandrel was then turned down from some aluminium bar stock, so that it was an easy slide fit in to the barrel, and this was then drilled with a 3/32” end mill, using the same set-up on the Mill as previously. The mandrel was then placed inside the barrel and a securing pin of 3/32” brass rod was inserted to hold the mandrel securely in place. The pin was a tight push fit, which made the whole assembly quite secure. Now it was time to break out the “secret weapon”. The base of the Mortar Barrel is a hemisphere in shape. I’d been pondering how to achieve this, when I discovered that Sherline make a “Radius Turning Attachment” for exactly this purpose. Happy days – a solution to my quandary AND a new accessory! Here is a picture of the setup, showing the mortar barrel being held in a 3-jaw self-centring chuck by the temporary mandrel. The radius turning tool is mounted on the cross slide and is quick and easy to set-up and to use. In this picture, I’ve already started to shape the end, having taken the first couple of passes with the tool. A few minutes later and voilà, a perfect hemisphere: Prior to commencing to use the radius turning tool, I had used a small centre drill to mark the centre of the end of the base. Once the radius had been turned, a 3/16” end mill was inserted in the tailstock, and a hole drilled to a depth of 5/16” – the reason will become clear shortly. With this hole drilled, the workpiece was again moved across, with the chuck, onto the rotary table on the Mill, this time mounted in the horizontal position. The 3/16” end mill was transferred to the Mill and the previously bored hole was used to index the mill table into alignment. The pin in the mandrel was used as a guide to align the barrel such that a slot could now be cut at 90-degrees to the pin. In the following picture, the slot has already been cut to the depth of the previously bored hole (ie 5/16”). The base of the mortar barrel is an interesting configuration, and includes the trunnion bar that also blends into the mortar barrel body. I elected to make this in two pieces, both from 3/16” square stock. The first piece would carry a trapezoid shape to blend into the barrel body, while the second piece would have its end turned into a cylindrical shape to form the trunnions. Sounds complex, but was really quite easy. A piece of 1/4" square stock was first re-sized to 3/16” square using the Brynes disc sander. The trapezoid shape was also achieved using the disc sander, while the trunnion bar was simply turned down on each end in the lathe. Here is a picture of the components prior to assembly: The pieces were then assembled and the mandrel and locating pin removed. The hole from the locating pin was filled by a mixture of PVA glue and some of those ebony shavings saved from the first part of the process. Two handles were made by bending a piece of 1/32” brass wire, chemically blackened and epoxied in place. Here is the final product prior to receiving a coat of Wipe-On Poly: And here it is with a “test” fit to the Turntable: The completed assembly was given a coat of Wipe-On Poly, and then posed in the firing position for a few final photos (the poly is not yet dry here, hence the slight sheen): All in all, I’m well pleased with the way this turned out. Time spent up front measuring and working out the workflow process was well invested, as was the money spent on the radius turning attachment. Amazingly, there were no re-dos in the entire process! Next up – the 4-pounder guns and carriages.


- 456 replies
-
- 37
-
-
- finished
- bomb ketch
- (and 2 more)
-
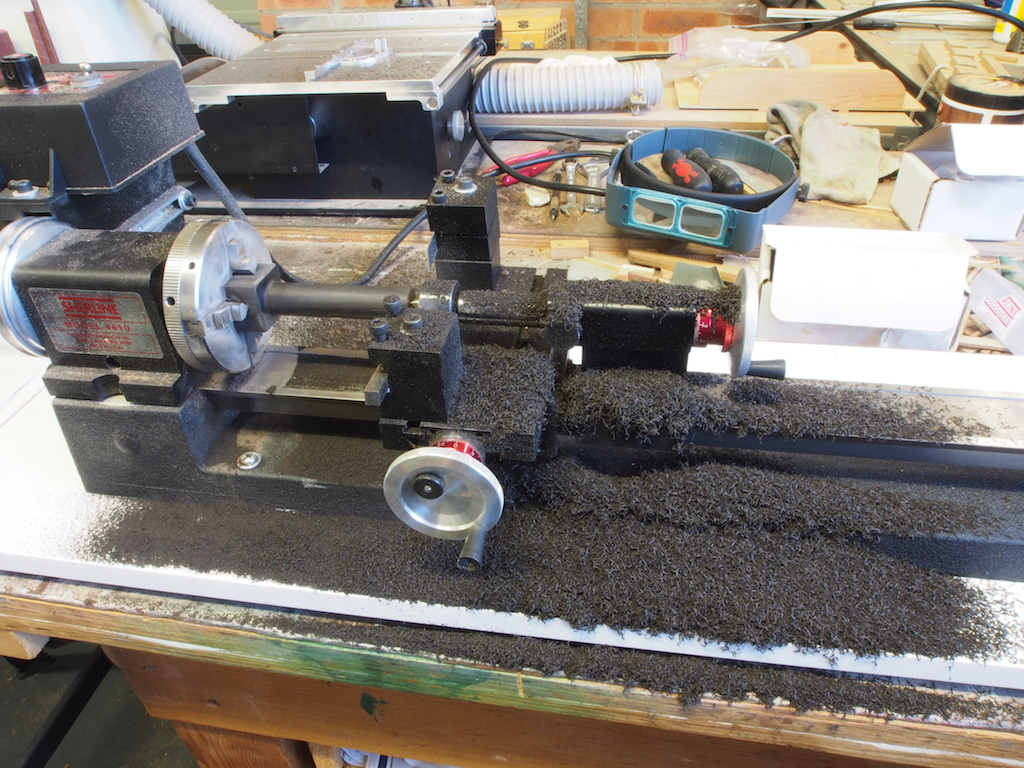
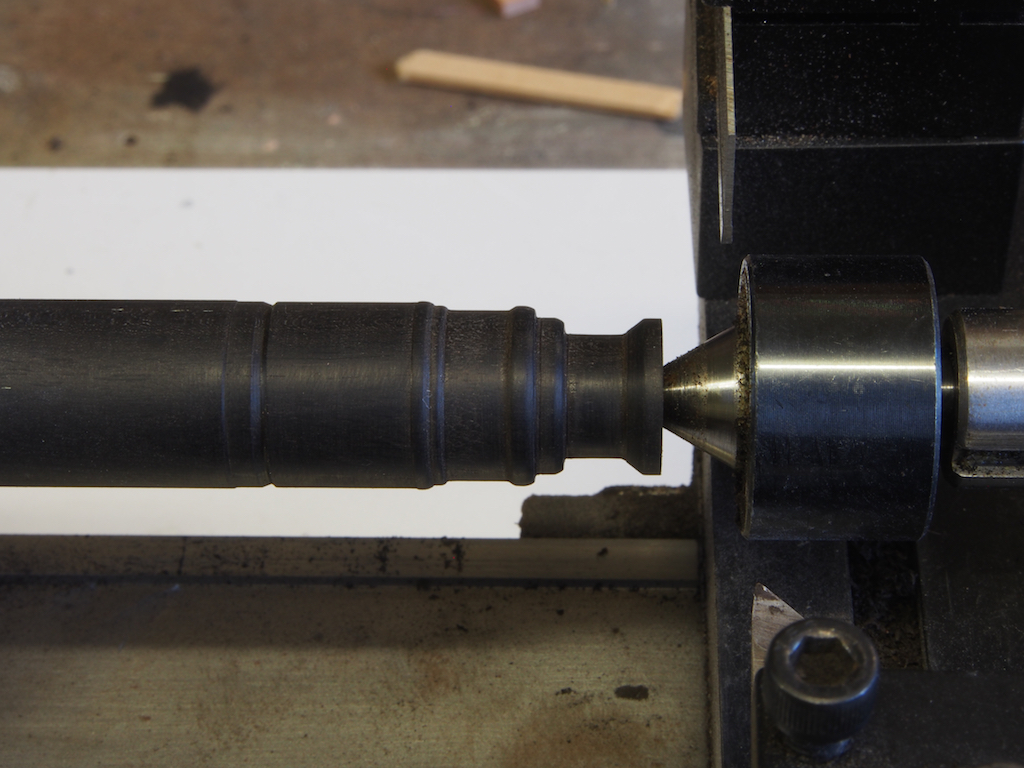
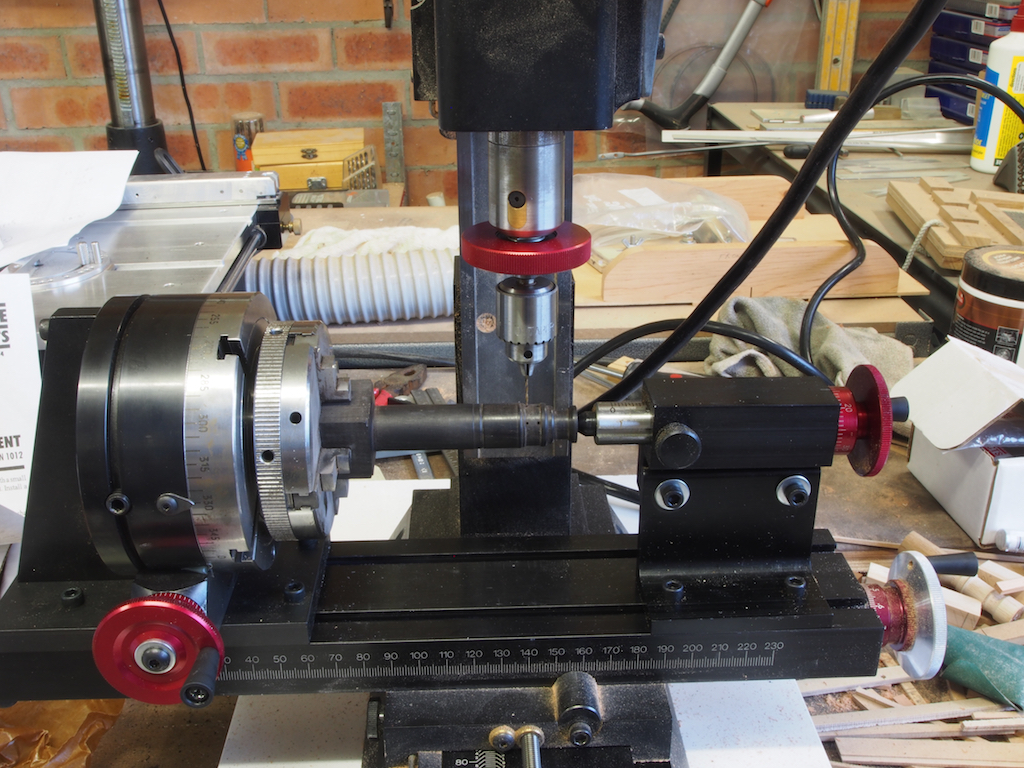
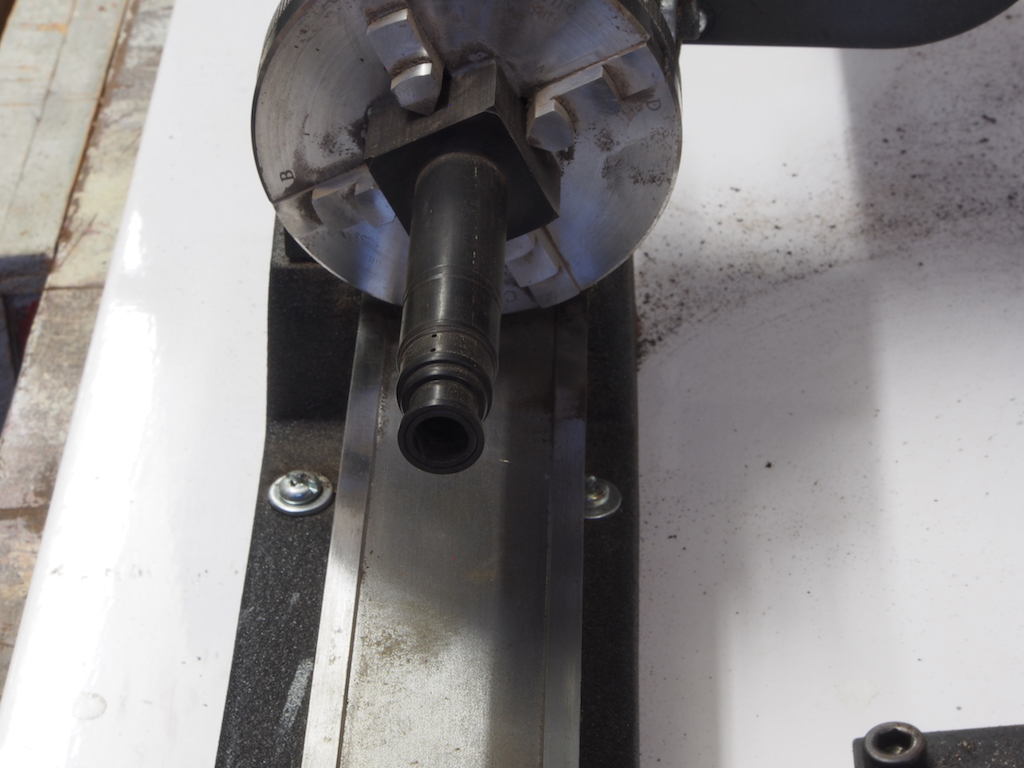
Thanks again one and all for all the encouraging comments and the "likes". Life's been a bit hectic lately, so it's been a little while between updates. I also needed to do some thinking about the next stage, as well as acquiring a new "secret weapon" (more on that later). At last, this weekend I got to spend some quality time in the shipyard and am well pleased with the results. I have completed the making of the Mortar Barrel, and documented my process fairly thoroughly in the hope that it may help others who progress down this path, or who (like me) are still novices in the world of machining. This post will therefore be in two parts. The Mortar Barrel The Mortar Barrel is another challenging but fun mini-project in its own right. I decided to turn the Barrel from Ebony, so the starting point was a 1” square piece of Ebony about 90mm long. I chucked this in a self-centring 4-jaw chuck, drilled a centre hole in one end, and mounted it with a live centre. The first job was turn the square to a round, with a diameter equal to the maximum diameter of the Mortar Barrel. Not having much experience in turning Ebony (or anything else for that matter) I used only very light cuts of about 0.25mm depth – it took a while! And here’s what was removed to allow the cylinder to emerge: Once that little mess was cleaned up, it was time to cut in the various sections of the barrel and reinforcing bands. I had spent quite a bit of time with the drawings and a ruler measuring where all of these went, and writing myself a set of step-by-step instructions to make the task easier. This paid off and all went well. I had to do quite a bit of swapping out of cutting bit from right to left hand bits, and while this is no big deal, it did illustrate the advantage of having a quick-change tool post. (Something to add to the never-ending “accessories to purchase” list!). At this point I decided it was a good time to drill the holes to take the “handles”, so the whole piece was transferred in the chuck to the Milling machine. I mounted the chuck directly onto the rotary table, which itself was mounted on a right-angle attachment. A right angle tailstock completed the setup, and we were ready to use the sensitive drill attachment, equipped with a No.67 drill bit. The rotary table was used to position two sets of holes, 60 degrees apart. While still in this configuration, I swapped out the drilling attachment for a 3/32” end mill, rotated the piece so that bottom dead centre was facing up, and drilled a hole near where the bottom of the barrel bore would be (more on that shortly). Then it was time to transfer the workpiece, still in the chuck, back to the lathe, where a 5/16” end mill was used to bore out the bore. An end mill was used in preference to a drill bit for this as it has cutting edges on the sides as well as the end, and so makes a very neat job. The bore was taken down to the bottom of what would become the mid-section of the barrel. (It was very difficult to get a decent photo of this on the lathe). Continued next post........


- 456 replies
-
- 23
-
-
- finished
- bomb ketch
- (and 2 more)
-
Nice to see your adaptation on this one Jay. I would be a little concerned about using climb cutting for this though, because of the danger of the cutting bit "grabbing" the stock and pulling it through. I agree with you on your thoughts for a hold-down featherboard (or two) of some description. I have the kernel of an idea wafting through my head at the moment. As soon as I get a bit of time, I'll have a crack at this one too.
-
Another engineering masterpiece Ian - no less than we have come to expect from you. Marvellous job Sir!
-
Your daughter is a lucky girl indeed Richard. Simply lovely work. Well done Sir!
- 45 replies
-
- 4
-
-
- yakatabune
- woody joe
- (and 1 more)
-
Thanks Frank - I suspect you're right on both counts.
-
Frank, Thanks so much for posting this. You've answered many questions and your pictures illustrate your explanations beautifully. I think I can now follow suit. One question I do have though. Do you think there would be any benefit in using a bearing on the end of your "feather board"? I'm thinking that it would hold the timber against the fence while still allowing to move freely past the end of the feather board (much like in my thin ripping guide for the Byrnes saw). Or would that just be overkill and difficult to make?
-
Nice to see an update Sherry, and what a lovely update to behold! Wonderful work.
-
A2Z Quick Change Tool Post Review
gjdale replied to jhearl's topic in Modeling tools and Workshop Equipment
John, An interesting review - thanks for sharing. Can I ask why you opted not to buy Sherline's own QCTP? -
Very nicely done Erik - neat and precise!
- 222 replies
-
- 3
-
-
- 18th century longboat
- model shipways
- (and 2 more)
-
Sorry to hear you've been in hospital Charlene and do hope that all is well now. I look forward to the continuation of your build. You're certainly in good hands with Jerry to guide you (and to make sure you don't over-do things post-hospital!!!).
-
Thanks for the update Slog. Good luck with the house move - I know just how traumatic they can be at times! I look forward to "resumption of play" once you're settled in.
-
Glad to hear that Frank! I look forward to seeing/reading about your results. It's been one of things I keep thinking, "surely there must be a fairly simple way to do this". I'm just glad that you are a little further down the path with this one. (BTW, I too have the Sherline Mill, upgraded to the 10,000 rpm pulley set).
-
Frank, Do you have any more pics of your 'router table' in action? I've been wondering how this might be possible and clearly you've solved the problem.
-
Congratulations on getting underway Tom. I'll follow along with interest too. This one is on my bucket list of builds.
-
Cutter Cheerful 1806 by rafine - FINISHED
gjdale replied to rafine's topic in - Build logs for subjects built 1801 - 1850
Looking pretty darn good from here Bob!- 525 replies
-
- 2
-
-
- cheerful
- Syren Ship Model Company
- (and 1 more)
-
Nice looking ratlines Ken. Your build is looking great!
- 440 replies
-
- 2
-
-
- niagara
- model shipways
- (and 1 more)