bruce d
-
Posts
3,046 -
Joined
-
Last visited
Content Type
Profiles
Forums
Gallery
Events
Everything posted by bruce d
-
 Eugenio, thanks for sharing. What a nice thing to pass down through the family. Very 'business-like' ships, aren't they?
- 1 reply
-
- 2
-

-
Well, fort of. The old 'S' was very much like the 'F' and it was phased out (I believe) in the late part of the 18th century. Good thing too, fome folkf could flip up on fimple fentancef. And don't get me ftarted on 'ye'.
-
This paper on the effects of lightning includes an illustration and partial description of the booms and rig of a masting hulk. rigging of masting hulk.pdf
-
- 1
-
-
This paper describes and illustrates a lightning conductor of 1770 Ships lightning conductor illustrated 1770.pdf
-
During my 'working years' I had no choice, the materials we used were metric (because the world had moved on) to make things that were designed in Imperial. There were mixes everywhere: we bought casting metal in old tons, injection moulding plastic in metric hoppers, turned components that had metric and Whitworth threads in one piece, and so on. Once I retired I found I could fiddle about at the bench using either system. Then to my surprise it turned out my head-bone worked better with metric input. I was nearly twenty before I even saw a metric measuring stick and now it is my default. The two builds currently on my benches are both very metric-centred, despite the plans for one of them (Mediator) being drawn in inches. Also, there are very few materials available here in the UK still made to Imperial standards so ... 'resistance is futile'.
-
New to PE, need suggestion about tools to fold
bruce d replied to Jsks76's topic in Modeling tools and Workshop Equipment
This is how it was done before the specialist tools were available: Hold the piece of brass PE down with a steel ruler. Align the edge of the ruler with the intended fold line. Press down and slide a scalpel under the protruding bit of PE all the way to the ruler. Now, without relaxing the pressure on the ruler, twist the scalpel. Stop at 90 degrees. You have folded the PE. If you need to go further than 90 degrees, remove the ruler, place the scalpel inside the bend (where the ruler was) and use the ruler to push the PE as far as it needs to go. The ruler should be standing on edge and twisted, much as the you did with the scalplel, and just rotate it down onto the PE. It works. Practice on a bit of scrap, concentrate and be aware stainless steel PE (not common anymore) will need more force. I have made thousands of bends like this, large and small. -
Hello from Kansas City (Kansas side)!
bruce d replied to GGibson's topic in New member Introductions
Hello Greg and welcome to MSW. Sounds like you are well on your way, enjoy the journey! -
Dave, I have a stack of the stuff you are welcome to if you are still stuck. Let me know. Otherwise, I suppose SpyGlass and I can start a shipyard? We'll be rich!
-
This is a great subject. Mind if I watch?
-
... but you are correct and it is surprising that this point was not picked up earlier. I have a nice painting of Beagle on my wall and yet I hadn't thought of it.
-
Like the side-by-side demo, thanks.
-
Hello Rachel and a warm welcome to the MSW family. An unfinished project to tackle? You will find many people here with that experience and, with a bit of luck, you will find advice and encouragement here to get it going. Can we look forward to a build log? Regards, Bruce (Wish I had a sample of your SoCal weather, it is chilly here)
-
Title: Models of Ships and Boats by Reisner, George Andrew, 1867-1942; Egypt. Maslahat al-Athar Published in 1913, studies of artifacts. Models of ships and boats EGYPT.pdf
- 1 reply
-
- 3
-
-
Hello Pete and welcome to MSW from frosty Sussex. I believe your background will sound familiar to many here. Hope to see a build log and find out which Pickle you got. Regards, Bruce
-
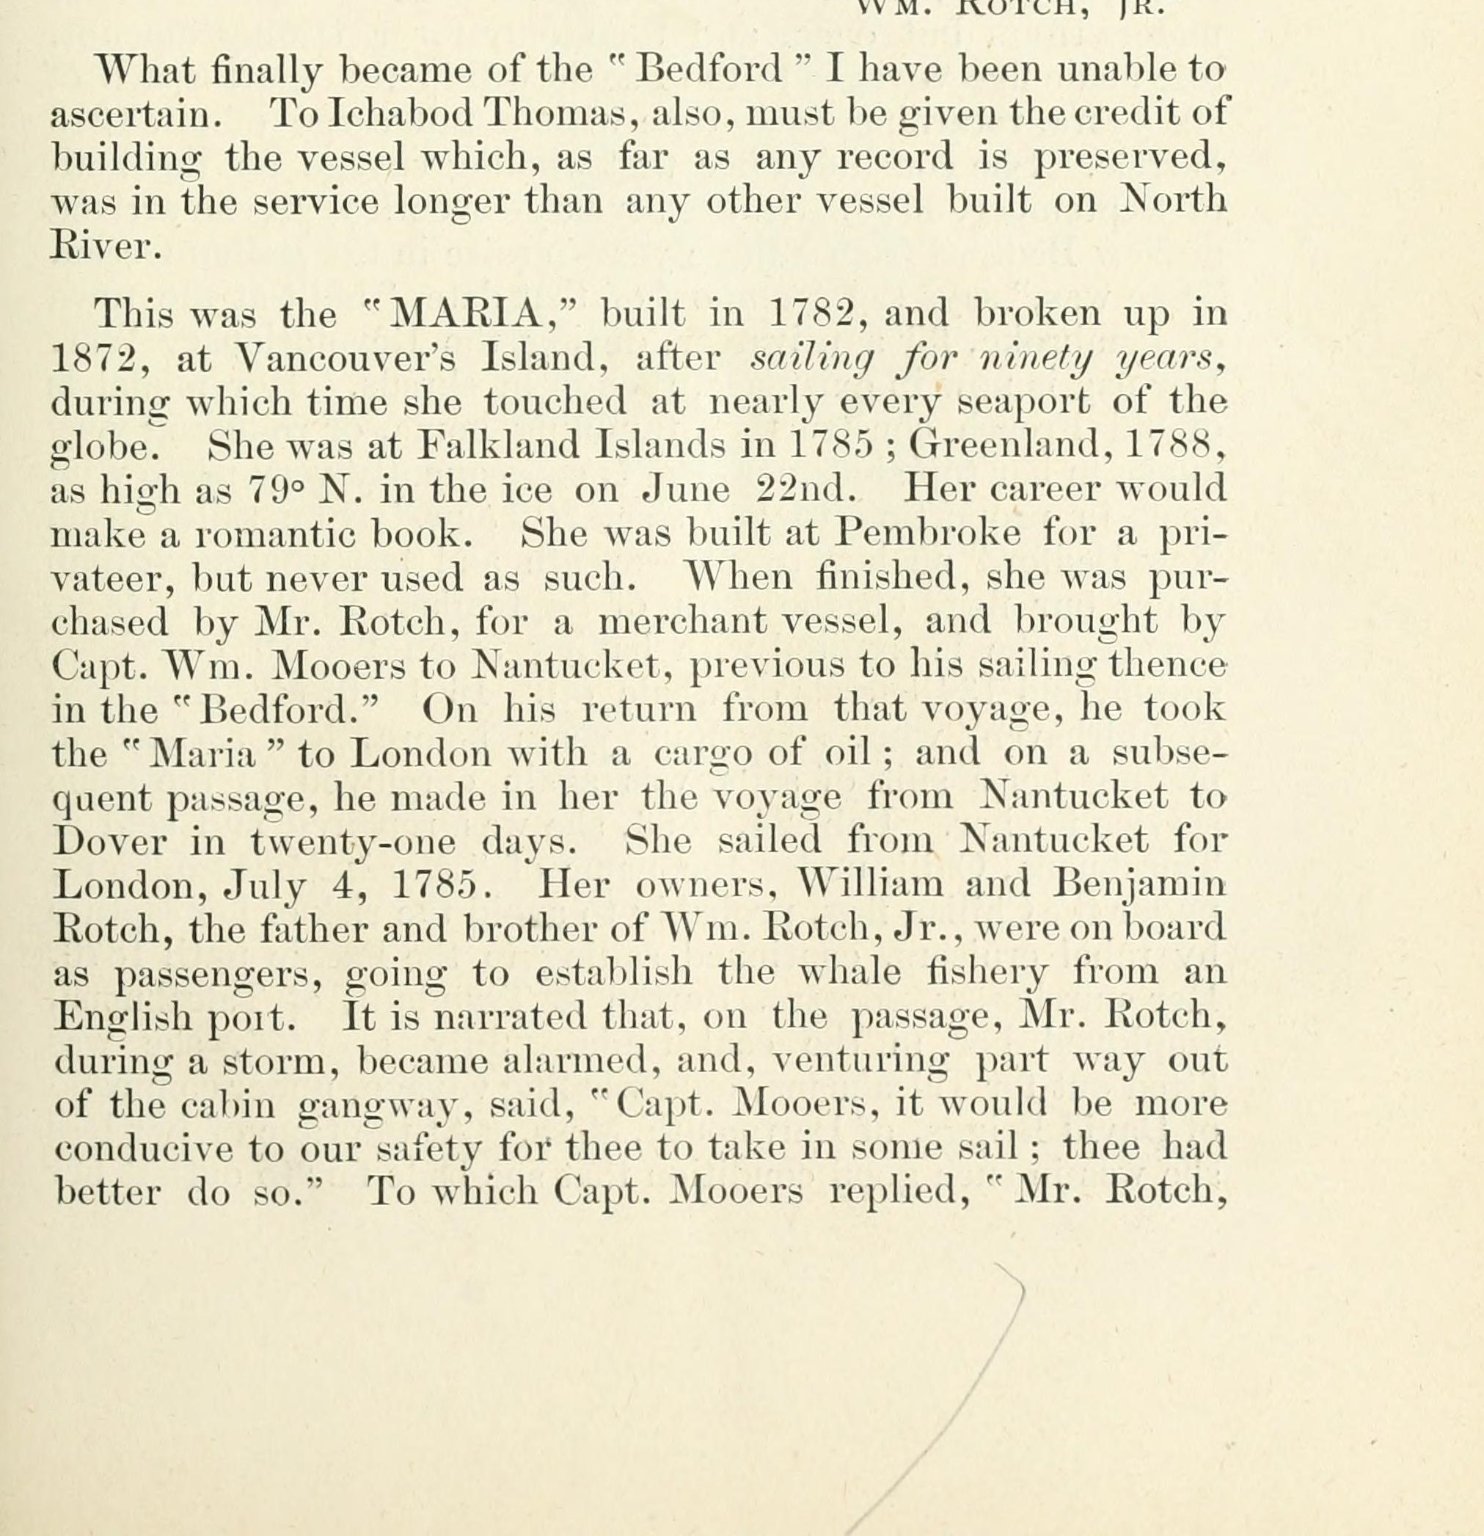
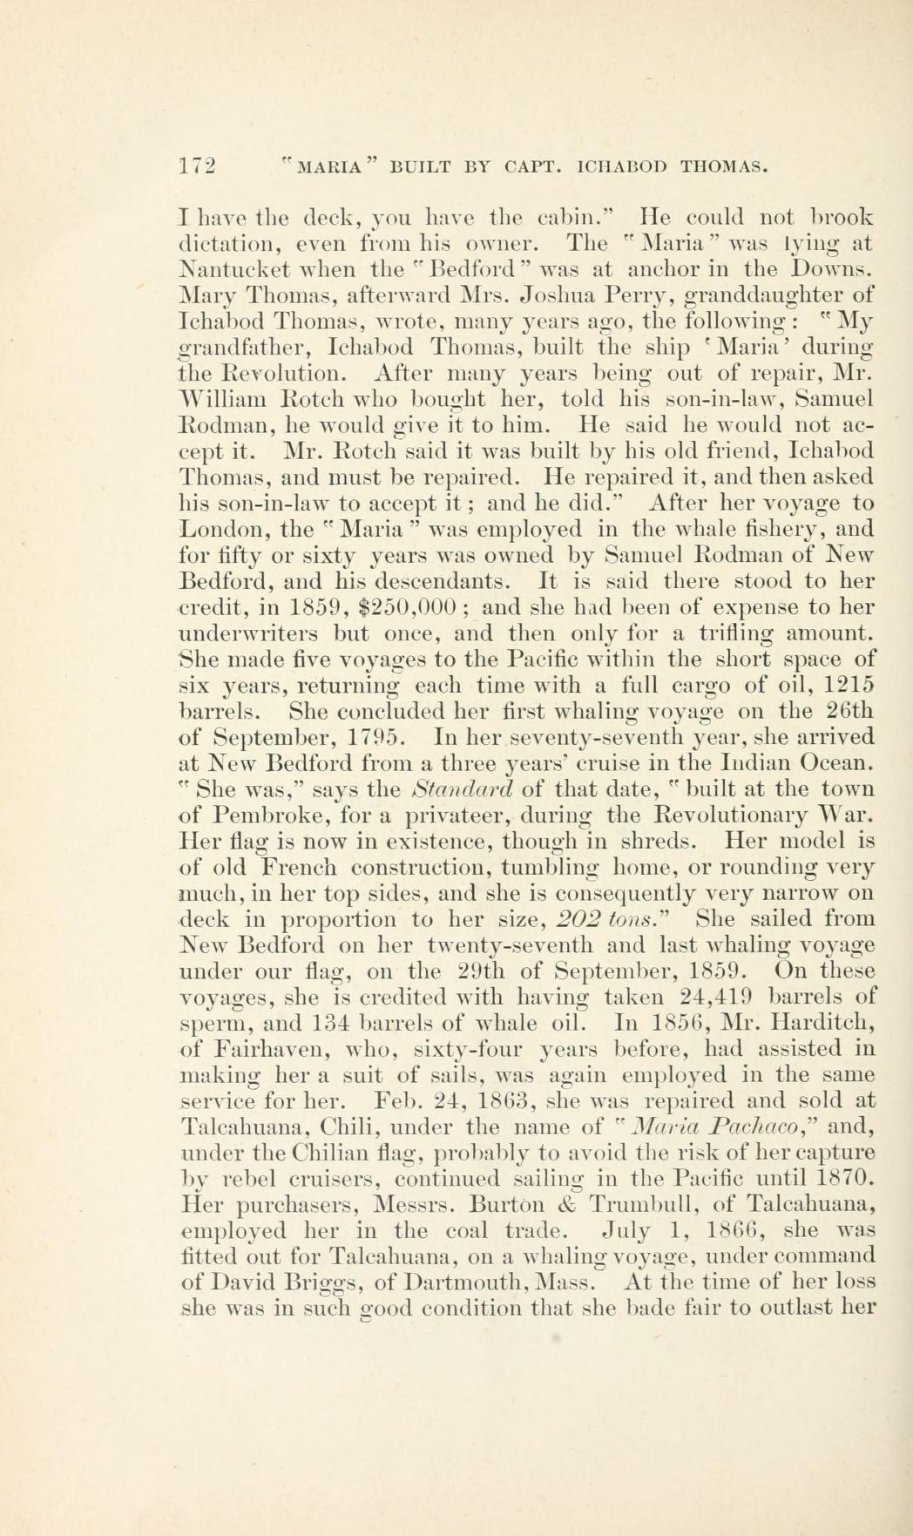
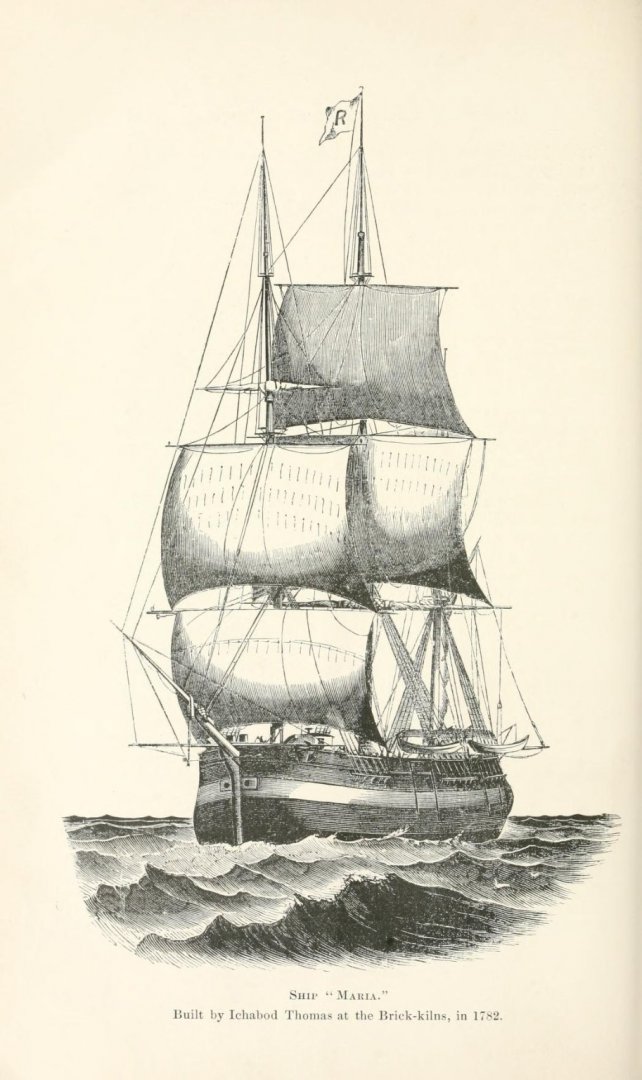
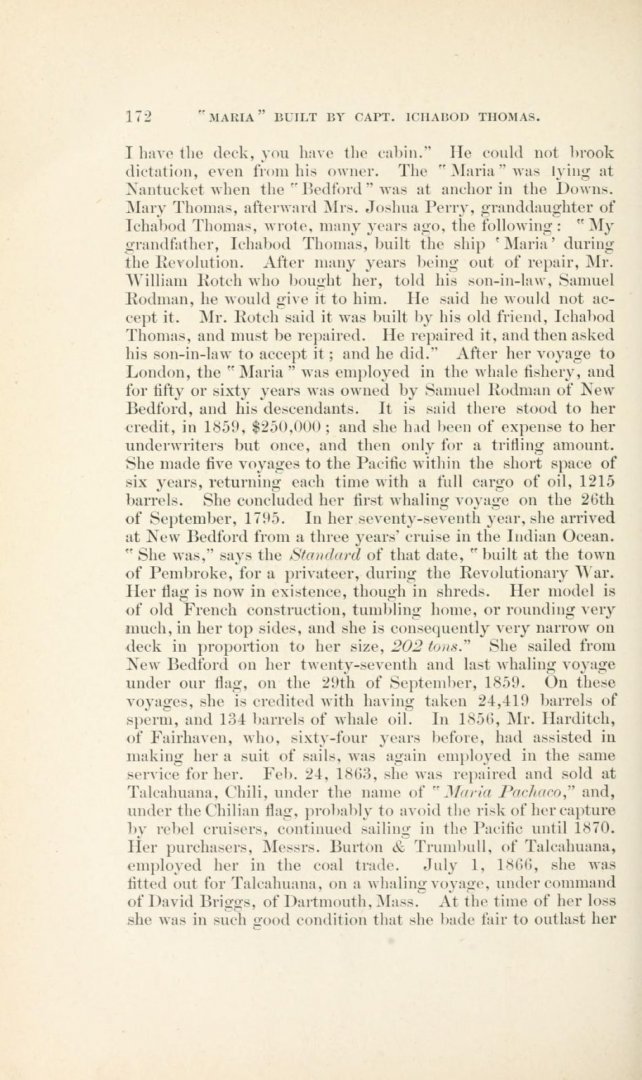
From "History of shipbuilding on North River, Plymouth County, Massachusetts" by Briggs, L. Vernon (Lloyd Vernon), 1863-1941 This picture of 'Maria' is appealing in part because of the way it portrays the handling of ships' boats. It has an interesting (at least to me) history which I include, but be aware I have done no fact-checking.


-
- 2
-

-
Hello Tim, Welcome to MSW from a chilly part of Sussex. Hope that shed at the bottom of the garden is heated and draft-proofed!
-
Doris, I am so sorry to hear your sad news. You have made a beautiful model. He would be proud of your strength and I am sure everyone here feels the same. Best regards, Bruce
- 1,035 replies
-
- 4
-
-
-
- royal katherine
- ship of the line
- (and 1 more)
-
Sutcliffe 1/72 vac form Coronado
bruce d replied to Lucius Molchany's topic in Non-ship/categorised builds
Aha! I was really hoping you would go with tri-colour, it is going to look fantastic. Very cool. -
Hi, I'm Neil. Gonna scratch build Orca from Jaws.
bruce d replied to neilm's topic in New member Introductions
Hello Niel and welcome to MSW. I hope you do a build log, there are lots of detailing and display possibilities with Orca! -
Very nice model, Jean-Paul, you did a good job. I will be consulting this log when I restart my Mediator, the finish you achieve is great.
- 164 replies
-
- 1
-
-
- first build
- model shipways
- (and 2 more)
-
Firstly..Happy New year everyone 😃😃
bruce d replied to Capt. Jack Sparrow's topic in New member Introductions
Hello Geoff, Happy New Year and welcome to MSW. Make yourself at home, rummage around the build logs and see what others have done. Welcome aboard. -
Hello Freebird, can I ask which country you are in?
- 310 replies
-
- 2
-
-
- cheerful
- Syren Ship Model Company
- (and 1 more)
-
Hello Pete, welcome to MSW. Why not post a message in the 'New Members Introduction' thread? That will draw attention to your project and allow you to get a few 'heads up' comments on your build. Looking forward to hearing how you do with Pickle. 😊
-
Jobbie, Looking good. Mind if I watch over your shoulder?