
HOLIDAY DONATION DRIVE - SUPPORT MSW - DO YOUR PART TO KEEP THIS GREAT FORUM GOING! (Only 44 donations so far out of 49,000 members - C'mon guys!)
×


BANYAN
-
Posts
5,938 -
Joined
-
Last visited
Content Type
Profiles
Forums
Gallery
Events
Everything posted by BANYAN
-
 Great present Dave, you will have plenty of fun with that. cheers Pat
- 962 replies
-
- 4
-

-
- sovereign of the seas
- ship of the line
- (and 1 more)
-
That's a heck of a lot of work very nicely done Dave and should make into very nice boats. Thanks for sharing your info and efforts; much appreciated. cheers Pat
-
Hi Dave, that is one model to be very proud of, especially haven taken the plunge into carving - I have yet to take that challenge so I dip my hat to you! I found the clean building table nice for a day or two but had to get on with something, even piece-meal, after a week or so; the club's build (HMCSS Victoria now has pride of place but I have yet to do much Enjoy the break and have a safe and happy festive season. I very much look forward to your "Connie"; ast 1:50 that will be a great scale for you to add detail. cheers Pat
- 962 replies
-
- 6
-
-
- sovereign of the seas
- ship of the line
- (and 1 more)
-
That's looking very good Sjors, a really nice model of Aggy; ...... and many thanks for your consideration - two photos for two eyes - let it be known that I am not a one-eyed critic I am also intrigued, what is that clipped/fixed to the main mast (or is it just a perspective thing with the photo and it is not attached? cheers Pat
- 1,616 replies
-
- 5
-
-
- caldercraft
- agamemnon
- (and 1 more)
-
Nice job on those flags Dave; they look great. The model looks superb with all its livery. cheers Pat
- 962 replies
-
- 4
-
-
- sovereign of the seas
- ship of the line
- (and 1 more)
-
That is a very fine and clean job on the coppering Jason, I especially like the 'touch' of the nails in the batten. Very nice work indeed! cheers Pat
-
That looks very good Dave, just the right amount of detail. cheers Pat
- 962 replies
-
- 7
-
-
- sovereign of the seas
- ship of the line
- (and 1 more)
-
Hang in there Denis; it will be worth the frustration of construction in the end and provide some more lovely detail! cheers Pat
-
A bit of dust just adds a great patina Sjors; adds to the intrigue We can wait (but not for too much longer ) cheers Pat
- 1,616 replies
-
- 6
-
-
- caldercraft
- agamemnon
- (and 1 more)
-
Crikey Greg, that is something else - great work. All those long hours with fiddly repetitive work are showing their fine results. cheers Pat
-
Gun Port Lids
BANYAN replied to wq3296's topic in Discussion for a Ship's Deck Furniture, Guns, boats and other Fittings
Hi Pete, again you touch on something I have found in researching HMCSS Victoria. Take a look at page 61 of Rudiments of Naval Architecture.... by James Peake (1851). It is a Google Book free to download as a PDF. Unfortunately, only a line drawing of it, with a supporting text description, but may be of interest? Victoria was fitted with Lang's Scuttles (mentioned on the same page) which removed the need for the Illuminator. The description of the illuminator reads: "Illuminator for light when the port lids are down". So basically just a round glass filled opening Lang's scuttles were conical shaped lumps of glass fitted on the end of a threaded rod, which could be wound in and out of a similarly shaped hole in the hull that would allow light in when open or closed. When open, air could come in around the cone (smallest part outboard). In the Victoria, the size was 5" diameter. As to the opening question - on the same page of this reference (valid in 1851) Peake states: "On the upper deck of line-of-battle ships, and main deck of frigates, the ports are in two parts; the lower one hung with hinges on the lower part of it, called a bucklar, and the upper part a half port to put in by hand". This would imply even in the 1850s, gun port lids were being fitted to the open decks of vessels? cheers pat -
Bad luck with those splices John; not enough tucks? Another milestone completed and shee is looking good! Look forward to seeing all those little details appear. cheers Pat
- 745 replies
-
- 3
-
-
- francis pritt
- mission ship
- (and 1 more)
-
Great idea and good results. Thanks for sharing. cheers Pat
-
Nice technique with soldering that ring into place Michael. cheers Pat
- 749 replies
-
- 4
-
-
- albertic
- ocean liner
- (and 2 more)
-
Cal, they would also have to be specific to the period of the ship you are modelling - best bet may be to make them yourself? Plenty of guidance and How to in the various logs and some plans in the database. cheers Pat
-
HMCSS Victoria 1855 by BANYAN - 1:72
BANYAN replied to BANYAN's topic in - Build logs for subjects built 1851 - 1900
Sorry there has not been an update for a little while, I am back at the PC drawing up the plans, and continuing the research. I am going to have to ensure a quality build noting the experience and abilities of the build followers cheers Pat- 1,006 replies
-
- 4
-
-
- gun dispatch vessel
- victoria
- (and 2 more)
-
Congratulations Russ; she looks absolutely grand! I am sure the client will be very thrilled with this model. cheers Pat
-
Wow what a comeback Glenn, I had been missing your updates. Those skylights are stunning. I will be making some for my Victoria project in the coming year and wish I had CNC. I have the mill but I don't think I would use CNC enough to get value-for-money; may need to investigate a little further noting the great results you achieve. You truly are the master of metal; those 'charley nobles' look great, and a neat construction technique. I am learning so much from following your build log; many thanks! cheers Pat
-
A Lorch Micro-Mill that never was ...
BANYAN replied to wefalck's topic in Modeling tools and Workshop Equipment
Now that you have almost completed your prototype, I'll send over my 'Lanco' for you to adapt Very nice work Wefalck; that will be a very useful mini-machine and a fine addition to your wonderful workshop. cheers Pat -
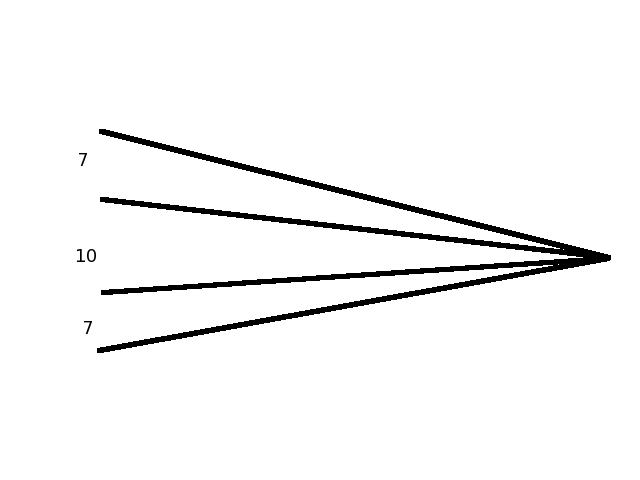
JT here is a rough copy of such a fan someone posted on this site I think (sorry cannot recall who). These are the proportions by which to reduce square stock to get an octagon (the 10 is the meat that remains). Simply place the square stock on the fan so that the edges of the stock meet the outer edges of the '7' fan lines, then mark the wood with the other lines. The lines should be ruled with a straight edge back towards the centre to reflect the angle of taper rquired. For some yards, not direct to the centre but to the point of transition from straight octagonal to taperered round. These then give you the guide lines to which you reduce the square stock with plane, chisel, file or.... Note: the square stock should be reduced to the appropriate thickness before starting, such that the width of the meat [10] ends up wide enough, that after rounding, is the correct diameter of the round - this takes a little calculation. Always better to err on 'bigger' so that you can reduce; harder to add Once you have the round, even in taper, it is relatively easy to maintain it with further sanding. cheers Pat
-
Go on Mike; serve them. If you have taken the time and effort to get it historically correct so far, you might as well get the rigging right to? It's not that hard once you get your jig/server up and running . You will get much more satisfaction from the fact you know it is correct. cheers Pat
-
Adapting what we have in accordance with our skills is the key Dave - I see a very nice capstan cheers Pat
- 962 replies
-
- 4
-
-
- sovereign of the seas
- ship of the line
- (and 1 more)
-
Nice work Michael, those stays especially are looking very good. cheers Pat
- 749 replies
-
- 4
-
-
- albertic
- ocean liner
- (and 2 more)