

Gregory
-
Posts
3,079 -
Joined
-
Last visited
Content Type
Profiles
Forums
Gallery
Events
Posts posted by Gregory
-
-
7 hours ago, DaveBaxt said:
That sounds like a good way to do this but could be a little tricky as I have already fitted sections for strengthening
When I described extra bulkheads, they don't have to extend to the backbone like the original framing.

All you are looking to do is fill out the outer profile to provide a surface for planking. Just add what amounts to shims
to the edges of the existing bulkheads. Create as many layers as you feel necessary. It is a lot like adding blocks, but laminated so
you can reduce the amount of shaping needed.
-
-
On 6/6/2021 at 12:04 PM, glbarlow said:
Normally I replace kit rope with Syren products but that is no longer an option and I have little interest in making my own.
I'm going to toss this out here..
I can make what I feel is very acceptable model rope.. However, I do not think I want to go into the model rope making business..
If someone has a particular project, with details in color and size, I would enjoy working with them to provide the rope they need.
The cost would basically be postage and materials. I do not have the space to create 20 foot lengths like Syren used to do.
It would be more in the 4 to 5 foot range.
Of course, I could provide as many 5 foot pieces as someone might think they need.
I never made anything for my own use that was more than a couple of feet. No one line in a project was ever longer than that.
Send me a message if you would like to discuss this or get a sample..
- KentM, Ryland Craze and mtaylor
-
 3
3
-
The gun ports outside the forecastle and the quarterdeck are on the weather deck. Port lids would serve no purpose..
- Old Collingwood, chris watton, KentM and 1 other
-
4
-
-
-
11 hours ago, druxey said:
If you absolutely want to pounce at scale, use watch gears.
Like these:

-
-
-
I'm reminded of:
" Are you building a model of a ship or a miniature ship ? "
Taking Jaager's comments a bit further:
New Copper Sheathing ( Constitution )
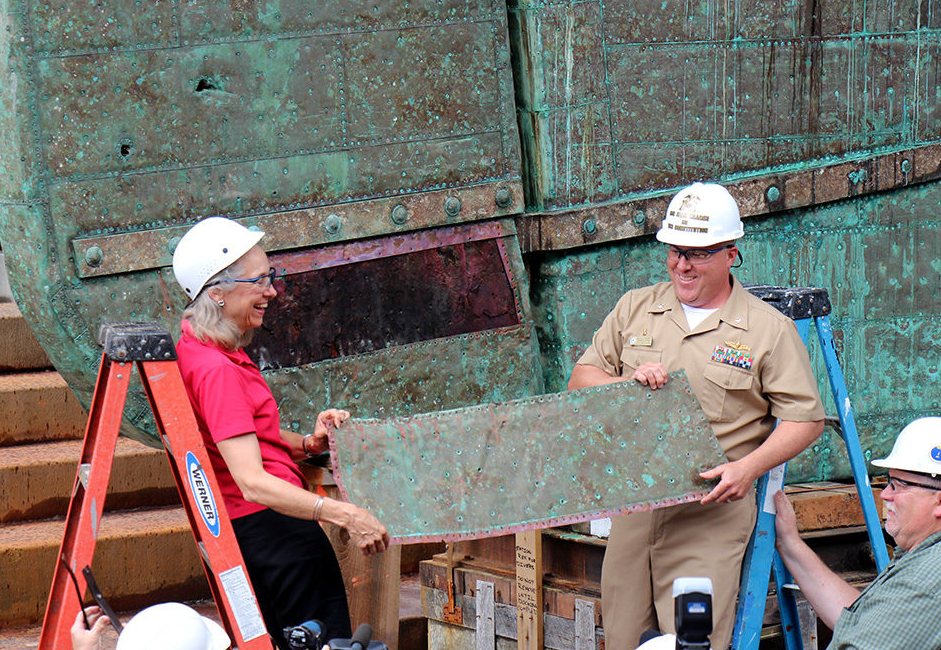
Nails barely visible..
-
-
-
-
Looking forward to your build..
You have several months to ask questions and prepare.. Don't wait till the build starts..
I wish more members would ask questions like you have during your Bounty build..
-
-
Any plans for your next ship?
-
-
On 3/15/2020 at 10:02 AM, wefalck said:
The problem is that the cutting software does not allow to superimpose images,
Have you seen LightBurn
It is a very robust cutting program with layer support. it supports many different controller boards.
It has limited editing features, but You can import multiple images and align them very precisely on the cutting grid.
It also has a very good tracing tool for defining cutting outlines of objects that are not vectorized.
-
Have you tried contacting the SS United States Conservancy?
-
I have had both of the kits Chris mentions in my possession, but didn't manage to build either one, so I don't know how valuable my opinion will be.
You can see looking from the builds that the BJ kit is POF and offers more options for finishing such as showing exposed framing.
The main parts are CNC and require a lot of finishing. A lot of detail requires fabrication, and most of the wood is bass, so if one does not want to do a lot of painting, they might choose to acquire some. after market wood. The instructions and plans are first rate.
I decided the kit was above my skill level at the time, and sold it.
The Mamoli/Dusek kit is fairly typical European, double planked, POB.
The plans are good and the instructions minimal.
The lines and deck layout match real well with several different drawings I have seen.
There's a companion way added that I haven't seen on any of my other references , so let me know if you are interested and want more detail.
It has a lot of useable metal fittings that clean up well. There use to be a sewn sail set available that didn't look too bad.
I don't know if you are familiar with the Mamoli " coppering " approach, but they include little green wood tiles as a solution. If someone were interested in producing a model with a " folk art " look, they would be worth considering. Otherwise it should be easy to use aftermarket copper tape or tiles if you want to copper.
Life got in the way of me proceeding with the kit, and my infatuation with America waned, but it is something I would consider again after I get some other projects out of the way. I would choose Mamoli over BJ, because of building method.
I take it you have looked at the Mamoli builds here at MSW.
I know the new Dusek released kits have laser cut bulkheads so it may require less fiddling now.
Let me know if I can help with any other info.
P.S.
I just looked at the new Mamoli/Dusek kit at ModelExpo , and they have added some PE parts and a roll of copper tape.
Should make for a better build.
-
-
A retired LT ?
- Keith Black, thibaultron and JRB
-
3
-
I think I need a picture..
-
I'll be the first to say Chuck's method is far superior to mine because it makes the planks lay flat on the bulkheads..
I only offered my flat bend as an example that does not benefit from extended soaking, steaming or boiling which is sometimes offered as a workable method.
I might use it for a couple of planks high up on the bow, but once the form requires bending in 2 dimensions, Chuck's method rules the day..
Dying/coloring rope; sources for purchase of quality rope
in Masting, rigging and sails
Posted
I'm revisiting this in response to the original post.
There was a discussion about staining/dyeing boxwood where it was agreed boxwood doesn't take some stains very well. One or more people mentioned dyeing with an alcohol based stain.
I proceeded to get some Fiebling's dark brown shoe dye to experiment. It actually worked pretty good to make my boxwood blocks darker.
I had thought, and mentioned above, that I didn't think synthetic/polyester would take dye very well, with the idea that it was like trying to dye plastic and wouldn't stick.
Well, I was wrong.
On a whim, I dyed some of my home made polyester rope with the above mentioned dye and it really worked pretty good.
Top is before, bottom is same rope dyed. ( Please ignore the unravelling.. That happened before I baked my rope.. )
Getting the color you want could take a lot of experimenting, and have a lot to do with the color you start with.
For home rope makers, I see it as a way to avoid getting different colored thread for standing and running rigging..
Find a good light color you like for running rigging, then dye it dark for the standing..
Note: The dye can be very messy, but it cleans up pretty easily with alcohol, depending on how long it sits before you get to it..