

Gregory
-
Posts
2,738 -
Joined
-
Last visited
Content Type
Profiles
Forums
Gallery
Events
Posts posted by Gregory
-
-
Quote
The 'chucklike' rabbet as shown by Gregory will takes a bit of trial and error in this case, as in his example the planking sits at almost 90 degrees at the stern, in the case of this ship, the planking has an angle of 40 ? degrees.
No trial and error.. It stays the same from front to back
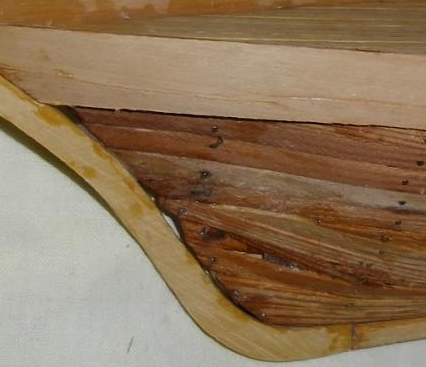
Using the rabbet strip, at the stern, the bearding line is made flush with the rabbet strip..
( GBarlow's Cheerful )
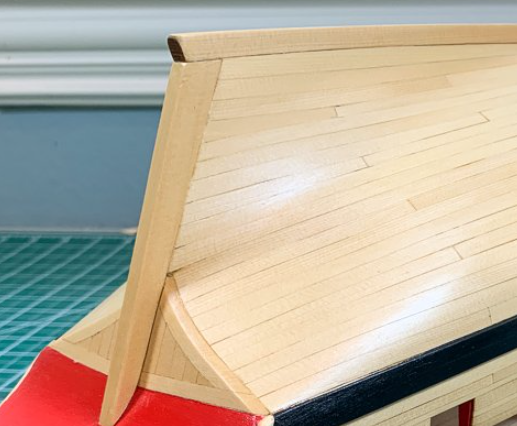
At this point, very little, if any of the thickness of the planks has been removed..
At most a small amount of beveling on some edges.
( Thanks to Glenn for providing a lot of detail in his build log.. )
-
1 hour ago, amateur said:
I guess that you making things overcomplicated:
I guess a lot of our members feel that it is complicated, because we get a lot of questions about these things..
That is why we depend on the more experienced members like yourself, to give us ideas that have worked for us..
AL might have a good method but they do not give detailed instructions that would provide a nice looking outcome..
Rabbet and bearding line do not seem to be part of their vocabulary, but are essential to well finished planking on ship models.
- DispleasedOwl and mtaylor
-
 2
2
-
Do you plan on offering the gun carriage jig in the store like you did for the grating jig?
-
17 hours ago, Ron B said:
Has anyone made a 2 or 3"diameter home made disc in order to fashion a decent size sander for shaping pieces.
If you want to try something just use the Dremel mandrel and cut out your own with some kind of rubber backing..
I don't think you will find anything ready made that is very robust..
-
29 minutes ago, DispleasedOwl said:
As for the rabbet, in a model in which the keel comes separate from the main body (skeleton) of the ship, do i need to carve out the keel pieces, place them and then insert the planks in the rabbet (left drawing), or do i sand down the keel pieces into a V shape and place them on the planks (right drawing)? Let me make a rought drawing in paint to show you what i mean.
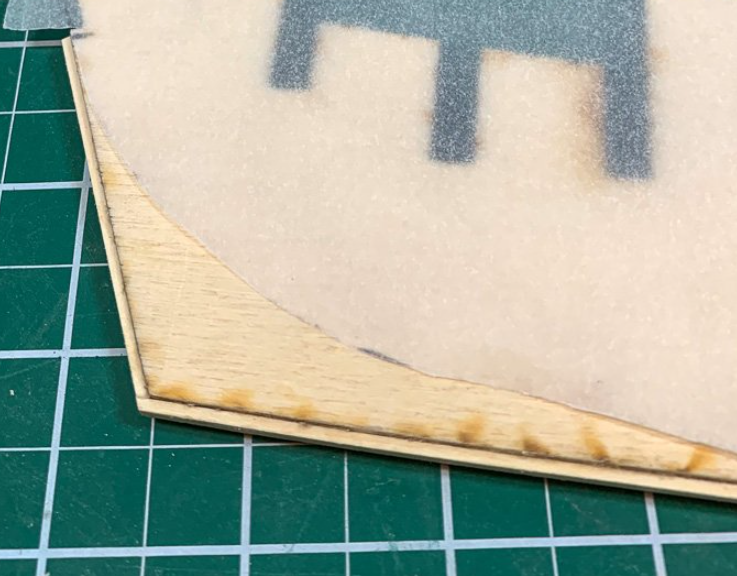
Here is something that works really well for most kits, and should work in your last example, with a back-bone type keel, where you add the separate keel, and stern post:
You add a 1/16 ( smaller or bigger depending on the size of the model ) square strip along the center of the piece.
As seen here on Chuck's Winchelsea.
This serves as a groove in which to fit your planks, and serves the same purpose as the rabbet..
It only adds a fraction to the dimensions of your model and should not cause any problems, while making the fitting of the planks easier and better looking..
So, instead of something like this:
You get something like:
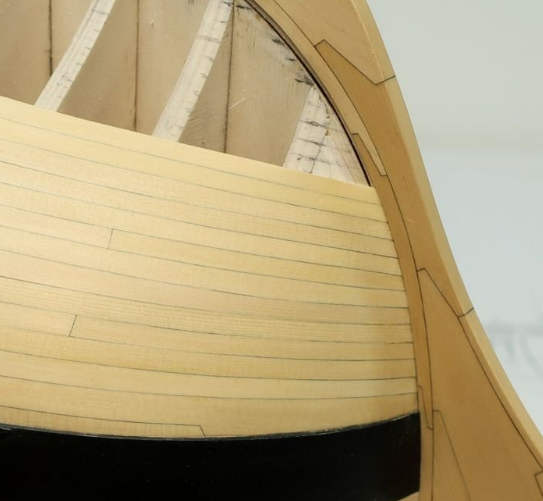
This!
Gregory
- allanyed, DispleasedOwl, mtaylor and 1 other
-
4
-
-
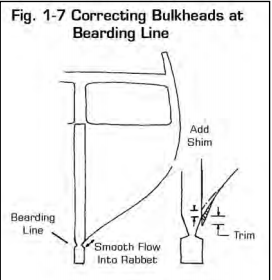
On the models where the planks appear to fit flush there is a sort of groove called the rabbet, and the edges of the planks are inserted into this groove.
At the stern , there is a recessed area called the bearding line, where the framing is recessed to be less than the thickness of the sternpost and keel so that the planks are flush with the sternpost and keel.
Most kits don't provide this detail, and you have to add it as you go along. At this point it would be difficult to add to your model.
In the future you will need to access some of the planking guides here at MSW..
Here is a simplified illustration of the bearding line and rabbet..

- DispleasedOwl, LyleK1, mtaylor and 1 other
-
4
-
If it comes loose it is because there wasn't a strong bond to begin with.
A good bond with CA depends on both surfaces being rough or porous.
If either surface has paint or varnish that is smooth, it will not bond well, except to the paint or varnish, and will separate easily taking the paint or varnish off with it.
1.
A good CA bond should last many 10's of years if not indefinitely. It forms a layer that is essentially plastic between the two surfaces.
2.
You could have used epoxy, it tends to adhere to non-porous surfaces better than CA. However, if used on finished surfaces, it can break apart, taking the finish with it.
Quote3) On old ship models, such as Admiralty models, how were gun carriages and other such "loose" items held in place?
The pieces may have been fastened with hidden nails or pegs.
- Smile-n-Nod, mtaylor and Canute
-
3
-
I hope you will excuse me to ask a question, but are the drawings for your stem pieces from the Hahn drawings?
I am curious as to piece number one and the gammoning slot.
It seems that the long horizontal joint would have been a weak point considering the forces present from the gammoning.
I have seen a similar configuration on another Hahn design for Rattlesnake..
I am certainly no expert, but other plans I have seen would have the gammoning slot in a piece that extended deeper vertically into the stem.
Perhaps someone with more knowledge than me could shed more light on this.
-
There is a reason it's so expensive..
The cheaper kits require you to be more innovative.. Consider your own skill set..
You might wait for the new 1:64 Amati
Probably more than Caldercraft, but then, maybe Caldercraft will go down..
- Landlubber Mike, mtaylor and Canute
-
3
-
An amazing development turnaround considering the quality and detail..
You should have a corner on this market, for awhile, anyway..
- chris watton, Canute and mtaylor
-
3
-
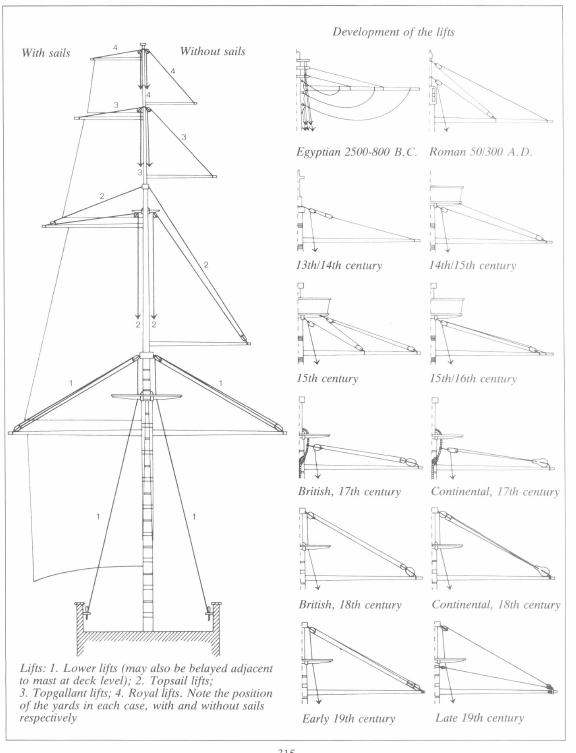
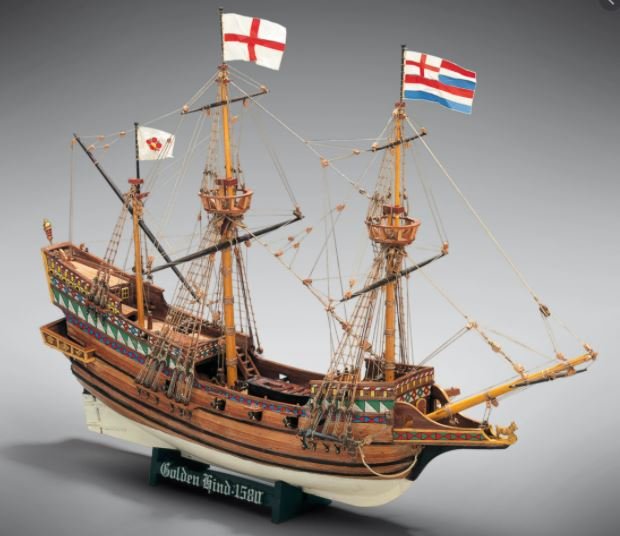
Note: Keep in mind that Monfeld shows one side without sails, in which case, the yards are lower on the masts..
Here is a nice model at NMM showing the topsails lowered. Speedwell
Another note, is that topgalant sails were often " set flying ".
The yards were not present when no sails were rigged. They were rigged on the deck, and hoisted ( set flying ) when required...
For modeling purposes, I think the yards without sails are often shown in a raised position, with the topgallant yards as well.
-
Here is an example from Mondfeld:
You can rig your Bounty with these drawings and feel you are doing it right..
If you are not going to include sails, you might consider leaving some lines off, such as clews, leech and bow lines..
Again it is up to you.
-
Does Amati name the ropes, i.e., main topsail lift ?
If they don't, using any good book that does, is way ahead of them..
For instance, Peterson will show you the main topsail lift and exactly how to run it and what the blocks and siezings should look like.
It would serve the same purpose whether it is the Bounty or the Victory.
If Amati is showing something different, I wouldn't waste time trying to follow their instructions. other than a rough starting point.
Of course, you must proceed with what you are comfortable with, and I am sure you are learning a lot as you go along..
-
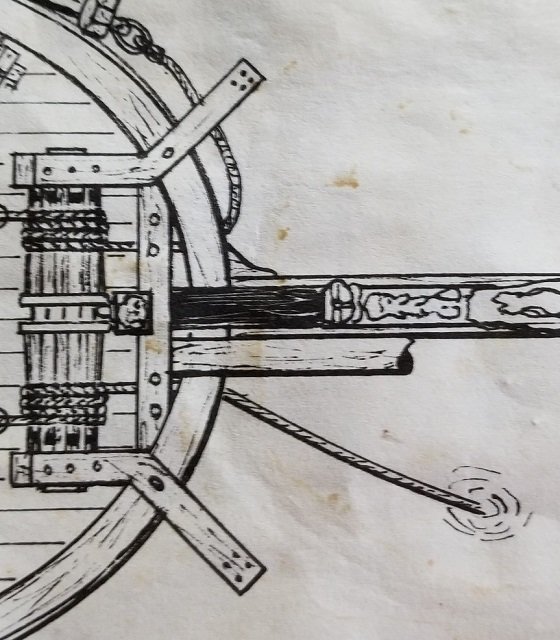
One more book to think about later; Rigging Period Ship Models:
This book has received some criticism because of perceived errors, but it is based on what the author observed on a contemporary model, and the model may have had an error or two.
It is a great resource that shows how every line ran on a ship including the belaying point. Even though it would not be a point for point match for Bounty, one could easily extrapolate for a reasonably accurate match..
Here is an example of the drawings in the book:
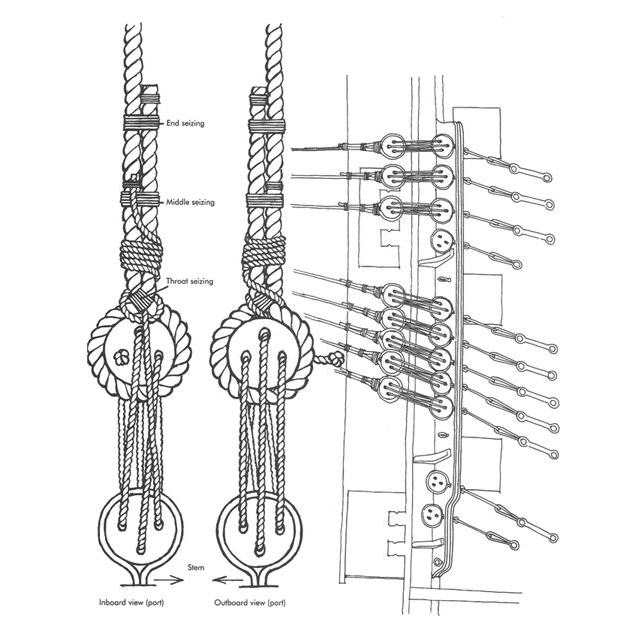
The author draws every rope on the model one at a time, showing exactly how it runs, with blocks, hooks and everything.
-
On 3/4/2021 at 2:05 AM, DaveBaxt said:
The book you have mentioned may be an option and Imight consider this. Do you think this book would be of any other future models that I build?
The AOTS book is good to have, but the rigging diagrams are relatively small and not easy to sort out..
If i were going to recommend a book that covers rigging in the spirit that Roger speaks of it would be this:
Historic Ship Models by Mondfeld.
He goes into detail about each line and how it is used.. This would have always been the same across various ships, as Roger pointed out.
-
1 hour ago, henry x said:
Now just a bit of light relief the MOD. can remove the pics if he likes
This is your log.. Post whatever you like! 🙂
- mtaylor and Keith Black
-
2
-
-
The problem with dyeing/coloring, synthetics don't take color very well, and naturals; cotton, linen, etc. may not hold up well over time, with coloring.
If coffee didn't work, it sounds like you are dealing with synthetic.
One of our sponsors, CraftySailor has some that looks good in the pictures.. Not sure how competitive they are,
But I have had real good experience buying other products from them..
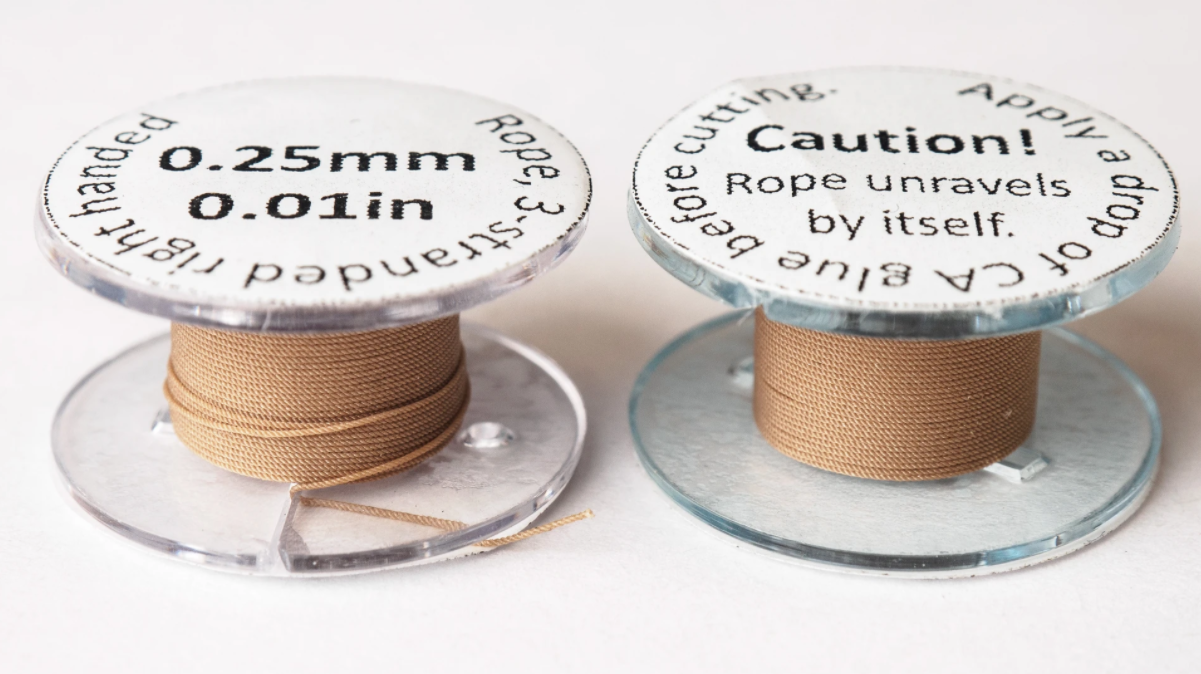
And don't forget: Making your own rope
-
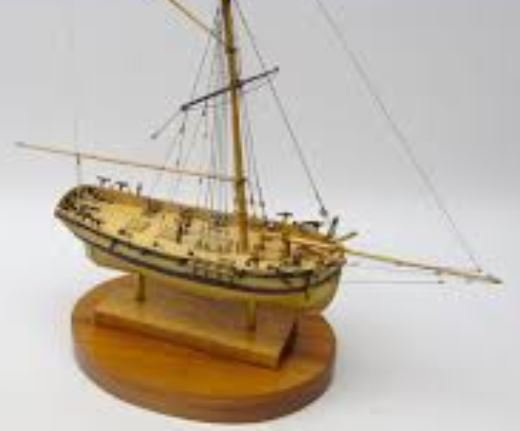
Just another possibility for consideration.
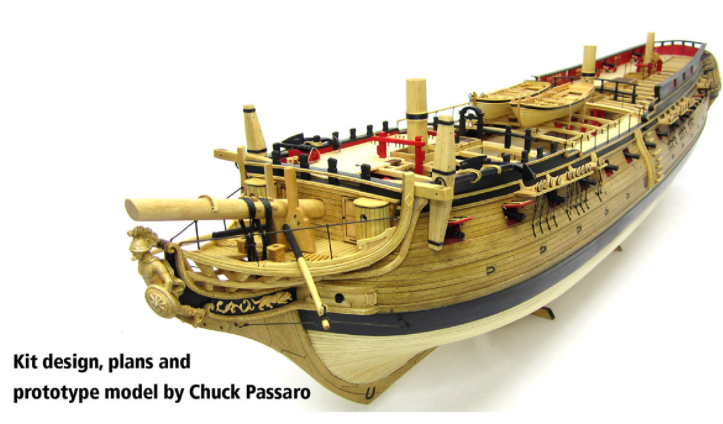
The Confederacy comes without rigging plans and is presented with this image.
I think the bowsprit without the stub masts might look a little incongruous.. But, that is my personal opinion, and has no bearing on what is considered proper..
Consider the painting of Enterprize:
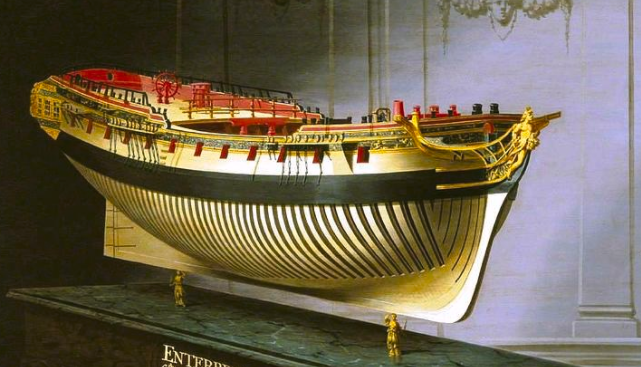
No bowsprit, no masts.
- Rob S and GrandpaPhil
-
2
-
Found this Googling..
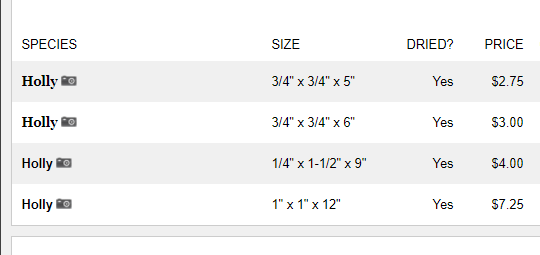
P.S.
It's hard to Google " Holly Wood ".. Guess why? 😁
Try " Holly lumber "
- thibaultron, grsjax, Edwardkenway and 1 other
-
2
-
 2
2
-
16 hours ago, RichardG said:
I got the plane for precisely this reason.
I was interested at $98, but $16 shipping seems unreasonable.. I might have pulled the trigger for $10.
- mtaylor, thibaultron and Canute
-
3
-
I don't know if this will help anyone, I have got in the habit of just opening a folder nearby where my pictures reside and just dragging and dropping my images to the current cursor position, rather than choosing and uploading pictures. Here is a little video that shows how I created the post that follows.
Then I drag another after moving my cursor to a new line...
And another..
Now I continue typing my text and pictures are where I want them to be..
I can also go to the " Uploaded images " area and click on the trash can if I want to delete an image..
If I put an image in the wrong place, or want a different image, I just delete it with the trash can. Put my cursor where I want the new image, and drag the image to the cursor position.
-
Don't forget Alaskan Yellow Cedar..
I was really impressed with how the grain showed up on Glenn Barlow's Cheerful.
It reminds me of curly maple. Of course the effect would depend on the way the wood is sawn.
Then not everyone wants to see dramatic grain patterns because they feel it is out of scale.
- glbarlow, Mike Dowling and thibaultron
-
3

Help planking around the keel
in Building, Framing, Planking and plating a ships hull and deck
Posted
Oh no.. That is the shape that blends with the rudder..