

Gregory
-
Posts
3,079 -
Joined
-
Last visited
Content Type
Profiles
Forums
Gallery
Events
Posts posted by Gregory
-
-
I'll have to look at my Mondfeldt later, but meanwhile here is something that may help.
At a scale of 1:37.5 your scale rope will be easier to determine than some smaller scales.
Most of the tables you find will be in inches rather than metric, so you may find yourself with another level of conversion,
however, to determine the size ( diameter ) of the scale line I am working with I wrap the line around a dowel of about 8mm diameter for 10 turns. The diameter of the dowel doesn't matter in this case . Make sure the 10 turns are touching but not compressed. I then measure the length created by the 10 turns. You then dive the distance by ten, and you will have the diameter of your scale line.
Example: 10 Turns of your scale line = 8.5mm. Divide by 10 = .85mm. The diameter of your line is .85mm = approx. .03 inches.
Obviously, if you are using very small line, like for ratlines and lanyards, you may want to use 15 or twenty turns and divide by the appropriate number..
I use a calculator like this: Length calculator , for my conversions..
Depending on your resources, getting scale rope in the exact size you need may be a challenge.
You will have more control if you are making your own rope, but it will still take a lot trial and error to get the sizes you are satisfied with.
-
-
4 minutes ago, James H said:
I have a bottle of this. I presume it's suitable?
That looks like it is what you want!
For application, depending on the surface, I keep it in a plastic squeeze bottle and put a little directly on the surface and spread it around with a soft cloth, eventually wiping off all the excess. For smaller parts, and stuff like masts and spars, I will brush it on and let it sit a few minutes before wiping off.
-
-
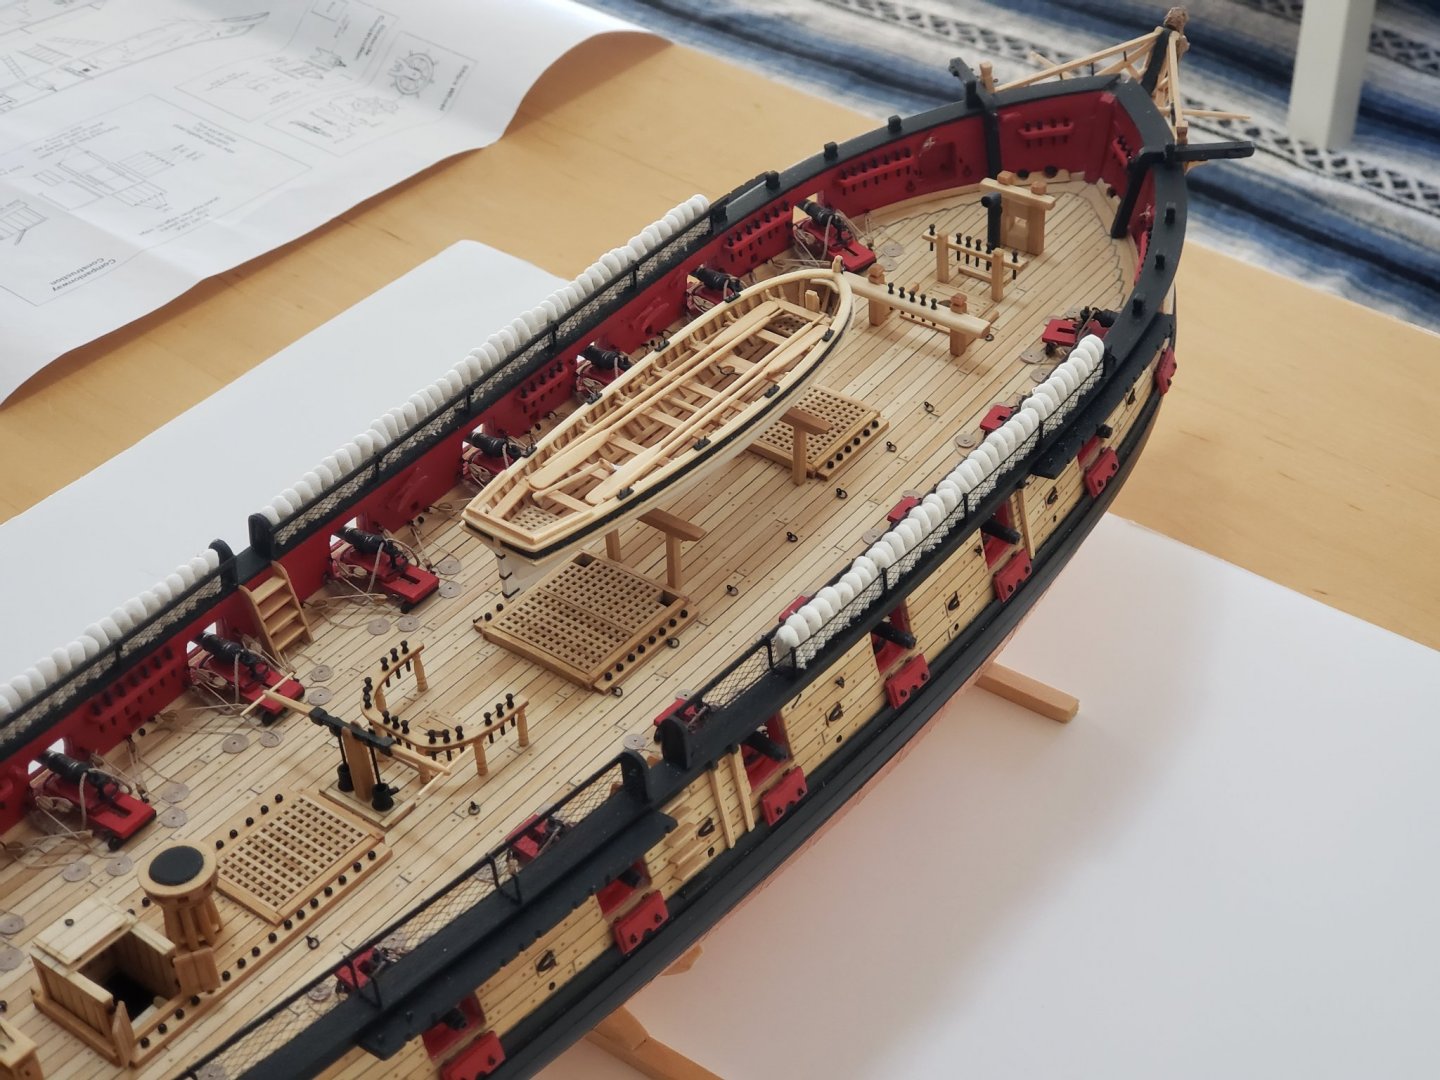
31 minutes ago, Ab Hoving said:
This model is a bad example of how people can turn beautiful ships into lousy objects.
Some models are good examples of how people can turn lousy kits into beautiful objects.. ( Eye of the beholder, and all that...)
You could spend all day for the next ten years pointing out the shortcomings in thousands of build logs.
I don't think that is what we are here for.
It's not very becoming to come into someone's log and lecture them about the futility of their efforts based on your superior knowledge.
I'm looking forward to the piece of art that Henry makes out of this salvaged model..
It has been really interesting so far.
Perhaps a moderator can tidy up the log and get it back to the excellent subject it is..
-
-
I wouldn't worry about getting a perfect match beyond having the two pieces in a straight line.
I assume there are going to be some trestle trees or other fittings covering up or hiding most of the joint.
If you can, use a small wood dowel instead of the brass rod.. This will give you some play while setting up and a better joint when the glue dries.
The seam does not have to be perfect or invisible. Once you build up the rest of the mast and add rigging it will not show. You can also do some fine tuning of the appearance after the glue dries.
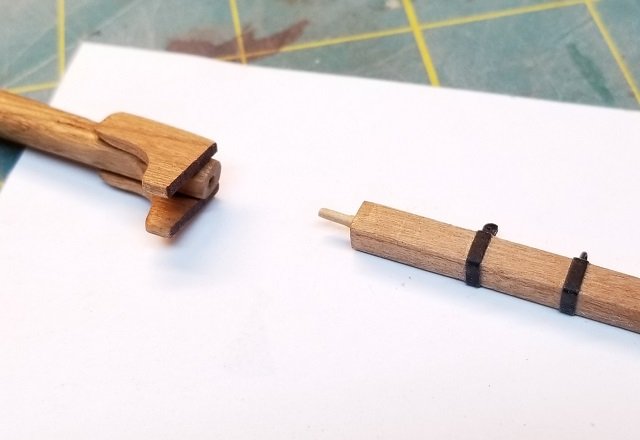
I often use this method to build up a mast from smaller pieces.
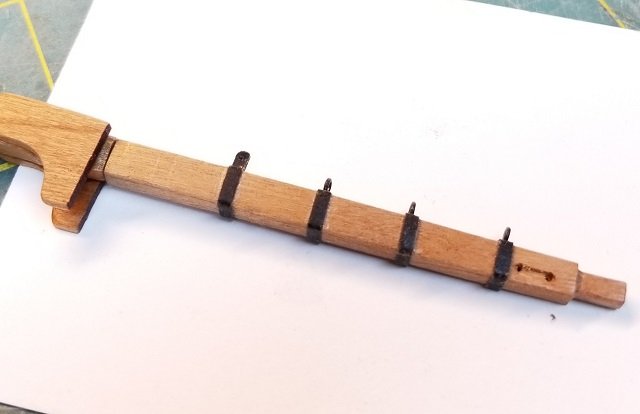
Here is a mast I am working on but haven't glued yet.. The joint will not be visible when I am done.
I hope this is what you are referring to.. If not will try to clarify..
Gregory
-
-
-
I'm having trouble visualizing dimensions of this.
Would 1.5 w by 1/2 h by 9" l work?
Hobby Lobby online has 1/2 x 3 x 24
-
2 minutes ago, Roger Pellett said:
The typical blocks that Syren furnishes are the older pattern blocks intended for external rope strops but the do offer laser cut kits that can be assembled into the internally stropped blocks that you require.
I provided a link to Syren's internally stropped blocks.
- Roger Pellett, Keith Black and mtaylor
-
 3
3
-
- mtaylor and Keith Black
-
2
-
You may have to hand-make the shackles with wire and such, but Syren may have some blocks that would work..
There are several sizes of these types of blocks..
Internally Strapped
There are several build logs where members are making detailed metal work..
Here is a good place to start.. Build logs for subjects built 1901 - Present Day
Meanwhile I will be looking for some links for you..
Cornwall Model Boats has a lot of these types of fittings, but searching for them may take some maneuvering.
Here is my search for shackles
But other words might produce results for other fittings..
-
You might browse some of the other restorations to get ideas about cleaning techniques.
Remove as many loose parts as you can and clean them individually. A mild soap solution is always a good start.
Alcohol and q-tips are another option.
For loosening old glue, you might try a hair dryer after you are sure there are no loose parts to go flying away.
- mtaylor, Ryland Craze and Keith Black
-
3
-
16 minutes ago, henry x said:
thinking it might be worth removing it
I would remove it just to see if there is some hidden treasure inside..🙂
I would enjoy seeing updates as you restore this.. It looks like a nice decorator model with an antique look ..
- Keith Black and Ryland Craze
-
2
-
-
On 2/14/2021 at 1:53 PM, PC52 said:
Any suggestion as to how to replace this part?
Here is an image where walrusguy ( skip down past the ship's boat ) used tissue paper to make hammocks..
Just roll up tissue paper. Wetting it may help to get a wrinkle effect..
You might use some light coloring if you don't wan't it to look too bright white..
-
-
I don't think anyone will notice if you make it 5.3 ..😁
- mtaylor and uss frolick
-
1
-
 1
1
-
- Canute, mtaylor and thibaultron
-
3
-
-
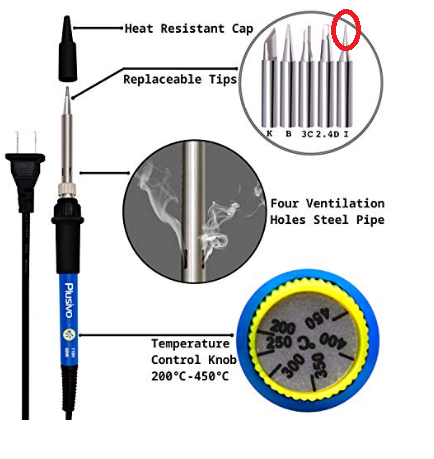
I really like this little Kit
I t comes with a lot of stuff I am not likely to use, but the price is good.
What is great is that it has a variable temp control ..
I use the little pointed tip to melt down polyester thread nibs when tying knots.. You can make them invisible..
-
Hang in over there..
The 1949 caught my attention..
I was born Jan 15 1949 in Hearne, Tx near Bryan/College station.
I see by the Farmers Almanac, the temp on that day was 75..
Then on Jan 31 it was -2.9... Brrr.
We lived out in the country, so I don't think we had electricity, and pretty sure we didn't have internet..😁
- glbarlow and Edwardkenway
-
2
-
I have learned a lot over the years. The biggest thing to wrap your head around, is that you can't cover a curved surface, with flat, straight planks.
Few kit instructions bother to point that out. To make it worse, they are often curved in more than one dimension.
You are doing a great job so far. Most importantly, you are asking questions and not getting discouraged.
Formula for the thickness of rope on any scale ship
in Masting, rigging and sails
Posted
@shipman
You are a far braver man than I am, but I guess I am exposing myself to unpopularity as well; but how bad can it get?
I am fully with you when it comes to " how it looks "..
" Establishments " were established so that government contracts would have a basis for going forward, and being audited at a later time.
Civilian contractors would also need to meet similar requirements.
They didn't want to be billed for 2 inch cable when half inch cable would have got the job done..
The size of the rope depends on the job being done, and in many respects is intuitive; this applies to the blocks as well, however, the size of the rope will determine the size of the block..
I may be oversimplifying, but maybe someone else will have more to say.
I think if the builders here take a good look at the models; good ones and bad ones, they will get a good sense of what looks right..