


Thukydides
-
Posts
776 -
Joined
-
Last visited
Content Type
Profiles
Forums
Gallery
Events
Posts posted by Thukydides
-
-
-
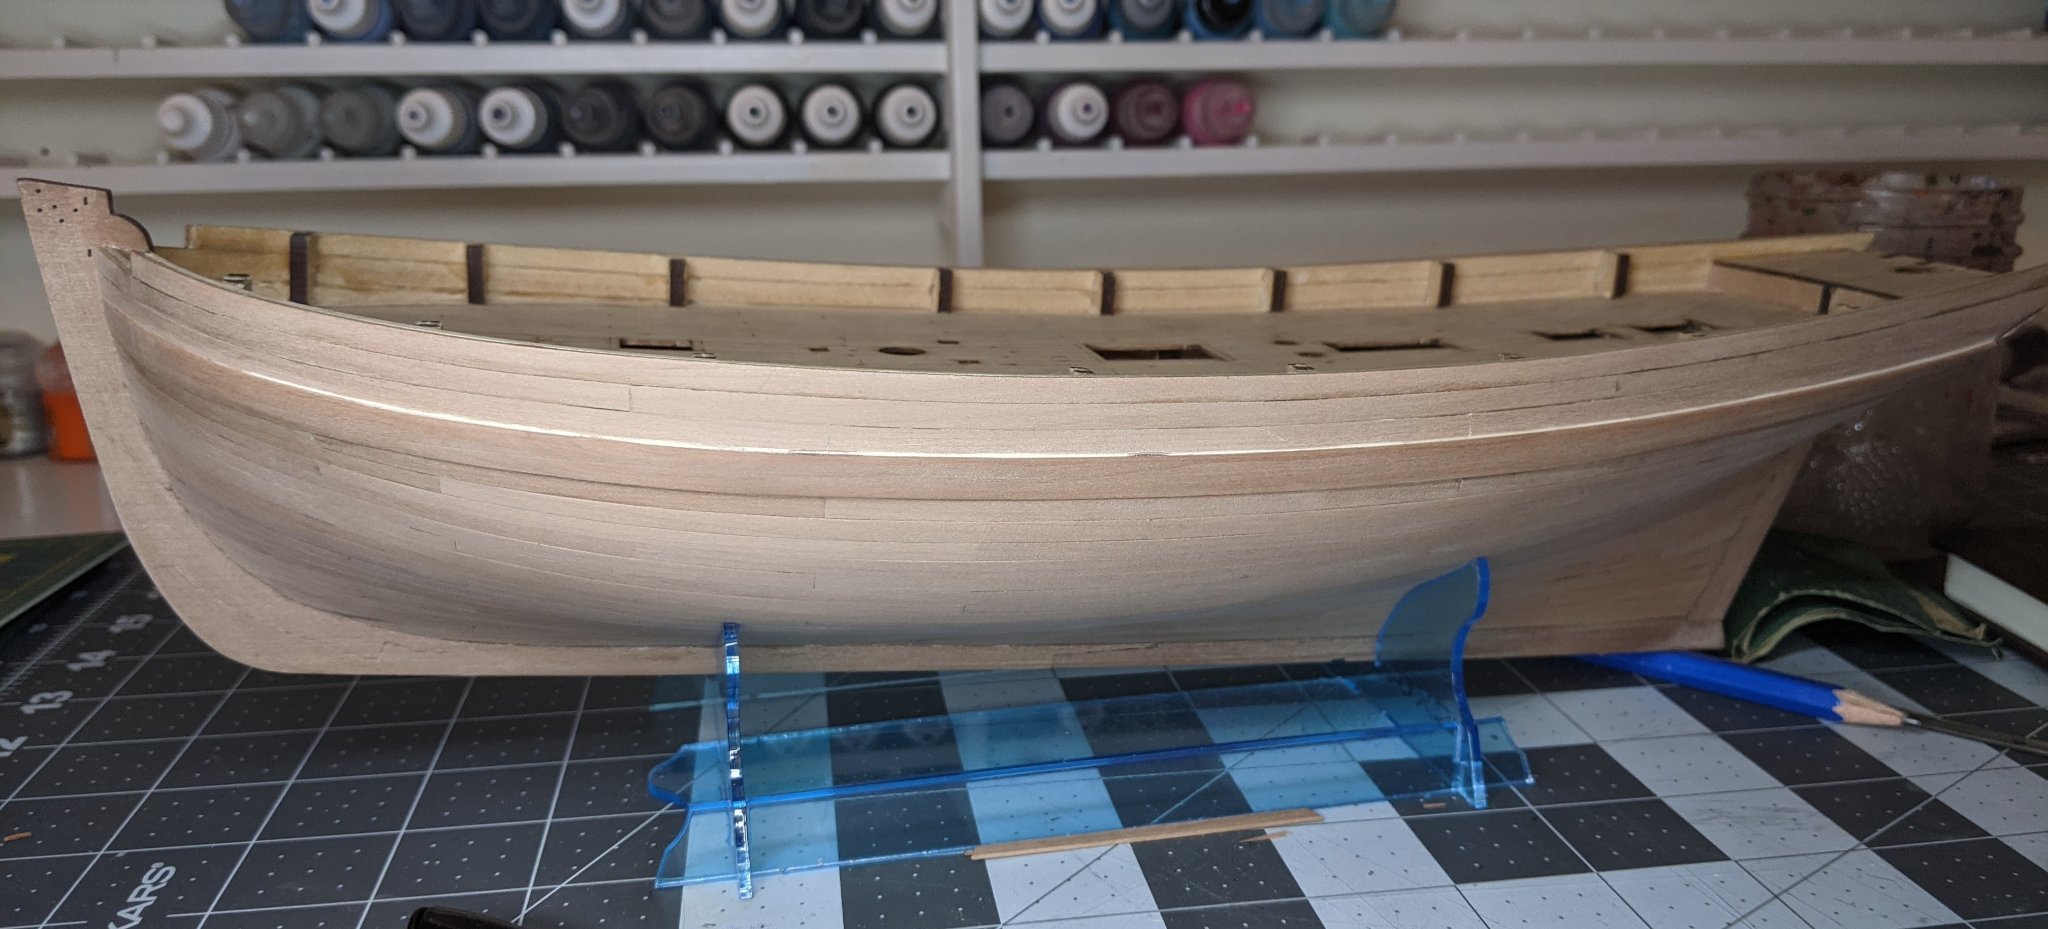
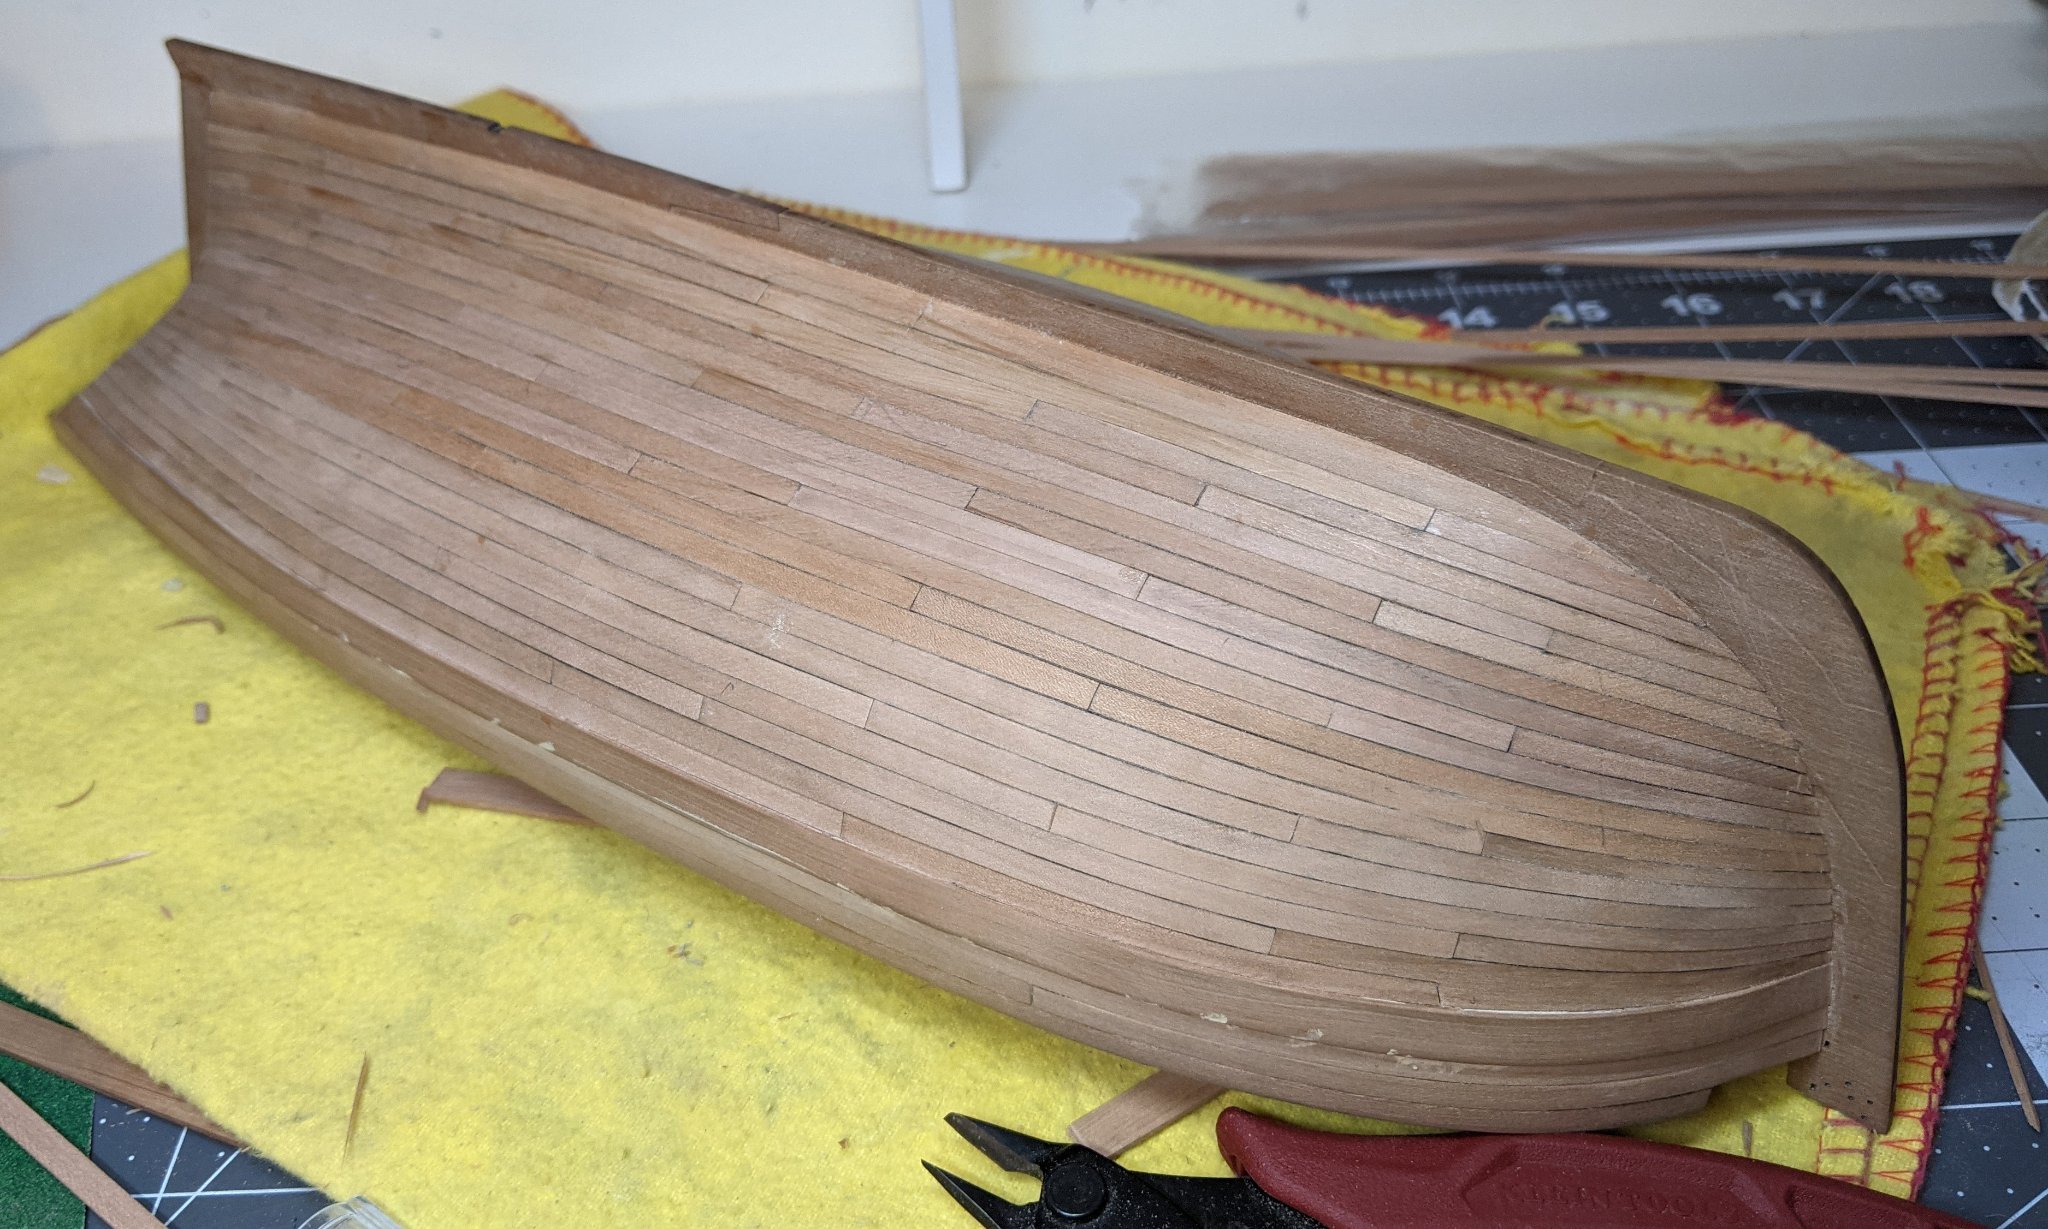
Log #13: Planking Retrospective
With the second planking complete, I figured I would dedicate a log to some of the things I learned through this process.

One of my goals with this log is to document the challenges of doing a first wooden ship build so those who come after me can hopefully learn from my mistakes.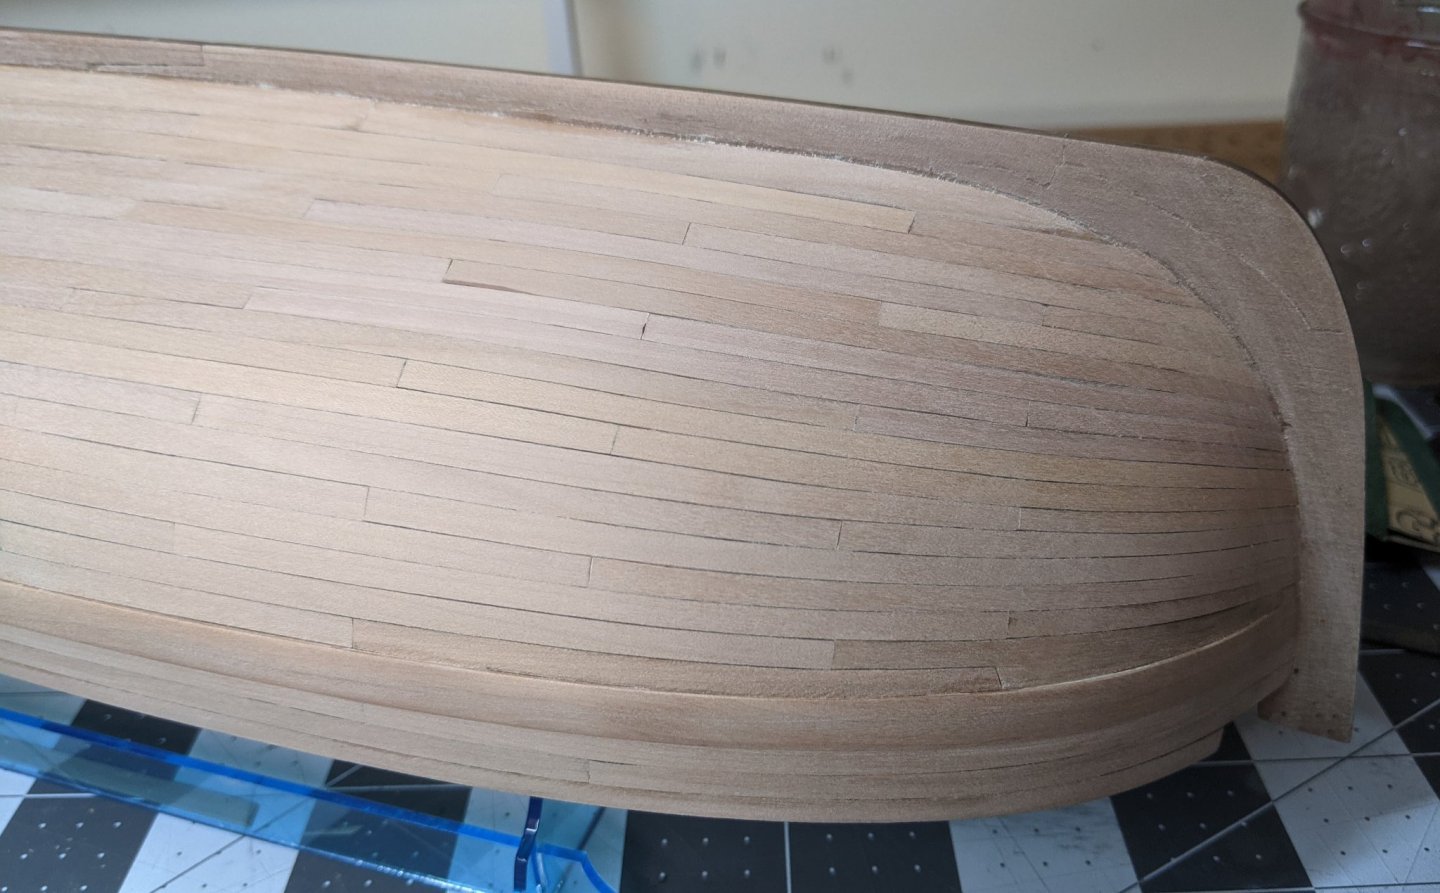
I have most of the sanding done except for a few minor issues I need to clean up / fill below the water line. Now that it is sanded I am somewhat pleased with the results, but I am also aware that it could have turned out so much better if I had just taken a little more time (particularly in the early stages).
So here is a list of things that I wish I had known or did know, but never took to heart:-
Early mistakes cause later troubles - Take your time, no really take your time. Early errors, especially on planking, will cause issues later. More time will be spent correcting errors at the front end will end up saving time overall and produce much better results.
-
Treat every plank as an individual project - Now this piece of advice is not for everyone, but if you want to have a really good result, the best way is to treat each plank as its own project to carefully fit into place. Take the time to get the bends right and bend it in as many directions as you can. It should sit flush without any effort. If you have to force it into place, the result will never be as good. I saw many other people on MSW say this, but I didn’t realize how true it is until I started to slow down. Better to start over on a plank than to have to deal with the consequences of one that didn’t fit properly.
-
Check the width / thickness of the planks - When I started the second planking, I sorted the planks by colour, but I didn’t check the dimensions. Even with the excellent standards that Chris has put in place on the Alert kit, there is still variation in plank dimensions. I found that the width varied between 3.8 and 4.1mm while the thickness could range from 0.8 to 1.1mm. Now these differences may not seem like a lot, but they can have a significant impact on the planking. I would have had much better results if I had sorted my planks by dimension first.
- In the end you have to learn by trying - In the end no matter how much you read, there are still minor adjustments that you need to learn by actually doing the work. I am very thankful that the members of MSW convinced me to start small as it is much better to learn these lessons on a smaller build than on the ship you have always dreamed of making.
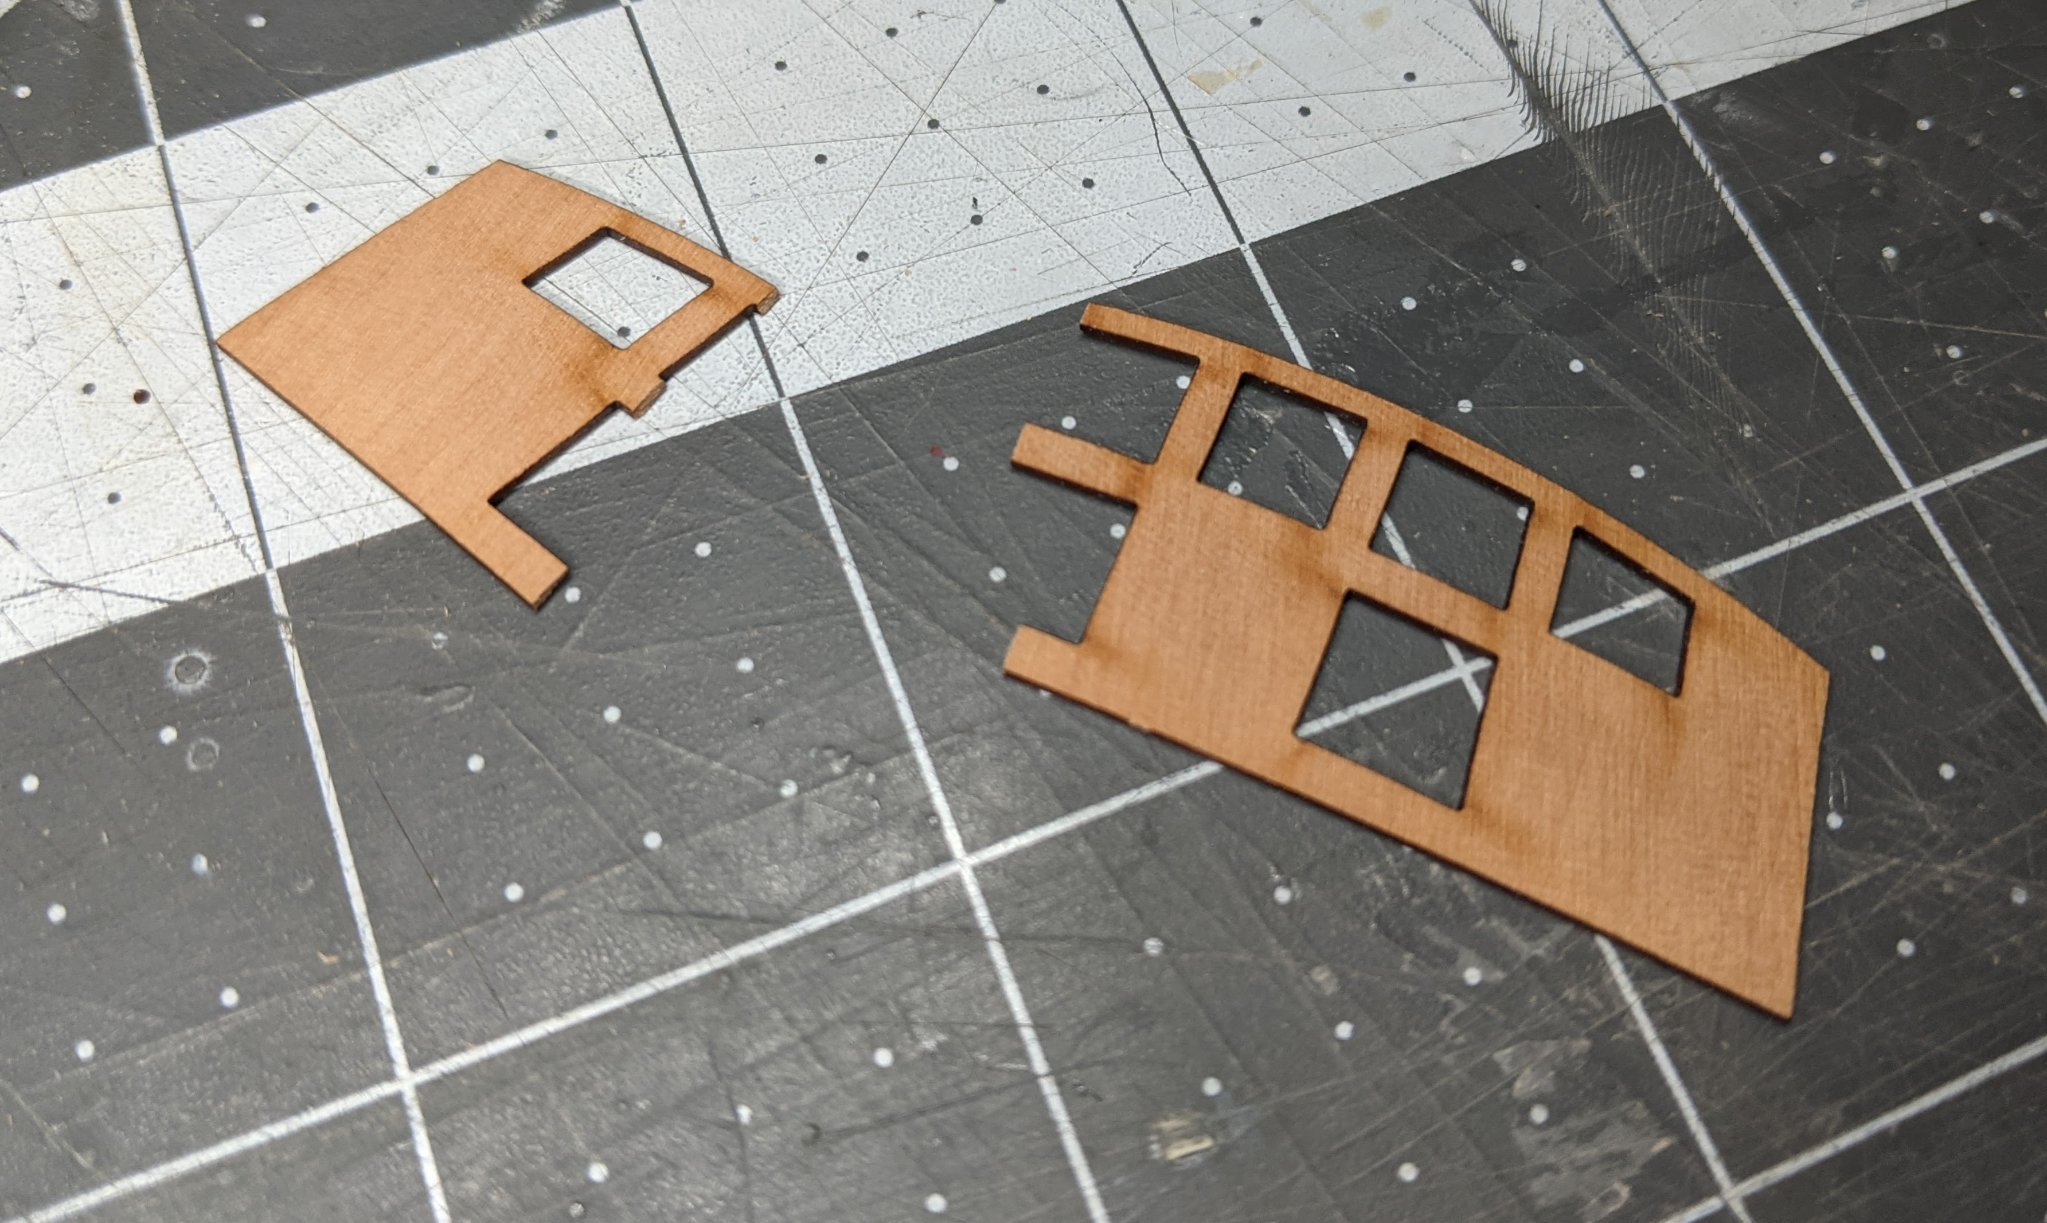
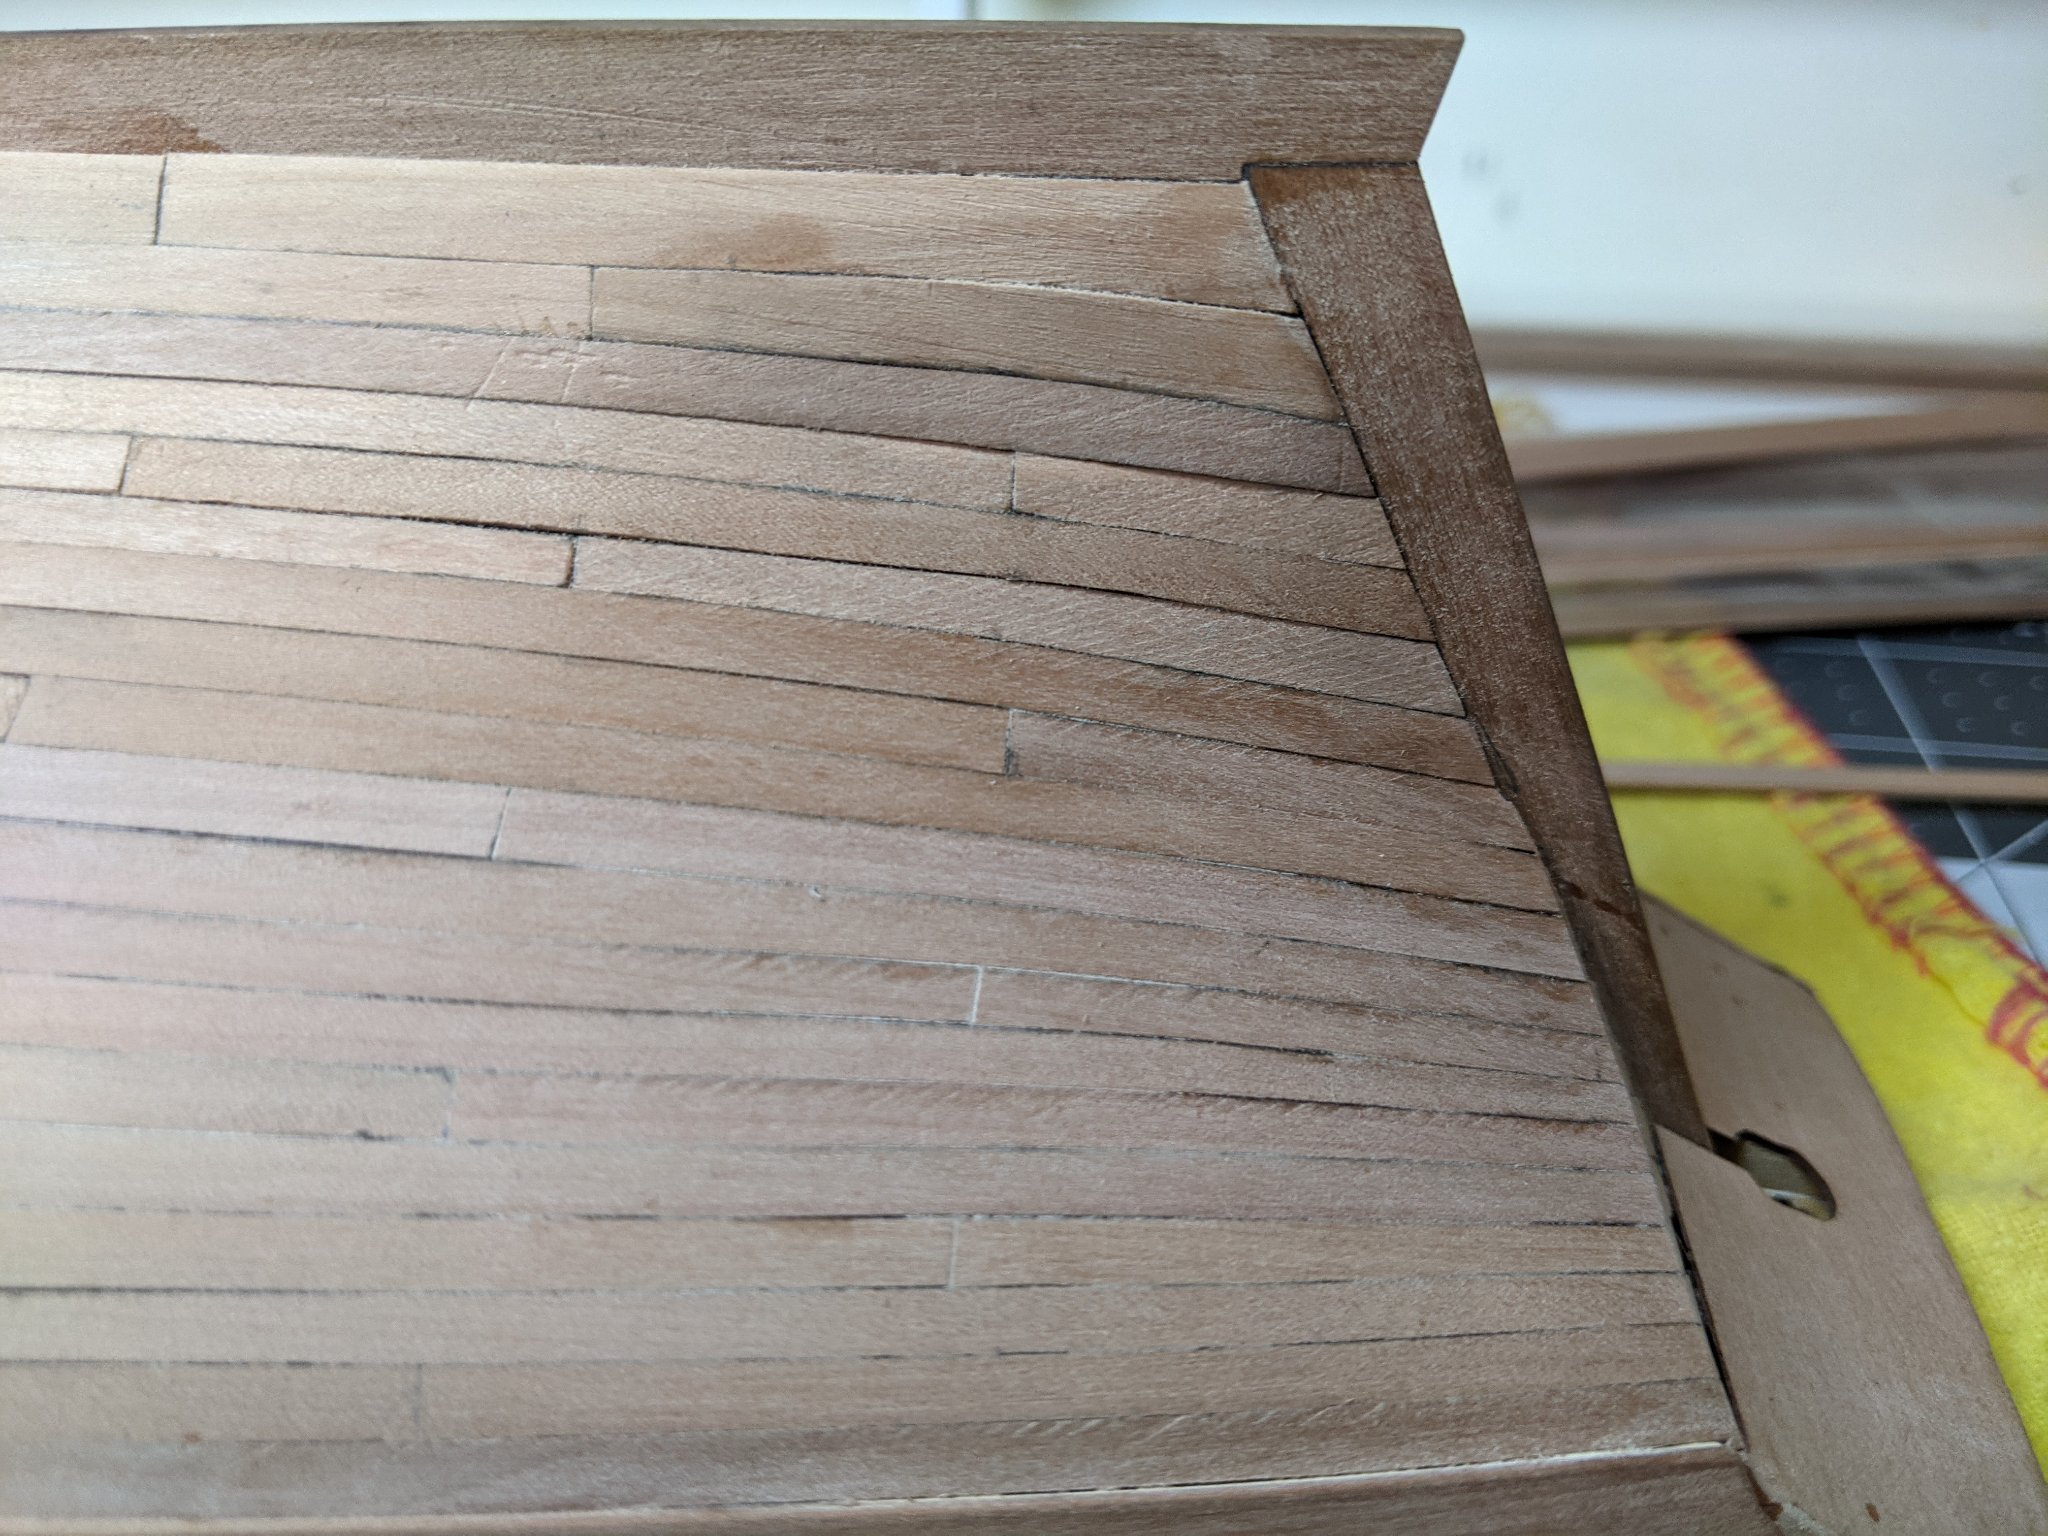
Speaking of mistakes, as I was trying to fit the stern transom pattern I accidentally snapped it in two.

I had been thinking about rebuilding this part of the model more in line with the drawings in the Goodwin book so I guess the decision has been made for me. More on this in my next log...
-
Early mistakes cause later troubles - Take your time, no really take your time. Early errors, especially on planking, will cause issues later. More time will be spent correcting errors at the front end will end up saving time overall and produce much better results.
-
Welcome to MSW. I won't belabour the points that others have said, but as from one first time builder to another who came into this with only plastic model experience, I want to really emphasize that starting small is important.
The only thing that really helped me from my modeling/miniature painting was knowing how to take my time and read lots before I did anything. You will make mistakes, but the nice thing about wood is that most mistakes can be corrected. Just take your time and read lots of build logs to get an idea of what mistakes others have made.
As for model recommdations, I am really enjoying vanguard models alert as a first build. The instructions are fantastic and there are lots of good build logs on it here on MSW which you can lean on.
- Keith Black and mtaylor
-
 2
2
-
-
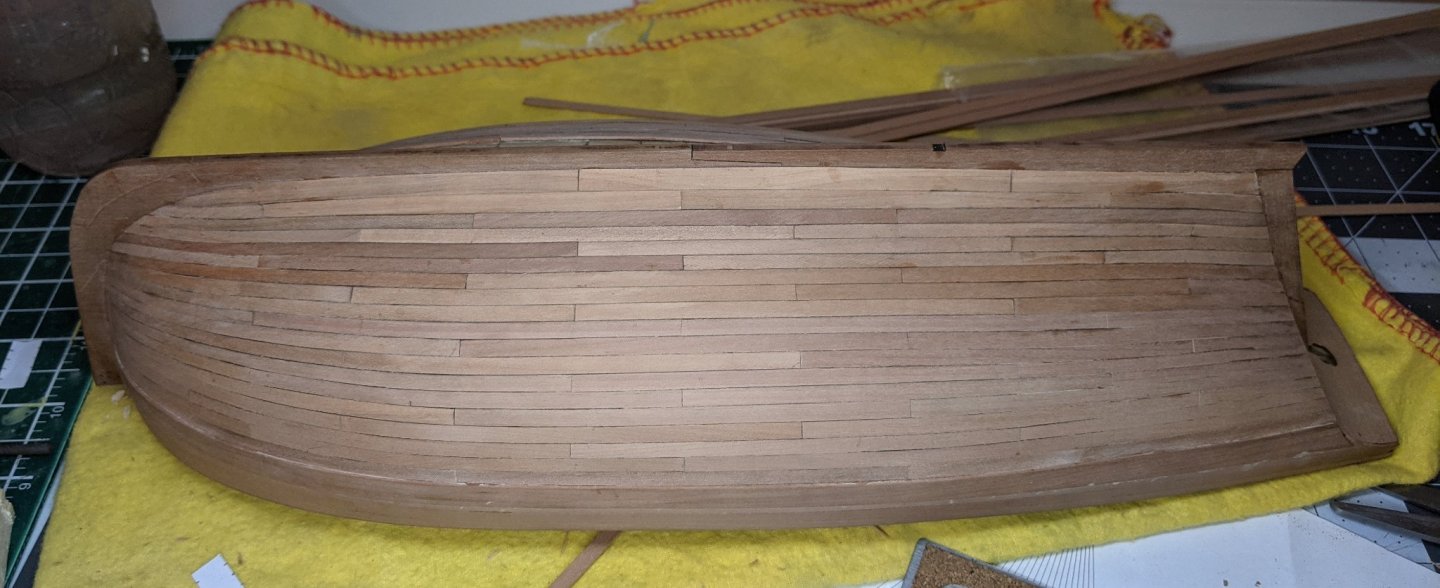
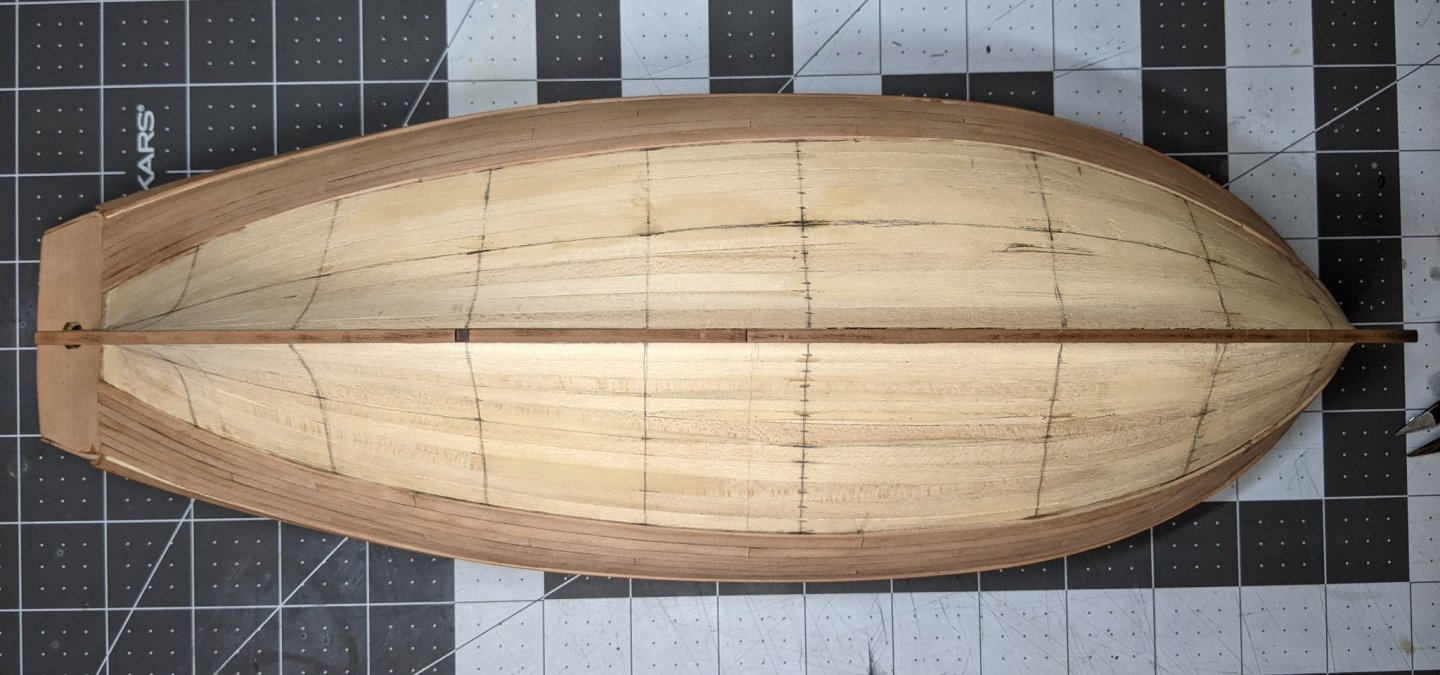
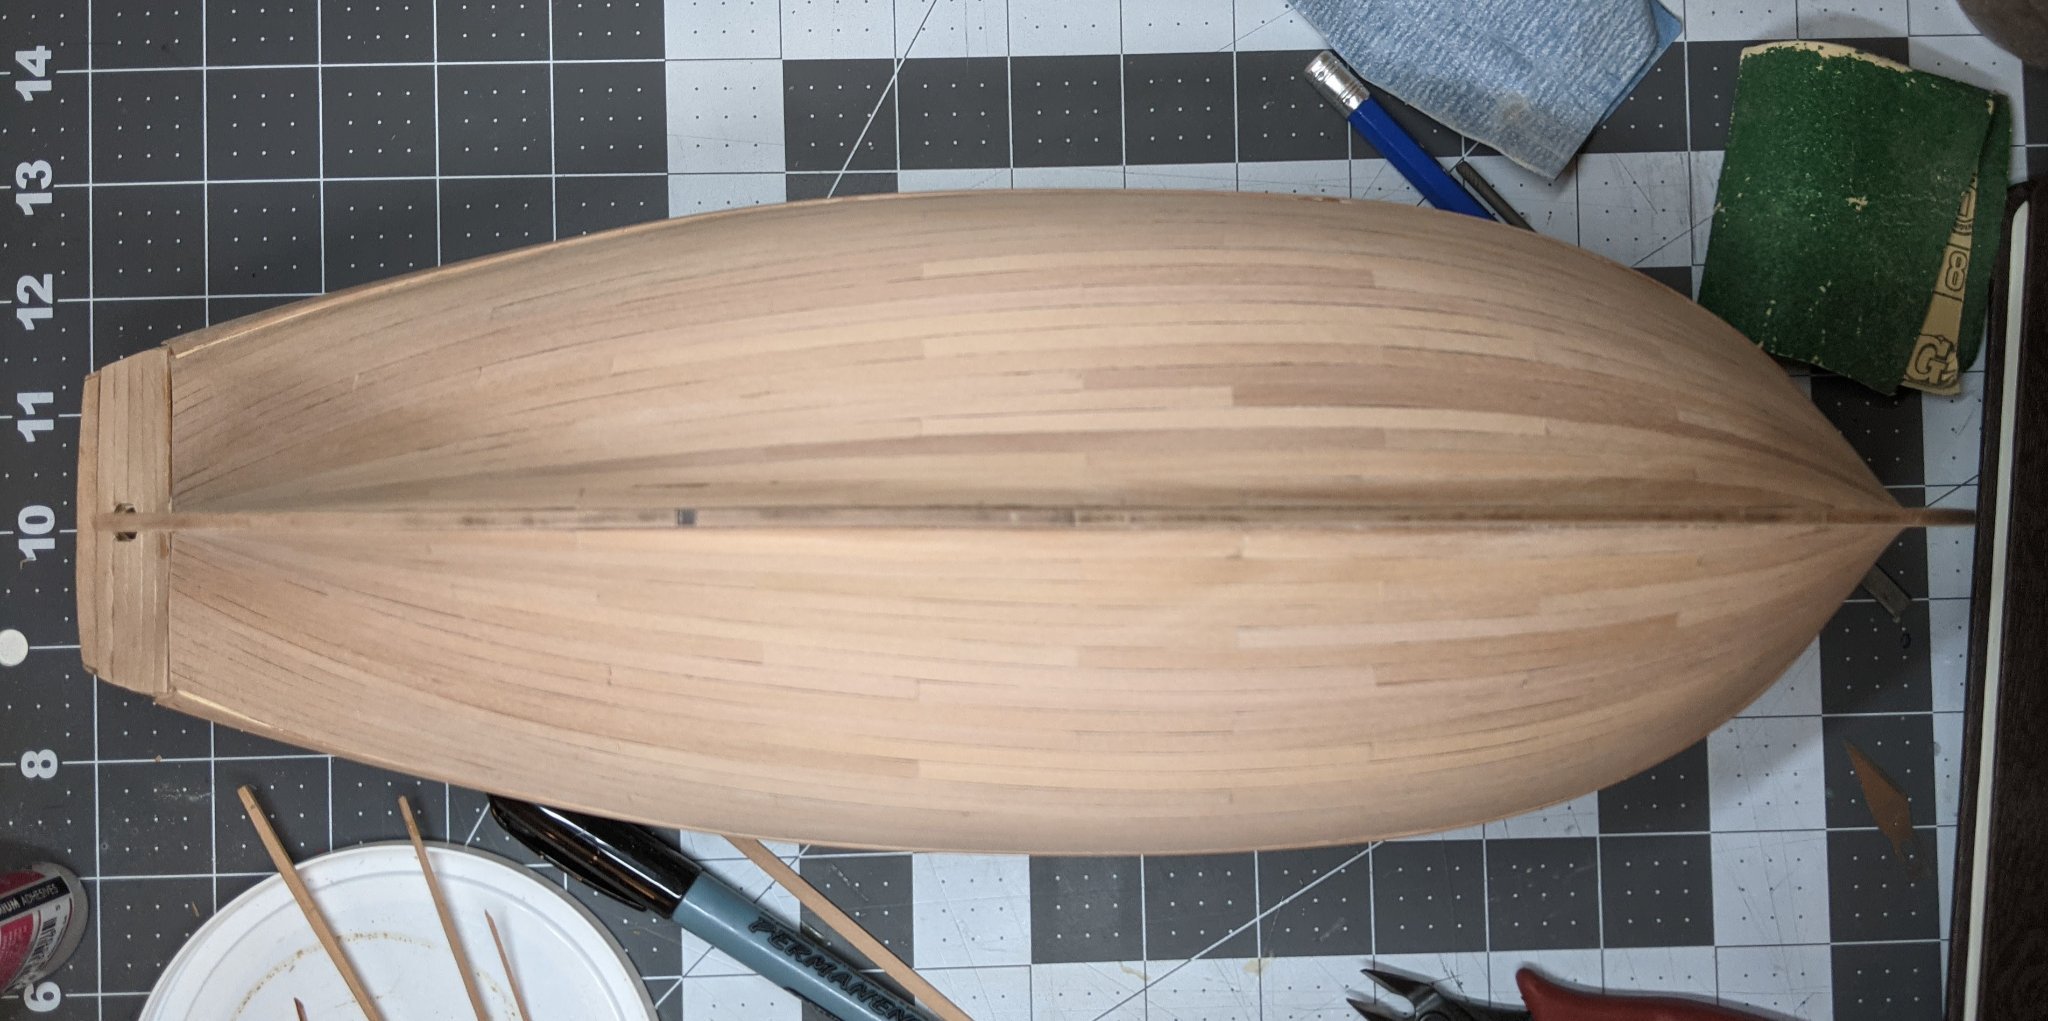
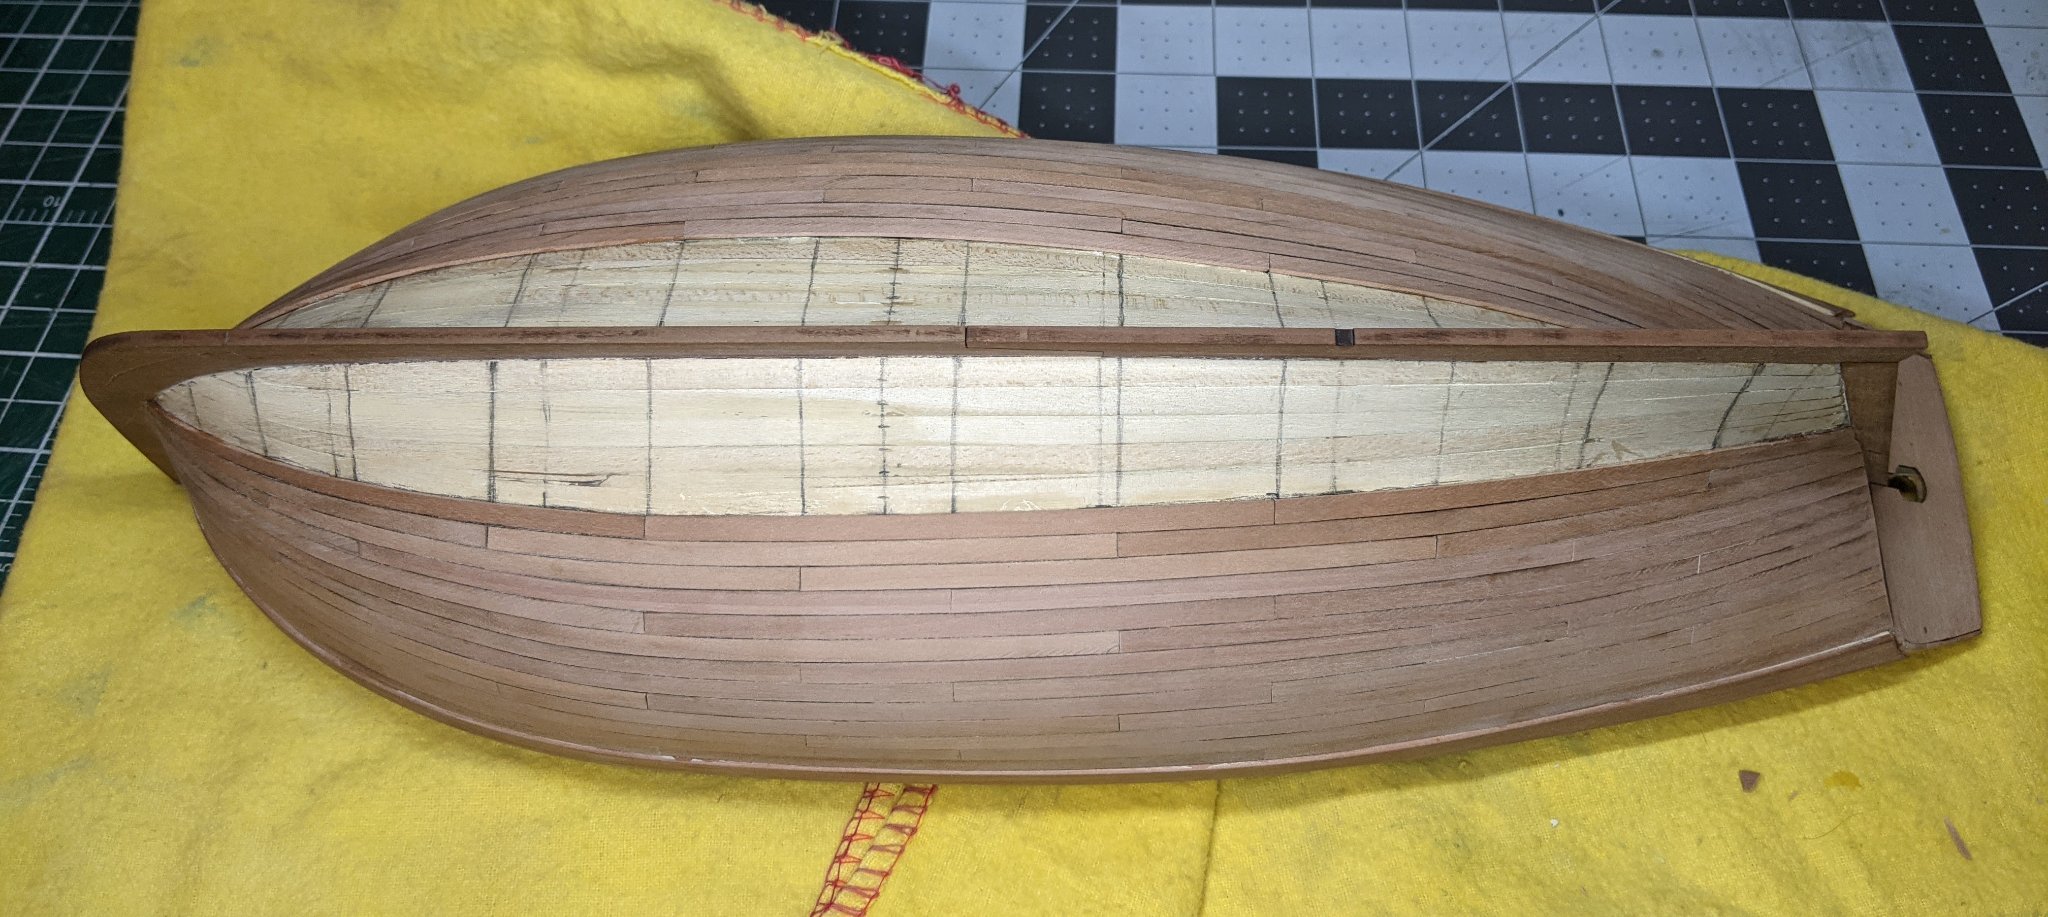
Another minor update, I will discuss some of the things I regret/wish I had known before I started more in my next full log, but the second planking is done.

I think I am more pleased with this side than the other one. I did a better job of managing the taper on the last band to make it more smoothly transition to the garboard.
Next up lots of sanding.
-
Visually it looks good to me though this is an area that I didn't do as good a job as I should have and it made the planking a lot harder. I suggest that you take one of the thinner planks and hold it against the hull at various angles and locations to check the run of the hull. The key here is that the plank should lay flat against all the bulkheads.
-
7 minutes ago, BobG said:
Do you just wipe the miniature with isopropyl alcohol and then brush on the weathering powder?
No so you would brush the powder on then on when you are happy with the look you carefully apply the isopropyl with a brush to the area. Not brushing just touching it. The capillary action will spread it through the powder and when it dries fix it in place.
Alternatively some people mix a small bit of the powder with isopropyl and paint it on, but it can be harder to get the right look this way.
The best I can say would be to try a whole bunch of ways till you find what works for you. Until you seal it with varnish all you need is a toothbrush and water to get it off.
-
2 hours ago, DelF said:
You and @glbarlow have converted me to the use of weathering powder - your buffed barrel is strikingly realistic - and I've already ordered some. I wasn't aware of the need for a fixative though - is that because you're applying the weathering powder to resin, or would you use it with any surface?
In miniature painting the process is to fix the powder using isopropyl (or alternative) then spraying it with a spray varnish. If you don't fix the powder then over time it will come off. If you go straight to the spray you risk blowing it off.
That being said where this is not being touched you may be fine without the varnish step. The powder will look better without varnish/fixing agent, but you risk it coming off over time.
- DelF, Blue Ensign, BobG and 1 other
-
4
-
Looks fantastic BE. Even though I am a long way from being able to kitbash to the extent that you do, I appreciate the inspiration for future builds.
- Blue Ensign and mtaylor
-
1
-
 1
1
-
On 10/22/2021 at 7:57 PM, jpalmer1970 said:
Great work Thukydides. I've still got 6 planks left to add each side in my second planking so you have moved ahead of where I am now. I look forward to following in your footsteps.
EG learning from my mistakes :).
-
3 hours ago, Peanut6 said:
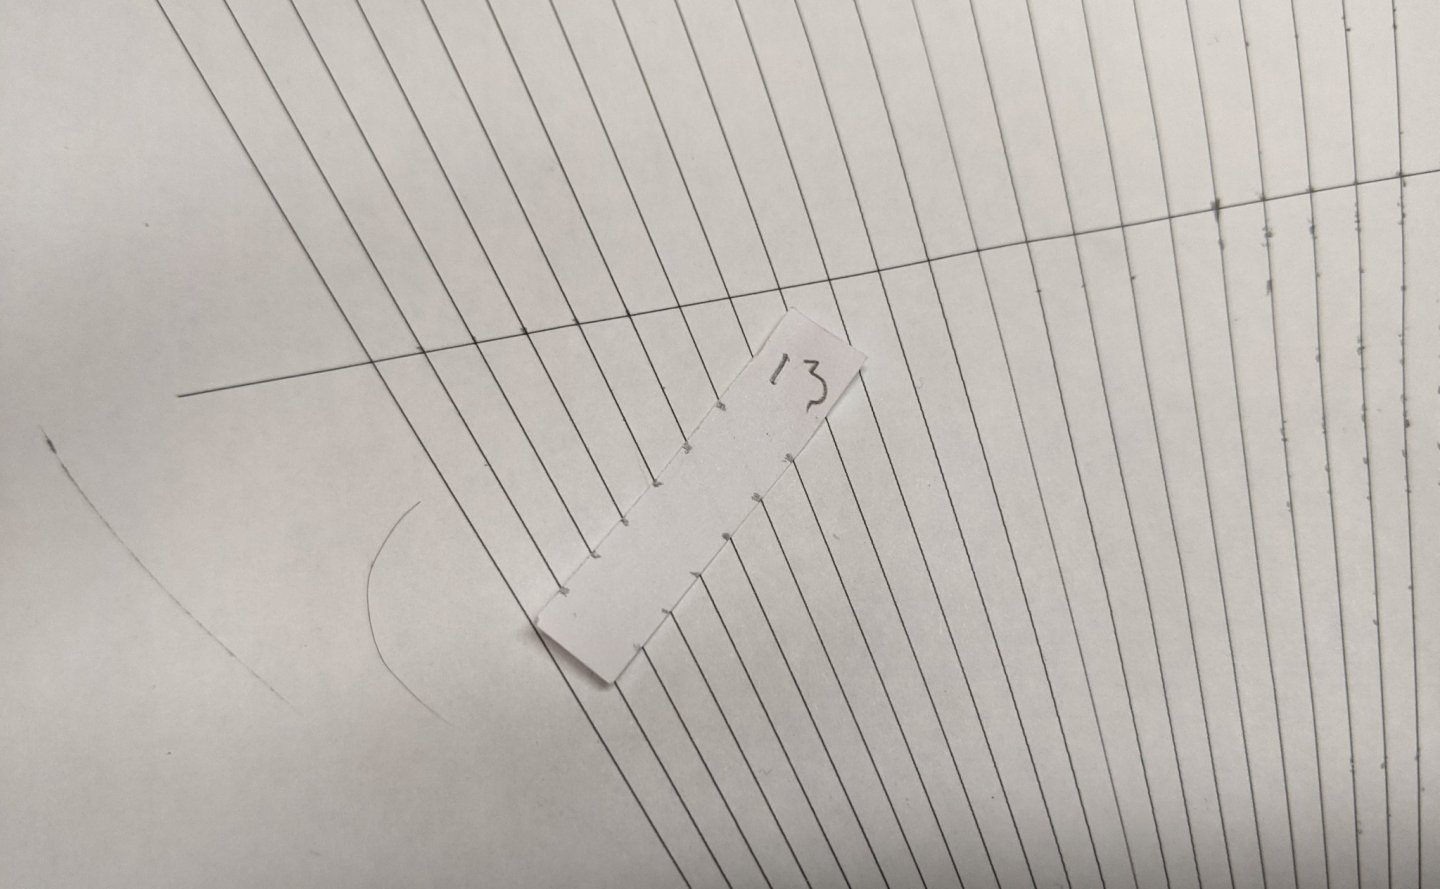
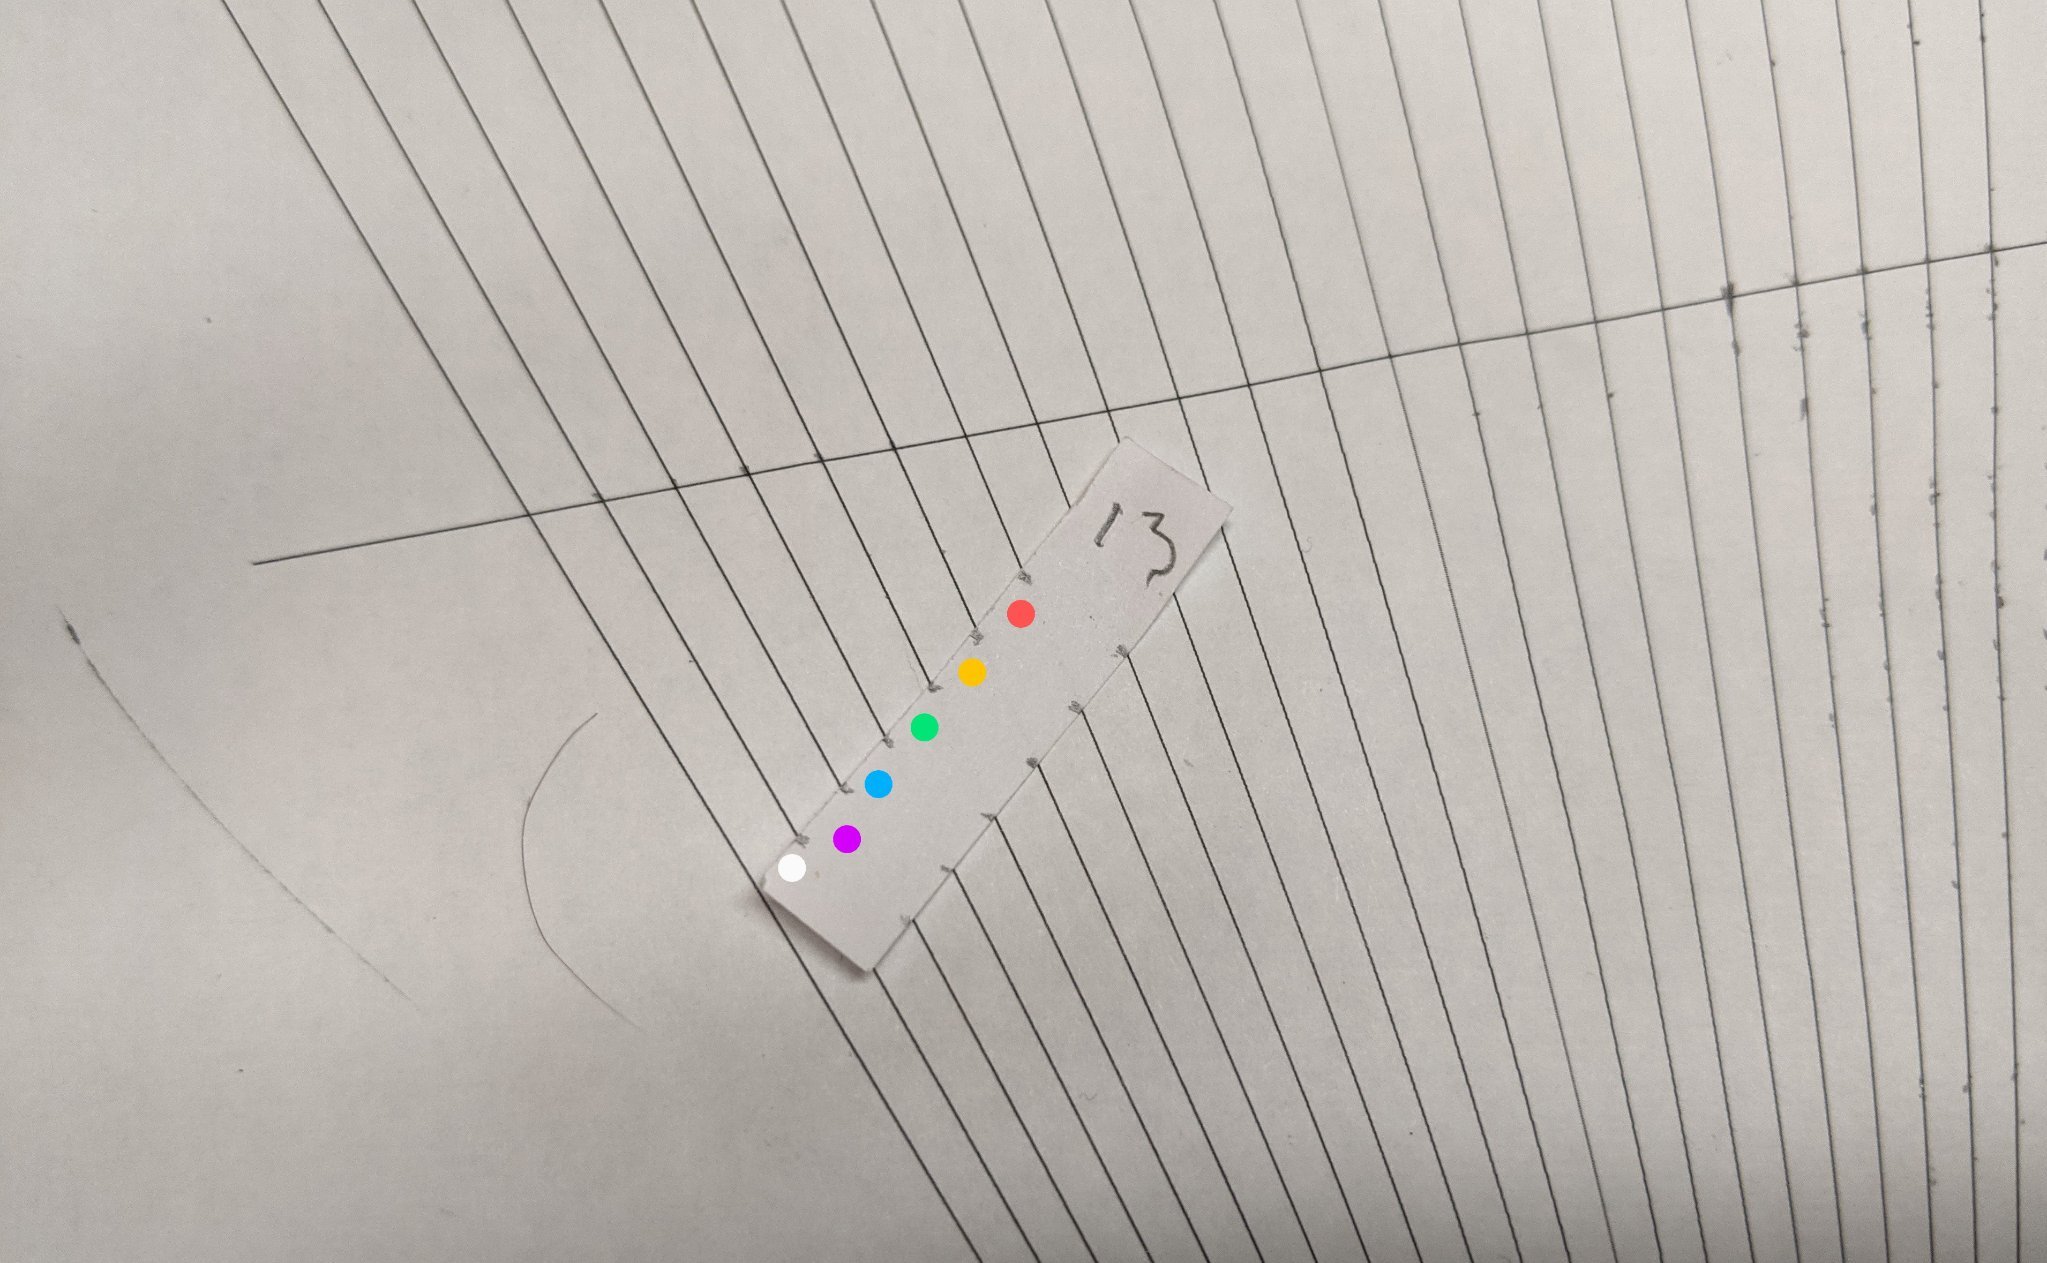
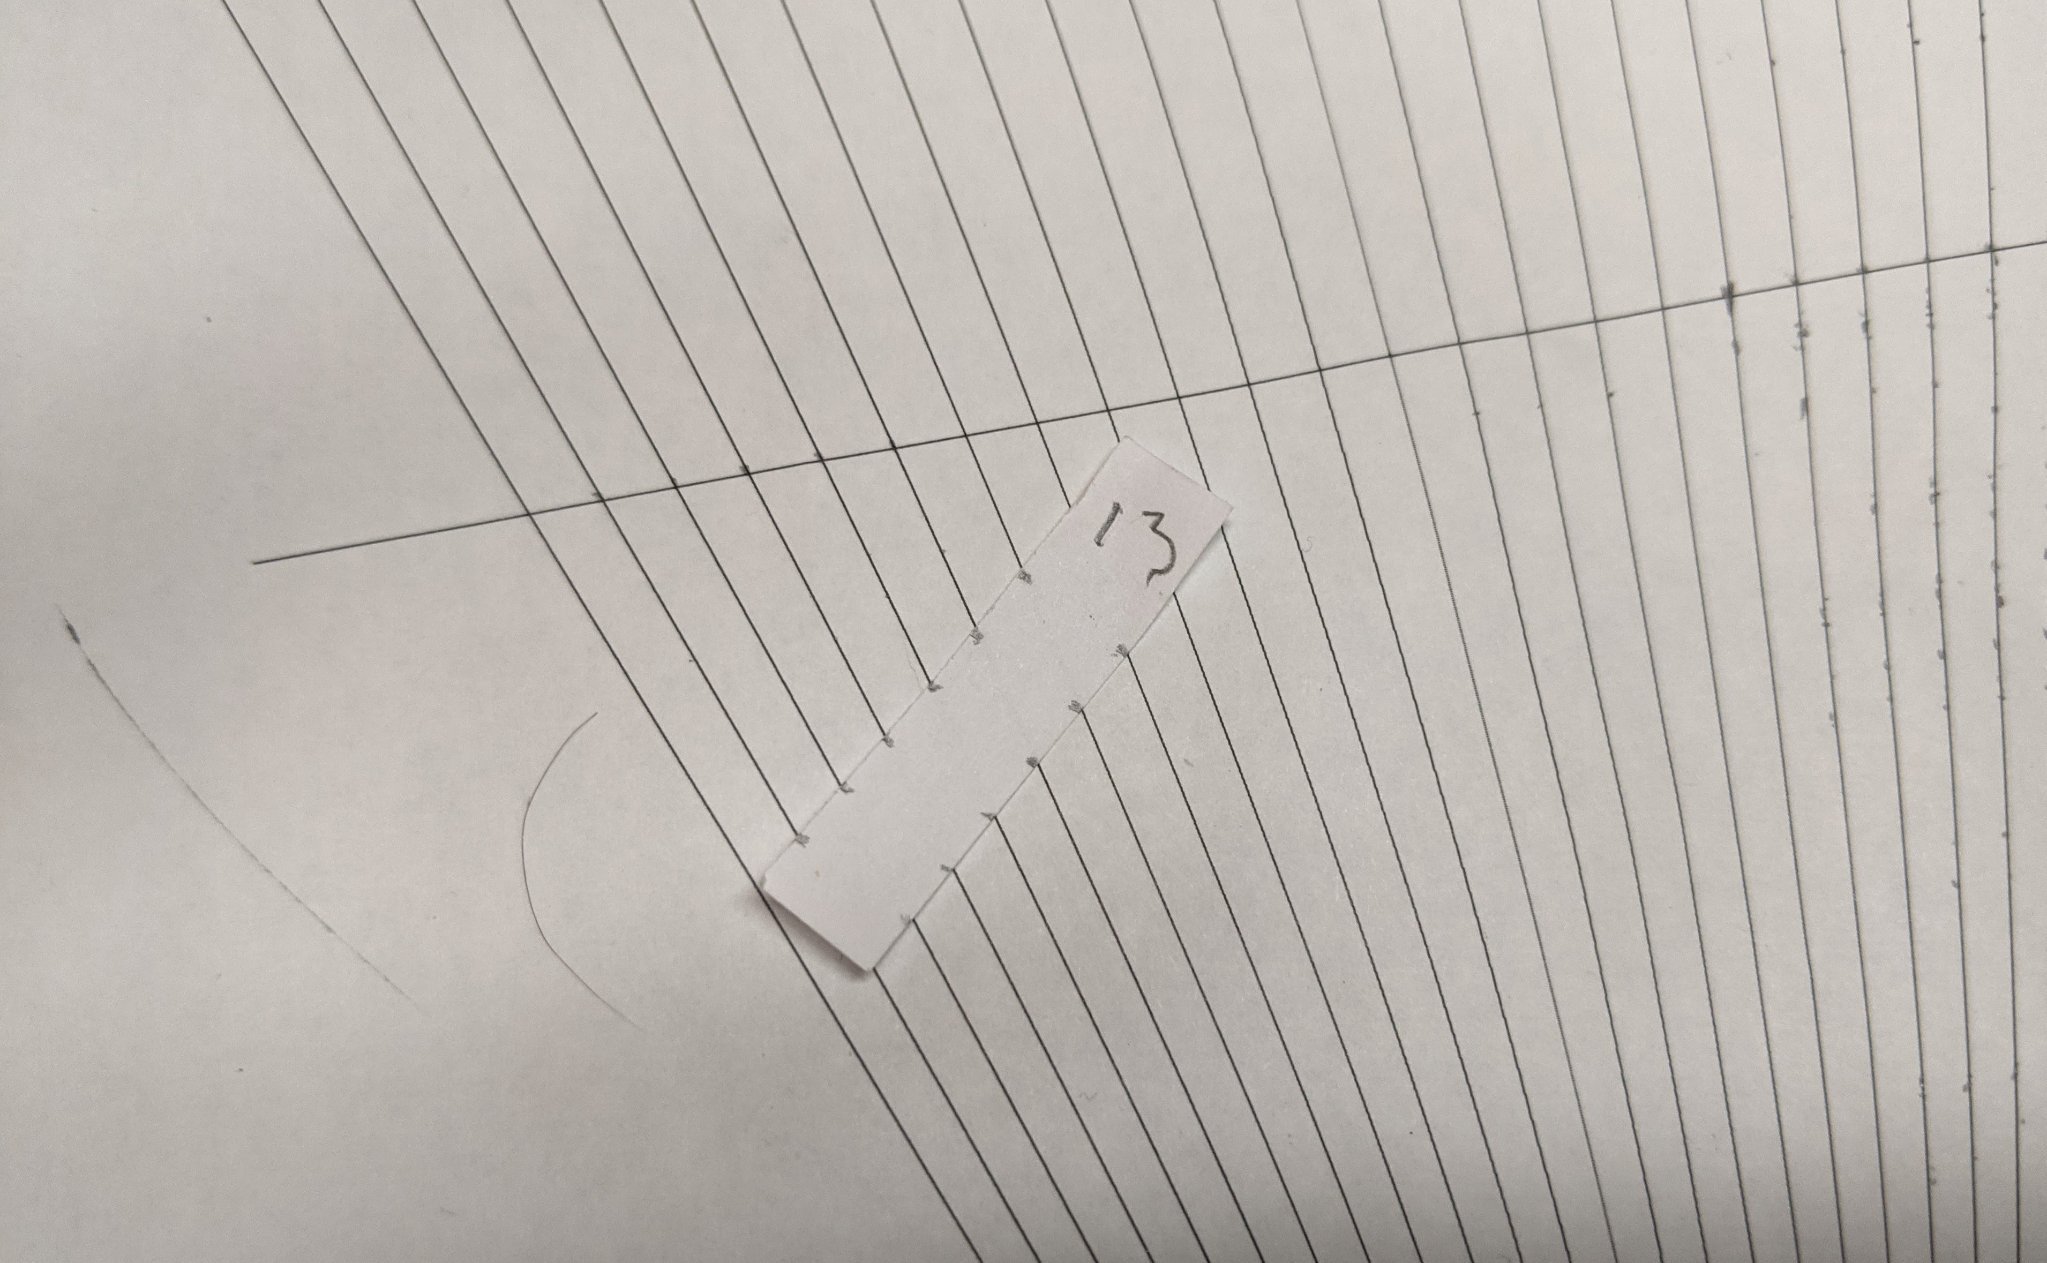
I think the only way it is going to get thru to me would be to identify a plank in the above photo and the corresponding marks on the rotated tick strip in the earlier photo.
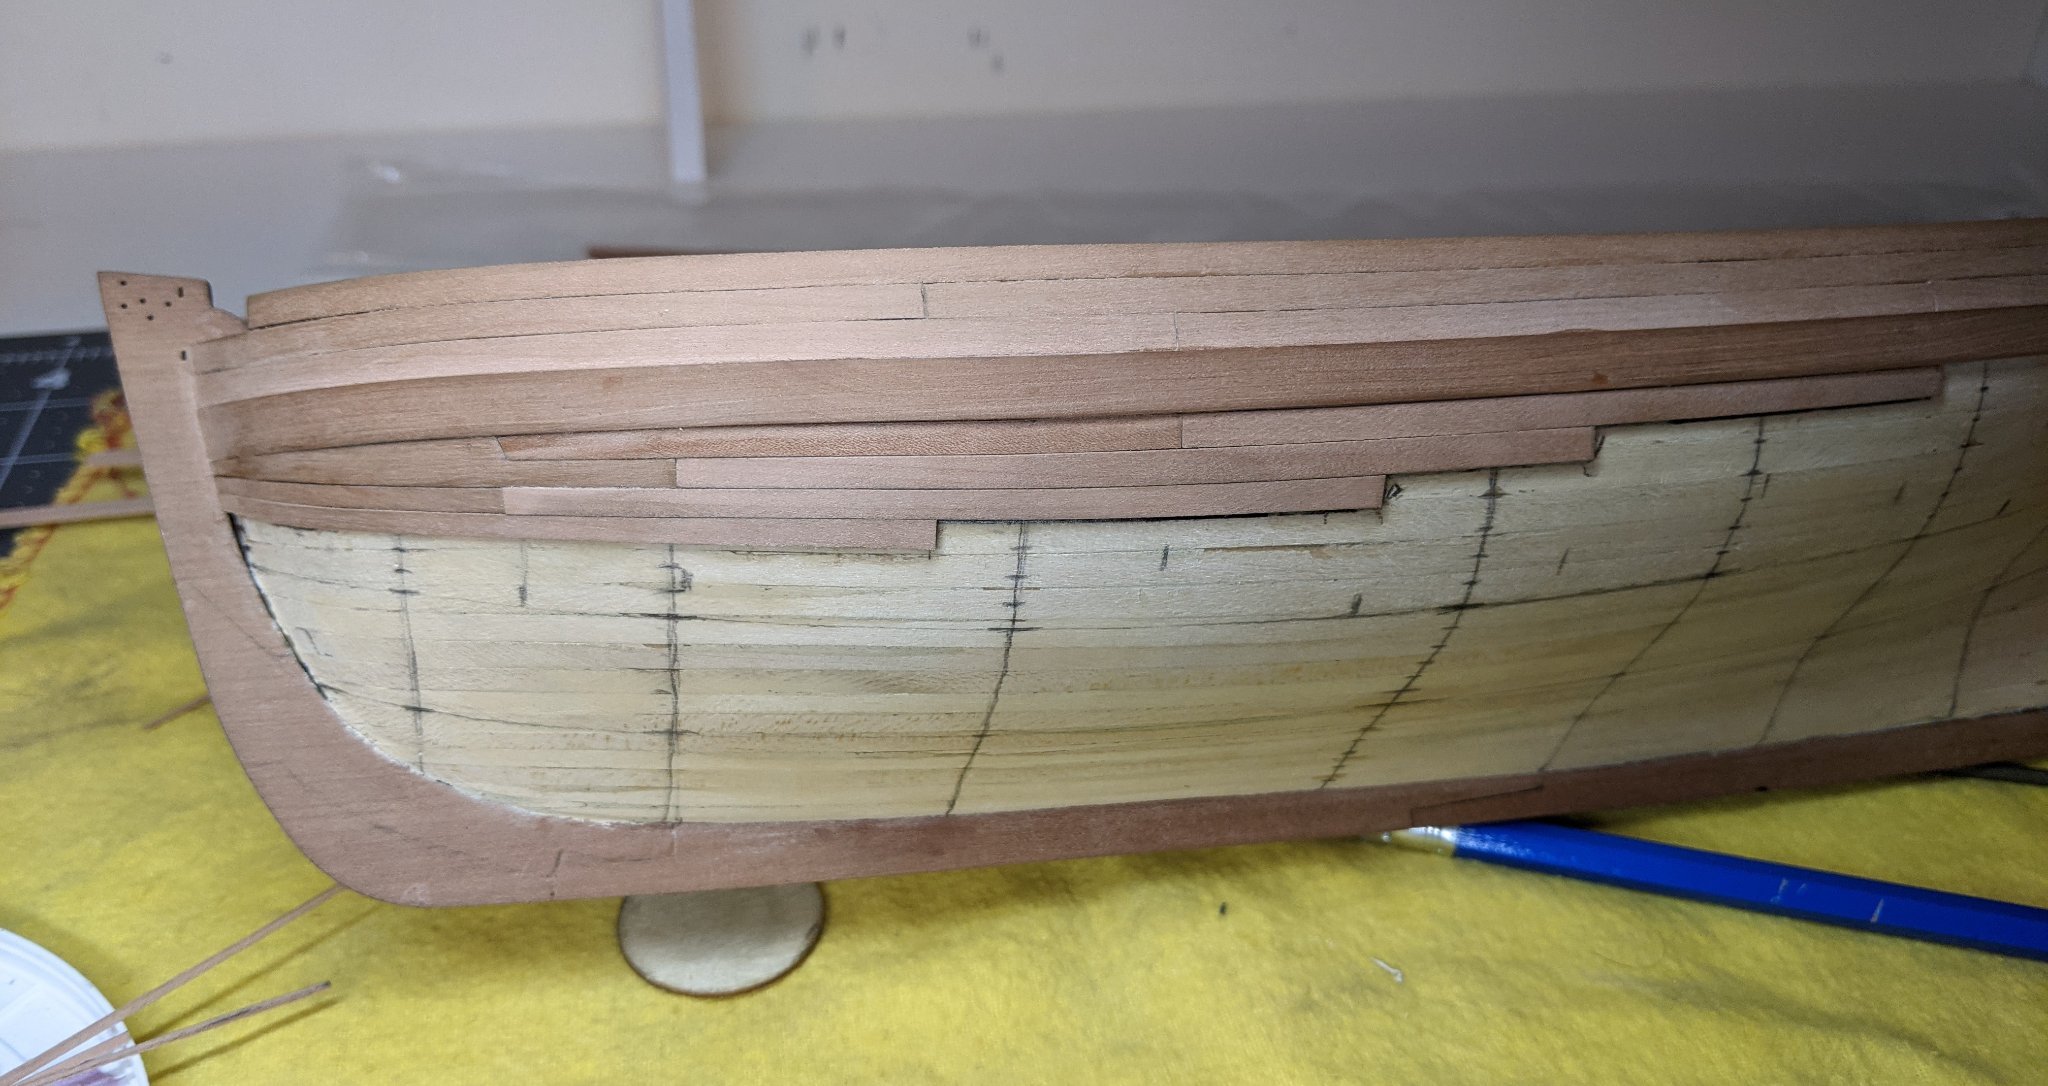
As requested see below with the planks colour coded.
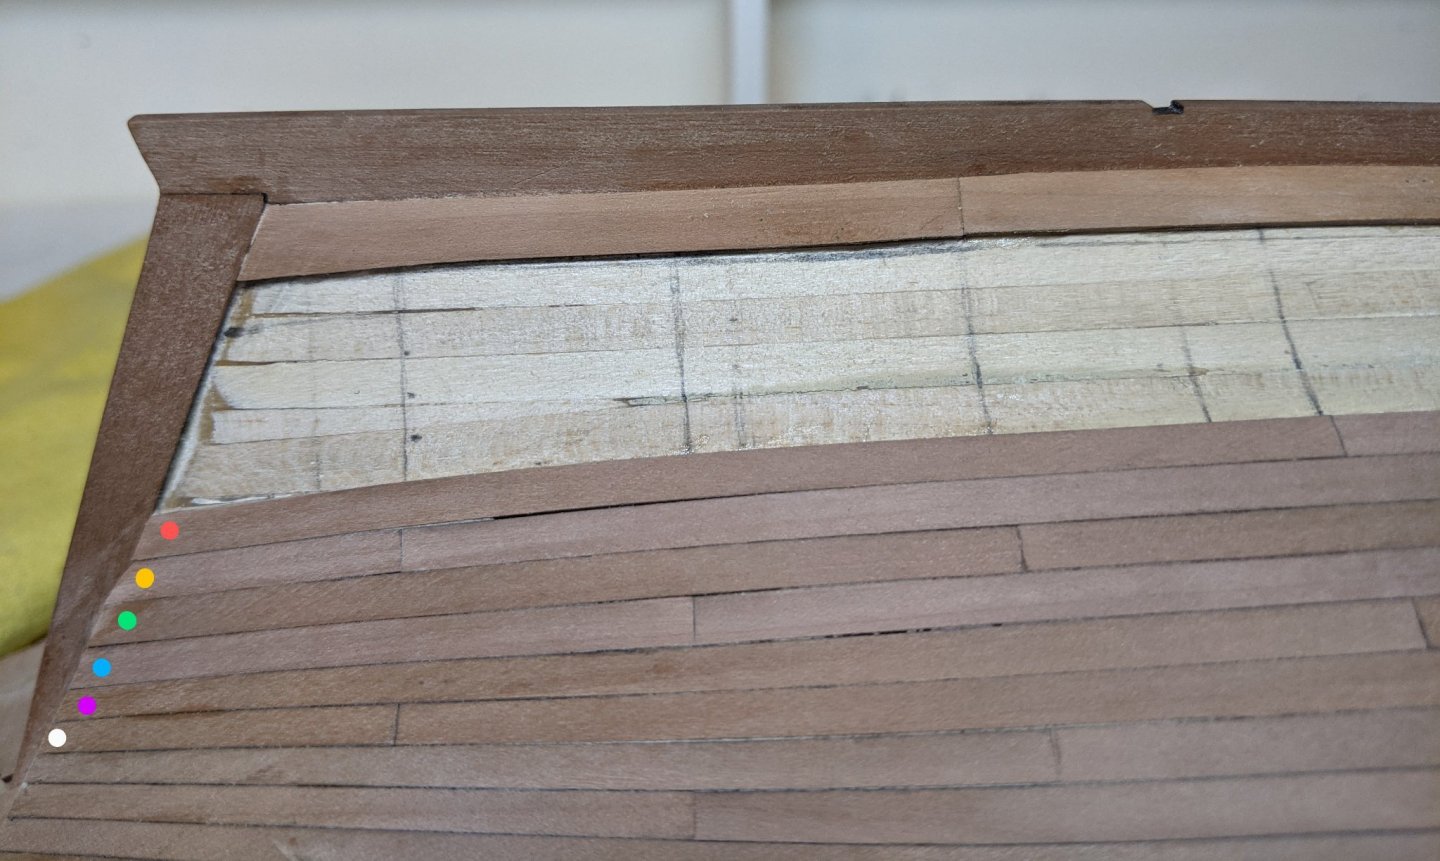
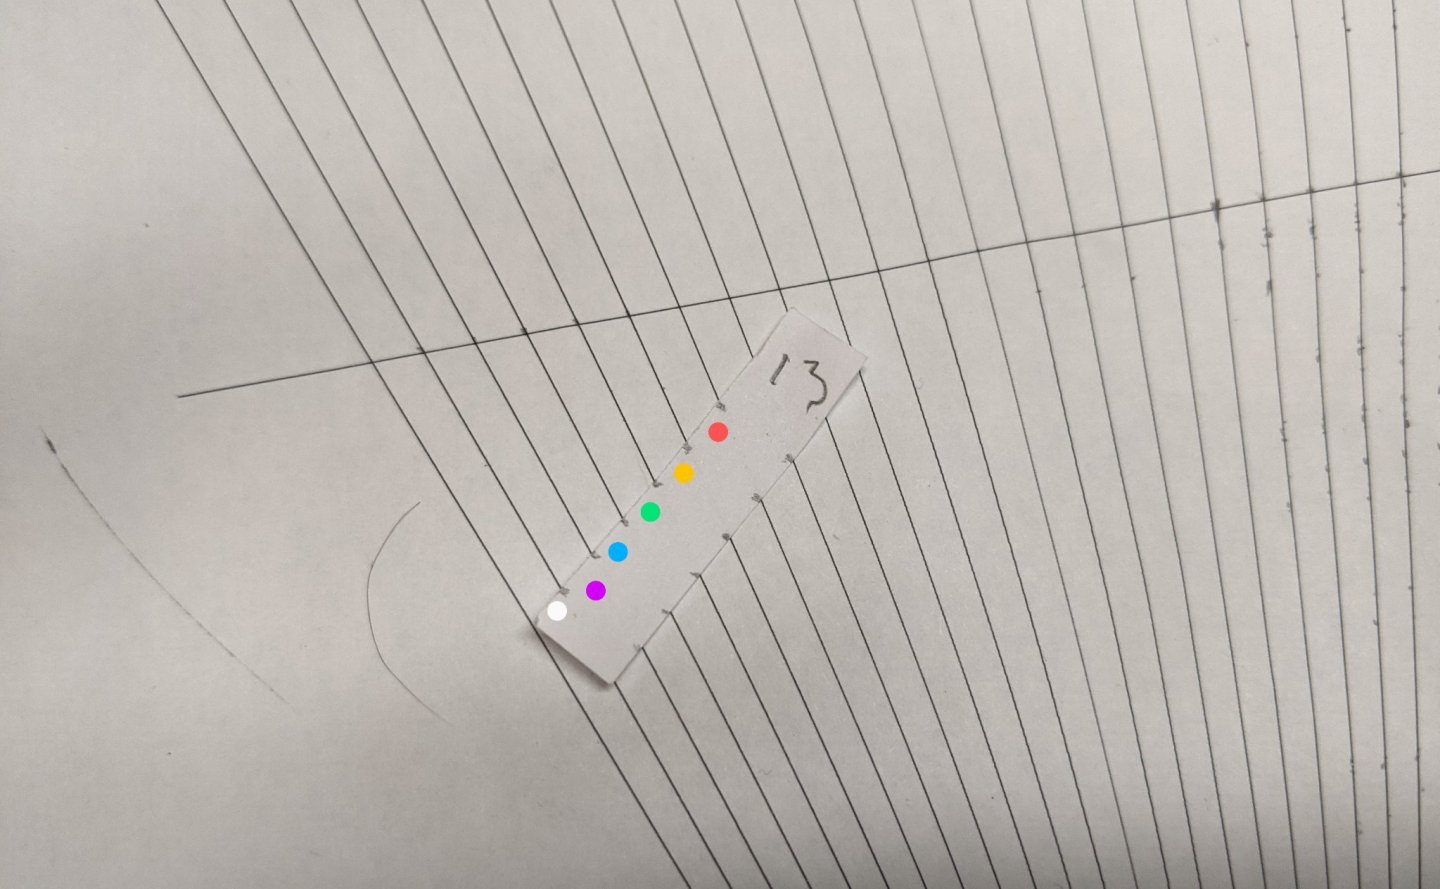
notice how the white mark is further away from the main plank fan line. It is closer to the narrow end of the fan. I positioned it by making the white mark the same width as the previous plank (that plank is unmarked).
I also had to make sure that the widest tick (the red one) didn't exceed the width of the provided strips.
- GrandpaPhil, Peanut6, BobG and 2 others
-
5
-
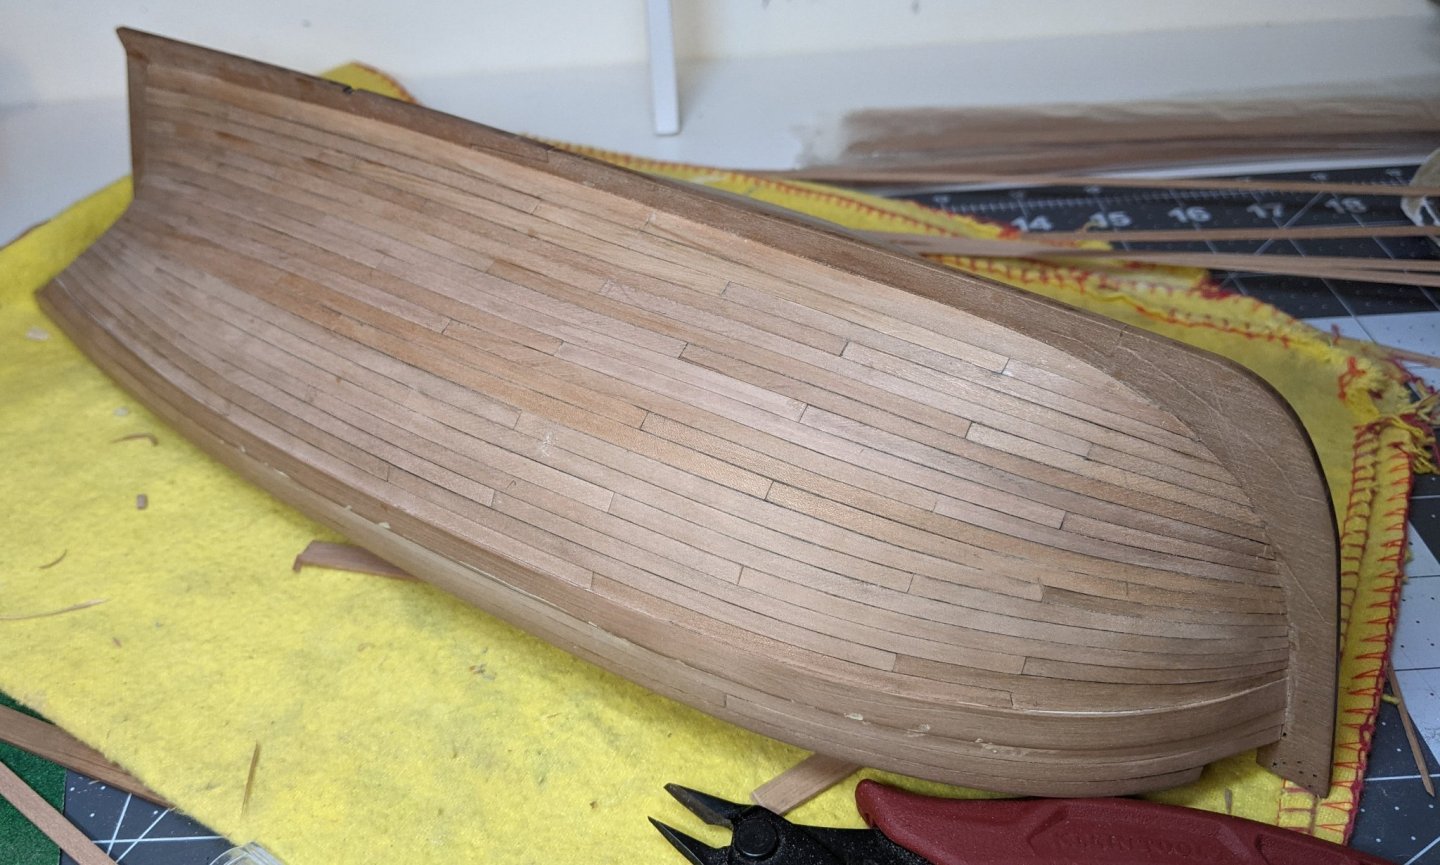
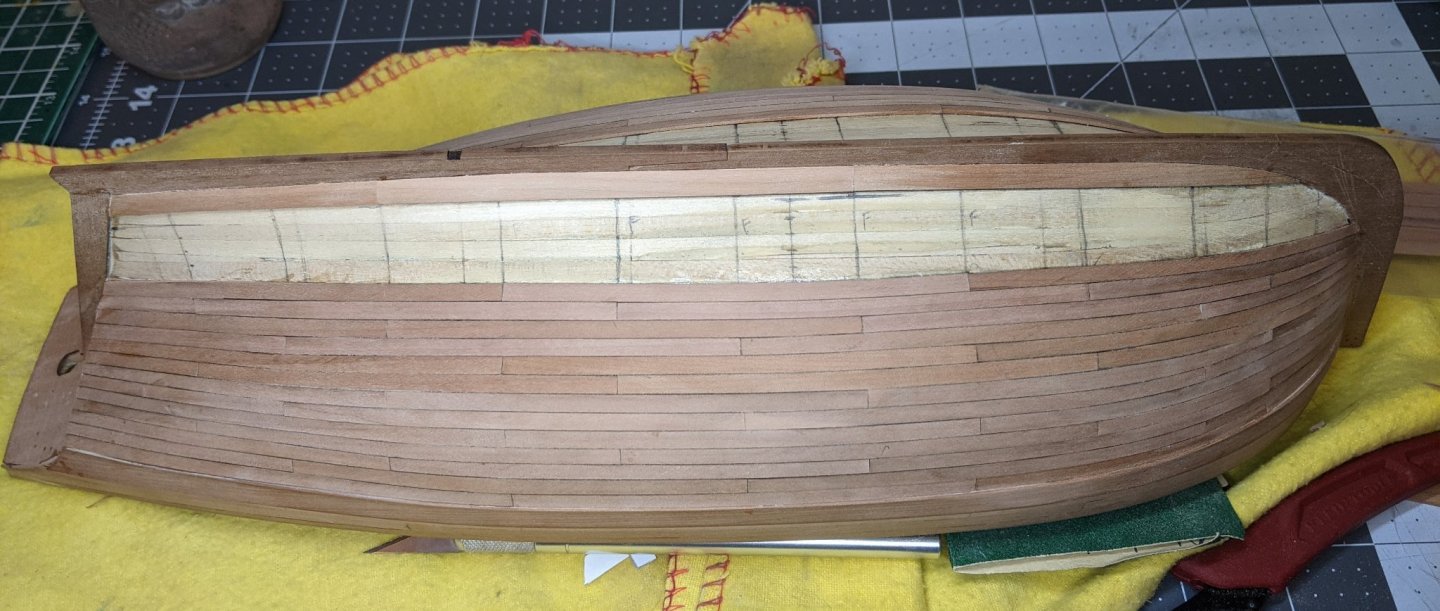
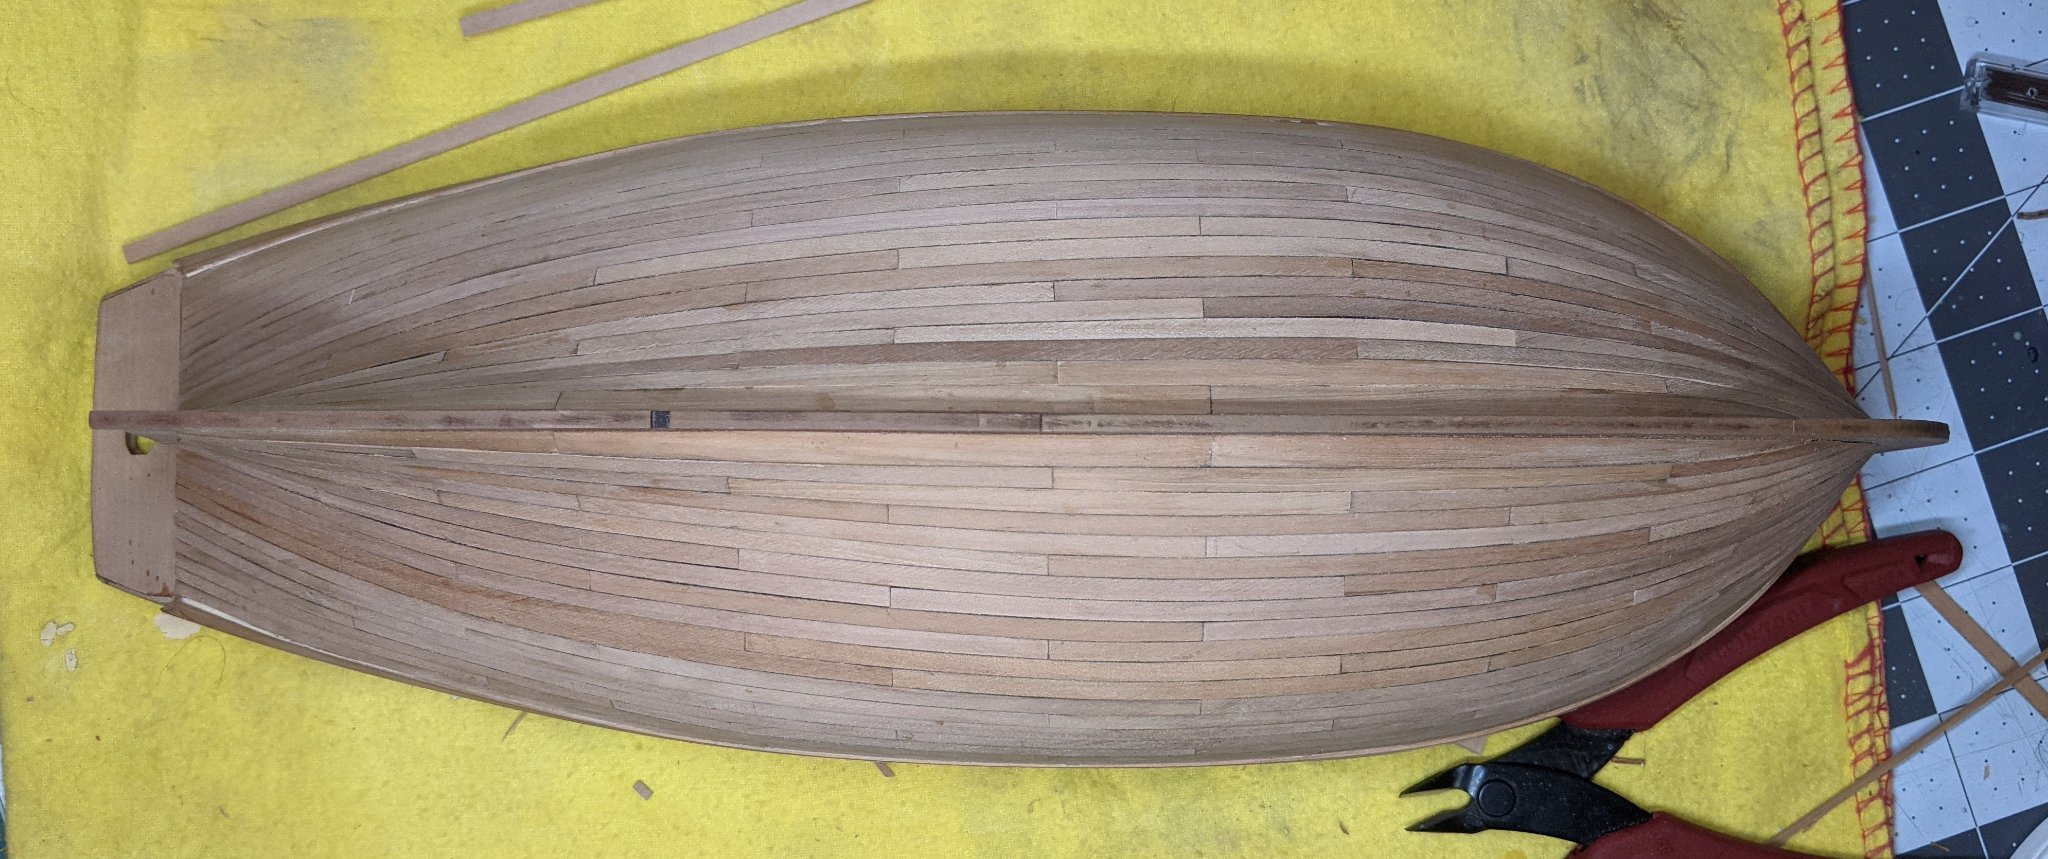
Minor Update, the planking on one side is done.
Thank you to everyone for the likes and the encouragement.
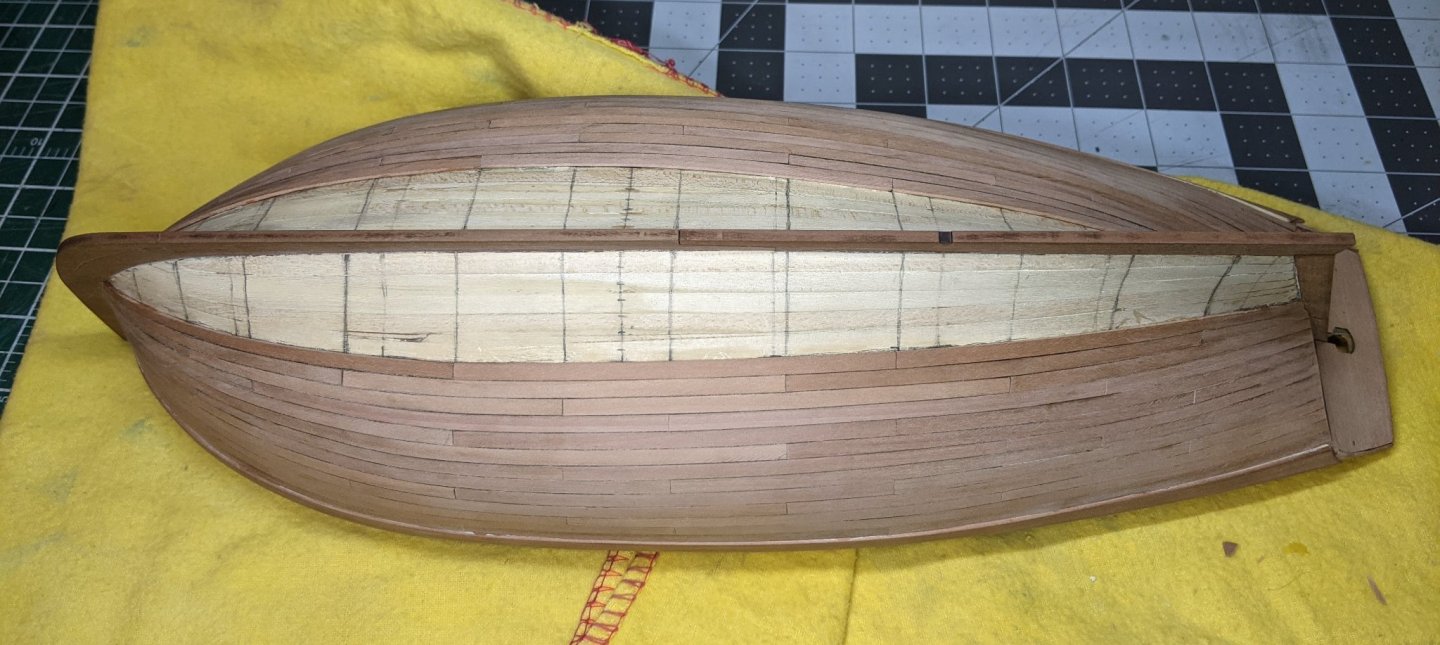
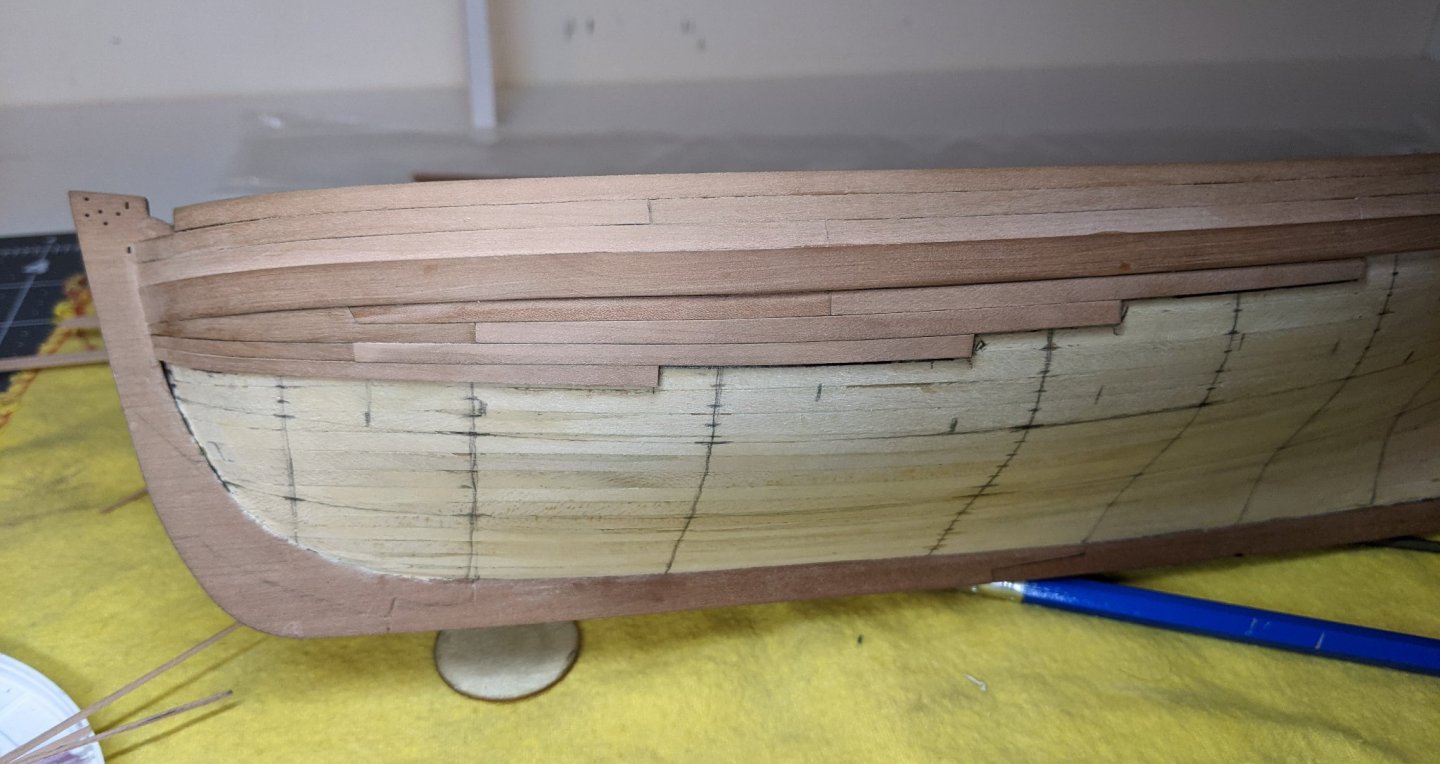
@glbarlow So with the benefit of hindsight I should have made the garboard thinner put in three strakes where above I had two. I had lots of room at the stem, but less room at the first two bulkhead lines. This also resulted in the wider second strake than I wanted at midships. Not a huge deal as this will all be sanded and filled and painted white below the water line.
@Peanut6 If you are talking about how I gradually widened the planks at the stern (which I discussed in log 11). You can see a good picture of the results of this in log 12 (second last picture). Just in case you were talking about something else, as requested see below:

Normally when you use the planing fan you need to make sure your tick strip is parallel to the main line on the fan. All I did to get a gradual increase was to rotate the tick strip which results in the distribution of ticks going from small to large. How I determined how much to rotate was based on using the previous plank to determine the first mark. Then I rotated the strip till that mark lined up with the first plank fan line. I hope this helps clarify it more for you.
- jpalmer1970, Joe V, Obormotov and 5 others
-
8
-
Fantastic work, I am consistently amazed by your work. I have really enjoyed following along with this log.
- Louie da fly, Keith Black, mtaylor and 1 other
-
4
-
10 minutes ago, mcpwilk said:
The planking is superb, but is carvel, not clinker.
Thanks mcp.
I didn't think clinker on my first build was wise
")
Also thanks @BobG and @jpalmer1970 for the encouragement.
- Obormotov, jpalmer1970 and mtbediz
-
3
-
-
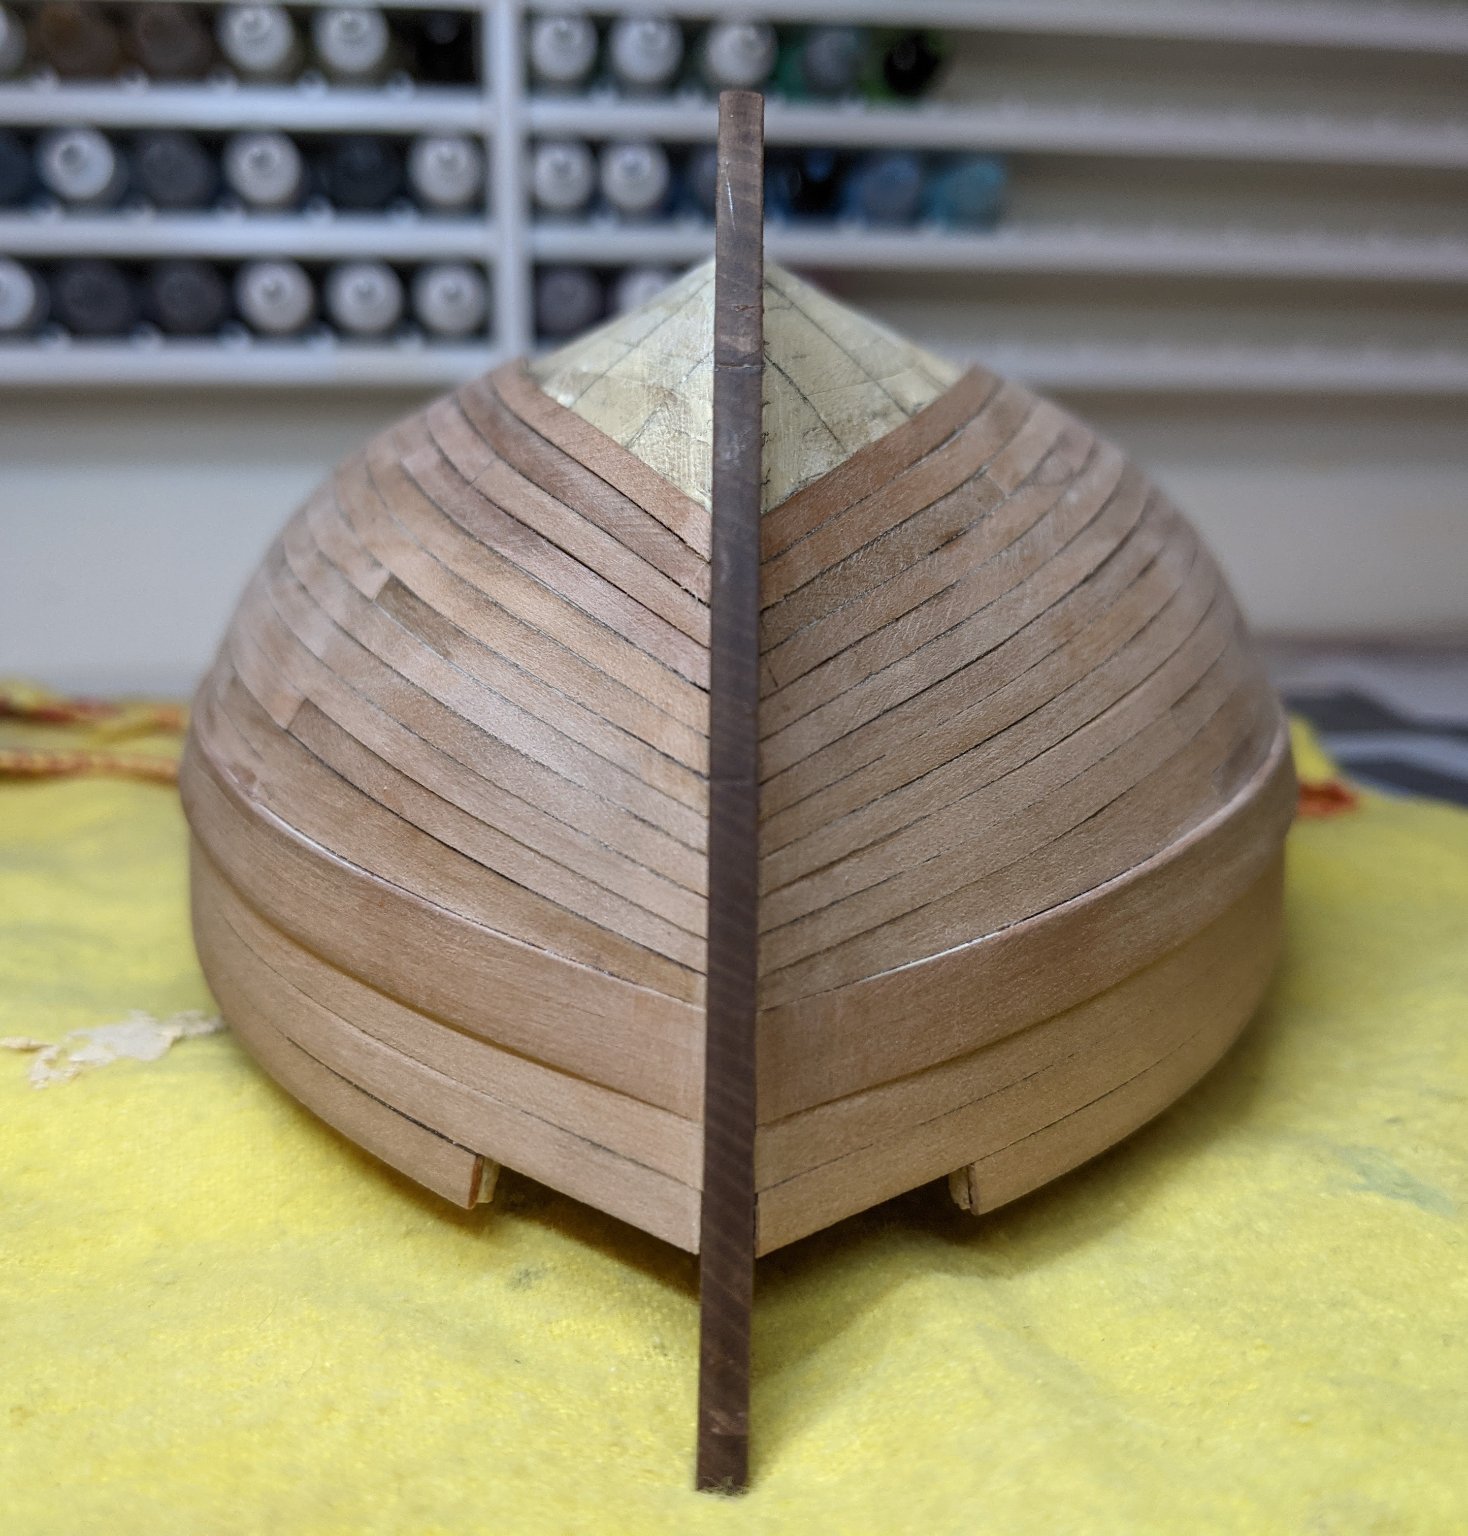
Log #12: The Garboard Strake
With the second band of planking complete it is time to consider the garboard strake.

I have done a lot of reading on where this should be positioned and what it should look like and I am still confused. To make matters worse, the clearest pictures I can find have bows which appear to curve much more sharply. So the part of the garboard that meets the stem has a shape that I can’t reproduce if I want it to fit the alert. The necessary shape of the garboard for the alert thins gradually to a point. The only way I can think of to avoid this is to curve the bottom edge, but that will introduce the requirement of much stronger bends at the bow and everything I read seems to suggest that the top edge of the garboard should be straight at that point.So what follows is my muddled attempts to fit a garboard plank that looks as close to the examples I found as I could make while also conforming to the hull.
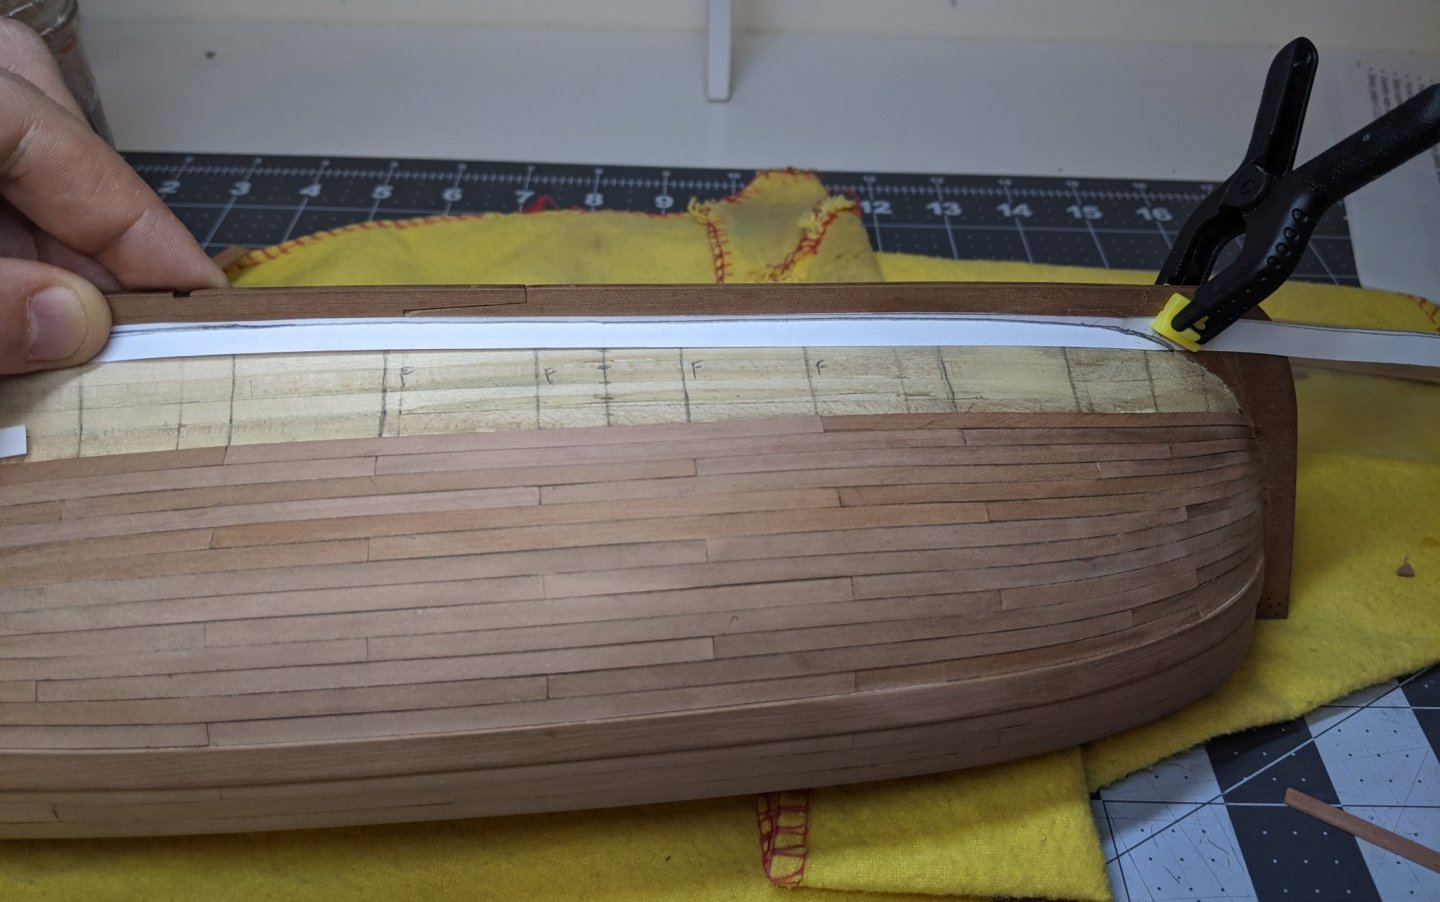
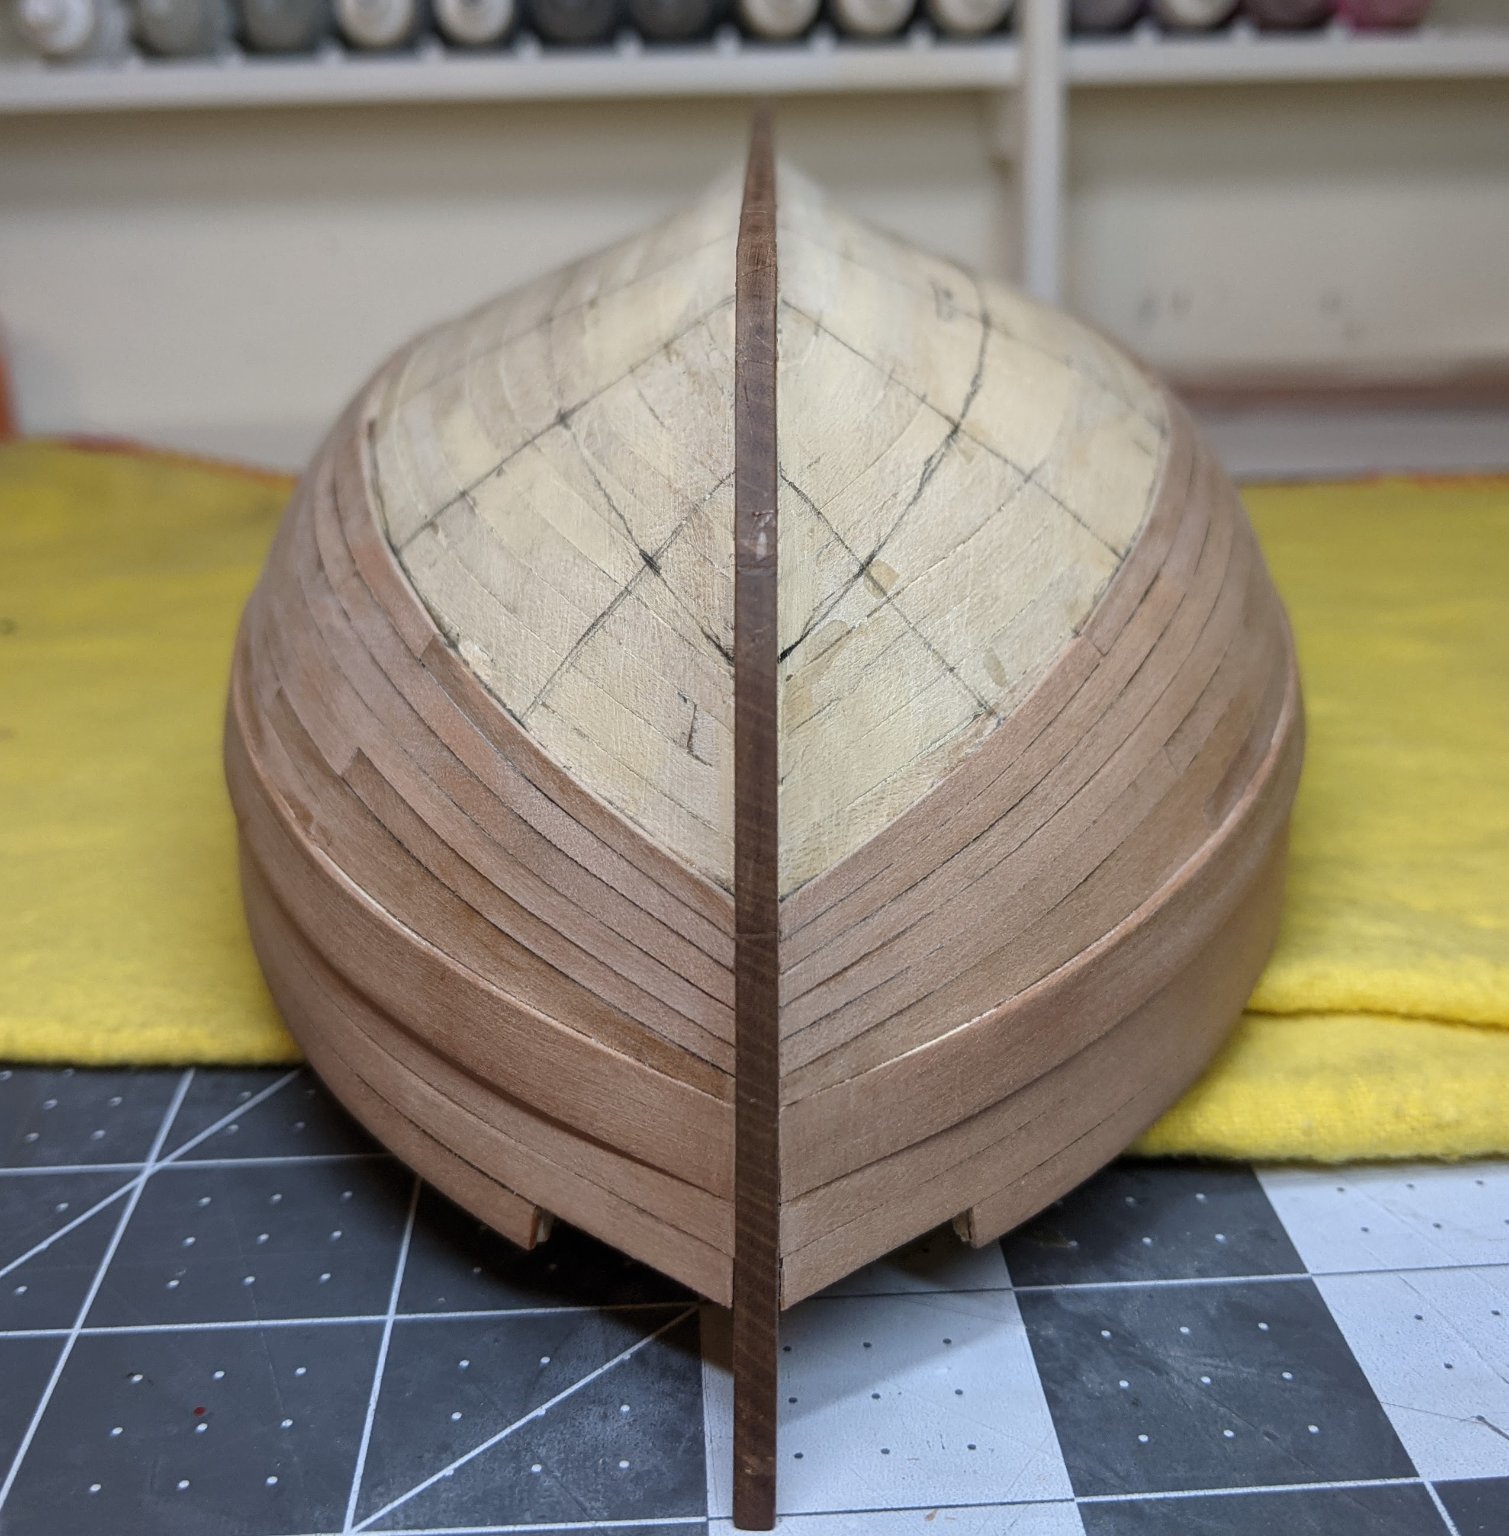
I used a piece of paper I clamped at both ends which I held against the hull and then ran a pencil along the edge between the keel and the hull to produce the necessary taper. I then transferred this shape to a piece of wider pearwood stock I purchased from @Joe V at the modeler’s sawmill.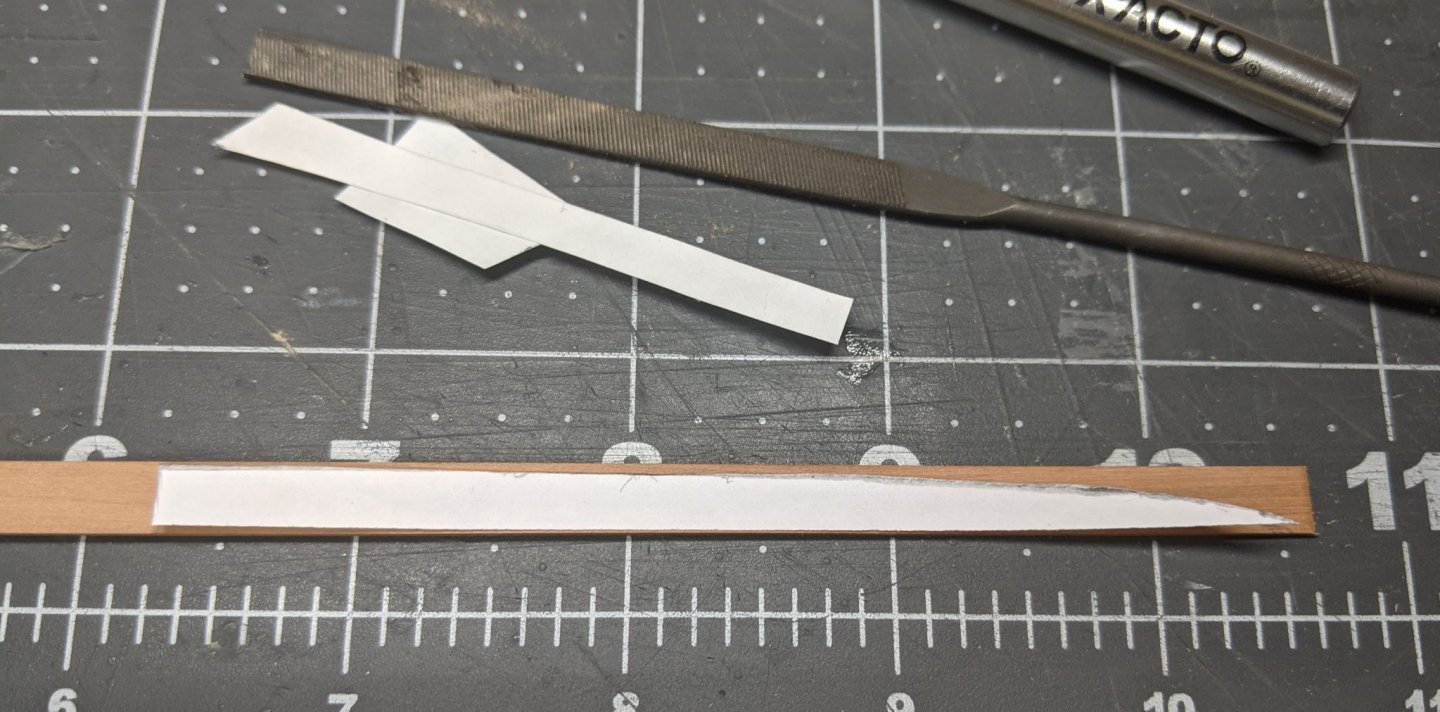
I then used heat and moisture to bend and twist it so it lay in place properly with no forcing required. One of the difficult parts of this process was determining the bevel on the lower edge in order to fit tightly against the keel given there is no rabbet to slide into. Interestingly, while the template appeared to be narrowing very gradually, now that I have the plank cut and bent, it looks much closer to the pictures I was trying to replicate. Maybe part of my problem was just the optical illusion produced by the pictures.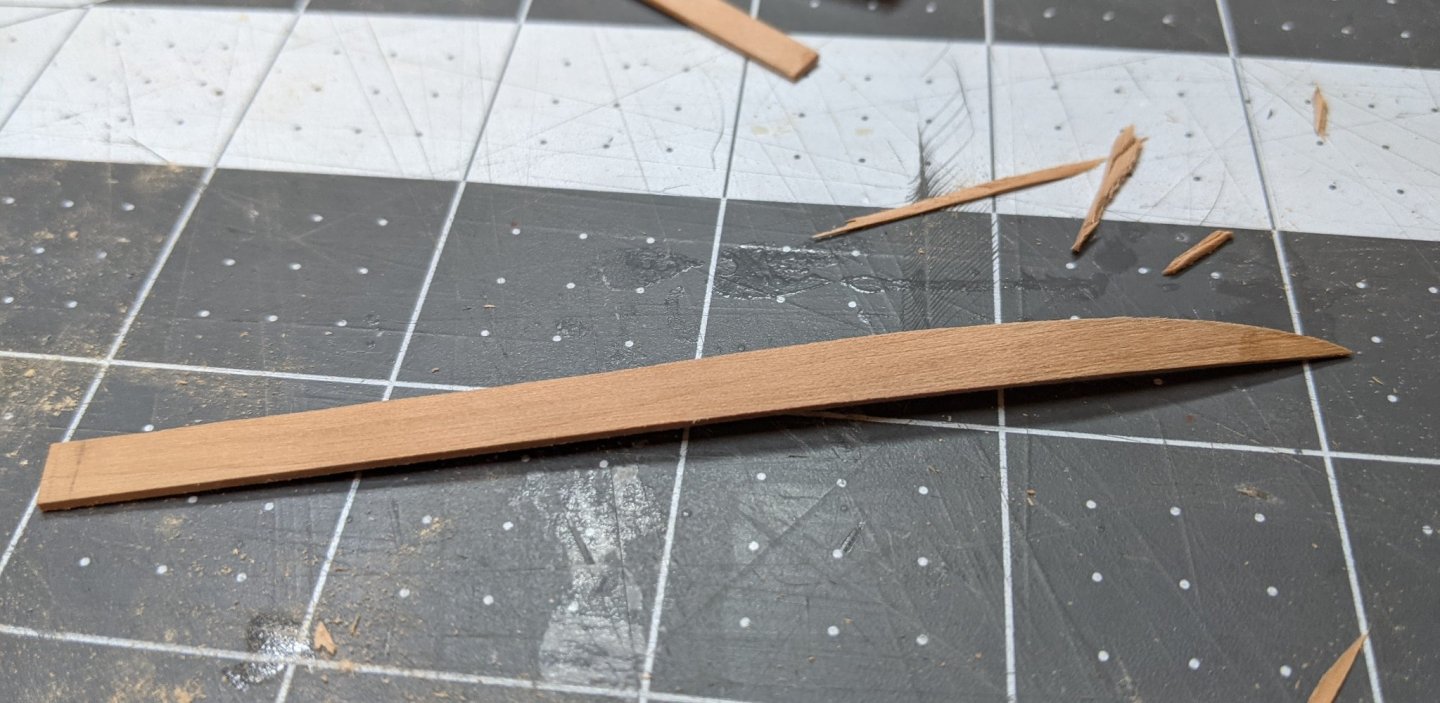
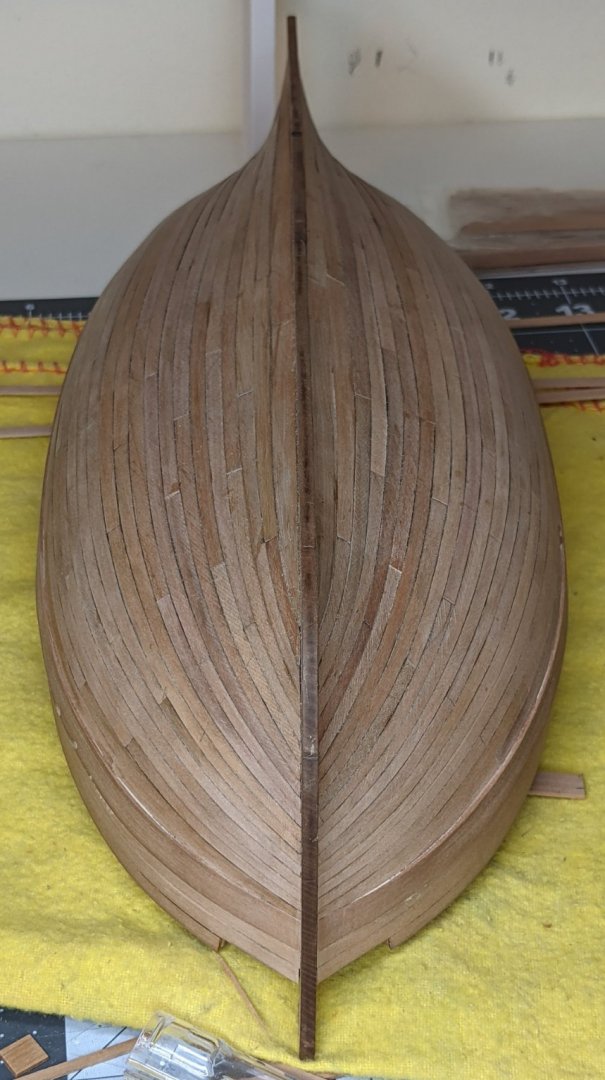
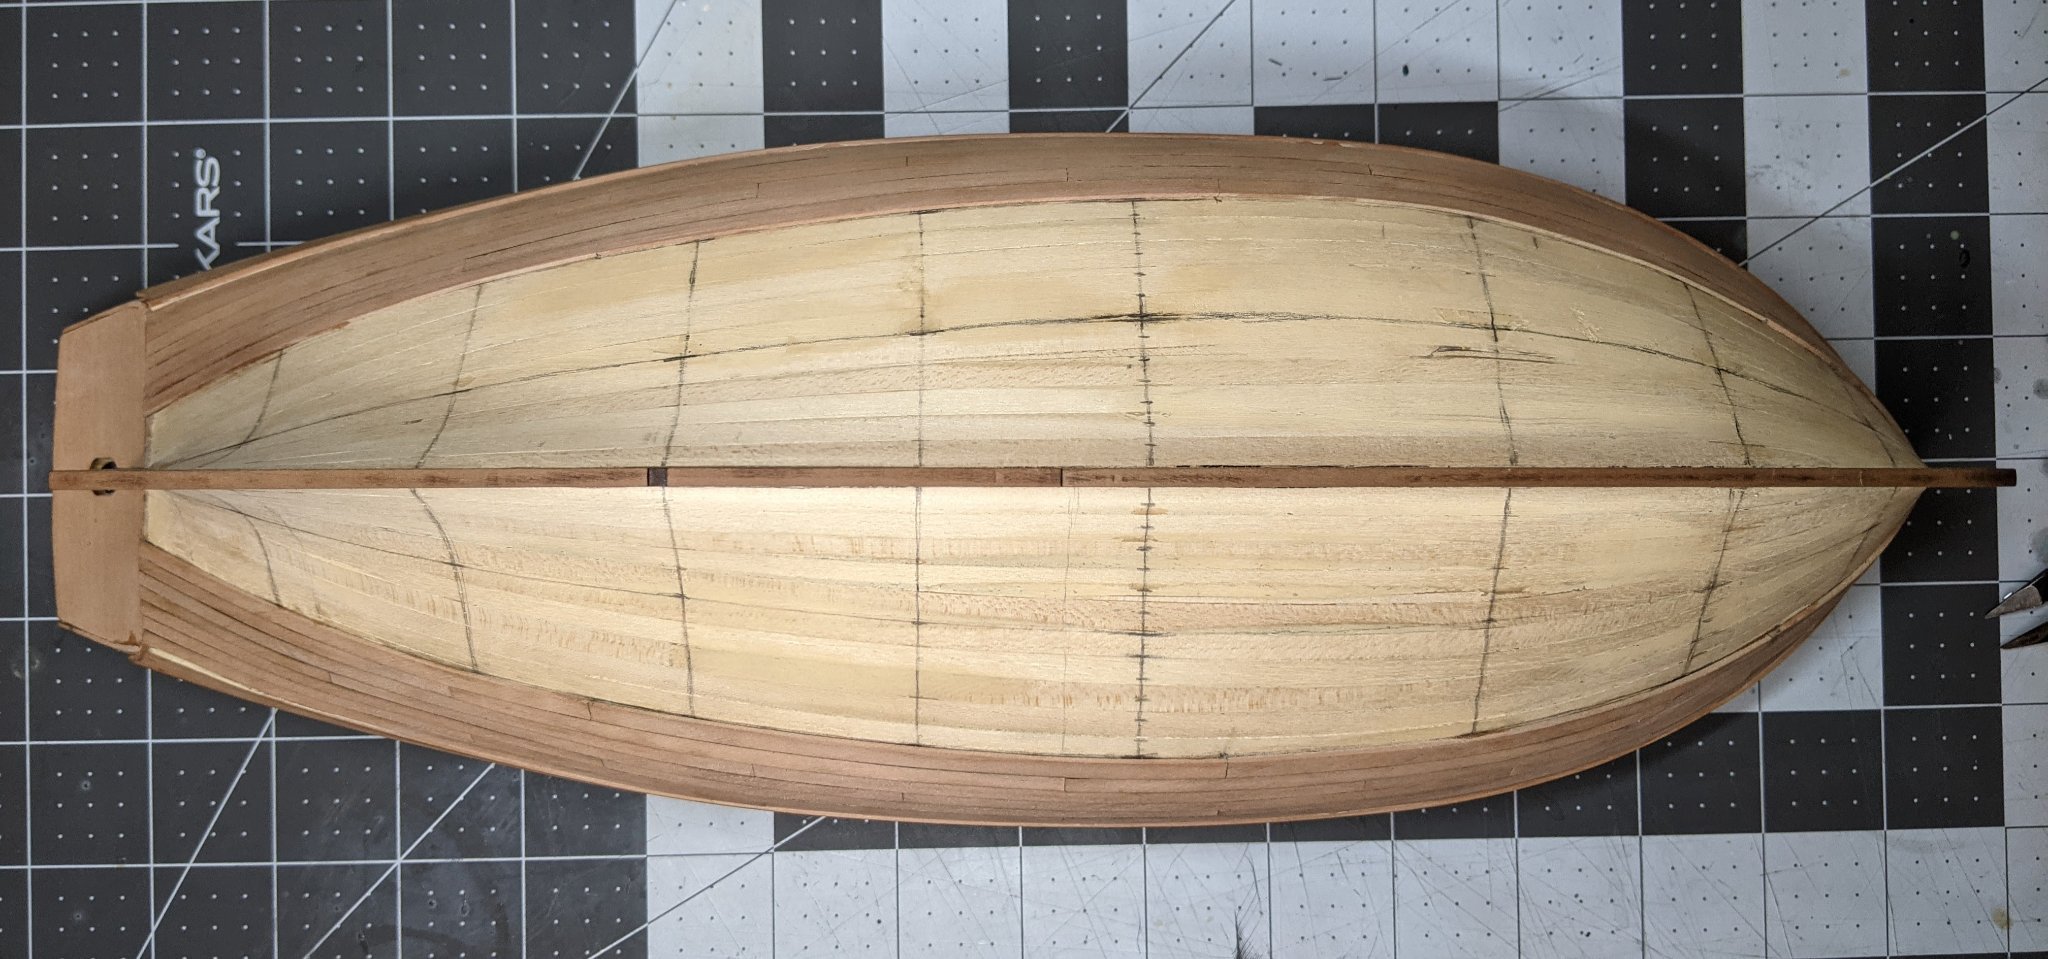
At the stern end I allowed the garboard to widen as it approached the stern post in order to follow the run of the planks at the bottom of the second band.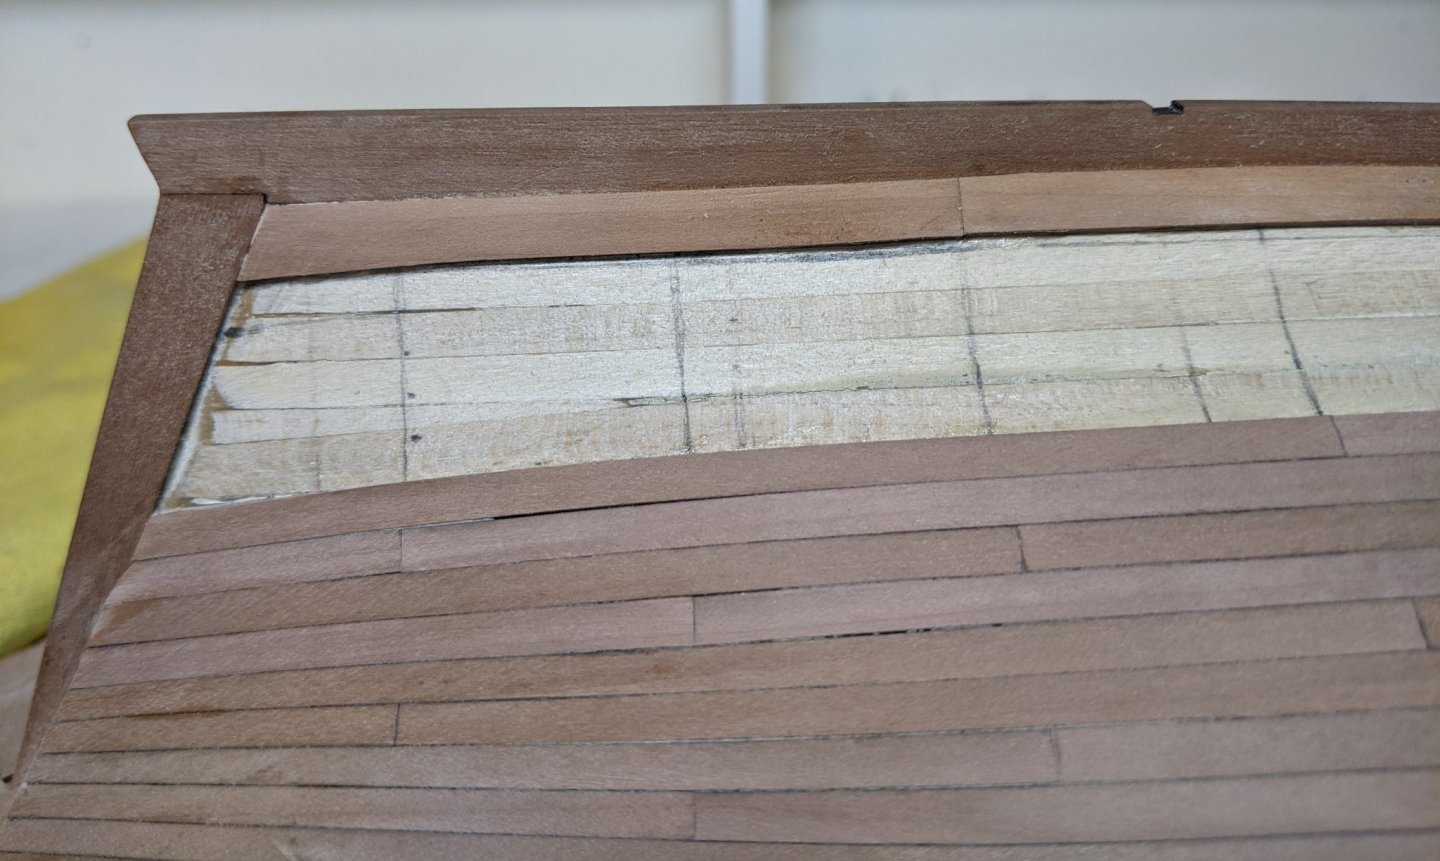
And this is how it looked in the end. Now I just need to finish the final band and the second planking will be complete.
-
-
Great idea with the barrels, it is really coming together now.
- mtaylor and Keith Black
-
2
-
22 minutes ago, Gregory said:
In my mind, lashing usually refers to attaching something to something, whereas a seizing involves binding up a rope or line to itself.
That would have been my understanding too.
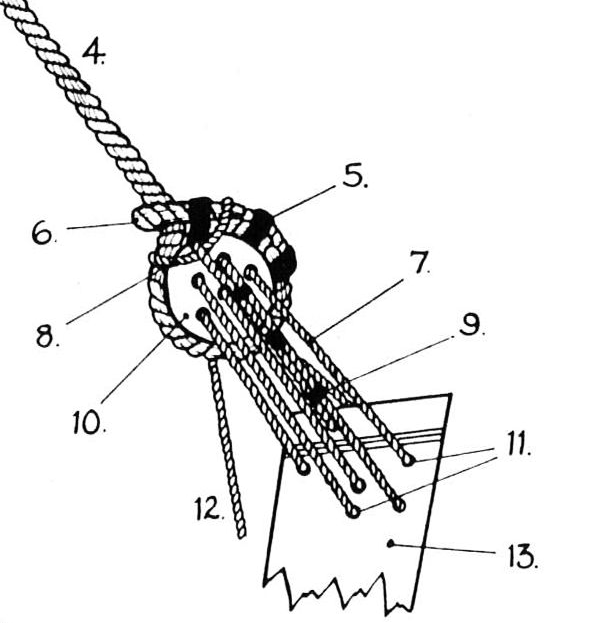
22 minutes ago, Gregory said:Just found this in Lavery's Bellona book He identifies 7 as a lashing between the hearts on the mainstay.
So, this might be what steel is referring to. The Alert doesn't have this arrangement.
Interestingly, the preventer stay on the alert does have the heart arrangement, but Steel only refers to lanyards in the table and Goodwin identifies the connection between the two hearts (very similar to the Lavery Bellona diagram) as being lanyards.
-
I am having trouble figuring out what the lashing for the mainstay would be for a cutter. In Steel's table he refers to lashing ropes in addition to the seizing, and lanyards.

The lashings are a larger diameter than the seizings, but it is not clear to me what they are. In the below diagram Goodwin makes no mention of lashings only calling numbers 5 and 9 seizing. A google search for lashings seems to indicate it was a bit like seizing but used to attach one rope to another. If anyone can shed any light on this I would appreciate it.
-
Log #11: Adjusting the Second Band
I have completed the first band of planking on each side and things appear to be progressing well.
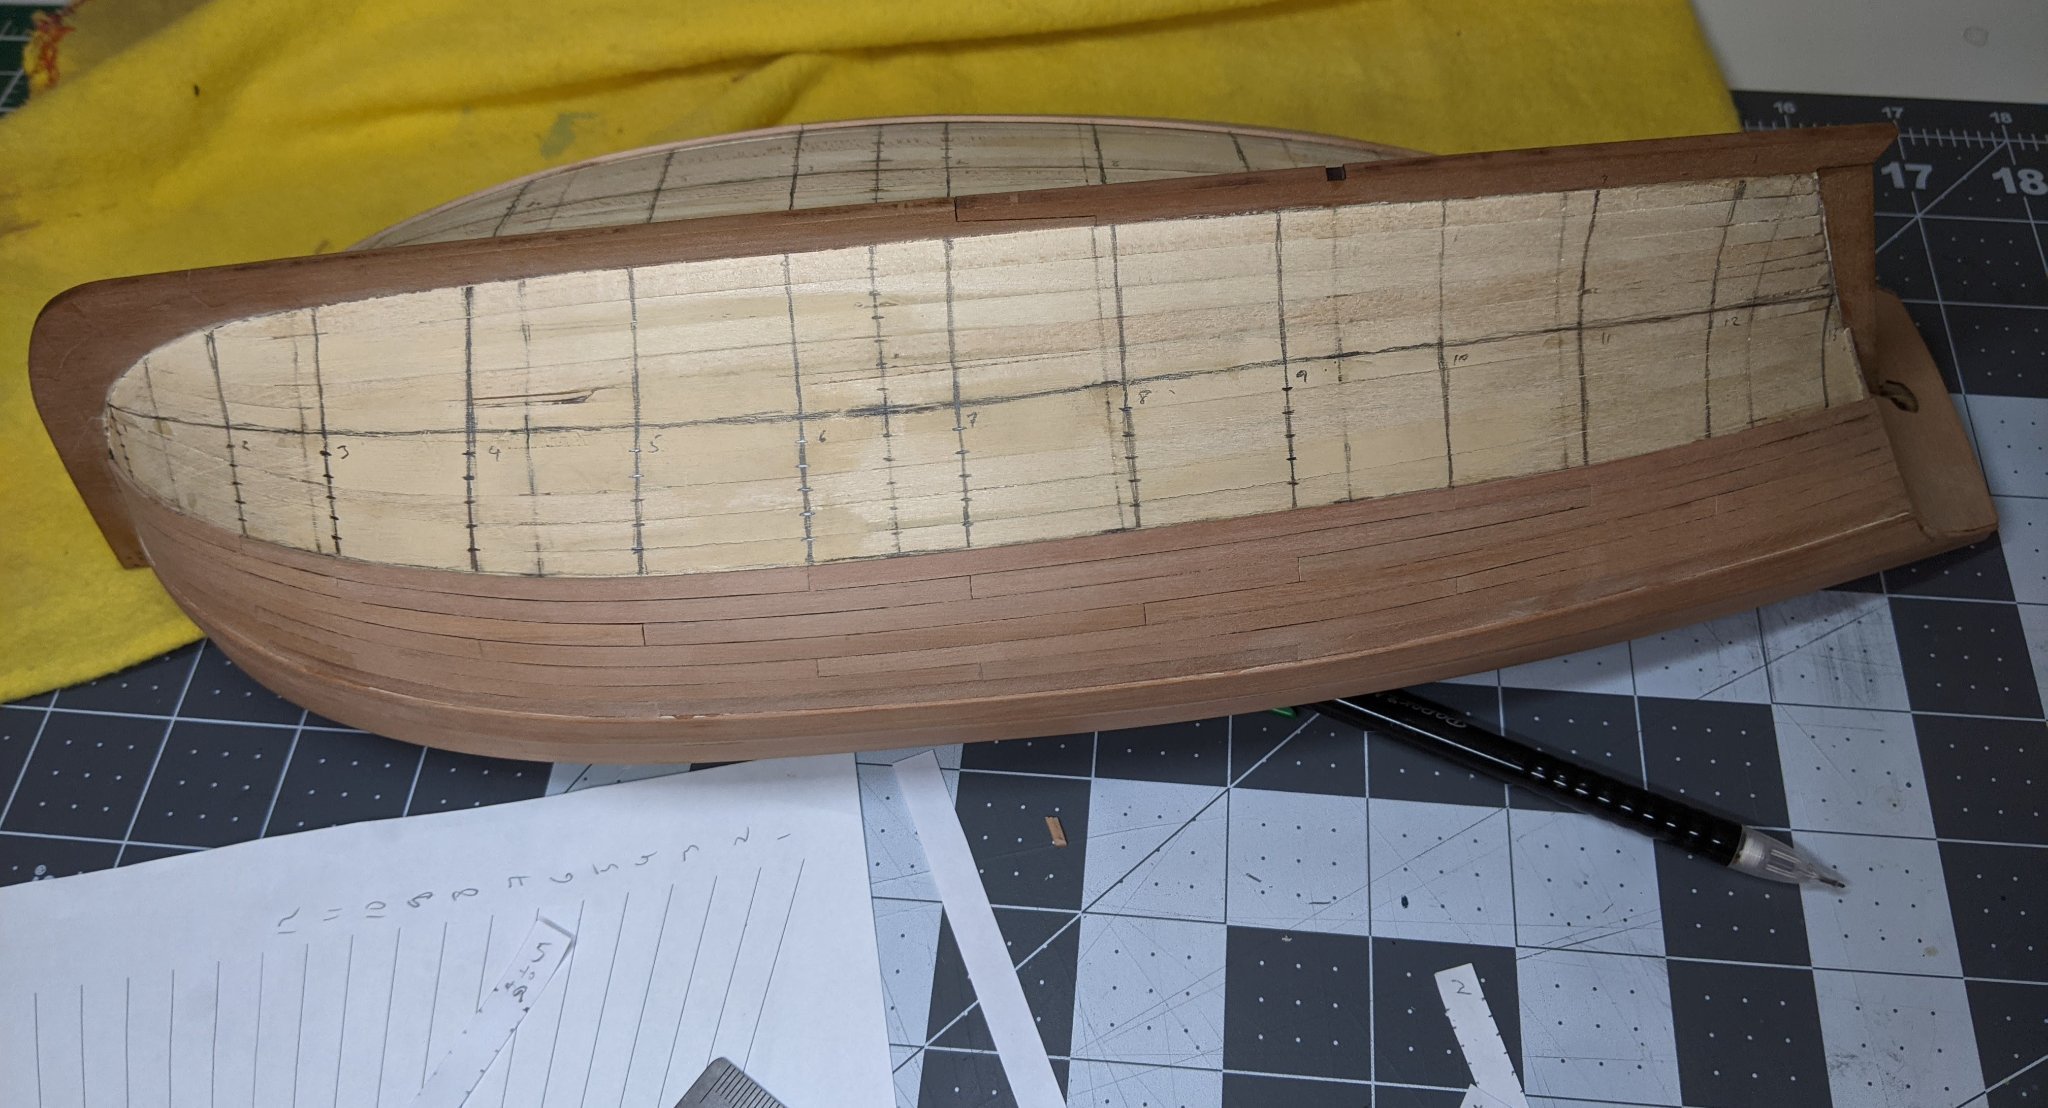
Now that the hull is beginning to take shape, I decided to make some adjustments to my lining off based on lessons learned so far.
The first of these changes was to stop using the bulkhead lines and to draw some new ones that lined up with the plank ends for my planking pattern. While reading @DelF's duchess build log, I came to the realization that the bulkhead lines were essentially arbitrary and I could use as many or as few as I wished.
The advantages of the new system are (1) more precision due to the increased number of measuring points and (2) measuring points that line up with the end of the planks making it easier to cut them to the right shape. Note the lines in the below picture don't look like they are parallel, but that is just a problem of the camera perspective.
With the second band the planks at the stern need to start getting wider (they will be full width in the third band). To avoid a jarring transition from narrow to wide I decided to increase the width of the planks at the stern gradually so that the first will match the width of the first band, but the last will be full width. To do this I simply measured the band using a tick strip as normal, but when it came time to mark the individual planks, I pre marked the first one using the width from the first band and then rotated the tick strip on the planking fan until both the two ends and the first plank lined up. This produced a continuous transition from narrow to wide which I then transferred to the stern.
Now I just have to finish the second band. In may next log entry we will discuss the garboard plank.
-
Just read lots of build logs for the lady nelson and take your time. You may also find a lot of helpful info in build logs for similar cutters such as the alert. Rushing will only cause things to take more time when you have to go back to correct previous errors.
You will make lots of mistakes. The great thing about working with wood is that most mistakes can be corrected.
Good luck and enjoy.
-
It has been quite a while since I last posted so I figured I would give another minor update.
I am still plugging away at the second planking, but have had very little time to work on it. I finally got an evening I was able to block off to work on it and have made some headway on the first band on the port side.
-
Maybe to add some more weight in favour of single blocks for most smaller guns is some stuff I found in the 1891 textbook of seamanship. In the section on tackle it refers to gun tackle now (in the late 1800s) using either a single and a double or two doubles where previously two single blocks were used.
Interestingly it notes that:
Power can only be increased at the expense of time, hence there are many cases on board ship where a great deal of purchase would be a positive disadvantage. Were treble-blocks used for the side tackles of a broadside gun, the gun could be run out more easily than with a double and a single block, but then it would be longer in running out, and there would be an inconvenient accumulation of fall.
This seems to suggest that likely two singles would have been used for somthing small like a 6pounder.
Edit: it seems to me that Goodwin was convinced of the single plus double arrangement because I managed to find his diagram of the tackle for the 6pounders in his book on the blandford and he is using the same single plus double arrangement as he used for the alert book. So now I am second guessing my conclusion :).


HM Cutter Alert by Thukydides - Vanguard Models - 1:64 - first build
in - Kit build logs for subjects built from 1751 - 1800
Posted
Log #14: Building the Transom
Since I broke the stern transom, I decided to go ahead and rebuild it from scratch. Doing this allows me to (1) align things a bit more with Goodwin and (2) try and fix whatever errors I previously made at the stern.
The attaching of the transom is one area of the manual I wish there had been more pictures (the manual only has diagrams of this). The reason I snapped the transom was in my efforts to see how it was meant to fit. The instructions seemed to indicate I should have the lip, but then I have trouble seeing how I could avoid an ugly edge showing. In addition, things were not lining up completely (likely due to previous errors on my part).
So I decided to remove the lip and attach a new transom right on the back. This would also allow me to plank the stern counter and cover up any edges with the counter rail.
To construct the transome I first bent two wider (and thicker) planks that I had to replicate the curve on the bottom of the original transom. The reason for bending them together was to ensure that they fitted together properly.
I then used the old transom to trace the pattern onto the planks making sure to leave some extra room at the bottom where originally the transom would have rested on the lip.
Then I carefully cut it out using a razor saw and my craft knife. I glue it in place with some difficulty (I almost glued my thumb to the counter) and filed the edges to get everything to line up properly.
And this is how it looked in the end.
I still need to adjust the curve on the top of it a bit, but that I can do by carefully filing it down. Next I need to finish the last plank of the counter to cover up the bottom edge of the transom. Then I can work on planking the inner bulworks and adding the side pieces to the transom.