


Thukydides
-
Posts
1,271 -
Joined
-
Last visited
Content Type
Profiles
Forums
Gallery
Events
Posts posted by Thukydides
-
-
I like the setup, it has some heft to it and fits nicely between the flag lockers.
In terms of the use of them, it does seem to be a bit of a mixed bag. There are examples from the 1790s of ships both with and without the ensign. I suspect it probably was based on the views of the commander though I have noticed that earlier contemporary paintings 1770s tend to have more of them than the later ones post 1800s. Now this is just a qualitative assessment based on the limited pool of ship paintings I have been looking at.
- Blue Ensign, Mr Whippy and jpalmer1970
-
 3
3
-
-
That is a lot of belaying pins to make.
- GrandpaPhil, Canute, mtaylor and 1 other
-
4
-
Looking good, she does have really nice lines. It is a great moment when you get the shrouds and stays in place, I feel it is the moment they start to look like a sailing ship.
Slow is good on the rigging, lots of skills and tricks to learn. By the time you are done you will finally start to know what you are doing 😄.
-
She is looking good, I like the patina, very visually striking.
-
I have been working on the other pendant and trying to be more precise, add more twists to the serving line and using even less glue than before.
I think I am finally at the point where the flaws are not visible with the naked eye.

Once everything is under tension on the model I will give it a coat of watered down matt varnish to make extra sure everything stays in place.
-
You are making good progress Glenn, great job.
I suspect that with regard to the fiddle block it is just a compromise on the part of the kit. For alert the fiddle blocks for the running backstays are also represented in the vanguard kit as two blocks on top of each other. This is one of those things that is not super noticeable unless you are looking for it and so I suspect Chris decided it was an acceptable compromise. This will always be the case with a kit and those of us who care about such details can easily fashion a fiddle block ourselves.
-
Slow and steady is the way to go, you are doing great.
One further minor comment. The ring bolts on deck look like they are sticking up more than they should be. Technically the "circle" should be partially submerged in the deck. At the very least there should be no part of the "stick" showing.
- BrochBoating, AJohnson and Mr Whippy
-
3
-
36 minutes ago, AJohnson said:
The other thing to consider is if you are going to rig your cannons. I have found out the hard way it is easier to rig them off the model than on. So you could leave the eyelets off until you rig them (if you are). I made a little jig to do the cannon rigging on my Trial and @Thukydides has really good posts on his Alert build log on his process for pre-rigging cannon.
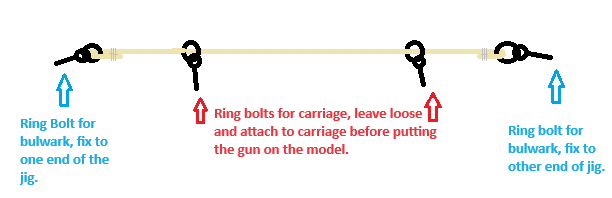
Agreed opening out holes in bulwark sides is a bit fiddly, but slow and steady usually works out.Just as a note though my gun tackle process was fine, I would not recommend following my method for the breeching ropes. I realized after I was done that it would have been much easier to rig the breaching ropes not on the cannons themselves. So don't attach the ring bolts to the carriages, just slip them on the breeching ropes while rigging them and then glue them on the carriages after the fact. That way you can easily do the seizing to the bulwark ring bolts and make sure they are all the same length. I did not do this and regretted it. You could make a jig to do this, see the below drawing illustrating what I mean.
- rvchima, BrochBoating, wvdhee and 2 others
-
5
-
Are you planning on serving your foremost shroud / stays? Also are you planning on serving where the shrouds loop the masthead?
I ask because if so it will be much easier to do so off model and then slip them over the top. So if it was me and I were serving things I would build the mast up as I worked my way up. For a much simpler version of this you can see how in my alert log I have been slowly building up the mainmast as I rig my way up it.
-
2 hours ago, AJohnson said:
Thank you for sharing your insights and learned techniques for working on such small ropes. I am definitely going to try an emulate your work on my Trial when I get time to return to it.
One solution I have been trying for fixing rope is “Matte Medium” used for acrylic paintings, it dries clear and has a matt finish. So far it has not left a white or flakey residue. I have got Liquitex branded, a small bottle to experiment with.Thank Andrew,
As with Alan, I appreciate the suggestions.
I should give matte medium a try, however I have been using acrylic matt varnish which is essentially the same thing with a bit of resin in it (so a bit stronger).
With the polyester rope the issue is that it doesn’t bond to glues as well as cotton rope does and so if you need the bond to have strength then I have found that I generally only trust supper glue or fabric glue if the joint will be under tension. I did a test a number of posts back where I tested the strength of various glues to hold a knot and fabric glue came out the winner. I then just add watered down matt varnish over to remove the shine (to be fair I coat everything in matt varnish once it is fully secured on the model).
With larger ropes the visibility of the glue is not a problem as it wicks into the gaps and you don’t see it, but with the tiny ropes it is hard to ensure that not too much glue goes on the surface. The other issue is the amount of bending that happens in a given area. Larger ropes (by virtue of their size) have much more gradual bends as I am working with them (sticking needles into them, getting them into place etc…). In a perfect world if I use the correct amount of glue, at the correct dilution and don’t bend the ropes much afterwards then there is no issue. The white stuff comes from either too much glue or the glue has been separated in some points from the rope leaving an air gap. I have found that with smaller ropes this is pretty much inevitable. The picture I showed was the worst example of the 4 I did just to illustrate the point (also in this particular case the area was going to be covered so I wasn’t being as careful as I would have on an area that could be seen).
This is all to say that it is totally possible to use glue and not have it look bad, I have just been removing it as much as possible as particularly on tiny dark ropes which I need to serve, the chances of a slight error leading to a bit of white stuff is really high. Also if I don’t use glue then it is easier to undo work that I don’t think is good enough without having to completely start over.
- BenD, CiscoH, jpalmer1970 and 3 others
-
6
-
2 hours ago, AON said:
First let me say I haven't done a miniature eye splice (yet) and I am impressed with anyone that manages it so well.
With full size rope, I find that gripping it either side of where the eye splice will be, twisting to unravel the strands and pushing both hands together will open the strands to get a spike or fid into and hold it. I imagine with small scale rope (1:64) the same will likely be true, the needle being your fid or spike, though a third hand might be useful. This might make it easier to make sure you don't pass a strand through a strand.
When the splice is done I would put it on the floor, step on it with my shoe, and roll it back an forth under my body weight to tighten it up. I imagine rolling the scaled down version between a pinched thumb and finger would do the same thing.
One day I will have to try this all for myself.
Thanks Alan,
I always appreciate these sort of comments as it makes me stop and think about what I am doing.
I should first say that my experience is fairly narrowly confined to using the polyester rope from ropes of scale and the lessons I have learned may not fully apply to other fibre types etc…
You are correct on the twisting, I do use this somewhat for the larger rope sizes, however as things get smaller (below 0.5mm) this becomes harder to do. The problem is twofold. First seeing the exact space to open up and second actually untwisting that part. As you can see from the pictures in my post the entire splice takes place over a 2mm or less length and so fingers are not great tools for precisely opening up the right place.
The polyester rope also has a tendency to resist being opened up and instead just wrap back on itself so that it just twists. Now you may find a better method than I could for precisely opening up the correct location, but I have found it is easier to just lay it on the table where I can get my head the right distance away for my magnification to work and slide in a sharp needle which does the job. Basically the necessary work to set up something with say quad hands might take longer than just carefully sticking a sharp needle into the rope gab. You can feel when you get it right because the resistance is much stronger when you go through the strands as opposed when you go between them.
On the needle handle I was using needles, but I found the sewing machine needle with the eye at the front worked better and having a handle just makes it easier to manipulate (plus I don’t loose them as easily).
- AON, jpalmer1970, DB789 and 1 other
-
4
-
Log #78: Methodology for preparing small ropes
Thanks to everyone for all the encouragement, I do really appreciate it all and it is nice to hear that you guys think the rigging is looking good. Sometimes when you have been staring at something trying to figure out how to make it better for a while all you can see is the flaws. In any case I think I finally have a method that works reasonably well for dealing with these small bits of rigging and the secret is essentially three changes to my methodology:
- No glue - One of the biggest eyesores is visible glue flakes. These catch the eye and are often readily visible with the naked eye. No matter how careful I was I found that inevitably something was put where it shouldn’t be so the solution is to pretty much get rid of glue.
- Twist - The fly tying thread I use for serving and seizing these small ropes is not twisted very tight and consequently has a tendency to lay flat. This has two problems, first there are lots of little hairs and threads hanging loose, second there is no visible rope in the serving. There should be a distinctive spiral of rope going round and this is actually quite noticeable even with the naked eye, though you might not know why one looked better than the other.
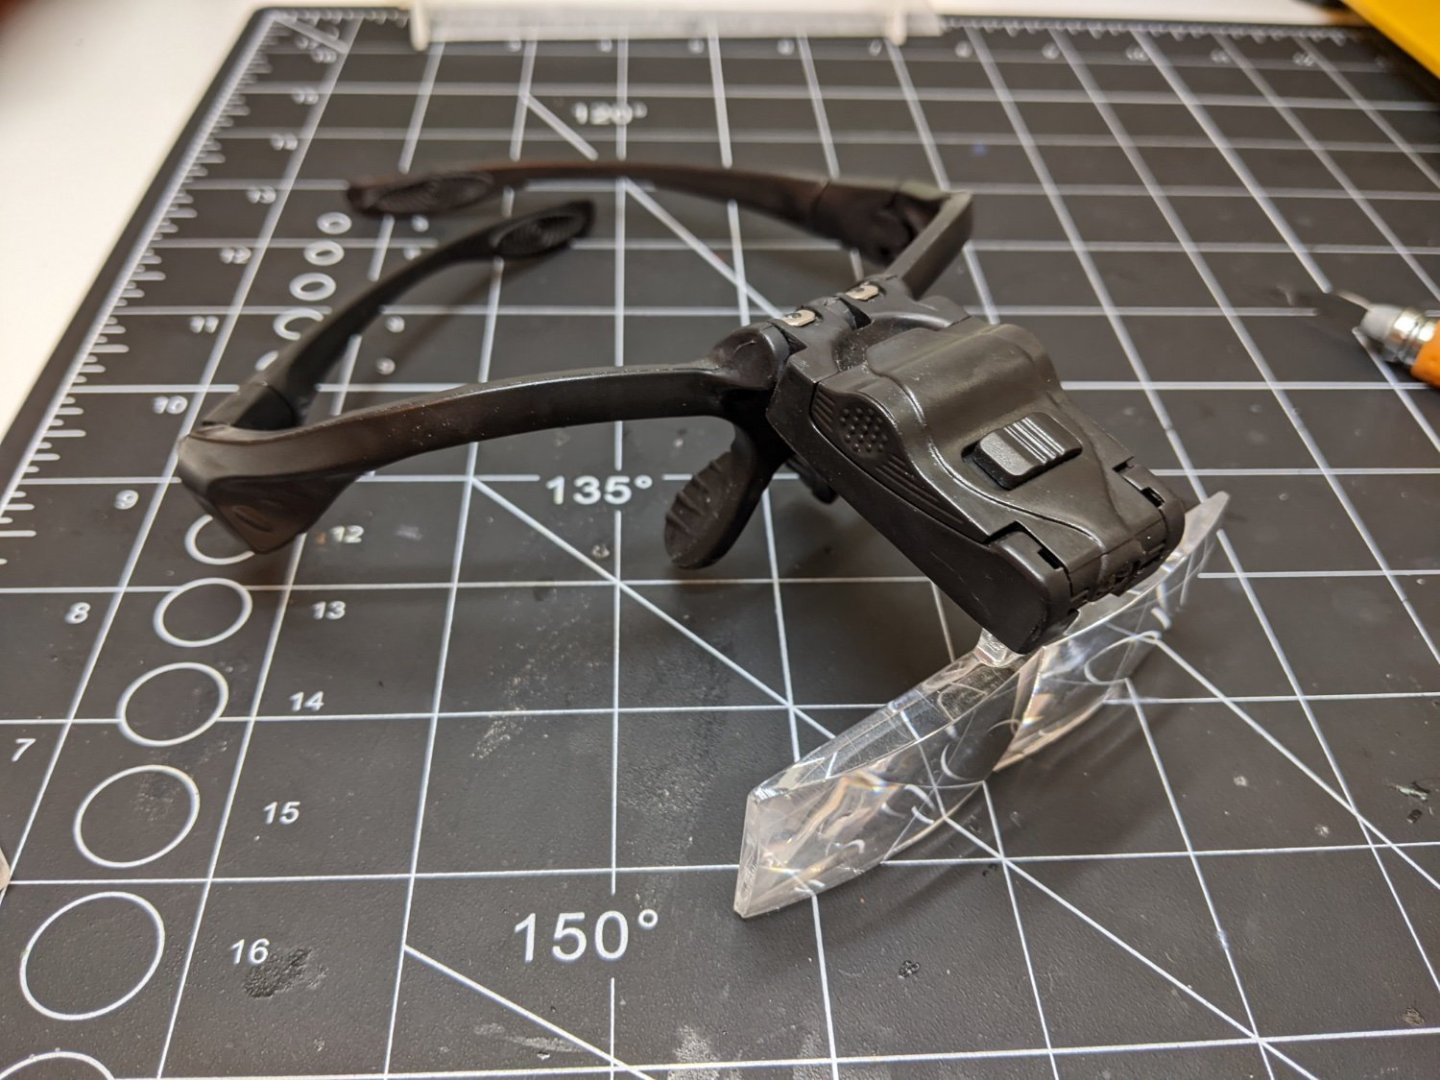
- Magnification - At the end of the day I realized that when working with the smaller ropes I need to use magnification. It is pretty much impossible to get it right without it as annoying as it is to use. This also has a side benefit that it slows the process down, but that actually helps matters as going slower also helps to improve the quality. See below for the glasses I use ($20 on Amazon).
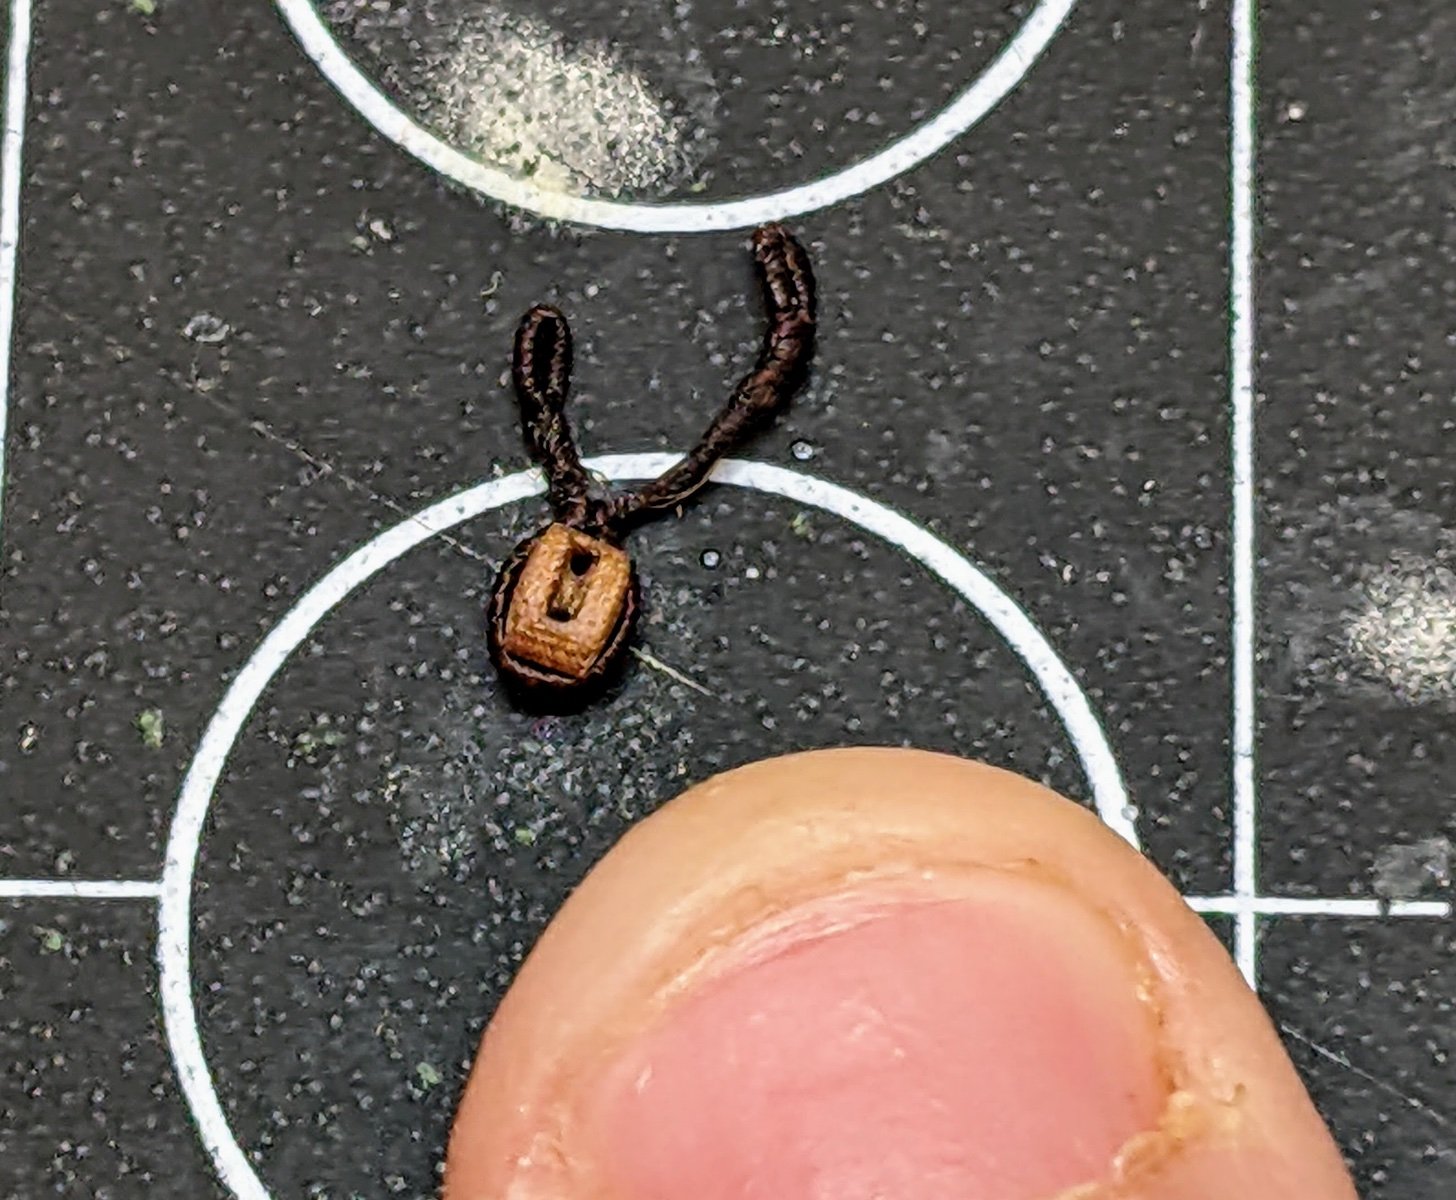
So with the above changes in mind, let me discuss how this practically works using the pendants for the spreadsail braces. These are made with .35mm rope and need to be served at both ends where they go round the yard and the block.
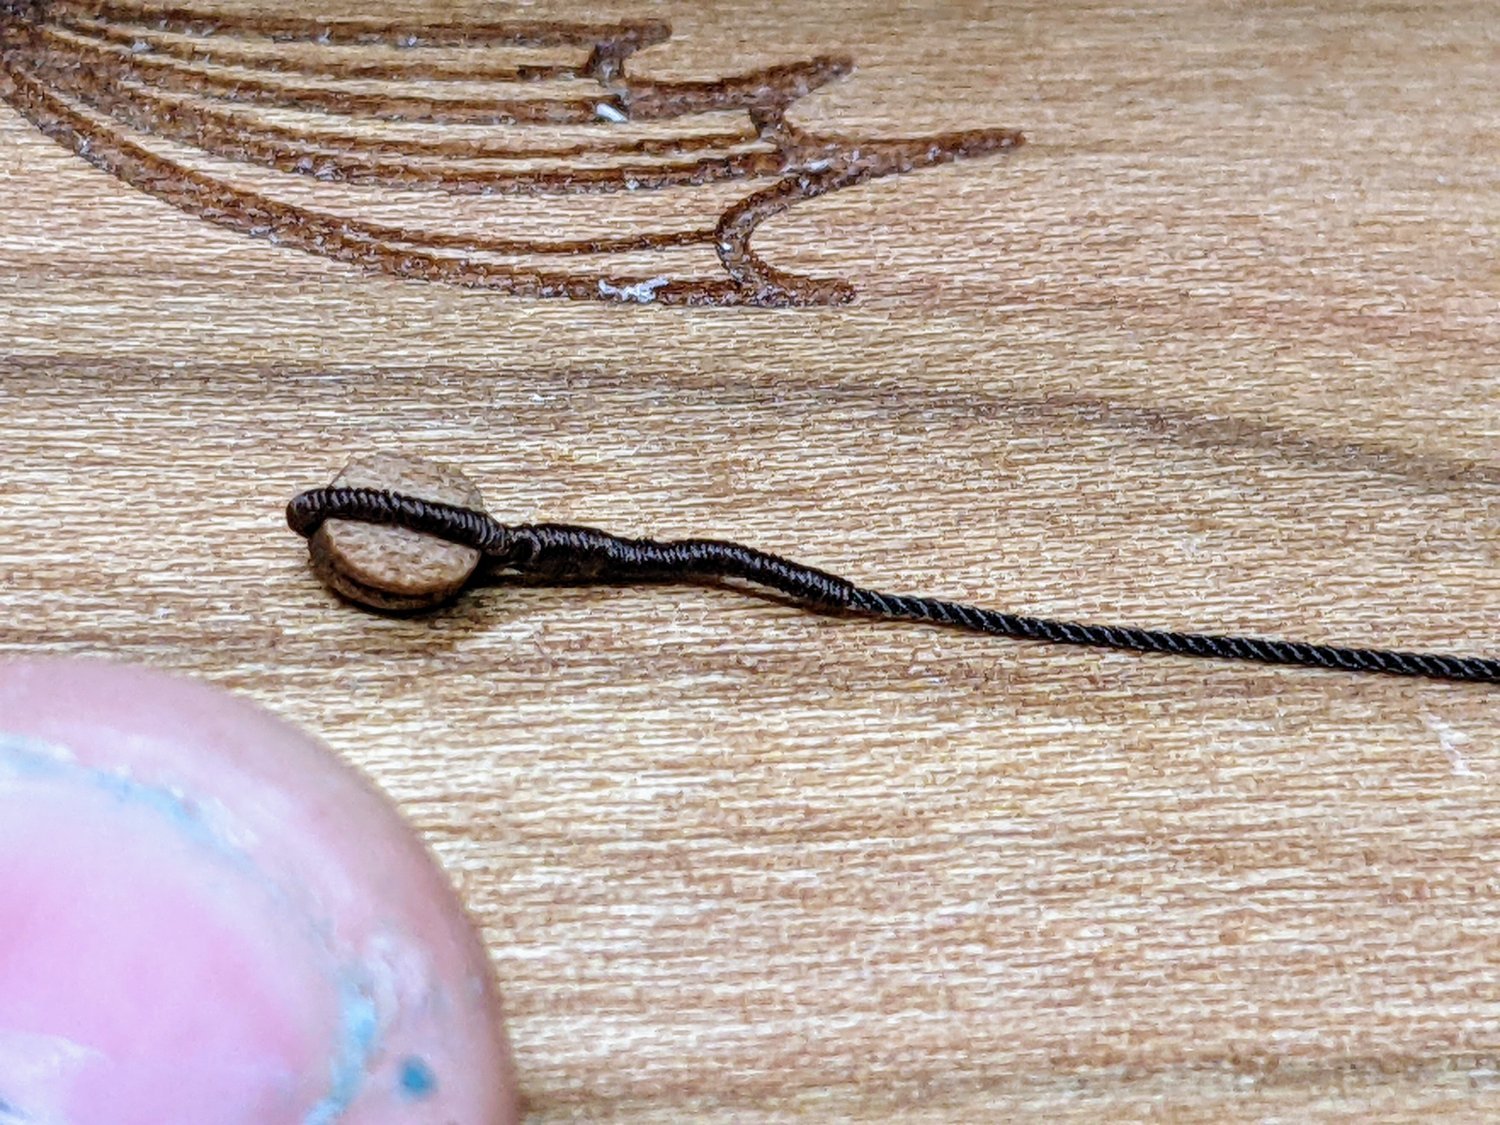
The first step is to serve the two sections of the rope that will make up the loops. The only way to do this well is to measure carefully and since I inevitably got the first measurement wrong, I have just resigned myself to having to always do at least one do over.
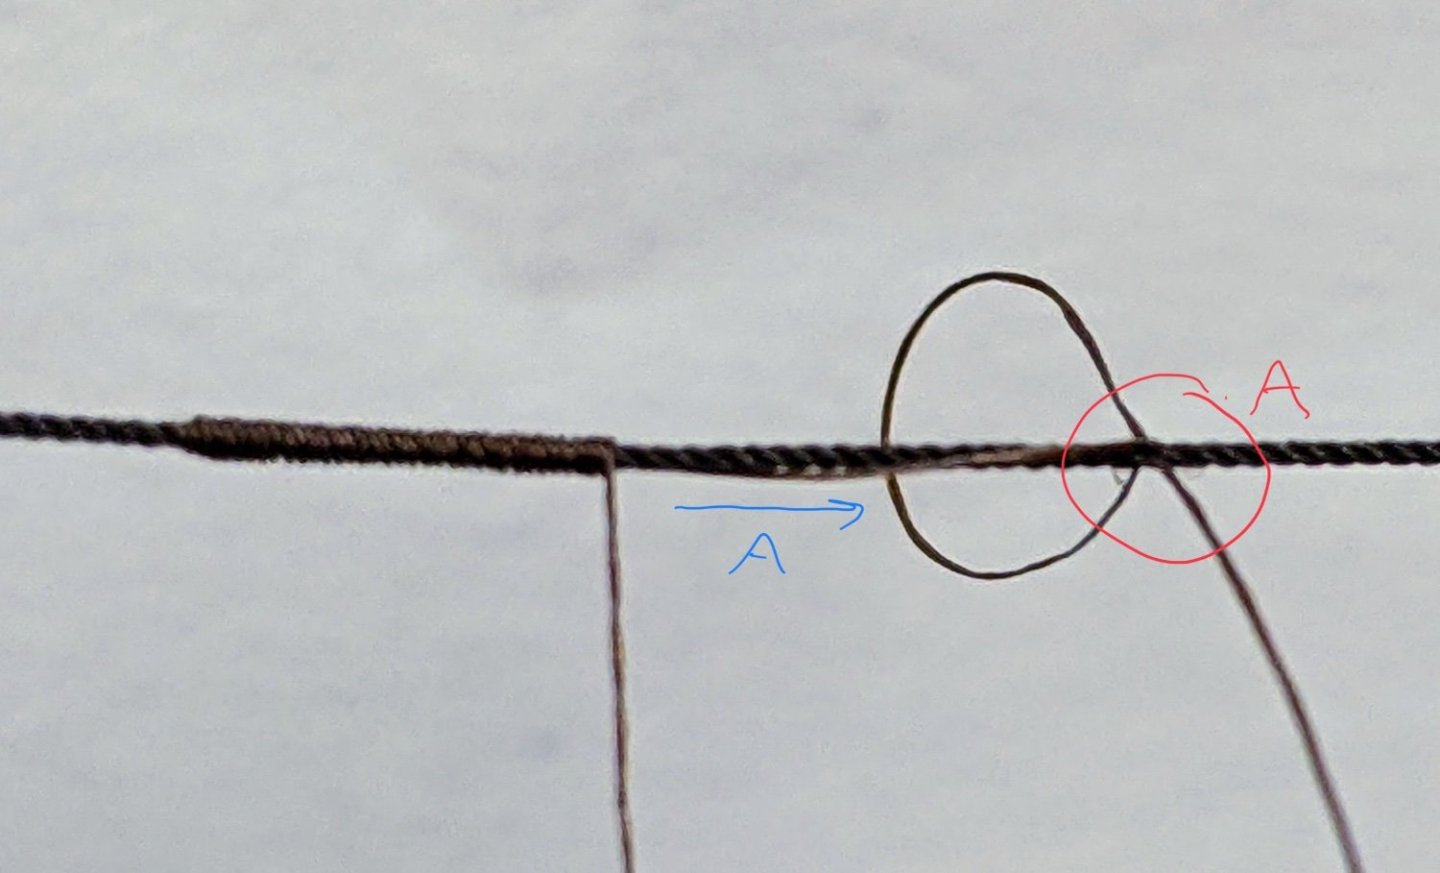
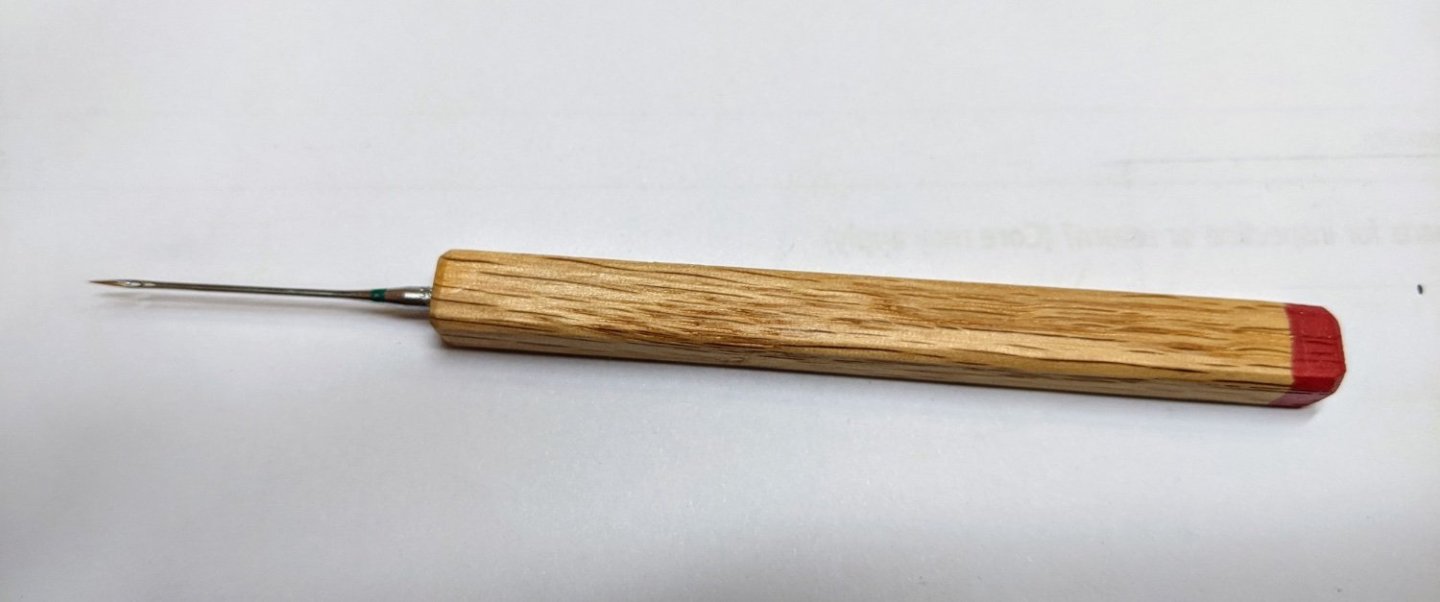
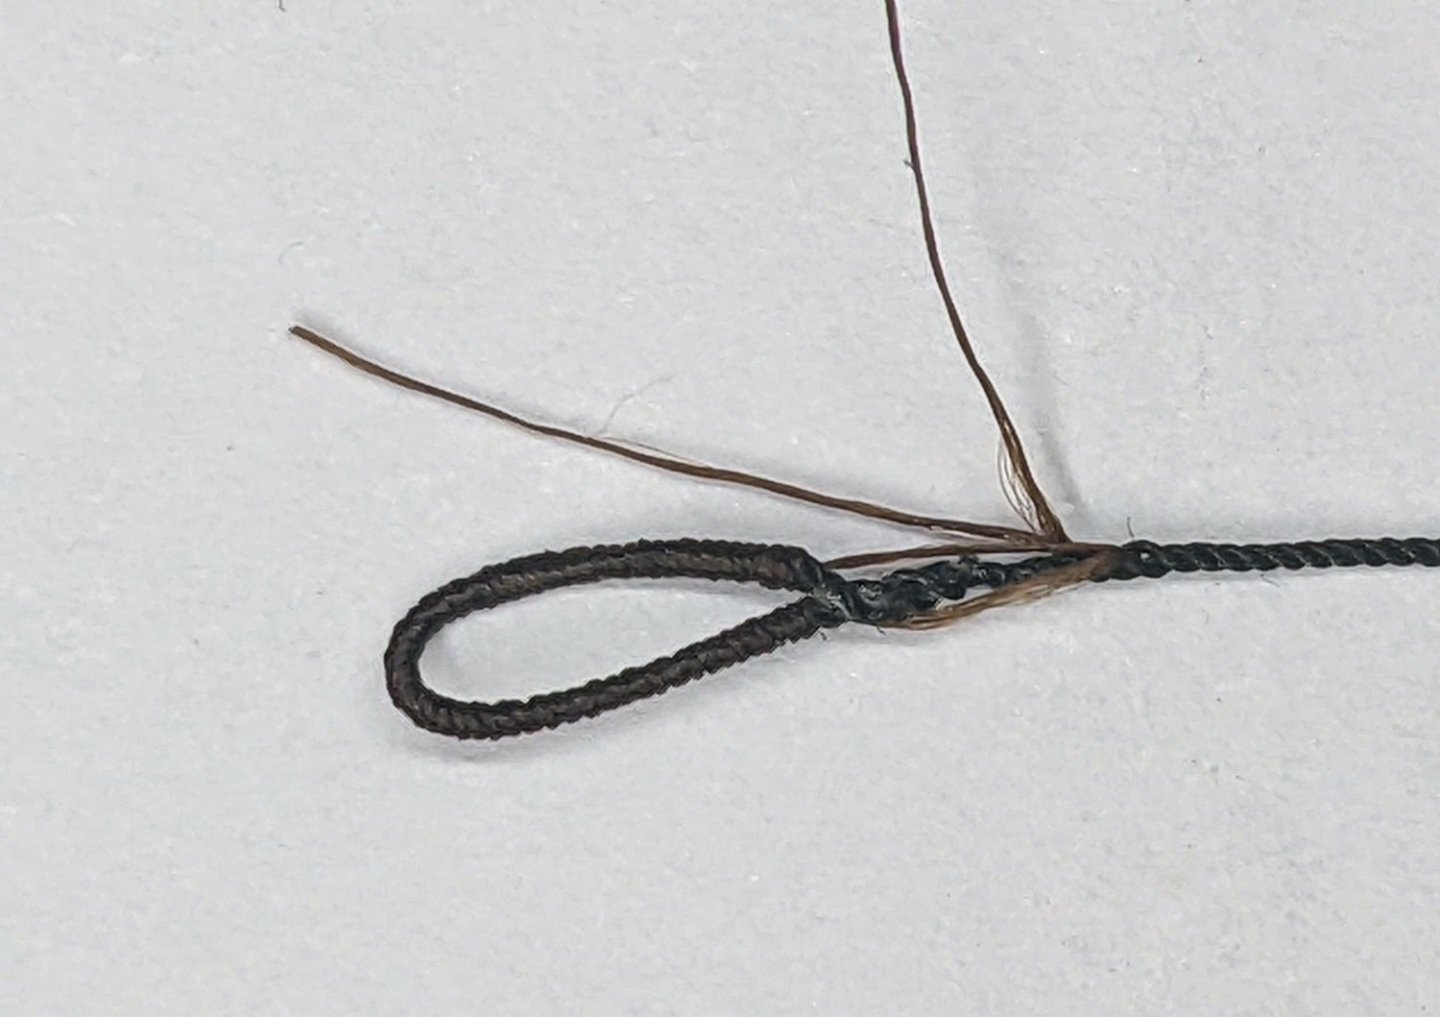
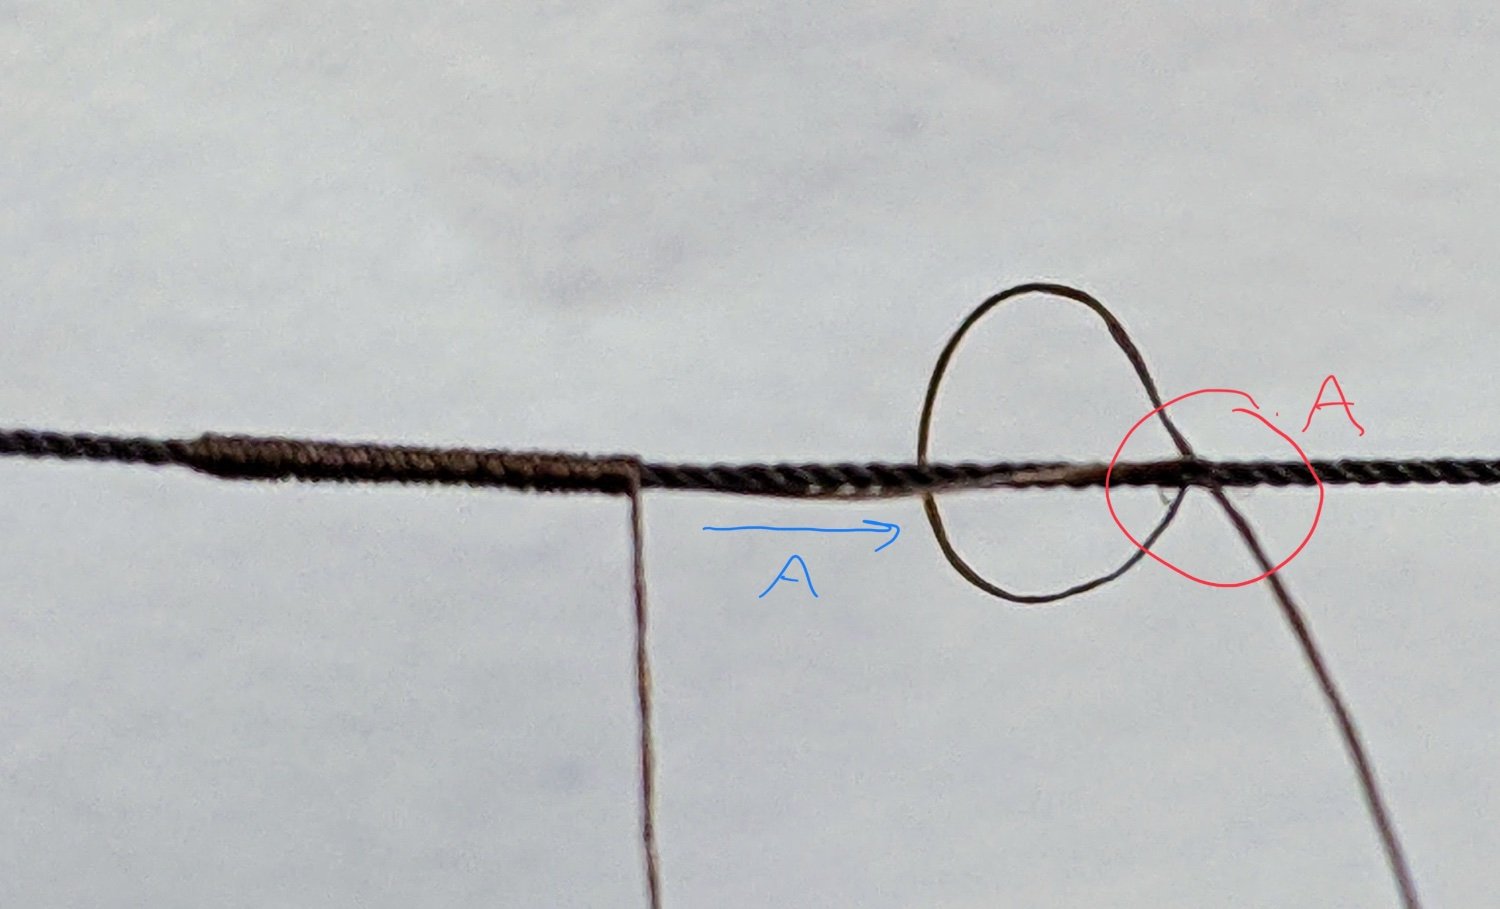
You can see in the above picture how I am twisting as I serve and so the distinct spiral can be seen. I also fasten it by using my needle tool (pictured below) to run the serving line through the rope and then along it to where the end of the serving will be (see A, blue). Then at the point where the serving should end I run it through the rope again, but then back out the same hole, essentially creating a loop with a thread I can pull to tighten it (the red point A, I meant to make it a B).
I serve along till I reach that loop then cut the end of the serving line and pass it through the loop while keeping tension to make sure the serving does not unravel. I then pull the loop tight and everything is fixed in place.
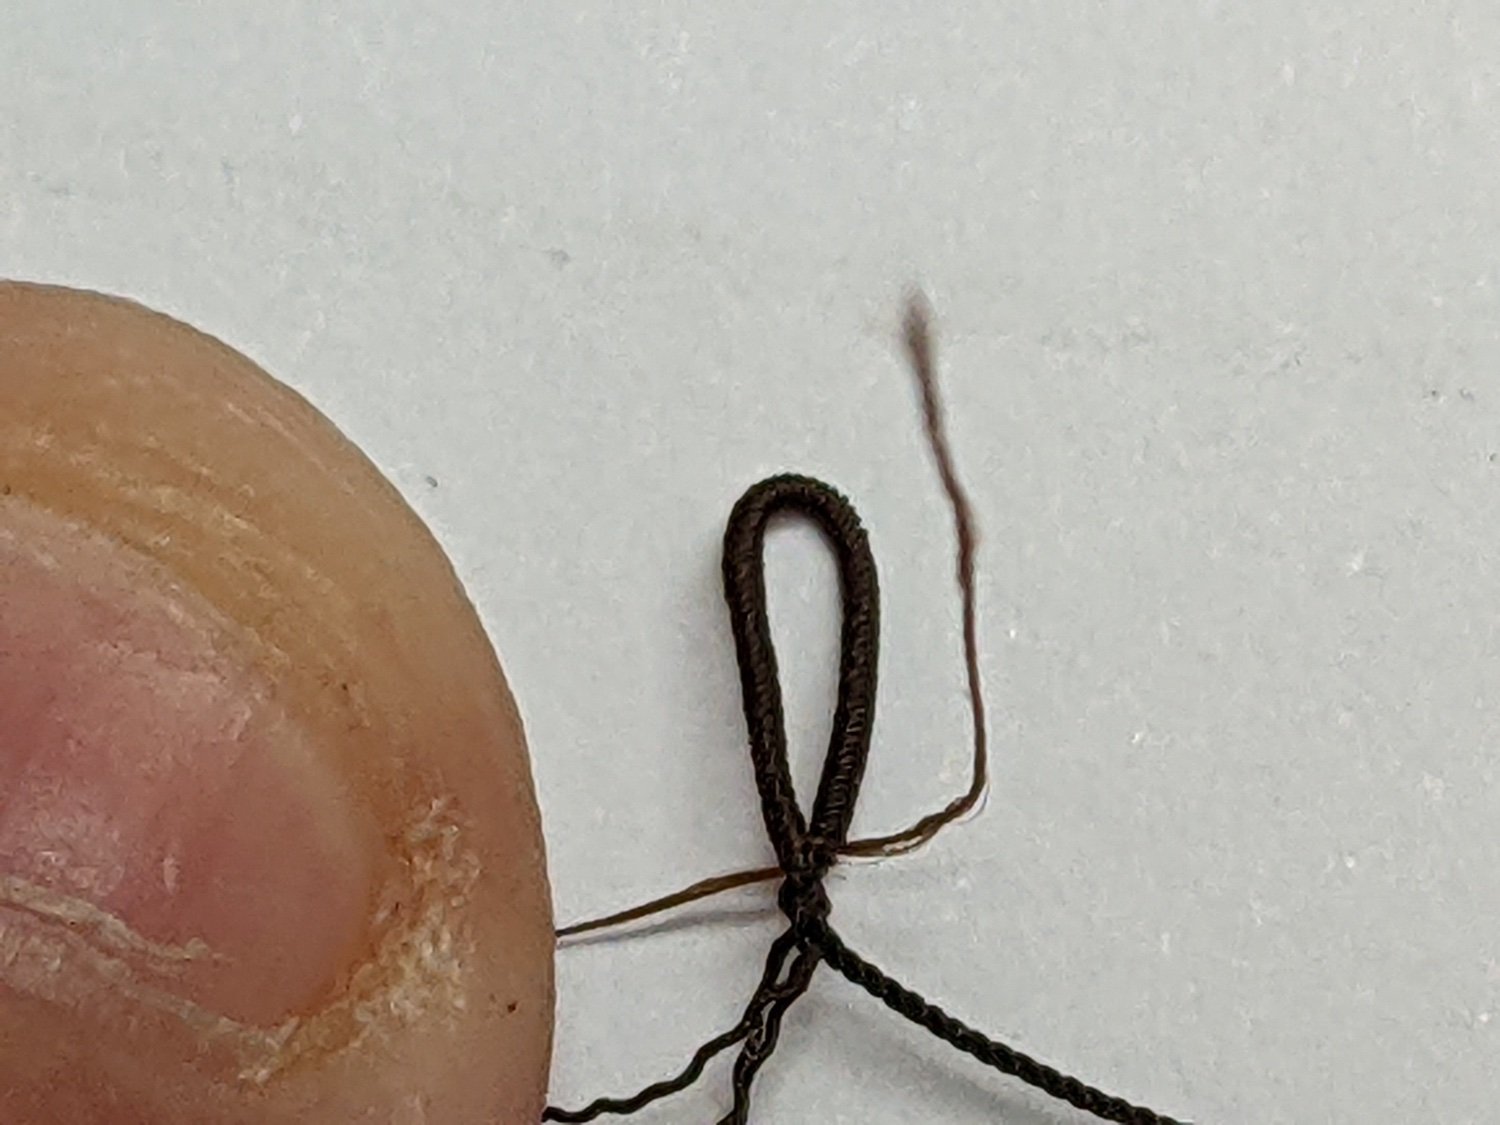
After serving both ends of the rope I loop them over and splice them into themselves. The method I have found that works best for this when covering it is to pass the whole rope through itself twice and then split off two strands which are passed through once. Care needs to be taken to make sure the rope is passed between the strands that make up the rope not through them.
I then used a little bit of watered down fabric glue on this area. This is just to make sure that they don’t come loose while I am serving them as they need to be under a fair bit of tension.

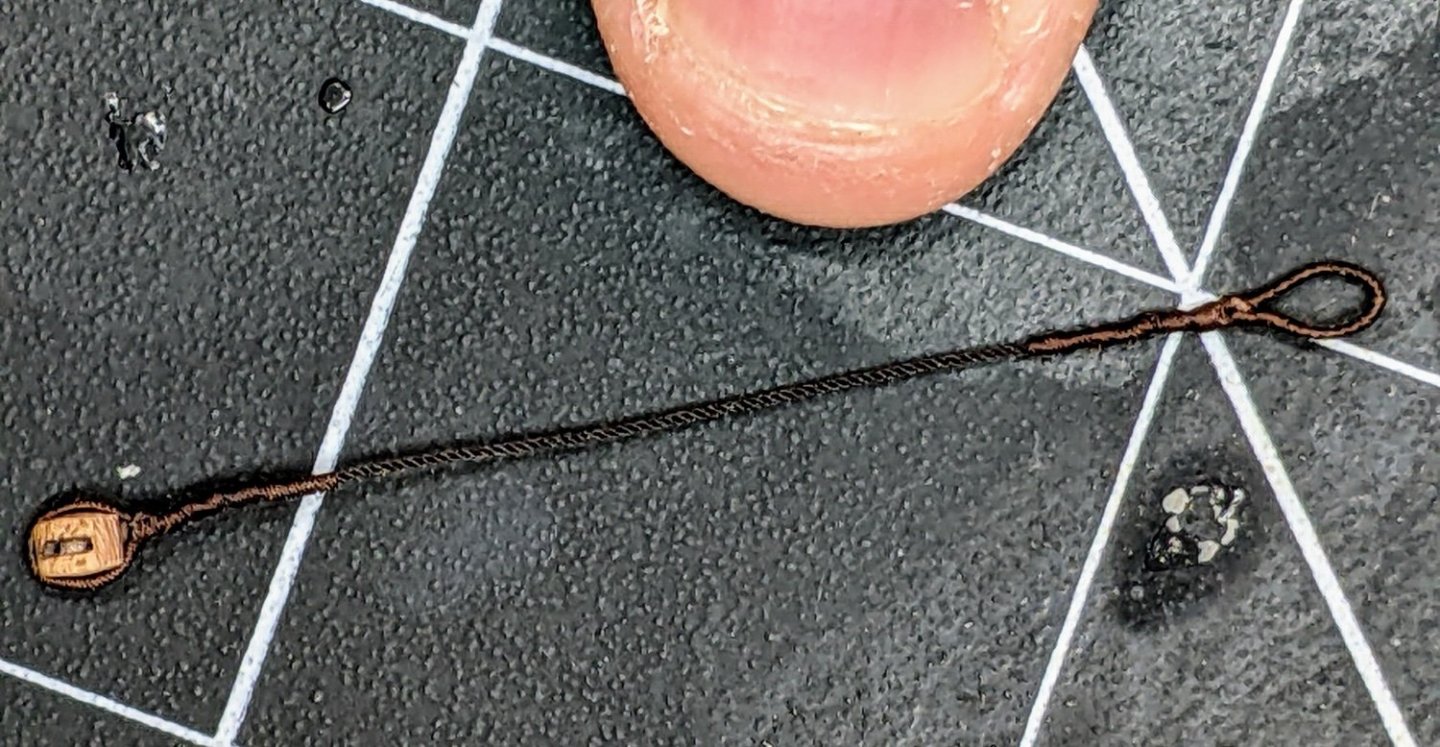
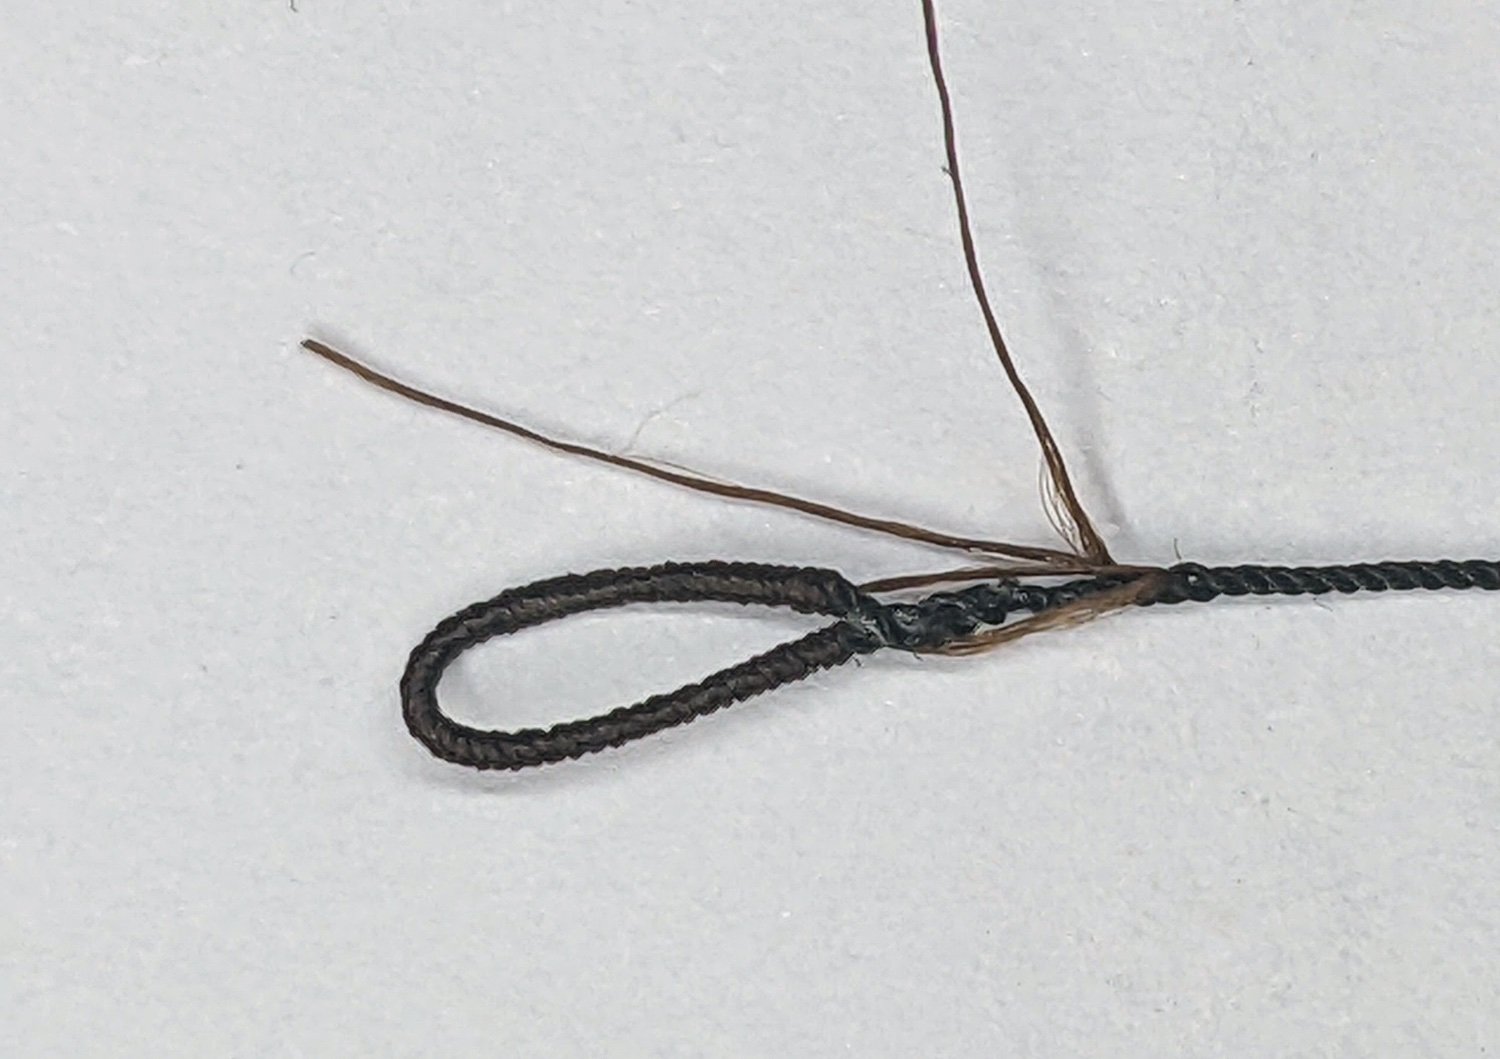
I then run the loose serving line ends through the rope and fold them back so they will be held in place by the serving that will go over the area. You can see below the problem with the glue. Even though I used watered down stuff you can still see at bit of discolouration where I am moving the rope around. This is why it needs to be restricted to places that will be covered and as little as possible.
And finally below you can see the finished line. This is the first one that I am actually pleased with as though it still has a few issues, they are only really visible with the camera zoom. I still need to work on making sure the transition from the rope to the spice is smoother as that is the reason for some of the not so clean serving near the loops, but I think I have the general process down.
- Scottish Guy, wvdhee, Paul Le Wol and 17 others
-
14
-
 1
1
-
 5
5
-
2 hours ago, Theodosius said:
I am amazed about your rigging! Incredibble for this size!
Thanks.
Like most of this model it is a work in progress. The goal is to keep getting it neater to the point that the flaws can only be seen with excessive camera zooming.
My latest iterations which I will show in my next post I think are getting closer. I have made some changes to my process which have seemed to help.
-
3 hours ago, Isaiah said:
Nice blocks! What size fiddle blocks did you use for the backstays?
They are 20 in as per the steel tables. I made them myself, I discuss the process in log #52.
The rest of the blocks I bought from either vanguard or crafty sailor, but they are no longer available as the supplier is located in Russia.
- Isaiah and Glen McGuire
-
1
-
1
-
Looking very nice. Great job.
- BrochBoating and AJohnson
-
2
-
Time for a minor update.
I have been slowly picking away trying to improve my method for making the straps for the blocks. I have been experimenting with avoiding the use of glue as much as possible and this seems to help. I also have been giving the fly tying thread I am using for serving a few extra twists before I serve it onto the rope and that seems to help as well.
In any case you can see below my latest attempt.
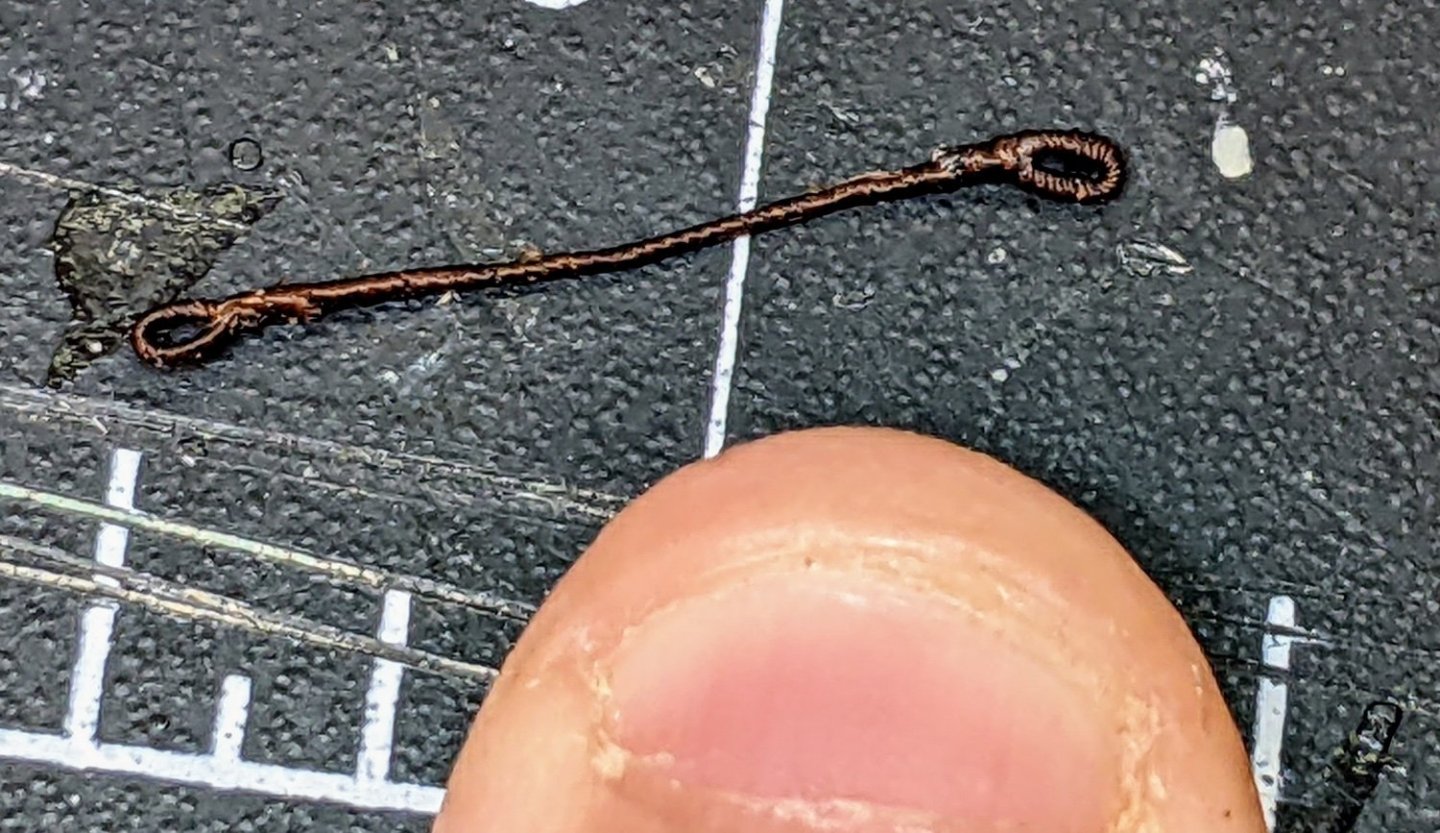
Compared to my last one the area around the loop is less bulky though the left hand loop turned out better than the right hand one. I did make some notes on things to do differently and so I am optimistic that I will soon have a good process down. I decided this one look good enough to use and so below you can see it on the block.

The new rope for the rose lashings should arrive soon and then I can get back to lashing everything to the spreadsail yard.
- Glen McGuire, dunnock, Theodosius and 17 others
-
17
-
3
-
Good luck, I am looking forward to see what you accomplish here.
I am also looking at a scratch build for my next one though maybe not quite as ambitious as a POF.
- jpalmer1970, AJohnson and mtaylor
-
3
-
Fantastic work.
I was wondering, are these braided stirrups just a feature of French rigging or would the english have done something similar?
- Keith Black and mtaylor
-
2
-
On 3/26/2024 at 9:25 PM, Louie da fly said:
'acrylic matt medium' and 'acrylic matt pouring medium' (considerably cheaper, but perhaps not right for the job).
pouring medium has a bunch more additives for helping the paint to flow. If you are using it as an adhesive I would stick with the matt medium. You could also look into acrylic matt or ultra matt varnish. I use that as a fixative sometimes and it works well.
Look for a hobby store in your area (somewhere that sells Warhammer or other miniature related products). They will definitely have some sort of small bottle of matt varnish that won't cost that much.
Your build is looking awesome.
- Glen McGuire, mtaylor and druxey
-
3
-
-
27 minutes ago, DaveBaxt said:
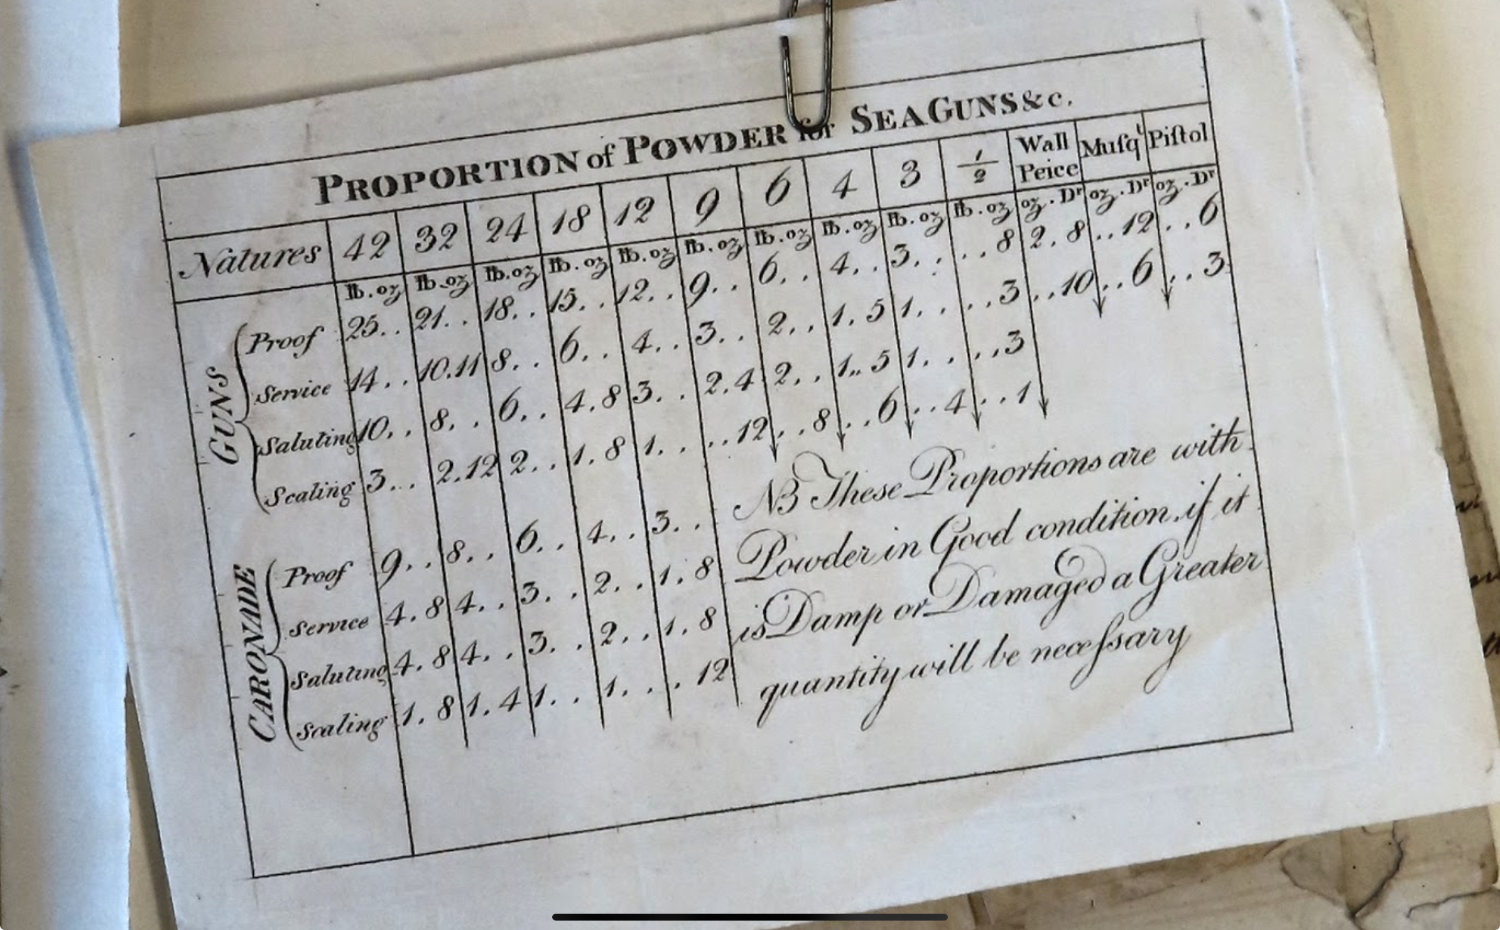
Thank you Thukydides for another table /list . I think thats what I was trying to say that the carriages would move further back and causes problems for them when first fitted.Perhaps thats why there design of the carriages were different too. Am correct in thinking the different amounts of powder were for Proof (testing) In battle ( service) Saluting someone of another vessel perhaps but could not work out what sealing is?
Thank you again for sharing your valued research , you definitely like to get an understanding of what really might be going on all that time ago. Thanks for your likes on my Diana log too.
Yes you pretty much have it:
- Proofing - making sure the gun was structurally sound
- Saluting - for signaling or showing honor to the admiral etc, there was no shot used in this case, not sure if they included the wadding still
- Service - firing cannon balls
- Scaling - cleaning out the residue from inside the gun
-
On 3/23/2024 at 7:11 PM, Bob Cleek said:
How do your expensive sable hair brushes stand up to use in water compared to a similar grade of synthetic bristle brush? Do you notice any difference?
I use sable brushes with acrylic paint and have some I have been using for years and they are still fine. I do know people who prefer synthetic, but I much prefer the natural hair brushes. I fine they keep their point better which is really what is most important when painting scale models.
That being said I would recommend a beginner start with relatively cheap synthetic brushes as there is no point in spending money on brushes you will inevitably ruin through lack of care. Once you know what you are doing you can invest in more expensive ones. I still use cheap walmart synthetic brushes for tasks which don’t require precision to block in colours etc…
Most important thing with brushes is learning to take care of them, invest in some brush soap and don’t ever let the paint rise more than half way up the brush. Rinse them frequently and take care not to damage the point.
- mtaylor, Ryland Craze, Bob Cleek and 1 other
-
4
-
23 hours ago, DaveBaxt said:
Would a lighter gun and possibly carriage not move further back for the same size weight of shot and the the same amount of charge. Just wonder why they had a few problems when first used.
Yes it would move back faster, but the force on it would be the same. If you remember your high school physics F=ma, so a lighter piece with the same force acting on it would accelerate back faster. I wonder if part of their problem was the recoil length. As the carronade was shorter it didn’t have as far back to go before running out of rope so to speak.
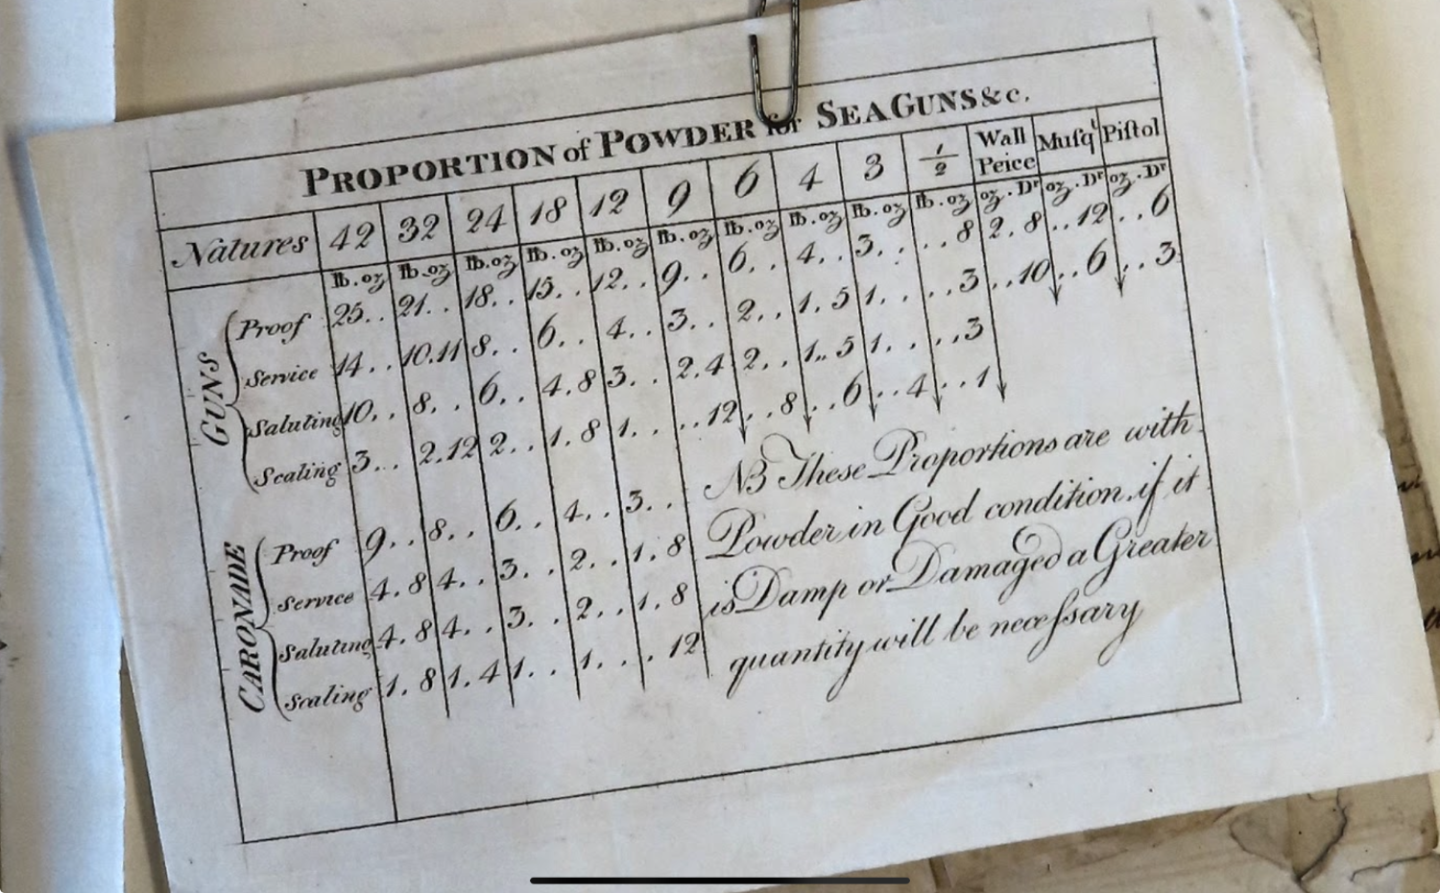
I found the following piece of paper which shows charge sizes. Now it has no date so not sure exactly when it is from, but you can see that a 32-pdr carronade (which was what 38 gun ships were rated to equip) is equivalent to the charge for a 12-pdr long gun (inbetween the 18 and 9-pdrs carried by 38 gun ships).
EDIT: Since I know @allanyed is going to ask
") this comes from ADM 160/150 as well.
this comes from ADM 160/150 as well.


HMS Crocodile 1781 by Pirate adam - 1/48 scale - POF
in - Build logs for subjects built 1751 - 1800
Posted
By this do you mean you just paint the flat of it so that the line shows once you glue them together?