


popeye the sailor
-
Posts
16,007 -
Joined
-
Last visited
Content Type
Profiles
Forums
Gallery
Events
Everything posted by popeye the sailor
-
 look'in darn sweet.........it is too bad that you don't have the entire kit in front of you though. you'll definitely need to use primer though, with all that PE very nice work!
 -
look'in very nice Carl.......you both seem to be going for the lighter color scheme. I guess I'll have to go with the darker scheme. the admiral told me that she got an e-mail........they just dropped the PE in the post. the above was a post I was going to make the past evening.........must have dozed off at the computer. I should know better than to look in during the work week. me......today, am {almost} fresh as a daisy...had a decent night's sleep. I'll see what I can do today. looking at both of your progress.......nothing short of awesome! you two have made some terrific progress ......your weathering Greg is first class........and your PE reserve Carl is really adding so much detail. I won't be adding all the extra stuff though.......if I were to start buying all the other stuff, the admiral would have a fit! I'm an enamel user........I do have friends though that use acrylics......like Vallejo. one trick they used was to use washer fluid for thinning......alcohol was used to hasten the drying time. it was hard for me to wrap my head around it because of the blue tint in the washer fluid........I though it would hinder mixing, if you were trying to arrive at a certain color. another paint that has been tried is Jo Santo, which is more of an artist's paint, than anything else. one fellow did a great job on a Duke's of Hazard car model using it. I'm an old stick in the mud though......I've never wavered from enamels. I do have a few Acrylic colors though and four of the life color packs......cs 20, cs 10 and cs 13....can't use them because of the enamel influence...the two paints don't mix. thanks for letting me know the colors your using.......I may go slightly darker though to reflect the time line I'll be going for. what stinks though, is that all of the pictures I've been seeing are in black 'n white........positive color matches are inconclusive. I'm going to do some more research later. I have a couple of pictures......just a tiny bit of a start. I've fitted almost all of the decks. ....and as you can see, I'm using a white sheet of paper as a cutting mat, so I can see the part clearly. I was going to assemble the deck onto the hull before painting, but weighing out all the masking, rather than touching up after assembly. I'll get more into the running one way or another today.......great job yous two
- 1,090 replies
-
- 11
-

-
- showcase models
- vendetta
- (and 2 more)
-
my translator is on automatic.......no worries wonderful job thus far!
- 146 replies
-
- 2
-
-
- deagostini
- vasa
- (and 1 more)
-
too bad they don't have them in the same scale as the Thermopylae that I'm building. they look very good.......doesn't have the depth markers though.....odd. the decals in the kit.......with the exception for kit's made by Revell/Germany (they seem to be bringing back these older kits}, you'll have to watch out for them. they may be old and micro cracking might be a problem. is this why your looking for them in photo etch?
-
http://www.hismodel.com/ I went to the site, and I found that a new site has taken it's place. they will send you here.
-
I thought I recognized the store.......I have it book marked http://www.radekshipmodels.cz/en/list-of-kits-and-accessories/accessories---sails you'll have to do some browsing.......
-
look'in very nice Carl.......you both seem to be going for the lighter color scheme. I guess I'll have to go with the darker scheme. the admiral told me that she got an e-mail........they just dropped the PE in the post. took me almost two weeks to get the model......I can just imagine when I'll see the PE! what color gray are you two using?
- 1,090 replies
-
- 5
-
-
- showcase models
- vendetta
- (and 2 more)
-
go here....... https://www.cornwallmodelboats.co.uk/acatalog/mantua-laser-etch.html
-
hey there Lawrence! I know the tree well we used to cut down the young ones and use them for stakes up in the hayloft back home {when we were kids}. they worked great in holding the loose hay in the loft.........tall, skinny, and straight you've started the Oliver Cromwell??!?!?! I'll have to take a look! thanks for the good word........made the sails {poorly, but I made them} and getting basis for the rigging ready. I should have more to add soon. thanks for looking in and the kind comment
- 171 replies
-
- 8
-
-
- krabbenkutter
- authentic models
- (and 1 more)
-
hey there gents........off the radar for a couple of days. I'm in the middle of my work week, but I thought I'd check in and give my report. I'm sorta waiting on that PE to come in.....I did some fitting with the hull and decks. they are ready to go, but now I need to decide which way to go with regards to time line. I hope I get some fancy stuff in the PE........you two are adding likely more than I will. at this scale......it going to be a feat to bend to shape. I spent Friday making sails for another project. I see you both have been keeping yourselves busy...what I'm seeing looks very good. great job with the hull work Greg........mine will likely come out half as good.
- 1,090 replies
-
- 10
-
-
- showcase models
- vendetta
- (and 2 more)
-
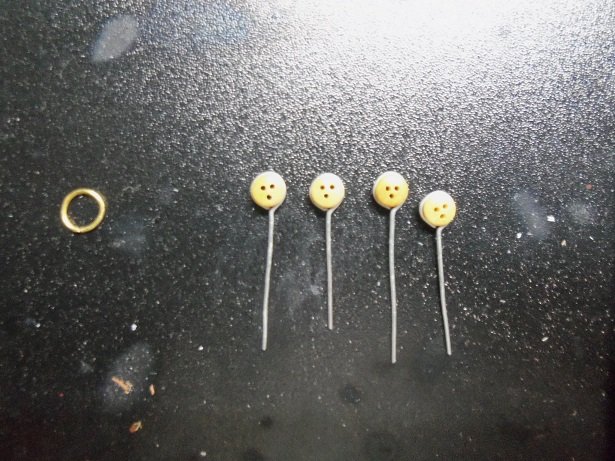
you've made quite a bit of progress since I last looked in..........very nicely done I notice the large eye bolts along the pin rails and wonder what they are for. are you going to use dead eyes for the shrouds? to tie the bottom dead eyes to them {if you are} may not give you the look you desire. it might be better if you removed them and set the bottom dead eyes in a post-like setting. you'll still be able to use the holes for them, and it will look a lot better. here is an example of what I'm talking about. the shafts can be trimmed to however long you need them to be. note the position of the holes....the center one is the lowest. this is some really flexible wire..I made these some time ago for another project....finally finding a use for them for a project I have on the table at the moment. if you have a plan for them, then don't mind me........pictures are worth a thousand words, and I'm going on assumption here. you've really done a great job with the deck layout
- 37 replies
-
- 2
-
-
- eagle
- constructo
- (and 1 more)
-
primer red - lightened up some.....perhaps with a tint of brown......kinda what I'm getting from it. looks great so far Greg.....as mentioned, she went through quite a few refits....hard to nail down what she had at any given time. really hate how the deck and hull were on the sprues......lucky for me, I saved all the fine sandpapers from the last Testor's paint set I bought. the hull bottom is looking much better, although the marks can still be seen {not for long though} I'm still amazed with all the molded detail....quite a bit for a model this size. I'm figuring out a starting point still.......fine tuning the deck parts from all the sprue marks, but I'll get there eventually
- 1,090 replies
-
- 9
-
-
- showcase models
- vendetta
- (and 2 more)
-
well......I'm glad to hear that you and Ninja Kitty are getting along better she'll never take her place, but you may find some common ground. it'll be good to see you back at the table. have you figured out a way to add to the bow, what you removed? if you still have the parts panel with the keel punch out, you could trace and cut a new one. then you could remove all of the bulkheads from the old one and add them to the new one. it's a bit of work to be sure, but it would be a great opportunity to adjust the keel to the specs that you needed to do in the first place.
-
very hard to do Piet.......very nice progress though the diorama is looking really good....your improvements made a big difference.
- 378 replies
-
- 7
-
-
- java
- pacific crossroads
- (and 2 more)
-
I just shocked the admiral........first the model.......then the PE...........I just asked her about buying a book single edge razor blade Carl.........one of my go to cutting tools
- 1,090 replies
-
- 7
-
-
- showcase models
- vendetta
- (and 2 more)
-
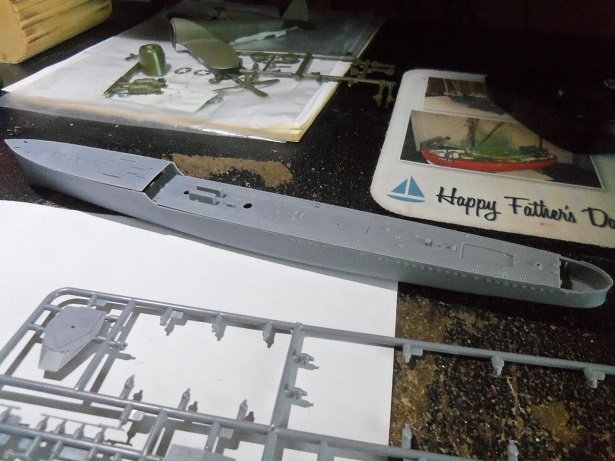
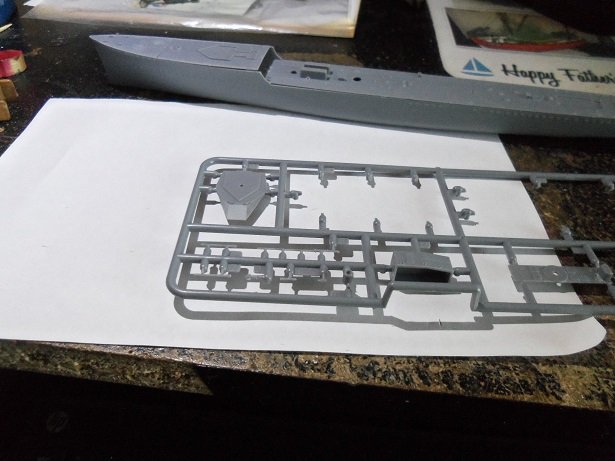
yea that's a P-47 on the desk.......it's missing the canopy though. it's from a kit put out by Lindberg models for the Discovery Channel "Legends of the Sky". it's a 1:72 scale kit that features two planes...a P-47B thunderbolt and a German He-111 Bomber. I tried to get a canopy for it, but since the Lindberg is defunct, and the molds sold to Round 2 Models, there's no chance of getting one. I'm just tinkering with it I might try and make one using clear cello and window maker .....now that the mini model is here.....I can bag it I was going to play around with the Adam West Batmobile.....It's about 3/4 finished. what can I say.....I'm a modeling nut! {I'm a slave to my own hobby} that's great Sam........poor Carl is gonna wake up......and glue an unpopped kernel to his model {scale's about right?!?!?! I've been pre drilling the holes in the main deck and looking through the instructions. I brought out a new razor blade for this one.......I've even had thoughts of using a freezer bag when I cut the parts off the sprues, so the part won't go flying .....so many tiny parts. I do have to admit though.......this kit is detailed fairly well........not a whole lot of flash either. so I'll be getting my bearings......and getting myself acclimated to micro modeling. Vendetta had many refits.....either from damage, or what roll it was to play. are either of you two gents going to do the two white bands on the funnel, for when she was part of the 7th destroyer flotilla? she wore the solid black pendent I 69 at that time in 1940......and the solid black pendent D 69 in between 1925 and 1939........before that she had the white with black outline D 69 pendent {1st or 5th destroyer flotilla}. how about Camo?........around 1940, she had the two tone camo, and soon after, a single tone camo. this lady went through a lot of changes. I guess it will depend on at which period your modeling her at. there were five ships that comprised the Scrap Iron Flotilla.....Stewart, Vampire, Vendetta, Voyager, and Waterhen. I've been looking through all of these vessels, as there might be a snippet of info that didn't get mentioned in Vendetta's article. I'm using this site for them all: http://www.navy.gov.au/hmas-vendetta-i
- 1,090 replies
-
- 6
-
-
- showcase models
- vendetta
- (and 2 more)
-
nice work on the sub so far.........your very handy with the brush you have some really neat detail going on here........you've made quite a bit of progress since I last looked in.
-
thanks.......look'in forward to when the DVD set comes out {I hate commercials} it will also be a great addition to my collection. my collection so far...... Walking Dead Game of thrones Badlands The Night of American Gods {if they get their butts in gear for season 2} The X Files and anything Stephen King
- 346 replies
-
- 2
-
-
- terror
- polar exploration
- (and 2 more)
-
good to see your making progress Jim......nice work on the cross trees {one more to make, I see}. love the view of the whole ship, she's really looking great! rigging looks super too!
-
this has been the making of a truly great model Nils.......not sure of how much more you can add to her. my congratz to you for showing us this fantastic project you've really done some extraordinary work!
- 692 replies
-
- 4
-
-
- eagle of algier
- chebec
- (and 2 more)
-
nice job with the dredge rollers....they look absolutely perfect! fantastic metal work love the view of the whole boat......she's really looking great!
-
really coming into shape quite nicely the black top is really nice.......I see a real snazzy paint job on this one I wonder what she would look like if you were to use PE on her.......I'm sure there's something out there.
-
I've never done a model using these joints....or I may have and was too inexperienced to know to do it I would say that if your in doubt, keep doing it the way your doing it. I can't imagine that the builders would change methods like that. after all, they were out to build a strong vessel.
-
ship's boat is coming along quite nicely Mark sometimes when I need an aggressive bend, I will go with the grain. I get the added flex. it can make whatever it is I'm making fragile...I just take a bit more care with the handling